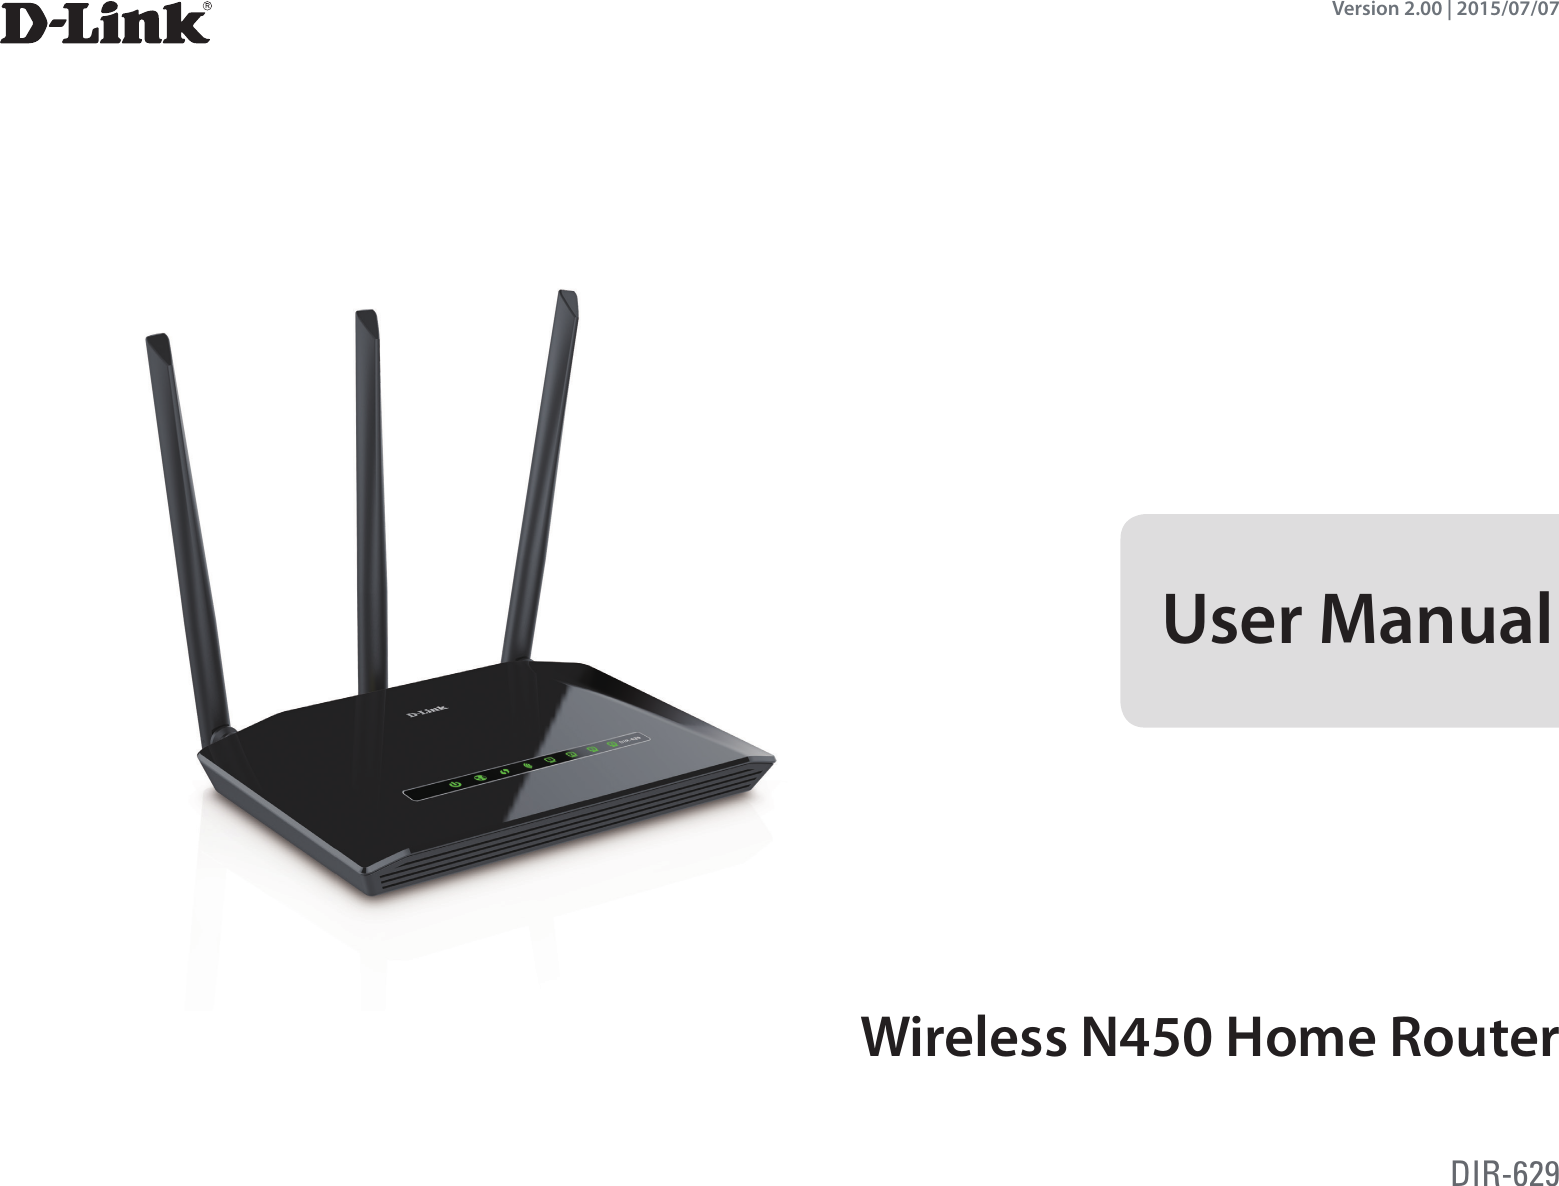
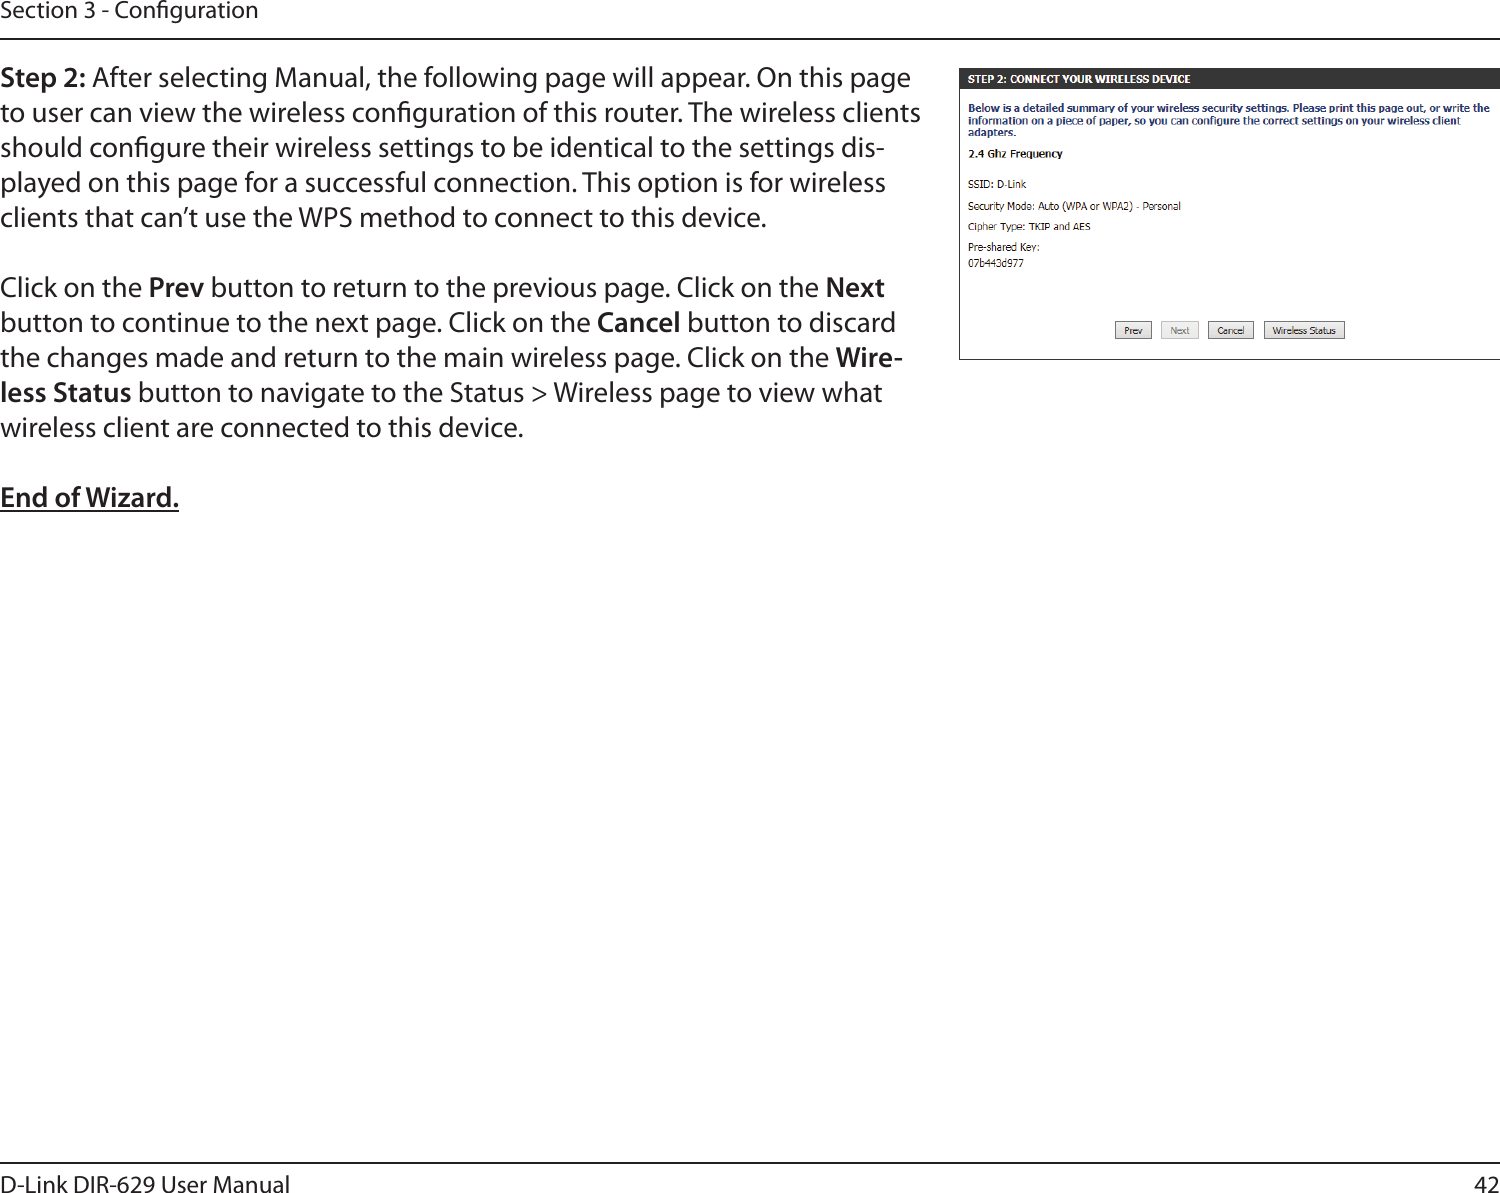
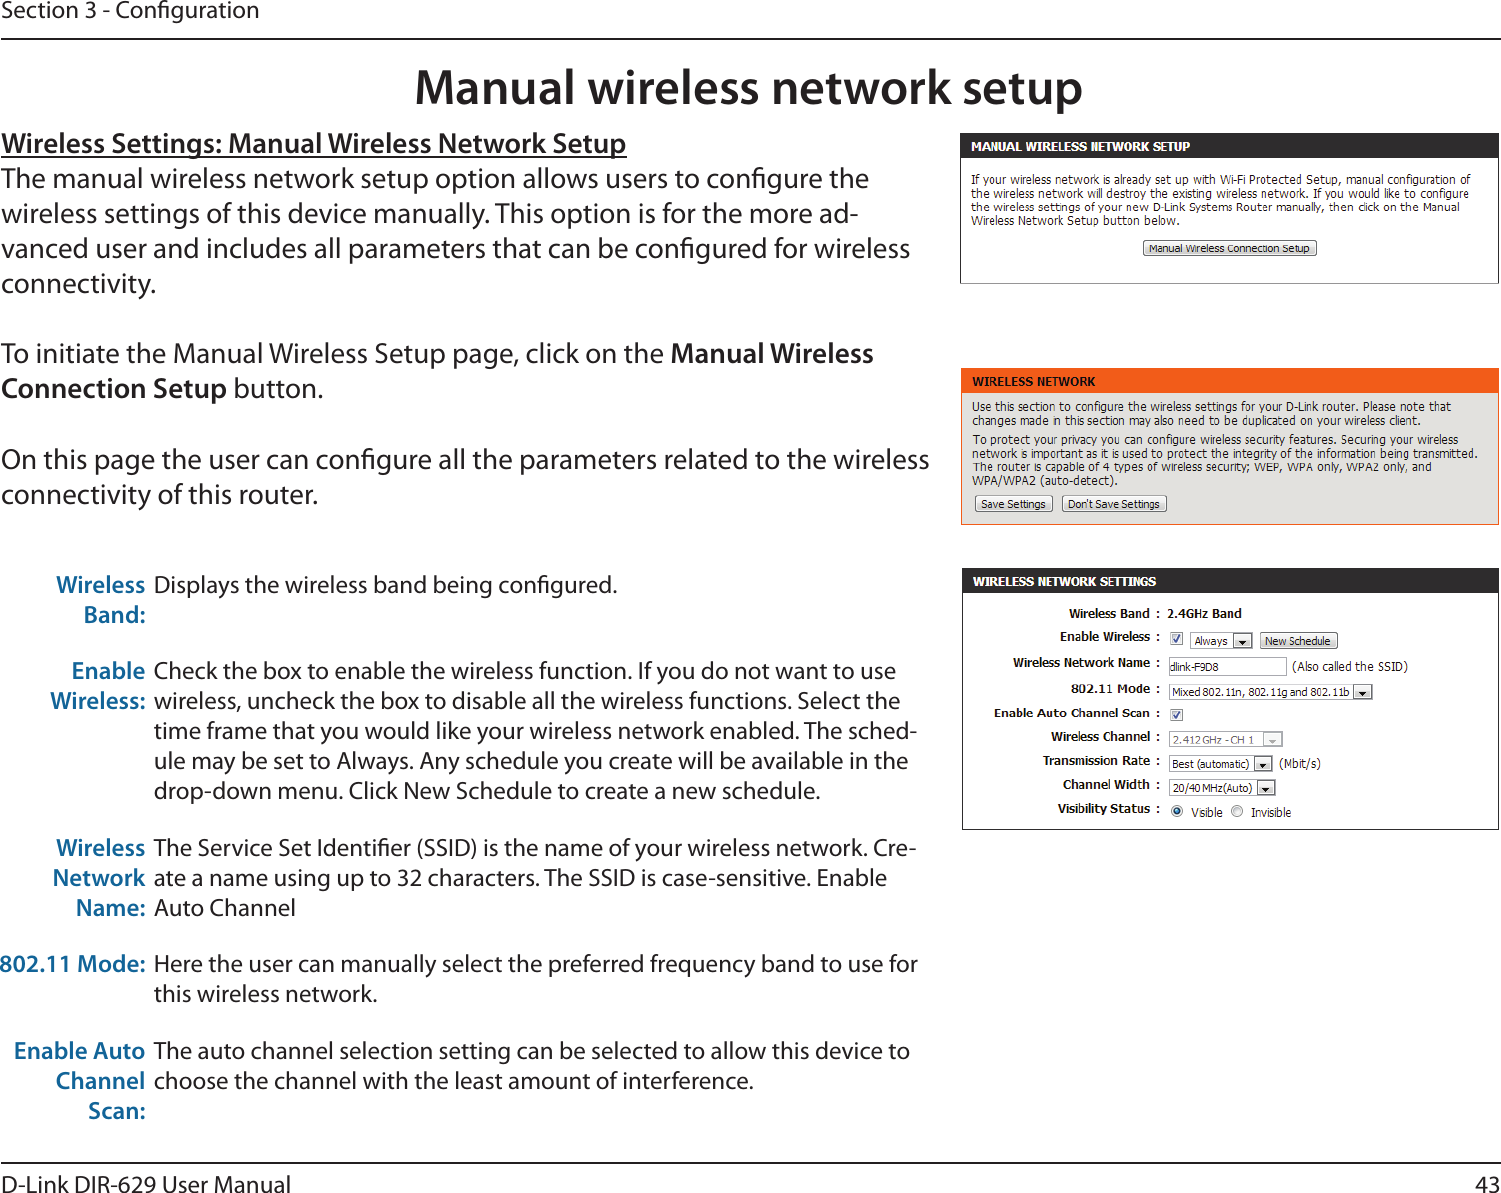
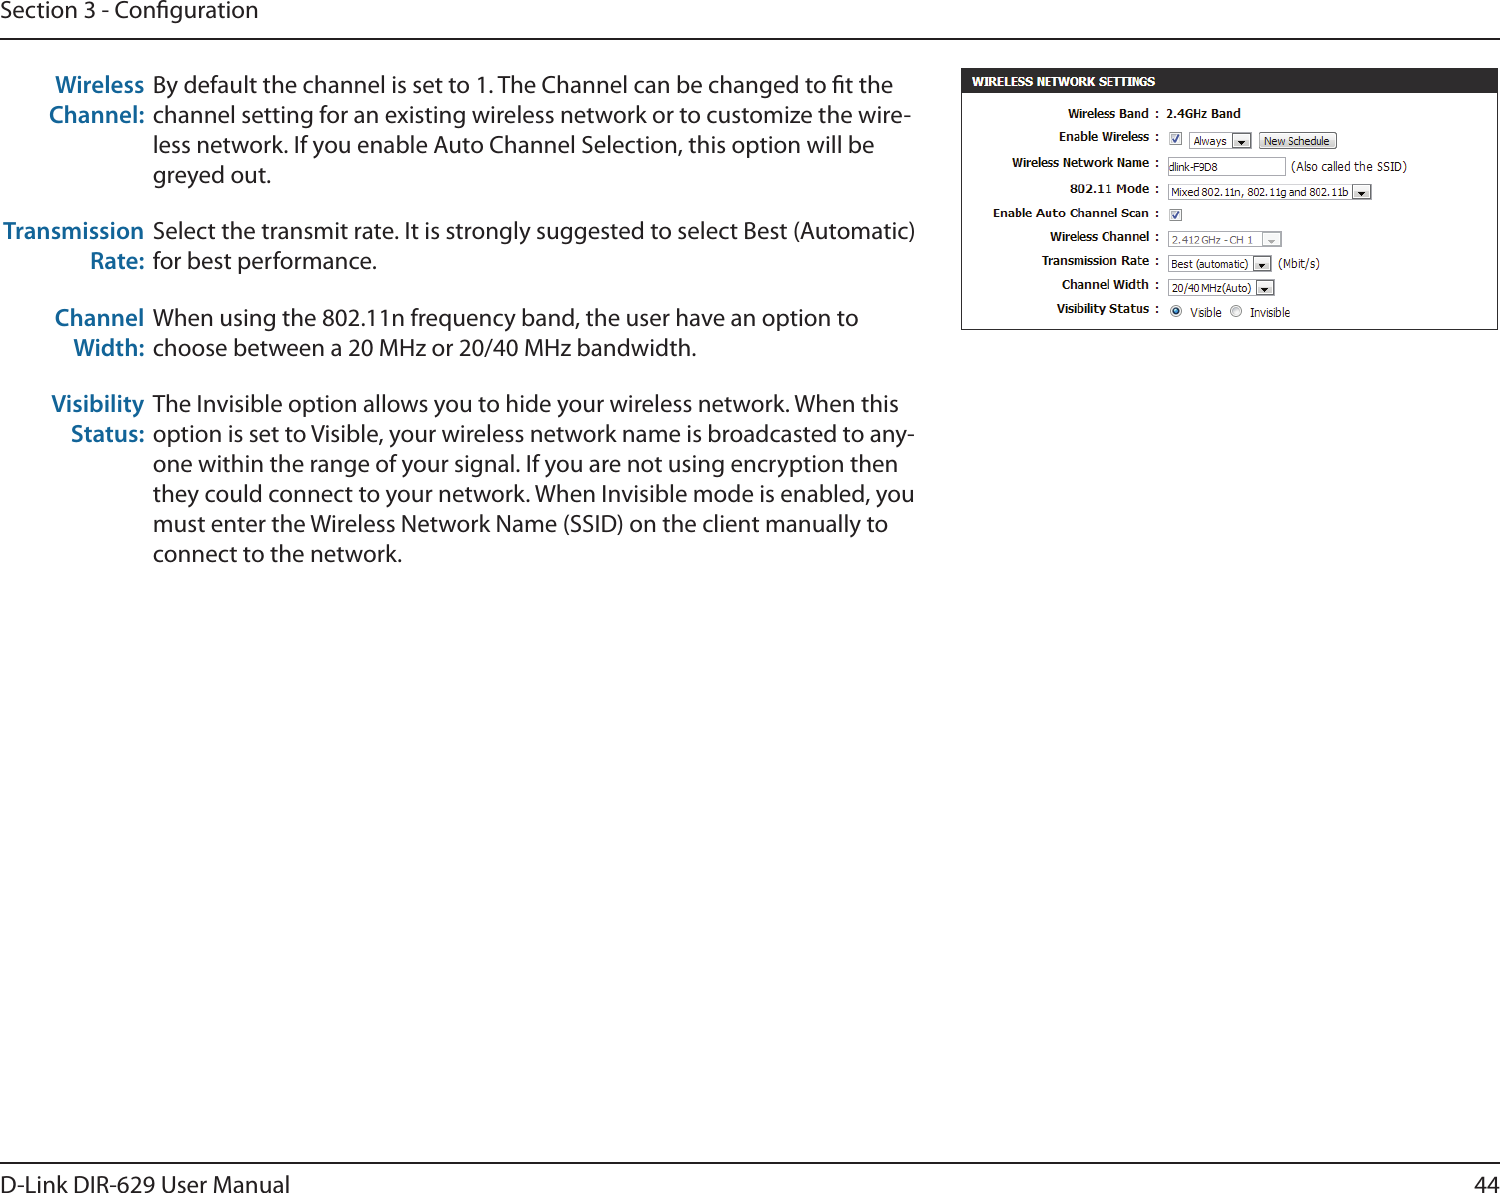
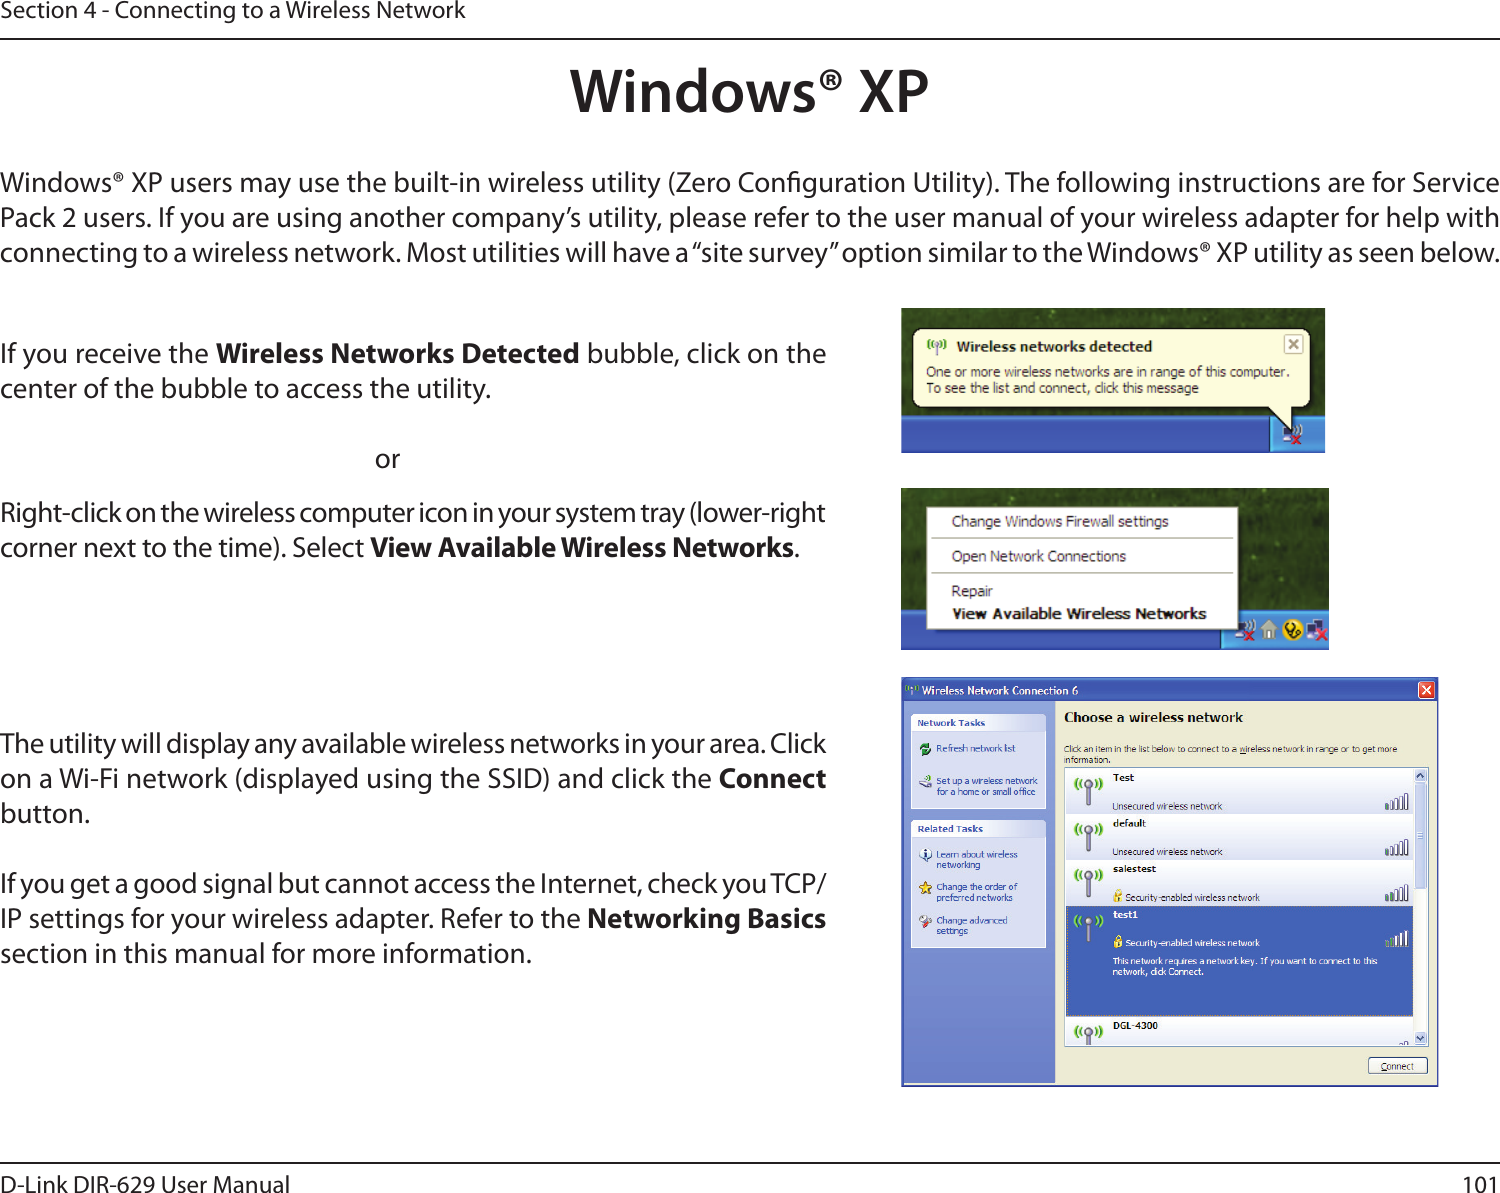
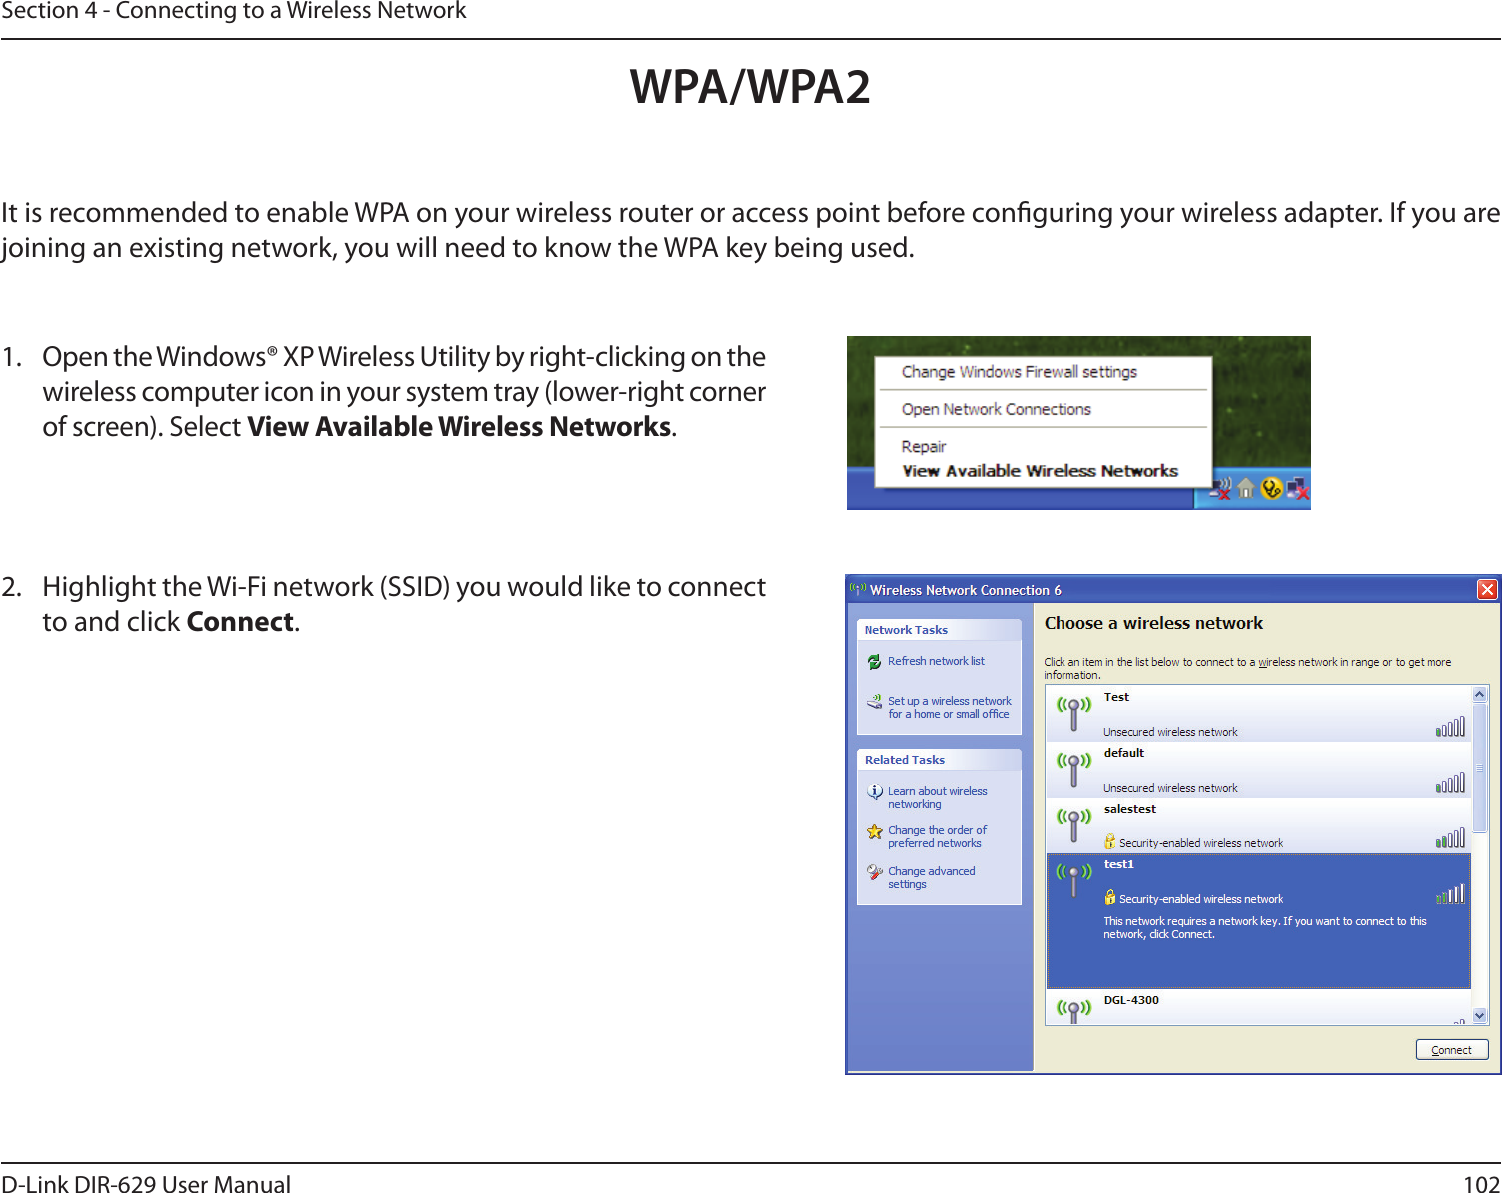
D Link IR629B1 Wireless N 450 home router User Manual

D Link Corporation Wireless N 450 home router Users Manual

Users Manual

Version 2.00 | 2015/07/07Wireless N450 Home RouterUser ManualDIR-629
1D-Link DIR-629 User ManualD-Link reserves the right to revise this publication and to make changes in the content hereof without obligation to notify any person or organization of such revisions or changes.Manual RevisionsTrademarksD-Link and the D-Link logo are trademarks or registered trademarks of D-Link Corporation or its subsidiaries in the United States or other countries. All other company or product names mentioned herein are trademarks or registered trademarks of their respective companies.Copyright © 2015 by D-Link Corporation, Inc.All rights reserved. This publication may not be reproduced, in whole or in part, without prior expressed written permission from D-Link Systems, Inc.Revision Date Description1.00 November 11, 2013 2.00 July 7, 2015 Preface
2D-Link DIR-629 User ManualTable of ContentsPreface ................................................................................. iProduct Overview ..............................................................1Package Contents .........................................................................1 .................................................................2Introduction ................................................................................... 3Features ............................................................................................ 4Hardware Overview .....................................................................5Connections ...........................................................................5LEDs ........................................................................................... 6Installation ......................................................................... 7 ...........................................................................7Wireless Installation Considerations ......................................8Manual Setup ................................................................................. 9Conguration ...................................................................11Quick Setup Wizard ....................................................................12 ..........................................................................17Web-based Conguration Utility ..........................................22Internet Connection Setup .............................................23Internet Connection Setup Wizard ............................... 24Internet (Manual) ................................................................30Static (assigned by ISP) ................................................32PPPoE (DSL) ...................................................................... 33PPTP ....................................................................................35L2TP ....................................................................................37Wireless Connection Setup Wizard ..............................39Wi-Fi Protected Setup Wizard ......................................... 41Manual wireless network setup ..................................... 43Wireless Security .................................................................45What is WPA? ...................................................................45Wireless Security Mode ...............................................46Network Settings ................................................................49 ...............................................................49DHCP Server Settings ...................................................50 .........................................................52Advanced ............................................................................... 53Virtual Server ...................................................................53Port Forwarding .............................................................54 ...........................................................55QoS Engine ....................................................................... 56Network Filters ................................................................ 59Inbound Filters ................................................................ 60Access Control .................................................................61Website Filters .................................................................64Firewall Settings .............................................................65Advanced Wireless ........................................................67Wi-Fi Protected Setup (WPS) .....................................68Advanced Network Settings ......................................70Tools ........................................................................................71Admin.................................................................................71Time ....................................................................................73Table of Contents
3D-Link DIR-629 User ManualTable of ContentsSysLog ................................................................................74Email Settings..................................................................75System ...............................................................................76Firmware ...........................................................................77Language Pack ................................................................ 77Dynamic DNS ..................................................................78System Check ..................................................................79Schedules .........................................................................80Status ......................................................................................81Device Info .......................................................................81Logs.....................................................................................82Statistics ............................................................................83Internet Sessions ............................................................ 84Wireless..............................................................................85Support ..................................................................................86Connect a Wireless Client to your Router ......................87 ...................................................................................87Windows® 8 ................................................................................... 88WPA/WPA2 ............................................................................88Windows® 7 ................................................................................... 90WPA/WPA2 ............................................................................90WPS ..........................................................................................93Windows Vista® ............................................................................ 97WPA/WPA2 ............................................................................98WPS/WCN 2.0 .................................................................... 100Windows® XP ............................................................................. 101WPA/WPA2 ......................................................................... 102Troubleshooting ............................................................104Wireless Basics ...............................................................108What is Wireless? ...................................................................... 109Tips ................................................................................................111Wireless Modes ......................................................................... 112Networking Basics .........................................................113Check your IP address ............................................................ 113Statically Assign an IP address ............................................ 114Technical Specications ................................................115Regulatory Information ................................................116
1D-Link DIR-629 User ManualSection 1 - Product OverviewProduct OverviewPackage ContentsNote: Using a power supply with a dierent voltage rating than the one included with the DIR-629 will cause damage and void the warranty for this product.If any of the above items are missing, please contact your reseller.Ethernet CablePower AdapterWI-FI Conguration Note
2D-Link DIR-629 User ManualSection 1 - Product OverviewNetwork RequirementsWeb-based Conguration Utility RequirementsComputer with the following:Browser Requirements:Microsoft Internet Explorer® 7, Mozilla® Firefox® 9.0,  Google® Chrome 16.0, or Safari® 4 or higherWindows® Users: Make sure you have the latest version of Java installed. Visit www.java.com to download the latest version.System Requirements
3D-Link DIR-629 User ManualSection 1 - Product OverviewIntroductionto multiple computers, game consoles, and media players. Create a secure wireless network to share photos, les, music, videos, printers, and network storage. Powered by the 802.11n technology this router provides wireless coverage for homes and oces, or for users running bandwidth-intensive applications. With some routers, all wired and wireless trac, including VoIP, Video Streaming, Online Gaming, and Web browsing are mixed D-Link Intelligent QoS Technology, wired and wireless trac are analyzed and separated into multiple data streams.or the Internet. Support for WPA™ and WPA2™ standards ensure that you will be able to use the best possible encryption regardless of your client devices. In addition, this router utilizes Dual Active Firewalls (SPI and NAT) to prevent potential attacks from across the Internet for the ideal centerpiece for your wireless network in the home or oce.
4D-Link DIR-629 User ManualSection 1 - Product Overview - GHz band. This capability allows users to participate in real-time activities online, such as video streaming, online gaming, and real-time audio. The performance of this 802.11n wireless router gives you the freedom of wireless networking at speeds faster than 802.11g.adapters. - The Web-based user interface displays a number of advanced network management features including:  - These lters can be scheduled to be active on certain days or for a duration of hours or minutes.corporate networks.information is accessible to those on the wireless network, whether from the Internet or from your company’s server. Congure your router to your specic settings within minutes.* Maximum wireless signal rate derived from IEEE Standard 802.11n, 802.11g, and 802.11n. Actual data throughput will vary. Network conditions and environmental factors, including volume of network trac, building materials and construction, and network overhead, lower actual data throughput rate. Environmental conditions will adversely aect wireless signal range.Features
5D-Link DIR-629 User ManualSection 1 - Product Overview412 3Hardware OverviewConnections1LAN Ports (1-4) Connect 10/100 Ethernet devices such as computers, switches, storage (NAS) devices, and game consoles.Internet Port Using an Ethernet cable, connect your broadband modem to this port.3Power Connector Connector for the supplied power adapter.4Reset & WPS ButtonPress the button and hold for at least 8 seconds to reset the router to the default settings.
6D-Link DIR-629 User ManualSection 1 - Product OverviewHardware OverviewLEDs1Power LED A solid green light indicates a proper connection to the power supply. Internet LED A solid light indicates connection on the Internet port. 3WPS LED This LED blinks during WPS handshake phase.4WLAN LED A solid light indicates that the wireless segment is ready.5Local Network LEDs A solid light indicates a connection to an Ethernet-enabled computer on ports 1-4.5321 4
7D-Link DIR-629 User ManualSection 2 - InstallationBefore you BeginInstallationThis section will walk you through the installation process. Placement of the router is very important. Do not place the router in an enclosed area such as a closet, cabinet, or in an attic or garage.  on the router, and then turn the modem back on. In some cases, you may need to call your ISP to change connection  
8D-Link DIR-629 User ManualSection 2 - InstallationWireless Installation ConsiderationsThe D-Link wireless router lets you access your network using a wireless connection from virtually anywhere within the operating range of your wireless network. Keep in mind, however, that the number, thickness and location of walls, ceilings, or other objects that the wireless signals must pass through, may limit the range. Typical ranges vary depending on the types follow these basic guidelines:1. Keep the number of walls and ceilings between the D-Link router and other network devices to a minimum - each wall or ceiling can reduce your adapter’s range from 3-90 feet (1-30 meters.) Position your devices so that the number of walls or ceilings is minimized.appears to be almost 3 feet (1 meter) thick. At a 2-degree angle it looks over 42 feet (14 meters) thick! Position devices so that the signal will travel straight through a wall or ceiling (instead of at an angle) for better reception.Try to position access points, wireless routers, and computers so that the signal passes through drywall or open doorways. Materials and objects such as glass, steel, metal, walls with insulation, water (sh tanks), mirrors, le cabinets, brick, and concrete will degrade your wireless signal.noise.5.  If you are using 2.4 GHz cordless phones or X-10 (wireless products such as ceiling fans, lights, and home security systems), your wireless connection may degrade dramatically or drop completely. Make sure your 2.4 GHz phone base is as far away from your wireless devices as possible. The base transmits a signal even if the phone in not in use.
9D-Link DIR-629 User ManualSection 2 - InstallationManual Setup2. Position your router close to your modem and a computer. Place the router in an open area of your intended work area for better wireless coverage.3.  Unplug the Ethernet cable from your modem (or existing router if upgrading) that is connected to your computer. Plug it into the LAN port labeled 1 on the back of your router. The router is now connected to your computer.ModemComputer
10D-Link DIR-629 User ManualSection 2 - InstallationINTERNET4. Plug one end of the included blue Ethernet cable that came with your router into the yellow port labeled 6.  Connect the supplied power adapter into the power port on the back of the router and then plug it into a power outlet or surge protector. The power LED will light up. Allow 1 minute for the router to boot up. already. Try opening a web browser and enter a web site. If a solid light indicates a connection on the Internet port, the router should be able to connect to the Internet. INTERNETModemModemComputerComputer
11D-Link DIR-629 User ManualSection 3 - CongurationThere are several dierent ways you can congure your router to connect to the Internet and connect to your clients:   Manual SetupConguration
12D-Link DIR-629 User ManualSection 3 - CongurationIf this is your rst time logging into the router, this wizard will start automatically. This wizard is designed to guide you through a step-by-step process to congure your new D-Link router and connect to the Internet.Click Next to continue. Quick Setup Wizardautomatically be directed to the Wizard Setup Screen. If not, type then, press Enter.If you have already congured your settings and you would like to access the conguration utility, please refer to page page 22.Step 1: Congure Your Internet Connection Please wait while your router detects your Internet connection type. If the router detects your Internet connection, you may need to enter your ISP information such as username and password.
13D-Link DIR-629 User ManualSection 3 - CongurationIf the router does not detect a valid Ethernet connection from the Internet port, this screen will appear. Connect your broadband modem to the Internet port and then click .If the router detects an Ethernet connection but does not detect the type of Internet connection you have, this screen will appear. Click Guide me through the Internet Connection Settings to display a list of connection types to choose from.Select your Internet connection type and click Next to continue.
14D-Link DIR-629 User ManualSection 3 - CongurationIf the router detected or you selected PPPoE, enter your PPPoE username and password and click Next to continue. Note: Make sure to remove your PPPoE software from your computer. The software is no longer needed and will not work through a router.If the router detected or you selected PPTP, enter your PPTP username, password, and other information supplied by your ISP. Click Next to continue. If the router detected or you selected , enter your L2TP username, password, and other information supplied by your ISP. Click Next to continue.
15D-Link DIR-629 User ManualSection 3 - CongurationIf the router detected or you selected Static, enter the IP and DNS settings supplied by your ISP. Click Next to continue. Step 2: Congure Your Wi-Fi Security Create a Wi-Fi network name (SSID) using up to 32 characters.need to have this passphrase or key entered to be able to connect to your wireless network.Click Next to continue.Step 1: Set Your Password In order to secure your router, please enter a new password. Check the Enable Graphical Authentication box to enable CAPTCHA authentication for added security. Click Next to continue.
16D-Link DIR-629 User ManualSection 3 - CongurationStep 4: Select Your Time Zone Select your time zone from the drop-down menu and click Next to continue. Step 5: Conrm WiFi Settings The Setup Complete window will display your Wi-Fi settings. Click Save and Connect to continue.If you want to create a bookmark to the router, click OK. Click Cancel if you do not want to create a bookmark.If you clicked Yes, a window may appear (depending on what web browser you are using) to create a bookmark.
17D-Link DIR-629 User ManualSection 3 - CongurationStep 1Search for the free QRS Mobile App on the iTunes Store or Google Play.Once your app is installed, you may now congure your router. Connect to the router wirelessly by going to your wireless utility on your device. Scan for the Wi-Fi name (SSID) as listed on the supplied info card. Select and then enter your Wi-Fi password.Step 3screen of your device.Note: The following steps show the Android interface of the QRS Mobile app. If you are using an iPhone, iPad, or iPod touch, the appearance may be dierent to that of the screenshots, but the process is the same.Note: The screenshots may be dierent depending on your mobile device’s OS version.QRS Mobile App
18D-Link DIR-629 User ManualSection 3 - CongurationStep 4Start to proceed, then enter your device password and tap Log In. Tap Next once the Operation Mode screen appears.Step 5At this point, please ensure that you the router is connected to a modem. Plug one end of the provided Ethernet cable into your DSL or cable modem, Next to automatically detect your Internet connection and proceed to the next step.
19D-Link DIR-629 User ManualSection 3 - CongurationStep 6Firstly, enter a network name (SSID) of your choice, or leave it unchanged to accept the default SSID. Secondly, choose a Wi-Fi password of at least 8 characters. Any device trying to connect to the router wirelessly will need to enter this password the rst time it connects.Finally, tap Next to proceed.Step 7Enter the administrator password of your choice. Unlike the Wi-Fi password,  for details of when this password is used. Tap Next to proceed.
20D-Link DIR-629 User ManualSection 3 - CongurationStep 8If you wish to receive push notications whenever a new rmware update is available, check the Notify me when new rmware is available box and tap Next.Otherwise, just tap Next to proceed.Tap Save to complete the setup.
21D-Link DIR-629 User ManualSection 3 - Congurationshare this information by tapping , Share By E-mail, or tap  to exit the app.If you tap you can now touch the tag with your other device until the conrmation message appears.Note: NFC is not supported by iPhone, iPad, and iPod touch devices.
22D-Link DIR-629 User ManualSection 3 - CongurationWeb-based Conguration UtilityLeave the password blank by default.To access the conguration utility, open a web-browser such as Internet Explorer and enter address of the router .
23D-Link DIR-629 User ManualSection 3 - CongurationInternet Connection SetupClick Manual Internet Connection Setup to congure your connection manually and continue to the next page.If you want to congure your router to connect to the Internet using the wizard, click Quick Setup Wizard.
24D-Link DIR-629 User ManualSection 3 - CongurationInternet Connection Setup WizardWhen conguring the router for the rst time, we recommend that you click use the , and follow the instructions method to congure the Internet Connectivity of this router.Anytime during the Internet Connection Setup Wizard, the user can click on the Cancel button to discard any changes made and return to the main Internet page. Also the user can click on the Prev button, to return to the previous window for re-conguration.Welcome:This wizard will guide you through a step-by-step process to congure your new D-Link router and connect to the Internet. Click Next to continue.Step 1: Set Your Password-ministrator access to the Web-based conguration pages. To secure your new networking device, please enter and verify a password in the spaces provided. The two passwords must match.Click Next to continue.
25D-Link DIR-629 User ManualSection 3 - Congurationrouter. Click Next to continue.Step 3: Internet Connectionother manual Internet Connection methods listed below.Dynamic IP Choose this if your Internet connection automatically provides you with an IP Address. Most Cable Modems use this type of connection.PPPoE: and password to get online. Most DSL modems use this type of connec-tion.PPTP: and password to get online. and password to get online.Static IP Choose this option if your Internet Setup Provider provided you with IP Address information that has to be manually congured.
26D-Link DIR-629 User ManualSection 3 - CongurationAfter selecting the Dynamic IP Address Internet connection method, the following page will appear.The following parameters will be available for conguration:Click Next to continue.Click Next to continue.After selecting the PPPoE Internet connection method, the following page will appear:The following parameters will be available for conguration:MAC Address:Enter the MAC address of the Internet gateway (plugged into the Internet port of this device) here.Clone Button: If the conguration PC also acts as the Internet gateway, then click on the the space provided. If you’re not sure, leave the MAC Address eld blank.Host Name: Name. If you do not have or know this information, please contact your ISP.Primary DNS Address:Enter the Primary DNS IP address used here.Secondary DNS Address:Enter the Secondary DNS IP address used here. This eld is normally op--tion, but using a second DNS address provides more stability.User Name: Enter the PPPoE account user name used here. This information is given by the ISP.Password: Enter the PPPoE account password used here. This information is given by the ISP.
27D-Link DIR-629 User ManualSection 3 - CongurationAfter selecting the PPTP Internet connection method, the following page will appear:The following parameters will be available for conguration: conguration.PPTP Enter the PPTP IP address used here. This option is only available if Static IP is selected.PPTP Subnet Mask:Enter the PPTP Subnet Mask used here.PPTP Gateway Enter the PPTP Gateway IP address used here.PPTP Server Enter the PPTP Server IP address used here. This is normally the same a the PPTP Gateway IP address.User Name: Enter the PPTP username used here.Password: Enter the PPTP password used here.Verify Password:Primary Enter the Primary DNS IP address used here.Secondary Enter the Secondary DNS IP address used here. This eld is normally op--tion, but using a second DNS address provides more stability.Click Next to continue.
28D-Link DIR-629 User ManualSection 3 - CongurationAfter selecting the L2TP Internet connection method, the following page will appear:The following parameters will be available for conguration: conguration.Enter the L2TP IP address used here. This option is only available if Static IP is selected.Subnet Mask:Enter the L2TP Subnet Mask used here.Enter the L2TP Gateway IP address used here.Enter the L2TP Server IP address used here. This is normally the same a the L2TP Gateway IP address.User Name: Enter the L2TP username used here.Password: Enter the L2TP password used here.Verify Password:Primary Enter the Primary DNS IP address used here.Secondary Enter the Secondary DNS IP address used here. This eld is normally op--tion, but using a second DNS address provides more stability.Click Next to continue.
29D-Link DIR-629 User ManualSection 3 - CongurationAfter selecting the Static IP Address Internet connection method, the following page will appear:The following parameters will be available for conguration:Setup Complete!This is the last page of the Internet Connection Setup Wizard. Click the Connect button to save your settings.Mode:Enter the Static IP address provided by the ISP here.Subnet Mask:Enter the Subnet Mask provided by the ISP here.Gateway Enter the Gateway IP address provided by the ISP here.Primary Enter the Primary DNS IP address used here.Secondary Enter the Secondary DNS IP address used here. This eld is normally op--tion, but using a second DNS address provides more stability.
30D-Link DIR-629 User ManualSection 3 - CongurationInternet (Manual)On this page the user can congure the Internet Connection settings manually. To access the Manual Internet Connection Setup page, click on the Manual Internet Connection Setup button. On this page there are multiple Internet Connection setup parameters available for conguration.At any given point you can save the conguration on this page, by clicking on the Save Settings button. If you choose to discard the changes made, click on the Don’t Save Settings button.Internet Connection TypeIn this section, you can select the type of Internet Connection to be used with this router. The options available to choose from are Static IP, Dynamic IP, PPPoE, PPTP, L2TP, and DS-Lite.After selecting a specic Internet Connection type, this page will automati-Internet Connection type.
31D-Link DIR-629 User ManualSection 3 - CongurationMy Internet Connection is: Dynamic IP (DHCP)The default WAN conguration for this router is Dynamic IP (DHCP). This option allows the router to obtain an IP address automatically from the device that is connected to the Internet port. Note: If you’re not sure about the type of Internet Connection you have, please contact your Internet Service Provider (ISP) for assistance.After selecting Dynamic IP, the following parameters will be available for conguration:Host Name: if you are not sure.Use Unicasting:Tick this option if you ISP uses the unicast method to provide IP address-es.Primary DNS: Enter the Primary DNS IP address used here.Secondary DNS: Enter the Secondary DNS IP address used here. This eld is normally connection, but using a second DNS address provides more stability.MTU: Maximum Transmission Unit - you may need to change the MTU for opti-mal performance with your specic ISP. 1500 is the default MTU.MAC Address:The default MAC Address is set to the Internet port’s physical interface the Clone Your PC’s MAC Address button to replace the Internet port’s MAC address with the MAC address of your Ethernet card.
32D-Link DIR-629 User ManualSection 3 - CongurationManual Internet SetupStatic (assigned by ISP)address, subnet mask, gateway address, and DNS address(es) provided to you by your ISP. Each IP address entered in the elds if it is not in this format.My Internet Connection:Select Static IP to manually enter the IP settings supplied by your ISP.IP Address: Enter the IP address assigned by your ISP.Subnet Mask: Enter the Subnet Mask assigned by your ISP.Default Gateway:Enter the Gateway assigned by your ISP.DNS Servers: The DNS server information will be supplied by your ISP (Internet Service Provider).MTU: Maximum Transmission Unit - you may need to change the MTU for opti-mal performance with your specic ISP. 1500 is the default MTU.MAC Address:The default MAC Address is set to the Internet port’s physical interface MAC Copy Your PC’s MAC Address button to replace the Internet port’s MAC address with the MAC address of your Ethernet card.
33D-Link DIR-629 User ManualSection 3 - CongurationInternet SetupPPPoE (DSL)username and password. This option is typically used for DSL services. Make sure to remove your PPPoE software from your computer. The software is no longer needed and will not work through a router.My Internet Connection:Select PPPoE (Username/Password) from the drop-down menu.Address Mode:use of a Dynamic or Static IPIP conguration.IP Address: Enter the PPPoE IP address used here. This option is only available if Static IP is selected.Username: Enter the PPPoE account user name used here. This information is given by the ISP.Password: Enter the PPPoE account password used here. This information is given by the ISP.Verify Password:Service Name:This optional eld enables the user to enter a service name to identify this Internet connection here.Reconnect Mode:Use the radio buttons to specify the reconnect mode. The user can specify a custom schedule or specify the On Demand, or Manual option. To specify a custom schedule, use the drop-down menu to select one of the schedules that has been dened in the Schedules page.
34D-Link DIR-629 User ManualSection 3 - CongurationTo create a new schedule, click the New Schedule button to open the Schedules page. Schedules will be discussed later.Maximum Idle Time: Enter a maximum idle time during which the Internet connection is main-tained during inactivity. DNS Mode:  This option allow the router to obtain the DNS IP addresses from the ISP, when Receive DNS from ISP is selected, or allows the user to enter DNS IP address manually, when Enter DNS Manually is selected.Primary DNS Server: Enter the Primary DNS IP address used here.Secondary DNS Server: Enter the Secondary DNS IP address used here. This eld is normally op--tion, but using a second DNS address provides more stability.MTU: Maximum Transmission Unit - you may need to change the MTU for opti-mal performance with your specic ISP. 1492 is the default MTU.MAC Address:The default MAC Address is set to the Internet port’s physical interface the  button to replace the Internet port’s MAC address with the MAC address of your Ethernet card.
35D-Link DIR-629 User ManualSection 3 - CongurationInternet SetupPPTPand password. This option is typically used for DSL services. My Internet Connection:Select  from the  drop-down menu.Address Mode: use of a Dynamic or Static IPconguration.PPTP IP Address:Enter the PPTP IP address used here. This option is only available if Static IP is selected.PPTP Subnet Mask:Enter the PPTP Subnet Mask used here.PPTP Gateway IP Address:Enter the PPTP Gateway IP address used here.PPTP Server IP Address:Enter the PPTP Server IP address used here. This is normally the same a the PPTP Gateway IP address.Username: Enter the PPTP username used here.Password: Enter the PPTP password used here.Verify Password:
36D-Link DIR-629 User ManualSection 3 - CongurationReconnect Mode:Use the radio buttons to specify the reconnect mode. The user can specify a custom schedule or specify the On Demand, or Manual option. To specify a custom schedule, use the drop-down menu to select one of the schedules that has been dened in the Schedules page. To create a new schedule, click the New Schedule button to open the Schedules page. Schedules will be discussed later.Maximum Idle Time:Enter a maximum idle time during which the Internet connection is maintained during inactivity. To disable this feature, enable Auto-reconnect.Primary DNS Server: Enter the Primary DNS IP address used here.Secondary DNS Server:Enter the Secondary DNS IP address used here. This eld is normally op--tion, but using a second DNS address provides more stability.MTU: Maximum Transmission Unit - you may need to change the MTU for opti-mal performance with your specic ISP. 1400 is the default MTU.MAC Address: The default MAC Address is set to the Internet port’s physical interface the Clone Your PC’s MAC Address button to replace the Internet port’s MAC address with the MAC address of your Ethernet card.
37D-Link DIR-629 User ManualSection 3 - CongurationInternet SetupL2TPpassword. This option is typically used for DSL services. My Internet Connection:Select  from the drop-down menu.Address Mode:conguration.L2TP IP Address:Enter the L2TP IP address used here. This option is only available if Static IP is selected.L2TP Subnet Mask:Enter the L2TP Subnet Mask used here.L2TP Gateway IP Address:Enter the L2TP Gateway IP address used here.L2TP Server IP Address:Enter the L2TP Server IP address used here. This is normally the same a the L2TP Gateway IP address.Username: Enter the L2TP username used here.Password: Enter the L2TP password used here.Verify Password:
38D-Link DIR-629 User ManualSection 3 - CongurationReconnect Mode:Use the radio buttons to specify the reconnect mode. The user can specify a custom schedule or specify the On Demand, or Manual option. To specify a custom schedule, use the drop-down menu to select one of the schedules that has been dened in the Schedules page. To create a new schedule, click the New Schedule button to open the Schedules page. Schedules will be discussed later.Maximum Idle Time:Enter a maximum idle time during which the Internet connection is main-tained during inactivity. To disable this feature, enable Auto-reconnect.Primary DNS Server:Enter the Primary DNS IP address used here.Secondary DNS Server:Enter the Secondary DNS IP address used here. This eld is normally op--tion, but using a second DNS address provides more stability.MTU: Maximum Transmission Unit - you may need to change the MTU for opti-mal performance with your specic ISP. 1400 is the default MTU.MAC Address: The default MAC Address is set to the Internet port’s physical interface the Clone Your PC’s MAC Address button to replace the Internet port’s MAC address with the MAC address of your Ethernet card.
39D-Link DIR-629 User ManualSection 3 - CongurationOn this page the user can congure the Wireless settings for this device. There are 3 ways to congure Wireless using this can choose to make use Wi-Fi Protected Setup. Lastly, the user can congure the Wireless settings manually.Wireless Settings: Wireless Connection Setup WizardThe Wireless Connection Setup Wizard is specially designed to assist basic network users with a simple, step-by-step set of instructions to congure the wireless settings of this router. It is highly recommended to customized the wireless network settings to t into your environment and to add higher security.Step 1: In this step, the user must enter a custom Wireless Network Name or SSID. Enter the new Network Name (SSID) in the appropriate space pro-vided.Secondly the user can choose between two wireless security wizard congu-rations. The user can select ‘Automatically assign a network key’, by which the router will automatically generate a WPA/WPA2 pre-shared key using the TKIP and AES encryption methods; or the user can select ‘Manually assign a network key’, by which the user will be prompt to manually enter a WPA/WPA2 pre-shared key using the TKIP and AES encryption methods.Click on the Prev button to return to the previous page. Click on the Next button to continue to the next page. Click on the Cancel button to discard the changes made and return to the main wireless page.To initiate the Wireless Connection Setup Wizard click on the Wireless Con-nection Setup Wizard button.Wireless Connection Setup Wizard
40D-Link DIR-629 User ManualSection 3 - CongurationStep 2: This step will only be available if the user selected ‘Manually assign a network key’ in the previous step. Here the user can manually enter the WPA/WPA2 pre-shared key in the Wireless Security Password space provided. The will be used when wireless clients wants to connect to this device. So please remember this key to prevent future troubleshooting.Click on the Prev button to return to the previous page. Click on the Next button to continue to the next page. Click on the Cancel button to discard the changes made and return to the main wireless page.Setup Complete: On this page the user can view the conguration made and verify whether they are correct.Click on the Prev button to return to the previous page. Click on the Cancel button to discard the changes made and return to the main wireless page. Click on the Save button to accept the changes made.After click the Save button the device will save the settings made and return to the main wireless page.End of Wizard.
41D-Link DIR-629 User ManualSection 3 - CongurationWireless Settings: Wi-Fi Protected Setup WizardIf your Wireless Clients support the WPS connection method, this Wi-Fi Pro-tected Setup Wizard can be used to initiate a wireless connection between this device and Wireless clients with a simple click of the WPS button. The Wi-Fi Protected Setup Wizard is specially designed to assist basic network us-ers with a simple, step-by-step set of instructions to connect wireless clients to this router using the WPS method.To initiate the Wi-Fi Protected Setup Wizard click on the Add Wireless Device with WPS button.Step 1:choose Auto if the wireless client supports WPS, or Manual if the wireless cli-ent does not support WPS.Click on the Prev button to return to the previous page. Click on the Next button to continue to the next page. Click on the Cancel button to discard the changes made and return to the main wireless page.Step 2: After selecting Auto, the following page will appear. There are two ways to add a wireless device, that supports WPS. Firstly, there is the Personal Identication Number (PIN) method. Using this method will prompt the user to enter a PIN code. This PIN code should be identical on the wireless client. PBC) method. Using this method will allow the wireless client to connect to this device by similarly Click on the Prev button to return to the previous page. Click on the Next button to continue to the next page. Click on the Cancel button to discard the changes made and return to the main wireless page.Wi-Fi Protected Setup Wizard
42D-Link DIR-629 User ManualSection 3 - CongurationStep 2: After selecting Manual, the following page will appear. On this page to user can view the wireless conguration of this router. The wireless clients should congure their wireless settings to be identical to the settings dis-played on this page for a successful connection. This option is for wireless clients that can’t use the WPS method to connect to this device.Click on the Prev button to return to the previous page. Click on the Next button to continue to the next page. Click on the Cancel button to discard the changes made and return to the main wireless page. Click on the Wire-less Status button to navigate to the Status > Wireless page to view what wireless client are connected to this device.End of Wizard.
43D-Link DIR-629 User ManualSection 3 - CongurationWireless Settings: Manual Wireless Network SetupThe manual wireless network setup option allows users to congure the wireless settings of this device manually. This option is for the more ad-vanced user and includes all parameters that can be congured for wireless connectivity.To initiate the Manual Wireless Setup page, click on the Manual Wireless Connection Setup button.On this page the user can congure all the parameters related to the wireless connectivity of this router.Manual wireless network setupWireless Band:Displays the wireless band being congured. Enable Wireless: Check the box to enable the wireless function. If you do not want to use wireless, uncheck the box to disable all the wireless functions. Select the time frame that you would like your wireless network enabled. The sched-ule may be set to Always. Any schedule you create will be available in the drop-down menu. Click New Schedule to create a new schedule.Wireless Network Name:The Service Set Identier (SSID) is the name of your wireless network. Cre-ate a name using up to 32 characters. The SSID is case-sensitive. Enable Auto Channel802.11 Mode: this wireless network.Enable Auto Channel Scan:The auto channel selection setting can be selected to allow this device to choose the channel with the least amount of interference.
44D-Link DIR-629 User ManualSection 3 - CongurationWireless Channel:channel setting for an existing wireless network or to customize the wire-less network. If you enable Auto Channel Selection, this option will be greyed out.Transmission Rate:for best performance.Channel Width:choose between a 20 MHz or 20/40 MHz bandwidth.Visibility Status:The Invisible option allows you to hide your wireless network. When this option is set to Visible, your wireless network name is broadcasted to any-one within the range of your signal. If you are not using encryption then they could connect to your network. When Invisible mode is enabled, you must enter the Wireless Network Name (SSID) on the client manually to connect to the network.
45D-Link DIR-629 User ManualSection 3 - CongurationWireless Securitythe following types of security:         What is WPA?Privacy). The 2 major improvements over WEP: hashing algorithm and, by adding an integrity-checking feature, ensures that the keys haven’t been tampered with. WPA2 is based on 802.11i and uses Advanced Encryption Standard (AES) instead of TKIP.WEP regulates access to a wireless network based on a computer’s hardware-specic MAC address, which is relatively simple to be snied out and stolen. EAP is built on a more secure public-key encryption system to ensure that only authorized network users can access the network.WPA-PSK/WPA2-PSK uses a passphrase or key to authenticate your wireless connection. The key is an alpha-numeric password between 8 and 63 characters long. The password can include symbols (!?*&_) and spaces. This key must be the exact same key entered on your wireless router or access point.WPA/WPA2 incorporates user authentication through the Extensible Authentication Protocol (EAP). EAP is built on a more secure public key encryption system to ensure that only authorized network users can access the network.
46D-Link DIR-629 User ManualSection 3 - Conguration-2.4 GHz. There are two types of encryption that can be used. WEP or WPA/WPA2.Wireless Security Mode: WEPbe used for wireless networks. Even though it is known as a ‘weak’ security method, it is better than no security at all. Older wireless adapter sometimes only supports WEP encryption and thus we still nd this encryption method used today.WEP Key Length:Authentication: Authentication is a process by which the router veries the identity of a network device that is attempting to join the wireless network. There are two types authentication for this device when using WEP. Open System allows all wireless devices to communicate with the router before they network. Shared Key -nicate with the router to provide the encryption key needed to access the network before they are allowed to communicate with the router.WEP Key 1: Enter the WEP key used here. For 64-bit keys you must enter 10 hex digits into each key box. For 128-bit keys you must enter 26 hex digits into each key box. A hex digit is either a number from 0 to 9 or a letter from A to F. be converted into a hexadecimal key using the ASCII values of the charac-ters. A maximum of 5 text characters can be entered for 64-bit keys, and a maximum of 13 characters for 128-bit keys.Wireless Security Mode
47D-Link DIR-629 User ManualSection 3 - CongurationWireless Security Mode: WPA-PersonalWi-Fi Protected Access (WPA) is the most advanced and up to date wireless encryption method used today. This is the recommended wireless security option. WPA supports two authentication frameworks. Personal (PSK) and Secret) for security. WPA Mode: WPA is the older standard; select this option if the clients that will be used with the router only support the older standard. WPA2 is the newer imple-mentation of the stronger IEEE 802.11i security standard. With the “WPA2” option, the router tries WPA2 rst, but falls back to WPA if the client only supports WPA. With the “WPA2 Only” option, the router associates only with clients that also support WPA2 security.Cipher Type: Select the appropriate cipher type to use here. Options to choose from are Temporal Key Integrity Protocol (TKIP), Advanced Encryption Standard (AESTKIP and AES).Group Key Update Interval:Enter the amount of time before the group key used for broadcast and multicast data is changed.Pre-Shared Key:Enter the shared secret used here. This secret phrase needs to be the same on all of the wireless clients for them to be able to connect to the wireless network successfully.The following parameters will be available for conguration:
48D-Link DIR-629 User ManualSection 3 - CongurationWireless Security Mode: WPA-EnterpriseWi-Fi Protected Access (WPA) is the most advanced and up to date wireless encryption method used today. This is the recommended wireless security option. WPA supports two authentication frameworks. Personal (PSK) and Enterprise (EAP). WPA Mode: WPA is the older standard; select this option if the clients that will be used with the router only support the older standard. WPA2 is the newer imple-mentation of the stronger IEEE 802.11i security standard. With the “WPA2” option, the router tries WPA2 rst, but falls back to WPA if the client only supports WPA. With the “WPA2 Only” option, the router associates only with clients that also support WPA2 security.Cipher Type: Select the appropriate cipher type to use here. Options to choose from are Temporal Key Integrity Protocol (TKIP), Advanced Encryption Standard (AESTKIP and AES).Group Key Update Interval:Enter the amount of time before the group key used for broadcast and multicast data is changed.RADIUS Server IP Address:When the user chooses to use the EAP authentication framework, the RADIUS Server Port:When the user chooses to use the EAP authentication framework, the RADIUS Server Shared Secret:Enter the shared secret used here. This secret phrase needs to be the same on all of the wireless clients for them to be able to connect to the wireless network successfully.The following parameters will be available for conguration:
49D-Link DIR-629 User ManualSection 3 - CongurationThis section will allow you to change the local network settings of the router and to congure the DHCP settings.Network SettingsRouter SettingsRouter IP Address:Enter the IP address of the router. The default IP address is 192.168.0.1.  If you change the IP address, once you click Save Settings, you will need to enter the new IP address in your browser to get back into the conguration utility.Subnet Mask: Enter the Subnet Mask. The default subnet mask is 255.255.255.0.Device Name: Enter a name for the router.Local Domain:Enter the Domain name (Optional).Enable DNS Relay:Uncheck the box to transfer the DNS server information from your ISP to your computers. If checked, your computers will use the router for a DNS server.
50D-Link DIR-629 User ManualSection 3 - CongurationDHCP Server Settingstheir TCP/IP settings to “Obtain an IP Address Automatically.” When you turn your computers on, they will automatically load Enable DHCP Server:Check this box to enable the DHCP server on your router. Uncheck to disable this function.DHCP IP Address Range:Enter the starting and ending IP addresses for the DHCP server’s IP assignment.Note: If you statically (manually) assign IP addresses to your computers or devices, make sure the IP addresses are outside of this range or you may have an IP conict. DHCP Lease Time:The length of time for the IP address lease. Enter the Lease time in minutes.Always Broadcast:If all the computers on the LAN successfully obtain their IP addresses from the router’s DHCP server as expected, this option can remain disabled. However, if one of the computers on the LAN fails to obtain an IP address from the router’s DHCP server, it may have an old DHCP client that incorrectly turns o the broadcast ag of DHCP packets. Enabling this option will cause the router to always broadcast its responses to all clients, thereby working around the problem, at the cost of increased broadcast trac on the LAN.NetBIOS Announcement:computers within the network, e.g. within Network Neighborhood.Learn NetBIOS from WAN:be learned from the WAN side, if available. Turn this setting o to congure manually.
51D-Link DIR-629 User ManualSection 3 - CongurationNetBIOS Scope:This is an advanced setting and is normally left blank. This allows the WAN’ is activated.NetBIOS Node:registration and discovery. H-Node, this indicates a Hybrid-State of operation. First WINS servers are tried, if any, followed by local network broadcast. This is generally the preferred mode if you have congured WINS servers. M-Node (default), this indicates a Mixed-Mode of operation. other hosts, if broadcast operation fails, WINS servers are tried, if any. This mode favours broadcast operation which may be preferred if WINS servers are reachable by a slow network link and the majority of network services such as servers and printers are local to the LAN. P-Node, this congured at least the primary WINS server IP to point to a working WINS setting is useful where there are no WINS servers available, however, it is preferred you try M-Node operation rst. This setting has no eect if the WINS IP Address:Enter your WINS Server IP address(es).
52D-Link DIR-629 User ManualSection 3 - CongurationDHCP ReservationIf you want a computer or device to always have the same IP address assigned, you can create a DHCP reservation. The router will assign the IP address only to that computer or device. Note: This IP address must be within the DHCP IP Address Range.Enable: Check this box to enable the reservation.Computer Name:Enter the computer name or select from the drop-down menu and click <<.IP Address: Enter the IP address you want to assign to the computer or device. This IP MAC Address:Enter the MAC address of the computer or device.Copy Your PC’s MAC Address:If you want to assign an IP address to the computer you are currently on, click this button to populate the elds. Save: Click SaveSave Settings at the top to activate your reservations. DHCP Reservations ListDHCP Reservations List:Displays any reservation entries. Displays the host name (name of your computer or device), MAC Address, and IP address.Enable: Check to enable the reservation.Edit: Click the edit icon to make changes to the reservation entry.Delete: Click to remove the reservation from the list.
53D-Link DIR-629 User ManualSection 3 - CongurationThis will allow you to open a single port. If you would like to open a range of ports, refer to the next page.Virtual ServerAdvancedName: Enter a name for the rule or select an application from the drop-down menu. Select an application and click << to populate the elds.IP Address: Enter the IP address of the computer on your local network that you want to allow the incoming service to. If your computer is receiving an IP address automatically from the router (DHCP), you computer will be listed in the “Computer Name” drop-down menu. Select your computer and click <<. Private Port/Public Port:Enter the port that you want to open next to Private Port and Public Port. The private and public ports are usually the same. The public port is the port seen from the Internet side, and the private port is the port being used by the application on the computer within your local network.Protocol Type:Select TCP, UDP, or Both from the drop-down menu.Schedule: schedule may be set to Always, which will allow the particular service to Tools > Schedules section.Inbound Filter:Select your own inbound lters in the  page.
54D-Link DIR-629 User ManualSection 3 - CongurationThis will allow you to open a single port or a range of ports.Port ForwardingName: Enter a name for the rule or select an application from the drop-down menu. Select an application and click << to populate the elds.IP Address: Enter the IP address of the computer on your local network that you want to allow the incoming service to. If your computer is receiving an IP address automatically from the router (DHCP), you computer will be listed in the “Computer Name” drop-down menu. Select your computer and click <<. TCP/UDP: a single port or a range of ports. Separate ports with a comma. Example: 24,1009,3000-4000Schedule: schedule may be set to , which will allow the particular service to Tools > Schedules section.Inbound Filter:Select your own inbound lters in the  page.
55D-Link DIR-629 User ManualSection 3 - CongurationApplication RulesThese applications have diculties working through NAT (Network Address Translation). Special Applications makes some of normally associated with an application in the “Trigger Port” eld, select the protocol type as TCP or UDP, then enter the rewall (public) ports associated with the trigger port to open them for inbound trac.want to use and enable it.Name:  pre-dened application from the drop-down menu and click <<.Trigger: This is the port used to trigger the application. It can be either a single port or a range of ports.Trac Type: Firewall: This is the port number on the Internet side that will be used to access the a comma to add multiple ports or port ranges.Trac Type: Schedule: schedule may be set to Always, which will allow the particular service Tools > Schedules section.
56D-Link DIR-629 User ManualSection 3 - CongurationQoS EngineWeighted Fair Queue (WFQ). SPQ will process trac based on trac priority. Queue1 has the highest priority and Queue4 Enable QoS: This option is disabled by default. Enable this option for better perfor-mance and experience with online games and other interactive applica-tions, such as VoIP.Uplink Speed:The speed at which data can be transferred from the router to your ISP. This is determined by your ISP. ISP’s often dene speed as a download/up-load pair. For example, 1.5 Mbits/284 Kbits. Using this example, you would enter 284. Alternatively you can test your uplink speed with a service such as www.dslreports.com.Downlink Speed:The speed at which data can be transferred from the ISP to the router. This is determined by your ISP. ISP’s often dene speed as a download/upload pair. For example, 1.5 Mbits/284 Kbits. Using this example, you would enter 1500. Alternatively you can test your downlink speed with a service such as www.dslreports.com.The following parameters will be available for conguration:
57D-Link DIR-629 User ManualSection 3 - CongurationQueue Type: -tion Strict Priority Queue, the router will apply QoS based on the internal Fair Queue, the router will apply QoS based on the user dened percent-age in the Queue Weight column.Queue ID: In this column the Queue ID used will be displayed.Queue Priority:In this column the Queue Priority used will be displayed.Queue Weight:After choosing to use the Weight Fair Queue option, under Queue Type, the user will be able to manual enter the Queue Weight for each individu-al Queue ID.
58D-Link DIR-629 User ManualSection 3 - CongurationAfter specifying the QoS framework used, in the QoS setup section, the user can now create individual rules for scenarios Checkbox: Tick this option to enable the rule specied.Name: Enter a custom name for the rule being created here. This name is used for identication.Queue ID: that will be applied to this rule. Option to choose from are Highest, High-Protocol: Select the protocol used for the application for in the drop-down menu and it will automatically place it in the Protocol eld.Local IP Range:Enter the local IP range used here. This is the IP range of you Local Area Remote IP Range:Enter the remote IP range used here. This is the IP range of the public network from the Internet Port side. To apply this rule to any IP addresses from the public side, enter the range 0.0.0.1 to 255.255.255.254.Application Port:Enter the application port number used here.The following parameters will be available for conguration:Click on the Save Settings button to accept the changes made.Click on the Don’t Save Settings button to discard the changes made.
59D-Link DIR-629 User ManualSection 3 - CongurationNetwork FiltersUse MAC (Media Access Control) Filters to allow or deny LAN (Local Area Network) computers by their MAC addresses from Select, , or listed below from the drop-down menu. Congure MAC Filtering:Enter the MAC address you would like to lter.MAC Address:To nd the MAC address on a computer, please refer to the Networking Basics section in this manual.DHCP Client: Select a DHCP client from the drop-down menu and click << to copy that MAC Address.
60D-Link DIR-629 User ManualSection 3 - CongurationThe Inbound Filter option is an advanced method of controlling data received from the Internet. With this feature you can congure inbound data ltering rules that control data based on an IP address range. Inbound Filters can be used with Virtual Inbound FiltersName: Enter a name for the inbound lter rule.Action: Select  or Deny.Enable: Check to enable rule.Remote IP Start:Enter the starting IP address. Enter 0.0.0.0 if you do not want to specify an IP range.Remote IP End:Enter the ending IP address. Enter 255.255.255.255 if you do not want to specify and IP range.Add: Click the Save Settings at the top to save the settings.Inbound Filter Rules List:Edit icon to change the settings or enable/disable the rule, or click the Delete icon to remove the rule.
61D-Link DIR-629 User ManualSection 3 - CongurationAccess ControlThe Access Control section allows you to control access in and out of your network. Use this feature as Parental Controls to only grant access to approved sites, limit web access based on time or dates, and/or block access from applications like P2P utilities or games.Click Next to continue with the wizard.Access Control WizardAdd Policy: Click the  button to start the Access Control Wizard.
62D-Link DIR-629 User ManualSection 3 - CongurationEnter a name for the policy and then click Next to continue.Select a schedule (I.E. Always) from the drop-down menu and then click Next to continue.Enter the following information and then click Next to continue.Select the ltering method and then click Next to continue.Address Type Select IP address, MAC address, or Other Machines.IP Address Enter the IP address of the computer you want to apply the rule to.Machine AddressEnter the PC MAC address (i.e. 00:00.00.00.00).
63D-Link DIR-629 User ManualSection 3 - CongurationEnter the rule:To enable web logging, click Enable.Click Save to save the access control rule.Policy Table.Enable Check to enable the rule.Name Enter a name for your rule.Dest IP Start Enter the starting IP address.Dest IP End Enter the ending IP address.Protocol Select the protocol.Dest Port StartEnter the starting port number.Dest Port End Enter the ending port number.
64D-Link DIR-629 User ManualSection 3 - CongurationWebsite FiltersWebsite Filters are used to allow you to set up a list of Web sites that can be viewed by multiple users through the network. To use this feature select to  or Deny, enter the domain or website and click Save Settings under the Access Control section.Add Website Filtering Rule:Select either DENY computers access to ONLY these sites or computers access to ONLY these sites.Website URL/Domain:Save Settings.
65D-Link DIR-629 User ManualSection 3 - CongurationFirewall Settingsprevent cyber attacks. Sometimes you may want a computer exposed to the outside world for certain types of applications. If you choose to expose a computer, you can enable DMZ. DMZ is short for Demilitarized Zone. This option will expose the chosen computer completely to the outside world.Enable SPI: SPI (Stateful Packet Inspection, also known as dynamic packet ltering) helps to prevent cyber attacks by tracking more state per session. It validates that the trac passing through the session conforms to the protocol.Enable this feature to protect your network from certain kinds of “spoong” attacks. Anti-Spoof Check:Specify the IP address of the computer on the LAN that you want to have unrestricted Internet communication. If this computer obtains it’s IP address automatically using DHCP, be sure to make a static reservation on the Setup > Network Settings page so that the IP address of the DMZ machine does not change.DMZ IP Address:Allows multiple machines on the LAN to connect to their corporate network using PPTP protocol.PPTP: Allows multiple VPN clients to connect to their corporate network using IPSec. Some VPN clients support traversal of IPSec throughIPSEC (VPN): NAT. This ALG may interfere with the operation of such VPN clients. If you are having trouble connecting with your corporate network, try turning this ALG o. Please check with the system administrator of your corporate network whether your VPN client supports NAT traversal.RTSP: the common applications using this protocol.
66D-Link DIR-629 User ManualSection 3 - CongurationSIP: Allows devices and applications using VoIP (Voice over IP) to communicate across NAT. Some VoIP applications and devices have the ability to discover NAT devices and work around them. This ALG may interfere with the operation of such devices. If you are having trouble making VoIP calls, try turning this ALG o.
67D-Link DIR-629 User ManualSection 3 - CongurationAdvanced WirelessTransmit Power:Set the transmit power of the antennas.WLAN Partition:This enables 802.11d operation. 802.11d is a wireless specication developed to allow implementation of wireless networks in countries that cannot use the 802.11 standard. This feature should only be enabled if you are in a country WMM Enable:and voice applications for your wireless clients.HT20/40 Coexistence:Enable this option to reduce interference from other wireless networks in your area. If the channel width is operating at 40 MHz and there is another wireless network’s channel over-lapping and causing interference, the router will automatically change to 20 MHz.
68D-Link DIR-629 User ManualSection 3 - CongurationWi-Fi Protected Setup (WPS)Wi-Fi Protected Setup (WPS) System is a simplied method for securing your wireless network during the “Initial setup” as well as the “Add New Device” processes. The Wi-Fi Alliance (WFA) has certied it across dierent products as well as manufactures. WPA2 is automatically used.Enable: Enable the Wi-Fi Protected Setup feature. Note: if this option is unchecked, the WPS button on the side of the router will be disabled.Lock Wireless Security Settings:Tick this option to lock the congured wireless security settings.PIN Settings: network or to create a new network. Only the Administrator (“admin” account) can change or reset the PIN.Current PIN: Shows the current PIN.Reset PIN to Default:Generate New PIN:Create a random number that is a valid PIN. This becomes the router’s PIN. 
69D-Link DIR-629 User ManualSection 3 - Congurationto automatically connect without logging into the router. WPS ButtonAdd Wireless Station:This Wizard helps you add wireless devices to the wireless network.Add Wireless Device Wizard:The wizard will either display the wireless network settings to guide you through manual conguration, prompt you to enter the PIN for the device, or ask you to press the conguration button on the device. If the device supports Wi-Fi Protected Setup and has a conguration button, you can add it to the network by pressing the conguration button on the device and then the on the router within 120 seconds. The status LED on the router will ash three times if the device has been successfully added to the network.There are several ways to add a wireless device to your network. A “registrar” controls access to the wireless network. A registrar only allows devices onto the wireless network if you have entered the PIN, or pressed a special Wi-Fi Protected Setup button on the device. The router acts as a registrar for the network, although other devices may act as a registrar as well.Click to start the wizard and refer to the section “Wi-Fi Protected Setup Wizard”
70D-Link DIR-629 User ManualSection 3 - CongurationAdvanced Network SettingsEnable UPnP: To use the Universal Plug and Play (UPnP™) feature click on Enabled. peripherals.WAN Ping: the box may provide some extra security from hackers.WAN Port Speed:Auto (recommended). Enable IPV4 Multicast Streams:Check the box to allow multicast trac to pass through the router from the Internet (IPv4).
71D-Link DIR-629 User ManualSection 3 - CongurationAdminare two accounts that can access the management interface through the web browser. The accounts are admin and user. Admin has read/write access while user has read-only access. User can only view the settings but cannot make any changes. Only the admin account has the ability to change both admin and user account passwords.ToolsDIR-629Admin Password:Enter a new password for the Administrator Login Name. The administrator can make changes to the settings.User Password:Enter the new password for the User login. If you login as the User, you cannot change the settings (you can only view them).Gateway name:Enter a name for your router.Enable Graphical Authentication:from a distorted image displayed on the screen to prevent online hackers and unauthorized users from gaining access to your router’s network settings.Enable HTTPS Server:Check to enable HTTPS to connect to the router securely. This means to connect to the router, you must enter https://192.168.0.1 (for example) instead of http://192.168.0.1. Enable Remote Management:Management interface. Remote Admin Port:and 8080 is the port used for the Web Management interface.If you have enabled  you must enter to access the router remotely.
72D-Link DIR-629 User ManualSection 3 - CongurationDIR-629Remote Admin Inbound Filter:Edit icon to change the settings or enable/disable the rule, or click the Delete icon to remove the rule. Details will display the current status.
73D-Link DIR-629 User ManualSection 3 - CongurationTimeThe Time Conguration option allows you to congure, update, and maintain the correct time on the internal system clock. From this section you can set the time zone that you are in and set the Time Server. Daylight Saving can also be congured to automatically adjust the time when needed.Time: Displays the current date and time of the router.Time Zone: Select your Time Zone from the drop-down menu.Enable Daylight Saving:To select Daylight Saving time manually, select enabled or disabled, and enter a start date and an end date for daylight saving time.Enable NTP Server:NTP is short for Network Time Protocol. A NTP server will synch the time and date with your router. This will only connect to a server on the Internet, not a local server. Check the box to enable this feature.NTP Server Used:Enter the IP address of a NTP server or select one from the drop-down menu.Manual: Month, Day, Hour, Minute, and Second and then click Set Time. Sync. Your Computer’s Time Settings to synch the date and time with the computer you are currently on.
74D-Link DIR-629 User ManualSection 3 - CongurationSysLogSysLog server on your network.DIR-629Enable Logging to SysLog Server:Check this box to send the router logs to a SysLog Server.SysLog Server IP Address:also select your computer from the drop-down menu (only if receiving an IP address from the router via DHCP).
75D-Link DIR-629 User ManualSection 3 - CongurationEmail SettingsThe Email feature can be used to send the system log les, router alert messages, and rmware update notication to your email address. DIR-629Enable Email Notication: When this option is enabled, router activity logs are emailed to a designated email address.From Email Address:This email address will appear as the sender when you receive a log le or rmware upgrade notication via email.To Email Address:Enter the email address where you want the email sent. SMTP Server Address:Enter the SMTP server address for sending email. SMTP Server Port:Enter the SMTP port used on the server.Enable Authentication:Account Name:Enter your account for sending email.Password: associated with the account.On Log Full: When this option is selected, logs will be sent via email to your account when the log is full.On Schedule: Selecting this option will send the logs via email according to schedule.Schedule: This option is enabled when On Scheduleschedule from the list of dened schedules. To create a schedule, go to .
76D-Link DIR-629 User ManualSection 3 - CongurationSystemThis section allows you to manage the router’s conguration settings, reboot the router, and restore the router to the factory DIR-629Save Settings to Local Hard Drive:Use this option to save the current router conguration settings to a le on the hard disk of the computer you are using. First, click the Save button. A le dialog will appear, allowing you to select a location and le name for the settings. Load Settings from Local Hard Drive:Use this option to load previously saved router conguration settings. First, use the Browse option to nd a previously saved le of conguration settings. Then, click the Load button to transfer those settings to the router. Restore to Factory Default Settings:This option will restore all conguration settings back to the settings that were in eect at the time the router was shipped from the factory. Any settings that have not been saved will be lost, including any rules that you have created. If you want to save the current router conguration settings, use the Save button above. Reboot Device:Click to reboot the router.
77D-Link DIR-629 User ManualSection 3 - CongurationFirmwarethe computer. Click on Browse to locate the rmware le to be used for the update. Please check the D-Link support website for rmware updates at Language Packpacks.DIR-629Browse: After you have downloaded the new rmware, click Browse to locate the rmware update on your hard drive. Click Upload to complete the rmware upgrade.Upload: Once you have a rmware update on your computer, use this option to browse for the le and then upload the information into the access point.Browse: After you have downloaded the new language pack, click Browse to locate the language pack le on your hard drive. Click Upload to complete the language pack upgrade.
78D-Link DIR-629 User ManualSection 3 - CongurationDynamic DNSThe DDNS feature allows you to host a server (Web, FTP, Game Server, etc…) using a domain name that you have purchased (www.whateveryournameis.com) with your dynamically assigned IP address. Most broadband Internet Service Providers assign dynamic (changing) IP addresses. Using a DDNS service provider, your friends can enter in your domain name to connect to your server no matter what your IP address is.DIR-629Enable Dynamic DNS:Dynamic Domain Name System is a method of keeping a domain name linked to a changing IP Address. Check the box to enable DDNS.Server Address:Select your DDNS provider from the drop-down menu or enter the DDNS server address.Host Name: Enter the Host Name that you registered with your DDNS service provider.Username or Key:Enter the Username or key for your DDNS account.Password or Key:Enter the Password or key for your DDNS account.Timeout: Enter a timeout time (in hours).Status: Displays the current connection status.
79D-Link DIR-629 User ManualSection 3 - CongurationSystem CheckPing Test: The Ping Test is used to send Ping packets to test if a computer is on the Internet. Enter the IP address that you wish to Ping and click Ping.Ping Results: The results of your ping attempts will be displayed here.
80D-Link DIR-629 User ManualSection 3 - CongurationSchedulesSchedules can be created for use with enforcing rules. For example, if you want to restrict web access to Mon-Fri from 3pm to 8pm, you could create a schedule selecting Mon, Tue, Wed, Thu, and Fri and enter a Start Time of 3pm and End Time of 8pm. DIR-629Name: Enter a name for your new schedule.Days: Select a day, a range of days, or All Week to include every day.Time: Check  or enter a start and end time for your schedule.Save: Save Settings at the top for your schedules to go into eect.Schedule Rules List:The list of schedules will be listed here. Click the Edit icon to make changes or click the Delete icon to remove the schedule.
81D-Link DIR-629 User ManualSection 3 - Congurationyour Internet connection is set up for a Dynamic IP address then a Release button and a Renew button will be displayed. Use Release to disconnect from your ISP and use Renew to connect to your ISP. If your Internet connection is set up for PPPoE, a Connect button and a Disconnect button will be displayed. Use Disconnect to drop the PPPoE connection and use Connect to establish the PPPoE connection.Device InfoStatusGeneral: Displays the router’s time and rmware version.WAN: Displays the MAC address and the public IP settings LAN: Displays the MAC address and the private (local) IP settings for the router.Wireless LAN1:Displays the 2.4 GHz wireless MAC address and your wireless settings such as SSID and Channel. LAN Computers:Displays computers and devices that are connected to the router via Ethernet and that are receiving an IP address assigned by the router (DHCP).
82D-Link DIR-629 User ManualSection 3 - CongurationLogsThe router automatically logs (records) events of possible interest in it’s internal memory. If there isn’t enough internal memory for all events, logs of older events are deleted but logs of the latest events are retained. The Logs option allows you to view external Syslog Server support so you can send the log les to a computer on your network that is running a Syslog utility.Log Options: log. System Activity, Debug Information, Attacks, Dropped Packets, and Notice messages can be selected. Click  to activate your settings.Refresh: Updates the log details on the screen so it displays any recent activity.First Page: Click to go to the rst page.Last Page: Click to go to the last page.Previous: Click to go back one page.Next: Click to go to the next page.Clear: Clears all of the log contents.Email Now: This option will send a copy of the router log to your email address congured in the Tools > Email Settings screen.Save Log: This option will save the router log to a le on your computer.
83D-Link DIR-629 User ManualSection 3 - CongurationStatisticsThe screen below displays the Trac Statisticsthe WAN, LAN ports and the wireless segments. The trac counter will reset if the device is rebooted.
84D-Link DIR-629 User ManualSection 3 - CongurationInternet SessionsThe Internet Sessions page displays full details of active Internet sessions through your router. An Internet session is a conversation between a program or application on a LAN-side computer and a program or application on a WAN-side computer.
85D-Link DIR-629 User ManualSection 3 - CongurationThe wireless client table displays a list of current connected wireless clients. This table also displays the connection time and MAC address of the connected wireless clients.Wireless
86D-Link DIR-629 User ManualSection 3 - CongurationSupport
87D-Link DIR-629 User ManualSection 4 - Connecting to a Wireless NetworkConnect a Wireless Client to your RouterWPS Button - Within 2 minutes, press the WPS button on your wireless client (or launch the software utility and start the WPS process).The easiest and most secure way to connect your wireless devices to the router is WPS (Wi-Fi Protected Setup). Most wireless wireless device you want to connect to make sure you understand how to enable WPS. Once you know, follow the steps below:Step 1 Internet LED on the front will start to blink.Step 3 -  Allow up to 1 minute to congure. Once the Internet light stops blinking, you will be connected and your wireless connection will be secure with WPA2.
88D-Link DIR-629 User ManualSection 4 - Connecting to a Wireless NetworkWindows® 8WPA/WPA2It is recommended to enable wireless security (WPA/WPA2) on your wireless router or access point before conguring your wireless adapter. If you are joining an existing network, you will need to know the security key (Wi-Fi password) being used.To join an existing network, locate the wireless network icon in the taskbar, next to the time display.  Wireless IconClicking on this icon will display a list of wireless networks which are within connecting proximity of your computer. Select the desired network by clicking on the network name.
89D-Link DIR-629 User ManualSection 4 - Connecting to a Wireless Networkthe wireless network. Enter the password into the box and click Next. If you wish to use Wi-Fi Protected Setup (WPS) to connect to the router, you can also press the WPS button on your router at the point to enable the WPS function. When you have established a successful connection a wireless network, the word Connected will appear next to the name of the network to which you are connected.
90D-Link DIR-629 User ManualSection 4 - Connecting to a Wireless NetworkWindows® 7It is recommended to enable wireless security (WPA/WPA2) on your wireless router or access point before conguring your wireless adapter. If you are joining an existing network, you will need to know the security key or passphrase being used.1. Click on the wireless icon in your system tray (lower-right corner).2. The utility will display any available wireless networks in your area.Wireless IconWPA/WPA2
91D-Link DIR-629 User ManualSection 4 - Connecting to a Wireless Network3.  Highlight the wireless connection with Wi-Fi name (SSID) you would like to connect to and click the Connect button.  If you get a good signal but cannot access the Internet, check your 4. The following window appears while your computer tries to connect to the router.
92D-Link DIR-629 User ManualSection 4 - Connecting to a Wireless Network5. Enter the same security key or passphrase (Wi-Fi password) that is on your router and click Connectthe WPS button on the router.It may take 20-30 seconds to connect to the wireless network. If the connection fails, please verify that the security settings are correct. The key or passphrase must be exactly the same as on the wireless router.
93D-Link DIR-629 User ManualSection 4 - Connecting to a Wireless NetworkWPScongure the WPS feature:1. Click the Start button and select Computer from the Start menu.2. Click Network on the left side.
94D-Link DIR-629 User ManualSection 4 - Connecting to a Wireless Network4. Input the WPS PIN number (on the router label or in the Setup > Wireless SetupNext.
95D-Link DIR-629 User ManualSection 4 - Connecting to a Wireless Network5. Type a name to identify the network.6. To congure advanced settings, click the         icon.Click Next to continue.
96D-Link DIR-629 User ManualSection 4 - Connecting to a Wireless Network7.  The following window appears while the router is being congured.   Wait for the conguration to complete.8. The following window informs you that WPS on the router has been setup successfully.  Make a note of the security key as you may need to provide this security key if adding an older wireless device to the network in the future.9. Click Close to complete WPS setup.
97D-Link DIR-629 User ManualSection 4 - Connecting to a Wireless NetworkWindows Vista®Windows Vista® users may use the built-in wireless utility. If you are using another company’s utility, please refer to the user manual of your wireless adapter for help with connecting to a wireless network. Most utilities will have a “site survey” option similar to the Windows Vista® utility as seen below.corner next to the time). Select Connect to a network.If you receive the Wireless Networks Detected bubble, click on the center of the bubble to access the utility.     orThe utility will display any available wireless networks in your area. Click on a network (displayed using the SSID) and click the Connect button.If you get a good signal but cannot access the Internet, check you TCP/Networking Basics section in this manual for more information.
98D-Link DIR-629 User ManualSection 4 - Connecting to a Wireless NetworkWPA/WPA2It is recommended to enable wireless security (WPA/WPA2) on your wireless router or access point before conguring your wireless adapter. If you are joining an existing network, you will need to know the security key or passphrase being used.2. Highlight the Wi-Fi name (SSID) you would like to connect to and click Connect.1. Open the Windows Vista® Wireless Utility by right-clicking on the wireless computer icon in your system tray (lower right corner of screen). Select Connect to a network.
99D-Link DIR-629 User ManualSection 4 - Connecting to a Wireless Network3.  Enter the same security key or passphrase (Wi-Fi password) that is on your router and click Connect.It may take 20-30 seconds to connect to the wireless network. If the connection fails, please verify that the security settings are correct. The key or passphrase must be exactly the same as on the wireless router.
100D-Link DIR-629 User ManualSection 4 - Connecting to a Wireless NetworkWPS/WCN 2.0The router supports Wi-Fi protection, referred to as WCN 2.0 in Windows Vista®. The following instructions for setting this up depends on whether you are using Windows Vista® to congure the router or third party software.When you rst set up the router, Wi-Fi protection is disabled and uncongured. To enjoy the benets of Wi-Fi protection, the router must be both enabled and congured. There are three basic methods to accomplish this: use Windows Vista’s built-in support for WCN 2.0, use software provided by a third party, or manually congure. If you are running Windows Vista®, log into the router and click the Enable checkbox in the Basic > Wireless section. Use the Current PIN that is displayed on the  >  section or choose to click the Generate New PIN button or Reset PIN to Default button. If you are using third party software to set up Wi-Fi Protection, carefully follow the directions. When you are nished, proceed to the next section to set up the newly-congured router.
101D-Link DIR-629 User ManualSection 4 - Connecting to a Wireless NetworkWindows® XPWindows® XP users may use the built-in wireless utility (Zero Conguration Utility). The following instructions are for Service Pack 2 users. If you are using another company’s utility, please refer to the user manual of your wireless adapter for help with connecting to a wireless network. Most utilities will have a “site survey” option similar to the Windows® XP utility as seen below.corner next to the time). Select .If you receive the Wireless Networks Detected bubble, click on the center of the bubble to access the utility.     orThe utility will display any available wireless networks in your area. Click on a Wi-Fi network (displayed using the SSID) and click the Connect button.If you get a good signal but cannot access the Internet, check you TCP/Networking Basics section in this manual for more information.
102D-Link DIR-629 User ManualSection 4 - Connecting to a Wireless NetworkIt is recommended to enable WPA on your wireless router or access point before conguring your wireless adapter. If you are joining an existing network, you will need to know the WPA key being used.2.  Highlight the Wi-Fi network (SSID) you would like to connect to and click Connect.1.  Open the Windows® XP Wireless Utility by right-clicking on the wireless computer icon in your system tray (lower-right corner of screen). Select . WPA/WPA2
103D-Link DIR-629 User ManualSection 4 - Connecting to a Wireless Network3. The Wireless Network Connection box will appear. Enter the WPA-PSK Wi-Fi password and click Connect.It may take 20-30 seconds to connect to the wireless network. If the connection fails, please verify that the WPA-PSK settings are correct. The Wi-Fi password must be exactly the same as on the wireless router.
104D-Link DIR-629 User ManualSection 5 - TroubleshootingTroubleshootingfollowing descriptions if you are having problems. The examples below are illustrated in Windows® XP. If you have a dierent operating system, the screenshots on your computer will look similar to the following examples.1. Why can’t I access the web-based conguration utility?When entering the IP address of the D-Link router (192.168.0.1 for example), you are not connecting to a website nor do you be on the same IP subnet to connect to the web-based utility.   - Microsoft Internet Explorer® 7 and higher- Mozilla Firefox 3.5 and higher- Google™ Chrome 8 and higher- Apple Safari 4 and higher dierent cable or connect to a dierent port on the device if possible. If the computer is turned o, the link light may not  be on. Norton Personal Firewall, and Windows® XP rewall may block access to the conguration pages. Check the help les included with your rewall software for more information on disabling or conguring it.
105D-Link DIR-629 User ManualSection 5 - Troubleshooting  Start > Settings > Control Panel. Double-click the Internet Options Icon. From the Security tab, click the button to restore the settings to their defaults. Connection tab and set the dial-up option to Never Dial a Connection. Click the LAN Settings button. Make sure nothing is checked. Click OK.   tab and click the button to restore these settings to their defaults. Click OK three times.  should open the login page for your web management.  seconds and try accessing the conguration. If you have multiple computers, try connecting using a dierent computer.If you forgot your password, you must reset your router. Unfortunately this process will change all your settings back to the factory defaults.To reset the router, locate the reset button (hole) on the rear panel of the unit. With the router powered on, use a paperclip seconds to access the router. The default IP address is 192.168.0.1. When logging in, the username is admin and leave the password box empty.
106D-Link DIR-629 User ManualSection 5 - Troubleshooting3. Why can’t I connect to certain sites or send and receive emails when connecting through my router? we suggest lowering the MTU in increments of ten (Ex. 1492, 1482, 1472, etc). To nd the proper MTU Size, you’ll have to do a special ping of the destination you’re trying to go to. A destination could be Start and then click Run. command (Windows® NT, 2000, XP, Vista®, and 7 users type in cmd) and press Enter (or click OK).   ping [url] [-f] [-l] [MTU value] Example: 
107D-Link DIR-629 User ManualSection 5 - Troubleshootingpacket. Take that value and add 28 to the value to account for the various TCP/IP headers. For example, lets say that 1452 was the proper value, the actual MTU size would be 1480, which is the optimum for the network we’re working with (1452+28=1480). Once you nd your MTU, you can now congure your router with the proper MTU size. To change the MTU rate on your router follow the steps below: OK. OK to enter the web conguration page for the device. Setup and then click Manual Congure. Save Settings to save your settings. of ten.
108D-Link DIR-629 User ManualAppendix A - Wireless BasicsD-Link wireless products are based on industry standards to provide easy-to-use and compatible high-speed wireless connectivity within your home, business or public access wireless networks. Strictly adhering to the IEEE standard, the D-Link to enjoy the freedom that wireless networking delivers.A wireless local area network (WLAN) is a cellular computer network that transmits and receives data with radio signals instead of wires. Wireless LANs are used increasingly in both home and oce environments, and public areas such as airports, coee shops and universities. Innovative ways to utilize WLAN technology are helping people to work and communicate more eciently. Increased mobility and the absence of cabling and other xed infrastructure have proven to be benecial for many users. Wireless users can use the same applications they use on a wired network. Wireless adapter cards used on laptop and desktop systems support the same protocols as Ethernet adapter cards. Under many circumstances, it may be desirable for mobile network devices to link to a conventional Ethernet LAN in order to this link.Wireless Basics
109D-Link DIR-629 User ManualAppendix A - Wireless BasicsWhat is Wireless?Wireless or Wi-Fi technology is another way of connecting your computer to the network without using wires. Wi-Fi uses radio Why D-Link Wireless?  D-Link is the worldwide leader and award winning designer, developer, and manufacturer of networking products. D-Link delivers the performance you need at a price you can aord. D-Link has all the products you need to build your network.How does wireless work?  to be able to connect your computer. There are two dierent types of wireless networks Wireless Local Area Network (WLAN), and Wireless Personal Area Network (WPAN).In a wireless local area network, a device called an Access Point (AP) connects computers to the network. The access point has a small antenna attached to it, which allows it to transmit data back and forth over radio signals. With an indoor access point as seen in the picture, the signal can travel up to 300 feet. With an outdoor access point the signal can reach out up to 30 miles to serve places like manufacturing plants, industrial locations, college and high school campuses, airports, golf courses, and many other outdoor venues.
110D-Link DIR-629 User ManualAppendix A - Wireless Basics30 feet away.Compared to WLAN the speed and wireless operation range are both less than WLAN, but in return it doesn’t use nearly as much power which makes it ideal for personal devices, such as mobile phones, PDAs, headphones, laptops, speakers, and other devices that operate on batteries.Who uses wireless?  Wireless technology as become so popular in recent years that almost everyone is using it, whether it’s for home, oce, business, D-Link has a wireless solution for it.Home     Small Oce and Home Oce    
111D-Link DIR-629 User ManualAppendix A - Wireless BasicsWhere is wireless used?  Wireless technology is expanding everywhere not just at home or oce. People like the freedom of mobility and it’s becoming so popular that more and more public facilities now provide wireless access to attract people. The wireless connection in public places is usually called “hotspots”.Using a D-Link Cardbus Adapter with your laptop, you can access the hotspot to connect to Internet from remote locations That’s why we’ve put together a few setup steps and tips to help you through the process of setting up a wireless network.TipsHere are a few things to keep in mind, when you install a wireless network. Make sure you place the router/access point in a centralized location within your network for the best performance. Try to place the router/access point as high as possible in the room, so the signal gets dispersed throughout your home. If you have a two-story home, you may need a repeater to boost the signal to extend the range.Eliminate Interference  Place home appliances such as cordless telephones, microwaves, and televisions as far away as possible from the router/access Security
112D-Link DIR-629 User ManualAppendix A - Wireless Basics Don’t let you next-door neighbors or intruders connect to your wireless network. Secure your wireless network by turning on      There are basically two modes of networking:  Infrastructure – All wireless clients will connect to an access point or wireless router.  – Directly connecting to another computer, for peer-to-peer communication, using wireless network An Infrastructure network contains an Access Point or wireless router. All the wireless devices, or clients, will connect to the wireless router or access point. An Ad-Hoc network contains only clients, such as laptops with wireless cardbus adapters. All the adapters must be in Ad-Hoc mode to communicate.Wireless Modes
113D-Link DIR-629 User ManualAppendix B - Networking BasicsNetworking BasicsCheck your IP addressAfter you install your new D-Link adapter, by default, the TCP/IP settings should be set to obtain an IP address from a DHCP server (i.e. wireless router) automatically. To verify your IP address, please follow the steps below.Click on Start > Run. In the run box type cmd and click OK. (Windows® 7/Vista® users type cmd in the Start Search box.)At the prompt, type ipcong and press Enter.This will display the IP address, subnet mask, and the default gateway of your adapter.If the address is 0.0.0.0, check your adapter installation, security settings, and the settings on your router. Some rewall software programs may block a DHCP 
114D-Link DIR-629 User ManualAppendix B - Networking BasicsStatically Assign an IP addressIf you are not using a DHCP capable gateway/router, or you need to assign a static IP address, please follow the steps below:Step 1Windows® 7 -  Click on Start > Control Panel > Network and Internet > Network and Sharing Center.Windows Vista® -  Click on Start > Control Panel > Network and Internet > Network and Sharing Center > Manage Network    Connections.Windows® XP -  Click on Start > Control Panel > Network Connections.Windows® 2000 -  From the desktop, right-click My Network Places > Properties. which represents your network adapter and select Properties.Step 3Highlight  and click Properties.Step 4Click Use the following IP address and enter an IP address that is on the same subnet as your network or the LAN IP address on your router. Example: If the router´s LAN IP address is 192.168.0.1, make your IP address 192.168.0.X where X is a number between 2 and 99. Make sure that the number you choose is not in use on the network. Set the Default Gateway the same as the LAN IP address of your router (I.E. 192.168.0.1). Set Primary DNS the same as the LAN IP address of your router (192.168.0.1). The Secondary DNS is not needed or you may enter a DNS server from your ISP.Step 5Click OK twice to save your settings.
115D-Link DIR-629 User ManualAppendix C - Technical SpecicationsTechnical Specications1Hardware Specications LAN Interface: Four 10/100 Mbps LAN ports WAN Interface: One 10/100 Mbps Internet port Wireless Interface (2.4 GHz): IEEE 802.11n/g/bOperating Voltage Input: 100~240 V (±20%), 50~60 Hz Output: DC 12 V, 1 A +/- 5% Maximum Power Consumption: 10 WTemperature Operating: 0 to 40 °C (32 to 104 °F) Storage: -20 to 65 °C (-4 to 149 °F)Humidity Operating: 10% - 90% non-condensing Non-Operating: 5% - 95% non-condensingWireless Frequency Range1 IEEE 802.11n/g/b: 2400 MHz~2484 MHzWireless Bandwidth Rate IEEE 802.11n: 6.5 to 300 Mbps IEEE 802.11g: 54, 48, 36, 24, 18, 12, 9, and 6 Mbps IEEE 802.11b: 11, 5.5, 2, and 1 MbpsAntenna Type Wireless Security Certications FCC CE CSA CCCDimensions & Weight 197.91 x 133.18 x 30.22 mm (7.79 x 5.24 x 1.19 inches) 280 grams (9.88 ounces)
Appendix D - Regulatory Information116Regulatory Informationaccordance with the instructions, may cause harmful interference to radio communications. However, there is no guarantee the interference by one of the following measures: -  -  -  - Consult the dealer or an experienced radio/TV technician for help.Non-modications Statement:Any changes or modications not expressly approved by the party responsible for compliance could void the user’s Caution:(1) This device may not cause harmful interference, and (2) this device must accept any interference received, including interference that may cause undesired operation.
Appendix D - Regulatory Information117This device and its antennas(s) must not be co-located or operating in conjunction with any other antenna or transmitter except in accordance with FCC multi-transmitter product procedures. For product available in the USA/Canada market, only channel 1~11 can be operated. Selection of other channels is not possible.NoteThe country code selection is for non-USA models only and is not available to all USA models. Per FCC regulations, all WiFi product marketed in the USA must be xed to USA operational channels only.should be installed and operated with minimum distance 20 cm between the radiator and your body.Warning
Appendix D - Regulatory Information118European Union:to the Declaration of Conformity. At the time of writing this addendum, some countries such as Italy, Greece, Portugal, and Spain have not allowed operation of radio devices in the 5 Ghz bands, although operation of 2.4 Ghz radio devices is allowed. Please check with your local authority to conrm. This device is restricted to indoor use when operated in the European Community using channels in the 5.15-5.35 GHz band to reduce the potential for interference. This device is a 2.4 GHz wideband transmission system (transceiver), intended for use in all EU member states and EFTA countries, except in France where restrictive use applies. This device may not be used for setting up outdoor radio links MHz. For detailed information the end-user should contact the national spectrum authority in France.Usage Notes:  This device is restricted from functioning in Ad-hoc mode while operating in 5 Ghz. Ad-hoc mode is direct peer-to-peer communication between two client devices without an Access Point. 
Appendix D - Regulatory Information119Region Frequency Band Max output power (EIRP)Metropolitan 2400 - 2454 MHz 100 mW 2454 - 2483.5 MHz 100 mW indoor, 10 mW outdoor 2400 - 2483.5 MHz 100 mW 2420 - 2483.5 MHz 100 mWR&TTE 1999/5/ECWLAN 2.4 - 2.4835 GHzIEEE 802.11b/g/nSpectrum Regulation MHz, Europa (ETSI) max. EIRP Innenbereich max. EIRP AußenbereichEuropa 2400 - 2483.5 MHz 100 mW 100 mWFrankreich 2400 - 2454 MHz 100 mW 100 mW2454 - 2483.5 MHz 100 mW 10 mW
Appendix D - Regulatory Information120European Community Declaration of Conformity:Česky [Czech] Dansk [Danish] væsentlige krav og øvrige relevante krav i direktiv 1999/5/EF.Deutsch [German]Eesti [Estonian] ja nimetatud direktiivist tulenevatele teistele asjakohastele sätetele.English and other relevant provisions of Directive 1999/5/EC.Español [Spanish]1999/5/CE.Ελληνική [Greek] ΑΠΑΙΤΗΣΕΙΣ ΚΑΙ ΤΙΣ ΛΟΙΠΕΣ ΣΧΕΤΙΚΕΣ ΙΑΤΑΞΕΙΣ ΤΗΣ ΟΗΓΙΑΣ 1999/5/ΕΚ.Français [French] essentielles et aux autres dispositions pertinentes de la directive 1999/5/CE.Italiano [Italian] alle altre disposizioni pertinenti stabilite dalla direttiva 1999/5/CE.Latviski [Latvian] Lietuvių [Lithuanian]  Direktyvos nuostatas.Nederlands [Dutch] eisen en de andere relevante bepalingen van richtlijn 1999/5/EG.
Appendix D - Regulatory Information121Malti [Maltese] Magyar [Hungarian] Polski [Polish] pozostałymi stosownymi postanowieniami Dyrektywy 1999/5/EC.Português [Portuguese] Slovensko [Slovenian] določili direktive 1999/5/ES.Slovensky [Slovak] ustanovenia Smernice 1999/5/ES.Suomi [Finnish] vaatimusten ja sitä koskevien direktiivin muiden ehtojen mukainen.Warning Statement:The power outlet should be near the device and easily accessible.
Appendix D - Regulatory Information122Safety InstructionsPlease adhere to the following safety guidelines to help ensure your own personal safety and protect your system from potential damage. Any acts taken that are inconsistent with ordinary use of the product, including improper testing, etc., and those not expressly approved by D-Link may result in the loss of product warranty.Unless expressly approved by an authorized representative of D-Link in writing, you may not and may not permit others to: Disassemble or reverse engineer the device or attempt to derive source code (underlying ideas, algorithms, or structure) from the device or from any other information provided by D-Link, except to the extent that this restriction is expressly prohibited by local law. Modify or alter the device. any.following precautions:Power Sources Observe and follow service markings. Do not push any objects into the openings of your device unless consistent with the authorized operation of the device. Doing so can cause a re or an electrical shock by shorting out interior components. The powering of this device must adhere to the power specications indicated for this product. Do not overload wall outlets and/or extension cords as this will increase the risk of re or electrical shock. Do not rest anything on the power cord or on the device (unless the device is made and expressly approved as suitable for stacking). sure that nothing rests on any cables. Operate the device only from the type of external power source indicated on the electrical ratings label.
Appendix D - Regulatory Information123 To help avoid damaging your device, be sure the voltage selection switch (if provided) on the power supply is set to match the power available at your location. Also be sure that attached devices are electrically rated to operate with the power available in your location. Use only approved power cable(s). If you have not been provided a power cable for your device or for any AC -powered option intended for your device, purchase a power cable that is approved for use in your country and is suitable for use electrical ratings label. The voltage and current rating of the cable should be greater than the ratings marked on the device. To help prevent an electrical shock, plug the device and peripheral power cables into properly grounded electrical or remove the grounding prong from a cable. If you must use an extension cable, use a 3-wire cable with properly grounded plugs. Observe extension cable and power strip ratings. Ensure that the total ampere rating of all products plugged into the extension cable or power strip does not exceed 80 percent of the ampere ratings limit for the extension cable or power strip. To help protect your device from sudden, transient increases and decreases in electrical power, use a surge suppressor, line conditioner, or uninterruptible power supply (UPS). Do not modify power cables or plugs. Consult a licensed electrician or your power company for site modications. Always follow your local/national wiring rules. When connecting or disconnecting power to hot-pluggable power supplies, if oered with your device, observe the following guidelines. Install the power supply before connecting the power cable to the power supply. Unplug the power cable before removing the power supply. If the system has multiple sources of power, disconnect power from the device by unplugging all power cables from the power supplies.
Appendix D - Regulatory Information124 Do not service any product except as expressly set forth in your system documentation. Opening or removing covers that are marked with the triangular symbol with a lightning bolt may expose you to an electrical shock. Only a trained service technician should service components inside these compartments. To reduce the risk of electrical shock, never disassemble this device. None of its internal parts are user-replaceable; therefore, there is no reason to access the interior. gets wet, see the appropriate section in your troubleshooting guide or contact your trained service provider.  Move products with care; ensure that all casters and/or stabilizers are rmly connected to the system. Avoid sudden stops and uneven surfaces.Environment Do not use this device near water (e.g. near a bathtub, sink, laundry tub, sh tank, in a wet basement or near a swimming pool). Do not use this device in areas with high humidity. This device must not be subjected to water or condensation. Keep your device away from radiators and heat sources. Also, do not block cooling vents.Cleaning Always unplug the power before cleaning this device.  Use a dry cloth for cleaning.
Appendix D - Regulatory Information125Static electricity can harm delicate components inside your system. To prevent static damage, discharge static electricity periodically touching an unpainted metal surface on the chassis.1. When unpacking a static-sensitive component from its shipping carton, do not remove the component from the antistatic packing material until you are ready to install the component in your system. Just before unwrapping the antistatic packaging, be sure to discharge static electricity from your body.2. When transporting a sensitive component, rst place it in an antistatic container or packaging.3. Handle all sensitive components in a static-safe area. If possible, use antistatic oor pads, workbench pads, and an antistatic grounding strap.Environmentalinstructions and local/national disposal and recycling regulations. For more information, please refer to the warranty guide.
Appendix D - Regulatory Information126Disposing of and Recycling Your Product ENGLISH ENThis symbol on the product or packaging means that according to local laws and regulations this product should be not be disposed of in household waste but sent for recycling. Please take it to a collection point designated by your local authorities once it has reached the end of its life, some will accept products for free. human health.D-Link and the EnvironmentAt D-Link, we understand and are committed to reducing any impact our operations and products may have on the environment. To minimise this impact D-Link designs and builds its products to be as environmentally friendly as possible, by using recyclable, low toxic materials in both products and packaging.will help to save energy and reduce CO2 emissions.To learn more about our environmentally responsible products and packaging please visit www.dlinkgreen.com.DEUTSCH DEDieses Symbol auf dem Produkt oder der Verpackung weist darauf hin, dass dieses Produkt gemäß bestehender örtlicher Gesetze und Vorschriften nicht über den normalen Hausmüll entsorgt werden sollte, entsprechend amtlich ausgewiesenen Sammelstelle, sobald das Produkt das Ende seiner Nutzungsdauer erreicht hat. Für die Annahme solcher Produkte erheben einige dieser Stellen keine Gebühren. Durch ein auf und die menschliche Gesundheit zu schützen.
Appendix D - Regulatory Information127D-Link und die UmweltD-Link ist sich den möglichen Auswirkungen seiner Geschäftstätigkeiten und seiner Produkte auf die Umwelt bewusst und fühlt sich verpichtet, diese entsprechend zu mindern. Zu diesem Zweck entwickelt und stellt D-Link seine Produkte mit dem Ziel größtmöglicher Umweltfreundlichkeit her und verwendet wiederverwertbare, schadstoarme Materialien bei Produktherstellung und Verpackung.D-Link empehlt, Ihre Produkte von D-Link, wenn nicht in Gebrauch, immer auszuschalten oder vom Netz zu nehmen. Auf diese Weise helfen Sie, Energie zu sparen und CO2-Emissionen zu reduzieren.Wenn Sie mehr über unsere umweltgerechten Produkte und Verpackungen wissen möchten, nden Sie entsprechende Informationen im Internet unter www.dlinkgreen.com. protéger la santé de l’homme.D-Link et l’environnementréaliserez ainsi des économies d’énergie et réduirez vos émissions de CO2.Pour en savoir plus sur les produits et emballages respectueux de l’environnement, veuillez consulter le www.dlinkgreen.com.
Appendix D - Regulatory Information128 ellos aceptan recogerlos de forma gratuita. Al reciclar el producto y su embalaje de esta forma, contribuye a preservar el medio ambiente y a proteger la salud de los seres humanos.D-Link y el medio ambienteactividades y nuestros productos en el medio ambiente. Para reducir este impacto, D-Link diseña y fabrica sus productos en el embalaje.ahorrar energía y a reducir las emisiones de CO2.www.dlinkgreen.com. 
Appendix D - Regulatory Information129D-Link e l'ambientewww.dlinkgreen.com. Dit symbool op het product of de verpakking betekent dat dit product volgens de plaatselijke wetgeving niet mag worden weggegooid met het huishoudelijk afval, maar voor recyclage moeten worden ingeleverd. Zodra het product het einde van de levensduur heeft bereikt, dient u het naar een inzamelpunt te brengen dat hiertoe werd aangeduid door uw plaatselijke autoriteiten, sommige autoriteiten accepteren producten zonder dat u hiervoor dient te betalen. Door het product en de verpakking op deze manier te recyclen helpt u het milieu en de gezondheid van de mens te beschermen.D-Link en het milieuimpact te beperken, ontwerpt en bouwt D-Link zijn producten zo milieuvriendelijk mogelijk, door het gebruik van recycleerbare producten met lage toxiciteit in product en verpakking.D-Link raadt aan om steeds uw D-Link producten uit te schakelen of uit de stekker te halen wanneer u ze niet gebruikt. Door dit te doen bespaart u energie en beperkt u de CO2-emissies.www.dlinkgreen.com voor meer informatie over onze milieuverantwoorde producten en verpakkingen.
Appendix D - Regulatory Information130POLSKI PLTen symbol umieszczony na produkcie lub opakowaniu oznacza, że zgodnie z miejscowym prawem i lokalnymi przepisami niniejszego produktu nie wolno wyrzucać jak odpady czy śmieci z gospodarstwa domowego, lecz wskazanego przez lokalne władze. Poprzez proces recyklingu i dzięki takiemu postępowaniu z produktem oraz jego opakowaniem, pomogą Państwo chronić środowisko naturalne i dbać o ludzkie zdrowie.D-Link i środowiskoFirma D-Link zaleca, aby Państwo zawsze prawidłowo wyłączali z użytku swoje produkty D-Link, gdy nie są one stroną internetową www.dlinkgreen.com. 
Appendix D - Regulatory Information131D-Link a životní prostředíVíce informací o našich ekologických výrobcích a obalech najdete na adrese www.dlinkgreen.com. segíti védeni a környezetet és az emberek egészségét. csökkentésében.www.dlinkgreen.com weboldalon tudhat meg.
Appendix D - Regulatory Information132NORSK NODette symbolet på produktet eller forpakningen betyr at dette produktet ifølge lokale lover og forskrifter ikke skal kastes sammen med husholdningsavfall, men leveres inn til gjenvinning. Vennligst ta det til et innsamlingssted anvist av lokale myndigheter når det er kommet til slutten av levetiden. Noen steder aksepteres produkter uten avgift. Ved på denne måten å gjenvinne produktet og forpakningen hjelper du å verne miljøet og beskytte folks helse.D-Link og miljøetHos D-Link forstår vi oss på og er forpliktet til å minske innvirkningen som vår drift og våre produkter kan ha på miljøet. For å minimalisere denne innvirkningen designer og lager D-Link produkter som er så miljøvennlig som mulig, ved å bruke resirkulerbare, lav-toksiske materialer både i produktene og forpakningen.D-Link anbefaler at du alltid slår av eller frakobler D-Link-produkter når de ikke er i bruk. Ved å gjøre dette hjelper du å spare energi og å redusere CO2-utslipp.For mer informasjon angående våre miljøansvarlige produkter og forpakninger kan du gå til www.dlinkgreen.com. Dette symbol på produktet eller emballagen betyder, at dette produkt i henhold til lokale love og regler ikke må bortskaes som husholdningsaald, mens skal sendes til genbrug. Indlever produktet til et indsamlingssted som angivet af de lokale myndigheder, når det er nået til slutningen af dets levetid. I nogle tilfælde vil produktet blive modtaget gratis. Ved at indlevere produktet og dets emballage til genbrug på denne måde bidrager du til at beskytte miljøet og den menneskelige sundhed.D-Link og miljøetHos D-Link forstår vi og bestræber os på at reducere enhver indvirkning, som vores aktiviteter og produkter kan have på miljøet. For at minimere denne indvirkning designer og producerer D-Link sine produkter, så de er så miljøvenlige som muligt, ved at bruge genanvendelige materialer med lavt giftighedsniveau i både produkter og emballage.D-Link anbefaler, at du altid slukker eller frakobler dine D-Link-produkter, når de ikke er i brug. Ved at gøre det bidrager du til at spare energi og reducere CO2-udledningerne.Du kan nde ere oplysninger om vores miljømæssigt ansvarlige produkter og emballage på www.dlinkgreen.com.
Appendix D - Regulatory Information133 Tämä symboli tuotteen pakkauksessa tarkoittaa, että paikallisten lakien ja säännösten mukaisesti tätä tuotetta ei pidä hävittää yleisen kotitalousjätteen seassa vaan se tulee toimittaa kierrätettäväksi. Kun tuote on elinkaarensa päässä, toimita se lähimpään viranomaisten hyväksymään kierrätyspisteeseen. Kierrättämällä käytetyn tuotteen ja sen pakkauksen autat tukemaan sekä ympäristön että ihmisten terveyttä ja hyvinvointia.D-Link ymmärtää ympäristönsuojelun tärkeyden ja on sitoutunut vähentämään tuotteistaan ja niiden valmistuksesta ympäristölle mahdollisesti aiheutuvia haittavaikutuksia. Nämä negatiiviset vaikutukset minimoidakseen D-Link suunnittelee ja valmistaa tuotteensa mahdollisimman ympäristöystävällisiksi käyttämällä kierrätettäviä, alhaisia pitoisuuksia haitallisia aineita sisältäviä materiaaleja sekä tuotteissaan että niiden pakkauksissa.Suosittelemme, että irrotat D-Link-tuotteesi virtalähteestä tai sammutat ne aina, kun ne eivät ole käytössä. Toimimalla näin autat säästämään energiaa ja vähentämään hiilidioksiidipäästöjä.Lue lisää ympäristöystävällisistä D-Link-tuotteista ja pakkauksistamme osoitteesta www.dlinkgreen.com. Den här symbolen på produkten eller förpackningen betyder att produkten enligt lokala lagar och föreskrifter inte skall kastas i hushållssoporna utan i stället återvinnas. Ta den vid slutet av dess livslängd till en av din lokala myndighet utsedd uppsamlingsplats, vissa accepterar produkter utan kostnad. Genom att på detta sätt återvinna produkten och förpackningen hjälper du till att bevara miljön och skydda människors hälsa.
Appendix D - Regulatory Information134På D-Link förstår vi och är fast beslutna att minska den påverkan våra verksamheter och produkter kan ha på miljön. För att minska denna påverkan utformar och bygger D-Link sina produkter för att de ska vara så miljövänliga som möjligt, genom att använda återvinningsbara material med låg gifthalt i både produkter och förpackningar.D-Link rekommenderar att du alltid stänger av eller kopplar ur dina D-Link produkter när du inte använder dem. Genom att göra detta hjälper du till att spara energi och minska utsläpp av koldioxid.För mer information om våra miljöansvariga produkter och förpackningar www.dlinkgreen.com.PORTUGUÊS PTembalagens.www.dlinkgreen.com.

Navigation menu