D Link IR818LA1 Wireless AC750 Dual Band Gigabit Cloud Router User Manual DCAN DIR 818L A1 QIG 112713 v1 0 English indd

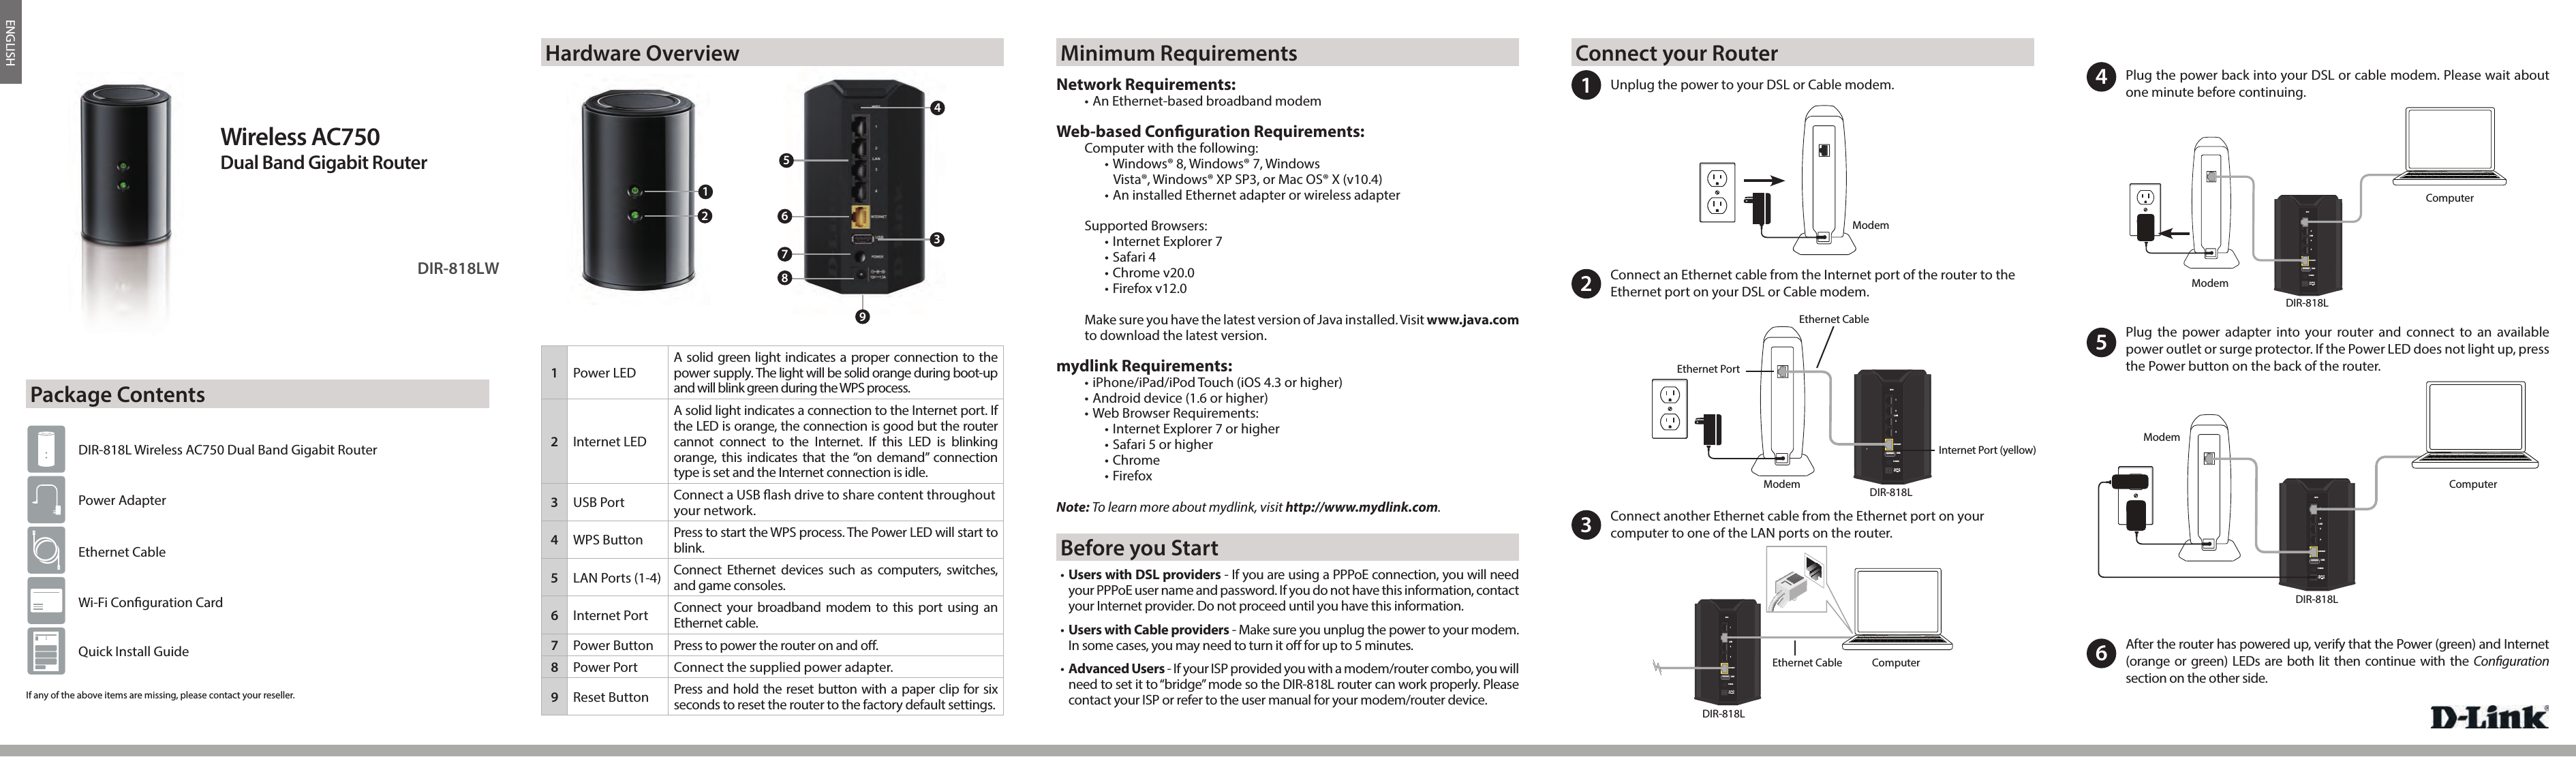
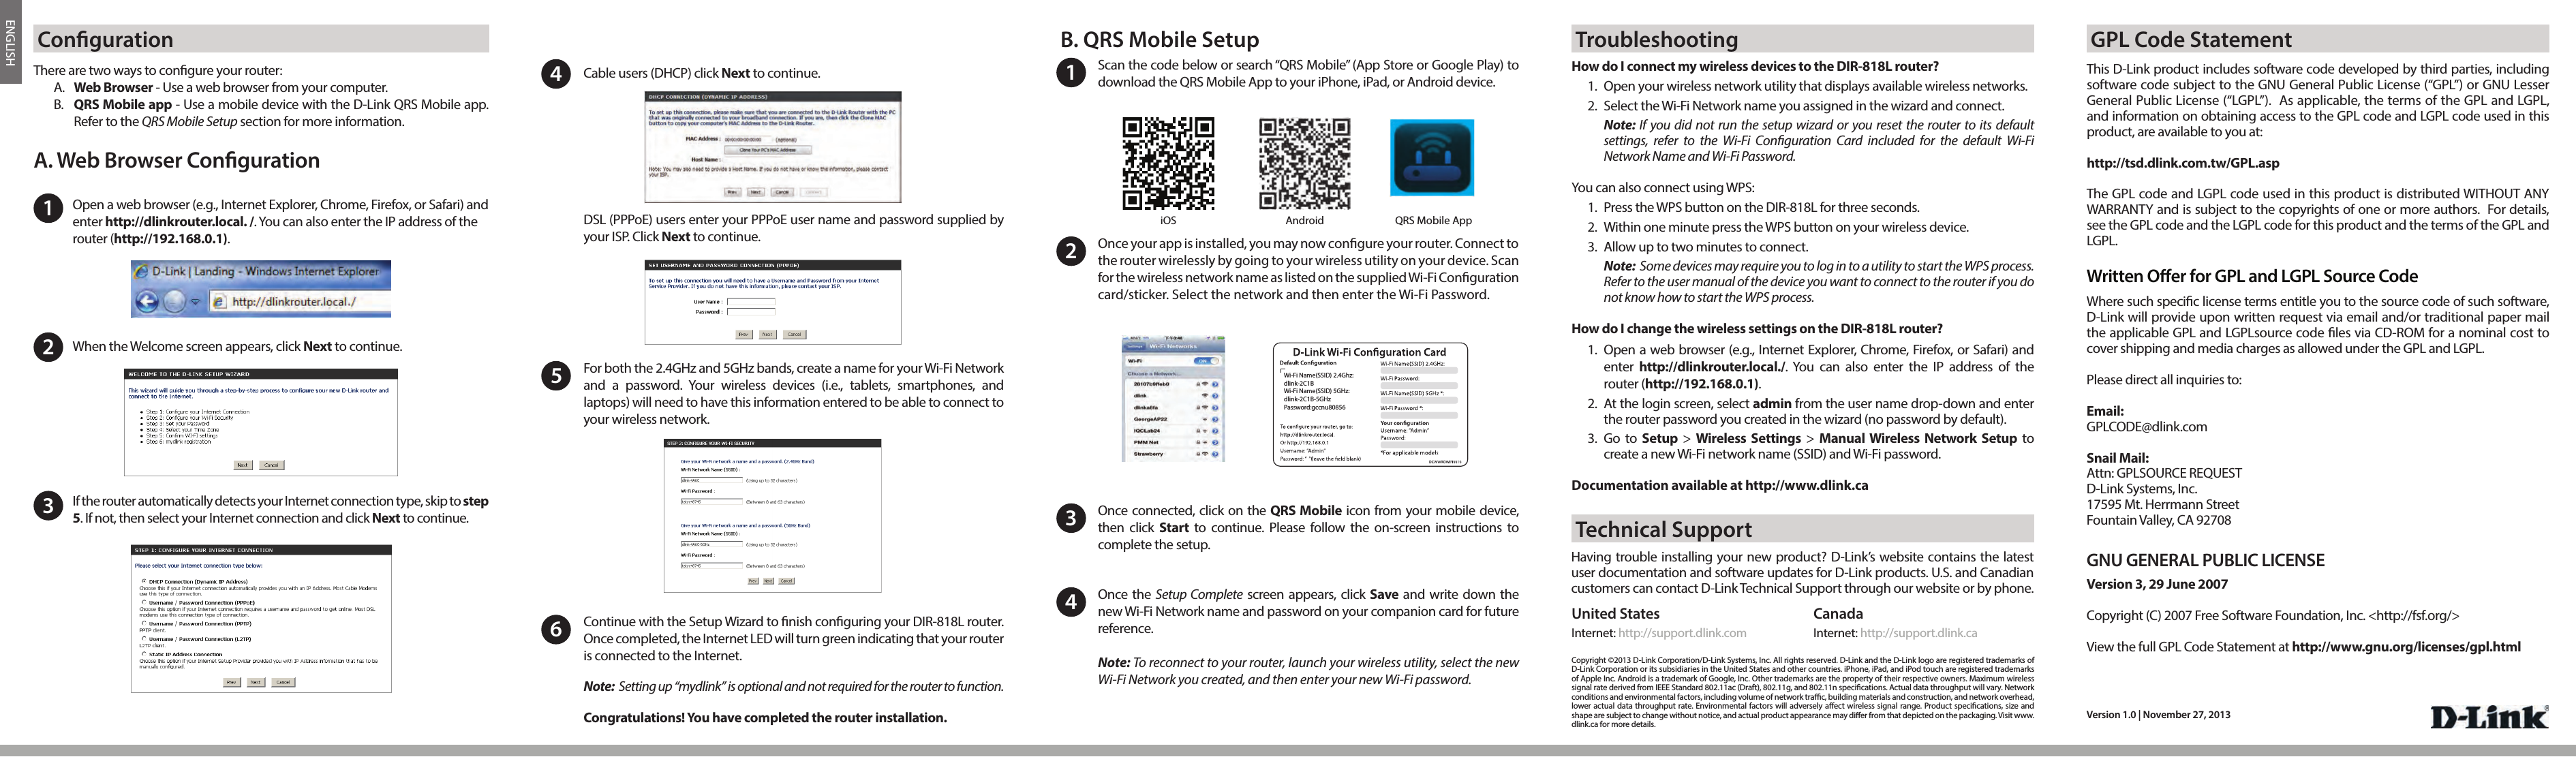
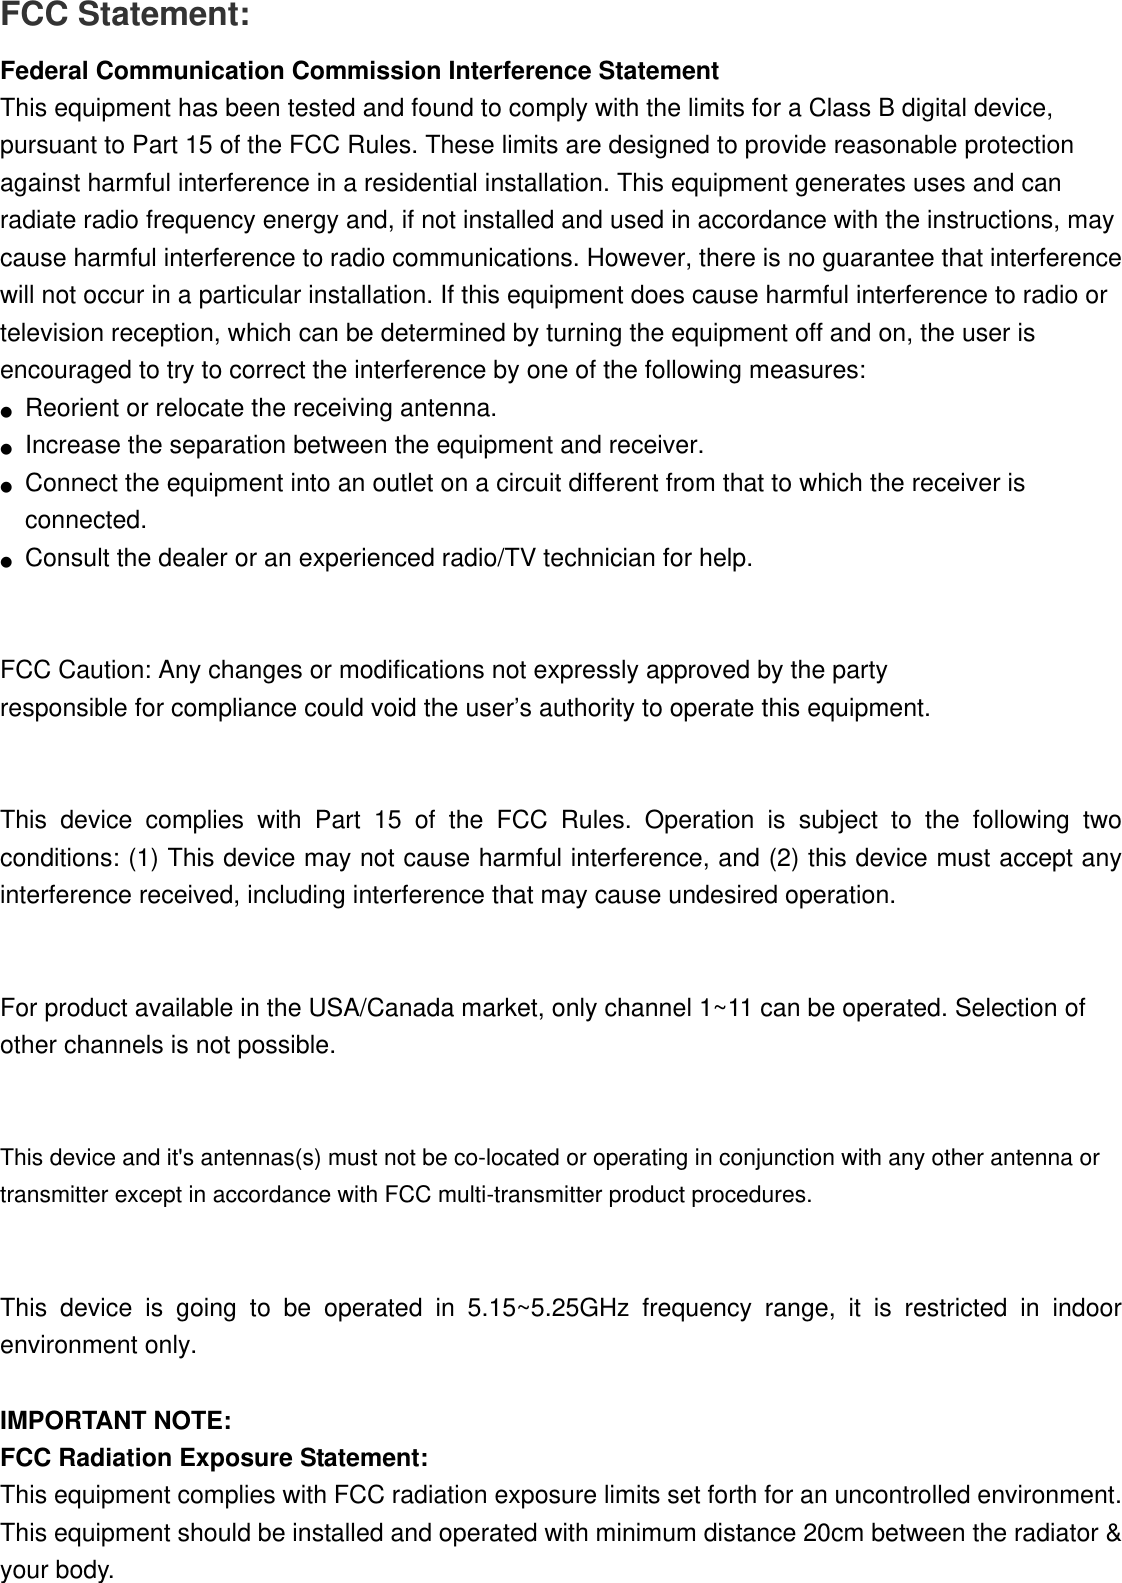
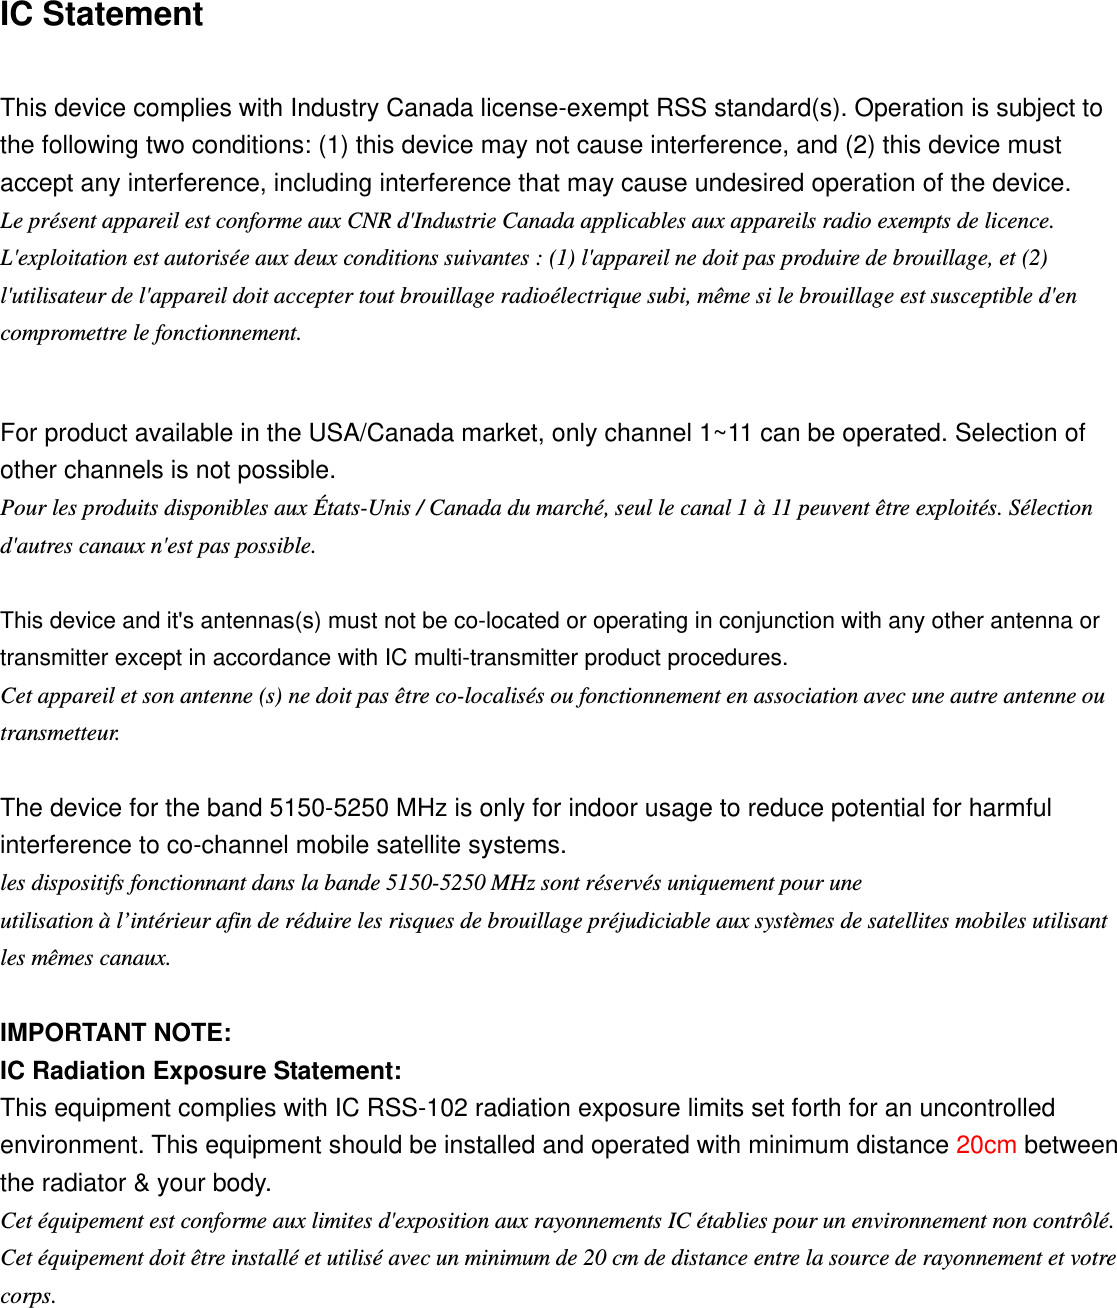
D Link Corporation Wireless AC750 Dual Band Gigabit Cloud Router DCAN DIR 818L A1 QIG 112713 v1 0 English indd

User manual

ENGLISH12V2AWPS123LAN4INTERNETPOWERUSB12V2AWPS123LAN4INTERNETPOWERUSB12V2AWPS123LAN4INTERNETPOWERUSBDIR-818LWWireless AC750Dual Band Gigabit RouterIf any of the above items are missing, please contact your reseller.DIR-818L Wireless AC750 Dual Band Gigabit RouterPower AdapterEthernet CableWi-Fi Con guration CardQuick Install Guide351Unplug the power to your DSL or Cable modem.2Connect an Ethernet cable from the Internet port of the router to theEthernet port on your DSL or Cable modem.3Connect another Ethernet cable from the Ethernet port on yourcomputer to one of the LAN ports on the router. 4Plug the power back into your DSL or cable modem. Please wait aboutone minute before continuing.5Plug the power adapter into your router and connect to an available power outlet or surge protector. If the Power LED does not light up, press the Power button on the back of the router.TModemModem DIR-818LDIR-818LComputerModemDIR-818LComputerPackage ContentsHardware Overview Minimum Requirements Connect your Router12V2AWPS123LAN4INTERNETPOWERUSB6After the router has powered up, verify that the Power (green) and Internet(orange or green) LEDs are both lit then continue with the Con guration section on the other side.ModemDIR-818LComputerEthernet PortEthernet CableInternet Port (yellow)Ethernet Cable• Users with DSL providers - If you are using a PPPoE connection, you will needyour PPPoE user name and password. If you do not have this information, contact your Internet provider. Do not proceed until you have this information.• Users with Cable providers - Make sure you unplug the power to your modem. In some cases, you may need to turn it o  for up to 5 minutes. •  Advanced Users - If your ISP provided you with a modem/router combo, you will need to set it to “bridge” mode so the DIR-818L router can work properly. Pleasecontact your ISP or refer to the user manual for your modem/router device.Before you StartNetwork Requirements:• An Ethernet-based broadband modemWeb-based Con guration Requirements:Computer with the following:• Windows® 8, Windows® 7, WindowsVista®, Windows® XP SP3, or Mac OS® X (v10.4)• An installed Ethernet adapter or wireless adapterSupported Browsers:• Internet Explorer 7• Safari 4• Chrome v20.0• Firefox v12.0Make sure you have the latest version of Java installed. Visit www.java.com to download the latest version.mydlink Requirements:• iPhone/iPad/iPod Touch (iOS 4.3 or higher)• Android device (1.6 or higher)• Web Browser Requirements:• Internet Explorer 7 or higher• Safari 5 or higher• Chrome• FirefoxNote: To learn more about mydlink, visit http://www.mydlink.com.12468791Power LEDA solid green light indicates a proper connection to the power supply. The light will be solid orange during boot-up and will blink green during the WPS process.2Internet LEDA solid light indicates a connection to the Internet port. If the LED is orange, the connection is good but the router cannot connect to the Internet. If this LED is blinking orange, this indicates that the “on demand” connection type is set and the Internet connection is idle.3USB Port Connect a USB  ash drive to share content throughout your network.4WPS Button Press to start the WPS process. The Power LED will start to blink.5LAN Ports (1-4) Connect Ethernet devices such as computers, switches, and game consoles.6Internet Port Connect your broadband modem to this port using an Ethernet cable.7Power Button Press to power the router on and o .8Power Port Connect the supplied power adapter.9Reset Button Press and hold the reset button with a paper clip for six seconds to reset the router to the factory default settings.
ENGLISHCable users (DHCP) click Next to continue.4For both the 2.4GHz and 5GHz bands, create a name for your Wi-Fi Network  and a password. Your wireless devices (i.e., tablets, smartphones, and laptops) will need to have this information entered to be able to connect to your wireless network.5Scan the code below or search “QRS Mobile” (App Store or Google Play) to download the QRS Mobile App to your iPhone, iPad, or Android device. Once connected, click on the QRS Mobile icon from your mobile device, then click Start to continue. Please follow the on-screen instructions to complete the setup.Once the Setup Complete screen appears, click Save and write down the new Wi-Fi Network name and password on your companion card for future reference. Note: To reconnect to your router, launch your wireless utility, select the new Wi-Fi Network you created, and then enter your new Wi-Fi password.134Copyright ©2013 D-Link Corporation/D-Link Systems, Inc. All rights reserved. D-Link and the D-Link logo are registered trademarks of D-Link Corporation or its subsidiaries in the United States and other countries. iPhone, iPad, and iPod touch are registered trademarks of Apple Inc. Android is a trademark of Google, Inc. Other trademarks are the property of their respective owners. Maximum wireless signal rate derived from IEEE Standard 802.11ac (Draft), 802.11g, and 802.11n specications. Actual data throughput will vary. Network conditions and environmental factors, including volume of network trac, building materials and construction, and network overhead, lower actual data throughput rate. Environmental factors will adversely aect wireless signal range. Product specications, size and shape are subject to change without notice, and actual product appearance may dier from that depicted on the packaging. Visit www.dlink.ca for more details. Version 1.0 | November 27, 2013Having trouble installing your new product? D-Link’s website contains the latest user documentation and software updates for D-Link products. U.S. and Canadian customers can contact D-Link Technical Support through our website or by phone.United StatesInternet: http://support.dlink.comCanadaInternet: http://support.dlink.caDSL (PPPoE) users enter your PPPoE user name and password supplied by your ISP. Click Next to continue. Once your app is installed, you may now congure your router. Connect to the router wirelessly by going to your wireless utility on your device. Scan for the wireless network name as listed on the supplied Wi-Fi Conguration card/sticker. Select the network and then enter the Wi-Fi Password.2Wi-Fi Name(SSID) 2.4Ghz:dlink-2C1BWi-Fi Name(SSID) 5GHz:dlink-2C1B-5GHzPassword:gccnu80856How do I connect my wireless devices to the DIR-818L router?1.  Open your wireless network utility that displays available wireless networks. 2.  Select the Wi-Fi Network name you assigned in the wizard and connect.Note: If you did not run the setup wizard or you reset the router to its defaultsettings, refer to the Wi-Fi Conguration Card included for the default Wi-FiNetwork Name and Wi-Fi Password. You can also connect using WPS: 1.  Press the WPS button on the DIR-818L for three seconds. 2.  Within one minute press the WPS button on your wireless device. 3.  Allow up to two minutes to connect. Note:  Some devices may require you to log in to a utility to start the WPS process. Refer to the user manual of the device you want to connect to the router if you do not know how to start the WPS process.How do I change the wireless settings on the DIR-818L router?1.  Open a web browser (e.g., Internet Explorer, Chrome, Firefox, or Safari) and enter  http://dlinkrouter.local./. You can also enter the IP address of therouter (http://192.168.0.1).2.  At the login screen, select admin from the user name drop-down and enterthe router password you created in the wizard (no password by default). 3.  Go  to  Setup > Wireless Settings > Manual Wireless Network Setup tocreate a new Wi-Fi network name (SSID) and Wi-Fi password.Documentation available at http://www.dlink.caiOS AndroidOpen a web browser (e.g., Internet Explorer, Chrome, Firefox, or Safari) and enter http://dlinkrouter.local. /. You can also enter the IP address of the router (http://192.168.0.1).1There are two ways to congure your router: A.  Web Browser - Use a web browser from your computer.B.  QRS Mobile app - Use a mobile device with the D-Link QRS Mobile app. Refer to the QRS Mobile Setup section for more information.When the Welcome screen appears, click Next to continue.2A. Web Browser CongurationIf the router automatically detects your Internet connection type, skip to step 5. If not, then select your Internet connection and click Next to continue.3Continue with the Setup Wizard to nish conguring your DIR-818L router. Once completed, the Internet LED will turn green indicating that your router is connected to the Internet. Note:  Setting up “mydlink” is optional and not required for the router to function.Congratulations! You have completed the router installation.Conguration B. QRS Mobile Setup TroubleshootingTechnical Support6QRS Mobile AppThis D-Link product includes software code developed by third parties, including software code subject to the GNU General Public License (“GPL”) or GNU Lesser General Public License (“LGPL”).  As applicable, the terms of the GPL and LGPL, and information on obtaining access to the GPL code and LGPL code used in this product, are available to you at:http://tsd.dlink.com.tw/GPL.aspThe GPL code and LGPL code used in this product is distributed WITHOUT ANY WARRANTY and is subject to the copyrights of one or more authors.  For details, see the GPL code and the LGPL code for this product and the terms of the GPL and LGPL.Written Oer for GPL and LGPL Source CodeWhere such specic license terms entitle you to the source code of such software, D-Link will provide upon written request via email and/or traditional paper mail the applicable GPL and LGPLsource code les via CD-ROM for a nominal cost to cover shipping and media charges as allowed under the GPL and LGPL.  Please direct all inquiries to:Email:GPLCODE@dlink.comSnail Mail:Attn: GPLSOURCE REQUESTD-Link Systems, Inc.17595 Mt. Herrmann StreetFountain Valley, CA 92708GNU GENERAL PUBLIC LICENSEVersion 3, 29 June 2007Copyright (C) 2007 Free Software Foundation, Inc. <http://fsf.org/> View the full GPL Code Statement at http://www.gnu.org/licenses/gpl.htmlGPL Code Statement
FCC Statement: Federal Communication Commission Interference Statement   This equipment has been tested and found to comply with the limits for a Class B digital device, pursuant to Part 15 of the FCC Rules. These limits are designed to provide reasonable protection against harmful interference in a residential installation. This equipment generates uses and can radiate radio frequency energy and, if not installed and used in accordance with the instructions, may cause harmful interference to radio communications. However, there is no guarantee that interference will not occur in a particular installation. If this equipment does cause harmful interference to radio or television reception, which can be determined by turning the equipment off and on, the user is encouraged to try to correct the interference by one of the following measures: ●Reorient or relocate the receiving antenna.●Increase the separation between the equipment and receiver.●Connect the equipment into an outlet on a circuit different from that to which the receiver isconnected.●Consult the dealer or an experienced radio/TV technician for help.FCC Caution: Any changes or modifications not expressly approved by the party   responsible for compliance could void the user’s authority to operate this equipment. This device complies with Part 15 of the FCC Rules. Operation is subject to the following two conditions: (1) This device may not cause harmful interference, and (2) this device must accept any interference received, including interference that may cause undesired operation. For product available in the USA/Canada market, only channel 1~11 can be operated. Selection of other channels is not possible. This device and it's antennas(s) must not be co-located or operating in conjunction with any other antenna or transmitter except in accordance with FCC multi-transmitter product procedures. This device is going to be operated in 5.15~5.25GHz frequency range, it is restricted in indoor environment only. IMPORTANT NOTE: FCC Radiation Exposure Statement: This equipment complies with FCC radiation exposure limits set forth for an uncontrolled environment. This equipment should be installed and operated with minimum distance 20cm between the radiator & your body.
IC Statement This device complies with Industry Canada license-exempt RSS standard(s). Operation is subject to the following two conditions: (1) this device may not cause interference, and (2) this device must accept any interference, including interference that may cause undesired operation of the device. Le présent appareil est conforme aux CNR d'Industrie Canada applicables aux appareils radio exempts de licence. L'exploitation est autorisée aux deux conditions suivantes : (1) l'appareil ne doit pas produire de brouillage, et (2) l'utilisateur de l'appareil doit accepter tout brouillage radioélectrique subi, même si le brouillage est susceptible d'en compromettre le fonctionnement. For product available in the USA/Canada market, only channel 1~11 can be operated. Selection of other channels is not possible. Pour les produits disponibles aux États-Unis / Canada du marché, seul le canal 1 à 11 peuvent être exploités. Sélection d'autres canaux n'est pas possible. This device and it's antennas(s) must not be co-located or operating in conjunction with any other antenna or transmitter except in accordance with IC multi-transmitter product procedures. Cet appareil et son antenne (s) ne doit pas être co-localisés ou fonctionnement en association avec une autre antenne ou transmetteur. The device for the band 5150-5250 MHz is only for indoor usage to reduce potential for harmful interference to co-channel mobile satellite systems. les dispositifs fonctionnant dans la bande 5150-5250 MHz sont réservés uniquement pour une utilisation à l’intérieur afin de réduire les risques de brouillage préjudiciable aux systèmes de satellites mobiles utilisant les mêmes canaux. IMPORTANT NOTE: IC Radiation Exposure Statement: This equipment complies with IC RSS-102 radiation exposure limits set forth for an uncontrolled environment. This equipment should be installed and operated with minimum distance 20cm between the radiator & your body. Cet équipement est conforme aux limites d'exposition aux rayonnements IC établies pour un environnement non contrôlé. Cet équipement doit être installé et utilisé avec un minimum de 20 cm de distance entre la source de rayonnement et votre corps.
NCC Statement以下警語適用台灣地區 經型式認證合格之低功率射頻電機,非經許可,公司、商號或使用者均不得擅自變更頻率、加大功率或變更原設計之特性及功能。 低功率射頻電機之使用不得影響飛航安全及干擾合法通信;經發現有干擾現象時,應立即停用,並改善至無干擾時方得繼續使用。前項合法通信,指依電信法規定作業之無線電通信。低功率射頻電機須忍受合法通信或工業、科學及醫療用電波輻射性電機設備之干擾。 5.25電磁波曝露量MPE標準值 1mW/cm2,送測產品實測值為:0.068495 mW/cm2-5.35 GHz 頻帶內操作之無線資訊傳輸設備,限於室內使用

Navigation menu