D Link IR850LA1 Wireless AC1200 Dual Band Gigabit Cloud Router User Manual Part 2
D Link Corporation Wireless AC1200 Dual Band Gigabit Cloud Router Part 2
D Link >
Contents
- 1. User Manual Part 1
- 2. User Manual Part 2
User Manual Part 2
101D-Link DIR-850L User Manual
Section 3 - Conguration
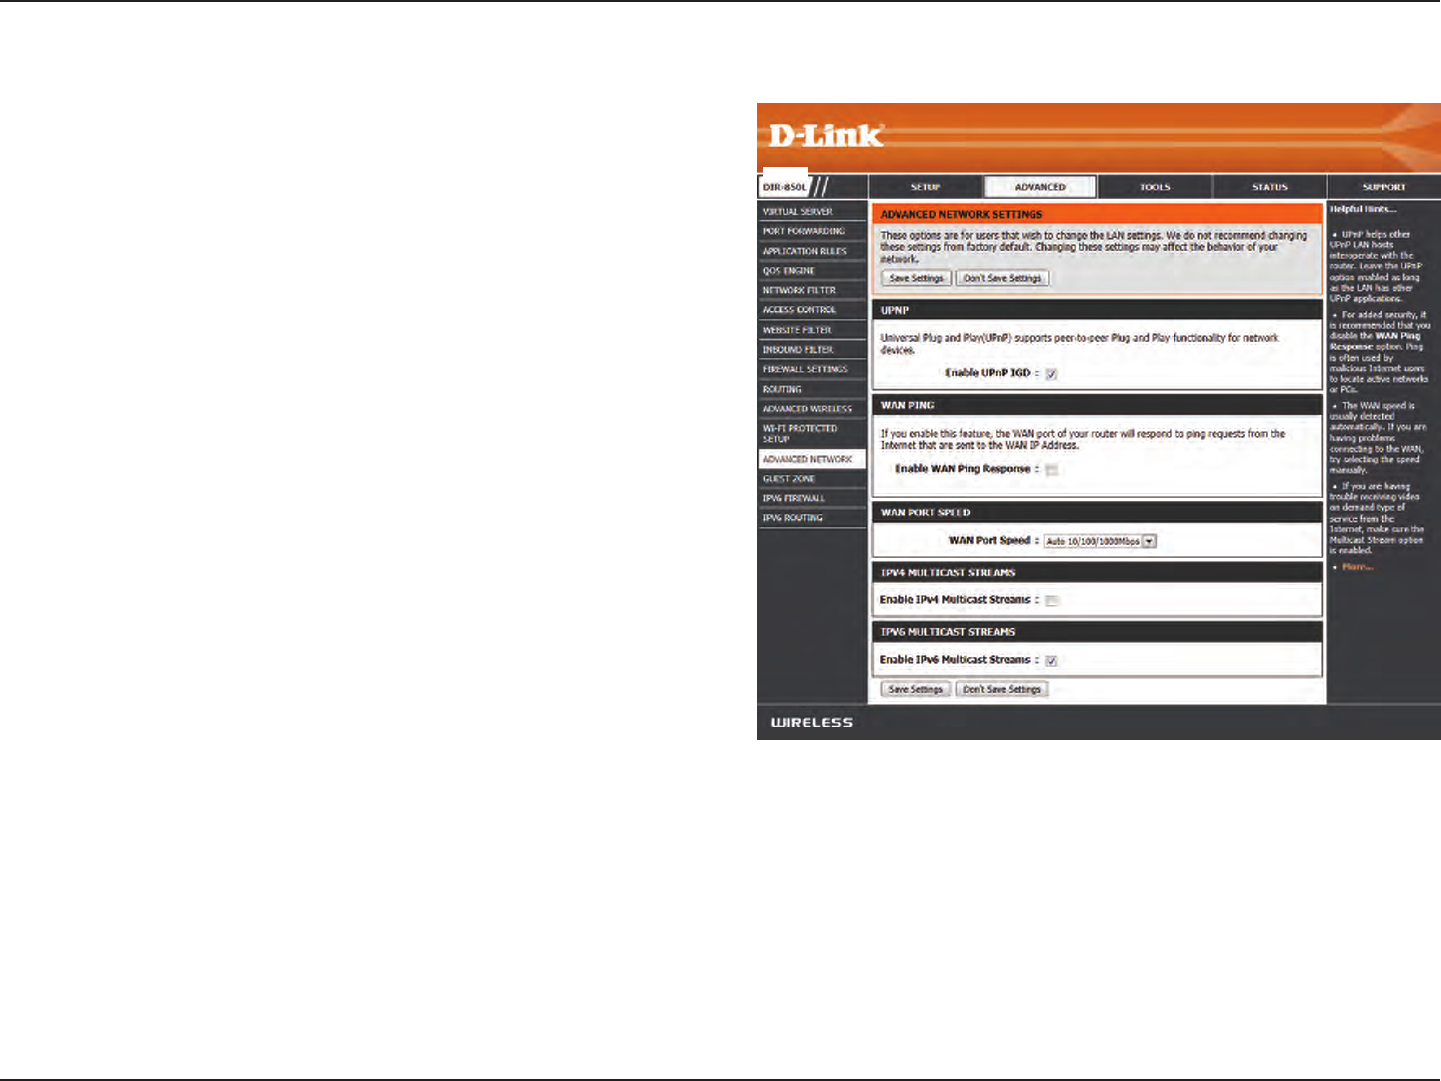
To use the Universal Plug and Play (UPnP™) feature click on
Enabled. UPnP provides compatibility with networking
equipment, software and peripherals.
Checking the box will allow the DIR-850L to respond
to pings. Unchecking the box may provide some extra
security from hackers.
You may set the port speed of the Internet port to 10Mbps,
100Mbps, 1000Mbps, or Auto (recommended).
Check the box to allow multicast trac to pass through
the router from the Internet (IPv4).
Check the box to allow multicast trac to pass through
the router from the Internet (IPv6).
Enable UPnP:
WAN Ping:
WAN Port Speed:
Enable IPV4
Multicast Streams:
Enable IPV6
Multicast Streams:
Advanced Network Settings
DIR-850L
102D-Link DIR-850L User Manual
Section 3 - Conguration
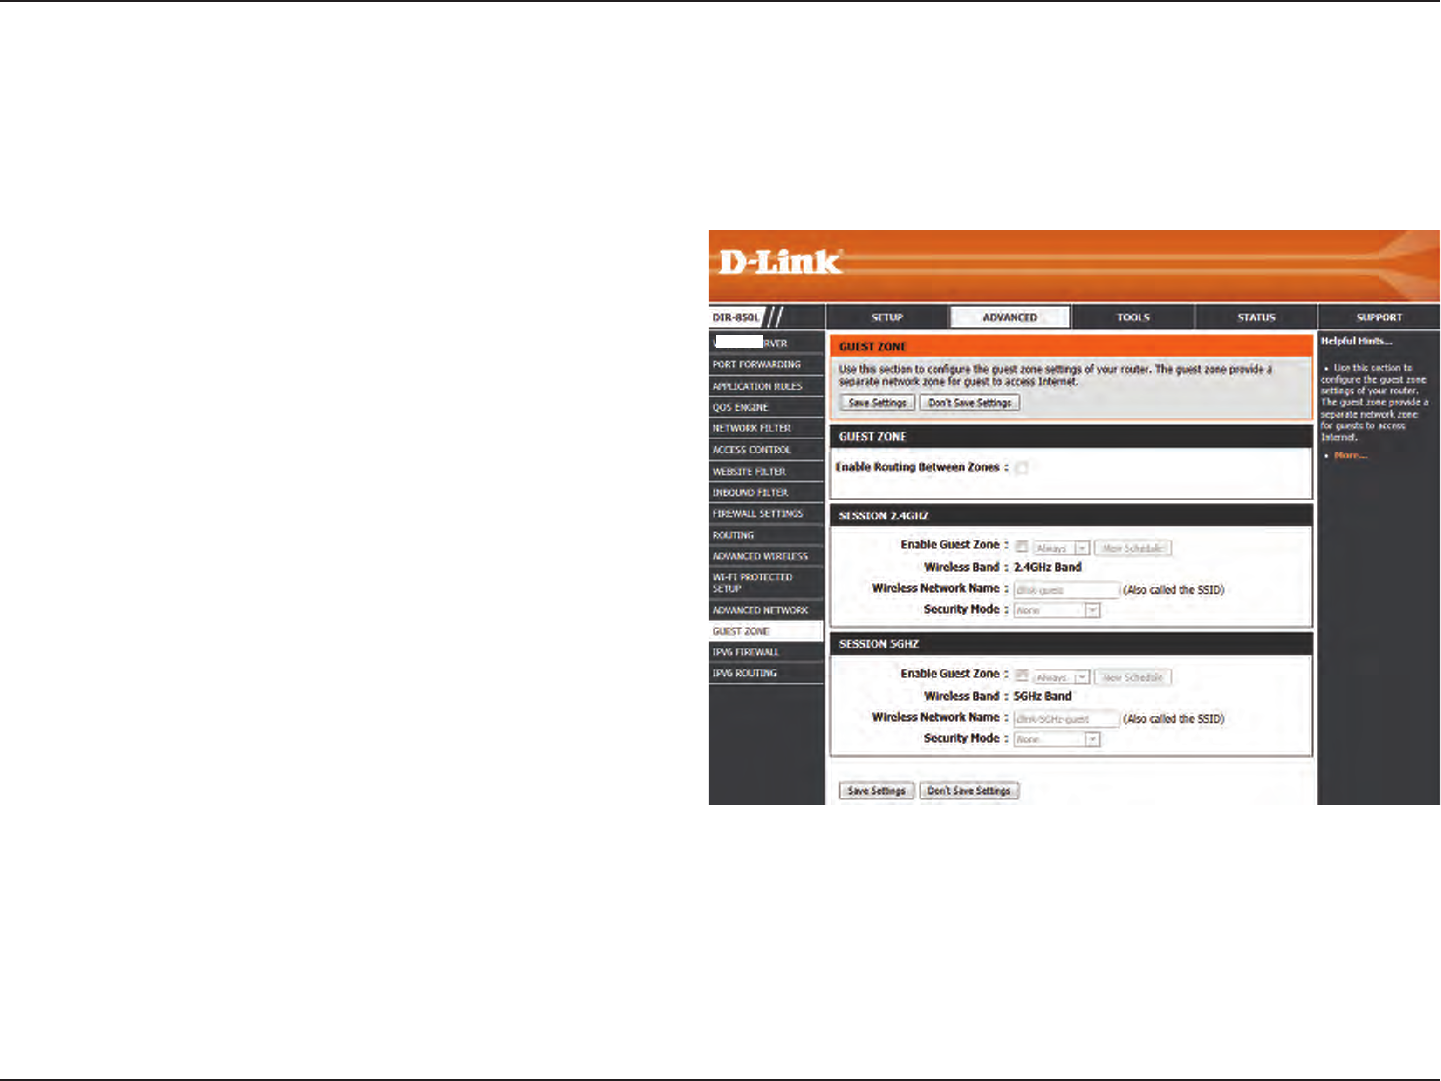
Guest Zone
Check to enable the Guest Zone feature.
The schedule of time when the Guest Zone will be
active. The schedule may be set to Always, which will
allow the particular service to always be enabled. You
can create your own times in the Tools > Schedules
section or click Add New.
Enter a wireless network name (SSID) that is dierent
from your main wireless network.
Check to allow network connectivity between the
dierent zones created.
Select the type of security or encryption you would
like to enable for the guest zone.
Enable Guest
Zone:
Schedule:
Wireless
Network Name:
Enable Routing
Between Zones:
Security Mode:
The Guest Zone feature will allow you to create temporary zones that can be used by guests to access the Internet. These zones
will be separate from your main wireless network. You may congure dierent zones for the 2.4GHz and 5GHz wireless bands.
DIR-850L
103D-Link DIR-850L User Manual
Section 3 - Conguration
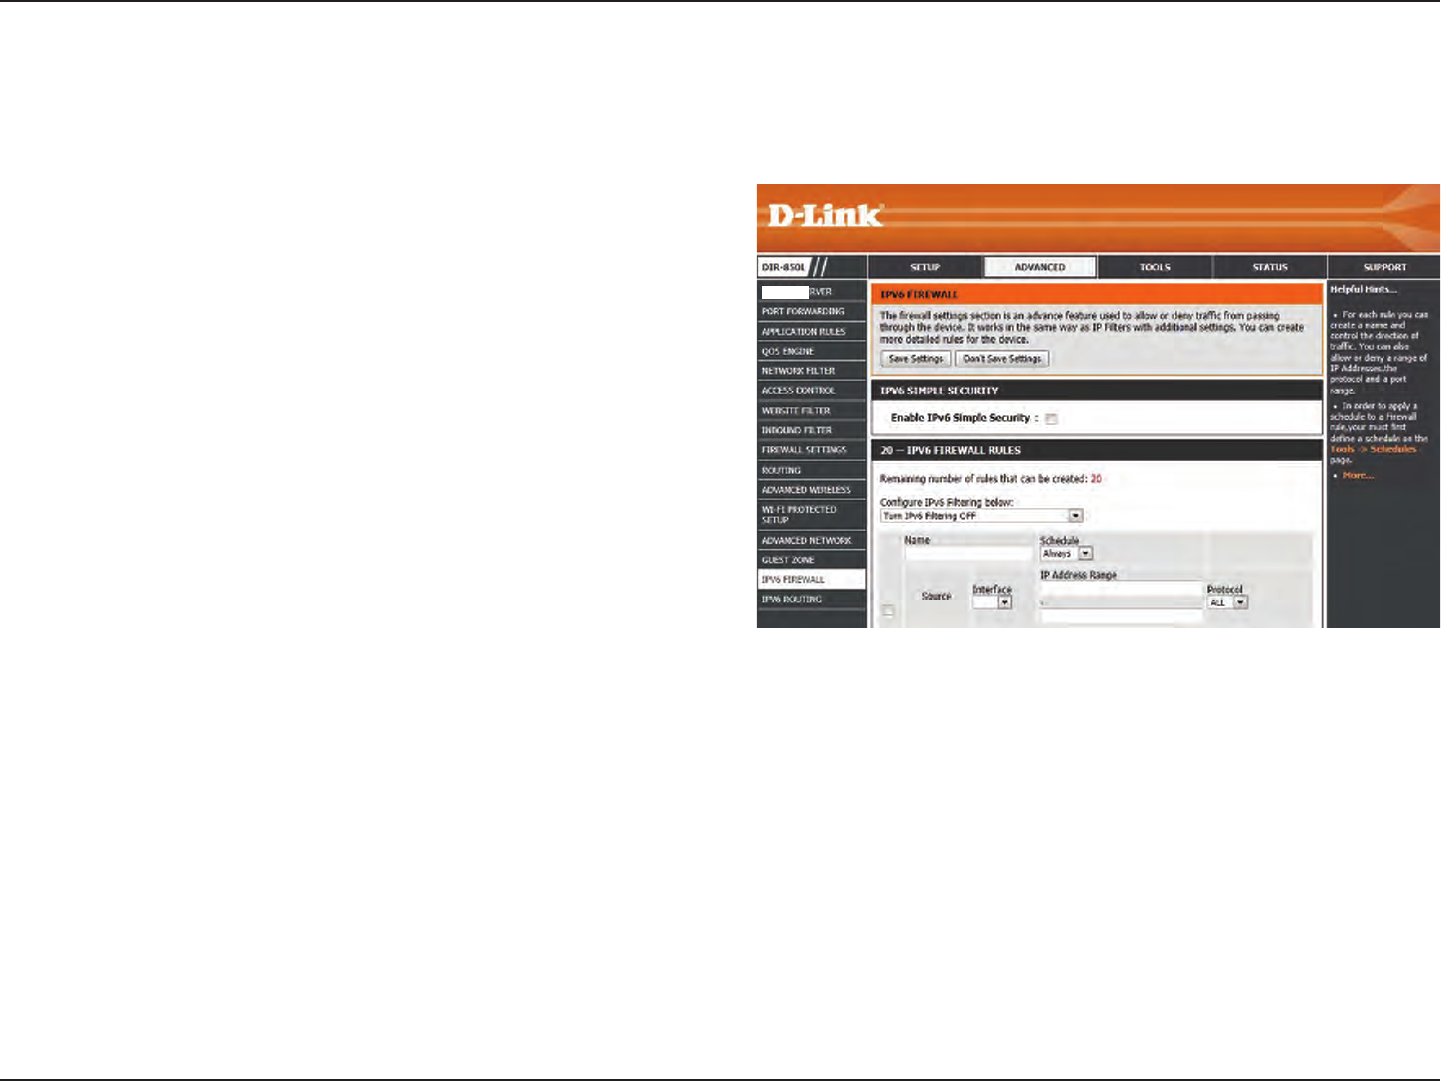
IPv6 Firewall
The DIR-850L’s IPv6 Firewall feature allows you to congure which kind of IPv6 trac is allowed to pass through the device.
The DIR-850L’s IPv6 Firewall functions in a similar way to the IP Filters feature.
Check the box to enable the IPv6 rewall simple security.
Select an action from the drop-down menu.
Enter a name to identify the IPv6 rewall rule.
Use the drop-down menu to select the time schedule that
the IPv6 Firewall Rule will be enabled on. The schedule may
be set to Always, which will allow the particular service to
always be enabled. You can create your own times in the
Tools > Schedules section.
Use the Source drop-down menu to specify the interface that
connects to the source IPv6 addresses of the rewall rule.
Enter the source IPv6 address range in the adjacent IP
Address Range eld.
Use the Dest drop-down menu to specify the interface that
connects to the destination IP addresses of the rewall rule.
Select the protocol of the rewall port (All, TCP, UDP, or
ICMP).
Enter the rst port of the range that will be used for the
rewall rule in the rst box and enter the last port in the
eld in the second box.
Enable Checkbox:
Congure IPv6
Firewall:
Name:
Schedule:
Source:
IP Address Range:
Dest:
Protocol:
Port Range:
DIR-850L
104D-Link DIR-850L User Manual
Section 3 - Conguration
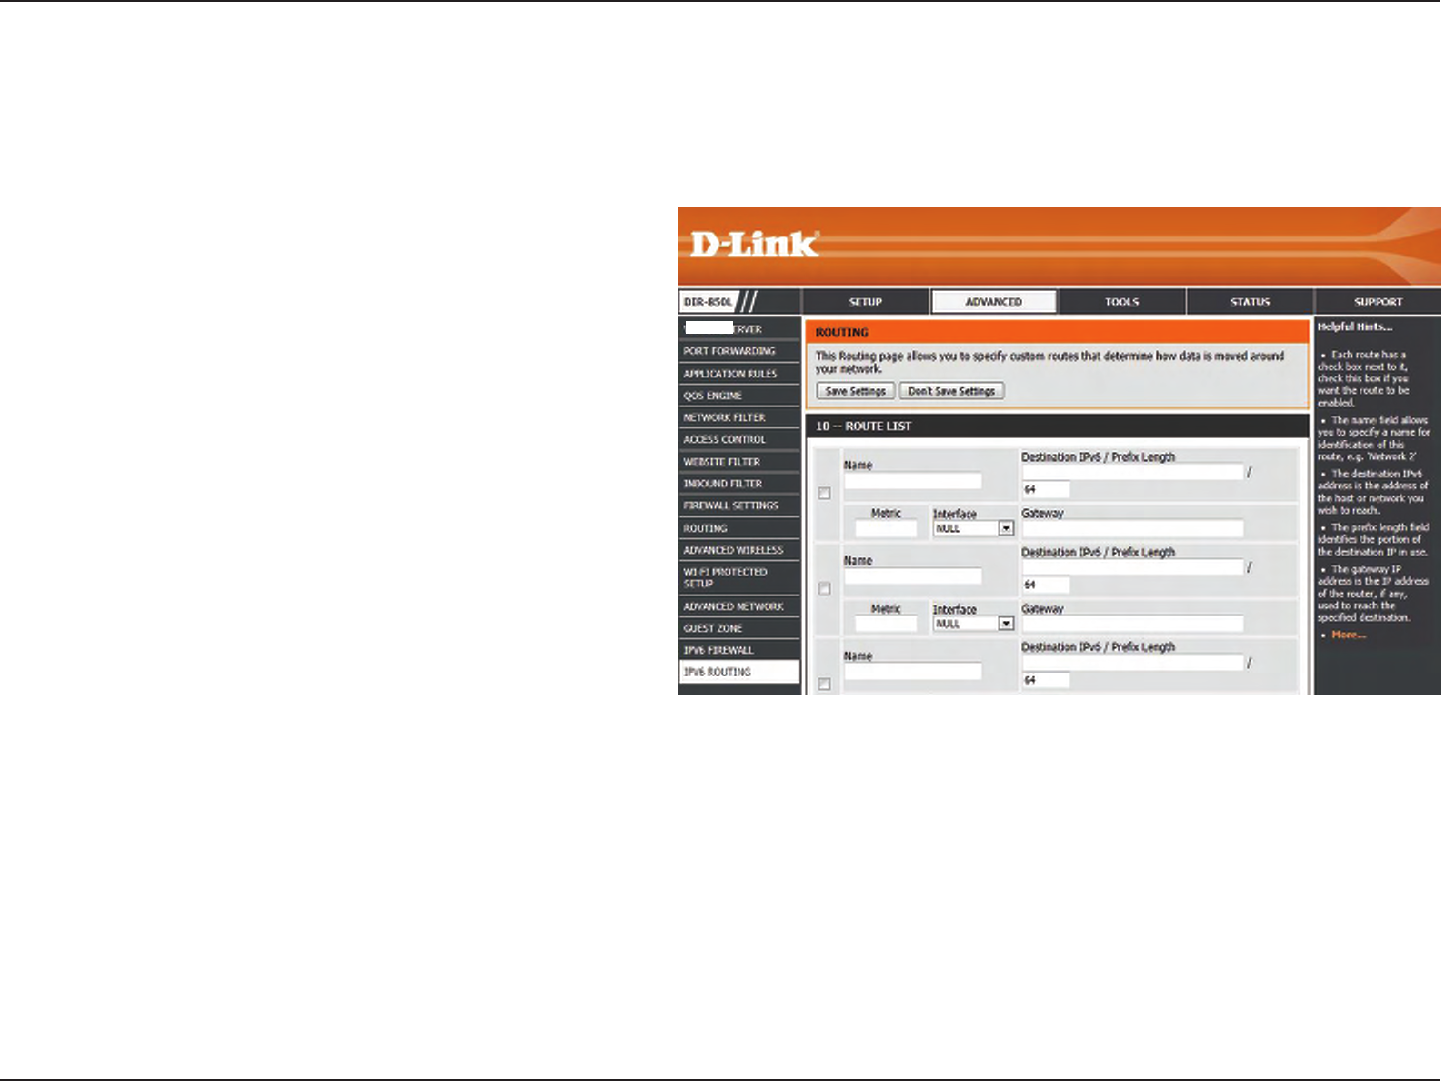
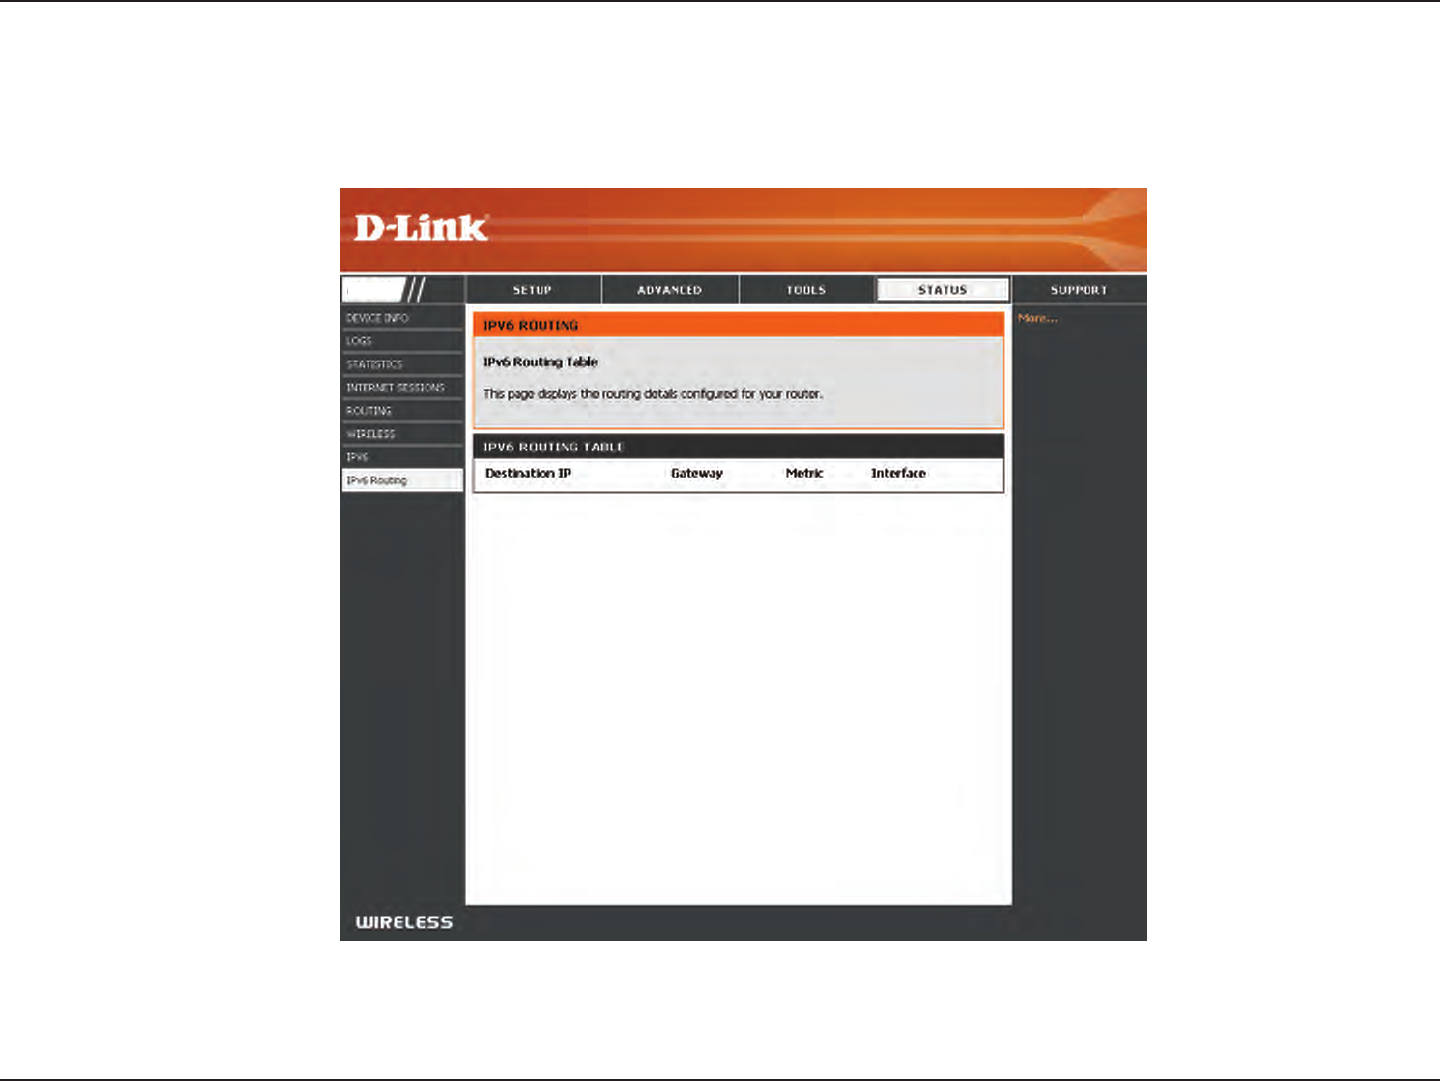
IPv6 Routing
Check the box next to the route you wish to enable.
Enter a specic name to identify this route.
This is the IP address of the router used to reach
the specied destination or enter the IPv6 address
prex length of the packets that will take this route.
Enter the metric value for this rule here.
Use the drop-down menu to specify if the IP packet
must use the WAN or LAN interface to transit out of
the Router.
Enter the next hop that will be taken if this route
is used.
Route List:
Name:
Destination IP/
Prex Length:
Metric:
Interface:
Gateway:
This page allows you to specify custom routes that determine how data is moved around your network.
DIR-850L
105D-Link DIR-850L User Manual
Section 3 - Conguration
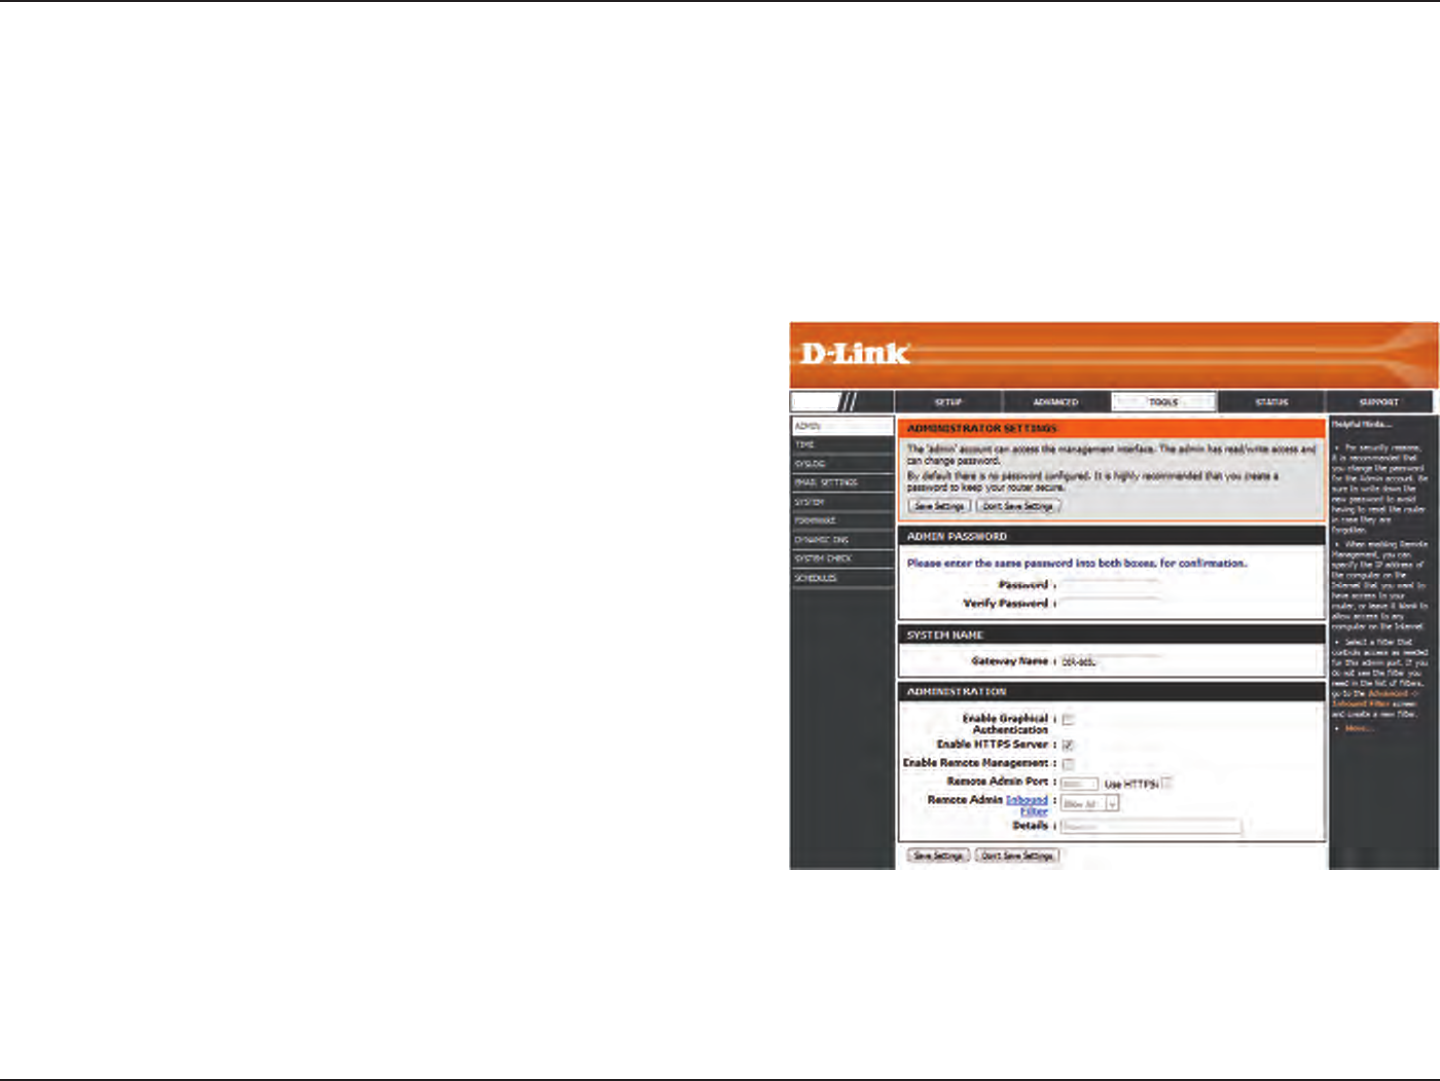
Admin
This page will allow you to change the Administrator and User passwords. You can also enable Remote Management. There are
two accounts that can access the management interface through the web browser. The accounts are admin and user. Admin
has read/write access while user has read-only access. User can only view the settings but cannot make any changes. Only the
admin account has the ability to change both admin and user account passwords.
Tools
Enter a new password for the Administrator Login Name. The administrator can
make changes to the settings.
Enter the new password for the User login. If you login as the User, you cannot
change the settings (you can only view them).
Enter a name for your router.
Enables a challenge-response test to require users to type letters or numbers
from a distorted image displayed on the screen to prevent online hackers and
unauthorized users from gaining access to your router’s network settings.
Check to enable HTTPS to connect to the router securely. This means to connect
to the router, you must enter https://192.168.0.1 (for example) instead of
http://192.168.0.1.
Remote management allows the DIR-850L to be congured from the Internet
by a web browser. A username/password is still required to access the Web
Management interface.
The port number used to access the DIR-850L is used in the URL. Example:
http://x.x.x.x:8080 whereas x.x.x.x is the Internet IP address of the DIR-850L and
8080 is the port used for the Web Management interface.
If you have enabled HTTPS Server, you must enter https:// as part of the URL to
access the router remotely.
This section will list any rules that are created. You may click the Edit icon to
change the settings or enable/disable the rule, or click the Delete icon to remove
the rule. Details will display the current status.
Admin Password:
User Password:
Gateway name:
Enable Graphical
Authentication:
Enable HTTPS
Server:
Enable Remote
Management:
Remote Admin Port:
Remote Admin
Inbound Filter:
DIR-850L
106D-Link DIR-850L User Manual
Section 3 - Conguration
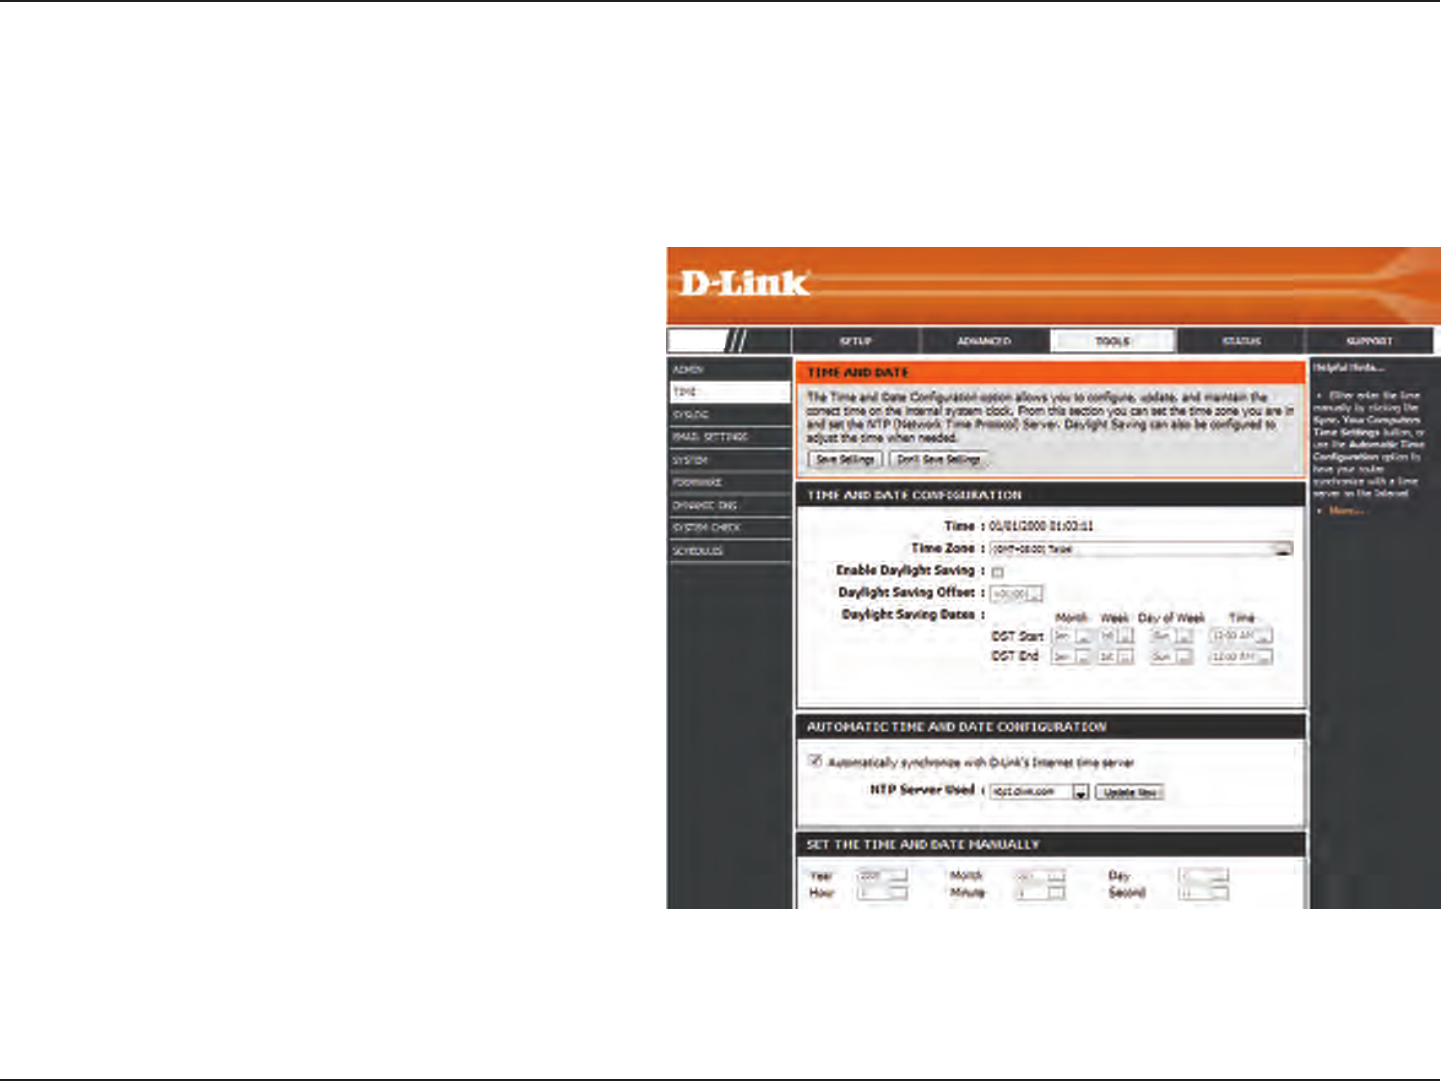
Time
Displays the current date and time of the router.
Select your Time Zone from the drop-down
menu.
To select Daylight Saving time manually, select
enabled or disabled, and enter a start date and
an end date for daylight saving time.
NTP is short for Network Time Protocol. A NTP
server will synch the time and date with your
router. This will only connect to a server on the
Internet, not a local server. Check the box to
enable this feature.
Enter the IP address of a NTP server or select one
from the drop-down menu.
To manually input the time, enter the values
in these elds for the Year, Month, Day, Hour,
Minute, and Second and then click Set Time.
You can also click Copy Your Computer’s Time
Settings to synch the date and time with the
computer you are currently on.
Time:
Time Zone:
Enable Daylight
Saving:
Enable NTP Server:
NTP Server Used:
Manual:
The Time Conguration option allows you to congure, update, and maintain the correct time on the internal system clock.
From this section you can set the time zone that you are in and set the Time Server. Daylight Saving can also be congured to
automatically adjust the time when needed.
DIR-850L
107D-Link DIR-850L User Manual
Section 3 - Conguration
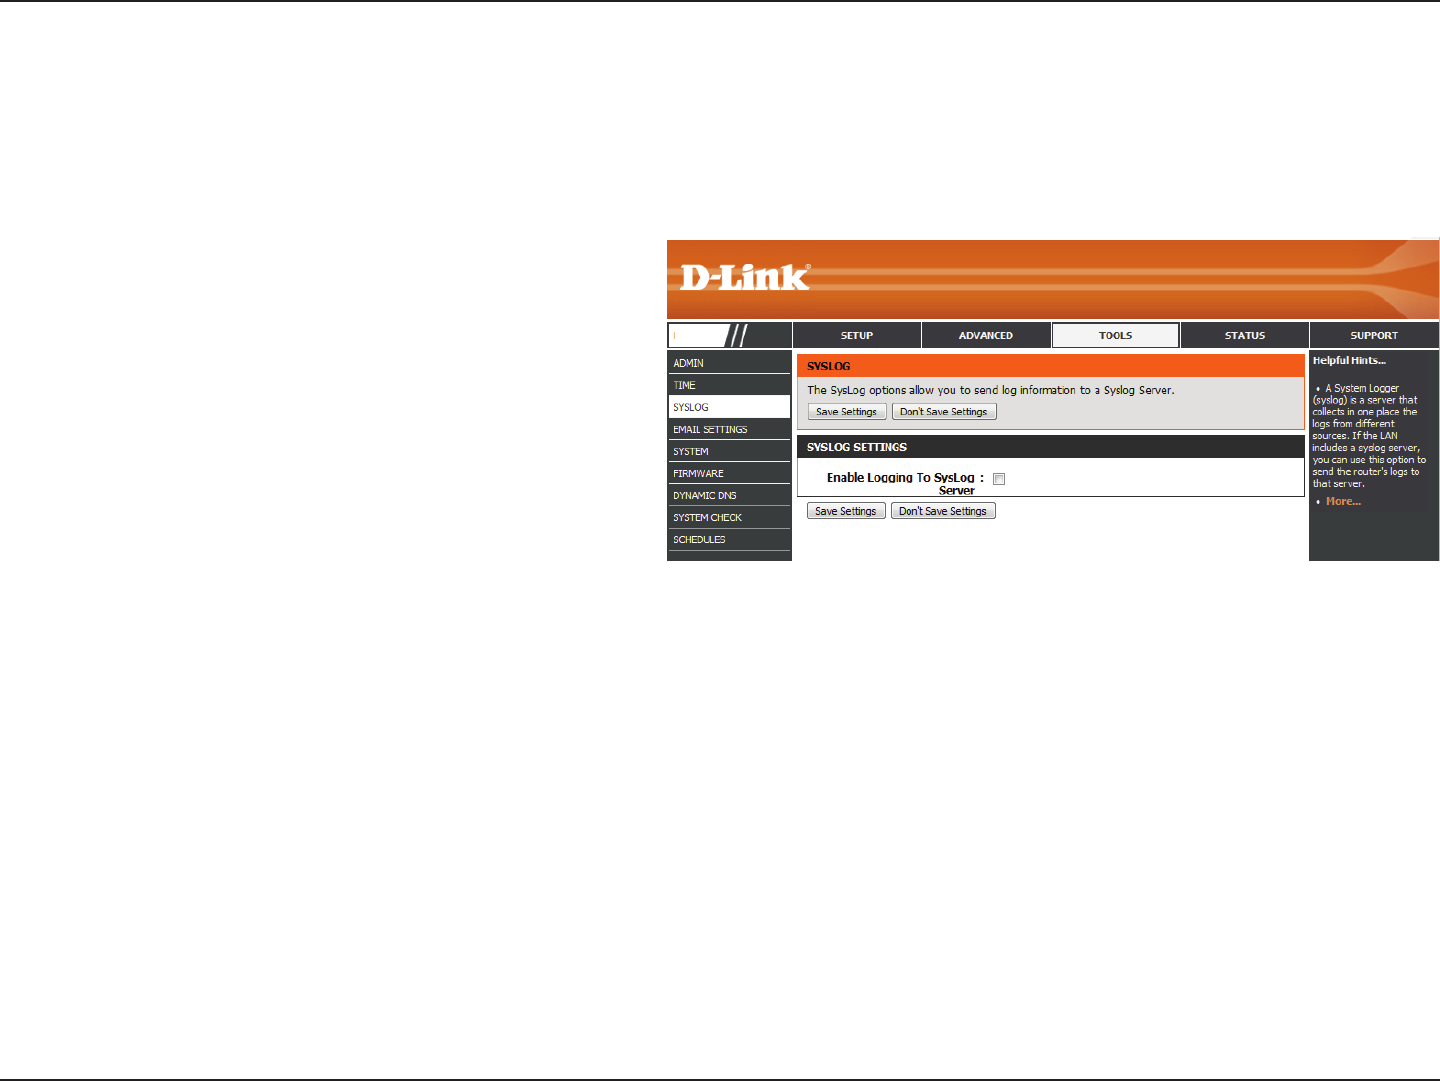
SysLog
The Broadband Router keeps a running log of events and activities occurring on the Router. You may send these logs to a
SysLog server on your network.
Enable Logging to
SysLog Server:
SysLog Server IP
Address:
Check this box to send the router logs to a SysLog
Server.
The address of the SysLog server that will be
used to send the logs. You may also select your
computer from the drop-down menu (only if
receiving an IP address from the router via DHCP).
DIR-850L

108D-Link DIR-850L User Manual
Section 3 - Conguration
Email Settings
The Email feature can be used to send the system log les, router alert messages, and rmware update notication to your
email address.
Enable Email
Notication:
From Email Address:
To Email Address:
SMTP Server Address:
SMTP Server Port:
Enable Authentication:
Account Name:
Password:
On Log Full:
On Schedule:
Schedule:
When this option is enabled, router activity logs are emailed to a
designated email address.
This email address will appear as the sender when you receive a log
le or rmware upgrade notication via email.
Enter the email address where you want the email sent.
Enter the SMTP server address for sending email.
Enter the SMTP port used on the server.
Check this box if your SMTP server requires authentication.
Enter your account for sending email.
Enter the password associated with the account. Re-type the
password associated with the account.
When this option is selected, logs will be sent via email to your
account when the log is full.
Selecting this option will send the logs via email according to
schedule.
This option is enabled when On Schedule is selected. You can select
a schedule from the list of dened schedules. To create a schedule,
go to Tools > Schedules.
DIR-850L

109D-Link DIR-850L User Manual
Section 3 - Conguration
Use this option to save the current router
conguration settings to a le on the hard disk of
the computer you are using. First, click the Save
button. A le dialog will appear, allowing you to
select a location and le name for the settings.
Use this option to load previously saved router
conguration settings. First, use the Browse option
to find a previously saved file of configuration
settings. Then, click the Load button to transfer
those settings to the router.
This option will restore all conguration settings
back to the settings that were in effect at the
time the router was shipped from the factory.
Any settings that have not been saved will be
lost, including any rules that you have created. If
you want to save the current router conguration
settings, use the Save button above.
Click to reboot the router.
Save Settings to
Local Hard Drive:
Load Settings
from Local Hard
Drive:
Restore to
Factory Default
Settings:
Reboot Device:
System
This section allows you to manage the router’s conguration settings, reboot the router, and restore the router to the factory
default settings. Restoring the unit to the factory default settings will erase all settings, including any rules that you’ve created.
DIR-850L
110D-Link DIR-850L User Manual
Section 3 - Conguration
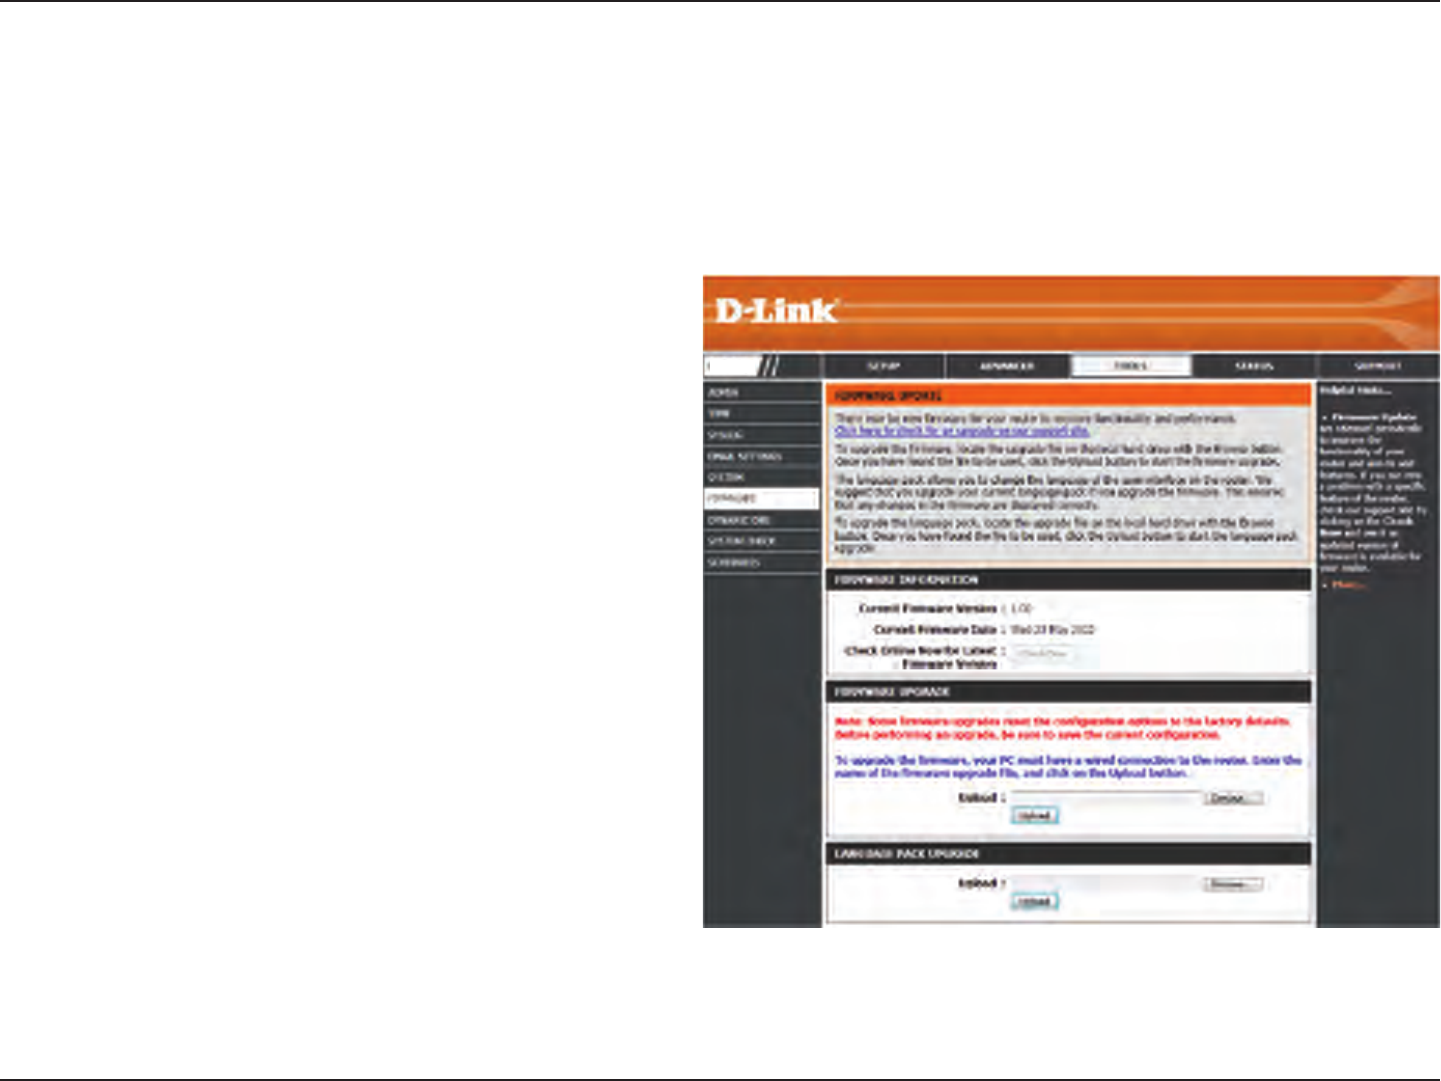
Firmware
Browse:
Upload:
After you have downloaded the new rmware, click
Browse to locate the rmware update on your hard
drive. Click Upload to complete the rmware upgrade.
Once you have a rmware update on your computer,
use this option to browse for the le and then upload
the information into the access point.
You can upgrade the rmware of the access point here. Make sure the rmware you want to use is on the local hard drive of
the computer. Click on Browse to locate the rmware le to be used for the update. Please check the D-Link support website
for rmware updates at http://support.dlink.com. You can download rmware upgrades to your hard drive from this site.
After you have downloaded the new language pack,
click Browse to locate the language pack le on your
hard drive. Click Upload to complete the language
pack upgrade.
Language Pack
You can change the language of the web UI by uploading
available language packs.
Browse:
DIR-850L

111D-Link DIR-850L User Manual
Section 3 - Conguration
Dynamic Domain Name System is a method of
keeping a domain name linked to a changing IP
Address. Check the box to enable DDNS.
Select your DDNS provider from the drop-down
menu or enter the DDNS server address.
Enter the Host Name that you registered with
your DDNS service provider.
Enter the Username or key for your DDNS
account.
Enter the Password or key for your DDNS account.
Enter a timeout time (in hours).
Displays the current connection status.
Enable
Dynamic DNS:
Server
Address:
Host Name:
Username or
Key:
Password or
Key:
Timeout:
Status:
Dynamic DNS
The DDNS feature allows you to host a server (Web, FTP, Game Server, etc…) using a domain name that you have purchased
(www.whateveryournameis.com) with your dynamically assigned IP address. Most broadband Internet Service Providers assign
dynamic (changing) IP addresses. Using a DDNS service provider, your friends can enter in your domain name to connect to
your server no matter what your IP address is.
DIR-850L
112D-Link DIR-850L User Manual
Section 3 - Conguration
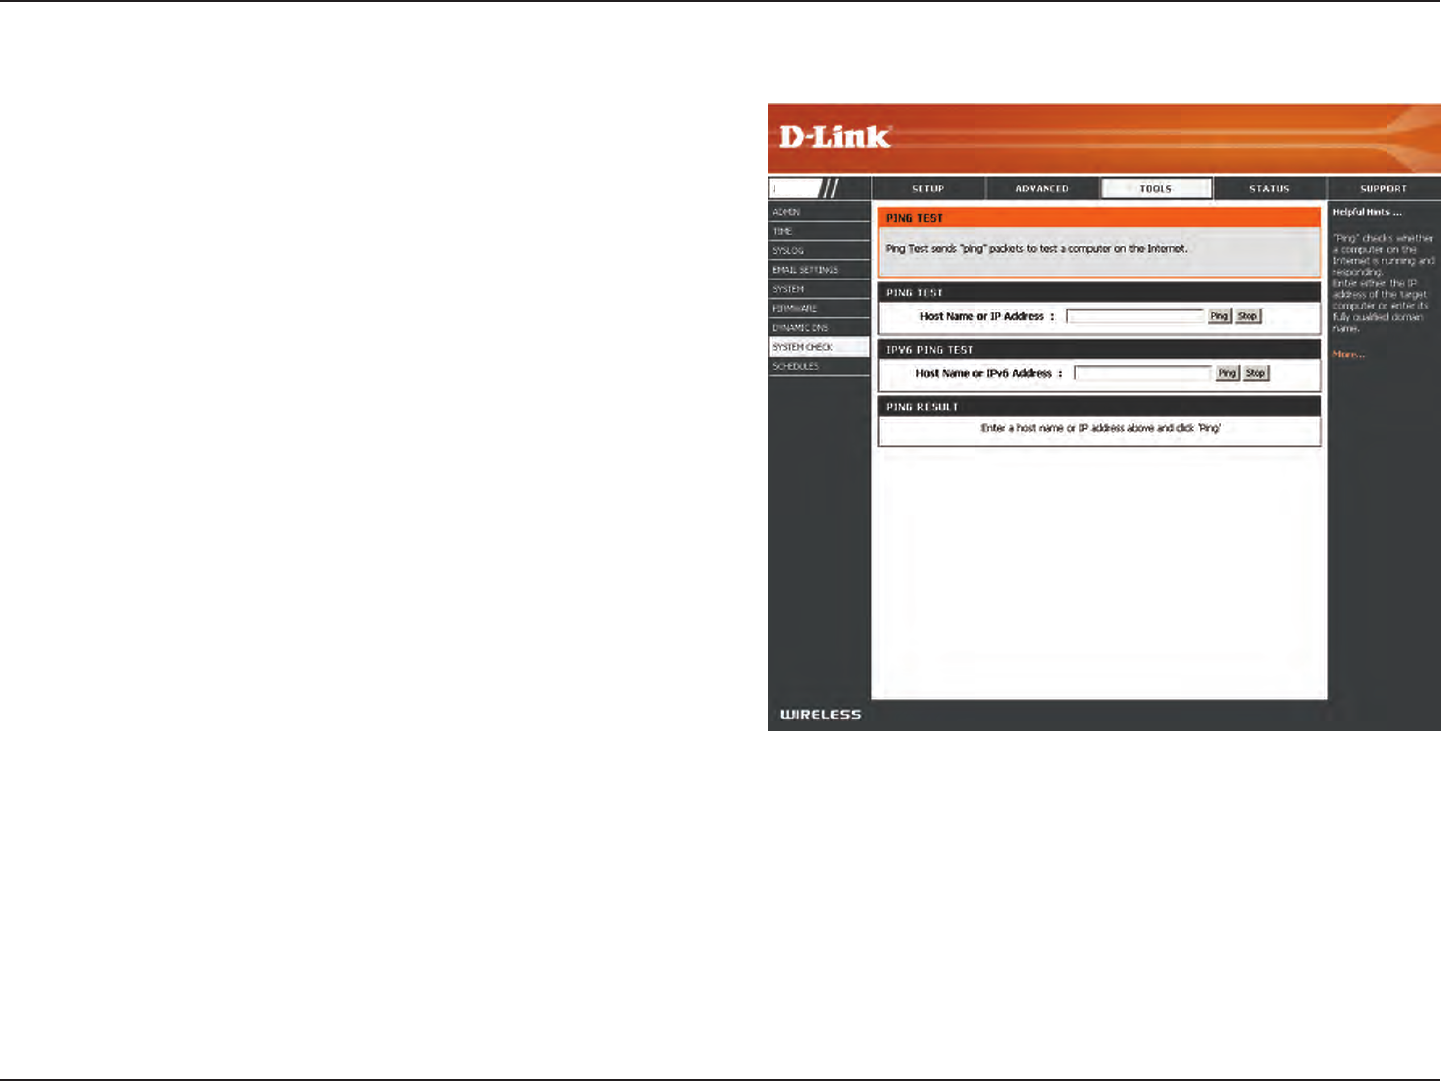
The Ping Test is used to send Ping packets to test if a
computer is on the Internet. Enter the IP address that you
wish to Ping and click Ping.
Enter the IPv6 address that you wish to Ping and click Ping.
The results of your ping attempts will be displayed here.
System Check
Ping Test:
IPv6 Ping Test:
Ping Results:
DIR-850L
113D-Link DIR-850L User Manual
Section 3 - Conguration
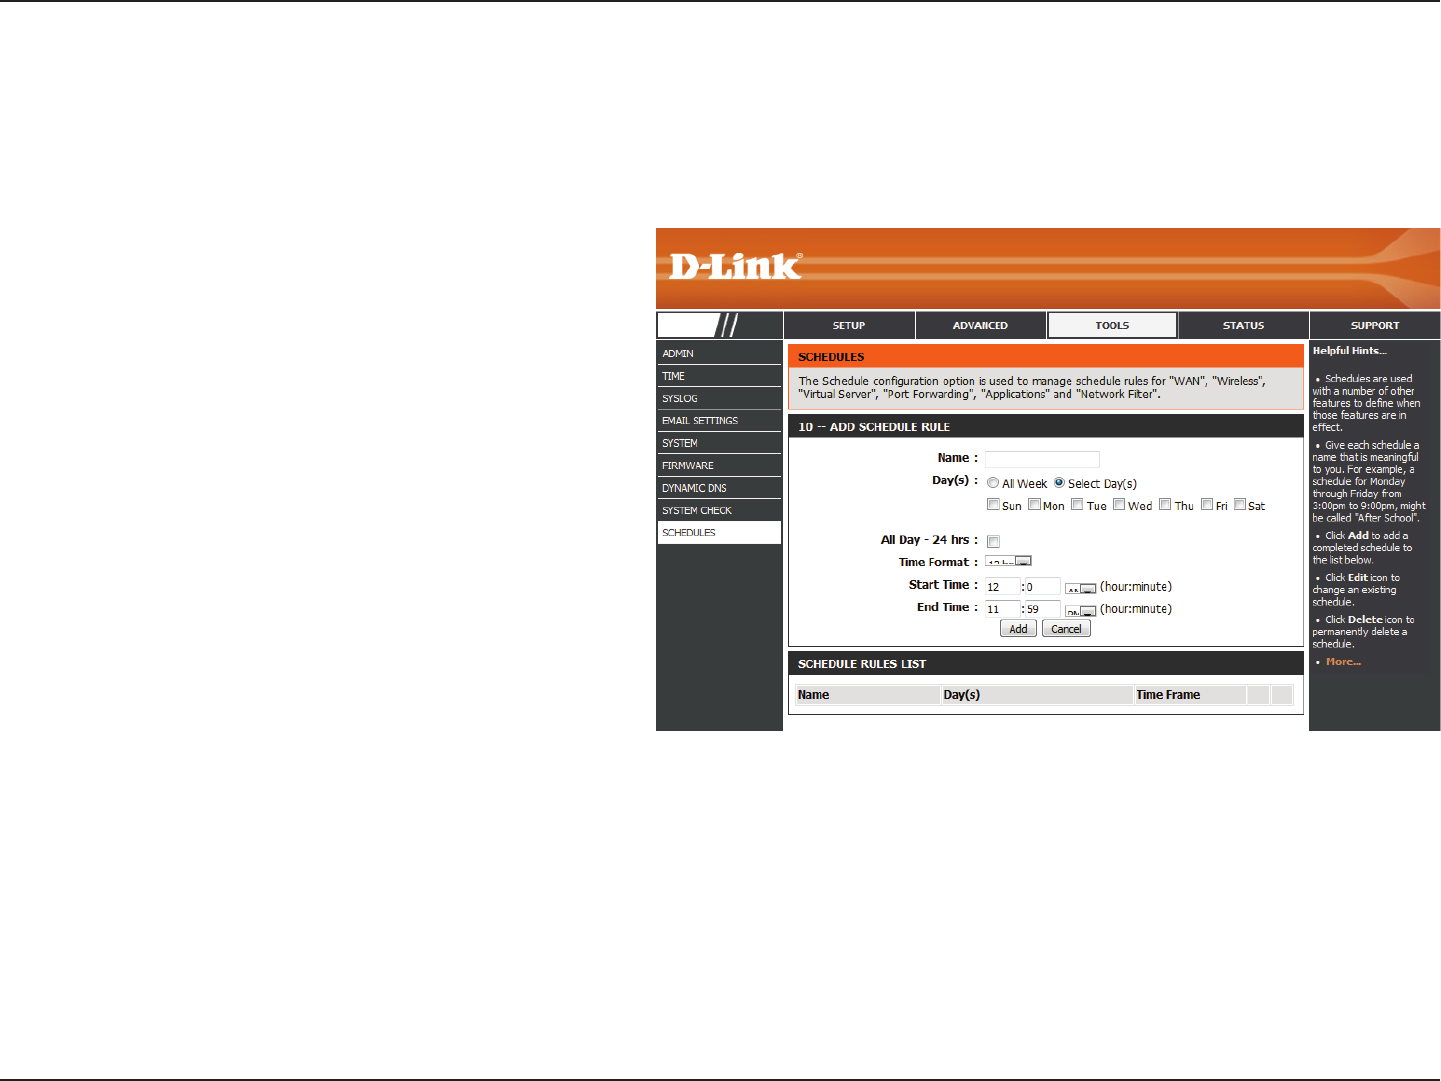
Enter a name for your new schedule.
Select a day, a range of days, or All Week to include
every day.
Check All Day - 24hrs or enter a start and end
time for your schedule.
You must click Save Settings at the top for your
schedules to go into eect.
The list of schedules will be listed here. Click the
Edit icon to make changes or click the Delete icon
to remove the schedule.
Name:
Days:
Time:
Save:
Schedule Rules
List:
Schedules
Schedules can be created for use with enforcing rules. For example, if you want to restrict web access to Mon-Fri from 3pm to
8pm, you could create a schedule selecting Mon, Tue, Wed, Thu, and Fri and enter a Start Time of 3pm and End Time of 8pm.
DIR-850L
114D-Link DIR-850L User Manual
Section 3 - Conguration
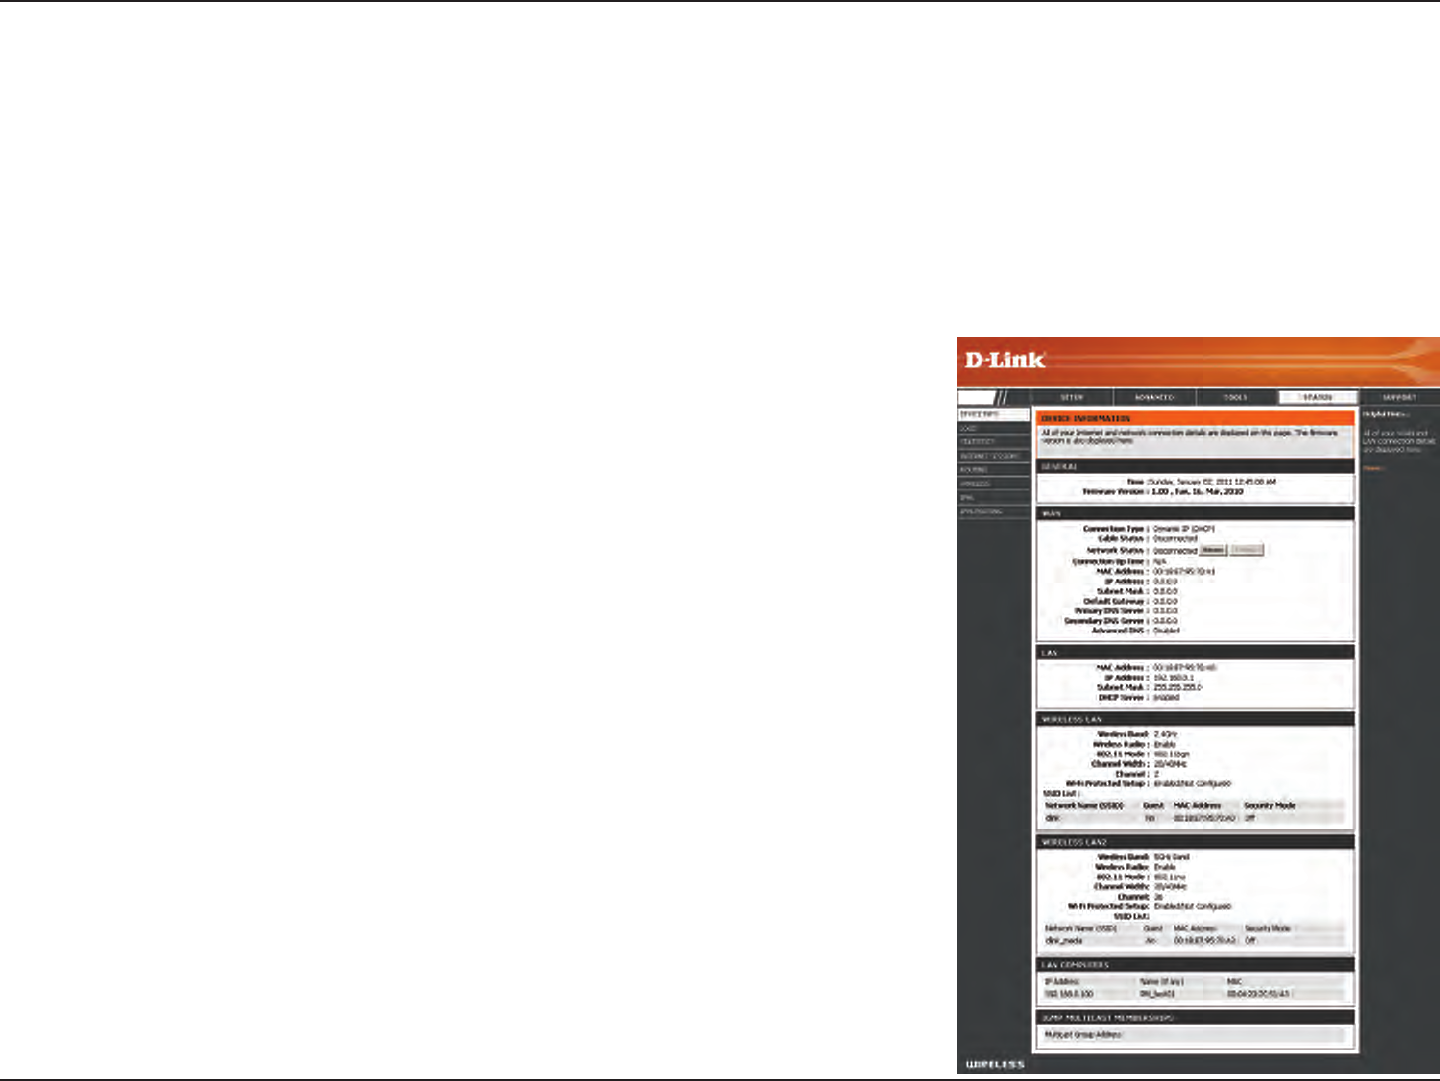
This page displays the current information for the DIR-850L. It will display the LAN, WAN (Internet), and Wireless information.
If your Internet connection is set up for a Dynamic IP address then a Release button and a Renew button will be displayed.
Use Release to disconnect from your ISP and use Renew to connect to your ISP.
If your Internet connection is set up for PPPoE, a Connect button and a Disconnect button will be displayed. Use Disconnect
to drop the PPPoE connection and use Connect to establish the PPPoE connection.
Displays the router’s time and rmware version.
Displays the MAC address and the public IP settings
Displays the MAC address and the private (local) IP settings for the router.
Displays the 2.4GHz wireless MAC address and your wireless settings such as
SSID and Channel.
Displays the 5GHz wireless MAC address and your wireless settings such as SSID
and Channel.
Displays computers and devices that are connected to the router via Ethernet
and that are receiving an IP address assigned by the router (DHCP).
General:
WAN:
LAN:
Wireless LAN1:
Wireless LAN2:
LAN Computers:
Device Info
Status
DIR-850L
115D-Link DIR-850L User Manual
Section 3 - Conguration
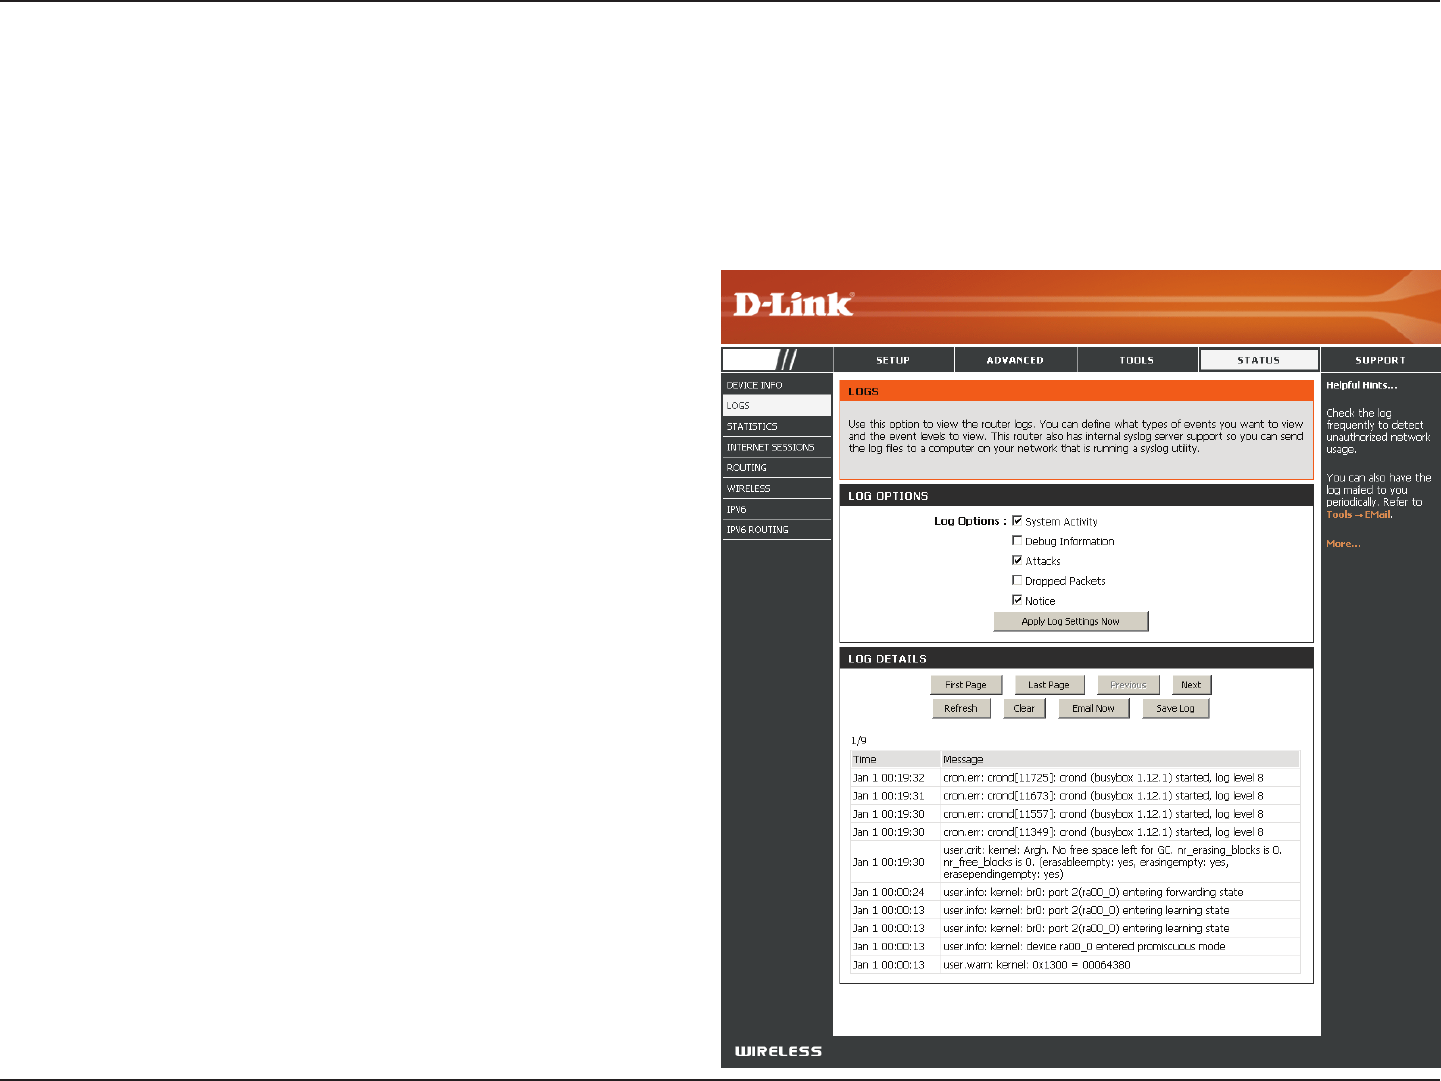
Logs
Log Options:
Refresh:
First Page:
Last Page:
Previous:
Next:
Clear:
Email Now:
Save Log:
You can select the types of messages that you want
to display from the log. System Activity, Debug
Information, Attacks, Dropped Packets, and Notice
messages can be selected. Click Apply Log Settings
Now to activate your settings.
Updates the log details on the screen so it displays any
recent activity.
Click to go to the rst page.
Click to go to the last page.
Click to go back one page.
Click to go to the next page.
Clears all of the log contents.
This option will send a copy of the router log to your
email address congured in the Tools > Email Settings
screen.
This option will save the router log to a le on your
computer.
The router automatically logs (records) events of possible interest in it’s internal memory. If there isn’t enough internal memory
for all events, logs of older events are deleted but logs of the latest events are retained. The Logs option allows you to view
the router logs. You can dene what types of events you want to view and the level of the events to view. This router also has
external Syslog Server support so you can send the log les to a computer on your network that is running a Syslog utility.
DIR-850L
116D-Link DIR-850L User Manual
Section 3 - Conguration
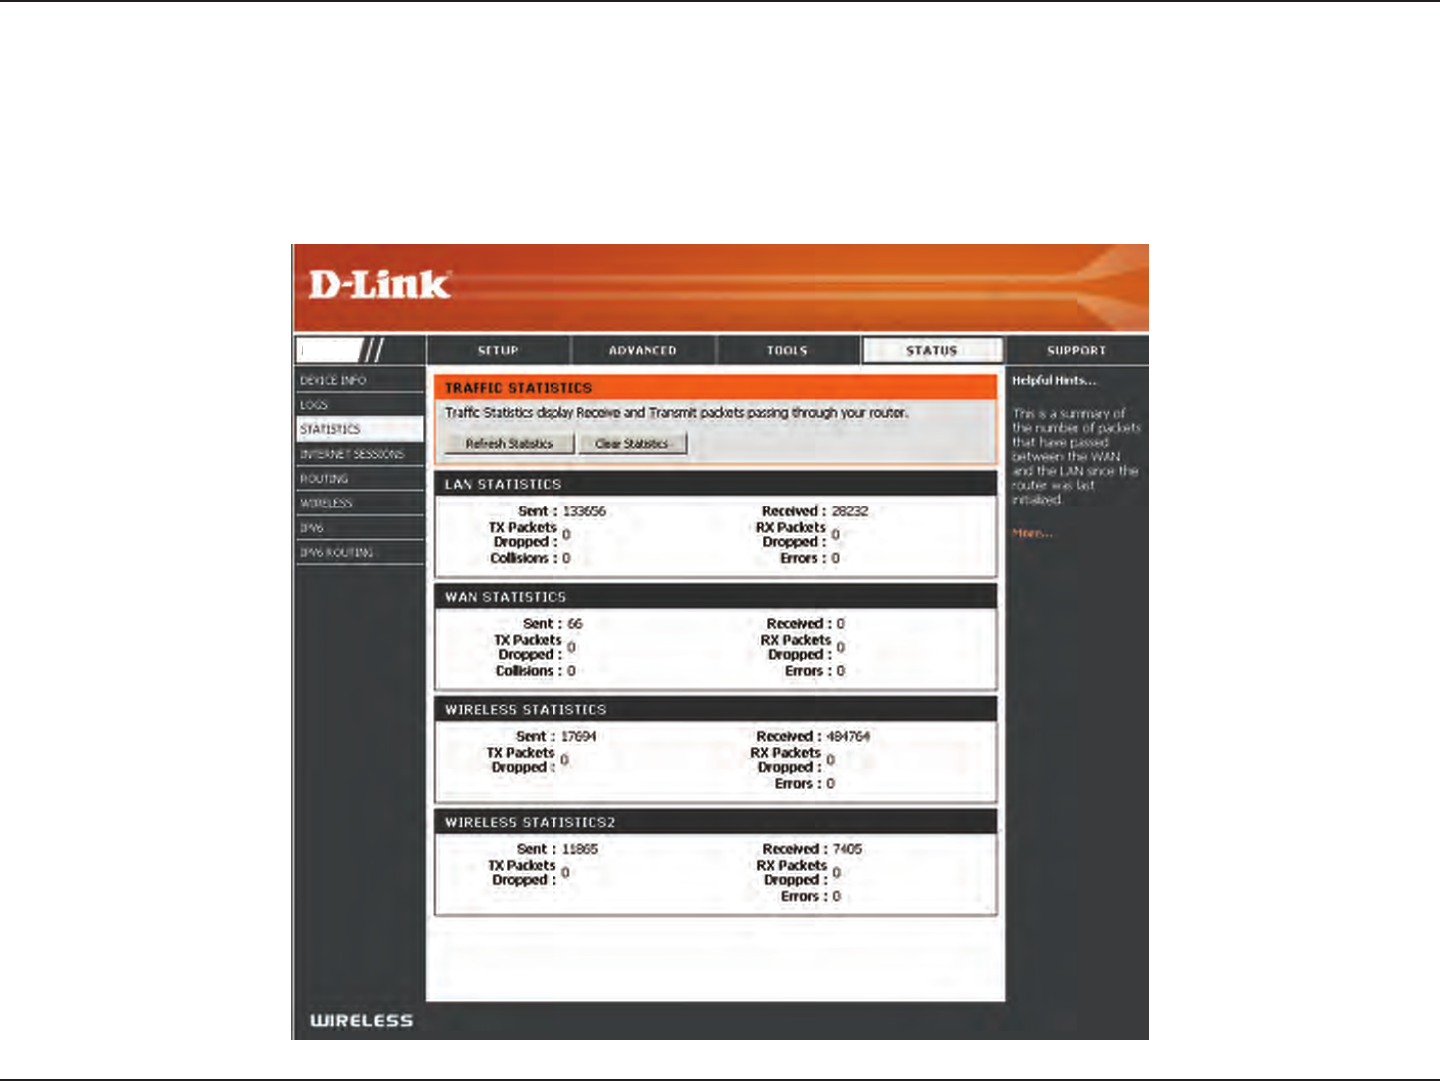
Statistics
The screen below displays the Trac Statistics. Here you can view the amount of packets that pass through the DIR-850L on both
the WAN, LAN ports and the wireless segments. The trac counter will reset if the device is rebooted.
DIR-850L
117D-Link DIR-850L User Manual
Section 3 - Conguration
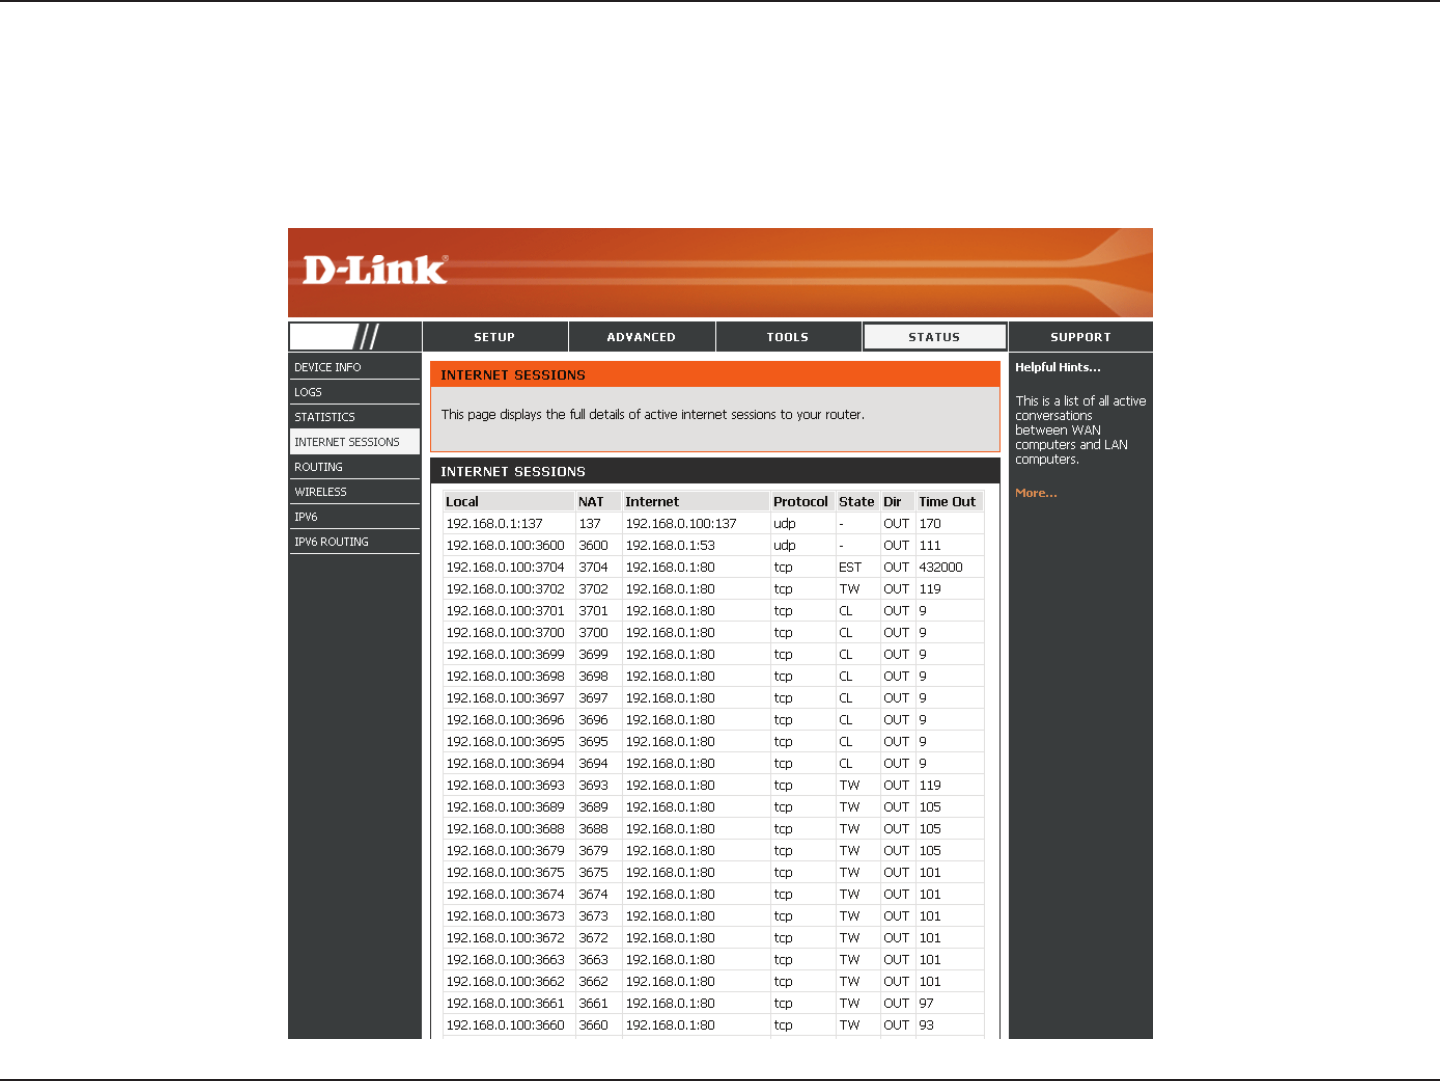
Internet Sessions
The Internet Sessions page displays full details of active Internet sessions through your router. An Internet session is a
conversation between a program or application on a LAN-side computer and a program or application on a WAN-side computer.
DIR-850L

118D-Link DIR-850L User Manual
Section 3 - Conguration
Routing
This page will display your current routing table.
DIR-850L
119D-Link DIR-850L User Manual
Section 3 - Conguration
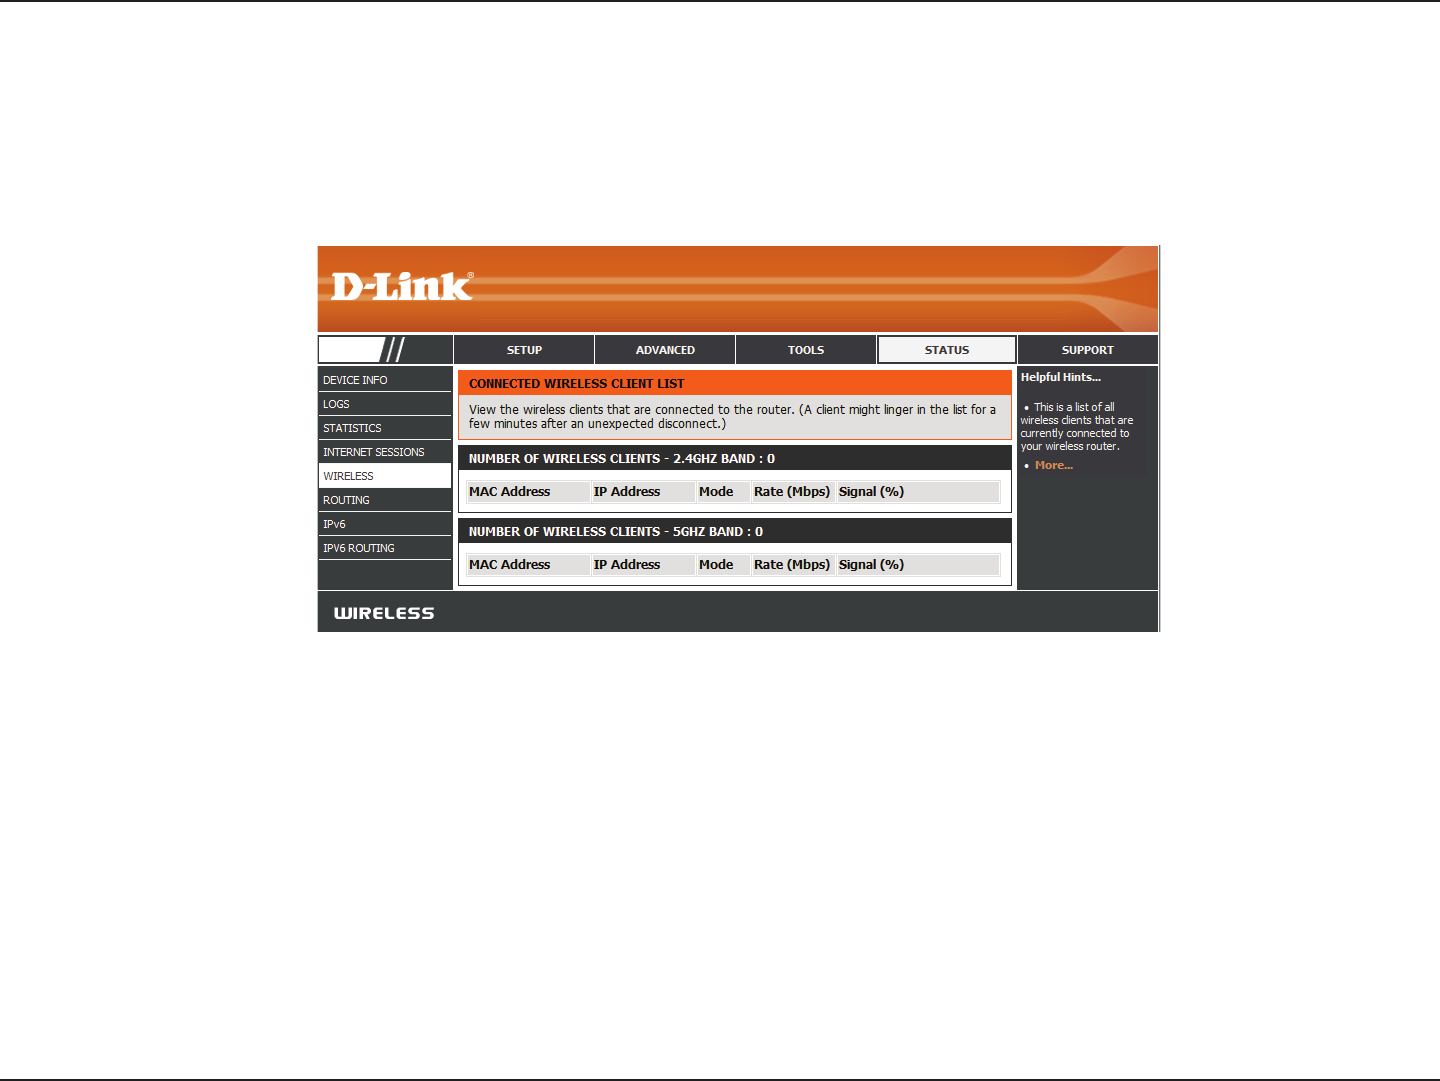
The wireless client table displays a list of current connected wireless clients. This table also displays the connection time and
MAC address of the connected wireless clients.
Wireless
DIR-850L
120D-Link DIR-850L User Manual
Section 3 - Conguration
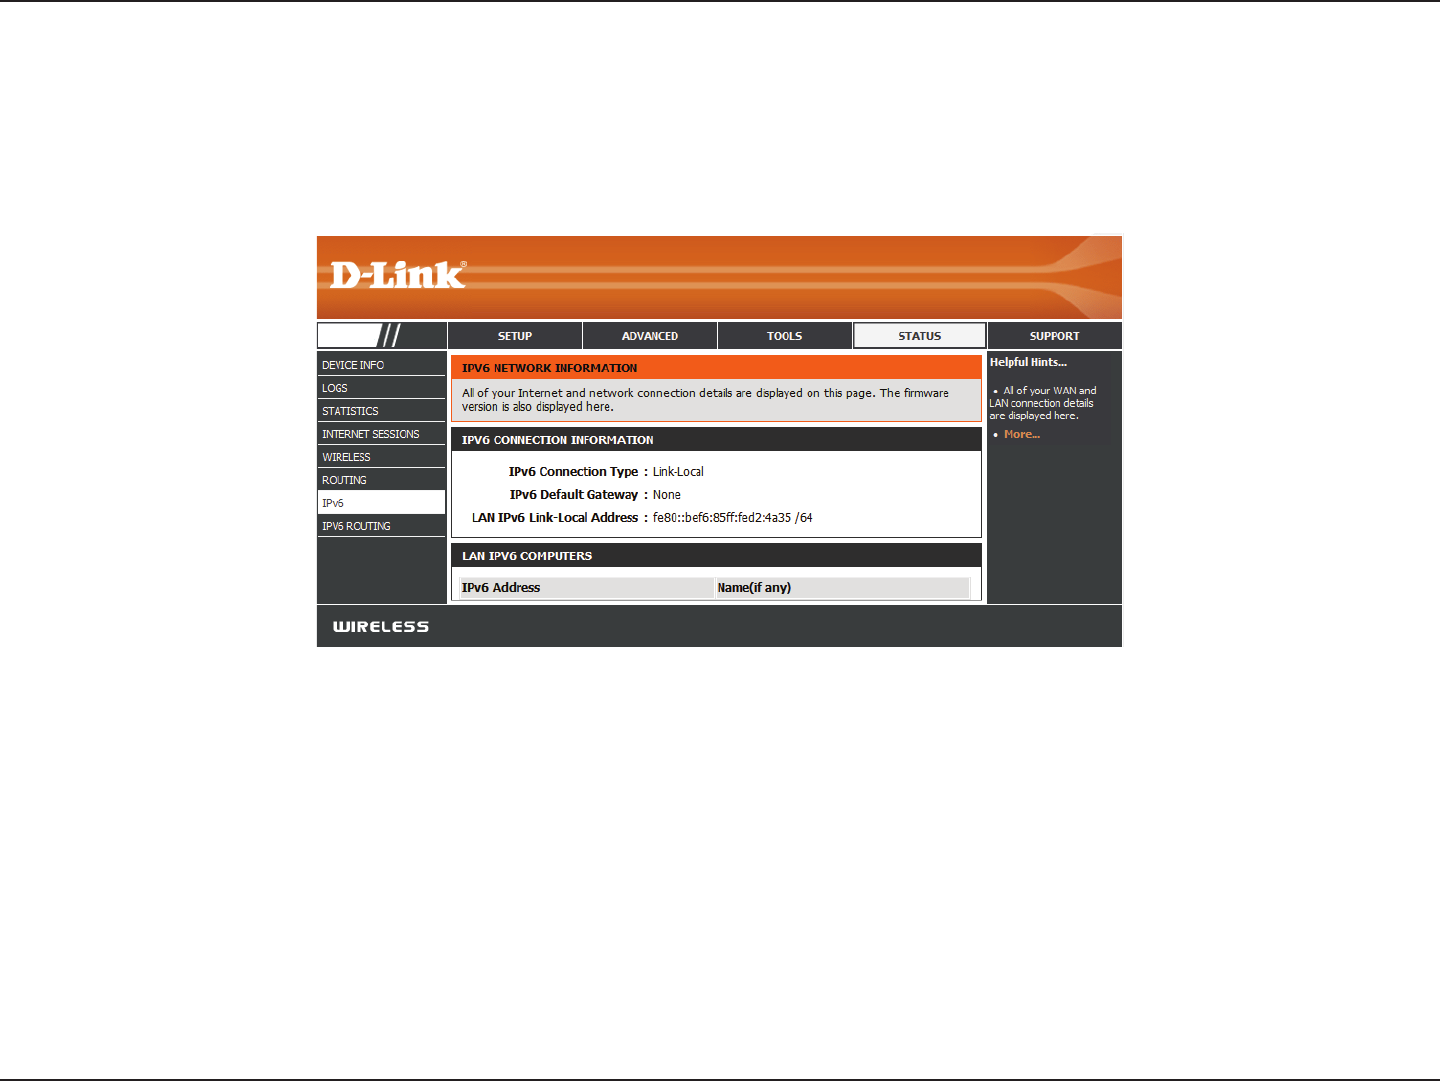
IPv6
The IPv6 page displays a summary of the Router’s IPv6 settings and lists the IPv6 address and host name of any IPv6 clients.
DIR-850L
121D-Link DIR-850L User Manual
Section 3 - Conguration
IPV6 Routing
This page displays the IPV6 routing details congured for your router.
DIR-850L
122D-Link DIR-850L User Manual
Section 3 - Conguration
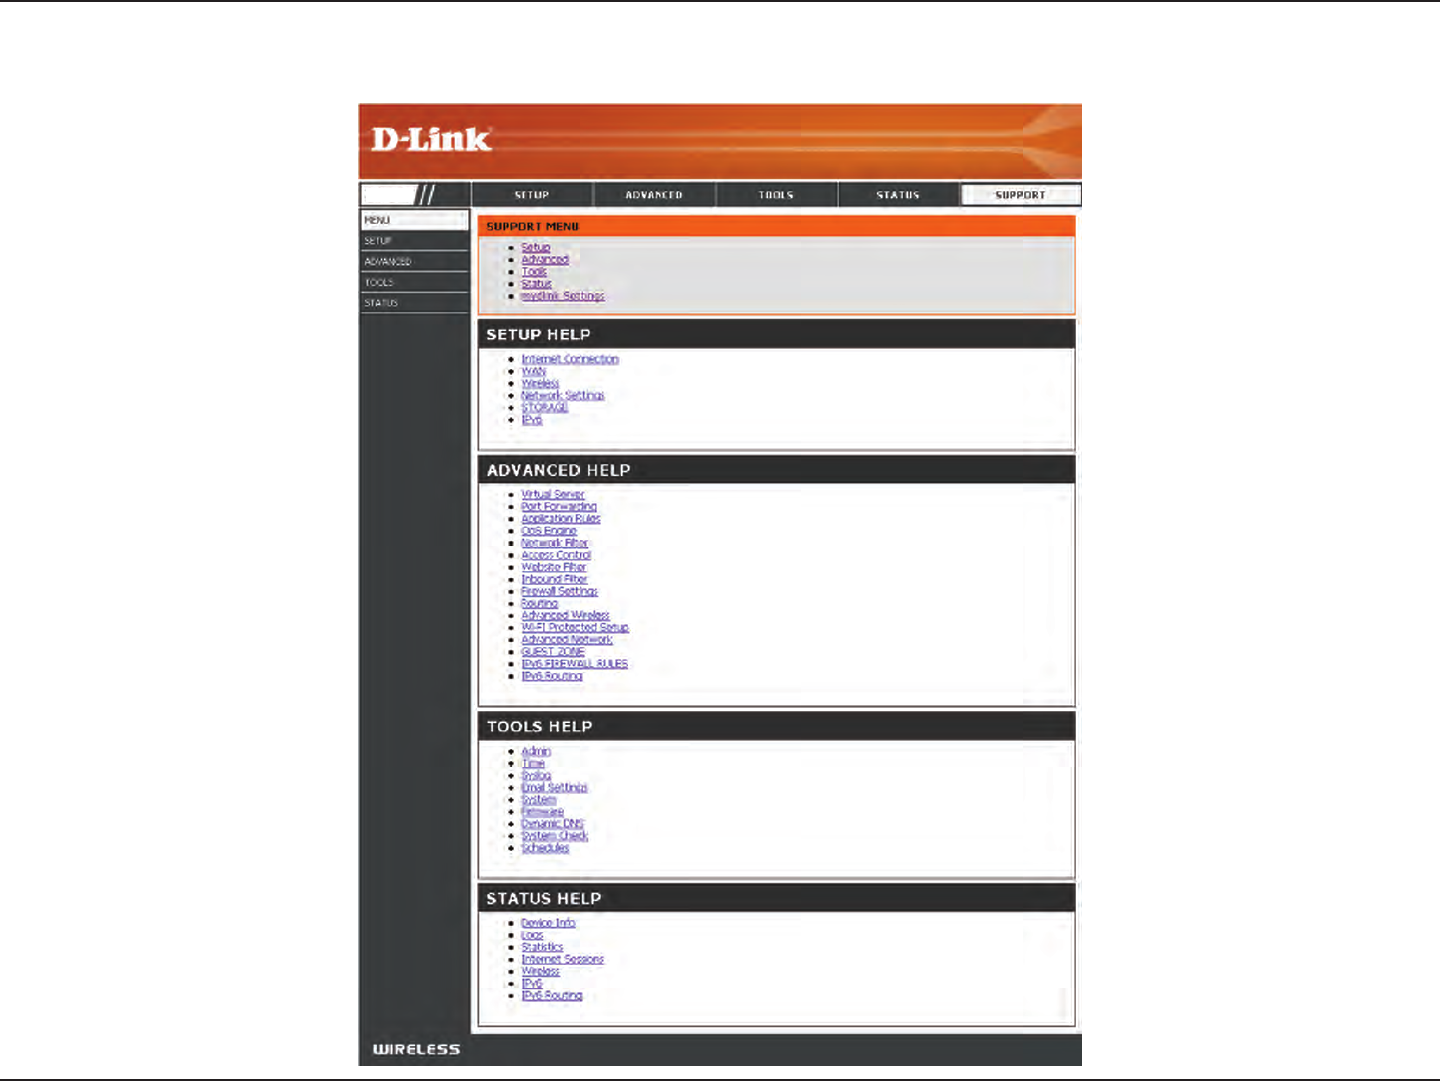
Support
DIR-850L
123D-Link DIR-850L User Manual
Section 4 - Security
Connect a Wireless Client to your Router
WPS Button
Step 2 - Within 2 minutes, press the WPS button on your wireless client (or launch the software utility and start the WPS
process).
The easiest and most secure way to connect your wireless devices to the router is WPS (Wi-Fi Protected Setup). Most wireless
devices such as wireless adapters, media players, Blu-ray DVD players, wireless printers and cameras will have a WPS button
(or a software utility with WPS) that you can press to connect to the DIR-850L router. Please refer to your user manual for the
wireless device you want to connect to make sure you understand how to enable WPS. Once you know, follow the steps below:
Step 1 - Press the WPS button on the DIR-850L for about 1 second. The Internet LED on the front will start to blink.
Step 3 - Allow up to 1 minute to congure. Once the Internet light stops blinking, you will be connected and your wireless
connection will be secure with WPA2.
WPS Button
124D-Link DIR-850L User Manual
Section 4 - Security
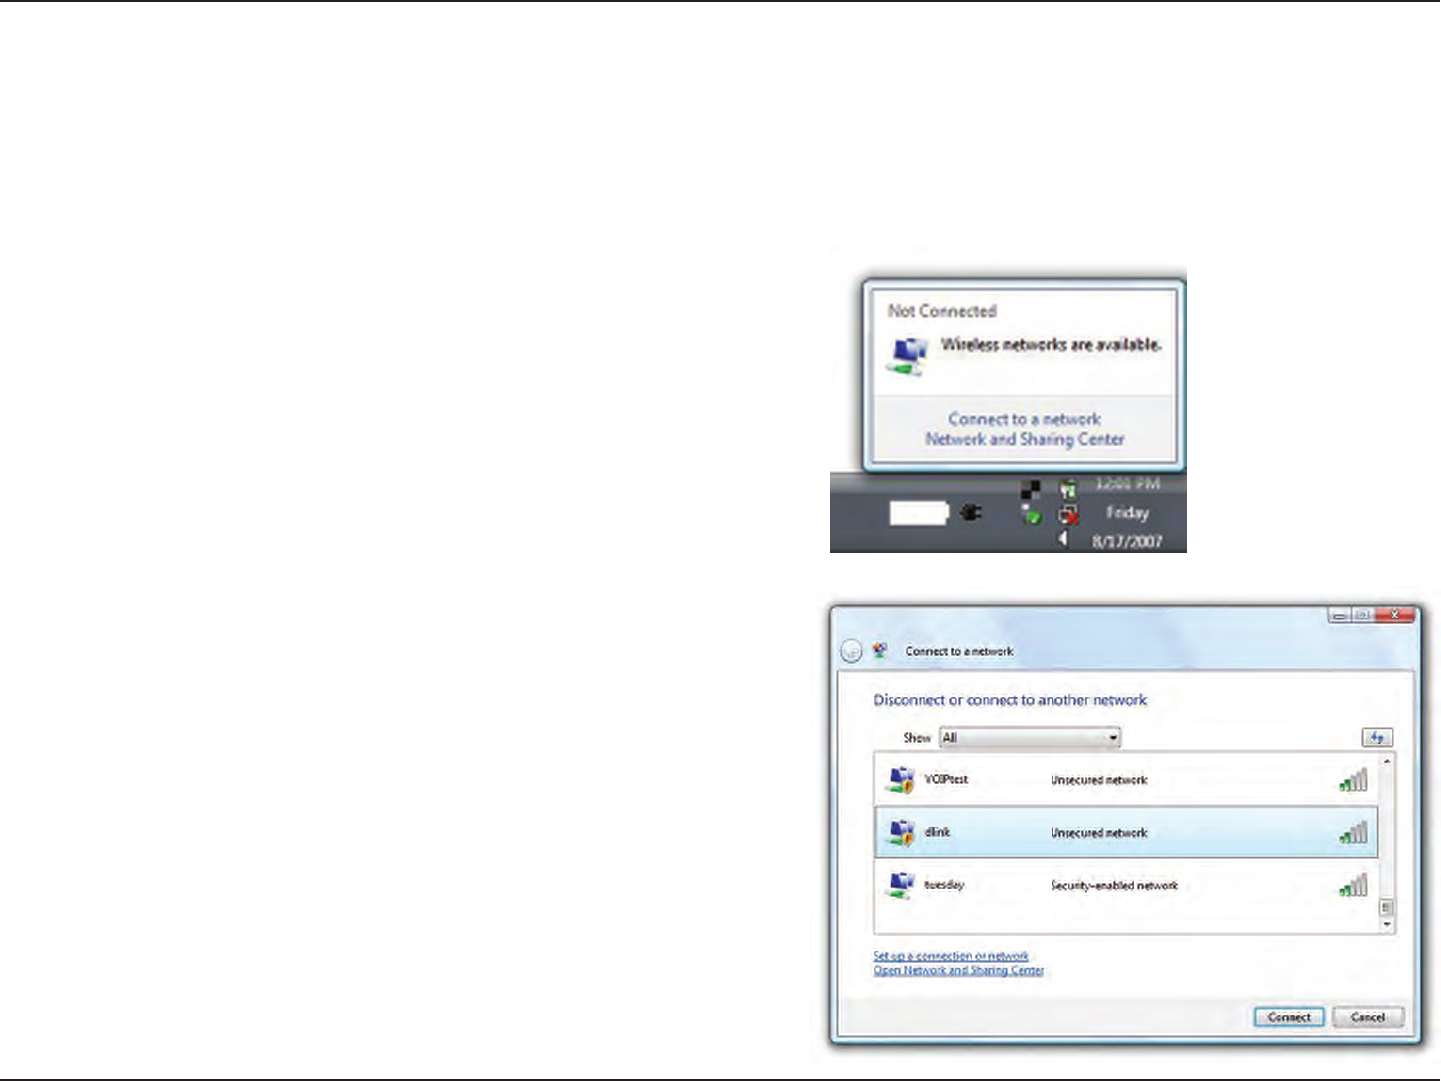
Windows® 7
It is recommended to enable wireless security (WPA/WPA2) on your wireless router or access point before conguring your
wireless adapter. If you are joining an existing network, you will need to know the security key or passphrase being used.
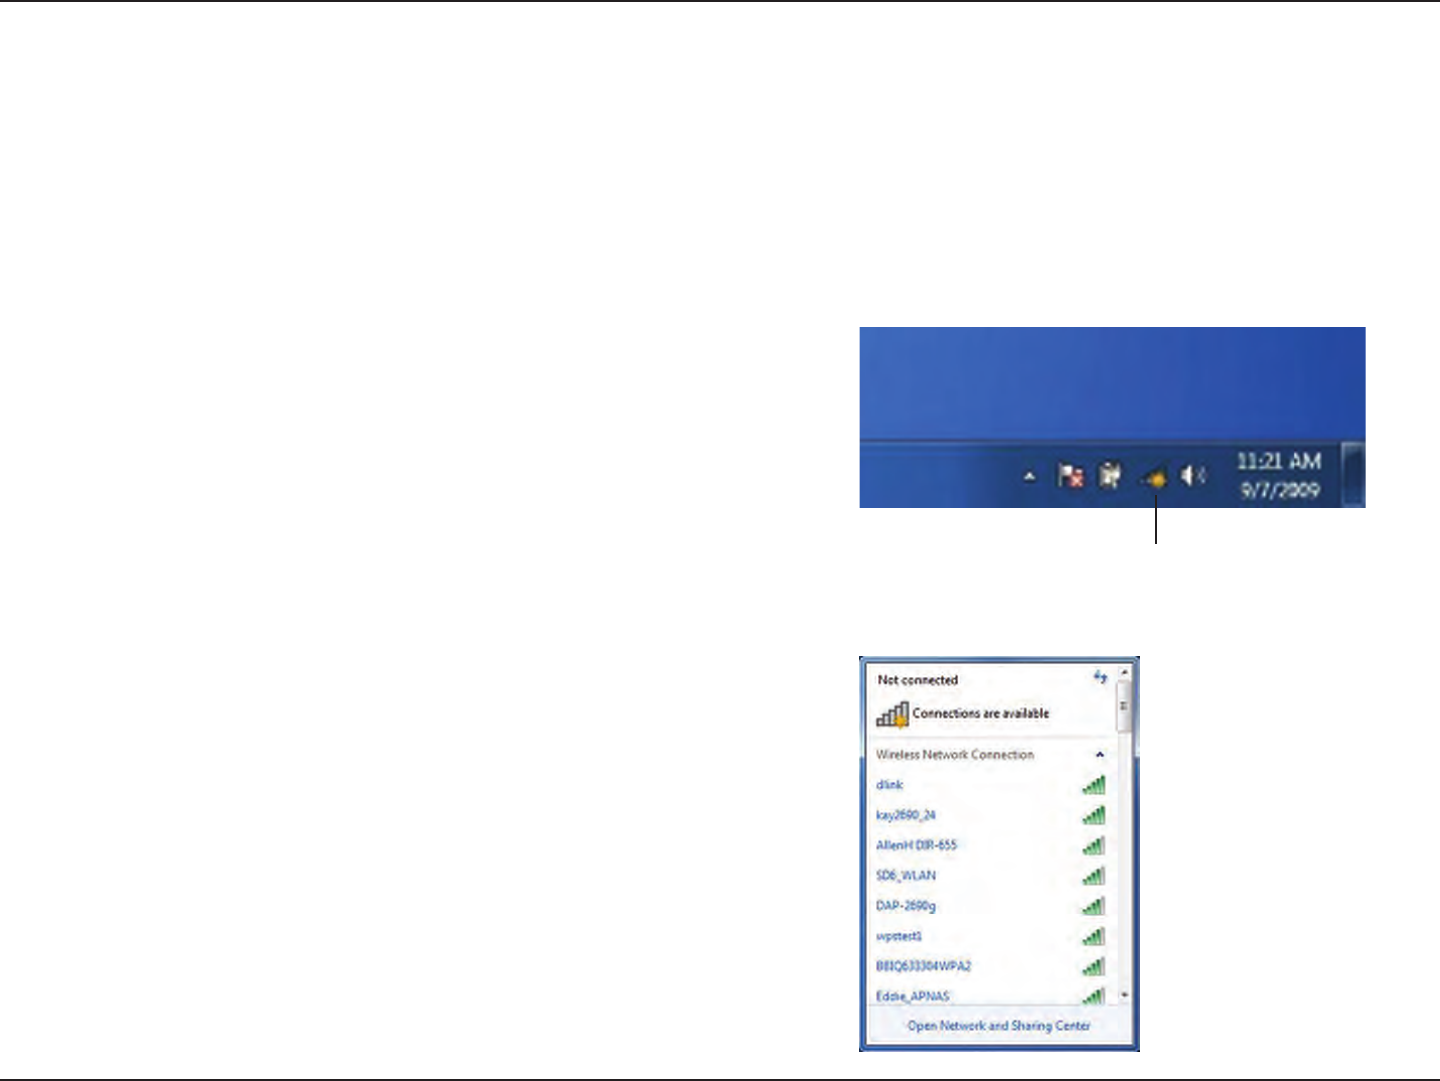
1. Click on the wireless icon in your system tray (lower-right corner).
2. The utility will display any available wireless networks in your area.
Wireless Icon
WPA/WPA2

125D-Link DIR-850L User Manual
Section 4 - Security
3. Highlight the wireless connection with Wi-Fi name (SSID) you would
like to connect to and click the Connect button.
If you get a good signal but cannot access the Internet, check your
TCP/IP settings for your wireless adapter. Refer to the Networking
Basics section in this manual for more information.
4. The following window appears while your computer tries to
connect to the router.

126D-Link DIR-850L User Manual
Section 4 - Security
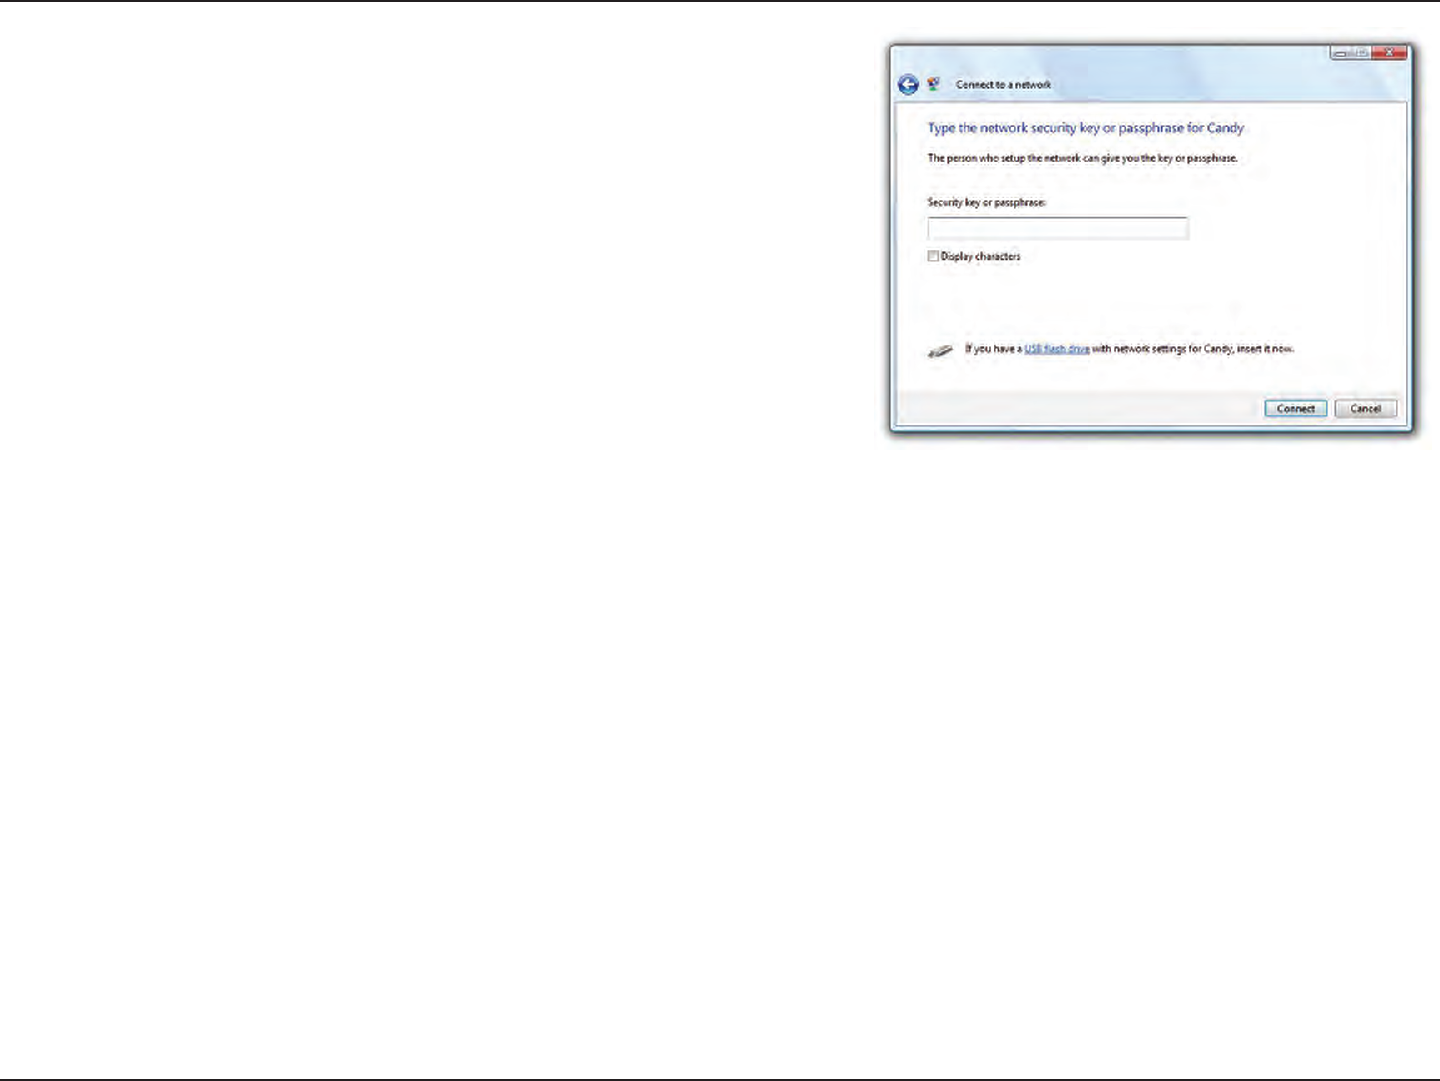
5. Enter the same security key or passphrase (Wi-Fi password) that is
on your router and click Connect. You can also connect by pushing
the WPS button on the router.
It may take 20-30 seconds to connect to the wireless network. If the
connection fails, please verify that the security settings are correct. The
key or passphrase must be exactly the same as on the wireless router.

127D-Link DIR-850L User Manual
Section 4 - Security
WPS
The WPS feature of the DIR-850L can be congured using Windows® 7. Carry out the following steps to use Windows® 7 to
congure the WPS feature:
1. Click the Start button and select Computer from the Start menu.
2. Click Network on the left side.
128D-Link DIR-850L User Manual
Section 4 - Security
3. Double-click the DIR-850L.
4. Input the WPS PIN number (displayed in the WPS window on the
Router’s LCD screen or in the Setup > Wireless Setup menu in
the Router’s Web UI) and click Next.
129D-Link DIR-850L User Manual
Section 4 - Security
5. Type a name to identify the network.
6. To congure advanced settings, click the icon.
Click Next to continue.
130D-Link DIR-850L User Manual
Section 4 - Security
7. The following window appears while the Router is being
congured.
Wait for the conguration to complete.
8. The following window informs you that WPS on the router has
been setup successfully.
Make a note of the security key as you may need to provide this
security key if adding an older wireless device to the network in
the future.
9. Click Close to complete WPS setup.
131D-Link DIR-850L User Manual
Section 5 - Connecting to a Wireless Network
Windows Vista®
Windows Vista® users may use the built-in wireless utility. If you are using another company’s utility, please refer to the user
manual of your wireless adapter for help with connecting to a wireless network. Most utilities will have a “site survey” option
similar to the Windows Vista® utility as seen below.
Right-click on the wireless computer icon in your system tray (lower-right
corner next to the time). Select Connect to a network.
If you receive the Wireless Networks Detected bubble, click on the
center of the bubble to access the utility.
or
The utility will display any available wireless networks in your area. Click
on a network (displayed using the SSID) and click the Connect button.
If you get a good signal but cannot access the Internet, check you TCP/
IP settings for your wireless adapter. Refer to the Networking Basics
section in this manual for more information.
132D-Link DIR-850L User Manual
Section 5 - Connecting to a Wireless Network
WPA/WPA2
It is recommended to enable wireless security (WPA/WPA2) on your wireless router or access point before conguring your
wireless adapter. If you are joining an existing network, you will need to know the security key or passphrase being used.
2. Highlight the Wi-Fi name (SSID) you would like to connect to and
click Connect.
1. Open the Windows Vista® Wireless Utility by right-clicking on the
wireless computer icon in your system tray (lower right corner of
screen). Select Connect to a network.
133D-Link DIR-850L User Manual
Section 5 - Connecting to a Wireless Network
3. Enter the same security key or passphrase (Wi-Fi password) that is on
your router and click Connect.
It may take 20-30 seconds to connect to the wireless network. If the
connection fails, please verify that the security settings are correct. The
key or passphrase must be exactly the same as on the wireless router.
134D-Link DIR-850L User Manual
Section 5 - Connecting to a Wireless Network
WPS/WCN 2.0
The router supports Wi-Fi protection, referred to as WCN 2.0 in Windows Vista®. The following instructions for setting this up
depends on whether you are using Windows Vista® to congure the router or third party software.
When you rst set up the router, Wi-Fi protection is disabled and uncongured. To enjoy the benets of Wi-Fi protection, the
router must be both enabled and congured. There are three basic methods to accomplish this: use Windows Vista’s built-in
support for WCN 2.0, use software provided by a third party, or manually congure.
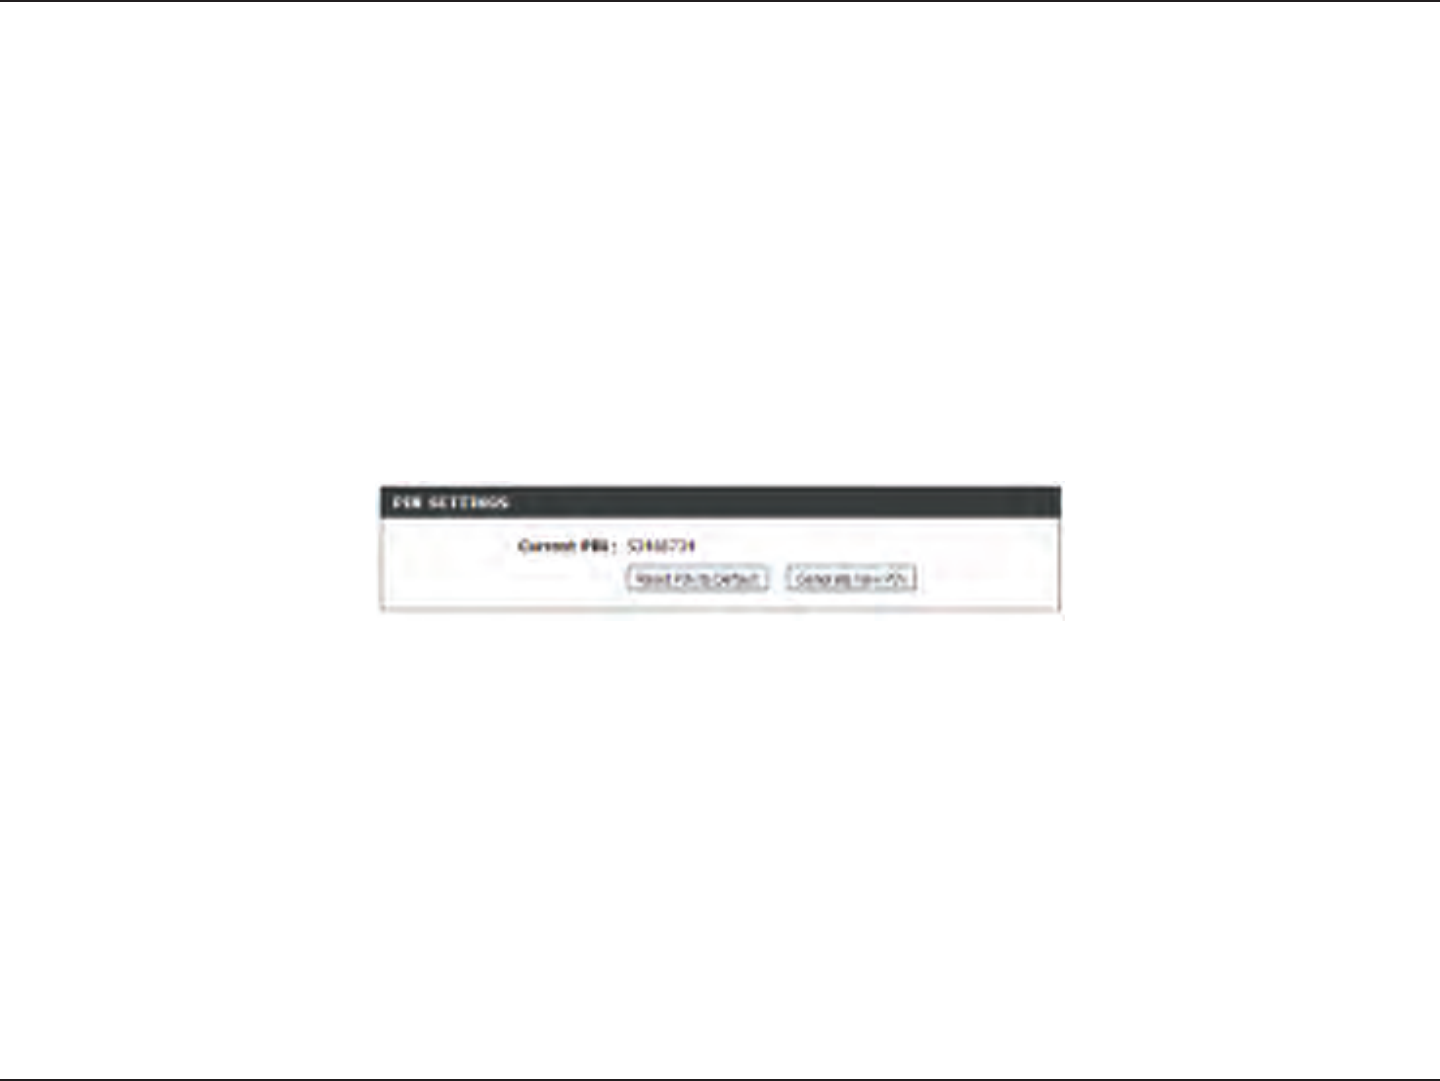
If you are running Windows Vista®, log into the router and click the Enable checkbox in the Basic > Wireless section. Use the
Current PIN that is displayed on the Advanced > Wi-Fi Protected Setup section or choose to click the Generate New PIN
button or Reset PIN to Default button.
If you are using third party software to set up Wi-Fi Protection, carefully follow the directions. When you are nished, proceed
to the next section to set up the newly-congured router.

135D-Link DIR-850L User Manual
Section 5 - Connecting to a Wireless Network
Windows® XP
Windows® XP users may use the built-in wireless utility (Zero Conguration Utility). The following instructions are for Service
Pack 2 users. If you are using another company’s utility, please refer to the user manual of your wireless adapter for help with
connecting to a wireless network. Most utilities will have a “site survey” option similar to the Windows® XP utility as seen below.
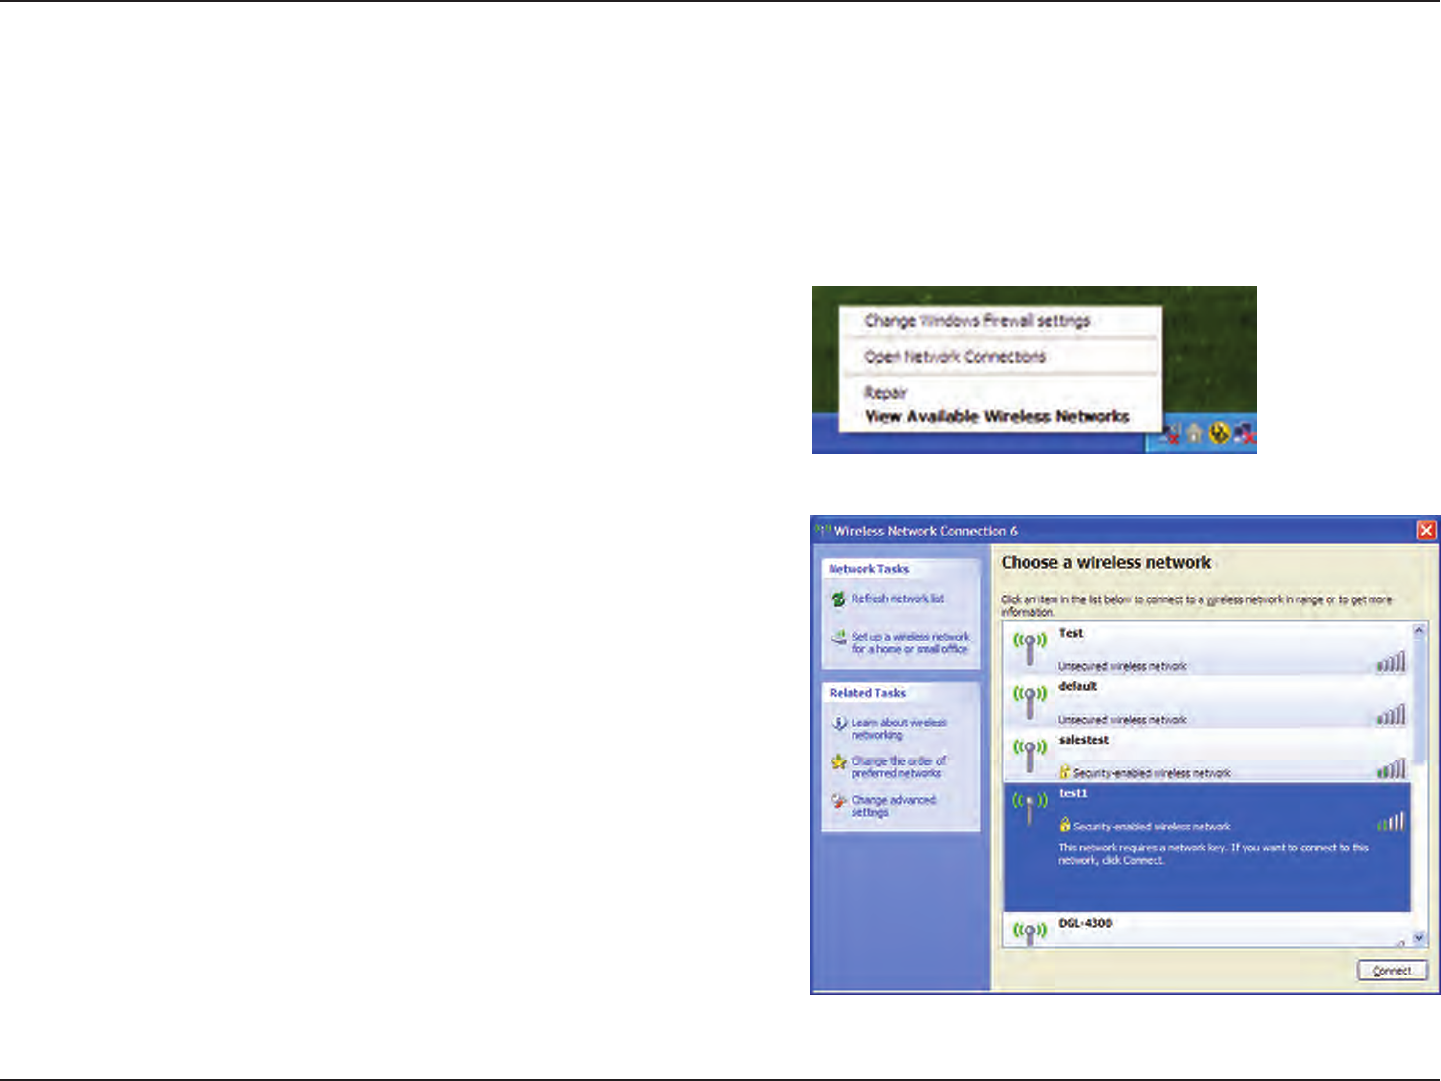
Right-click on the wireless computer icon in your system tray (lower-right
corner next to the time). Select View Available Wireless Networks.
If you receive the Wireless Networks Detected bubble, click on the
center of the bubble to access the utility.
or
The utility will display any available wireless networks in your area. Click
on a Wi-Fi network (displayed using the SSID) and click the Connect
button.
If you get a good signal but cannot access the Internet, check you TCP/
IP settings for your wireless adapter. Refer to the Networking Basics
section in this manual for more information.
136D-Link DIR-850L User Manual
Section 5 - Connecting to a Wireless Network
It is recommended to enable WPA on your wireless router or access point before conguring your wireless adapter. If you are
joining an existing network, you will need to know the WPA key being used.
2. Highlight the Wi-Fi network (SSID) you would like to connect
to and click Connect.
1. Open the Windows® XP Wireless Utility by right-clicking on the
wireless computer icon in your system tray (lower-right corner
of screen). Select View Available Wireless Networks.
WPA/WPA2
137D-Link DIR-850L User Manual
Section 5 - Connecting to a Wireless Network
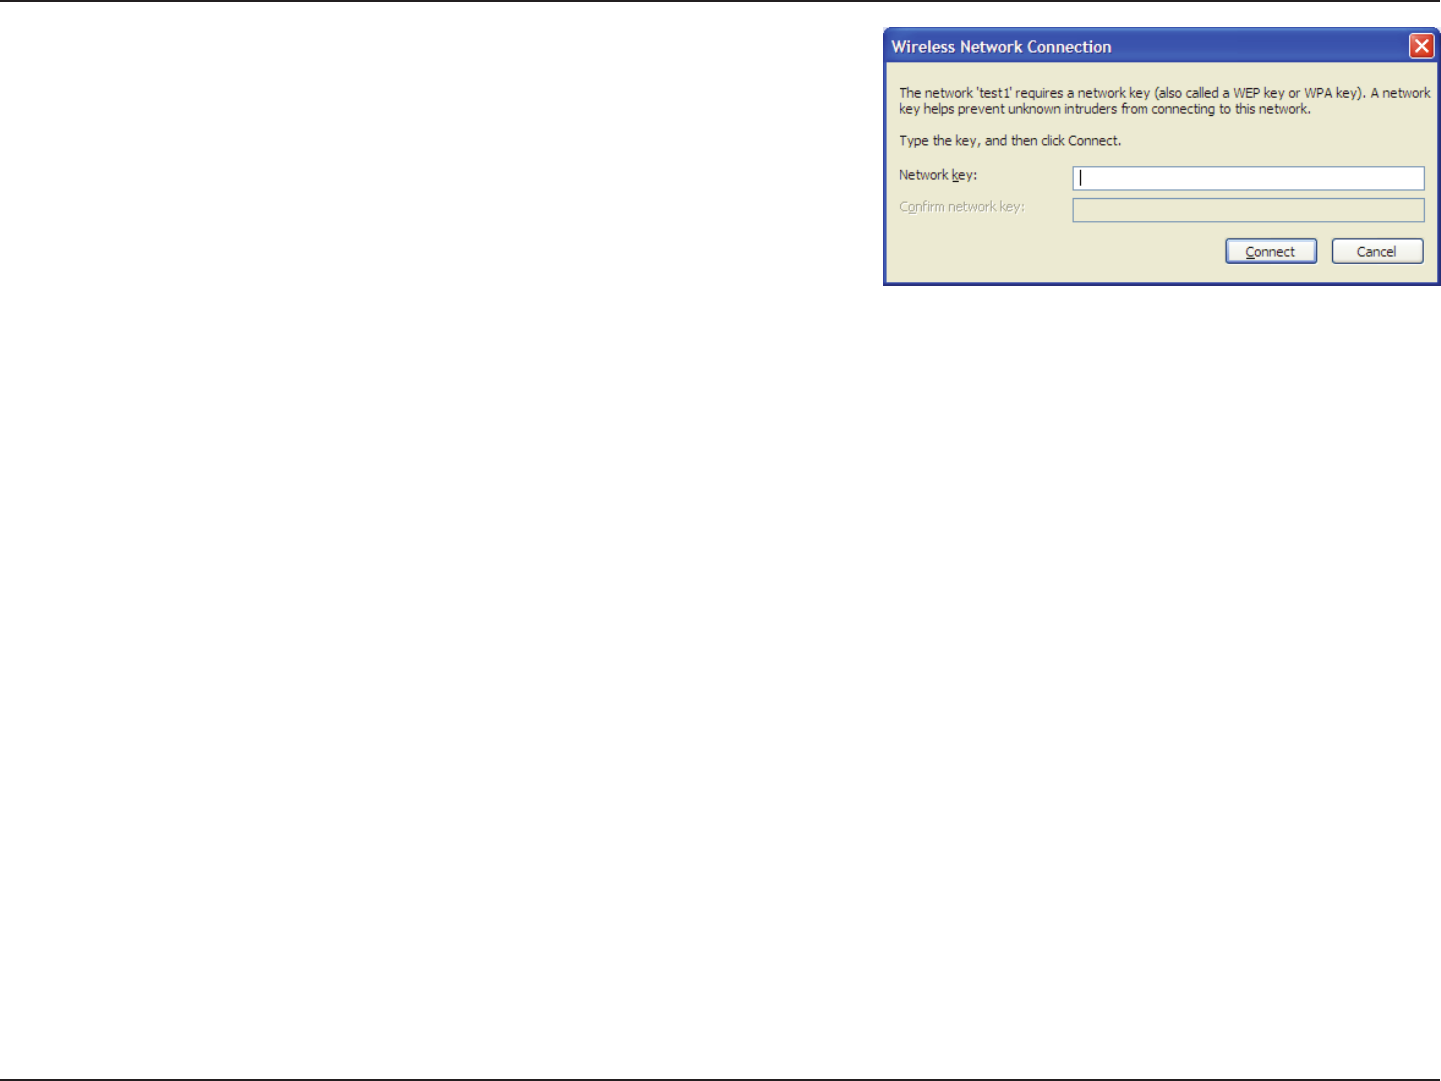
3. The Wireless Network Connection box will appear. Enter the WPA-PSK
Wi-Fi password and click Connect.
It may take 20-30 seconds to connect to the wireless network. If the
connection fails, please verify that the WPA-PSK settings are correct. The
Wi-Fi password must be exactly the same as on the wireless router.

138D-Link DIR-850L User Manual
Section 6 - Troubleshooting
Troubleshooting
This chapter provides solutions to problems that can occur during the installation and operation of the DIR-850L. Read the
following descriptions if you are having problems. The examples below are illustrated in Windows® XP. If you have a dierent
operating system, the screenshots on your computer will look similar to the following examples.
1. Why can’t I access the web-based conguration utility?
When entering the IP address of the D-Link router (192.168.0.1 for example), you are not connecting to a website nor do you
have to be connected to the Internet. The device has the utility built-in to a ROM chip in the device itself. Your computer must
be on the same IP subnet to connect to the web-based utility.
• Make sure you have an updated Java-enabled web browser. We recommend the following:
- Microsoft Internet Explorer® 7 and higher
- Mozilla Firefox 3.5 and higher
- Google™ Chrome 8 and higher
- Apple Safari 4 and higher
• Verify physical connectivity by checking for solid link lights on the device. If you do not get a solid link light, try using a
dierent cable or connect to a dierent port on the device if possible. If the computer is turned o, the link light may not be
on.
• Disable any Internet security software running on the computer. Software rewalls such as Zone Alarm, Black Ice, Sygate,
Norton Personal Firewall, and Windows® XP rewall may block access to the conguration pages. Check the help les included
with your rewall software for more information on disabling or conguring it.

139D-Link DIR-850L User Manual
Section 6 - Troubleshooting
• Congure your Internet settings:
• Go to Start > Settings > Control Panel. Double-click the Internet Options Icon. From the Security tab, click
the button to restore the settings to their defaults.
• Click the Connection tab and set the dial-up option to Never Dial a Connection. Click the LAN Settings button.
Make sure nothing is checked. Click OK.
• Go to the Advanced tab and click the button to restore these settings to their defaults. Click OK three times.
• Close your web browser (if open) and open it.
• Access the web management. Open your web browser and enter the IP address of your D-Link router in the address bar. This
should open the login page for your web management.
• If you still cannot access the conguration, unplug the power to the router for 10 seconds and plug back in. Wait about 30
seconds and try accessing the conguration. If you have multiple computers, try connecting using a dierent computer.
2. What can I do if I forgot my password?
If you forgot your password, you must reset your router. Unfortunately this process will change all your settings back to the
factory defaults.
To reset the router, locate the reset button (hole) on the rear panel of the unit. With the router powered on, use a paperclip
to hold the button down for 10 seconds. Release the button and the router will go through its reboot process. Wait about 30
seconds to access the router. The default IP address is 192.168.0.1. When logging in, the username is admin and leave the
password box empty.
140D-Link DIR-850L User Manual
Section 6 - Troubleshooting
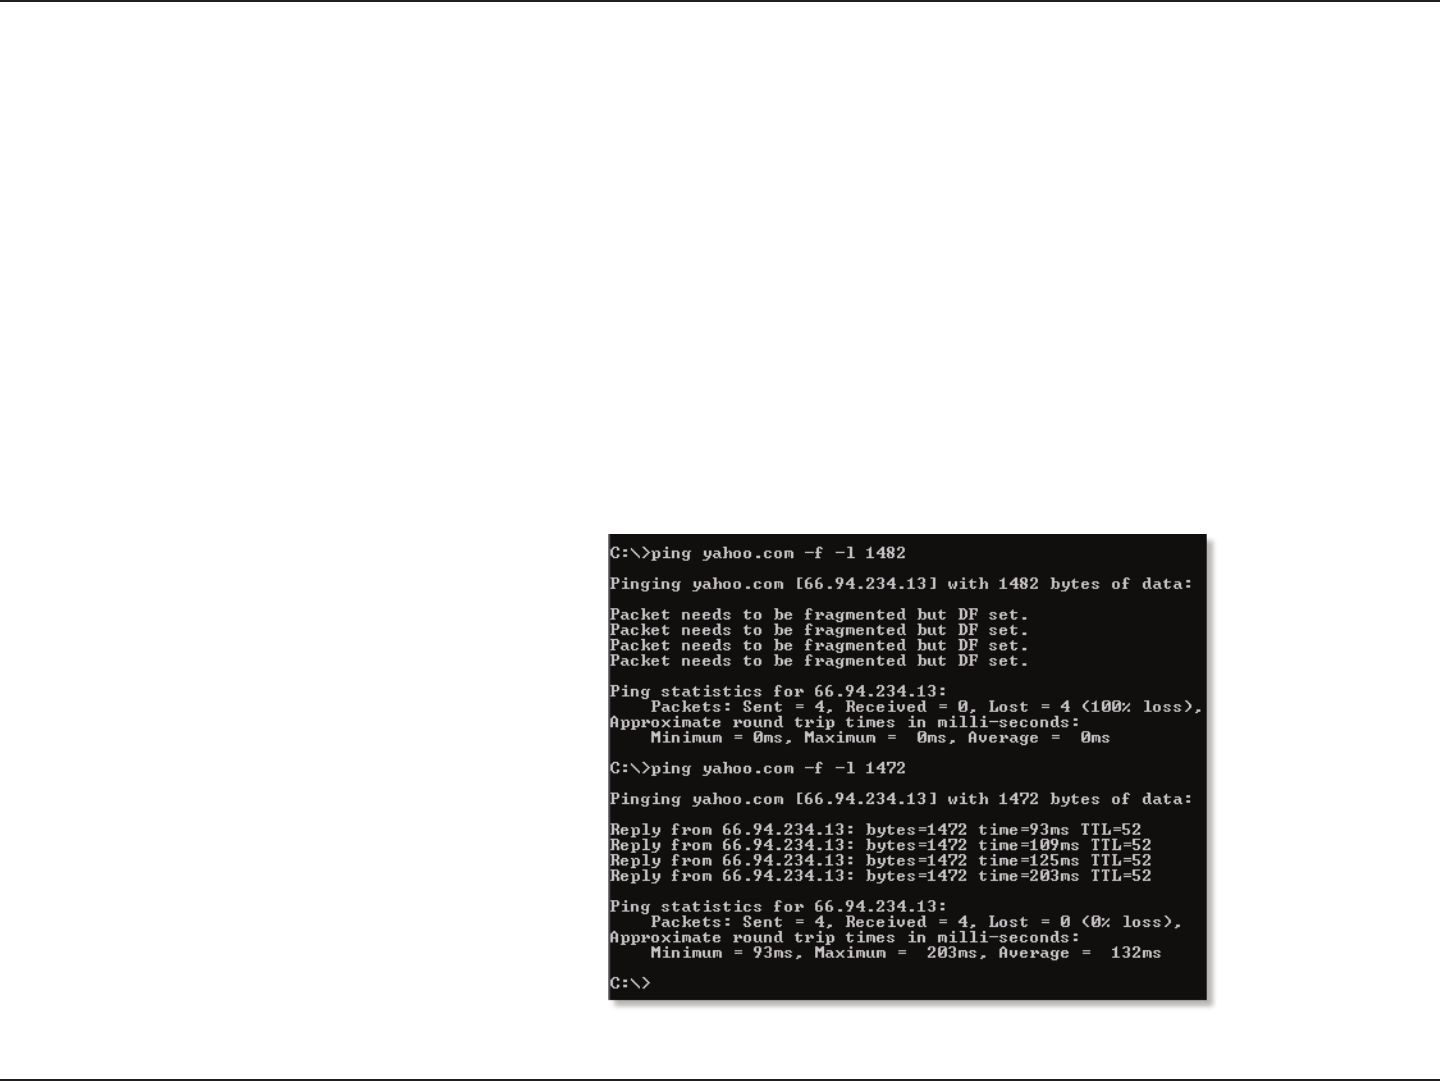
3. Why can’t I connect to certain sites or send and receive emails when connecting through my router?
If you are having a problem sending or receiving email, or connecting to secure sites such as eBay, banking sites, and Hotmail,
we suggest lowering the MTU in increments of ten (Ex. 1492, 1482, 1472, etc).
To nd the proper MTU Size, you’ll have to do a special ping of the destination you’re trying to go to. A destination could be
another computer, or a URL.
• Click on Start and then click Run.
• Windows® 95, 98, and Me users type in command (Windows® NT, 2000, XP, Vista®, and 7 users type in cmd) and
press Enter (or click OK).
• Once the window opens, you’ll need to do a special ping. Use the following syntax:
ping [url] [-f] [-l] [MTU value]
Example: ping yahoo.com -f -l 1472

141D-Link DIR-850L User Manual
Section 6 - Troubleshooting
You should start at 1472 and work your way down by 10 each time. Once you get a reply, go up by 2 until you get a fragmented
packet. Take that value and add 28 to the value to account for the various TCP/IP headers. For example, lets say that 1452 was the
proper value, the actual MTU size would be 1480, which is the optimum for the network we’re working with (1452+28=1480).
Once you nd your MTU, you can now congure your router with the proper MTU size.
To change the MTU rate on your router follow the steps below:
• Open your browser, enter the IP address of your router (192.168.0.1) and click OK.
• Enter your username (admin) and password (blank by default). Click OK to enter the web conguration page
for the device.
• Click on Setup and then click Manual Congure.
• To change the MTU enter the number in the MTU eld and click Save Settings to save your settings.
• Test your email. If changing the MTU does not resolve the problem, continue changing the MTU in increments
of ten.

142D-Link DIR-850L User Manual
Appendix A - Wireless Basics
D-Link wireless products are based on industry standards to provide easy-to-use and compatible high-speed wireless
connectivity within your home, business or public access wireless networks. Strictly adhering to the IEEE standard, the D-Link
wireless family of products will allow you to securely access the data you want, when and where you want it. You will be able
to enjoy the freedom that wireless networking delivers.
A wireless local area network (WLAN) is a cellular computer network that transmits and receives data with radio signals instead of
wires. Wireless LANs are used increasingly in both home and oce environments, and public areas such as airports, coee shops
and universities. Innovative ways to utilize WLAN technology are helping people to work and communicate more eciently.
Increased mobility and the absence of cabling and other xed infrastructure have proven to be benecial for many users.
Wireless users can use the same applications they use on a wired network. Wireless adapter cards used on laptop and desktop
systems support the same protocols as Ethernet adapter cards.
Under many circumstances, it may be desirable for mobile network devices to link to a conventional Ethernet LAN in order to
use servers, printers or an Internet connection supplied through the wired LAN. A Wireless Router is a device used to provide
this link.
Wireless Basics

143D-Link DIR-850L User Manual
Appendix A - Wireless Basics
What is Wireless?
Wireless or Wi-Fi technology is another way of connecting your computer to the network without using wires. Wi-Fi uses radio
frequency to connect wirelessly, so you have the freedom to connect computers anywhere in your home or oce network.
Why D-Link Wireless?
D-Link is the worldwide leader and award winning designer, developer, and manufacturer of networking products. D-Link
delivers the performance you need at a price you can aord. D-Link has all the products you need to build your network.
How does wireless work?
Wireless works similar to how cordless phone work, through radio signals to transmit data from one point A to point B. But
wireless technology has restrictions as to how you can access the network. You must be within the wireless network range area
to be able to connect your computer. There are two dierent types of wireless networks Wireless Local Area Network (WLAN),
and Wireless Personal Area Network (WPAN).
Wireless Local Area Network (WLAN)
In a wireless local area network, a device called an Access Point (AP) connects computers to the network. The access point has
a small antenna attached to it, which allows it to transmit data back and forth over radio signals. With an indoor access point
as seen in the picture, the signal can travel up to 300 feet. With an outdoor access point the signal can reach out up to 30 miles
to serve places like manufacturing plants, industrial locations, college and high school campuses, airports, golf courses, and
many other outdoor venues.

144D-Link DIR-850L User Manual
Appendix A - Wireless Basics
Wireless Personal Area Network (WPAN)
Bluetooth is the industry standard wireless technology used for WPAN. Bluetooth devices in WPAN operate in a range up to
30 feet away.
Compared to WLAN the speed and wireless operation range are both less than WLAN, but in return it doesn’t use nearly as
much power which makes it ideal for personal devices, such as mobile phones, PDAs, headphones, laptops, speakers, and other
devices that operate on batteries.
Who uses wireless?
Wireless technology as become so popular in recent years that almost everyone is using it, whether it’s for home, oce, business,
D-Link has a wireless solution for it.
Home
• Gives everyone at home broadband access
• Surf the web, check email, instant message, etc.
• Gets rid of the cables around the house
• Simple and easy to use
Small Oce and Home Oce
• Stay on top of everything at home as you would at oce
• Remotely access your oce network from home
• Share Internet connection and printer with multiple computers
• No need to dedicate oce space

145D-Link DIR-850L User Manual
Appendix A - Wireless Basics
Where is wireless used?
Wireless technology is expanding everywhere not just at home or oce. People like the freedom of mobility and it’s becoming
so popular that more and more public facilities now provide wireless access to attract people. The wireless connection in public
places is usually called “hotspots”.
Using a D-Link Cardbus Adapter with your laptop, you can access the hotspot to connect to Internet from remote locations
like: Airports, Hotels, Coee Shops, Libraries, Restaurants, and Convention Centers.
Wireless network is easy to setup, but if you’re installing it for the rst time it could be quite a task not knowing where to start.
That’s why we’ve put together a few setup steps and tips to help you through the process of setting up a wireless network.
Tips
Here are a few things to keep in mind, when you install a wireless network.
Centralize your router or Access Point
Make sure you place the router/access point in a centralized location within your network for the best performance. Try to
place the router/access point as high as possible in the room, so the signal gets dispersed throughout your home. If you have
a two-story home, you may need a repeater to boost the signal to extend the range.
Eliminate Interference
Place home appliances such as cordless telephones, microwaves, and televisions as far away as possible from the router/access
point. This would signicantly reduce any interference that the appliances might cause since they operate on same frequency.
Security

146D-Link DIR-850L User Manual
Appendix A - Wireless Basics
Don’t let you next-door neighbors or intruders connect to your wireless network. Secure your wireless network by turning on
the WPA or WEP security feature on the router. Refer to product manual for detail information on how to set it up.
There are basically two modes of networking:
• Infrastructure – All wireless clients will connect to an access point or wireless router.
• Ad-Hoc – Directly connecting to another computer, for peer-to-peer communication, using wireless network
adapters on each computer, such as two or more DIR-850L wireless network Cardbus adapters.
An Infrastructure network contains an Access Point or wireless router. All the wireless devices, or clients, will connect to the
wireless router or access point.
An Ad-Hoc network contains only clients, such as laptops with wireless cardbus adapters. All the adapters must be in Ad-Hoc
mode to communicate.
Wireless Modes
147D-Link DIR-850L User Manual
Appendix B - Networking Basics
Networking Basics
Check your IP address
After you install your new D-Link adapter, by default, the TCP/IP settings should be set to obtain an IP address from a DHCP
server (i.e. wireless router) automatically. To verify your IP address, please follow the steps below.
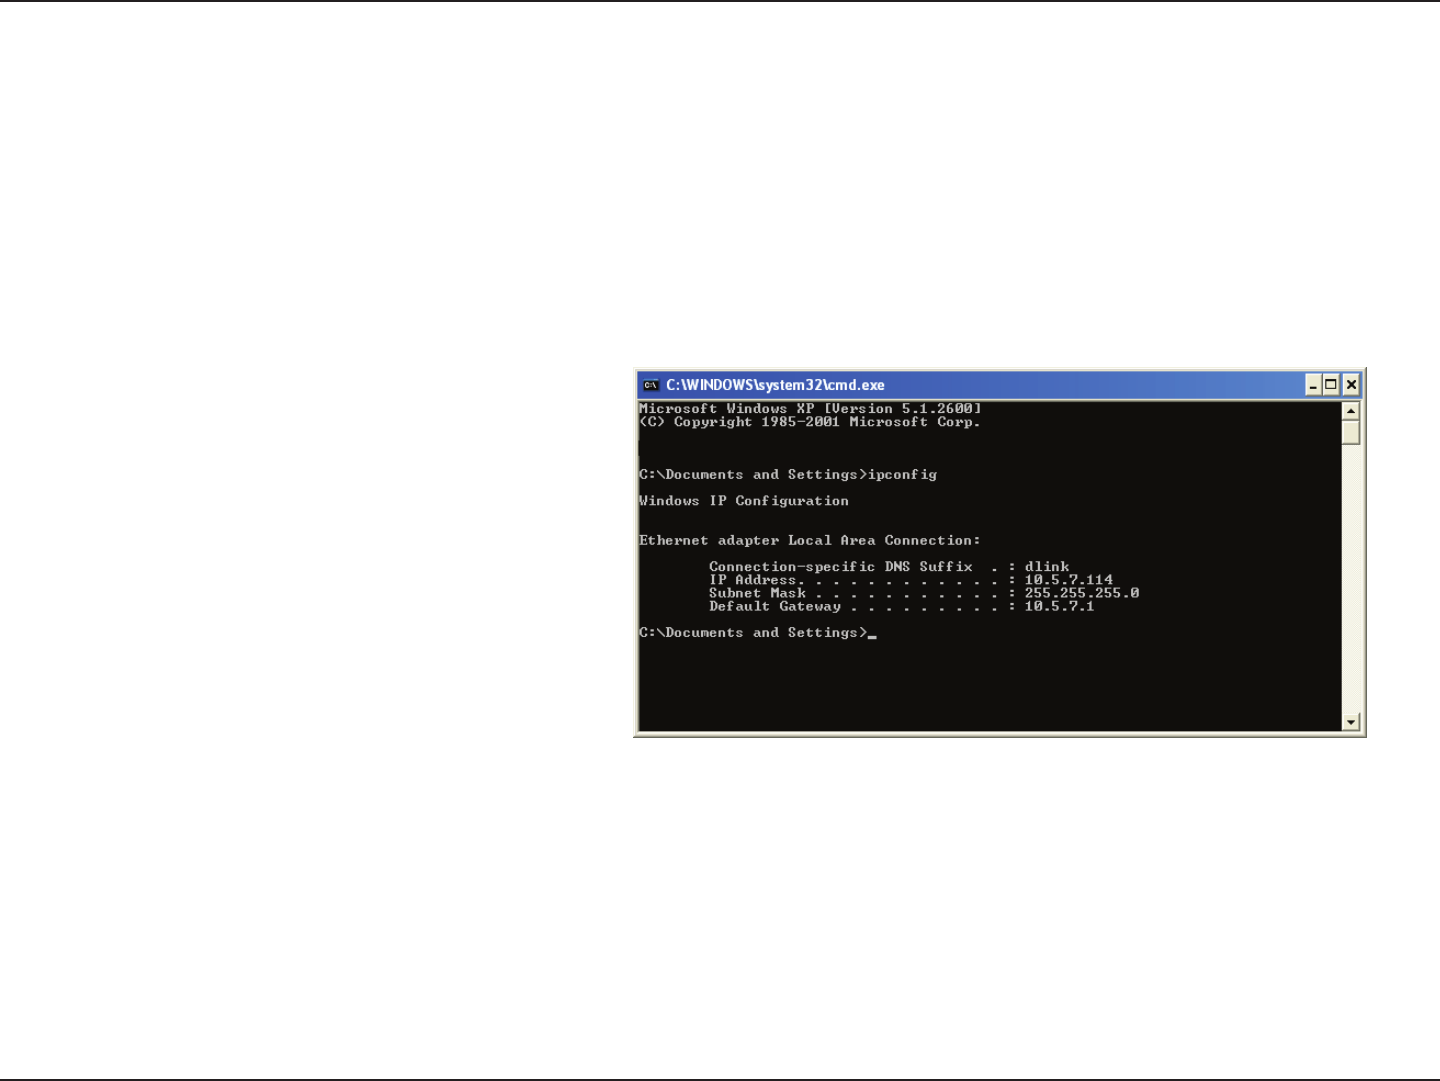
Click on Start > Run. In the run box type cmd and click OK. (Windows® 7/Vista® users type cmd in the Start Search box.)
At the prompt, type ipcong and press Enter.
This will display the IP address, subnet mask, and the
default gateway of your adapter.
If the address is 0.0.0.0, check your adapter installation,
security settings, and the settings on your router.
Some rewall software programs may block a DHCP
request on newly installed adapters.
148D-Link DIR-850L User Manual
Appendix B - Networking Basics
Statically Assign an IP address
If you are not using a DHCP capable gateway/router, or you need to assign a static IP address, please follow the steps below:
Step 1
Windows® 7 - Click on Start > Control Panel > Network and Internet > Network and Sharing Center.
Windows Vista® - Click on Start > Control Panel > Network and Internet > Network and Sharing Center > Manage Network
Connections.
Windows® XP - Click on Start > Control Panel > Network Connections.
Windows® 2000 - From the desktop, right-click My Network Places > Properties.
Step 2
Right-click on the Local Area Connection which represents your network adapter and select Properties.
Step 3
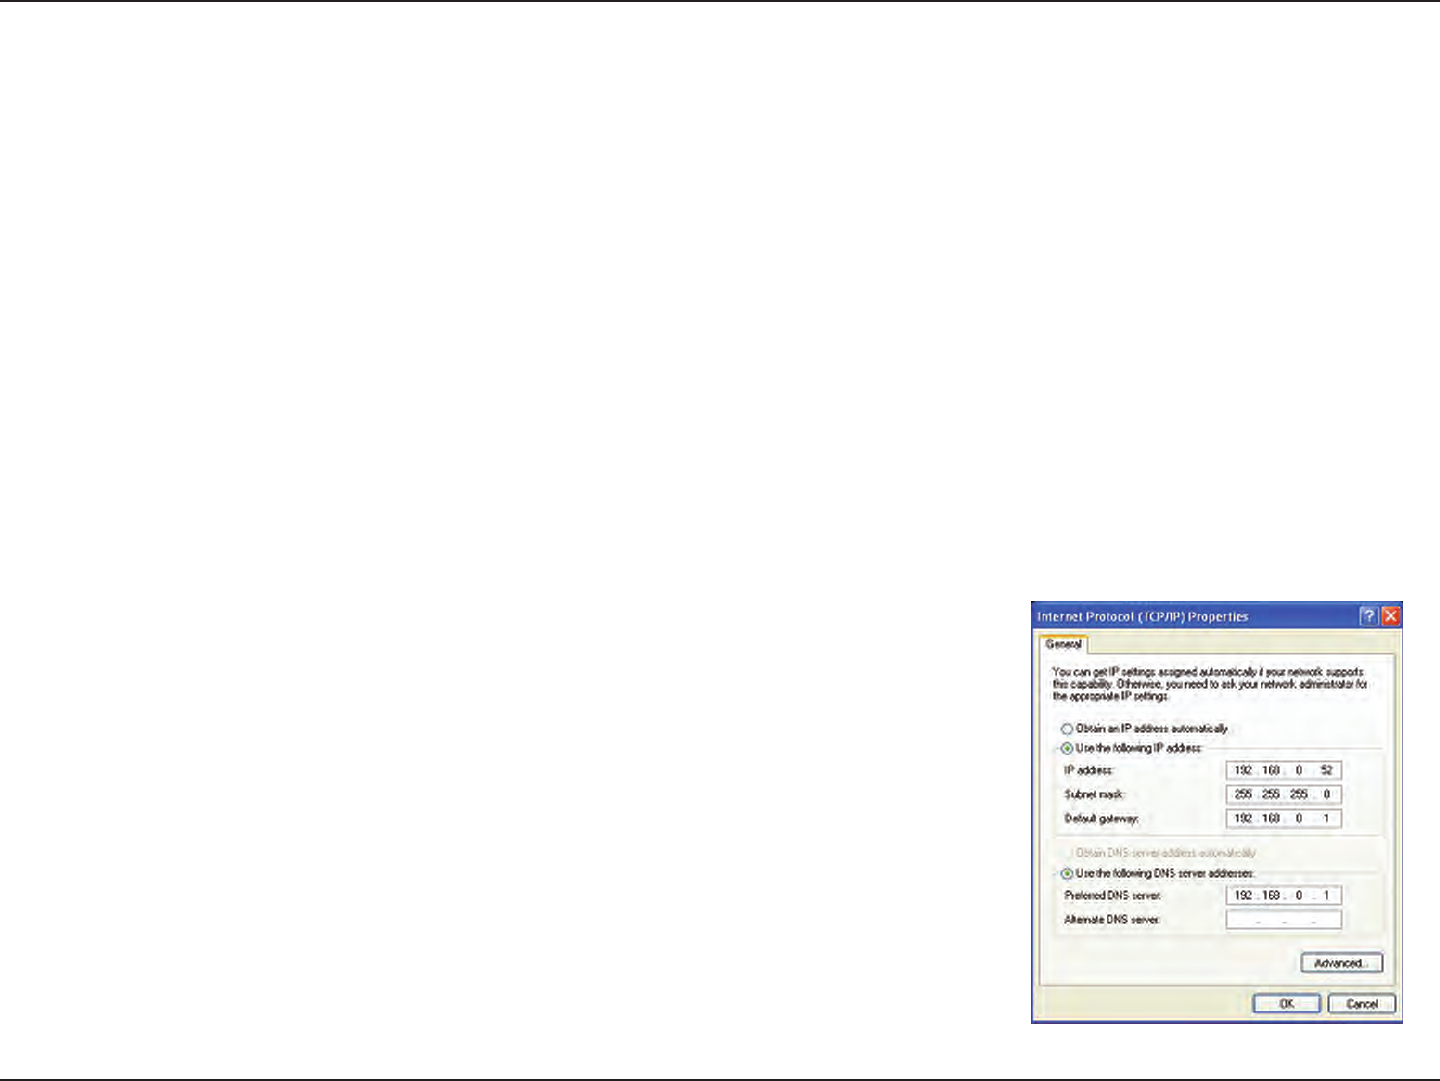
Highlight Internet Protocol (TCP/IP) and click Properties.
Step 4
Click Use the following IP address and enter an IP address that is on the same subnet
as your network or the LAN IP address on your router.
Example: If the router´s LAN IP address is 192.168.0.1, make your IP address 192.168.0.X
where X is a number between 2 and 99. Make sure that the number you choose is not
in use on the network. Set the Default Gateway the same as the LAN IP address of your
router (I.E. 192.168.0.1).
Set Primary DNS the same as the LAN IP address of your router (192.168.0.1). The
Secondary DNS is not needed or you may enter a DNS server from your ISP.
Step 5
Click OK twice to save your settings.

149D-Link DIR-850L User Manual
Appendix C - Technical Specications
Technical Specications
Hardware Specications
• LAN Interface: Four 10/100/1000Mbps LAN ports
• WAN Interface: One 10/100/1000Mbps Internet port
• Wireless Interface (2.4Ghz): IEEE 802.11b/g/n
• Wireless Interface (5Ghz): IEEE 802.11a/n/ac
• USB Interface: Complaint USB 2.0
Operating Voltage
• Input: 100~240V (±20%), 50~60Hz
• Output: DC12V, 2A
Temperature
• Operating: 32 ~ 104oF (0 ~ 40oC)
• Non-Operating: -4 ~ 149oF (-20 ~ 65oC)
Humidity
• Operating: 10% - 90% non-condensing
• Non-Operating: 5% - 95% non-condesing
Wireless Frequency Range
• IEEE 802.11a: 5180 MHz~5240 MHz, 5745 MHz~5825 MHz
• IEEE 802.11b: 2400 MHz~2483 MHz
• IEEE 802.11g: 2400 MHz~2484 MHz
• IEEE 802.11n: 2400 MHz~2484 MHz, 5180 MHz~5240 MHz, 5745
MHz~5825 MHz
• IEEE 802.11ac: 5180 MHz~5240 MHz, 5745 MHz~5825 MHz
Wireless Bandwidth Rate
• IEEE 802.11a: 54, 48, 36, 24, 18, 12, 9, and 6 Mbps
• IEEE 802.11b: 11, 5.5, 2, and 1 Mbps
• IEEE 802.11g: 54, 48, 36, 24, 18, 12, 9, and 6 Mbps
• IEEE 802.11n: 6.5 to 300 Mbps
• IEEE 802.11ac(Draft): 6.5 to 1300 Mbps
Antenna Type
• Four Internal Antennas (Two 2.4 GHz Antennas, Two 5 GHz Anten-
nas)
Wireless Security
• 64/128bit WEP, WPA/WPA2-Personal, WPA/WPA2-Enterprise, WPS
(PIN & PBC)
Certications
• FCC, CE, C-Tick.
• CSA internation
• Wi-Fi / WPS
• DLNA
• IPv6 Ready
• WIN 8
• CCC
Dimensions & Weight
• 93 x 116 x 145mm (3.7 x 4.6 x 5.76 inch)
• 330 grams (0.73lbs)

150D-Link DIR-850L User Manual
Federal Communication Commission Interference Statement
This device complies with Part 15 of the FCC Rules. Operation is subject to the following two conditions: (1) This device may
not cause harmful interference, and (2) this device must accept any interference received, including interference that may
cause undesired operation.
This equipment has been tested and found to comply with the limits for a Class B digital device, pursuant to Part 15 of the
FCC Rules. These limits are designed to provide reasonable protection against harmful interference in a residential instal-
lation. This equipment generates, uses and can radiate radio frequency energy and, if not installed and used in accordance
with the instructions, may cause harmful interference to radio communications. However, there is no guarantee that inter-
ference will not occur in a particular installation. If this equipment does cause harmful interference to radio or television
reception, which can be determined by turning the equipment o and on, the user is encouraged to try to correct the inter-
ference by one of the following measures:
- Reorient or relocate the receiving antenna.
- Increase the separation between the equipment and receiver.
- Connect the equipment into an outlet on a circuit dierent from that to which the receiver is connected.
- Consult the dealer or an experienced radio/TV technician for help.
FCC Caution: Any changes or modications not expressly approved by the party responsible for compliance could void the
user’s authority to operate this equipment.
This transmitter must not be co-located or operating in conjunction with any other antenna or transmitter.
Operations in the 5.15-5.25GHz band are restricted to indoor usage only.
Radiation Exposure Statement:
This equipment complies with FCC radiation exposure limits set forth for an uncontrolled environment. This equipment
should be installed and operated with minimum distance 20cm between the radiator & your body.

151D-Link DIR-850L User Manual
Industry Canada statement
This device complies with RSS-210 of the Industry Canada Rules. Operation is subject to the following two conditions:
(1) This device may not cause harmful interference, and (2) this device must accept any interference received, including
interference that may cause undesired operation.
Ce dispositif est conforme à la norme CNR-210 d’Industrie Canada applicable aux appareils radio exempts de licence. Son
fonctionnement est sujet aux deux conditions suivantes: (1) le dispositif ne doit pas produire de brouillage préjudiciable,
et (2) ce dispositif doit accepter tout brouillage reçu, y compris un brouillage susceptible de provoquer un fonctionnement
indésirable.
Caution :
(i) the device for operation in the band 5150-5250 MHz is only for indoor use to reduce the potential for harmful
interference to co-channel mobile satellite systems;
Avertissement:
(i) les dispositifs fonctionnant dans la bande 5 150-5 250 MHz sont réservés uniquement pour une utilisation à l’intérieur an
de réduire les risques de brouillage préjudiciable aux systèmes de satellites mobiles utilisant les mêmes canaux;
Radiation Exposure Statement:
This equipment complies with IC radiation exposure limits set forth for an uncontrolled environment. This equipment
should be installed and operated with minimum distance 20cm between the radiator & your body.
Déclaration d’exposition aux radiations:
Cet équipement est conforme aux limites d’exposition aux rayonnements IC établies pour un environnement non contrôlé.
Cet équipement doit être installé et utilisé avec un minimum de 20 cm de distance entre la source de rayonnement et votre
corps.