D Link OD-2LP-CL DECT-CORDLESS PHONE User Manual USERS MANUAL
D Link Corporation DECT-CORDLESS PHONE USERS MANUAL
D Link >
USERS MANUAL

2.4GHz Digital Spread Spectrum
D-Link 2-line Digital Phone System Dual Dialing Operation Manual
2-line Speakerphone Base and Answering Machine System
with Multiple 2-line Handsets
CIDCW accessed by Base and Handsets
Handsets are expandable up to 8 units
***********************************
OD-2LP-500DAM
The 2-line Digital Phone with multiple handsets. The Model types combination and the
functions are:
Model Types Combination:
Product Item # Main function
OD-2LP-100DAM Phone with dialing keypad
2-line selection on Base
2-line selection on Handset
Answering machine operated at base and handset
speakerphone
Caller ID accessed at base and handset
3-way conference accessed at base and handset
OD-2LP-200DAM OD-2LP-100DAM
OD-2LP-300EH: One Handset with independent charging cradle
OD-2LP-300EH One Handset with independent charging cradle
OD-2LP-400DAM Cordless phone with dialing keypad at base
One handset on cordless base
2-line selection on Base
2-line selection on Handset
Answering machine operated at base and handset
speakerphone
Caller ID accessed at base and handset
3-way conference accessed at base and handset
OD-2LP-500DAM OD-2LP-400DAM

OD-2LP-300EH
PRODUCT FEATURES
When examining your new 2.4G digital phone system, you will find an array of special function
including (take OD-2LP-200DAM as example):
General Product Function:
1. 2-line 2.4G DSS frequency hopping, multiple handsets extension up to 8 or more than 8
handsets.
2. Two lines available for dialing or conversation/ leaving message on mail boxes by base unit
or handset.
3. Line auto selection and line-in-use indicator for each line
4. CID & Call Waiting are accessed either from base unit or from handset
5. Digital Answering System with 5 mail boxes and greetings.
6. 3-way Conference conversation on each line (one outside line and two handsets/or bases on
one C/O line)
7. 3-way conference conversation with 2 lines (two outside lines and one handset/or base
conference)
8. Call transfer: (1) handset transfer to another handset, (2) base via speakerphone and
transfer to handset, (3) handset transfer to base
9. Lines swapping (line hold and change to another line for conversation)
10. Speakerphone on Base
11. Multiple handsets are allowed to register into one base
12. System/Base function programming
13. Personal phonebook for each handset (20 records allowed to save into phonebook
14. 90 groups of Caller ID on system
15. 10 - Memory dialing ( speed dialing ) by one touch button on base
16. 10 groups of Last Number Redial on handset
17. Call Timer: to set up time counter of a call
18. Battery low warning
19. Out-of-range warning
20. Phone with 7 ring volume level adjustment
21. To saving Caller ID into phonebook
22. Alarm setting on handset

23. Handset-to-Handset Intercom without costing on phone
24. Page Finder
25. Pause function on base and handset
26. Flash function on base and handset
27. Hold and Transfer function on base and handset
28. Charging indicator light & paging light
29. Phone Mute
30. Headset Jack
31. Removable Belt clip on handset
32. Tone/Pulse Switch
33. LCD icon indicators: Time/Date, New call, battery power, receiving power gain signal, line
1/line 2
34. user name setting on handset
35. Handset/base ringing volume adjustable
36. LCD contrast setting
37. Desk & Wall mount (100DAM/200DAM)
Caller ID/Call Waiting Function:
38. LCD automatically shows Caller ID New record , total records, and repeat records
39. Caller Name and Number with Time/Date display on base and handset
40. Allow to save caller ID record into Memory on base
41. Allow to save caller ID into Phonebook on handset
42. New call indicator
43. Displays Time and Date of each call
44. Scroll keys (UP/DOWN) for reviewing incoming caller’s information
45. Area Code Setting
46. Making call from Caller ID record
47. Edit/delete/save of all or selective incoming Caller ID
TAD Function (full digital answering system)
48. Greeting Announcement setting
49. 5 mailboxes available: one public mailbox, and 4 individual mailboxes
50. Screening Calls (to allow user to listen to a caller leaving message, to turn off screen means user couldn’t hear a
caller leaving message)
51. Message Alert (the Answer system generate beep sound after a new message has been recorded)
52. Ring Setting (to choose the number of times the phone rings before Answer System responds, set Ring Select
switch to 3R, 5R or Toll Saver)
53. Record/play memo and messages (to play message/memos is allowed to

repeat/skip/speed/delete message/memos)
54. Memory full announce (under the full memory status, user can access messages via remote control)
55. Save/edit/erase messages on ICM
56. Mailbox code setting on system for each of 5 mailboxes
57. assign mailbox number to individual handset
58. Remote operation of TAD and mailbox via handset (through handset remote access code)
59. Setting of voice announcement (ANNOC)
60. Remote operation of TAD and mailbox via outside telephone.
61. Setting Answer ON/OFF ( to initiate or to turn off Answering Machine)
62. To speed playing message – to run faster on message playing
63. Total Recording time: 14 min
64. 2 min recording time length for each message
Phone System Technique specification:
The system are:
1. 2.4G spread spectrum frequency hopping technology
2. FCC part 16, part 68 specification compliance
3. UL specification compliance
4. DTMF dialing meet RS-470 & CEPT standard
5. To use 9V 600mA AC power adaptor on phone base
6. To use 9V 300mA AC power adaptor on handset
7. To use handset battery 3.6V 800mA
8. Handset talking mode 11.4 Hours
9. Handset stand-by mode 133 Hours
10. Handset & Base LCD display 5 x 7 dot matrix segment
11. Handset & Base LCD display with backlit
12. Time/Date display
13. New Call display
14. Answering machine total recording time (OGM + ICM +MEMO): 14 min
15. OGM /MEMO recording time: 30 sec max
16. ICM recording time: 2 min max
Phone System Introduction
The system include:
1) Phone base operation,
2) handset operation,

3) answering machine on base,
4) answering machine remote operation via handset,
5) Advance system (Menu) setting,
6) Advance handset (Menu) setting.
To enter into Base Menu or Handset Menu, press MENU button at Base or at Handset,
1. To press MEMU
2. Use score UP and DOWN to get functions
I. Base MENU Introduction
Base MENU (SYSTEM MENU) Structure
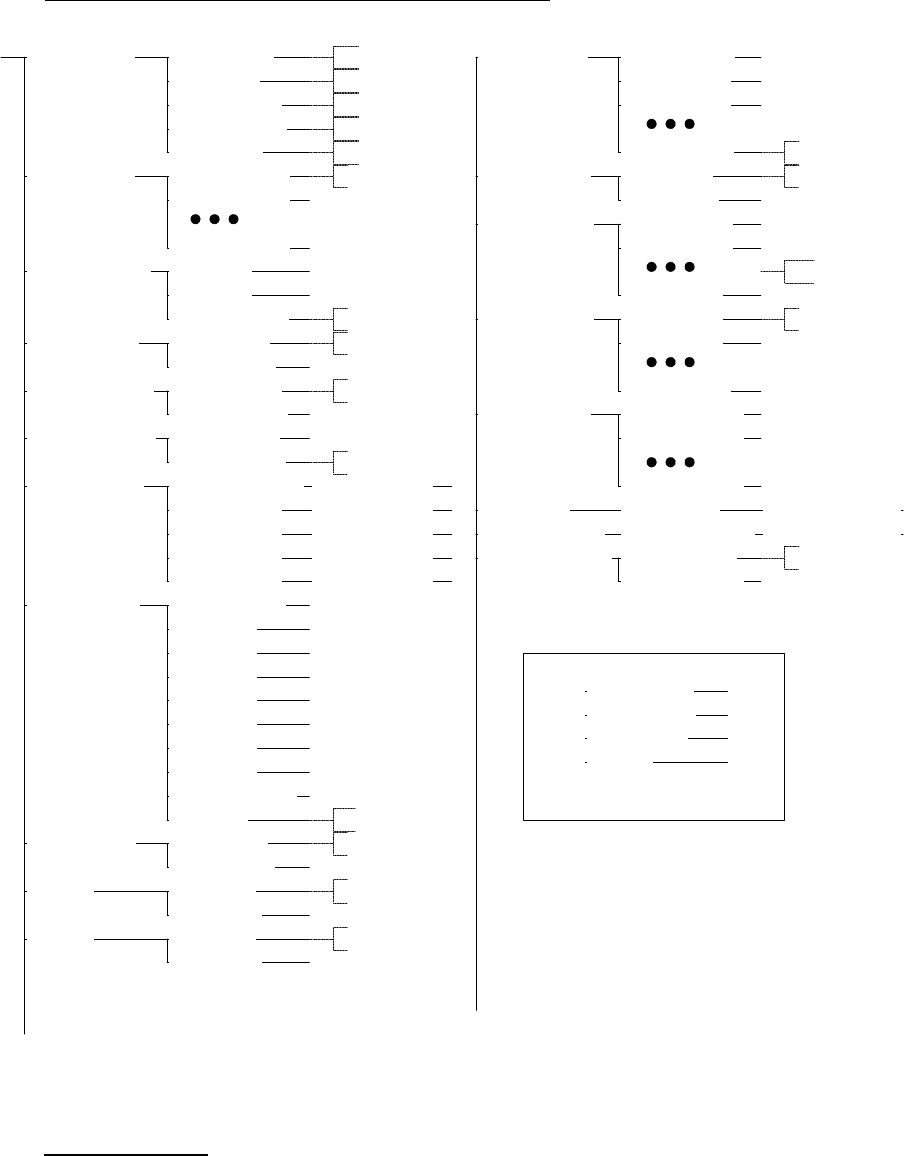
D-LINK Hopping System Base Menu Tree
05 ANNOUNCEMENT 01 ANNOUNCE ON
02 ANNOUNCE OFF
04 MSG ALERT 01 ALERT ON
02 ALERT OFF
03 RING SELECT
03 TOLL SAVER
02 5 RINGS
01 3 RINGS
06 SCREEN CALL 01 SCREEN ON
02 SCREEN OFF
01 TIME/DATE 01 SET HOUR:
02 SET MIN:
03 SET AM/PM:
04 SET MONTH:
05 SET DAY:
08 AREA CODE 01 HOME AREA
02 LOCAL 1
03 LOCAL 2
04 LOCAL 3
05 LOCAL 4
06 LOCAL 5
07 LOCAL 6
08 LOCAL 7
09 OUT OF AREA
10 ON/OFF
9 CALL TIMER 01 TIMER ON
02 TIMER OFF
10 L1:T/P 01 L1:TONE
02 L1:PULSE
11 L2:T/P 01 L2:TONE
02 L2:PULSE
13 HOLD TONE 01 TONE ON
02 TONE OFF
17 RESET ID 01 ARE YOU SURE01 RESET ID?
07 MAILBOX CODE
01 GENERAL BOX
02 MAIL BOX 1
03 MAIL BOX 2
04 MAIL BOX 3
05 MAIL BOX 4
01 ENTER CODE
01 ENTER CODE
01 ENTER CODE
01 ENTER CODE
01 ENTER CODE
19 HELP DISPLAY 01 DISPLAY ON
02 DISPLAY OFF
18 SET DEFAULT 01 ARE YOU SURE01 SET DEFAULT?
HELP DISPLAY
OK=CONFIRM
OFF= CANCEL
^= PREVIOUS
V=NEXT
12 HOLD TIME
02 TIME:30SEC
03 TIME:60SEC
08TIME:210SEC
01 CONTINOUS
14 FLASH TIME 01 TIME:100MS
02 TIME:200MS
10 TIME:1SEC
15 PAUSE TIME 01 TIME:1SEC
02 TIME:2SEC
10 TIME:10SEC
16 SET CONTRAST
01 CONTRAST=1
02 CONTRAST=2
08 CONTRAST=8
02 RING TONE 01 RING TONE 1
02 RING TONE 2
xx RING TONE n
Default
Default
Default is ON
Default
Default
Default
Default
Default
Default is 12
Default is 00
Default is PM
Default is 01
Default is 01
Default
Default
Default
Default is 600MS
Default
Default
2. Handset Menu Structure
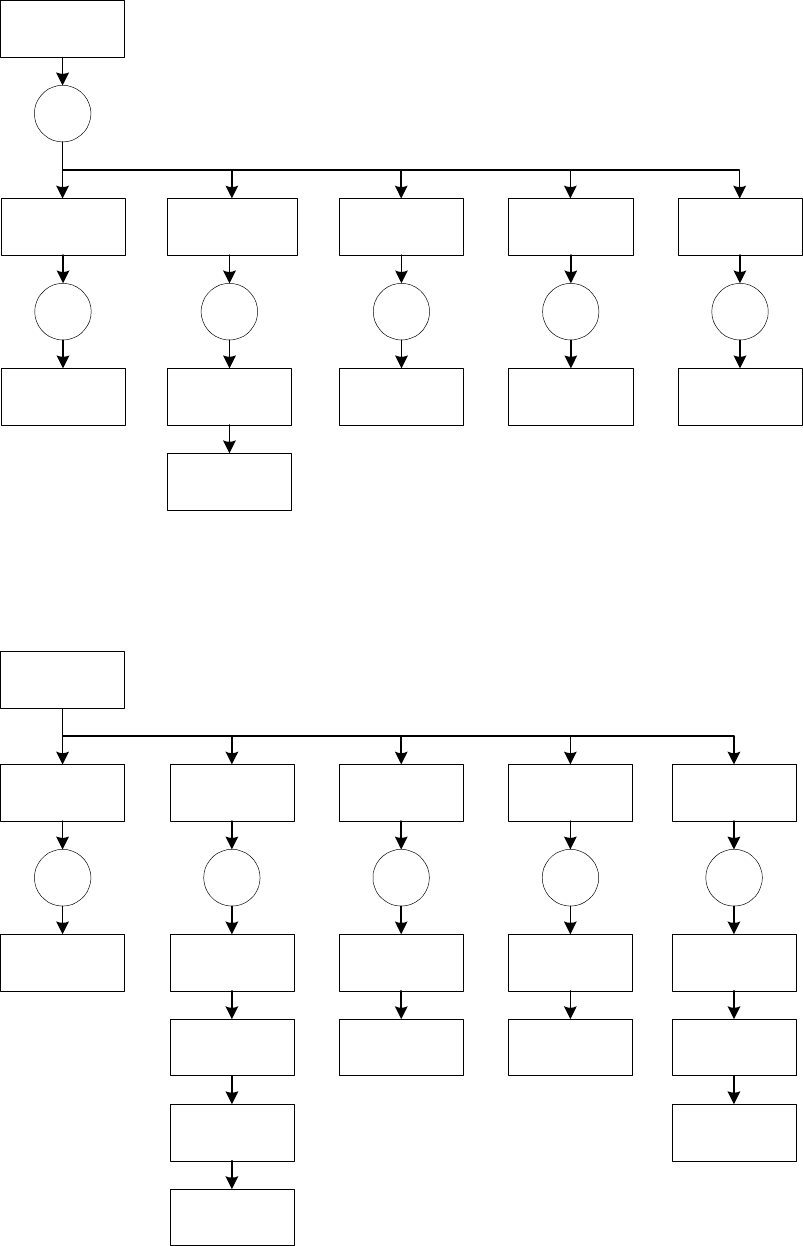
MENU
07
ALARM SET
04
RING TONE
10
PHONE BOOK
01
REG. HANDSET
02
HANDSET NAME
MENU
03
SET MAIL BOX
06
SET CONTRAST
09
SET DEFAULT
05
KEY BEEP VOL
08
HELP DISPLAY
OK
HS NO:
OK
EMPTY REC 01
OK
***
RING TYPE 01
OK
00-00A
ENTER TIME
OK
IJJ.CD
OK
05-01
KEYBEEP=01
OK
SET DEFAULT?
OK
06-01
CONSTRAST=01
OK
03-01
MAIL BOX=01
OK
08-02
DISPLAY ON
PS.
KEYBEEP=
OFF,01~07
PS.
UP/DOWN KEY SET
RING TYPE=01~04
RIGHT/LEFT KEY SET
RING VOLUME=
*~********
SKEY
PS.
MAIL BOX=
GEN,01~04
PS.VIEW PHONE BOOK
ADD/DEL RECOED
TOTAL 20 RECORDS
PS.
ADD/EDIT
PHONE NAME
08-01
DISPLAY OFF
PS.
CONSTRAST=
01~08
PS.
HS NO:01~99
12-30A
ALARM OFF?
12-30A
ALARM ON?
ADD NUMBER?
ADD NAME?
HANDSET MENU
OK KEY
OK KEY
ENTER TIME
12-30A
CONFIRMED
UP/DOWN KEY
ARE YOU SURE
CONFIRMED

LCD Icon description:
Antenna signal: Shows the level of receiving power gain
Message Icon (mail symbol): message icon is flashing when calling waiting (type II) come in
Call#: Shows total (accumulate) calls of caller ID, the number include the caller ID has been reviewed.
NEW Icon: Under idle mode, the NEW call icon will flash slowly when a new Caller ID call has been
received.
Hour/Min AM/PM: it shows current date& time when idle. Beside the first line of time/date icon. Current
time/date are also showing the information of Month/Day, Hour,/Minutes in main LCD display.
Month/Day: Shows month/day information. It also showing in main LCD display.
Battery Icon: to display the battery power by bar indicator.
Line 1/Line 2 indicator: when C/O line is in conversation, the line (Line 1 or Line 2) is blinking.
Preparing for Use
If you bought the phone system with extra independent handset, before you use the phone
system, you must charge the HANDSET for 12 hours. Failure to do so will require more
frequent recharging of the BATTERY PACK.
1. Place the HANDSET on the BASE unit or on Charging Cradle for 12 hours.
2. After 12 hours, lift the HANDSET from Base unit
You will hear two beep sounds, and see “ NO ID “ on LCD screen. Please follow Handset
Registration (refer to Register Handset to Base).
Base Operation
Making a Call
With the phone system you can make a regular call or pre-dial a telephone number.
Place a pre-dial call via base unit:
1. Press SPEAKER to get a dial tone (hand-free dialing), you also can press LINE 1 or LINE
2 button to get a dial tone. The Line 1 or Line 2 led is lighting on when pressing LINE 1 or
LINE 2 button.
2. Dial the wanted number,

3. You will hear the ringing sound.
4. The system will automatically assign the free C/O line for dialing out.
5. LINE 1 (or LINE 2) icon is blinking which indicates the line is in use.
6. To end conversation, press EXIT button.
Place a regular call from base unit:
1. To lift the corded handphone,
2. Dial the want number,
3. You will hear the ringing sound.
4. to end conversation, put corded handphone back into base cradle.
Note:
STANDBY Mode - When in STANDBY mode (ON-HOOK), the phone is capable of receiving a call.
When the HANDSET is on the CORDLESS BASE UNIT, it is automatically in the STANDBY mode (ONHOOK).
When the HANDSET is taken off the BASE UNIT, it remains in the STANDBY mode until you press the LINE 1 or LINE 2
button
Answering a call:
To answer a call:
1. To lift the corded handphone on corded base unit.
Or
1. To lift the handset from cordless base .
Note:
Caller ID information is sent from the telephone company to your phone system between the first ring and second ring.
Therefore, if you want the telephone number of the incoming call to appear on the display and in the caller record, you must
wait until the information appears on the display before answering the telephone.
Putting a call on hold
When you put a call on hold it is important to hang up the handphone.
To put a call on hold and take a call off hold:
1. To place or to answer a call,
2. press HOLD button, and blinking the LINE 1 or LINE 2 led
3. hang up the handphone.
4. to retrieve the call, lift the handphone. (If not hang up the handphone on Step 3, press SPEAKER
button to retrieve call)

Note:
1. If you don’t retrieve the call after 30 sec, the call is automatically back to handphone, and base display “ L1 CALLING”.
2. At this time, if handphone is busy when the call is back, the handphone will hear bi-bi sound. Then, the call will be transferred to all
handsets (all handsets will ring)
3. If you don’t hang up the handphone after you have put a call on hold, you pick up with another handset extension, the call remains
connected to your telephone and is taken off hold. This means any background noise from your area will be heard by the caller and the
other extension.
4. If an incoming call is placed on hold and no one at another extension handset pick up, the telephone will ringing back to base after 30
sec. When the call come back to base, and base are in busy, the call will be transferred to the rest of handsets.
Note:
To put a call on hold via independent handset when under the conversation.
1. When handset is on the phone, the handset display showing “ CONF HOLD “.
2. Press right softkey to select HOLD (refer to Handset Call Transfer),
3. dial another handset number and press OK.
4. if another handset doesn’t pick up or in busy status, then it ring back to the first handset after 30 sec
* When the phone is putting on hold, the caller will hear bi-bi tone until the other extension is picked up.
Putting a call on mute
If you want to temporarily disable the base microphone.
To mute a call:
1. Press SPEAKER (or LINE 1, or LINE 2) button to get the line,
2. to turn off the microphone off, press MUTE button. You can hear your caller but your caller can
not hear you.
3. to resume speaking with your caller, press MUTE again .
4. to end conversation, press EXIT button.
Note:
To put a call on mute via independent handset, press DEL/MUTE (refer to “To mute a call via handset” )
Redial
If you do not remember a number you just dialed, press REDIAL button shows you a number you
called.
To make a call from Redial:

1. Under Standby mode, press Redial button
2. Press SPEAKER button to dial out.
The system will automatically assign the free C/O line for dialing out. The LINE 1 (or LINE
2) icon will be lighted
Turning the ringer volume
To turn the ringer volume:
1. Press the right shift button. Continue to press the Right Shift ( button until you reach the desired
ring volume.
To turn the ringer OFF:
1. Press the left shift button. Continue to press the Left Shift button until the ringer is off.
Control the ringer volume
While the telephone is idle or ringing, you can press the Right Shift button or the Left Shift button
for soft or loud ringer volume.
Control the receiver volume
While you are on the telephone, you can press the Right Shift button or the Left Shift button for
soft or loud receiver volume. When you have completed your call, the receiver volume returns to
default.
Setting the ring tone and ringer volume
To set the ring tone and volume:
1. Press MENU button (refer to MENU – 03 RING TONE )
2. Scroll UP or DOWN button to select: 03 RING TONE, Press OK, the tone is ringing
3. Press UP or DOWN to select Ring Tone, the tone option available is 01 – 04
4. When choosing the desire ring tone, press right shift – left shift button to adjust the volume.
5. Press OK to confirm the setting, or press EXIT button to go back to previous screen.
Turning the Answering Machine OFF
The answering machine is defaulted at ON status. You can turn if off by pressing ANS.OFF button.
To resume Answering ON by pressing ANS.ON button.
Note;
Even when the answering machine is turn off, it still answer the call after 15 rings. This allows you to turn on the answering machine
using the Remote Access feature.

To Set Number of Rings before answering
You can set the number of rings answering machine waits before answering. Three options to set: 3
rings, 5 rings, or Toll Saver. The default is 5 rings.
To set the number of rings:
1. Press MENU button (refer to MENU – 04 RING SELECT)
2. Scroll UP or DOWN button to select: 04 RING SELECT. There are 3 rings (#01), 5 rings (#02),
and Toll Saver (#03).
3. Press OK to confirm
To page handset
If you expand multiple handsets for the telephone system, the telephone base page to all handsets or
any handset.
To page all handsets:
Under standby mode in base,
1. press PAGE button, the display shows INTER:HS,
2. press PAGE button again, all the handsets registered with this base will be ringing at this
time.
3. Any one of handset to pick up the paging by pressing any key to enable the intercom with
base. At this moment, the rest of handsets will stop ringing.
4. when display showing INTER:HS, dial handset number, the handset will ring. Base could
be as a finder of handset.
Above is the text I sent to you/Daniel. It’s same step as you revised it.
Base Intercom with Handset:
When base feel like to have conversation with a particular handset, and Base is under standby
mode,
1. Base press PAGE button, and the screen shows “ INTER:HS “
2. then dial handset number, for example “INTER: 15” at this time, press OK,
3. the handset will be ringing, the handset screen shows “ BASE PAGING “
4. handset press any button to pick up intercom with base.
5. handset press EXIT button to stop intercom with Base.
Note: if an outside call come in, you will hear a instruction tone from phone ( to remind you having a outside
call ringing ) while you are busy on talking intercom with your base or handset.
Caller ID call back

Place Call by CID on Base Unit:
1. Under Standby mode, press CID button, the screen shows
“ NEW CALL # TOTAL CALL# “,
for example “ 01 16 “, means 1 new call, and total 16 calls of caller ID. If user has
reviewed the new call, then the display become to show “ 00 16 “.
2. press UP button, the screen shows the latest (the last) Caller ID number, keep pressing UP
button again, it shows the next latest Caller ID number. Keep pressing UP button to review
the rest of caller ID records until to display “ end of list ”, then to start to show the latest
caller ID record again. (press DOWN button, the screen shows the first caller ID number)
3. Select the phone number & name by scroll UP or DOWN button,
4. Press OK to dial out the wanted number.
5. The system will automatically assign a free C/O for dialing out.
Memory Keys
The ANS./MEMORY LED light is on (factory default) which indicate the phone system is
under Answering Machine mode. Press ANS./MEMORY button once to switch into Memory
Mode. Under Memory Mode, the ANS./MEMORY LED light is off.
Saving numbers and names to memory keys
You can save the number and names of your customers, business associates, or anyone you call
frequently in memory keys. You also can choose the phonebook record or Caller ID record to
store into memory button.
To save a number and name:
1. press ANS./MEMORY button (switch from Answering Mode into Memory mode).
2. press the memory key where you want to save the number, for instances, M1 button (i.e.
STOP/M1, dual function button) . The screen does not show any number if the phone are
new entry.
3. dial phone number on base dialing keypad,
4. press and hold down M1 for a few seconds (long key) until a sound emitted out and
display shows “SAVE to M1” .
User to put on name label on phone
To save number from the display:
1. Ensure that number is on the display. (For example, answer a call or make a call using the
dial keypad, or use Caller ID, or Redial list )
2. press and hold down the memory key where you want to save the number for a few

seconds (long key).
5. the phone emit out beep sound and display showing “ SAVE TO M# “ after beep sound.
6. label the memory key.
To save number from Caller ID records:
1. Under the standby mode on base, press CID button,
2. scroll UP or DOWN button to find the wanted Caller ID record,
3. press and hold down the memory key for a few seconds (long key) to save it.
4. the phone emit out sound and display shows “ SAVE TO M3 “.
Making calls from memory keys
The memory dialing let you list the record on base keypad by one touch dialing.
To call from a memory key:
1. Press memory button like M1 button, the LCD will display the number,
2. press SPEAKER button(or to press LINE 1 or LINE 2).
3. the system will automatically assign the free C/O line for dialing out
if under company phone system, press Line 1 or Line 2 to get dial tone, press” 0”, then press
M1 button, the phone will be making call.
Or
To pre-dial from a memory key:
1. Press SPEAKER (or press LINE 1 or LINE 2, or lift handphone)
2. press memory button like M1, the LCD will display the number,
3. the system will assign the free C/O line for dialing out.
CALL TRANSFER
When Base (or Handset) is in conversation with outside line, you can transfer the call from
base to another handset. ( Handset use two soft keys under LCD screen : Right button and Left
button to operate Call transfer function)
Making call transfer from base to handset extension
Call transfer from base to handset extension:
1. Base is under the line, press TRANSFER button, the display showing “ TRANS:HS “,
2. dial handset number,
3. press OK button
4. at this time, the called handset is ringing, and handset showing “ BS PAGING”.
5. lift the handset to answer it (or press any key to answer). The call is transferred to handset.

6. Base hang up.
7. To end conversation, press EXIT button.
Making call transfer from handset extension to base
Call transfer from handset extension to base:
1. When outside call is ringing in, to lift handset from charger to answer the call (or press any
key to answer if handset isn’t stayed at charger ), the handset screen shows “ CONF HOLD
“
2. Select HOLD by pressing Right softkey on handset, screen shows “ NO: RETRV “
3. Handset to press * (star) button (star is indicated as base), the screen shows “ NO: BS
RETRV ” , then handset press OK button.
4. At this time, Base keep emitting out with two-tone sound with display blinking “ PAGING “,
and “ HS# CALLING “
4. Base press PAGE button to get on hook with handset for hand-free speaking (or to lift
handphone on base to get on hook with handset).
5. Handset press EXIT button . Thus base get the transfer call .
Making transfer call from handset extension to another handset extension
Handset under talking mode & transfer to another handset (the second handset)
Call transfer from handset to handset:
1. When conversation in the line (under the talking mode) on handset 01, the handset 01 screen
shows “ CONF HOLD “,
2.Select HOLD by pressing Right softkey on handset, screen shows “ NO: RETRV “,
3. Handset 01 dial the another handset number, for example, “ 02” (the second handset 02),
then press OK button.
4. the second handset will ring. The second handset press any key to pick up the call (or to
lift handset from charger).
5. The handset 01 press EXIT button.
6. Handset 02 get on-hook with outside line.
Note: when the first handset has transferred call to second handset and leave away, the second handset will
be ringing. If the second handset didn’t answer the transferring call within 30 seconds, the first handset
will ring back again to remind the first handset the call is returned.
Line SWAP
When the first line is under talking mode and the second line is ringing, user temporarily hold
the first line and get the second line. If user finish the second line conversation (or hold the

second line), and go back to the first line and continue the conversation. While the first line
caller is putting on hold, the caller will hear bi-bi(hold tone) tone until the line resumed.
Making line swap
To make line swap:
1. When conversation in the line (under the talking mode) on base (or handset, refer to
Handset line swap), and another line come in. Yo u do not hear the other line ringing while
you are in the first line, but the LINE 2 LED is lighting on. The LINE 2 indicator on
display is blinking too.
2. At this time, press HOLD button in base,
3. press the other ringing line (LINE 1 or LINE 2 button) to get on hook with the second
caller.
4. press EXIT button to end conversation with the second line, or you still can hold the line 2
(by pressing HOLD button),
5. to resume the first line conversation, press the first line button (LINE 1 or LINE 2 button,
the one with LED on) again on base.
6. to end the conversation with the first line, base press EXIT button.
Alex hand writing is not clear on step 4, step 6. But above operation are correct.
CONFERENCE CALL
When Base (or Handset) is in conversation with outside line, you can invite the third party to
join the conference call. The third party could be caller/dialer from the second line or the other
extension of this system.
Making 3-way conference call
To make 3-way conference call among base, handset and outside line:
Base is under conversation with outside line and invite handset to join conference call.
1. When conversation in the line (under the talking mode) on base by speakerphone (or by
handphone) with outside line caller,
2. Base press CONF button, the screen shows “ CONF: HS ” ,
3. Base dial Handset # (for example, 02), the handset-02 will ring,
4. Handset press OK button to get connection with Base,
5. Base press CONF button to activate conference call among base, the outside caller in CO
line, and handset-02.
To make 3-way conference call among Handset, Base and outside line:

Handset is under conversation with outside line and invite base to join conference call.
1. when handset is on the line, the screen shows “ CONF HOLD “,
2. Select CONF from handset screen by pressing Left Shift key (soft key) on handset
3. screen shows “ DIAL INTER “.
4. Select INTER by pressing Right softkey on right side,
5. Handset then press “ *” star button (to call base), handset screen show “ NO:BS ”,
6. handset press OK, Base will keep ringing two-tone sound and display showing “ HS
CALLING “
7. Base press PAGE button to get connection with handset; at this time, handset shows
“ CONF RETRV’
8. handset select CONF by pressing OK (soft key) to activate 3-way conference.
To make 3-way conference call among handset, the second handset and outside line:
1. When conversation in the line (under the talking mode) on handset - 01 with outside line
caller,
2. Handset - 01 LCD screen is showing “ CONF HOLD ” ,
3. Handset - 01 select CONF by pressing Left softkey, the screen is showing “ DIAL
INTER “,
4. Handset - 01select INTER by pressing Right soft key, the screen showing “ NO: “.
5. Dial the second handset # , for example, 02, then press OK button,
6. At this time, Handset-02 will ring. Handset-02 press OK button to intercom with
Handset-01,
7. Handset-01 select CONF by pressing Left soft key to activate conference call among
Handset-01 , the caller from CO line, and Handset-02. The handsets display
“ CONFERENCE”.
To make 3-way conference call among Line 1, Line 2 and Base:
1. When conversation in the Line 1 (under the talking mode) on base by speakerphone (or by
handphone) with outside line caller,
2. Base press CONF button, the screen shows “CONF “ ,
3. Base press Line 2 to get with the third party , the screen shows “ Talking “,
4. Base press CONF button again to activate conference call among base, the outside caller
in CO line, and handset.
Note: we found above steps are correct in 100DAM and 400DAM.
Caller ID System

This phone system automatically displays incoming callers name and telephone numbers
together with time and date of the call. It records up to 90 groups of call data. Base and
handsets share the same caller ID data, no matter how many HANDSETS link to the same
BASE unit. Each handset can select & pick up the caller ID records he want and save into his
individual handset phonebook.
The caller ID records are still in system memory after the handset has saved the record into his
phonebook.
When you have new caller ID, the NEW CALL led is flashing. It is also blinking on NEW icon
on LCD.
View Caller ID
To view caller ID on base:
1. Under Standby mode, press CID button, the screen shows
“ NEW # TOTAL # “,
for example “ 01 16 “, means 1 new call, and total 16 calls of caller ID. If user has
reviewed the new call, then the display become to show “ 00 16 “.
2. press UP button, the screen shows the latest (the last) Caller ID number, keep pressing UP
button again, it shows the next latest Caller ID number. Keep pressing UP button to review
the rest of caller ID records until to display “ END OF LIST ”, then to start to show the
latest caller ID record again. (press DOWN button, the screen shows the first caller ID
number)
3. Select the phone number & name by scroll UP or DOWN button,
4. Press OK to dial out the wanted number.
5. The system will automatically assign a free C/O for dialing out.
Making call by Caller ID
To call from caller ID record via base:
1. Under Standby mode, base press CID button, the screen shows
NEW # TOTAL #
2. Select the wanted phone number & name by scroll UP or DOWN button,
3. Press SPEAKER (or LINE 1/ LINE 2 ) button to dial out the number.
4. The system will automatically assign a free C/O for dialing out.
Deleting Caller ID
To delete caller ID record:

1. Under Standby mode, base press CID button, the screen shows
NEW # TOTAL #
2. Select the wanted phone number & name by scroll UP or DOWN button,
3. press HOLD button to clean the caller ID record.
5. Press EXIT button to exit.
To delete all caller ID:
If you want to delete ALL Caller ID records at one time,
Under any caller ID record display,
1. press and hold down HOLD button (long key) until the screen displaying “ Delete All CID ?
“,
2. press OK button to delete all caller ID records,
3. press EXIT button to exit.
Note: if you use handset to clean Caller ID records, press handset DEL/MUTE button to clean it.
Call WAITING (Caller ID type II)
When you subscribe to a Caller ID Call Waiting service from your local telephone company,
this telephone will display the name and number of the second caller while you are on the
conversation with your first caller.
1. When you having a conversation, this phone automatically display the name and number of
the second caller. The name is blinking.
2. Press FLASH button to answer the second caller (in the same talking line).
The first caller name and number will be displayed. The name is blinking.
3. To end conversation with the second caller, press FLASH to resume conversation with the
first caller.
Message Waiting (Voice Mail message)
If you subscribed to Voice Mail message service and if you have requested Visual Message
indication from your local telephone company. When there is a Voice Mail message for you,
this phone detects a stutter tone, then follow the steps as per telephone company instruction.
Note: to get the Voice Mail message by dialing the access code number assigned by telephone company.
Phone Registration
If you purchase expandable handset with charger, please refer to the Handset Registration
procedure.

ADVANCE FEATURE on Base MENU
The phone base allows system manager to set up or change the system defaults for customizing
reasons. The system management function are as the Base Menu tree
( Handset isn’t allow you to access into Base Menu program).
Base Menu contents
To access base Menu:
1. Press MENU button on base,
2. Scroll UP or DOWN button to get the wanted function item.
The base Menu contents and function item numbers are:
01 TME/DATE
02 RING TONE
03 RING SELECT
04 MSG ALERT
05 ANNOUNCEMENT
06 SCREEN CALL
07 MAILBOX CODE
08 AREA CODE
09 CALL TIMER
10 L1: T/P
11 L2: T/P
12 HOLD TIME
13 HOLD TONE
14 FLASH TIME
15 PAUSE TIME
16 SET CONTRAST
17 RESET ID?
18 SET DEFAULT?
19 HELP DISPLAY
01 Language
To change the language:
Under Standby mode (same as handset, refer to handset Menu)
1. press MENU button,
2. use UP or DOWN to select 01 LANGUAGE, press OK button

3. to select the wanted language by using UP or DOWN button, press OK to save it.
4. press OK again to confirm. A three-beep sound emit out to confirm the setting.
01 Time/Date
System will synchronize time and date to Answering Machine when answering machine is
initiated. When incoming call with caller ID data, the time/date of Caller ID will update the
phone system time/date automatically.
To set time/date:
Under Standby mode
1. press MENU button,
2. use UP or DOWN to select 06 TIME/DATE, press OK button
3. use UP or DOWN button to select:
01 SET HOUR:, 02 SET MIN: 03 SET AM/PM:, 04 SET MONTH:, 06 SET DAY:,
4. press OK to confirm. A three-beep sound emit out to confirm the setting.
To set hour:
Dial the number from 01 – 12 from keypad
To set minute:
Dial the number 01 – 59 from keypad.
To set AM/PM:
Use UP or DOWN to select AM or PM.
To set Month:
Dial 01 – 12 from keypad.
To set day:
Dial 01 – 31 from keypad.
02 Ring TONE
There are 4 kinds of tone selection on the system.
To set ringing tone:
Under Standby mode
1. press MENU button,
2. use UP or DOWN to select 02 RING TONE, press OK button. The phone emit out tone
sound. Press Left Shift – Right Shift button to adjust tone volume.
3. use UP or DOWN button to select: 01 RING TONE, 02 RING TONE, 03 RING TONE ,
04 RING TONE . The tone you choose, you hear the tone emitted out from phone, press
OK .
3. A three-beep sound emitted out to confirm.

03 RING SELECT
To choose the number of times the phone rings before the Answering System responds, set the
Ring Select switch to 3R, 5R or Toll SAVER.
Set to 3R - System answers call after the third ring.
Set to 5R - System answers call after the fifth ring.
Set to Toll Saver - when you will be checking your system for message from a remote location
using long distance services or from a pay phone.
To set ringing selection:
Under Standby mode
1. press MENU button,
2. use UP or DOWN to select 03 RING SELECT, press OK button
3. use UP or DOWN button to select 01 3 RINGS, or 02 5 RINGS, or 03 TOLL SAVER, press
OK to save it.
4. A three-beep sound emit out to confirm the setting.
04 MSG ALERT
When the message alert is ON, the unit will generate a beep sound every 15 seconds after a
new message has been recorded. If you do not want to hear the beep sound on every 15
seconds, to set the message alert to OFF position.
To set message alert:
Under Standby mode
1. press MENU button,
2. use UP or DOWN to select 03 MSG ALERT, press OK button
3. use UP or DOWN button to select 01 ALERT ON or 02 ALERT OFF, press OK to save it.
4. A three-beep sound emit out to confirm the setting.
05 ANNOUNCEMENT
To set Announce mode means to set up your system answers incoming calls with your
recorded announcement but it will not record any ICMs. (incoming call messages). Please see
the detail operation manual on Answering System.
To set announcement:
Under Standby mode
1. press MENU button,
2. use UP or DOWN to select 05 ANNOUNCE, press OK button
3. use UP or DOWN button to select 01 ANNOC ON or 02 ANNOC OFF, press OK to save it.
4. A three-beep sound emit out to confirm the setting.
06 SCREEN CALL

Setting Screen Call
The Answering System allows you to listen to a caller leaving an ICM. To set the screen ON is
to disable the base answering machine speakerphone sound while the caller is leaving message.
The screen OFF is to resume the answering machine speakerphone sound while the caller is
leaving message.
To set screen call:
Under Standby mode
1. press MENU button,
2. use UP or DOWN to select 06 SCREEN CALL, press OK button
3. use UP or DOWN button to select 01 SCREEN ON, or 02 SCREEN OFF, press OK to save
it.
4. A three-beep sound emit out to confirm the setting.
To converse with caller:
No matter to put the Screen ON or Screen OFF, while the caller is leaving the message, the line
indicator is light on. At this time, press the line button which is on recording (the light on
button) via base or handset, the answering machine will stop recording and you can converse
with the caller.
To get another line while the caller leaving message:
1. When the MENU system is put on SCREEN ON and some one is leaving message, the
voices will be muted. But you can see LINE 1 or LINE 2 LED is lighting on. The message
is left on answering machine.
2. You can make a call on the second line via handset while caller is leaving message. The
dialer might wish to mute the voice who is leaving message on machine if he happen to
make a call at the same time.
3. The system is defaulted at SCREEN OFF
To listen the message playing via base
When listening the message, if you do not want to disturb others with the ICM voice, you may
pick up the handphone to listen. At this time, if a call from outside, only handsets will be
ringing as the base speakerphone is busy with answering
07 MAILBOX CODE
The phone system allows you with 5 mailboxes: one is for public mailbox (General Mailbox),
and 4 personal Mailboxes.
For user to access personal mailbox (except General Mailbox) in base must enter mailbox
password before operation of listening incoming message or any other recording OGM etc.

Note:
To access mailbox in base, under standby mode,
dial “ 0 “ to get General Box, then press PLAY button to listen ICM.
dial “ 1” to get Mailbox 1, then press PLAY button, the system demand to enter password
dial “ 2” to get Mailbox 2, then press PLAY button, the system demand to enter password
dial “ 3 “ to get Mailbox 3, then press PLAY button, the system demand to enter password
dial “ 4” to get Mailbox 4, then press PLAY button, the system demand to enter password
You can also assign a mailbox to each of handset. A group of family members or colleagues
Might share the same Mailbox number or has his own mailbox. Each Mailbox can be recorded
with his own outgoing OGM greeting.
For caller to leave a message in a specific mailbox, they must enter the mailbox number before
they record their message, For this, you must inform the caller via OGM greeting to guide
caller how to enter into individual mailbox.
Note:
1. To access mailbox via handset, you follow the voice instruction (refer to Handset Answering machine
operation)
2. To access mailbox at remote telephone, you follow the voice instruction (refer to Answering machine operation
via remote Tone Telephone)
To set up individual mailbox code:
Under Standby mode
1. press MENU button,
2. use UP or DOWN to select 07 MAILBOX CODE , press OK button
3. scroll UP or DOWN button to select the wanted mailbox: 01 GENERAL BOX, 02 MAIL
BOX 1, 03 MAIL BOX 2, 04 MAIL BOX 3, 05 MAIL BOX 4, press OK.
4. The display showing “ 01 ENTER CODE “, then dial 3- digits code.
5. A three-beep sound emit out to confirm the setting.
Note:
The factory defaults for mailbox codes are:
General mailbox: 999
Mailbox 1: 555
Mailbox 2: 666
Mailbox 3: 777
Mailbox 4: 888
08 AREA CODE
The area codes include: HOME AREA (1 group of Home Area), LOCAL AREA (7 groups of

Local Area) and OUT OF AREA (1 group of Out of Area). Home Area and Local Area Code
need to be programmed for caller ID dialing back. The Home area code is the same area code
as the line connected to this base unit.
The system allow user to input and save Home Area Code , or 7 groups of Local Area Codes,
or Out of Area Code.
The Local area codes are provided for areas with 10-digits dialing where multiple area codes
are used to serve the calling area.
To input area code:
Under Standby mode
1. press MENU button,
2. use UP or DOWN to select 07 AREA CODE, press OK button
3. use UP or DOWN button to select: 01 HOME AREA, 02 LOCAL 1, 03 LOCAL 2 , 04
LOCAL 3, 05 LOCAL 4, 06 LOCAL 5, 07 LOCAL 6, 08 LOCAL 7, 09 OUT OF AREA, 10
AREA ON/OFF, press OK .
4. the cursor on screen will be on the second line which is ready for user to dial 3 digits
5. After dialing 3 digits, press OK to save this area code.
6. Repeat the same step to input/edit next local area code.
To edit out of area code:
The system will judge if this Caller ID ready for dialing out meet the above 8 groups area
codes ( 1 group of Home area code and 7 groups of Local area codes). If not, the system will
automatically add “ 1 “ on the prefix of the 10-digits dialing number. The defaulted OUT OF
AREA code (Long Distance Code: L-D-C) for U.S. is “ 1 “. The system automatically add “ 1”
to the outbound telephone number if a 10-digits dialing number does not match any of the 7
groups of Local Area Codes.
To close the editing of area code:
1. To disable the area code setting, selection 10 AREA ON/OFF
2. Use UP or DOWN to choose ON or OFF.
3. press OK to save it.
4. a two-beep sound emit out for confirm.
09 CALL TIMER
To set up the time counting of a call. Once setting on the call, the display show the
running time of the call. To return to the call information display, switch to TIMER OFF.

To set call timer:
Under Standby mode
1. press MENU button,
2. use UP or DOWN to select 09 CALL TIMER, press OK button
3. use UP or DOWN button to select 01 TIMER ON or 02 TIMER OFF, press OK to save it.
4. A three-beep sound emit out to confirm the setting.
5. When the call is over, hang up the phone, the timer stops counting.
10 L1:T/P
To set up tone/pulse on L1:
Under Standby mode
1. press MENU button,
2. use UP or DOWN to select 10 L1: T/P , press OK button
3. use UP or DOWN button to select 01 L1: TONE or 02 L1: PULSE, press OK to save it.
4. A three-beep sound emit out to confirm the setting.
11 L2: T/P
To set up tone/pulse on L2:
Under Standby mode
1. press MENU button,
2. use UP or DOWN to select 11 L2: T/P , press OK button
3. use UP or DOWN button to select 01 L2: TONE or 02 L2: PULSE, press OK to save it.
4. A three-beep sound emit out to confirm the setting.
12 Hold Time
To set up Hold Time:
Under Standby mode
1. press MENU button,
2. use UP or DOWN to select 14 HOLD TIME , press OK button
3. there are 9 levels of selection, scroll UP or DOWN button to select from 01 CONTUNUE,
02 TIME:30SEC, 03 TIME:60SEC up to 09 TIME:240SEC , press OK to save it.
4. A three-beep sound emit out to confirm the setting.
5. the factory defaults at 240SEC.
13 Hold Tone
To set up Hold Tone:
Under Standby mode
1. press MENU button,

2. use UP or DOWN to select 13 HOLD TONE , press OK button
3. there are 2 selection, scroll UP or DOWN button to select from 01 TONE ON, 02 TONE
OFF, press OK to save it.
4. A three-beep sound emit out to confirm the setting.
5. the factory defaults as Tone ON.
14 FLASH TIME
To set flash time:
Under Standby mode
1. press MENU button,
2. use UP or DOWN to select 14 FLASH TIME , press OK button
3. there are 10 levels of selection, scroll UP or DOWN button to select from 01 TIME: 100
MS, up to 10 TIME: 1000 MS , press OK to save it.
4. A three-beep sound emit out to confirm the setting.
5. the factory default at 600 ms, in compliance with U.S. specification.
15 Pause Time
To set up Pause Time:
Under Standby mode
1. press MENU button,
2. use UP or DOWN to select 15 PAUSE TIME , press OK button
3. there are 10 levels of selection, scroll UP or DOWN button to select from 01 TIME: 1 SEC,
up to 10 TIME: 10SEC , press OK to save it.
4. A three-beep sound emit out to confirm the setting.
16 Set Contrast
To set contrast:
Under Standby mode
1. press MENU button,
2. use UP or DOWN to select 16 SET CONTRAST , press OK button
3. there are 8 levels of contrast selection: 01 LCDCTL =1, 02 LCDCTL=2, it go up to 08
LCDCTL =8, scroll UP or DOWN to select the wanted contract level, press OK.
4. The LCD display showing brighter or darker when pressing UP or DOWN once. The bigger
level number is darker.
5. A three-beep sound emit out to confirm the setting.
17 Reset ID
The system allow manager to reset system ID. After changing system ID, all the handsets need

to be registered into base again. All the settings on the phone with ID changed still remain as
same as ID before.
To reset system ID:
Under Standby mode
1. press MENU button,
2. use UP or DOWN to select 17 RESET ID , press OK button
3. the LCD display showing “ ARE YOU SURE? “,
4. A three-beep sound emit out to confirm the setting.
5. the screen does not show ID number , but the system has already changed ID number
automatically (user doesn’t have to know the system ID code).
18 Set Default
The phone is allowed to change and clear all the values/codes/passwords set manually, and
return back to original factory defaults.
To set default:
Under Standby mode
1. press MENU button,
2. use UP or DOWN to select 18 SET DEFAULT? , press OK button
3. The LCD display showing “ ARE YOU SURE? “ Press OK to confirm. A three-beep
sound emit out to confirm the setting.
19 Help Display
To set up help display:
Under Standby mode
1. press MENU button,
2. use UP or DOWN to select 19 HELP DISPLAY, press OK button
3. use UP or DOWN button to select 01 DISPLAY ON or 02 DISPLAY OFF, press OK to save
it.
4. A three-beep sound emit out to confirm the setting.
To turn the display ON, is the phone display will shows helpful hints automatically.
To turn the display OFF, is the phone display doesn’t shows helpful hints. This is for user who
already know the operation.
Answering Machine System – Operating via Base Unit
Initiating the Answering Machine System

Setting Day/Time Stamp
Once the phone is connected and set up the Day/Time, the system will synchronize the
Answering Machine Day/Time.
To enter into answering machine mode:
1. The phone system defaults as Memory mode (the LED on ANS./MEMORY button is light
off when connecting the phone). You have to press ANS./MEMORY button to initiate
Answering Machine (the LED lighting on indicates Answering Mode; LED light off
indicates Memory mode).
2. You can close Answering Machine by pressing ANS.OFF button. To open Answering
Machine, press ANS.ON button.
3. All the Answering Machine operation buttons are in base phone. If user operate Answering
Machine function via handset or call to this phone system remotely, he has to dial password
to enter into Answering Machine (refer to Operating Answering Machine via Handset). The
system will emit out announcement of instruction to guide user to follow the procedure.
Accessing Mailbox from Base
The phone system allows you with 5 mailboxes: one is for public mailbox (General Mailbox),
and 4 personal Mailboxes.
For user to access personal mailbox (except General Mailbox) in base must enter mailbox
password before operation of listening incoming message or any other recording OGM etc.
To access Mailbox from base
under standby mode,
dial “ 0 “ to get General Box, then press PLAY button to listen incoming message.
dial “ 1” to get Mailbox 1, then press PLAY button, the system demand to enter password
dial “ 2” to get Mailbox 2, then press PLAY button, the system demand to enter password
dial “ 3 “ to get Mailbox 3, then press PLAY button, the system demand to enter password
dial “ 4” to get Mailbox 4, then press PLAY button, the system demand to enter password
For caller to leave a message in a specific mailbox, they must enter the mailbox number before
they record their message, For this, you must inform the caller via OGM greeting to guide
caller how to enter into individual mailbox.
You can also assign a mailbox to each of handset. A group of family members or colleagues
Might share the same Mailbox number or has his own mailbox. Each Mailbox can be recorded
with his own outgoing OGM greeting.
Note:
1. To access mailbox via handset, you follow the voice instruction (refer to Handset Answering machine

operation)
2. To access mailbox at remote telephone, you follow the voice instruction (refer to Answering machine operation
via remote Tone Telephone)
Recording Outgoing Greeting
Your Answering System provides voice mail which can receive the incoming messages (ICM).
Before using your Answering Machine, it is suggested that you record an Outgoing Message
(OGM). This is the announcement callers will hear when the system answers a call. Since the
system has 5 mailboxes, it’s also suggest user to record Outgoing Message Message, for
example: “ this is Anderson family….. please leave your message to our common mailbox after the beep. You
can enter into Daniel mailbox by pressing *1, enter into Maurice by pressing *2, enter into Jeff by pressing *3,
enter into Jack by pressing *4….”
Once caller enter into personal mailbox, for example, after dialing *1, then caller will hear the
individual Outgoing OGM greeting (if the mailbox owner has recorded the OGM greeting),
such as “ Hi, this is Daniel, I’m not available right now, please leave your message after the beep…..”
To record Outgoing greeting:
After you select mailbox (or you have select personal mailbox and pressed password), then
follow the steps as below,
1. Press and hold down the OGM button to record outgoing greeting.
2. Begin to speak after you hear “ please record your announcement after the beep” . Continue
to hold the OGM button. After completing your outgoing message, release the OGM button.
3. Your recorded greeting will be played after releasing the OGM automatically.
4. To change Outgoing greeting, repeat step 1.
5. After the Outgoing greeting is recorded, to check Outgoing greeting, press OGM button to
play the Outgoing greeting.
To delete Outgoing greeting:
1. While Outgoing greeting is playing, press DELETE button to erase it
Turning Answering Machine ON/OFF
To turn Answering Machine OFF:
1. Press ANS.OFF button to turn off the Answering Machine. The factory default in ANS.ON.
2. When Answering Machine is off, the Answer Machine will also be activated after 10 rings.
To turn Answering Machine ON:
1. Press ANS.ON button to turn on the answering machine. It will be activated after 3 rings (if
system set to 3 rings), or 5 rings (if system set to 5 rings).
2. The LED is lighting on when to press ANS.ON.

Setting Announce Mode
Setting Announce mode is your system answers incoming calls with your recorded
greeting/memo, but not to record any incoming messages.
To set Announce Mode:
1. Press MENU button on base,
2. Scroll UP or DOWN to find 02 ANNOUNCE, or just key in 02 from keypad.
3. use UP and DOWN to select 01 ANNOC ON , or 02 ANNOC OFF
4. press OK to save it.
5. Press OK again to confirm it. The system emit out three beep sound to confirm the setting.
Note:
If you have not recorded an announcement for ANNOUNCE MODE, even if the system setting
to ANNOUNCE MODE, the answering machine will automatically operate in ICM mode and
will record all incoming messages and memo.
Recording a Memo
To record Memo:
1. Press and hold down the MEMO button to record your memo.
2. Begin to speak after you hear “ please record your message after the beep”.
3. Continue to hold the MEMO button. After completing your memo, release the MEMO
button.
4. After the memo is recorded, to check memo, press PLAY button. After press PLAY button,
all the incoming messages and memo will play.
Note:
Memo is handled like incoming messages. You can come into Answering Machine and leave
memo/messages to the other members.
To delete Memo:
1. While Memo is playing, press DELETE button to erase it
Playing Messages/memo
To play message/memo:
1. Press PLAY button, if you have new messages, the system will announce “ you have # of
new message”. Then, the system will play all new messages and memo. The announcement
will continue “message 1, sent at Sep 27, 12:45, AM “, then the message content will be
playing. After each message content is played, the system pause 3 sec to continue the next
message, and continue announce “ message 2, sent at Sep 27, 11:30 PM”
2. After playing all NEW messages/memo, press PLAY button again, the system will re-play
ALL of its messages/memo.

3. After playing all of your messages, the system saves messages automatically. After playing
all of your messages, the system announces “ end of message ”.
To stop message:
1. Press STOP button once while playing a message, the system to pause the playing message.
2. Press PLAY button to continue playing the message where you stopped.
3. To press STOP button again (twice), the message is stopped. The system emit out “end of
message”.
To speed playing message/memo:
1. While the message are playing, press SPEED button and you hear the message voices are
playing faster (about 30% faster)
2. To resume the normal speed of playing message, press SPEED button again.
To skip messages/memo:
1. While playing message, press SKIP button once, the answering machine will skip the current
message and moves to the next message/memo and you hear “ message 2, sent at Sep 26, 11:
15AM”, then continue to play the message content.
To delete all of old messages:
1. Under standby mode, press and hold down the DELETE button until you hear the
announcement “Message deleted. You have no messages”.
2. When executing the message deletion, the system only to delete the old messages which you
already accessed. The new messages which you haven’t listened are still in the machine,
only after you listened and press DELETE button to clean message.
To delete the selected messages/memo:
1. While the unwanted message is playing, press DELETE button.
2. The system announces “Message deleted “, then you hear “ message 5, sent at Sep 28, 08:
37 AM “, then continue to play the message content.
When the memory is full:
1. When there is no memory available for additional messages, the system will announce
“ memory full”, but will not save messages. Then, the system will hang up phone.
2. Unless you enter into remote access code within 20 seconds of activating the remote control
function to maintain your connection with Answering system. If you delay to input the
access code within 20 seconds, the system hang up.

Remote Operation through a remote access code at Tone Telephone
You can use many Answering system features when you are away from home. i.e., you can
remotely operate answering machine function like to record Outgoing OGM greeting, to get
message, and to administer Outgoing message. To protect your privacy, most of the features
can be used only after you enter the 3-digits remote access code.
It’s a password to access messages from remote side.
Remote Answering Machine operation
1. Dial your telephone number.
2. Listen or bypass the OGM/greeting
3. enter your Mailbox password
4. A beep will sound when your password is accepted by your answering machine.
5. After you access into the mailbox, you will hear the voice announcement to guide you to do
remote control function.
6. If you input the wrong access code, the system announces “invalid password “. You have to
input password again. It allows you to input three times. If the third time of password entry
is still wrong, the system hang up.
Calling from outside to leave message to mailbox
If you want to leave message to a mailbox by calling from outside,
1. Dial your telephone number.
2. Listen or bypass the OGM/greeting
3. choose the mailbox destination by pressing:
“ * 1 “ to enter into mailbox 1
“ * 2” to enter into mailbox 2
“ * 3” to enter into mailbox 3,
“ * 4 “ to enter into mailbox 4
if you do not press any key, the message will left to General Mailbox.
Operating remote control function
When you get into remote control function, the system allows you: 1) to record messages, 2)
to get messages, 3) to administer outgoing messages. These are the same procedures for
handset of this system to operate Answering Machine remote control function.
( Please refer to Answering Machine via Handset )
To operate remote control function:
1. When you get into remote control function, the system announces “You have # of new

messages “ or “ you have no message “. Pause 2 seconds, then continue to announce “ to
record messages, please press 1; to get messages, please press 2; to administer outgoing
greeting, please press 3 “.
2. If a command is not received by the system within 20 seconds, it will signal 3 beeps and
hang up.
3. You follow the instruction codes to keep going the necessary steps.
Recording Message remotely
To record messages remotely:
1. When you get into remote control function, you press 1 to record message.
2. the system announces “ please select mailbox number destination “
3. if caller didn’t dial mailbox number for 12 seconds. After over 12 seconds, the system will
save message to General Mailbox.
4. User press the desired mailbox number on keypad, for instances, 02, then announces,
“ mailbox 2, please leave message after the beep. When finish, press # “.
5. you begin to record your message. After recording message, press #.
6. The system announces “ end of recording. To listen to your recording, press 3; to delete and
re-recording, press 1; to confirm and saved your message, press # “.
5-1 To confirm and saved recording messages
Selecting to confirm and saved your message by pressing “ # “, the system announces
“ message saved “. The system starts again with remote control function announcement
(refer to To operate remote control function, step 2)
5-2 To delete and re-recording messages
Selecting to delete and re-recording by pressing 1, the system announces “ message
deleted, please leave your message after the beep. When finish, press # “. Then system go
back to step 5.
5-3 To listen recording message
Selecting to listen to your recording by pressing 3, the system play the messages. After
playing messages, the system go back to announce “To listen to your recording, press 3;
to delete and re-recording, press 1; to confirm and saved your message, press # “.
Getting messages remotely
To get message remotely
1. When you get into remote control function, you press 2 to get messages.
3. the system announces “ you have # of new messages “ or “ you have no new message”.
4. If you have new messages. The system announces “ message 1, sent at Sep 27, 11: 15 AM”,
then to play announcement “ to listen message please press 0, to save or continue press #, to delete, press

*D”. After one message played, the system announces “ end of message. To repeat message,
press 1; to save or continue, press #, to delete, press *D “.
4-1 To repeat message playing
Selecting to repeat message by pressing 1, the system play the message again.
4-2 To save or continue message
Selecting to save or continue message by pressing #, the system announces “ message
saved, next message. “ Then the system continue to play the next message as step 4.
4-3 To delete message
Selecting to delete message by pressing *D, the system announces “ message deleted “.
Then the system continue to play the next message as step 4.
5. If no more message to play, the system announces “you have no more message “. Then, the
system go back to remote control function as To operate remote control function.
Administering outgoing greeting remotely
When you get into remote control function, you press 3 to administer greeting
The system announces “ to record greeting, press 1; to turn greeting on or off, press 2 “.
To record greeting:
1. When enter into Administer outgoing greeting, you select to record greeting by pressing 1,
the system announces “ please leave your greeting announcement after the beep. When
finished, press # “.
2. Begin to record greeting. When finished the recording, press #. The system announces
“ end of recording. To listen to your recording, press 3; to delete and re-recording, press 1; to confirm and saved
your message, press #”. After pressing #, the system announces “ greeting saved “.
To turn greeting on or off:
When enter into Administer outgoing greeting, you select to turn greeting on or off by press 2,
the system announces “ press 1 to turn greeting on; press 2 to turn greeting off “.
A. To turn greeting on
To turn greeting on by pressing 1, the system will confirm setting by emitting out beep
sound and announces “greeting is on “. After then, the system go back to remote control
function as To operate remote control function.
B. To turn greeting off
To turn greeting off by pressing 2, the system will confirm setting by emitting out beep
sound and announces “greeting is off “. After then, the system go back to remote control
function as To operate remote control function.
Note: Greeting ON means the mailbox doesn’t allow caller to leave message. Each mailbox
can be setting to Greeting ON or Greeting OFF except General Mailbox. General Mailbox is
always on Greeting OFF (General Mailbox has to be left message).

Handset Operation
Handset Registration
To register new handset to base:
1. Under the Stand by mode, handset press Right softkey ,
2. Scroll UP or DOWN button to find “ 02 REG.HANDSET”, or just dial 02 from keypad to
go directly to item 2: “ 02 REG.HANDSET”“. Press OK button,
3. the screen shows “ HS NO: “, require to input wanted handset number by 2-digits, for
instances, 00 - 99, dial 2-digit number, press OK button to confirm the handset number.
4. the handset screen shows ‘WAIT CONF ‘ (Waiting registration Confirmation). At this
moment, Base press and hold down PAGE button for a few seconds (long key) until base
LCD shows “ALLOW REQ”.
5. After 2 – 3 seconds, the handset will come to display the registered number and emit out
three tones indicating the handset registration is successful.
A registered handset screen normally shows:
L1 L2
HS: 22 MENU
When handset registration is completed, the LCD screen shows (in standby mode): “ HS-01
MENU “, Base LCD screen shows the current time.
Making a Call
With the phone system you can make a regular call or pre-dial a telephone number.
Place a call via handset unit:
1. Press LINE 1 or LINE 2 button to get a dial tone. The Line 1 (or Line 2) indicator on top of
LCD is displayed
2. Dial the wanted number,
3. You will hear the dial tone.
4. to end conversation, press EXIT button.

Note:
STANDBY Mode - When in STANDBY mode (ON-HOOK), the phone is capable of receiving a call.
When the HANDSET is on the CORDLESS BASE UNIT, it is automatically in the STANDBY mode (ONHOOK).
When the HANDSET is taken off the BASE UNIT, it remains in the STANDBY mode until you activate the LINE 1 or LINE 2
button
When phone is under Standby mode, the LCD display is showing the current time & date information by
Hour/Minutes/Month/Day. When you lift the handphone or handset, the time & date information is still showing
on the display.
Answering a call:
To answer a call via handset:
1. To lift the handset from cordless base .
2. When the handset is not in charger cradle, press any key to answer the call
3. to end of conversation, press EXIT button
Note:
Caller ID information is sent from the telephone company to your phone system between the first ring and second ring. Therefore,
if you want the telephone number of the incoming call to appear on the display and in the caller record, you must wait until the
information appears on the display before answering the telephone.
Putting a call on hold via handset
When handset is under conversation, the display showing “ CONF HOLD “
To put a call on hold and take a call off hold:
1. to select HOLD function by press left shift soft key, the display shows that the call is on hold. The
Line 1 (or Line 2) indicator is lighting on.
2. Handset to retrieve the call, press the Line 1 (or Line 2) button which is still lighting on.
Note:
1. If you don’t retrieve the call after 30 sec, the call is automatically back to handphone, and base display “ L1 CALLING”.
2. At this time, if handphone is busy when the call is back, the handphone will hear bi-bi sound. Then, the call will be transferred to all
handsets (all handsets will ring)
3. If you don’t hang up the handphone after you have put a call on hold, you pick up with another handset extension, the call remains
connected to your telephone and is taken off hold. This means any background noise from your area will be heard by the caller and
the other extension.
4. If an incoming call is placed on hold and no one at another extension handset pick up, the telephone will ringing back to base after 30
sec. When the call come back to base, and base are in busy, the call will be transferred to the rest of handsets.
* When the phone is putting on hold, the caller will hear bi-bi tone until the other extension is picked up.

Putting a call on mute via handset
If you want to temporarily disable the microphone.
To mute a call:
1. Press LINE 1 (or LINE 2) button to get the line,
2. to turn off the microphone off, press DEL/MUTE button. You can hear your caller but your caller
can not hear you.
3. to speak to your caller, press DEL/MUTE again to resume microphone.
4. When the call is over, press EXIT button.
Redial via handset
If you do not remember a number you just dialed, press REDIAL button shows you a list of last ten numbers you called.
To make a call from Redial List:
1. Under Standby mode, press Redial button
2. scroll UP and DOWN to select the number,
3. Press Line 1 (or Line 2) button to dial out.
The system will automatically assign the free C/O line for dialing out. The top on LCD
display LINE 1 (or LINE 2) is displayed which indicates the line are in use. There are 10
recent dialed numbers saved on handset.
To turn the ringer ON:
1. Press the right shift button. Continue pressing the right shift button until you reach the desired ring
volume.
To turn the ringer OFF:
1. Press the left shift button. Continue pressing the left shift button until the ringer is off. Ringer is
OFF appears on the display.
Control the ringer volume
While the telephone is idle or ringing, you can press the right shift button or the left shift button for
soft or loud ringer volume.
Control the receiver volume
While you are on the telephone, you can press UP button or the DOWN button for soft or loud
receiver volume. When you have completed your call, the receiver volume returns to default.
Setting the ring tone and ringer volume
While you are on the telephone, press UP or DOWN button to get into the Menu selection of Ring

Tone. Use Right-Shift and Left-Shift buttons to adjust the ringer volume. Press Right Shift for
higher volume; press Left Shift for low volume until it turn off the ringer. There are 8 levels of
volume selection.
To set the ring tone and volume:
1. Select MENU function by pressing Right Shift button
2. Scroll UP or DOWN button to select: 4 RING TONE, the tone option is from 01 – 05 (for base,
refer to MENU – 08 RING TONE ), press OK button
3. The screen displays ringing tone indicator level on first line and second line “ RING TYPE # “.
4. Use Right-Shift and Left-Shift buttons to adjust the ringer volume.
5. Press OK to confirm
Handset-to-Handset Intercom
Under standby mode,
1. Handset-01 press INTERCOM button, and dial the handset number, for example, 02
2. the handset-02 will ring. Handset-02 to pick up the phone by pressing any key.
Handset-to-base Intercom
Under standby mode,
1. Handset-01 press INTERCOM button, then press * (means base) and OK button.
2. base will ring. Base to pick up the phone by pressing any key.
Base Intercom with Handset:
When base feel like to have conversation with a particular handset, Base is under standby
mode,
1. Base press PAGE button, and the screen shows “ INTER HS “
2. dial handset number, for example, 02 and then press OK button. At this time, the handset-02
will be ringing, the handset screen shows “ Base Paging “
3. handset to press any button to enable the intercom with base.
4. handset press EXIT button to stop intercom with Base.
Note: if a call for outside is ringing, you will hear an instruction tone from the phone system
while you are talking intercom with your base or handset.
Caller ID call back
Place Call by Caller ID record :
1. Under Standby mode, press UP or DOWN button, the screen shows
“ NEW CALL # TOTAL CALL# “,
for example “ 01 16 “, means 1 new call, and total 16 calls of caller ID. If user has

reviewed the new call, then the display become to show “ 00 16 “.
2. press UP button, the screen shows the latest (the last) Caller ID number, keep pressing UP
button again, it shows the next latest Caller ID number. Keep pressing UP button to review
the rest of caller ID records until to display “ END OF LIST ”, then to start to show the
latest caller ID record again. (press DOWN button, the screen shows the first caller ID
number)
3. Select the phone number & name by scroll UP or DOWN button,
4. Press OK to dial out the wanted number.
5. The system will automatically assign a free C/O for dialing out.
To save Caller ID into handset Phonebook:
1. Under Standby mode, press UP or DOWN button, the screen shows “ NEW CALL #
TOTAL CALL# “. Press UP or DOWN button again, the screen shows the latest caller ID
number.
2. Scroll UP or DOWN button to select the phone number
3. Press & hold down the FLASH button (long key) to save the caller ID number into handset
phonebook..
Phonebook Dialing: (via handset )
1. Under the Standby mode, press Right softkey (MENU) button,
2. scroll UP or DOWN button to select “ PHONE BOOK ‘ on screen, press OK button,
3. The screen displays the recent new phonebook number,
4. scroll UP or DOWN button to locate the wanted phone book number,
5. press OK button to dial out
Speed Dialing ( Call by Phonebook Dialing): via handset (only handset) follow the same
steps.
The system allows the 20 groups of phonebook by speed dialing, i.e., the system allows 2 digits which is coincide with the
phonebook sequence record number (the location number) for speed dialing,
1. under Standby mode , press 2 digits of record number,
2. press LINE 1 (or LINE 2) button for dialing out
Handset out-of-range warning:
If you are too far away from base unit while talking via handset, the Handset emits “beep –
beep” sounds to warn you. The sound from handset will be mute when you step out of talking
range, at this time, you should go back to base range to resume handset conversation.
Otherwise, the call will automatically cut off if handset leaving base range too long.

CALL TRANSFER
When Handset (or base) is in conversation with outside line, you can transfer the call from
handset to another handset. ( Handset use two soft keys under LCD screen : Right button and
Left button to operate Call transfer function)
Making call transfer from base to handset extension
Call transfer from base to handset extension:
1. Base is under the line, press TRANSFER button, the display showing “ HS NO: “.
2. dial handset number,
3. press OK button again
4. at this time, the handset called by base is ringing, and display showing “ BASE
PAGING ”
5. handset to get the call by pressing right soft button.
6. Base hang up to enable handset talking to the outside line.
Making call transfer from handset extension to base
Call transfer from handset extension to base:
1. When conversation in the line on handset, screen shows “ CONF HOLD “
2. Select HOLD by pressing Right softkey on handset, screen shows “ NO: RETRV “
3. Handset to press * (star) button (star is indicated as base), the screen shows “ NO: BS
RETRV ” , then handset select base by pressing Left softkey “ OK “
4. At this time, Base keep emitting out with two-tone sound. Display shows “ HS NO: 01 “
5. Base press any key (PAGE ) button (or lift the handphone) to get connection with handset.
6. Handset press EXIT button . Thus base get the transfer call .
Making transfer call from handset extension to another handset extension
Handset under talking mode & transfer to another handset (the second handset)
Call transfer from handset to handset:
1. When conversation in the line (under the talking mode) on handsets, screen shows “ CONF
HOLD “,
2.Select HOLD by pressing Right softkey on handset, screen shows “ NO: RETRV “,
3. press Left softkey , the screen shows “ HS NO: “ waiting for dialing handset number,
4. Dial handset number, for example, “ 02” (the second handset #), then press OK button.
5. the hanset-02 will ring. The handset-02 press any key (or OK button ) to pick up the call.
6. The first handset press EXIT button.

Note: if the second handset didn’t answer the transferred call within 30 seconds, the first handset will ring
alarming user to get back the return call.
Line SWAP
When the first line is under talking mode, the second line is ringing and the signal of line is
blinking too. To temporarily hold the conversation on the first line , and to get the second line,
After finishing the second line conversation, get back to the first line and continue the
conversation. While the first line caller is putting on hold, the caller will hear bi-bi tone until
the line resumed.
Making line swap
To make line swap:
1. When conversation in the line 1 (under the talking mode) on handset, the other line (line 2)
is calling in at this time, you will hear the instruction tone from handset reminding you
have line 2 calling. Line 1 and Line 2 indicators on LCD are blinking too. During the
handset is under talking with line 1, the display showing “ CONF HOLD “.
2. Handset press Right soft key to select HOLD function. The line 1 is hold, at this time, the
handset is ringing.
3. handset press the other ringing line (LINE 1 or LINE 2 button) to get connection with the
second caller.
4. press EXIT button to end conversation with the second line,
5. to resume the first line conversation, press the first line button (LINE 1 or LINE 2 button,
the one with LED is on) again.
6. to end the conversation with the first line, base press EXIT button.
CONFERENCE CALL
When Handset (or base) is in conversation with outside line, you can invite the third party to
join the conference call. The third party could be caller/dialer from the second line or the other
extension of this system.
Making 3-way conference call
To make 3-way conference call among base, handset and outside line:
Base is under conversation with outside line and invite handset to join conference call.
1. When conversation in the line (under the talking mode) on base by speakerphone (or by

handphone) with outside line caller,
2. Base press HOLD CONF button, the screen shows “ TRANS: HS ” ,
3. Base dial Handset # (for example, 02), the handset-02 will ring,
4. Handset-02 press OK button to get on hook with Base,
5. Base press CONF button to activate conference call among base, the outside caller in CO
line, and handset-02.
To make 3-way conference call among Handset, Base and outside line:
Handset is under conversation with outside line and invite base to join conference call.
1. when handset is on the line, the screen shows “ CONF HOLD “,
2. Select CONF from handset screen and press OK (soft key) on handset
3. screen shows “ DIAL INTER “.
4. Select INTER by pressing Right softkey on right side,
5. Handset then press “ *” star button (to call base), handset screen show “ NO:BS ”,
6. handset press OK, Base will keep ringing two-tone sound and display showing “ HS
CALLING “
7. Base press PAGE button to get on hook with handset; at this time, handset shows “ CONF
RETRV’
8. handset select CONF by pressing OK (soft key) to activate 3-way conference.
To make 3-way conference call among handset, the second handset and outside line:
1. When conversation in the line (under the talking mode) on handset - 01 with outside line
caller,
2. Handset - 01 LCD screen is showing “ CONF HOLD ” ,
3. Handset - 01 select CONF by pressing Left softkey, the screen is showing “ DIAL
INTER “,
4. Handset - 01select INTER by pressing Right soft key, the screen showing “ NO: “.
5. Dial the second handset # , for example, 02, then press OK button,
6. At this time, Handset-02 will ring. Handset-02 press OK button to intercom with
Handset-01,
7. Handset-01 select CONF by pressing Left soft key to activate conference call among
Handset -01 , the caller from CO line, and Handset-02.
To make 3-way conference call among Line 1, Line 2 and Handset:
1. When conversation in the Line 1 (under the talking mode) via handset with outside line
caller,
2. Handset press Right softkey, the display shows “ CONF HOLD “
3. Handset select CONF function by pressing Left softkey, the screen shows “DIAL INTER

“ ,
4. Handset select DIAL by pressing Left softkey, the screen shows “ TALK PBOOK “.
5. Handset select TALK by pressing Left softkey, The system get another C/O to connect with
the third party. During in talking with line 2, the screen shows “ CONF RETRV “.
6. Handset select CONF by pressing Left softkey to activate the 3-way conference among line
1, line 2, and handset.
Handset Broadcasting (to all handsets)
1. When conversation in the line (under the talking mode) on handset, screen shows “ CONF
HOLD “,
2. Select HOLD by pressing MENU right (soft key) on handset, screen shows “ NO:
RETRV “,
3. press “ # “ button, the screen shows: “ NO: HS RETRV “, and then press Left softkey
OK to broadcast all handsets. All handsets will ring at this time,
4. Ringing handset to answer the broadcast is by pressing any button or OK button.
5. Any one of handset to answer the broadcast, the rest of handsets will stop ringing.
6. Press the CONF button to have conference call
Caller ID System
This phone system automatically displays incoming callers name and telephone numbers
together with time and date of the call. It records up to 100 groups of call data. Base and
handset, if you purchase handset, share the same caller ID record list. No matter how many
HANDSETS link to the same BASE unit. Each handset can review Caller ID saved in Base
memory. Each handset also can select & pick up the caller ID records he want and save into his
individual handset phonebook.
The caller ID records are still in system memory after the handset has saved the record into his
phonebook.
The new indicator(the call led light) is flashing when receive new caller ID, and it’s also
blinking on top of LCD icon in base and handset.
To view caller ID on handset:
Under the standby mode,
1. press DOWN button once, the screen shows “ NEW: xx, TOTAL: xx “,

2. press UP button to get the recent new caller data (or use DOWN button to get the first new
caller data). To press UP or DOWN button once, the caller ID record is shown one record
with sequence number.
3. User keep pressing UP button to the last record (the recent one) of caller ID, the next will
display “ EMPTY RECORD # “, to remind user the last record with sequence number of
record. User keep pressing DOWN button to the first caller ID record (with sequence
number 01). If user keep pressing DOWN button, the next will display “ EMPTY RECORD
# “, then the next one is the last record with sequence number of record.
4. If a call is received from the same number more than once since the records were last viewed,
the repeat call icon will displayed at LCD indicating the number of repeat calls.
Making call by Caller ID
To call from caller ID record via handset:
1. Under Standby mode, press DOWN button, the screen shows
NEW # TOTAL #
2. Select the wanted phone number & name by scroll UP or DOWN button,
3. Press OK button (or LINE 1/ LINE 2 ) button to dial out the number.
4. The system will automatically assign a free C/O for dialing out.
Deleting Caller ID
To delete caller ID record via handset:
1. Under Standby mode, press DOWN button, the screen shows
NEW CALL # TOTAL CALL#
2. Select the wanted phone number & name by scroll UP or DOWN button,
3. When the LCD is showing the Caller ID number and name, and you want to delete this
caller ID record,
4. press Delete button once to clean this caller ID record.
5. Press EXIT button to exit.
To delete all caller ID:
If you want to delete all Caller ID records at one time,
Under any caller ID record display,
1. press and hold down DEL/MUTE button (long key) until the screen displaying “ Delete All
CID ? “,
2. press OK button to delete all caller ID records,
3. press EXIT button to exit.

Call WAITING (Caller ID type II)
When you subscribe to a Caller ID Call Waiting service from your local telephone company,
this telephone will display the name and number of the second caller while you are on the
conversation with your first caller.
1. When you having a conversation, this phone automatically display the name and number of
the second caller. The name is blinking.
2. Press FLASH button to answer the second caller (in the same talking line).
The first caller name and number will be displayed. The name is blinking.
3. To end conversation with the second caller, press FLASH to resume conversation with the
first caller.
Message Waiting (Voice Mail message)
If you subscribed to Voice Mail message service and if you have requested Visual Message
indication from your local telephone company. When there is a Voice Mail message for you,
this phone detects a stutter tone.
Note: to get the Voice Mail message by dialing the access code number assigned by telephone company.
Advance Function on Handset Menu
Handset Menu allows you to do phone settings which are belong to handset personal use.
Handset couldn’t access into Base Menu.
Handset Menu content
Access into handset menu:
1. Press Right softkey to enter into Handset Menu
2. Scroll UP or DOWN button to select function, or just dial the function item number to go
directly to the specified function.
The handset Menu contents and function item numbers are:
01. REG..HANDSET
02 HANDSET NAME
03 SET MAILBOX
04 RING TONE
05 KEY BEEP VOL
06 SET CONTRAST
07 ALARN SET
08 HELP DISPLAY
09 SET DEFAULT

10 PHONEBOOK
01 Setting Languages:
To change the language:
Under Standby mode
5. press Right softkey to enter into handset menu,
6. use UP or DOWN to select 01 LANGUAGE, press OK button
7. use UP or DOWN button to select: 01-01 ENGLISH, 01-02 ESPANOL, 01-03 FRANCAIS.
press OK to save it.
8. press OK again to confirm. A three-beep sound emit out to confirm the setting.
01 Handset Registration
To register handset to base:
7. Under the Stand by mode, handset press Right softkey ,
8. Scroll UP or DOWN button to find “ 01 REG.HANDSET”, or just dial 02 from keypad to
go directly to item 2: “ 02 REG.HANDSET”“. Press OK button,
2. the screen shows “ HS NO: “, require to input wanted handset number by 2-digits, for
instances, 00 - 99, dial 2-digit number, press OK button to confirm the handset number.
6. the handset screen shows ‘WAIT CONF ‘ (Waiting registration Confirmation). At this
moment, Base press and hold down PAGE button for a few seconds (long key) until base
LCD shows “ALLOW REQ”.
7. After 2 – 3 seconds, the handset will come to display the registered number and emit out
three tones indicating the handset registration is successful.
A registered handset screen normally shows:
L1 L2
HS: 22 MENU
When handset registration is completed, the LCD screen shows (in standby mode): “ HS-01
MENU “, Base LCD screen displays the current time.
02 Handset Name setting
To set handset name:
Under standby mode, press Right softkey.
1. Use UP or DOWN button to locate “ 02 HANDSET NAME “.
2. press OK button, the display shows registered handset number on first line, and the blinking
cursor “ – “ stay at the second line ready for input the handset name.
3. If the handset has been edited username before, the screen shows the saved name with the

blinking “ – “ at the end of name character. Use DEL to re-edit/correct the name.
4. Press OK button to save the name
4. A long-beep sound emit out to confirm the setting.
03 Setting Mailbox
The phone system allows you with 5 mailboxes: one is for public mailbox (General Mailbox),
and 4 personal Mailboxes.
You can assign a mailbox to each of handset. A group of family members or colleagues might
share the same Mailbox or has his own mailbox. Each Mailbox can be recorded with
his own outgoing OGM greeting.
To set mailbox:
Under standby mode, press Right softkey.
1. Use UP or DOWN button to locate “ 03 SET MAILBOX “
2. press OK button, the display shows “ 03-01 MAILBOX= “, which is ready to select the
mailbox number.
3. Select the mailbox number by pressing UP or DOWN button
4. press OK to confirm. A long-beep sound emit out to confirm the setting.
5. The mailbox number is assigned to this handset. Press EXIT button to return to standby
mode.
04 Ring Tone
To set ringing tone:
Under standby mode, press Right softkey.
1. Use UP or DOWN button to locate “ 04 RING TONE “ ,press OK button.
2. The screen shows “ RING TONE= 01 “. Scroll UP or DOWN to select the different tone.,
The handset will come with lyrics while you are tuning UP or DOWN button. There are 4
choices of ring tone.
3. pres OK button to save the tone.
4. A long-beep sound emit out to confirm the setting.
5. Press EXIT button to go back to standby mode.
05 Key Beep Volume
To set key beep vol:
Under standby mode, press Right softkey.
1. Use UP or DOWN button to locate “ 05 KEEP BEEP VOL “ ,press OK button.
2. The screen shows “ KEYBEEP= 01 “. Press UP or DOWN buttons to select the different
key beep sound. The handset will come with beep sound while you are tuning with UP or

DOWN button. There are 8 levels available for choice. Move to the left side to turn off key
beep volume (key beep level 1 is mute).
3. press OK again to confirm. A long-beep sound emit out to confirm the setting.
06 Setting Contrast
To set contract:
Under standby mode, press Right softkey.
1. Use UP or DOWN button to locate “ 07 SET CONTRAST “ ,press OK button.
2. the screen shows LCDCTL: 01 – 08,
4. to adjust the brightness of display contract by pressing UP or DOWN (scale level 01 – 08,
the bigger number is darker).
5. press OK to save it and return to standby mode.
6. press OK again to confirm. A long-beep sound emit out to confirm the setting.
07 Alarm Set (Wake-Up Alarm)
To set alarm:
1. Under standby mode, press Right softkey.
2. use UP or DOWN button to locate “ ALARM SET “.
3. The screen will show “ 00-00A “ on seond line, and “ Enter Time “ on third line.
00A
Enter Time:
Note: how to edit “ 00-00A “ is by the following steps:
1) The first 2-digit means hour which require to dial two numbers from keypad. The hour number requires
from 01 up to 12.
2) The second 2-digit means minute which require to dial two numbers from 01 up to 59.
3) The last letter indicates AM or PM. To change AM or PM by pressing UP or DOWN button to rotate it.
4. Press OK button to save the time setting.
5. The screen will show “ Alarm OFF “, to set into “ Alarm ON “ by pressing UP or DOWN
button to rotate it.
6. Press OK button to save it.
7. press OK again to confirm. A long-beep sound emit out to confirm the setting.
8. When the phone is alarming on time, press any button to terminate the alarm.
08 Help Display
To set up help display:
Under Standby mode, press Right Softkey,
1. use UP or DOWN to select 08 HELP DISPLAY, press OK button
2. use UP or DOWN button to select 01 DISPLAY ON or 02 DISPLAY OFF, press OK to

save it.
3. press OK again to confirm. A long-beep sound emit out to confirm the setting.
To turn the display ON, is the phone display will show helpful hints automatically.
To turn the display OFF, is the phone display doesn’t show helpful hints. This is for user who
already know the operation.
09 SET Defaults
To set defaults:
Under Standby mode,
1. use Right softkey to select “ 10 SET DEFAULT? “, press OK button.
2. the system asking user by the display “ Are You Sure? “
3. Press OK to save it.
4. The system emit out long-beep sound to confirm
10 Phonebook
The system allow to save 20 records of phone book in handset. i.e. Each handset can save
individual phonebook up to 20 records.
Phonebook Dialing: (from Handset)
Under the Standby mode,
1. press Right softkey to select “ 10 Phonebook “.
2. press OK button and screen displays the first stored phone number if user has saved phone
book number before.
3. Press DOWN button to go to the next phone book number. If the next phone book is empty,
the screen display “EMPTY REC # “. Press UP button to go to the last phonebook number
saved.
4. when you find the wanted phonebook number, press OK button to dial out.
3. scroll UP or DOWN to rotate the phone numbers and find the one to be edited,
4. use left shift button and right shift button to move the cursor to edit or delete phone number
on the second roll ( to delete the letter by pressing DEL/MUTE button in handset; or just
dial the letters to add)
5. press OK button to change into the name on the third roll.
6. press OK button to save the edited phone number and name.
7. press OK button again to save the mode and exit.
8. press DOWN to continue the next stored phone number and name.
9. If no further Caller ID record, the screen shows “ Empty Record “.
We took off phonebook editing function

To add new phonebook
Under standby mode,
1. press Right softkey to select “ 10 Phonebook “.
2. press OK button and screen displays the first stored phone number if user has saved phone
book number before.
3. Press DOWN button to go to the next phone book number. If the next phone book is empty,
the screen display “EMPTY REC # “.
5. press OK button, the screen shows “ ADD NUMBER?”
6. press OK button again, the screen is ready to input phone number
7. dial phone number, press OK button
8. the screen shows “ ADD NAME”
9. press OK button.
10. the screen shows phone number on first line and is blinking the cursor on second line
which is ready to input name. Press OK button to save phone number, or go to the next step.
11. input name for keypad. Use DEL/MUTE button to move forward and “ * “ button for
space while dialing the name.
12. Press OK button to save phone number and name into Phone Book.
Note:
1. There is total 20 records of numbers are allowed to be saved on Phonebook on each
handset, and each handset can have his/her individual phonebook on handset.
2. The CID numbers also can be allowed to save into Phonebook. Please refer to SAVE CID
INTO PHONEBOOK.
Answering Machine System – Operating via Handset
To operate Answering Machine via handset, basically it’s similar to access remote control as
the description on the section of “ Operating remote control function through Tone
Telephone ”.
Setting Day/Time Stamp on handset
Once the phone is connected and set up the Day/Time, the system will synchronize the
Answering Machine Day/Time Stamp. Handset Day/Time is also to synchronize with base
Day/Time.
Initiating Answering Machine via handset
All the Answering Machine operation buttons are in base phone. If user to operate Answering

Machine function via handset or call to this phone system remotely, he has to dial password to
enter into Answering Machine . The system will emit out announcement of instruction to guide
user to follow the procedures.
To initiate Answering Machine via handset:
1. Handset hold MENU button for 3 seconds to enter into Answering Mode.
2. Handset LCD display shows connecting…, then handset announces “ connecting to mailbox
“.
Handset to access mailbox
The system are with 5 mailboxes for message storages : one for general mailbox which open to any
handset can go into, and another 4 personal mailboxes. A mailbox can be assigned to a group member
or a individual person. For each of personal mailbox, you have to enter into password to record message,
to get message and to administer outgoing greeting.
To access mailbox
1. After connected to mailbox, the handset user will hear “ press 0 for general mailbox, press 1
for mailbox 1, press 2 for mailbox 2; press 3 for mailbox 4; press 4 for mailbox 4 “.
2. 2. If dial the wrong mailbox number, you will hear “invalid mailbox”. Then the system to
announces again as step 1.
Remote Operation via handset through password
You can use many Answering system features with handset. To protect your privacy, most of
the features can be used only after you enter the 3-digits password.
password:
4. After dialing mailbox number,
5. you will hear the system to announce “ Mailbox #, please enter password “. If no command
is received for 45 seconds, the system hang up.
6. If password is accepted by system, the system go into remote control function, which it
allows you to do recording messages, to get messages, and to administer outgoing
messages.
7. If you input the wrong access code, the system announces “invalid password “. You have
to input password again. It allows you to input three times. If the third time of password
entry is still wrong, the system hang up will go back to the main manual and prompt you to
enter the mailbox number.
Operating remote control function through handset
When you get into remote control function, the system allows you: 1) to record messages, 2)
to get messages, 3) to administer outgoing messages.
It help you reduce the disturbing noises to some colleagues who is close by , if you carry

handset to proceed above function.
To operate remote control function:
4. When you get into remote control function, the system announces “You have # of new
messages “ or “ you have no message “. Pause 2 seconds, then continue to announce “ to
record messages, please press 1; to get messages, please press 2; to administer outgoing
greeting, please press 3 “.
5. If a command is not received by the system within 45 seconds, it will signal 3 beeps and
hang up.
6. You follow the instruction codes to keep going the necessary steps.
Recording Message
To record messages:
7. When you get into remote control function, you press 1 to record message.
8. the system announces “ please select mailbox number destination “
9. User press the desired mailbox number on keypad, for instances, 02, then announces,
“ mailbox 2, please leave message after the beep. When finish, press # “.
10. you begin to record your message. After recording message, press #.
11. The system announces “ end of recording. To listen to your recording, press 3; to delete
and re-recording, press 1; to confirm and saved your message, press # “.
Note: Even you use your handset (from your mailbox) to leave message to your member at another mailbox, for
example, mailbox 3. The base will still alert user by emitting out sound to remind new ICM, if system Menu is
setting to MSG ALERT.
5-4 To confirm and save recording messages
Selecting to confirm and save your message by pressing “ # “, the system announces
“ message saved “. The system starts again with remote control function announcement
(refer to To operate remote control function, step 2)
5-5 To delete and re-recording messages
Selecting to delete and re-recording by pressing 1, the system announces “ message
deleted, please leave your message after the beep. When finish, press # “. Then system go
back to step 5.
5-6 To listen recording message
Selecting to listen to your recording by pressing 3, the system play the messages. After
playing messages, the system go back to announce “To listen to your recording, press 3;
to delete and re-recording, press 1; to confirm and saved your message, press # “.
Getting messages
To get message

1. When you get into remote control function, you press 2 to get messages.
3. the system announces “ you have # of new messages “ or “ you have no new message”.
4. If you have new messages. The system announces “ message 1, sent at Sep 27, 11: 15 AM”,
then to play announcement “ to listen message please press 0, to save or continue press #, to delete, press
*D”. After one message played, the system announces “ end of message. To repeat message,
press 1; to save or continue, press #, to delete, press *D “.
4-1 To repeat message playing
Selecting to repeat message by pressing 1, the system play the message again.
4-2 To save or continue message
Selecting to save or continue message by pressing #, the system announces “ message
saved, next message. “ Then the system continue to play the next message as step 4.
4-3 To delete message
Selecting to delete message by pressing *D, the system announces “ message deleted “.
Then the system continue to play the next message as step 4.
5. If no more message to play, the system announces “you have no more message “. Then, the
system go back to remote control function as To operate remote control function.
Administering outgoing greeting
When you get into remote control function, you press 3 to administer greeting
The system announces “ to record greeting, press 1; to turn greeting on or off, press 2 “.
To record greeting:
1. When enter into Administer outgoing greeting, you select to record greeting by pressing 1,
the system announces “ please leave your greeting announcement after the beep. When
finished, press # “.
2. Begin to record greeting. When finished the recording, press #. The system announces “ end
of recording. To listen to your recording, press 3; to delete and re-recording, press 1; to confirm and saved your
message, press #”. The system announces “ greeting saved “. Then the system play greeting.
To turn greeting on or off:
When enter into Administer outgoing greeting, you select to turn greeting on or off by press 2,
the system announces “ press 1 to turn greeting on; press 2 to turn greeting off “.
A. To turn greeting on
To turn greeting on by pressing 1, the system will confirm setting by emitting out beep
sound and announces “greeting is on “. After then, the system go back to remote control
function as To operate remote control function.
B. To turn greeting off
To turn greeting off by pressing 2, the system will confirm setting by emitting out beep
sound and announces “greeting is off “. After then, the system go back to remote control
function as To operate remote control function.
Note: Greeting ON means the mailbox doesn’t allow caller to leave message. Each mailbox
can be setting to Greeting ON or Greeting OFF except General Mailbox. General Mailbox is
always on Greeting OFF (General Mailbox has to be left message).
FCC Regulations:
zThis device complies with part 15 of the FCC Rules. Operation is subject to the condition
that this device does not cause harmful interference.
zThis device complies with part 15 of the FCC Rules. Operation is subject to the following
two conditions: (1) This device may not cause harmful interference, and (2) this device must
accept any interference received, including interference that may cause undesired operation.
zThis device has been tested and found to comply with the limits for a Class B digital device,
pursuant to Part 15 of the FCC Rules. These limits are designed to provide reasonable
protection against harmful interference in a residential installation. This equipment generates,
uses and can radiated radio frequency energy and, if not installed and used in accordance with
the instructions, may cause harmful interference to radio communications. However, there is
no guarantee that interference will not occur in a particular installation If this equipment does
cause harmful interference to radio or television reception, which can be determined by
turning the equipment off and on, the user is encouraged to try to correct the interference by
one or more of the following measures:
-Reorient or relocate the receiving antenna.
-Increase the separation between the equipment and receiver.
-Connect the equipment into an outlet on a circuit different from that to which the receiver is
connected.
-Consult the dealer or an experienced radio/TV technician for help.
Changes or modifications not expressly approved by the party responsible for compliance
could void the user‘s authority to operate the equipment.

4RF Exposure Information (SAR)
This device meets the government’s requirements for exposure to radio waves.
This device is designed and manufactured not to exceed the emission limits for exposure to
radio frequency (RF) energy set by the Federal Communications Commission of the U.S.
Government.
The exposure standard for wireless devices employs a unit of measurement known as the
Specific Absorption Rate, or SAR. The SAR limit set by the FCC is 1.6W/kg. *Tests for
SAR are conducted using standard operating positions accepted by the FCC with the device
transmitting at its highest certified power level in all tested frequency bands. Although the
SAR is determined at the highest certified power level, the actual SAR level of the device
while operating can be well below the maximum value. This is because the device is
designed to operate at multiple power levels so as to use only the poser required to reach the
network. In general, the closer you are to a wireless base station antenna, the lower the
power output.
The highest SAR value for the device as reported to the FCC when tested for use at the ear is
0.041 W/kg and when worn on the body, as described in this user guide, is 0.019 W/kg.
(Body-worn measurements differ among device models, depending upon available
enhancements and FCC requirements.)
While there may be differences between the SAR levels of various devices and at various
positions, they all meet the government requirement.
The FCC has granted an Equipment Authorization for this device with all reported SAR
levels evaluated as in compliance with the FCC RF exposure guidelines. SAR information
on this device is on file with the FCC and can be found under the Display Grant section of
http://www.fcc.gov/oet/fccid after searching on FCC ID: KA2-OD-2LP-CL.
For body worn operation, this device has been tested and meets the FCC RF exposure
guidelines for use with an accessory that contains no metal and the positions the handset a
minimum of 1.5 cm from the body. Use of other enhancements may not ensure compliance
with FCC RF exposure guidelines.