D Link RFHTN102A1 Wi-Fi Invite Home Hub User Manual
D Link Corporation Wi-Fi Invite Home Hub
D Link >
User Manual
RocketFish RF-HTN102 Wi-Fi Invite Home Hub
User Manual

2
Preface
RocketFish reserves the right to modify this document at any time without obligation or notification of any person or organization of such revisions or changes.
Manual Revisions
Trademarks
©2010 RocketFish. RocketFish and the RocketFish logo are trademarks of Best Buy Enterprise Services, Inc. Other brands and product names are trademarks or registered
trademarks of their respective holders.
Revision Date Description
1.0 November 23, 2010 First Draft
2.0 December 9, 2010 Second Draft
3.0 December 21, 2010 Third Draft
4.0 December 22, 2010 Fourth Draft

3
Table of Contents
Preface........................................................................................................................................................................................................................................................................2
Manual Revisions....................................................................................................................................................................................................................................................2
Trademarks.............................................................................................................................................................................................................................................................2
Product Overview.......................................................................................................................................................................................................................................................5
Package Contents...................................................................................................................................................................................................................................................5
System Requirements ............................................................................................................................................................................................................................................ 5
Introduction................................................................................................................................................................................................................................................................6
Features..................................................................................................................................................................................................................................................................7
Hardware Overview................................................................................................................................................................................................................................................ 8
Hardware Overview (Continued) ...........................................................................................................................................................................................................................9
Installation................................................................................................................................................................................................................................................................12
Connecting the Hub to your Network......................................................................................................................................................................................................................13
Configuration............................................................................................................................................................................................................................................................14
Web-based configuration utility...........................................................................................................................................................................................................................17
Accessing the web-based configuration utility ................................................................................................................................................................................................18
Checking the General Status of the Hub ..........................................................................................................................................................................................................19
Checking the Wireless Network Status ............................................................................................................................................................................................................19
Checking the Traffic Statistics...........................................................................................................................................................................................................................21
Accessing the System Log...............................................................................................................................................................................................錯誤
錯誤錯誤
錯誤! 尚未定義書籤
尚未定義書籤尚未定義書籤
尚未定義書籤。
。。
。
Hub Administration ............................................................................................................................................................................................................錯誤
錯誤錯誤
錯誤! 尚未定義書籤
尚未定義書籤尚未定義書籤
尚未定義書籤。
。。
。
Adjusting the Time and Date Settings............................................................................................................................................................................錯誤
錯誤錯誤
錯誤! 尚未定義書籤
尚未定義書籤尚未定義書籤
尚未定義書籤。
。。
。
Changing the Administrator Account...............................................................................................................................................................................................................22
Changing the Host Name of the Hub................................................................................................................................................................................................................23

4
Changing the IP Address of the Hub.................................................................................................................................................................................................................24
Remote Management ......................................................................................................................................................................................................................................24
Backing up and Restoring Hub Settings............................................................................................................................................................................................................26
Updating the Firmware of the RF-HTN102.......................................................................................................................................................................................................26
Rebooting the Hub ...........................................................................................................................................................................................................................................27
Configuring Wireless Settings...............................................................................................................................................................................................................................28
Connecting to a Wireless Network...................................................................................................................................................................................................................28
Configuring Advanced Wi-Fi 2.4GHz Settings...................................................................................................................................................................................................31
Configuring Advanced 5GHz Wi-Fi Settings......................................................................................................................................................................................................33
Configuring WPS (Wi-Fi Protected Setup)........................................................................................................................................................................................................14
Disabling and Enabling WPS ...........................................................................................................................................................................................錯誤
錯誤錯誤
錯誤! 尚未定義書籤
尚未定義書籤尚未定義書籤
尚未定義書籤。
。。
。
Troubleshooting ...................................................................................................................................................................................................................................................35

5
Product Overview
Package Contents
RF-HTN102 Wi-Fi Invite Home Hub Ethernet Cable (1M RJ45) Quick Start Guide
Power Adapter (12V DC 1.25A) CD-ROM with Manual
System Requirements
Network requirements
• an Ethernet-based Cable or DSL Modem
• IEEE 802.11n or 802.11a/b/g wireless clients
• 10/100Mbit Ethernet cable
Web-based configuration utility requirements
A computer with:
• a Windows, Mac or Linux-based operating system
• an installed Ethernet adapter
• A CD-ROM drive
Browser requirements:
• Internet Explorer 6 or higher
• Mozilla Firefox 3.0 or higher
• Safari 3 or higher

6
Introduction
Congratulations on your purchase of the RocketFish RF-HTN102 Wi-Fi Invite Wireless Hub. We hope that you will enjoy using this product to enhance your home network,
but before you begin, please take a moment to read through this manual to learn all the features of the device.
The RF-HTN102 is a high performance wireless hub designed to easily fit into your network and provide you with an easy way to connect all your devices and enjoy
multimedia and games throughout your home.
SUPERIOR SPEED
Supporting 802.11a/b/g/n, the RF-HTN102 provides a blazingly fast wireless transfer speed so that you can enjoy the latest multimedia to its full. When connecting using
802.11n you can experience speeds exceeding that of 100Mbps wired Ethernet connections.
BETTER PERFORMANCE
The RF-HTN102 can operate at both 2.4GHz and 5GHz spectrums allowing you to choose which frequency performs best for you. If you have compatible hardware, you can
switch to operate on the 5GHz frequency to avoid crowding of the 2.4GHz spectrum and improve the stability and speed of your wireless connection.
INCREASED SECURITY
Using the included Wi-Fi Protected Setup (WPS), you can set up your wireless connection simply and securely. The RF-HTN102 supports both PBC and PIN methods of
securely setting up the device. You can choose to use either WPA or WPA2 encryption methods to protect your network from intruders.
EASY SETUP
The Wi-FI Protected Setup (WPS) and Wi-Fi Invite features allow you to easily connect to a wireless router such as the RocketFish RF-HTN104.

7
Features
• Faster Wireless Networking - The RF-HTN102 provides up to 300Mbps
*
wireless connection with 802.11n wireless routers. This capability allows users to
participate in real-time activities online, such as video streaming, online gaming, and real-time audio. The performance of this 802.11n wireless hub gives you the
freedom of wireless networking at speeds 650% faster than 802.11g.
• Compatible with 802.11a, 802.11b, and 802.11g Devices - The RF-HTN102 is fully compatible with the IEEE 802.11a, 802.11b, and 802.11g standards, so it can
connect with existing 802.11a, 802.11b, and 802.11g PCI and USB network adapters.
• Advanced Wi-Fi Configuration – The RF-HTN102 allows you to fine-tune your wireless settings to optimize performance for your specific environment.
• Restrict Remote Access – You can specify which computers on the LAN have access to the administration tool.
* Maximum wireless signal rate derived from IEEE Standard 802.11a, 802.11b, 802.11g, and Draft 802.11n specifications. Actual data throughput will vary. Network conditions and
environmental factors, including volume of network traffic, building materials and construction, and network overhead, lower actual data throughput rate. Environmental conditions will
adversely affect wireless signal range.
8
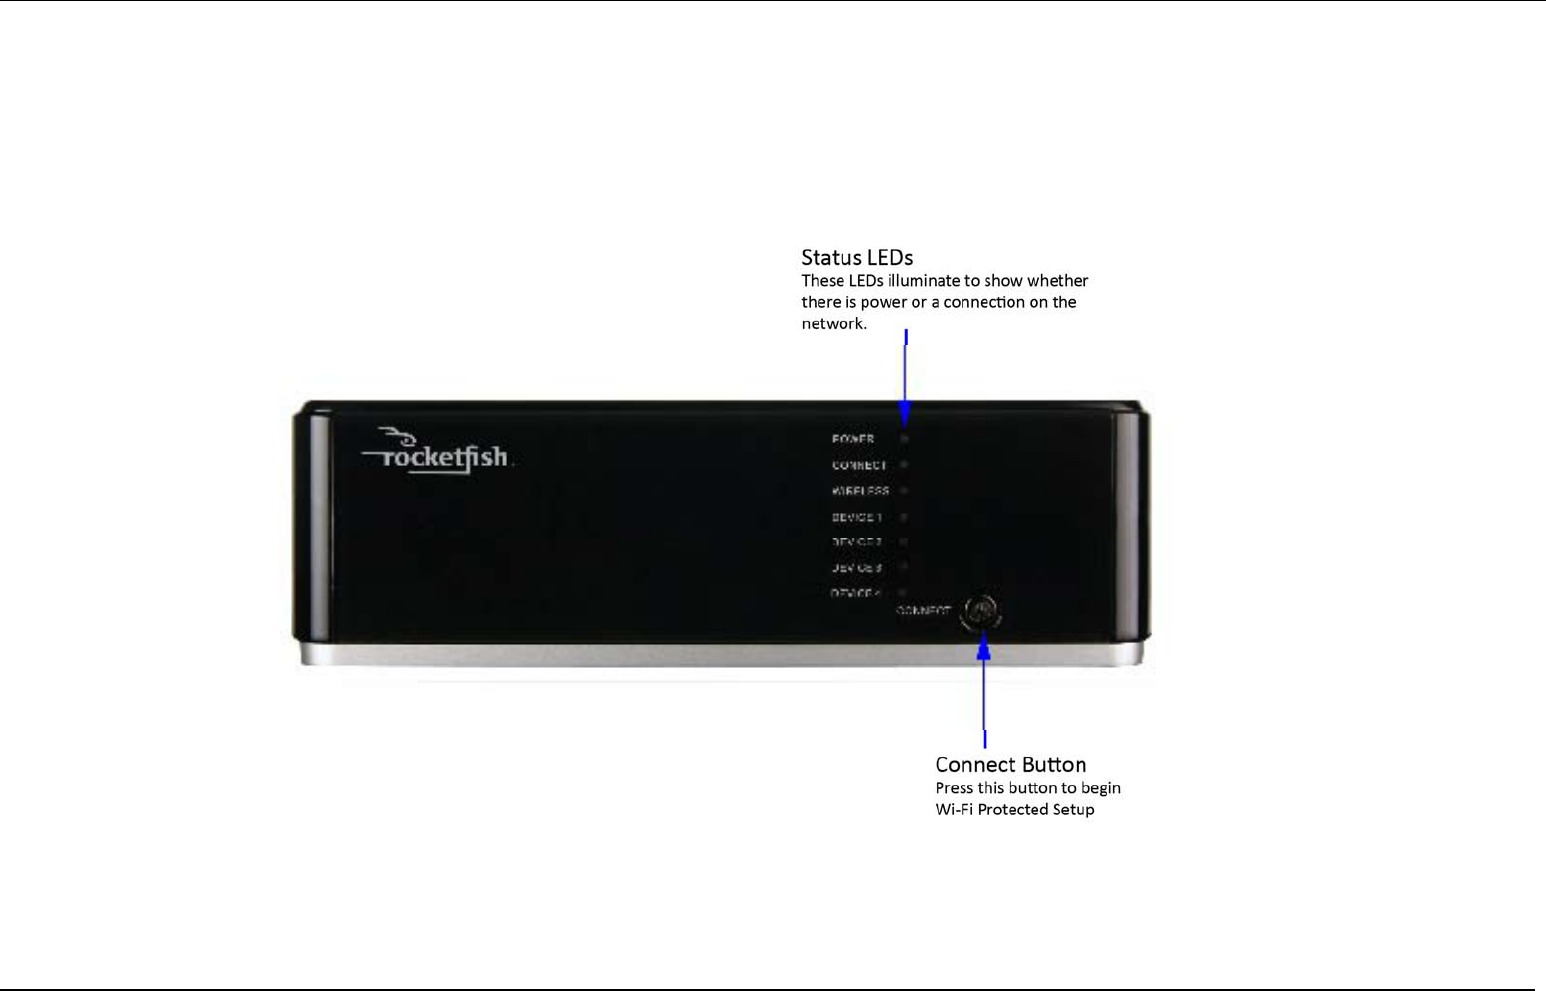
Hardware Overview
FRONT PANEL

9
Hardware Overview (Continued)
REAR PANEL
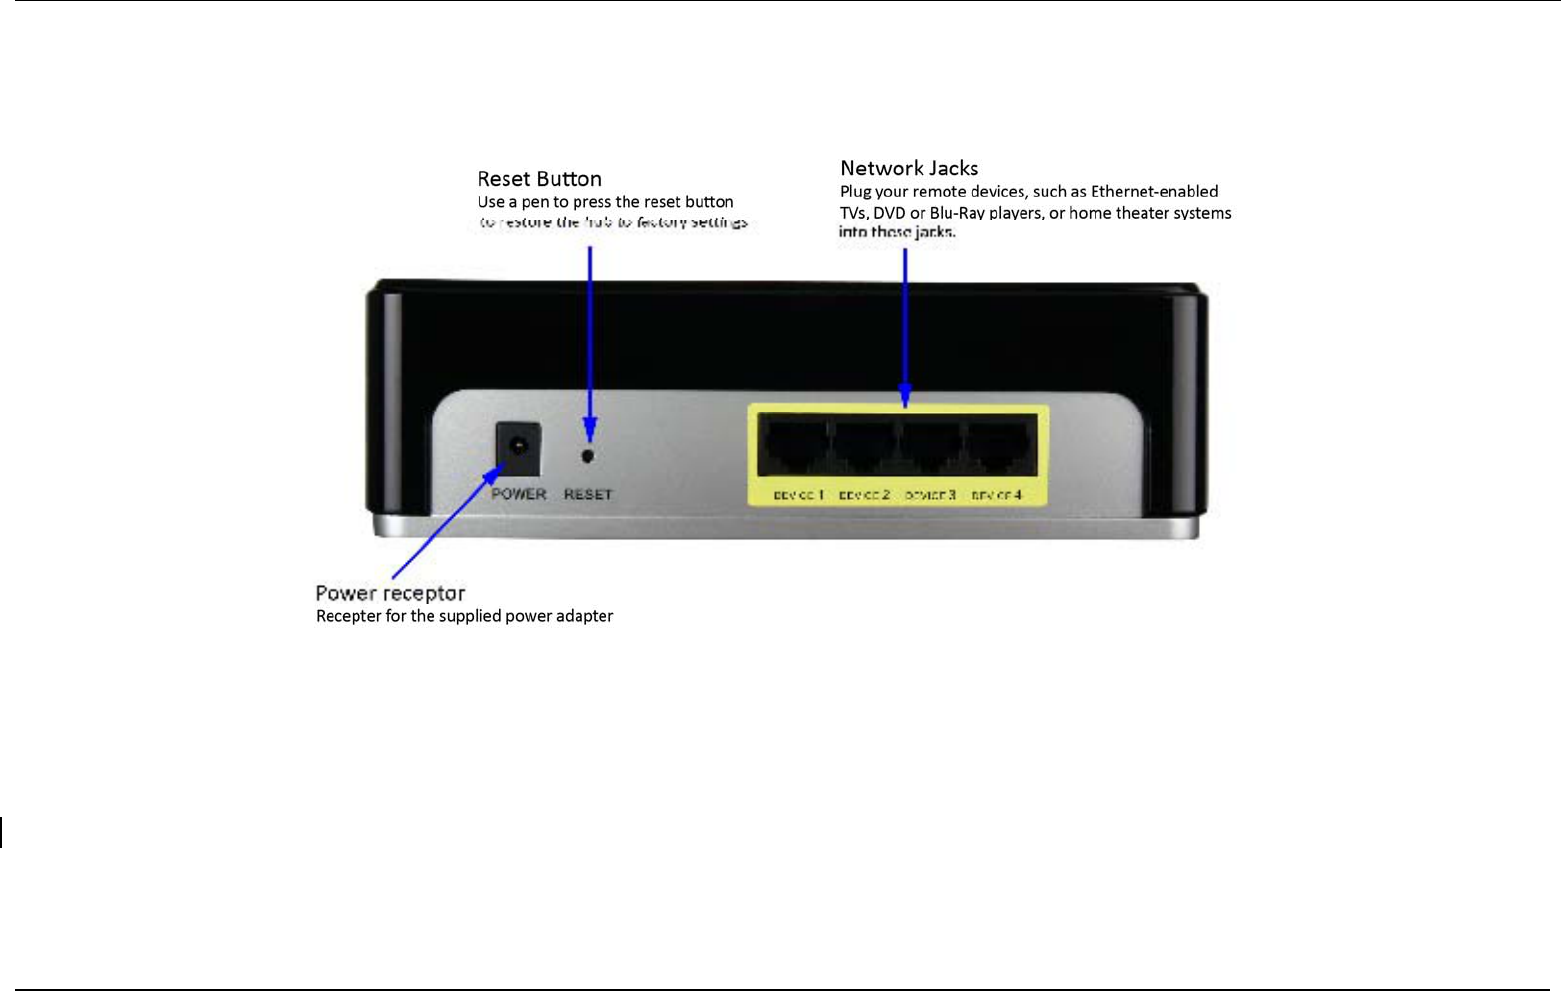
10

11
Hardware Overview (Continued)
LED Indicators
INDICATOR STATUS DESCRIPTION
Solid Light Router is ON Power
Light Off Router is OFF
Connect Blinking Light WPS or Wi-Fi Invite connection in progress
Solid Light Hub is connected to router
Blinking Light Data is being sent and received between the hub and a
remote router.
Wireless
Light Off Hub is not connected to router
Device 1 -4 Solid Light A device is connected to the network jack

12
Installation
This section will walk you through installing the wireless hub. Placement of the hub is very important. Be sure not to place it in an enclosed space like a cabinet, closet, attic,
garage or any other area where there is not ample ventilation.
The RocketFish RF-HTN102 wireless hub allows you to access your network via a wireless connection from anywhere within its operating range. However, keep in mind that
there are factors that affect the signal strength and range of your connection. The number of objects the signal must pass through together with the number of radio
frequencies in the area will have an effect on the range. Remember these tips to maximize the wireless range of your network:
1. Keep the number of walls or ceilings that the signal must pass through to a minimum. Each wall or ceiling that the signal must pass through will have an adverse
affect on the range of your network.
2. Be aware of the direct line between the devices. A wall that is at an angle will mean that signal needs to pass through a greater surface area than the normal
thickness of the wall.
3. Building materials make a difference. Try to position access points, routers and computers so that the signal passes through open doorways or through drywall.
Materials such as glass, metal, steel, walls with insulation, bodies of water such as fish tanks, mirrors, file cabinets, brick and concrete will degrade your wireless
signal.
4. Keep your wireless hub at least 3-6 feet (1-2 meters) away from other devices which generate radio frequencies.
5. If you choose to operate the wireless hub on the 2.4GHz spectrum, be aware that this is more commonly used than the 5GHz spectrum and is therefore susceptible
to interference from devices such as microwaves and cordless phones. Try to keep the base station of your cordless phone as far away as possible from the wireless
hub as the base station will transmit a signal even if the phone is not in use.
13
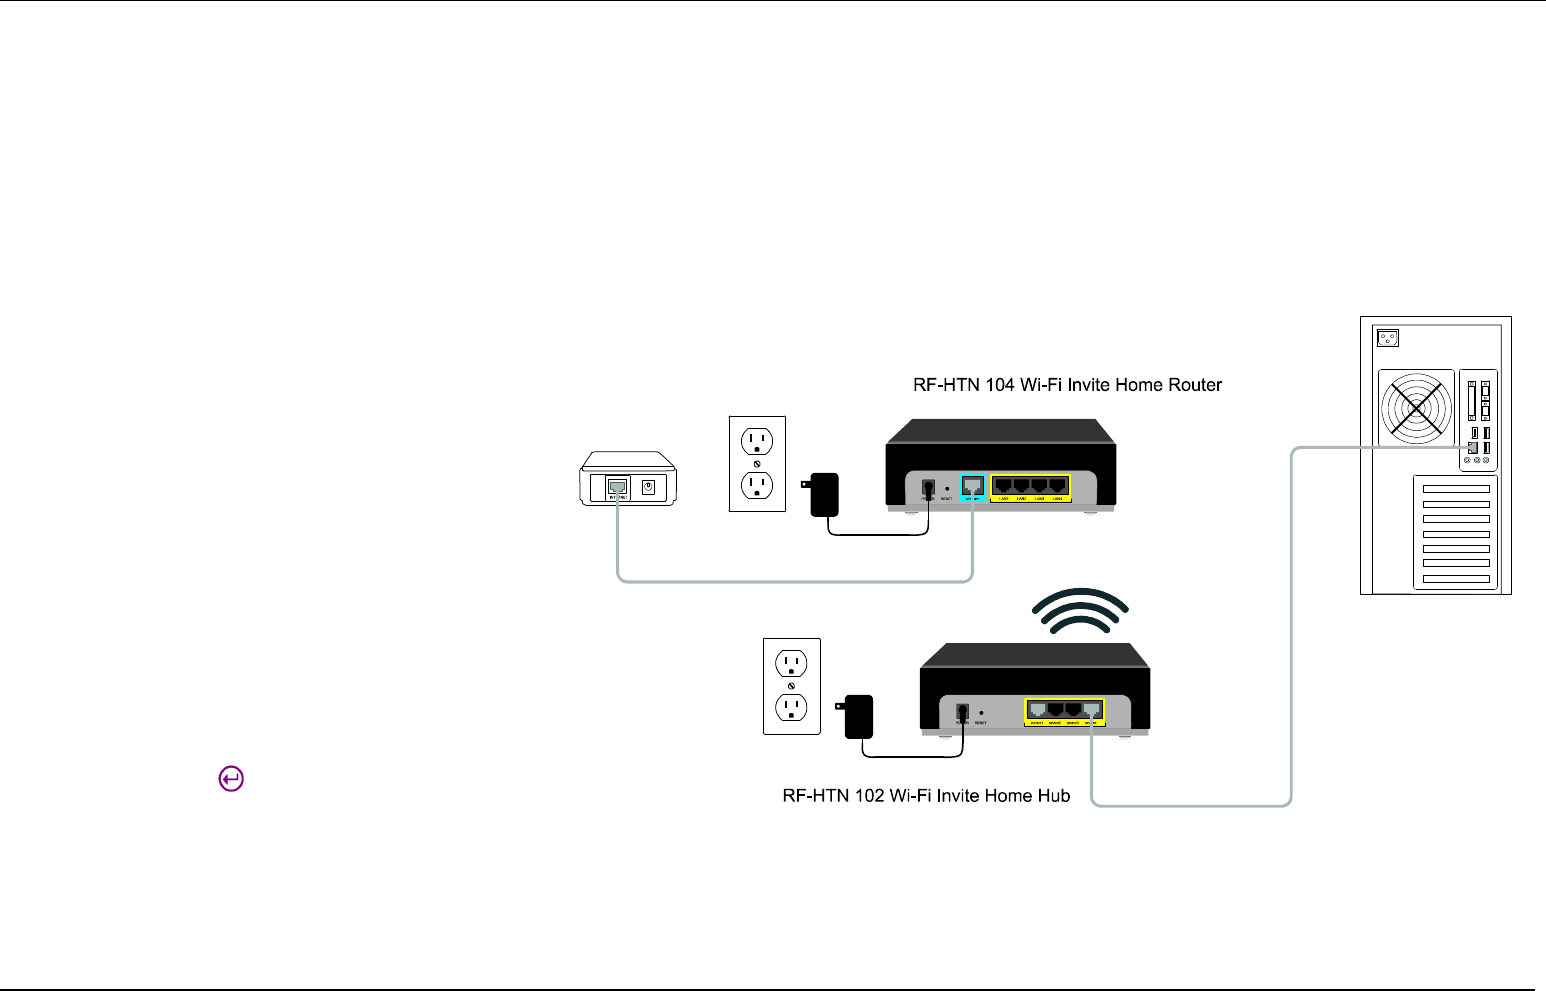
Connecting the Hub
Connect the Hub
1. Position your hub close to your router which is
already online. Connect an Ethernet cable from your
computer to one of the DEVICE ports on the back of
the hub.
2. Connect the supplied power adapter into the POWER
receptor on the back of the hub and then plug into a
power outlet or surge protector. Verify the power
light is lit.
3. Make sure that your computer has an IP Address of
192.168.1.XX and a Subnet of 255.255.255.0. Refer to
the Troubleshooting section of the user manual for
more information.
4. Open a web browser, enter http://192.168.1.50 and
then press Enter. When the login window appears,
set the user name to admin and leave the password
box blank. Click to continue the setup. Please
refer to the user manual for more detailed
installation information and advanced features.
5. When you have completed the setup, move the hub to desired location and connect the power adapter. Connect the devices you want to use into the DEVICE ports
on the back of the hub.

14
Using Wi-Fi to connect to a router
You can connect the Wi-Fi Invite Home Hub to your router using either Wi-Fi Invite or Wi-Fi Protected Setup (WPS). Once a Wi-Fi connection is successfully established, you
are ready to begin using your Wi-Fi Invite Home Hub.
Using WPS
The Wi-Fi Protected Setup (WPS) system is a simplified method for:
• Securing your wireless network during the initial setup
• Adding a new device to the network
There are two simple methods to securely add a device to your network via WPS:
• Push Button Configuration (PBC) method
• Personal Identification Number (PIN) Code method.
Both of these WPS methods greatly reduce the time it takes to get a new device on your network while using WPA2 encryption.
To connect to a wireless router using the PBC method:
1. Position the router and hub together for the initial Wi-Fi connection procedure.
2. Power on the router and wait approximately 1 minute for it to start before powering on your Wi-Fi Invite Home Hub.
3. Press the CONNECT button on the front of the Wi-Fi Invite Router. On other brands of routers, there will be a similar button for the WPS function.
4. Press Connect next to PBC near the bottom of the screen, or hold down the Connect button on the front of your Wi-Fi Invite Hub for approximately 3 seconds. The
two devices will connect within 2 minutes.
5. Place the hub in the desired location when the connection is successful.
To connect to a wireless router using the PIN Code method:

15
1. Position the router and hub together for the initial Wi-Fi connection procedure.
2. Power on the router and wait approximately 1 minute for it to start before powering on your Wi-Fi Invite Home Hub.
3. Locate the PIN number on the bottom of the Wi-Fi Invite Home Hub and make a note of it.
If you are unable to find it, you can:
Reset the PIN to the default by clicking Reset PIN Code to Default.
OR
Generate a new PIN Code by clicking Generate New PIN Code.
4. Enter the PIN Code into the PIN Code field of the Wi-Fi Invite Home Router’s WPS page and click Connect.
5. Press the Connect button on the front panel of the Wi-Fi Invite Home Hub. The two devices will connect within 2 minutes.
6. Place the hub in the desired location when the connection is successful.
Tip: To make sure that the connection was successful, click , then click Wireless Status in the menu on the left. If the connection was successful, CONNECTED and the
router’s SSID are displayed.
To Turn Off WPS
• Click Disable WPS and then click , or click to cancel.
Note: WPS is enabled by default. If you turn it off, then want to turn it back on, click Enable WPS.
Using Wi-Fi Invite
To join a network using Wi-Fi Invite:
1. Place the hub and router close to each other for the setup procedure and power them on. The first time the router detects a signal from a Wi-Fi Invite hub within
range, it displays the following screen:

16
2. Select the Invite function to continue by pressing the center button on the control pad. The router will scan for wireless clients in range and show a list of
discovered devices after a few moments.
3. Select the host name of the device you want to invite from the list by pressing the right direction button on the control pad. For the Wi-Fi Invite Home Hub, this will
be RF-HTN102 by default.
4. On your RocketFish Wi-Fi Invite Home Hub, you should see the CONNECT button flashing if you have invited it successfully. If the CONNECT button is not flashing,
confirm that you have invited the correct device from the router and try again. Press the CONNECT button on the front to accept the invitation. Within 2 minutes,
the router will connect with the hub and display “WIFI invite connection established!”. If it does not establish a connection, try repositioning the router or the client
and try again.
5. Place the hub in the desired location when the connection is successful.

17
Web-based configuration utility
After you have made an initial Wi-Fi connection to your router, you might need to adjust settings on the hub. This section explains how to adjust the configuration using the
web-based configuration utility.
If you successfully established a Wi-Fi connection, go to Configuring the hub on page 17 to continue.
If you were unable to establish a Wi-Fi connection, follow these steps to connect directly to the hub. Before you begin, make sure that your computer is connected to the
hub using an Ethernet cable. Connect one end of the cable to the network adapter on your computer and the other end to one of the network jacks on the back of the Wi-Fi
Invite Home Hub.
Setting the computer’s IP address
The RF-HTN102 does not have a DHCP Server. Therefore, the first time you connect your computer to the hub, the hub will not be able to give you a local IP address. You
will need to manually set your IP address to a local one in order to connect to the hub.
- Click Start > Settings > Control Panel. Select Network Connections. Select the connection profile which is connected to the hub, most likely labeled
Local Area Connection.
- Select Internet Protocol (TCP/IP) and click Properties. Select the radio button Use the following IP address and give the connection a local IP address
which is not in use already e.g. 192.168.1.111. Set the Subnet Mask to 255.255.255.0. Click OK twice.
- Try to connect to the web-based configuration utility again.
18
Configuring the hub
This section will describe how to set up the RF-HTN102 using the web-based configuration utility.
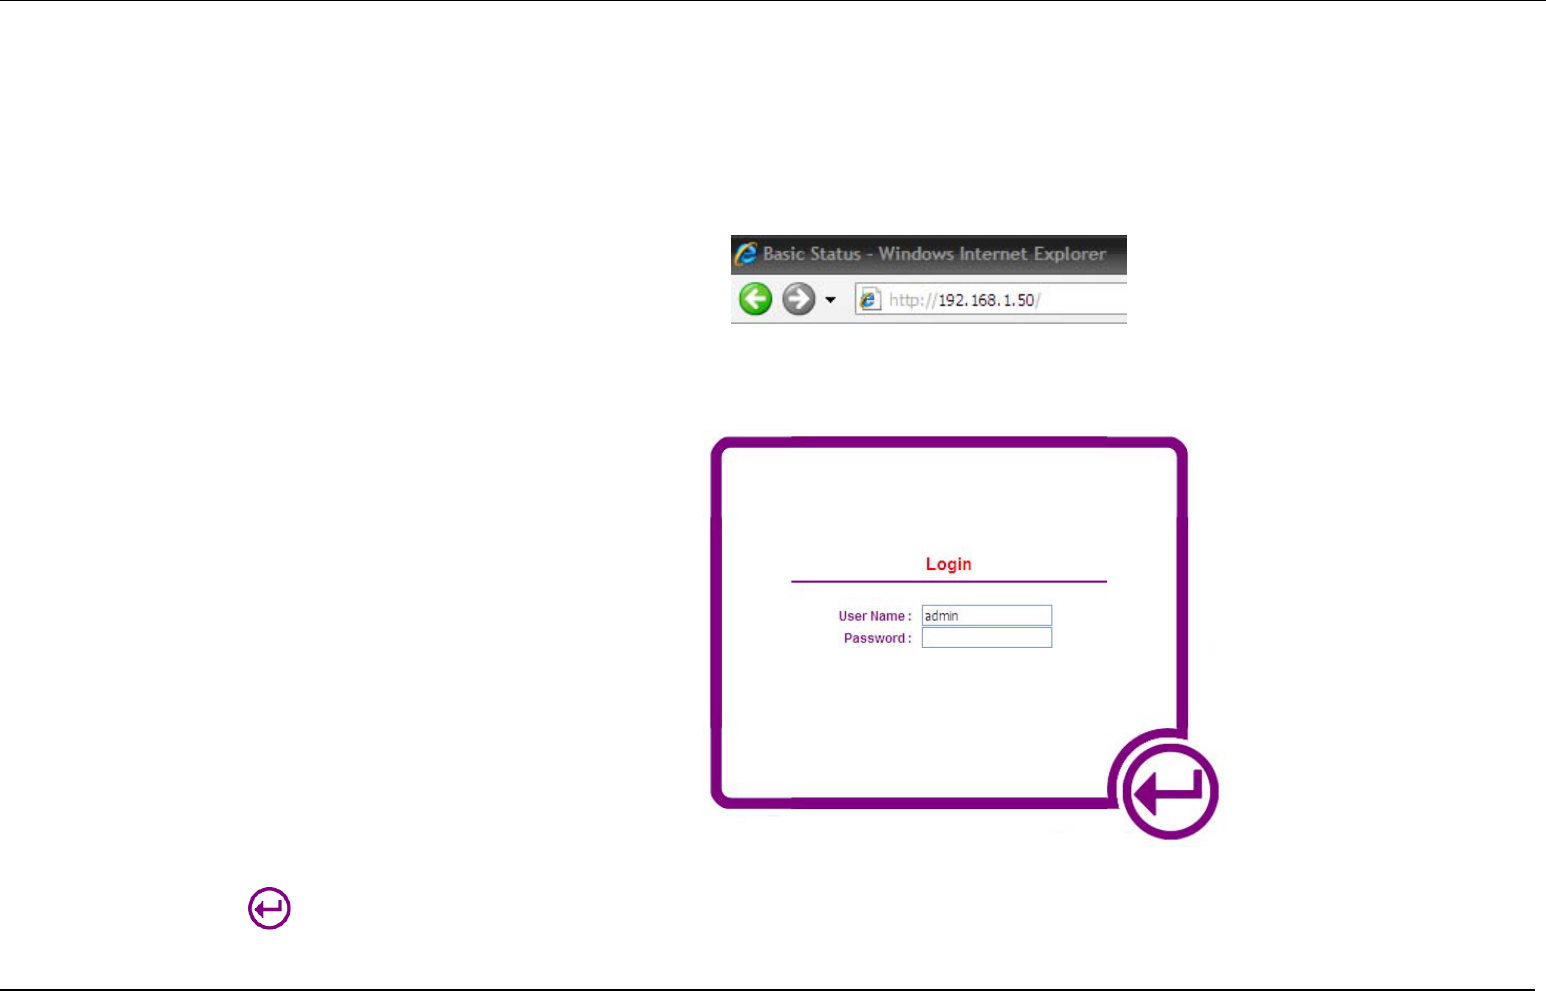
Accessing the web-based configuration utility
To access the web-based configuration utility, open a web browser, such as
Internet Explorer and enter the IP address of the hub (192.168.1.50) .
Enter admin in the User Name field and leave the Password field empty for
the initial setup process.
Press the Enter key or click to complete the login.

19
Checking the General Status of the Hub
After logging in, the Device Basic Status screen is displayed. This is the
home screen, denoted by an icon of a house. This screen displays the
device uptime and the version of firmware
The menu on the left side of the screen allows you to select various status
screens which provide information about the status of the various
functions of the hub.
Checking the Wireless Network Status
Wireless Status – 2.4GHz Band & Wireless Status – 5GHz Band
This section shows the details of the 2.4GHz and 5GHz wireless connection
including the mode it is running in and the current supported standards
(a/b/g/n), the Network Name or SSID, the MAC address of the wireless access
point, the channel it is operating on, authentication mode and type of
encryption.
Connection Status
This section displays the current status of the wireless hubs connection to the
router. If connected, it will state CONNECTED and list the BSSID of the router it

20
is connected to.
21
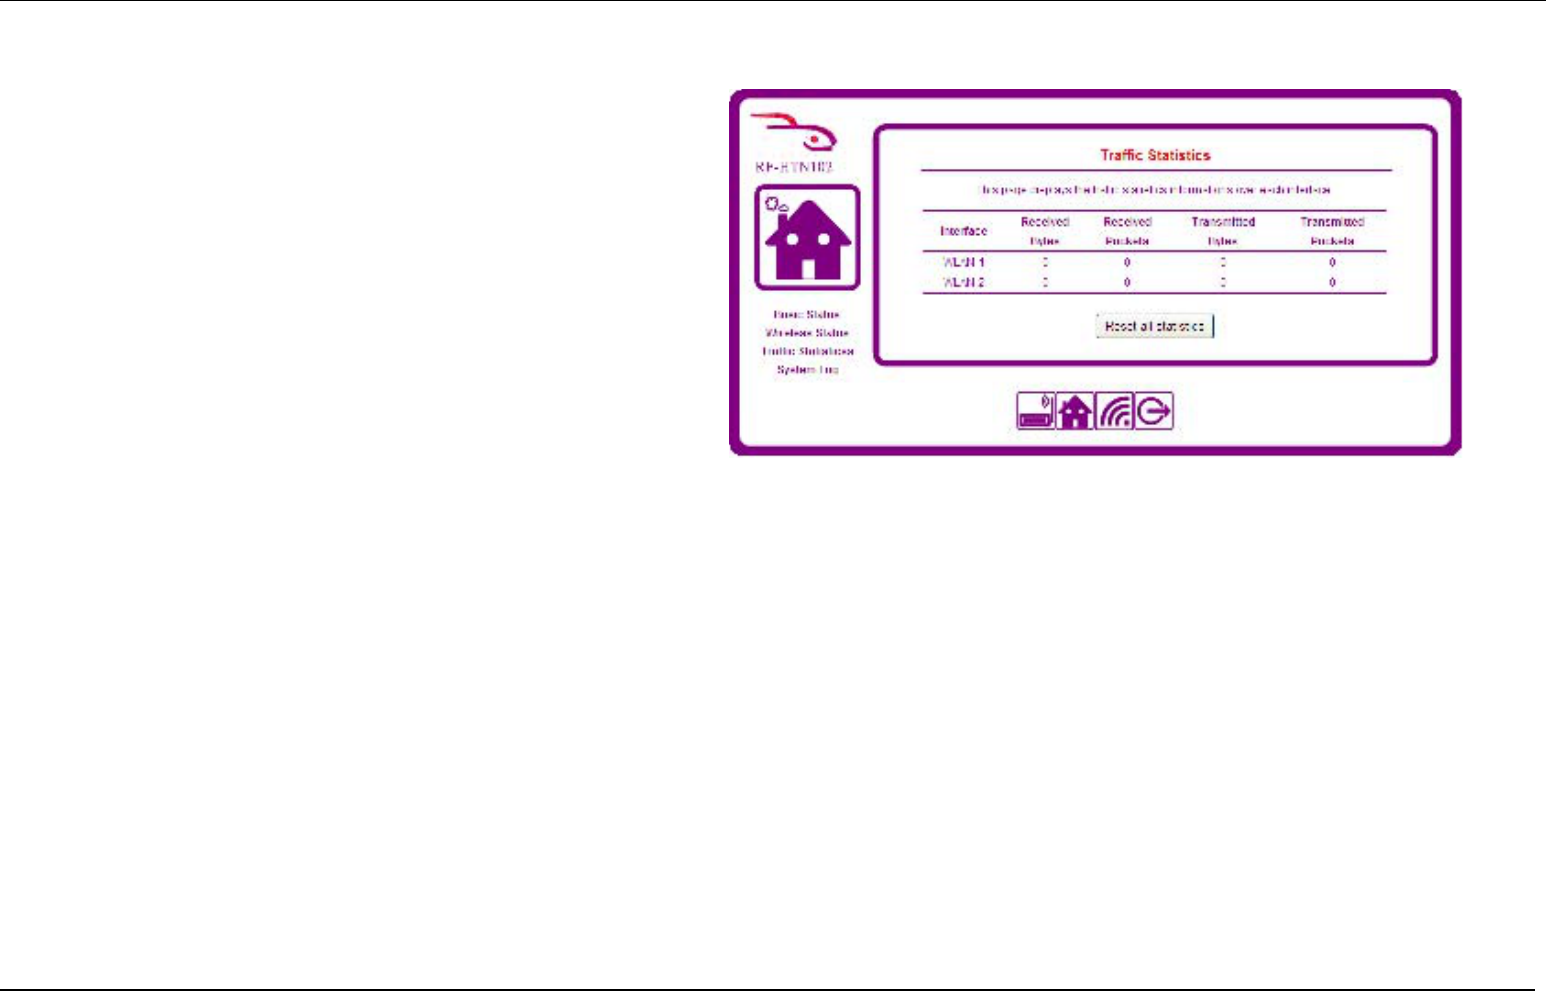
Checking the Traffic Statistics
This screen shows the number of packets and bytes received and transmitted
for each wireless radio (2.4Ghz and 5GHz) of the hub.
22
Changing hub configuration settings
1. Login to the hub as described in the section titled “Configuring the
hub”
2. Click the icon from the animated menu at the bottom of the web-
configuration utility.
3. The Date and Time Properties screen is displayed along with a menu on
the left from which you can select what you would like to configure.
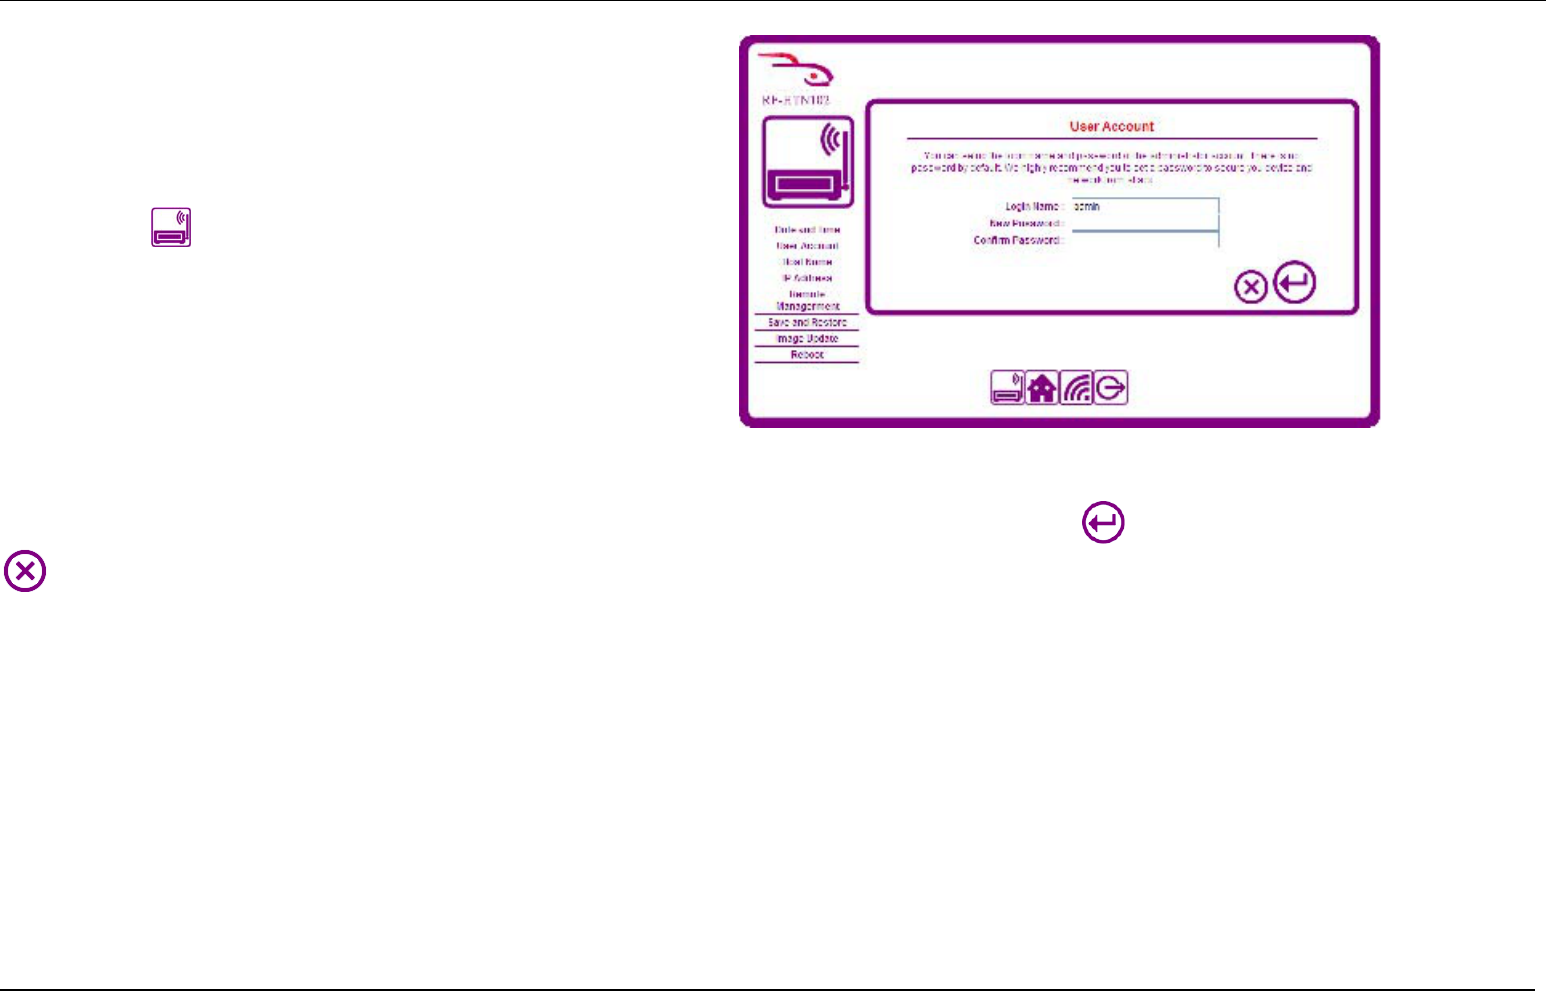
Changing the Administrator Account
You can change the login name and password for the hub. To change the login name and/or password, enter the login name you wish to use. In the New Password field,
type the new password you wish to use. Repeat the password you just typed in the Confirm Password field and click the button. If you wish to cancel, press the
button.
It is strongly recommended that you set a secure password to prevent unauthorized access to your router configuration.
23
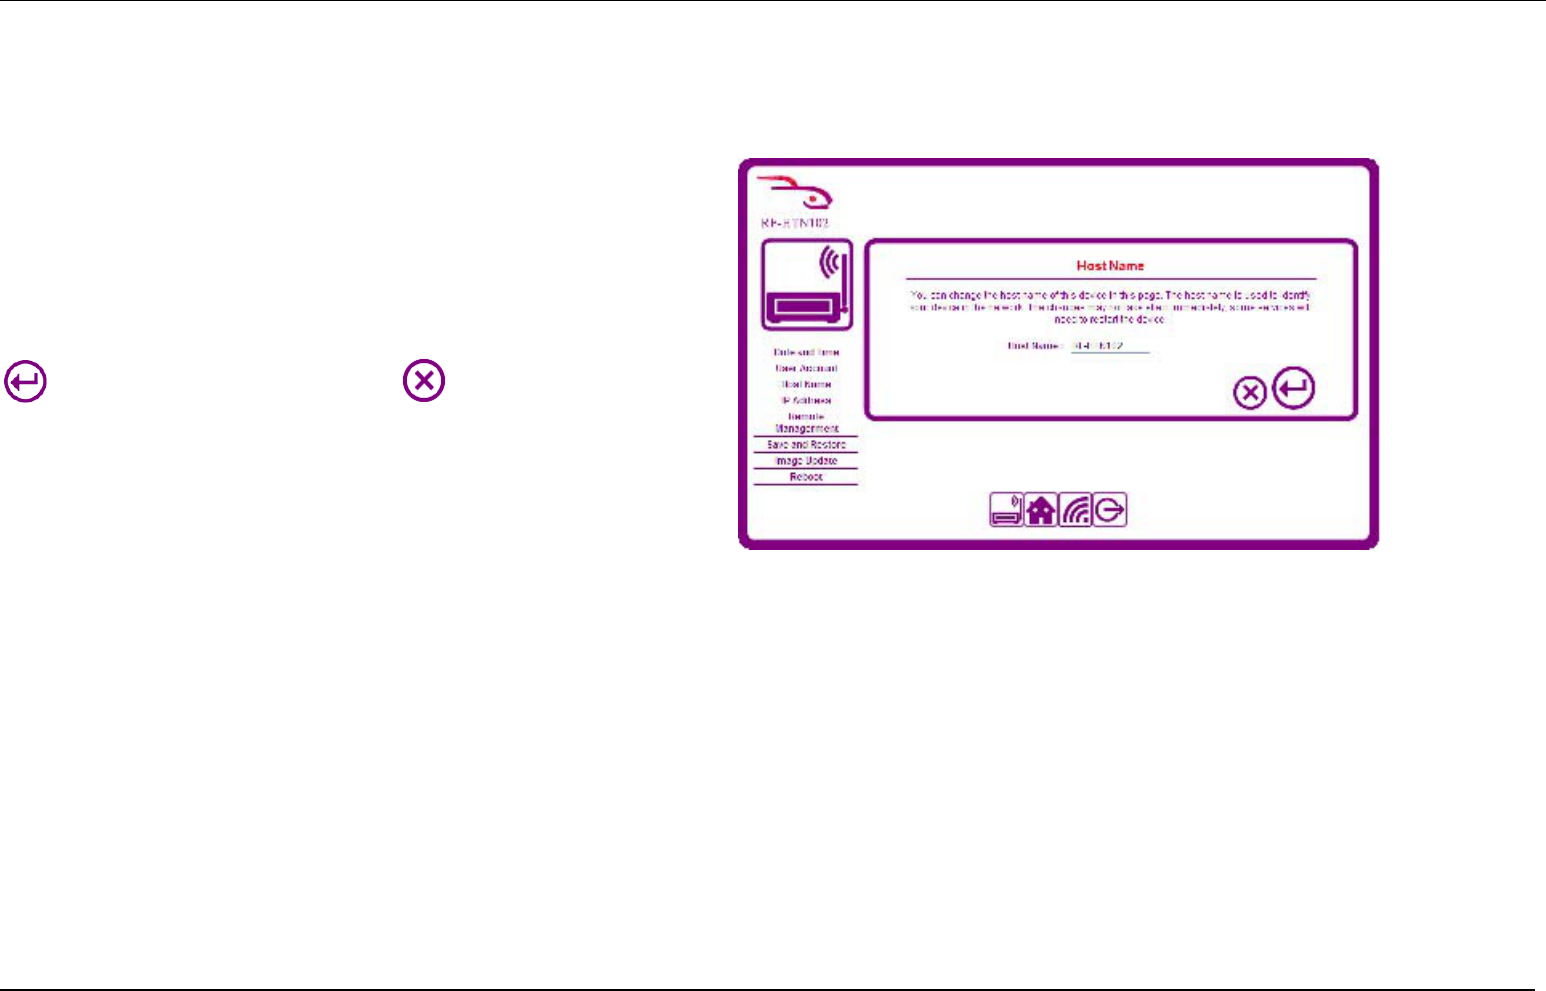
Changing the Host Name of the Hub
The host name of the device is the name which is used to identify the hub on
your network. On this screen you may change the host name of the hub to
make it easily identifiable.
To change the host name, enter a name of up to 15 characters and press the
button. If you wish to cancel, press the button.
You may not enter a space in the name or use special characters such as @ # $
% & * in the host name. If you enter any forbidden characters, the hub will
show an error when you try to save the host name.
You may need to restart the device for the changes to take effect.
24
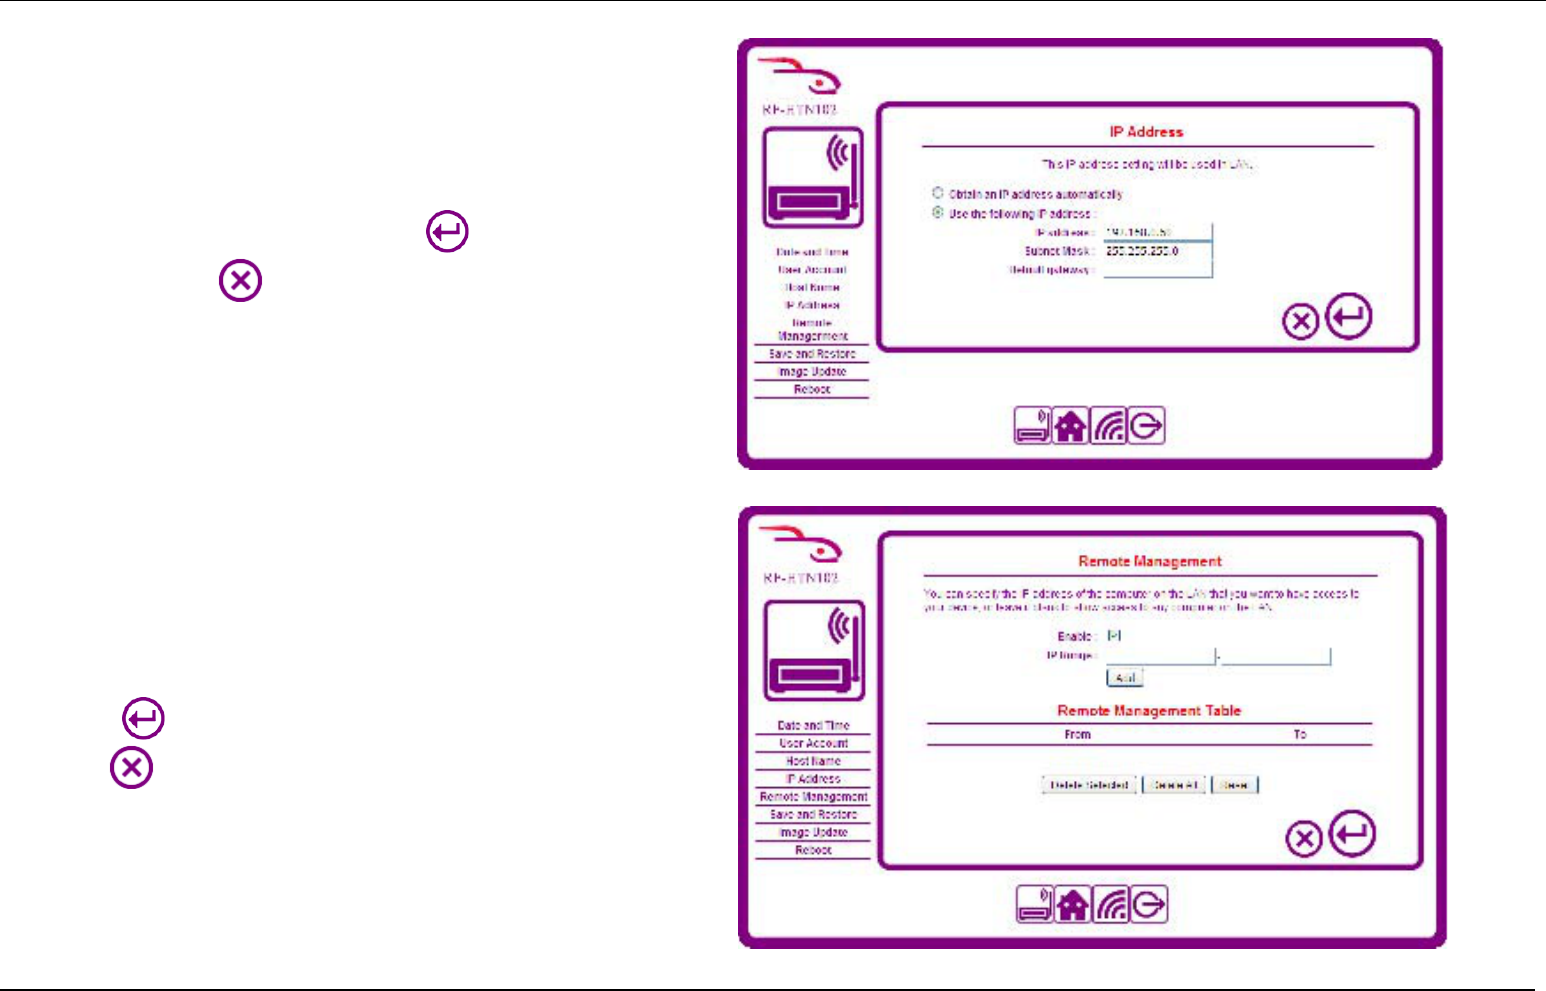
Changing the IP Address of the Hub
The IP Address is the address used to locate and identify the hub on your
network. The default IP address of the hub is 192.168.1.50. On this screen you
may change the IP address and subnet mask allocated to your hub if you have
another device on your network which uses 192.168.1.50, for example. When
you have entered the new IP Address, click the button to continue. If you
wish to cancel, click the button.
Remote Management
If you wish to restrict access to the administration interface, you can do so here.
To restrict the access:
1. Check the Enable box.
2. Enter the range of IP Addresses you want to allow access to. If you only
want to allow one IP Address to have access, enter it in the first field
and leave the second field blank.
3. Click to save your settings and continue. If you wish to cancel, click
the button.
Remote Management Table
This shows a list of IP addresses which are allowed access to the administration
interface. You can remove selected ones by putting a check in the
corresponding box and selecting Delete Selected. If the Remote Management

25
Table is empty, no restrictions are applied and any IP address on your LAN can access the hub.
26
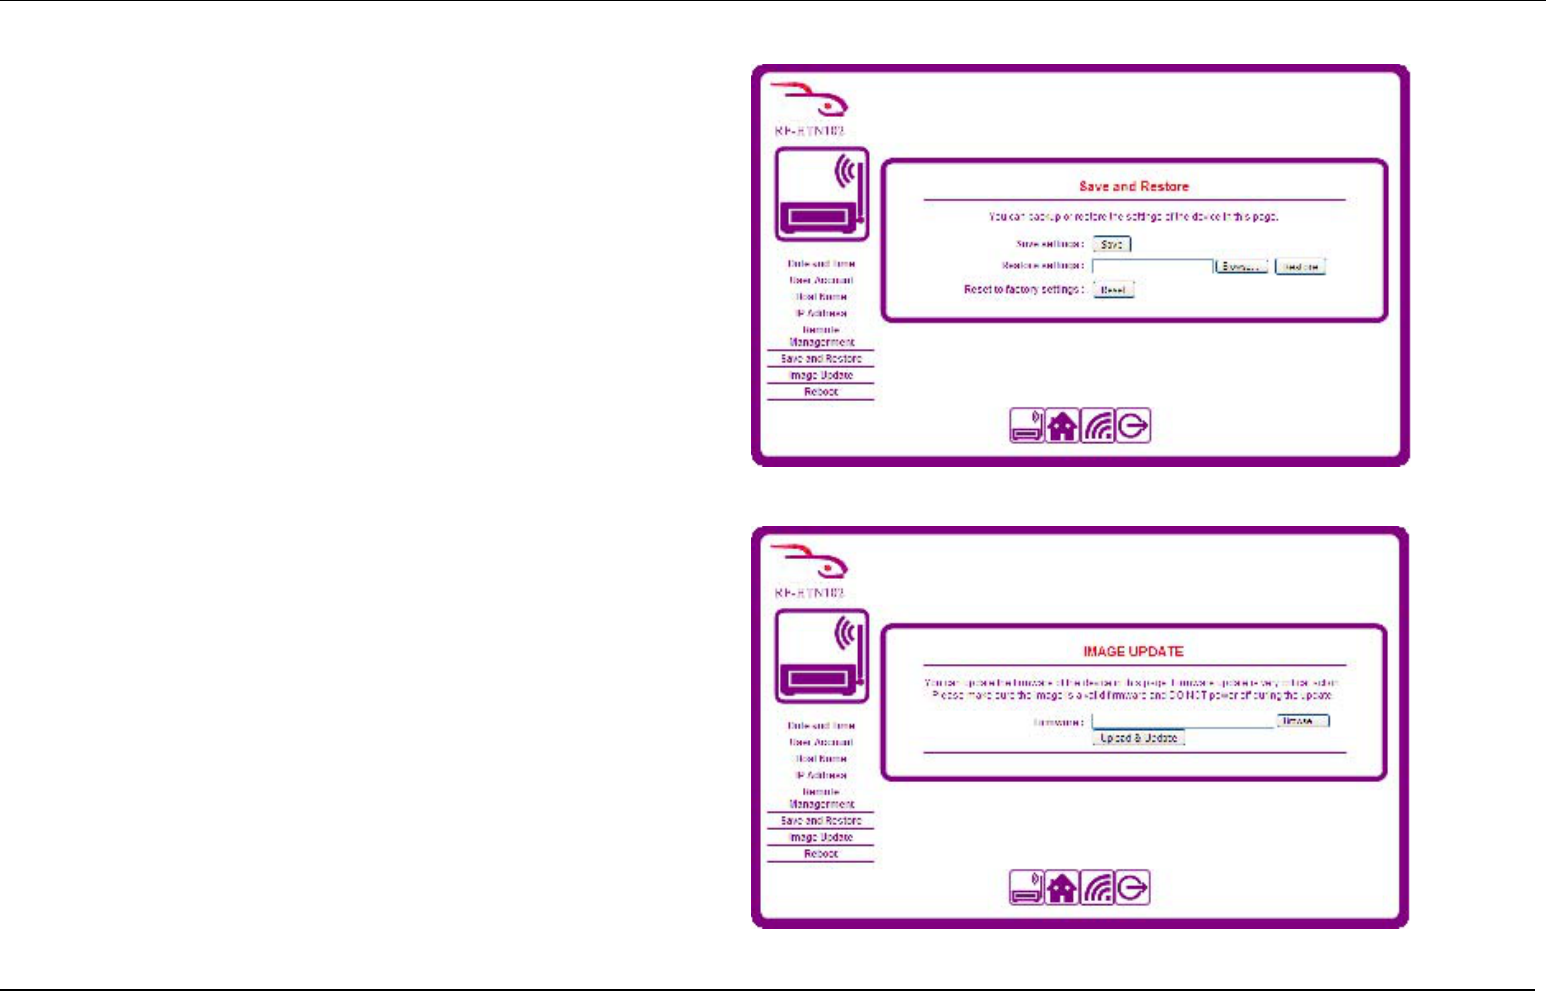
Backing up and Restoring Hub Settings
When you have configured the hub to your liking, you can back up the settings to
a file in case you want to make changes and you are able to easily revert back to
a trusted configuration.
To save the configuration, click the Save button. A window appears prompting
you to save the file named config.bin. Choose a place on your computer to save
the file and click the save button.
To restore the configuration from a previously saved configuration, click the
Browse button, select the file on your computer in the window which appears
and click Open. Click the Restore button. The router will update the settings
according to those in the config.bin file and reboot.
To restore the hub to the factory settings, simply click the Reset button. Be
aware that this will cause any configuration changes you have made to be lost.
Updating the Firmware of the RF-HTN102
From time to time, RocketFish may provide firmware updates to add or improve
the existing features of your hub. If you need to update the firmware, click the
Browse button and select the firmware file you downloaded and click Open. Click
the Upload & Update button to begin the firmware update process.
Note: The process of updating the firmware is a sensitive one. Ensure that you
have the selected the correct firmware for your device and do not turn off the
power to the router during the update.
27
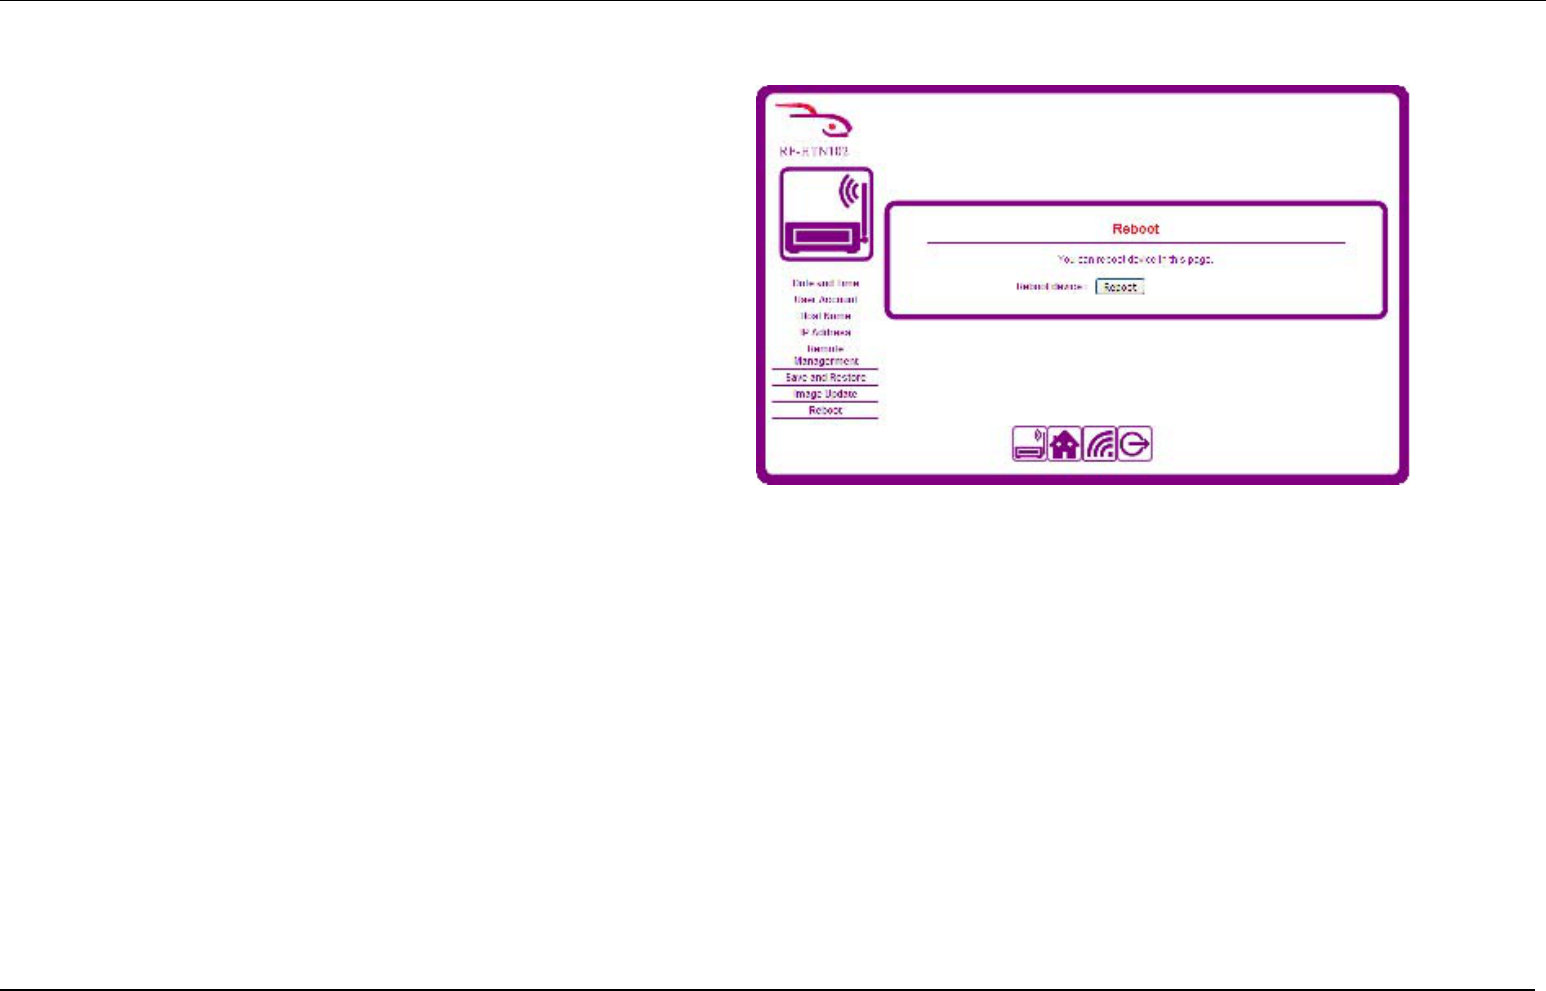
Rebooting the Hub
To reboot the device, click the Reboot button. The device will power up again and
retain your configuration.
28
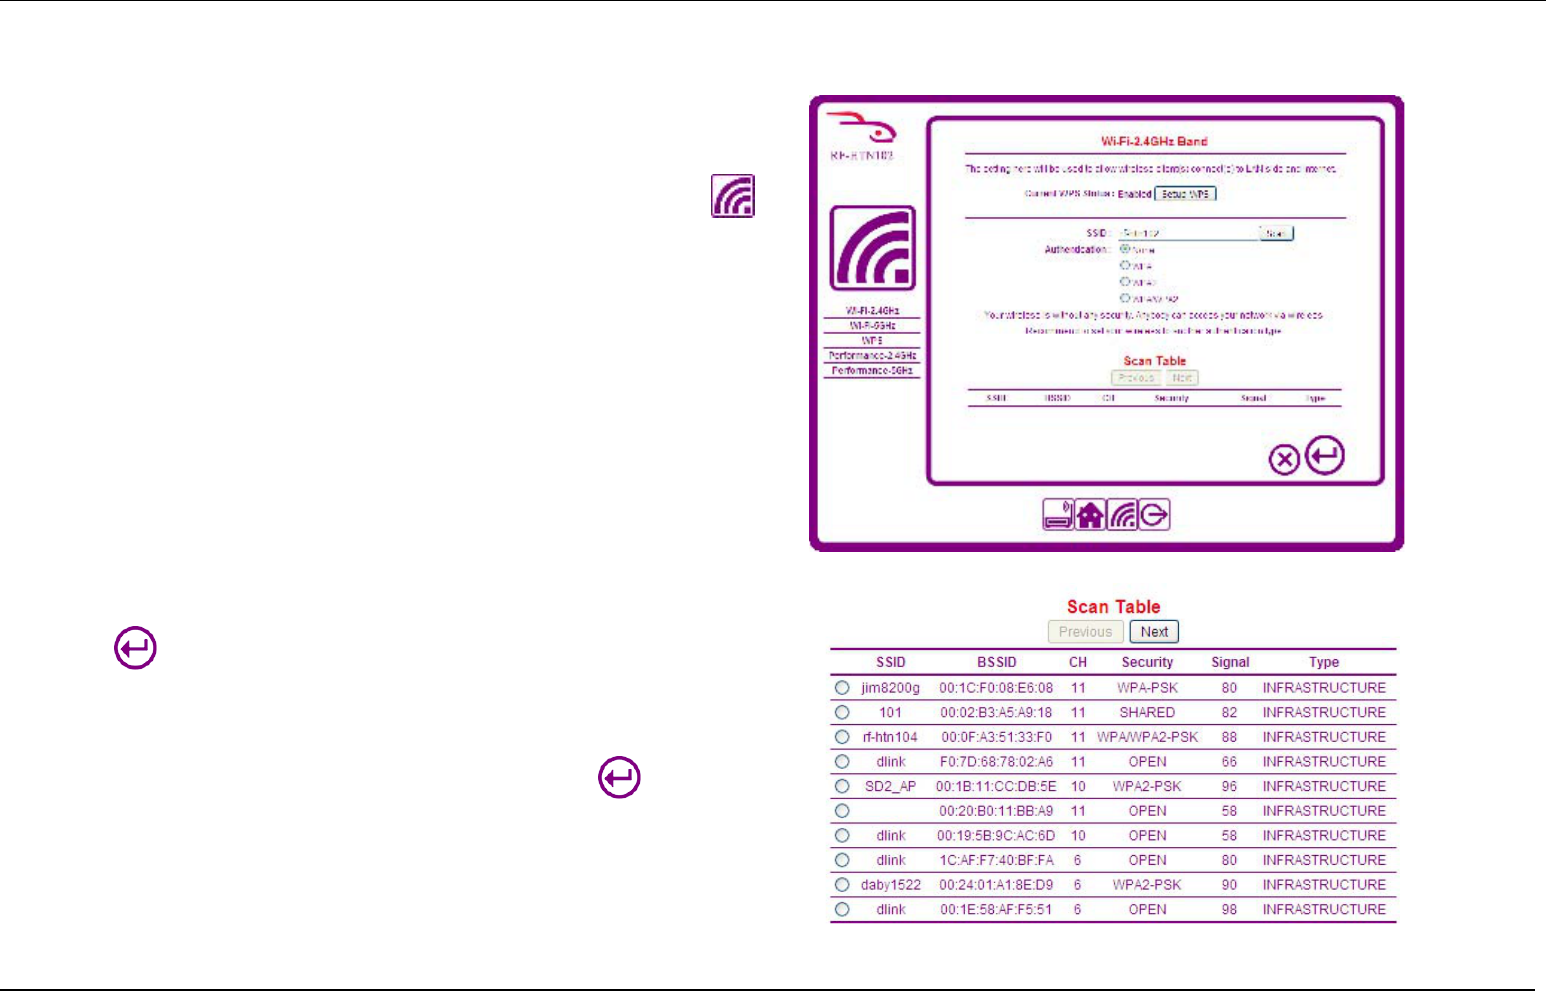
Configuring Wireless Settings
To connect to a wireless network using your hub, login to the hub and click the
icon. The Wi-Fi-2.4GHz Band page appears.
Connecting to a Wireless Network
To connect to another wireless network using 2.4GHz Wi-Fi:
1. Click the Scan button on the right hand side of the screen. A list of available
networks appears after the hub scans for networks in range, including
information about the broadcast channel, security type and signal strength. If
there are more than 10 networks found, you can press the Next button to see
those not listed on the first page.
2. Select the radio button for the network you wish to join. You can identify the
network by the SSID.
3. Click to proceed.
4. If the network is open, your hub will join the network and you are ready to begin
using your wireless hub. If there is security applied to the network, a new field
will appear above the Scan Table called Passphrase/PSK. Enter the passphrase
into the Passphrase/PSK field to join the network and click to proceed.
5. You are now ready to begin using your wireless network.
29
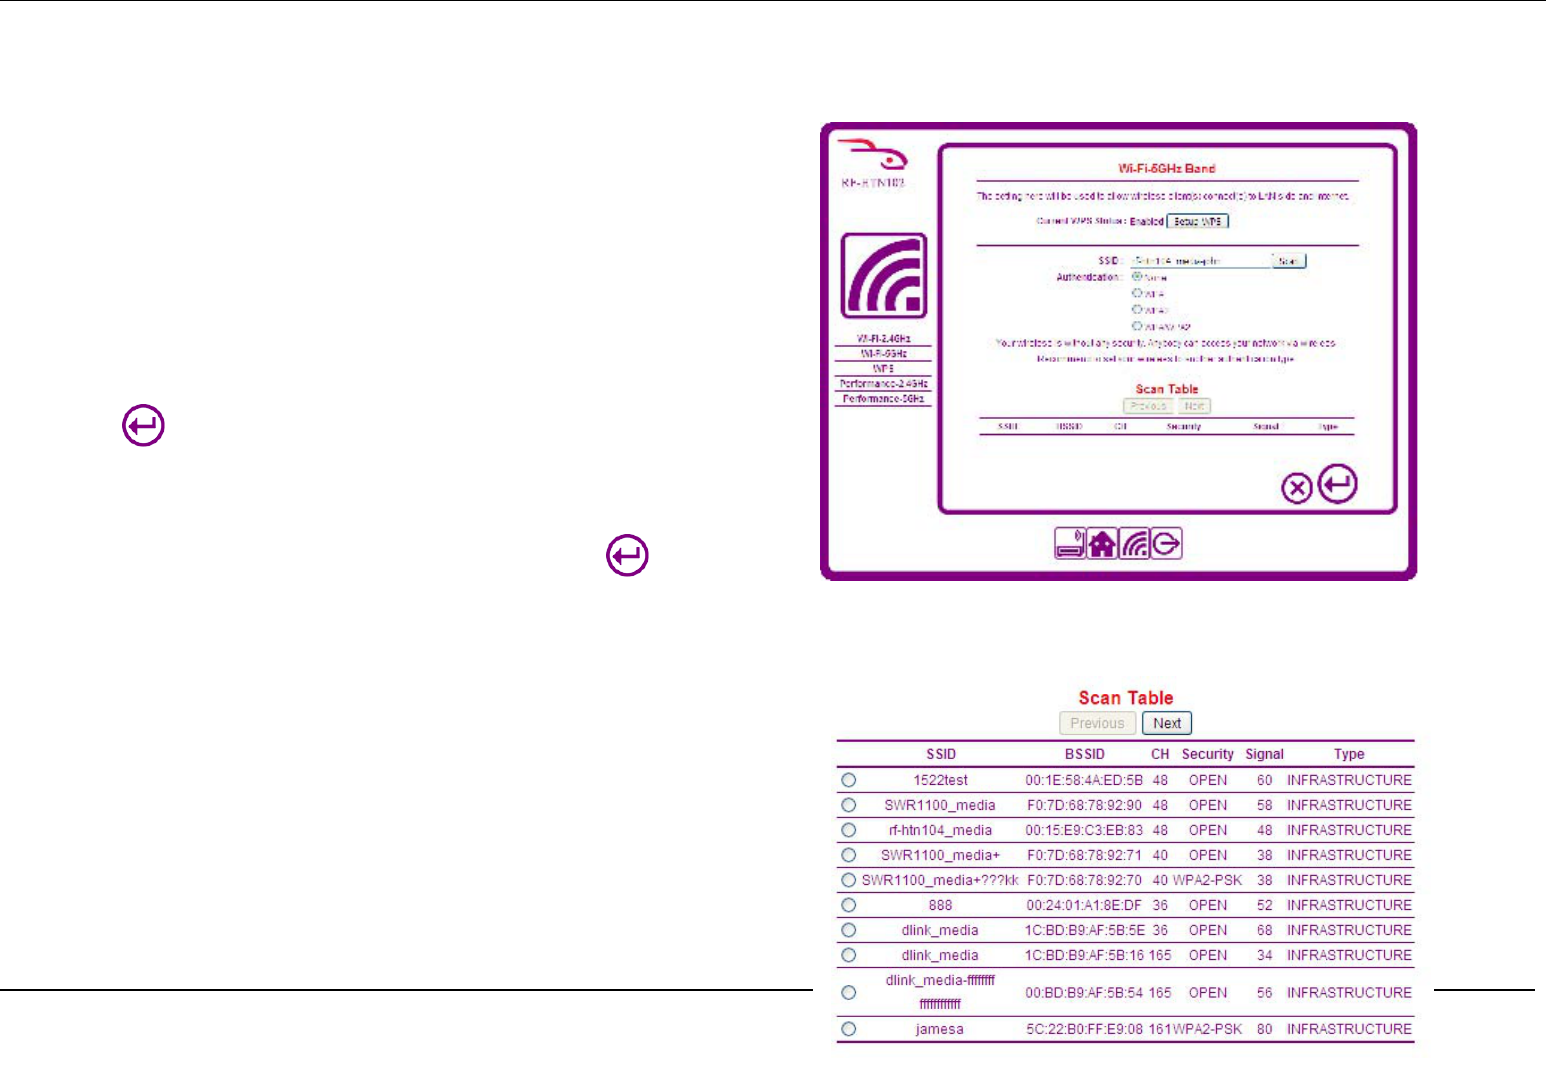
To connect to another wireless network using 5GHz Wi-Fi:
1. Click the Scan button on the right hand side of the screen. A list of available
networks appears after the hub scans for networks in range, including
information about the broadcast channel, security type and signal strength. . If
there are more than 10 networks found, you can press the Next button to see
those not listed on the first page.
2. Select the radio button for the network you wish to join. You can identify the
network by the SSID.
3. Click to proceed.
4. If the network is open, your hub will join the network and you are ready to begin
using your wireless hub. If there is security applied to the network, a new field
will appear above the Scan Table called Passphrase/PSK. Enter the passphrase
into the Passphrase/PSK field to join the network and click to proceed.
5. You are now ready to begin using your wireless network.

30
31
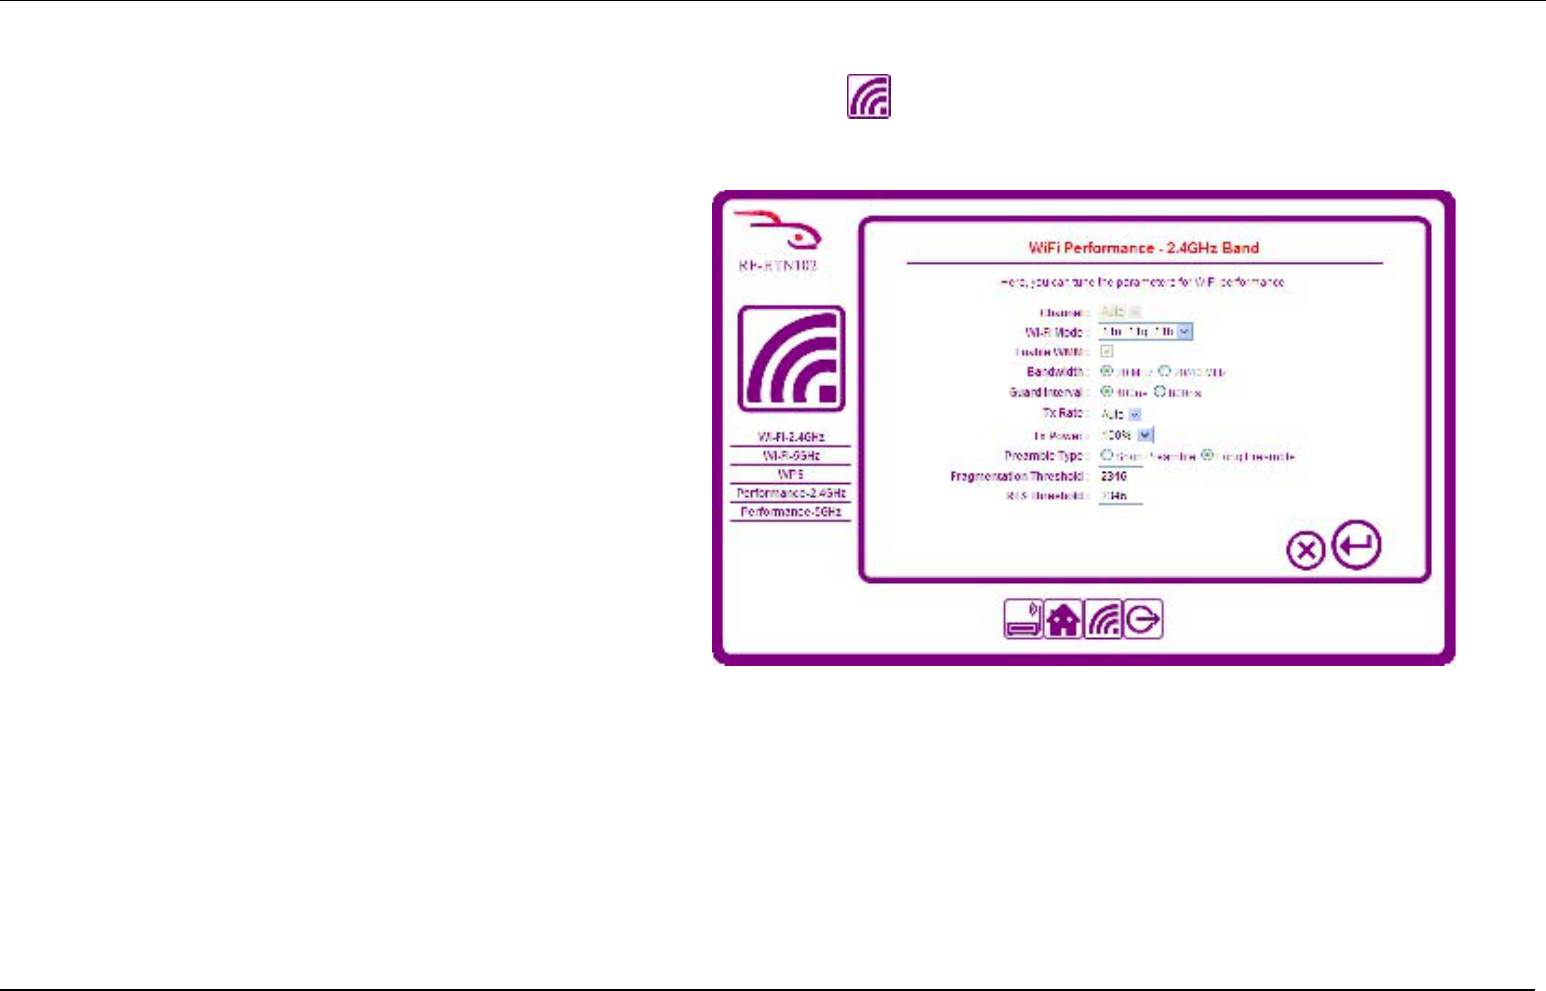
Configuring Advanced Wi-Fi 2.4GHz Settings
To adjust the advanced settings of the 2.4GHz Wi-Fi function, login to the hub and click on the icon, then select Performance-2.4GHz from the menu on the left.
Note: It is only recommended that you change these settings if you are experienced and familiar with what each of these settings does.
Wi-Fi Mode: Select a mode from the drop down menu. This will affect the
wireless connection speed of your devices. Some older devices may not work
if you choose to work in 11n alone.
Enable WMM: Wi-Fi Multimedia (WMM) is Quality of Service (QoS) for your
router. Check this box to improve the quality of video and voice applications
for your wireless clients. This cannot be selected for modes where 11n is
operational.
Bandwidth: Select the frequency which you want to operate on by checking
the radio box for 20MHz or 20/40MHz.
Guard Interval: The guard interval is the space between symbols being
transmitted. It is often confused with the space between packets. Normal
802.11 operation is 800ns but with 802.11n, you may halve the time to wait
to 400ns which can increase throughput.
Tx Rate: Only modifiable if 11n Wi-Fi Mode is selected. This allows you to
specify the maximum transmission rate for the wireless network.
Tx Power: Sets the transmission power. Modifying this can help you to achieve more range on your network.
Preamble Type: The Preamble Type defines the length of the Cyclic Redundancy Check (CRC) block for communication between the hub and roaming wireless adapters.
Fragmentation Threshold: The 802.11 standard includes the ability for radio-based network interface cards (NICs) and access points to fragment packets for improving
performance in the presence of RF interference and marginal coverage areas. The fragment size value can typically be set between 256 and 2,346 bytes. Setting it at or
above 2,346 bytes effectively disables fragmentation.

32
RTS Threshold: Request To Send (RTS) is an optional feature which can reduce collisions on your network. Set a packet size between 0 and 2346. If the packet that the hub
is transmitting is larger than the threshold, it will initiate the RTS function. If the packet size is equal to or less than the threshold, the hub will not kick off RTS. The use of
2346 bytes effectively disables RTS for the hub.
Click the button to save your settings when you have finished. If you wish to cancel, press the button.
33
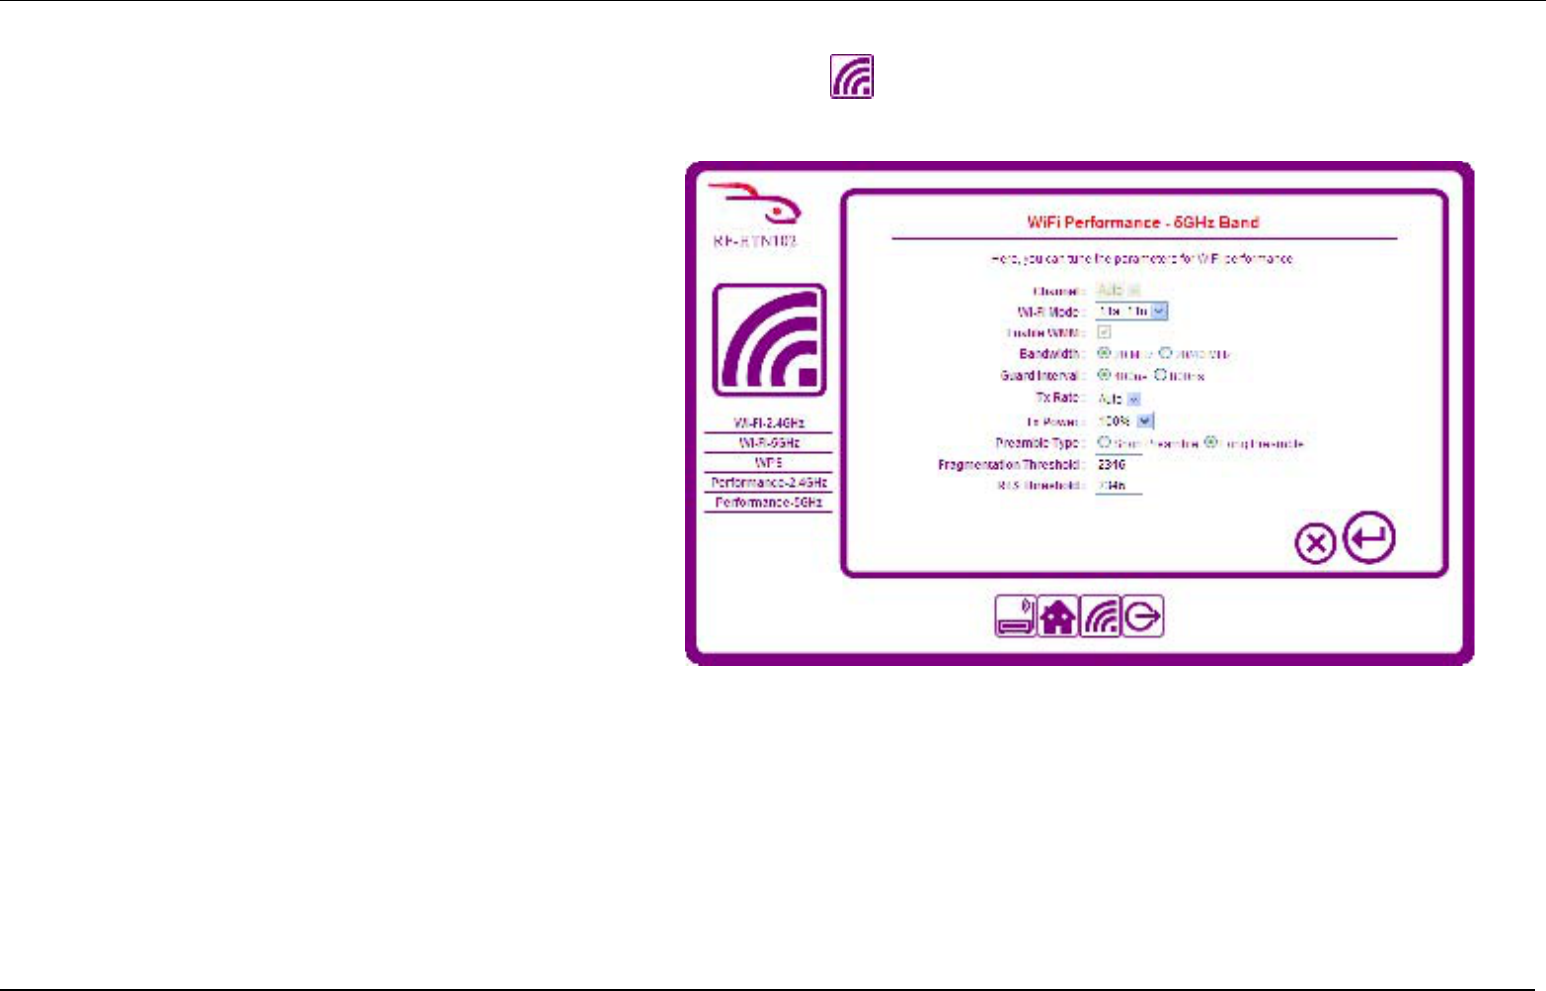
Configuring Advanced 5GHz Wi-Fi Settings
To adjust the advanced settings of the 5GHz Wi-Fi function, login to the hub and click on the icon, then select Performance-5GHz from the menu on the left.
Note: It is only recommended that you change these settings if you are experienced and familiar with what each of these settings does.
Wi-Fi Mode: Select a mode from the drop down menu. This will affect the
wireless connection speed of your devices. Some older devices may not
work if you choose to work in 11n alone.
Enable WMM: Wi-Fi Multimedia (WMM) is Quality of Service (QoS) for
your router. Check this box to improve the quality of video and voice
applications for your wireless clients. This cannot be selected for modes
where 11n is operational.
Bandwidth: Select the frequency which you want to operate on by
checking the radio box for 20MHz or 20/40MHz.
Guard Interval: The guard interval is the space between symbols being
transmitted. It is often confused with the space between packets. Normal
802.11 operation is 800ns but with 802.11n, you may halve the time to
wait to 400ns which can increase throughput.
Tx Rate: Only modifiable if 11n Wi-Fi Mode is selected. This allows you to
specify the maximum transmission rate for the wireless network.
Tx Power: Sets the transmission power. Modifying this can help you to achieve more range on your network.
Preamble Type: The Preamble Type defines the length of the Cyclic Redundancy Check (CRC) block for communication between the hub and roaming wireless adapters.
Fragmentation Threshold: The 802.11 standard includes the ability for radio-based network interface cards (NICs) and access points to fragment packets for improving
performance in the presence of RF interference and marginal coverage areas. The fragment size value can typically be set between 256 and 2,346 bytes. Setting it at or
above 2,346 bytes effectively disables fragmentation.
RTS Threshold: Request To Send (RTS) is an optional feature which can reduce collisions on your network. Set a packet size between 0 and 2346. If the packet that the hub
is transmitting is larger than the threshold, it will initiate the RTS function. If the packet size is equal to or less than the threshold, the hub will not kick off RTS. The use of
2346 bytes effectively disables RTS for the hub.

34
Click the button to save your settings when you have finished. If you wish to cancel, press the button.

35
Troubleshooting
This section provides solutions to problems that can occur during the installation and operation of the RF-HTN102. Read the following descriptions if you are having
problems. The following is written assuming you are using Windows XP. For other operating systems or versions of Windows, the steps provided may differ.
1. Why can’t I access the web-based configuration utility?
When entering the IP address of the RocketFish router (192.168.1.50 for example), you are not connecting to a website hosted on the Internet. The Wi-Fi Invite Home Hub
has the utility built-in to a ROM chip in the device itself. Your computer must be on the same IP subnet to connect to the web-based utility.
• The RF-HTN102 does not have a DHCP Server. Therefore, the first time you connect your computer to the hub, the hub will not be able to give you a local IP address.
You will need to manually set your IP address to a local one in order to connect to the hub.
- Click Start > Settings > Control Panel. Select Network Connections. Select the connection profile which is connected to the hub, most likely labeled
Local Area Connection.
- Select Internet Protocol (TCP/IP) and click Properties. Select the radio button Use the following IP address and give the connection a local IP address
which is not in use already e.g. 192.168.1.111. Set the Subnet Mask to 255.255.255.0. Click OK twice.
- Try to connect to the web-based configuration utility again.
• Make sure you have an updated Java-enabled web browser. We recommend the following:
- Microsoft Internet Explorer® 6.0 and higher
- Mozilla Firefox 3.0 and higher
- Google™ Chrome 2.0 and higher
- Apple Safari 3.0 and higher
• Verify physical connectivity on the device. Look at the front panel to see if there is a solid link light for the port you are trying to connect with. Try using a different
cable or connect to a different port on the device if possible.
• Disable any Internet security software running on the computer. Software firewalls such as Zone Alarm, Black Ice, Sygate, Norton Personal Firewall, and Windows®
XP firewall may block access to the configuration pages. Check the help files included with your firewall software for more information on disabling or configuring it.

36
• Configure your Internet settings:
- Go to Start > Settings > Control Panel. Select the Internet Options Icon. From the Security tab, click the button to restore the settings to their defaults.
- Click the Connection tab and set the dial-up option to Never Dial a Connection. Click the LAN Settings button. Make sure nothing is checked. Click OK.
- Go to the Advanced tab and click the button to restore these settings to their defaults. Click OK three times.
- Close your web browser (if open) and open it.
- Access the web management. Open your web browser and enter the IP address of your RocketFish router in the address bar. This should open the login
page for your web management.
- If you still cannot access the configuration, unplug the power to the router for 10 seconds and plug back in. Wait about 30 seconds and try accessing the
configuration. If you have multiple computers, try connecting using a different computer.
2. What can I do if I forgot my password?
If you forgot your password, you must reset your hub. Unfortunately this process will change all your settings back to the factory defaults.
To reset the hub, locate the reset button on the rear panel of the unit. With the router powered on, use a pen to hold the button down for 10 seconds. Release the button
and the hub will go through its reboot process. Wait about 30 seconds to access the hub. The default IP address is 192.168.1.50. When logging in, the username is admin
and leave the password box empty.

37
Technical Specifications
STANDARDS IEEE 802.11n
IEEE 802.11g
IEEE 802.11b
IEEE 802.11a
IEEE 802.3
IEEE 802.3u
DEVICE INTERFACE 4 10/100 LAN Ports
SECURITY Wi-Fi Protected Access (WPA, WPA2)
ADVANCED FEATURES AP-Client supports up to 4 device
Wi-Fi Invite
DEVICE MANAGEMENT Internet Explorer 6 or later
Mozilla Firefox 3.0 or later
Safari 3 or later
LEDS Power
Connect
WLAN
Device1
Device2
Device3
Device4
CERTIFICATION FCC / IC
Wi-Fi
Device: 180*171*55mm (7.1"*6.7"*2.2")
DIMENSIONS (WxDxH)
Packaging: 308.9*218.9*90.5mm (12.2"*8.6"*3.56")
Device: 484.9grams (1.07lbs)
WEIGHT
Packaging: 676.8grams (1.49lbs)
WARRANTY 1-Year Limited (US only)

38
FCC
Federal Communication Commission Interference Statement
This equipment has been tested and found to comply with the limits for a Class B digital device, pursuant to Part 15 of the FCC Rules. These limits are designed to provide
reasonable protection against harmful interference in a residential installation. This equipment generates, uses and can radiate radio frequency energy and, if not installed
and used in accordance with the instructions, may cause harmful interference to radio communications. However, there is no guarantee that interference will not occur in
a particular installation. If this equipment does cause harmful interference to radio or television reception, which can be determined by turning the equipment off and on,
the user is encouraged to try to correct the interference by one of the following measures:
• Reorient or relocate the receiving antenna.
• Increase the separation between the equipment and receiver.
• Connect the equipment into an outlet on a circuit different from that to which the receiver is connected.
• Consult the dealer or an experienced radio/TV technician for help.
This device complies with Part 15 of the FCC Rules. Operation is subject to the following two conditions: (1) This device may not cause harmful interference, and (2) this
device must accept any interference received, including interference that may cause undesired operation.
FCC Caution: Any changes or modifications not expressly approved by the party responsible for compliance could void the user's authority to operate this equipment. For
operation within 5.15 ~ 5.25GHz frequency range, it is restricted to indoor environment.
IMPORTANT NOTE:
FCC Radiation Exposure Statement:
This equipment complies with FCC radiation exposure limits set forth for an uncontrolled environment. This equipment should be installed and operated with minimum
distance 20cm between the radiator & your body. This transmitter must not be co-located or operating in conjunction with any other antenna or transmitter.
IEEE 802.11b or 802.11g operation of this product in the U.S.A. is firmware-limited to channels 1 through 11.

39
Industry Canada statement: This device complies with Industry Canada licence-exempt RSS standard(s). Operation is subject to the following two conditions:
(1) This device may not cause harmful interference, and (2) this device must accept any interference received, including interference that may cause undesired operation.
Règlement d’Industry Canada
Le présent appareil est conforme aux CNR d'Industrie Canada applicables aux appareils radio exempts de licence. L'exploitation est autorisée aux deux conditions suivantes :
(1) l'appareil ne doit pas produire de brouillage, et (2) l'utilisateur de l'appareil doit accepter tout brouillage radioélectrique subi, même si le brouillage est susceptible d'en
compromettre le fonctionnement.
IMPORTANT NOTE:
Radiation Exposure Statement:
This equipment complies with IC radiation exposure limits set forth for an uncontrolled environment. This equipment should be installed and operated with minimum
distance 20cm between the radiator & your body.
Cet équipement est conforme aux limites d'exposition aux rayonnements définies par IC pour un environnement non contrôlé. Cet équipement doit être installé et utilisé
avec un minimum de 20 cm de distance entre le radiateur et votre corps.
Antenna statement
Under Industry Canada regulations, this radio transmitter may only operate using an antenna of a type and maximum (or lesser) gain approved for the transmitter by
Industry Canada.
To reduce potential radio interference to other users, the antenna type and its gain should be so chosen that the equivalent isotropically radiated power (e.i.r.p.) is not
more than that necessary for successful communication.
Conformément à la réglementation d'Industrie Canada, le présent émetteur radio peut fonctionner avec une antenne d'un type et d'un gain maximal (ou inférieur)
approuvé pour l'émetteur par Industrie Canada.
Dans le but de réduire les risques de brouillage radioélectrique à l'intention des autres utilisateurs, il faut choisir le type d'antenne et son gain de sorte que la puissance
isotrope rayonnée équivalente (p.i.r.e.) ne dépasse pas l'intensité nécessaire à l'établissement d'une communication satisfaisante.