D Link SL2740RA1 WIRELESS G ADSL2+MODEM ROUTER User Manual User Man2
D Link Corporation WIRELESS G ADSL2+MODEM ROUTER User Man2
D Link >
Contents
- 1. User Man1
- 2. User Man2
User Man2
Section 3 – Configuration
D-Link DSL-2740R User Manual 32
Advanced
This chapter include the more advanced features used for network management and security.
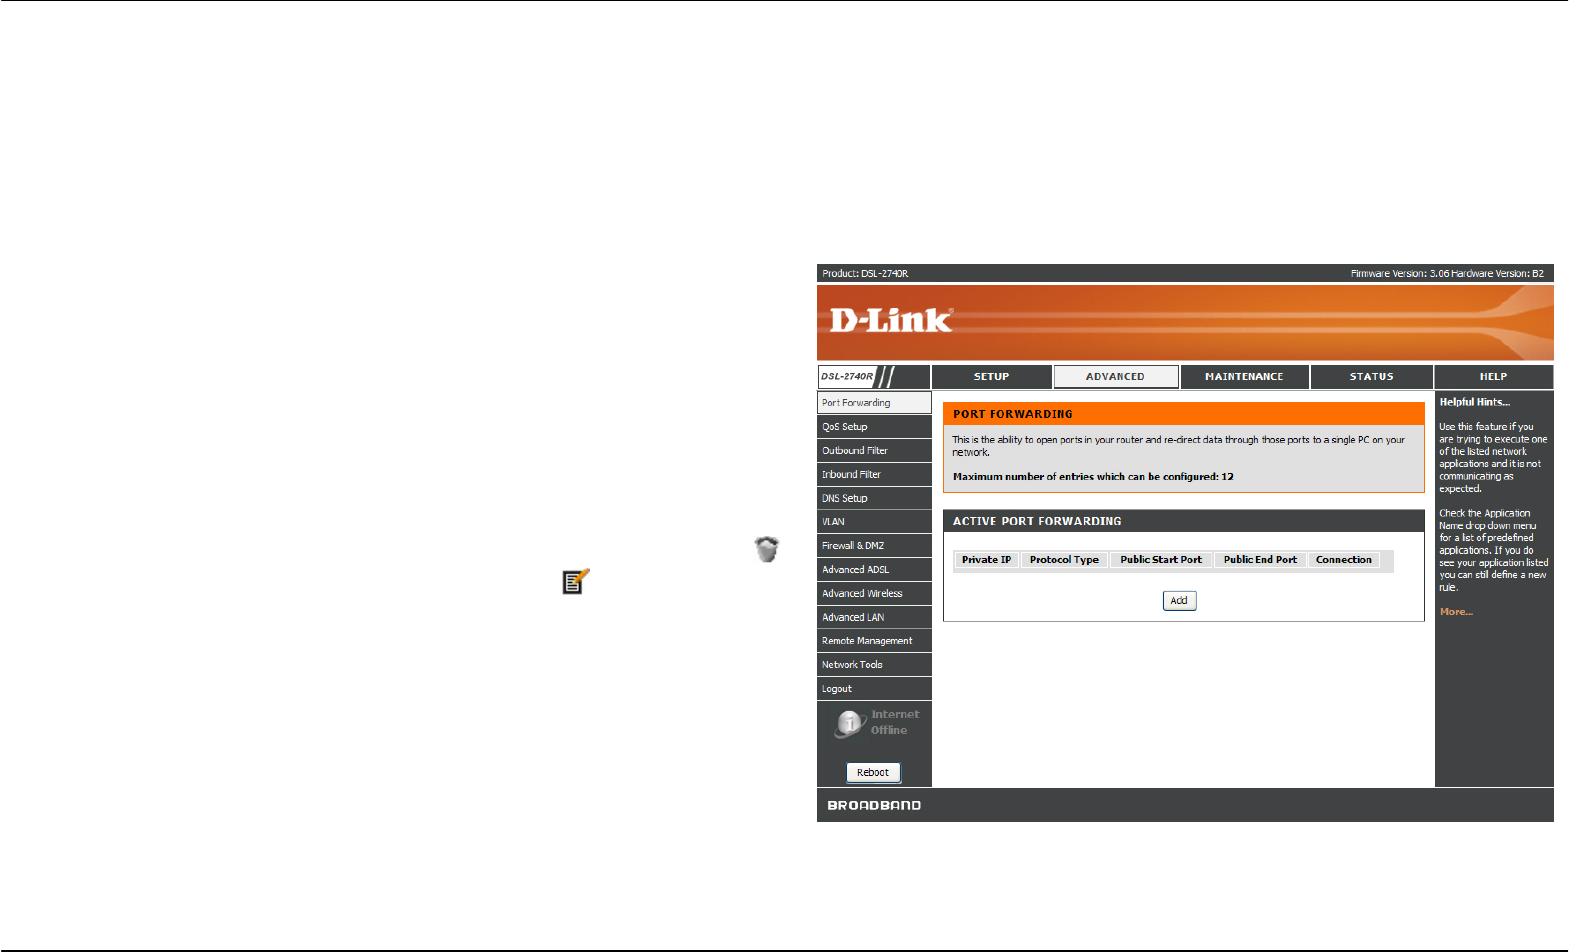
Port Forwarding
To access the Port Forwarding window, click the Port Forwarding button in the Advanced directory.
Port Forwarding is used to allow Internet users access to LAN services.
Click Add to enter a new entry. Enter an IP address in the Private IP
field, select a Protocol Type from the drop-down menu, enter a range of
ports in the Public Start Port and Public End Port fields, and then click
the Apply button. Finally, click the Reboot button on the left panel to let
your changes take effect.
To remove a port forwarding entry in the table, click the corresponding
button. To modify an entry, click the corresponding button, make the
desired changes, and then click the Apply button.
Section 3 – Configuration
D-Link DSL-2740R User Manual 33
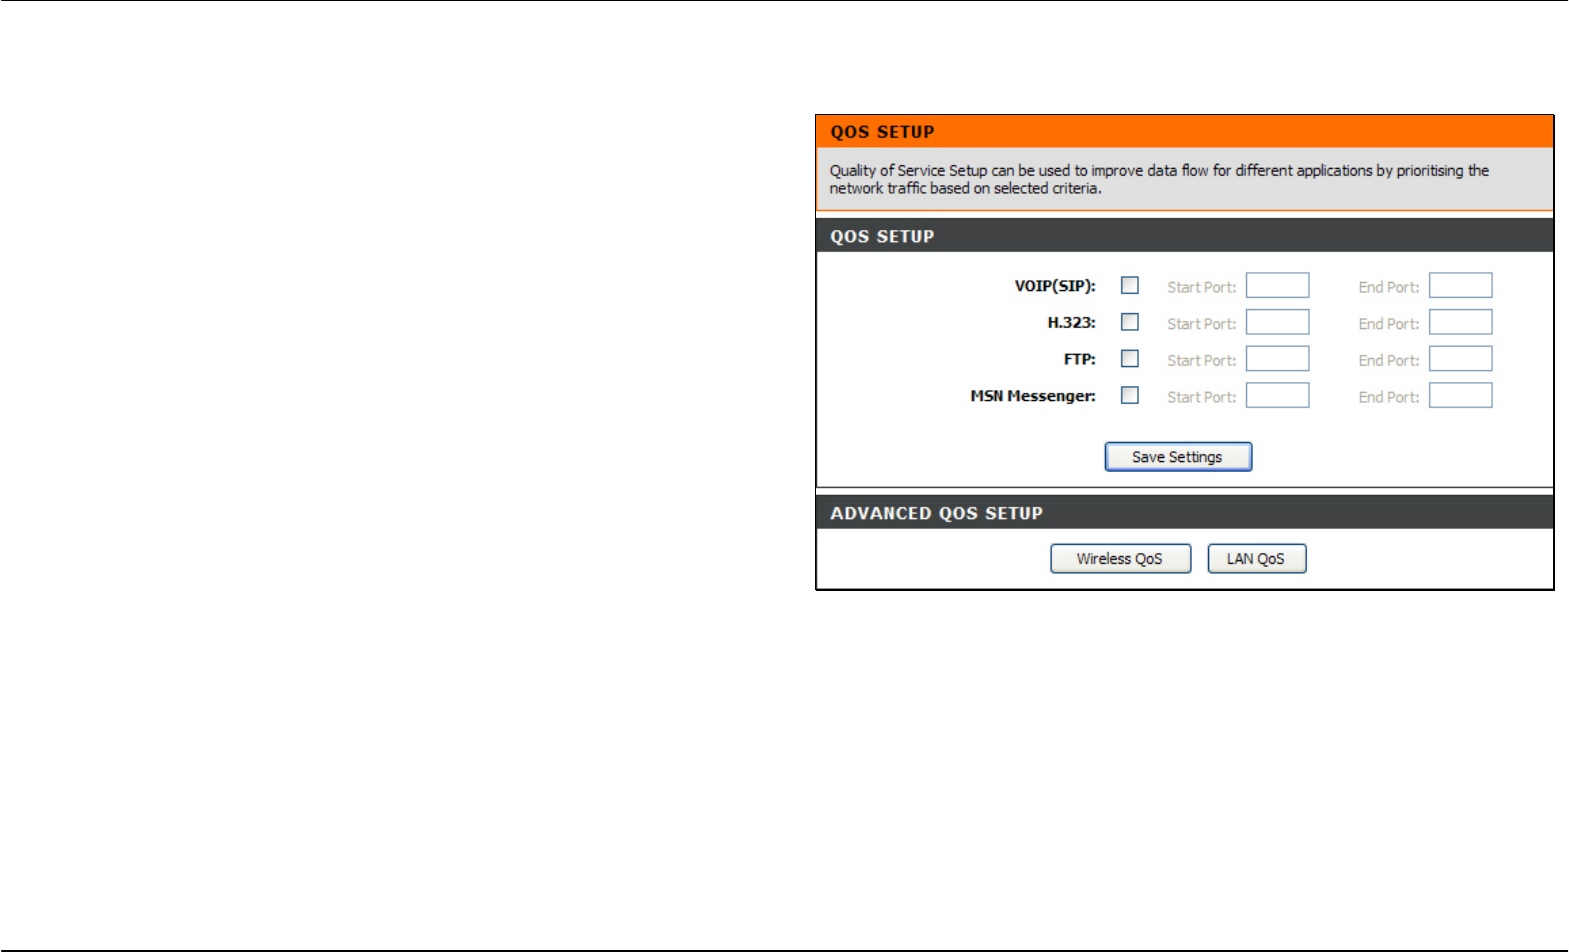
QoS Setup
To access the QoS Setup window, click the QoS Setup button in the Advanced directory.
QoS or Quality of Service allows your Router to help prioritize the data
packet flow in your Router and network. This is very important for time
sensitive applications such as VoIP where it may help prevent dropped
calls. Large amounts of non-critical data can be scaled so as not to
affect these prioritized sensitive real-time programs.
Click the Wireless Qos to configure QoS on Wireless LAN.

Section 3 – Configuration
D-Link DSL-2740R User Manual 34
Wireless QoS
This page allows you to configure the Wireless QoS.
Enter the Traffic Class Name, select the transmit prioriy and protocol,
enter the source and destination IP Address, subnet mask and port.
Click the Add/Apply button to save this rule.
Section 3 – Configuration
D-Link DSL-2740R User Manual 35
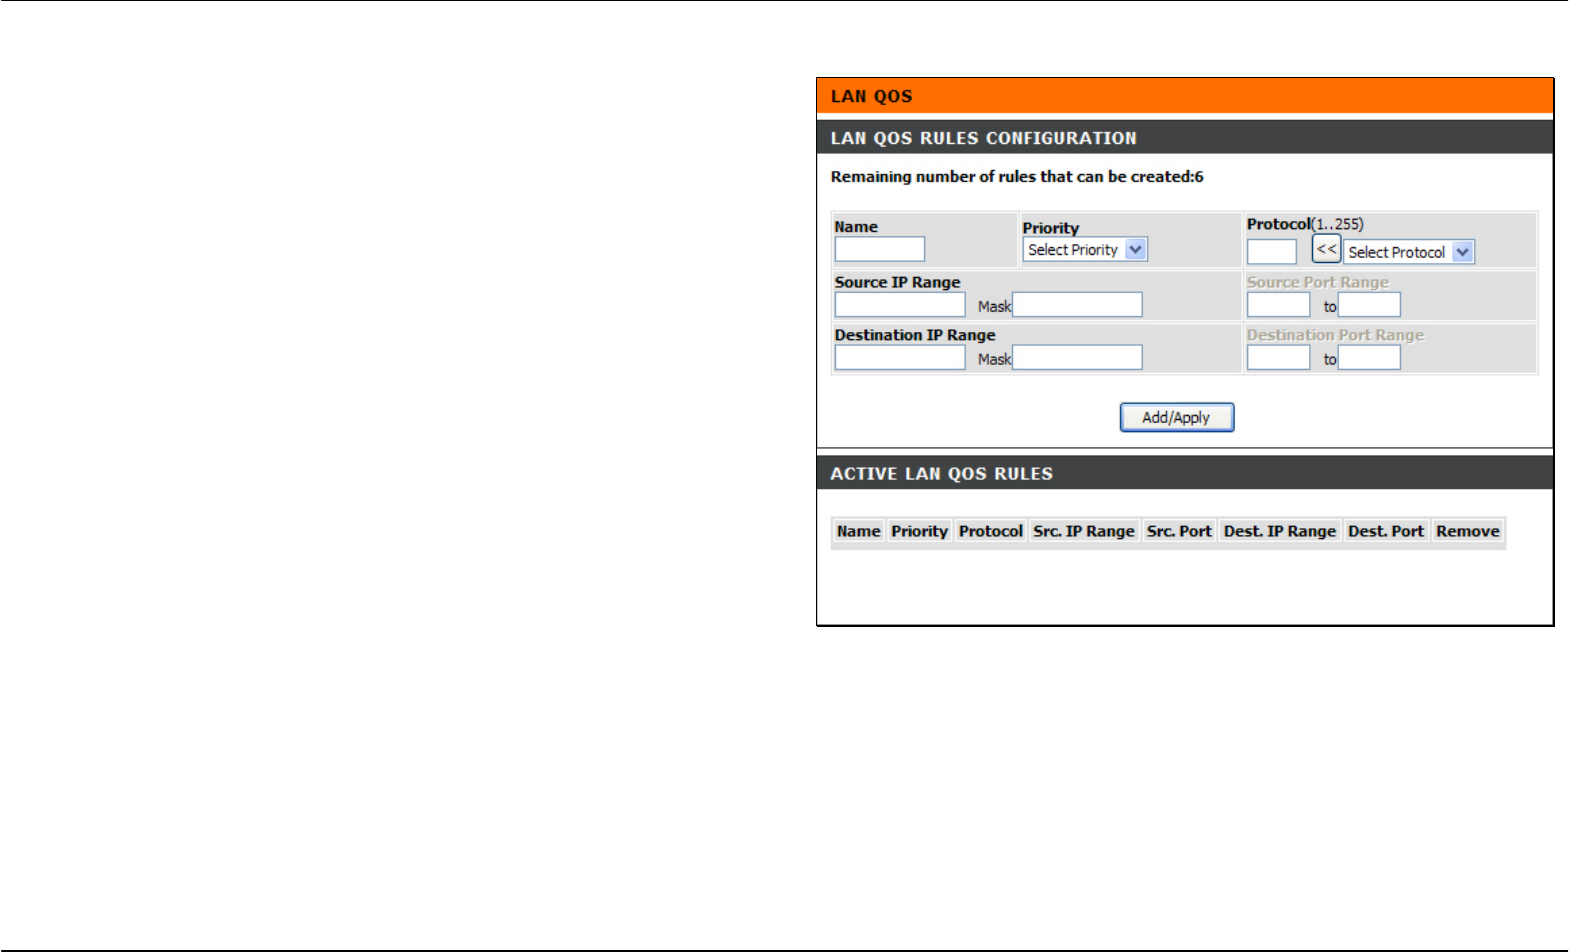
LAN QoS
This page helps you to set the priorities of LAN.
Enter a name of the rule, select the Priority, Protocol and enter the
Source and Destination IP Address range and their subnet mask.
Click the Add/Apply button to save this rule.
Section 3 – Configuration
D-Link DSL-2740R User Manual 36
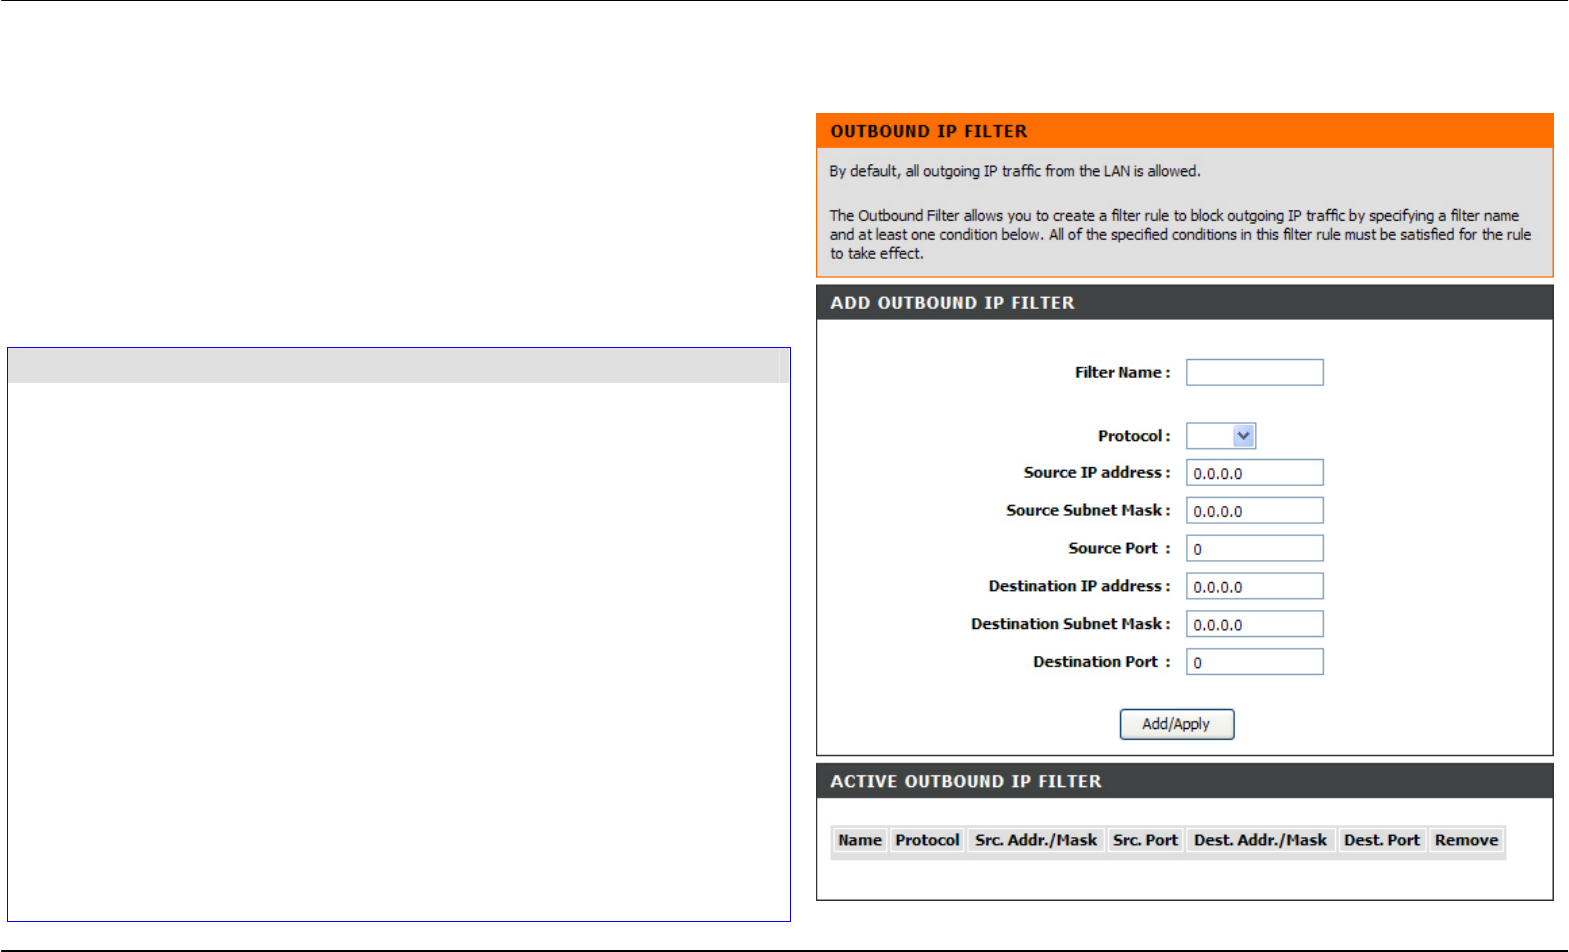
Outbound Filter
To access the Outbound FIlter window, click the Outbound Filter button in the Advanced directory.
The Outbound Filter allows you to create a filter rule to block outgoing IP
traffic by specifying a filter name and at least one condition on this
window. All of the specified conditions in this filter rule must be satisfied
for the rule to take effect. Filters are used to allow or deny LAN or WAN
users from accessing the Internet or your internal network.
Click the Add/Apply button and then click the Reboot button on the left
panel to let your changes take effect.
Filters Parameter Description
Name Enter a name for the new filter.
Protocol Select the transport protocol (TCP, UDP, or ICMP)
that will be used for the filter rule.
Source IP Address & Source
Subnet Mask
For an Outbound Filter, this is the IP address or IP
addresses and their associated subnets on your LAN
for which you are creating the filter rule. For an
Inbound Filter, this is the IP address or IP addresses
and their associated subnets for which you are
creating the filter rule.
Source Port
The Source Port is the TCP/UDP port on either the
LAN or WAN depending on if you are configuring an
Outbound or Inbound Filter rule.
Destination IP Address &
Destination Subnet Mask
Where the Destination IP address and subnet mask
resides also depends on if you are configuring an
Inbound or Outbound filter rule.
Destination Port
The Destination Port is the TCP/UDP port on either
the LAN or WAN depending on if you are configuring
an Outbound or Inbound Filter rule.
Section 3 – Configuration
D-Link DSL-2740R User Manual 37
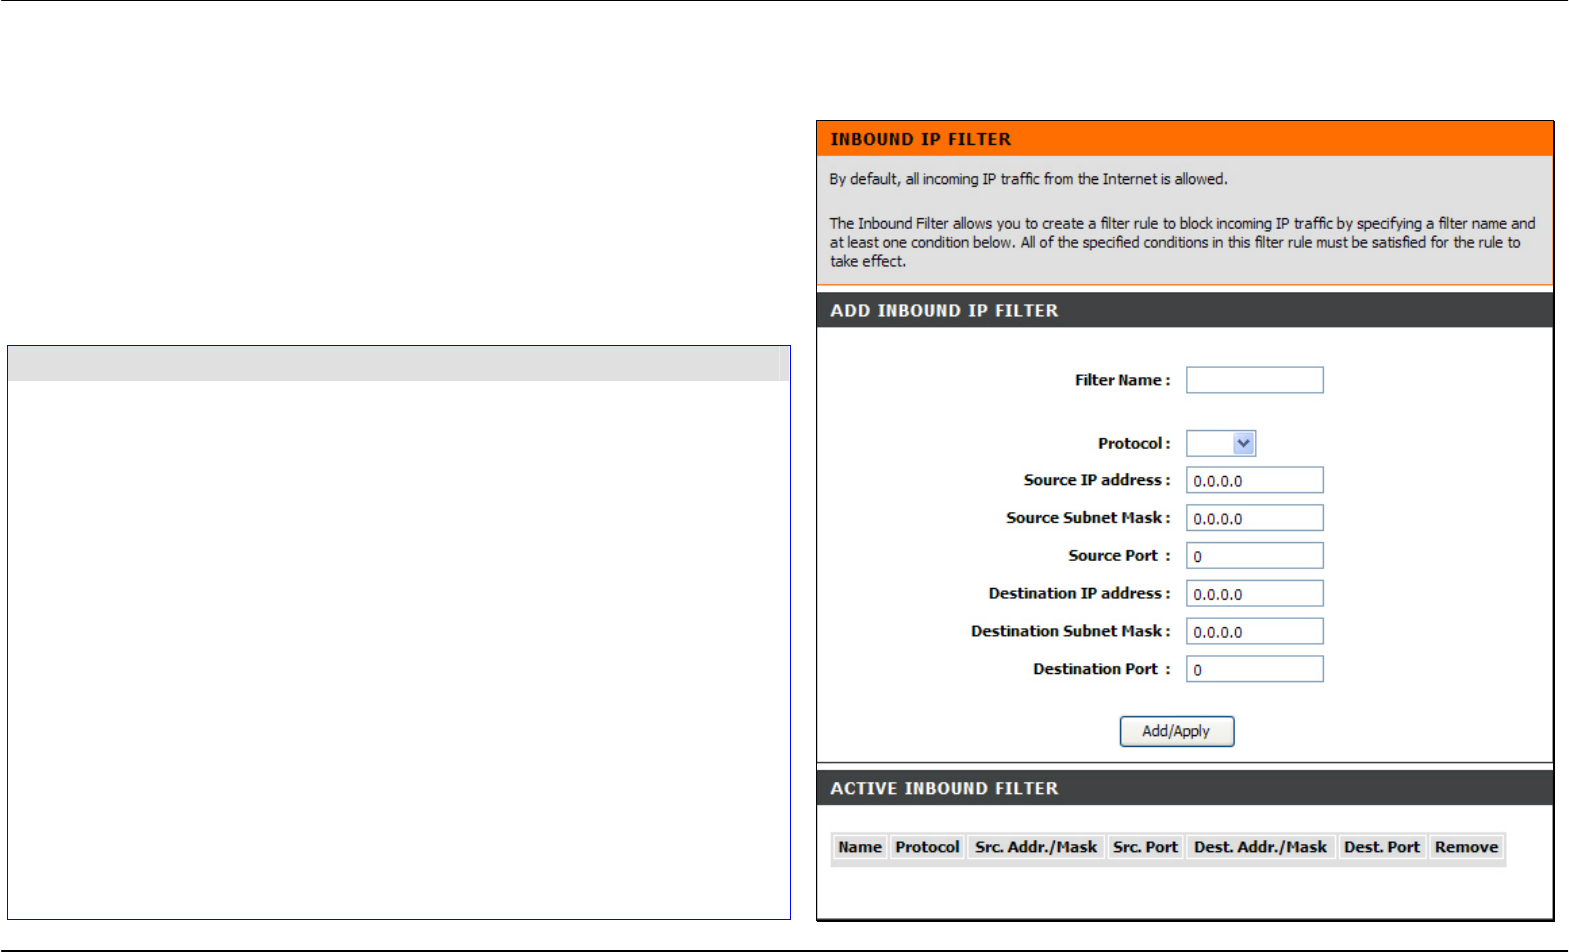
Inbound Filter
To access the Inbound Filter window, click the Inbound Filter button in the Advanced directory.
The Inbound Filter allows you to create a filter rule to allow incoming IP
traffic by specifying a filter name and at least one condition on this
window. All of the specified conditions in this filter rule must be satisfied
for the rule to take effect. By default, all incoming IP traffic from the
Internet is blocked when the firewall is enabled.
Click the Add/Apply button and then click the Reboot button on the left
panel to let your changes take effect.
Filters Parameter Description
Name Enter a name for the new filter.
Protocol Select the transport protocol (TCP, UDP, or ICMP)
that will be used for the filter rule.
Source IP Address & Source
Subnet Mask
For an Outbound Filter, this is the IP address or IP
addresses and their associated subnets on your LAN
for which you are creating the filter rule. For an
Inbound Filter, this is the IP address or IP addresses
and their associated subnets for which you are
creating the filter rule.
Source Port
The Source Port is the TCP/UDP port on either the
LAN or WAN depending on if you are configuring an
Outbound or Inbound Filter rule.
Destination IP Address &
Destination Subnet Mask
Where the Destination IP address and subnet mask
resides also depends on if you are configuring an
Inbound or Outbound filter rule.
Destination Port
The Destination Port is the TCP/UDP port on either
the LAN or WAN depending on if you are configuring
an Outbound or Inbound Filter rule.
Section 3 – Configuration
D-Link DSL-2740R User Manual 38
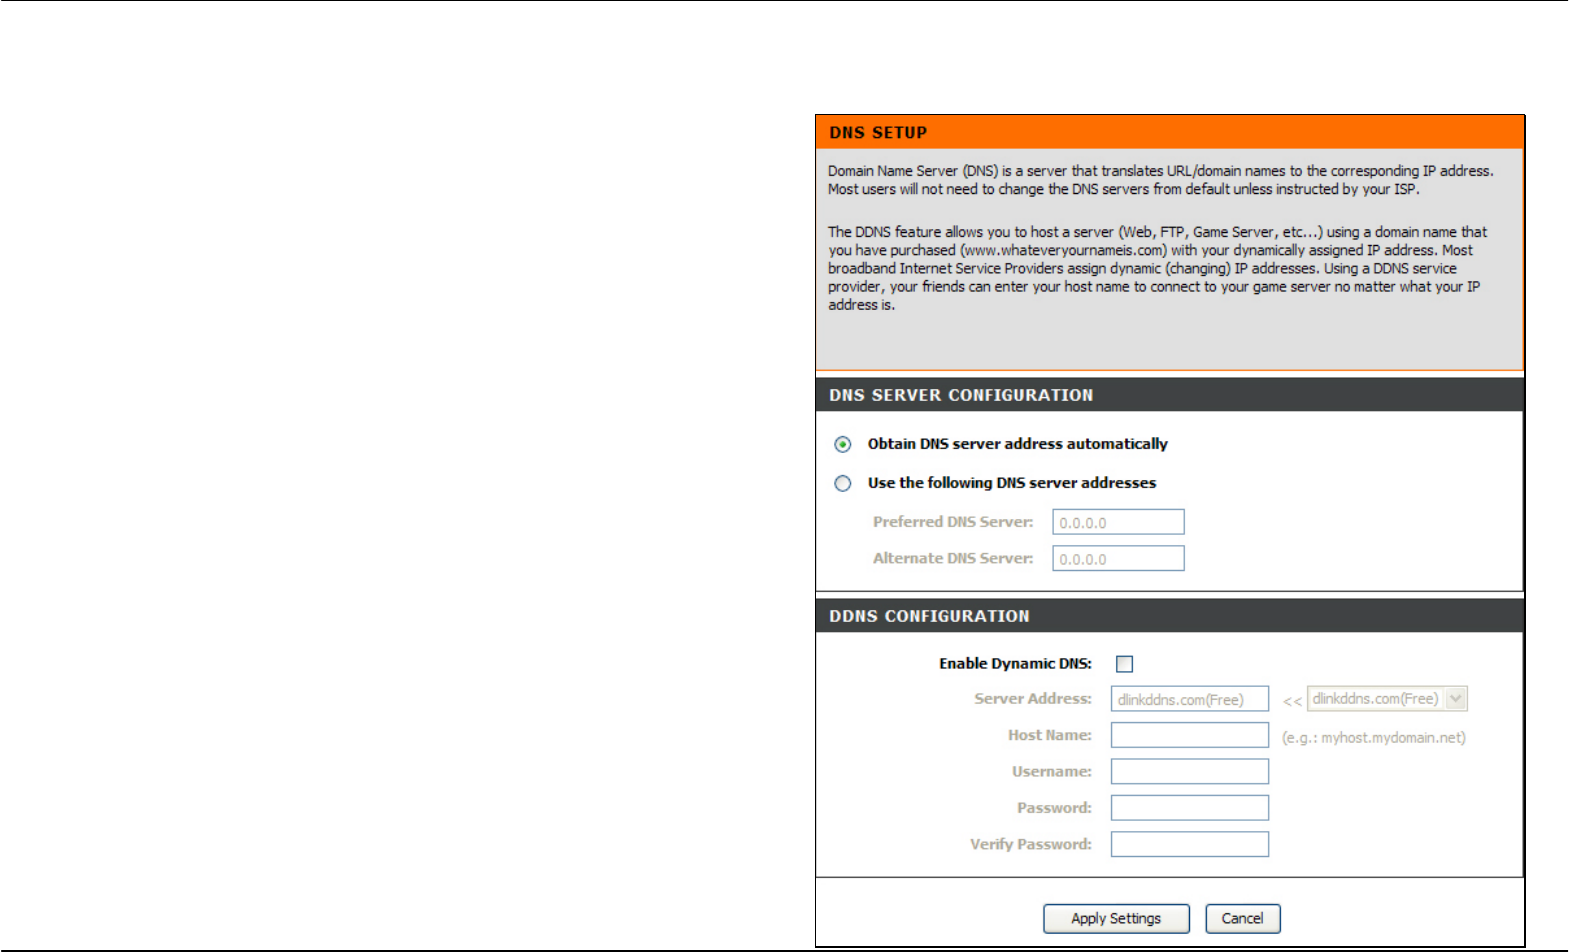
DNS Setup
To access the DNS Setup window, click the DNS Setup button in the Advanced directory.
The Router can be configured to relay DNS settings from your ISP or
another available service to workstations on your LAN. When using DNS
relay, the Router will accept DNS requests from hosts on the LAN and
forward them to the ISP’s, or alternative DNS servers. DNS relay can
use auto discovery or the DNS IP address can be manually entered by
the user. Alternatively, you may also disable the DNS relay and
configure hosts on your LAN to use DNS servers directly. Most users
who are using the Router for DHCP service on the LAN and are using
DNS servers on the ISP’s network, will leave DNS relay enabled (either
auto discovery or user configured).
If you have not been given specific DNS server IP addresses or if the
Router is not pre-configured with DNS server information, select the
“Obtain DNS server address automatically” option. Auto discovery DNS
instructs the Router to automatically obtain the DNS IP address from the
ISP through DHCP. If your WAN connection uses a Static IP address,
auto discovery for DNS cannot be used.
If you have DNS IP addresses provided by your ISP, click the “Use the
following DNS server addresses” radio button and enter these IP
addresses in the available entry fields for the Preferred DNS Server and
the Alternative DNS Server. When you have configured the DNS
settings as desired, click the Apply Settings button and then click the
Reboot button on the left panel to let your changes take effect.
The Router supports DDNS (Dynamic Domain Name Service). The
Dynamic DNS service allows a dynamic public IP address to be
associated with a static host name in any of the many domains, allowing
access to a specified host from various locations on the Internet. This is
enabled to allow remote access to a host by clicking a hyperlinked URL
Section 3 – Configuration
D-Link DSL-2740R User Manual 39
in the form hostname.dyndns.org, Many ISPs assign public IP addresses using DHCP, this can make it difficult to locate a specific host on the LAN
using standard DNS. If for example you are running a public web server or VPN server on your LAN, this ensures that the host can be located from
the Internet if the public IP address changes. DDNS requires that an account be setup with one of the supported DDNS providers.
Tick the Enable Dynamic DNS check box, enter the required DDNS information, click the Apply Settings button, and then click the Reboot button
on the left panel to let your changes take effect to set this information in the Router.
Note
DDNS requires that an account be setup with one of the supported DDNS servers prior to engaging it on the Router. This function will not work without an accepted
account with a DDNS server.
Section 3 – Configuration
D-Link DSL-2740R User Manual 40
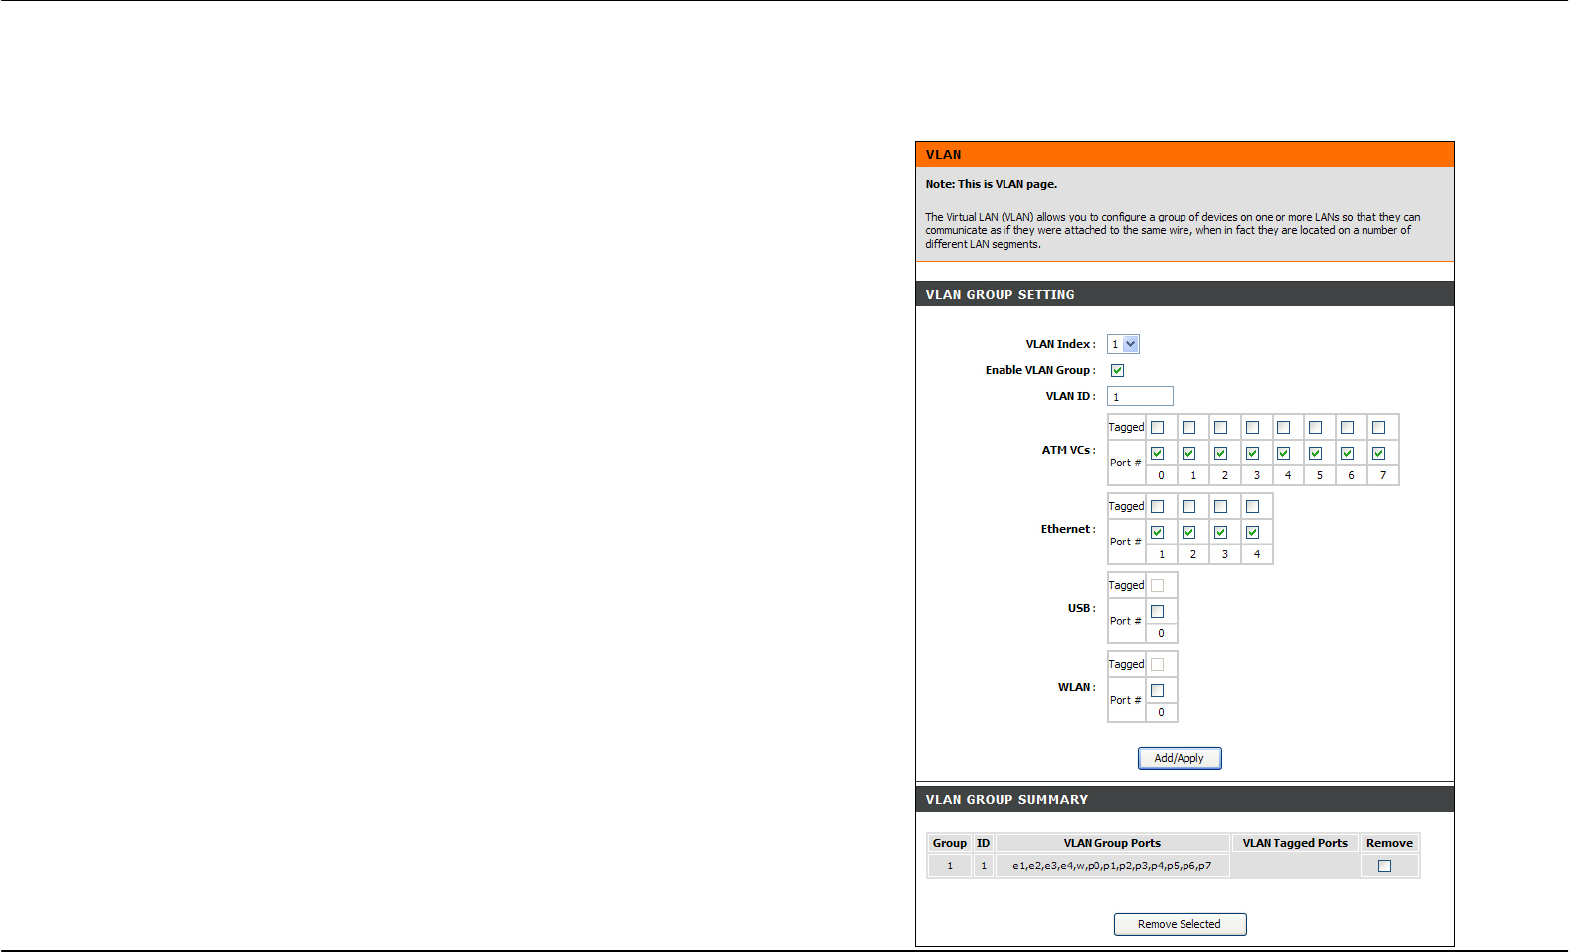
VLAN
To access the VLAN window, click the VLAN button in the Advanced directory.
The Virtual LAN (VLAN) can group the devices even if they are not in the
same LAN segment.
Select a number in the VLAN Index drop-down list, tick the Enable
VLAN Group check box, .and tick the Port number and the
corresponding tagged check boxes.
Click the Add/Apply button to create the VLAN group.
Section 3 – Configuration
D-Link DSL-2740R User Manual 41
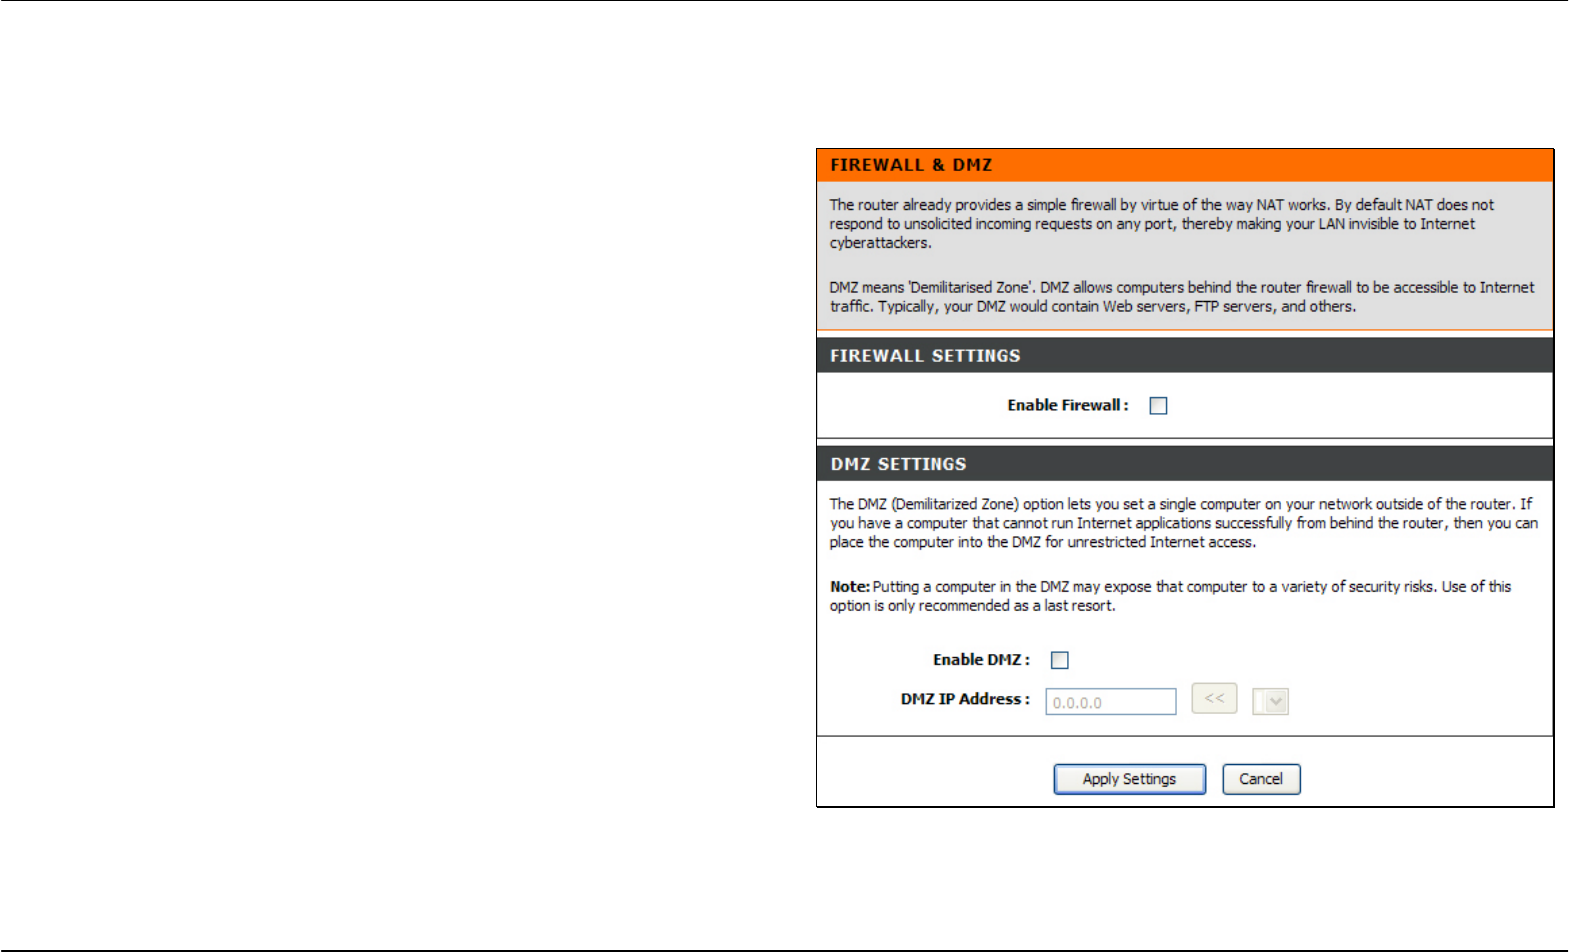
Firewall & DMZ
To access the Firewall & DMZ window, click the Firewall & DMZ button in the Advanced directory.
Firewalls may conflict with certain interactive applications such as video
conferencing or playing Internet video games. For these applications, a
firewall bypass can be set up using a DMZ IP address. The DMZ IP
address is a “visible” address and does not benefit from the full
protection of the firewall function. Therefore it is advisable that other
security precautions be enabled to protect the other computers and
devices on the LAN. It may be wise to use isolate the device with the
DMZ IP address from the rest of the LAN.
If you want to use video conferencing, for example, and still use a
firewall, you can use the DMZ IP address function. In this case, you must
have a PC or server through which video conferencing will take place.
The IP address of this PC or server will then be the DMZ IP address. You
can designate the server’s IP address as the DMZ by going to the DMZ
Settings section and typing in the IP address in the IP Address field
provided and then enabling its status by ticking the Enable DMZ
checkbox, clicking Apply Settings, and then clicking the Reboot button
on the left panel to let your changes take effect.
For the system that uses the DMZ IP address, you may want to manually
assign an IP address to it and adjust your DHCP server addresses so
that the DMZ IP address is not included in the DHCP server range. This
way you avoid possible IP address problems if you reboot the DMZ
system.
The Firewall Settings section allows the Router to enforce specific
predefined policies intended to protect against certain common types of
attacks. Tick the Enable Firewall check box, and click the Apply
Settings button to active the function.

Section 3 – Configuration
D-Link DSL-2740R User Manual 42
Advanced ADSL
To access the Advanced ADSL window, click the Advanced ADSL button in the Advanced directory.
This window allows the user to set the configuration for ADSL protocols.
For most ADSL accounts the default settings Autosense will work. This
configuration works with all ADSL implementations. If you have been
given instructions to change the Modulation method used, select the
desired option from the Modulation Mode and Type drop-down menu,
and click the Apply Settings button. Click the Reboot button on the left
panel to let your changes take effect.
Leave the Capability setting at the bottom of the window unchanged
unless otherwise instructed by your ISP. Both Bitswap Enable and
Seemless Rate Adaption (SRA) Enable deal with tests that determine
the line condition between your Router and the ISP’s Central office.
Section 3 – Configuration
D-Link DSL-2740R User Manual 43
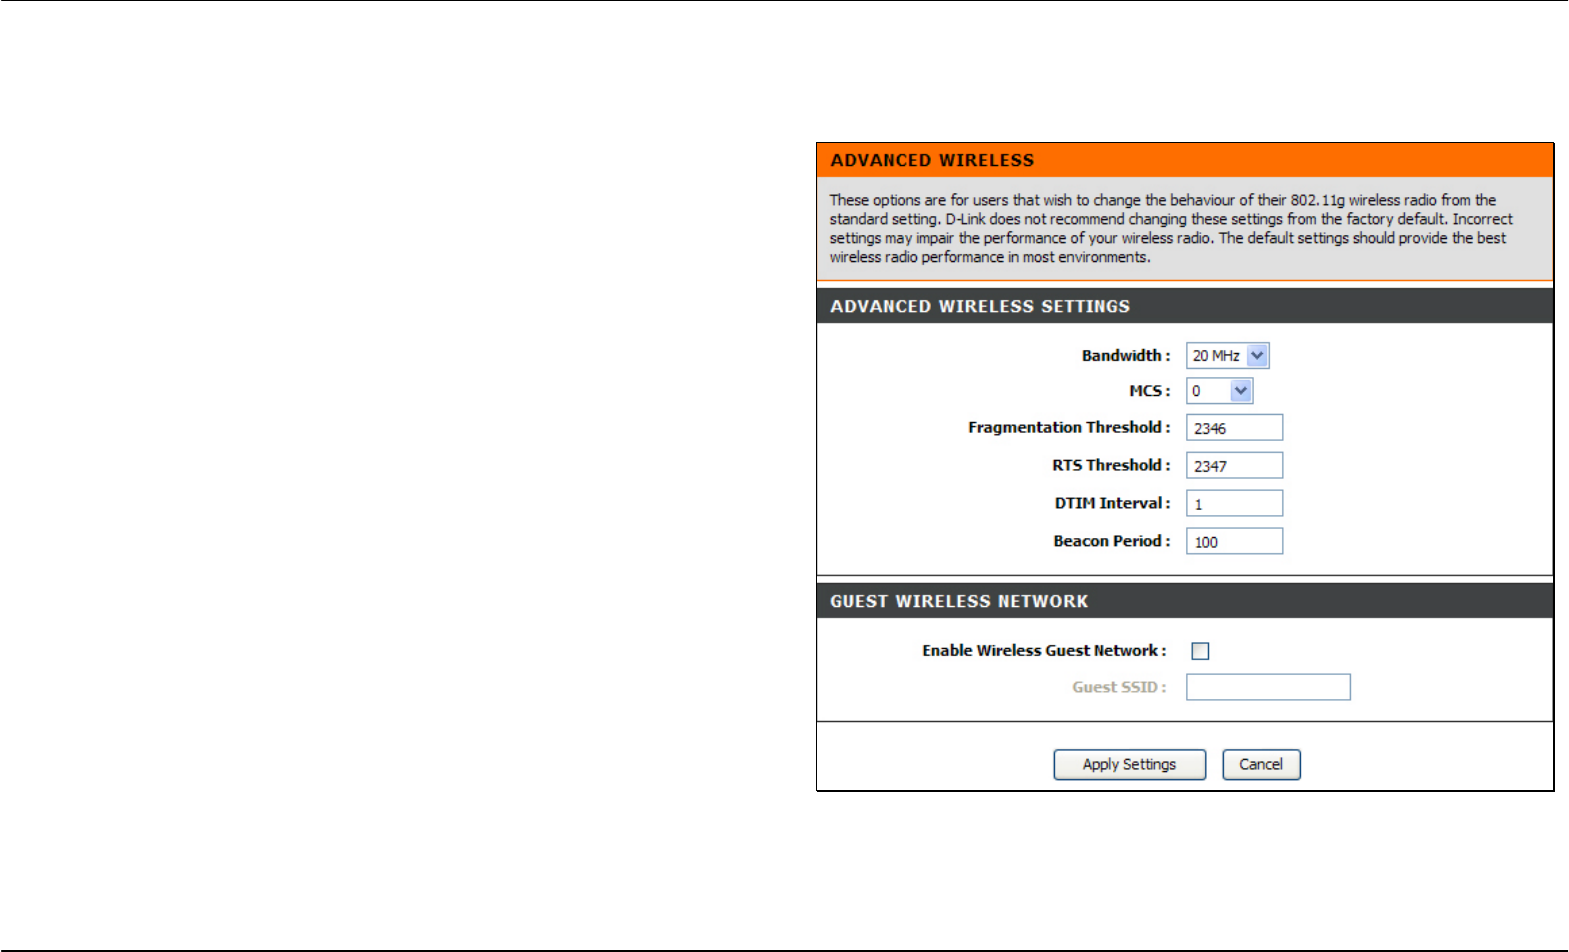
Advanced Wireless
To access the Advanced Wireless window, click the Advanced Wireless button in the Advanced directory.
In this page, you can configure more advanced settings of 802.11g
wireless radio. However, it is recommended to remain as default unless
your ISP requests to change it.
Section 3 – Configuration
D-Link DSL-2740R User Manual 44
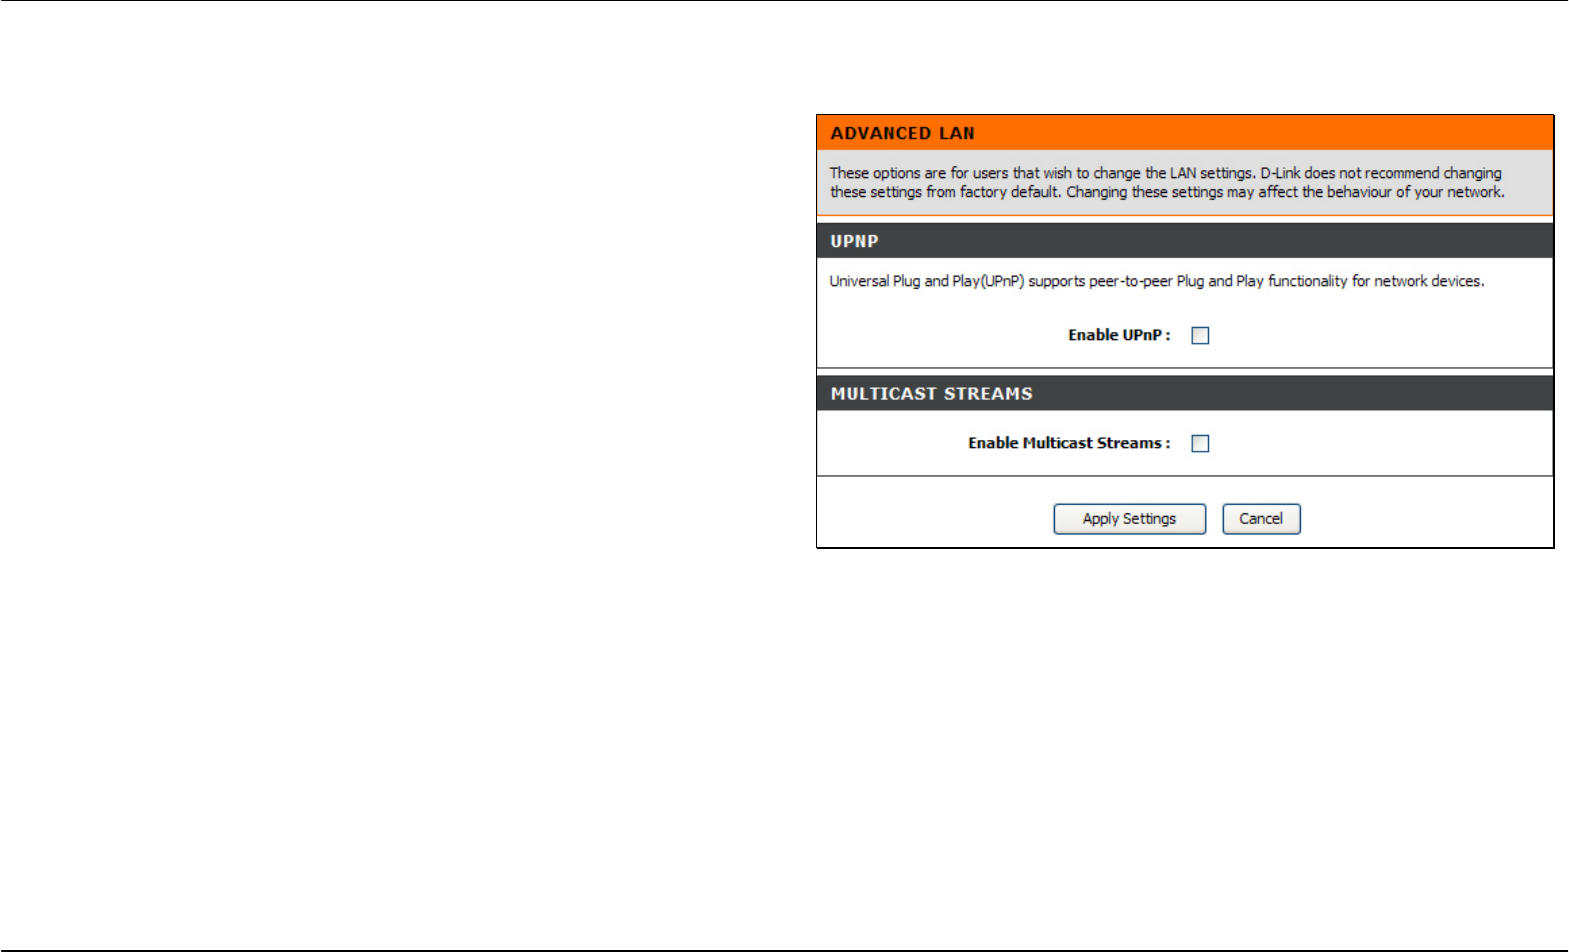
Advanced LAN
To access the Advanced LAN window, click the Advanced LAN button in the Advanced directory.
UPnP supports zero-configuration networking and automatic discovery
for many types of networked devices. When enabled, it allows other
devices that support UPnP to dynamically join a network, obtain an IP
address, convey its capabilities, and learn about the presence and
capabilities of other devices. DHCP and DNS service can also be used i
f
available on the network. UPnP also allows supported devices to leave a
network automatically without adverse effects to the device or other
devices on the network. UPnP is a protocol supported by diverse
networking media including Ethernet, Firewire, phone line, and power
line networking.
To enable UPnP for any available connection, tick the Enable UPnP
check box, select the connection or connections on which you will
enable UPnP listed under Available Connections and click the Apply
Settings button. Click the Reboot button on the left panel to let your
changes take effect.
When “Enable Multicast Streams (IGMP)” is ticked, Multicast packets
are allowed to pass in both directions on the WAN interface. Most users
will want to leave this on. Click Apply Settings.
Section 3 – Configuration
D-Link DSL-2740R User Manual 45
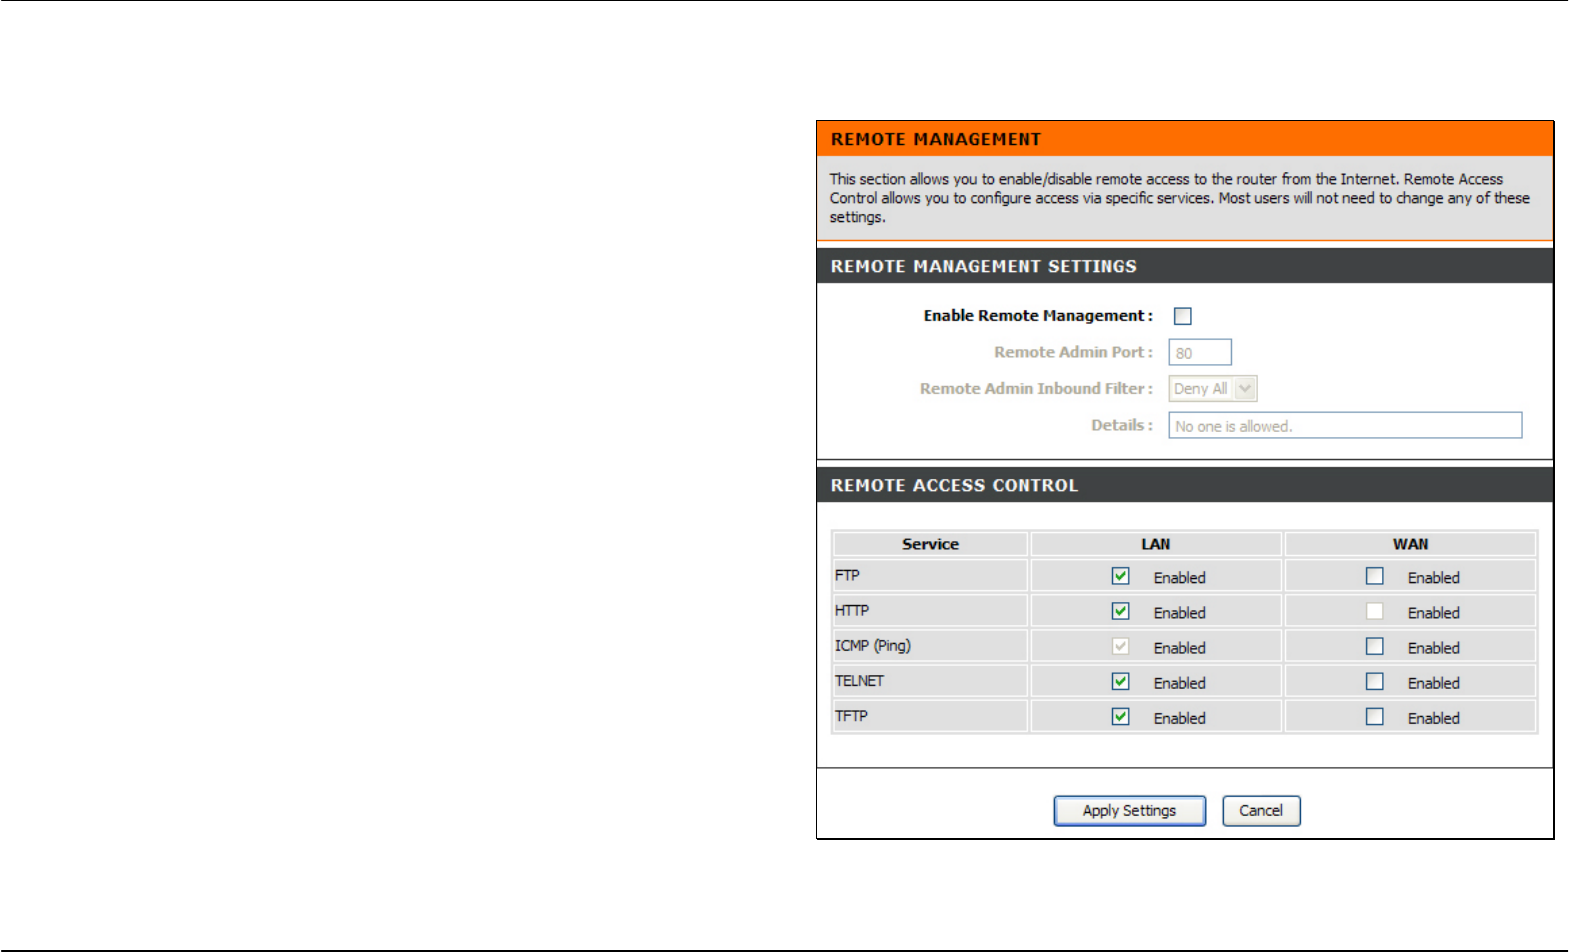
Remote Management
To access the Remote Management window, click the Remote Management button in the Advanced directory.
The Router allows remote Web and Telnet management in the top
section of the window. Tick the Enable Remote Management check
box, enter a remote admin port number, select the method of Inbound
filter in the Remote Admin Inbound Filter, enter optional identifying
information in the Details field if desired, and click the Apply Settings
button.
Use the Access Control section in the middle of the window to restrict a
service from being accessed via the WAN interface. Click the Apply
Settings button and then click the Reboot button on the left panel to let
your changes take effect.
Section 3 – Configuration
D-Link DSL-2740R User Manual 46
Network Tools
To access the Network Tools window, click the Network Tools button in the Advanced directory.
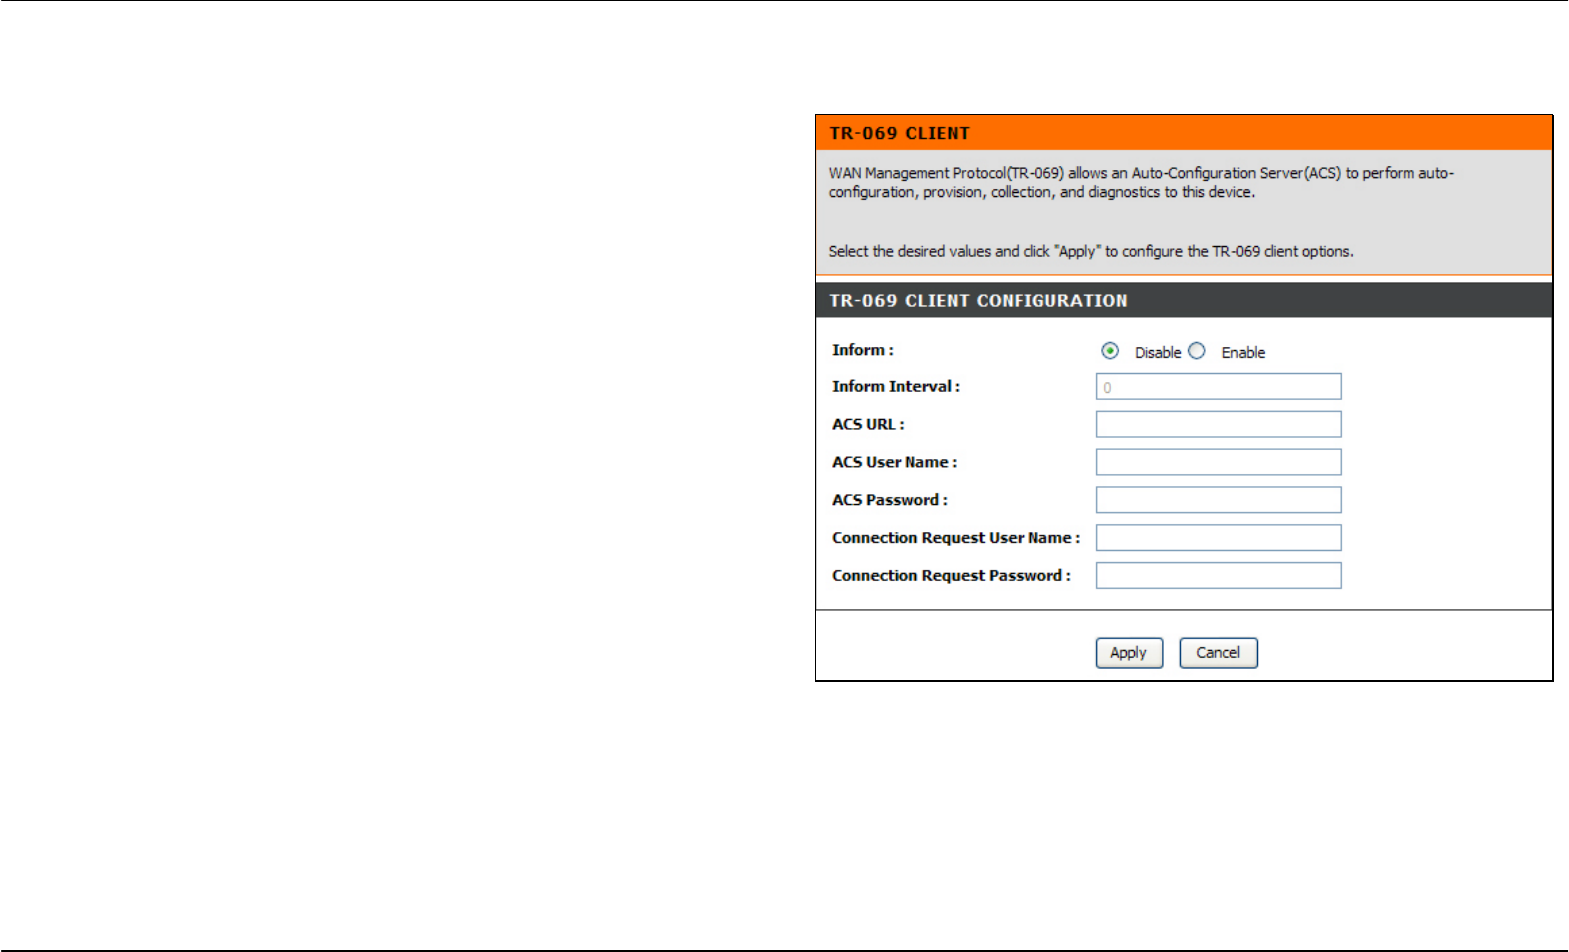
The Network Tools page allows you to setup WAN Management
Protocol (TR069). Enable the function can help the terminals connect to
the Auto Configuration Server (ACS) and establish configuration
automatically.
Click the Enable radio button under Inform. Enter the ACS URL, and
ACS and Connection Request username and password in the
corresponding fields.
Click the Apply button when you are satisfied that all the settings are
configured correctly.
Section 3 – Configuration
D-Link DSL-2740R User Manual 47
Maintenance
The Maintenance directory features an array of options designed to help you get the most out of your Router.
Password
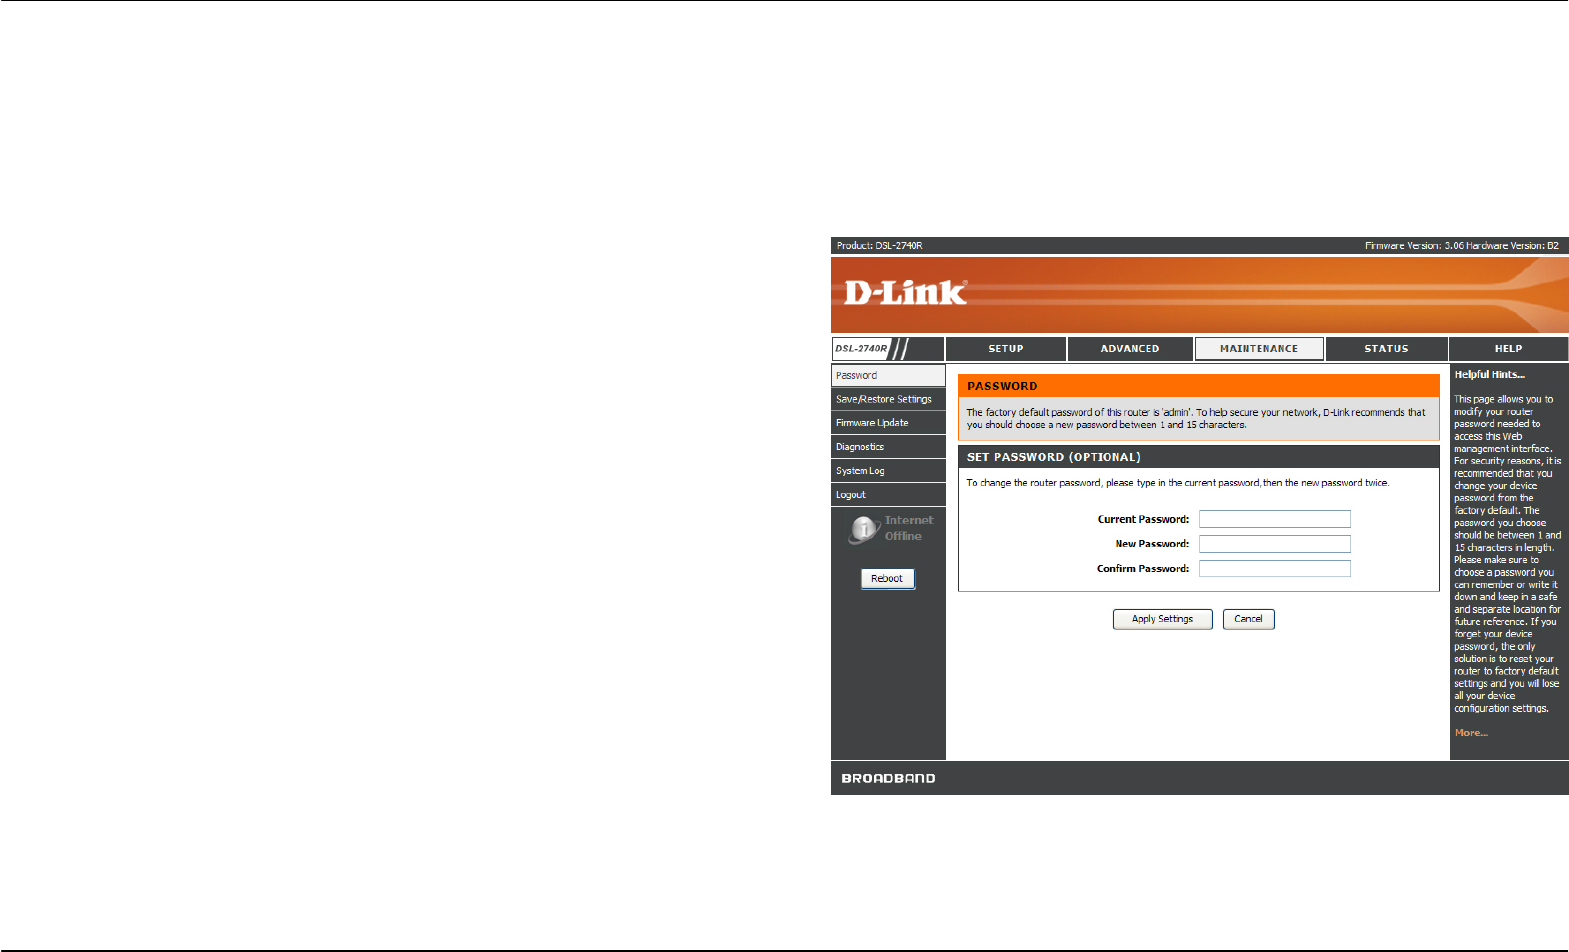
To access the Password window, click the Settings button in the Maintenance directory.
To change the Administrator’s password, type the Current Password in
the first field, the New Password in the second field, and enter the
password again in the Confirm Password field to be certain you have
typed it correctly. Click the Apply Settings button and then click the
Reboot button on the left panel to let your changes take effect. The
system User Name remains “admin,” this cannot be changed using the
Web manager interface.
Section 3 – Configuration
D-Link DSL-2740R User Manual 48
Save/Restore Settings
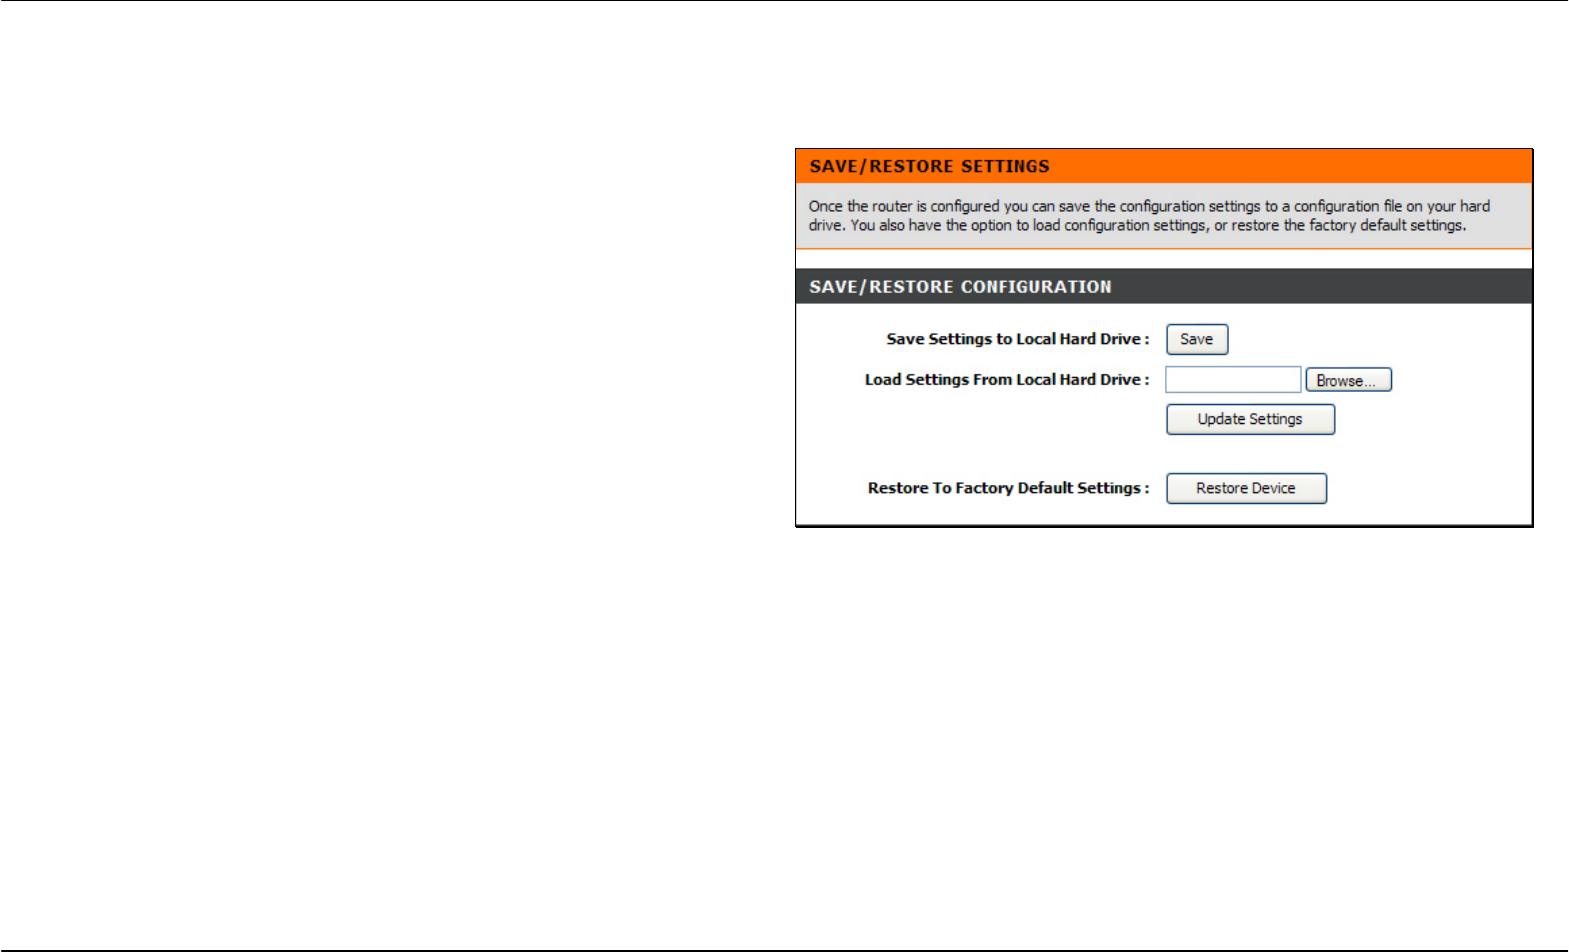
To access the Save/Restore Settings window, click the Save/Restore Settings button in the Maintenance directory.
Once you have configured the Router to your satisfaction, it is a good
idea to back up the configuration file to your computer. To save the
current configuration settings to your computer, click the Save button.
You will be prompted to select a location on your computer to put the
file. The file type is bin and may be named anything you wish.
To load a previously saved configuration file, click the Browse button
and locate the file on your computer. Click the Upload Settings button
to load the settings from your local hard drive. Confirm that you want to
load the file when prompted. The Router will reboot and begin
operating with the configuration settings that have just been loaded.
To reset the Router to its factory default settings, click the Restore
Device button. You will be prompted to confirm your decision to reset
the Router. The Router will reboot with the factory default settings
including IP settings (192.168.1.1) and Administrator password
(
admin
)
.
Section 3 – Configuration
D-Link DSL-2740R User Manual 49
Firmware Update
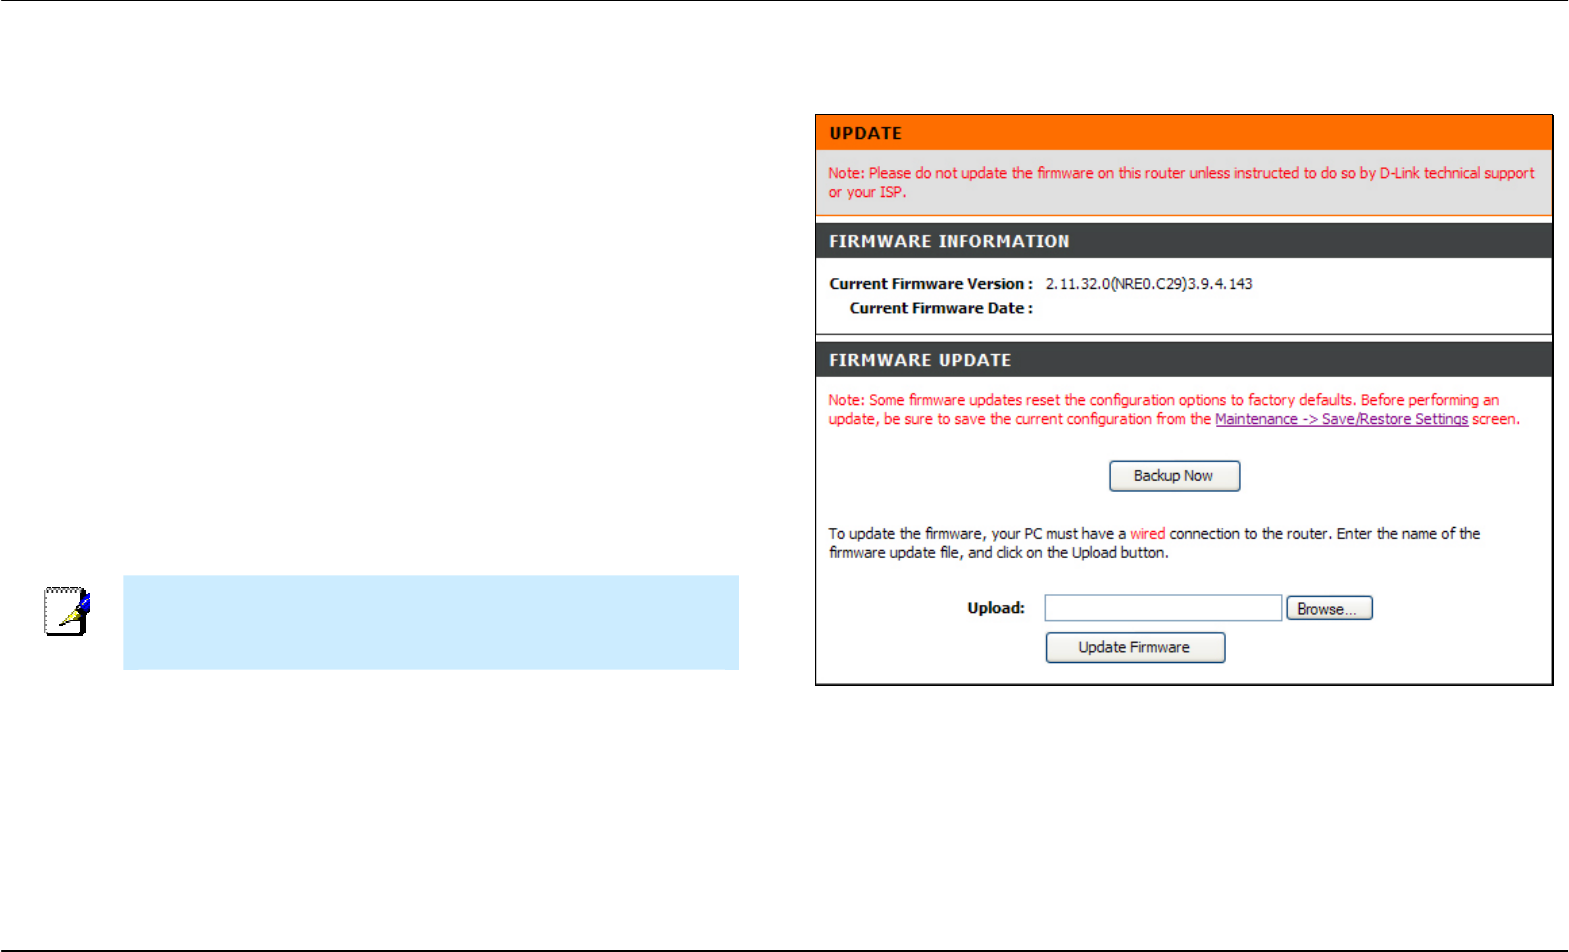
To access the Firmware Update window, click the Firmware Update button in the Maintenance directory.
Use this window to load the latest firmware for the device. Note that the
device configuration settings may return to the factory default settings,
so make sure you save the configuration settings with the Save/Restore
Settings window described on the previous page.
To upgrade firmware, type in the name and path of the file or click on the
Browse button to search for the file. Click the Update Firmware button
to begin copying the file. The file will load and restart the Router
automatically.
To save your current configuration file to your computer, click the
Backup Now button. A File Download dialog box will open. Click the
Save button and then designate the location for the configuration file in
the Save As window that immediately opens. The default location is
your desktop.
Note
Performing a Firmware Upgrade can sometimes change the
configuration settings. Be sure to backup the Router’s configuration
settings before upgrading the firmware.
Section 3 – Configuration
D-Link DSL-2740R User Manual 50
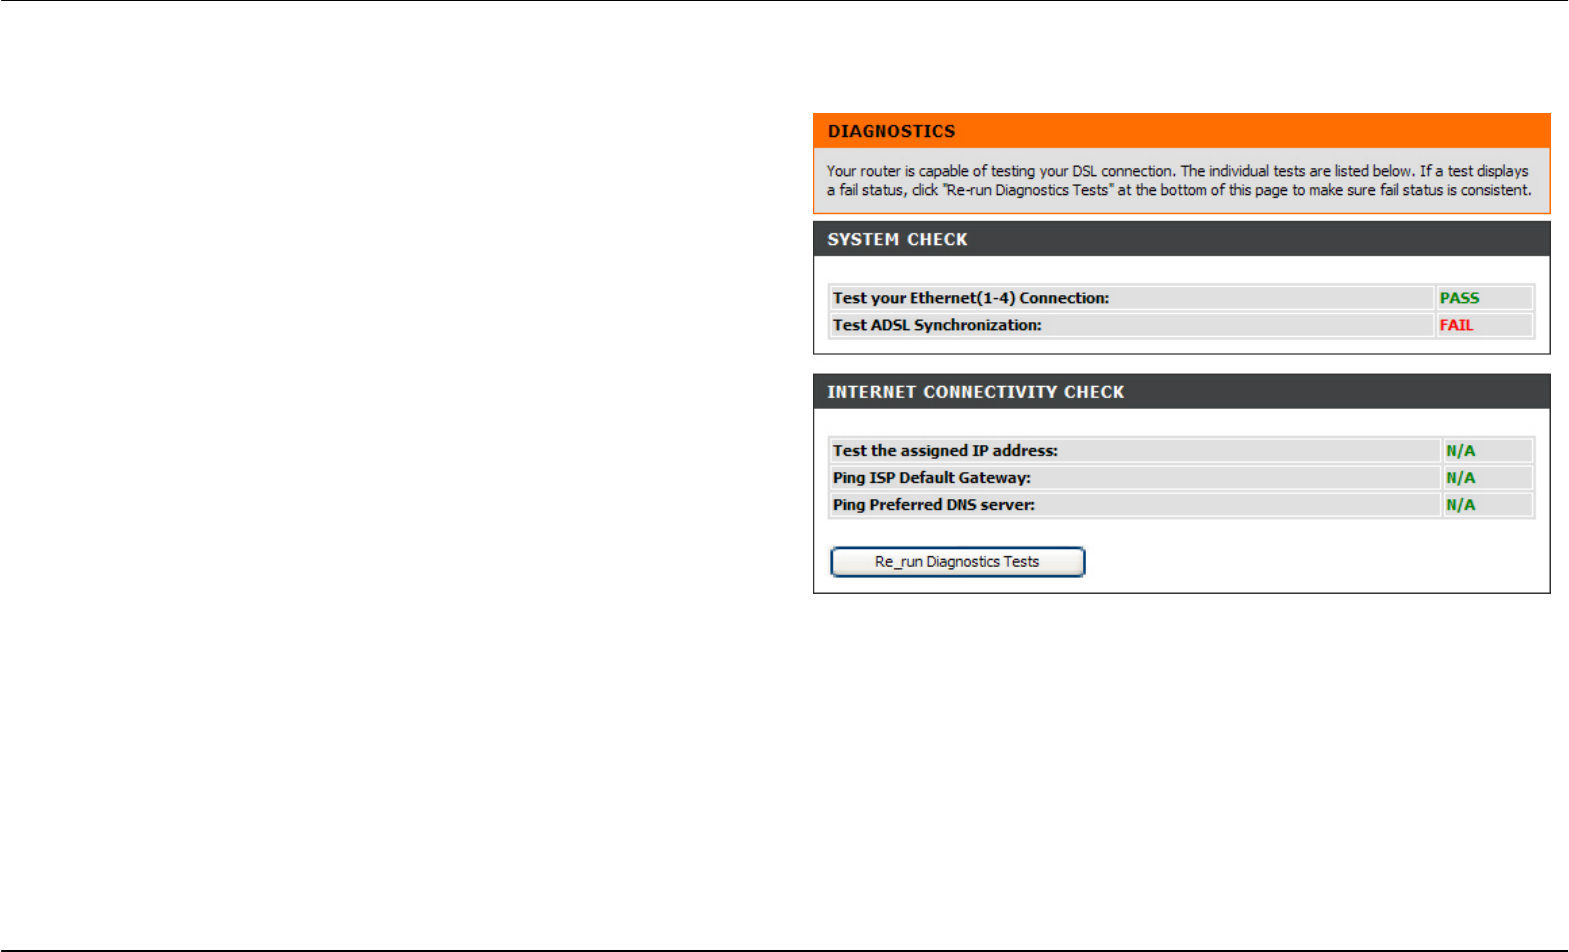
Diagnostics
To access the Diagnostic window, click the Diagnostics button in the Maintenance directory.
This window is used to test connectivity of the Router. A Ping test may
be done through the local or external interface to test connectivity to
known IP addresses. The diagnostics feature executes a series of tests
of your system software and hardware connections. Use this window
when working with your ISP to troubleshoot problems.
Section 3 – Configuration
D-Link DSL-2740R User Manual 51
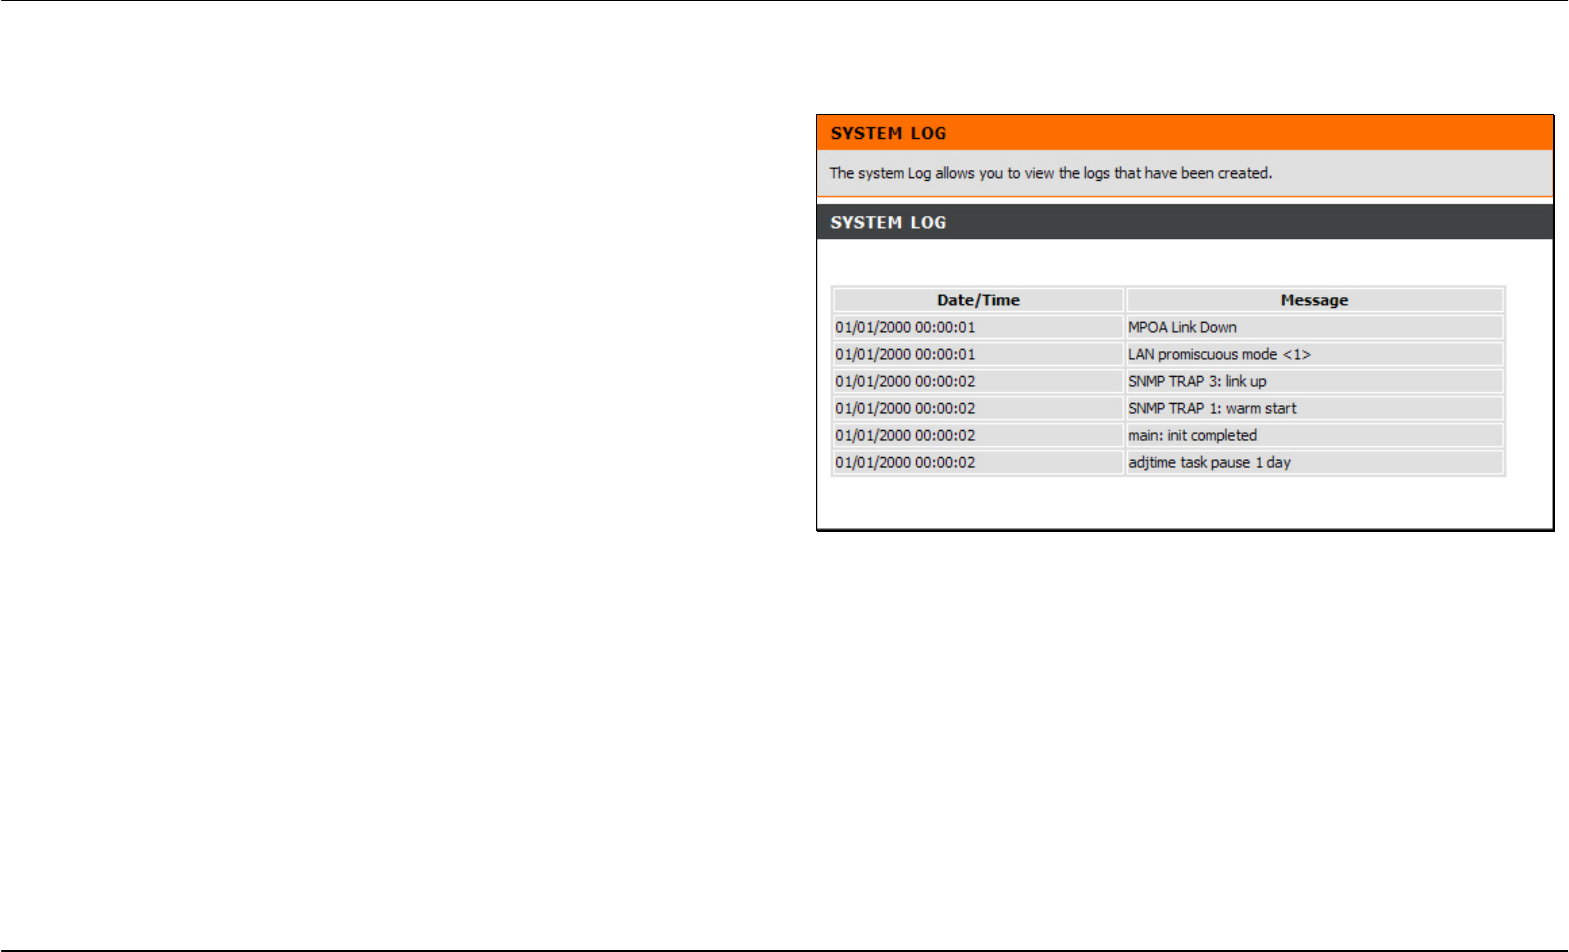
System Log
To access the System Log window, click the System Log button in the Maintenance directory.
This window displays the system log information of the Router.
Section 3 – Configuration
D-Link DSL-2740R User Manual 52
Status
Use the various read-only windows to view system information and monitor performance.
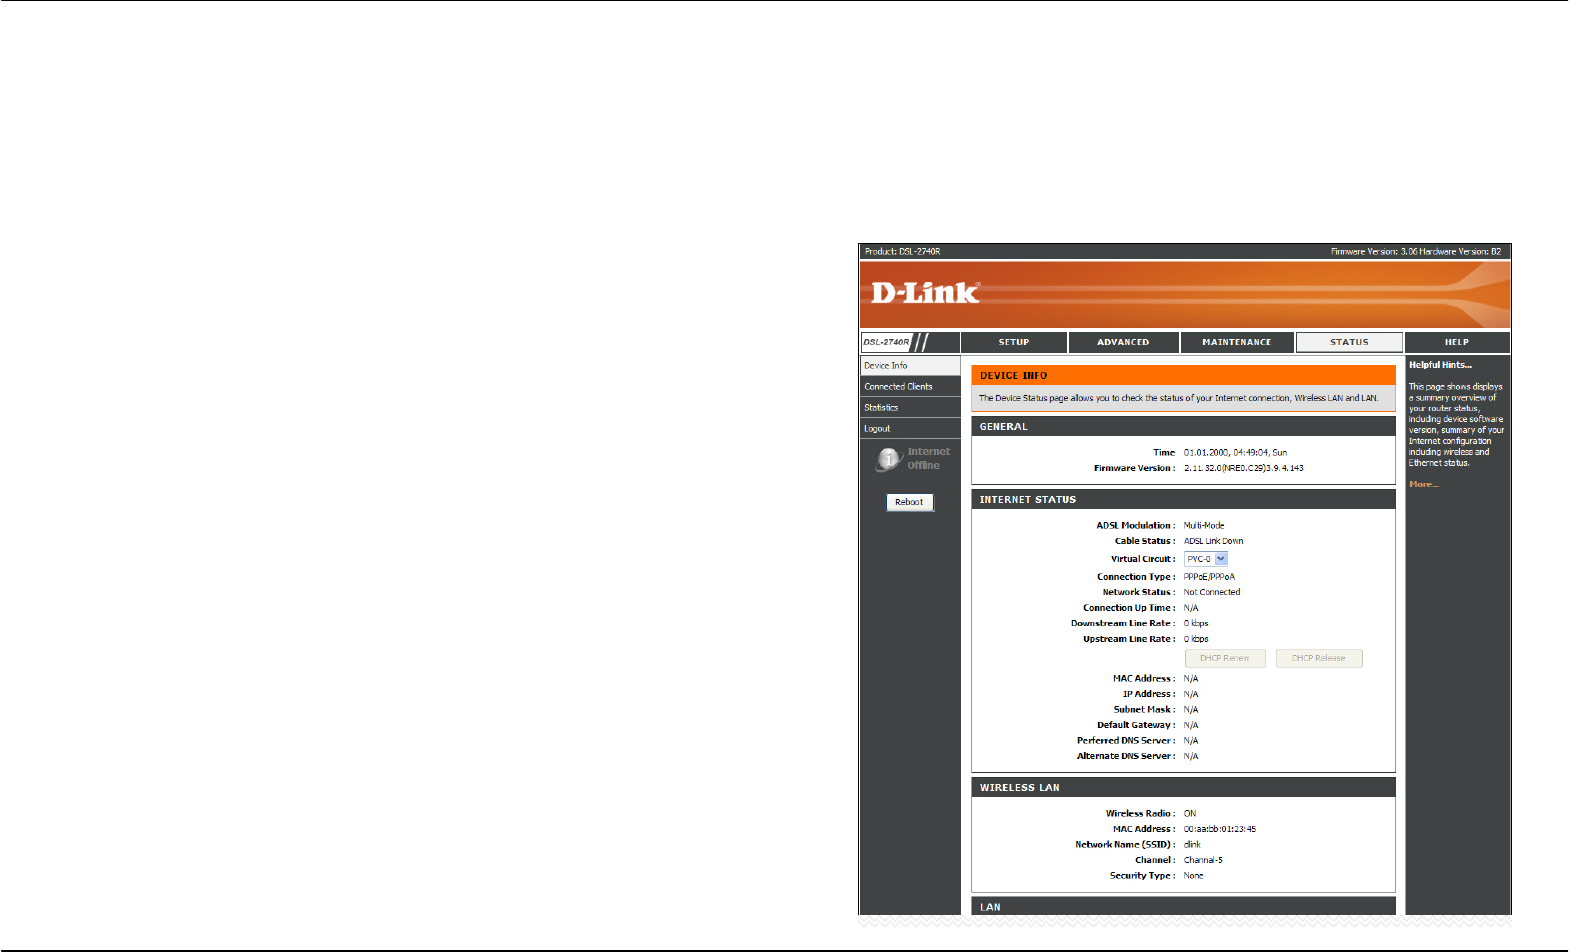
Device Info
To access the Device Info window, click the Device Info button in the Status directory.
Use this window to quickly view basic current information about the LAN
and WAN interfaces and device information including Firmware Version
and MAC address.
Section 3 – Configuration
D-Link DSL-2740R User Manual 53
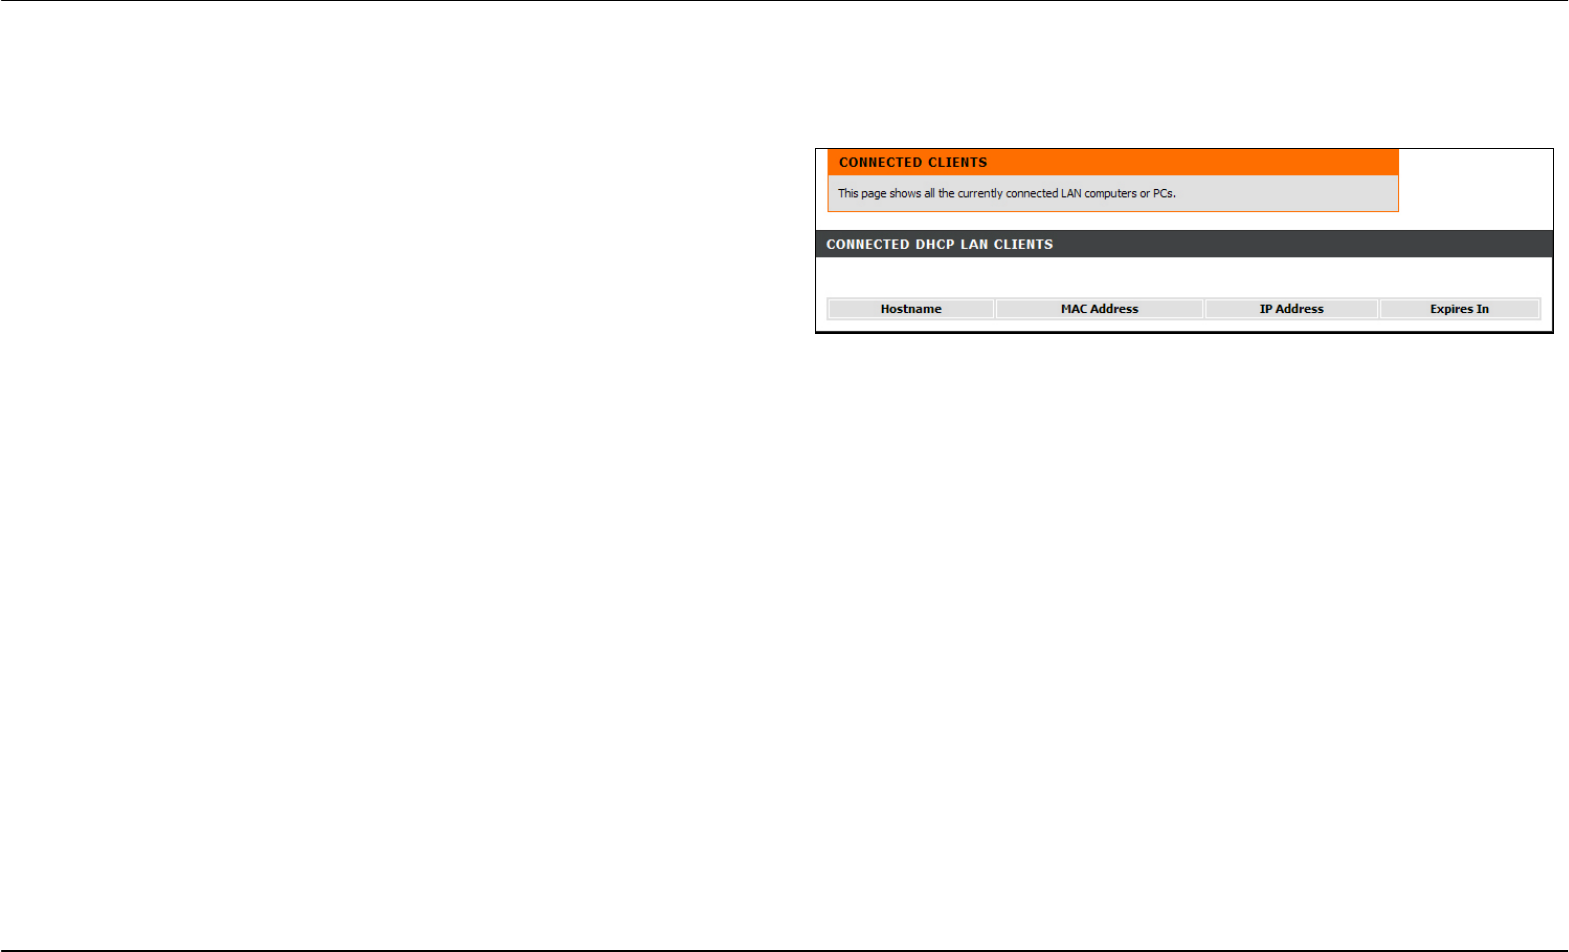
Connected Clients
To access the Connected Clients window, click the Connected Clients button in the Status directory.
The Connected LAN Clients list displays active DHCP clients when the
router is acting as a DHCP server.
Section 3 – Configuration
D-Link DSL-2740R User Manual 54
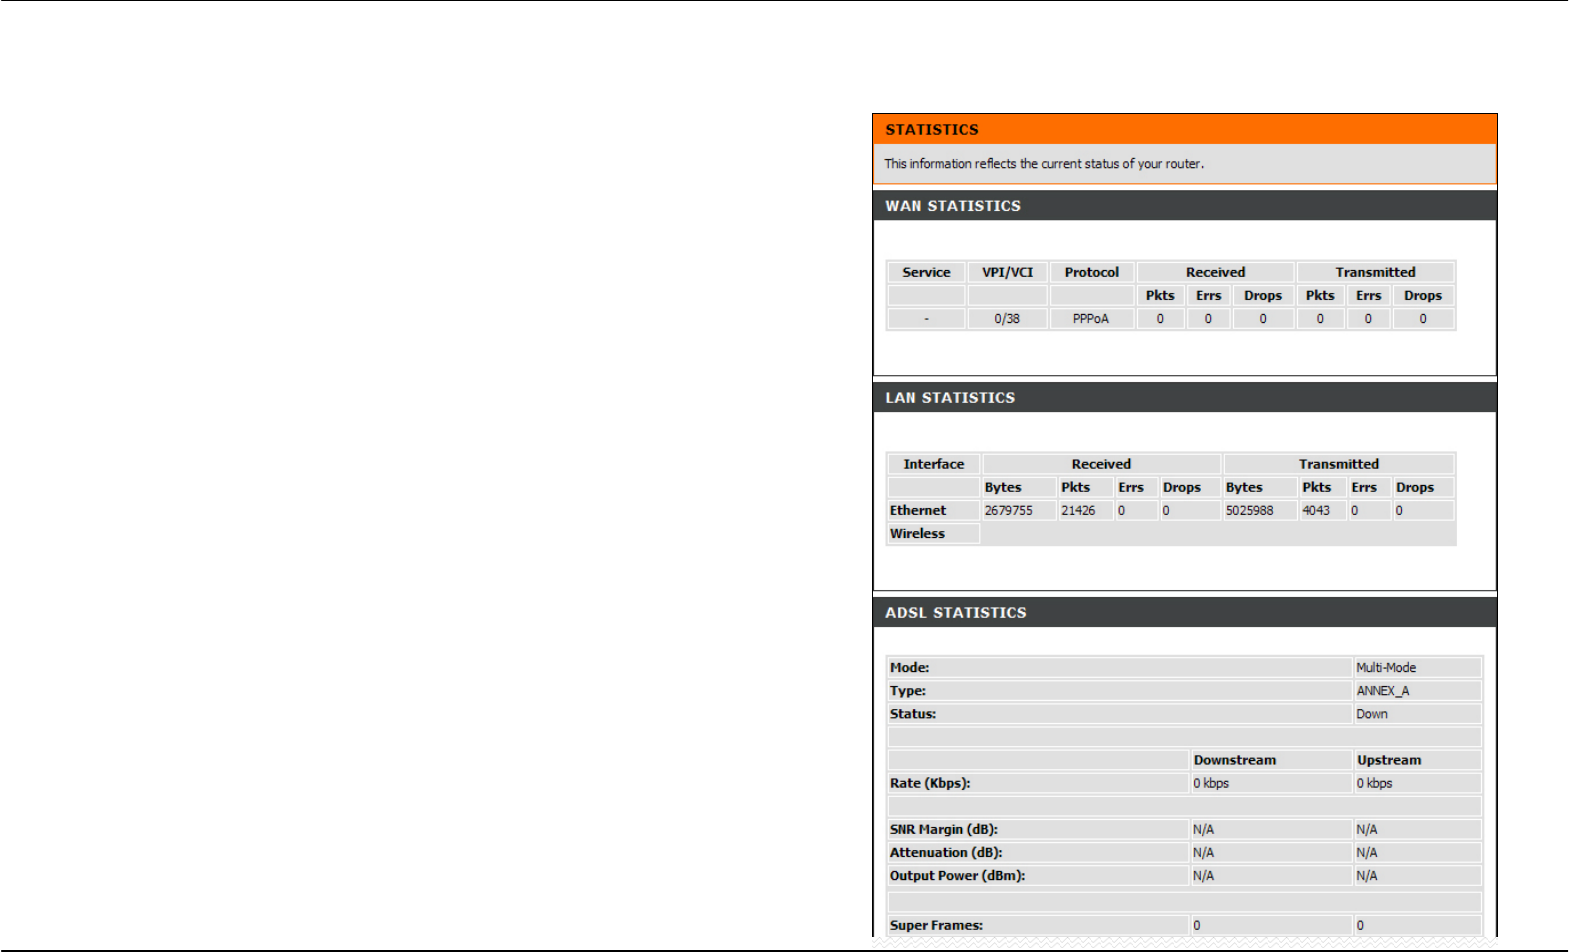
Statistics
To access the Statistics window, click the Statistics button in the Status directory.
Use this window to monitor traffic on the Ethernet or ADSL connection.
This window also displays information concerning ADSL status.
Section 3 – Configuration
D-Link DSL-2740R User Manual 55
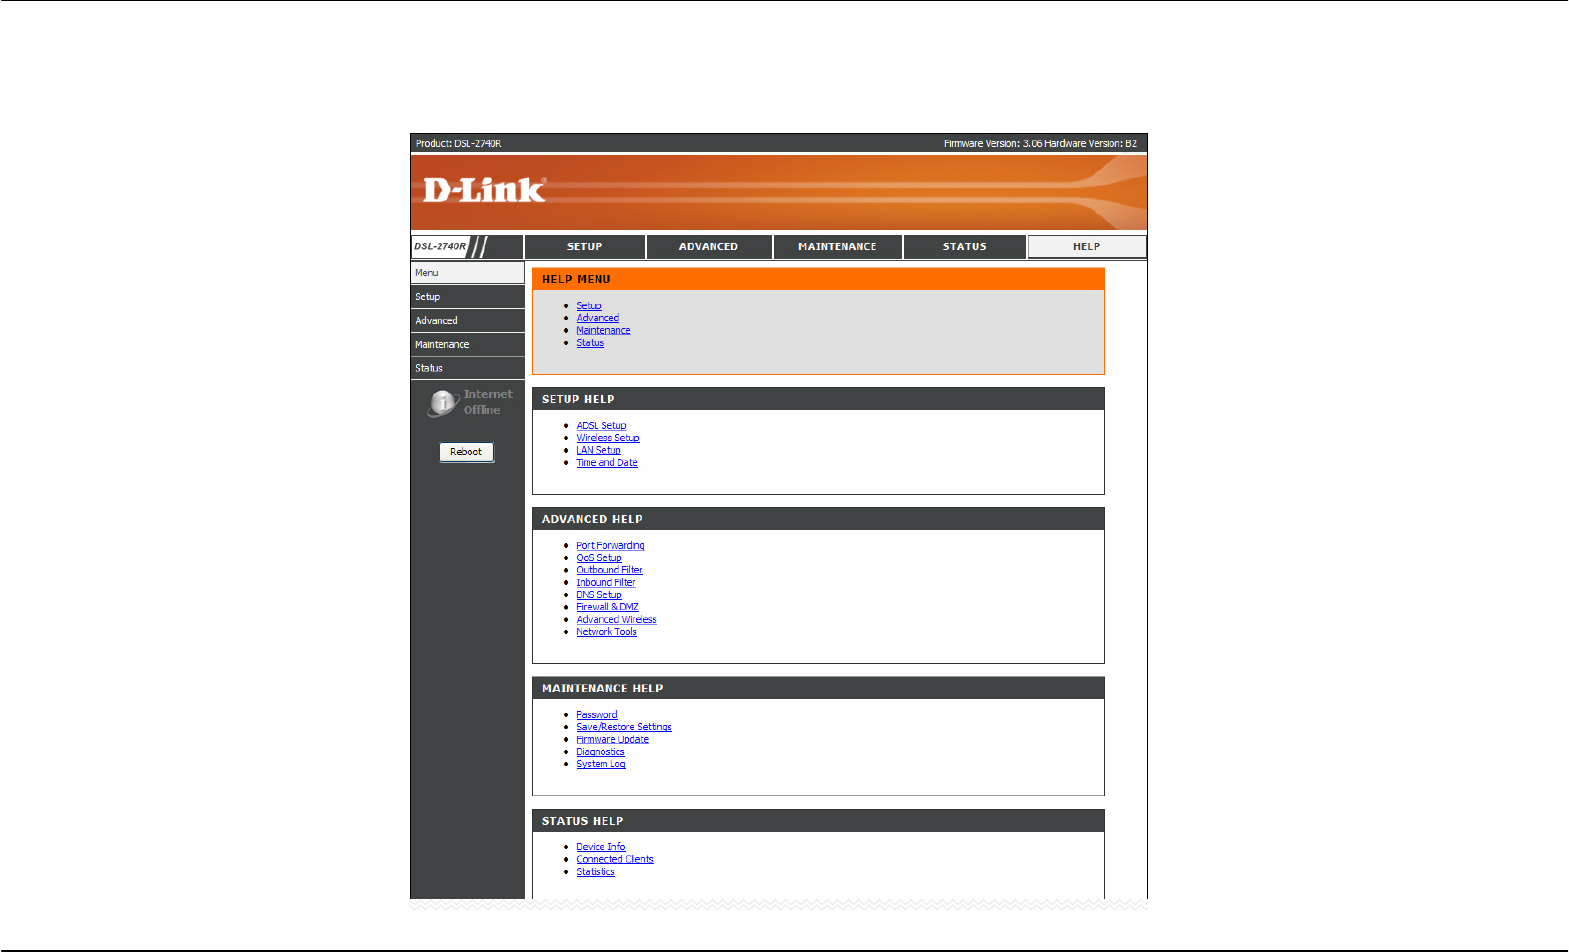
Help
To access the Help window, click the Help directory.

Appendix A – Troubleshooting
D-Link DSL-2740R User Manual 56
Troubleshooting
This chapter provides solutions to problems that might occur during the installation and operation of the DSL-2740R. Read the following
descriptions if you are having problems. (The examples below are illustrated in Windows® XP. If you have a different operating system, the
screenshots on your computer will look similar to the following examples.)
1. How do I configure my DSL-2740R Router without the CD-ROM?
• Connect your PC to the Router using an Ethernet cable.
• Open a web browser and enter the address http://192.168.1.1
• The default username is ‘admin’ and the default password is ‘admin’.
• If you have changed the password and cannot remember it, you will need to reset the Router to the factory default setting (see question 2),
which will set the password back to ‘admin’.
Note: Please refer to the next section “Networking Basics” to check your PC’s IP configuration if you can’t see the login windows.
2. How do I reset my Router to the factory default settings?
• Ensure the Router is powered on.
• Press and hold the reset button on the back of the device for approximately 5 to 8 seconds.
• This process should take around 1 to 2 minutes.
Note: Resetting the Router to the factory default settings will erase the current configuration settings. To reconfigure your settings, login to the Router as
outlined in question 1, then run the Quick Setup wizard.
3. What can I do if my Router is not working correctly?
There are a few quick steps you can take to try and resolve any issues:
• Follow the directions in Question 2 to reset the Router.
• Check that all the cables are firmly connected at both ends.
• Check the LEDs on the front of the Router. The Power indicator should be on, the Status indicator should flash, and the DSL and LAN
indicators should be on as well.

Appendix A – Troubleshooting
D-Link DSL-2740R User Manual 57
• Please ensure that the settings in the Web-based configuration manager, e.g. ISP username and password, are the same as the settings
that have been provided by your ISP.
4. Why can’t I get an Internet connection?
For ADSL ISP users, please contact your ISP to make sure the service has been enabled/connected by your ISP and that your ISP username and
password are correct.
5. What can I do if my Router can’t be detected by running the installation CD?
• Ensure the Router is powered on.
• Check that all the cables are firmly connected at both ends and all LEDs work correctly.
• Ensure only one network interface card on your PC is activated.
• Click on Start > Control Panel > Security Center to disable the firewall.
Note: There is a potential security issue if the firewall is disabled on your PC. Please remember to turn it back on once you have finished the whole
installation procedure. This will enable you to be able to surf the Internet without any problem.
Appendix B - Networking Basics
D-Link DSL-2740R User Manual 58
Networking Basics
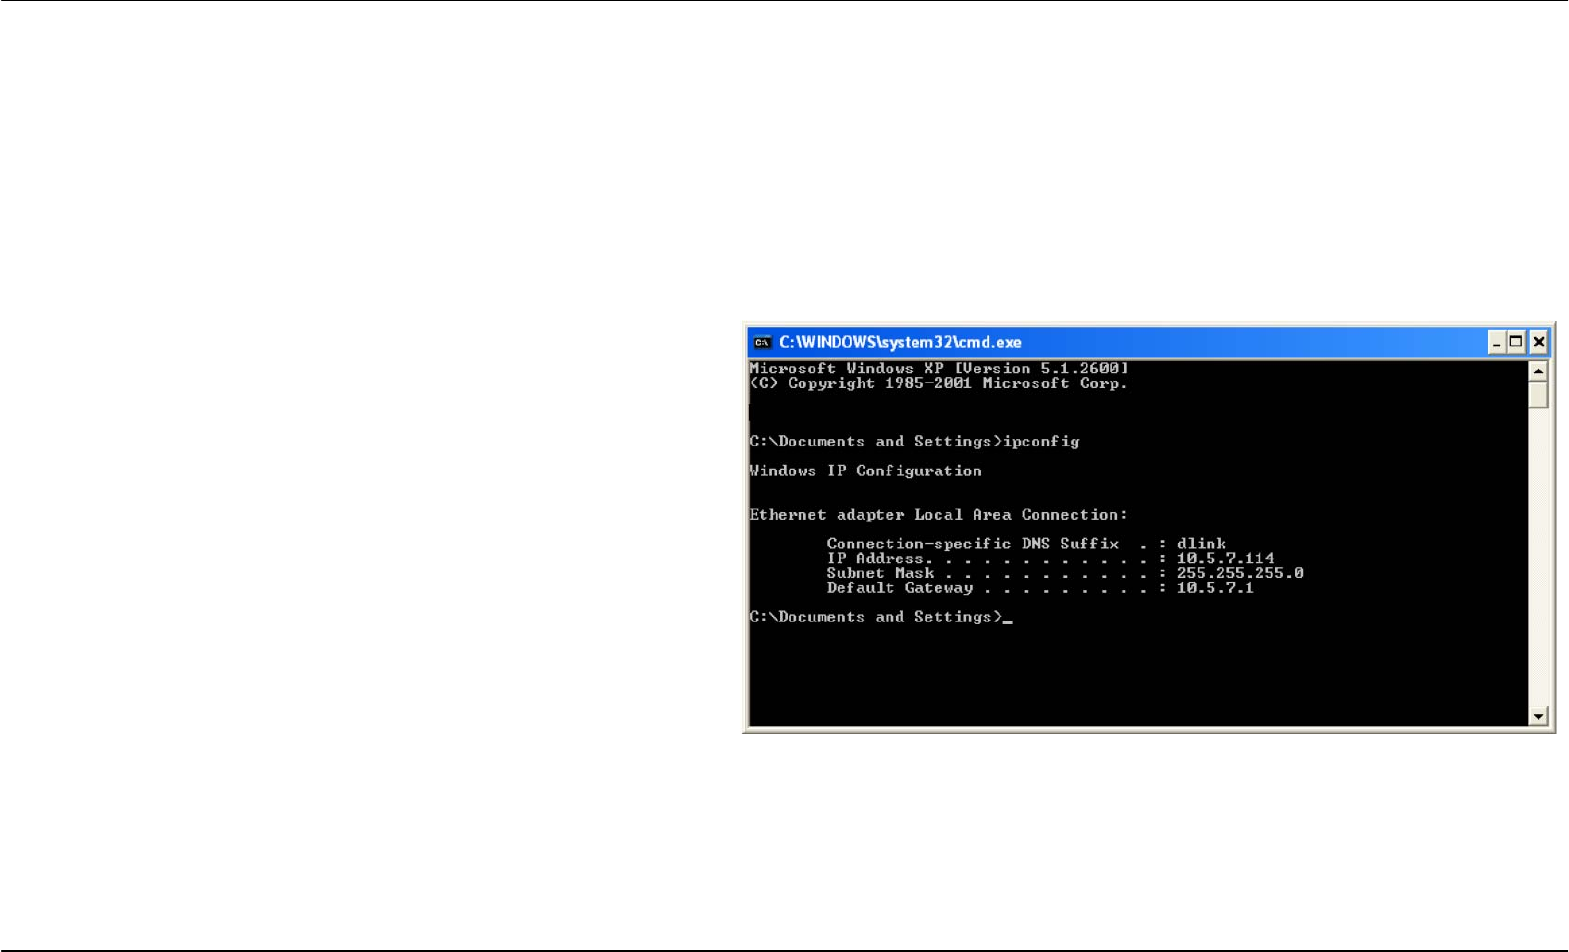
Check Your IP Address
After you install your new D-Link adapter, by default, the TCP/IP settings should be set to obtain an IP address from a DHCP server (i.e. wireless
router) automatically. To verify your IP address, please follow the steps below.
Click on Start > Run. In the run box type cmd and click on the OK.
At the prompt, type ipconfig and press Enter.
This will display the IP address, subnet mask, and the default
gateway of your adapter.
If the address is 0.0.0.0, check your adapter installation, security
settings, and the settings on your router. Some firewall software
programs may block a DHCP request on newly installed adapters.
If you are connecting to a wireless network at a hotspot (e.g. hotel,
coffee shop, airport), please contact an employee or administrator
to verify their wireless network settings.
Appendix B - Networking Basics
D-Link DSL-2740R User Manual 59
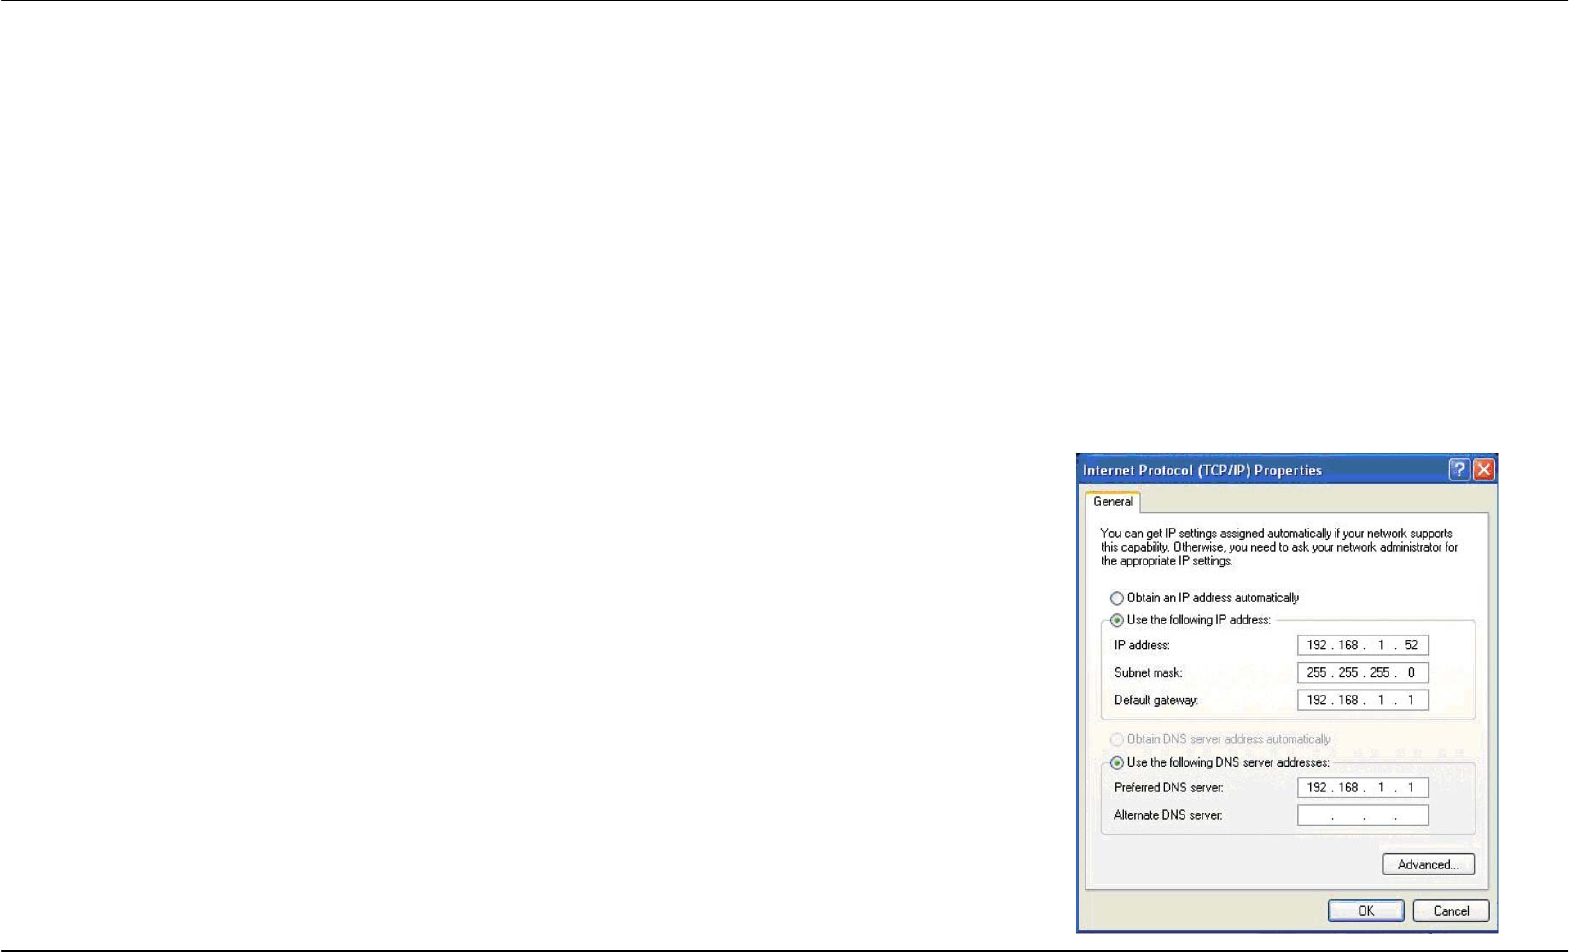
Statically Assign An IP Address
If you are not using a DHCP capable gateway/router, or you need to assign a static IP address, please follow the steps below:
Step 1
Windows® XP - Click on Start > Control Panel > Network Connections.
Windows® 2000 - From the desktop, right-click on the My Network Places > Properties.
Step 2
Right-click on the Local Area Connection which represents your D-Link network adapter and select Properties.
Step 3
Highlight Internet Protocol (TCP/IP) and click on the Properties.
Step 4
Click on the Use the following IP address and enter an IP address that is on the same subnet as
your network or the LAN IP address on your router.
Example: If the router’s LAN IP address is 192.168.1.1, make your IP address 192.168.1.X where X
is a number between 2 and 99. Make sure that the number you choose is not in use on the network.
Set Default Gateway the same as the LAN IP address of your router (192.168.1.1).
Set Primary DNS the same as the LAN IP address of your router (192.168.1.1). The Secondary
DNS is not needed or you may enter a DNS server from your ISP.
Step 5
Click on the OK twice to save your settings.

Appendix C – Technical Specifications
D-Link DSL-2740R User Manual 60
Technical Specifications
ADSL Standards
• Full-rate ANSI T1.413 Issue 2
• ITU G.992.1 (G.dmt) AnnexA/C/I
• ITU G.992.2 (G.lite) Annex A/C
• ITU G.994.1 (G.hs)
ADSL2 Standards
• ITU G.992.3 (G.dmt.bis) Annex A/J/K/L/M
• ITU G.992.4 (G.lite.bis) Annex A
ADSL2+ Standards
• ITU G.992.5 Annex A/L/M
Protocols
• IEEE 802.1d Spanning
Tree
• TCP/UDP
• ARP
• RARP
• ICMP
• RFC1058 RIP v1
• RFC1213 SNMP v1 & v2c
• RFC1334 PAP
• RFC1389 RIP v2
• RFC1577 Classical IP over
ATM
• RFC1483/2684
Multiprotocol
Encapsulation over ATM
Adaptation Layer 5 (AAL5)
• RFC1661 Point to Point
Protocol
• RFC1994 CHAP
• RFC2131 DHCP Client /
DHCP Server
• RFC2364 PPP over ATM
• RFC2516 PPP over
Ethernet
Data Transfer Rate
• G.dmt full rate downstream: up to 8 Mbps / upstream: up to 1
Mbps
• G.lite: ADSL downstream up to 1.5 Mbps / upstream up to 512
Kbps
• G.dmt.bis full rate downstream: up to 12 Mbps / upstream: up
to 1 Mbps
•
A
DSL full rate downstream: up to 24 Mbps / upstream: up to 1
Mbps
Media Interface
• ADSL interface: RJ-11 connector for connection to 24/26
AWG twisted pair telephone line
• LAN interface: four RJ-45 ports for 10/100BASE-T Ethernet
connection

Appendix C – Technical Specifications
D-Link DSL-2740R User Manual 61