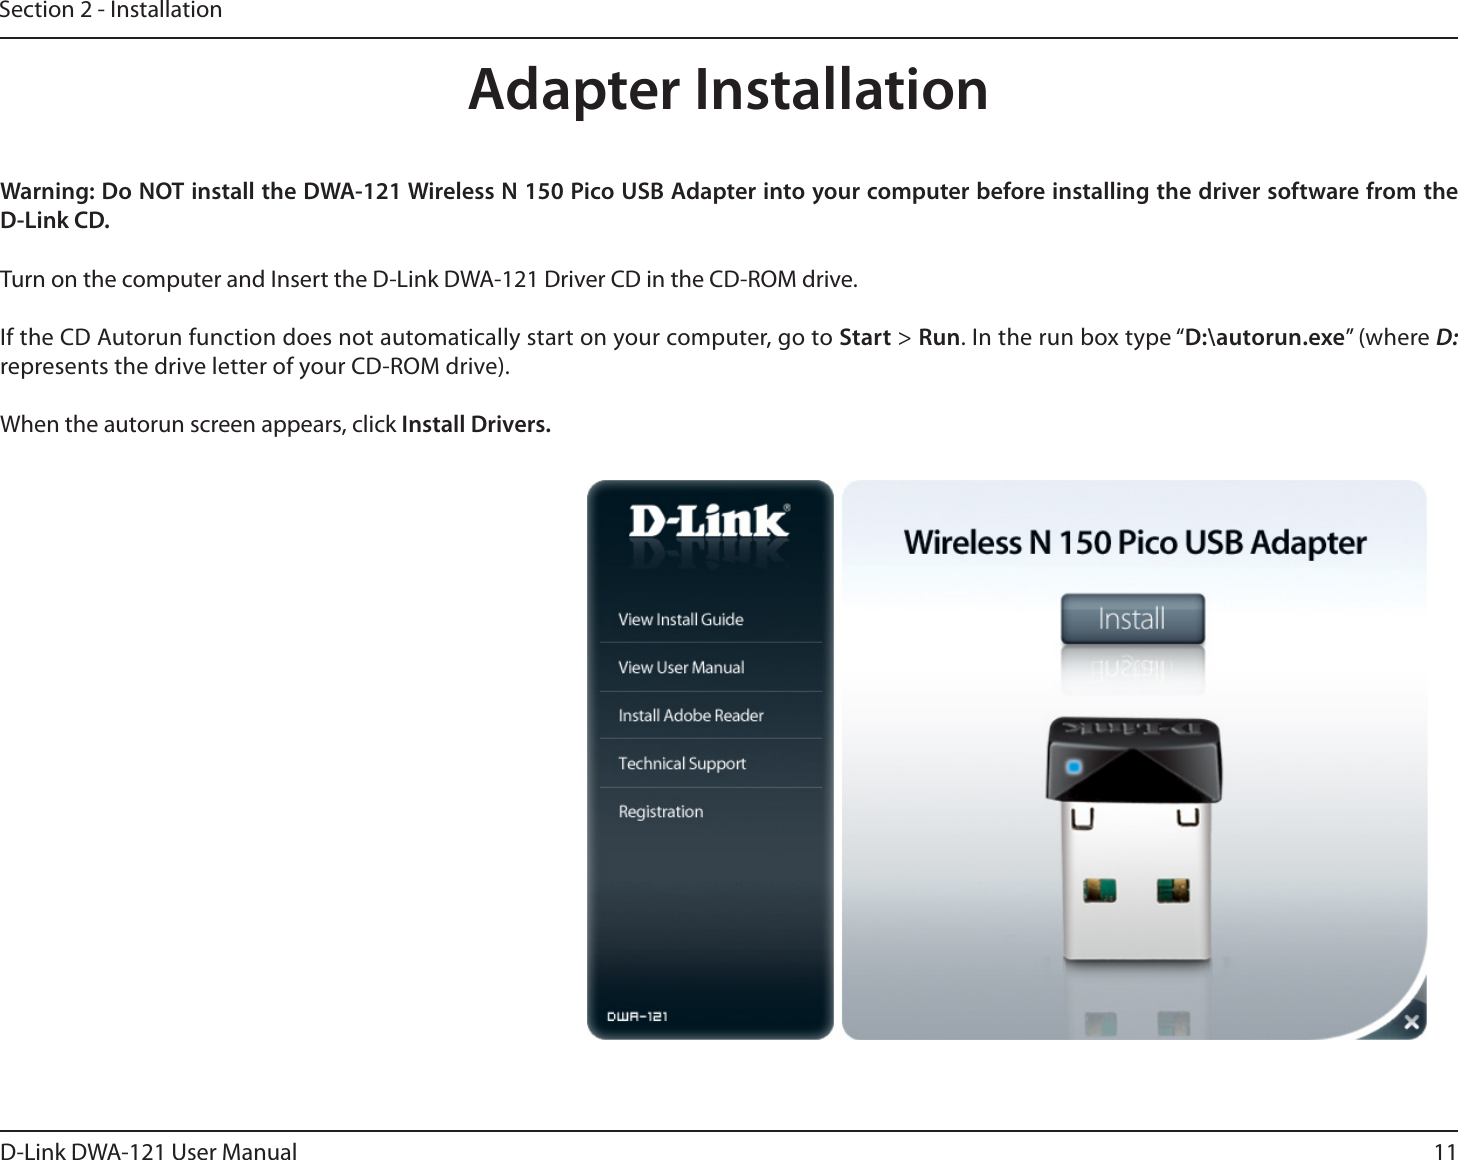
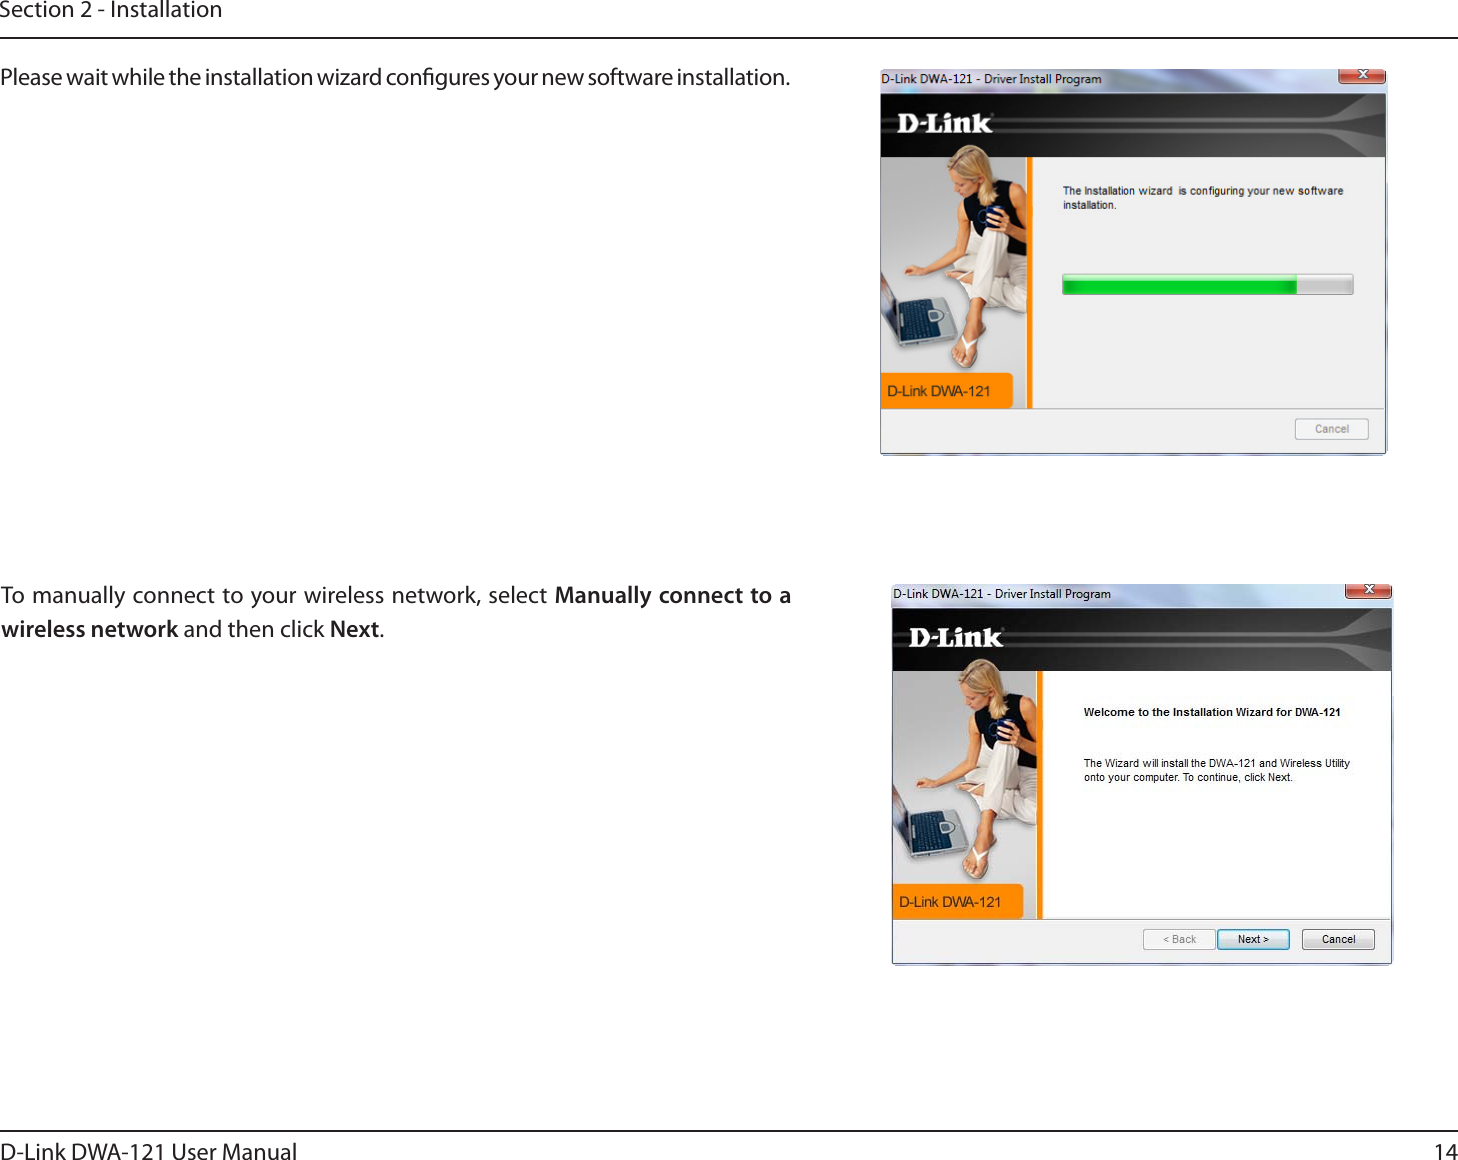
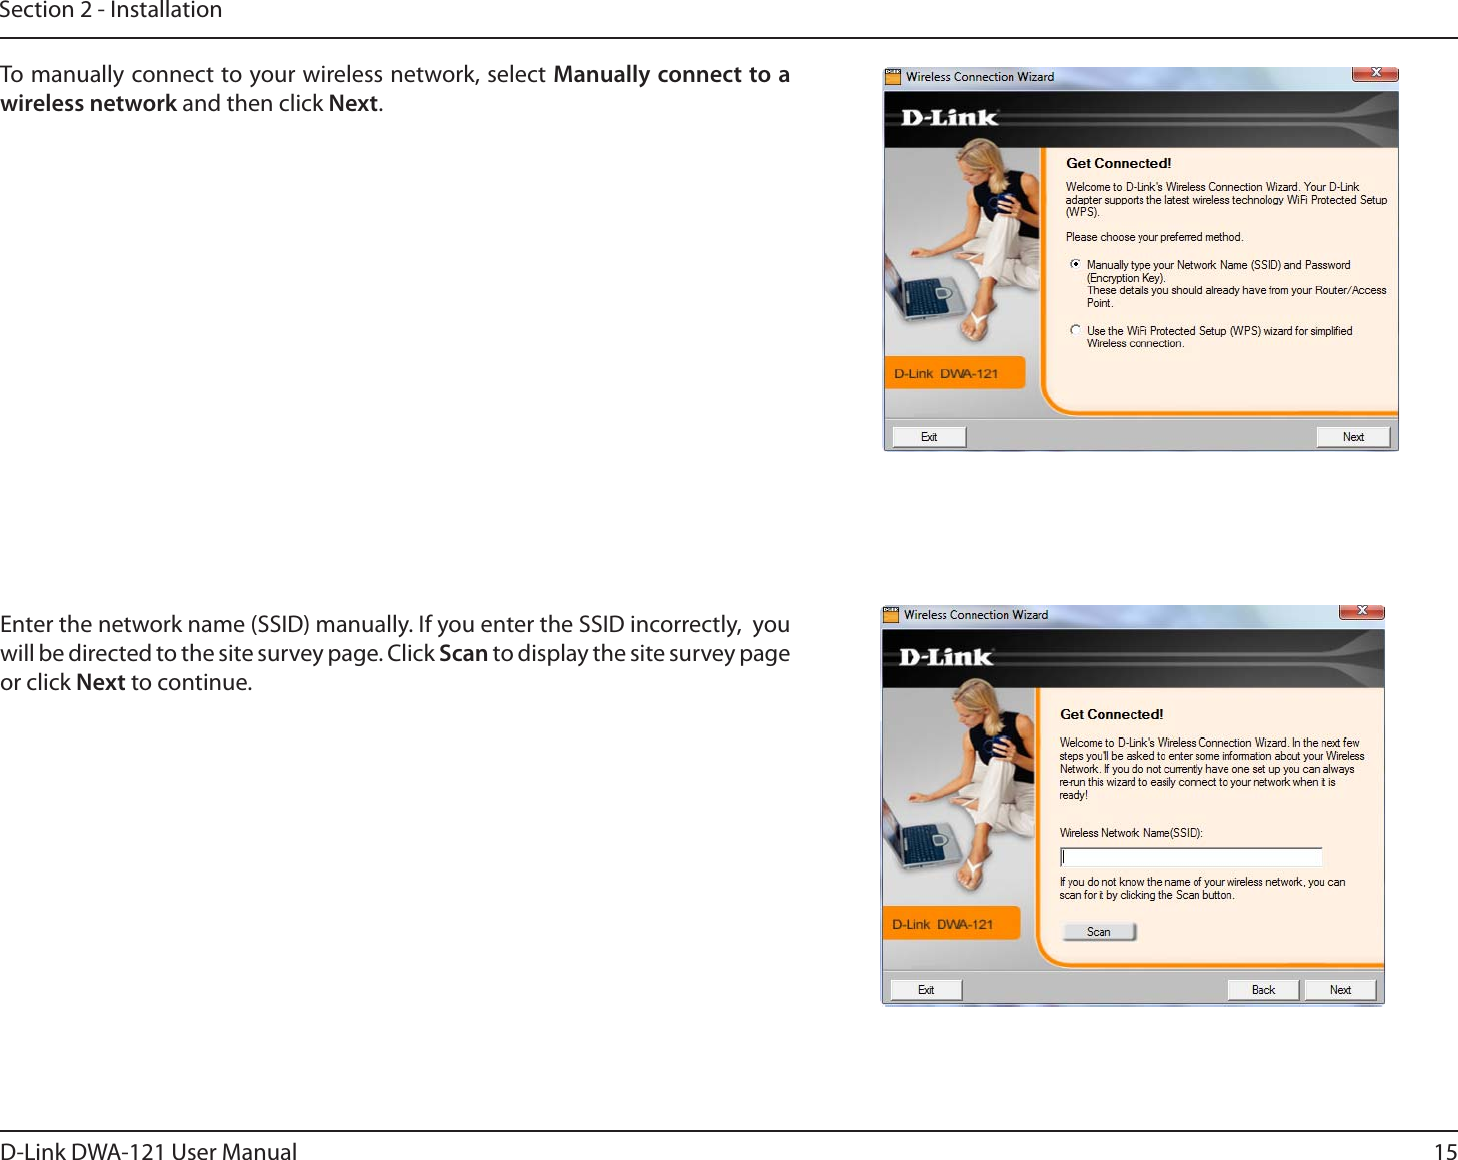
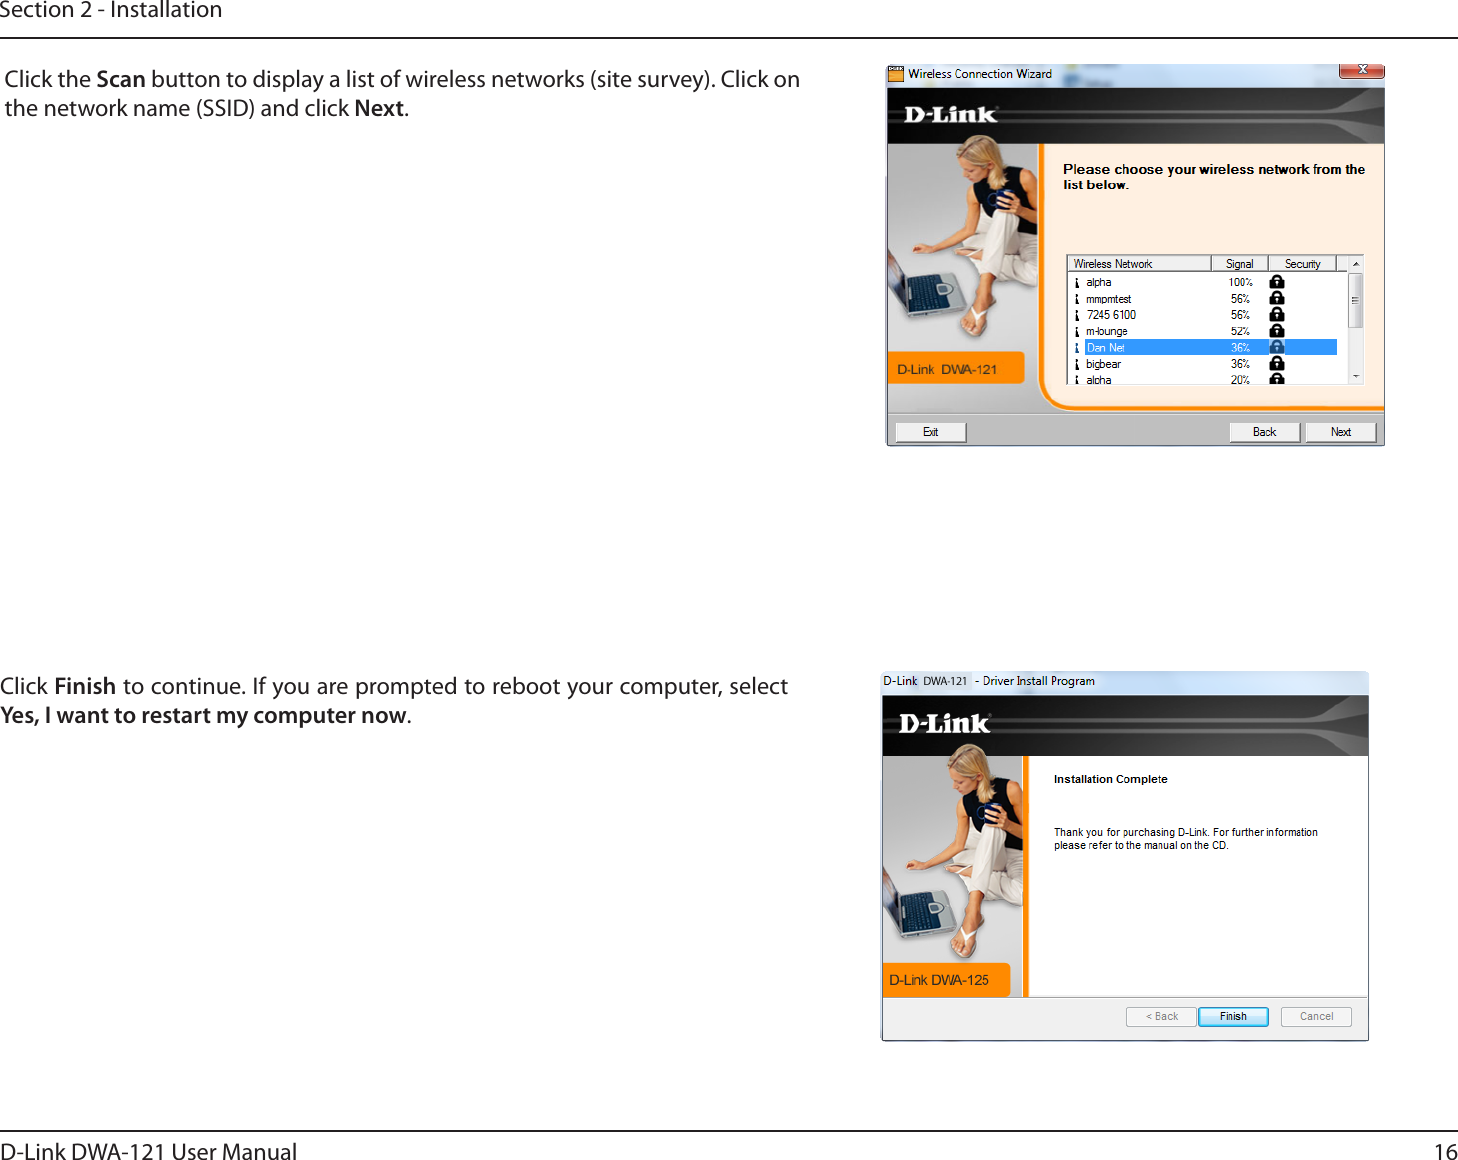
D Link WA121A1 Wireless N 150 Pico USB Adapter, Wireless N 150 Compact USB Adapter User Manual DWA 121 EN manual 10

D Link Corporation Wireless N 150 Pico USB Adapter, Wireless N 150 Compact USB Adapter DWA 121 EN manual 10

User Manual

Xjsfmftt!O!261!Qjdp!VTC!คጕᆛၡь!
2D-Link DWA-121 User ManualTable of ContentsProduct Overview ......................................................................3Package Contents ........................................................................................... 3System Requirements .................................................................................... 3Introduction ...................................................................................................... 4Features .............................................................................................................. 5Hardware Overview ........................................................................................ 6Installation ..................................................................................7Getting Started ................................................................................................ 7Remove Existing Installations ............................................................ 7Disable Other Wireless Adapters ...................................................... 8Wireless Installation Considerations ......................................................10Adapter Installation ......................................................................................11Wi-Fi® Protected Setup (WPS) ...........................................................17Conguration .......................................................................... 20D-Link Wireless Connection Manager ...................................................20Wireless Networks ................................................................................21My Wireless Networks .........................................................................25Add Prole .......................................................................................26Modify Prole..................................................................................27Support ....................................................................................................28About ........................................................................................................ 29Connect to a Wireless Network ............................................ 30Using Windows® 7 ..........................................................................................30Connect to a Wireless Network ............................................ 31Using Windows Vista® ...................................................................................31Using Windows® XP .......................................................................................32Wireless Security ..................................................................... 33What is WPA? ...................................................................................................33Congure WPA/WPA2 Passphrase ...........................................................34Using the D-Link Wireless Connection Manager ......................34Using Windows® 7 .................................................................................36Using Windows Vista® .......................................................................... 39Using the Windows® XP Utility .........................................................41Congure WPA/WPA2 (RADIUS) ...............................................................43Using the D-Link Wireless Connection Manager ......................43Troubleshooting ..................................................................... 44Windows® 7 Troubleshooting ....................................................................48Wireless Basics ........................................................................ 50Wireless Modes ..............................................................................................54Networking Basics .................................................................. 55Check your IP address ..................................................................................55Windows® XP/2000 Users ...................................................................55Windows 7/Vista® Users ......................................................................55Statically Assign an IP address ..................................................................56Windows® XP/2000 Users ...................................................................56Windows 7/Vista® Users ......................................................................57Technical Specications ........................................................ 58Contacting Technical Support .............................................. 59Warranty ................................................................................... 60Registration ............................................................................. 66Table of Contents
3D-Link DWA-121 User ManualSection 1 - Product OverviewD-Link DWA-121 Wireless N 150 Pico USB AdapterSystem Requirements•  A computer or laptop with an available USB 2.0 port• Windows® 7, Vista®, XP (Service Pack 2)•  CD-ROM Drive•  300MHz processor and at least 64MB of RAM•  A 802.11n or 802.11g access point or wireless routerProduct OverviewPackage ContentsManual and Software on CDQuick Installation Guide
4D-Link DWA-121 User ManualSection 1 - Product OverviewIntroductionThe DWA-121 Wireless N 150 Pico USB Adapter is a convenient wireless connectivity solution for desktop or notebook PCs. Instead of stringing Ethernet cables to your PC or dismantling your desktop computer case, the DWA-121 can enable 802.11n wireless connectivity by simply utilizing your desktop or notebook PC’s USB port.Powered by Wireless N 150 technology, the DWA-121 provides a faster wireless connection and superior reception than 802.11g*. The DWA-121 is designed for use in bigger homes and for those that demand higher bandwidth networking. Maximize wireless performance by connecting this USB Adapter to a Wireless N™ router and stay connected from virtually anywhere in the home. This USB Adapter supports WPA and WPA2 encryption to prevent outside intrusion and protect your personal information from being exposed.D-Link’s Quick Setup Wizard guides you step-by-step through the installation process. You’ll be able to congure this USB Adapter without having any diculties. The D-Link Wireless Manager is included with this product to keep track of all your most frequently accessed networks.Compact in size, robust in speed the DWA-121 Wireless N 150 Pico USB Adapter is great for travel and a convenient solution for providing high performance wireless connectivity to your desktop or notebook PC. Enjoy the many benets of wireless connectivity today!* Maximum wireless signal rate derived from IEEE Standard 802.11g and 802.11n specications. Actual data throughput will vary. Network conditions and environmental factors, including volume of network traf0c, building materials and construction, and network overhead, lower actual data throughput rate. Environmental conditions will adversely aect wireless signal range.
5D-Link DWA-121 User ManualSection 1 - Product OverviewFeatures•  Compact size for placement anywhere•  Convenience of Plug & Play installation•  Fully 802.11g compatible• 802.11n compliant•  Powered by the USB port; no external power source required•  USB 2.0 standard*•  You can securely connect to a wireless network using WPA/WPA2 (Wi-Fi Protected Access) providing you a much higher level of security for your data and communication than has previously been available. •  Position the DWA-121 almost anywhere in your workspace to achieve the best reception possible•  Supports Infrastructure networks via an access point•  User-friendly conguration and diagnostic utilities* Using a USB 1.1 port will adversely aect throughput.
6D-Link DWA-121 User ManualSection 1 - Product OverviewHardware Overview1USB Connector Used to connect the DWA-121 to your computer.1
7D-Link DWA-121 User ManualSection 2 - InstallationGetting StartedInstallationThis section will walk you through the installation process. If you have a built-in wireless adapter, please disable it in device manager before installing your D-Link adapter. Also, if you have previously installed another wireless adapter, please make sure any software is uninstalled.Before installing your new D-Link wireless adapter, please verify the following:•  Remove any previous installations of wireless adapters•  Disable any built-in wireless adapters •  Verify the settings such as the SSID and security settings of the network(s) you want to connect toRemove Existing InstallationsIf you’ve installed a dierent manufacture’s adapter or a dierent model D-Link adapter, make sure the software is uninstalled before installing the new software. Some utilities may cause a conict with the new software. If you plan to use multiple adapters at dierent times, make sure the utilities are not set to load when your computer boots up. Windows® 7, Vista® and XP users may use the built-in wireless utility for all adapters.To remove any old software:  Windows 7 users: Click Start > Control Panel > Uninstall Programs.  Windows Vista/XP users: Click Start > Control Panel > Add or Remove Programs.   Windows 2000 users: Click Start > Settings > Control Panel > Add or Remove Programs.
8D-Link DWA-121 User ManualSection 2 - InstallationDisable Other Wireless AdaptersMost newer laptops may include a built-in wireless adapter. To prevent any conicts with the D-Link wireless adapter, it is recommended to disable the wireless adapter (as well as any unused Ethernet adapters).From the desktop, right-click on the My Computer icon and select Manage. Then,  click Device Manager. Scroll down the list and click the + sign to the left of Network Adapters.Right-click the adapter you would like to disable and select Disable.
9D-Link DWA-121 User ManualSection 2 - InstallationClick Yes to disable the adapter.The adapter is now disabled. When disabled, a red X will be displayed. Disabling the adapter will not remove the drivers. If you would like to use the adapter, simply right-click it and select Enable.
10D-Link DWA-121 User ManualSection 2 - InstallationWireless Installation ConsiderationsThe D-Link wireless adapter lets you access your network using a wireless connection from virtually anywhere within the operating range of your wireless network. Keep in mind that the number, thickness and location of walls, ceilings, or other objects that the wireless signals must pass through, may limit the range. Typical ranges vary depending on the types of materials and background RF (radio frequency) noise in your home or business. The key to maximizing wireless range is to follow these basic guidelines:1.  Keep the number of walls and ceilings between the D-Link adapter and other network devices to a minimum - each wall or ceiling can reduce your adapter’s range from 3-90 feet (1-30 meters.) Position your devices so that the number of walls or ceilings is minimized.2.  Be aware of the direct line between network devices. A wall that is 1.5 feet thick (.5 meters), at a 45-degree angle appears to be almost 3 feet (1 meter) thick. At a 2-degree angle it looks over 42 feet (14 meters) thick! Position devices so that the signal will travel straight through a wall or ceiling (instead of at an angle) for better reception.3.  Building Materials make a dierence. A solid metal door or aluminum studs may have a negative eect on range. Try to position access points, wireless routers, and computers so that the signal passes through drywall or open doorways. Materials and objects such as glass, steel, metal, walls with insulation, water (sh tanks), mirrors, le cabinets, brick, and concrete will degrade your wireless signal.4.  Keep your product away (at least 3-6 feet or 1-2 meters) from electrical devices or appliances that generate RF noise.5.  If you are using 2.4GHz cordless phones or X-10 (wireless products such as ceiling fans, lights, and home security systems), your wireless connection may degrade dramatically or drop completely. Make sure your 2.4GHz phone base is as far away from your wireless devices as possible. The base transmits a signal even if the phone in not in use.
11D-Link DWA-121 User ManualSection 2 - InstallationWarning: Do NOT install the DWA-121 Wireless N 150 Pico USB Adapter into your computer before installing the driver software from the D-Link CD.Turn on the computer and Insert the D-Link DWA-121 Driver CD in the CD-ROM drive. If the CD Autorun function does not automatically start on your computer, go to Start > Run. In the run box type “D:\autorun.exe” (where D: represents the drive letter of your CD-ROM drive).When the autorun screen appears, click Install Drivers.Adapter Installation
12D-Link DWA-121 User ManualSection 2 - InstallationThe InstallShield Wizard window will appear.Please select your language from the list and click Next to continue.
13D-Link DWA-121 User ManualSection 2 - InstallationInsert the adapter into an available USB port on your computer.If the Found New Hardware Wizard appears, click Cancel. Select the new folder or an existing folder that you would like the installation Wizard to add program icons to and then click Next.
14D-Link DWA-121 User ManualSection 2 - InstallationPlease wait while the installation wizard congures your new software installation. To manually connect to your wireless network, select Manually connect to a wireless network and then click Next.
15D-Link DWA-121 User ManualSection 2 - InstallationTo manually connect to your wireless network, select Manually connect to a wireless network and then click Next.Enter the network name (SSID) manually. If you enter the SSID incorrectly,  you will be directed to the site survey page. Click Scan to display the site survey page or click Next to continue.
16D-Link DWA-121 User ManualSection 2 - InstallationClick Finish to continue. If you are prompted to reboot your computer, select Yes, I want to restart my computer now.Click the Scan button to display a list of wireless networks (site survey). Click on the network name (SSID) and click Next.
17D-Link DWA-121 User ManualSection 2 - InstallationWi-Fi® Protected Setup (WPS)Wi-Fi Protected Setup (WPS) System is designed for easy setup of security-enabled Wi-Fi networks. It is recommended to have the access point or wireless router nearby during setup. For more information on WPS, visit the Wi-Fi Alliance website at www.wi-.org.To begin the WPS setup, select the option the Use the WiFi Protected Setup (WPS) wizard for simplied Wireless connection and click Next.
18D-Link DWA-121 User ManualSection 2 - InstallationPress the WPS button located on the right side of the Router/ Access point until it is lit and click on the virtual Connect Now button. Please wait while the Router/ Access point establishes connection.
19D-Link DWA-121 User ManualSection 2 - InstallationWhen this screen appears, you have successfully established connectivity. Click Finish to complete your setup.Press the WPS button located on the right side of the Router/Access point until it is lit and click on the virtual Connect Now button.
20D-Link DWA-121 User ManualSection 3 - CongurationCongurationThis section will show you how to congure your new D-Link wireless adapter using the D-Link Utility as well as the Windows® XP Zero Conguration Utility and Vista WLAN Autoconguration.D-Link Wireless Connection ManagerThe D-Link DWA-121 uses the Wireless Connection Manager as the management software. The manager provides the user an easy interface to change any settings related to the wireless adapter. Clicking on the Wireless Connection Manager icon on the desktop will start the Conguration.If you are using Windows® 7, Vista®, or XP, please skip to pages 30, 31 or 32 respectively.Double-click the Wireless Connection Manager icon on your desktop.
21D-Link DWA-121 User ManualSection 3 - CongurationWireless NetworksThe SSID (Service Set Identier) is the name of the wireless network.Displays the MAC address of the wireless device.Displays the Link Quality of the wireless connection. If there is a “lock” icon, this means the wireless network is secure. You must know the encryption key/security settings to connect.Displays the channel of the wireless network.Connect to a wireless network using Wi-Fi Protected Setup. Refer to the next page.Rescans for available wireless networks in your area.Highlight a wireless network and click the Connect button. If the network is secure, a pop-up window will appear. Enter the security information to connect (refer to the Wireless Security section for more information).Select a wireless network prole from the drop-down menu and click Activate to connect. Allow up to 30 seconds to connect.MAC:SSID:Channel:Signal:Security:Refresh Button:Connect Button:Activate Button:The Wireless Networks (Site Survey) page will display all wireless networks that are available in your area. To connect to a network, simply highlight the wireless network (SSID) and click Connect.WPS Button:
22D-Link DWA-121 User ManualSection 3 - CongurationTo use the PIN method, select PIN (Personal Identication Number) and click Next.Make sure your access point or wireless router is close by. Write down the number on the screen. Enter this number in your access point or wireless router. Please refer to the manufacture’s manual for instructions.Once you click Next, you will have two minutes to enter this number in your access point or wireless router.Personal Identication Number (PIN)
23D-Link DWA-121 User ManualSection 3 - CongurationThe adapter will try to establish connectivity to your access point or wireless router.When this screen appears, you have successfully established connectivity. Click Finish to complete your setup.
24D-Link DWA-121 User ManualSection 3 - CongurationPress the WPS button located on the right side of the Router/Access point until it is lit and click on the virtual Connect Now button.
25D-Link DWA-121 User ManualSection 3 - CongurationMy Wireless NetworksThe My Wireless Networks page will allow you to create, edit, and delete wireless network proles. Every time you connect to a network using the Wireless Networks page, a prole will automatically be created. New Button:Modify:Click New to create a new wireless network prole (refer to page 22).Click Modify to edit a current prole (refer to page 23).Click Delete to remove a prole.Click Activate to use a prole. Allow up to 30 seconds to connect to the wireless network.The Prole Details section will display information about the wireless network such as the network name (SSID), network type (Infrastructure), and if the network is secured.Delete:Activate:Prole Details:
26D-Link DWA-121 User ManualSection 3 - CongurationAdd ProleYou may add a new network by clicking the New button from the My Wireless Networks page.Prole Name:SSID:Enter a name for your prole (e.g. Home, Oce, Coee Shop).Enter the SSID of the wireless network.Select the network type. If you are connecting to a wireless router or access point, select Infrastructure. (Ad-hoc mode is not supported)Select the type of security used. Please refer to the Wireless Security section for more information.Click OK to save your settings.Network Type:Security Type:OK Button:
27D-Link DWA-121 User ManualSection 3 - CongurationModify ProleYou may edit an existing prole by selecting the prole and clicking the Modify button from the My Wireless Networks page.Prole Name:SSID:Enter a name for your prole (e.g. Home, Oce, Coee Shop).Displays the SSID of the network. Displays the network type.Select the type of security used. Please refer to the Wireless Security section for more information.Click OK to save your settings.Network Type:Security Type:OK Button:
28D-Link DWA-121 User ManualSection 3 - CongurationSupportIf you need help, click the Support button. A panel will appear to the right of the utility which will display information about the utility.
29D-Link DWA-121 User ManualSection 3 - CongurationThe About screen gives you information about the Driver and Utility Versions of the DWA-121.About
30D-Link DWA-121 User ManualSection 3 - CongurationConnect to a Wireless NetworkUsing Windows® 7Windows 7 users may use the built-in wireless utility. If you are using another company’s utility or Windows 2000, please refer to the user manual of your wireless adapter for help with connecting to a wireless network. Most utilities will have a “site survey” option similar to the Windows 7 utility as seen below.Right-click on the wireless computer icon in your system tray (lower-right corner next to the time). Select Connect to a network.If you receive the Wireless Networks Detected bubble, click on the center of the bubble to access the utility.     orThe utility will display any available wireless networks in your area. Click on a network (displayed using the SSID) and click the Connect button.If you get a good signal but cannot access the Internet, check you TCP/IP settings for your wireless adapter. Refer to the Networking Basics section in this manual for more information.
31D-Link DWA-121 User ManualSection 3 - CongurationConnect to a Wireless NetworkUsing Windows Vista®Windows Vista users may use the built-in wireless utility. If you are using another company’s utility or Windows 2000, please refer to the user manual of your wireless adapter for help with connecting to a wireless network. Most utilities will have a “site survey” option similar to the Windows Vista utility as seen below.Right-click on the wireless computer icon in your system tray (lower-right corner next to the time). Select Connect to a network.If you receive the Wireless Networks Detected bubble, click on the center of the bubble to access the utility.     orThe utility will display any available wireless networks in your area. Click on a network (displayed using the SSID) and click the Connect button.If you get a good signal but cannot access the Internet, check you TCP/IP settings for your wireless adapter. Refer to the Networking Basics section in this manual for more information.
32D-Link DWA-121 User ManualSection 3 - CongurationConnect to a Wireless NetworkUsing Windows® XPWindows XP users may use the built-in wireless utility (Zero Conguration Utility). The following instructions are for Service Pack 2 users. If you are using another company’s utility or Windows 2000, please refer to the user manual of your wireless adapter for help with connecting to a wireless network. Most utilities will have a “site survey” option similar to the Windows XP utility as seen below.Right-click on the wireless computer icon in your system tray (lower-right corner next to the time). Select View Available Wireless Networks.If you receive the Wireless Networks Detected bubble, click on the center of the bubble to access the utility.     orThe utility will display any available wireless networks in your area. Click on a network (displayed using the SSID) and click the Connect button.If you get a good signal but cannot access the Internet, check you TCP/IP settings for your wireless adapter. Refer to the Networking Basics section in this manual for more information.
33D-Link DWA-121 User ManualSection 4 - Wireless SecurityWireless SecurityThis section will show you the dierent levels of security you can use to protect your data from intruders. The DWA-121 oers the following types of security:• WPA2 (Wi-Fi Protected Access 2)     • WPA2-PSK (Pre-Shared Key)• WPA (Wi-Fi Protected Access)    • WPA-PSK (Pre-Shared Key)What is WPA?WPA, or Wi-Fi Protected Access, is a Wi-Fi standard that was designed to improve the security features of WEP (Wired Equivalent Privacy).  The 2 major improvements over WEP: •  Improved data encryption through the Temporal Key Integrity Protocol (TKIP). TKIP scrambles the keys using a hashing algorithm and, by adding an integrity-checking feature, ensures that the keys haven’t been tampered with. WPA2 is based on 802.11i and uses Advanced Encryption Standard instead of TKIP.•  User authentication, which is generally missing in WEP, through the extensible authentication protocol (EAP). WEP regulates access to a wireless network based on a computer’s hardware-specic MAC address, which is relatively simple to be snied out and stolen. EAP is built on a more secure public-key encryption system to ensure that only authorized network users can access the network.WPA-PSK/WPA2-PSK uses a passphrase or key to authenticate your wireless connection. The key is an alpha-numeric password between 8 and 63 characters long. The password can include symbols (!?*&_) and spaces. This key must be the exact same key entered on your wireless router or access point.WPA/WPA2 incorporates user authentication through the Extensible Authentication Protocol (EAP). EAP is built on a more secure public key encryption system to ensure that only authorized network users can access the network.
34D-Link DWA-121 User ManualSection 4 - Wireless SecurityCongure WPA/WPA2 PassphraseUsing the D-Link Wireless Connection ManagerIt is recommended to enable WPA-PSK on your wireless router or access point before conguring your wireless adapter. If you are joining an existing network, you will need to know the WPA-PSK passphrase being used.1.  Open the Wireless Connection Manager by double-clicking on the D-Link icon on your desktop. 2.  Highlight the wireless network (SSID) you would like to connect to and click Connect. If the network is using WPA-PSK, the screen (as shown to the bottom-right) will appear. 3.  Enter the WPA-PSK passphrase exactly as it is on your wireless router or access point. Click the Show text in the password eld box to see the passphrase. Unchecking it will hide it.4. Click OK to connect to the network. Allow up to 30 seconds to connect.If you would like to create a new network and enter the WPA-PSK settings, refer to the next page.
35D-Link DWA-121 User ManualSection 4 - Wireless SecurityIt is recommended to enable WPA-PSK on your wireless router or access point before conguring your wireless adapter. Make sure you enter the passphrase exactly the same on all wireless devices.1.  Open the Wireless Connection Manager by double-clicking on the D-Link icon on your desktop. Click on New to create a new prole or highlight an existing prole and click Modify. 2. Select WPA/WPA2-Personal under Set Security Option.3. Select TKIP or AES. 4.  Enter the passphrase exactly as it is on your wireless router or access point.5. Click OK to connect to the network. Allow up to 30 seconds to connect.
36D-Link DWA-121 User ManualSection 4 - Wireless SecurityCongure WPA/WPA2 PassphraseUsing Windows® 7It is recommended to enable wireless security (WPA/WPA2) on your wireless router or access point before conguring your wireless adapter. If you are joining an existing network, you will need to know the security key or passphrase being used.2.  The utility will display any available wireless networks in your area.1.  Click on the wireless icon in your system tray (lower-right corner).
37D-Link DWA-121 User ManualSection 4 - Wireless Security3.  Highlight the wireless network (SSID) you would like to connect to and click the Connect button.  If you get a good signal but cannot access the Internet, check your TCP/IP settings for your wireless adapter. Refer to the Networking Basics section in this manual for more information.4.  The following window appears while your computer tries to connect to the router.
38D-Link DWA-121 User ManualSection 4 - Wireless Security5.  Enter the same security key or passphrase that is on your router and click Connect. You can also connect by pushing the WPS button on the router.It may take 20-30 seconds to connect to the wireless network. If the connection fails, please verify that the security settings are correct. The key or passphrase must be exactly the same as on the wireless router.
39D-Link DWA-121 User ManualSection 4 - Wireless SecurityCongure WPA/WPA PassphraseUsing Windows Vista®It is recommended to enable wireless security (WPA/WPA2) on your wireless router or access point before conguring your wireless adapter. If you are joining an existing network, you will need to know the security key or passphrase being used.2.  Highlight the wireless network (SSID) you would like to connect to and click Connect.1.  Open the Windows Vista® Wireless Utility by right-clicking on the wireless computer icon in your system tray (lower right corner of screen). Select Connect to a network.
40D-Link DWA-121 User ManualSection 4 - Wireless Security3.  Enter the same security key or passphrase that is on your router and click Connect.It may take 20-30 seconds to connect to the wireless network. If the connection fails, please verify that the security settings are correct. The key or passphrase must be exactly the same as on the wireless router.
41D-Link DWA-121 User ManualSection 4 - Wireless SecurityCongure WPA/WPA2 PassphraseUsing the Windows® XP UtilityIt is recommended to enable WPA-PSK on your wireless router or access point before conguring your wireless adapter. If you are joining an existing network, you will need to know the WPA-PSK key being used.2.  Highlight the wireless network (SSID) you would like to connect to and click Connect.1.  Open the Windows XP Wireless Utility by right-clicking on the wireless computer icon in your system tray (lower-right corner of screen). Select View Available Wireless Networks.
42D-Link DWA-121 User ManualSection 4 - Wireless Security3. The Wireless Network Connection box will appear. Enter the WPA-PSK passphrase and click Connect.It may take 20-30 seconds to connect to the wireless network. If the connection fails, please verify that the WPA-PSK settings are correct. The WPA-PSK passphrase must be exactly the same as on the wireless router or access point.
43D-Link DWA-121 User ManualSection 4 - Wireless SecurityCongure WPA/WPA2 (RADIUS)Using the D-Link Wireless Connection ManagerWPA and WPA2 are for advanced users who are familiar with using a RADIUS server and setting up certicates.1.  Open the Wireless Connection Manager by double-clicking on the D-Link icon on your desktop. Click on New to create a new prole or highlight an existing prole and click Modify. 2. Select WPA/WPA2-Enterprise under Set Security Option and then select TKIP or AES.3. Click on Advanced Cong to continue.4. Next to EAP Type, select EAP-TLS or PEAP. Extensible Authentication Protocols allow devices on the network to request authentication from the RADIUS server in the network. All the devices on the network must use the same EAP type when using a RADIUS server for authentication. Some RADIUS servers require that the Validate Server eld be selected. Check this eld if your RADIUS server requires validation.5. Select an User Certicate from the drop-down menu.6.  Enter the login information required to authenticate.7. Click Add to enter the IP address(es) of your RADIUS servers.8. Click OK to save your settings.
44D-Link DWA-121 User ManualSection 5 - Troubleshooting1.  How do I know if my adapter is installed properly?Select the Hardware Tab.TroubleshootingThis chapter provides solutions to problems that can occur during the installation and operation of the DWA-121. Read the following descriptions if you are having problems. (The examples below are illustrated in Windows® XP. If you have a dierent operating system, the screenshots on your computer will look similar to the following examples.)Go to Start > My Computer > Properties.
45D-Link DWA-121 User ManualSection 5 - TroubleshootingClick the + sign next to Network Adapters.Right-click on D-Link DWA-121 USB Adapter.Select Properties to check that the drivers are installed properly.Look under Device Status to check that the device is working properly. Click OK to continue.D-Link DWA-121 Wireless N 150 Pico USB Adapter D-Link DWA-121 Wireless N 150 Pico USB Adapter
46D-Link DWA-121 User ManualSection 5 - TroubleshootingMake sure that the DWA-121 Wireless USB Adapter is properly seated in the computer’s USB port. If Windows does not detect the hardware upon insertion of the adapter,  try a dierent port. Also, make sure to completely remove the drivers that were previously loaded. 2.  The computer does not recognize the DWA-121 Wireless N 150 Pico USB Adapter.•  Check that the LED indicators for the broadband modem are indicating normal activity. If not, there may be a problem with the broadband connection.•  Check that the LED indicators on the wireless router are functioning properly. If not, check that the AC power and Ethernet cables are rmly connected.•  Check that the IP Address, subnet mask, gateway, and DNS settings are correctly obtained from your network. Conrm your wireless key.• In Infrastructure mode, make sure the same Service Set Identier (SSID) is specied on the settings for the wireless clients and access points. The SSID factory default setting for D-Link products is default. (Double-click on the WLAN icon in the taskbar. The Link Info screen will display the SSID setting.)3.  The computer with the DWA-121 installed is unable to connect to the wireless network and/or the Internet.
47D-Link DWA-121 User ManualSection 5 - TroubleshootingCheck that the Network Connection for the wireless client is congured properly. Select AP (Infrastructure) when connecting to an access point. Double-click on the WLAN icon in the taskbar > click on Conguration to change the settings for the wireless adapter.If Security is enabled, make sure that the correct encryption keys are entered on both the DWA-121 and the access point. Double-click on the WLAN icon in the taskbar > click Encryption. Check to see that the key selected is set to the same key as other devices on the network.
48D-Link DWA-121 User ManualSection 5 - TroubleshootingWindows® 7 TroubleshootingGo to Start > Computer > Properties.Select the Device Manager
49D-Link DWA-121 User ManualSection 5 - TroubleshootingClick the + sign next to Network Adapters.Right-click on D-Link DWA-121 Wireless N 150 Pico USB Adapter.Select Properties to check that the drivers are installed properly.Look under Device Status to check that the device is working properly. Click OK to continue.
50D-Link DWA-121 User ManualAppendix A - Wireless BasicsD-Link wireless products are based on industry standards to provide easy-to-use and compatible high-speed wireless connectivity within your home, business or public access wireless networks. Strictly adhering to the IEEE standard, the D-Link wireless family of products will allow you to securely access the data you want, when and where you want it. You will be able to enjoy the freedom that wireless networking delivers.A wireless local area network (WLAN) is a cellular computer network that transmits and receives data with radio signals instead of wires. Wireless LANs are used increasingly in both home and oce environments, and public areas such as airports, coee shops and universities. Innovative ways to utilize WLAN technology are helping people to work and communicate more eciently. Increased mobility and the absence of cabling and other xed infrastructure have proven to be benecial for many users. Wireless users can use the same applications they use on a wired network. Wireless adapter cards used on laptop and desktop systems support the same protocols as Ethernet adapter cards. Under many circumstances, it may be desirable for mobile network devices to link to a conventional Ethernet LAN in order to use servers, printers or an Internet connection supplied through the wired LAN. A Wireless Router is a device used to provide this link.Wireless Basics
51D-Link DWA-121 User ManualAppendix A - Wireless BasicsWhat is Wireless?Wireless or Wi-Fi technology is another way of connecting your computer to the network without using wires. Wi-Fi uses radio frequency to connect wirelessly, so you have the freedom to connect computers anywhere in your home or oce network.Why D-Link Wireless?   D-Link is the worldwide leader and award winning designer, developer, and manufacturer of networking products. D-Link delivers the performance you need at a price you can aord. D-Link has all the products you need to build your network.How does wireless work?   Wireless works similar to how cordless phone work, through radio signals to transmit data from one point A to point B. But wireless technology has restrictions as to how you can access the network. You must be within the wireless network range area to be able to connect your computer. There are two dierent types of wireless networks Wireless Local Area Network (WLAN), and Wireless Personal Area Network (WPAN).Wireless Local Area Network (WLAN)In a wireless local area network, a device called an Access Point (AP) connects computers to the network. The access point has a small antenna attached to it, which allows it to transmit data back and forth over radio signals. With an indoor access point as seen in the picture, the signal can travel up to 300 feet. With an outdoor access point the signal can reach out up to 30 miles to serve places like manufacturing plants, industrial locations, college and high school campuses, airports, golf courses, and many other outdoor venues.Wireless Personal Area Network (WPAN)Bluetooth is the industry standard wireless technology used for WPAN. Bluetooth devices in WPAN operate in a range up to 30 feet away.Compared to WLAN the speed and wireless operation range are both less than WLAN, but in return it doesn’t use nearly as much power which makes it ideal for personal devices, such as mobile phones, PDAs, headphones, laptops, speakers, and other devices that operate on batteries.
52D-Link DWA-121 User ManualAppendix A - Wireless BasicsWho uses wireless?   Wireless technology as become so popular in recent years that almost everyone is using it, whether it’s for home, oce, business, D-Link has a wireless solution for it.Home  • Gives everyone at home broadband access  • Surf the web, check email, instant message, and etc  • Gets rid of the cables around the house  • Simple and easy to use Small Oce and Home Oce  • Stay on top of everything at home as you would at oce  • Remotely access your oce network from home  • Share Internet connection and printer with multiple computers  • No need to dedicate oce space
53D-Link DWA-121 User ManualAppendix A - Wireless BasicsWhere is wireless used? Wireless technology is expanding everywhere not just at home or oce. People like the freedom of mobility and it’s becoming so popular that more and more public facilities now provide wireless access to attract people. The wireless connection in public places is usually called “hotspots”.Using a D-Link wireless desktop adapter with your laptop, you can access the hotspot to connect to Internet from remote locations like: Airports, Hotels, Coee Shops, Libraries, Restaurants, and Convention Centers.Wireless network is easy to setup, but if you’re installing it for the rst time it could be quite a task not knowing where to start. That’s why we’ve put together a few setup steps and tips to help you through the process of setting up a wireless network.TipsHere are a few things to keep in mind, when you install a wireless network.Centralize your router or Access PointMake sure you place the router/access point in a centralized location within your network for the best performance. Try to place the router/access point as high as possible in the room, so the signal gets dispersed throughout your home. If you have a two-story home, you may need a repeater to boost the signal to extend the range.Eliminate Interference Place home appliances such as cordless telephones, microwaves, and televisions as far away as possible from the router/access point. This would signicantly reduce any interference that the appliances might cause since they operate on same frequency.Security Don’t let your next-door neighbors or intruders connect to your wireless network. Secure your wireless network by turning on the WPA security feature on the router. Refer to product manual for detail information on how to set it up.
54D-Link DWA-121 User ManualAppendix A - Wireless BasicsThere are basically two modes of networking: •  Infrastructure – All wireless clients will connect to an access point or wireless router.•  Ad-Hoc – Directly connecting to another computer, for peer-to-peer communication, using wireless network adapters on each computer. Unfortunately 802.11g/n products such as the DWA-121 do not support ad-hoc mode.An Infrastructure network contains an Access Point or wireless router. All the wireless devices, or clients, will connect to the wireless router or access point. An Ad-Hoc* network contains only clients, such as laptops with wireless USB Adapters. All the adapters must be in Ad-Hoc mode to communicate.* Not supported with the DWA-121.Wireless Modes
55D-Link DWA-121 User ManualAppendix B - Networking BasicsNetworking BasicsCheck your IP addressAfter you install your new D-Link wireless adapter and have established a wireless connection, by default, the TCP/IP settings should be set to obtain an IP address from a DHCP server (i.e. router) automatically. To verify your IP address, please follow the steps below.Windows® XP/2000 Users• Click on Start > Run. In the run box type cmd and click OK.•  At the prompt, type ipcong and press Enter.•  This will display the IP address, subnet mask, and the default gateway of your adapter.Windows 7/Vista® Users• Click Start > All Programs > Accessories > Command Prompt. You may need administrative access to run this application.•  For all additional prompt windows inquiring of running the command prompt application, select Yes, OK, or Continue.•  At the prompt, type ipcong and press Enter.•  This will display the IP address, subnet mask, and default gateway of your adapter.If the address is 0.0.0.0, check your adapter installation, security settings, and the settings on your router. Some rewall software programs may block a DHCP request on newly installed adapters.
56D-Link DWA-121 User ManualAppendix B - Networking BasicsStatically Assign an IP addressIf you are not using a DHCP capable gateway/router, or you need to assign a static IP address, please follow the steps below:Windows® XP/2000 Users•  Windows XP - Click on Start > Control Panel. Make sure you are in Classic View. Double-click on the Network Connections icon. Windows 2000 – From the desktop, right-click My Network Places > Properties.•  Right-click on the Local Area Connection which represents your D-Link wireless network adapter (or other adapter) which will be connected to your router.• Highlight Internet Protocol (TCP/IP) and click Properties.• Click Use the following IP address and enter an IP address that is on the same subnet as your network or LAN IP address on your router. Example: If the router’s LAN IP address is 192.168.0.1, make your IP address 192.168.0.X where X is a number between 2 and 99. Make sure that the number you choose is not in use on the network. • Set Default Gateway the same as the LAN IP address of your router or gateway.• Set Primary DNS the same as the LAN IP address of your router or gateway. • The Secondary DNS is optional (you may enter a DNS server from your ISP).• Click OK to save your settings.
57D-Link DWA-121 User ManualAppendix B - Networking BasicsWindows 7/Vista® Users• Click on Start > Control Panel (make sure you are in Classic View). Double-click on the Network and Sharing Center icon. If you are using Windows Vista, click on Manage network connections along the left panel in the window. For Windows 7, click on Change adapter settings.•  Right-click on the Wireless Network Connection which represents your D-Link wireless network adapter.• Highlight Internet Protocol Version 4 (TCP /IPv4) and click Properties.• Click Use the following IP address and enter an IP address that is on the same subnet as your network or LAN IP address on your router or network. Example: If the router’s LAN IP address is 192.168.0.1, make your IP address 192.168.0.X where X is a number between 2 and 99. Make sure that the number you choose is not in use on the network. • Set Default Gateway the same as the LAN IP address of your router or gateway.• Set Primary DNS the same as the LAN IP address of your router or gateway. • The Secondary DNS is optional (you may enter a DNS server from your ISP).• Click OK to save your settings.
58D-Link DWA-121 User ManualAppendix C - Technical SpecicationsTechnical SpecicationsStandards • IEEE 802.11n  • IEEE 802.11gBus Type • USB 2.0 (1.1 compatible)Security • WPA/WPA2 - Wi-Fi Protected Access (AES, MIC,    IV Expansion, Shared Key Authentication) • WPS (PBC/PIN) Media Access Control • CSMA/CA with ACKFrequency Range • 2.4GHz to 2.483GHz (North America)Power Consumption (802.11n) • 230 mA at continuous transmit mode  • 120 mA at receive modeModulation Technology  • Orthogonal FrequencyDivision Multiplexing (OFDM) • Complementary Code Keying (CCK)Transmitter Power Output • 11b: 17dBm  • 11g: 15dBm  • 11n: 14 dBm at HT 20, 13 dBm at HT 40Operating Voltage • 5 VDC +/- 10%Operating Temperature • 0 to 40 ºC (32 to 104 ˚F)Operating Humidity • 10% to 90% maximum (non-condensing)Dimensions • .75” x .05” x 0.2”Weight • 2.2 gCertications  • FCC Class B • IC • Wi-FiWarranty • 1 Year* Maximum wireless signal rate derived from IEEE Standard 802.11n and 802.11g specications. Actual data throughput will vary. Network conditions and environmental factors, including volume of network trac, building materials and construction, and network overhead, lower actual data throughput rate. Environmental factors will adversely aect wireless signal range.5 VDC +/- 5% USA: FCC 15B/ FCC 15C/ SAR CANADA: RSS-210 TAIWAN: NCC LP0002 2.4GHz to 2.462GHz (USA/ Canada/ Taiwan) • 11b: 19.9dBm • 11g: 24.3dBm • 11n: 22.3dBm at HT 20, 21.5dBm at HT 40
59D-Link DWA-121 User ManualAppendix D - Contacting Technical SupportContacting Technical SupportBefore you contact technical support, please have the following ready:  • Model number of the product (e.g. DWA-121)  • Hardware Revision (located on the label on the adapter (e.g. rev A1))  • Serial Number (s/n number located on the label on the adapter). You can nd software updates and user documentation on the D-Link website as well as frequently asked questions and answers to technical issues.For customers within the United States: Phone Support: (877) 453-5465 Internet Support: http://support.dlink.com For customers within Canada: Phone Support: (800) 361-5265   Internet Support: http://support.dlink.ca
60D-Link DWA-121 User ManualAppendix E - WarrantyWarrantySubject to the terms and conditions set forth herein, D-Link Systems, Inc. (“D-Link”) provides this Limited Warranty:•  Only to the person or entity that originally purchased the product from D-Link or its authorized reseller or distributor, and•  Only for products purchased and delivered within the fty states of the United States, the District of Columbia, U.S. Possessions or Protectorates, U.S. Military Installations, or addresses with an APO or FPO.Limited Warranty:D-Link warrants that the hardware portion of the D-Link product described below (“Hardware”) will be free from material defects in workmanship and materials under normal use from the date of original retail purchase of the product, for the period set forth below (“Warranty Period”), except as otherwise stated herein.•  Hardware (excluding power supplies and fans): One (1) year•  Power supplies and fans: One (1) year•  Spare parts and spare kits: Ninety (90) daysThe customer’s sole and exclusive remedy and the entire liability of D-Link and its suppliers under this Limited Warranty will be, at  D-Link’s option, to repair or replace the defective Hardware during the Warranty Period at no charge to the original owner or to refund the actual purchase price paid. Any repair or replacement will be rendered by D-Link at an Authorized D-Link Service Oce. The replacement hardware need not be new or have an identical make, model or part. D-Link may, at its option, replace the defective Hardware or any part thereof with any reconditioned product that D-Link reasonably determines is substantially equivalent (or superior) in all material respects to the defective Hardware. Repaired or replacement hardware will be warranted for the remainder of the original Warranty Period or ninety (90) days, whichever is longer, and is subject to the same limitations and exclusions. If a material defect is incapable of correction, or if D-Link determines that it is not practical to repair or replace the defective Hardware, the actual price paid by the original purchaser for the defective Hardware will be refunded by D-Link upon return to D-Link of the defective Hardware. All Hardware or part thereof that is replaced by D-Link, or for which the purchase price is refunded, shall become the property of D-Link upon replacement or refund.
61D-Link DWA-121 User ManualAppendix E - WarrantyLimited Software Warranty:D-Link warrants that the software portion of the product (“Software”) will substantially conform to D-Link’s then current functional specications for the Software, as set forth in the applicable documentation, from the date of original retail purchase of the Software for a period of ninety (90) days (“Software Warranty Period”), provided that the Software is properly installed on approved hardware and operated as contemplated in its documentation. D-Link further warrants that, during the Software Warranty Period, the magnetic media on which D-Link delivers the Software will be free of physical defects. The customer’s sole and exclusive remedy and the entire liability of D-Link and its suppliers under this Limited Warranty will be, at D-Link’s option, to replace the non-conforming Software (or defective media) with software that substantially conforms to D-Link’s functional specications for the Software or to refund the portion of the actual purchase price paid that is attributable to the Software. Except as otherwise agreed by D-Link in writing, the replacement Software is provided only to the original licensee, and is subject to the terms and conditions of the license granted by D-Link for the Software. Replacement Software will be warranted for the remainder of the original Warranty Period and is subject to the same limitations and exclusions. If a material non-conformance is incapable of correction, or if D-Link determines in its sole discretion that it is not practical to replace the non-conforming Software, the price paid by the original licensee for the non-conforming Software will be refunded by D-Link; provided that the non-conforming Software (and all copies thereof) is rst returned to D-Link. The license granted respecting any Software for which a refund is given automatically terminates.Non-Applicability of Warranty:The Limited Warranty provided hereunder for Hardware and Software portions of D-Link’s products will not be applied to and does not cover any refurbished product and any product purchased through the inventory clearance or liquidation sale or other sales in which D-Link, the sellers, or the liquidators expressly disclaim their warranty obligation pertaining to the product and in that case, the product is being sold “As-Is” without any warranty whatsoever including, without limitation, the Limited Warranty as described herein, notwithstanding anything stated herein to the contrary.Submitting A Claim: The customer shall return the product to the original purchase point based on its return policy. In case the return policy period has expired and the product is within warranty, the customer shall submit a claim to D-Link as outlined below:• The customer must submit with the product as part of the claim a written description of the Hardware defect or Software nonconformance in sucient detail to allow DLink to conrm the same, along with proof of purchase of the product (such as a copy of the dated purchase invoice for the product) if the product is not registered.•  The customer must obtain a Case ID Number from D-Link Technical Support at 1-877-453-5465, who will attempt to assist the customer in resolving any suspected defects with the product. If the product is considered defective, the customer must obtain a Return Material Authorization (“RMA”) number by completing the RMA form and entering the assigned Case ID Number at https://rma.dlink.com/.
62D-Link DWA-121 User ManualAppendix E - Warranty•  After an RMA number is issued, the defective product must be packaged securely in the original or other suitable shipping package to ensure that it will not be damaged in transit, and the RMA number must be prominently marked on the outside of the package. Do not include any manuals or accessories in the shipping package. DLink will only replace the defective portion of the product and will not ship back any accessories.•  The customer is responsible for all in-bound shipping charges to D-Link. No Cash on Delivery (“COD”) is allowed. Products sent COD will either be rejected by D-Link or become the property of D-Link. Products shall be fully insured by the customer and shipped to D-Link Systems, Inc., 17595 Mt. Herrmann, Fountain Valley, CA 92708. D-Link will not be held responsible for any packages that are lost in transit to D-Link. The repaired or replaced packages will be shipped to the customer via UPS Ground or any common carrier selected by D-Link. Return shipping charges shall be prepaid by D-Link if you use an address in the United States, otherwise we will ship the product to you freight collect. Expedited shipping is available upon request and provided shipping charges are prepaid by the customer. D-Link may reject or return any product that is not packaged and shipped in strict compliance with the foregoing requirements, or for which an RMA number is not visible from the outside of the package. The product owner agrees to pay D-Link’s reasonable handling and return shipping charges for any product that is not packaged and shipped in accordance with the foregoing requirements, or that is determined by D-Link not to be defective or non-conforming.What Is Not Covered:The Limited Warranty provided herein by D-Link does not cover:Products that, in D-Link’s judgment, have been subjected to abuse, accident, alteration, modication, tampering, negligence, misuse, faulty installation, lack of reasonable care, repair or service in any way that is not contemplated in the documentation for the product, or if the model or serial number has been altered, tampered with, defaced or removed; Initial installation, installation and removal of the product for repair, and shipping costs; Operational adjustments covered in the operating manual for the product, and normal maintenance; Damage that occurs in shipment, due to act of God, failures due to power surge, and cosmetic damage; Any hardware, software, rmware or other products or services provided by anyone other than D-Link; and Products that have been purchased from inventory clearance or liquidation sales or other sales in which D-Link, the sellers, or the liquidators expressly disclaim their warranty obligation pertaining to the product.While necessary maintenance or repairs on your Product can be performed by any company, we recommend that you use only an Authorized D-Link Service Oce. Improper or incorrectly performed maintenance or repair voids this Limited Warranty.Disclaimer of Other Warranties:EXCEPT FOR THE LIMITED WARRANTY SPECIFIED HEREIN, THE PRODUCT IS PROVIDED “AS-IS” WITHOUT ANY WARRANTY OF ANY KIND WHATSOEVER INCLUDING, WITHOUT LIMITATION, ANY WARRANTY OF MERCHANTABILITY, FITNESS FOR A PARTICULAR PURPOSE AND NONINFRINGEMENT.
63D-Link DWA-121 User ManualAppendix E - WarrantyIF ANY IMPLIED WARRANTY CANNOT BE DISCLAIMED IN ANY TERRITORY WHERE A PRODUCT IS SOLD, THE DURATION OF SUCH IMPLIED WARRANTY SHALL BE LIMITED TO THE DURATION OF THE APPLICABLE WARRANTY PERIOD SET FORTH ABOVE. EXCEPT AS EXPRESSLY COVERED UNDER THE LIMITED WARRANTY PROVIDED HEREIN, THE ENTIRE RISK AS TO THE QUALITY, SELECTION AND PERFORMANCE OF THE PRODUCT IS WITH THE PURCHASER OF THE PRODUCT.Limitation of Liability:TO THE MAXIMUM EXTENT PERMITTED BY LAW, D-LINK IS NOT LIABLE UNDER ANY CONTRACT, NEGLIGENCE, STRICT LIABILITY OR OTHER LEGAL OR EQUITABLE THEORY FOR ANY LOSS OF USE OF THE PRODUCT, INCONVENIENCE OR DAMAGES OF ANY CHARACTER, WHETHER DIRECT, SPECIAL, INCIDENTAL OR CONSEQUENTIAL (INCLUDING, BUT NOT LIMITED TO, DAMAGES FOR LOSS OF GOODWILL, LOSS OF REVENUE OR PROFIT, WORK STOPPAGE, COMPUTER FAILURE OR MALFUNCTION, FAILURE OF OTHER EQUIPMENT OR COMPUTER PROGRAMS TO WHICH D-LINK’S PRODUCT IS CONNECTED WITH, LOSS OF INFORMATION OR DATA CONTAINED IN, STORED ON, OR INTEGRATED WITH ANY PRODUCT RETURNED TO D-LINK FOR WARRANTY SERVICE) RESULTING FROM THE USE OF THE PRODUCT, RELATING TO WARRANTY SERVICE, OR ARISING OUT OF ANY BREACH OF THIS LIMITED WARRANTY, EVEN IF D-LINK HAS BEEN ADVISED OF THE POSSIBILITY OF SUCH DAMAGES. THE SOLE REMEDY FOR A BREACH OF THE FOREGOING LIMITED WARRANTY IS REPAIR, REPLACEMENT OR REFUND OF THE DEFECTIVE OR NONCONFORMING PRODUCT. THE MAXIMUM LIABILITY OF D-LINK UNDER THIS WARRANTY IS LIMITED TO THE PURCHASE PRICE OF THE PRODUCT COVERED BY THE WARRANTY. THE FOREGOING EXPRESS WRITTEN WARRANTIES AND REMEDIES ARE EXCLUSIVE AND ARE IN LIEU OF ANY OTHER WARRANTIES OR REMEDIES, EXPRESS, IMPLIED OR STATUTORY.Governing Law:This Limited Warranty shall be governed by the laws of the State of California. Some states do not allow exclusion or limitation of incidental or consequential damages, or limitations on how long an implied warranty lasts, so the foregoing limitations and exclusions may not apply. This Limited Warranty provides specic legal rights and you may also have other rights which vary from state to state.Trademarks:D-Link is a registered trademark of D-Link Corporation/D-Link Systems, Inc. Other trademarks or registered trademarks are the property of their respective owners.Copyright Statement:No part of this publication or documentation accompanying this product may be reproduced in any form or by any means or used to make any derivative such as translation, transformation, or adaptation without permission from D-Link Corporation/D-Link Systems, Inc., as stipulated by the United States Copyright Act of 1976 and any amendments thereto. Contents are subject to change without prior notice.Copyright 2010 by D-Link Corporation/D-Link Systems, Inc. All rights reserved.
64D-Link DWA-121 User ManualAppendix E - WarrantyFCC Statement:This device has been tested for compliance with FCC RF Exposure (SAR) limits in the typical laptop computer conguration and this device can be used in desktop or laptop computers with side mounted USB ports which can provide 2 cm separation distance from the antenna to the body of the user or a nearby person. This device cannot be used with handheld PDAs (personal digital assistants). This device and its antenna must not be co-located or operated in conjunction with any other antenna or transmitter.This equipment has been tested and found to comply with the limits for a Class B digital device, pursuant to part 15 of the FCC Rules. These limits are designed to provide reasonable protection against harmful interference in a residential installation. This equipment generates, uses, and can radiate radio frequency energy and, if not installed and used in accordance with the instructions, may cause harmful interference to radio communication. However, there is no guarantee that interference will not occur in a particular installation. If this equipment does cause harmful interference to radio or television reception, which can be determined by turning the equipment o and on, the user is encouraged to try to correct the interference by one or more of the following measures:•  Reorient or relocate the receiving antenna.•  Increase the separation between the equipment and receiver.•  Connect the equipment into an outlet on a circuit dierent from that to which the receiver is connected.•  Consult the dealer or an experienced radio/TV technician for help.This device complies with Part 15 of the FCC Rules. Operation is subject to the following two conditions:(1) This device may not cause harmful interference, and (2) this device must accept any interference received, including interference that may cause undesired operation.IMPORTANT NOTICE:FCC Radiation Exposure Statement:This equipment complies with FCC radiation exposure limits set forth for an uncontrolled environment. End users must follow the specic operating instructions for satisfying RF exposure compliance. This transmitter must not be co-located or operating in conjunction with any other antenna or transmitter. IEEE 802.11g operation of this product in the U.S.A. is rmware-limited to channels 1 through 11. This equipment has been SAR-evaluated for use in laptops (notebooks) with side slot conguration.For detailed warranty information applicable to products purchased outside the United States, please contact the corresponding local D-Link oce.Federal Communication Commission Interference Statement  This equipment has been tested and found to comply with the limits for a Class B digital device, pursuant to Part 15 of the FCC Rules.  These limits are designed to provide reasonable protection against harmful interference in a residential installation.  This equipment generates, uses and can radiate radio frequency energy and, if not installed and used in accordance with the instructions, may cause harmful interference to radio communications.  However, there is no guarantee that interference will not occur in a particular installation.  If this equipment does cause harmful interference to radio or television reception, which can be determined by turning the equipment off and on, the user is encouraged to try to correct the interference by one of the following measures: - Reorient or relocate the receiving antenna. - Increase the separation between the equipment and receiver. - Connect the equipment into an outlet on a circuit different from that to which the receiver is connected. - Consult the dealer or an experienced radio/TV technician for help. This device complies with Part 15 of the FCC Rules. Operation is subject to the following two conditions: (1) This device may not cause harmful interference, and (2) this device must accept any interference received, including interference that may cause undesired operation. FCC Caution: Any changes or modifications not expressly approved by the party responsible for compliance could void the user's authority to operate this equipment. IEEE 802.11b or 802.11g operation of this product in the U.S.A. is firmware-limited to channels 1 through 11. IMPORTANT NOTE: FCC Radiation Exposure Statement: This equipment complies with FCC radiation exposure limits set forth for an uncontrolled environment. End users must follow the specific operating instructions for satisfying RF exposure compliance. To maintain compliance with FCC RF exposure compliance requirements, please follow operation instruction as documented in this manual. This transmitter must not be co-located or operating in conjunction with any other antenna or transmitter. SAR compliance has been established in typical laptop computer(s) with USB slot, and product could be used in typical laptop computer with USB slot. Other application like handheld PC or similar device has not been verified and may not compliance with related RF exposure rule and such use shall be prohibited.  This equipment has been tested and found to comply with the limits for a Class B digital device, pursuant to Part 15 of the FCC Rules.  These limits are designed to provide reasonable protection against harmful interference in a residential installation. This equipment generates, uses and can radiate radio frequency energy and, if not installed and used in accordance with the instructions, may cause harmful interference to radio communications.  However, there is no guarantee that interference will not occur in a particular installation.  If this equipment does cause harmful interference to radio or television reception, which can be determined by turning the equipment off and on, the user is encouraged to try to correct the interference by one of the following measures: - Reorient or relocate the receiving antenna. - Increase the separation between the equipment and receiver. - Connect the equipment into an outlet on a circuit different from that to which the receiver is connected. - Consult the dealer or an experienced radio/TV technician for help. FCC Caution: Any changes or modifications not expressly approved by the party responsible for compliance could void the user's authority to operate this equipment. This device complies with Part 15 of the FCC Rules. Operation is subject to the following two conditions: (1) This device may not cause harmful interference, and (2) this device must accept any interference received, including interference that may cause undesired operation. IMPORTANT NOTE: Radiation Exposure Statement: The product comply with the US/Canada portable RF exposure limit set forth for an uncontrolled environment and are safe for intended operation as described in this manual. The further RF exposure reduction can be achieved if the product can be kept as far as possible from the user body or reduce output power if it doesn't affect the transmission/receiving quality. This transmitter must not be co-located or operating in conjunction with any other antenna or transmitter. SAR compliance has been established in typical laptop computer(s) with USB slot, and product could be used in typical laptop computer with USB slot. Other application like handheld PC or similar device has not been verified and may not compliance with related RF exposure rule and such use shall be prohibited. The USB dongle transmitter is approved for use in typical laptop computers.  To comply with FCC RF exposure requirements, it should not be used in other devices or certain laptop and tablet computer configurations where the USB connectors on the host computer are unable to provide or ensure the necessary operating configurations intended for the device and its users or bystanders to satisfy RF exposure compliance requirements.
65D-Link DWA-121 User ManualAppendix E - WarrantyIndustry Canada Notice:This device complies with Canadian RSS-210“This Class B digital apparatus complies with Candadian ICES-003”Cet appareil numérique de la classe B est conforme à la norme NMB-003 du Canada.IC statementOperation is subject to the following two conditions: (1)This device may not cause interference and (2)This device must accept any interference, including interference that may cause undesired operation of the device. This device has been designed to operate with an antenna having a maximum gain of 2 dBi. Antenna having a higher gain is strictly prohibited per regulations of Industry Canada. The required antenna impedance is 50 ohms. IMPORTANT NOTE: IC Radiation Exposure Statement: This equipment complies with IC radiation exposure limits set forth for an uncontrolled environment. End users must follow the specic operating instructions for satisfying RF exposure compliance. This equipment should be installed and operated with minimum distance 20cm between the radiator & your body. This transmitter must not be co-located or operating in conjunction with any other antenna or transmitter. Règlement d’Industry Canada Les conditions de fonctionnement sont sujettes à deux conditions: (1)Ce périphérique ne doit pas causer d’interférence et. (2)Ce périphérique doit accepter toute interférence, y compris les interférences pouvant perturber le bon fonctionnement de ce périphérique.This device has been designed to operate with an antenna having a maximum gain of -8.21 dBi. Antenna having a higher gain is strictly prohibited per regulations of Industry Canada. The required antenna impedance is 50 ohms. Industry Canada Statement This device complies with RSS-210 of the Industry Canada Rules. Operation is subject to the following two conditions: 1) this device may not cause interference and 2) this device must accept any interference, including interference that may cause undesired operation of the device IMPORTANT NOTE: IC Radiation Exposure Statement: This equipment complies with IC radiation exposure limits set forth for an uncontrolled environment. End users must follow the specific operating instructions for satisfying RF exposure compliance. To maintain compliance with IC RF exposure compliance requirements, please follow operation instruction as documented in this manual. This device complies with RSS-210 of the Industry Canada Rules. Operation is subject to the following two conditions: (1) This device may not cause harmful interference, and (2) this device must accept any interference received, including interference that may cause undesired operation. IMPORTANT NOTE: Radiation Exposure Statement: This equipment complies with IC radiation exposure limits set forth for an uncontrolled environment. End users must follow the specific operating instructions for satisfying RF exposure compliance. To maintain compliance with IC RF exposure compliance requirements, please follow operation instruction as documented in this manual.
66D-Link DWA-121 User ManualAppendix F - RegistrationVersion 1.0October 5, 2010 Product registration is entirely voluntary and failure to complete or return this form will not diminish your warranty rights.Registration
אՀᤞ፿ᔞش؀᨜چ೴אՀᤞ፿ᔞش؀᨜چ೴אՀᤞ፿ᔞش؀᨜چ೴אՀᤞ፿ᔞش؀᨜چ೴ʳʳʳʳʳᆖীڤᎁᢞٽ௑հ܅פ෷୴᙮ሽᖲΔॺᆖ๺ױΔֆ׹Ε೸ᇆࢨࠌشृ݁լ൓ᖐ۞᧢ޓ᙮෷ΕףՕפ෷ࢨ᧢ޓ଺๻ૠհ௽ࢤ֗פ౨Ζʳ܅פ෷୴᙮ሽᖲհࠌشլ൓ᐙ᥼ଆ౰ڜ٤֗եឫٽऄຏॾΙᆖ࿇෼ڶեឫ෼ွழΔᚨمܛೖشΔࠀޏ࿳۟ྤեឫழֱ൓ᤉᥛࠌشΖছႈٽऄຏॾΔਐࠉሽॾऄ๵ࡳ܂ᄐհྤᒵሽຏॾΖ܅פ෷୴᙮ሽᖲႊݴ࠹ٽऄຏॾࢨՠᄐΕઝᖂ֗᠔᛭شሽंᘿ୴ࢤሽᖲ๻ໂհեឫΖʳ

Navigation menu