D Link WA125A1 USB ADAPTER User Manual DWA 125 UserMan
D Link Corporation USB ADAPTER DWA 125 UserMan
D Link >
Users Manual

2D-Link DWA-125 User Manual
Table of Contents
Product Overview........................................................ 3
Package Contents ................................................... 3
System Requirements ............................................. 3
Introduction.............................................................. 4
Features .................................................................. 5
Hardware Overview ................................................. 6
Installation....................................................................7
Getting Started ........................................................7
Remove Existing Installations............................7
Disable Other Wireless Adapters....................... 8
Wireless Installation Considerations...................... 10
Adapter Installation................................................11
%QPſIWTCVKQP............................................................. 17
D-Link Wireless Connection Manager ................... 17
Wireless Networks ........................................... 18
Wi-Fi Protected Setup (WPS) .......................... 19
My Wireless Networks ..................................... 23
#FF2TQſNG................................................... 24
/QFKH[2TQſNG............................................... 25
Support ............................................................ 26
About ............................................................... 27
Connect to a Wireless Network................................ 28
Using Windows® Vista™......................................... 28
Using Windows® XP............................................... 30
Wireless Security....................................................... 31
What is WPA? .......................................................31
%QPſIWTG92#92#2CUURJTCUG....................... 32
Using the D-Link Wireless Connection
Manager........................................................... 32
Using Windows® Vista...................................... 34
Using the Windows® XP Utility......................... 36
%QPſIWTG92#92#4#&+75.......................... 38
Using the D-Link Wireless Connection
Manager........................................................... 38
6TQWDNGUJQQVKPI ........................................................ 39
Wireless Basics ......................................................... 43
Wireless Modes ..................................................... 47
0GVYQTMKPI$CUKEU .................................................... 48
Check your IP address .......................................... 48
Windows®:27UGTU................................ 48
Windows Vista™ Users..................................... 48
Statically Assign an IP address ............................. 49
Windows®:27UGTU................................ 49
Windows Vista™ Users..................................... 50
6GEJPKECN5RGEKſECVKQPU........................................... 51
%QPVCEVKPI6GEJPKECN5WRRQTV ................................. 52
Warranty..................................................................... 53
4GIKUVTCVKQP................................................................61
Table of Contents
3D-Link DWA-125 User Manual
Section 1 - Product Overview
Ŗ&.KPM&9#9KTGNGUU75$#FCRVGT
Ŗ%TCFNG
Ŗ/CPWCNCPF9CTTCPV[QP%&
Ŗ&.KPM9KTGNGUU%QPPGEVKQP/CPCIGTQP%&
Ŗ3WKEM+PUVCNNCVKQP)WKFG
System Requirements
Ŗ#EQORWVGTQTNCRVQRYKVJCPCXCKNCDNG75$RQTV
Ŗ9KPFQYU®Vista™, 2000 (Service Pack 4) or XP (Service Pack 2)
Ŗ%&41/&TKXG
Ŗ/*\RTQEGUUQTCPFCVNGCUV/$QH4#/
Ŗ#FTCHVPQTICEEGUURQKPVQTYKTGNGUUTQWVGT
Product Overview
Package Contents

4D-Link DWA-125 User Manual
Section 1 - Product Overview
Introduction
6JG&9#9KTGNGUU75$#FCRVGTKUCEQPXGPKGPVYKTGNGUUEQPPGEVKXKV[UQNWVKQPHQTFGUMVQRQTPQVGDQQM2%U
Instead of stringing Ethernet cables to your PC or dismantling your desktop computer case, the DWA-125 can enable
&TCHVPYKTGNGUUEQPPGEVKXKV[D[UKORN[WVKNK\KPI[QWTFGUMVQRQTPQVGDQQM2%ŏU75$RQTV
Powered by Wireless 150 technology, the DWA-125 provides a faster wireless connection and superior reception than
802.11g*. The DWA-125 is designed for use in bigger homes and for those that demand higher bandwidth networking.
/CZKOK\GYKTGNGUURGTHQTOCPEGD[EQPPGEVKPIVJKU75$#FCRVGTVQC9KTGNGUU0™ router and stay connected from
XKTVWCNN[CP[YJGTGKPVJGJQOG6JKU75$#FCRVGTUWRRQTVU92#CPF92#GPET[RVKQPVQRTGXGPVQWVUKFGKPVTWUKQP
and protect your personal information from being exposed.
&.KPMŏU3WKEM5GVWR9K\CTFIWKFGU[QWUVGRD[UVGRVJTQWIJVJGKPUVCNNCVKQPRTQEGUU6JG&.KPM9KTGNGUU/CPCIGT
is included with this product to keep track of all your most frequently accessed networks.
%QORCEVKPUK\GTQDWUVKPURGGFVJG&9#9KTGNGUU75$#FCRVGTKUITGCVHQTVTCXGNCPFCEQPXGPKGPVUQNWVKQP
HQTRTQXKFKPIJKIJRGTHQTOCPEG YKTGNGUU EQPPGEVKXKV[ VQ [QWT FGUMVQRQT PQVGDQQM2%'PLQ[VJGOCP[DGPGſVUQH
wireless connectivity today!
/CZKOWOYKTGNGUUUKIPCNTCVGFGTKXGFHTQO+'''5VCPFCTFICPF&TCHVPURGEKſECVKQPU#EVWCNFCVCVJTQWIJRWVYKNNXCT[0GVYQTM
EQPFKVKQPUCPFGPXKTQPOGPVCNHCEVQTUKPENWFKPIXQNWOGQHPGVYQTMVTCHſEDWKNFKPIOCVGTKCNUCPFEQPUVTWEVKQPCPFPGVYQTMQXGTJGCFNQYGTCEVWCN
data throughput rate. Environmental conditions will adversely affect wireless signal range.

5D-Link DWA-125 User Manual
Section 1 - Product Overview
Features
Ŗ%QORCEVUK\GHQTRNCEGOGPVCP[YJGTG
Ŗ%QPXGPKGPEGQH2NWI2NC[KPUVCNNCVKQP
Ŗ(WNN[IEQORCVKDNG
Ŗ&TCHVPEQORNKCPV
Ŗ2QYGTGFD[VJG75$RQTVPQGZVGTPCNRQYGTUQWTEGTGSWKTGF
Ŗ75$UVCPFCTF*.
Ŗ;QWECPUGEWTGN[EQPPGEVVQCYKTGNGUUPGVYQTMWUKPI92#92#9K(K2TQVGEVGF#EEGUURTQXKFKPI
you a much higher level of security for your data and communication than has previously been available.
;QWOC[CNUQWUGZHQTYKTGNGUUCWVJGPVKECVKQP
Ŗ2QUKVKQPVJG&9#CNOQUVCP[YJGTGKP[QWTYQTMURCEGVQCEJKGXGVJGDGUVTGEGRVKQPRQUUKDNG
ŖSupports Infrastructure networks via an access point
Ŗ7UGTHTKGPFN[EQPſIWTCVKQPCPFFKCIPQUVKEWVKNKVKGU
7UKPIC75$RQTVYKNNCFXGTUGN[CHHGEVVJTQWIJRWV
6D-Link DWA-125 User Manual
Section 1 - Product Overview
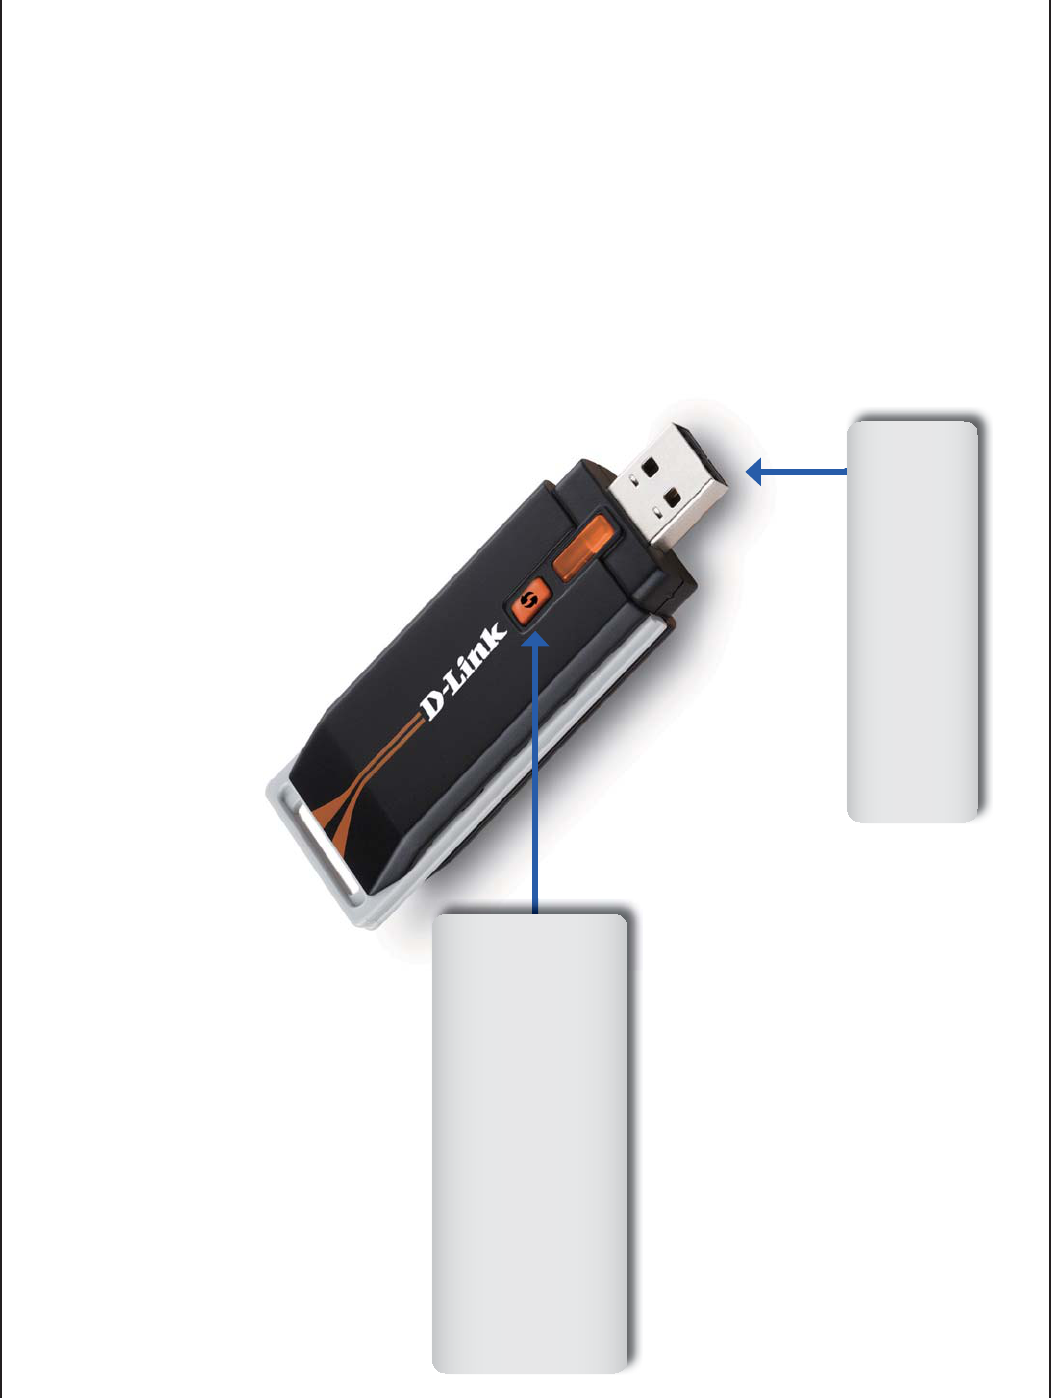
Hardware Overview
USB Port
Used to connect the DWA-125
to your computer.
WPS Button
Press the WPS button to automatically
connect to a WPS-enabled wireless
router or access point and establish
connectivity. Refer to pg 19.

7D-Link DWA-125 User Manual
Section 2 - Installation
Getting Started
Installation
This section will walk you through the installation process. If you have a built-in wireless adapter, please disable it in
device manager before installing your D-Link adapter. Also, if you have previously installed another wireless adapter,
please make sure any software is uninstalled.
$GHQTGKPUVCNNKPI[QWTPGY&.KPMYKTGNGUUCFCRVGTRNGCUGXGTKH[VJGHQNNQYKPI
Ŗ4GOQXGCP[RTGXKQWUKPUVCNNCVKQPUQHYKTGNGUUCFCRVGTU
Ŗ&KUCDNGCP[DWKNVKPYKTGNGUUCFCRVGTU
Ŗ8GTKH[VJGUGVVKPIUUWEJCUVJG55+&CPFUGEWTKV[UGVVKPIUQHVJGPGVYQTMU[QWYCPVVQEQPPGEVVQ
Remove Existing Installations
+H[QWŏXGKPUVCNNGFCFKHHGTGPVOCPWHCEVWTGŏUCFCRVGTQTCFKHHGTGPVOQFGN&.KPMCFCRVGTOCMGUWTGVJGUQHVYCTGKU
WPKPUVCNNGFDGHQTGKPUVCNNKPIVJGPGYUQHVYCTG5QOGWVKNKVKGUOC[ECWUGCEQPƀKEVYKVJVJGPGYUQHVYCTG+H[QWRNCP
to use multiple adapters at different times, make sure the utilities are not set to load when your computer boots up.
Windows® XP users may use the built-in wireless utility for all adapters.
6QTGOQXGCP[QNFUQHVYCTG
Windows®:28KUVC™WUGTU%NKEMStart > Control Panel > #FFQT4GOQXG2TQITCOU.
Windows®WUGTU%NKEMStart > 5GVVKPIU > Control Panel > #FFQT4GOQXG2TQITCOU.
8D-Link DWA-125 User Manual
Section 2 - Installation
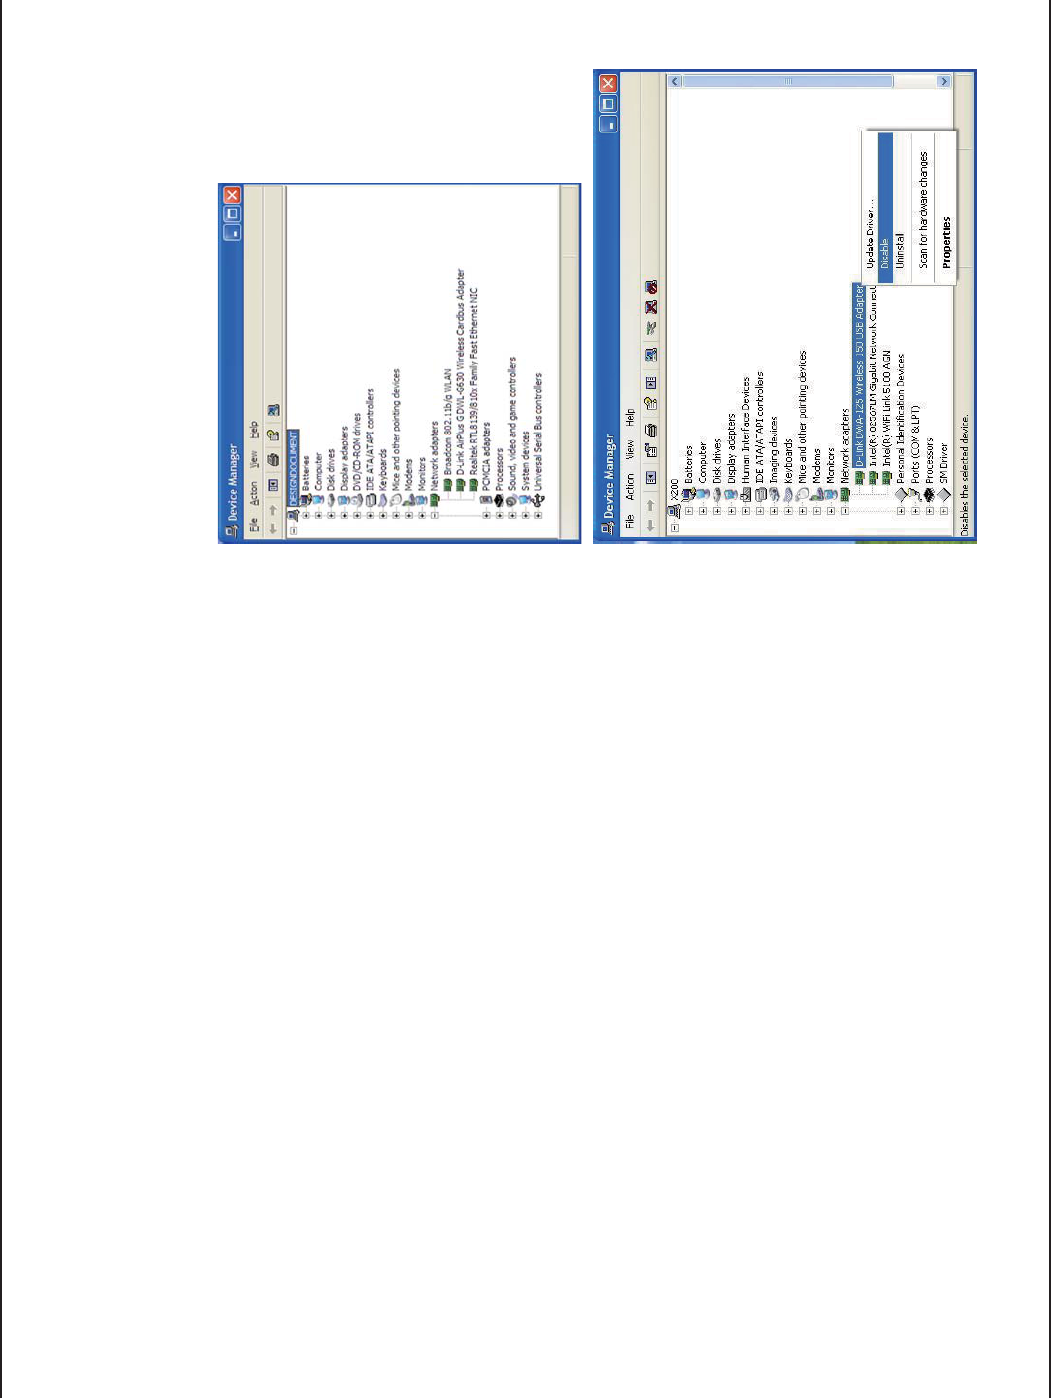
Disable Other Wireless Adapters
/QUVPGYGTNCRVQRUOC[KPENWFGCDWKNVKPYKTGNGUUCFCRVGT6QRTGXGPVCP[EQPƀKEVUYKVJVJG&.KPMYKTGNGUUCFCRVGT
it is recommended to disable the wireless adapter (as well as any unused Ethernet adapters).
From the desktop, right-click on the My Computer icon and select
Properties.
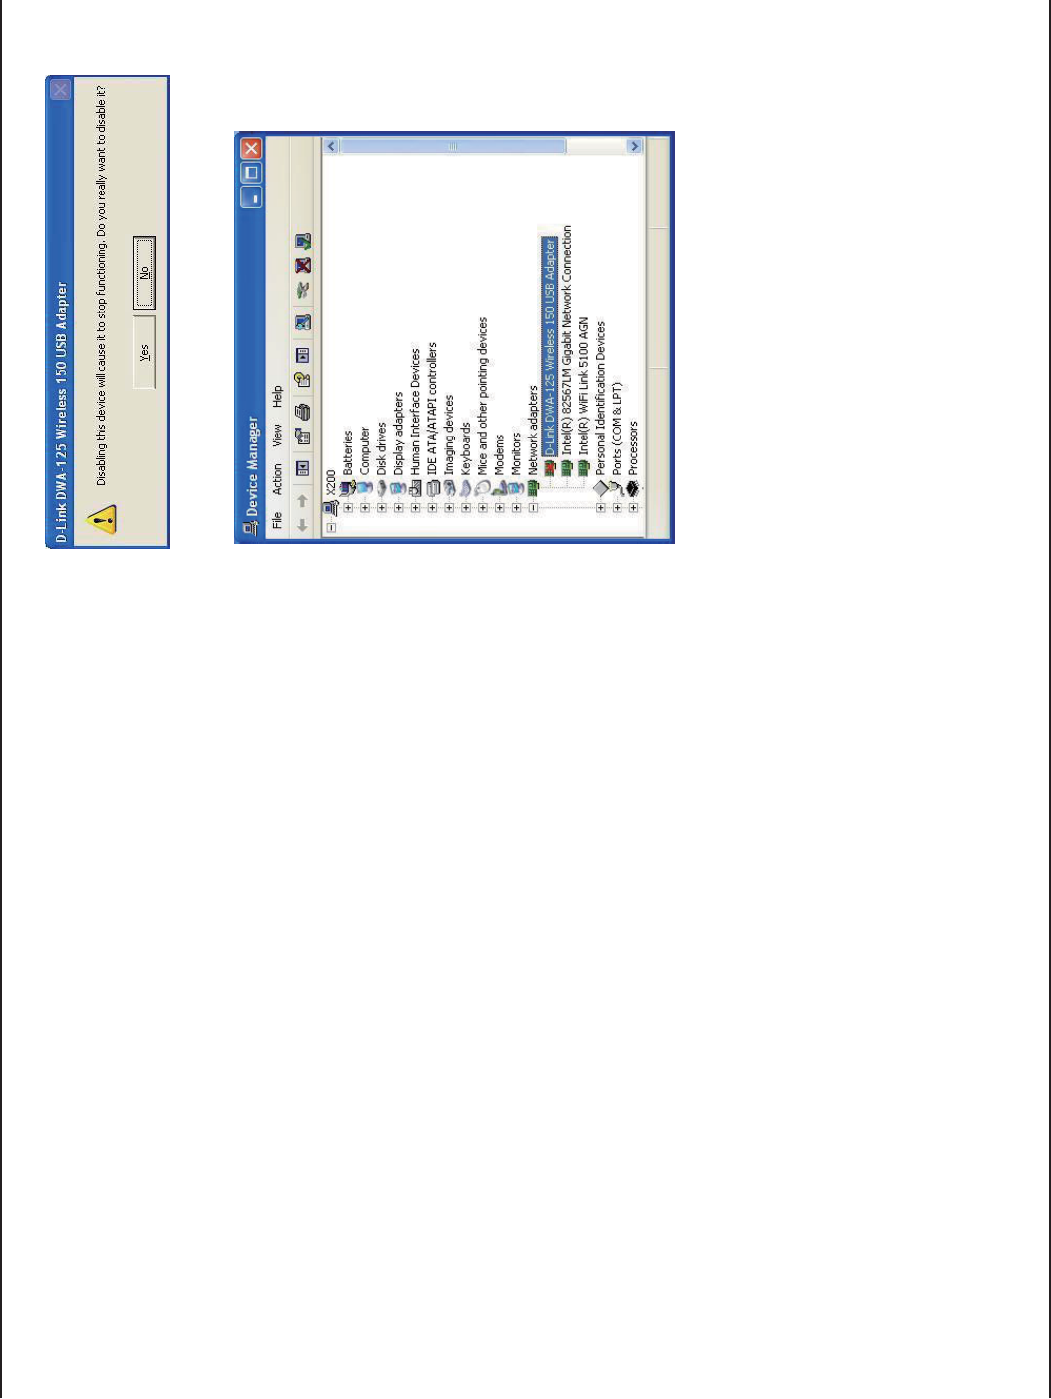
Click the Hardware tab and then click &GXKEG/CPCIGT. Scroll down
the list and click the + sign to the left of Network Adapters.
Right-click the adapter you would like to disable and select
Disable.
9D-Link DWA-125 User Manual
Section 2 - Installation
Click Yes to disable the adapter.
The adapter is now disabled. When disabled, a red X will be
displayed.
Disabling the adapter will not remove the drivers. If you would like
to use the adapter, simply right-click it and select Enable.

10D-Link DWA-125 User Manual
Section 2 - Installation
Wireless Installation Considerations
The D-Link wireless adapter lets you access your network using a wireless connection from virtually anywhere within
the operating range of your wireless network. Keep in mind, however, that the number, thickness and location of
walls, ceilings, or other objects that the wireless signals must pass through, may limit the range. Typical ranges vary
depending on the types of materials and background RF (radio frequency) noise in your home or business. The key
VQOCZKOK\KPIYKTGNGUUTCPIGKUVQHQNNQYVJGUGDCUKEIWKFGNKPGU
1. Keep the number of walls and ceilings between the D-Link adapter and other network devices to a
OKPKOWOGCEJYCNNQTEGKNKPIECPTGFWEG[QWTCFCRVGTŏUTCPIGHTQOHGGVOGVGTU2QUKVKQP
[QWTFGXKEGUUQVJCVVJGPWODGTQHYCNNUQTEGKNKPIUKUOKPKOK\GF
2$G CYCTG QH VJG FKTGEV NKPG DGVYGGP PGVYQTM FGXKEGU # YCNN VJCV KU HGGV VJKEM OGVGTU CV C
45-degree angle appears to be almost 3 feet (1 meter) thick. At a 2-degree angle it looks over 42 feet
(14 meters) thick! Position devices so that the signal will travel straight through a wall or ceiling (instead
of at an angle) for better reception.
3$WKNFKPI/CVGTKCNUOCMGCFKHHGTGPEG#UQNKFOGVCNFQQTQTCNWOKPWOUVWFUOC[JCXGCPGICVKXGGHHGEVQP
range. Try to position access points, wireless routers, and computers so that the signal passes through
drywall or open doorways. Materials and objects such as glass, steel, metal, walls with insulation, water
ſUJVCPMUOKTTQTUſNGECDKPGVUDTKEMCPFEQPETGVGYKNNFGITCFG[QWTYKTGNGUUUKIPCN
4. Keep your product away (at least 3-6 feet or 1-2 meters) from electrical devices or appliances that
generate RF noise.
5+H[QWCTGWUKPI)*\EQTFNGUURJQPGUQT:YKTGNGUURTQFWEVUUWEJCUEGKNKPIHCPUNKIJVUCPF
home security systems), your wireless connection may degrade dramatically or drop completely. Make
UWTG[QWT)*\RJQPGDCUGKUCUHCTCYC[HTQO[QWTYKTGNGUUFGXKEGUCURQUUKDNG6JGDCUGVTCPUOKVU
a signal even if the phone in not in use.
11D-Link DWA-125 User Manual
Section 2 - Installation
9CTPKPI&Q016KPUVCNNVJG&9#75$#FCRVGTKPVQ[QWTEQORWVGTDGHQTGKPUVCNNKPIVJGFTKXGTUQHVYCTG
HTQOVJG&.KPM%&
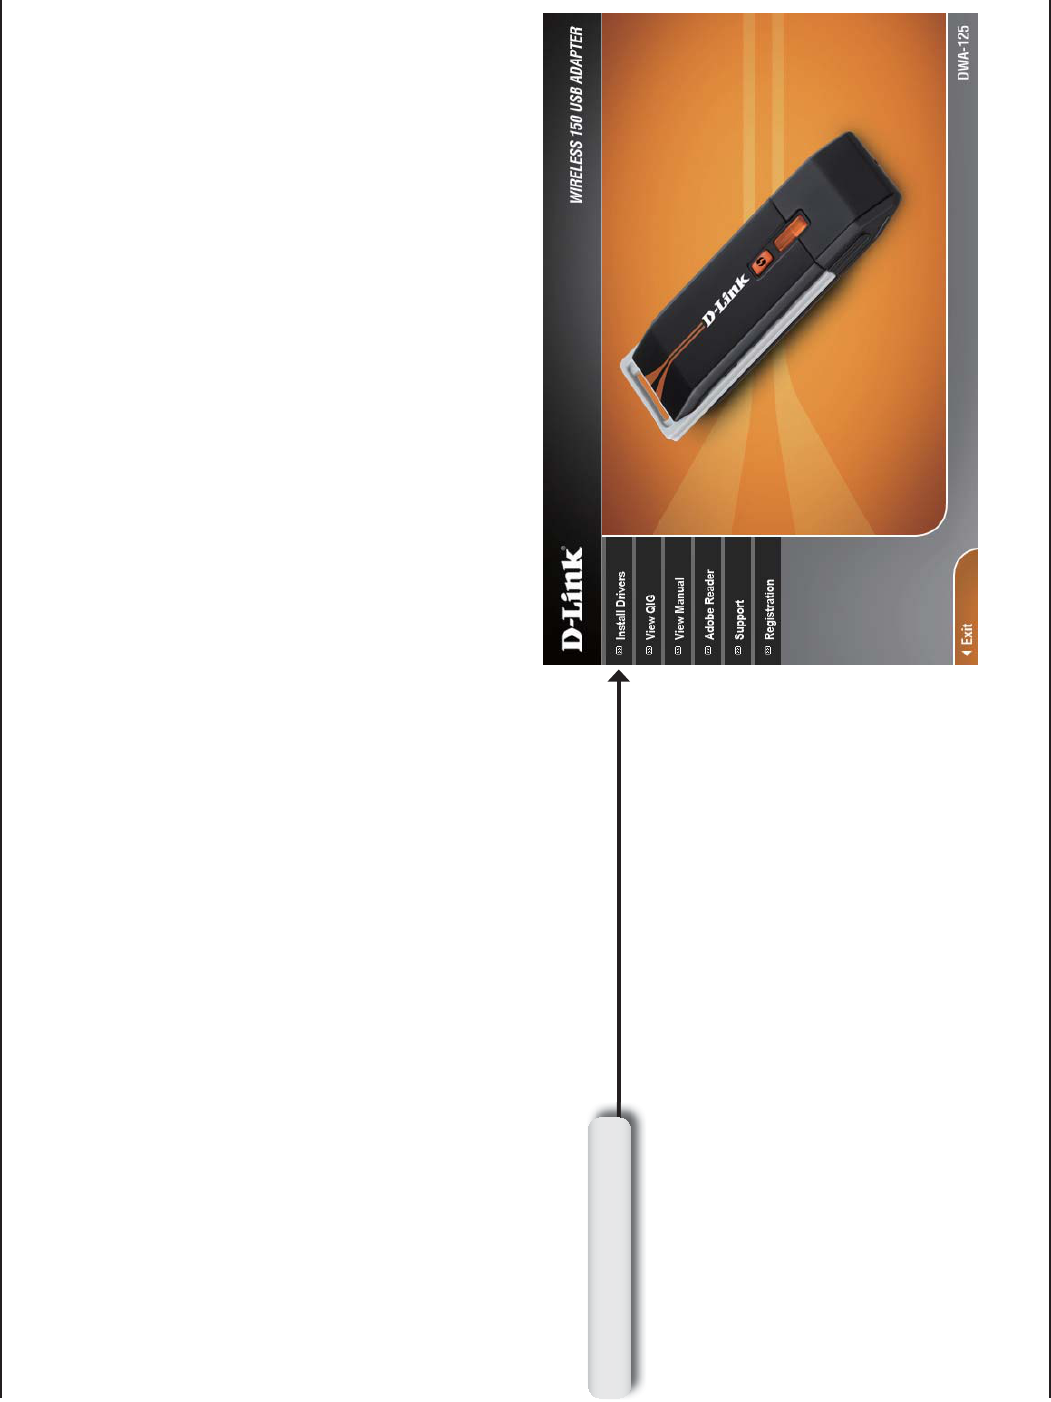
Turn on the computer and Insert the D-Link DWA-125 Driver CD in the CD-ROM drive.
If the CD Autorun function does not automatically start on your computer, go to Start > Run. In the run box type “&>
DWA125.exe” (where D: represents the drive letter of your CD-ROM drive).
When the autorun screen appears, click Install Drivers.
Adapter Installation
Click Install Drivers
12D-Link DWA-125 User Manual
Section 2 - Installation
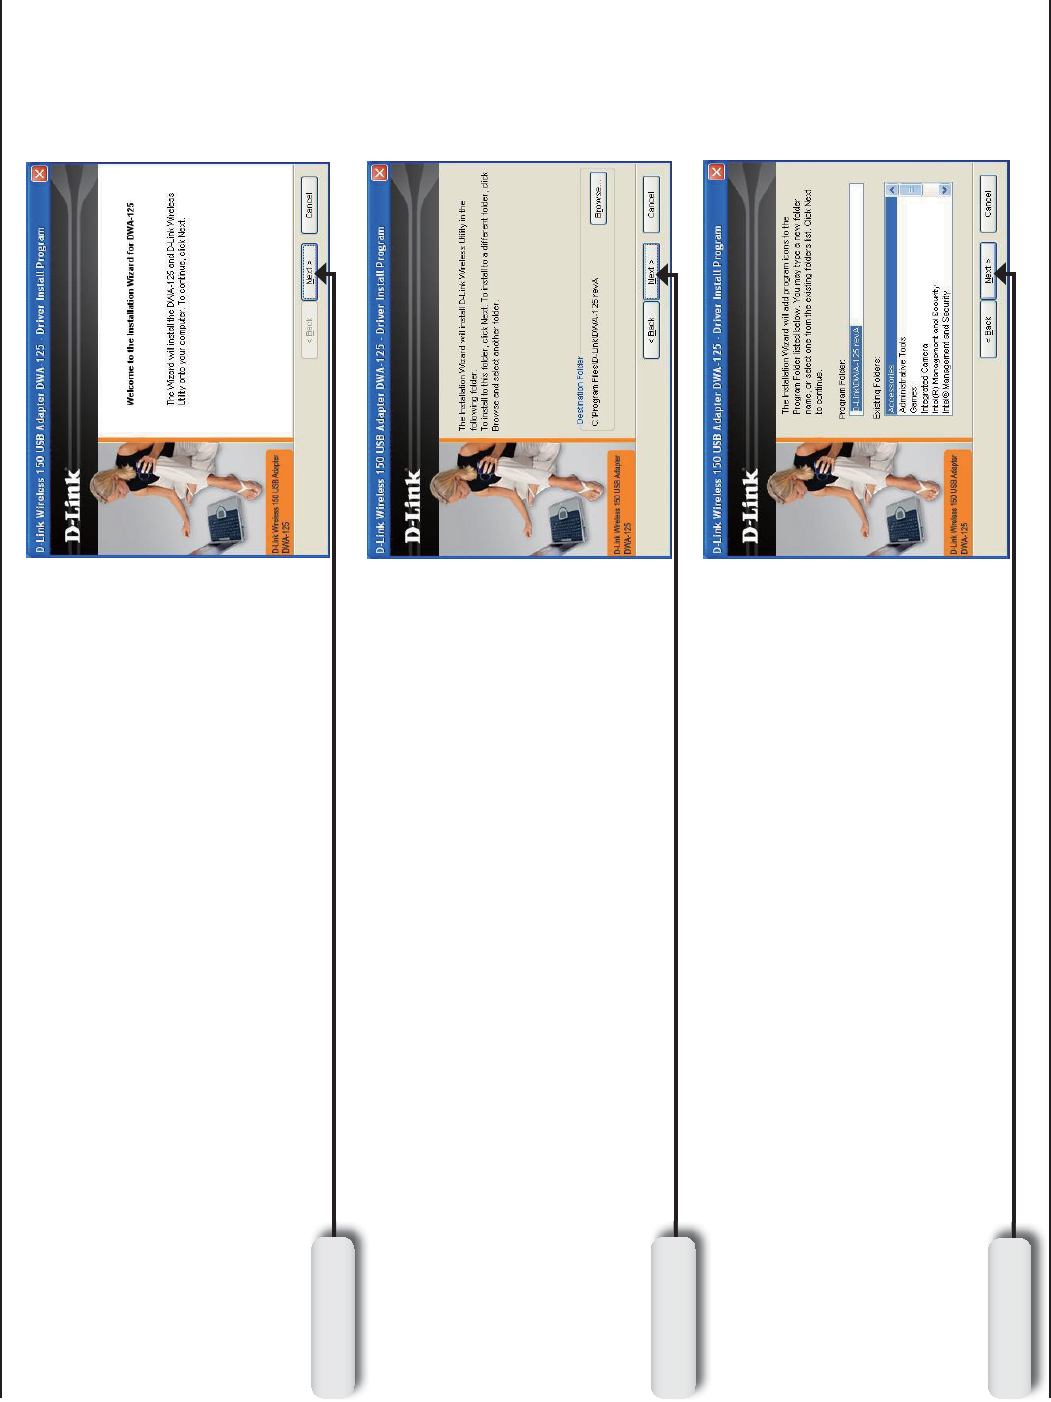
The InstallShield Wizard window will appear.
$[FGHCWNVUGVWRYKNNKPUVCNNVQVJGFGHCWNVNQECVKQPC:\Program
Files\D-Link\DWA-125YJGTG%TGRTGUGPVUVJGFTKXGNGVVGTQH
your hard drive. To install to a different location click Browse
and specify the location.
Select the Program Files folder location.
Click Next
Click Next
Click Next
13D-Link DWA-125 User Manual
Section 2 - Installation
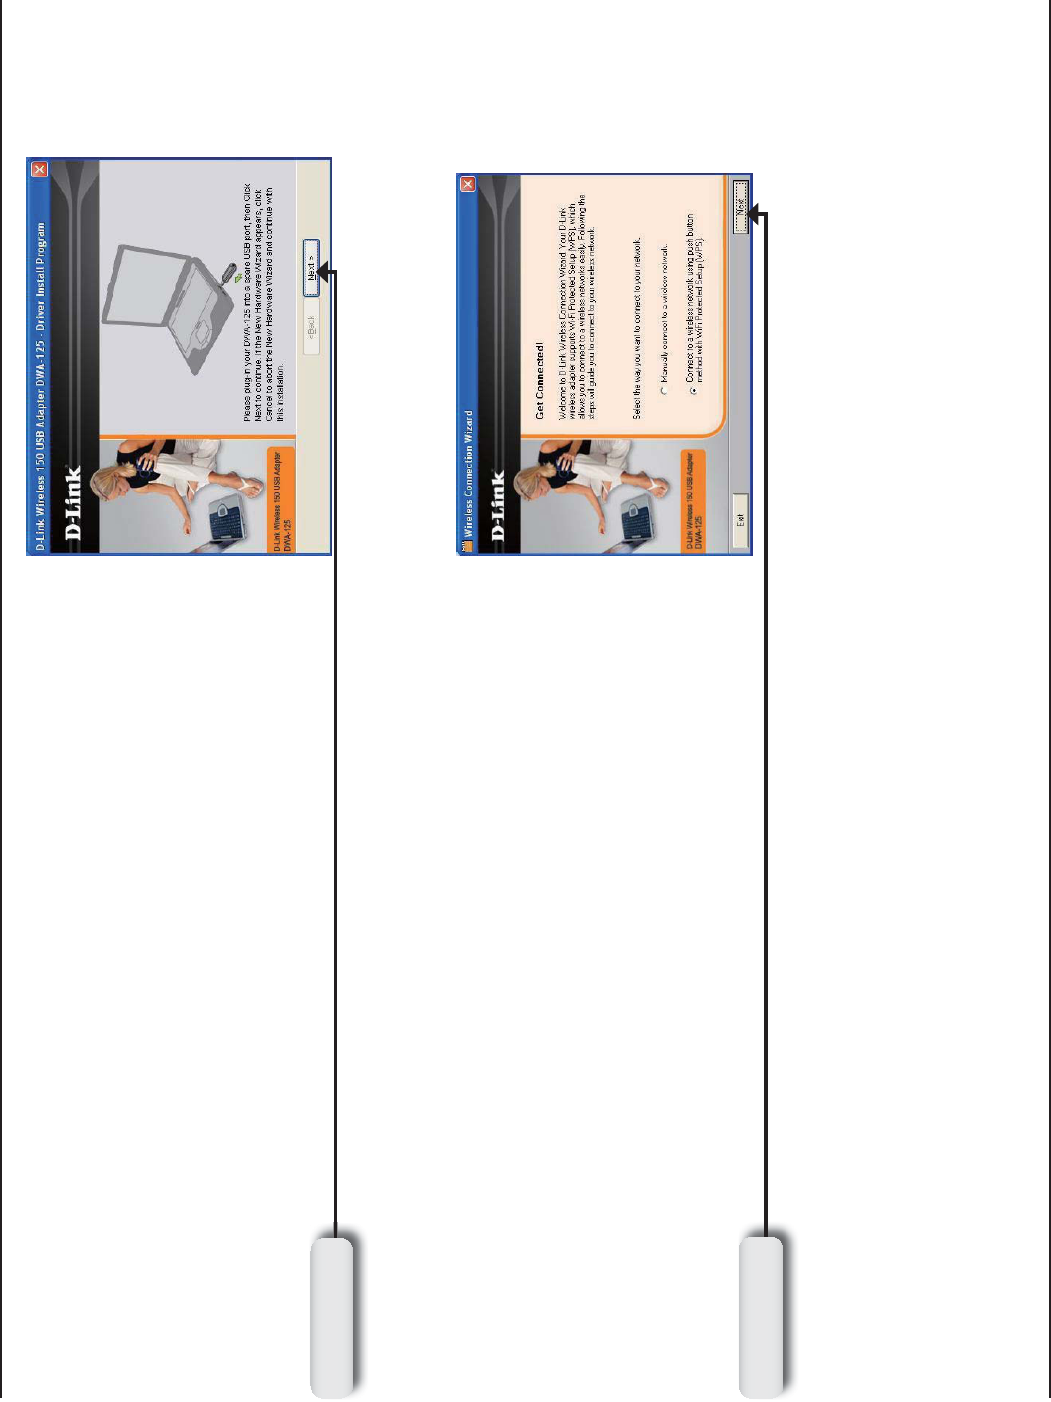
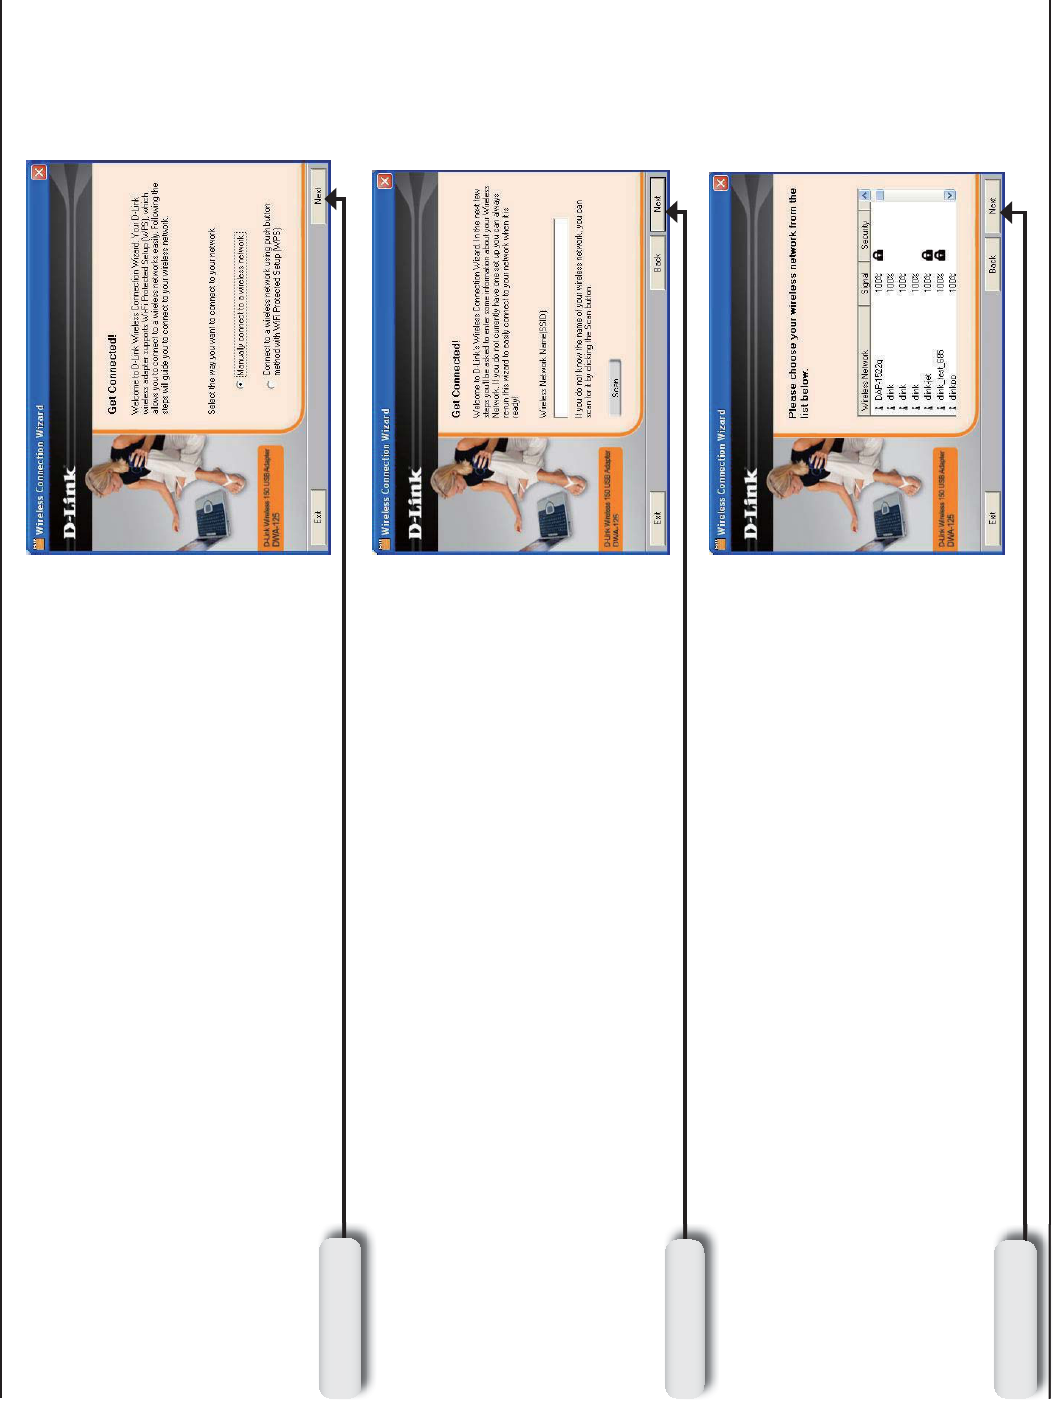
6JG9KTGNGUU%QPPGEVKQP9K\CTFYKNNPQYCRRGCT
If you want to manually connect to a wireless network, refer to
page 15. The following instructions will connect you to a wireless
network using Wi-Fi Protected Setup (WPS).
+PUGTV VJG CFCRVGT KPVQ CP CXCKNCDNG 75$ RQTV QP [QWT
computer.
If the Found New Hardware Wizard appears, click Cancel.
Click Next
Click Next
14D-Link DWA-125 User Manual
Section 2 - Installation
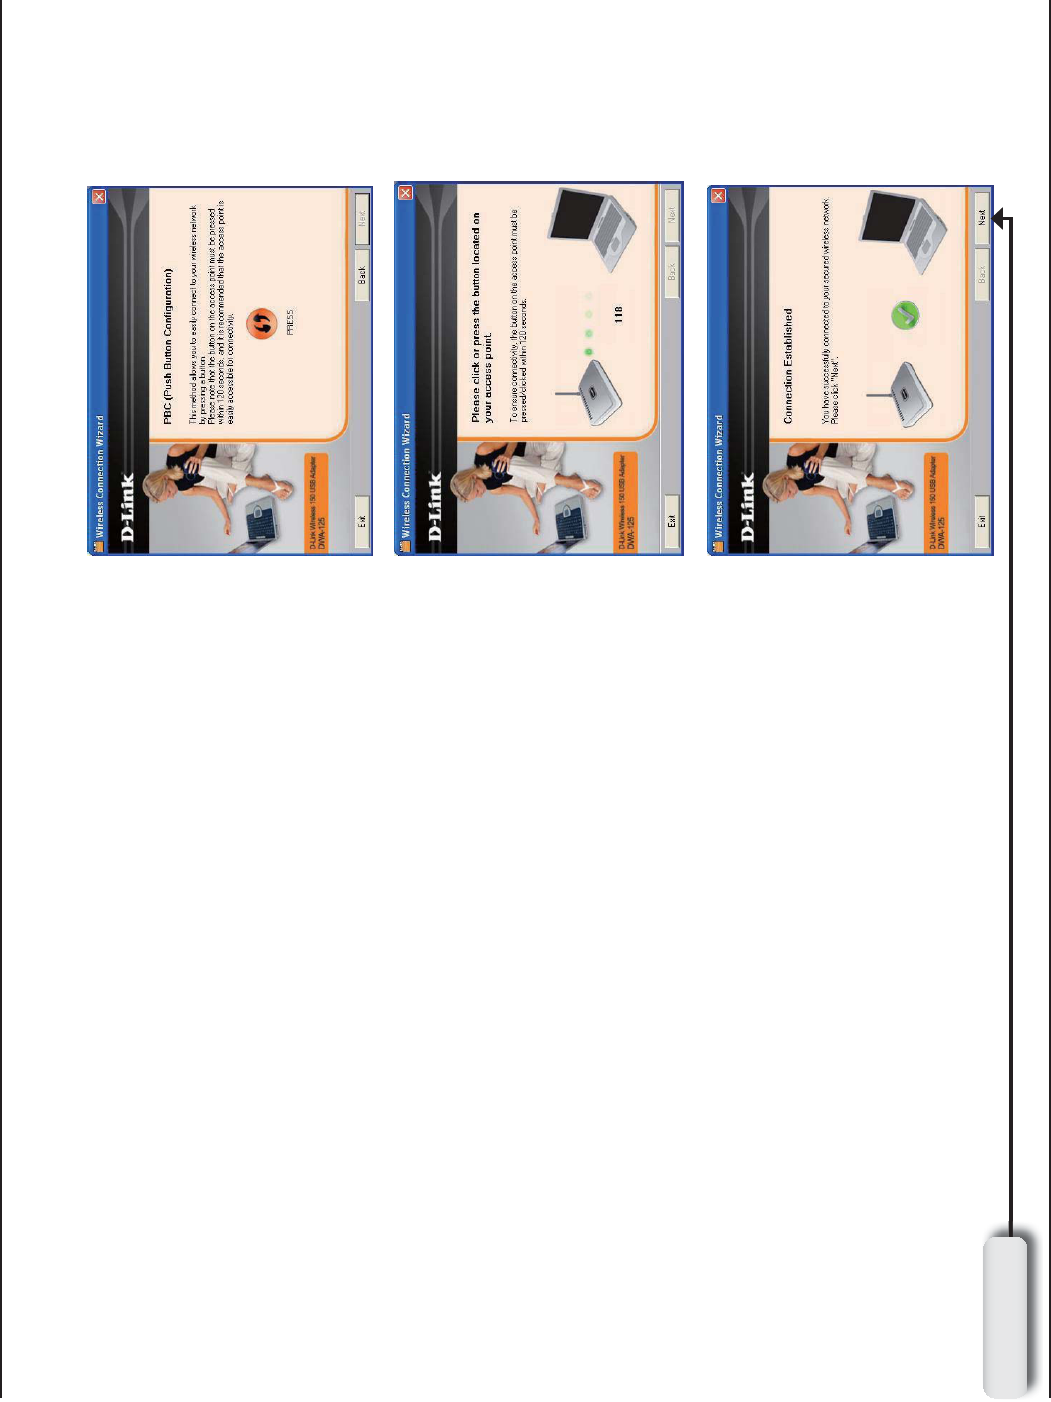
To connect to your network using the WPS push button
EQPſIWTCVKQPOGVJQFENKEMVJGXKTVWCNDWVVQPCUUJQYPKPVJG
screenshot.
Press the WPS button on your access point or wireless router
within 2 minutes to establish connectivity.
When this screen appears, you have successfully connected to
your wireless network. Click Next to complete your setup.
Click Next
Push Button Configuration (PBC)
15D-Link DWA-125 User Manual
Section 2 - Installation
To manually connect to your wireless network, select Manually
connect to a wireless network and then click Next.
Click Next
Click the Scan button to display a list of wireless networks (site
survey). Click on the network name (SSID) and click Next.
Click Next
Enter the network name (SSID) manually. If you enter the SSID
incorrectly, you will automatically be brought to the site survey
page. Click Scan to display the site survey page.
Click Next
16D-Link DWA-125 User Manual
Section 2 - Installation
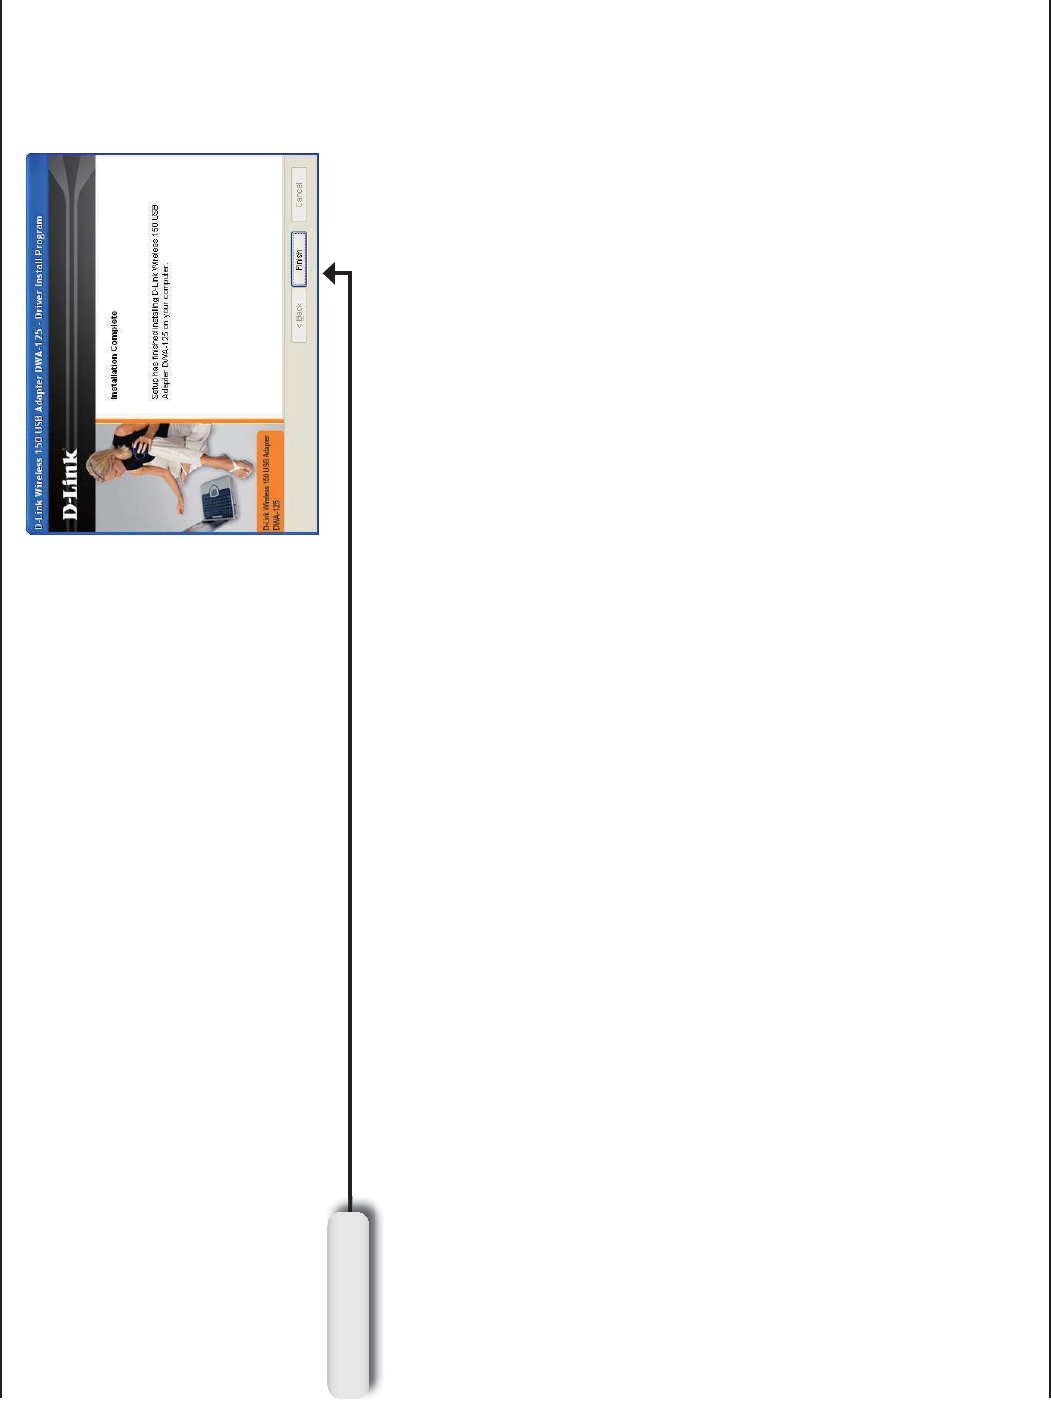
Click Finish to continue. If you are prompted to reboot your
computer, select Yes, I want to restart my computer now.
Click Finish
17D-Link DWA-125 User Manual
Section 3 - Configuration
Configuration
6JKUUGEVKQPYKNNUJQY[QWJQYVQEQPſIWTG[QWTPGY&.KPMYKTGNGUUCFCRVGTWUKPIVJG&.KPM7VKNKV[CUYGNNCUVJG
Windows®:2<GTQ%QPſIWTCVKQP7VKNKV[CPF8KUVC9.#0#WVQEQPſIWTCVKQP
D-Link Wireless Connection Manager
The D-Link DWA-125 uses the Wireless Connection Manager as the management software. The manager provides
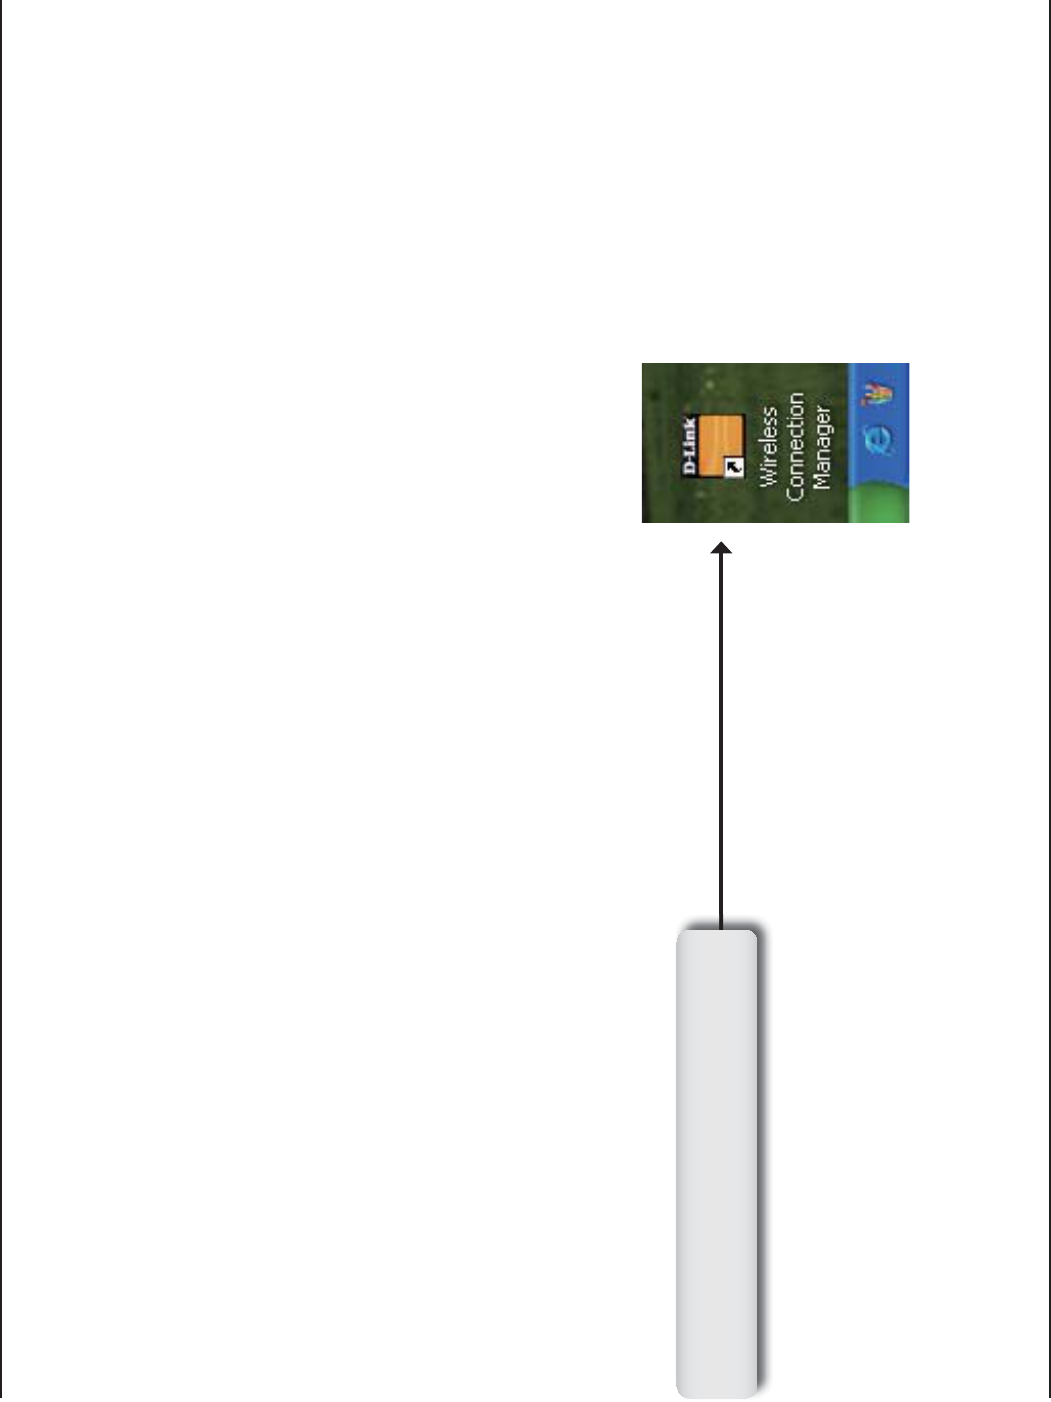
the user an easy interface to change any settings related to the wireless adapter. Clicking on the Wireless Connection
/CPCIGTKEQPQPVJGFGUMVQRYKNNUVCTVVJG%QPſIWTCVKQP
If you are using Windows® Vista™ please skip to page 27 or Windows® XP skip to page 29.
Double-click the Wireless Connection
/CPCIGTicon on your desktop.
18D-Link DWA-125 User Manual
Section 3 - Configuration
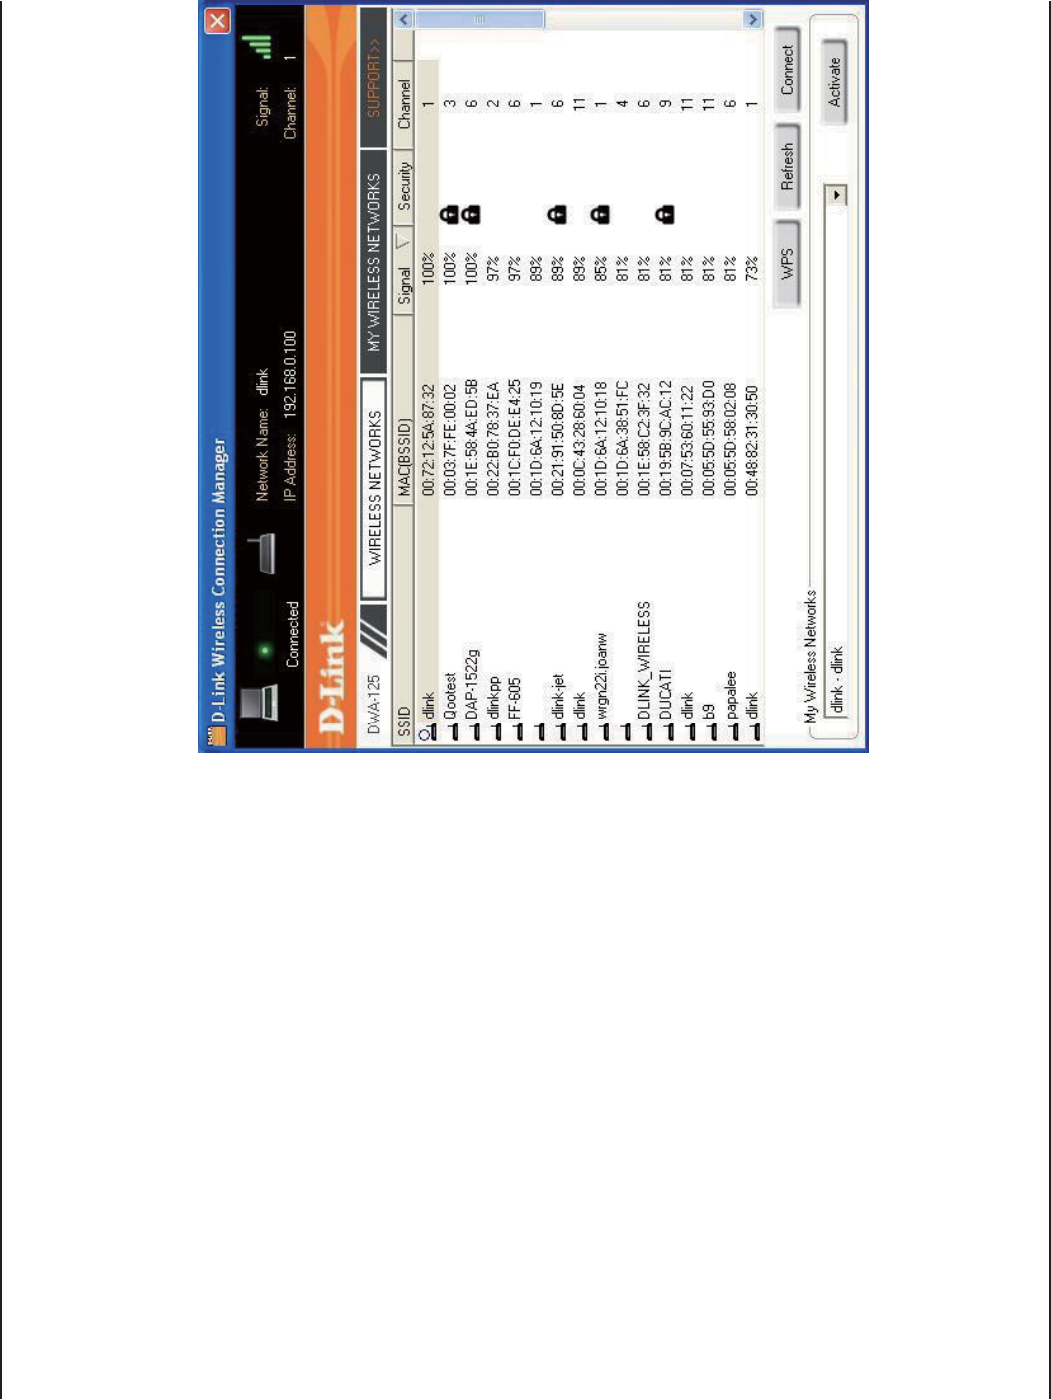
Wireless Networks
6JG55+&5GTXKEG5GV+FGPVKſGTKUVJGPCOG
of the wireless network.
Displays the MAC address of the wireless
device.
&KURNC[U VJG .KPM 3WCNKV[ QH VJG YKTGNGUU
connection.
If there is a “lock” icon, this means the wireless
PGVYQTMKUUGEWTG;QWOWUVMPQYVJGGPET[RVKQP
MG[UGEWTKV[UGVVKPIUVQEQPPGEV
Displays the channel of the wireless network.
Connect to a wireless network using Wi-Fi
Protected Setup. Refer to the next page.
Rescans for available wireless networks in your
area.
Highlight a wireless network and click the
Connect button. If the network is secure, a
pop-up window will appear. Enter the security
information to connect (refer to the Wireless
Security section for more information).
Select a wireless network profile from the
drop-down menu and click Activate to connect.
Allow up to 30 seconds to connect.
MAC:
SSID:
Channel:
Signal:
Security:
Refresh Button:
Connect Button:
Activate Button:
The Wireless Networks (Site Survey) page will display all wireless networks that are available in your area. To connect
to a network, simply highlight the wireless network (SSID) and click Connect.
WPS Button:
19D-Link DWA-125 User Manual
Section 3 - Configuration
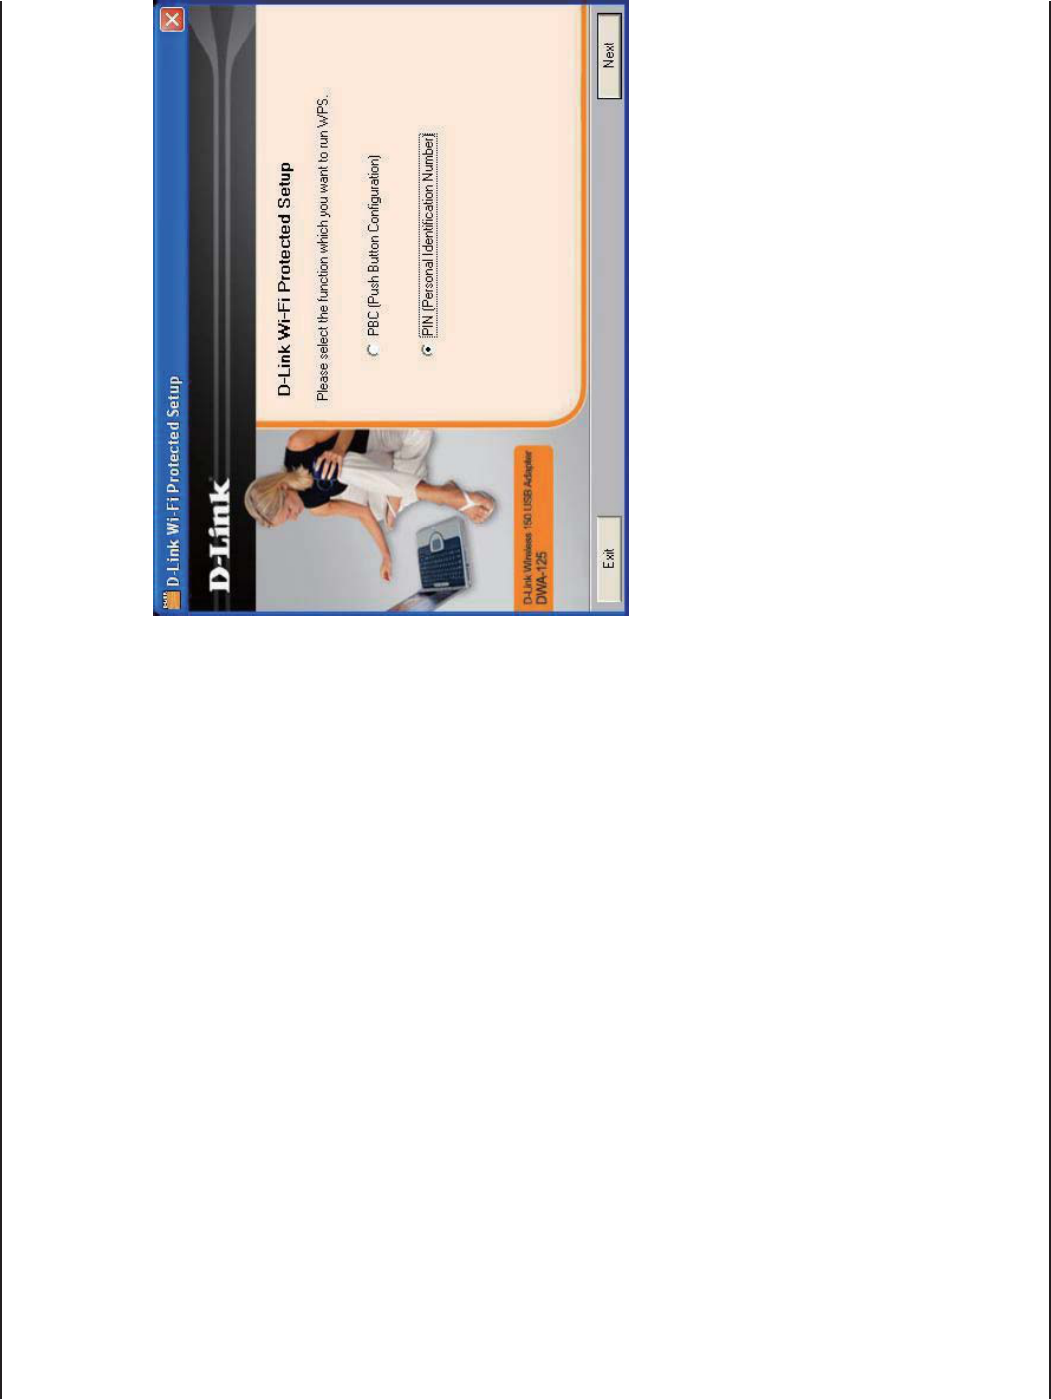
Wi-Fi Protected Setup (WPS)
Wi-Fi Protected Setup (WPS) System is designed for easy setup
of security-enabled Wi-Fi networks. It is recommended to have
the access point or wireless router nearby during setup.
For more information on WPS, visit the Wi-Fi Alliance website
CVYYYYKſQTI
“2WUJ$WVVQP%QPſIWTCVKQPŒ2$%KUCXKTVWCNDWVVQPKPVJG
utility that connects you to other WPS-enabled devices. A
connection can be established by clicking on the virtual button,
then pushing the physical button on the access point or wireless
router within 120 seconds. Refer to page 14.
“2GTUQPCN +FGPVKſECVKQP 0WODGT” (PIN) is a unique number
IGPGTCVGFTCPFQON[D[VJG YKTGNGUU CFCRVGTŏU WVKNKV[ 'PVGTKPI
this number in the utility of the WPS-enabled wireless router or
access point connects you with the intended wireless network.
Refer to the next page for more information.
20D-Link DWA-125 User Manual
Section 3 - Configuration
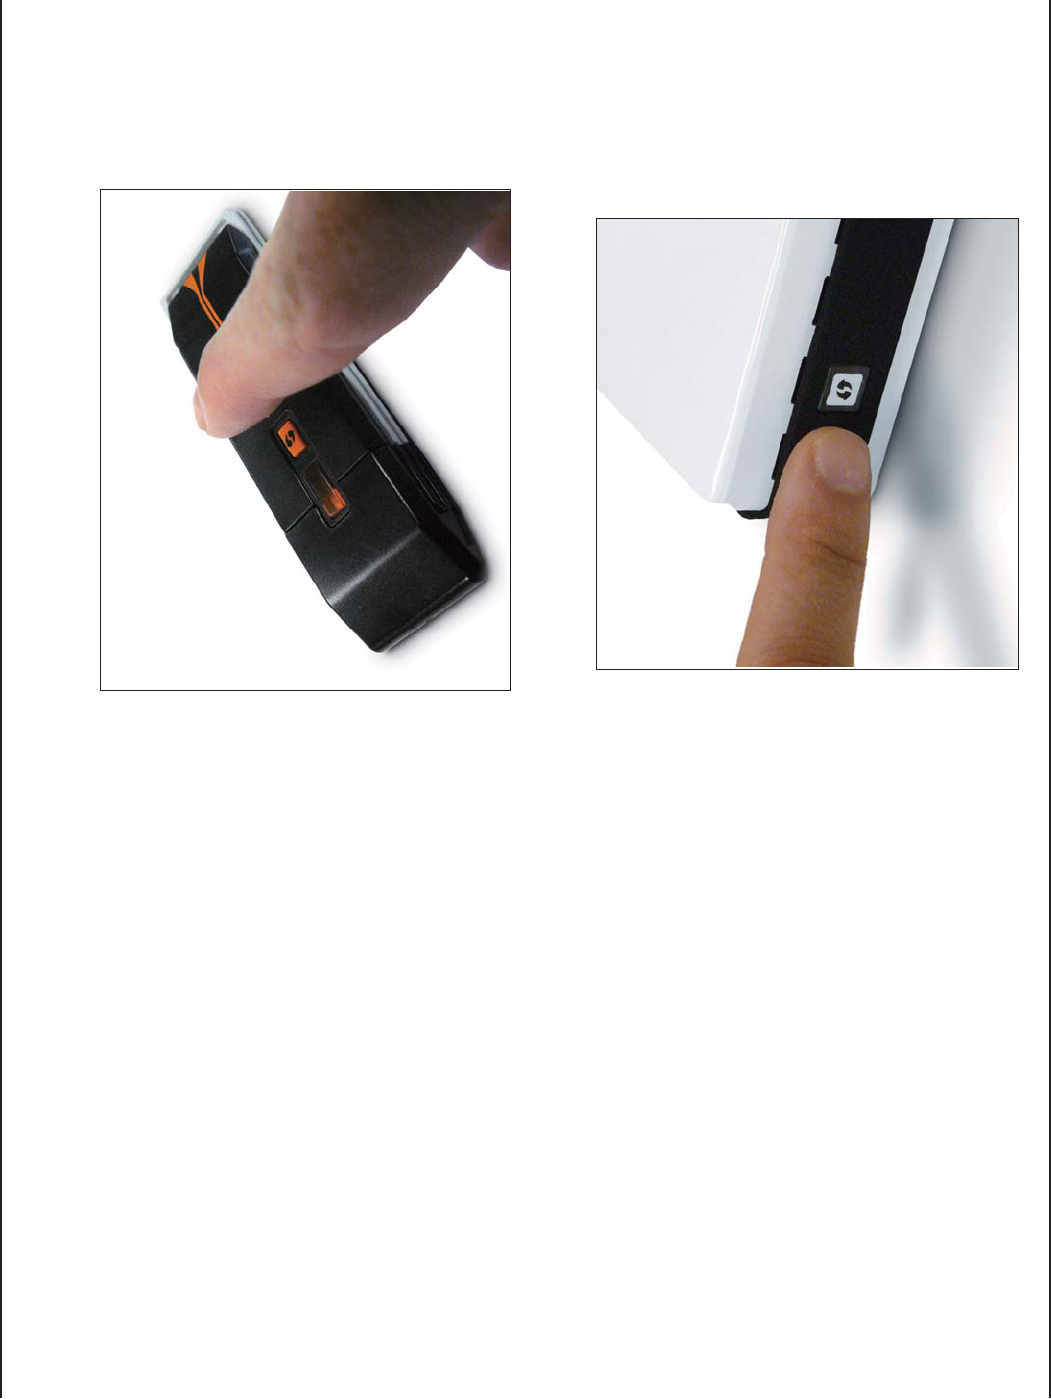
Push Button
1. To connect to your network, press the WPS button
on the adapter and hold for two seconds until the
YK\CTFUETGGPCRRGCTU
2. Press the WPS button located on your access
point or router to continue. This screen will appear
once you have successfully established connection
with your network.
21D-Link DWA-125 User Manual
Section 3 - Configuration
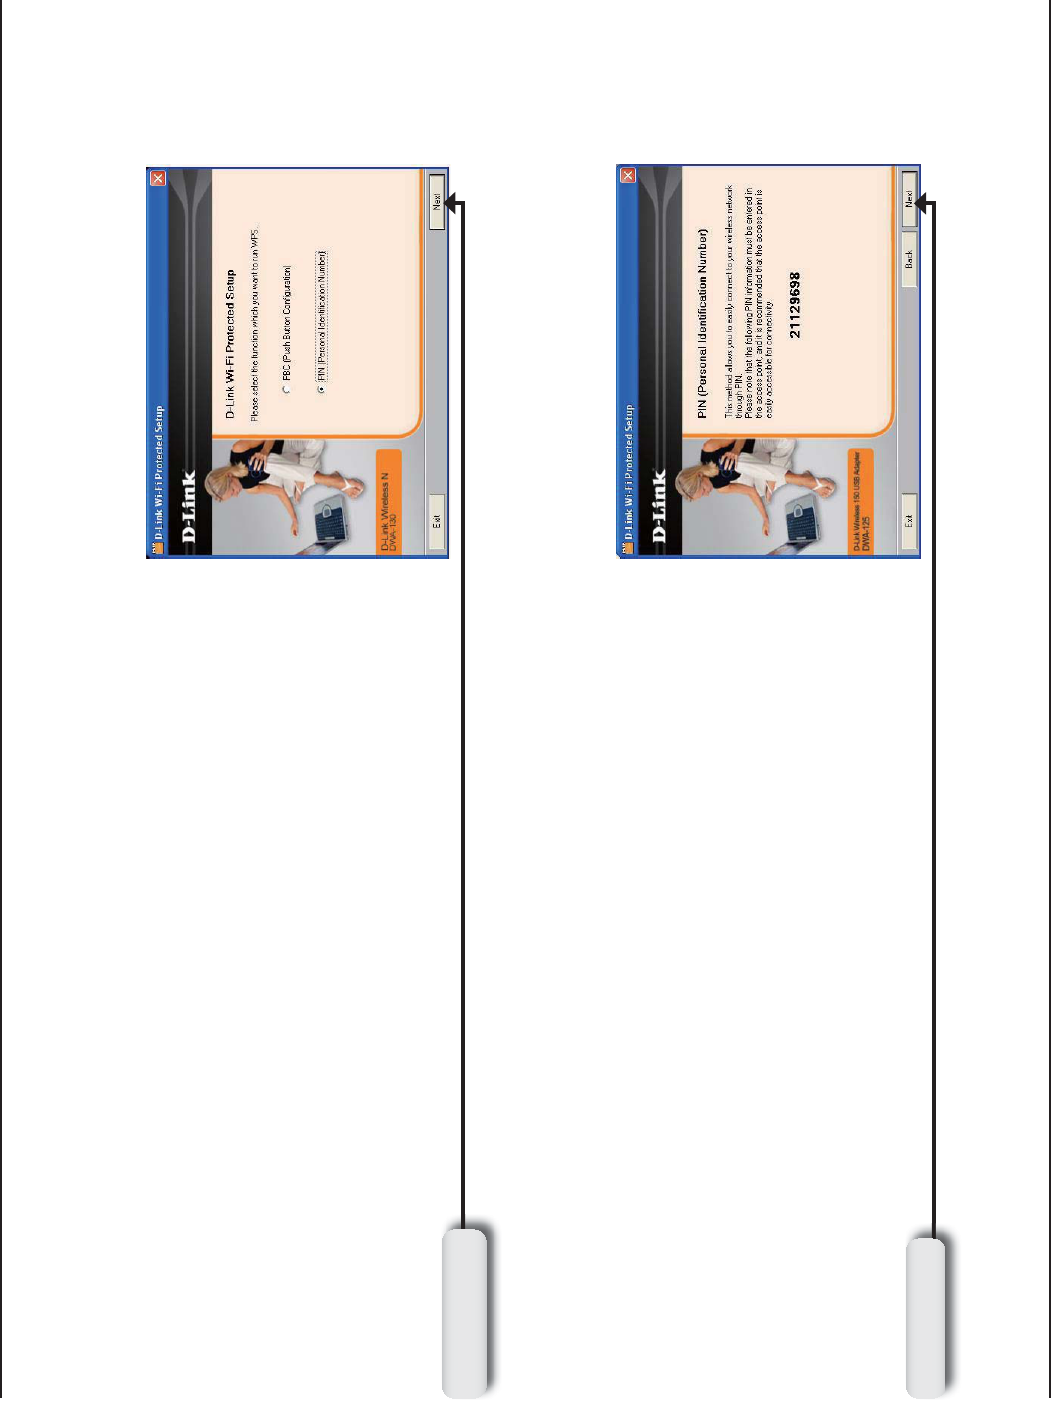
+H[QWYCPVVQEQPPGEVWUKPIVJG2$%OGVJQFTGHGTVQRCIG6Q
WUGVJG2+0OGVJQFUGNGEV2+02GTUQPCN+FGPVKſECVKQP0WODGT
and click Next.
Click Next
Make sure your access point or wireless router is close by. Write
down the number on the screen. Enter this number in your access
RQKPVQTYKTGNGUUTQWVGT2NGCUGTGHGTVQVJGOCPWHCEVWTGŏUOCPWCN
for instructions.
Once you click Next, you will have 2 minutes to enter this number
in your access point or wireless router.
Click Next
Personal Identification Number (PIN)
22D-Link DWA-125 User Manual
Section 3 - Configuration
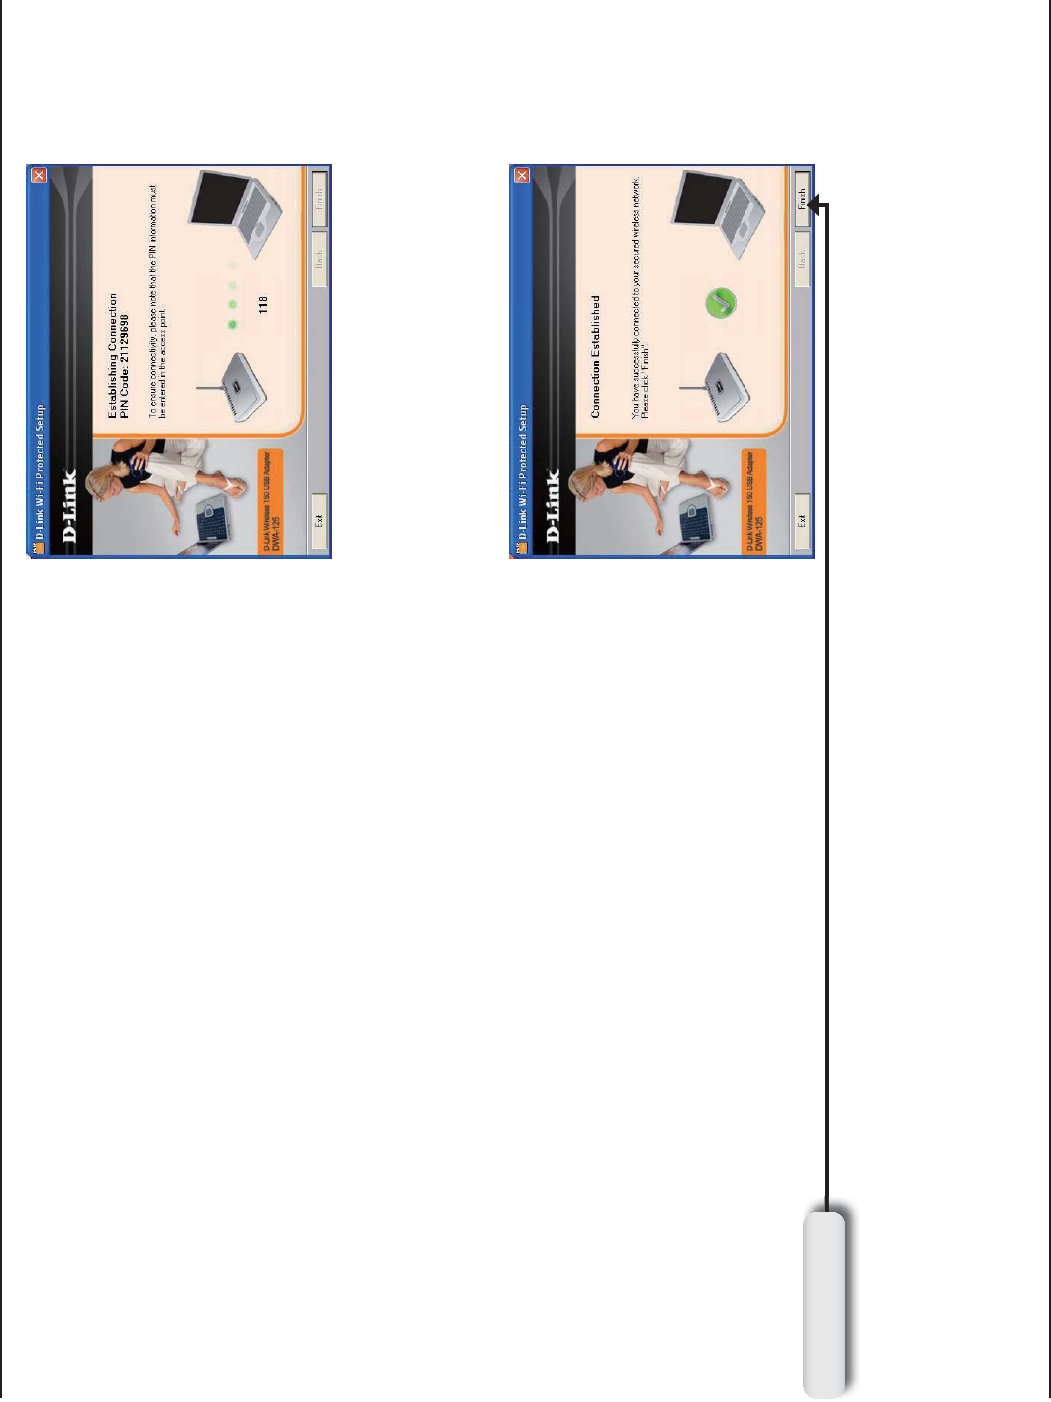
The adapter will try to establish connectivity to your access point
or wireless router.
When this screen appears, you have successfully established
connectivity. Click Finish to complete your setup.
Click Finish
23D-Link DWA-125 User Manual
Section 3 - Configuration
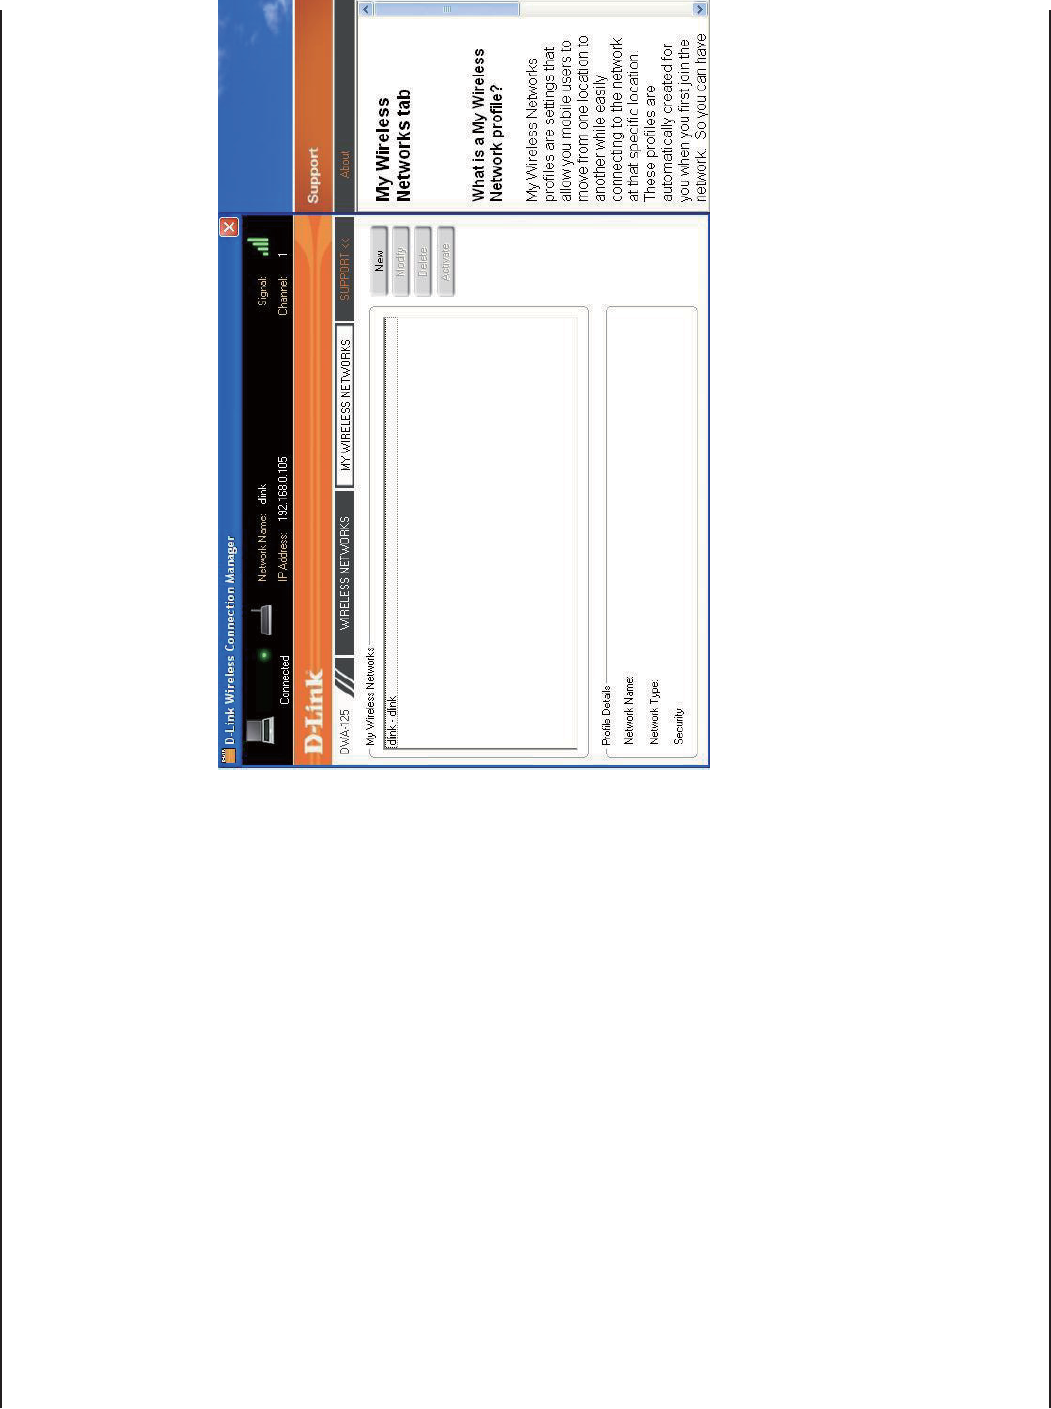
My Wireless Networks
6JG/[9KTGNGUU0GVYQTMURCIGYKNNCNNQY[QWVQETGCVGGFKVCPFFGNGVGYKTGNGUUPGVYQTMRTQſNGU'XGT[VKOG[QW
connect to a network using the Wireless NetworksRCIGCRTQſNGYKNNCWVQOCVKECNN[DGETGCVGF
New Button:
Modify:
Click New to create a new wireless network
RTQſNGTGHGTVQRCIG
Click /QFKH[VQGFKVCEWTTGPVRTQſNGTGHGTVQ
page 24).
Click DeleteVQTGOQXGCRTQſNG
Click ActivateVQWUGCRTQſNG#NNQYWRVQ
seconds to connect to the wireless network.
6JG2TQſNG&GVCKNUUGEVKQPYKNNFKURNC[KPHQTOCVKQP
about the wireless network such as the network
name (SSID), network type (Infrastructure), and
if the network is secured.
Delete:
Activate:
Profile Details:

24D-Link DWA-125 User Manual
Section 3 - Configuration
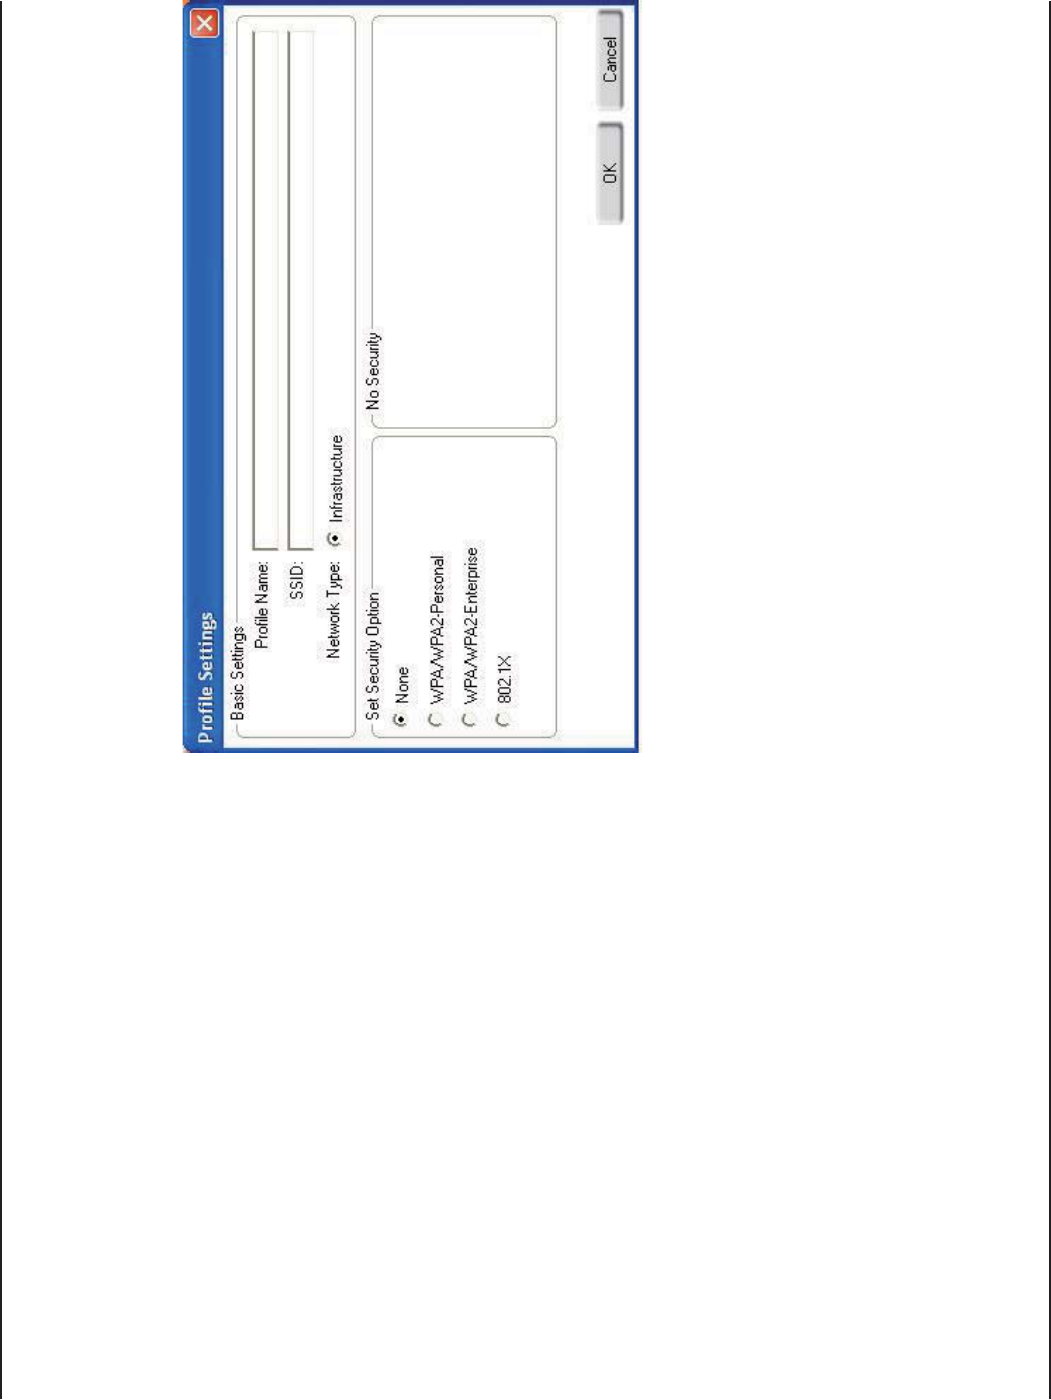
Add Profile
;QWOC[CFFCPGYPGVYQTMD[ENKEMKPIVJGNew button from the My Wireless Networks page.
Profile Name:
SSID:
'PVGTCPCOGHQT[QWTRTQſNGGI*QOG1HſEG
Coffee Shop).
Enter the SSID of the wireless network.
Select the network type. If you are connecting
to a wireless router or access point, select
+PHTCUVTWEVWTG. (Ad-hoc mode is not supported)
Select the type of security used. Please refer
to the Wireless Security section for more
information.
Click OK to save your settings.
Network Type:
Security Type:
OK Button:
25D-Link DWA-125 User Manual
Section 3 - Configuration
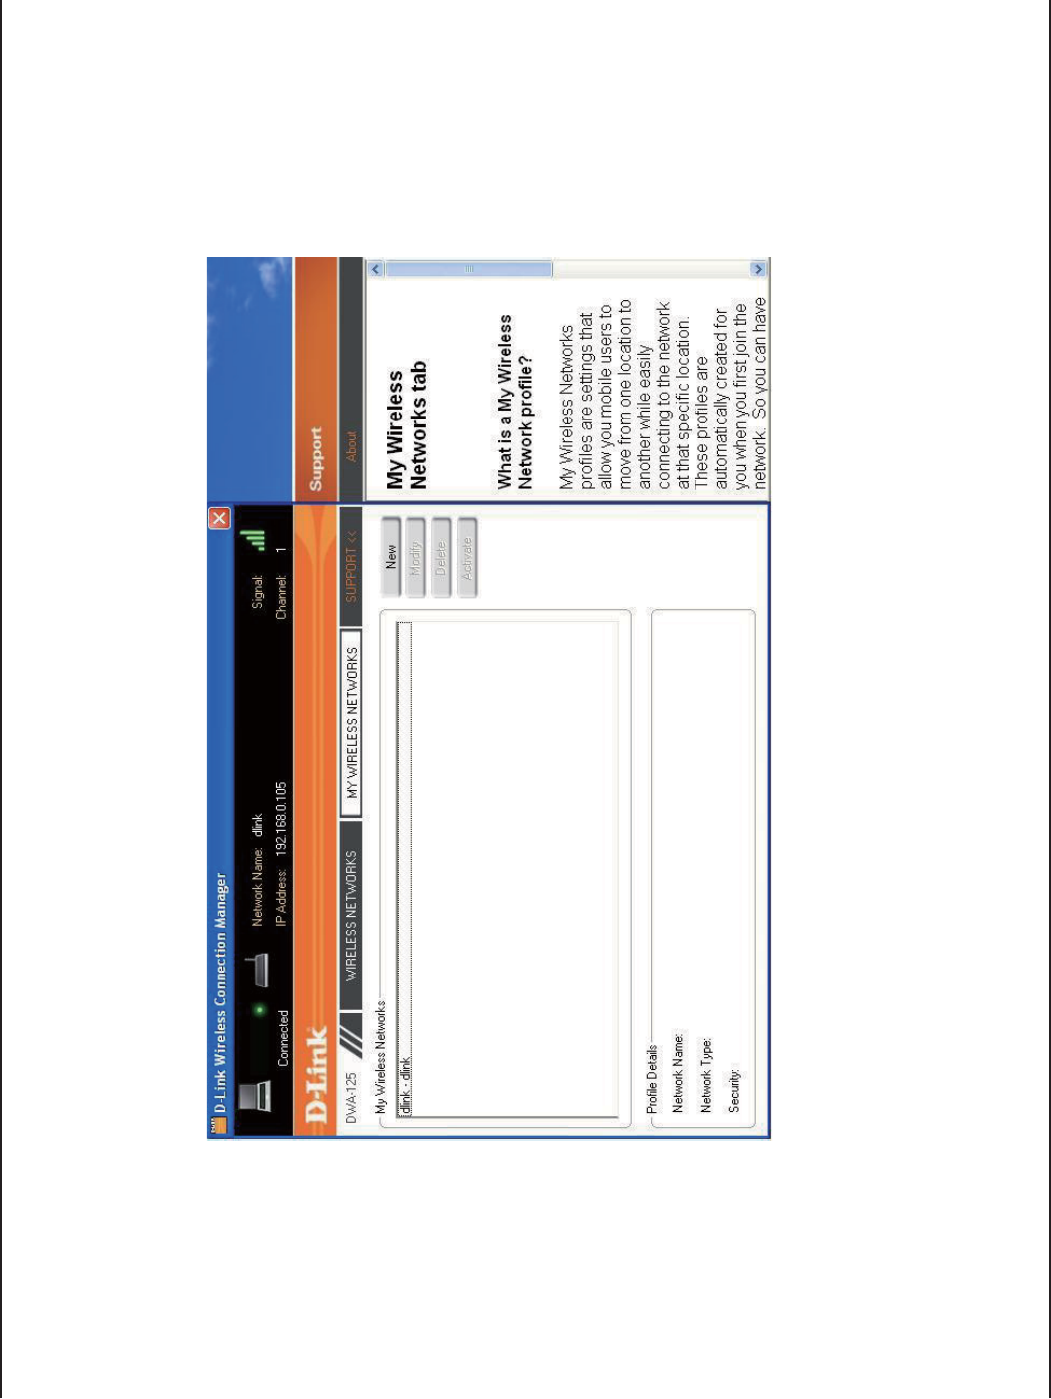
Modify Profile
;QWOC[GFKVCPGZKUVKPIRTQſNGD[UGNGEVKPIVJGRTQſNGCPFENKEMKPIVJG/QFKH[ button from the My Wireless Networks
page.
Profile Name:
SSID:
'PVGTCPCOGHQT[QWTRTQſNGGI*QOG1HſEG
Coffee Shop).
Displays the SSID of the network.
Displays the network type.
Select the type of security used. Please refer
to the Wireless Security section for more
information.
Click OK to save your settings.
Network Type:
Security Type:
OK Button:
26D-Link DWA-125 User Manual
Section 3 - Configuration
Support
If you need help, click the Support button. A panel will appear to the right of the utility which will display information
about the utility.
27D-Link DWA-125 User Manual
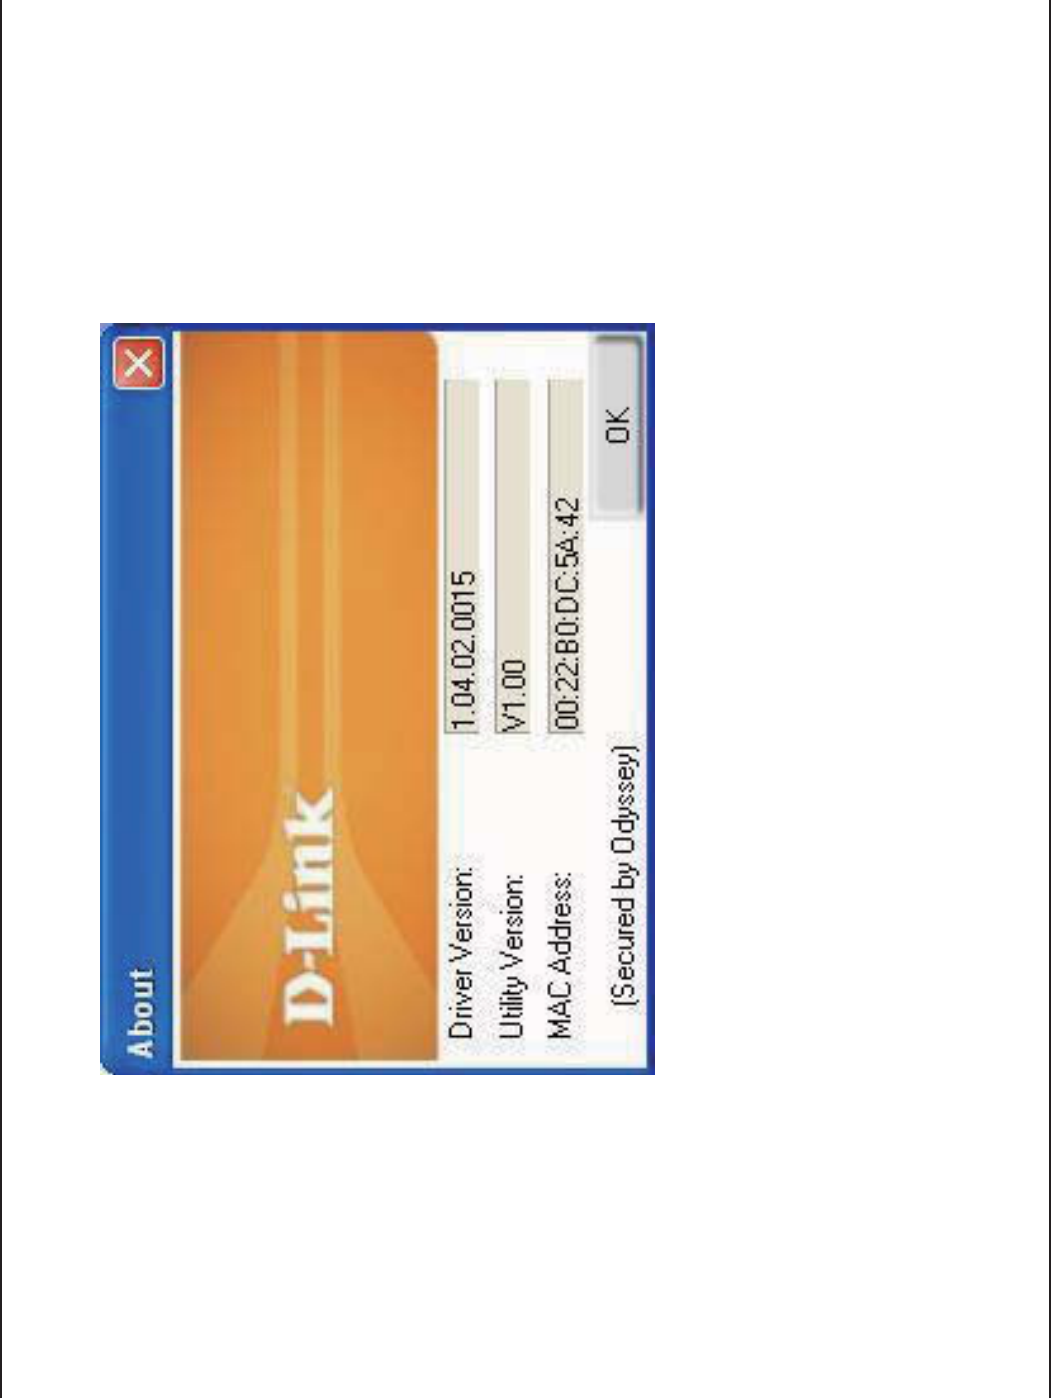
Section 3 - Configuration
The About screen gives you information about the Firmware and Utility Versions of the DWA-125.
About
28D-Link DWA-125 User Manual
Section 3 - Configuration
Connect to a Wireless Network
Using Windows® Vista™
Windows® Vista™WUGTUOC[WUGVJGDWKNVKPYKTGNGUUWVKNKV[+H[QWCTGWUKPICPQVJGTEQORCP[ŏUWVKNKV[QT9KPFQYU®
2000, please refer to the user manual of your wireless adapter for help with connecting to a wireless network. Most
utilities will have a “site survey” option similar to the Windows® Vista™ utility as seen below.
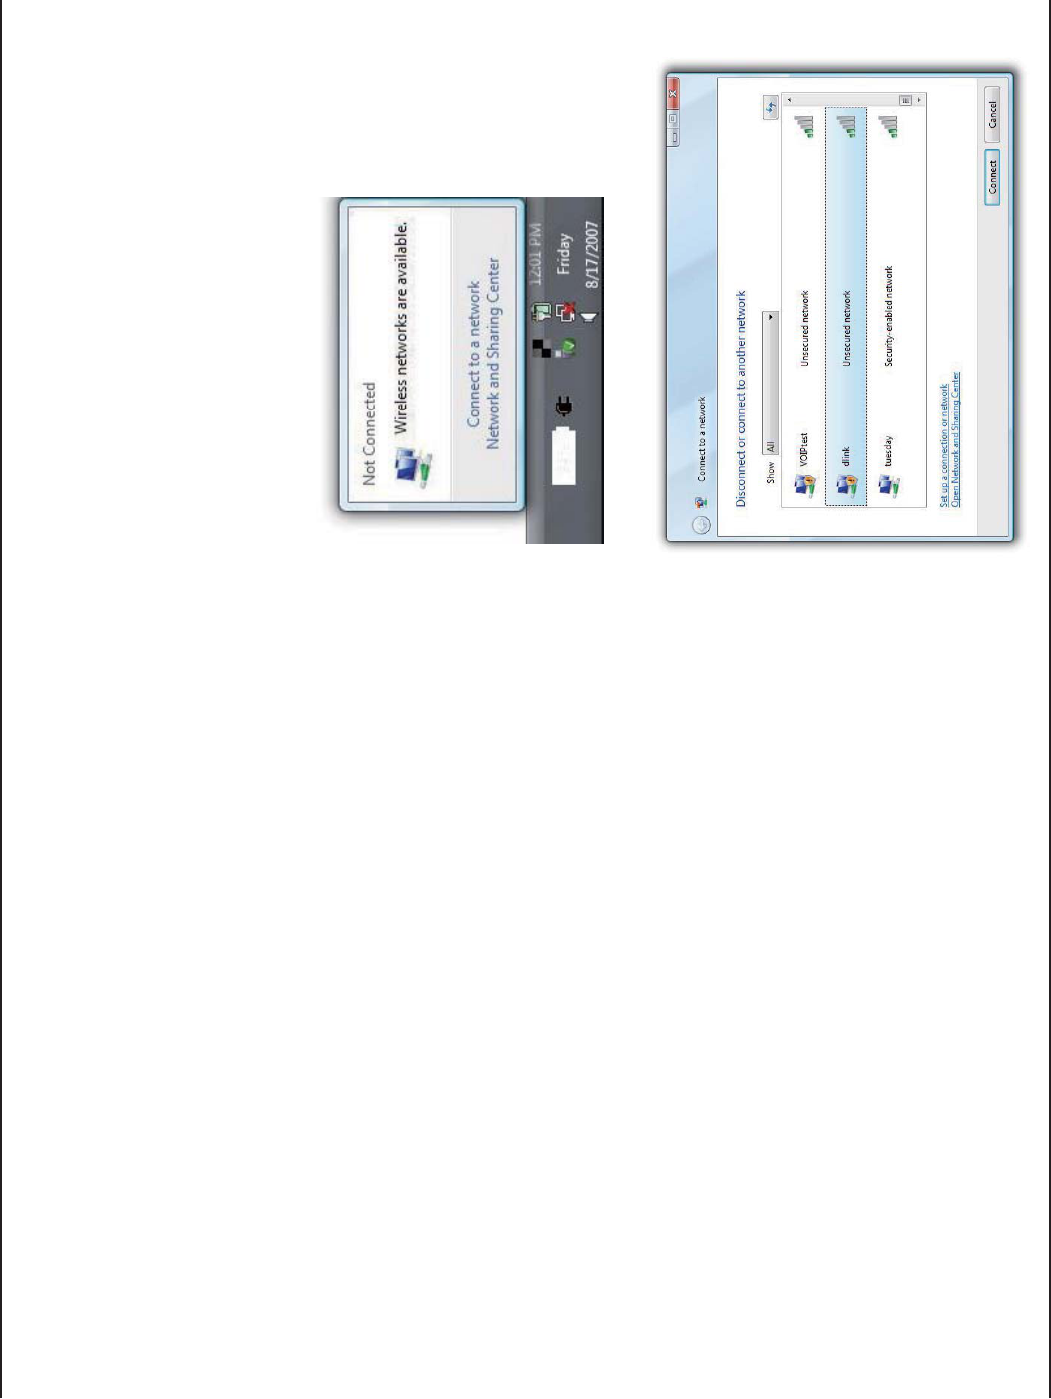
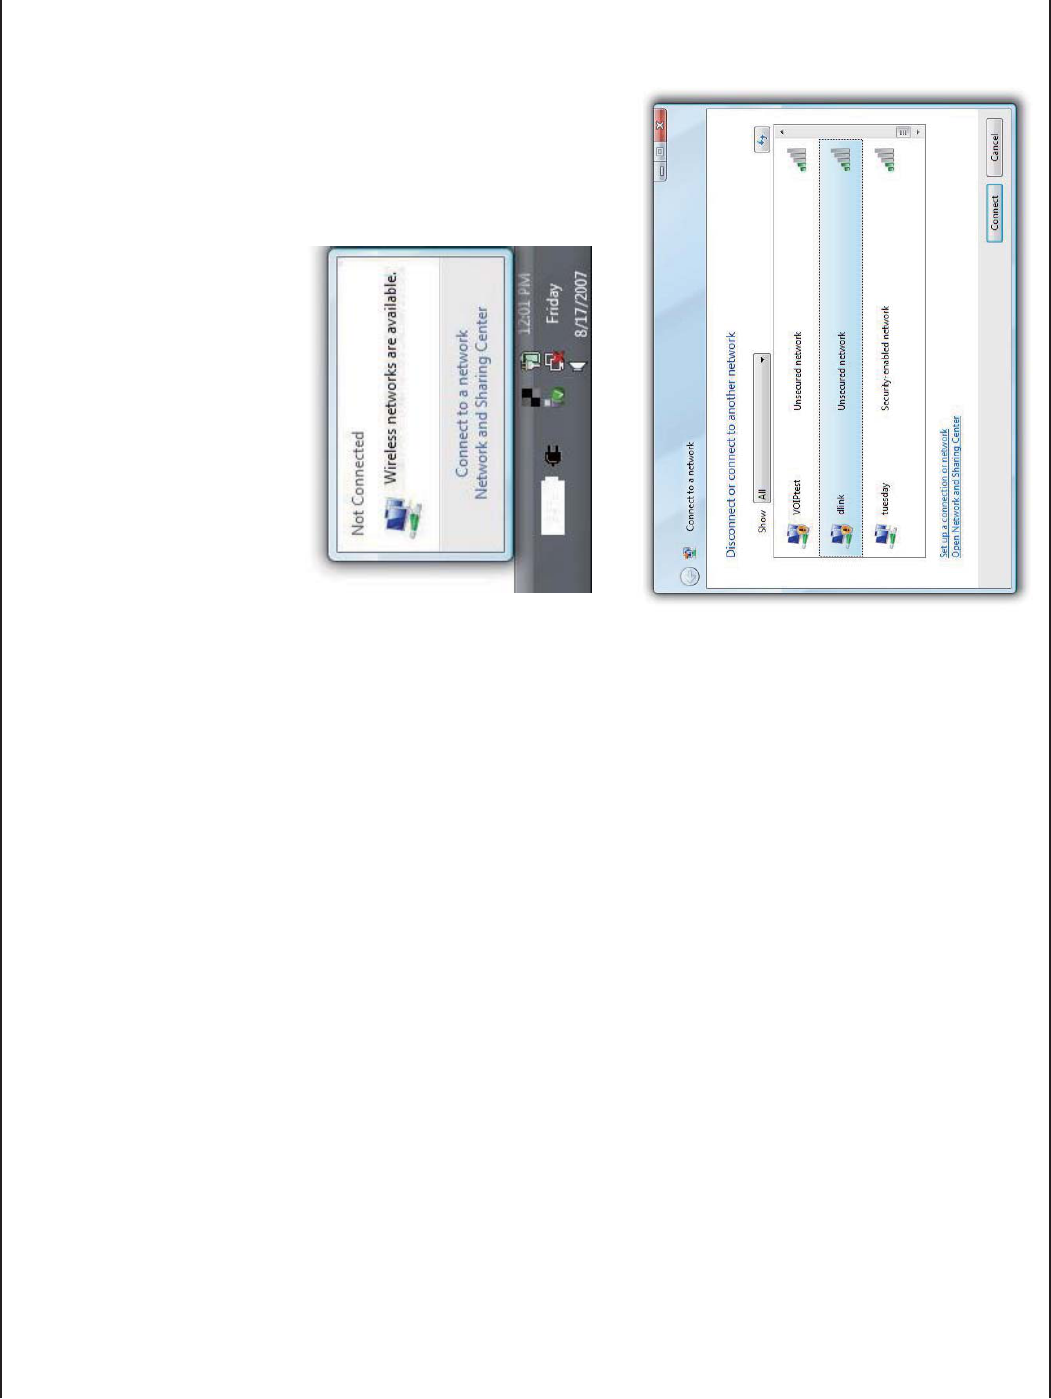
Right-click on the wireless computer icon in your system tray
(lower-right corner next to the time). Select Connect to a
network.
If you receive the Wireless Networks Detected bubble, click
on the center of the bubble to access the utility.
or
The utility will display any available wireless networks in your
area. Click on a network (displayed using the SSID) and click
the Connect button.
If you get a good signal but cannot access the Internet,
EJGEM [QW 6%2+2 UGVVKPIU HQT [QWT YKTGNGUU CFCRVGT 4GHGT
to the 0GVYQTMKPI $CUKEU section in this manual for more
information.
29D-Link DWA-125 User Manual
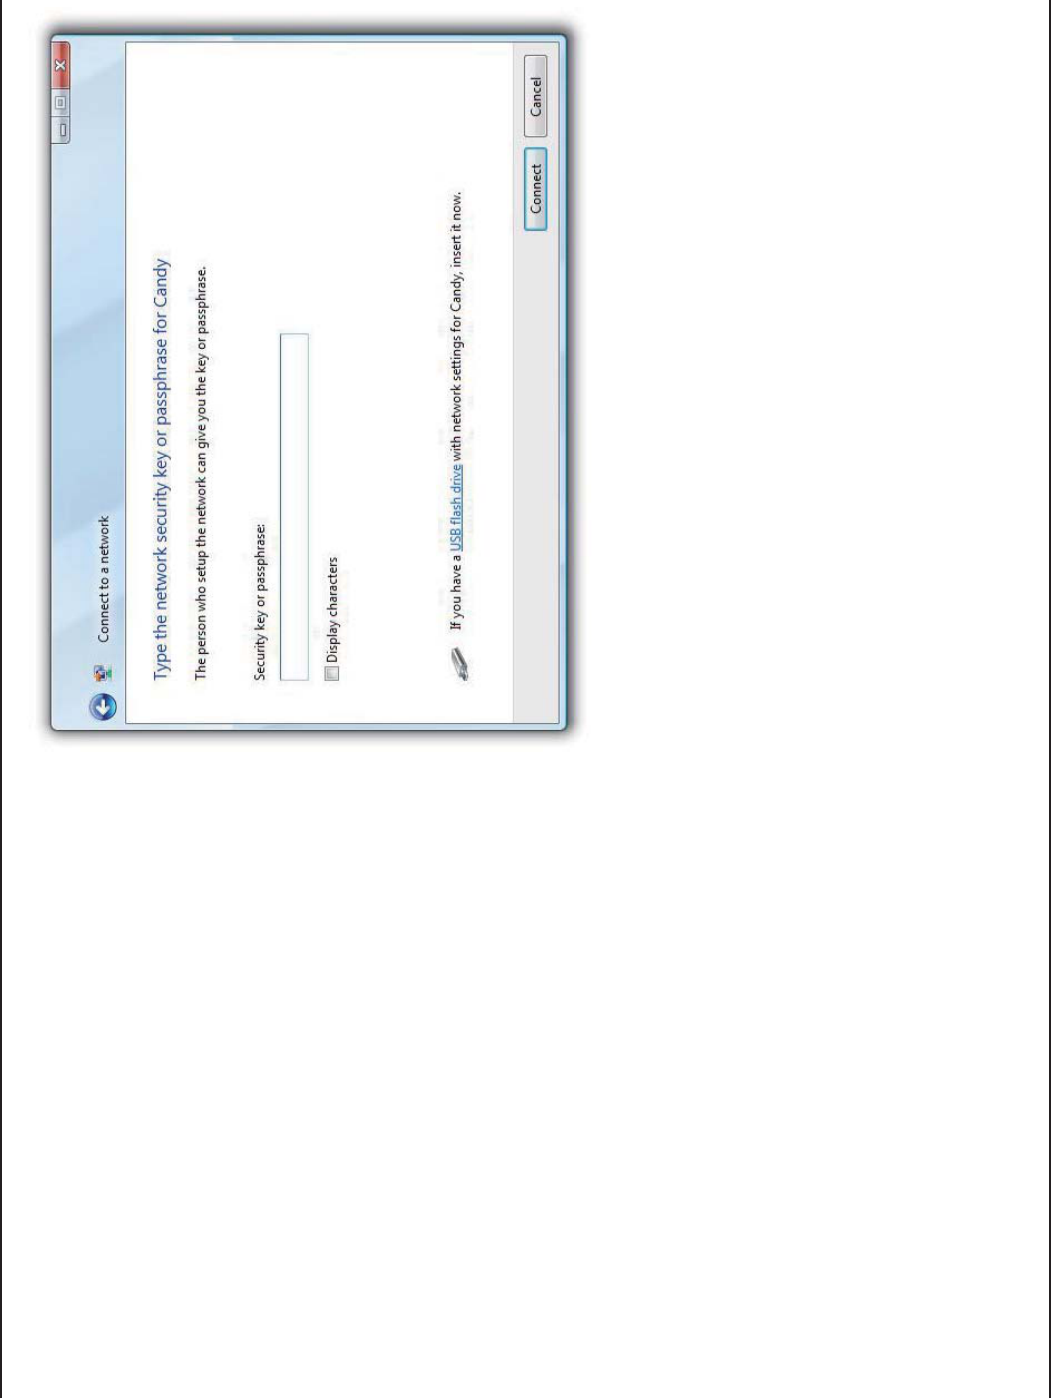
Section 3 - Configuration
Enter the same security key or passphrase that is
on your router and click Connect.
It may take 20-30 seconds to connect to the wireless
network. If the connection fails, please verify that the
security settings are correct. The key or passphrase
must be exactly the same as on the wireless
router.
30D-Link DWA-125 User Manual
Section 3 - Configuration
Connect to a Wireless Network
Using Windows® XP
Windows®:2WUGTUOC[WUGVJGDWKNVKPYKTGNGUUWVKNKV[<GTQ%QPſIWTCVKQP7VKNKV[6JGHQNNQYKPIKPUVTWEVKQPUCTGHQT
5GTXKEG2CEMWUGTU+H[QWCTGWUKPICPQVJGTEQORCP[ŏUWVKNKV[QT9KPFQYU® 2000, please refer to the user manual
of your wireless adapter for help with connecting to a wireless network. Most utilities will have a “site survey” option
similar to the Windows® XP utility as seen below.
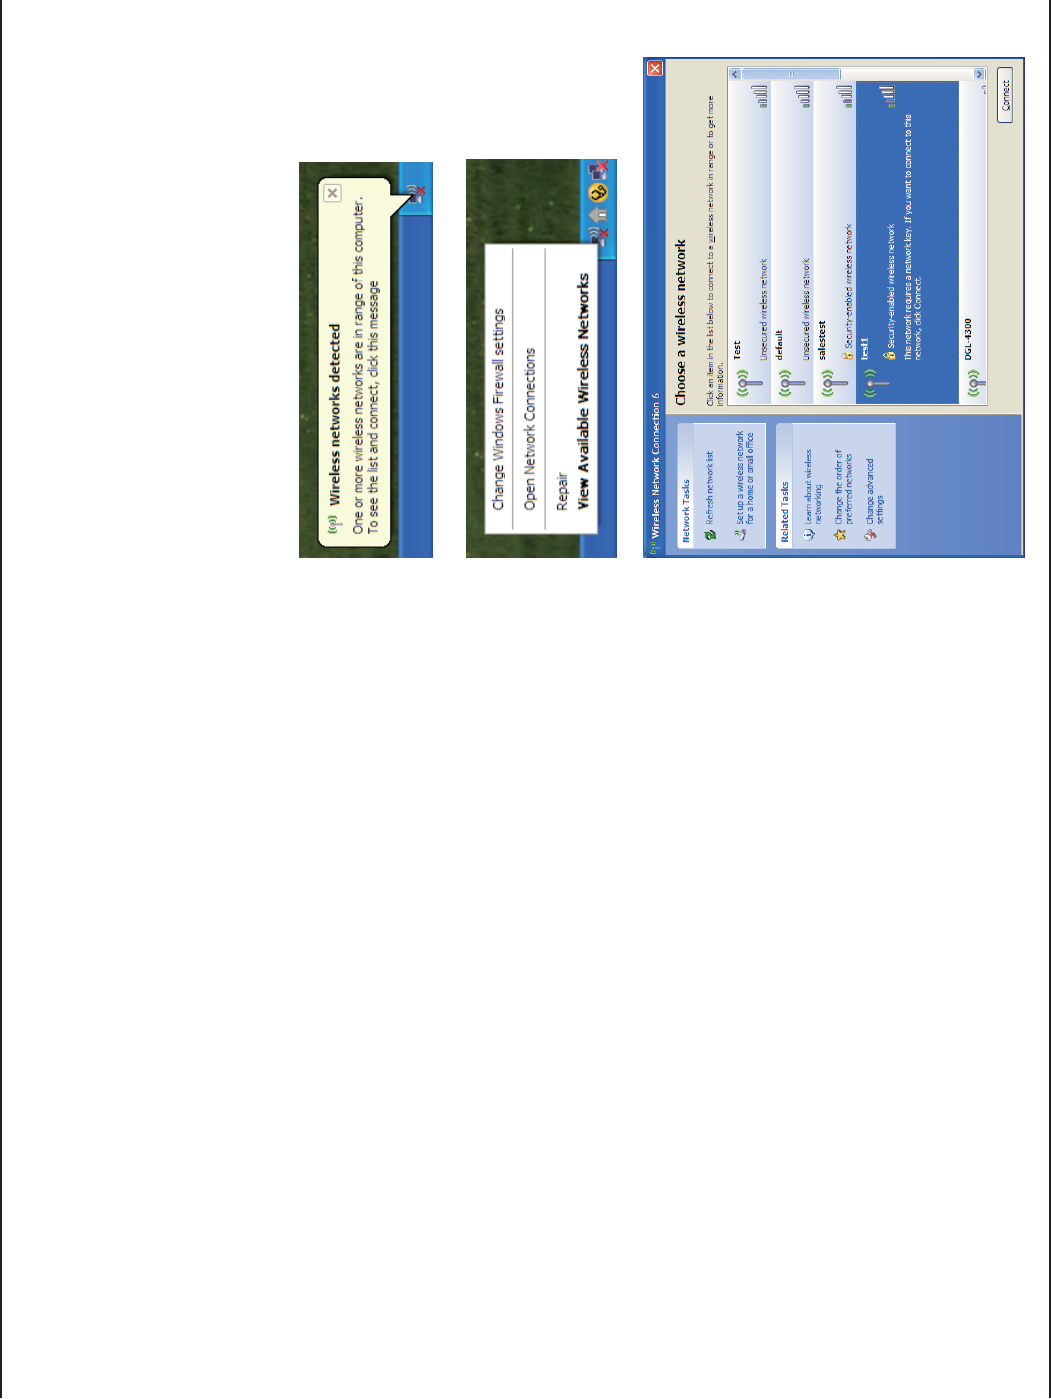
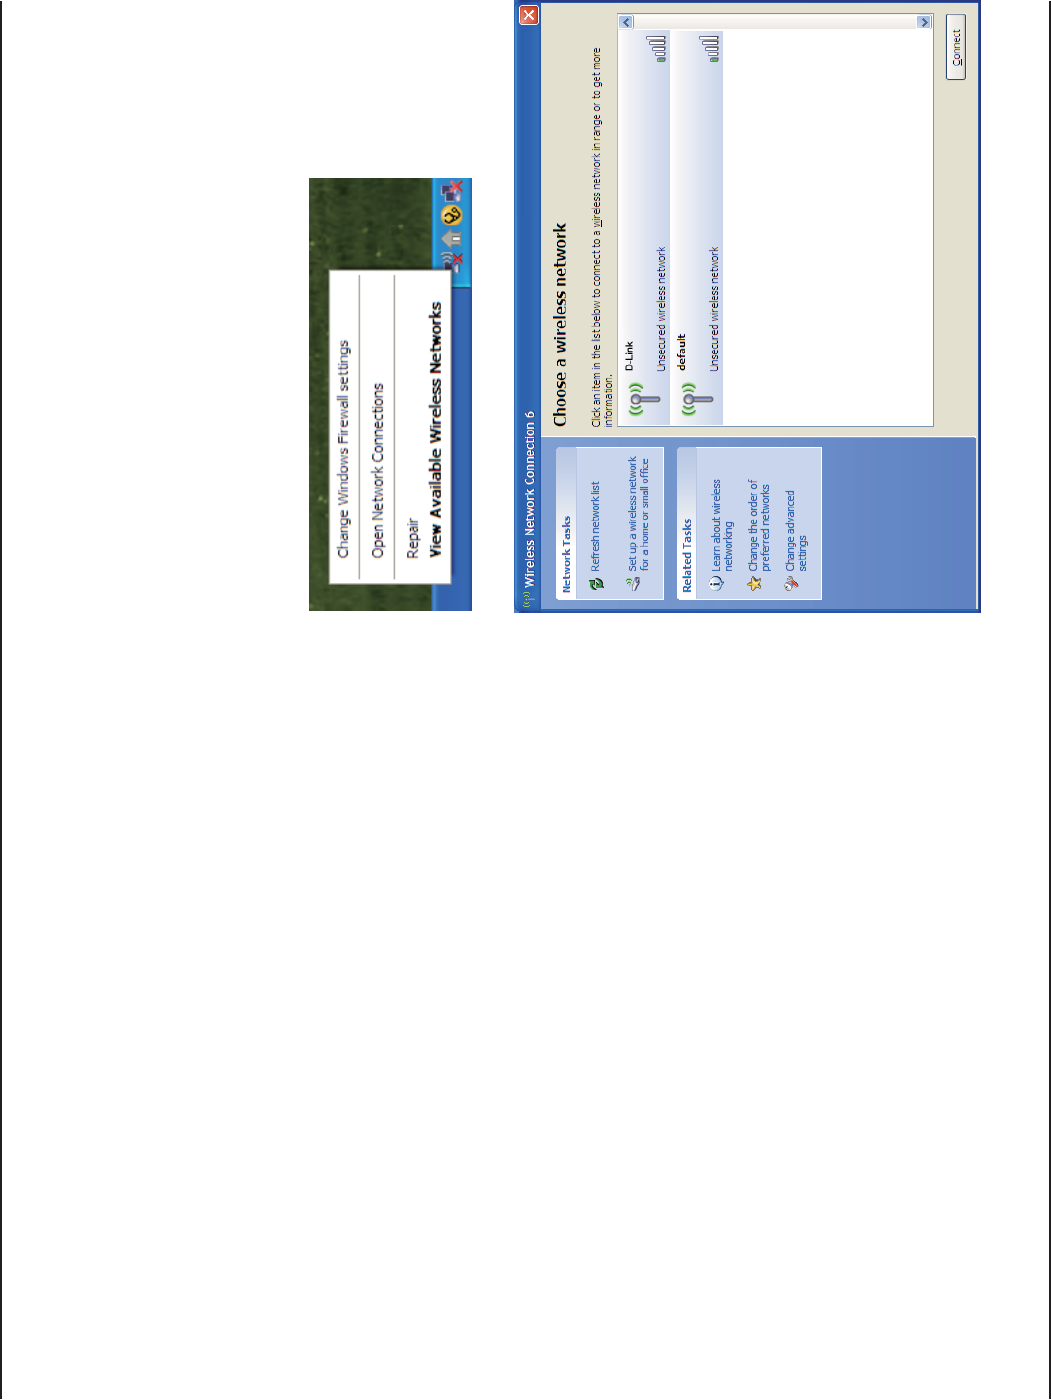
Right-click on the wireless computer icon in your system tray
(lower-right corner next to the time). Select View Available
Wireless Networks.
If you receive the Wireless Networks Detected bubble, click
on the center of the bubble to access the utility.
or
The utility will display any available wireless networks in your
area. Click on a network (displayed using the SSID) and click
the Connect button.
If you get a good signal but cannot access the Internet,
EJGEM [QW 6%2+2 UGVVKPIU HQT [QWT YKTGNGUU CFCRVGT 4GHGT
to the 0GVYQTMKPI $CUKEU section in this manual for more
information.

31D-Link DWA-125 User Manual
Section 4 - Wireless Security
Wireless Security
This section will show you the different levels of security you can use to protect your data from intruders. The
&9#QHHGTUVJGHQNNQYKPIV[RGUQHUGEWTKV[
Ŗ92#9K(K2TQVGEVGF#EEGUU Ŗ92#25-2TG5JCTGF-G[
Ŗ92#9K(K2TQVGEVGF#EEGUU Ŗ92#25-2TG5JCTGF-G[
ŖZ4#&+75
What is WPA?
WPA, or Wi-Fi Protected Access, is a Wi-Fi standard that was designed to improve the security features of WEP (Wired
Equivalent Privacy).
6JGOCLQTKORTQXGOGPVUQXGT9'2
Ŗ+ORTQXGFFCVCGPET[RVKQPVJTQWIJVJG6GORQTCN-G[+PVGITKV[2TQVQEQN6-+26-+2UETCODNGUVJGMG[U
WUKPICJCUJKPICNIQTKVJOCPFD[CFFKPICPKPVGITKV[EJGEMKPIHGCVWTGGPUWTGUVJCVVJGMG[UJCXGPŏVDGGP
tampered with. WPA2 is based on 802.11i and uses Advanced Encryption Standard instead of TKIP.
Ŗ7UGTCWVJGPVKECVKQPYJKEJKUIGPGTCNN[OKUUKPIKP9'2VJTQWIJVJGGZVGPUKDNGCWVJGPVKECVKQPRTQVQEQN
'#29'2TGIWNCVGUCEEGUUVQCYKTGNGUUPGVYQTM DCUGF QP C EQORWVGTŏU JCTFYCTGURGEKſE /#%
address, which is relatively simple to be sniffed out and stolen. EAP is built on a more secure public-key
GPET[RVKQPU[UVGOVQGPUWTGVJCVQPN[CWVJQTK\GFPGVYQTMWUGTUECPCEEGUUVJGPGVYQTM
92#25-92#25-WUGUCRCUURJTCUGQTMG[VQCWVJGPVKECVG[QWTYKTGNGUUEQPPGEVKQP6JGMG[KUCPCNRJCPWOGTKE
RCUUYQTFDGVYGGPCPFEJCTCEVGTUNQPI6JGRCUUYQTFECPKPENWFGU[ODQNU!ACPFURCEGU6JKUMG[OWUV
be the exact same key entered on your wireless router or access point.
92#92#KPEQTRQTCVGUWUGTCWVJGPVKECVKQPVJTQWIJVJG'ZVGPUKDNG#WVJGPVKECVKQP2TQVQEQN'#2'#2KUDWKNVQPC
OQTGUGEWTGRWDNKEMG[GPET[RVKQPU[UVGOVQGPUWTGVJCVQPN[CWVJQTK\GFPGVYQTMWUGTUECPCEEGUUVJGPGVYQTM
32D-Link DWA-125 User Manual
Section 4 - Wireless Security
Configure WPA/WPA2 Passphrase
Using the D-Link Wireless Connection Manager
+VKUTGEQOOGPFGFVQGPCDNG92#25-QP[QWTYKTGNGUUTQWVGTQTCEEGUURQKPVDGHQTGEQPſIWTKPI[QWTYKTGNGUUCFCRVGT
If you are joining an existing network, you will need to know the WPA-PSK passphrase being used.
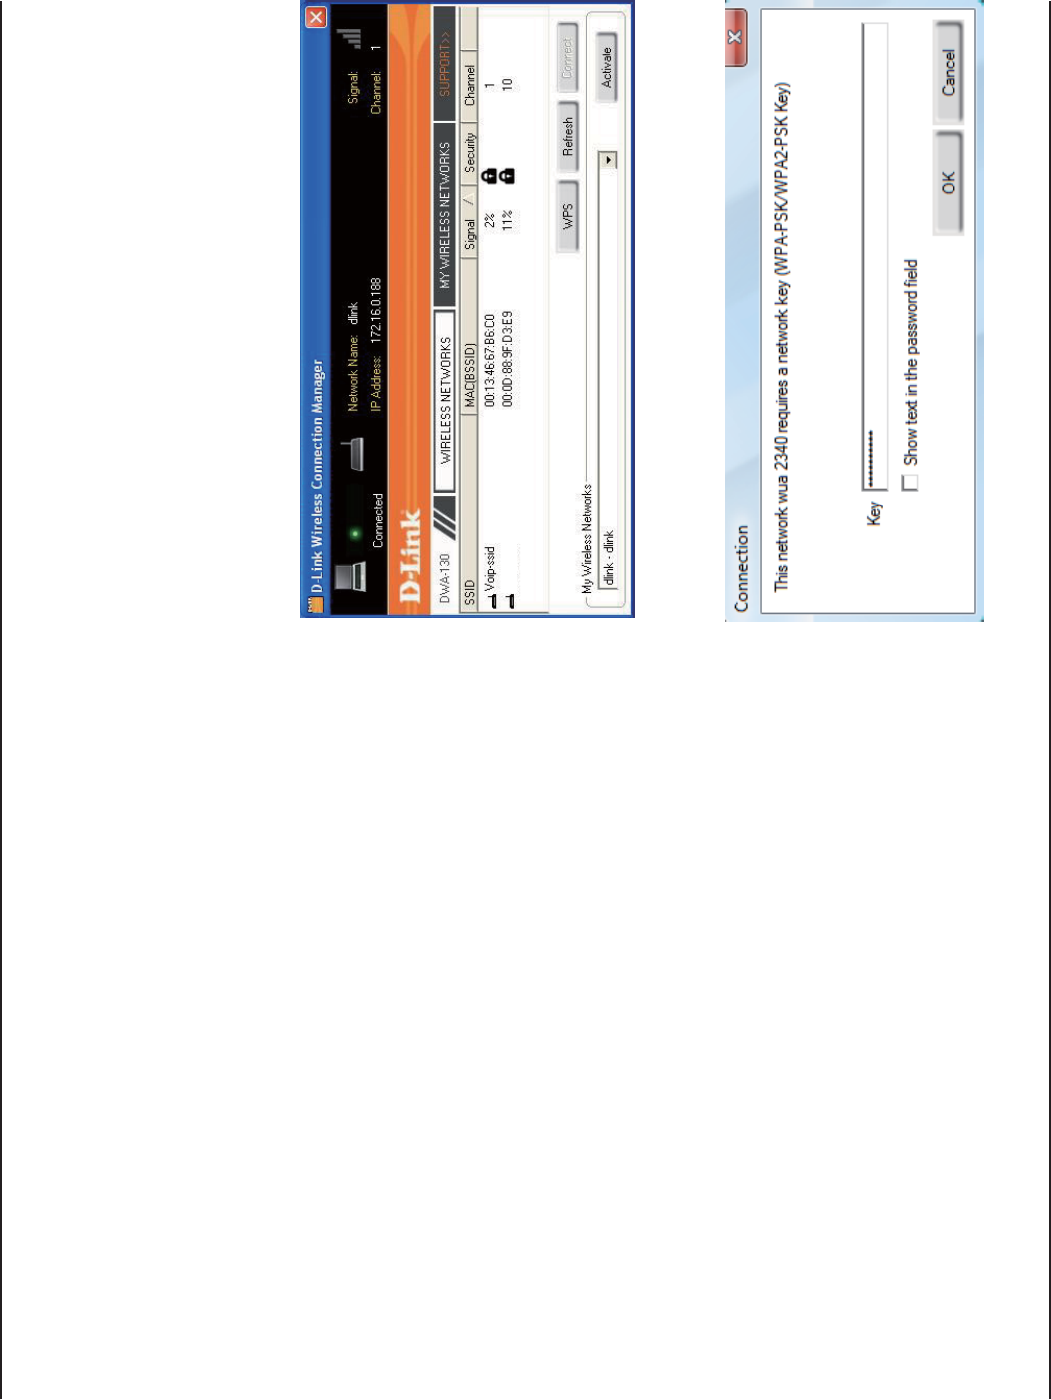
1. Open the Wireless Connection Manager by double-clicking on
the D-Link icon on your desktop.
2. Highlight the wireless network (SSID) you would like to connect
to and click Connect. If the network is using WPA-PSK, the
screen (as shown to the bottom-right) will appear.
3. Enter the WPA-PSK passphrase exactly as it is on your
wireless router or access point. Click the Show text in the
RCUUYQTFſGNF box to see the passphrase. Unchecking it will
hide it.
4. Click OK to connect to the network. Allow up to 30 seconds
to connect.
If you would like to create a new network and enter the WPA-PSK
settings, refer to the next page.

33D-Link DWA-125 User Manual
Section 4 - Wireless Security
+VKUTGEQOOGPFGFVQGPCDNG92#25-QP[QWTYKTGNGUUTQWVGTQTCEEGUURQKPVDGHQTGEQPſIWTKPI[QWTYKTGNGUUCFCRVGT
Make sure you enter the passphrase exactly the same on all wireless devices.
1. Open the Wireless Connection Manager by double-clicking on the D-Link icon on your desktop. Click on New to
ETGCVGCPGYRTQſNGQTJKIJNKIJVCPGZKUVKPIRTQſNGCPFENKEM/QFKH[.
2. Select 92#92#2GTUQPCN under Set Security Option.
3. Select TKIP or AES.
4. Enter the passphrase exactly as it is on your wireless router
or access point.
5. Click OK to connect to the network. Allow up to 30 seconds
to connect.
34D-Link DWA-125 User Manual
Section 4 - Wireless Security
Configure WPA/WPA2 Passphrase
Using Windows® Vista
+VKUTGEQOOGPFGFVQGPCDNGYKTGNGUUUGEWTKV[92#92#QP[QWTYKTGNGUUTQWVGTQTCEEGUURQKPVDGHQTGEQPſIWTKPI
your wireless adapter. If you are joining an existing network, you will need to know the security key or passphrase
being used.
2. Highlight the wireless network (SSID) you would like to
connect to and click Connect.
1. Open the Windows® Vista™ Wireless Utility by right-clicking
on the wireless computer icon in your system tray (lower
right corner of screen). Select Connect to a network.
35D-Link DWA-125 User Manual
Section 4 - Wireless Security
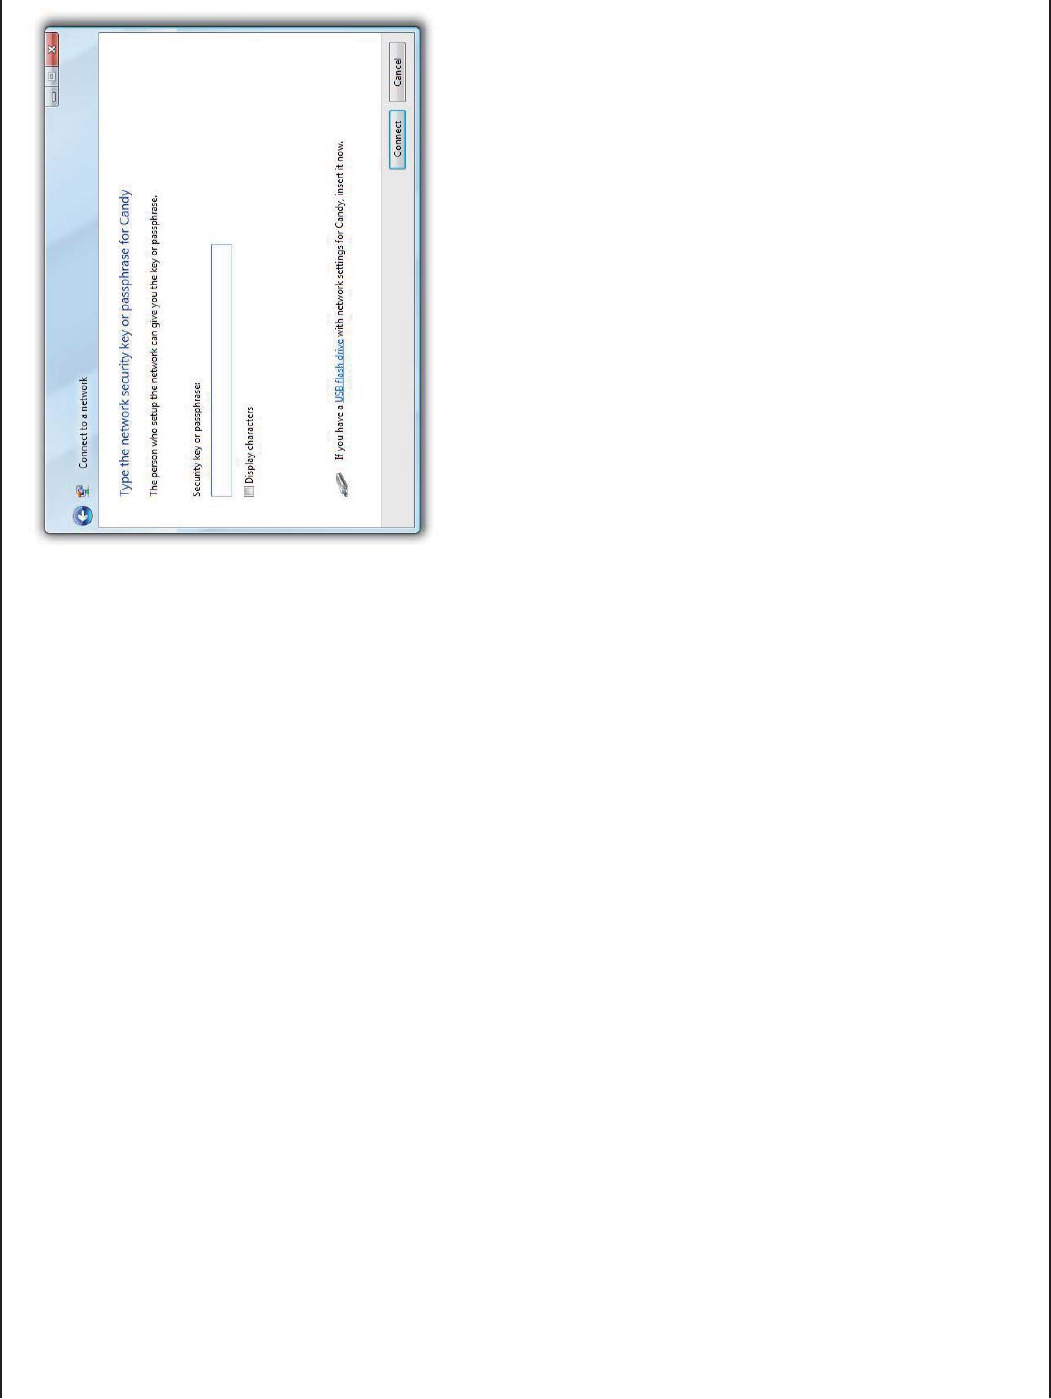
3. Enter the same security key or passphrase that is on your router
and click Connect.
It may take 20-30 seconds to connect to the wireless network. If the
connection fails, please verify that the security settings are correct.
The key or passphrase must be exactly the same as on the wireless
router.
36D-Link DWA-125 User Manual
Section 4 - Wireless Security
Configure WPA/WPA2 Passphrase
Using the Windows® XP Utility
+VKUTGEQOOGPFGFVQGPCDNG92#25-QP[QWTYKTGNGUUTQWVGTQTCEEGUURQKPVDGHQTGEQPſIWTKPI[QWTYKTGNGUUCFCRVGT
If you are joining an existing network, you will need to know the WPA-PSK key being used.
2. Highlight the wireless network (SSID) you would like
to connect to and click Connect.
1. Open the Windows® XP Wireless Utility by right-clicking
on the wireless computer icon in your system tray
(lower-right corner of screen). Select View Available
Wireless Networks.
37D-Link DWA-125 User Manual
Section 4 - Wireless Security
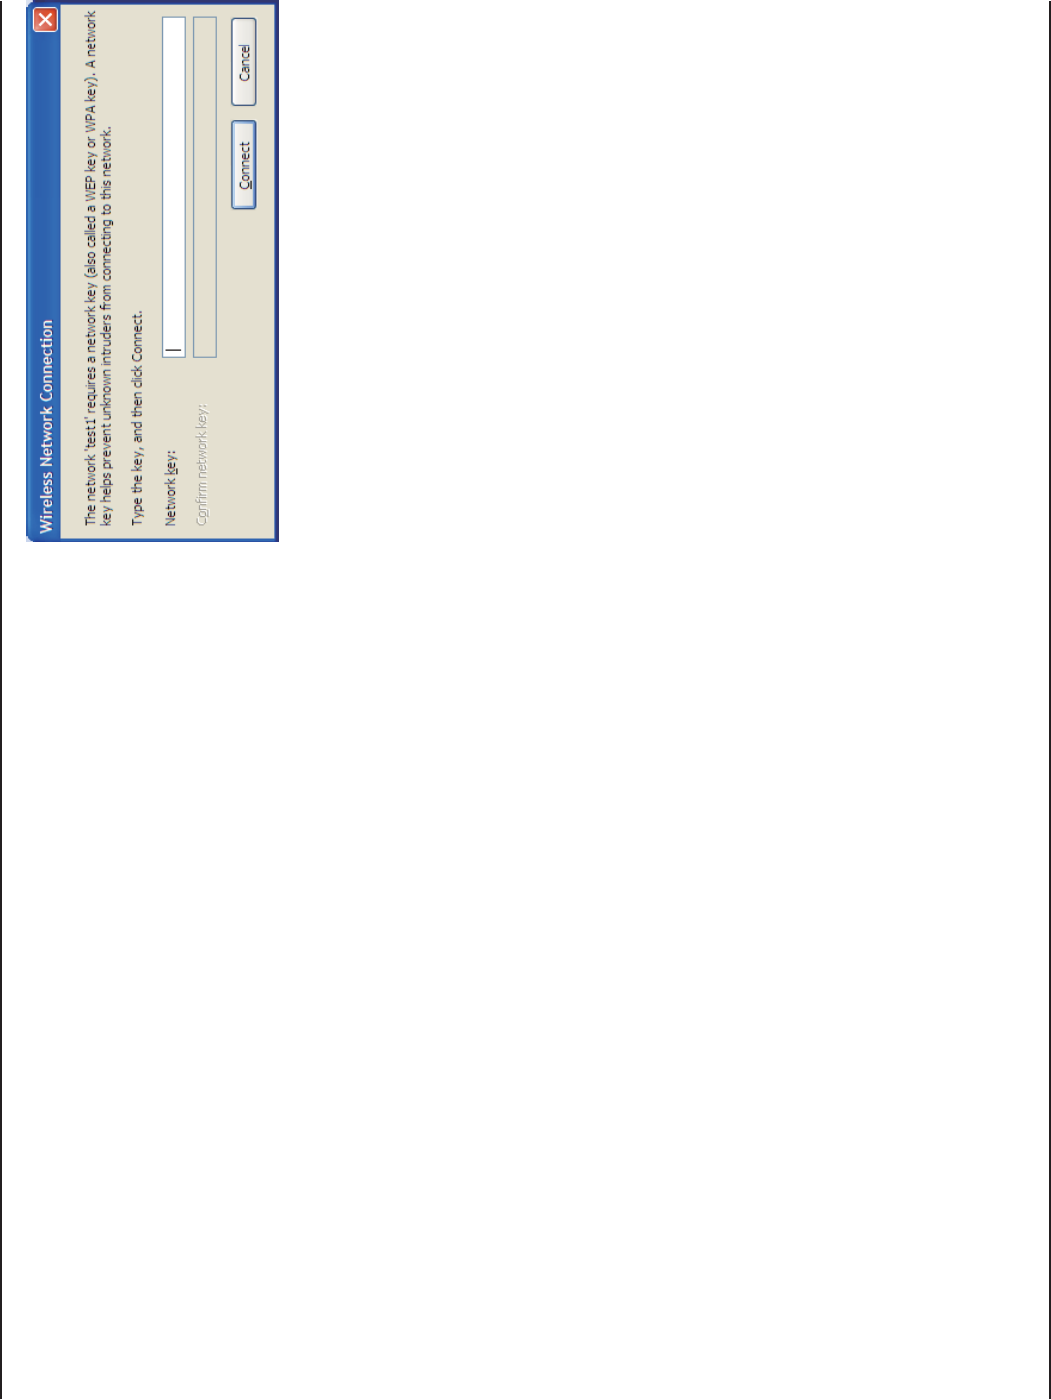
3. The Wireless Network Connection box will appear. Enter the
WPA-PSK passphrase and click Connect.
It may take 20-30 seconds to connect to the wireless network. If the
connection fails, please verify that the WPA-PSK settings are correct.
The WPA-PSK passphrase must be exactly the same as on the
wireless router or access point.
38D-Link DWA-125 User Manual
Section 4 - Wireless Security
Configure WPA/WPA2 (RADIUS)
Using the D-Link Wireless Connection Manager
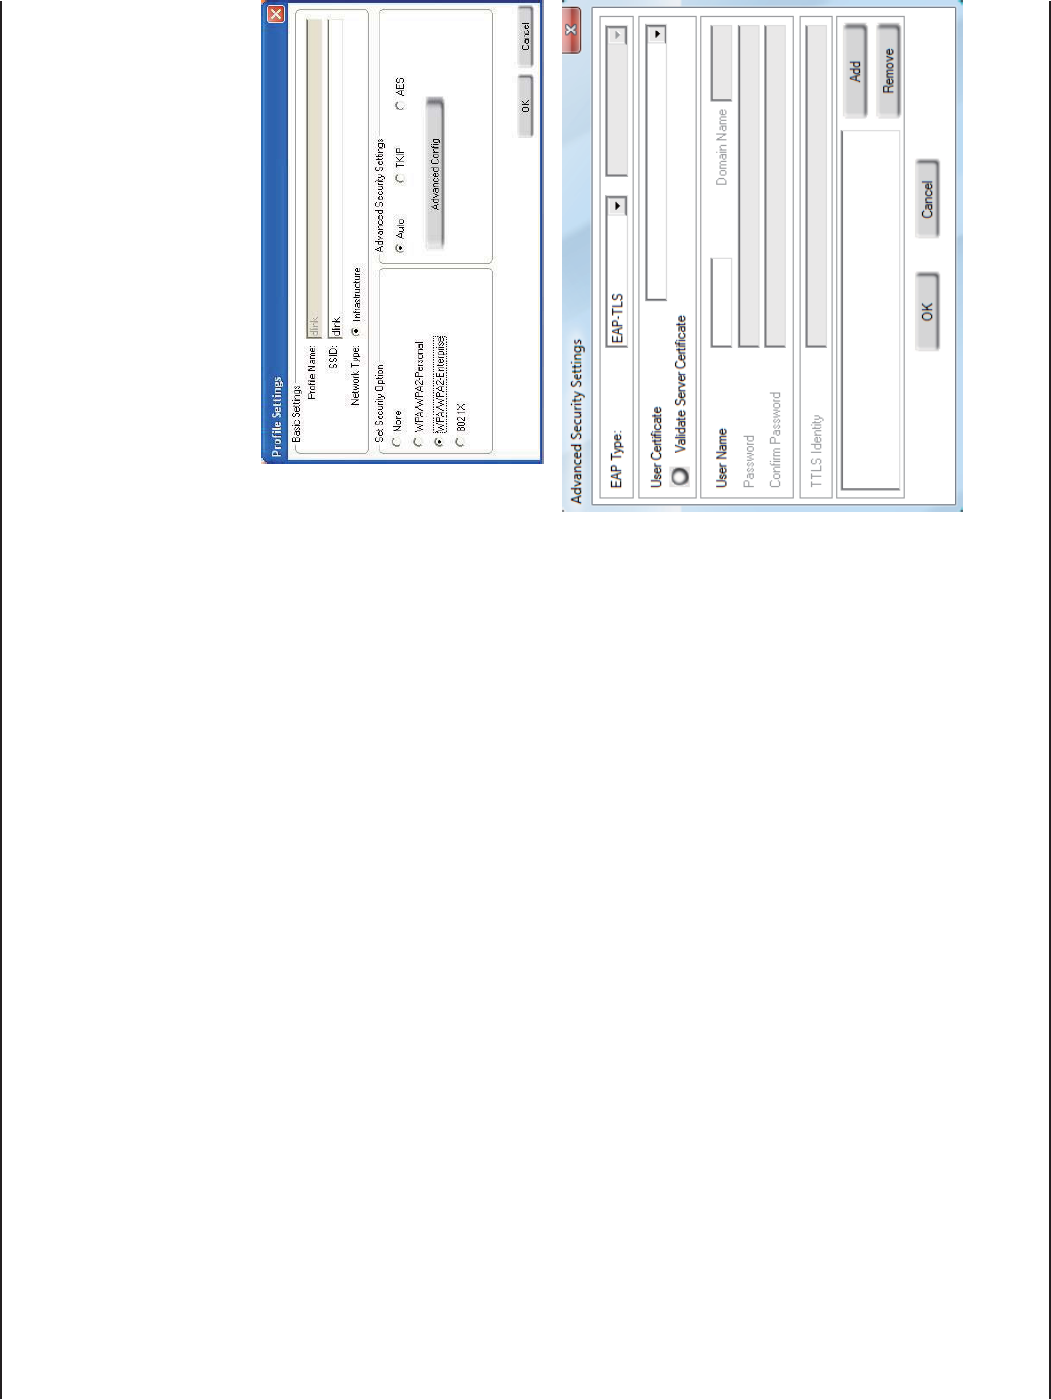
92#CPF92#CTGHQTCFXCPEGFWUGTUYJQCTGHCOKNKCTYKVJWUKPIC4#&+75UGTXGTCPFUGVVKPIWREGTVKſECVGU
1. Open the Wireless Connection Manager by double-clicking on the D-Link
icon on your desktop. Click on NewVQETGCVGCPGYRTQſNGQTJKIJNKIJVCP
GZKUVKPIRTQſNGCPFENKEM/QFKH[.
2. Select 92#92#'PVGTRTKUG under Set Security Option and then select
TKIP or AES.
3. Click on #FXCPEGF%QPſI to continue.
4. Next to EAP Type, select '#26.5,'#266.5, or PEAP. Extensible
Authentication Protocols allow devices on the network to request
authentication from the RADIUS server in the network. All the devices
on the network must use the same EAP type when using a RADIUS
server for authentication. Some RADIUS servers require that the Validate
5GTXGTſGNFDGUGNGEVGF%JGEMVJKUſGNFKH[QWT4#&+75UGTXGTTGSWKTGU
validation.
5. Select an 7UGT%GTVKſECVG from the drop-down menu.
6. Enter the login information required to authenticate.
7. Click Add to enter the IP address(es) of your RADIUS servers.
8. Click OK to save your settings.
39D-Link DWA-125 User Manual
Section 5 - Troubleshooting
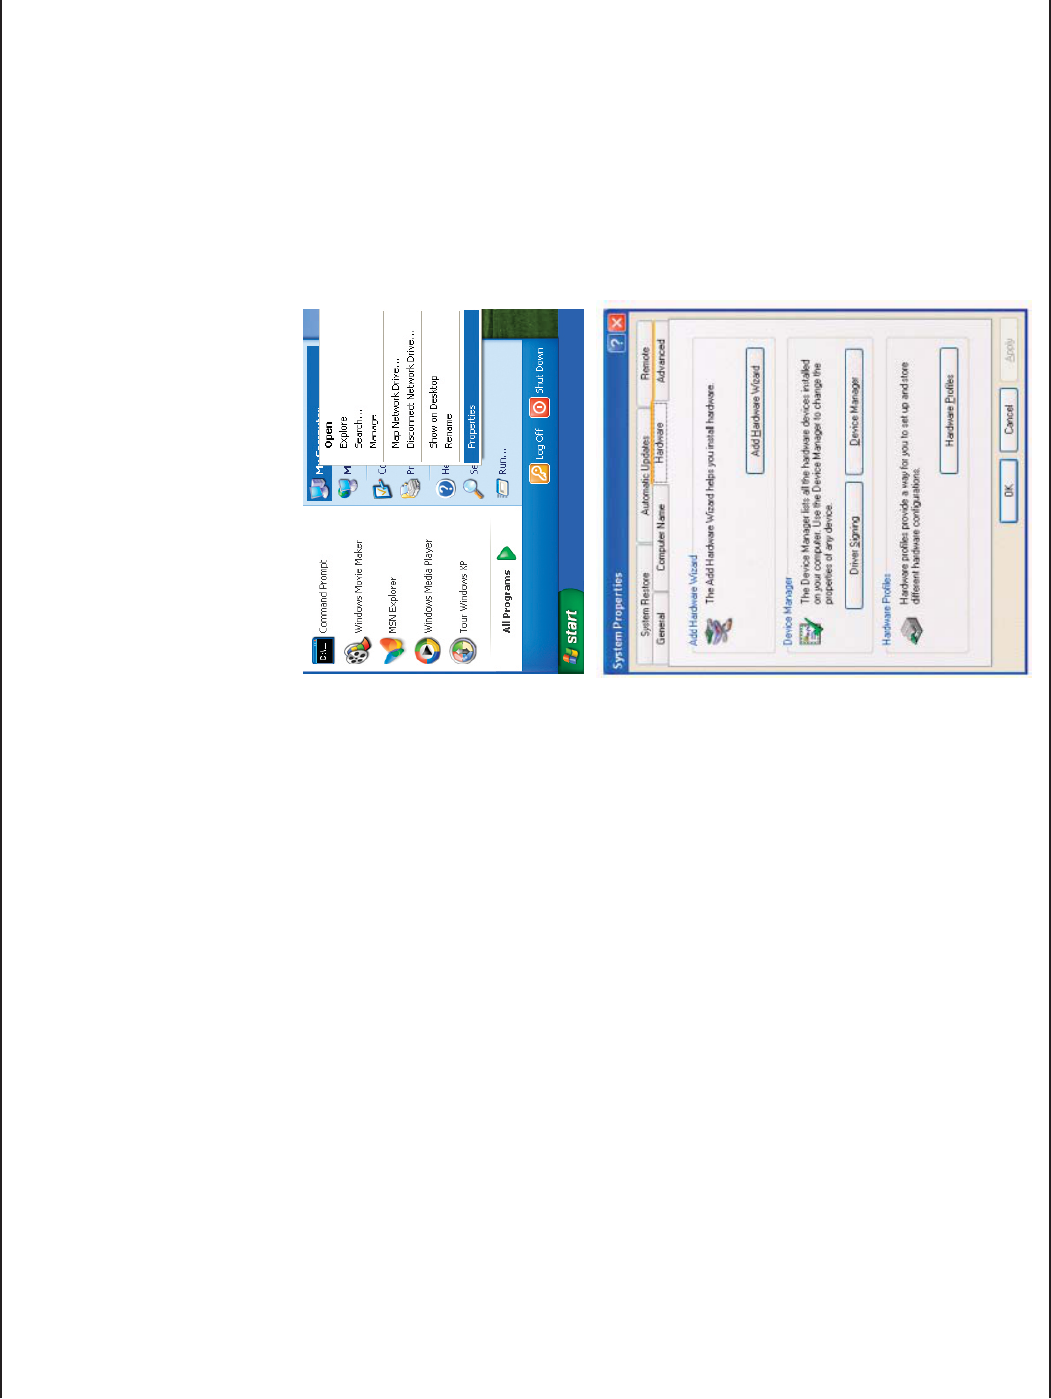
*QYFQ+MPQYKHO[CFCRVGTKUKPUVCNNGFRTQRGTN[!
Select the Hardware Tab.
Troubleshooting
This chapter provides solutions to problems that can occur during the installation and operation of the DWA-125. Read
the following descriptions if you are having problems. (The examples below are illustrated in Windows® XP. If you
have a different operating system, the screenshots on your computer will look similar to the following examples.)
Go to Start > My Computer > Properties.
40D-Link DWA-125 User Manual
Section 5 - Troubleshooting
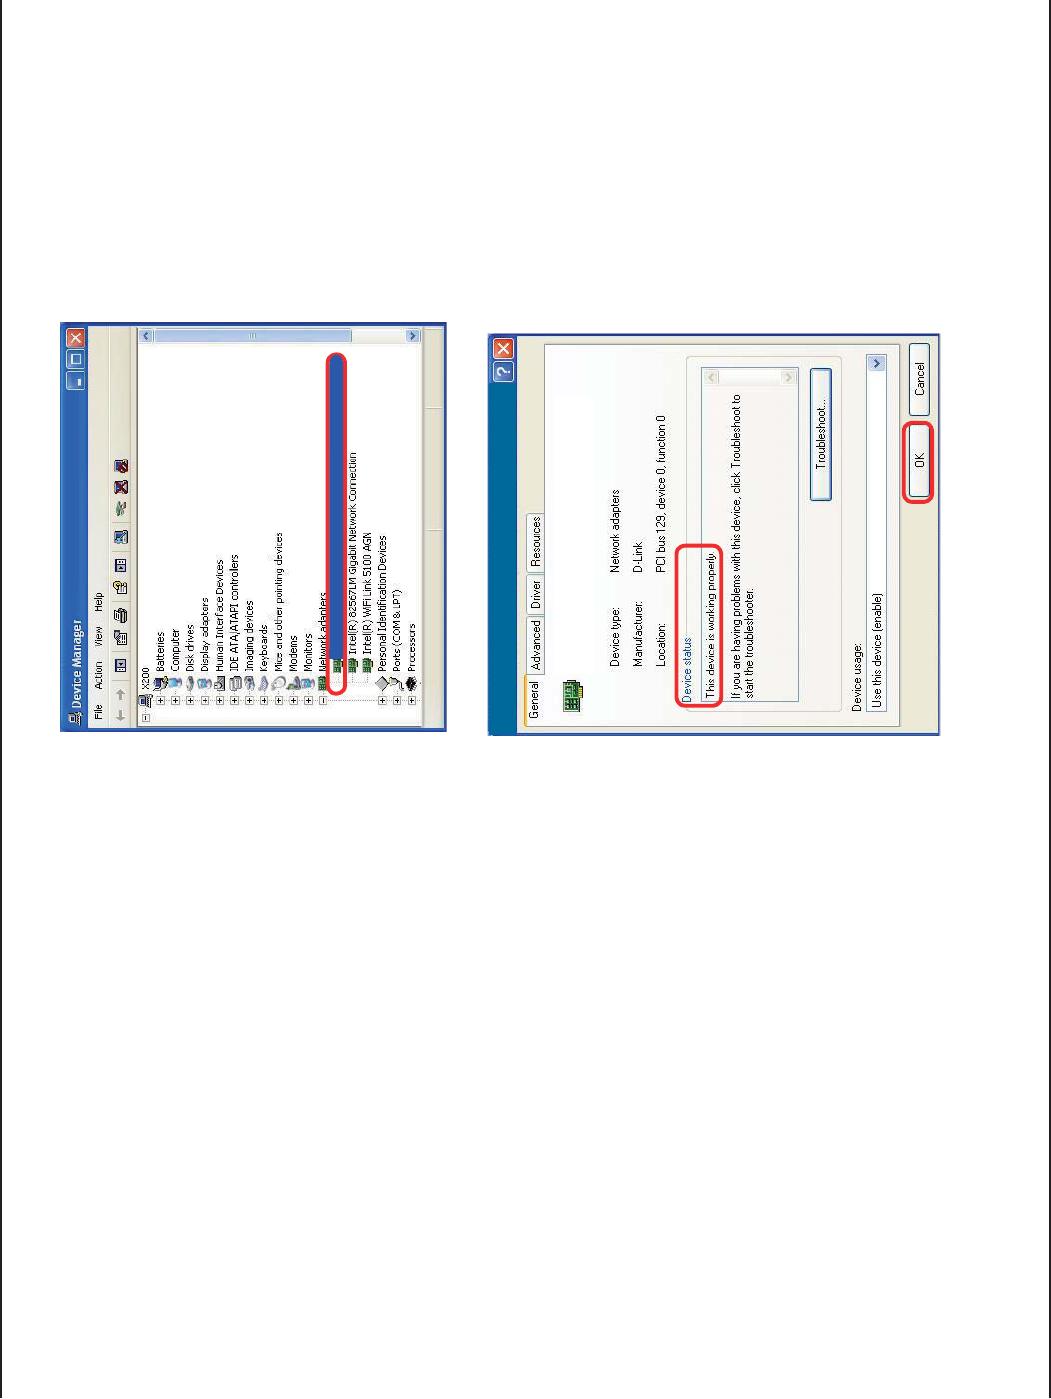
Click the + sign next to Network Adapters.
Right-click on &.KPM&9#75$#FCRVGT
Select Properties to check that the drivers are
installed properly.
Look under Device Status to check that the device
is working properly. Click OK to continue.
&.KPM&9#75$#FCRVGT
D-Link DWA-125
9KTGNGUU75$#FCRVGT

41D-Link DWA-125 User Manual
Section 5 - Troubleshooting
/CMGUWTGVJCVVJG&9#9KTGNGUU75$#FCRVGTKURTQRGTN[UGCVGFKPVJGEQORWVGTŏU75$RQTV
If Windows does not detect the hardware upon insertion of the adapter, make sure to completely remove drivers that
were previously loaded.
6JGEQORWVGTFQGUPQVTGEQIPK\GVJG&9#9KTGNGUU75$#FCRVGT
Ŗ%JGEMVJCVVJG.'&KPFKECVQTUHQTVJGDTQCFDCPFOQFGOCTGKPFKECVKPIPQTOCNCEVKXKV[+HPQVVJGTGOC[
be a problem with the broadband connection.
Ŗ%JGEMVJCVVJG.'&KPFKECVQTUQPVJGYKTGNGUUTQWVGTCTGHWPEVKQPKPIRTQRGTN[+HPQVEJGEMVJCVVJG#%
RQYGTCPF'VJGTPGVECDNGUCTGſTON[EQPPGEVGF
Ŗ %JGEM VJCV VJG +2 #FFTGUU UWDPGV OCUM ICVGYC[ CPF &05 UGVVKPIU CTG EQTTGEVN[ GPVGTGF HQT VJG
network
Ŗ+P+PHTCUVTWEVWTG mode, make sure the same 5GTXKEG5GV+FGPVKſGT (SSID)KUURGEKſGFQPVJGUGVVKPIU
for the wireless clients and access points. The SSID factory default setting for D-Link products is FGHCWNV
(Double-click on the WLAN icon in the taskbar. The.KPM+PHQscreen will display the SSID setting.)
6JGEQORWVGTYKVJVJG&9#KPUVCNNGFKUWPCDNGVQEQPPGEVVQVJGYKTGNGUUPGVYQTMCPFQTVJG+PVGTPGV

42D-Link DWA-125 User Manual
Section 5 - Troubleshooting
Check that the Network ConnectionHQTVJGYKTGNGUUENKGPVKUEQPſIWTGFRTQRGTN[5GNGEV#2+PHTCUVTWEVWTG when
connecting to an access point. Double-click on the 9.#0 icon in the taskbar > click on %QPſIWTCVKQP to change the
settings for the wireless adapter.
If Security is enabled, make sure that the correct encryption keys are entered on both the DWA-125 and the access
point. Double-click on the 9.#0 icon in the taskbar > click Encryption. Check to see that the key selected is set to
the same key as other devices on the network.

43D-Link DWA-125 User Manual
Appendix A - Wireless Basics
D-Link wireless products are based on industry standards to provide easy-to-use and compatible high-speed wireless
connectivity within your home, business or public access wireless networks. Strictly adhering to the IEEE standard,
the D-Link wireless family of products will allow you to securely access the data you want, when and where you want
KV;QWYKNNDGCDNGVQGPLQ[VJGHTGGFQOVJCVYKTGNGUUPGVYQTMKPIFGNKXGTU
A wireless local area network (WLAN) is a cellular computer network that transmits and receives data with radio signals
KPUVGCFQHYKTGU9KTGNGUU.#0UCTGWUGFKPETGCUKPIN[KPDQVJJQOGCPFQHſEGGPXKTQPOGPVUCPFRWDNKECTGCUUWEJ
CUCKTRQTVUEQHHGGUJQRUCPFWPKXGTUKVKGU+PPQXCVKXGYC[UVQWVKNK\G9.#0VGEJPQNQI[CTGJGNRKPIRGQRNGVQYQTMCPF
EQOOWPKECVGOQTGGHſEKGPVN[+PETGCUGFOQDKNKV[CPFVJGCDUGPEGQHECDNKPICPFQVJGTſZGFKPHTCUVTWEVWTGJCXGRTQXGP
VQDGDGPGſEKCNHQTOCP[WUGTU
Wireless users can use the same applications they use on a wired network. Wireless adapter cards used on laptop
and desktop systems support the same protocols as Ethernet adapter cards.
Under many circumstances, it may be desirable for mobile network devices to link to a conventional Ethernet LAN in
order to use servers, printers or an Internet connection supplied through the wired LAN. A Wireless Router is a device
used to provide this link.
Wireless Basics

44D-Link DWA-125 User Manual
Appendix A - Wireless Basics
9JCVKU9KTGNGUU!
Wireless or Wi-Fi technology is another way of connecting your computer to the network without using
wires. Wi-Fi uses radio frequency to connect wirelessly, so you have the freedom to connect computers
CP[YJGTGKP[QWTJQOGQTQHſEGPGVYQTM
9J[&.KPM9KTGNGUU?
D-Link is the worldwide leader and award winning designer, developer, and manufacturer of networking
products. D-Link delivers the performance you need at a price you can afford. D-Link has all the products
you need to build your network.
*QYFQGUYKTGNGUUYQTM!
Wireless works similar to how cordless phone work, through radio signals to transmit data from one point
#VQRQKPV$$WVYKTGNGUUVGEJPQNQI[JCUTGUVTKEVKQPUCUVQJQY[QWECPCEEGUUVJGPGVYQTM;QWOWUV
be within the wireless network range area to be able to connect your computer. There are two different
types of wireless networks Wireless Local Area Network (WLAN), and Wireless Personal Area Network
(WPAN).
9KTGNGUU.QECN#TGC0GVYQTM9.#0
In a wireless local area network, a device called an Access Point (AP) connects computers to the network.
The access point has a small antenna attached to it, which allows it to transmit data back and forth over
radio signals. With an indoor access point as seen in the picture, the signal can travel up to 300 feet.
With an outdoor access point the signal can reach out up to 30 miles to serve places like manufacturing
plants, industrial locations, college and high school campuses, airports, golf courses, and many other
outdoor venues.

45D-Link DWA-125 User Manual
Appendix A - Wireless Basics
Wireless Personal Area Network (WPAN)
$NWGVQQVJ KU VJG KPFWUVT[ UVCPFCTF YKTGNGUU VGEJPQNQI[ WUGF HQT 92#0 $NWGVQQVJ FGXKEGU KP 92#0
operate in a range up to 30 feet away.
Compared to WLAN the speed and wireless operation range are both less than WLAN, but in return it
FQGUPŏVWUGPGCTN[CUOWEJRQYGTYJKEJOCMGUKVKFGCNHQTRGTUQPCNFGXKEGUUWEJCUOQDKNGRJQPGU
PDAs, headphones, laptops, speakers, and other devices that operate on batteries.
9JQWUGUYKTGNGUU!
9KTGNGUUVGEJPQNQI[CUDGEQOGUQRQRWNCTKPTGEGPV[GCTUVJCVCNOQUVGXGT[QPGKUWUKPIKVYJGVJGTKVŏU
HQTJQOGQHſEGDWUKPGUU&.KPMJCUCYKTGNGUUUQNWVKQPHQTKV
Home
Ŗ)KXGUGXGT[QPGCVJQOGDTQCFDCPFCEEGUU
Ŗ5WTHVJGYGDEJGEMGOCKNKPUVCPVOGUUCIGCPFGVE
Ŗ)GVUTKFQHVJGECDNGUCTQWPFVJGJQWUG
Ŗ5KORNGCPFGCU[VQWUG
5OCNN1HſEGCPF*QOG1HſEG
Ŗ5VC[QPVQRQHGXGT[VJKPICVJQOGCU[QWYQWNFCVQHſEG
Ŗ4GOQVGN[CEEGUU[QWTQHſEGPGVYQTMHTQOJQOG
Ŗ5JCTG+PVGTPGVEQPPGEVKQPCPFRTKPVGTYKVJOWNVKRNGEQORWVGTU
Ŗ0QPGGFVQFGFKECVGQHſEGURCEG

46D-Link DWA-125 User Manual
Appendix A - Wireless Basics
9JGTGKUYKTGNGUUWUGF!
9KTGNGUUVGEJPQNQI[KUGZRCPFKPIGXGT[YJGTGPQVLWUV CV JQOG QT QHſEG 2GQRNG NKMG VJG HTGGFQO QH
OQDKNKV[CPFKVŏUDGEQOKPIUQRQRWNCTVJCVOQTGCPFOQTGRWDNKEHCEKNKVKGUPQYRTQXKFGYKTGNGUUCEEGUU
to attract people. The wireless connection in public places is usually called “hotspots”.
7UKPIC&.KPM75$#FCRVGTYKVJ[QWTNCRVQR[QWECPCEEGUUVJGJQVURQVVQEQPPGEVVQ+PVGTPGVHTQO
TGOQVGNQECVKQPUNKMG#KTRQTVU*QVGNU%QHHGG5JQRU.KDTCTKGU4GUVCWTCPVUCPF%QPXGPVKQP%GPVGTU
9KTGNGUUPGVYQTMKUGCU[VQUGVWRDWVKH[QWŏTGKPUVCNNKPIKVHQTVJGſTUVVKOGKVEQWNFDGSWKVGCVCUMPQV
MPQYKPIYJGTGVQUVCTV6JCVŏUYJ[YGŏXGRWVVQIGVJGTCHGYUGVWRUVGRUCPFVKRUVQJGNR[QWVJTQWIJVJG
process of setting up a wireless network.
Tips
Here are a few things to keep in mind, when you install a wireless network.
%GPVTCNK\G[QWTTQWVGTQT#EEGUU2QKPV
/CMGUWTG[QWRNCEGVJGTQWVGTCEEGUURQKPVKPCEGPVTCNK\GFNQECVKQPYKVJKP[QWTPGVYQTMHQTVJGDGUV
RGTHQTOCPEG6T[VQRNCEGVJGTQWVGTCEEGUURQKPVCUJKIJCURQUUKDNGKPVJGTQQOUQVJGUKIPCNIGVU
dispersed throughout your home. If you have a two-story home, you may need a repeater to boost the
signal to extend the range.
'NKOKPCVG+PVGTHGTGPEG
Place home appliances such as cordless telephones, microwaves, and televisions as far away as possible
HTQOVJGTQWVGTCEEGUURQKPV6JKUYQWNFUKIPKſECPVN[TGFWEGCP[KPVGTHGTGPEGVJCVVJGCRRNKCPEGUOKIJV
cause since they operate on same frequency.

47D-Link DWA-125 User Manual
Appendix A - Wireless Basics
Security
&QPŏVNGV[QWPGZVFQQTPGKIJDQTUQTKPVTWFGTUEQPPGEVVQ[QWTYKTGNGUUPGVYQTM5GEWTG[QWTYKTGNGUU
network by turning on the WPA or WEP security feature on the router. Refer to product manual for detail
information on how to set it up.
6JGTGCTGDCUKECNN[VYQOQFGUQHPGVYQTMKPI
Ŗ+PHTCUVTWEVWTG – All wireless clients will connect to an access point or wireless router.
Ŗ#F*QE – Directly connecting to another computer, for peer-to-peer communication, using wireless
PGVYQTMCFCRVGTUQPGCEJEQORWVGT7PHQTVWPCVGN[IPRTQFWEVUUWEJCUVJG&9#FQPQV
support ad-hoc mode.
An Infrastructure network contains an Access Point or wireless router. All the wireless devices, or clients, will connect
to the wireless router or access point.
#P#F*QEPGVYQTMEQPVCKPUQPN[ENKGPVUUWEJCUNCRVQRUYKVJYKTGNGUU75$#FCRVGTU#NNVJGCFCRVGTUOWUVDGKP
Ad-Hoc mode to communicate.
* Not supported with the DWA-125.
Wireless Modes
48D-Link DWA-125 User Manual
Appendix B - Networking Basics
Networking Basics
Check your IP address
#HVGT[QWKPUVCNN[QWTPGY&.KPMYKTGNGUUCFCRVGTCPFJCXGGUVCDNKUJGFCYKTGNGUUEQPPGEVKQPD[FGHCWNVVJG6%2+2
settings should be set to obtain an IP address from a DHCP server (i.e. router) automatically. To verify your IP address,
please follow the steps below.
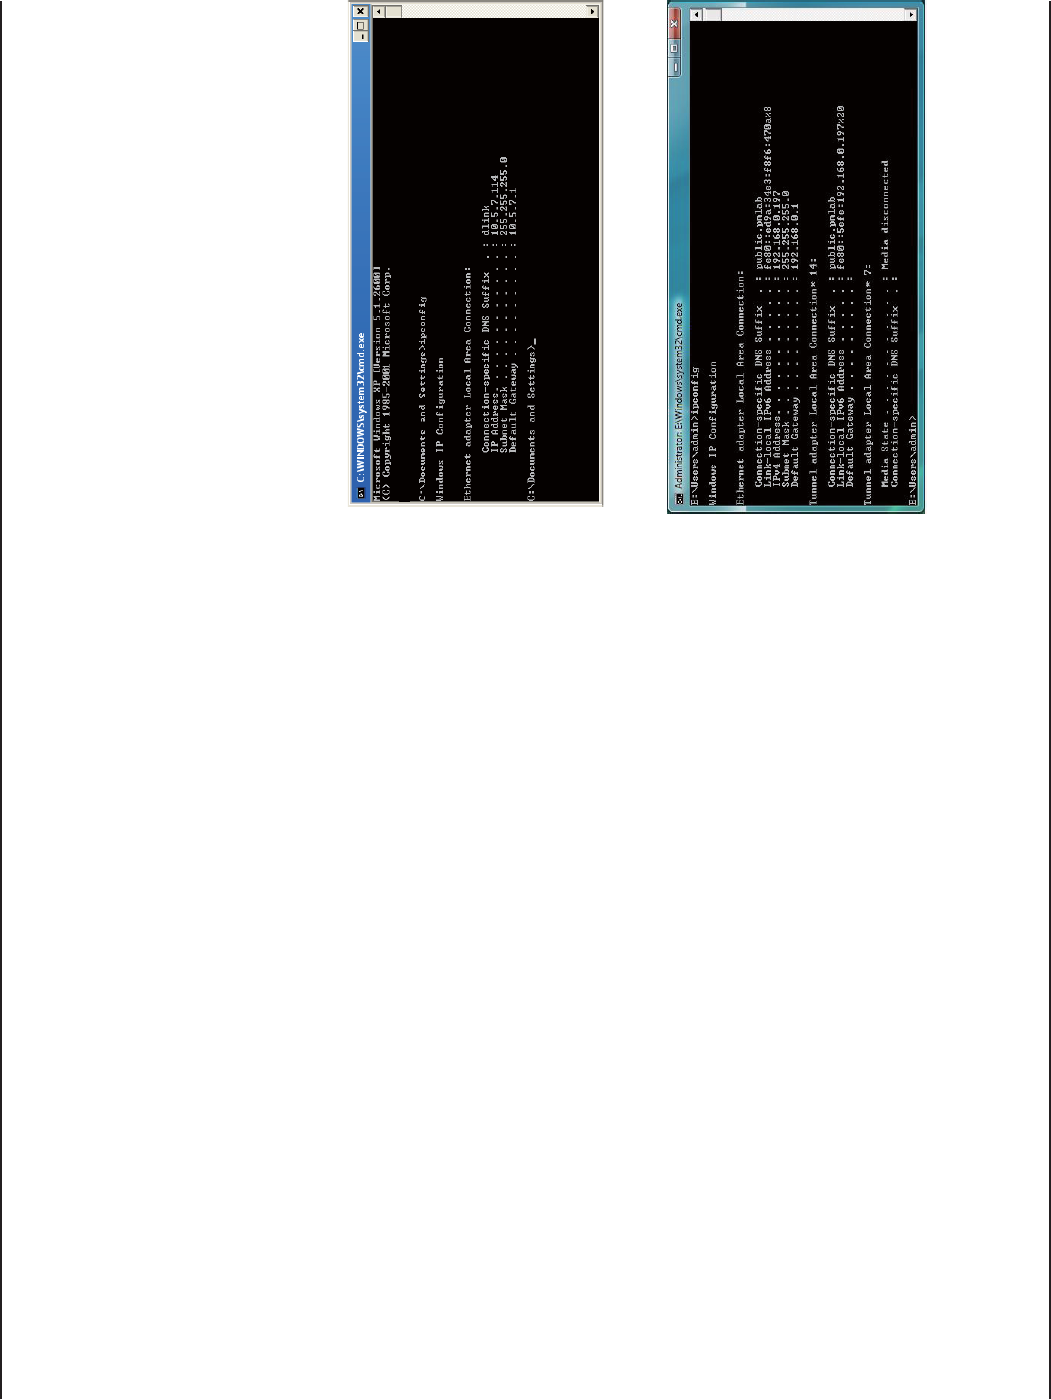
Windows® XP/2000 Users
Ŗ %NKEMQPStart > Run. In the run box type cmd and click OK.
Ŗ #VVJGRTQORVV[RGipconfig and press Enter.
Ŗ 6JKUYKNNFKURNC[VJG+2CFFTGUUUWDPGVOCUMCPFVJGFGHCWNVICVGYC[QH[QWT
adapter.
Windows Vista™ Users
Ŗ %NKEMStart > #NN2TQITCOU > Accessories > Command Prompt;QWOC[
need administrative access to run this application.
Ŗ (QTCNNCFFKVKQPCNRTQORVYKPFQYUKPSWKTKPIQHTWPPKPIVJGEQOOCPFRTQORV
application, select Yes,OK, or Continue.
Ŗ #VVJGRTQORVV[RGipconfig and press Enter.
Ŗ 6JKUYKNNFKURNC[VJG+2CFFTGUUUWDPGVOCUMCPFFGHCWNVICVGYC[QH[QWT
adapter.
+HVJGCFFTGUUKUEJGEM[QWTCFCRVGTKPUVCNNCVKQPUGEWTKV[UGVVKPIUCPFVJGUGVVKPIUQP[QWTTQWVGT5QOGſTGYCNNUQHVYCTGRTQITCOU
may block a DHCP request on newly installed adapters.
49D-Link DWA-125 User Manual
Appendix B - Networking Basics
Statically Assign an IP address
+H[QWCTGPQVWUKPIC&*%2ECRCDNGICVGYC[TQWVGTQT[QWPGGFVQCUUKIPCUVCVKE+2CFFTGUURNGCUGHQNNQYVJGUVGRU
DGNQY
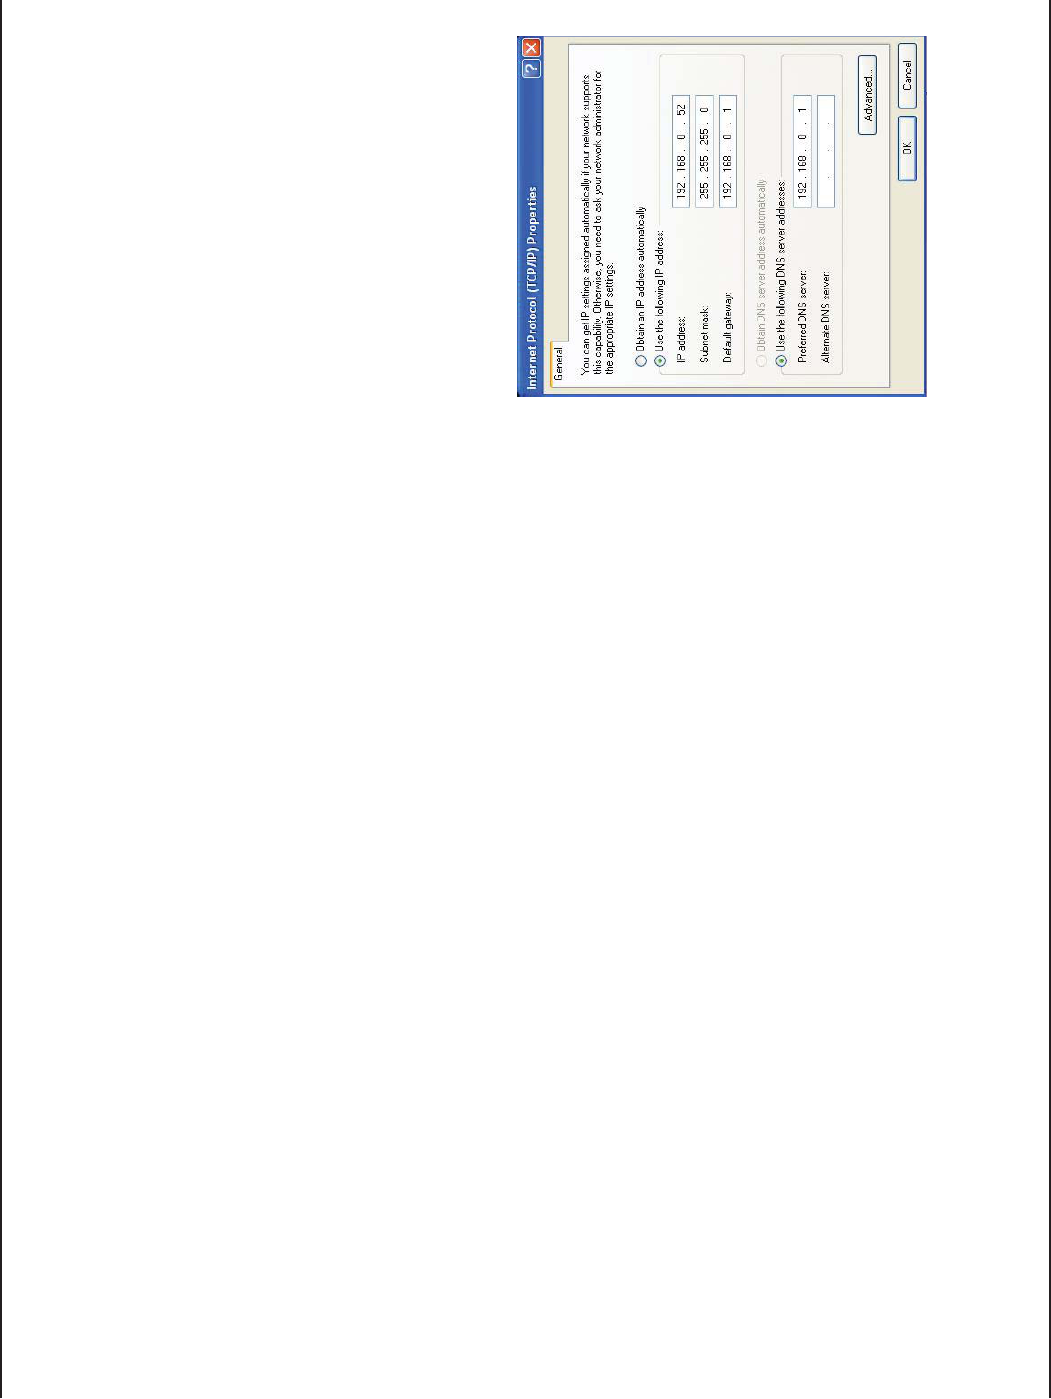
Windows® XP/2000 Users
Ŗ Windows® XP - Click on Start > Control Panel. Make sure you are in Classic View. Double-click on the Network Connections
icon.
Windows® 2000 – From the desktop, right-click My Network Places > Properties.
Ŗ 4KIJVENKEMQPVJG.QECN#TGC%QPPGEVKQP which represents your D-Link wireless network adapter (or other adapter) which will
be connected to your router.
Ŗ *KIJNKIJVInternet Protocol (TCP/IP) and click Properties.
Ŗ %NKEM7UGVJGHQNNQYKPI+2CFFTGUU and enter an IP address that is on the same subnet
as your network or LAN IP address on your router.
'ZCORNG+HVJGTQWVGTŏU.#0+2CFFTGUUKUOCMG[QWT+2CFFTGUU:
where X is a number between 2 and 99. Make sure that the number you choose is not
in use on the network.
Ŗ 5GV&GHCWNV)CVGYC[ the same as the LAN IP address of your router or gateway.
Ŗ 5GVPrimary DNS the same as the LAN IP address of your router or gateway.
Ŗ 6JGSecondary DNS is optional (you may enter a DNS server from your ISP).
Ŗ %NKEMOK to save your settings.
50D-Link DWA-125 User Manual
Appendix B - Networking Basics
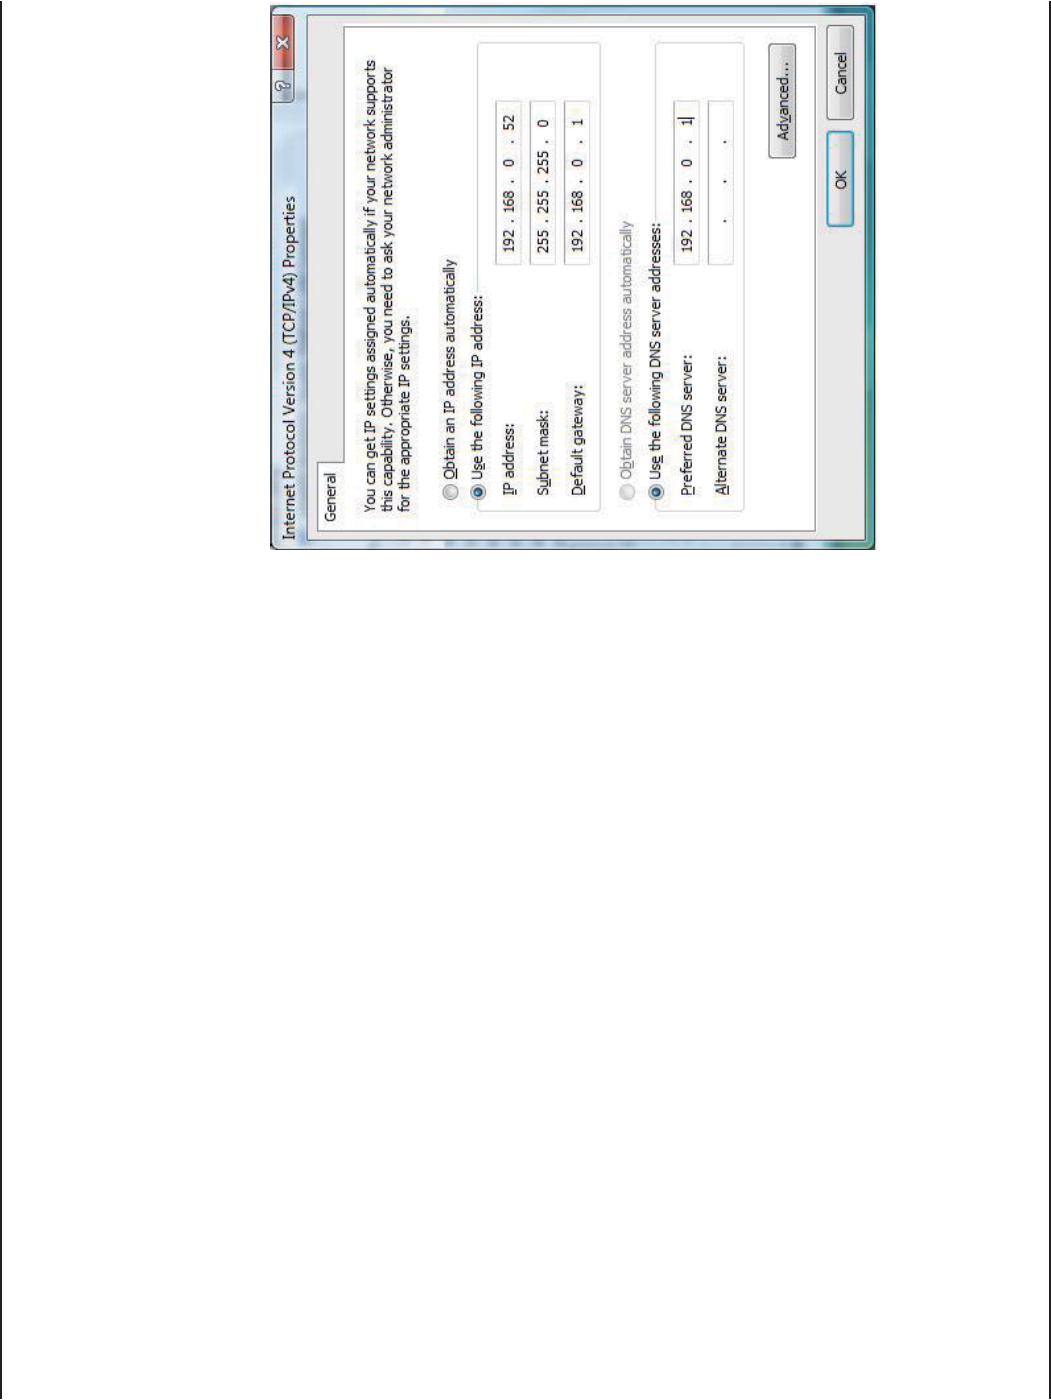
Windows Vista™ Users
Ŗ %NKEMQPStart > Control Panel. Make sure you are in Classic View. Double-click on the 0GVYQTMCPF5JCTKPI%GPVGT icon. Along
the left panel in the window, click on /CPCIGPGVYQTMEQPPGEVKQPU.
Ŗ 4KIJVENKEMQPVJG.QECN#TGC%QPPGEVKQP which represents your D-Link wireless network adapter which will be connected to your
network.
Ŗ *KIJNKIJVInternet Protocol Version 4 (TCP /IPv4) and click Properties.
Ŗ %NKEM7UGVJGHQNNQYKPI+2CFFTGUU and enter an IP address that is on
the same subnet as your network or LAN IP address on your router or
network.
'ZCORNG +H VJG TQWVGTŏU .#0 +2 CFFTGUU KU OCMG [QWT +2
address 192.168.0.X where X is a number between 2 and 99. Make sure
that the number you choose is not in use on the network.
Ŗ 5GV&GHCWNV)CVGYC[ the same as the LAN IP address of your router or
gateway.
Ŗ 5GV Primary DNS the same as the LAN IP address of your router or
gateway.
Ŗ 6JGSecondary DNS is optional (you may enter a DNS server from your
ISP).
Ŗ %NKEMOK to save your settings.

51D-Link DWA-125 User Manual
Appendix C - Technical Specifications
Technical Specifications
Standards
Ŗ+'''D
Ŗ%QORN[YKVJ+'''PFTCHV6GEJPQNQI[
Ŗ+'''I
Bus Type
Ŗ75$EQORCVKDNG
Security
Ŗ92#92#9K(K2TQVGEVGF#EEGUU6-+2#'5/+%
IV Expansion, Shared Key Authentication)
ŖZ
Ŗ9252+0CPF2$%
Media Access Control
Ŗ%5/#%#YKVJ#%-
(TGSWGPE[4CPIG
Ŗ)*\VQ)*\0QTVJ#OGTKEC
Power Consumption (802.11n)
Ŗ6ZO#
Ŗ4ZO#
/QFWNCVKQP6GEJPQNQI[
Ŗ1TVJQIQPCN(TGSWGPE[
&KXKUKQP/WNVKRNGZKPI1(&/
Ŗ%QORNGOGPVCT[%QFG-G[KPI%%-
Transmitter Power Output
Ŗ+'''DF$O
Ŗ+'''IF$O
Ŗ+'''P*6F$O
Ŗ+'''P*6F$O
1RGTCVKPI8QNVCIG
Ŗ8&%
1RGTCVKPI6GORGTCVWTG
Ŗu(VQu(u%VQu%
1RGTCVKPI*WOKFKV[
ŖVQOCZKOWOPQPEQPFGPUKPI
Dimensions
ŖŒZŒZŒ
9GKIJV
ŖNDUI
%GTVKſECVKQPU
Ŗ(%%%NCUU$
Ŗ+%
Warranty
Ŗ;GCT
/CZKOWOYKTGNGUUUKIPCNTCVGFGTKXGFHTQO+'''5VCPFCTFPFTCHVCPFIURGEKſECVKQPU#EVWCNFCVCVJTQWIJRWVYKNNXCT[0GVYQTM
EQPFKVKQPUCPFGPXKTQPOGPVCNHCEVQTUKPENWFKPIXQNWOGQHPGVYQTMVTCHſEDWKNFKPIOCVGTKCNUCPFEQPUVTWEVKQPCPFPGVYQTMQXGTJGCFNQYGTCEVWCN
data throughput rate. Environmental factors will adversely affect wireless signal range.

52D-Link DWA-125 User Manual
Appendix D - Contacting Technical Support
Contacting Technical Support
$GHQTG[QWEQPVCEVVGEJPKECNUWRRQTVRNGCUGJCXGVJGHQNNQYKPITGCF[
Ŗ/QFGNPWODGTQHVJGRTQFWEVGI&9#
Ŗ*CTFYCTG4GXKUKQPNQECVGFQPVJGNCDGNQPVJGCFCRVGTGITGX#
Ŗ5GTKCN0WODGTUPPWODGTNQECVGFQPVJGNCDGNQPVJGCFCRVGT
;QWECPſPFUQHVYCTGWRFCVGUCPFWUGTFQEWOGPVCVKQPQPVJG&.KPMYGDUKVGCUYGNNCUHTGSWGPVN[CUMGFSWGUVKQPU
and answers to technical issues.
(QTEWUVQOGTUYKVJKPVJG7PKVGF5VCVGU
2JQPG5WRRQTV
(877) 453-5465
+PVGTPGV5WRRQTV
JVVRUWRRQTVFNKPMEQO
(QTEWUVQOGTUYKVJKP%CPCFC
2JQPG5WRRQTV
(800) 361-5265
+PVGTPGV5WRRQTV
JVVRUWRRQTVFNKPMEQO

53D-Link DWA-125 User Manual
Appendix E - Warranty
Warranty
5WDLGEVVQVJGVGTOUCPFEQPFKVKQPUUGVHQTVJJGTGKP&.KPM5[UVGOU+PEő&.KPMŒRTQXKFGUVJKU.KOKVGF9CTTCPV[
Ŗ1PN[VQVJGRGTUQPQTGPVKV[VJCVQTKIKPCNN[RWTEJCUGFVJGRTQFWEVHTQO&.KPMQTKVUCWVJQTK\GFTGUGNNGTQTFKUVTKDWVQTCPF
Ŗ 1PN[ HQT RTQFWEVU RWTEJCUGF CPF FGNKXGTGF YKVJKP VJG HKHV[ UVCVGU QH VJG 7PKVGF 5VCVGU VJG &KUVTKEV QH %QNWODKC 75
Possessions or Protectorates, U.S. Military Installations, or addresses with an APO or FPO.
.KOKVGF9CTTCPV[
D-Link warrants that the hardware portion of the D-Link product described below (“Hardware”) will be free from material defects in
workmanship and materials under normal use from the date of original retail purchase of the product, for the period set forth below
(“Warranty Period”), except as otherwise stated herein.
Ŗ*CTFYCTGGZENWFKPIRQYGTUWRRNKGUCPFHCPU1PG[GCT
Ŗ2QYGTUWRRNKGUCPFHCPU1PG[GCT
Ŗ5RCTGRCTVUCPFURCTGMKVU0KPGV[FC[U
6JG EWUVQOGTŏU UQNG CPF GZENWUKXG TGOGF[ CPF VJG GPVKTG NKCDKNKV[ QH &.KPM CPF KVU UWRRNKGTU WPFGT VJKU .KOKVGF 9CTTCPV[ YKNN DG CV
&.KPMŏUQRVKQPVQTGRCKTQTTGRNCEGVJGFGHGEVKXG*CTFYCTGFWTKPIVJG9CTTCPV[2GTKQFCVPQEJCTIGVQVJGQTKIKPCNQYPGTQTVQTGHWPFVJG
CEVWCNRWTEJCUGRTKEGRCKF#P[TGRCKTQTTGRNCEGOGPVYKNNDGTGPFGTGFD[&.KPMCVCP#WVJQTK\GF&.KPM5GTXKEG1HſEG6JGTGRNCEGOGPV
hardware need not be new or have an identical make, model or part. D-Link may, at its option, replace the defective Hardware or any part
thereof with any reconditioned product that D-Link reasonably determines is substantially equivalent (or superior) in all material respects
to the defective Hardware. Repaired or replacement hardware will be warranted for the remainder of the original Warranty Period or ninety
(90) days, whichever is longer, and is subject to the same limitations and exclusions. If a material defect is incapable of correction, or if
D-Link determines that it is not practical to repair or replace the defective Hardware, the actual price paid by the original purchaser for
the defective Hardware will be refunded by D-Link upon return to D-Link of the defective Hardware. All Hardware or part thereof that is
replaced by D-Link, or for which the purchase price is refunded, shall become the property of D-Link upon replacement or refund.

54D-Link DWA-125 User Manual
Appendix E - Warranty
.KOKVGF5QHVYCTG9CTTCPV[
&.KPMYCTTCPVUVJCVVJGUQHVYCTGRQTVKQPQHVJGRTQFWEVő5QHVYCTGŒYKNNUWDUVCPVKCNN[EQPHQTOVQ&.KPMŏUVJGPEWTTGPVHWPEVKQPCNURGEKſECVKQPU
for the Software, as set forth in the applicable documentation, from the date of original retail purchase of the Software for a period of ninety
(90) days (“Software Warranty Period”), provided that the Software is properly installed on approved hardware and operated as contemplated
in its documentation. D-Link further warrants that, during the Software Warranty Period, the magnetic media on which D-Link delivers the
5QHVYCTGYKNNDGHTGGQHRJ[UKECNFGHGEVU6JGEWUVQOGTŏUUQNGCPFGZENWUKXGTGOGF[CPFVJGGPVKTGNKCDKNKV[QH&.KPMCPFKVUUWRRNKGTUWPFGT
VJKU.KOKVGF9CTTCPV[YKNNDGCV&.KPMŏUQRVKQPVQTGRNCEGVJGPQPEQPHQTOKPI5QHVYCTGQTFGHGEVKXGOGFKCYKVJUQHVYCTGVJCVUWDUVCPVKCNN[
EQPHQTOUVQ&.KPMŏUHWPEVKQPCNURGEKſECVKQPUHQTVJG5QHVYCTGQTVQTGHWPFVJGRQTVKQPQHVJGCEVWCNRWTEJCUGRTKEGRCKFVJCVKUCVVTKDWVCDNG
to the Software. Except as otherwise agreed by DLink in writing, the replacement Software is provided only to the original licensee, and
is subject to the terms and conditions of the license granted by D-Link for the Software. Replacement Software will be warranted for the
remainder of the original Warranty Period and is subject to the same limitations and exclusions. If a material non-conformance is incapable
of correction, or if D-Link determines in its sole discretion that it is not practical to replace the non-conforming Software, the price paid by
VJGQTKIKPCNNKEGPUGGHQTVJGPQPEQPHQTOKPI5QHVYCTGYKNNDGTGHWPFGFD[&.KPMRTQXKFGFVJCVVJGPQPEQPHQTOKPI5QHVYCTGCPFCNNEQRKGU
VJGTGQHKUſTUVTGVWTPGFVQ&.KPM6JGNKEGPUGITCPVGFTGURGEVKPICP[5QHVYCTGHQTYJKEJCTGHWPFKUIKXGPCWVQOCVKECNN[VGTOKPCVGU
0QP#RRNKECDKNKV[QH9CTTCPV[
6JG.KOKVGF9CTTCPV[RTQXKFGFJGTGWPFGTHQT*CTFYCTGCPF5QHVYCTGRQTVKQPUQH&.KPMŏURTQFWEVUYKNNPQVDGCRRNKGFVQCPFFQGUPQVEQXGT
any refurbished product and any product purchased through the inventory clearance or liquidation sale or other sales in which D-Link, the
sellers, or the liquidators expressly disclaim their warranty obligation pertaining to the product and in that case, the product is being sold
“As-Is” without any warranty whatsoever including, without limitation, the Limited Warranty as described herein, notwithstanding anything
stated herein to the contrary.
5WDOKVVKPI#%NCKO
The customer shall return the product to the original purchase point based on its return policy. In case the return policy period has expired
CPFVJGRTQFWEVKUYKVJKPYCTTCPV[VJGEWUVQOGTUJCNNUWDOKVCENCKOVQ&.KPMCUQWVNKPGFDGNQY
Ŗ6JGEWUVQOGTOWUVUWDOKVYKVJVJGRTQFWEVCURCTVQHVJGENCKOCYTKVVGPFGUETKRVKQPQHVJG*CTFYCTGFGHGEVQT5QHVYCTG
PQPEQPHQTOCPEGKPUWHſEKGPVFGVCKNVQCNNQY&.KPMVQEQPſTOVJGUCOGCNQPIYKVJRTQQHQHRWTEJCUGQHVJGRTQFWEVUWEJ
as a copy of the dated purchase invoice for the product) if the product is not registered.
Ŗ6JGEWUVQOGTOWUVQDVCKPC%CUG+&0WODGTHTQO&.KPM6GEJPKECN5WRRQTVCVYJQYKNNCVVGORVVQCUUKUV
the customer in resolving any suspected defects with the product. If the product is considered defective, the customer must
QDVCKPC4GVWTP/CVGTKCN#WVJQTK\CVKQPő4/#ŒPWODGTD[EQORNGVKPIVJG4/#HQTOCPFGPVGTKPIVJGCUUKIPGF%CUG+&
0WODGTCVJVVRUTOCFNKPMEQO

55D-Link DWA-125 User Manual
Appendix E - Warranty
Ŗ#HVGTCP4/#PWODGTKUKUUWGFVJGFGHGEVKXGRTQFWEVOWUVDGRCEMCIGFUGEWTGN[KPVJGQTKIKPCNQTQVJGTUWKVCDNGUJKRRKPI
package to ensure that it will not be damaged in transit, and the RMA number must be prominently marked on the outside
of the package. Do not include any manuals or accessories in the shipping package. DLink will only replace the defective
portion of the product and will not ship back any accessories.
Ŗ6JGEWUVQOGTKUTGURQPUKDNGHQTCNNKPDQWPFUJKRRKPIEJCTIGUVQ&.KPM0Q%CUJQP&GNKXGT[ő%1&ŒKUCNNQYGF2TQFWEVU
sent COD will either be rejected by D-Link or become the property of D-Link. Products shall be fully insured by the customer
and shipped to D-Link Systems, Inc., 17595 Mt. Herrmann, Fountain Valley, CA 92708. D-Link will not be held responsible
for any packages that are lost in transit to D-Link. The repaired or replaced packages will be shipped to the customer via
UPS Ground or any common carrier selected by D-Link. Return shipping charges shall be prepaid by D-Link if you use an
address in the United States, otherwise we will ship the product to you freight collect. Expedited shipping is available upon
request and provided shipping charges are prepaid by the customer. D-Link may reject or return any product that is not
packaged and shipped in strict compliance with the foregoing requirements, or for which an RMA number is not visible from
VJGQWVUKFGQHVJGRCEMCIG6JGRTQFWEVQYPGTCITGGUVQRC[&.KPMŏUTGCUQPCDNGJCPFNKPICPFTGVWTPUJKRRKPIEJCTIGU
for any product that is not packaged and shipped in accordance with the foregoing requirements, or that is determined by
D-Link not to be defective or non-conforming.
9JCV+U0QV%QXGTGF
6JG.KOKVGF9CTTCPV[RTQXKFGFJGTGKPD[&.KPMFQGUPQVEQXGT
2TQFWEVUVJCVKP&.KPMŏULWFIOGPVJCXGDGGPUWDLGEVGFVQCDWUGCEEKFGPVCNVGTCVKQPOQFKſECVKQPVCORGTKPIPGINKIGPEGOKUWUGHCWNV[
installation, lack of reasonable care, repair or service in any way that is not contemplated in the documentation for the product, or if the
OQFGNQTUGTKCNPWODGTJCUDGGPCNVGTGFVCORGTGFYKVJFGHCEGFQTTGOQXGF+PKVKCNKPUVCNNCVKQPKPUVCNNCVKQPCPFTGOQXCNQHVJGRTQFWEVHQT
TGRCKTCPFUJKRRKPIEQUVU1RGTCVKQPCNCFLWUVOGPVUEQXGTGFKPVJGQRGTCVKPIOCPWCNHQTVJGRTQFWEVCPFPQTOCNOCKPVGPCPEG&COCIG
VJCVQEEWTUKPUJKROGPVFWGVQCEVQH)QFHCKNWTGUFWGVQRQYGTUWTIGCPFEQUOGVKEFCOCIG#P[JCTFYCTGUQHVYCTGſTOYCTGQTQVJGT
RTQFWEVUQTUGTXKEGURTQXKFGFD[CP[QPGQVJGTVJCP&.KPMCPF2TQFWEVUVJCVJCXGDGGPRWTEJCUGFHTQOKPXGPVQT[ENGCTCPEGQTNKSWKFCVKQP
sales or other sales in which D-Link, the sellers, or the liquidators expressly disclaim their warranty obligation pertaining to the product.
9JKNGPGEGUUCT[OCKPVGPCPEGQTTGRCKTUQP[QWT2TQFWEVECPDGRGTHQTOGFD[CP[EQORCP[YGTGEQOOGPFVJCV[QWWUGQPN[CP#WVJQTK\GF
&.KPM5GTXKEG1HſEG+ORTQRGTQTKPEQTTGEVN[RGTHQTOGFOCKPVGPCPEGQTTGRCKTXQKFUVJKU.KOKVGF9CTTCPV[
&KUENCKOGTQH1VJGT9CTTCPVKGU
':%'26(146*'.+/+6'&9#44#06;52'%+(+'&*'4'+06*'241&7%6+52418+&'&ő#5+5Œ9+6*176#0;9#44#06;
1(#0;-+0&9*#651'8'4+0%.7&+0)9+6*176.+/+6#6+10#0;9#44#06;1(/'4%*#06#$+.+6;(+60'55(14#
PARTICULAR PURPOSE AND NONINFRINGEMENT.

56D-Link DWA-125 User Manual
Appendix E - Warranty
+(#0;+/2.+'&9#44#06;%#0016$'&+5%.#+/'&+0#0;6'44+614;9*'4'#241&7%6+551.&6*'&74#6+101(
57%*+/2.+'& 9#44#06; 5*#..$' .+/+6'& 61 6*' &74#6+101( 6*' #22.+%#$.'9#44#06; 2'4+1&5'6 (146*
#$18'':%'26#5':24'55.;%18'4'&70&'46*'.+/+6'&9#44#06;2418+&'&*'4'+06*''06+4'4+5-#561
6*'37#.+6;5'.'%6+10#0&2'4(14/#0%'1(6*'241&7%6+59+6*6*'274%*#5'41(6*'241&7%6
.KOKVCVKQPQH.KCDKNKV[
61 6*' /#:+/7/ ':6'06 2'4/+66'& $; .#9 &.+0- +5 016 .+#$.' 70&'4 #0; %1064#%6 0').+)'0%' 564+%6
.+#$+.+6; 14 16*'4 .')#. 14 '37+6#$.' 6*'14; (14 #0; .155 1( 75' 1( 6*' 241&7%6 +0%108'0+'0%' 14
&#/#)'5 1( #0; %*#4#%6'4 9*'6*'4 &+4'%6 52'%+#. +0%+&'06#. 14 %105'37'06+#. +0%.7&+0) $76 016
LIMITED TO, DAMAGES FOR LOSS OF GOODWILL, LOSS OF REVENUE OR PROFIT, WORK STOPPAGE, COMPUTER FAILURE OR
/#.(70%6+10(#+.74'1(16*'4'37+2/'0614%1/276'4241)4#/5619*+%*&.+0-ŏ5241&7%6+5%100'%6'&
9+6*.1551(+0(14/#6+1014#%106#+0'&+05614'&1014+06')4#6'&9+6*#0;241&7%64'6740'&61
&.+0-(149#44#06;5'48+%'4'57.6+0)(41/6*'75'1(6*'241&7%64'.#6+0)619#44#06;5'48+%'14
#4+5+0)1761(#0;$4'#%*1(6*+5.+/+6'&9#44#06;'8'0+(&.+0-*#5$''0#&8+5'&1(6*'2155+$+.+6;1(
57%*&#/#)'56*'51.'4'/'&;(14#$4'#%*1(6*'(14')1+0).+/+6'&9#44#06;+54'2#+44'2.#%'/'0614
4'(70&1(6*'&'('%6+8'14010%10(14/+0)241&7%66*'/#:+/7/.+#$+.+6;1(&.+0-70&'46*+59#44#06;
+5.+/+6'&616*'274%*#5'24+%'1(6*'241&7%6%18'4'&$;6*'9#44#06;6*'(14')1+0)':24'5594+66'0
9#44#06+'5#0&4'/'&+'5#4'':%.75+8'#0'+0.+'71(#0;16*'49#44#06+'5144'/'&+'5':24'55
+/2.+'&1456#67614;
)QXGTPKPI.CY
This Limited Warranty shall be governed by the laws of the State of California. Some states do not allow exclusion or limitation of incidental
or consequential damages, or limitations on how long an implied warranty lasts, so the foregoing limitations and exclusions may not apply.
6JKU.KOKVGF9CTTCPV[RTQXKFGUURGEKſENGICNTKIJVUCPF[QWOC[CNUQJCXGQVJGTTKIJVUYJKEJXCT[HTQOUVCVGVQUVCVG
6TCFGOCTMU
&.KPMKUCTGIKUVGTGFVTCFGOCTMQH&.KPM%QTRQTCVKQP&.KPM5[UVGOU+PE1VJGTVTCFGOCTMUQTTGIKUVGTGFVTCFGOCTMUCTGVJGRTQRGTV[
of their respective owners.
%QR[TKIJV5VCVGOGPV
No part of this publication or documentation accompanying this product may be reproduced in any form or by any means or used to make any
FGTKXCVKXGUWEJCUVTCPUNCVKQPVTCPUHQTOCVKQPQTCFCRVCVKQPYKVJQWVRGTOKUUKQPHTQO&.KPM%QTRQTCVKQP&.KPM5[UVGOU+PECUUVKRWNCVGF
by the United States Copyright Act of 1976 and any amendments thereto. Contents are subject to change without prior notice.
%QR[TKIJVD[&.KPM%QTRQTCVKQP&.KPM5[UVGOU+PE#NNTKIJVUTGUGTXGF

57D-Link DWA-125 User Manual
Appendix E - Warranty
(%%5VCVGOGPV
6JKUFGXKEGJCUDGGPVGUVGFHQTEQORNKCPEGYKVJ(%%4('ZRQUWTG5#4NKOKVUKPVJGV[RKECNNCRVQREQORWVGTEQPſIWTCVKQPCPFVJKUFGXKEG
ECPDGWUGFKPFGUMVQRQTNCRVQREQORWVGTUYKVJUKFGOQWPVGF75$RQTVUYJKEJECPRTQXKFGEOUGRCTCVKQPFKUVCPEGHTQOVJGCPVGPPC
to the body of the user or a nearby person. This device cannot be used with handheld PDAs (personal digital assistants). This device and
its antenna must not be co-located or operated in conjunction with any other antenna or transmitter.
6JKUGSWKROGPVJCUDGGPVGUVGFCPFHQWPFVQEQORN[YKVJVJGNKOKVUHQTC%NCUU$FKIKVCNFGXKEGRWTUWCPVVQRCTVQHVJG(%%4WNGU
These limits are designed to provide reasonable protection against harmful interference in a residential installation. This equipment
generates, uses, and can radiate radio frequency energy and, if not installed and used in accordance with the instructions, may cause
harmful interference to radio communication. However, there is no guarantee that interference will not occur in a particular installation.
If this equipment does cause harmful interference to radio or television reception, which can be determined by turning the equipment off
CPFQPVJGWUGTKUGPEQWTCIGFVQVT[VQEQTTGEVVJGKPVGTHGTGPEGD[QPGQTOQTGQHVJGHQNNQYKPIOGCUWTGU
Ŗ4GQTKGPVQTTGNQECVGVJGTGEGKXKPICPVGPPC
Ŗ+PETGCUGVJGUGRCTCVKQPDGVYGGPVJGGSWKROGPVCPFTGEGKXGT
Ŗ%QPPGEVVJGGSWKROGPVKPVQCPQWVNGVQPCEKTEWKVFKHHGTGPVHTQOVJCVVQYJKEJVJGTGEGKXGTKUEQPPGEVGF
Ŗ%QPUWNVVJGFGCNGTQTCPGZRGTKGPEGFTCFKQ68VGEJPKEKCPHQTJGNR
6JKUFGXKEGEQORNKGUYKVJ2CTVQHVJG(%%4WNGU1RGTCVKQPKUUWDLGEVVQVJGHQNNQYKPIVYQEQPFKVKQPU
(1) This device may not cause harmful interference, and (2) this device must accept any interference received, including interference that
may cause undesired operation.
+/2146#06016+%'
(%%4CFKCVKQP'ZRQUWTG5VCVGOGPV
6JKUGSWKROGPVEQORNKGUYKVJ(%%TCFKCVKQPGZRQUWTGNKOKVUUGVHQTVJHQTCPWPEQPVTQNNGFGPXKTQPOGPV'PFWUGTUOWUVHQNNQYVJGURGEKſE
operating instructions for satisfying RF exposure compliance. This transmitter must not be co-located or operating in conjunction with
CP[QVJGTCPVGPPCQTVTCPUOKVVGT+'''IQRGTCVKQPQHVJKURTQFWEVKPVJG75#KUſTOYCTGNKOKVGFVQEJCPPGNUVJTQWIJ6JKU
GSWKROGPVJCUDGGP5#4GXCNWCVGFHQTWUGKPNCRVQRUPQVGDQQMUYKVJUKFGUNQVEQPſIWTCVKQP
For detailed warranty information applicable to products purchased outside the United States, please contact the corresponding local
&.KPMQHſEG

58D-Link DWA-125 User Manual
Appendix E - Warranty
+PFWUVT[%CPCFC0QVKEG
This device complies with Canadian RSS-210
ő6JKU%NCUU$FKIKVCNCRRCTCVWUEQORNKGUYKVJ%CPFCFKCP+%'5Œ
%GVCRRCTGKNPWOÃTKSWGFGNCENCUUG$GUVEQPHQTOG´NCPQTOG0/$FW%CPCFC
IC statement
1RGTCVKQPKUUWDLGEVVQVJGHQNNQYKPIVYQEQPFKVKQPU
(1)This device may not cause interference and
(2)This device must accept any interference, including interference that may cause undesired operation of the
device.
6JKUFGXKEGJCUDGGPFGUKIPGFVQQRGTCVGYKVJCPCPVGPPCJCXKPICOCZKOWOICKPQHF$K#PVGPPCJCXKPICJKIJGT
gain is strictly prohibited per regulations of Industry Canada. The required antenna impedance is 50 ohms.
+/2146#06016'
+%4CFKCVKQP'ZRQUWTG5VCVGOGPV
This equipment complies with IC radiation exposure limits set forth for an uncontrolled environment. End users must
HQNNQYVJGURGEKſEQRGTCVKPIKPUVTWEVKQPUHQTUCVKUH[KPI4(GZRQUWTGEQORNKCPEG6JKUGSWKROGPVUJQWNFDGKPUVCNNGF
CPFQRGTCVGFYKVJOKPKOWOFKUVCPEGEODGVYGGPVJGTCFKCVQT[QWTDQF[
This transmitter must not be co-located or operating in conjunction with any other antenna or transmitter.
4ÂINGOGPVFŏ+PFWUVT[%CPCFC
.GUEQPFKVKQPUFGHQPEVKQPPGOGPVUQPVUWLGVVGU´FGWZEQPFKVKQPU
%GRÃTKRJÃTKSWGPGFQKVRCUECWUGTFŏKPVGTHÃTGPEGGV
(2)Ce périphérique doit accepter toute interférence, y compris les interférences pouvant perturber le bon fonctionnement
de ce périphérique.

59D-Link DWA-125 User Manual
Appendix E - Warranty
(GFGTCN%QOOWPKECVKQP%QOOKUUKQP+PVGTHGTGPEG5VCVGOGPV
6JKUGSWKROGPVJCUDGGPVGUVGFCPFHQWPFVQEQORN[YKVJVJGNKOKVUHQTC%NCUU$FKIKVCNFGXKEGRWTUWCPVVQ2CTVQHVJG(%%4WNGU
These limits are designed to provide reasonable protection against harmful interference in a residential installation. This equipment
generates, uses and can radiate radio frequency energy and, if not installed and used in accordance with the instructions, may cause
harmful interference to radio communications. However, there is no guarantee that interference will not occur in a particular installation.
If this equipment does cause harmful interference to radio or television reception, which can be determined by turning the equipment off
CPFQPVJGWUGTKUGPEQWTCIGFVQVT[VQEQTTGEVVJGKPVGTHGTGPEGD[QPGQHVJGHQNNQYKPIOGCUWTGU
- Reorient or relocate the receiving antenna.
- Increase the separation between the equipment and receiver.
- Connect the equipment into an outlet on a circuit different from that to which the receiver is connected.
%QPUWNVVJGFGCNGTQTCPGZRGTKGPEGFTCFKQ68VGEJPKEKCPHQTJGNR
6JKUFGXKEGEQORNKGUYKVJ2CTVQHVJG(%%4WNGU1RGTCVKQPKUUWDLGEVVQVJGHQNNQYKPIVYQEQPFKVKQPU6JKUFGXKEGOC[PQVECWUGJCTOHWN
interference, and (2) this device must accept any interference received, including interference that may cause undesired operation.
(%%%CWVKQP#P[EJCPIGUQTOQFKſECVKQPUPQVGZRTGUUN[CRRTQXGFD[VJGRCTV[TGURQPUKDNGHQTEQORNKCPEGEQWNFXQKFVJGWUGTUCWVJQTKV[
to operate this equipment.
+'''DQTIQRGTCVKQPQHVJKURTQFWEVKPVJG75#KUſTOYCTGNKOKVGFVQEJCPPGNUVJTQWIJ
+/2146#06016'
(%%4CFKCVKQP'ZRQUWTG5VCVGOGPV
6JKUGSWKROGPVEQORNKGUYKVJ(%%TCFKCVKQPGZRQUWTGNKOKVUUGVHQTVJHQTCPWPEQPVTQNNGFGPXKTQPOGPV'PFWUGTUOWUVHQNNQYVJGURGEKſE
operating instructions for satisfying RF exposure compliance. To maintain compliance with FCC RF exposure compliance requirements,
please follow operation instruction as documented in this manual.
This transmitter must not be co-located or operating in conjunction with any other antenna or transmitter.
5#4EQORNKCPEGJCUDGGPGUVCDNKUJGFKPV[RKECNNCRVQREQORWVGTUYKVJ75$UNQVCPFRTQFWEVEQWNFDGWUGFKPV[RKECNNCRVQREQORWVGT
YKVJ75$UNQV1VJGTCRRNKECVKQPNKMGJCPFJGNF2%QTUKOKNCTFGXKEGJCUPQVDGGPXGTKſGFCPFOC[PQVEQORNKCPEGYKVJTGNCVGF4(GZRQUWTG
rule and such use shall be prohibited.
0QVGVQ75OQFGNQYPGT6QEQORN[YKVJ75(%%TGIWNCVKQPVJGEQWPVT[UGNGEVKQPHWPEVKQPJCUDGGPEQORNGVGN[TGOQXGFHTQO
CNN75OQFGNU6JGCDQXGHWPEVKQPKUHQTPQP75OQFGNUQPN[
6JGCXCKNCDKNKV[QHUQOGURGEKſEEJCPPGNUCPFQTQRGTCVKQPCNHTGSWGPE[DCPFUCTGEQWPVT[FGRGPFGPVCPFCTGſTOYCTGRTQITCOOGFCV
VJGHCEVQT[VQOCVEJVJGKPVGPFGFFGUVKPCVKQP6JGſTOYCTGUGVVKPIKUPQVCEEGUUKDNGD[VJGGPFWUGT

60D-Link DWA-125 User Manual
Appendix E - Warranty
Industry Canada Statement
6JKUFGXKEGEQORNKGUYKVJ455QHVJG+PFWUVT[%CPCFC4WNGU1RGTCVKQPKUUWDLGEVVQVJGHQNNQYKPIVYQEQPFKVKQPU
1) this device may not cause interference and
2) this device must accept any interference, including interference that may cause undesired operation of the device
+/2146#06016'
+%4CFKCVKQP'ZRQUWTG5VCVGOGPV
6JKUGSWKROGPVEQORNKGUYKVJ+%TCFKCVKQPGZRQUWTGNKOKVUUGVHQTVJHQTCPWPEQPVTQNNGFGPXKTQPOGPV'PFWUGTUOWUVHQNNQYVJGURGEKſE
operating instructions for satisfying RF exposure compliance. To maintain compliance with IC RF exposure compliance requirements,
please follow operation instruction as documented in this manual.
以下警語適用台灣地區:
經型式認證合格之低功率射頻電機,非經許可,公司、商號或使用者均不得擅自變更頻率、加大功率或變更原設計之
特性及功能。
低功率射頻電機之使用不得影響飛航安全及干擾合法通信;經發現有干擾現象時,應立即停用,並改善至無干擾時方
得繼續使用。前項合法通信,指依電信法規定作業之無線電通信。低功率射頻電機須忍受合法通信或工業、科學及醫
療用電波輻射性電機設備之干擾。
61D-Link DWA-125 User Manual
Appendix F - Registration
Version 1.0
April 15, 2009
Product registration is entirely voluntary and failure to complete or return this form will not diminish your warranty
rights.
Registration