D Link WA525A1 WIRELESS N 150 USB ADAPTER User Manual WA525A1 UserMan
D Link Corporation WIRELESS N 150 USB ADAPTER WA525A1 UserMan
D Link >
Users Manual


2D-Link WA525A1 User Manual
Table of Contents
Product Overview ........................................................3
Package Contents ..................................................... 3
System Requirements...............................................3
Introduction ...............................................................4
Features .................................................................... 5
Hardware Overview................................................... 6
LEDs ......................................................................6
Installation....................................................................7
Getting Started..........................................................7
Remove Existing Installations ................................7
Disable Other Wireless Adapters ...........................8
Wireless Installation Considerations .......................10
Adapter Installation .................................................11
Push Button Configuration (PBC) ........................14
Configuration.............................................................17
D-Link Wireless Connection Manager.....................17
Wireless Networks ...............................................18
Wi-Fi Protected Setup (WPS) ..............................19
Personal Identification Number (PIN)................... 20
My Wireless Networks..........................................22
Support.................................................................25
About....................................................................26
Connect to a Wireless Network ................................27
Using Windows® 7 ................................................... 27
Using Windows Vista®............................................. 28
Windows® XP Configuration Utility ..........................30
Wireless Security.......................................................33
What is WEP? .........................................................33
What is WPA?..........................................................34
Configure WEP........................................................35
Using the D-Link Wireless Connection Manager..35
Configure WEP Passphrase.................................... 37
Using the Windows Vista®....................................37
Using the Windows® XP Utility..............................39
Configure WPA/WPA2 Passphrase .........................41
Using the D-Link Wireless Connection Manager..41
Using Windows® 7 ................................................ 43
Using the Windows Vista®....................................46
Using the Windows® XP Utility..............................48
Configure WPA/WPA2 (RADIUS) ............................ 50
Using the D-Link Wireless Connection Manager..50
Troubleshooting.........................................................51
Wireless Basics ......................................................... 56
Wireless Modes....................................................... 60
Networking Basics ....................................................61
Check your IP address............................................ 61
Windows® XP/2000 Users.................................... 61
Windows® 7/Windows Vista® Users......................61
Statically Assign an IP address...............................62
Windows® XP/2000 Users.................................... 62
Windows® 7/Windows Vista® Users......................63
Technical Specifications...........................................64
Table of Contents

3D-Link WA525A1 User Manual
Section 1 - Product Overview
s$,INK7!!7IRELESS.$ESKTOP!DAPTER
s-ANUALAND7ARRANTYON#$
s$,INK7IRELESS#ONNECTION-ANAGERON#$
s1UICK)NSTALLATION'UIDE
System Requirements
s!DESKTOPCOMPUTERWITHANAVAILABLE0#)SLOT
s7INDOWS® 7, Windows Vista®, 2000 (Service Pack 4) or XP (Service Pack 2 or higher)
s#$2/-$RIVE
s-(ZPROCESSORANDATLEAST-"OF2!-
s!NNGORBACCESSPOINTFOR)NFRASTRUCTUREMODEOR
ANOTHERNGORBWIRELESSADAPTERFOR!$(OCMODE
Product Overview
Package Contents

4D-Link WA525A1 User Manual
Section 1 - Product Overview
Introduction
The D-Link Wireless N 150 Desktop Adapter (WA525A1) is a 802.11n client device that delivers unrivaled wireless
PERFORMANCEFOR YOURDESKTOPCOMPUTER7ITH THE7!!YOU CAN ADDORUPGRADE YOUR$ESKTOP 0#SWIRELESS
CONNECTIVITYWITHOUTHAVINGTOPURCHASEANEWCOMPUTER/NCECONNECTEDACCESSYOURNETWORKSHIGHSPEED)NTERNET
CONNECTIONWHILESHARINGPHOTOSlLESMUSICVIDEOPRINTERSANDSTORAGE'ETABETTER)NTERNETEXPERIENCEWITHAFASTER
wireless connection so you can enjoy digital phone calls, gaming, downloading, and video streaming.
0OWEREDBY7IRELESS.TECHNOLOGYTHE7!!PROVIDESAFASTERWIRELESSCONNECTIONANDSUPERIORRECEPTIONTHAN
G4HE7!!ISDESIGNEDFORUSEINBIGGERHOMESANDFORTHOSETHATDEMANDHIGHERNETWORKING-AXIMIZE
WIRELESSPERFORMANCEBYCONNECTINGTHISDESKTOPADAPTERTOA7IRELESS.2OUTERANDSTAYCONNECTEDFROMVIRTUALLY
anywhere in the home. This adapter supports WEP, WPA, and WPA2 encryption to prevent outside intrusion and protect
YOURPERSONALINFORMATIONFROMBEINGEXPOSED
4HE$,INK7IRELESS.7!!ISAPOWERFULBITDESKTOPADAPTERTHATINSTALLSQUICKLYANDEASILYINTODESKTOP
computers. Like all D-Link wireless adapters, the WA525A1 can be used in ad-hoc mode to connect directly with other
CARDSFORPEERTOPEERlLESHARINGORININFRASTRUCTUREMODETOCONNECTWITHAWIRELESSACCESSPOINTORROUTERFORACCESS
TOTHE)NTERNETINYOUROFlCEORHOMENETWORK
4HE7!!FEATURESROBUSTSECURITYTOHELPPROTECTTHEWIRELESSNETWORKFROMINTRUDERSCOMPLYINGWITHTHELATEST
WIRELESSNETWORKINGSECURITYPROTOCOLSINCLUDING7%0ENCRYPTIONAND7I&I0ROTECTED!CCESS70!SUPPORTFOR
WPA2-PSK. The WA525A1 also includes a configuration utility to discover available wireless networks and create and
SAVEDETAILEDCONNECTIVITYPROlLESFORTHOSENETWORKSMOSTOFTENACCESSED
sMaximum wireless signal rate derived from IEEE Standard 802.11g and 802.11n specifications. Actual data throughput will vary. Network conditions and environmental factors, including
volume of network traffic, building materials and construction, and network overhead, lower actual data throughput rate. Environmental factors will adversely affect wireless signal
range.

5D-Link WA525A1 User Manual
Section 1 - Product Overview
s&ASTER7IRELESS.ETWORKINGEnable wireless connectivity on your Desktop PC computer with the
7!!7ITHTHEPERFORMANCEOF$,INKS7IRELESS.LINEOFWIRELESSPRODUCTSTHE7!!
DELIVERS AMORE RELIABLEWIRELESS CONNECTION 0ERFORM MULTIPLENETWORK TASKS AT ONCE WITHTHE SPEED
provided by this Wireless Adapter.
s#OMPATIBLEWITHBANDG$EVICESFully compatible with the IEEE 802.11b and 802.11g
standards, the WA525A1 can connect with existing 802.11b or 802.11g compliant routers, access points
ANDCARDS4HATMEANSYOUCANSTILLCOMMUNICATEWITHCOLLEAGUESANDFRIENDSWHILEYOUHAVETHEABILITY
to link to even more wireless networks.
s"ETTER3ECURITYWITH70!70!AND703With the WA525A1 in your Desktop PC you can securely
CONNECTTOAWIRELESSNETWORKUSING70!70!7I&I0ROTECTED!CCESSFORWIRELESSAUTHENTICATION
ASWELLAS7037I&I0ROTECTED3ETUPPROVIDINGYOUAMUCHHIGHERLEVELANDANEASIERWAYOFSECURITY
FORYOURDATAANDCOMMUNICATIONTHANHASPREVIOUSLYBEENAVAILABLE
s4OTAL0ERFORMANCEUpgrade your computer with the latest 802.11n technology.
s-AXIMUMWIRELESSSIGNALRATEDERIVEDFROM)%%%3TANDARDGANDNSPECIlCATIONS!CTUALDATATHROUGHPUTWILLVARY.ETWORKCONDITIONSAND
ENVIRONMENTALFACTORS INCLUDINGVOLUMEOFNETWORK TRAFlCBUILDINGMATERIALSAND CONSTRUCTIONANDNETWORK OVERHEADLOWERACTUALDATATHROUGHPUTRATE
%NVIRONMENTALFACTORSWILLADVERSELYAFFECTWIRELESSSIGNALRANGE
Features
6D-Link WA525A1 User Manual
Section 1 - Product Overview
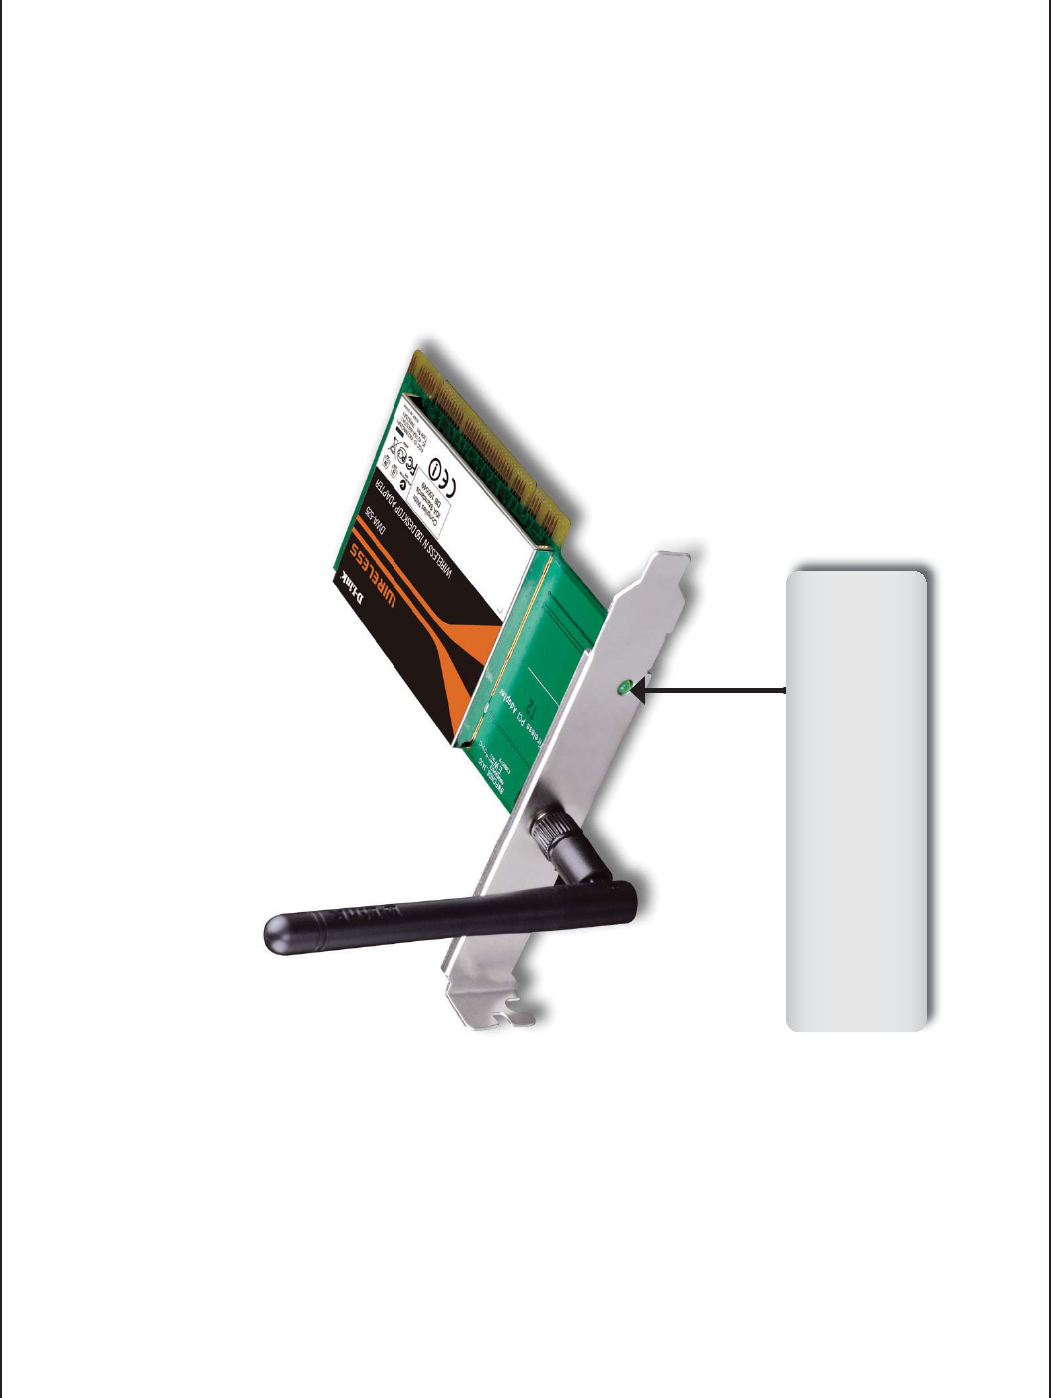
Hardware Overview
LEDs
!#4,INK
A blinking light indicates transmission
OF DATA ! STEADY LIGHT INDICATES A
connection to a wireless network.

7D-Link WA525A1 User Manual
Section 2 - Installation
Getting Started
Installation
4HISSECTIONWILLWALKYOUTHROUGHTHEINSTALLATIONPROCESS)FYOUHAVEABUILTINWIRELESSADAPTERPLEASEDISABLEITIN
DEVICEMANAGERBEFOREINSTALLINGYOUR$,INKADAPTER!LSOIFYOUHAVEPREVIOUSLYINSTALLEDANOTHERWIRELESSADAPTER
PLEASEMAKESUREANYSOFTWAREISUNINSTALLED
"EFOREINSTALLINGYOURNEW$,INKWIRELESSADAPTERPLEASEVERIFYTHEFOLLOWING
s2EMOVEANYPREVIOUSINSTALLATIONSOFWIRELESSADAPTERS
s$ISABLEANYBUILTINWIRELESSADAPTERS
s6ERIFYTHESETTINGSSUCHASTHE33)$ANDSECURITYSETTINGSOFTHENETWORKSYOUWANTTOCONNECTTO
Remove Existing Installations
)FYOUVEINSTALLEDADIFFERENTMANUFACTURESADAPTERORADIFFERENTMODEL$,INKADAPTERMAKESURETHESOFTWAREIS
UNINSTALLEDBEFOREINSTALLINGTHENEWSOFTWARE3OMEUTILITIESMAYCAUSEACONmICTWITHTHENEWSOFTWARE)FYOUPLAN
TOUSEMULTIPLEADAPTERSATDIFFERENTTIMESMAKESURETHEUTILITIESARENOTSETTOLOADWHENYOURCOMPUTERBOOTSUP
Windows® 7/Vista/Windows®80USERSMAYUSETHEBUILTINWIRELESSUTILITYFORALLADAPTERS
4OREMOVEANYOLDSOFTWARE
Windows®USERS#LICK3TART#ONTROL0ANEL0ROGRAMSAND&EATURES5NINSTALLORCHANGEAPROGRAM.
Windows® XP/Vista®USERS#LICK3TART#ONTROL0ANEL!DDOR2EMOVE0ROGRAMS
8D-Link WA525A1 User Manual
Section 2 - Installation
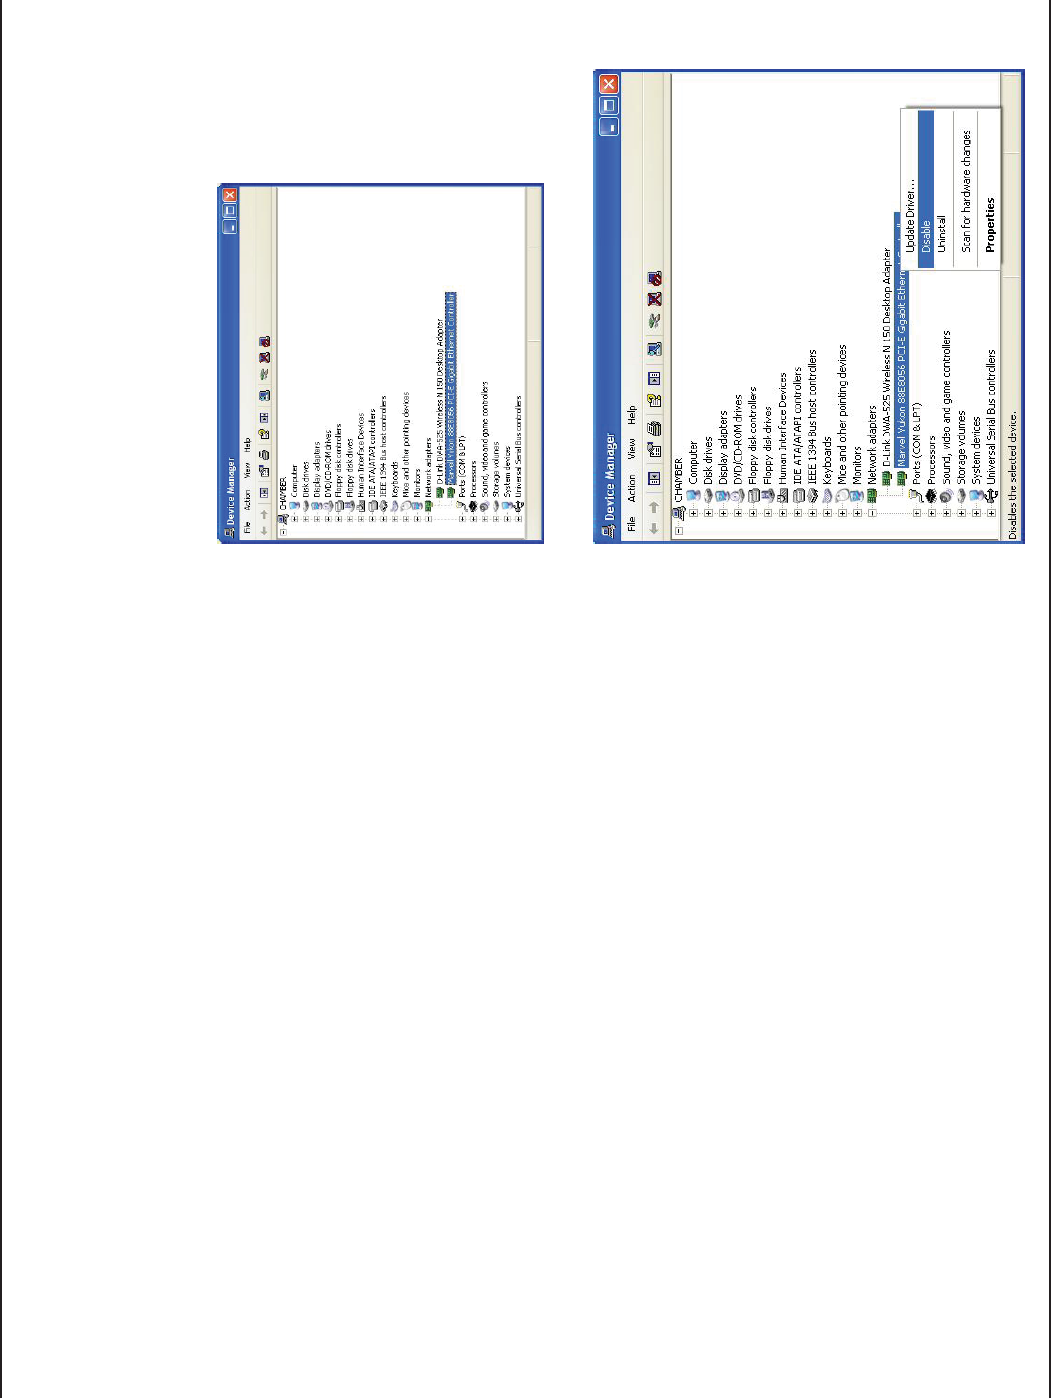
Disable Other Wireless Adapters
4OPREVENTANYCONmICTSWITHTHE$,INKWIRELESSADAPTERITISRECOMMENDEDTODISABLEANYWIRELESSADAPTERASWELL
as any unused Ethernet adapters).
From the desktop, right-click on the -Y #OMPUTER icon and select
Properties.
Click the Hardware tab and then click $EVICE-ANAGER. Scroll down
the list and click the +SIGNTOTHELEFTOF.ETWORK!DAPTERS.
Right-click the adapter you would like to disable and select
$ISABLE.
9D-Link WA525A1 User Manual
Section 2 - Installation
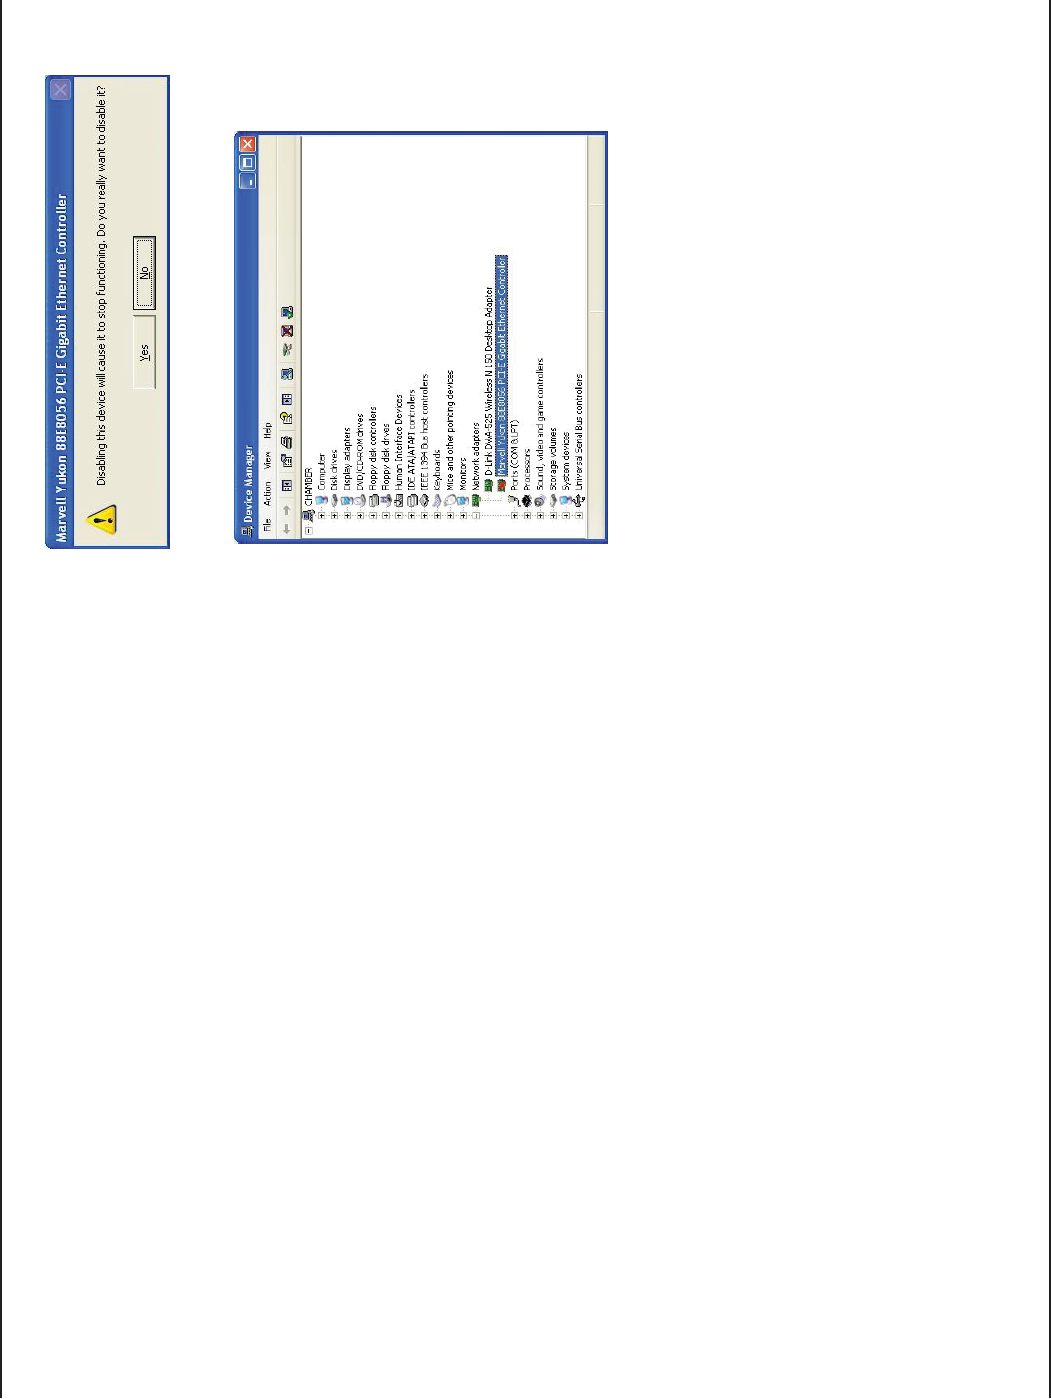
Click Yes to disable the adapter.
The adapter is now disabled. When disabled, a red X will be
displayed.
$ISABLINGTHEADAPTERWILLNOTREMOVETHEDRIVERS)FYOUWOULDLIKE
to use the adapter, simply right-click it and select Enable.

10D-Link WA525A1 User Manual
Section 2 - Installation
Wireless Installation Considerations
4HE$,INKWIRELESSADAPTERLETSYOUACCESSYOURNETWORKUSINGAWIRELESSCONNECTIONFROMVIRTUALLYANYWHEREWITHIN
THE OPERATING RANGE OF YOUR WIRELESS NETWORK +EEP IN MIND HOWEVER THAT THE NUMBER THICKNESS AND LOCATION OF
walls, ceilings, or other objects that the wireless signals must pass through, may limit the range. Typical ranges vary
DEPENDINGONTHETYPESOFMATERIALSANDBACKGROUND2&RADIOFREQUENCYNOISEINYOURHOMEORBUSINESS4HEKEY
TOMAXIMIZINGWIRELESSRANGEISTOFOLLOWTHESEBASICGUIDELINES
1+EEPTHENUMBEROFWALLSANDCEILINGS BETWEENTHE $,INKADAPTERANDOTHER NETWORK DEVICESTO A
MINIMUMEACHWALLORCEILINGCANREDUCEYOURADAPTERSRANGEFROMFEETMETERS0OSITION
YOURDEVICESSOTHATTHENUMBEROFWALLSORCEILINGSISMINIMIZED
2"E AWARE OF THE DIRECT LINE BETWEEN NETWORK DEVICES ! WALL THAT IS FEET THICK METERS AT A
DEGREEANGLEAPPEARSTOBEALMOSTFEETMETERTHICK!TADEGREEANGLEITLOOKSOVERFEET
(14 meters) thick! Position devices so that the signal will travel straight through a wall or ceiling (instead
OFATANANGLEFORBETTERRECEPTION
3"UILDING-ATERIALSMAKEADIFFERENCE!SOLIDMETALDOORORALUMINUMSTUDSMAYHAVEANEGATIVEEFFECTON
range. Try to position access points, wireless routers, and computers so that the signal passes through
drywall or open doorways. Materials and objects such as glass, steel, metal, walls with insulation, water
(fish tanks), mirrors, file cabinets, brick, and concrete will degrade your wireless signal.
4+EEP YOUR PRODUCT AWAY AT LEAST FEET OR METERS FROM ELECTRICAL DEVICES OR APPLIANCES THAT
generate RF noise.
5)FYOUAREUSING'(ZCORDLESSPHONESOR8WIRELESSPRODUCTSSUCHASCEILINGFANSLIGHTSAND
home security systems), your wireless connection may degrade dramatically or drop completely. Make
SUREYOUR'(ZPHONEBASEISASFARAWAYFROMYOURWIRELESSDEVICESASPOSSIBLE4HEBASETRANSMITS
ASIGNALEVENIFTHEPHONEINNOTINUSE
11D-Link WA525A1 User Manual
Section 2 - Installation
Warning: Do NOT install the WA525A1 Wireless N 150 Desktop Adapter into your computer before installing the driver software
from the D-Link CD.
Turn on the computer and Insert the D-Link WA525A1 Driver CD in the CD-ROM drive.
)FTHE#$!UTORUNFUNCTIONDOESNOTAUTOMATICALLYSTARTONYOURCOMPUTERGOTOStart > 2UN. In the run box type “$<
$7!EXE” (where D:REPRESENTSTHEDRIVELETTEROFYOUR#$2/-DRIVE
When the autorun screen appears, click Install Drivers.
Adapter Installation
Click )NSTALL$RIVERS
12D-Link WA525A1 User Manual
Section 2 - Installation
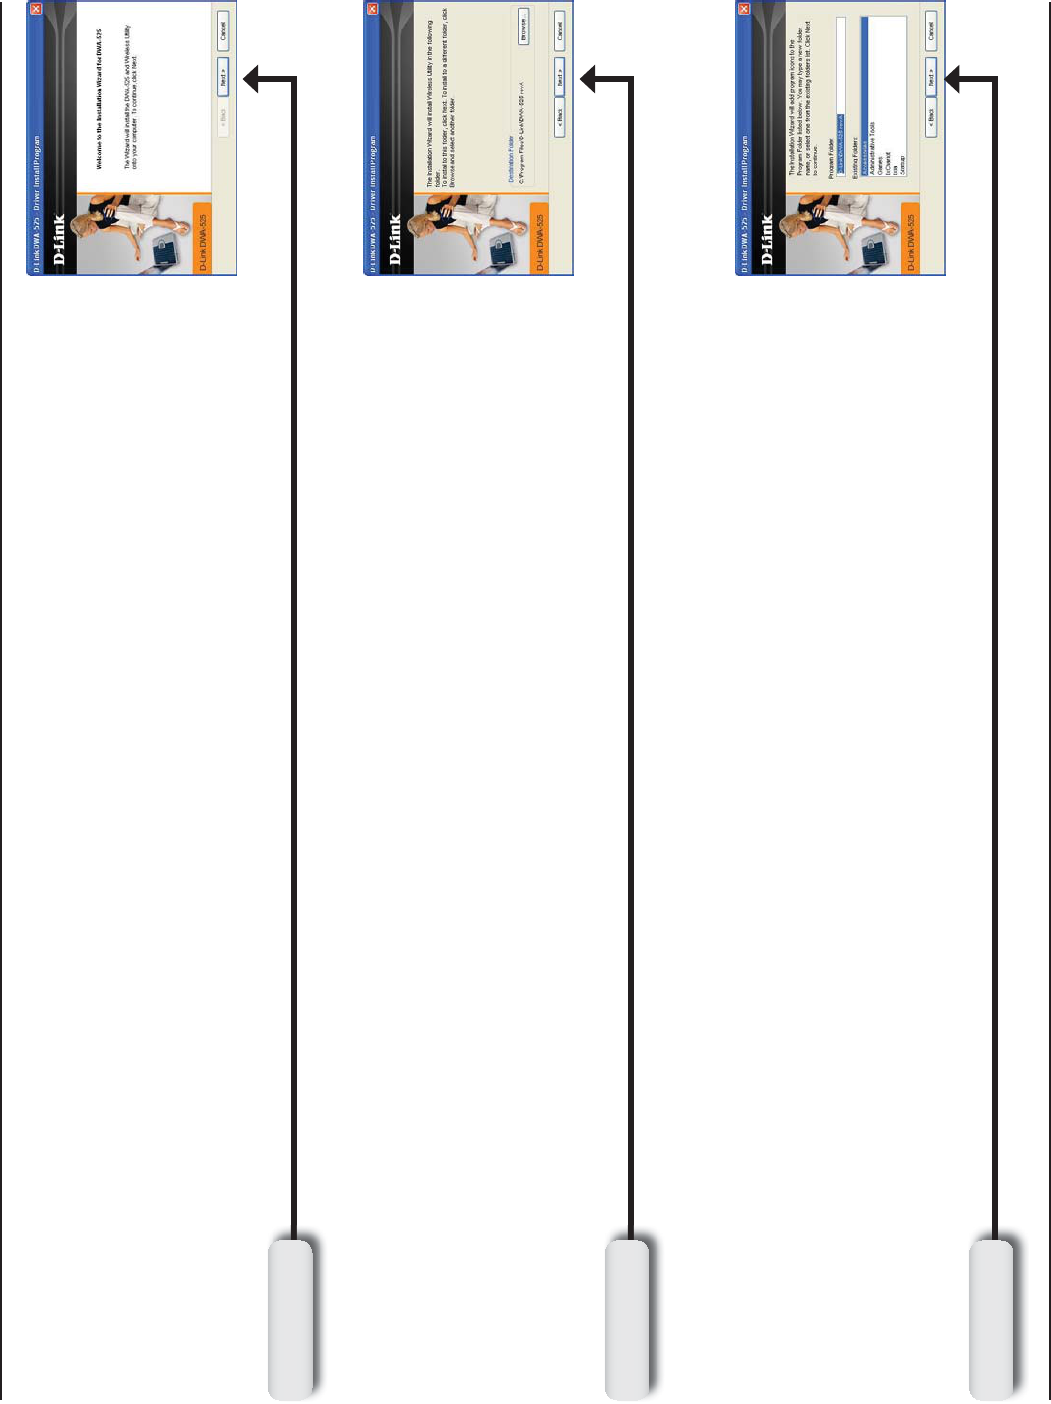
The InstallShield Wizard window will appear.
Click .EXT to continue.
"YDEFAULTSETUPWILLINSTALLTOTHEDEFAULTLOCATIONC:\Program
Files\D-Link\WA525A1WHERE#REPRESENTSTHEDRIVELETTEROF
YOURHARDDRIVE4OINSTALLTOADIFFERENTLOCATIONCLICKBrowse
ANDSPECIFYTHELOCATION#LICK.EXT.
Click .EXT
Click .EXT
3ELECTTHE0ROGRAM&ILESFOLDERLOCATION
Click .EXT
13D-Link WA525A1 User Manual
Section 2 - Installation
Click .EXT
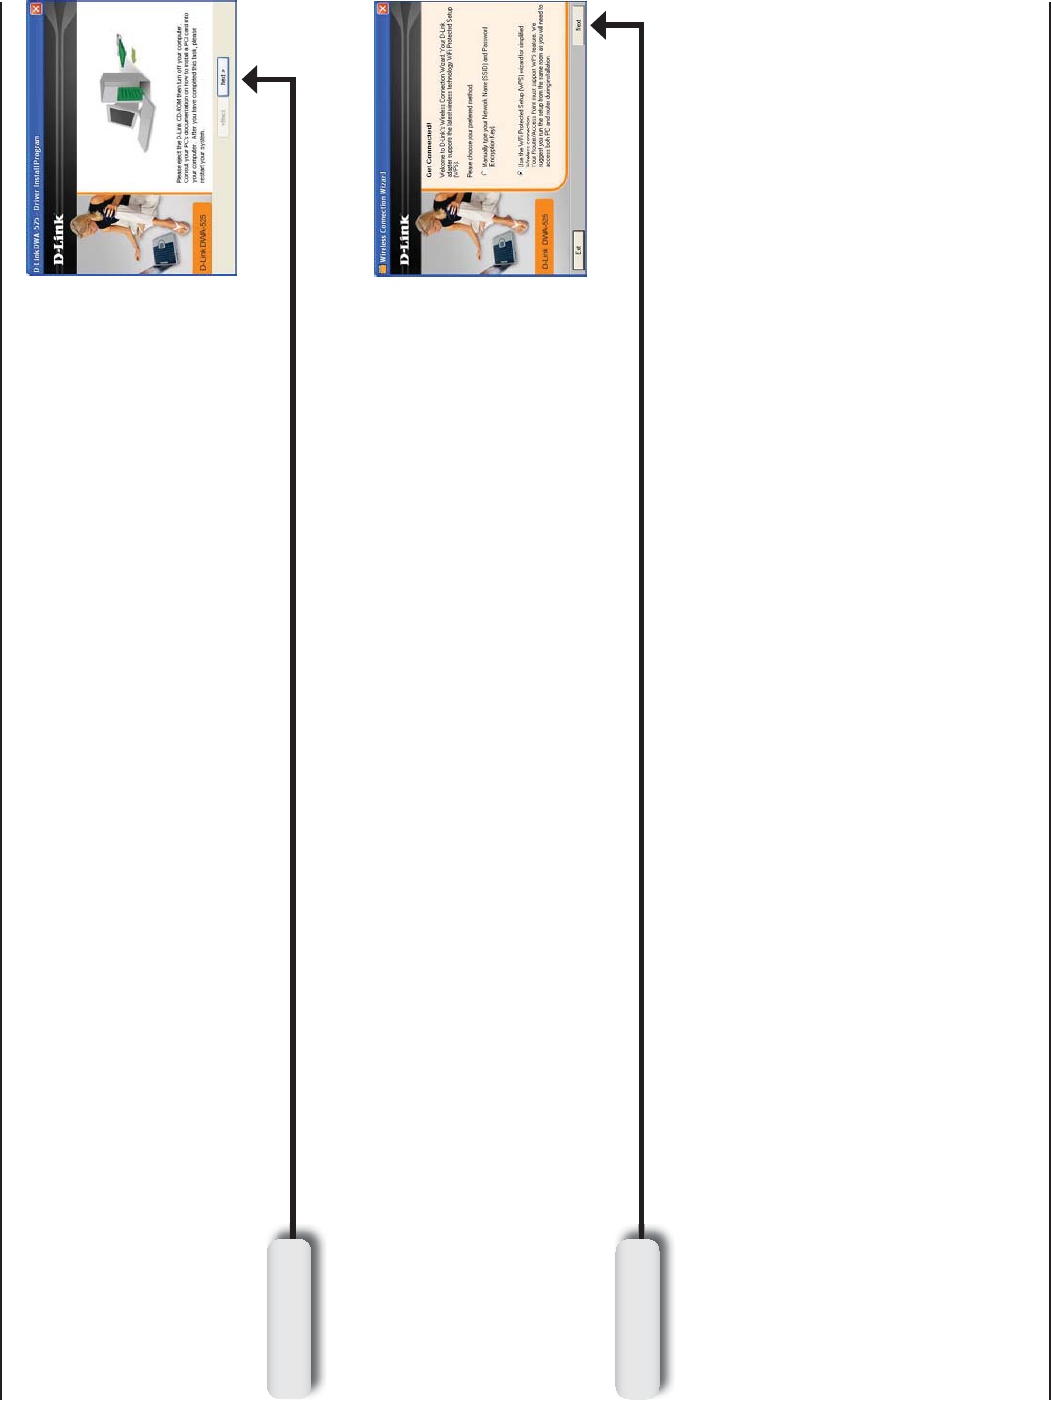
4HE7IRELESS#ONNECTION7IZARDWILLNOWAPPEAR
)FYOUWANTTOMANUALLYCONNECTTOAWIRELESSNETWORKREFERTOPAGE
4HEFOLLOWINGINSTRUCTIONSWILLCONNECTYOUTOAWIRELESSNETWORKUSING
Wi-Fi Protected Setup (WPS).
Click .EXT
0LEASETURNOFFYOURCOMPUTERANDINSTALLA0#)CARD
)FTHEFound New Hardware Wizard appears, click Cancel.

14D-Link WA525A1 User Manual
Section 2 - Installation
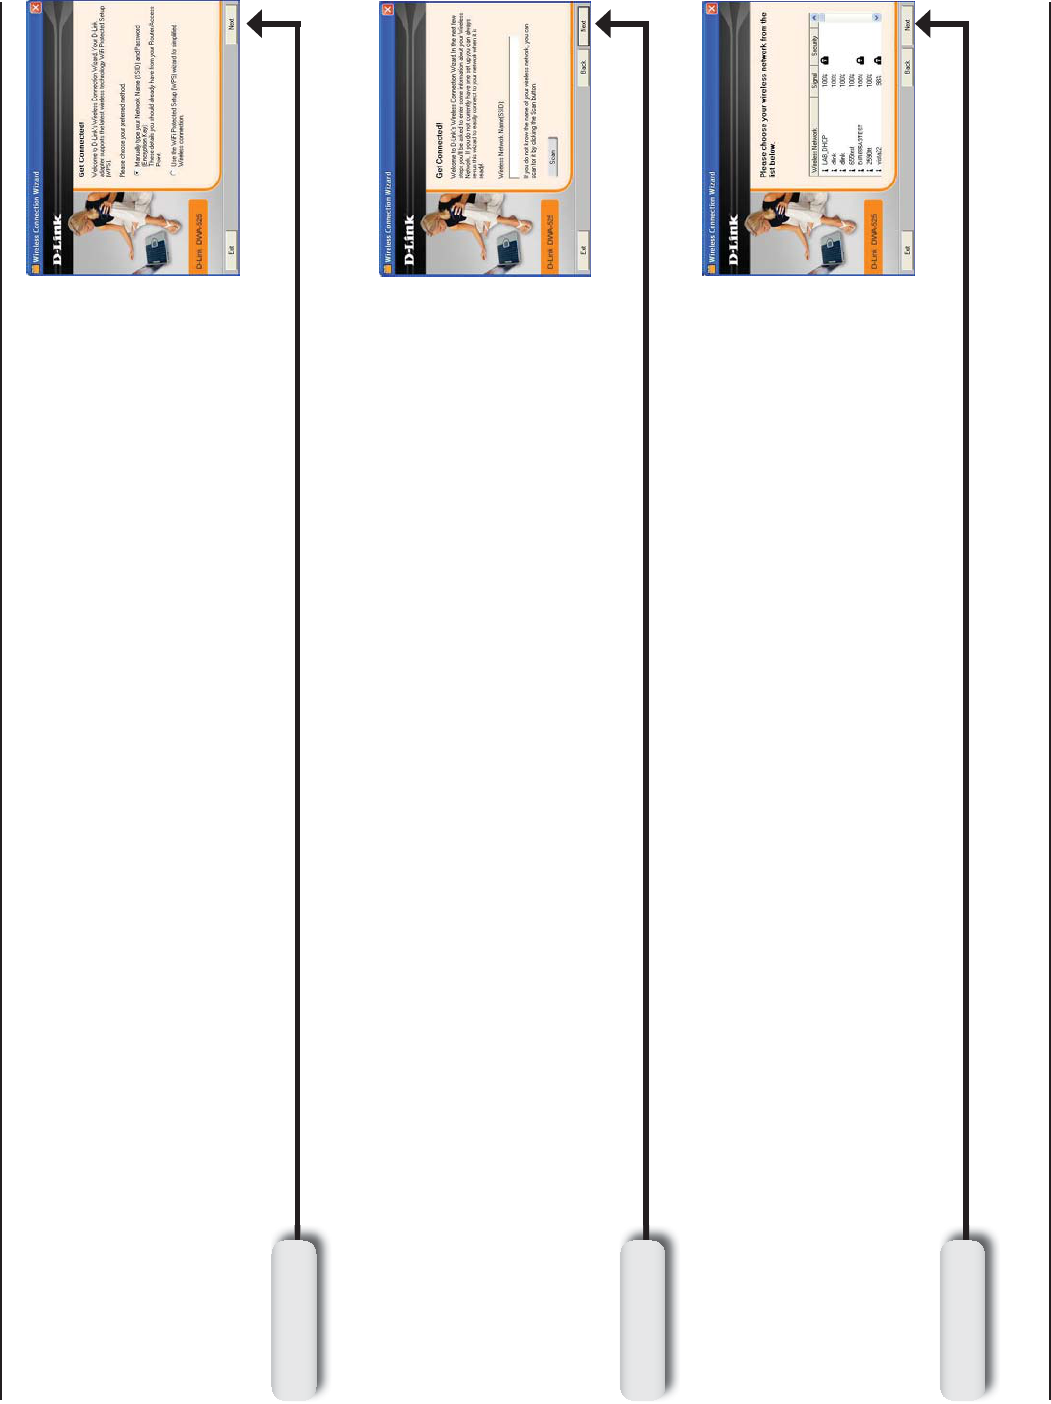
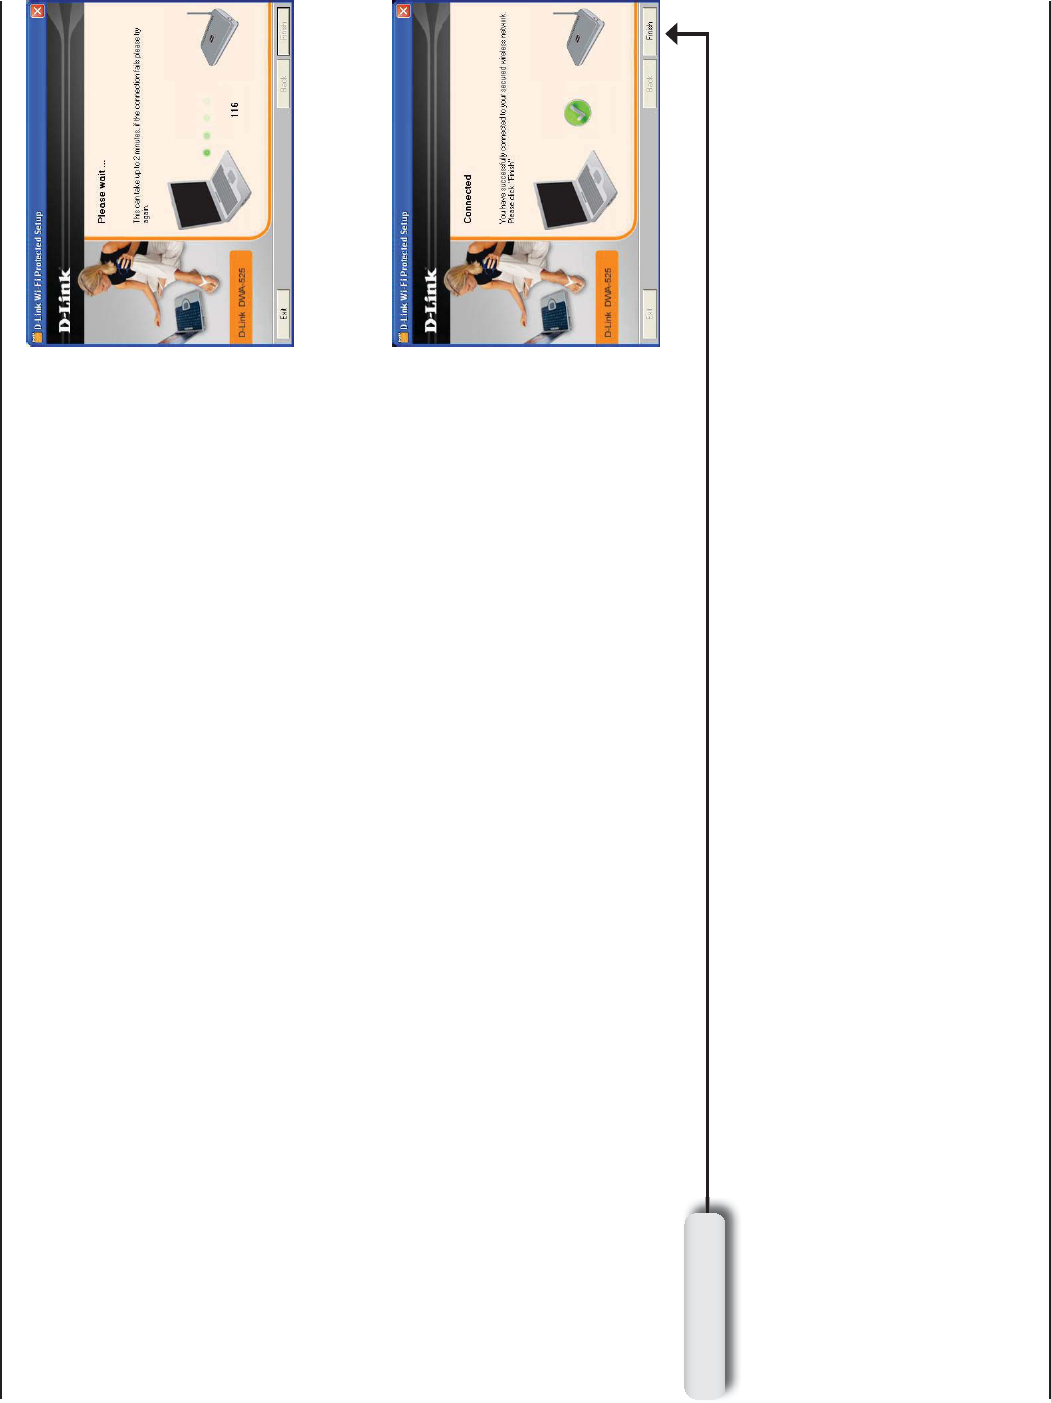
To connect to your network using the WPS push button configuration
method, click the virtual button as shown in the screenshot.
Press the WPS button on your access point or wireless router within 2
minutes to establish connectivity.
Push Button Configuration (PBC)
7HENTHISSCREENAPPEARSYOUHAVESUCCESSFULLYCONNECTEDTOYOUR
wireless network. Click .EXT to complete your setup.
Click .EXT
15D-Link WA525A1 User Manual
Section 2 - Installation
To manually connect to your wireless network, select Manually
connect to a wireless network and then click .EXT.
#LICKTHE3CANBUTTONTODISPLAYALISTOFWIRELESSNETWORKSSITE
survey). Click on the network name (SSID) and click .EXT.
%NTERTHENETWORKNAME33)$MANUALLY)FYOUENTERTHE33)$
incorrectly, you will automatically be brought to the site survey
page. Click Scan to display the site survey page.
Click .EXT
Click .EXT
Click .EXT
16D-Link WA525A1 User Manual
Section 2 - Installation
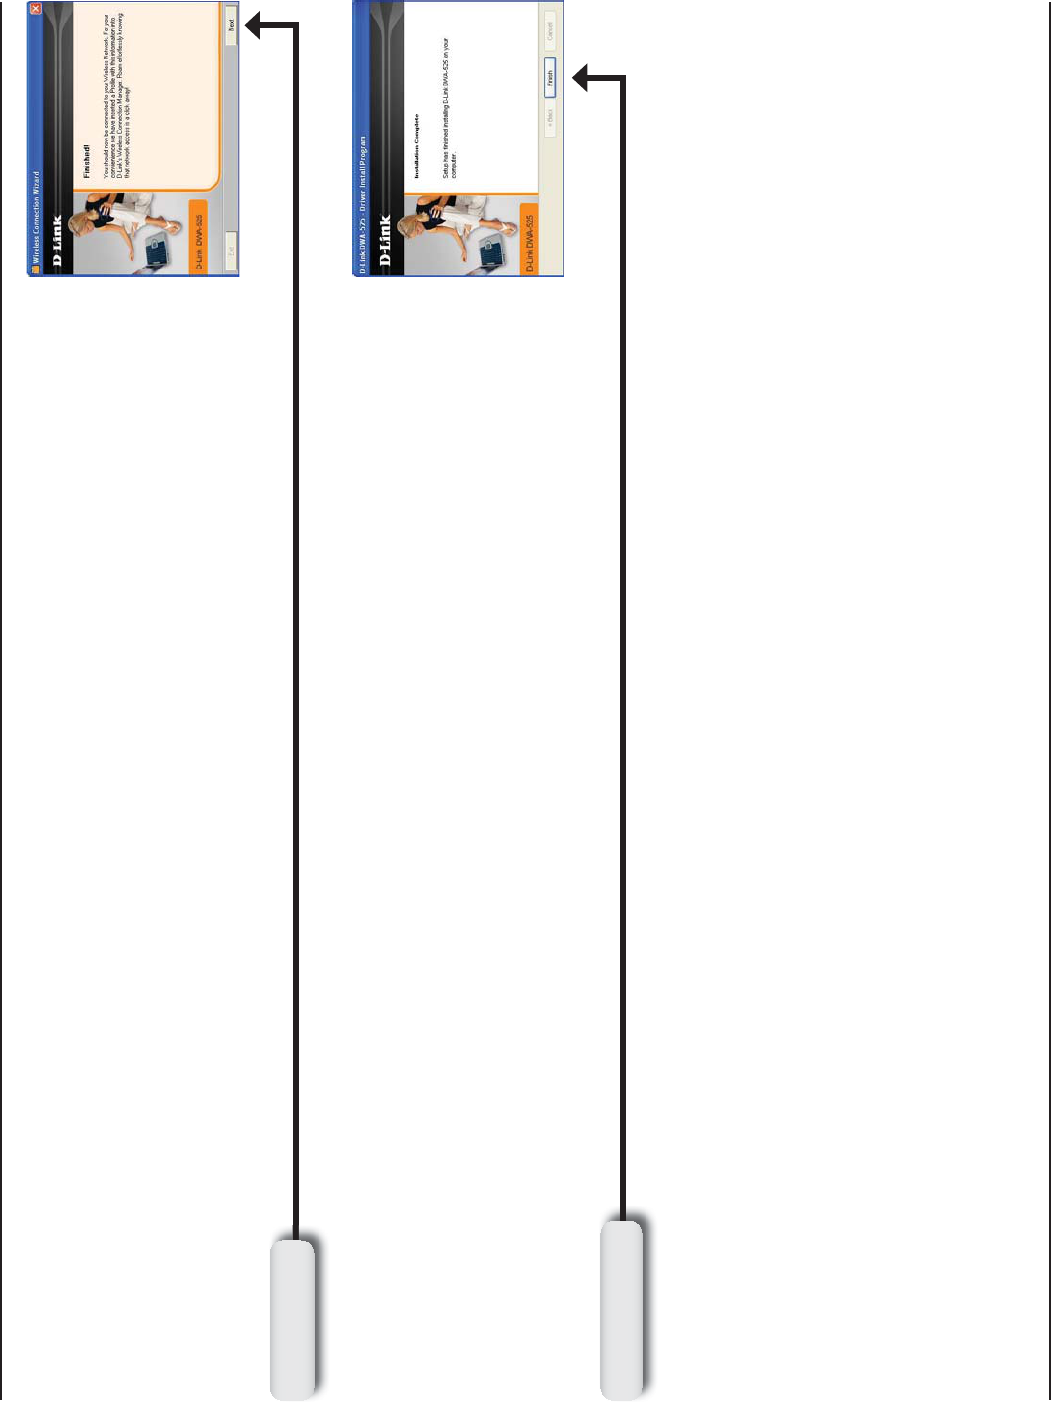
7HENTHISSCREENAPPEARSYOUARESUCCESSFULLYCONNECTEDTO
your wireless network. Click .EXT to complete your setup.
Click &INISH TO CONTINUE )F YOU ARE PROMPTED TO REBOOT YOUR
computer, select Yes, I want to restart my computer now.
Click .EXT
Click &INISH
17D-Link WA525A1 User Manual
Section 3 - Configuration
Configuration
This section will show you how to configure your new D-Link wireless adapter using the D-Link Utility as well as the
Windows® XP Zero Configuration Utility & Windows Vista WLAN Autoconfig.
D-Link Wireless Connection Manager
4HE$,INK7!!USESTHE7IRELESS#ONNECTION-ANAGERASTHEMANAGEMENTSOFTWARE4HEMANAGERPROVIDES
THEUSERANEASYINTERFACETOCHANGEANYSETTINGSRELATEDTOTHEWIRELESSADAPTER$OUBLECLICKINGONTHE7IRELESS
Connection Manager icon on your desktop will start the Configuration.
)FYOUAREUSING7INDOWS® Vista, please skip to page 26 or Windows XP skip to page 28.
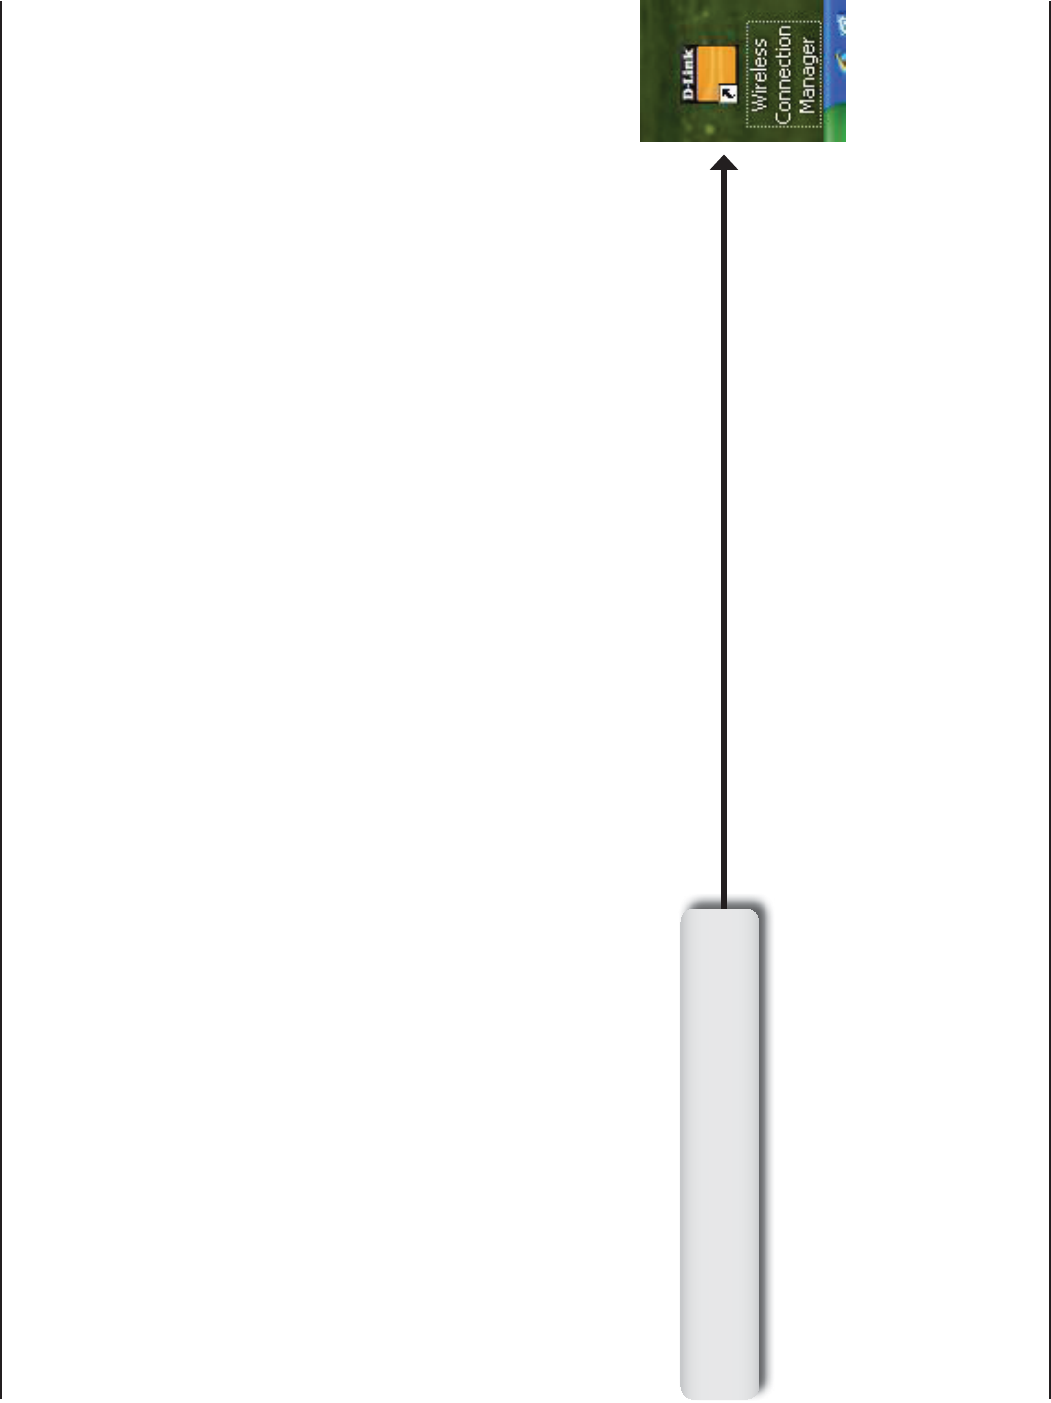
Double-click the Wireless Connection
Manager icon on your desktop.
18D-Link WA525A1 User Manual
Section 3 - Configuration
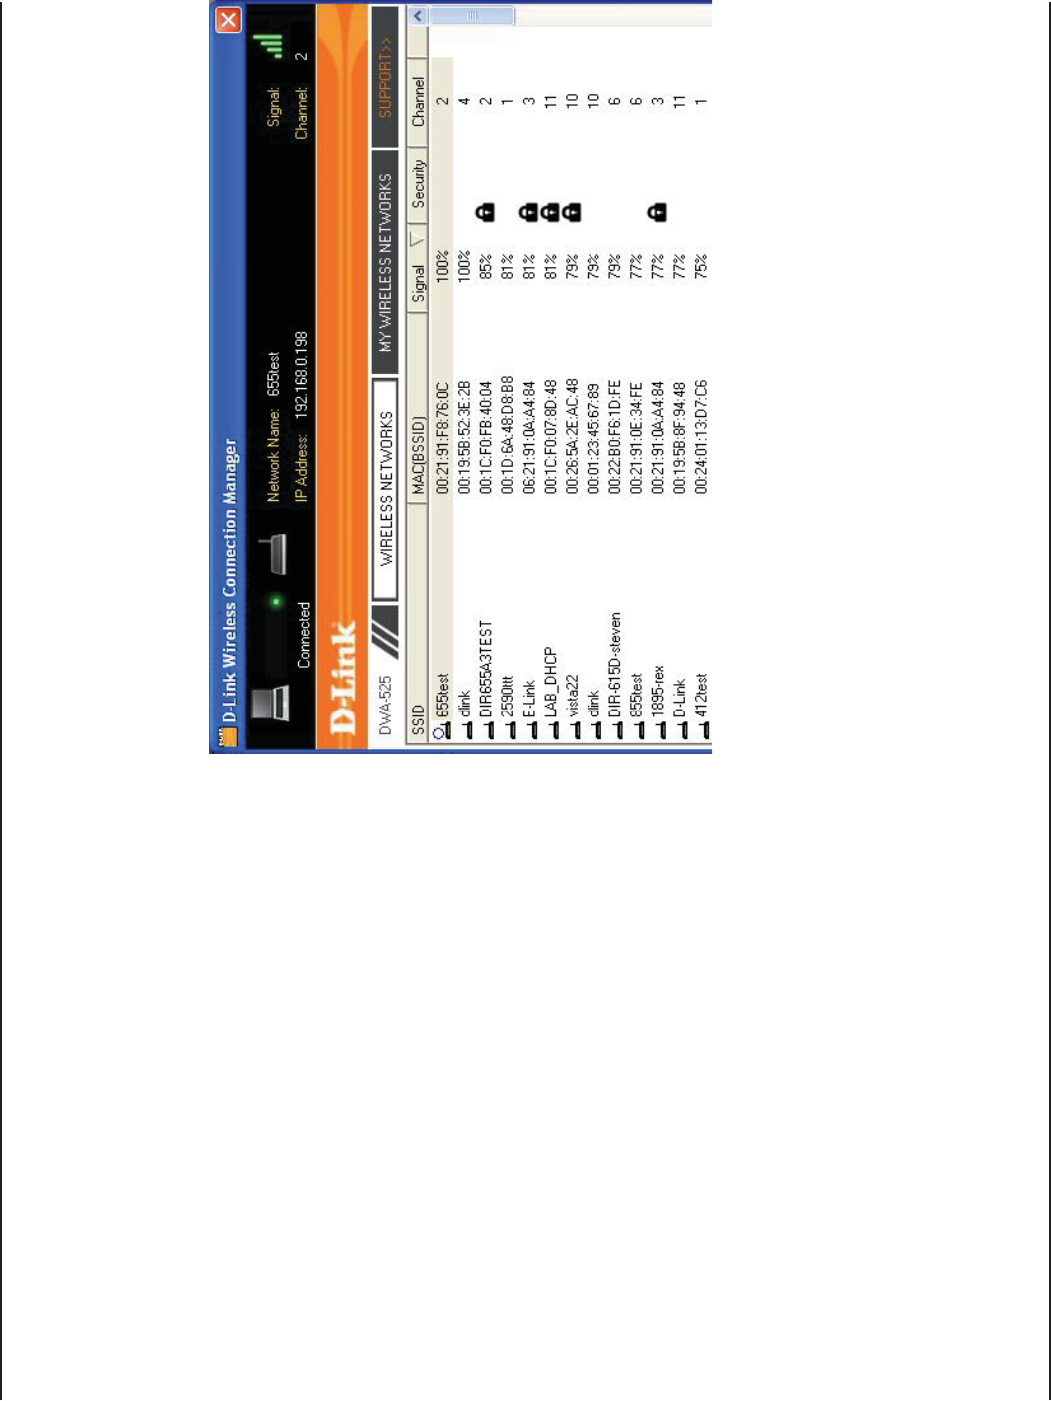
Wireless Networks
The SSID (Service Set Identifier) is the name
OFTHEWIRELESSNETWORK
$ISPLAYS THE -!# ADDRESS OF THE WIRELESS
device.
$ISPLAYS THE ,INK 1UALITY OF THE WIRELESS
connection.
)FTHEREISAhLOCKvICONTHISMEANSTHEWIRELESS
network is secure. You must know the encryption
key/security settings to connect.
$ISPLAYSTHECHANNELOFTHEWIRELESSNETWORK
Connect to a wireless network using Wi-Fi
0ROTECTED3ETUP2EFERTOTHENEXTPAGE
2ESCANSFORAVAILABLEWIRELESSNETWORKSINYOUR
area.
Highlight a wireless network and click the
Connect BUTTON )F THE NETWORK IS SECURE A
pop-up window will appear. Enter the security
INFORMATION TO CONNECT REFERTOTHE Wireless
SecuritySECTIONFORMOREINFORMATION
3ELECT A WIRELESS NETWORK PROFILE FROM THE
drop-down menu and click !CTIVATE to connect.
Allow up to 30 seconds to connect.
MAC:
SSID:
Channel:
Signal:
Security:
Refresh Button:
Connect Button:
Activate Button:
The Wireless Networks (Site Survey) page will display all wireless networks that are available in your area. To connect
to a network, simply highlight the wireless network (SSID) and click Connect.
WPS Button:
19D-Link WA525A1 User Manual
Section 3 - Configuration
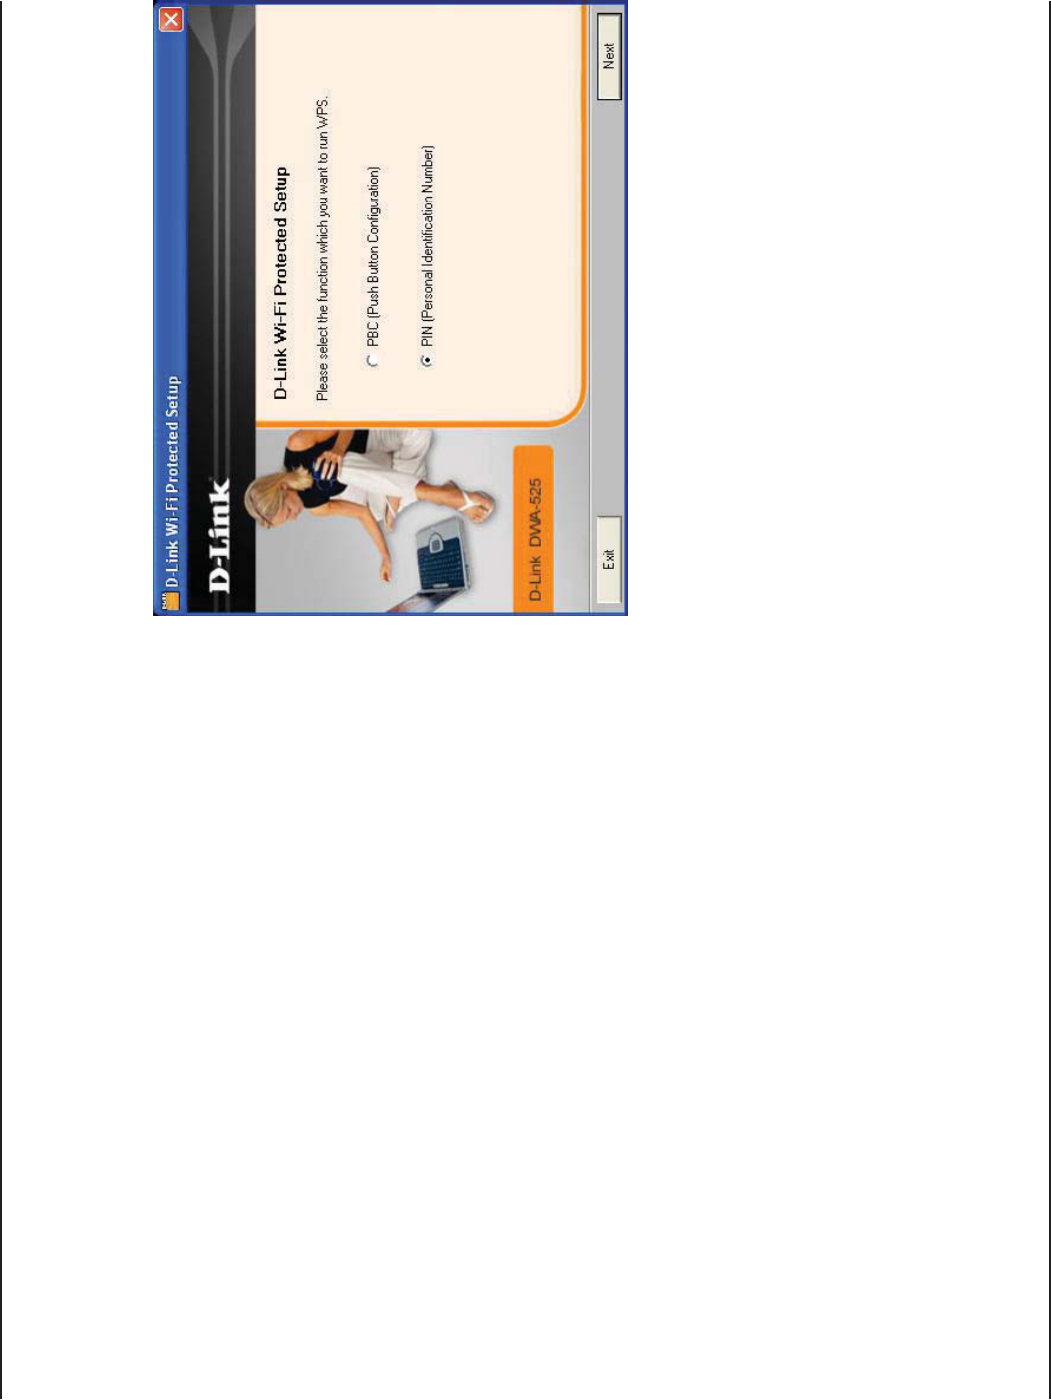
Wi-Fi Protected Setup (WPS)
7I&I0ROTECTED3ETUP7033YSTEMISDESIGNEDFOREASYSETUP
OFSECURITYENABLED7I&INETWORKS)TISRECOMMENDEDTOHAVE
the access point or wireless router nearby during setup.
&ORMOREINFORMATIONON703VISITTHE7I&I!LLIANCEWEBSITE
at www.wi-fi.org.
“Push Button Configuration” (PBC) is a virtual button in the utility
that connects you to other WPS-enabled devices. A connection
can be established by clicking on the virtual button, then pushing
the physical button on the access point or wireless router within
SECONDS2EFERTOPAGE
“Personal Identification Number” (PIN) is a unique number
GENERATED RANDOMLY BY THE WIRELESS ADAPTERS UTILITY %NTERING
THISNUMBERINTHEUTILITYOFTHE703ENABLEDWIRELESSROUTEROR
access point connects you with the intended wireless network.
2EFERTOTHENEXTPAGEFORMOREINFORMATION

20D-Link WA525A1 User Manual
Section 3 - Configuration
)FYOUWANTTOCONNECTUSINGTHE0"#METHODREFERTOPAGE4O
use the PIN method, select PIN (Personal Identification Number)
and click Next.
Click Next
Make sure your access point or wireless router is close by. Write
down the number on the screen. Enter this number in your access
POINTORWIRELESSROUTER0LEASEREFERTOTHEMANUFACTURESMANUAL
FORINSTRUCTIONS
Once you click Next, you will have 2 minutes to enter this number
in your access point or wireless router.
Click Next
Personal Identification Number (PIN)
21D-Link WA525A1 User Manual
Section 3 - Configuration
The adapter will try to establish connectivity to your access point or wireless router.
7HENTHISSCREENAPPEARSYOUHAVESUCCESSFULLYESTABLISHEDCONNECTIVITY#LICK&INISH
to complete your setup.
Click &INISH
22D-Link WA525A1 User Manual
Section 3 - Configuration
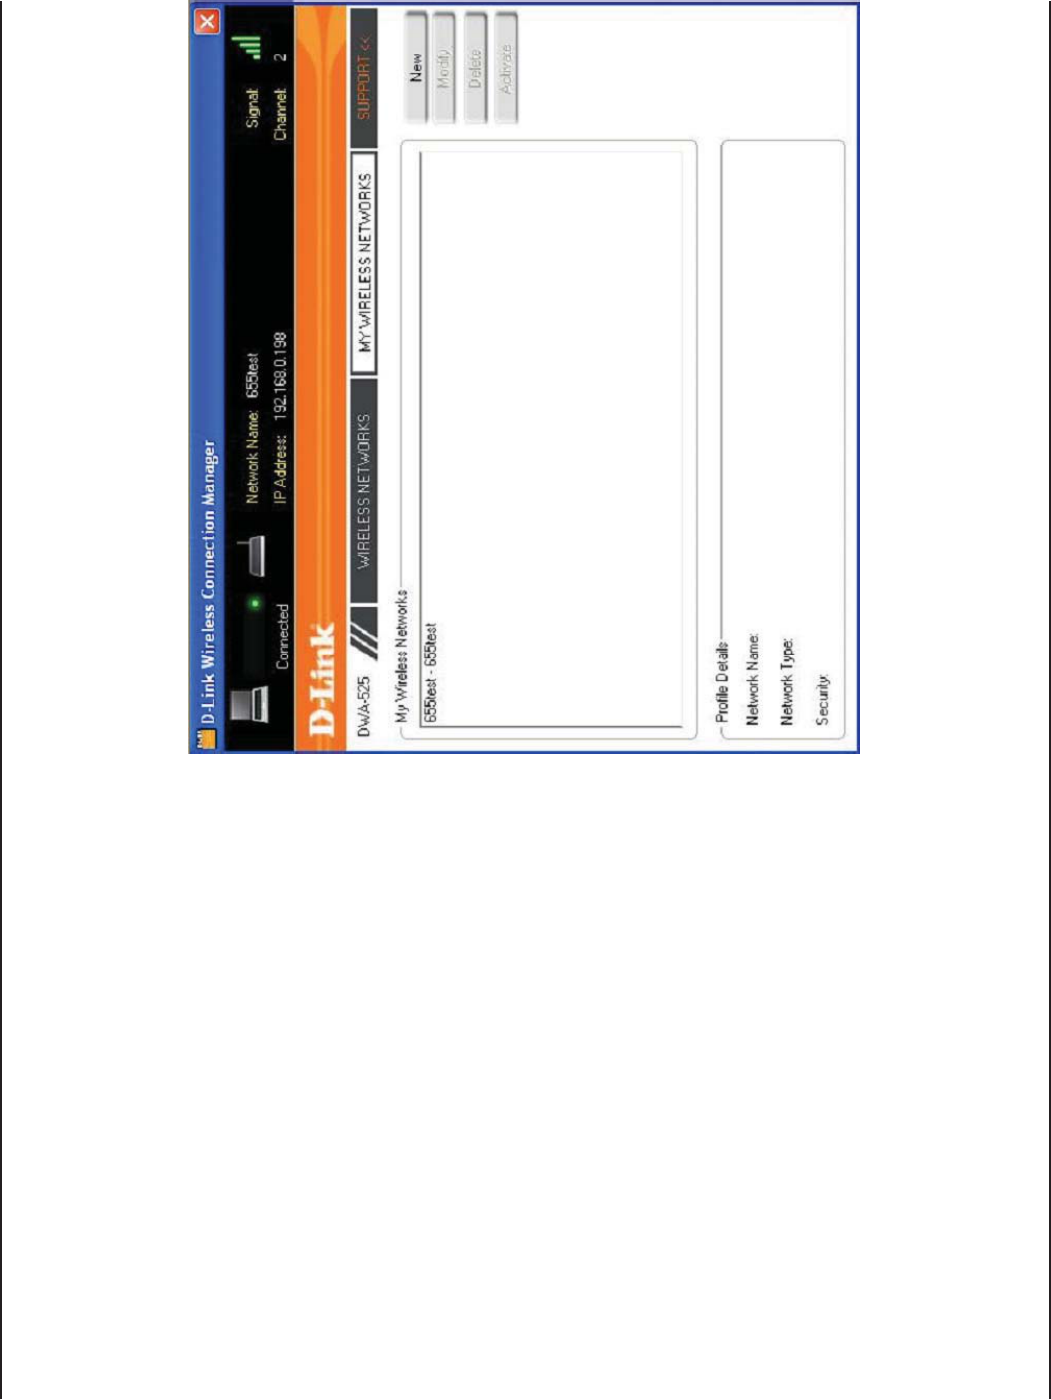
My Wireless Networks
The My Wireless Networks page will allow you to create, edit, and delete wireless network profiles. Every time you
connect to a network using the Wireless Networks page, a profile will automatically be created.
New Button:
Modify:
Click New to create a new wireless network
PROlLEREFERTOPAGE
Click -ODIFYTOEDITACURRENTPROlLEREFERTO
page 23).
Click $ELETE to remove a profile.
Click !CTIVATE to use a profile. Allow up to 30
seconds to connect to the wireless network.
4HE0ROlLE$ETAILSSECTIONWILLDISPLAYINFORMATION
about the wireless network such as the network
NAME 33)$ NETWORK TYPE )NFRASTRUCTURE OR
!D(OCANDIFTHENETWORKISSECURED
Delete:
Activate:
Profile Details:
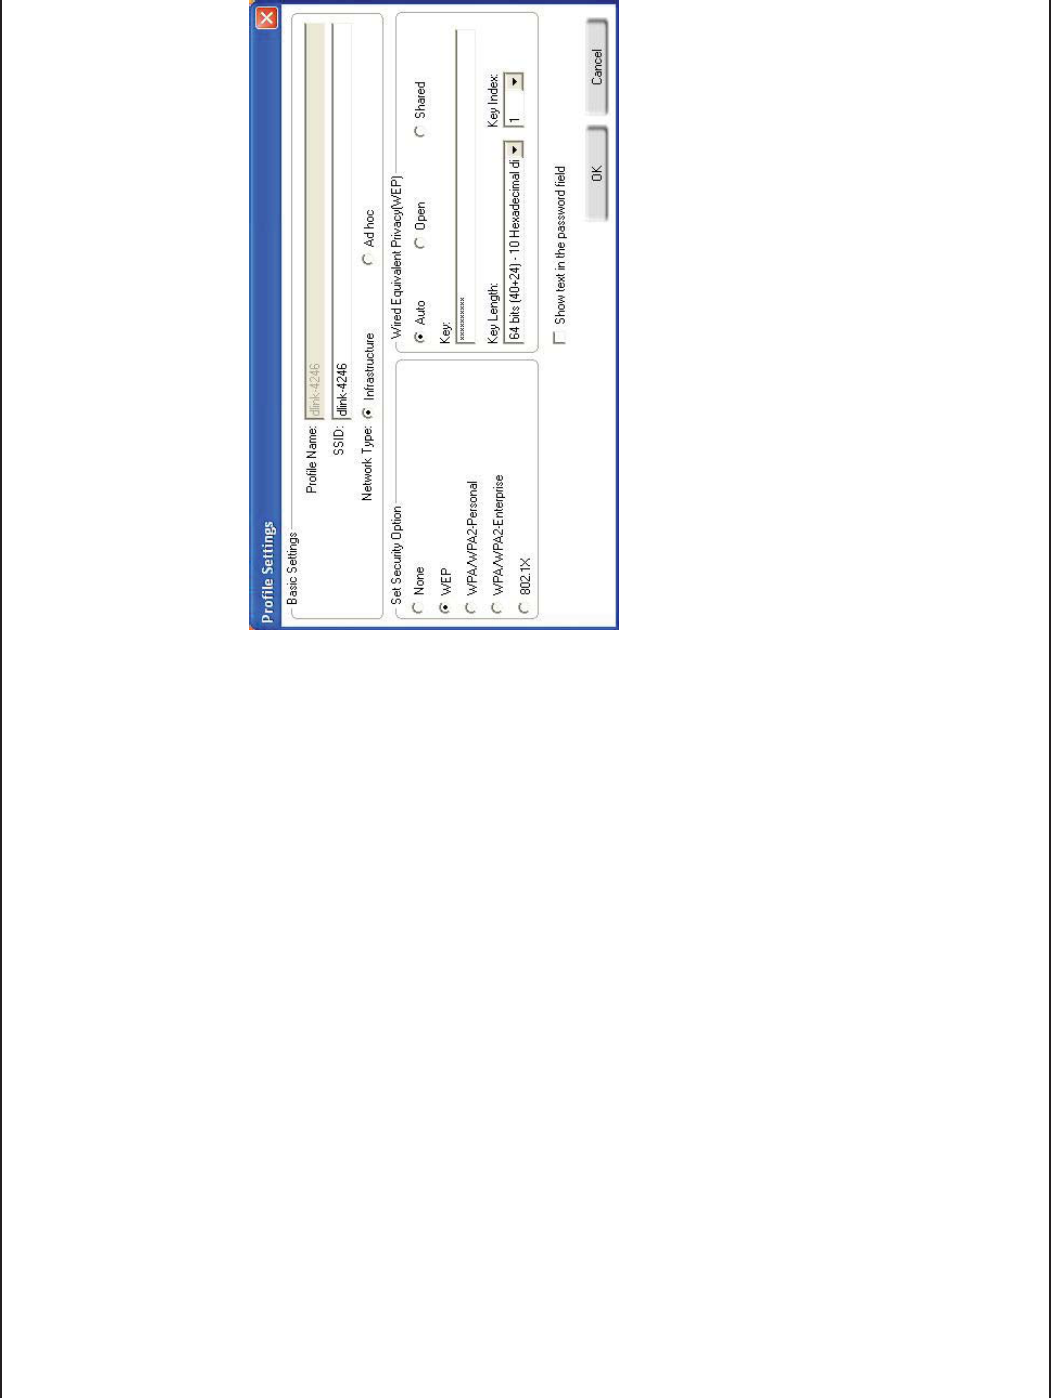
23D-Link WA525A1 User Manual
Section 3 - Configuration
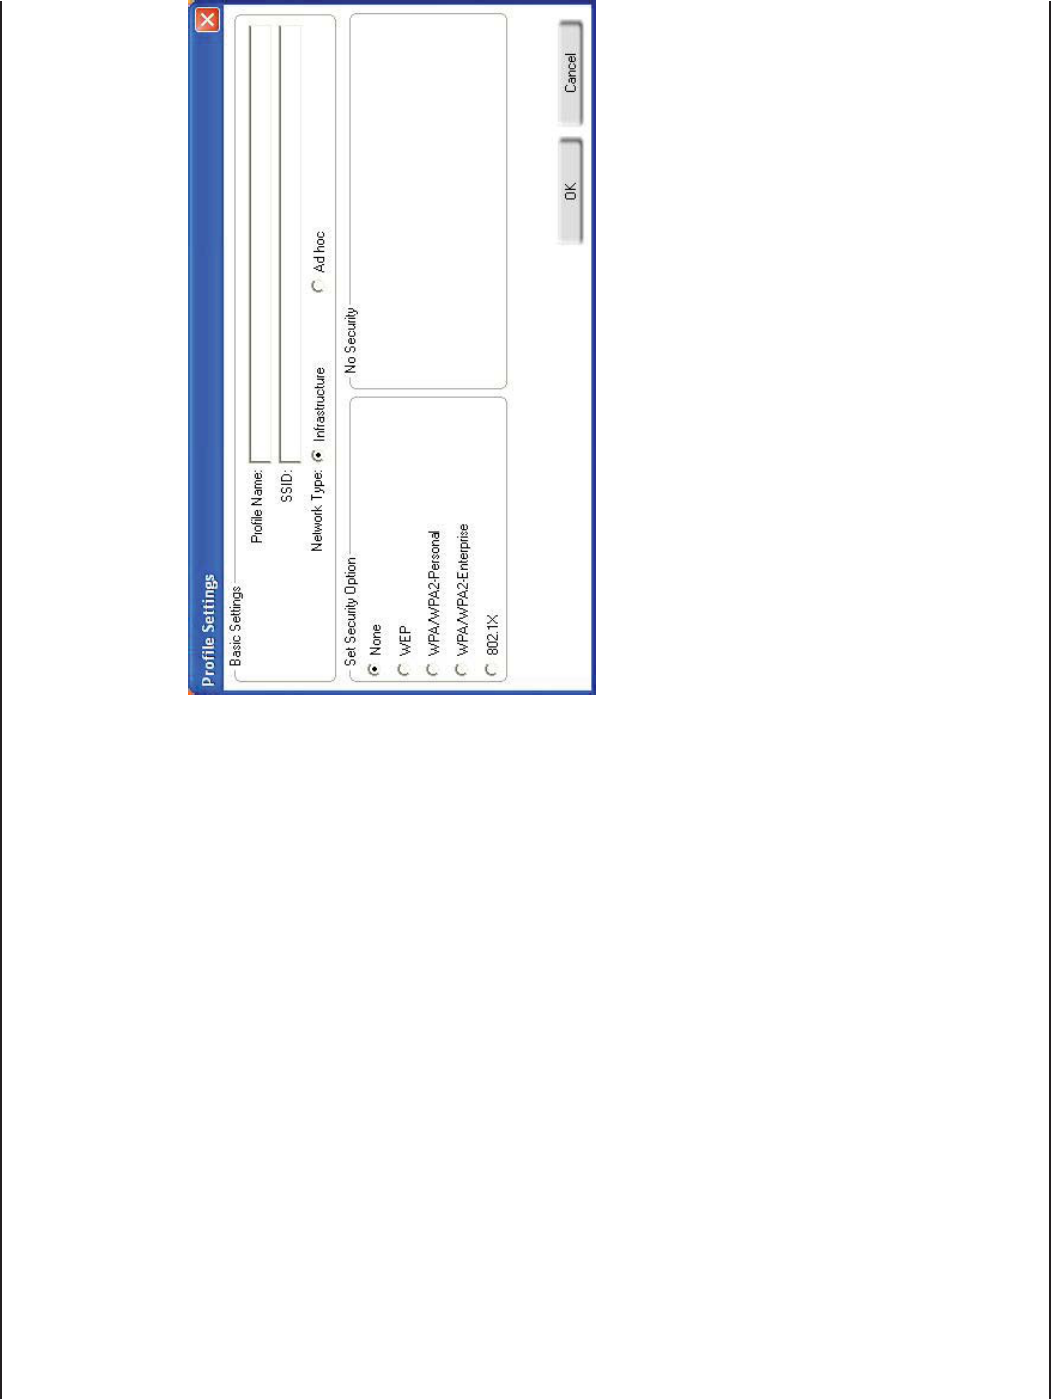
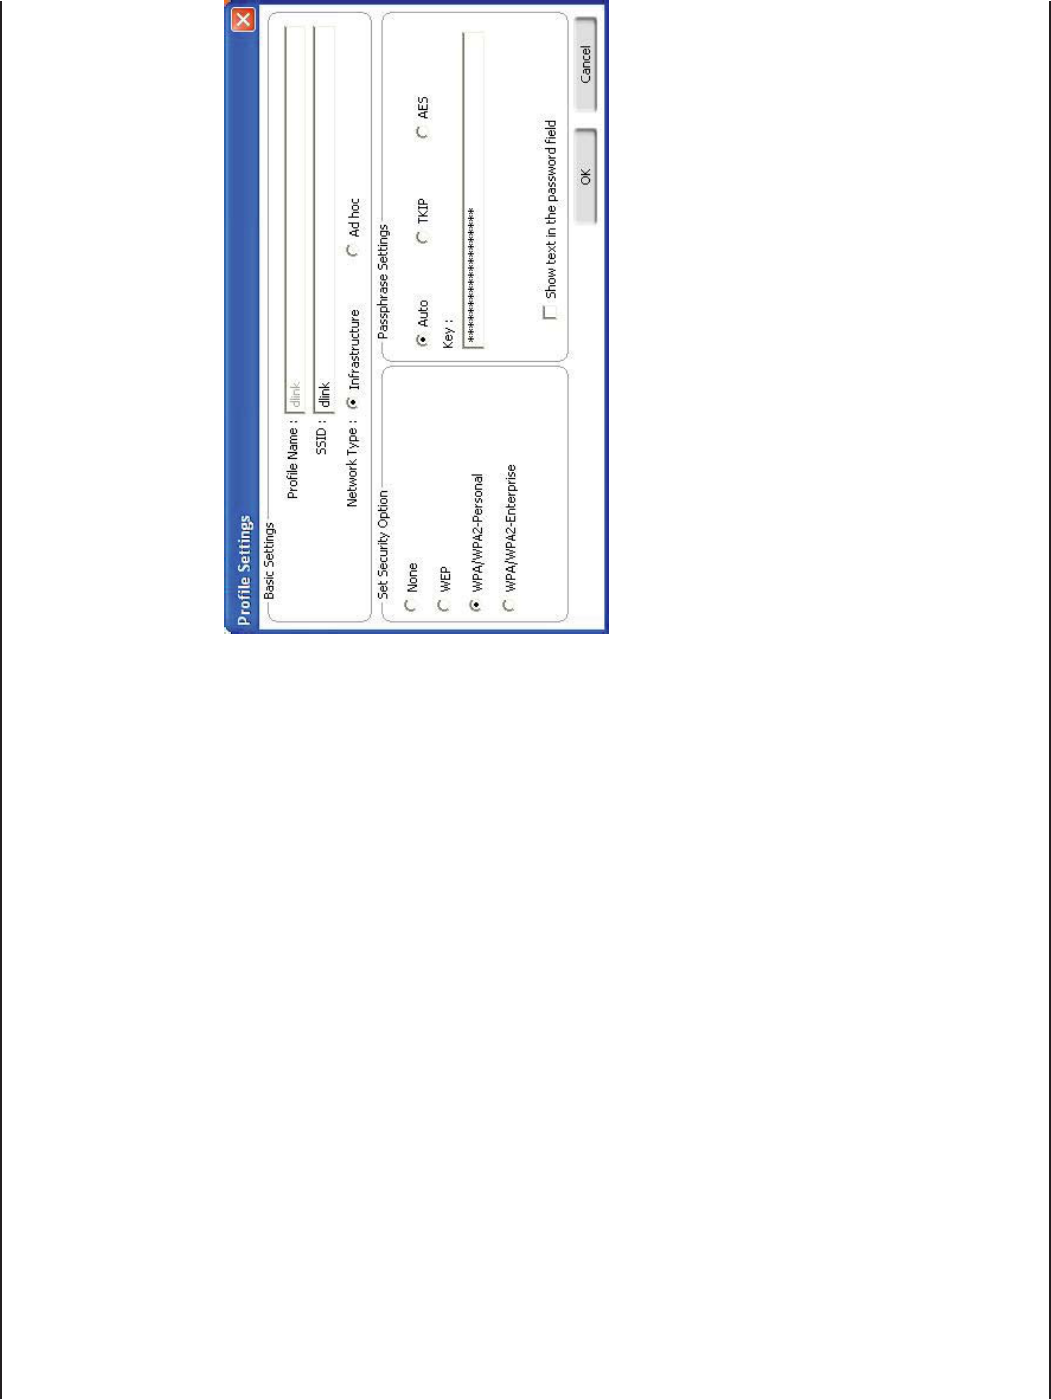
Add Profile
You may add a new network by clicking the NewBUTTONFROMTHEMy Wireless Networks page.
Profile Name:
SSID:
%NTERANAMEFORYOURPROlLEEG(OME/FlCE
#OFFEE3HOP
%NTERTHE33)$OFTHEWIRELESSNETWORK
3ELECTTHENETWORKTYPE)FYOUARECONNECTING
to a wireless router or access point, select
)NFRASTRUCTURE)FYOUARECONNECTINGTOANOTHER
wireless client such as an adapter, select
!D(OC.
3ELECTTHETYPEOFSECURITYUSED0LEASEREFER
to the Wireless Security SECTION FOR MORE
INFORMATION
Click OK to save your settings.
Network Type:
Set Security:
OK Button:
24D-Link WA525A1 User Manual
Section 3 - Configuration
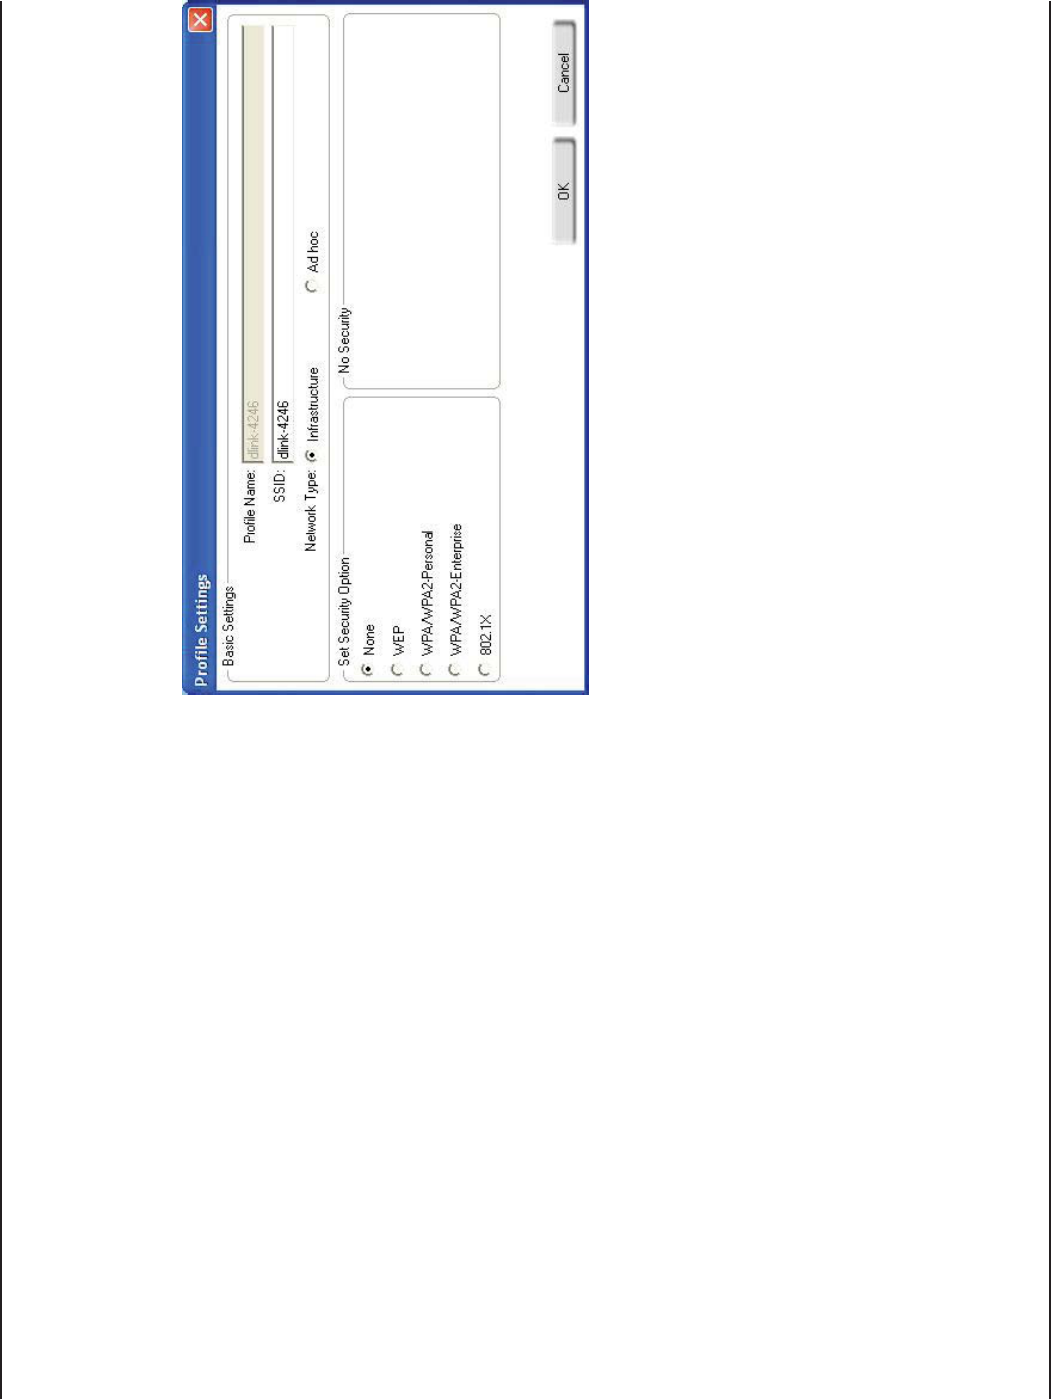
Modify Profile
You may edit an existing profile by clicking the -ODIFYBUTTONFROMTHEMy Wireless Networks page.
Profile Name:
SSID:
%NTERANAMEFORYOURPROlLEEG(OME/FlCE
#OFFEE3HOP
$ISPLAYSTHE33)$OFTHENETWORK
Displays the network type.
3ELECTTHETYPEOFSECURITYUSED0LEASEREFER
to the Wireless Security SECTION FOR MORE
INFORMATION
Click OK to save your settings.
Network Type:
Set Security:
OK Button:
25D-Link WA525A1 User Manual
Section 3 - Configuration
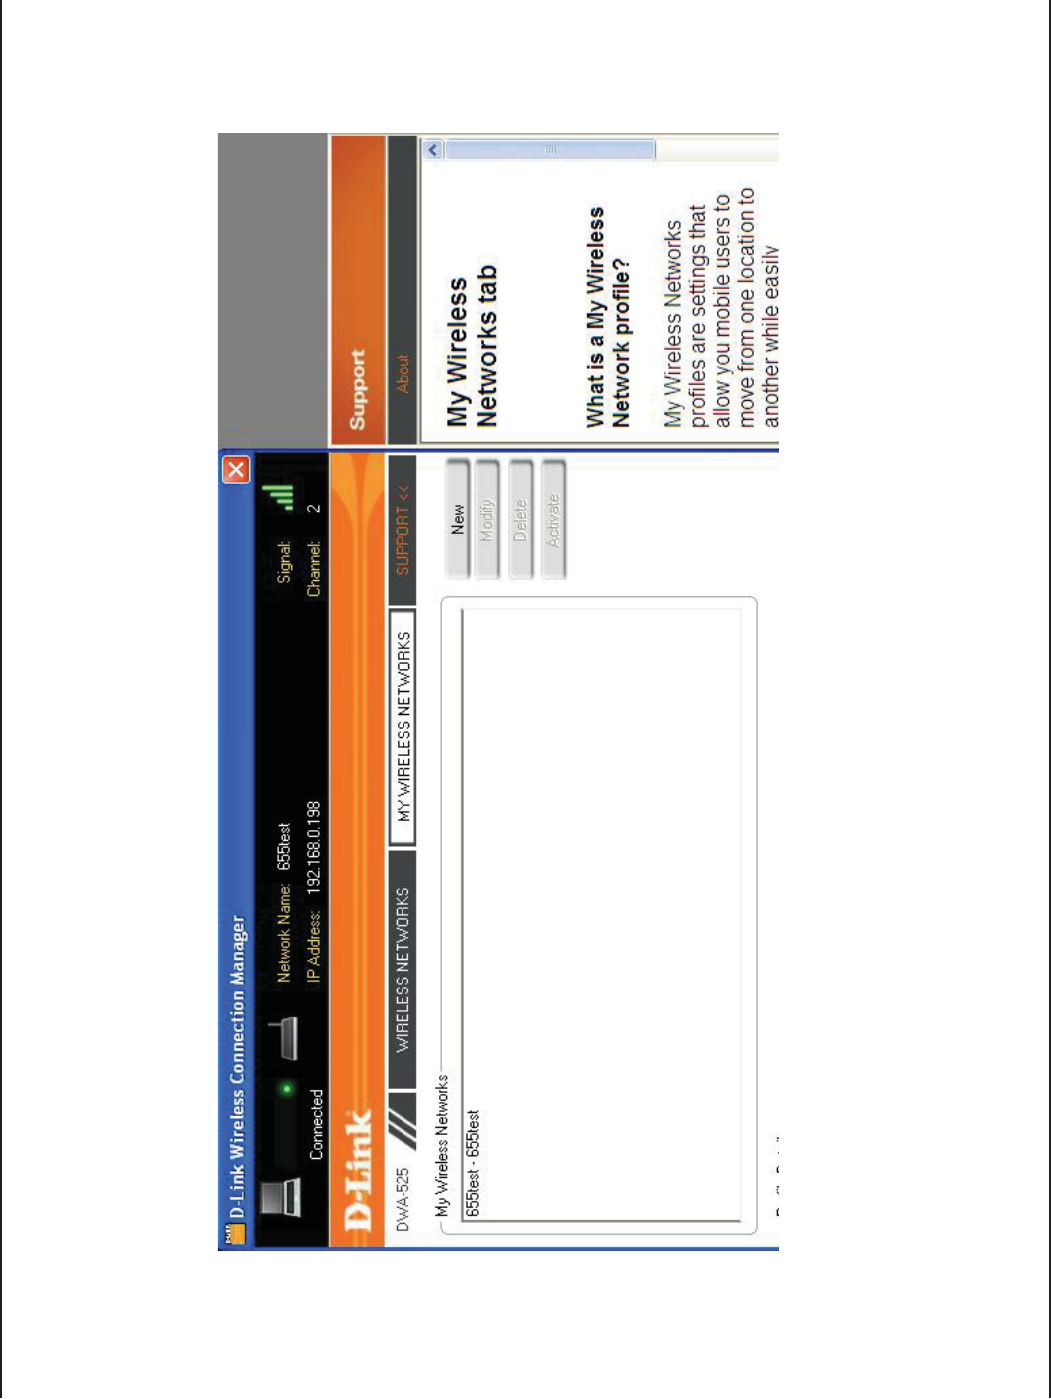
Support
)FYOUNEEDHELPCLICKTHE3UPPORTBUTTON!PANEWILLAPPEARTOTHERIGHTOFTHEUTILITYWHICHWILLDISPLAYINFORMATION
about the utility.
26D-Link WA525A1 User Manual
Section 3 - Configuration
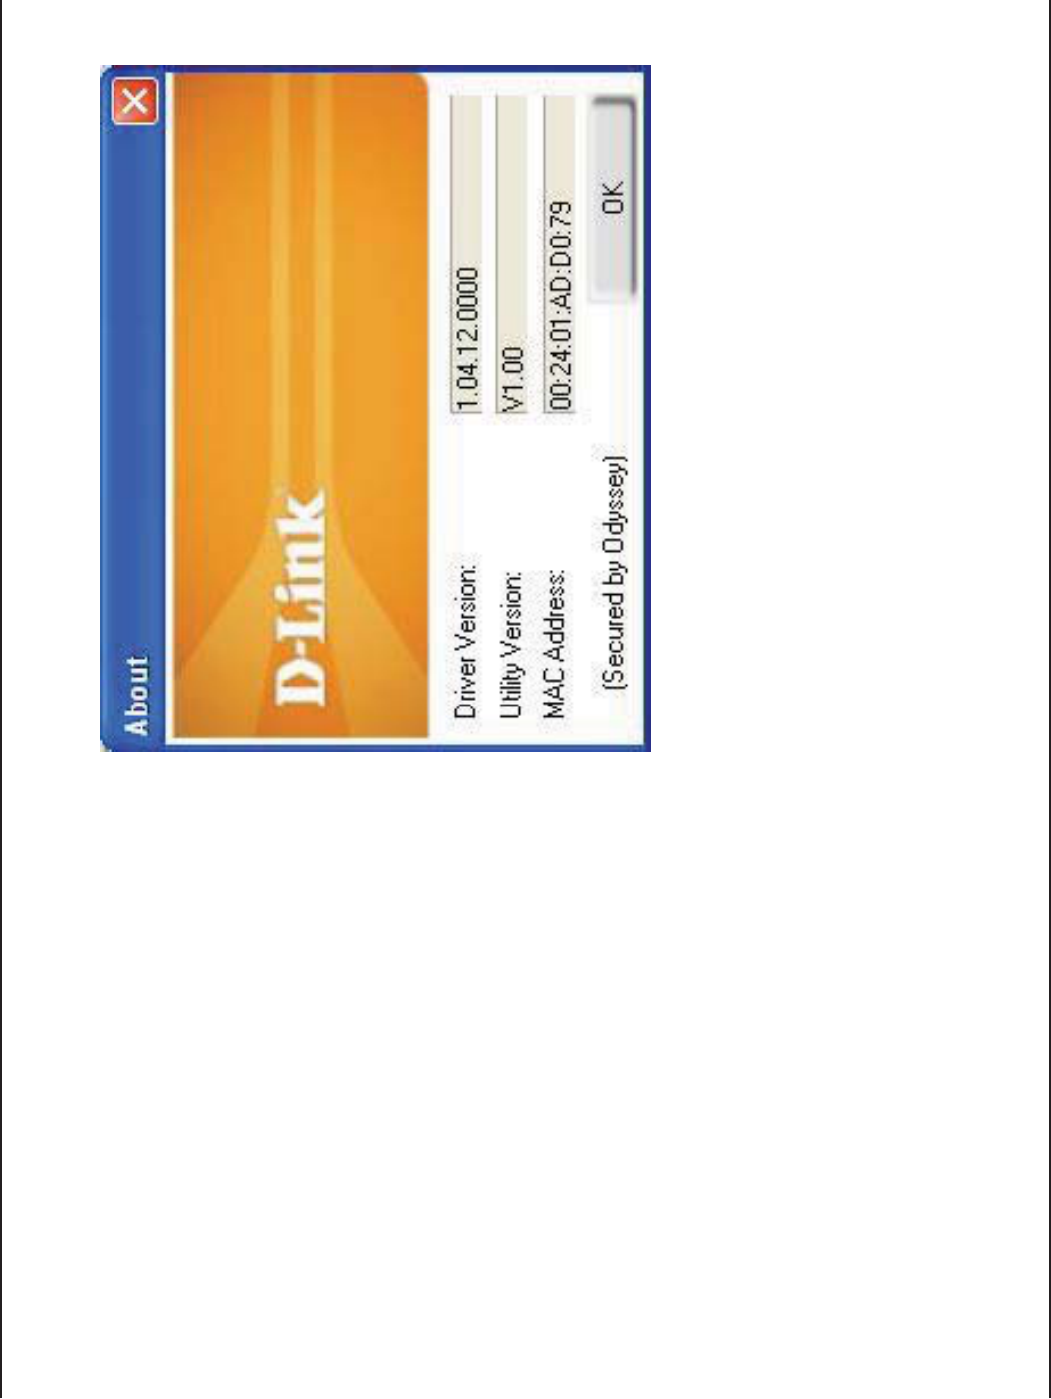
4HE!BOUTSCREENGIVESYOUINFORMATIONABOUTTHE
&IRMWAREAND5TILITY6ERSIONSOFTHE7!!
About
27D-Link WA525A1 User Manual
Section 3 - Configuration
Connect to a Wireless Network
Using Windows® 7
Windows®USERSMAYUSETHEBUILTINWIRELESSUTILITY)FYOUAREUSINGANOTHERCOMPANYSUTILITYOR7INDOWS® 2000,
PLEASEREFERTOTHEUSERMANUALOFYOURWIRELESSADAPTERFORHELPWITHCONNECTINGTOAWIRELESSNETWORK-OSTUTILITIES
will have a “site survey” option similar to the Windows® 7 utility as seen below.
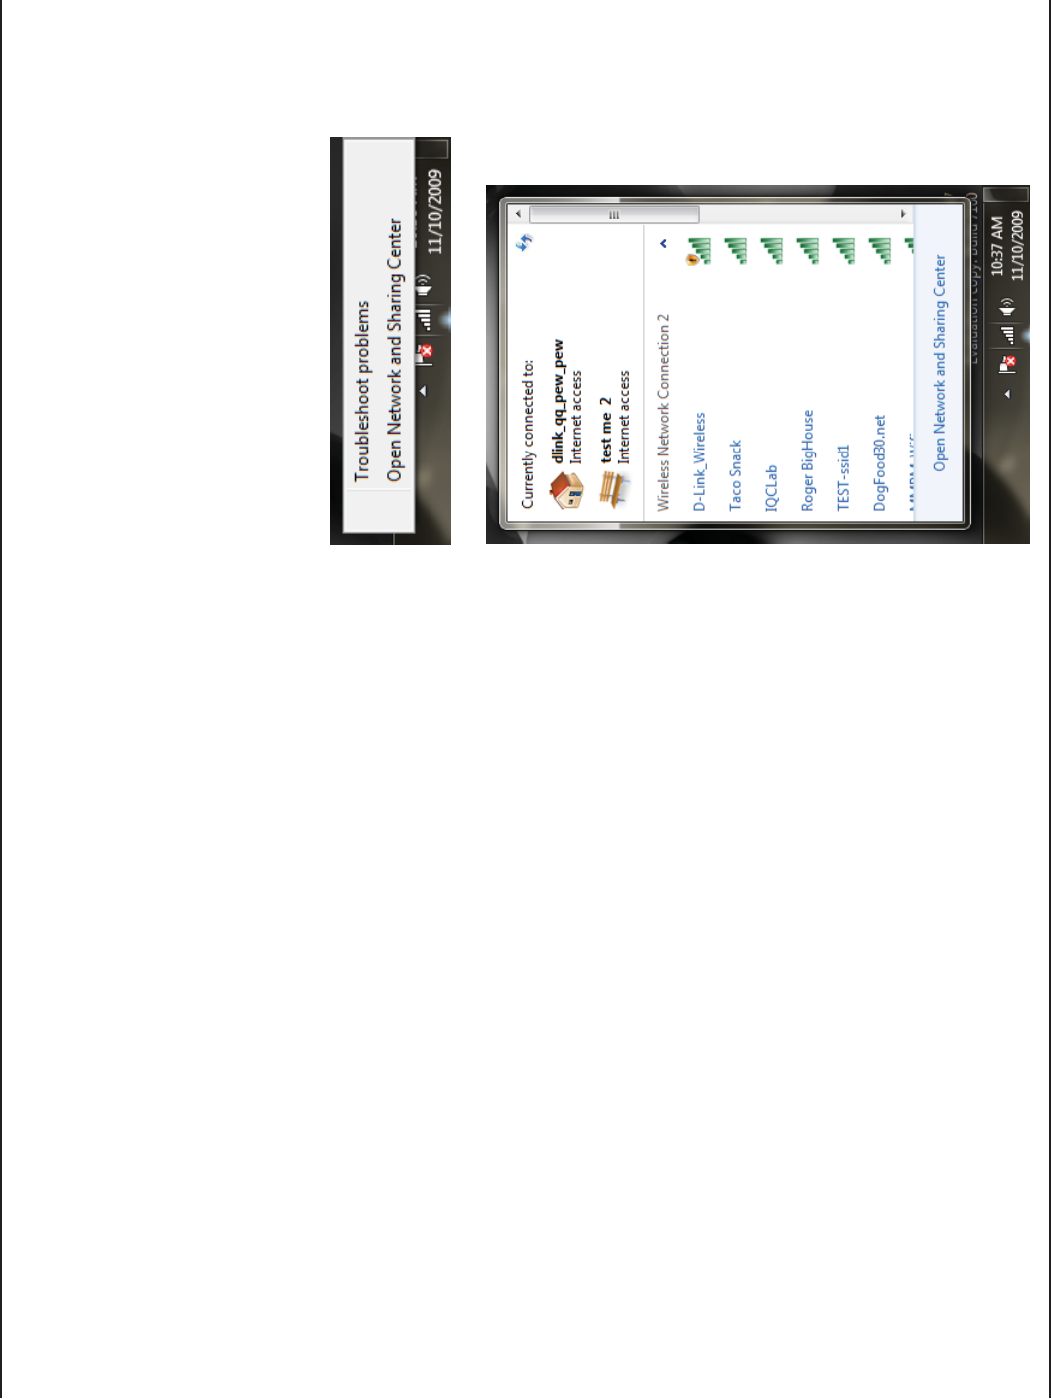
,EFTCLICK THE WIRELESS ICON IN YOUR SYSTEM TRAY LOWERRIGHT
corner next to the time).
)FYOURECEIVETHE7IRELESS.ETWORKS$ETECTED bubble, click
ONTHECENTEROFTHEBUBBLETOACCESSTHEUTILITY
or
The utility will display any available wireless networks in your
area. Click on a network (displayed using the SSID) and click
the Connect button.
)F YOU GET A GOOD SIGNAL BUT CANNOT ACCESS THE )NTERNET
CHECK YOUR4#0)0 SETTINGS FOR YOUR WIRELESS ADAPTER 2EFER
to the Networking Basics SECTION IN THIS MANUAL FOR MORE
INFORMATION
28D-Link WA525A1 User Manual
Section 3 - Configuration
Connect to a Wireless Network
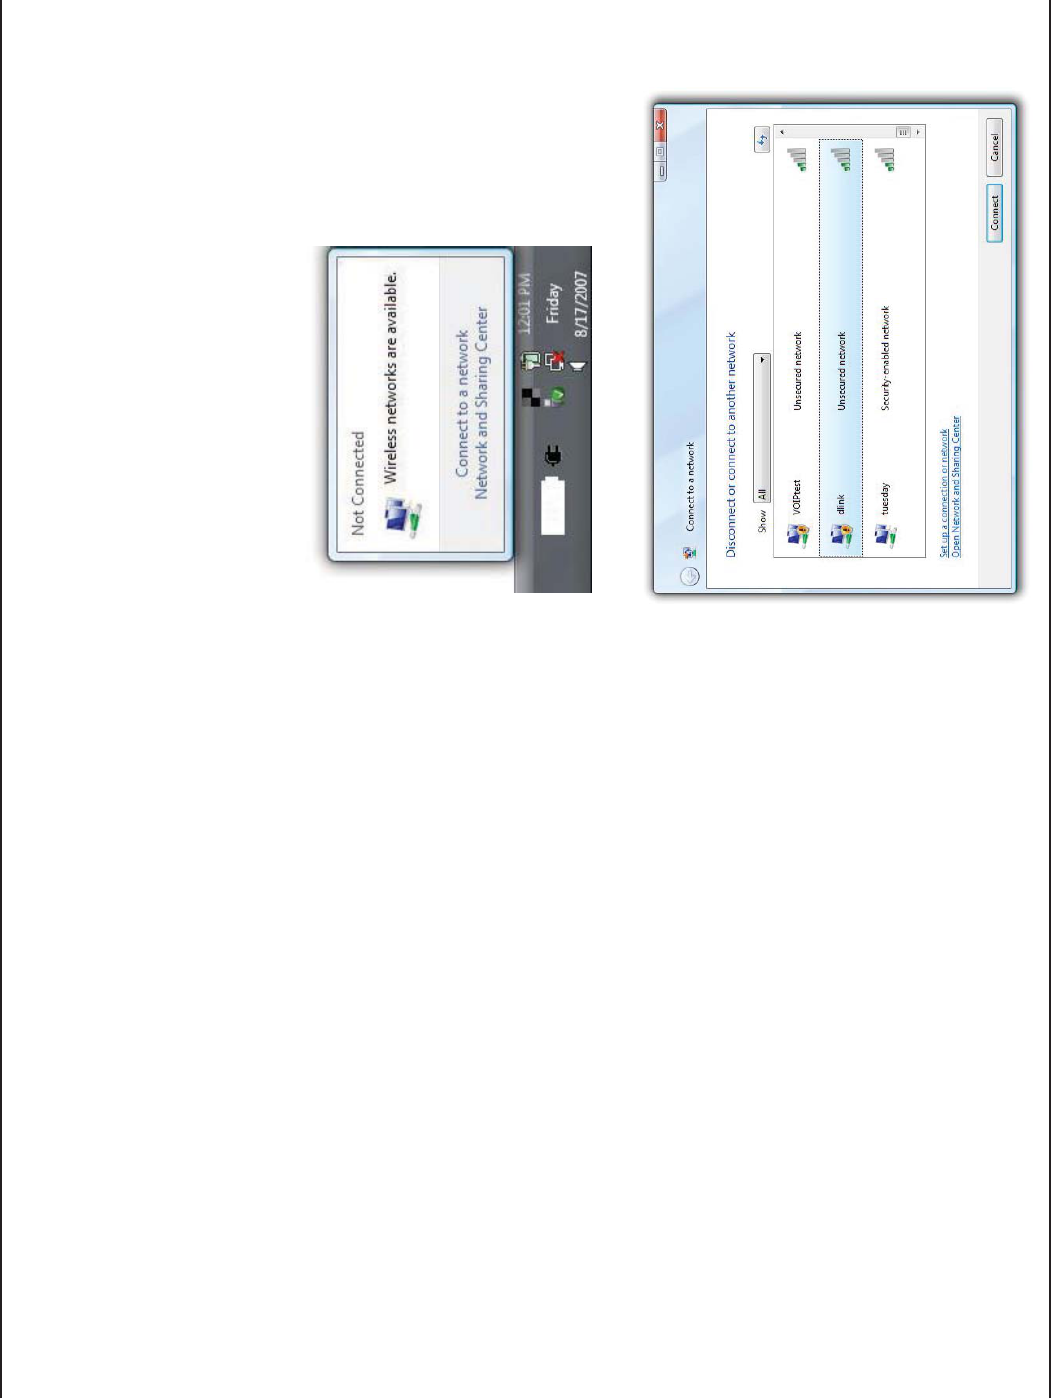
Using Windows® Vista™
Windows® Vista™USERSMAYUSETHEBUILTINWIRELESSUTILITY)FYOUAREUSINGANOTHERCOMPANYSUTILITYOR7INDOWS®
PLEASEREFERTOTHEUSERMANUALOFYOURWIRELESSADAPTERFORHELPWITHCONNECTINGTOAWIRELESSNETWORK-OST
utilities will have a “site survey” option similar to the Windows® Vista™ utility as seen below.
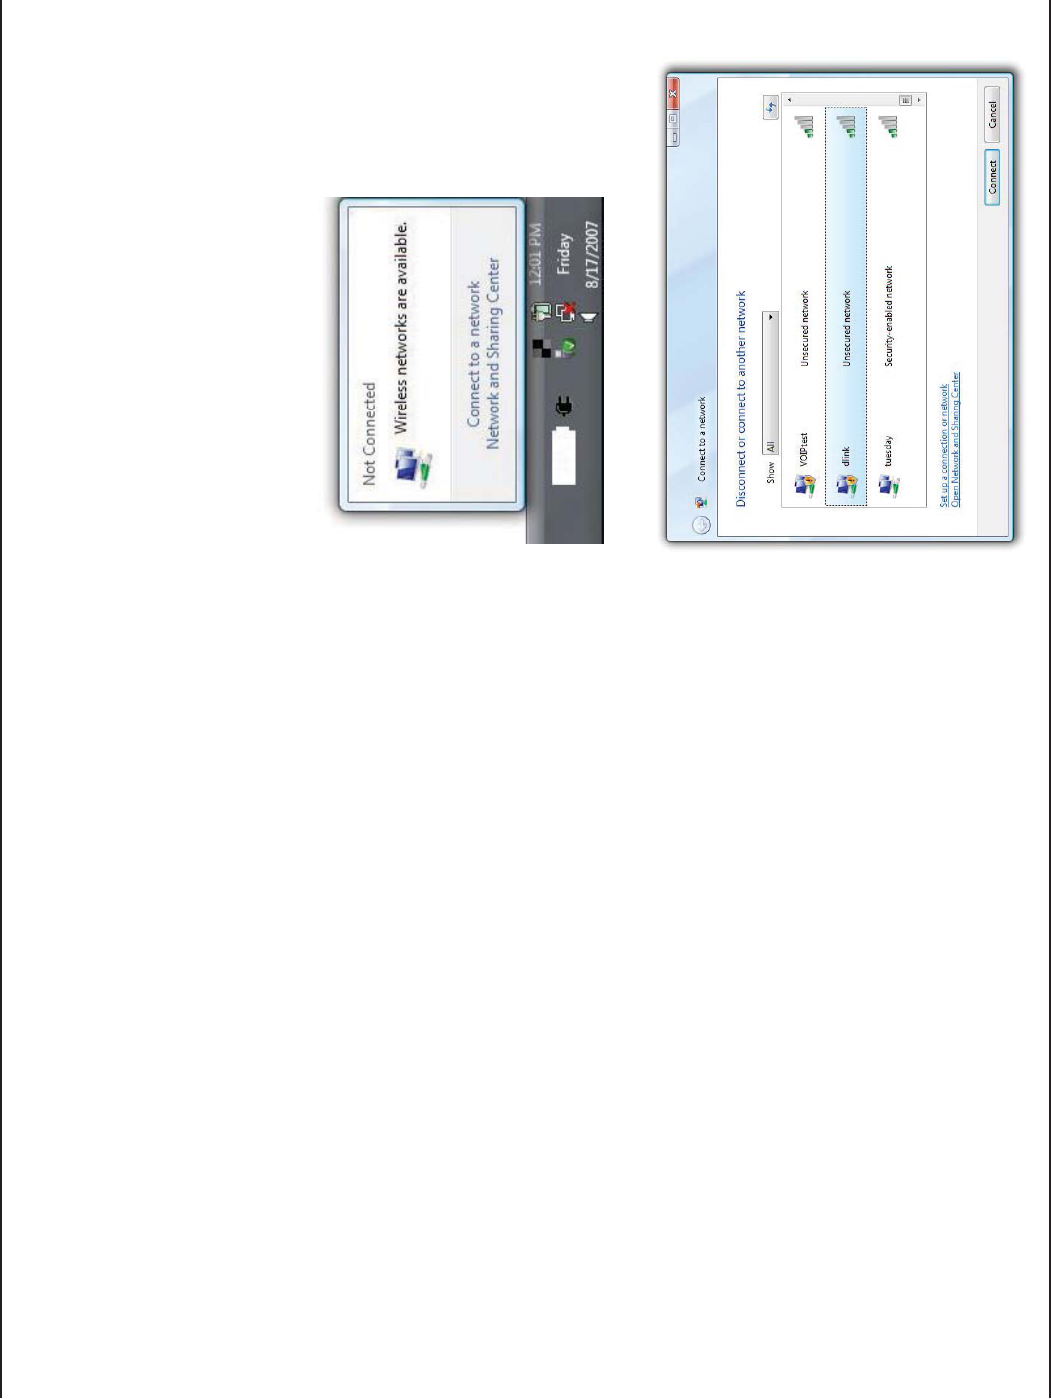
Right-click on the wireless computer icon in your system
tray (lower-right corner next to the time). Select Connect to
a network.
)FYOURECEIVETHE7IRELESS.ETWORKS$ETECTEDBUBBLECLICK
ONTHECENTEROFTHEBUBBLETOACCESSTHEUTILITY
or
The utility will display any available wireless networks in your
area. Click on a network (displayed using the SSID) and click
the Connect button.
)FYOUGETAGOODSIGNALBUTCANNOTACCESSTHE)NTERNETCHECKYOU
4#0)0SETTINGSFORYOURWIRELESSADAPTER2EFERTOTHE.ETWORKING
"ASICSSECTIONINTHISMANUALFORMOREINFORMATION
29D-Link WA525A1 User Manual
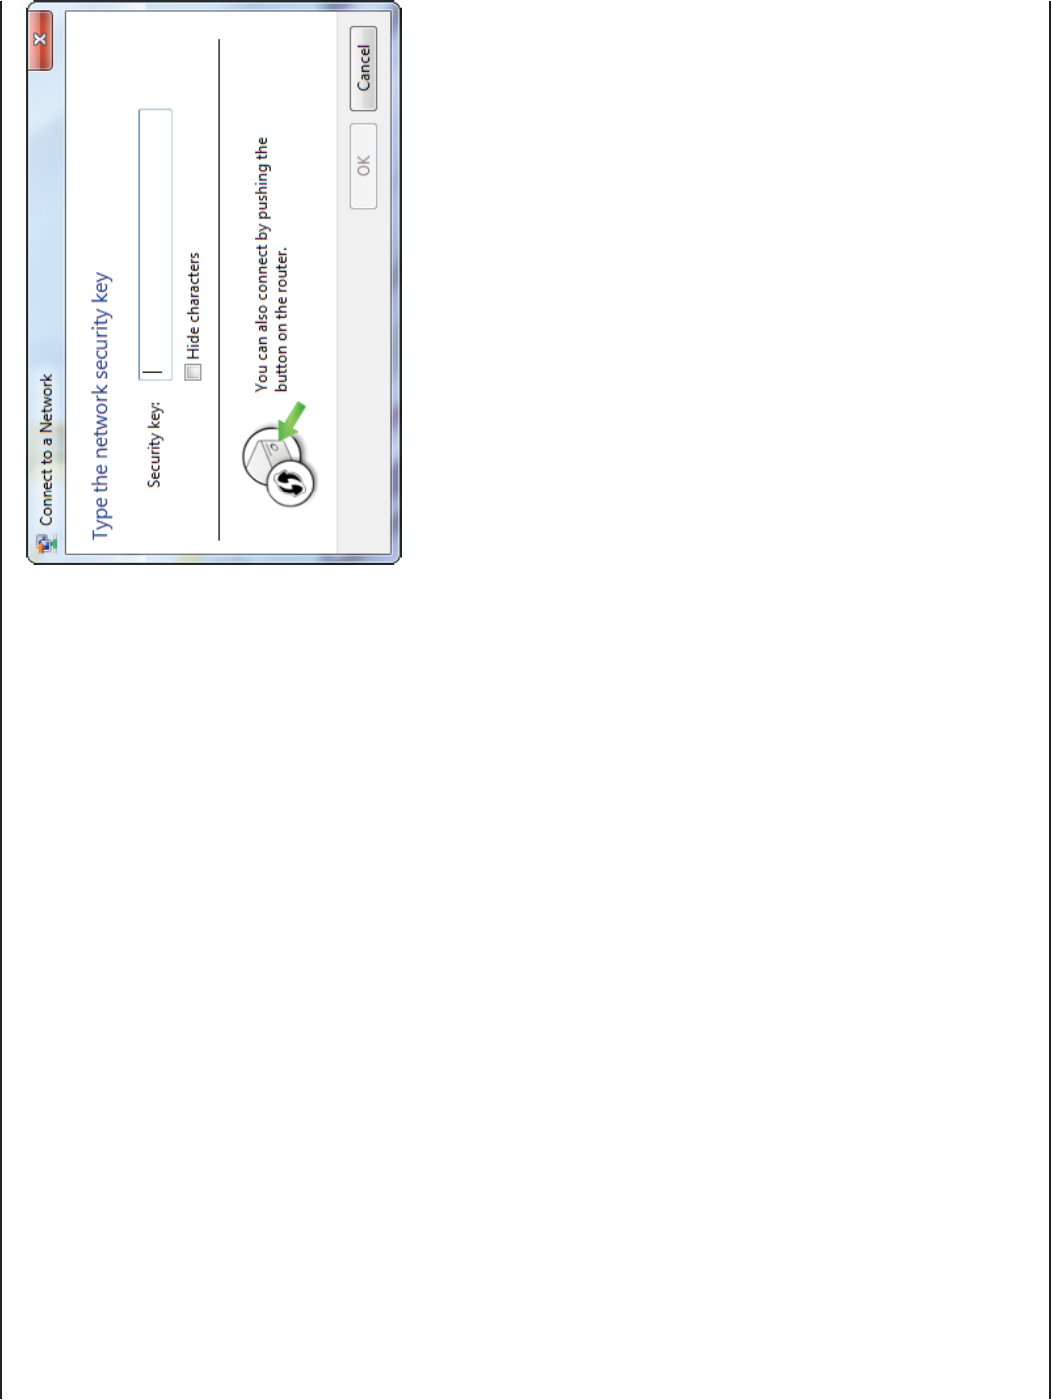
Section 3 - Configuration
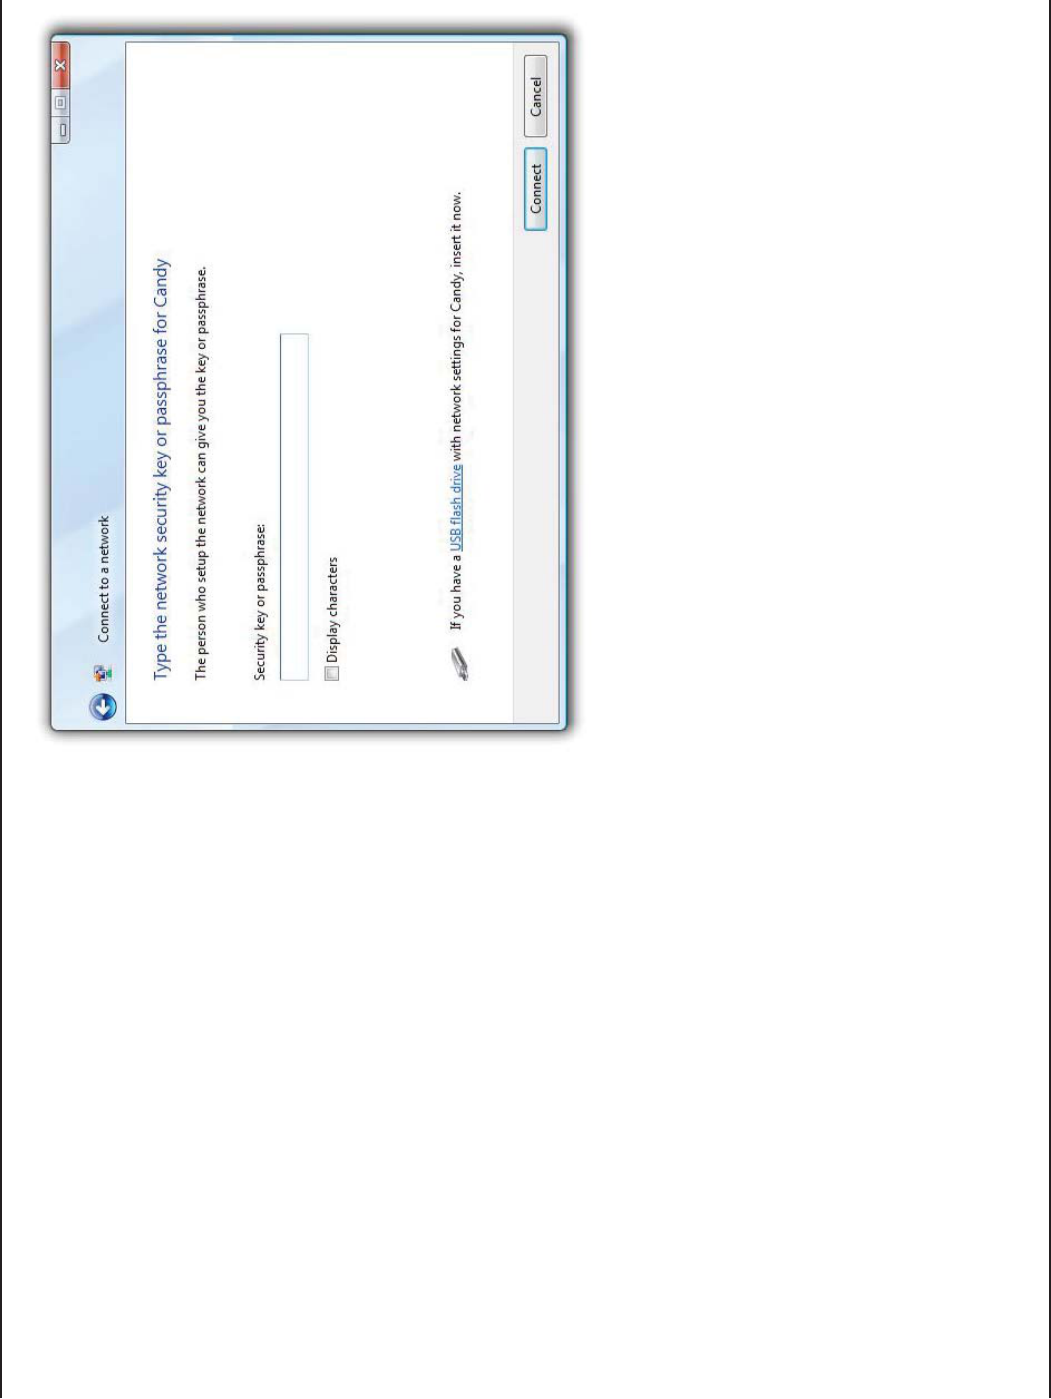
Enter the same security key or passphrase that is
on your router and click Connect.
It may take 20-30 seconds to connect to the wireless
NETWORK)FTHECONNECTIONFAILSPLEASEVERIFYTHATTHE
security settings are correct. The key or passphrase
must be exactly the same as on the wireless
router.
30D-Link WA525A1 User Manual
Section 3 - Configuration
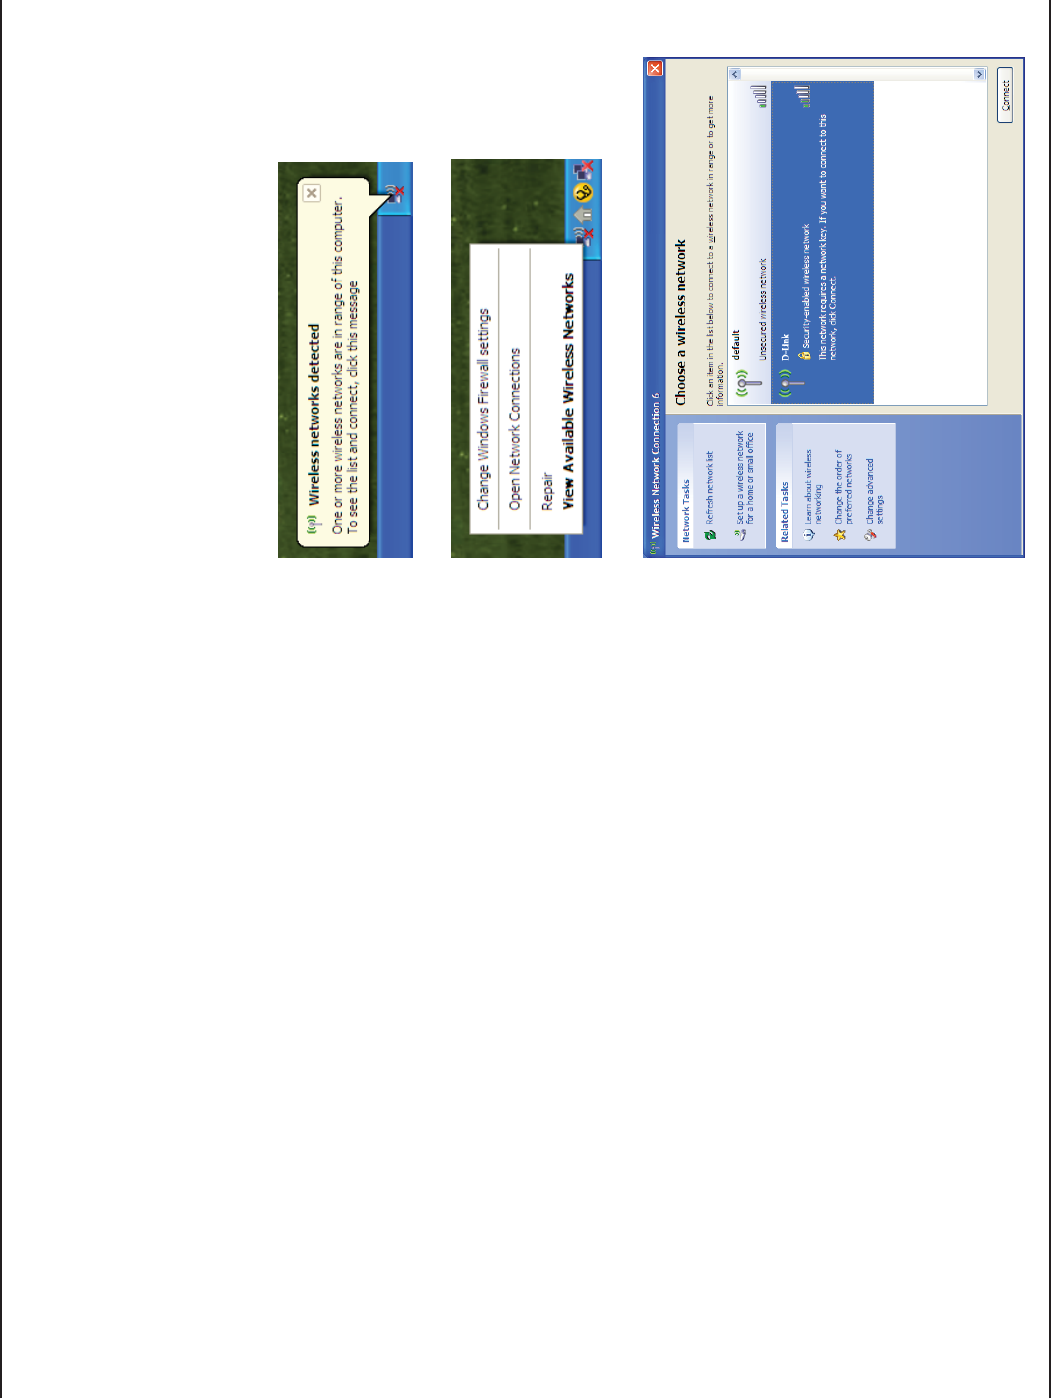
Windows® XP Configuration Utility
Windows®80USERSMAYUSETHEBUILTINWIRELESSUTILITY4HEFOLLOWINGINSTRUCTIONSAREFOR3ERVICE0ACKUSERS
)FYOUAREUSING7INDOWS®YOUMUSTUSETHE$,INK7IRELESS#ONNECTION-ANAGER0LEASEREFERTOPAGE
Right-click on the wireless computer icon in your system tray
(lower-right corner next to the time). Select 6IEW!VAILABLE
Wireless Networks.
)FYOURECEIVETHE7IRELESS.ETWORKS$ETECTED bubble, click
ONTHECENTEROFTHEBUBBLETOACCESSTHEUTILITY
The utility will display any available wireless networks in your
area. Click on a network and click the Connect button.
2EFER TO THE Wireless Security SECTION FOR INFORMATION ON
connecting to a secure network.
)FYOUWANTTOUSETHE$,INKMANAGERINSTEADOFTHE7INDOWS®
80WIRELESSUTILITYREFERTOTHENEXTPAGE
31D-Link WA525A1 User Manual
Section 3 - Configuration
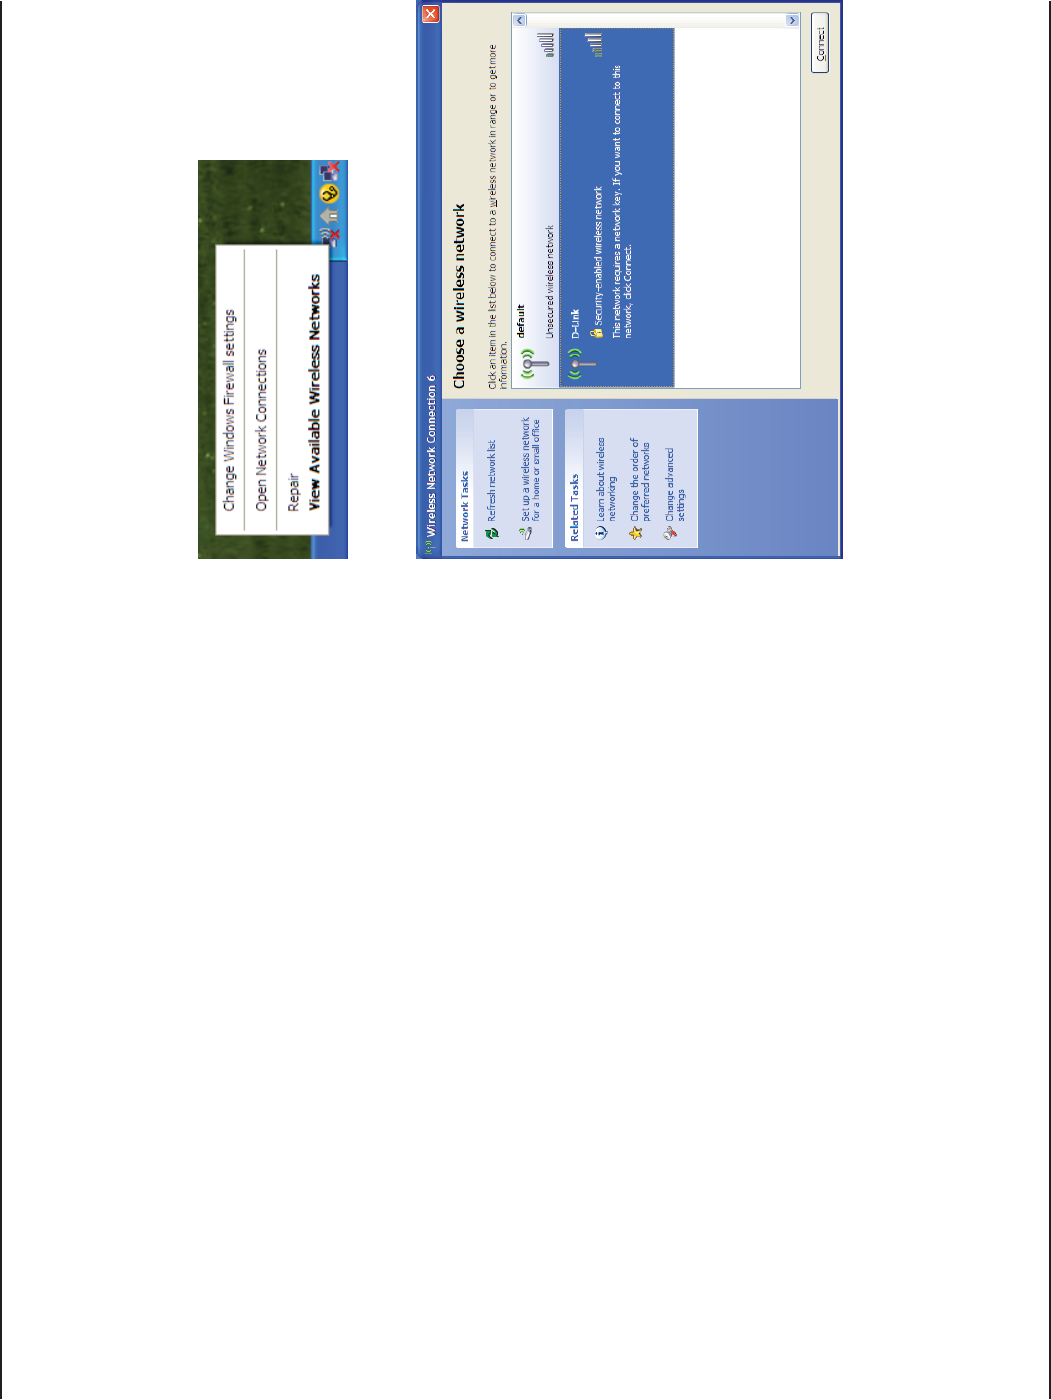
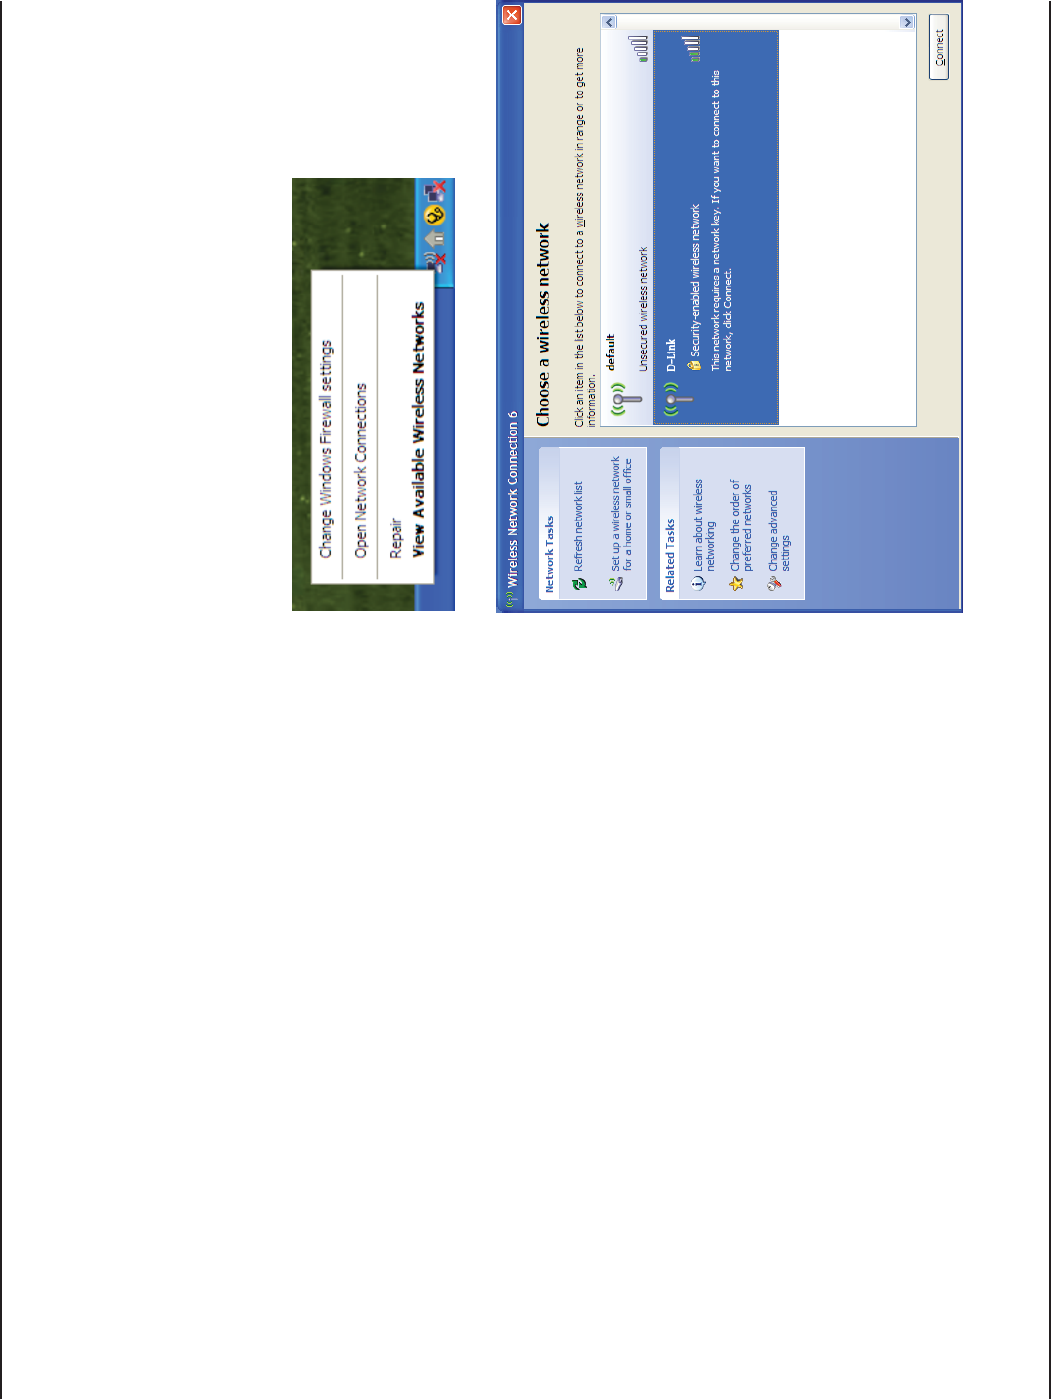
Disabling The Windows® XP Utility
)FYOUWANTTOUSETHE$,INK7IRELESS#ONNECTION-ANAGERYOUMUSTDISABLETHE7INDOWS® XP wireless utility.
Right-click on the wireless computer icon in your system tray
(lower-right corner next to the time). Select 6IEW!VAILABLE
Wireless Networks.
In the Choose a Wireless Network window click Change
!DVANCED3ETTINGSONTHELEFTSIDEBELOWRelated Tasks.
32D-Link WA525A1 User Manual
Section 3 - Configuration
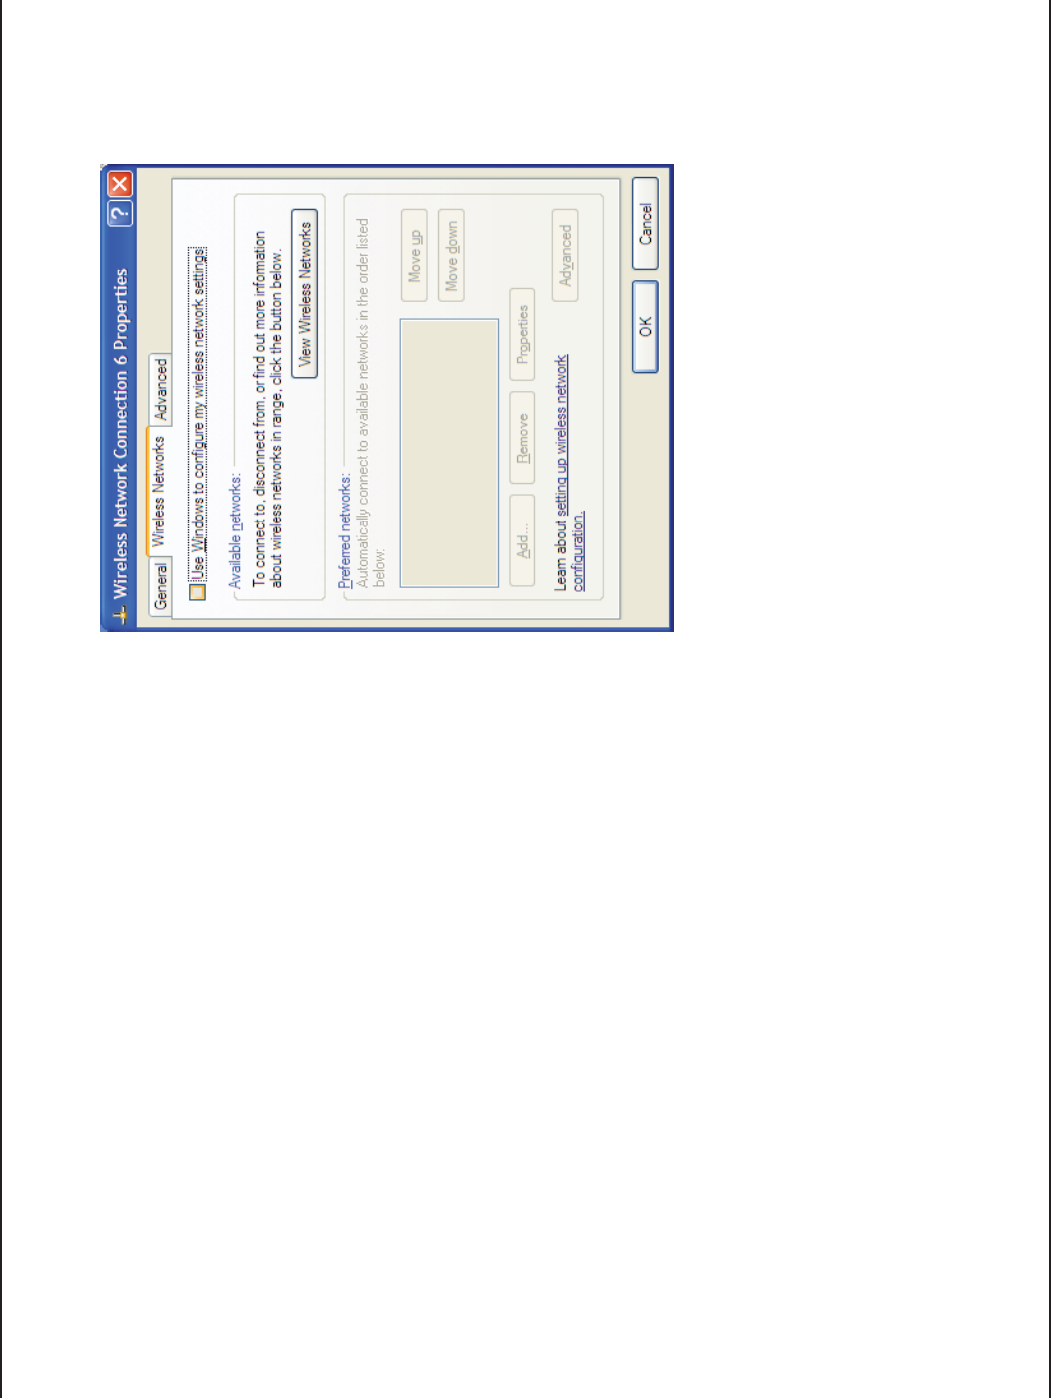
In the Wireless Network Connection Properties window,
uncheck 5SE7INDOWS®TOCONlGUREMYWIRELESSNETWORK
settings and then click OK.
2EFERTOPAGEONINSTRUCTIONSFORLAUNCHINGTHE$,INKWireless Connection Manager.

33D-Link WA525A1 User Manual
Section 4 - Wireless Security
Wireless Security
4HISSECTIONWILLSHOWYOUTHEDIFFERENTLEVELSOFSECURITYYOUCANUSETOPROTECTYOURDATAFROMINTRUDERS4HE
7!!OFFERSTHEFOLLOWINGTYPESOFSECURITY
s70!7I&I0ROTECTED!CCESS s70!03+0RE3HARED+EY
s70!7I&I0ROTECTED!CCESS s70!03+0RE3HARED+EY
s7%07IRED%QUIVALENT0RIVACY sX2!$)53
What is WEP?
7%0STANDS FOR7IRED %QUIVALENT0RIVACY)T ISBASEDON THE)%%% STANDARDANDUSESTHE2#ENCRYPTION
algorithm. WEP provides security by encrypting data over your wireless network so that it is protected as it is transmitted
FROMONEWIRELESSDEVICETOANOTHER
4OGAINACCESSTOA7%0NETWORKYOUMUSTKNOWTHEKEY4HEKEYISASTRINGOFCHARACTERSTHATYOUCREATE7HEN
USING7%0YOUMUSTDETERMINETHELEVELOFENCRYPTION4HETYPE OFENCRYPTION DETERMINESTHEKEYLENGTH BIT
encryption requires a longer key than 64-bit encryption. Keys are defined by entering in a string in HEX (hexadecimal
USINGCHARACTERS!&OR!3#))!MERICAN3TANDARD#ODEFOR)NFORMATION)NTERCHANGEnALPHANUMERICCHARACTERS
FORMAT!3#))FORMATISPROVIDEDSOYOUCANENTERASTRINGTHATISEASIERTOREMEMBER4HE!3#))STRINGISCONVERTEDTO
(%8FORUSEOVERTHENETWORK&OURKEYSCANBEDElNEDSOTHATYOUCANCHANGEKEYSEASILY

34D-Link WA525A1 User Manual
Section 4 - Wireless Security
What is WPA?
70!OR7I&I0ROTECTED!CCESSISA7I&ISTANDARDTHATWASDESIGNEDTOIMPROVETHESECURITYFEATURESOF7%07IRED
Equivalent Privacy).
4HEMAJORIMPROVEMENTSOVER7%0
s)MPROVEDDATAENCRYPTIONTHROUGHTHE4EMPORAL+EY)NTEGRITY0ROTOCOL4+)04+)0SCRAMBLESTHEKEYS
USINGAHASHINGALGORITHMANDBYADDINGANINTEGRITYCHECKINGFEATUREENSURESTHATTHEKEYSHAVENTBEEN
TAMPEREDWITH70!ISBASEDONIANDUSES!DVANCED%NCRYPTION3TANDARDINSTEADOF4+)0
s5SERAUTHENTICATIONWHICHISGENERALLYMISSINGIN7%0THROUGHTHEEXTENSIBLEAUTHENTICATIONPROTOCOL
%!07%0 REGULATES ACCESS TO A WIRELESS NETWORK BASED ON A COMPUTERS HARDWARESPECIlC -!#
ADDRESSWHICHISRELATIVELYSIMPLETOBESNIFFEDOUTANDSTOLEN%!0ISBUILTONAMORESECUREPUBLICKEY
ENCRYPTIONSYSTEMTOENSURETHATONLYAUTHORIZEDNETWORKUSERSCANACCESSTHENETWORK
WPA-PSK/WPA2-PSK uses a passphrase or key to authenticate your wireless connection. The key is an alpha-numeric
password between 8 and 63 characters long. The password can include symbols (!?*&_) and spaces. This key must
be the exact same key entered on your wireless router or access point.
WPA/WPA2 incorporates user authentication through the Extensible Authentication Protocol (EAP). EAP is built on a
MORESECUREPUBLICKEYENCRYPTIONSYSTEMTOENSURETHATONLYAUTHORIZEDNETWORKUSERSCANACCESSTHENETWORK
35D-Link WA525A1 User Manual
Section 4 - Wireless Security
Configure WEP
Using the D-Link Wireless Connection Manager
)TISRECOMMENDEDTOENABLE7%0ONYOURWIRELESSROUTERORACCESSPOINTBEFORECONlGURINGYOURWIRELESSADAPTER)F
you are joining an existing network, you will need to know the WEP key being used.
1. Open the Wireless Connection Manager by double-clicking
ONTHE$,INKICONONYOURDESKTOP&ROMTHELISTOFAVAILABLE
wireless networks, select the network you want to connect to
and click Connect)FTHENETWORKISUSING7%0THESCREEN
(as shown to the right) will appear.
2. Enter the WEP key exactly as it is on your wireless router or
access point.
3. Click the 3HOWTEXTINTHEPASSWORDlELD box to see the WEP key. Unchecking it will hide the key.
4. Click OK to connect to the network. Allow up to 30 seconds to connect.
)FYOUWOULDLIKETOCREATEANEWNETWORKANDENTERTHE7%0SETTINGSREFERTOTHENEXTPAGE
36D-Link WA525A1 User Manual
Section 4 - Wireless Security
)TISRECOMMENDEDTOENABLE7%0ONYOURWIRELESSROUTERORACCESSPOINTBEFORECONlGURINGYOURWIRELESSADAPTER
make sure you enter the WEP key exactly the same on all wireless devices. It is strongly recommended to set the
authentication to Shared Key.
1. Open the Wireless Connection Manager by double-clicking on the D-Link icon on your desktop. Click on New to
create a new profile or highlight an existing profile and click -ODIFY.
2. Select WEP under Set Security Option.
3. Select Shared and then select the Key Length FROM THE
drop-down menu.
4. Enter the WEP key exactly as it is on your wireless router or
access point.
5. Click OK to connect to the network. Allow up to 30 seconds
to connect.

37D-Link WA525A1 User Manual
Section 4 - Wireless Security
Configure WEP Passphrase
Using the Windows® Vista
)TISRECOMMENDEDTOENABLEWIRELESSSECURITY70!70!ONYOURWIRELESSROUTERORACCESSPOINTBEFORECONlGURING
YOURWIRELESSADAPTER)FYOUAREJOININGANEXISTINGNETWORKYOUWILLNEEDTOKNOWTHESECURITYKEYORPASSPHRASE
being used.
2. Highlight the wireless network (SSID) you would like to
connect to and click Connect.
1. Open the Windows® Vista™ Wireless Utility by right-clicking
on the wireless computer icon in your system tray (lower
RIGHTCORNEROFSCREEN3ELECT#ONNECTTOANETWORK

38D-Link WA525A1 User Manual
Section 4 - Wireless Security
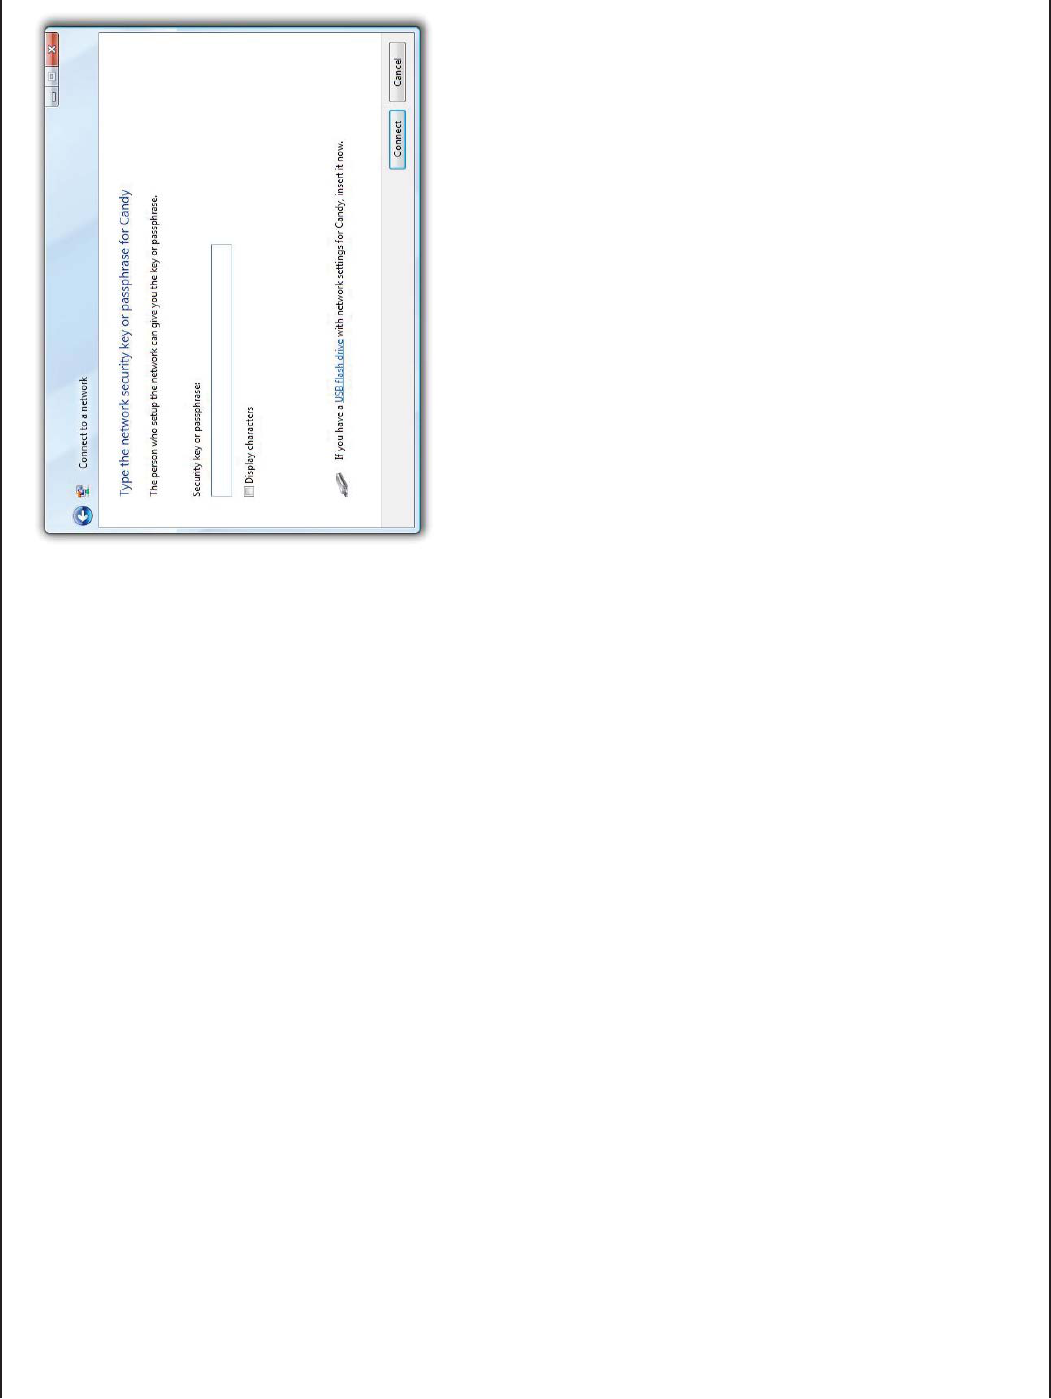
3. Enter the same security key or passphrase that is on your router
and click Connect.
)TMAYTAKESECONDSTOCONNECTTOTHEWIRELESSNETWORK)FTHE
CONNECTIONFAILSPLEASEVERIFYTHATTHESECURITYSETTINGSARECORRECT
The key or passphrase must be exactly the same as on the wireless
router.
39D-Link WA525A1 User Manual
Section 4 - Wireless Security
Configure WEP
Using the Windows® XP Utility
)TISRECOMMENDEDTOENABLE7%0ONYOURWIRELESSROUTERORACCESSPOINTBEFORECONlGURINGYOURWIRELESSADAPTER)F
you are joining an existing network, you will need to know the WEP key being used.
2. Highlight the wireless network (SSID) you would like to
connect to and click Connect.
1. Open the Windows® XP Wireless Utility by right-clicking
on the wireless computer icon in your system tray
LOWERRIGHT CORNER OF SCREEN 3ELECT 6IEW !VAILABLE
Wireless Networks.
40D-Link WA525A1 User Manual
Section 4 - Wireless Security
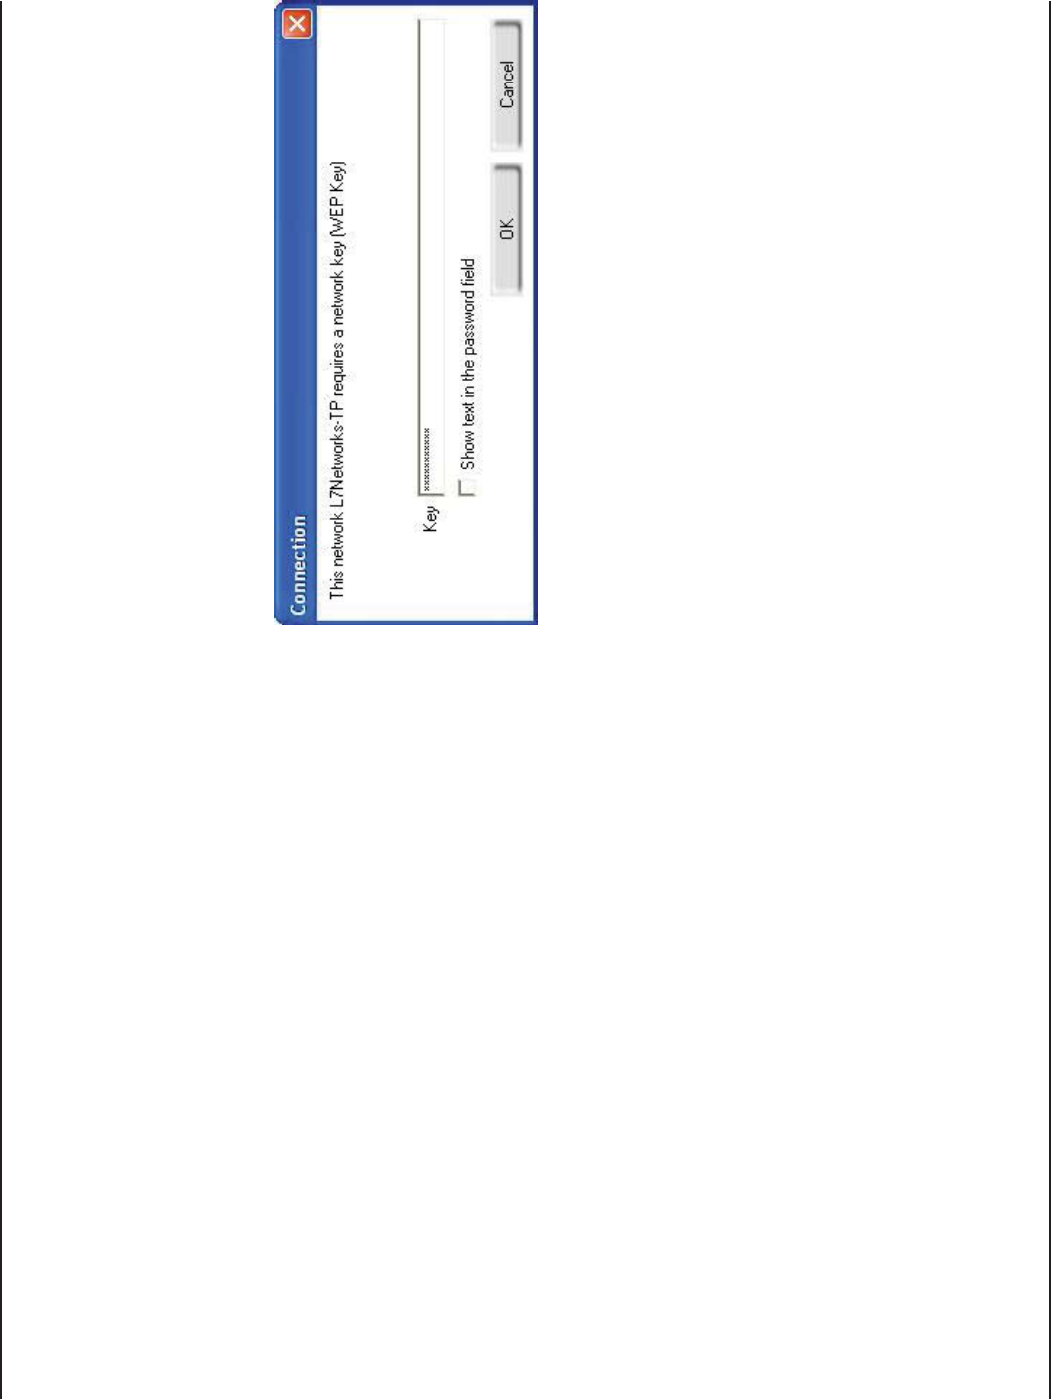
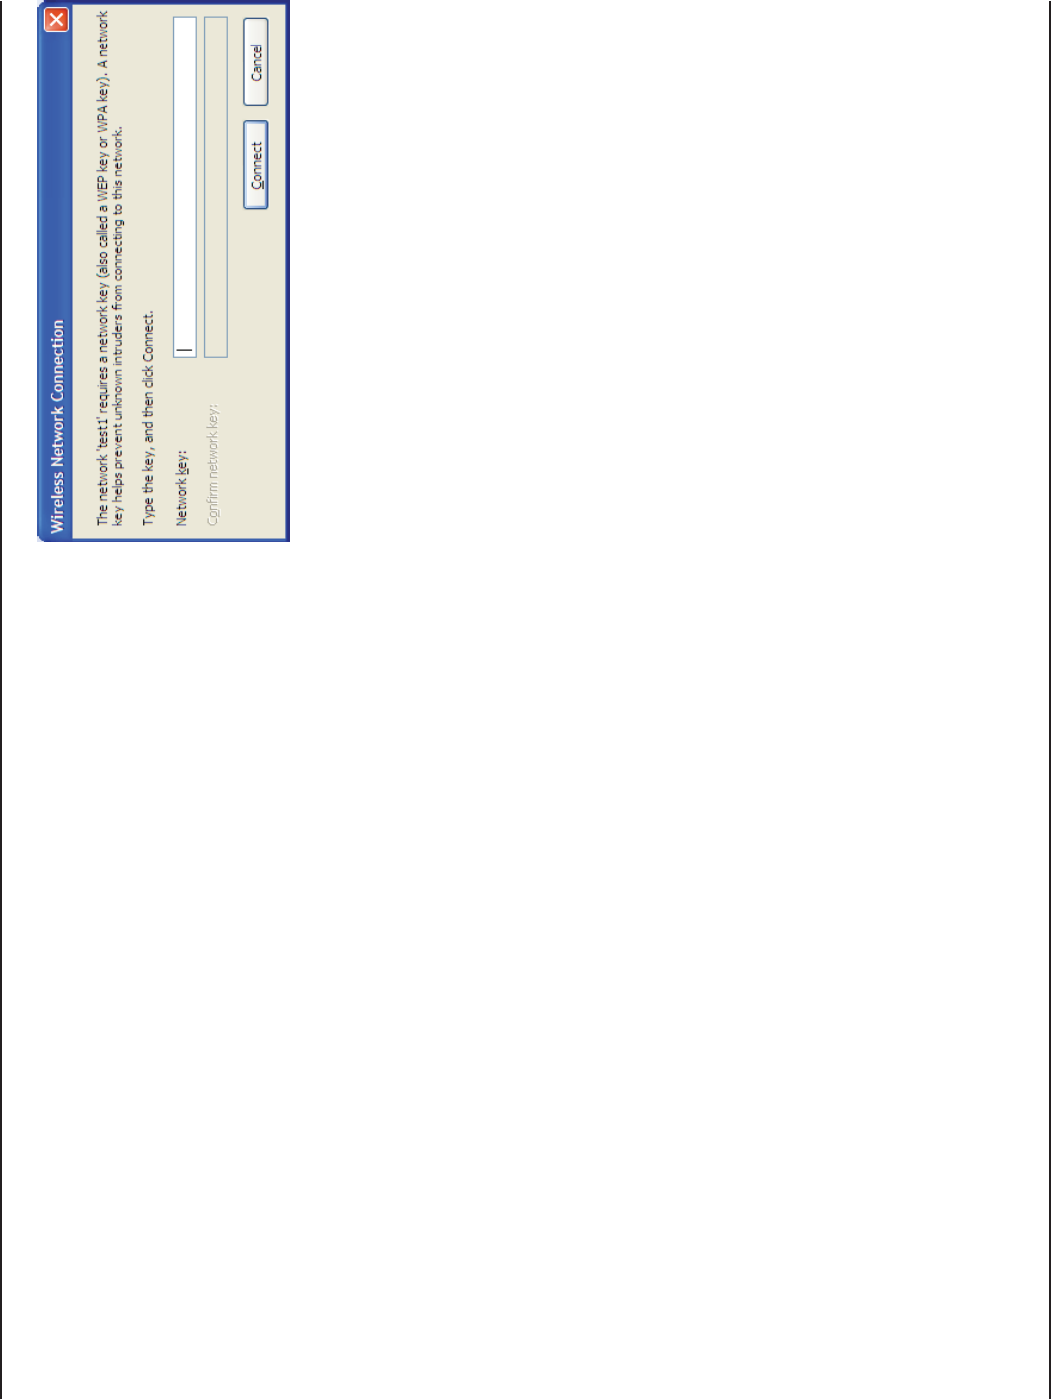
3. The Wireless Network Connection box will appear. Enter the WEP
key and click Connect.
)TMAYTAKESECONDSTOCONNECTTOTHEWIRELESSNETWORK)FTHE
CONNECTION FAILS PLEASE VERIFY THAT THE7%0 SETTINGS ARE CORRECT
The WEP key must be exactly the same as on the wireless router or
access point.
41D-Link WA525A1 User Manual
Section 4 - Wireless Security
Configure WPA/WPA2 Passphrase
Using the D-Link Wireless Connection Manager
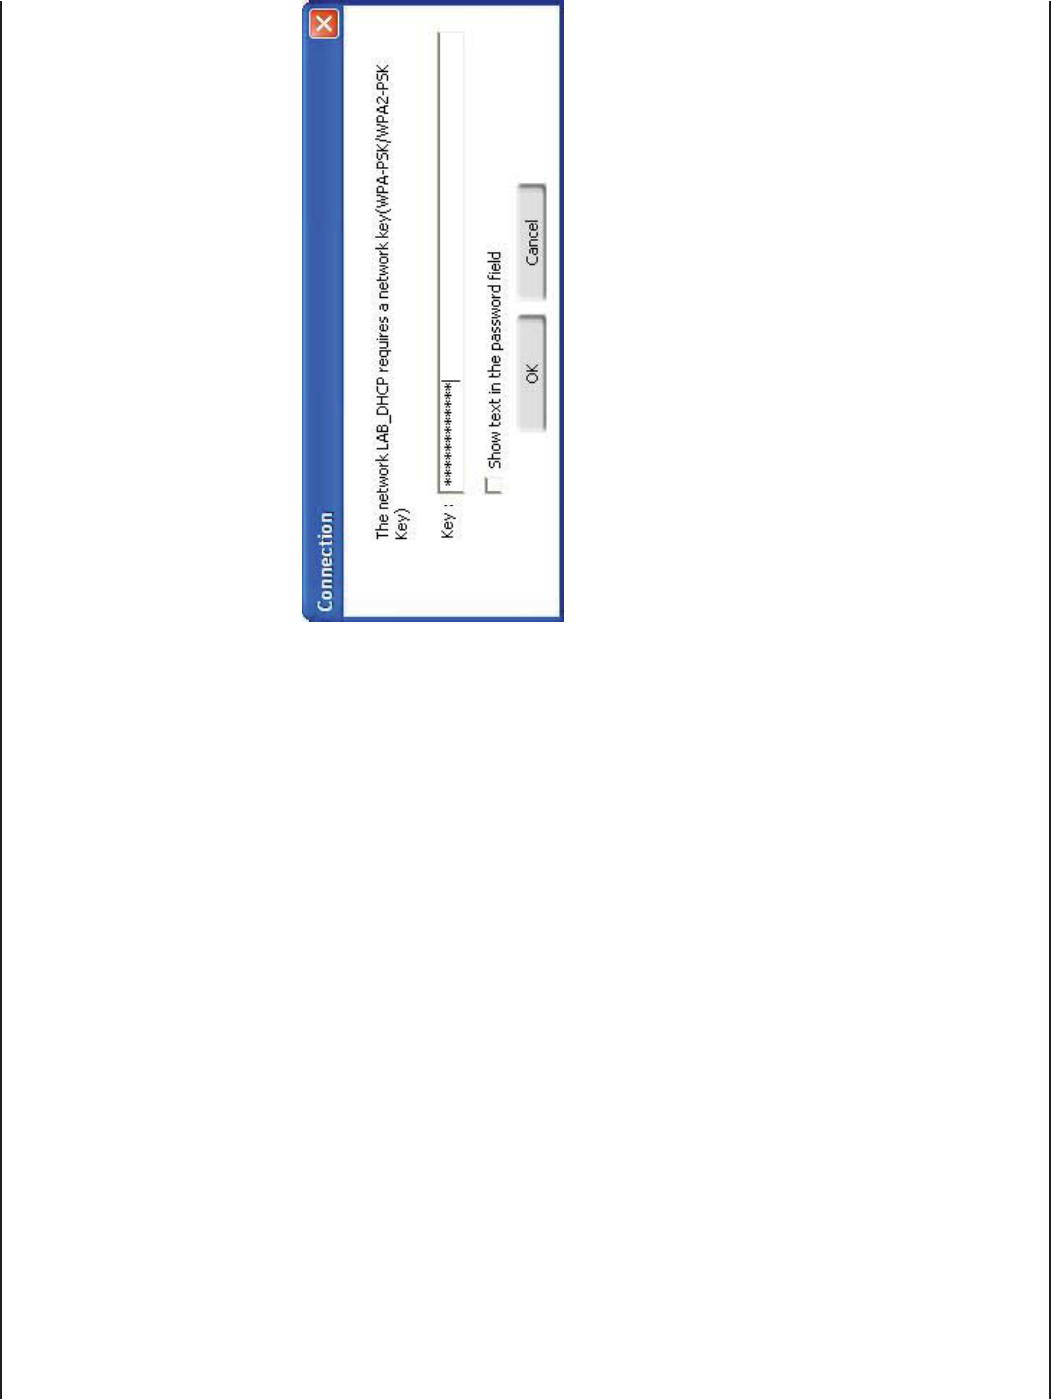
)TISRECOMMENDEDTOENABLE70!03+ONYOURWIRELESSROUTERORACCESSPOINTBEFORECONlGURINGYOURWIRELESSADAPTER
)FYOUAREJOININGANEXISTINGNETWORKYOUWILLNEEDTOKNOWTHE70!03+PASSPHRASEBEINGUSED
1. Open the Wireless Connection Manager by double-clicking on
the D-Link icon on your desktop.
2. Highlight the wireless network (SSID) you would like to connect
to and click Connect)FTHENETWORKISUSING70!03+THE
screen (as shown to the right) will appear.
3. Enter the WPA-PSK passphrase exactly as it is on your wireless
router or access point. Click the 3HOWTEXTINTHEPASSWORD
field box to see the passphrase. Unchecking it will hide it.
4. Click OK to connect to the network. Allow up to 30 seconds to connect.
)FYOUWOULDLIKETOCREATEANEWNETWORKANDENTERTHE7%0SETTINGSREFERTOTHENEXTPAGE
42D-Link WA525A1 User Manual
Section 4 - Wireless Security
)TISRECOMMENDEDTOENABLE70!03+ONYOURWIRELESSROUTERORACCESSPOINTBEFORECONlGURINGYOURWIRELESSADAPTER
Make sure you enter the passphrase exactly the same on all wireless devices.
1. Open the Wireless Connection Manager by double-clicking on the D-Link icon on your desktop. Click on New to
create a new profile or highlight an existing profile and click -ODIFY.
2. Select 70!70!0ASSPHRASE under Set Security Option.
3. Select TKIP or !%3.
4. Enter the passphrase exactly as it is on your wireless router
or access point.
5. Click OK to connect to the network. Allow up to 30 seconds
to connect.

43D-Link WA525A1 User Manual
Section 4 - Wireless Security
Configure WPA/WPA2 Passphrase
Using Windows® 7
)TISRECOMMENDEDTOENABLEWIRELESSSECURITY70!70!ONYOURWIRELESSROUTERORACCESSPOINTBEFORECONlGURING
YOURWIRELESSADAPTER)FYOUAREJOININGANEXISTINGNETWORKYOUWILLNEEDTOKNOWTHESECURITYKEYORPASSPHRASE
being used.
2. The utility will display any available wireless networks
in your area.
1. Click on the wireless icon in your system tray (lower-right
corner).
44D-Link WA525A1 User Manual
Section 4 - Wireless Security
3. Highlight the wireless network (SSID) you would like to
connect to and click the Connect button.
)F YOU GET A GOOD SIGNAL BUT CANNOT ACCESS THE )NTERNET
CHECKYOUR4#0)0SETTINGSFORYOURWIRELESSADAPTER2EFER
to the Networking BasicsSECTIONINTHISMANUALFORMORE
INFORMATION
4HEFOLLOWINGWINDOWAPPEARSWHILEYOURCOMPUTERTRIESTO
connect to the router.
45D-Link WA525A1 User Manual
Section 4 - Wireless Security
5. Enter the same security key or passphrase that is on your
router and click Connect. You can also connect by pushing
the WPS button on the router.
)TMAYTAKESECONDSTOCONNECTTOTHEWIRELESSNETWORK)F
THECONNECTIONFAILSPLEASEVERIFYTHATTHESECURITYSETTINGSARE
correct. The key or passphrase must be exactly the same as on
the wireless router.
46D-Link WA525A1 User Manual
Section 4 - Wireless Security
Configure WPA/WPA2 Passphrase
Using the Windows® Vista
)TISRECOMMENDEDTOENABLEWIRELESSSECURITY70!70!ONYOURWIRELESSROUTERORACCESSPOINTBEFORECONlGURING
YOURWIRELESSADAPTER)FYOUAREJOININGANEXISTINGNETWORKYOUWILLNEEDTOKNOWTHESECURITYKEYORPASSPHRASE
being used.
2. Highlight the wireless network (SSID) you would like to
connect to and click Connect.
1. Open the Windows® Vista™ Wireless Utility by right-clicking
on the wireless computer icon in your system tray (lower
RIGHTCORNEROFSCREEN3ELECT#ONNECTTOANETWORK
47D-Link WA525A1 User Manual
Section 4 - Wireless Security
3. Enter the same security key or passphrase that is on your router
and click Connect.
)TMAYTAKESECONDSTOCONNECTTOTHEWIRELESSNETWORK)FTHE
CONNECTIONFAILSPLEASEVERIFYTHATTHESECURITYSETTINGSARECORRECT
The key or passphrase must be exactly the same as on the wireless
router.

48D-Link WA525A1 User Manual
Section 4 - Wireless Security
Configure WPA/WPA2 Passphrase
Using the Windows® XP Utility
)TISRECOMMENDEDTOENABLE70!ONYOURWIRELESSROUTERORACCESSPOINTBEFORECONlGURINGYOURWIRELESSADAPTER)F
you are joining an existing network, you will need to know the WPA key being used.
2. Highlight the wireless network (SSID) you would like to
connect to and click Connect.
1. Open the Windows® XP Wireless Utility by right-clicking
on the wireless computer icon in your system tray
LOWERRIGHT CORNER OF SCREEN 3ELECT 6IEW !VAILABLE
Wireless Networks.

49D-Link WA525A1 User Manual
Section 4 - Wireless Security
3. The Wireless Network Connection box will appear. Enter the
WPA-PSK passphrase and click Connect.
)TMAYTAKESECONDSTOCONNECTTOTHEWIRELESSNETWORK)FTHE
CONNECTIONFAILSPLEASEVERIFYTHATTHE70!03+SETTINGSARECORRECT
The WPA-PSK passphrase must be exactly the same as on the
wireless router or access point.
50D-Link WA525A1 User Manual
Section 4 - Wireless Security
Configure WPA/WPA2 (RADIUS)
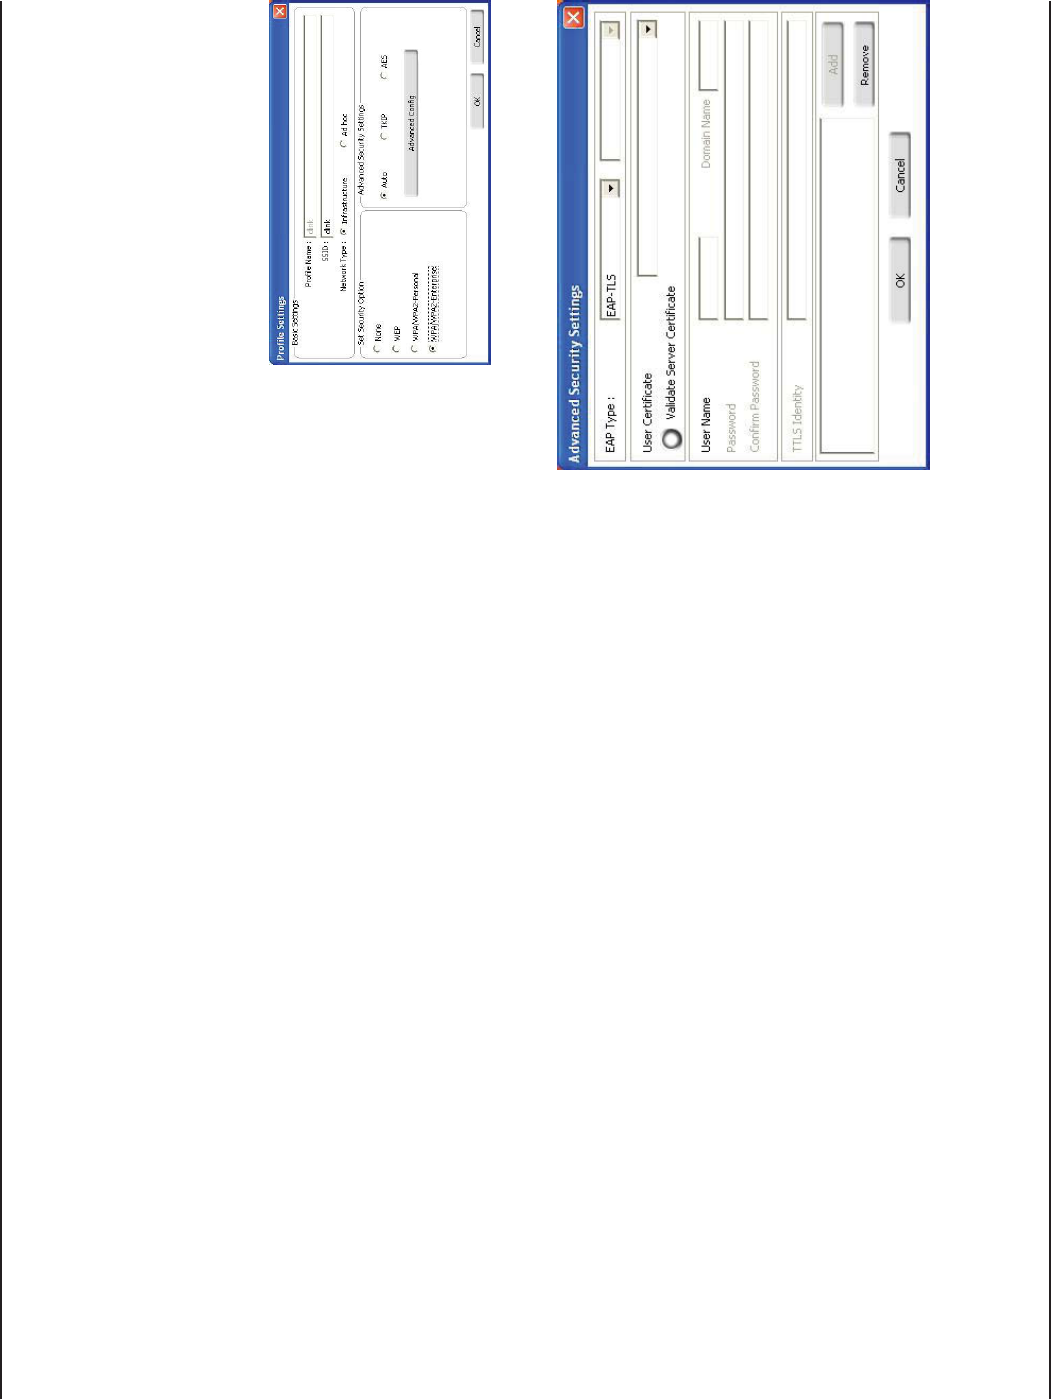
Using the D-Link Wireless Connection Manager
70!AND70!AREFORADVANCEDUSERSWHOAREFAMILIARWITHUSINGA2!$)53SERVERANDSETTINGUPCERTIlCATES
1. Open the Wireless Connection Manager by double-clicking on the D-Link icon on
your desktop. Click on New to create a new profile or highlight an existing profile
and click -ODIFY.
2. Select 70!70! under Set Security Option and then select TKIP or !%3.
3. Click on !DVANCED#ONlG to continue.
4. Next to EAP Type, select %!04,3, %!044,3, or 0%!0. Extensible
Authentication Protocols allow devices on the network to request
AUTHENTICATIONFROMTHE2!$)53SERVERINTHENETWORK!LLTHEDEVICESON
THENETWORKMUSTUSETHESAME%!0TYPEWHENUSINGA2!$)53SERVERFOR
authentication. Some RADIUS servers require that the Validate Server field
BESELECTED#HECKTHISlELDIFYOUR2!$)53SERVERREQUIRESVALIDATION
5. Select an 5SER#ERTIlCATEFROMTHEDROPDOWNMENU
6.%NTERTHELOGININFORMATIONREQUIREDTOAUTHENTICATE
7. Click !DDTOENTERTHE)0ADDRESSESOFYOUR2!$)53SERVERS
Click OK to save your settings.
51D-Link WA525A1 User Manual
Section 5 - Troubleshooting
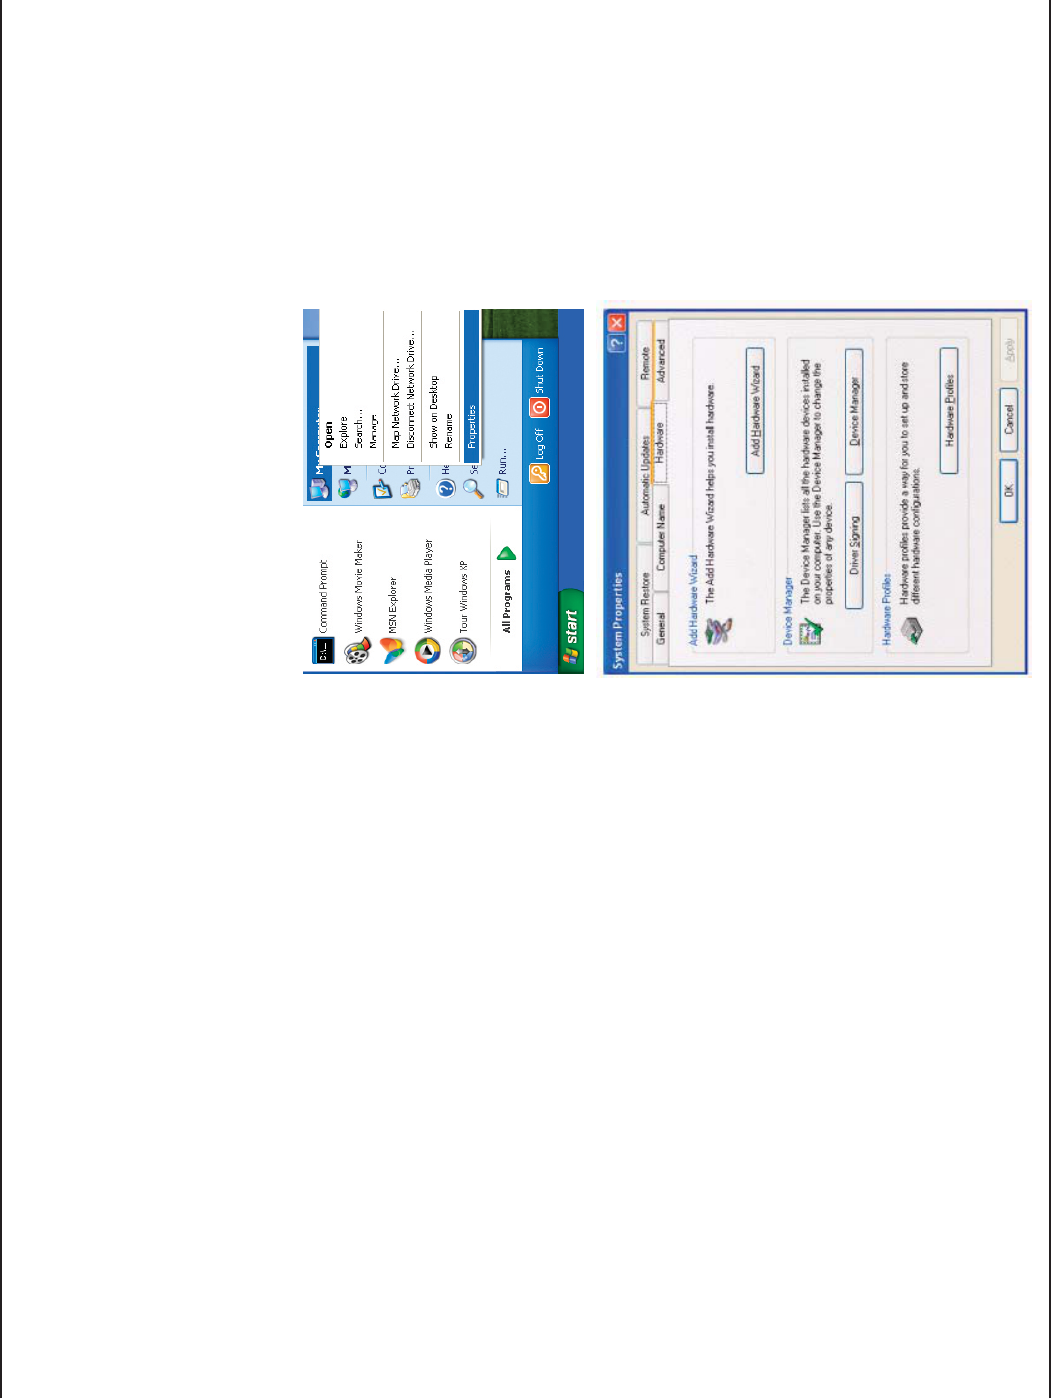
(OWDO)KNOWIFMYADAPTERISINSTALLEDPROPERLY
Select the Hardware Tab.
Troubleshooting
4HISCHAPTERPROVIDESSOLUTIONSTOPROBLEMSTHATCANOCCURDURINGTHEINSTALLATIONANDOPERATIONOFTHE7!!2EAD
THEFOLLOWINGDESCRIPTIONSIFYOUAREHAVINGPROBLEMS4HEEXAMPLESBELOWAREILLUSTRATEDIN7INDOWS®80)FYOUHAVE
ADIFFERENTOPERATINGSYSTEMTHESCREENSHOTSONYOURCOMPUTERWILLLOOKSIMILARTOTHEFOLLOWINGEXAMPLES
Go to Start >-Y#OMPUTER> Properties.
52D-Link WA525A1 User Manual
Section 5 - Troubleshooting
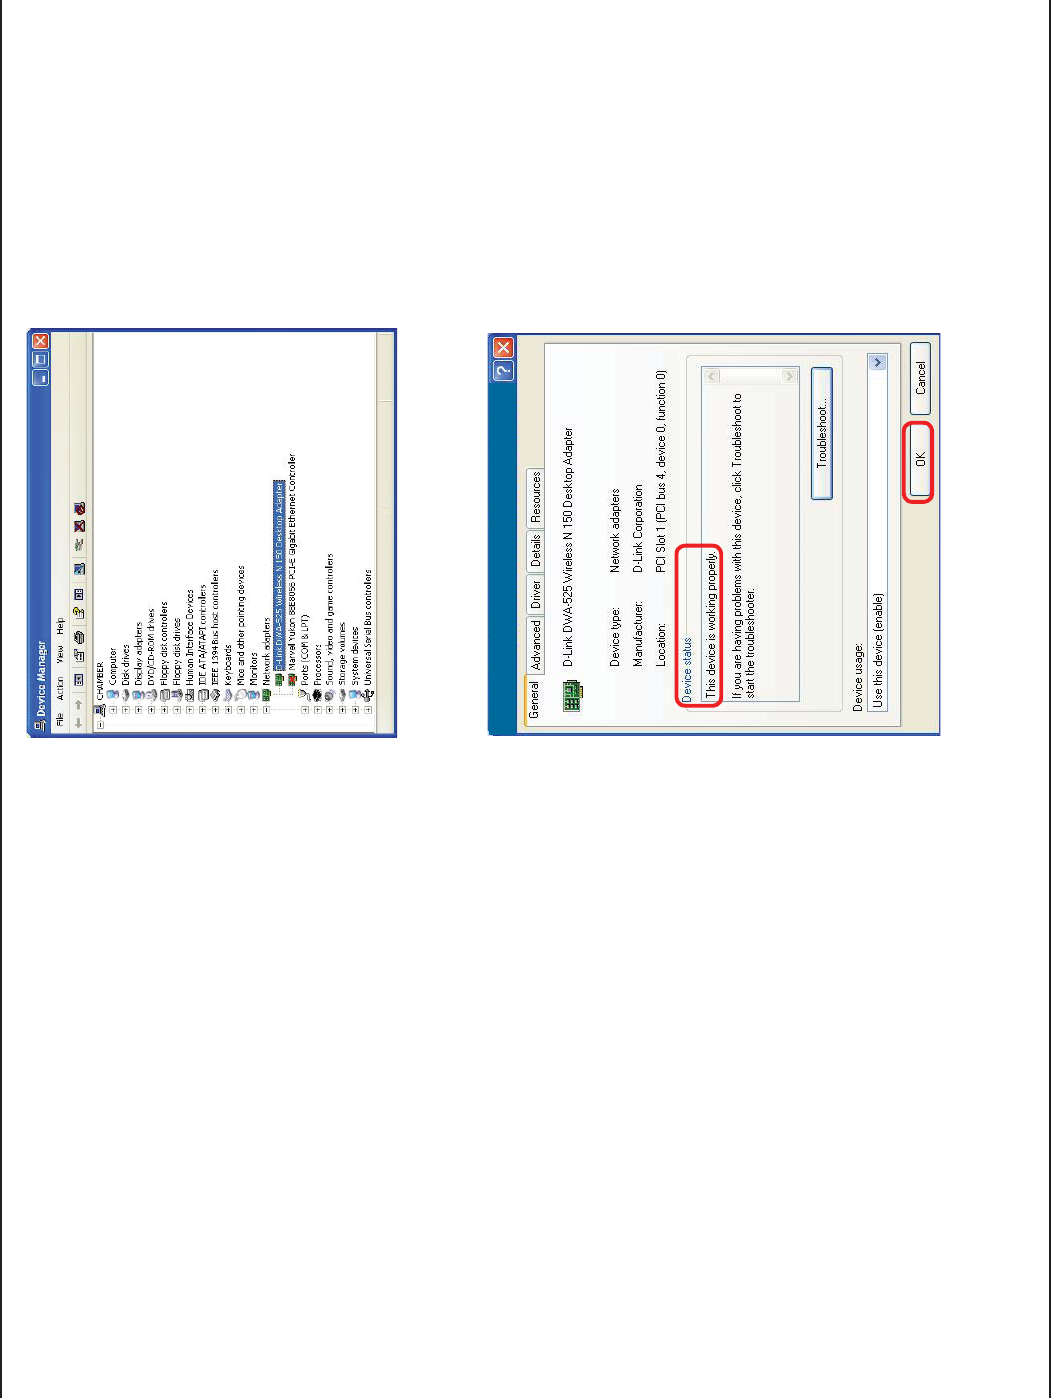
Click the + sign next to .ETWORK!DAPTERS
Right-click on $,INK7!!7IRELESS.
$ESKTOP!DAPTER
Select Properties to check that the drivers are
installed properly.
Look under $EVICE3TATUS to check that the device
is working properly. Click OK to continue.

53D-Link WA525A1 User Manual
Section 5 - Troubleshooting
s-AKESURETHATTHE33)$ONTHE7!!DESKTOPADAPTERISEXACTLYTHESAMEASTHE33)$ONTHE!CCESS
Point or wireless router.
s-OVETHE7!!AND!CCESS0OINTOR7IRELESSROUTERINTOTHESAMEROOMANDTHENTESTTHEWIRELESS
connection.
s$ISABLEALLSECURITYSETTINGS7%0-!#!DDRESS#ONTROL!%3
s-AKESURETHATTHE2ADIOISNOTLOCKEDDOWNTOADIFFERENTFREQUENCY
s4URNOFFYOUR!CCESS0OINTANDTHECOMPUTERWITHTHE7!!4URNONTHE!CCESS0OINTANDTHENTURN
on the computer with the WA525A1.
s2EFRESHTHE7!!5TILITY
2. I cannot connect to the access point or the wireless router.
s#HECKTOSEEIFTHE7!!DESKTOPADAPTERISlRMLYINSERTEDINTOTHE0#)SLOTOFYOURLAPTOPCOMPUTER
4HE7!!,%$LIGHTSARENOTON
s2ESETTHE!CCESS0OINTTOITSFACTORYDEFAULTSETTINGSANDRESTORETHE7!!7IRELESS.$ESKTOP
!DAPTERTOTHEFACTORYDEFAULTSETTINGS4HEDEFAULTSETTINGSARELISTEDINTHE#ONlGURATIONSECTIONINTHIS
manual.
)FORGOTMYENCRYPTIONKEY

54D-Link WA525A1 User Manual
Section 5 - Troubleshooting
s-AKESURETHATTHE7!!7IRELESS!DAPTERISPROPERLYSEATEDINTHECOMPUTERS0#)SLOT
s)F7INDOWSDOESNOTDETECTTHEHARDWAREUPONINSERTIONOFTHEADAPTERMAKESURETOCOMPLETELYREMOVE
DRIVERSTHATWEREPREVIOUSLYLOADED4OREMOVETHEDRIVERSDOTHEFOLLOWING
A. Under Tools > select &OLDER/PTIONSx > select ViewUNDER(IDDENlLESANDFOLDERSSELECT3HOW
HIDDENlLESANDFOLDERS
B. Uncheck (IDEEXTENSIONFORKNOWNlLETYPES > click on !PPLY
#3EARCHFORPREVIOUSLYLOADEDDRIVERlLES2EMOVETHESElLESFROMTHE).&AND3934%-$2)6%23
FOLDERSINTHE7INDOWSDIRECTORYNote: Windows® XP and 2000 will rename .inf files that have not
received WHQL certification into oem.inf files (e.g., oem1.inf).
4HECOMPUTERDOESNOTRECOGNIZETHE7!!7IRELESS!DAPTER
s#HECKTHATTHE,%$INDICATORSFORTHEBROADBANDMODEMAREINDICATINGNORMALACTIVITY)FNOTTHERE
may be a problem with the broadband connection.
s#HECKTHATTHE,%$INDICATORSONTHEWIRELESSROUTERAREFUNCTIONINGPROPERLY)FNOTCHECKTHATTHE
AC power and Ethernet cables are firmly connected.
s#HECKTHATTHE)0!DDRESSSUBNETMASKGATEWAYAND$.3SETTINGSARECORRECTLYENTEREDFORTHE
network.
4HECOMPUTERWITHTHE7!!INSTALLEDISUNABLETOCONNECTTOTHEWIRELESSNETWORKANDORTHE)NTERNET

55D-Link WA525A1 User Manual
Section 5 - Troubleshooting
s)N)NFRASTRUCTUREMODEMAKESURETHESAME3ERVICE3ET)DENTIlER33)$ISSPECIlEDONTHE
SETTINGSFORTHEWIRELESSCLIENTSANDACCESSPOINTS4HE33)$FACTORYDEFAULTSETTINGFOR$,INK
PRODUCTSISDEFAULT
s)N!D(OC mode, both wireless clients will need to have the same 33)$. Please note that it might
be necessary to set up one client to establish a BSS (Basic Service Set)ANDWAITBRIEmYBEFORE
SETTINGUPOTHERCLIENTS4HISPREVENTSSEVERALCLIENTSFROMTRYINGTOESTABLISHABSS at the same
time, which can result in multiple singular BSSs being established, rather than a single BSS with
multiple clients associated to it.
s#HECKTHATTHENetwork ConnectionFORTHEWIRELESSCLIENTISCONlGUREDPROPERLY3ELECT!0
)NFRASTRUCTURE when connecting to an access point and select !D(OCMODE when connecting
without an access point. Double-click on the 7,!.ICON in the taskbar > click on Configuration to
CHANGETHESETTINGSFORTHEWIRELESSADAPTER
s
)FSecurity is enabled, make sure that the correct encryption keys are entered on both the WA525A1
and the access point. Double-click on the 7,!. icon in the taskbar > click Encryption. Check
to see that the key selected is set to the same key as other devices on the network.
sMove the WA525A1 and Access Point or Wireless router into the same room and then test the
wireless connection.
s#HANGETHECHANNELOFTHE!CCESS0OINT
s-OVEDEVICESWITHINTHELINEOFSIGHT
(OWCAN)TROUBLESHOOTDISTANCEISSUESUSINGTHE7!!

56D-Link WA525A1 User Manual
Appendix A - Wireless Basics
D-Link wireless products are based on industry standards to provide easy-to-use and compatible high-speed wireless
connectivity within your home, business or public access wireless networks. Strictly adhering to the IEEE standard,
THE$,INKWIRELESSFAMILYOFPRODUCTSWILLALLOWYOUTOSECURELYACCESSTHEDATAYOUWANTWHENANDWHEREYOUWANT
IT9OUWILLBEABLETOENJOYTHEFREEDOMTHATWIRELESSNETWORKINGDELIVERS
A wireless local area network (WLAN) is a cellular computer network that transmits and receives data with radio signals
INSTEADOFWIRES7IRELESS,!.SAREUSEDINCREASINGLYINBOTHHOMEANDOFlCEENVIRONMENTSANDPUBLICAREASSUCH
ASAIRPORTSCOFFEESHOPSANDUNIVERSITIES)NNOVATIVEWAYSTOUTILIZE7,!.TECHNOLOGYAREHELPINGPEOPLETOWORKAND
COMMUNICATEMOREEFlCIENTLY)NCREASEDMOBILITYANDTHEABSENCEOFCABLINGANDOTHERlXEDINFRASTRUCTUREHAVEPROVEN
TOBEBENElCIALFORMANYUSERS
Wireless users can use the same applications they use on a wired network. Wireless adapter cards used on laptop
and desktop systems support the same protocols as Ethernet adapter cards.
5NDERMANYCIRCUMSTANCESITMAYBEDESIRABLEFORMOBILENETWORKDEVICESTOLINKTOACONVENTIONAL%THERNET,!.IN
order to use servers, printers or an Internet connection supplied through the wired LAN. A Wireless Router is a device
used to provide this link.
Wireless Basics

57D-Link WA525A1 User Manual
Appendix A - Wireless Basics
7HATIS7IRELESS
7IRELESSOR7I&ITECHNOLOGYISANOTHERWAYOFCONNECTINGYOURCOMPUTERTOTHENETWORKWITHOUTUSINGWIRES7I&I
USESRADIOFREQUENCYTOCONNECTWIRELESSLYSOYOUHAVETHEFREEDOMTOCONNECTCOMPUTERSANYWHEREINYOURHOME
OROFlCENETWORK
7HY$,INK7IRELESS?
$,INK IS THE WORLDWIDE LEADER AND AWARD WINNING DESIGNER DEVELOPER AND MANUFACTURER OF NETWORKING PRODUCTS
$,INKDELIVERSTHEPERFORMANCEYOUNEEDATAPRICEYOUCANAFFORD$,INKHASALLTHEPRODUCTSYOUNEEDTOBUILDYOUR
network.
(OWDOESWIRELESSWORK
7IRELESSWORKSSIMILARTOHOWCORDLESSPHONEWORKTHROUGHRADIOSIGNALSTOTRANSMITDATAFROMONEPOINT!TOPOINT
B. But wireless technology has restrictions as to how you can access the network. You must be within the wireless
NETWORKRANGEAREATOBEABLETOCONNECTYOURCOMPUTER4HEREARETWODIFFERENTTYPESOFWIRELESSNETWORKS7IRELESS
Local Area Network (WLAN), and Wireless Personal Area Network (WPAN).
7IRELESS,OCAL!REA.ETWORK7,!.
In a wireless local area network, a device called an Access Point (AP) connects computers to the network. The access
POINTHASASMALLANTENNAATTACHEDTOITWHICHALLOWSITTOTRANSMITDATABACKANDFORTHOVERRADIOSIGNALS7ITHAN
INDOORACCESSPOINTASSEENINTHEPICTURETHESIGNALCANTRAVELUPTOFEET7ITHANOUTDOORACCESSPOINTTHESIGNAL
CANREACHOUTUPTOMILESTOSERVEPLACESLIKEMANUFACTURINGPLANTSINDUSTRIALLOCATIONSCOLLEGEANDHIGHSCHOOL
CAMPUSESAIRPORTSGOLFCOURSESANDMANYOTHEROUTDOORVENUES

58D-Link WA525A1 User Manual
Appendix A - Wireless Basics
7IRELESS0ERSONAL!REA.ETWORK70!.
"LUETOOTHISTHEINDUSTRYSTANDARDWIRELESSTECHNOLOGYUSEDFOR70!."LUETOOTHDEVICESIN70!.OPERATEINARANGE
UPTOFEETAWAY
#OMPAREDTO7,!.THESPEEDANDWIRELESSOPERATIONRANGEAREBOTHLESSTHAN7,!.BUTINRETURNITDOESNTUSE
NEARLYASMUCHPOWERWHICHMAKESITIDEALFORPERSONALDEVICESSUCHASMOBILEPHONES0$!SHEADPHONESLAPTOPS
speakers, and other devices that operate on batteries.
7HOUSESWIRELESS
7IRELESSTECHNOLOGYASBECOMESOPOPULARINRECENTYEARSTHATALMOSTEVERYONEISUSINGITWHETHERITSFORHOME
OFlCEBUSINESS$,INKHASAWIRELESSSOLUTIONFORIT
(OME
s'IVESEVERYONEATHOMEBROADBANDACCESS
s3URFTHEWEBCHECKEMAILINSTANTMESSAGEANDETC
s'ETSRIDOFTHECABLESAROUNDTHEHOUSE
s3IMPLEANDEASYTOUSE
3MALL/FlCEAND(OME/FlCE
s3TAYONTOPOFEVERYTHINGATHOMEASYOUWOULDATOFlCE
s2EMOTELYACCESSYOUROFlCENETWORKFROMHOME
s3HARE)NTERNETCONNECTIONANDPRINTERWITHMULTIPLECOMPUTERS
s.ONEEDTODEDICATEOFlCESPACE

59D-Link WA525A1 User Manual
Appendix A - Wireless Basics
7HEREISWIRELESSUSED
7IRELESSTECHNOLOGYISEXPANDINGEVERYWHERENOTJUSTATHOMEOROFlCE0EOPLELIKETHEFREEDOMOFMOBILITYANDITS
BECOMINGSOPOPULARTHATMOREANDMOREPUBLICFACILITIESNOWPROVIDEWIRELESSACCESSTOATTRACTPEOPLE4HEWIRELESS
connection in public places is usually called “hotspots”.
5SINGA$,INKWIRELESSDESKTOPADAPTERWITHYOURLAPTOPYOUCANACCESSTHEHOTSPOTTOCONNECTTO)NTERNETFROM
REMOTELOCATIONSLIKE!IRPORTS(OTELS#OFFEE3HOPS,IBRARIES2ESTAURANTSAND#ONVENTION#ENTERS
7IRELESSNETWORKISEASYTOSETUPBUTIFYOUREINSTALLINGITFORTHElRSTTIMEITCOULDBEQUITEATASKNOTKNOWINGWHERETO
START4HATSWHYWEVEPUTTOGETHERAFEWSETUPSTEPSANDTIPSTOHELPYOUTHROUGHTHEPROCESSOFSETTINGUPAWIRELESS
network.
Tips
(EREAREAFEWTHINGSTOKEEPINMINDWHENYOUINSTALLAWIRELESSNETWORK
#ENTRALIZEYOURROUTEROR!CCESS0OINT
-AKESUREYOUPLACETHEROUTERACCESSPOINTINACENTRALIZEDLOCATIONWITHINYOURNETWORKFORTHEBESTPERFORMANCE4RY
to place the router/access point as high as possible in the room, so the signal gets dispersed throughout your home.
)FYOUHAVEATWOSTORYHOMEYOUMAYNEEDAREPEATERTOBOOSTTHESIGNALTOEXTENDTHERANGE
%LIMINATE)NTERFERENCE
0LACEHOMEAPPLIANCESSUCHASCORDLESSTELEPHONESMICROWAVESANDTELEVISIONSASFARAWAYASPOSSIBLEFROMTHE
ROUTERACCESSPOINT4HISWOULDSIGNIlCANTLYREDUCEANYINTERFERENCETHATTHEAPPLIANCESMIGHTCAUSESINCETHEYOPERATE
ONSAMEFREQUENCY

60D-Link WA525A1 User Manual
Appendix A - Wireless Basics
Security
$ONTLETYOUNEXTDOORNEIGHBORSORINTRUDERSCONNECTTOYOURWIRELESSNETWORK3ECUREYOURWIRELESSNETWORKBYTURNING
ONTHE70!OR7%0SECURITYFEATUREONTHEROUTER2EFERTOPRODUCTMANUALFORDETAILINFORMATIONONHOWTOSETITUP
4HEREAREBASICALLYTWOMODESOFNETWORKING
s)NFRASTRUCTUREn!LLWIRELESSCLIENTSWILLCONNECTTOANACCESSPOINTORWIRELESSROUTER
s!D(OC n $IRECTLY CONNECTING TO ANOTHER COMPUTER FOR PEERTOPEER COMMUNICATION USING WIRELESS
network adapters on each computer, such as two or more WA525A1 wireless network wireless desktop
adapters.
!N)NFRASTRUCTURENETWORKCONTAINSAN!CCESS0OINTORWIRELESSROUTER!LLTHEWIRELESSDEVICESORCLIENTSWILLCONNECT
to the wireless router or access point.
An Ad-Hoc network contains only clients, such as laptops with wireless desktop adapters. All the adapters must be in
Ad-Hoc mode to communicate.
Wireless Modes

61D-Link WA525A1 User Manual
Appendix B - Networking Basics
Networking Basics
Check your IP address
!FTERYOUINSTALLYOURNEW$,INKWIRELESSADAPTERANDHAVEESTABLISHEDAWIRELESSCONNECTIONBYDEFAULTTHE4#0)0
SETTINGSSHOULDBESETTOOBTAINAN)0ADDRESSFROMA$(#0SERVERIEROUTERAUTOMATICALLY4OVERIFYYOUR)0ADDRESS
PLEASEFOLLOWTHESTEPSBELOW
Windows®805SERS
s #LICKONStart > 2UN. In the run box type cmd and click OK.
s !TTHEPROMPTTYPEipconfig and press Enter.
s 4HISWILLDISPLAYTHE)0ADDRESSSUBNETMASKANDTHEDEFAULTGATEWAYOFYOUR
adapter.
Windows®7INDOWS6ISTA®5SERS
s #LICKStart > !LL0ROGRAMS > !CCESSORIES > #OMMAND0ROMPT. You may
need administrative access to run this application.
s &ORALLADDITIONALPROMPTWINDOWSINQUIRINGOFRUNNINGTHECOMMANDPROMPT
application, select Yes,OK, or Continue.
s !TTHEPROMPTTYPEipconfig and press Enter.
s 4HISWILLDISPLAYTHE)0ADDRESSSUBNETMASKANDDEFAULTGATEWAYOFYOUR
adapter.
)FTHEADDRESSISCHECKYOURADAPTERINSTALLATIONSECURITYSETTINGSANDTHESETTINGSONYOURROUTER3OMElREWALLSOFTWAREPROGRAMS
may block a DHCP request on newly installed adapters.
62D-Link WA525A1 User Manual
Appendix B - Networking Basics
Statically Assign an IP address
)FYOUARENOTUSINGA$(#0CAPABLEGATEWAYROUTERORYOUNEEDTOASSIGNASTATIC)0ADDRESSPLEASEFOLLOWTHESTEPS
BELOW
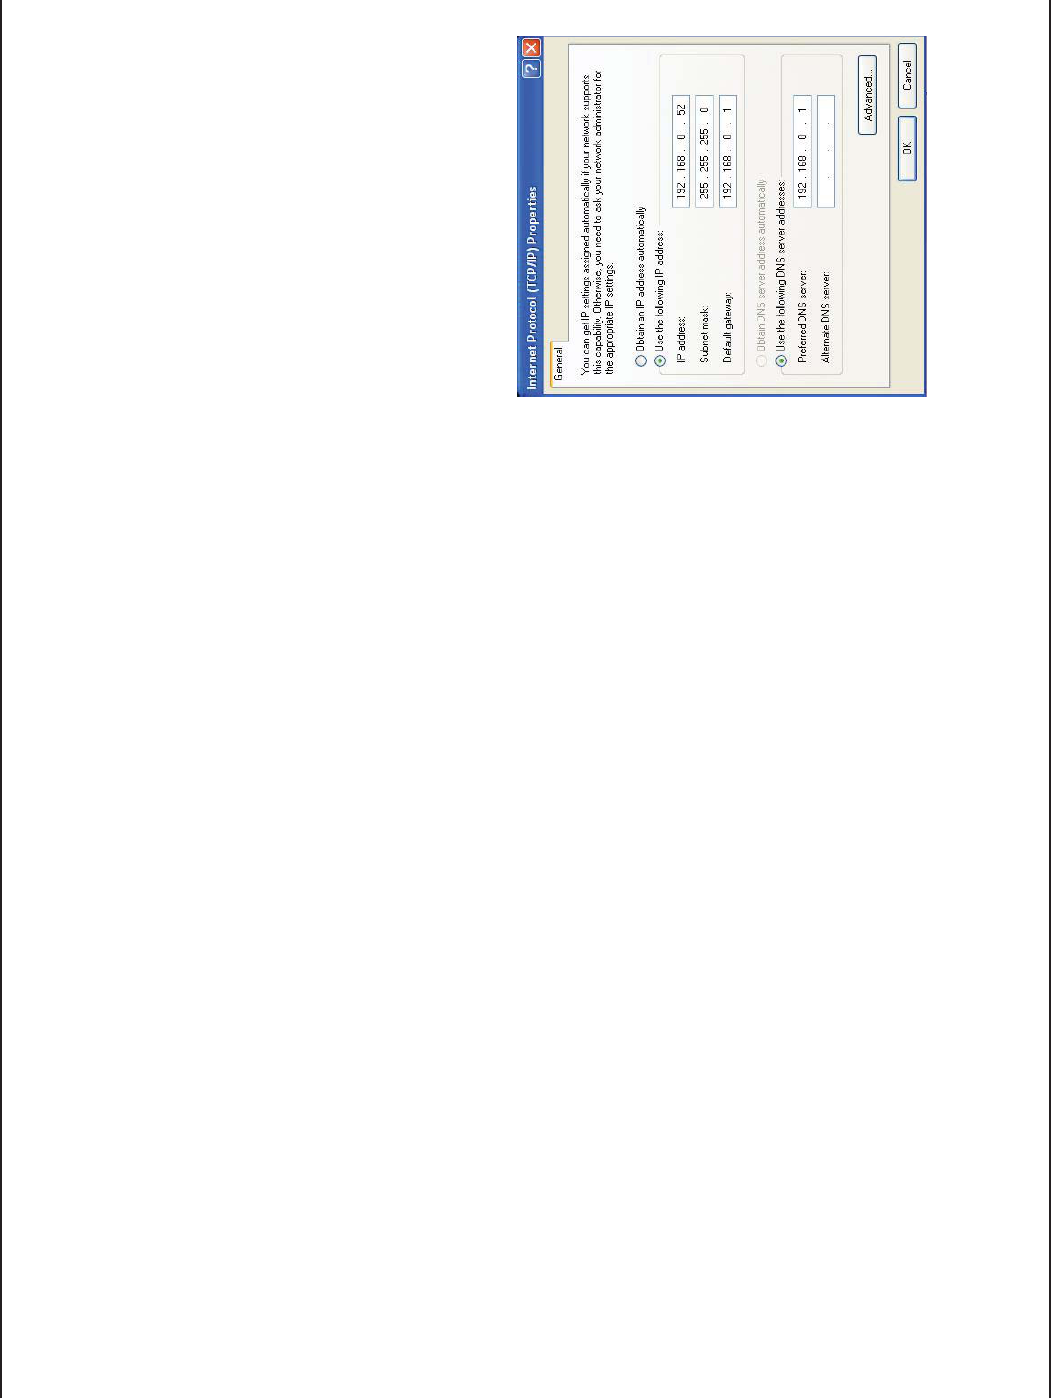
Windows® XP/2000 Users
s Windows® XP - Click on Start > Control Panel. Make sure you are in Classic View. Double-click on the Network Connections
icon.
Windows®n&ROMTHEDESKTOPRIGHTCLICKMy Network Places > Properties.
s 2IGHTCLICKONTHE,OCAL!REA#ONNECTION which represents your D-Link wireless network adapter (or other adapter) which will
be connected to your router.
s (IGHLIGHT)NTERNET0ROTOCOL4#0)0 and click Properties.
s #LICK5SETHEFOLLOWING)0ADDRESS and enter an IP address that is on the same subnet
as your network or LAN IP address on your router.
%XAMPLE)FTHEROUTERS,!.)0ADDRESSISMAKEYOUR)0ADDRESS8
where X is a number between 2 and 99. Make sure that the number you choose is not
in use on the network.
s 3ET$EFAULT'ATEWAYTHESAMEASTHE,!.)0ADDRESSOFYOURROUTERORGATEWAY
s 3ET0RIMARY$.3THESAMEASTHE,!.)0ADDRESSOFYOURROUTERORGATEWAY
s 4HE3ECONDARY$.3ISOPTIONALYOUMAYENTERA$.3SERVERFROMYOUR)30
s #LICKOK to save your settings.
63D-Link WA525A1 User Manual
Appendix B - Networking Basics
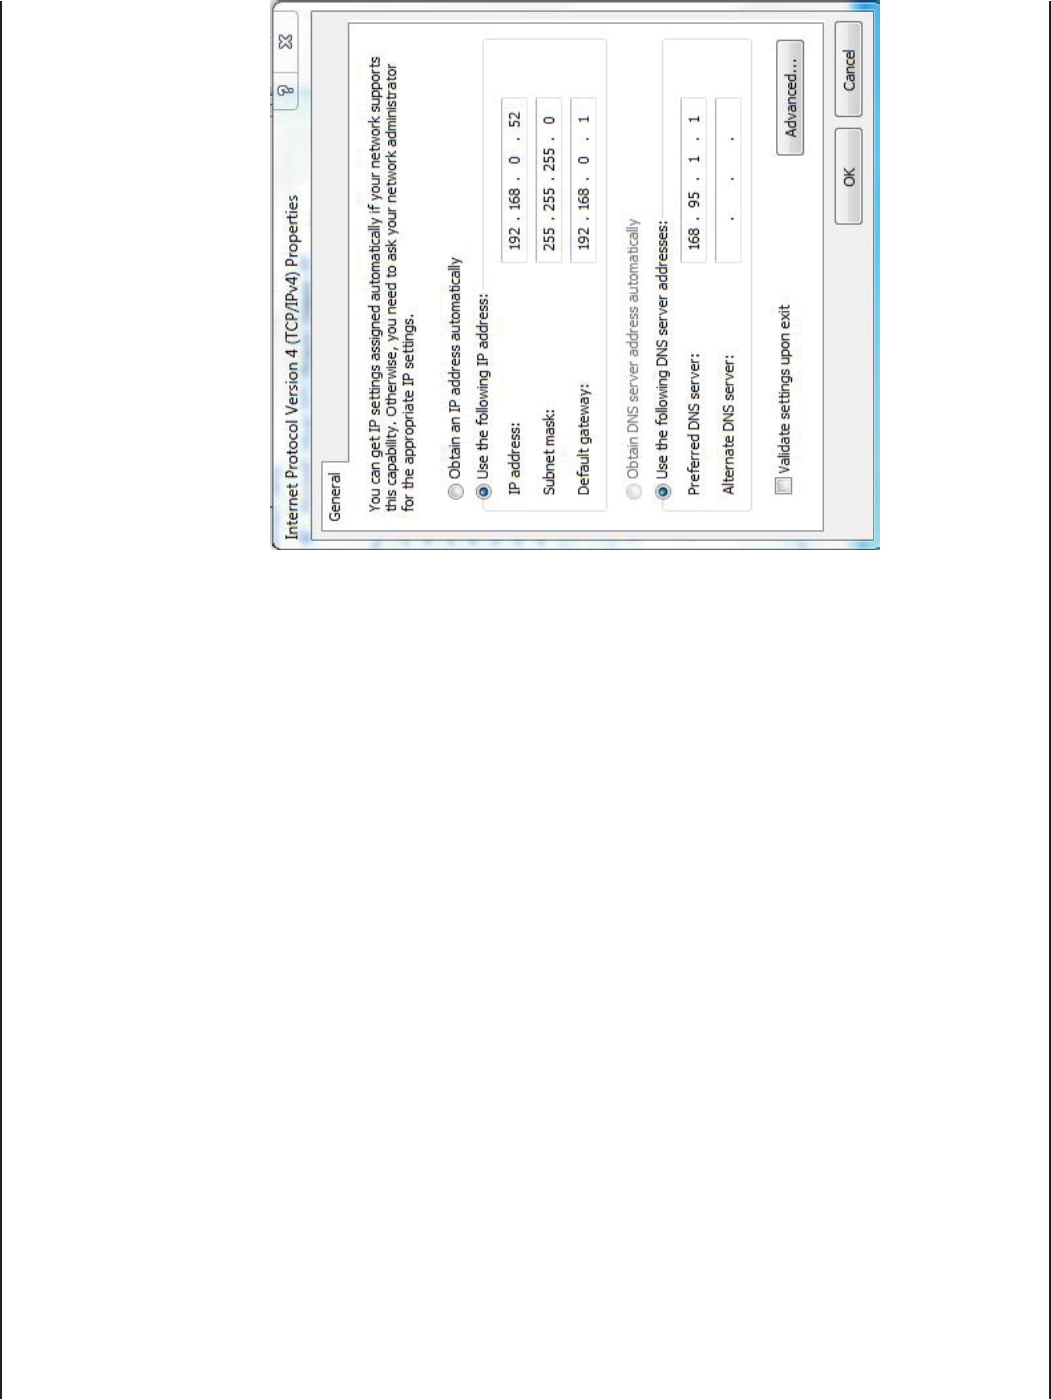
Windows® 7/Windows Vista® Users
s #LICKONStart > Control Panel. Make sure you are in Classic View. Double-click on the Network and Sharing Center icon. Along
THELEFTPANELINTHEWINDOWCLICKONManage network connections.
s 2IGHTCLICKONTHE,OCAL!REA#ONNECTION which represents your D-Link wireless network adapter which will be connected to your
network.
s (IGHLIGHT)NTERNET0ROTOCOL6ERSION4#0)0V and click Properties.
s #LICK5SETHEFOLLOWING)0ADDRESS and enter an IP address that is on
the same subnet as your network or LAN IP address on your router or
network.
%XAMPLE )F THE ROUTERS ,!. )0 ADDRESS IS MAKE YOUR )0
address 192.168.0.X where X is a number between 2 and 99. Make sure
that the number you choose is not in use on the network.
s 3ET$EFAULT'ATEWAYTHESAMEASTHE,!.)0ADDRESSOFYOURROUTEROR
gateway.
s 3ET 0RIMARY $.3 THE SAME AS THE ,!. )0 ADDRESS OF YOUR ROUTER OR
gateway.
s 4HE3ECONDARY$.3ISOPTIONALYOUMAYENTERA$.3SERVERFROMYOUR
ISP).
s #LICKOK to save your settings.

64D-Link WA525A1 User Manual
Appendix C - Technical Specifications
Technical Specifications
3TANDARDS
s)%%%G
s)%%%N
Security
s70!70!7I&I0ROTECTED!CCESS4+)0-)#
IV Expansion, Shared Key Authentication)
sBIT7%0
s7037I&I0ROTECTED
&REQUENCY2ANGE
s'(ZTO'(Z
%XTERNAL!NTENNA4YPE
s$IPOLEWITHDETACHABLEREVERSE3-!CONNECTOR
/PERATING4EMPERATURE
s#TO#
(UMIDITY
sMAXIMUMNONCONDENSING
$IMENSIONS
s,X7X(XXMMXXINCHES
Weight
sLBG
Warranty
s9EAR
sMaximum wireless signal rate derived from IEEE Standard 802.11g and 802.11n
specifications. Actual data throughput will vary. Network conditions and environmental
factors, including volume of network traffic, building materials and construction, and
network overhead, lower actual data throughput rate. Environmental factors will adversely
affect wireless signal range.

65D-Link WA525A1 User Manual
Appendix E - Warranty
&EDERAL#OMMUNICATION#OMMISSION)NTERFERENCE3TATEMENT
4HISEQUIPMENTHASBEENTESTEDANDFOUNDTOCOMPLYWITHTHELIMITSFORA#LASS"DIGITALDEVICEPURSUANTTO0ARTOFTHE&##2ULES
4HESE LIMITS ARE DESIGNED TO PROVIDE REASONABLE PROTECTION AGAINST HARMFUL INTERFERENCE IN A RESIDENTIAL INSTALLATION4HIS EQUIPMENT
GENERATESUSESANDCANRADIATERADIOFREQUENCYENERGYANDIFNOTINSTALLEDANDUSEDINACCORDANCEWITHTHEINSTRUCTIONSMAYCAUSE
HARMFULINTERFERENCETORADIOCOMMUNICATIONS(OWEVERTHEREISNOGUARANTEETHATINTERFERENCEWILLNOTOCCURINAPARTICULARINSTALLATION
)FTHISEQUIPMENTDOESCAUSEHARMFULINTERFERENCETORADIOORTELEVISIONRECEPTIONWHICHCANBEDETERMINEDBYTURNINGTHEEQUIPMENTOFF
ANDONTHEUSERISENCOURAGEDTOTRYTOCORRECTTHEINTERFERENCEBYONEOFTHEFOLLOWINGMEASURES
- Reorient or relocate the receiving antenna.
- Increase the separation between the equipment and receiver.
#ONNECTTHEEQUIPMENTINTOANOUTLETONACIRCUITDIFFERENTFROMTHATTOWHICHTHERECEIVERISCONNECTED
#ONSULTTHEDEALERORANEXPERIENCEDRADIO46TECHNICIANFORHELP
&###AUTION!NYCHANGESORMODIlCATIONSNOTEXPRESSLYAPPROVEDBYTHEPARTYRESPONSIBLEFORCOMPLIANCECOULD
VOIDTHEUSERSAUTHORITYTOOPERATETHISEQUIPMENT
4HISDEVICECOMPLIESWITH0ARTOFTHE&##2ULES/PERATIONISSUBJECTTOTHEFOLLOWINGTWOCONDITIONS4HISDEVICE
MAYNOTCAUSEHARMFULINTERFERENCEANDTHISDEVICEMUSTACCEPTANYINTERFERENCERECEIVEDINCLUDINGINTERFERENCE
that may cause undesired operation.
)-0/24!.4./4%
&##2ADIATION%XPOSURE3TATEMENT
4HISEQUIPMENTCOMPLIESWITH&##RADIATIONEXPOSURELIMITSSETFORTHFORANUNCONTROLLEDENVIRONMENT%NDUSERSMUSTFOLLOWTHESPECIlC
OPERATINGINSTRUCTIONSFORSATISFYING2&EXPOSURECOMPLIANCE4OMAINTAINCOMPLIANCEWITH&##2&EXPOSURECOMPLIANCEREQUIREMENTS
PLEASEFOLLOWOPERATIONINSTRUCTIONASDOCUMENTEDINTHISMANUAL
This transmitter must not be co-located or operating in conjunction with any other antenna or transmitter.
4HEAVAILABILITYOFSOMESPECIlCCHANNELSANDOROPERATIONALFREQUENCYBANDSARECOUNTRYDEPENDENTANDARElRMWAREPROGRAMMEDAT
THEFACTORYTOMATCHTHEINTENDEDDESTINATION4HElRMWARESETTINGISNOTACCESSIBLEBYTHEENDUSER
)NDUSTRY#ANADA.OTICE
This device complies with Canadian RSS-210
“This Class B digital apparatus complies with Candadian ICES-003”

66D-Link WA525A1 User Manual
Appendix E - Warranty
#ETAPPAREILNUM£RIQUEDELACLASSE"ESTCONFORMEÜLANORME.-"DU#ANADA
)#STATEMENT
/PERATIONISSUBJECTTOTHEFOLLOWINGTWOCONDITIONS
4HISDEVICEMAYNOTCAUSEINTERFERENCEAND
4HISDEVICEMUSTACCEPTANYINTERFERENCEINCLUDINGINTERFERENCETHATMAYCAUSEUNDESIREDOPERATIONOFTHEDEVICE
4HISDEVICEHASBEENDESIGNEDTOOPERATEWITHANANTENNAHAVINGAMAXIMUMGAINOFD"I!NTENNAHAVINGAHIGHERGAINISSTRICTLY
PROHIBITEDPERREGULATIONSOF)NDUSTRY#ANADA4HEREQUIREDANTENNAIMPEDANCEISOHMS
)-0/24!.4./4%
)#2ADIATION%XPOSURE3TATEMENT
4HISEQUIPMENTCOMPLIESWITH)#RADIATIONEXPOSURELIMITSSETFORTHFORANUNCONTROLLEDENVIRONMENT%NDUSERSMUSTFOLLOWTHESPECIlC
OPERATINGINSTRUCTIONSFORSATISFYING2&EXPOSURECOMPLIANCE4HISEQUIPMENTSHOULDBEINSTALLEDANDOPERATEDWITHMINIMUMDISTANCE
20cm between the radiator & your body.
This transmitter must not be co-located or operating in conjunction with any other antenna or transmitter.
2áGLEMENTD)NDUSTRY#ANADA
,ESCONDITIONSDEFONCTIONNEMENTSONTSUJETTESÜDEUXCONDITIONS
#EP£RIPH£RIQUENEDOITPASCAUSERDINTERF£RENCEET
#E P£RIPH£RIQUE DOIT ACCEPTER TOUTE INTERF£RENCE Y COMPRIS LES INTERF£RENCES POUVANT PERTURBER LE BON FONCTIONNEMENT DE CE
périphérique.