D Link WM110A1 IEEE802.16e WiMAX USB adapter User Manual Manual
D Link Corporation IEEE802.16e WiMAX USB adapter Manual
D Link >
Manual

Table of Contents
D-Link DWM-110 User Manual
Table of Contents
Introduction ...........................................................1
Package Contents..............................................2
System Requirements........................................2
Features.............................................................2
Hardware Overview ...........................................3
Hardware Installation .........................................4
Before You Start ................................................4
DWM-110 WiMAX Utility .......................................5
Installing the Utility .............................................5
Accessing the WiMAX Utility (User mode).........8
Using the Utility ..................................................8
Home ..............................................................8
User Profile .................................................... 9
Information ................................................... 10
Radio On/Off ................................................ 12
Connect/Disconnect ..................................... 12
Accessing WiMAX Utility (Advanced Mode).... 13
Using the Utility ............................................... 13
Home............................................................ 13
Profile ........................................................... 14
Information ................................................... 18
Network Search............................................ 20
Technical Specifications..................................... 21
Warning Statements......................................... 212
Chapter 1 – Product Overview
D-Link DWM-110 User Manual 1
Introduction
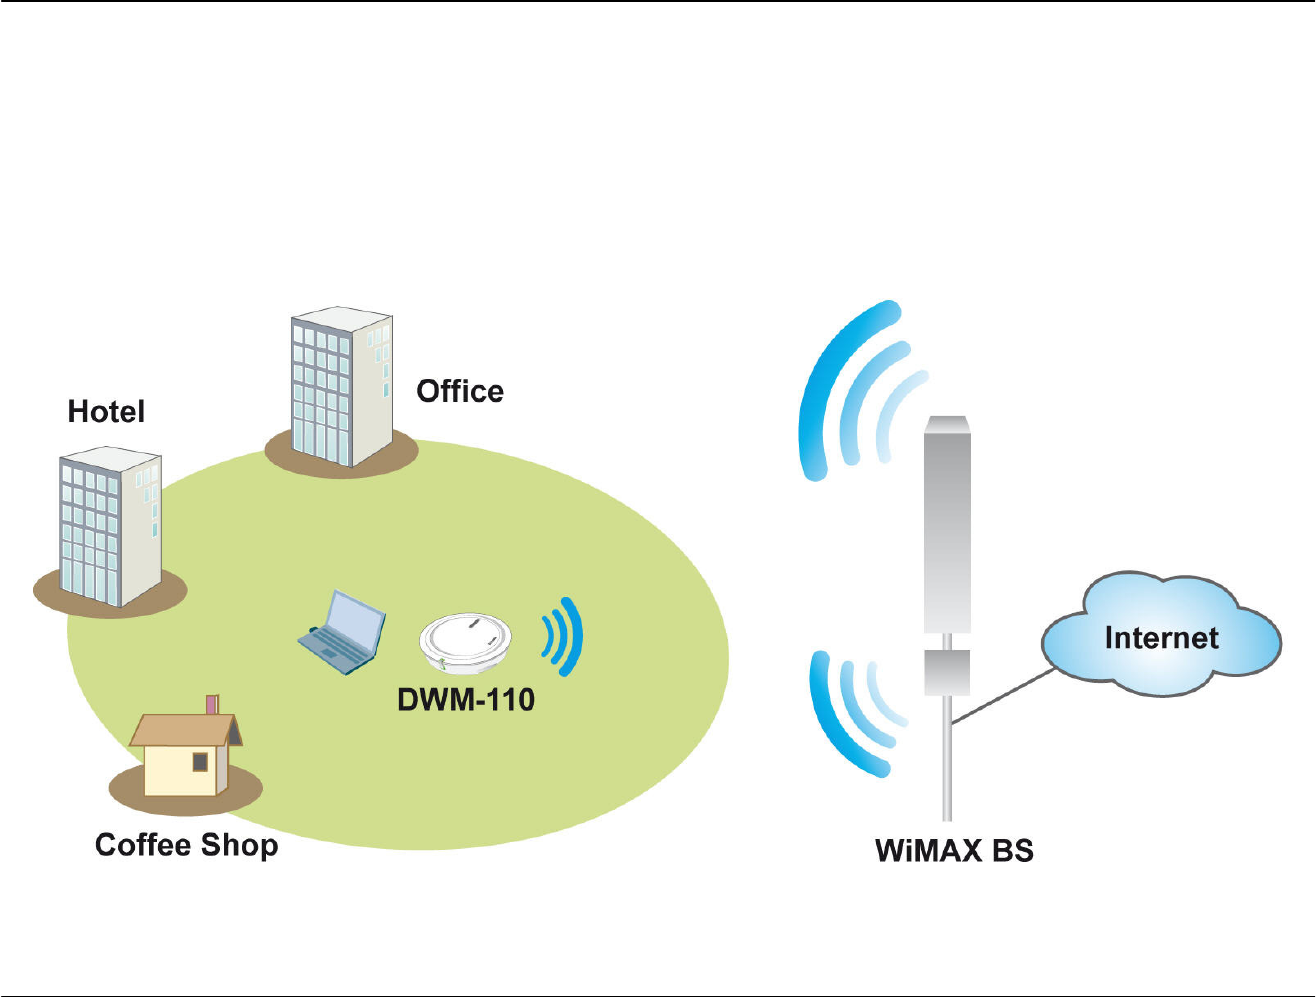
Worldwide Interoperability for Microwave Access (WiMAX) is the 802.16 networking standard that wirelessly provides high
bandwidth at long distances. D-Link DWM-110, with IEEE 802.16e-2005 standard, is a broadband wireless access (BWA) USB
adapter. With simple configurations, you can wirelessly access high-speed Internet via the WiMAX base station (BS) of your
Internet service provider (ISP) within its coverage area. Simply plug the D-Link DWM-110 Adapter into your USB, and get
started.

Chapter 1 – Product Overview
D-Link DWM-110 User Manual 2
Package Contents
• DWM-110 IEEE 802.16e WiMAX USB Adapter
• CD-ROM with User Manual/ WiMAX Utility
System Requirements
• Computer with:
• At least one USB 2.0 port
• Windows XP/Vista
• WiMAX Utility
Features
• Supports IEEE802.16e-2005 Wireless MAN-OFDMA and Wireless HUMAN air interface
• Visual graphic icon and signal strength for connecting and disconnecting WiMAX
• Radio on/off function for when traveling on an airplane or any location that prohibits radio usage
• EAP base authentication for security
Chapter 2 – Overview
D-Link DWM-110 User Manual 3
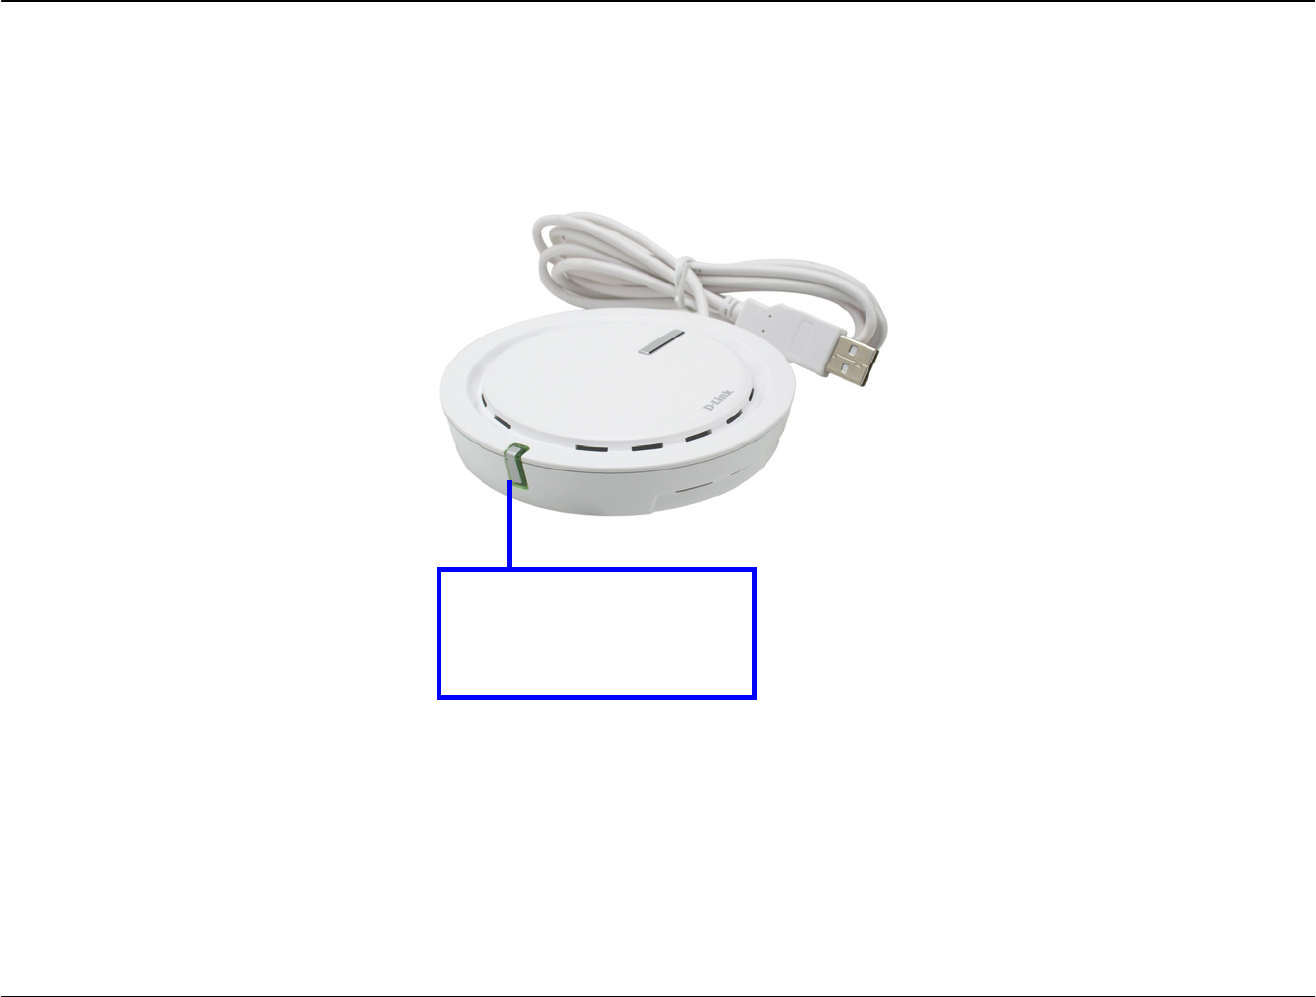
Hardware Overview
Power LED: A steady
green light indicates that
the WiMAX Adapter is
ready for use.

Chapter 2 – Overview
D-Link DWM-110 User Manual 4
Hardware Installation
1. Find an open USB port.
2. Insert the DWM-110 into the USB port.
Note: Make sure that you have installed the WiMAX utility before inserting the adapter into your USB port. The WiMAX utility also
includes the WiMAX adapter driver.
Before You Start
Before starting installation of the device and utility, make sure that you have the following information obtained from your ISP:
• User name/Identity
• Password
• Anonymous Identity (If necessary)
• Frequency (If necessary)
Note: If you need to configure the frequency of WiMAX channels, use WiMAX Utility Advanced mode for configuration.
Chapter 3 – DWM Series WiMAX Utility
D-Link DWM-110 User Manual 5
DWM-110 WiMAX Utility
The WiMAX Utility helps you to configure the settings of the WiMAX adapter. You may need to get the information from your
Internet Service Provider (ISP) in order to connect to the Internet with the WiMAX Adapter.
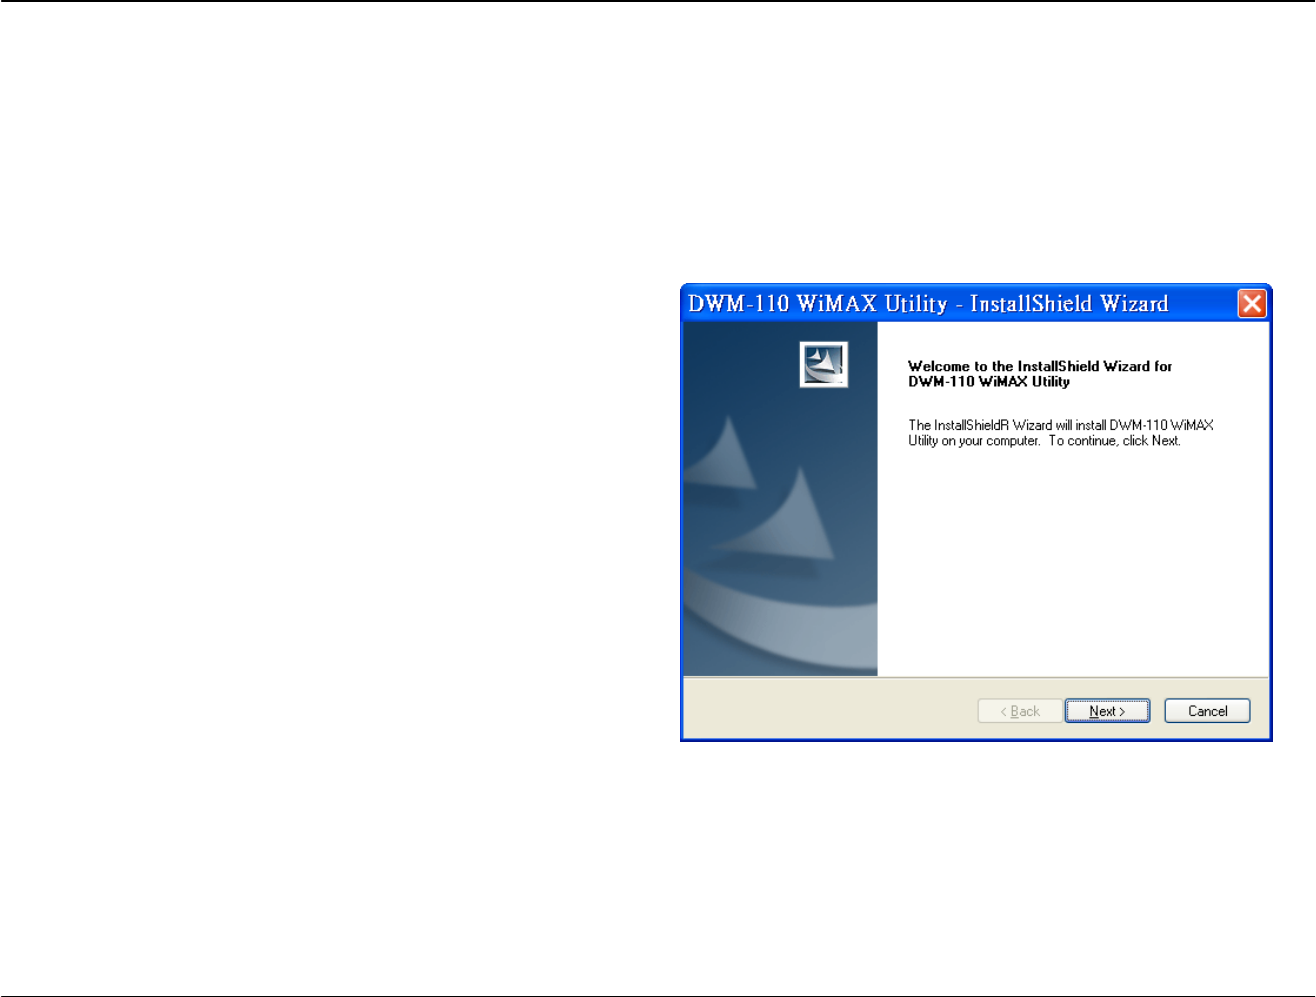
Installing the Utility
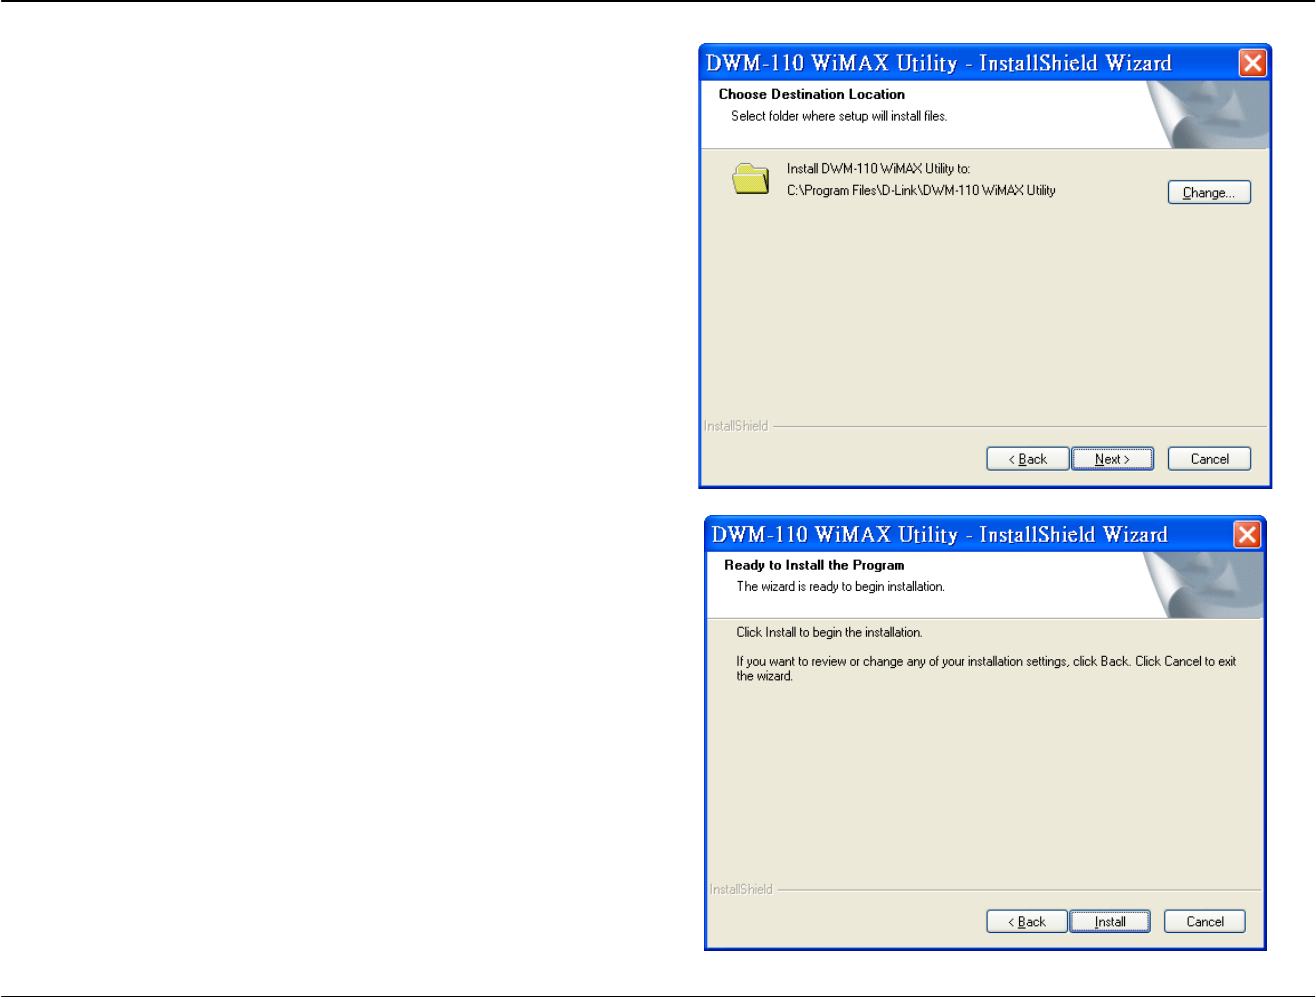
Double-click on the Setup.exe file and the installation
dialog will then box appear. Click Next to proceed.
Chapter 3 – DWM Series WiMAX Utility
D-Link DWM-110 User Manual 6
Choose WiMAX Utility’s destination location by clicking
Change. If you do not need to change the given default
location, click Next.
Click Install to start the installation.
Chapter 3 – DWM Series WiMAX Utility
D-Link DWM-110 User Manual 7
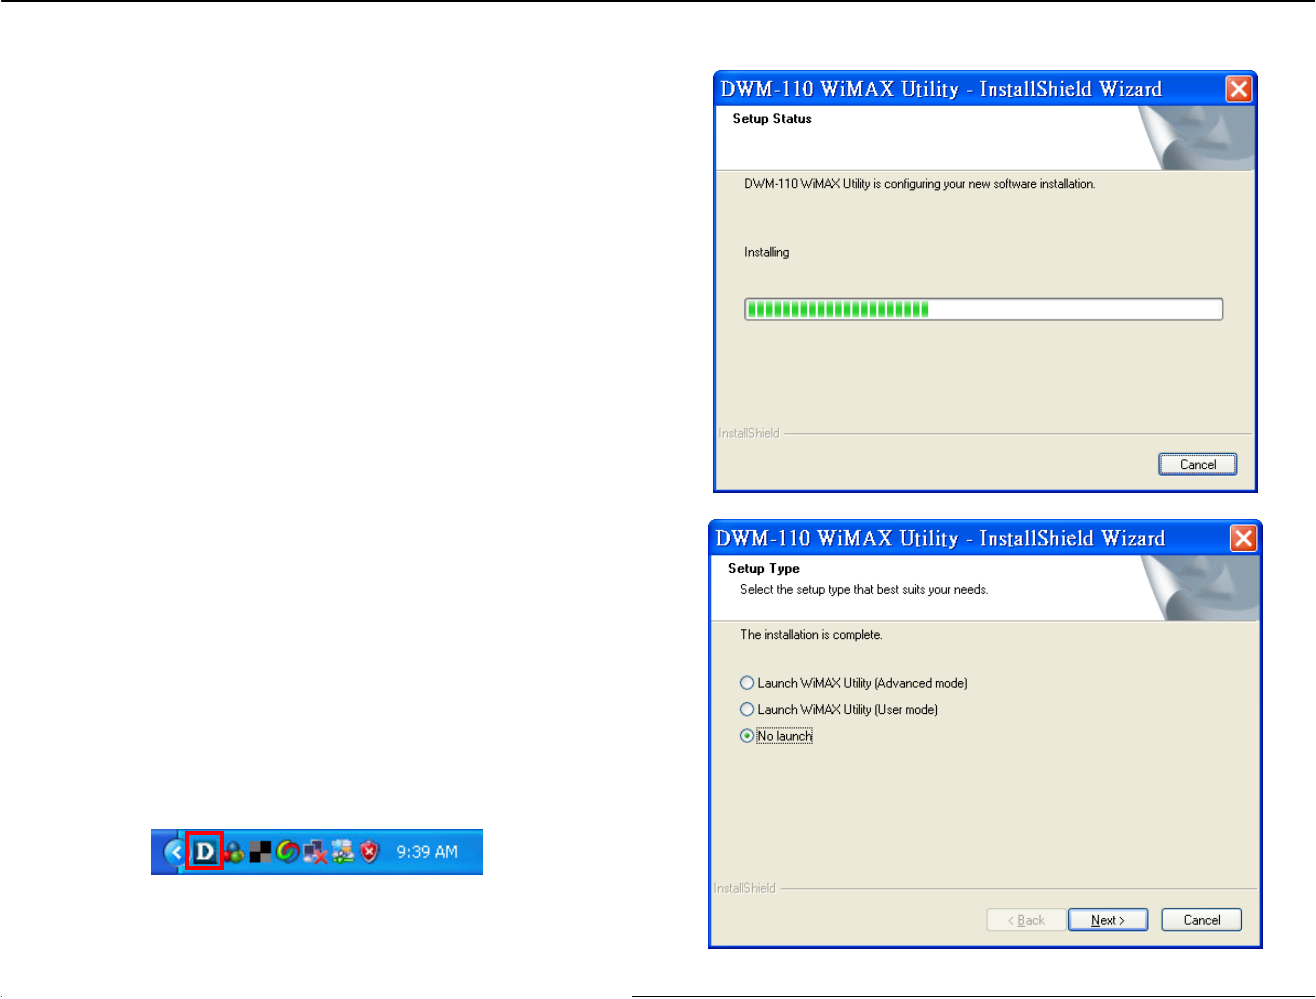
The process bar indicates that the installation is
proceeding.
If you select Launch WiMax Utility (Advanced mode) or
Launch WiMax Utility (User mode), the software will
start after clicking Next. If No launch is selected, the
software will not automatically start, and you can go to
Start > Programs > D-Link > DWM-110 WiMAX
Adapater, and select one of the WiMax Utility modes to
start.
Once the mode is selected, you will see an icon on the
taskbar as shown below. Double-click on the D-Link icon
to open up the WiMax Utility screen.
Hint: It is recommended to use WiMAX Utility (User
mode) unless the ISP suggests to change advanced
settings such as frequency.
Chapter 3 – DWM Series WiMAX Utility
D-Link DWM-110 User Manual 8
Accessing the WiMAX Utility (User mode)
Click Start > Programs > D-Link > DWM-110 WiMAX Adapter > D-Link WiMAX Utility (User mode) to start the utility, or
double-click – located in the taskbar – to start WiMAX Utility (User mode).
Using the Utility
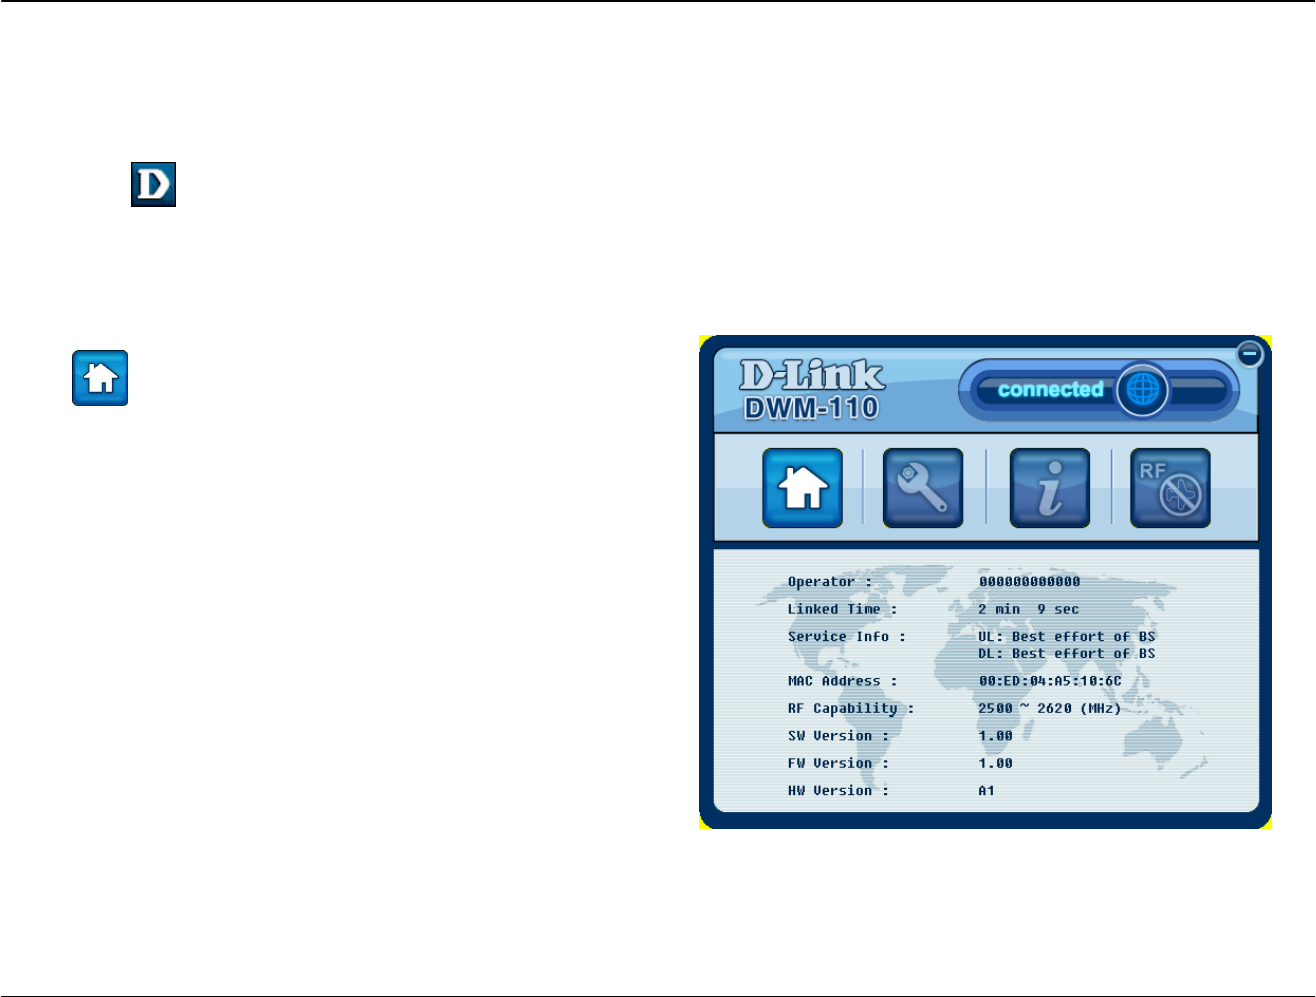
Home
Click to see the home page. This page provides you
with basic information on the WiMAX USB Adapter and its
utility.
Chapter 3 – DWM Series WiMAX Utility
D-Link DWM-110 User Manual 9
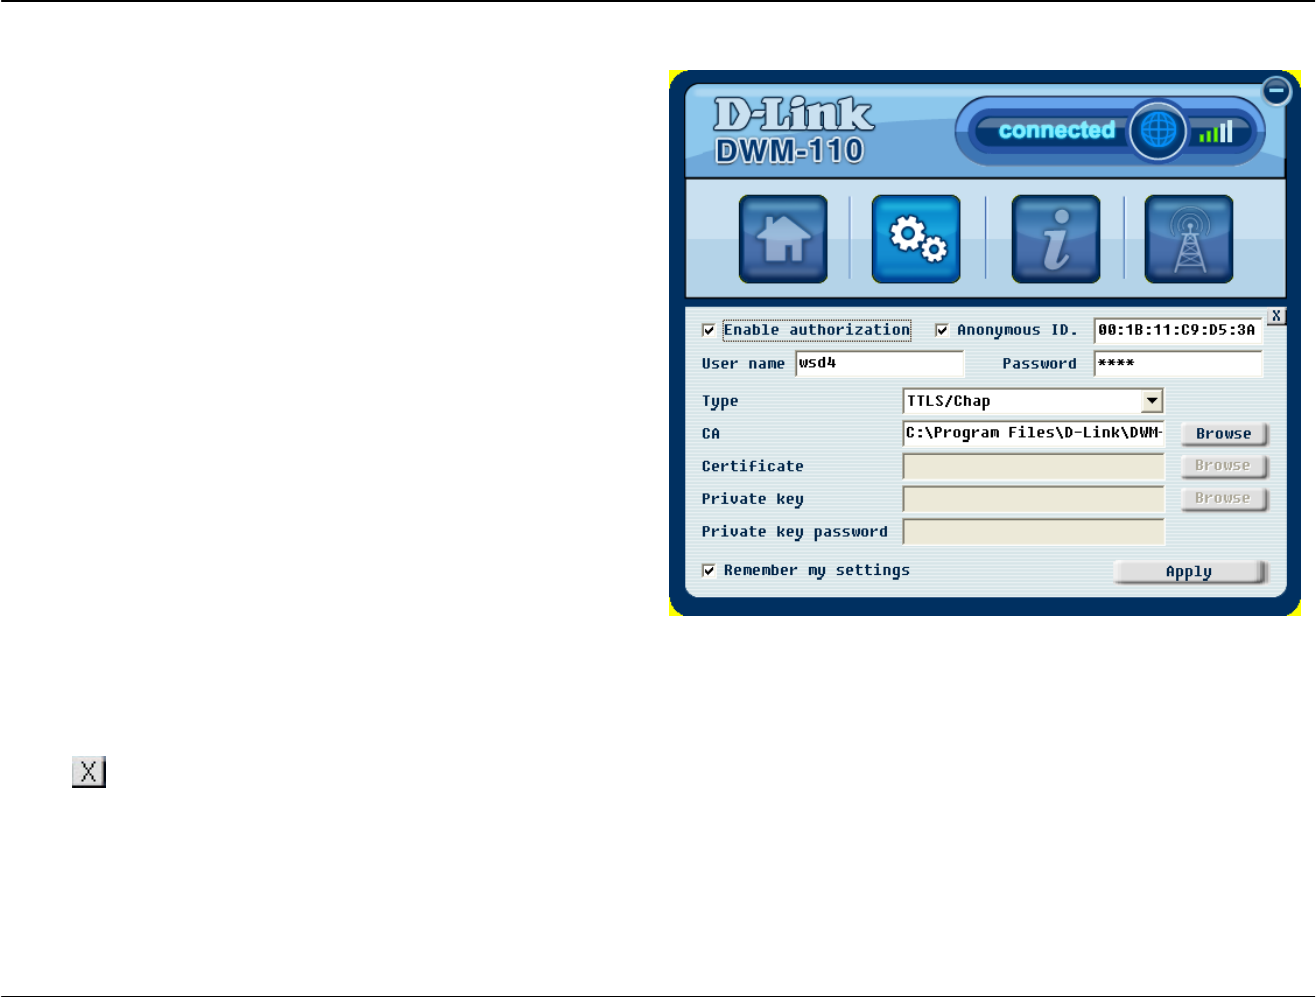
User Profile
Click to see the Authentication page. This page is
for a base station to authenticate the device. The device
supports Extensible Authentication Protocol (EAP).
Information for this page needs to be obtained from your
ISP.
Select Enable authorization for user name, identity and
password entry during usage.
You may select Anonymous ID., and enter the identity if
requested by the ISP.
The CA, Certificate, Private key and Private key
password boxes can be edited depending on the EAP
type that is selected. Click Browse to find a CA, certificate
or private key file to add to the field accordingly.
Note: If you want to change the EAP type, open up
WiMAX Utility (Advanced mode) for configuration.
Select Remember my settings to save personal settings
for future connection.
Click Apply to save your current information.
Chapter 3 – DWM Series WiMAX Utility
D-Link DWM-110 User Manual 10
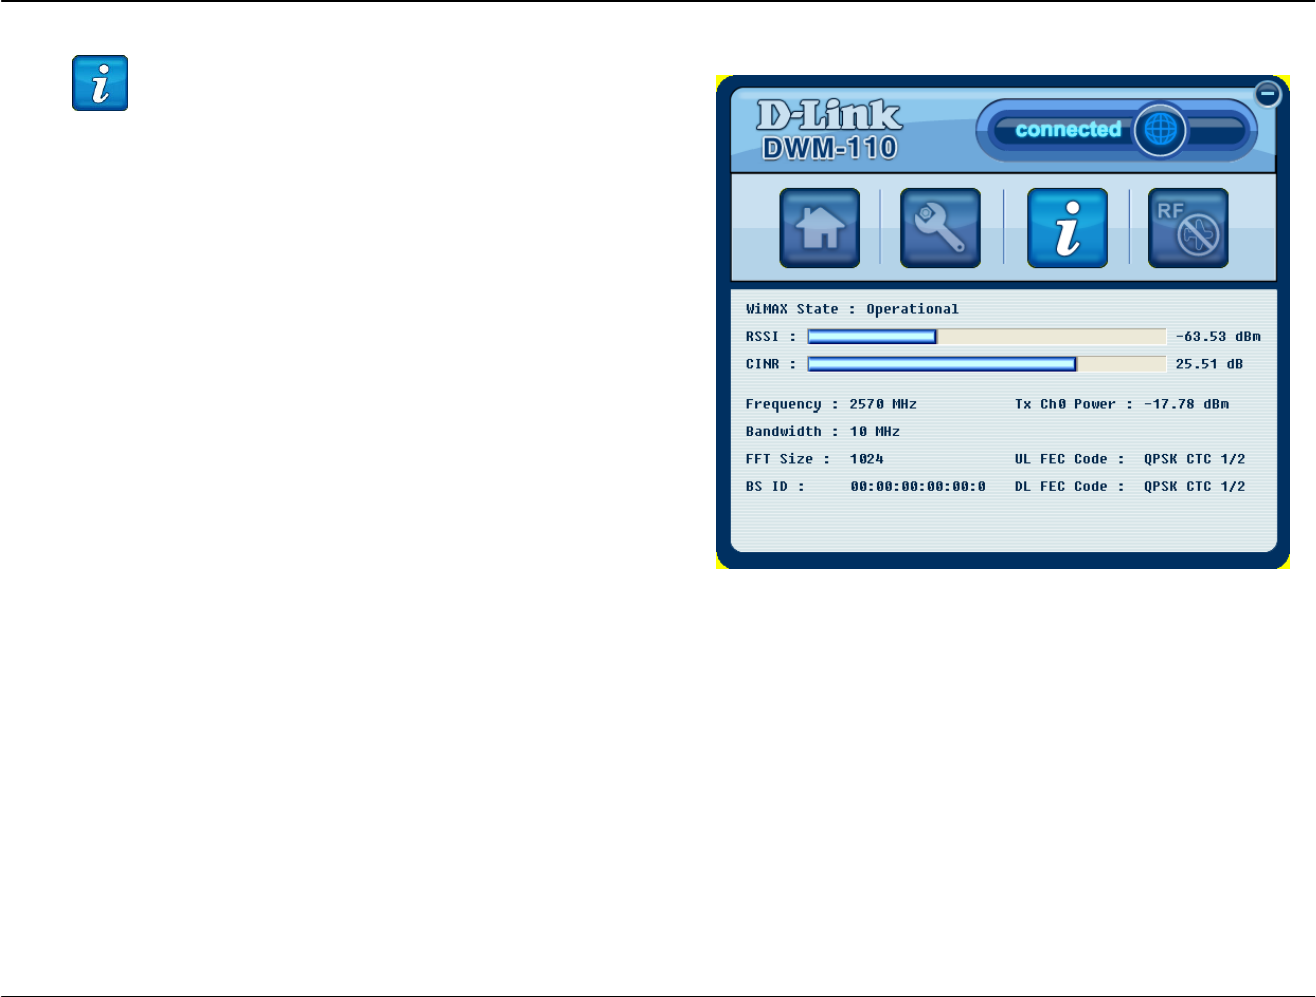
Information
Click to see the information page. This page displays
the status of your WiMAX connection.
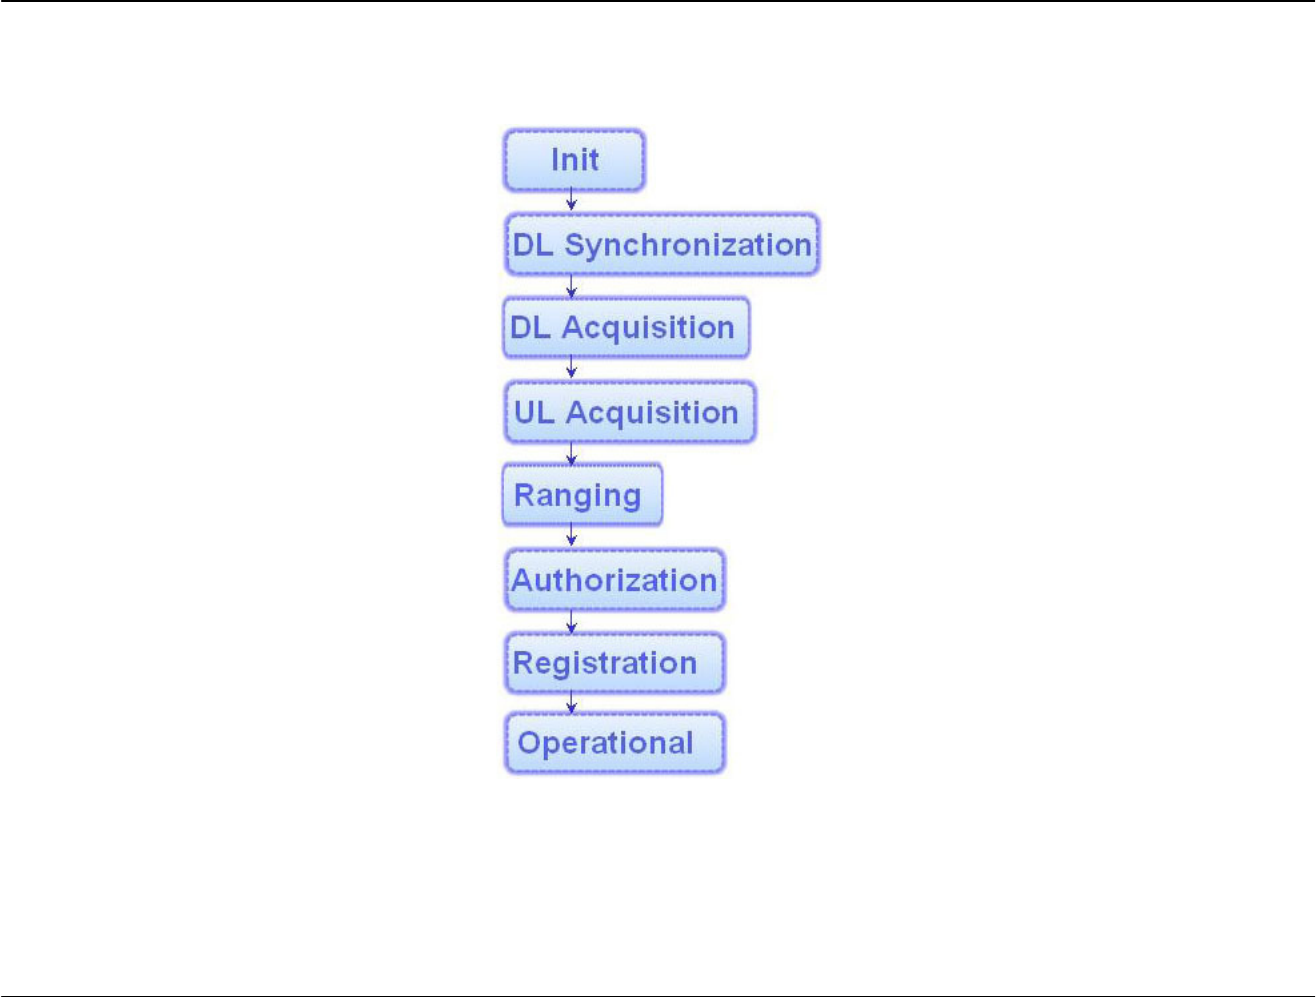
WiMAX State will display one of the following connecting
statuses:
Init: The device is attempting to connect to a base station.
DL Synchronization: The device is receiving downlink
information from a base station.
DL Acquisition: The device is moving from one coverage
area to another, and is receiving downlink information from
another base station.
UL Acquisition: The device is receiving uplink information
from another base station.
Capabilities negotiation:
Ranging: The device is moving from one coverage area to
another, and is attempting to connect to a new base station.
Authorization: The device is sending out authentication.
Registration: The device is registering with a server.
Operational: The device has successfully connected to a
base station and is ready to use.
Idle: The device is in Power Saving mode.
Aborted: The device is not connected to any base
station.
RSSI: Received Signal Strength Indication, which
usually ranges from -100 to 0 dBm.
CINR: Carrier to Interference plus Noise Ratio.
Frequency: The operating frequency of the BS
connection.
Chapter 3 – DWM Series WiMAX Utility
D-Link DWM-110 User Manual 11
The connection flow diagram of the WiMAX Utility (User mode).
Chapter 3 – DWM Series WiMAX Utility
D-Link DWM-110 User Manual 12
Radio On/Off
Connect/Disconnect
Click to turn radio connection on, the button will
then grey out, representing the radio channel is on. Click
the button again to turn the radio channel off.
Click , located at the top-right of the user interface,
to start your WiMAX connection. You will see connected
highlighted to its left when connection is established. Click
the button again to disconnect.

Appendix A – Accessing WiMAX Utility (Advanced Mode)
D-Link DWM-110 User Manual 13
Accessing WiMAX Utility (Advanced Mode)
WiMAX Utility (Advanced mode) offers more manual configurations than standard WiMAX Utility, including the Network Profile
option, extended authentication options, and additional choices of available BS. Consult with a technical staff or the ISP during
configuration for this mode. Click Start > Programs > D-Link > DWM-110 WiMAX Adapter > D-Link WiMAX Utility
(Advanced mode) to start the utility.
Using the Utility
Home
Click to see the home page. This page provides you
with basic information on the WiMAX USB Adapter and its
utility.
Appendix A – Accessing WiMAX Utility (Advanced Mode)
D-Link DWM-110 User Manual 14
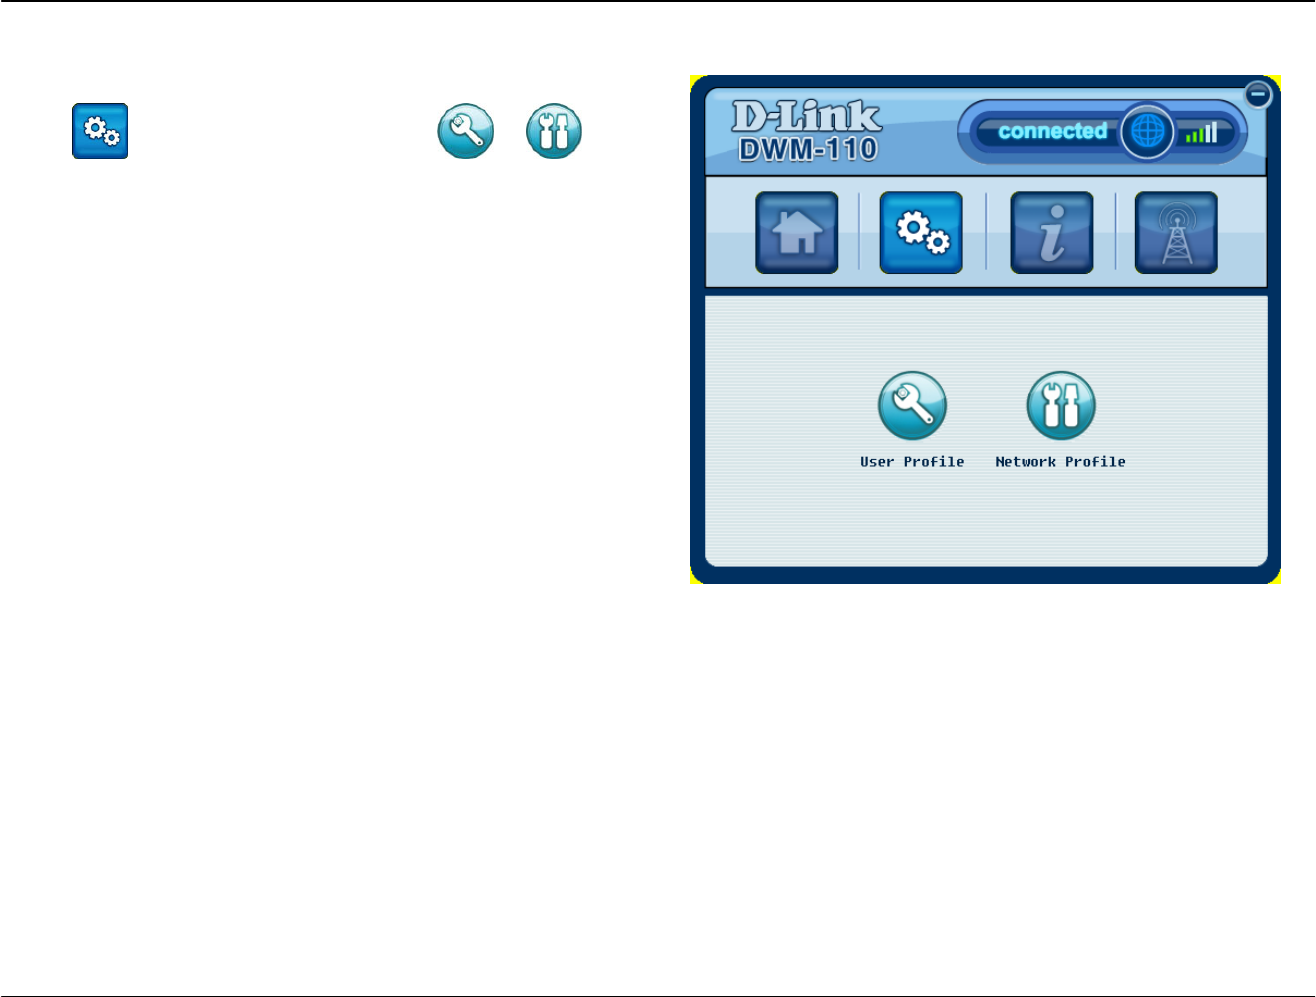
Profile
Click to see the Profile page. Click or to
see more settings for the User Profile or Network Profile
respectively.
Appendix A – Accessing WiMAX Utility (Advanced Mode)
D-Link DWM-110 User Manual 15
User Profile
This page is for a base station to authenticate the device.
The device supports Extensible Authentication Protocol
(EAP).
Note: You may need to contact your ISP for filling in
information on this page.
Select Enable authorization to create username/identity
and password entry for authorization.
You may select Anonymous identity, and enter the
identity if requested by the ISP.
Select an EAP type from the Type drop-down list.
The CA, Certificate, Private key, and Private key
password boxes can be edited depending on the EAP
type you selected. Click Browse to find a CA, certificate
or private key file to add to the field accordingly.
Select Remember my settings to save personal settings
for future connection.
Click Apply to save your current information.
Click to go back to the Profile’s main page.
Appendix A – Accessing WiMAX Utility (Advanced Mode)
D-Link DWM-110 User Manual 16
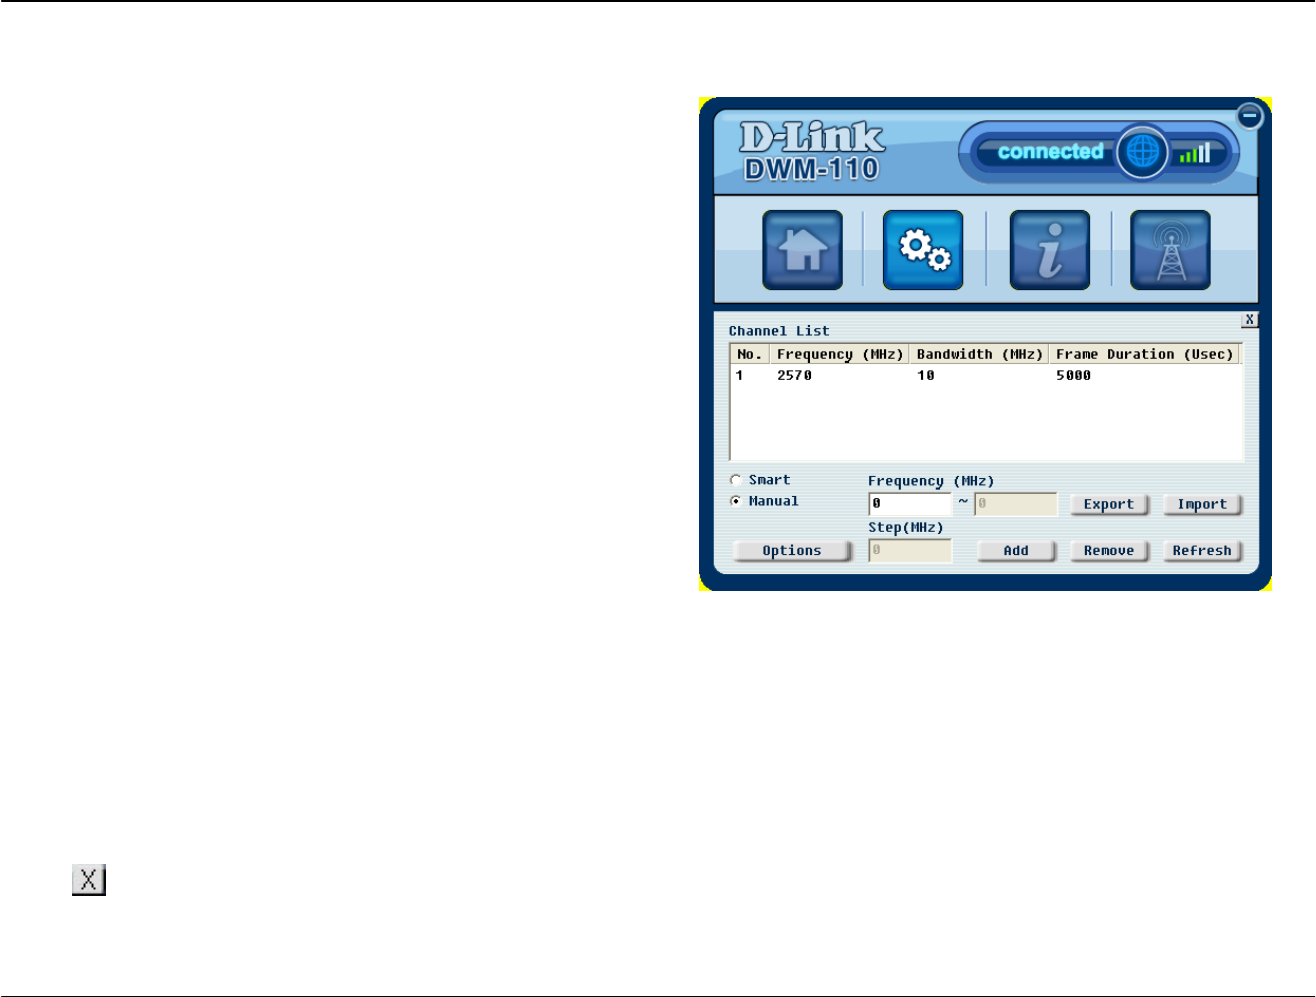
Network Profile
This page lists the radio frequencies for channels
connecting to the ISP’s base stations.
Note: The information should be obtained from your ISP.
There are two ways to add more radio frequency
channels:
1. Click Smart to enter the range of channels in the
Frequency (MHz) fields, followed by the step
increments desired in the Step (MHz) field. Click Add
and the utility will input the channels – based on your
requirements – into your channel list.
2. Click Manual to individually enter the frequency
number in the Frequency (MHz), then click Add.
To remove added channels, select a channel from the
Channel List and click Remove.
Click Refresh to update the list.
Click Export to save your channel list as an INI file. The
file can then be used by other devices by clicking Import
and selecting the particular file.
Click Options to see more settings.
Click to go back to the Profile’s main page.
Appendix A – Accessing WiMAX Utility (Advanced Mode)
D-Link DWM-110 User Manual 17
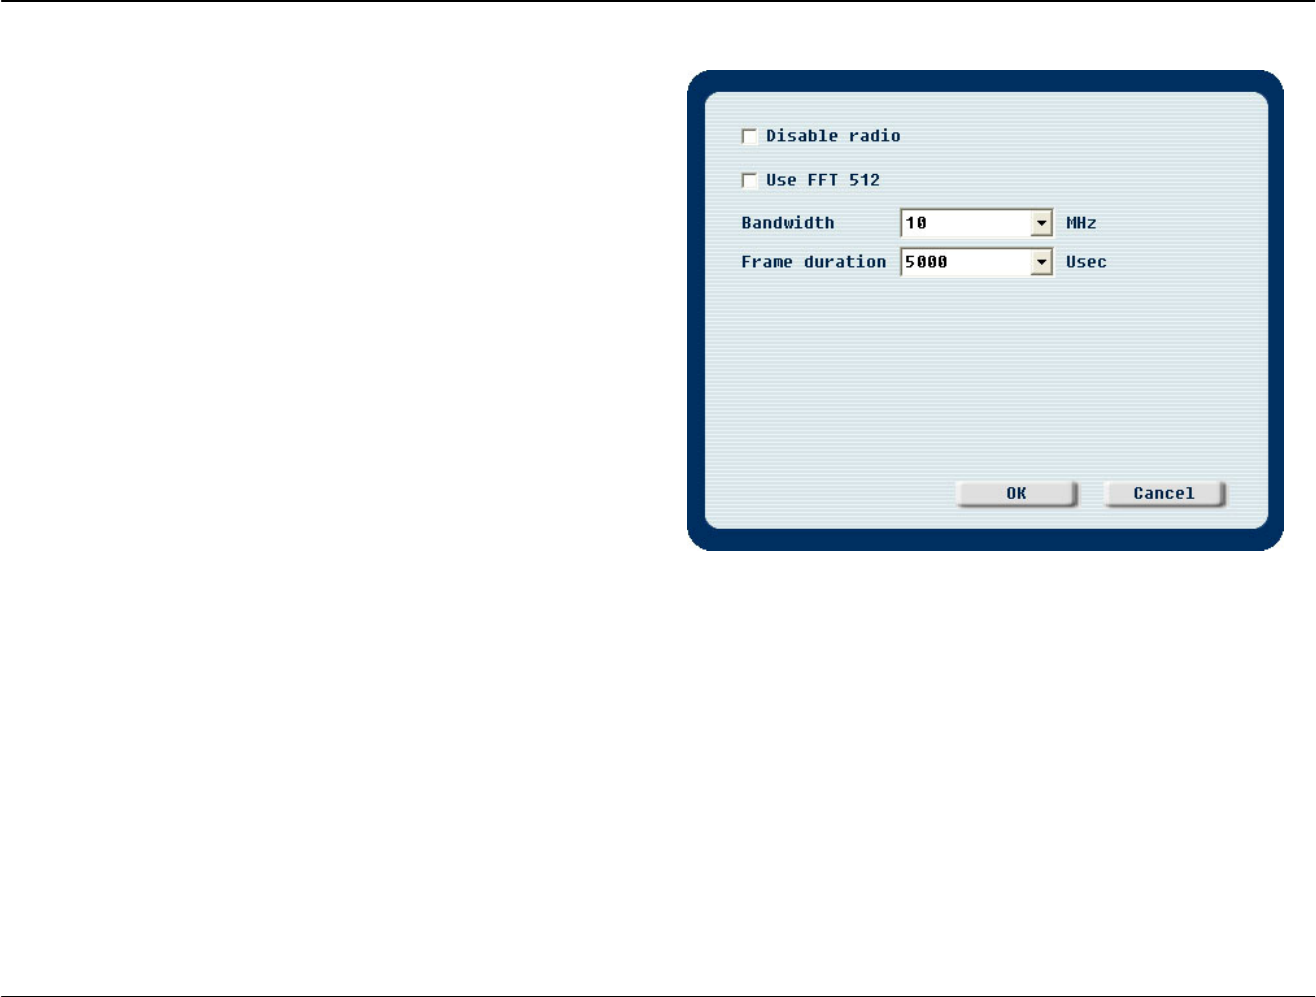
Network Profile – Options
Select Disable radio to turn off the radio.
Select Use FFT 512 to enable FFT 512 point.
Click OK to save current settings.
Appendix A – Accessing WiMAX Utility (Advanced Mode)
D-Link DWM-110 User Manual 18
Information
Click to see the information page, this page displays
the status of your WiMAX connection.
WiMAX State displays one of the following current
connecting statuses:
Init: The device is attempting to connect to a base station.
DL Synchronization: The device is receiving downlink
information from another base station.
DL Acquisition: The device is moving from one coverage
area to another, and is receiving downlink information from
another base station.
UL Acquisition: The device is receiving uplink information
from a base station.
Capabilities negotiation:
Ranging: The device is moving from one coverage area to
another, and is attempting to connect to a new base station.
Authorization: The device is sending out authentication.
Registration: The device is registering with a server.
Operational: The device has successfully connected to a
base station and is ready to use.
Idle: The device is in Power Saving mode.
Aborted: The device is not connected to any base
station.
RSSI: Received Signal Strength Indication, which
usually ranges from -100 to 0 dBmO.
CINR: Carrier to Interference plus Noise Ratio.
Frequency: The operating frequency of the BS
connection.
Appendix A – Accessing WiMAX Utility (Advanced Mode)
D-Link DWM-110 User Manual 19
The connection flow diagram of the WiMAX Utility.
Appendix A – Accessing WiMAX Utility (Advanced Mode)
D-Link DWM-110 User Manual 20
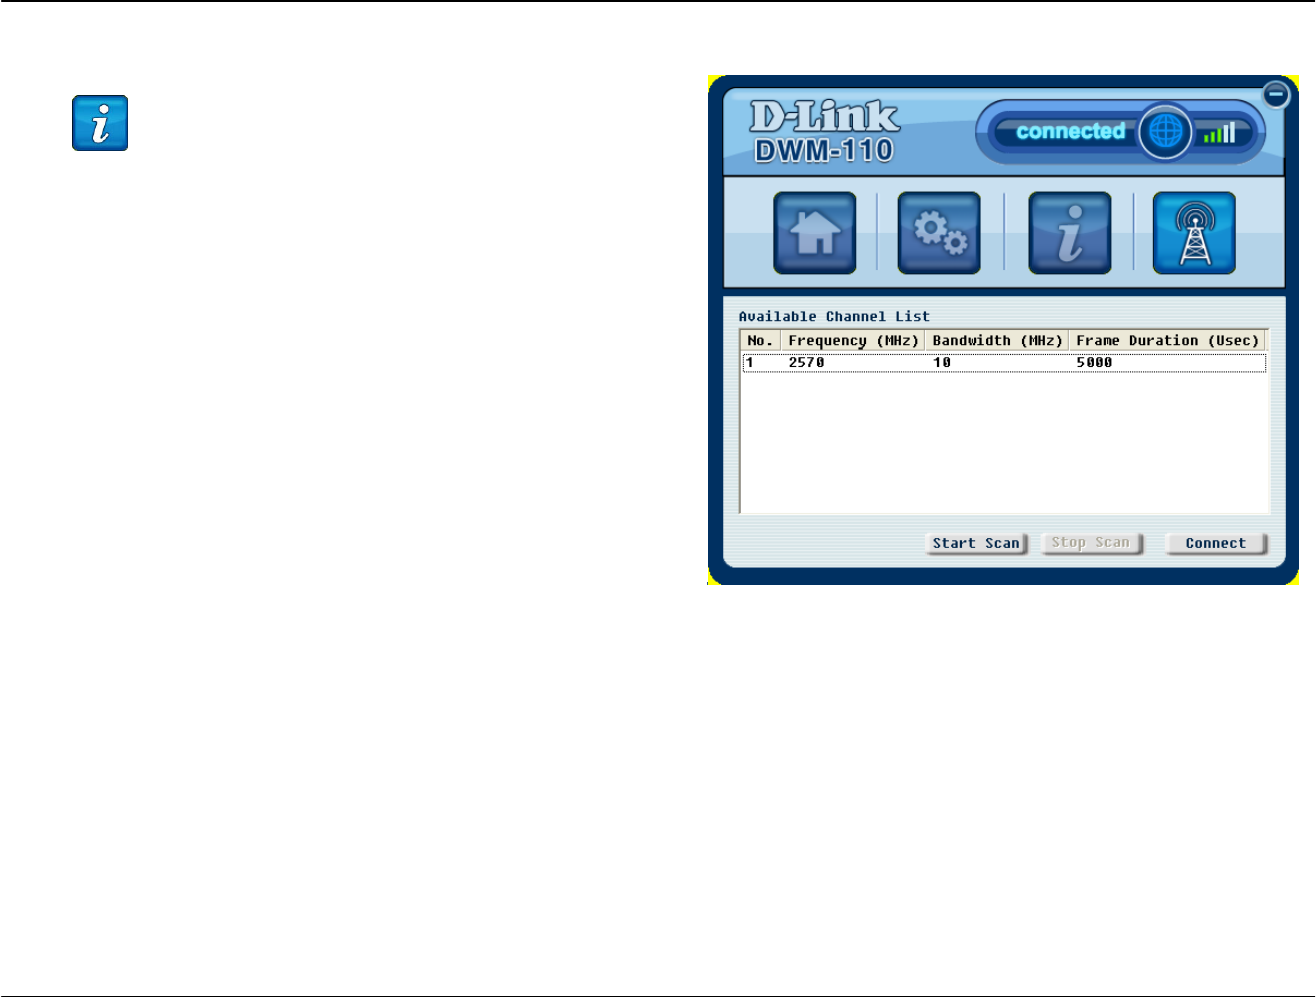
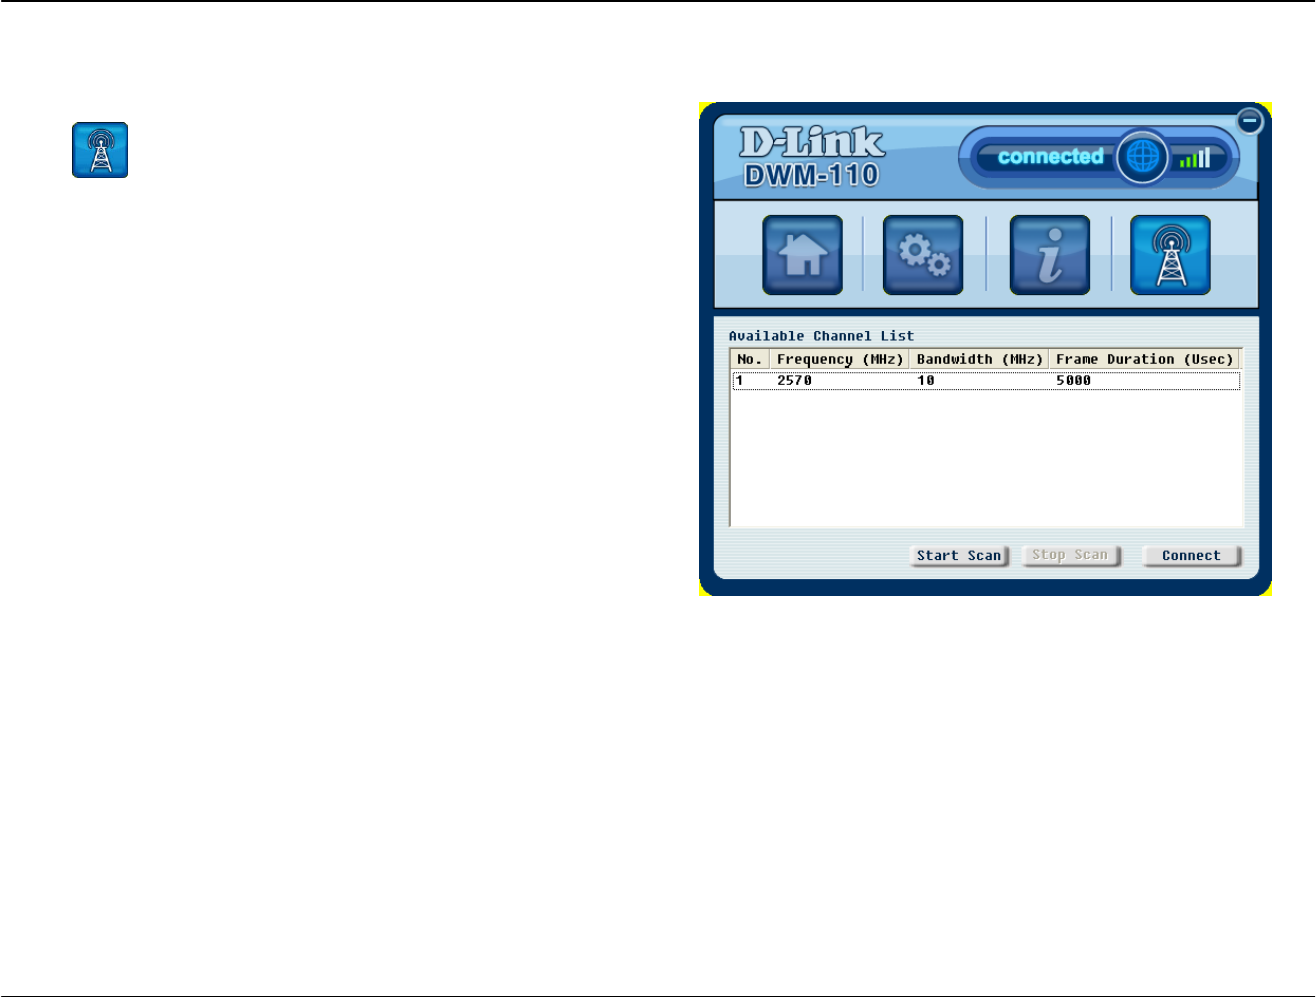
Network Search
Click to see the Network Search page. This page
displays the available wireless connections at a base
station.
Click Start Scan to search for available connections
around the base stations nearby.
Select a channel located within the Available Channel
List and click Connect to connect to a wireless network.
Note: The frequencies first need to be configured in the
Network Profile page in order to search for its available
connection.

Appendix B – Technical Specifications
D-Link DWM-110 User Manual 21
Technical Specifications
Frequency Range
• 2.5GHz radio front-end cover from 2.5GHz to 2.7GHz
(NCC Frequencies 2.5025~2.6875GHz )
RF/Antenna
• Transmit power 23dBm
• Embedded antenna
• Support MIMO Matrix A processing
Modulation
• Support QPSK, 16QAM, 64QAM modulation (DL)
Mode
• Support TDD (Time Division Duplex) mode
Channel Bandwidth
• For profile 3A, support 5MHz and 10MHz bandwidth
Standards
• IEEE 802.16e-2005
Interface
• USB 2.0
LED Indicator
• Power
Authentication
• Support PKMv2 protocol, EAP-based authorization,
EAP-TLS, EAP-TTLS.
Utility
• Device drivers: Windows XP/Vista

Appendix B – Technical Specifications
D-Link DWM-110 User Manual 22
Warning Statement
Federal Communication Commission Interference Statement
This equipment has been tested and found to comply with the limits for a Class B digital device, pursuant to Part 15 of
the FCC Rules. These limits are designed to provide reasonable protection against harmful interference in a residential
installation. This equipment generates, uses and can radiate radio frequency energy and, if not installed and used in
accordance with the instructions, may cause harmful interference to radio communications. However, there is no
guarantee that interference will not occur in a particular installation. If this equipment does cause harmful interference to
radio or television reception, which can be determined by turning the equipment off and on, the user is encouraged to try
to correct the interference by one of the following measures:
- Reorient or relocate the receiving antenna.
- Increase the separation between the equipment and receiver.
- Connect the equipment into an outlet on a circuit different from that
to which the receiver is connected.
- Consult the dealer or an experienced radio/TV technician for help.
FCC Caution: Any changes or modifications not expressly approved by the party responsible for compliance could void
the user's authority to operate this equipment.
This device complies with Part 15 of the FCC Rules. Operation is subject to the following two conditions: (1) This device
may not cause harmful interference, and (2) this device must accept any interference received, including interference
that may cause undesired operation.
===== RF Exposure statement for mobile device without SAR measurement======
IMPORTANT NOTE:
FCC Radiation Exposure Statement:
This equipment complies with FCC radiation exposure limits set forth for an uncontrolled environment. This equipment
should be installed and operated with minimum distance 20cm between the radiator & your body.

Appendix B – Technical Specifications
D-Link DWM-110 User Manual 23
This transmitter must not be co-located or operating in conjunction with any other antenna or transmitter.
減少電磁波影響,請妥適使用