D Link WR116A1 Wireless N300 Multi-WAN Router User Manual 2
D Link Corporation Wireless N300 Multi-WAN Router Users Manual 2
D Link >
Contents
- 1. Users Manual-1
- 2. Users Manual-2
Users Manual-2
41D-Link DWR-116 User Manual
Section 3 - Conguration
Select this box to Enable the lter.
You may select Always On or choose the
number of a schedule rule that you have
dened.
Copies the predened lter to the specied ID
Identies the lter.
Specify the local IP address
Specify the local port after the colon.
Specify the remote IP address
Specify the remote port after the colon.
Select this box to enable the lter.
Specify the schedule rule number.
Go back to the previous lter page.
Advance to the next lter page.
Click Save Settings to save your changes,
or click Don’t Save Settings to discard your
changes.
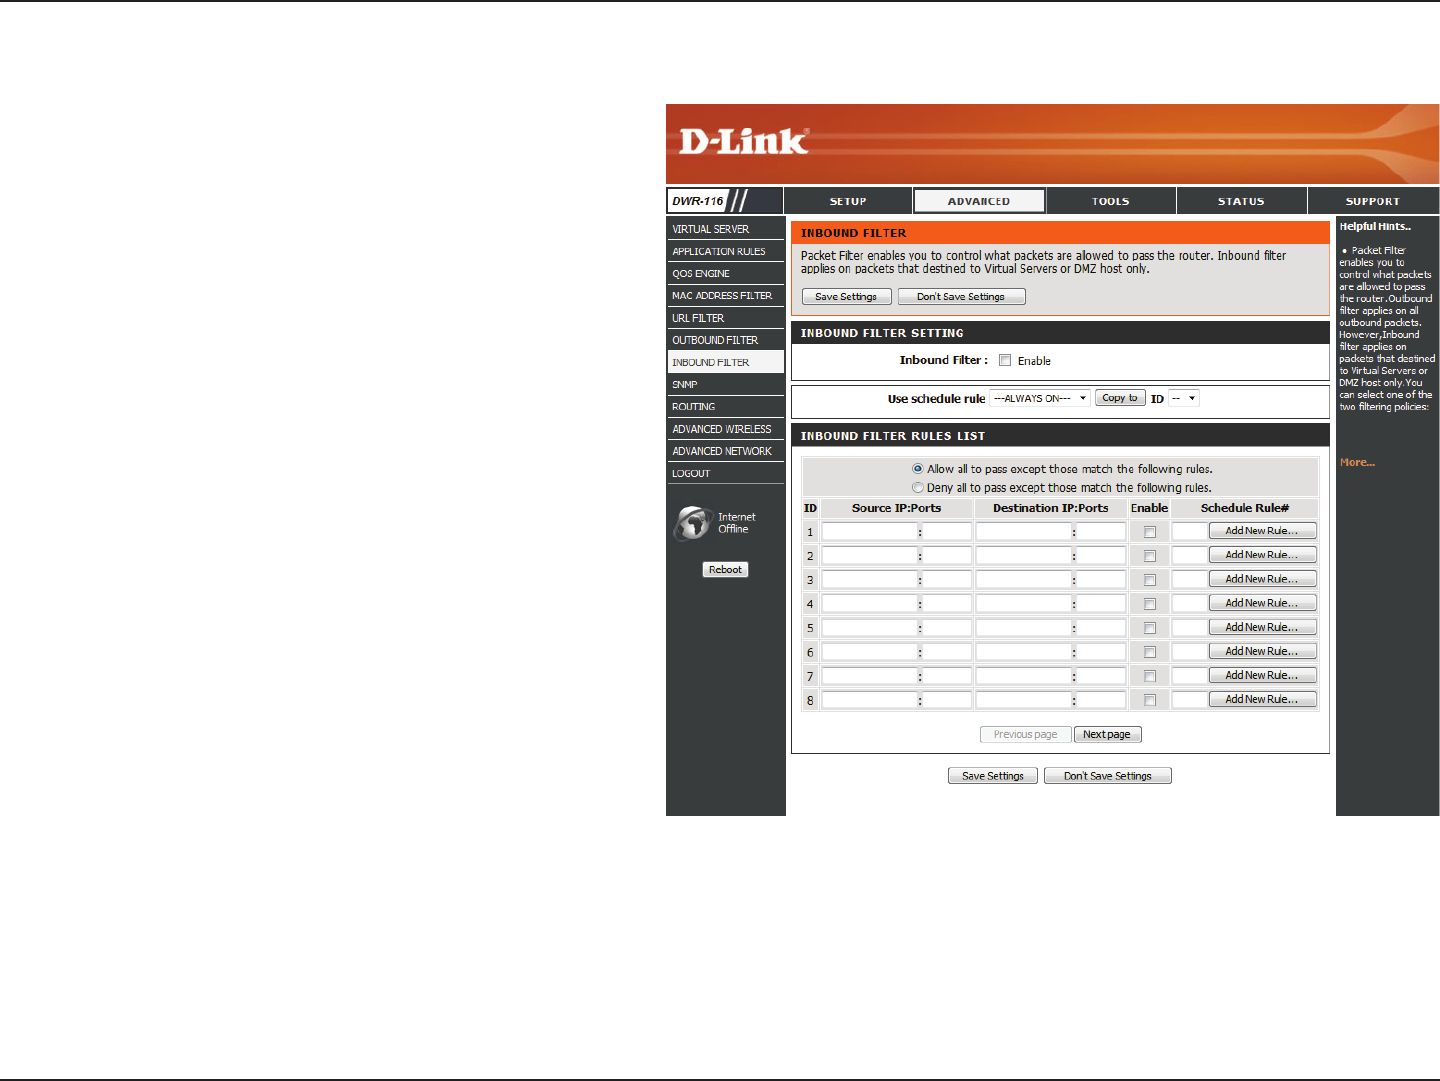
Inbound Filter
Inbound Filter:
Use Schedule
Rule:
Copy to ID:
ID:
Source IP :
Source Ports:
Destination IP :
Destination Ports:
Enable:
Schedule Rule #:
Previous Page:
Next Page:
Inbound Filter enables you to control what packets are allowed
to pass through the router. Inbound filter only applies to packets
that are destined for Virtual Servers or DMZ hosts.
42D-Link DWR-116 User Manual
Section 3 - Conguration
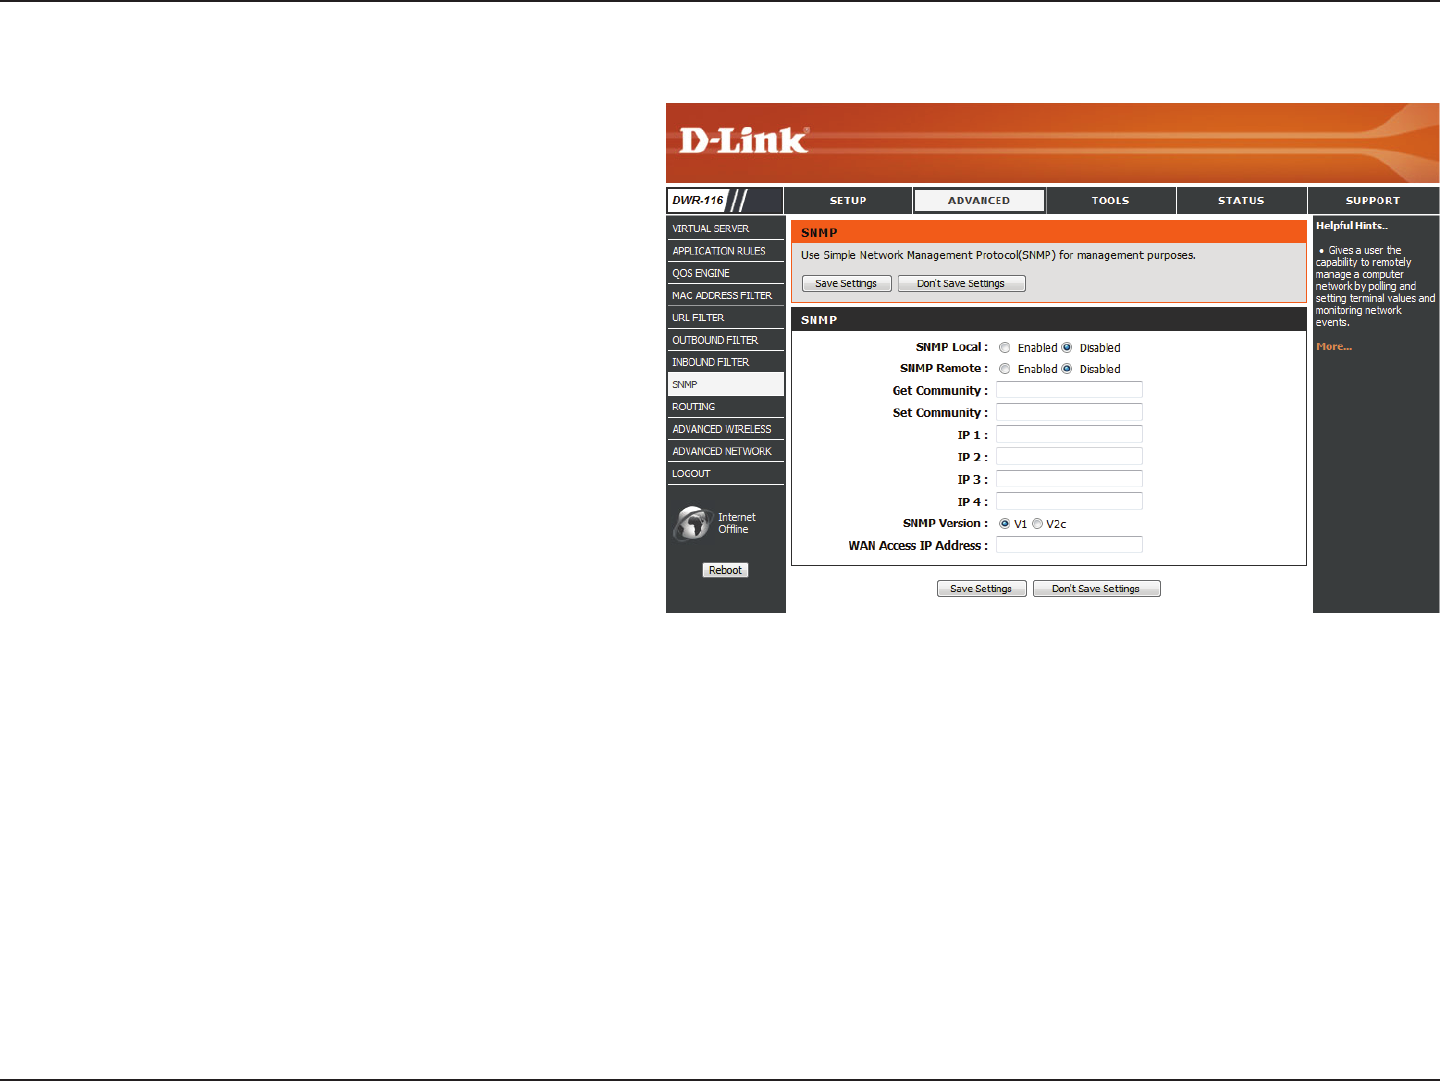
Select Enabled to allow local SNMP
administration. Select Disabled to disallow
local SNMP administration.
Select Enabled to allow local SNMP
administration. Select Disabled to disallow
local SNMP administration.
Enter the password in this eld to allow “Read
only” access to network administration using
SNMP. You can view the network, but no
conguration is possible with this setting.
Enter the password in this eld to gain “Read
and Write” access to the network using SNMP
software.
Enter up to four IP addresses of any trap targets
on your network.
Select the SNMP version of your system.
Click Save Settings to save your changes,
or click Don’t Save Settings to discard your
changes.
SNMP
SNMP Local:
SNMP Remote:
Get Community:
Set Community:
IP 1, IP 2, IP 3,
IP 4:
SNMP Version:
SNMP (Simple Network Management Protocol) is a widely used
network monitoring and control protocol that reports activity on
each network device to the administrator of the network. SNMP
can be used to monitor traffic and statistics of the DWR-116. The
DWR-116 supports SNMP v1 or v2c.
43D-Link DWR-116 User Manual
Section 3 - Conguration
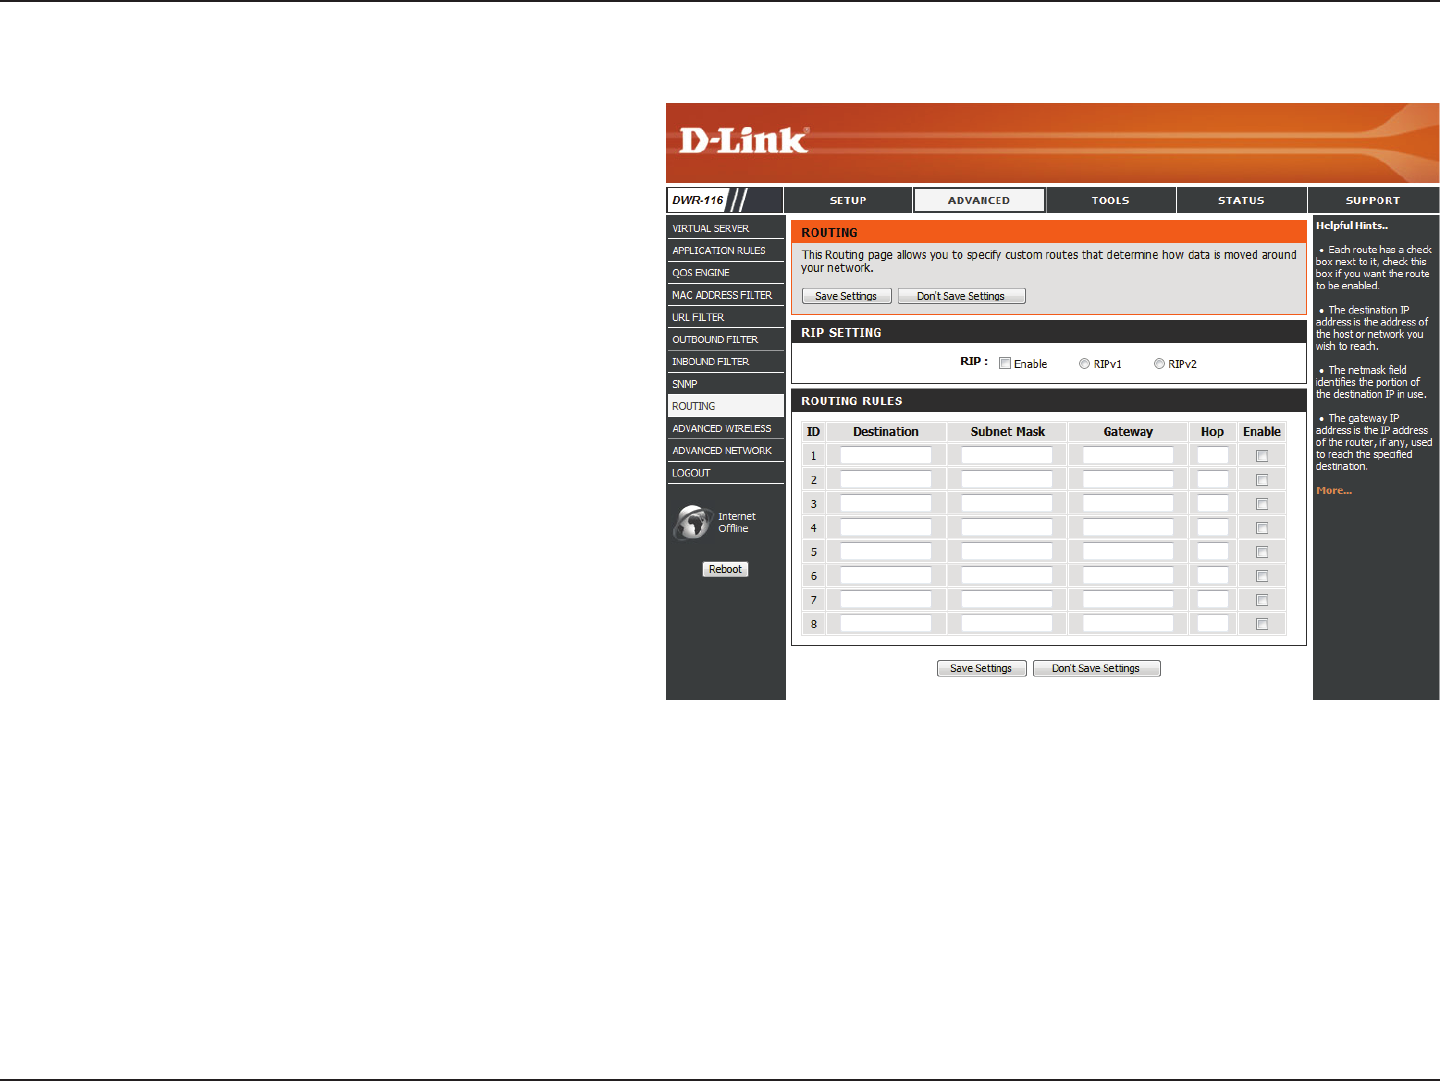
Select this box to enable routing.
RIPv1: Protocol in which the IP address is
routed through the Internet.
RIPv2: Enhanced version of RIPv1 with added
features such as authentication, routing
domain, next hop forwarding, and subnet-
mask exchange.
Identies the rule.
Enter the IP of the specied network that you
want to access using the static route.
Enter the subnet mask to be used for the
specied net work.
Enter the gateway IP address to the specied
network.
Enter the amount of hops it will take to reach
the specied network.
Select this box to enable the rule.
Routing
RIP:
ID:
Destination:
Subnet Mask:
Gateway:
Hop:
Enable:
The Routing page allows you to specify custom routes that
determine how data is moved around your network.
44D-Link DWR-116 User Manual
Section 3 - Conguration
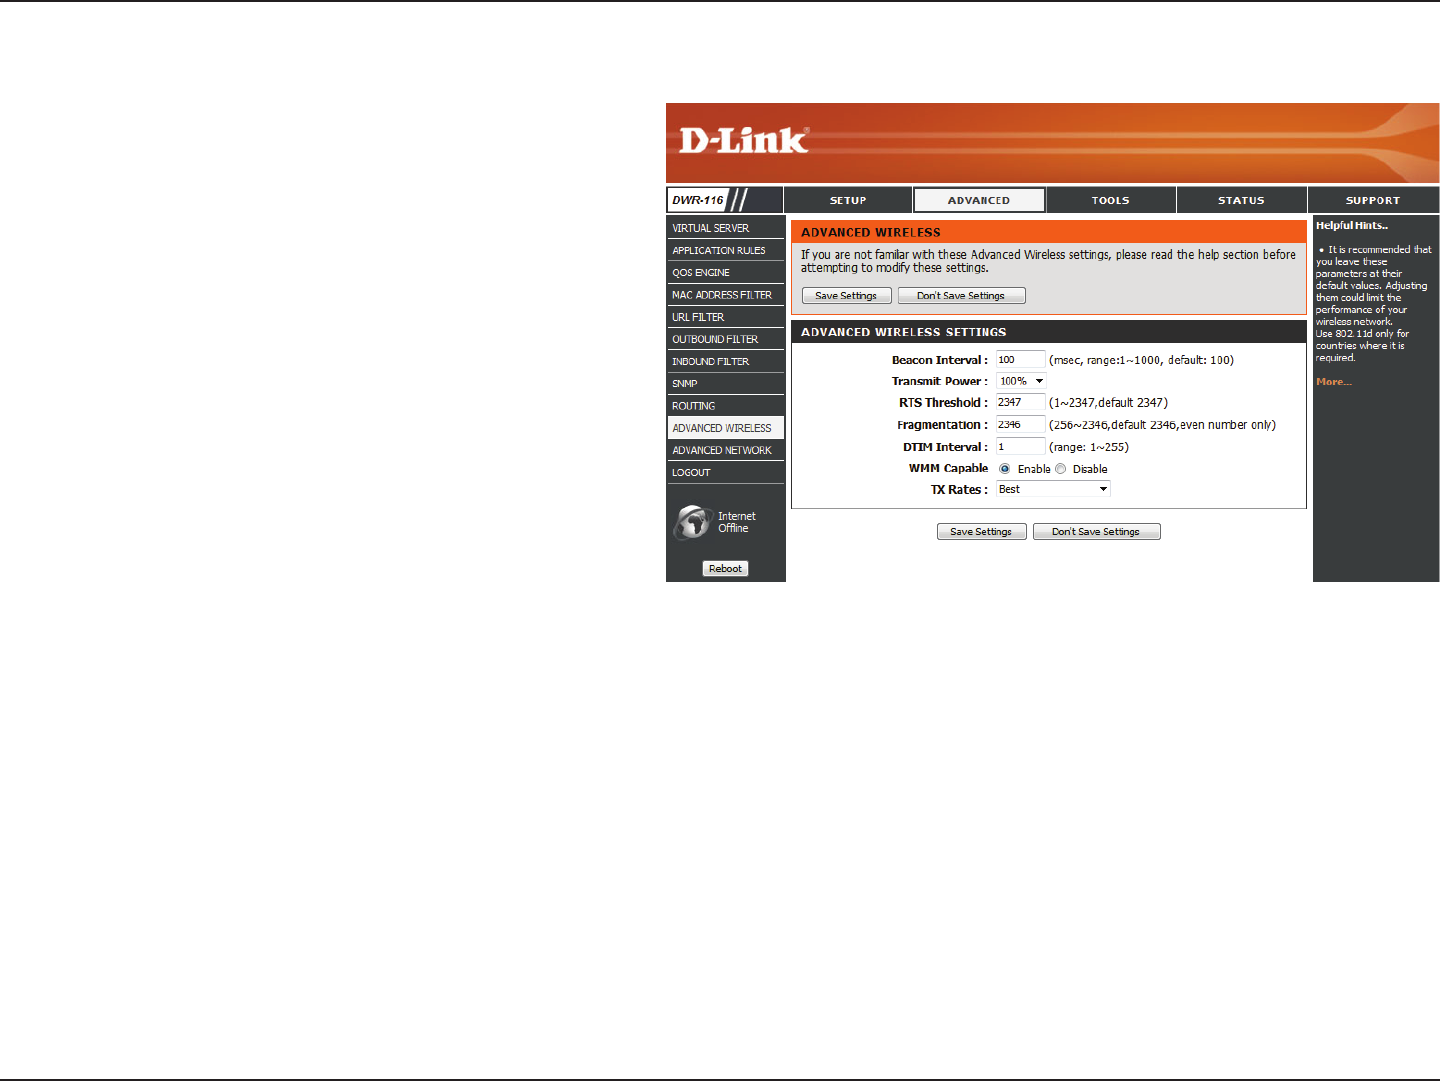
Beacons are packets sent by an Access Point
to synchronize a wireless network. Specify
a value. 100 is the default setting and is
recommended.
Set the transmit power of the antennas.
This value should remain at its default setting
of 2347. If inconsistent data ow is a problem,
only a minor modication should be made.
The fragmentation threshold, which is specied
in bytes, determines whether packets will be
fragmented. Packets exceeding the 2346 byte setting will be fragmented before transmission. 2346 is the default setting.
A Delivery Trac Indication Message (DTIM) is a countdown informing clients of the next window for listening to broadcast and
multicast messages. The default interval is 3.
WMM (Wi-Fi Multimedia) is a QoS (Quality of Service) system for your wireless network. Enable this option to improve the quality
of video and voice applications for your wireless clients.
Select the basic transfer rates based on the speed of wireless adapters on your wireless network. It is strongly recommended to
keep this setting to Auto.
Click Save Settings to save your changes, or click Don’t Save Settings to discard your changes.
Beacon Interval:
Transmit Power:
RTS Threshold:
Fragmentation:
DTIM Interval:
WMM Capable:
TX Rates:
Advanced Wireless
Advanced Wireless contains settings which can negatively affect
the performance of your router if configured improperly. Do not
change these settings unless you are already familiar with them
or have been instructed to to do so.
45D-Link DWR-116 User Manual
Section 3 - Conguration
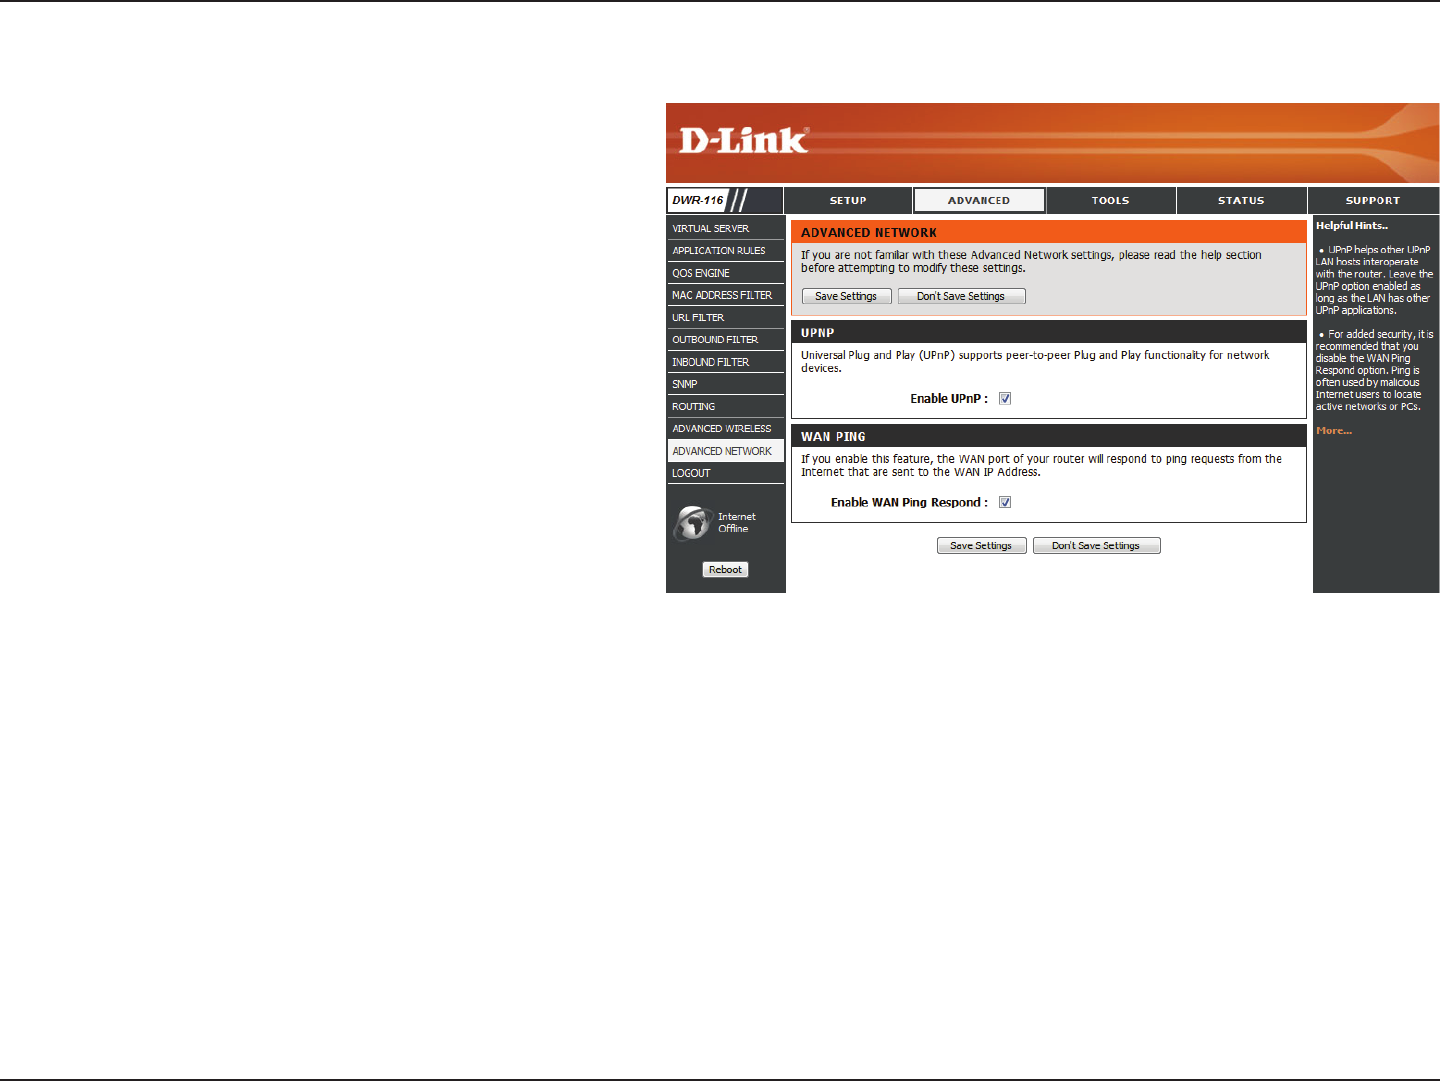
Click Enable UPnP to use the Universal Plug
and Play (UPnP™) feature. UPnP provides
compatibility with networking equipment,
software and peripherals.
Select the box to allow the WAN port to
be “pinged.” Blocking the Ping option may
provide some extra security from hackers.
Click Save Settings to save your changes,
or click Don’t Save Settings to discard your
changes.
Advanced Network
Advanced Network contains settings which can change the way
the router handles certain types of traffic. We recommend that
you do not change any of these settings unless you are already
familiar with them or have been instructed to do so.
Enable UPnP:
Enable WAN
Ping Respond:
46D-Link DWR-116 User Manual
Section 3 - Conguration
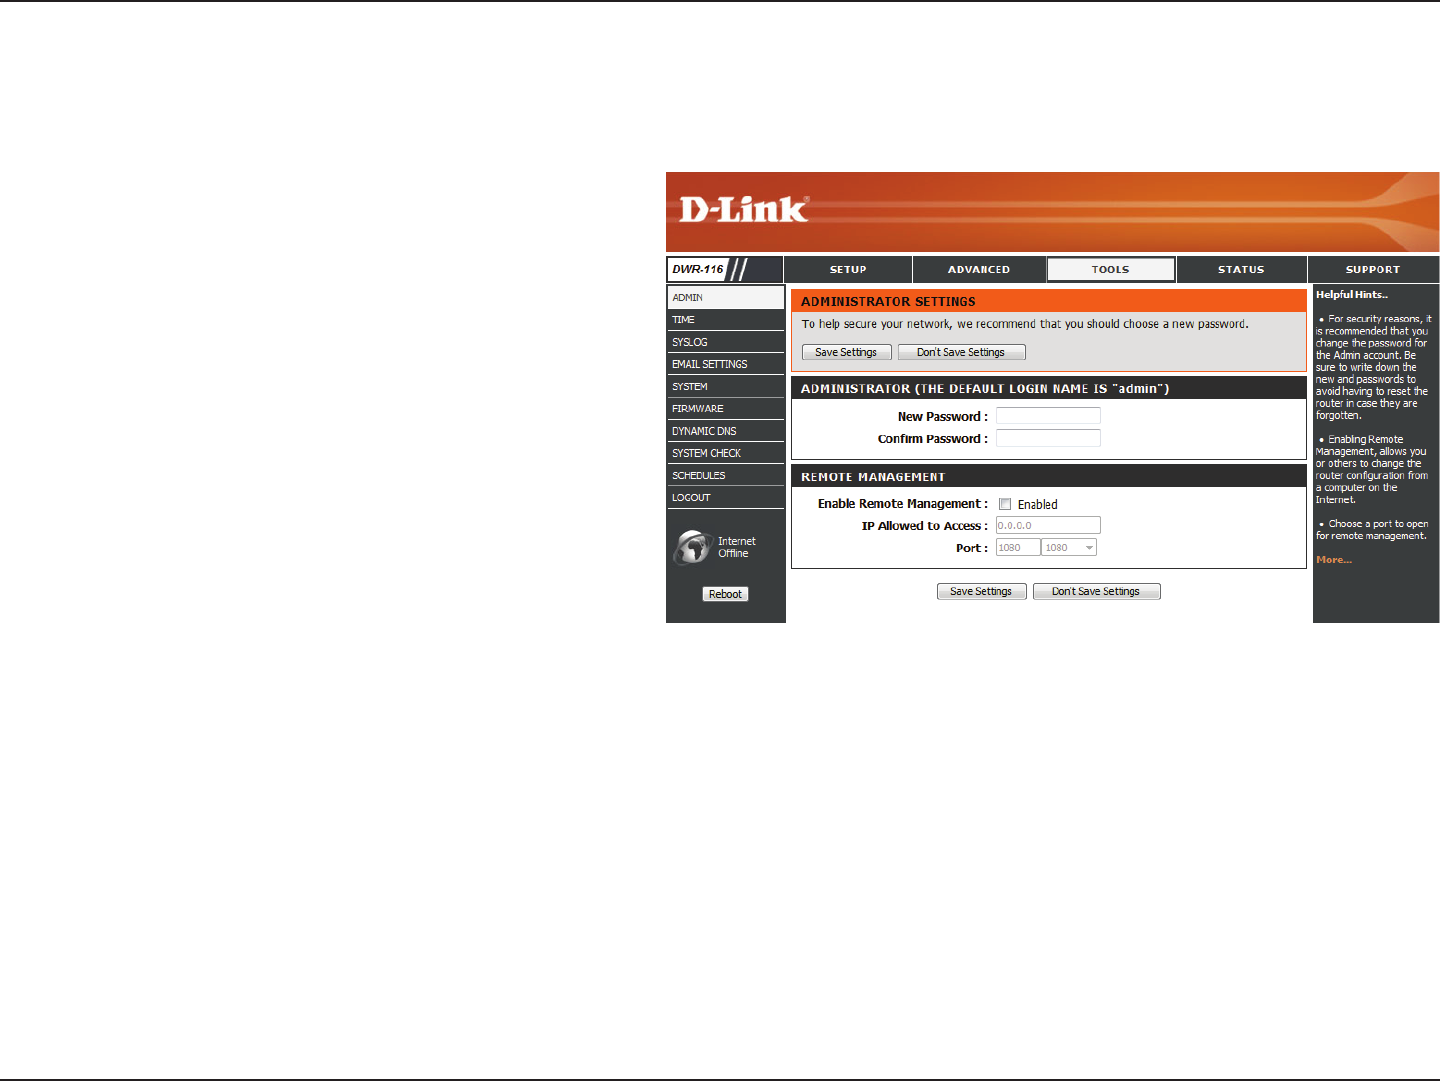
Enter a password that the admin account
will use to access the router’s management
interface.
Conrm the chosen password.
Remote management allows the DWR-116
to be congured from the Internet using a
web browser. A username and password is
still required to access the web-management
interface. Usually only a member of your
network can browse the built-in web pages to perform Administrator tasks. This feature enables you to perform Administrator
tasks from the remote (Internet) host.
Enter the Internet IP address of the PC that has access to the broadband router. If you enter an asterisk (*) in this eld, then anyone
will be able to access the router. Adding an asterisk (*) into this eld could present a security risk and is not recommended.
This is the port number used to access the router. Example: 8080 is the port used for the web-management interface.
Click Save Settings to save your changes, or click Don’t Save Settings to discard your changes.
Tools
Admin
The Admin page allows you to change the Administrator
password and enable Remote Management. The Administrator
has read/write access while the user has read-only access. Only
the admin has the ability to change both admin and user account
passwords.
New Password:
Confirm Password:
Remote
Management:
IP Allowed to
Access:
Port:
47D-Link DWR-116 User Manual
Section 3 - Conguration
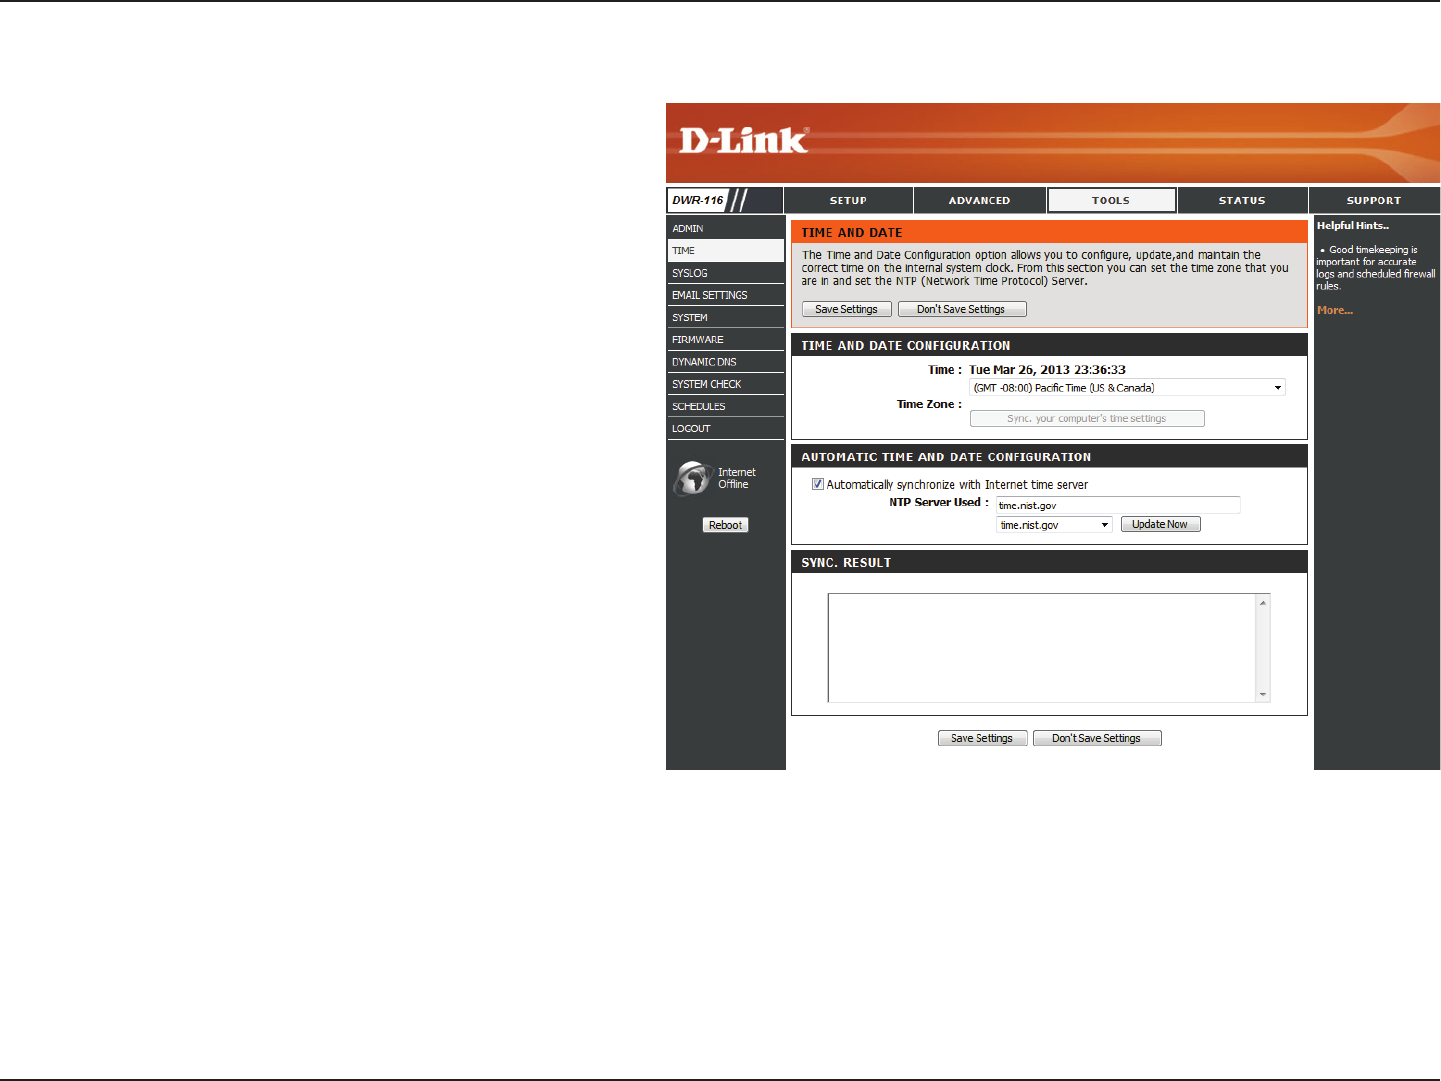
Time
Displays the current time and date of the
DWR-116.
Select the appropriate Time Zone from the
drop-down box.
Select this checkbox to automatically
synchronize the DWR-116 with an Internet
time server.
Choose the NTP Server used for synchronizing
time and date.
Shows the result of the last time
synchronization.
Click Save Settings to save your changes,
or click Don’t Save Settings to discard your
changes.
This section will help you set the time zone that you are in and
the NTP (Network Time Protocol) server. Daylight Saving can also
be configured to adjust the time when needed.
Time:
Time Zone:
Automatically
synchronize
with Internet
time server:
NTP Server
Used:
Sync. Result:
48D-Link DWR-116 User Manual
Section 3 - Conguration
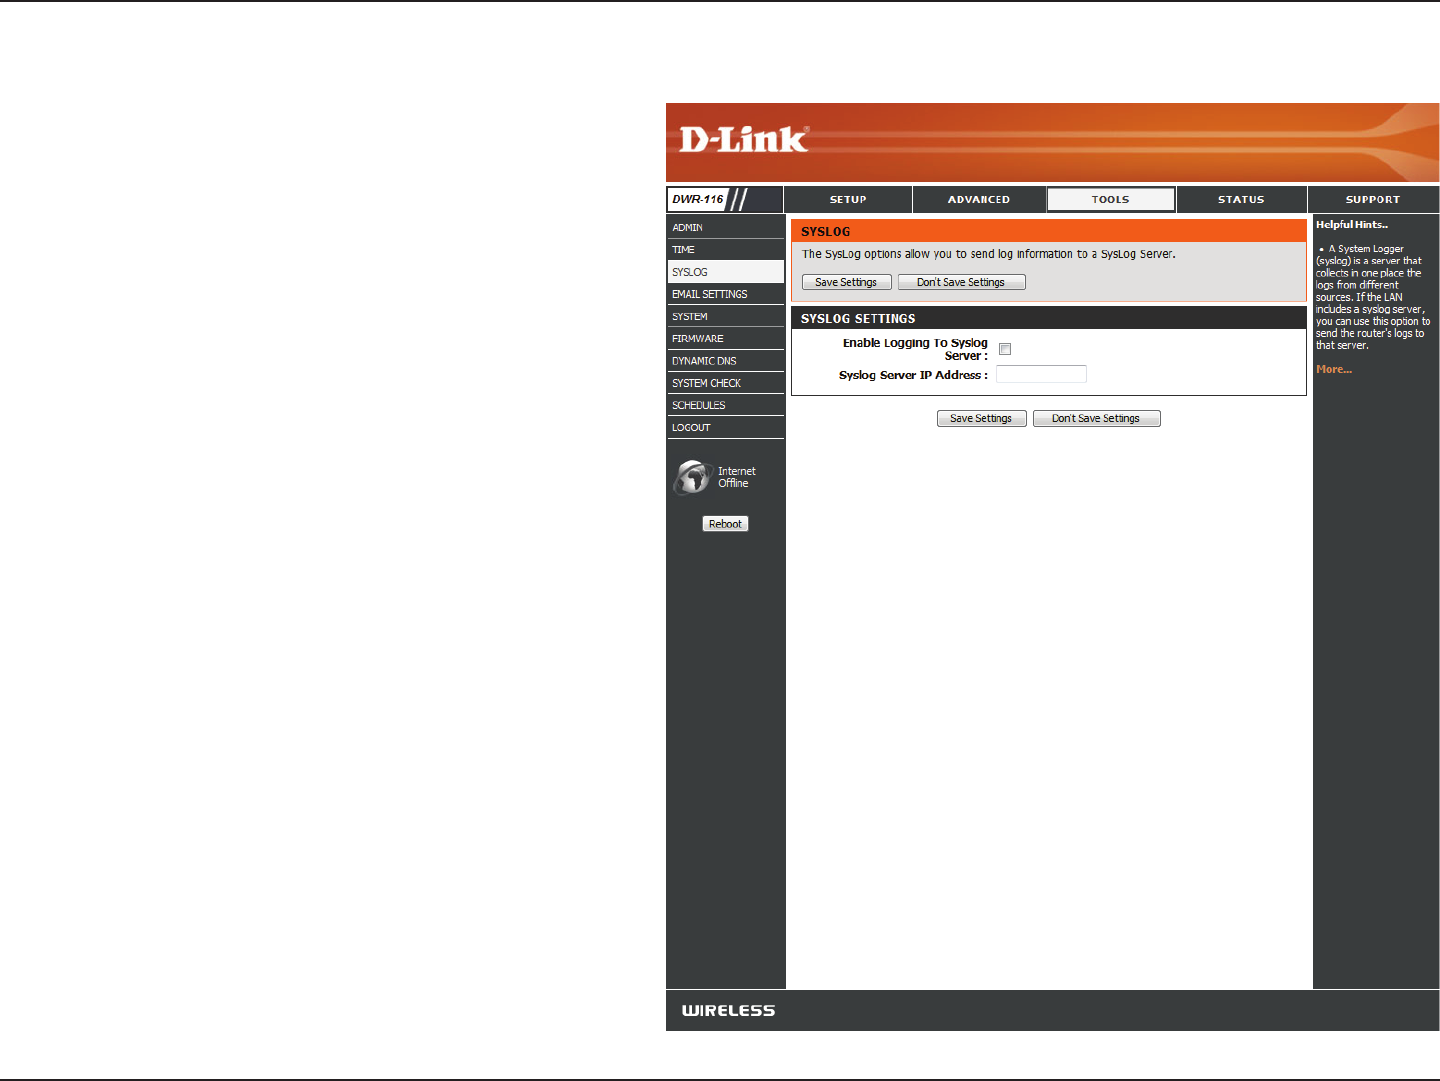
Syslog
Select this box to send the router logs to a
Syslog server.
Enter the address of the Syslog server that will
be used to send the logs.
Click Save Settings to save your changes,
or click Don’t Save Settings to discard your
changes.
The DWR-116 keeps a running log of events and activities
occurring on the router. You may send these logs to a SysLog
server on your network.
Enable Logging
to Syslog Server:
Syslog Server IP
Address:
49D-Link DWR-116 User Manual
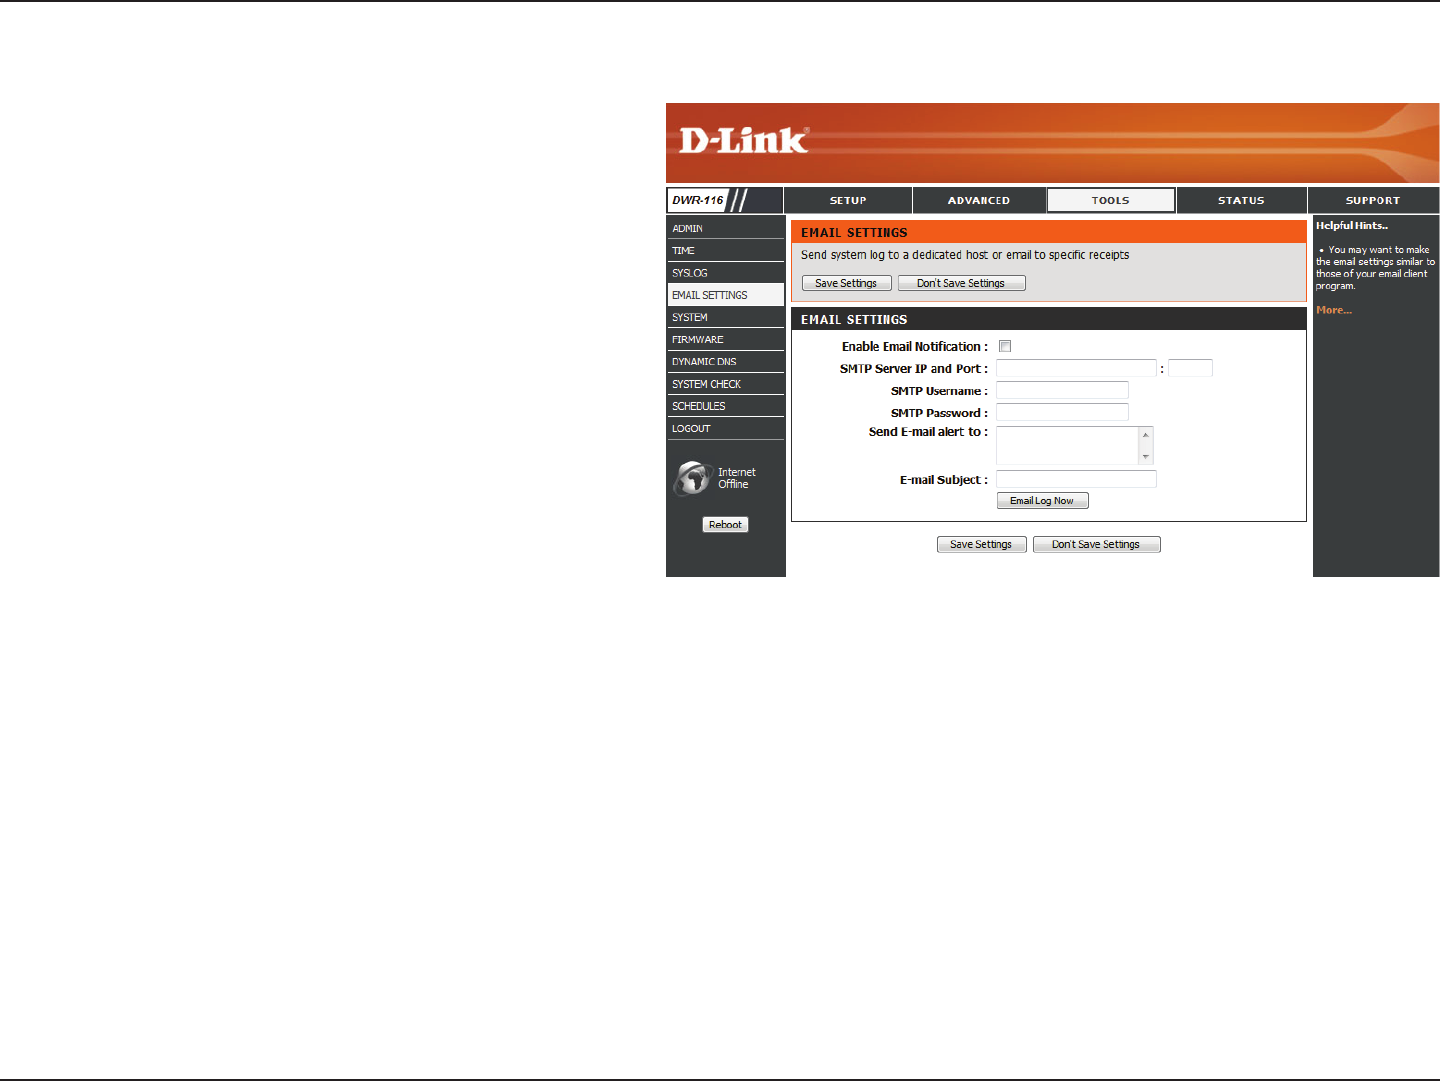
Section 3 - Conguration
Email Settings
When this option is enabled, router activity
logs are e-mailed to a designated e-mail
address.
Enter the SMTP server IP address followed
by a colon and the port number (e.g.
123.123.123.1:25).
Enter the SMTP username.
Enter the SMTP password.
Enter the e-mail address where you would like
the e-mail sent to.
Enter a subject for the e-mail.
Click this button to access the e-mail log.
Click Save Settings to save your changes,
or click Don’t Save Settings to discard your
changes.
Enable E-mail
Notification:
SMTP Sever IP
and Port:
SMTP
Username:
SMTP Password:
Send E-mail
Alert to:
E-mail Subject:
E-mail Log Now:
Email Settings allows you to send the system log files, router alert
messages, and firmware update notifications to an e-mail address.

50D-Link DWR-116 User Manual
Section 3 - Conguration
System
Use this option to save your current router
conguration settings to a le and onto your
computer. Click Save to open a le dialog,
and then select a location and le name for
the settings.
Use this option to load the previously saved
router conguration settings. Browse to nd
the saved le and then click Upload Settings
to transfer those settings to the router.
This option will restore all settings back to
their defaults. Any settings that have not been
backed up will be lost, including any rules that
you have created.
Save Settings
To Local Hard
Drive:
Load Settings
From Local Hard
Drive:
Restore To
Factory Default
Settings:
Here, you can save the current system settings onto the local
hard drive.
51D-Link DWR-116 User Manual
Section 3 - Conguration
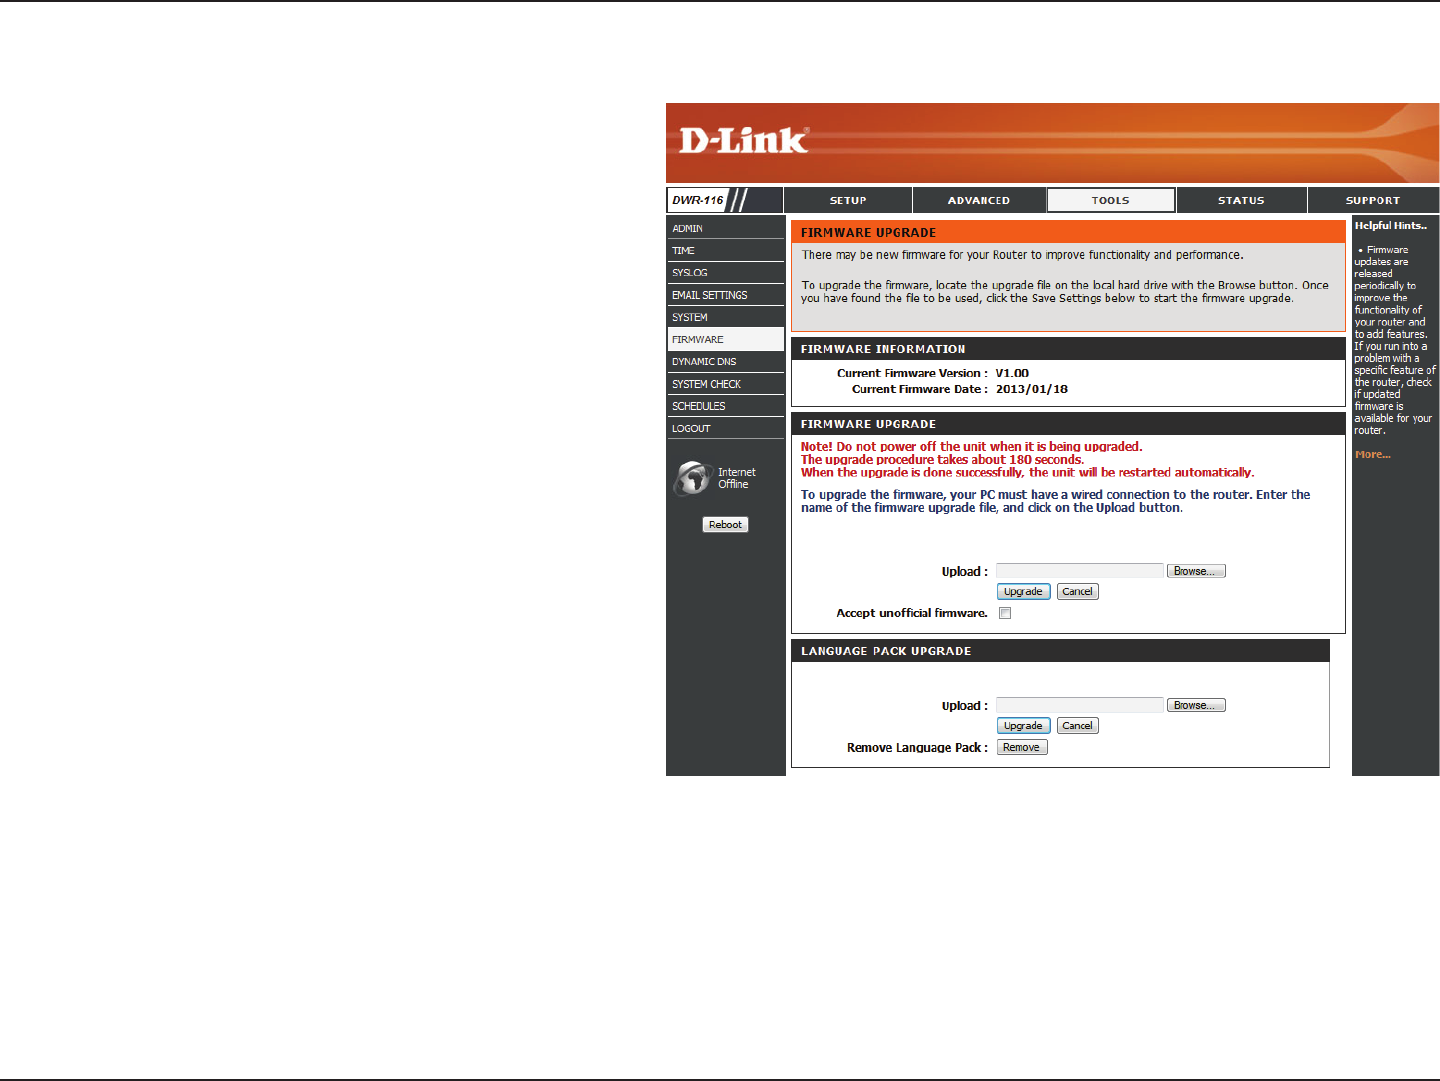
Firmware
Displays your current rmware version.
Displays your current rmware date.
After you have downloaded the new rmware,
click Browse to locate the rmware on your
computer. Tick Accept unocial rmware
if you want to update the DWR-116 with
unocial rmware (not recommended).
Click Upload to start the rmware upgrade.
Here, you can upgrade the firmware of your router. Make sure
the firmware you want to use is on the local hard drive of the
computer and then click Browse to upload the file. Please check
the D-Link support site for firmware updates at http://support.
dlink.com. You can download firmware upgrades to your hard
drive from the D-Link support site.
Current
Firmware
Version:
Current
Firmware Date:
Browse:
52D-Link DWR-116 User Manual
Section 3 - Conguration
Dynamic DNS
DDNS is a method of keeping a domain name
linked to a changing IP Address. Select this box
to enable DDNS.
Select your DDNS provider from the drop-
down box.
Enter the Host Name that you registered with
your DDNS service provider.
Enter the Username for your DDNS account.
Enter the Password for your DDNS account.
Click Save Settings to save your changes,
or click Don’t Save Settings to discard your
changes.
The Dynamic Domain Name System (DDNS) feature allows you
to host a server (Web, FTP, or Game Server) using a domain name
that you have purchased (www.whateveryournameis.com) with
your dynamically assigned IP address.
Sign up for D-Link’s free DDNS service at www.dlinkddns.com.
Enable DDNS:
Provider:
Host Name:
Username /
E-mail:
Password / Key:
53D-Link DWR-116 User Manual
Section 3 - Conguration
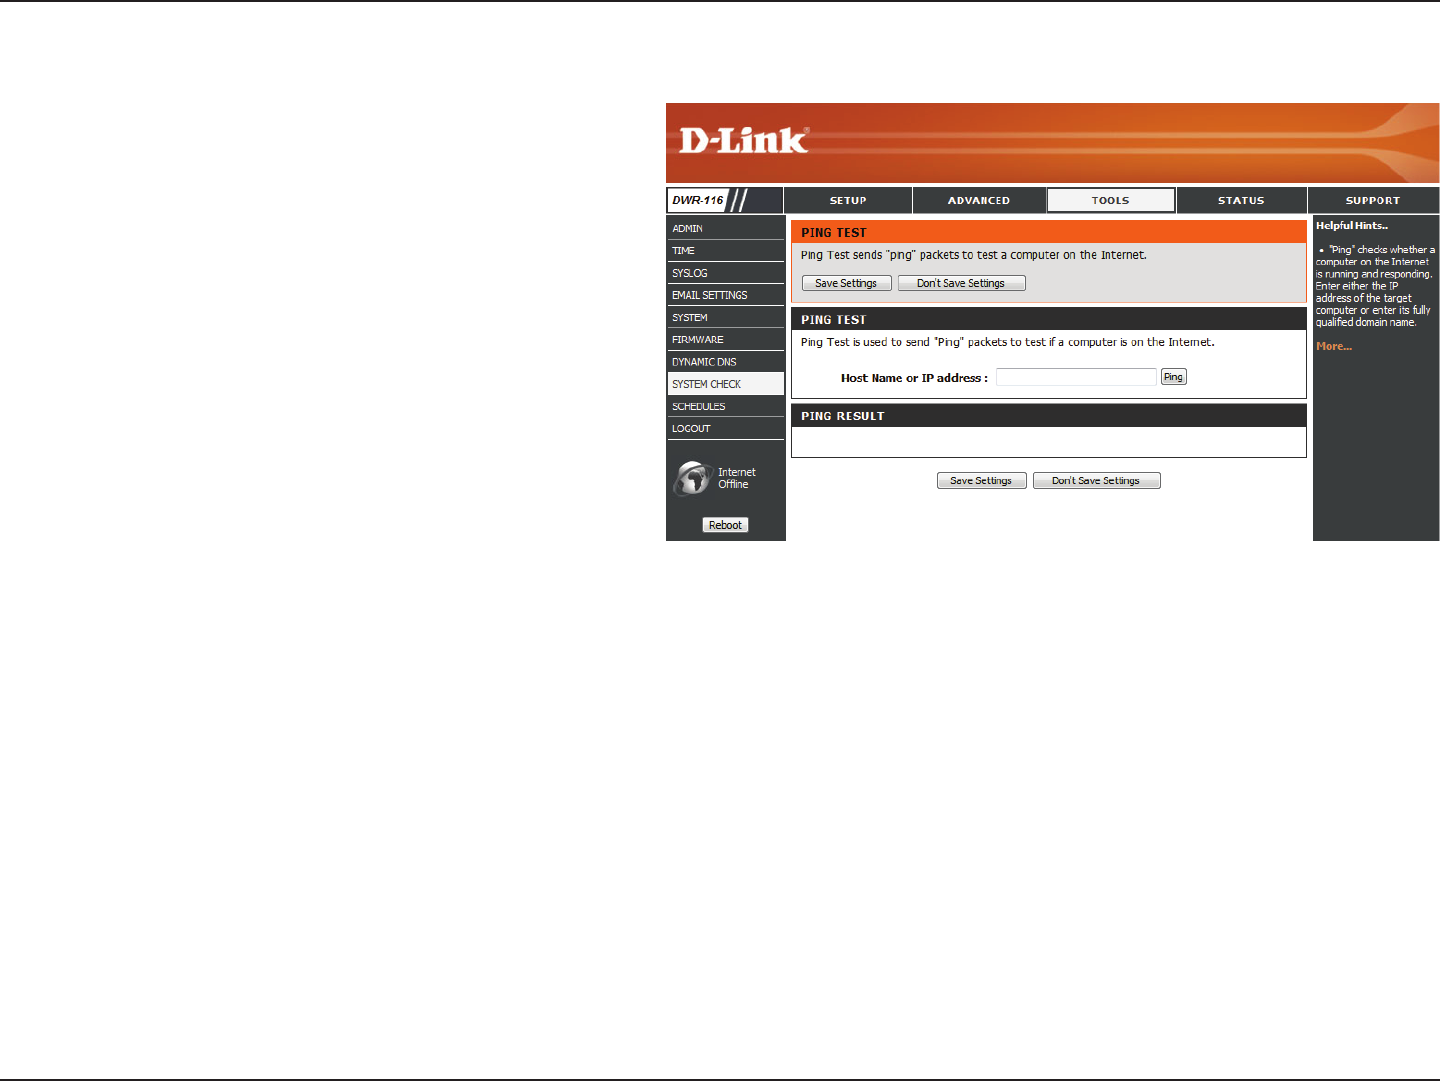
System Check
Enter a host name or the IP address that you
want to ping and click Ping.
The status of your Ping attempt will be
displayed in the Ping Result box.
This useful diagnostic utility can be used to check if a computer
is connected to the network. It sends ping packets and listens for
responses from the specific host.
Host Name or IP
Address:
PING Result:
54D-Link DWR-116 User Manual
Section 3 - Conguration
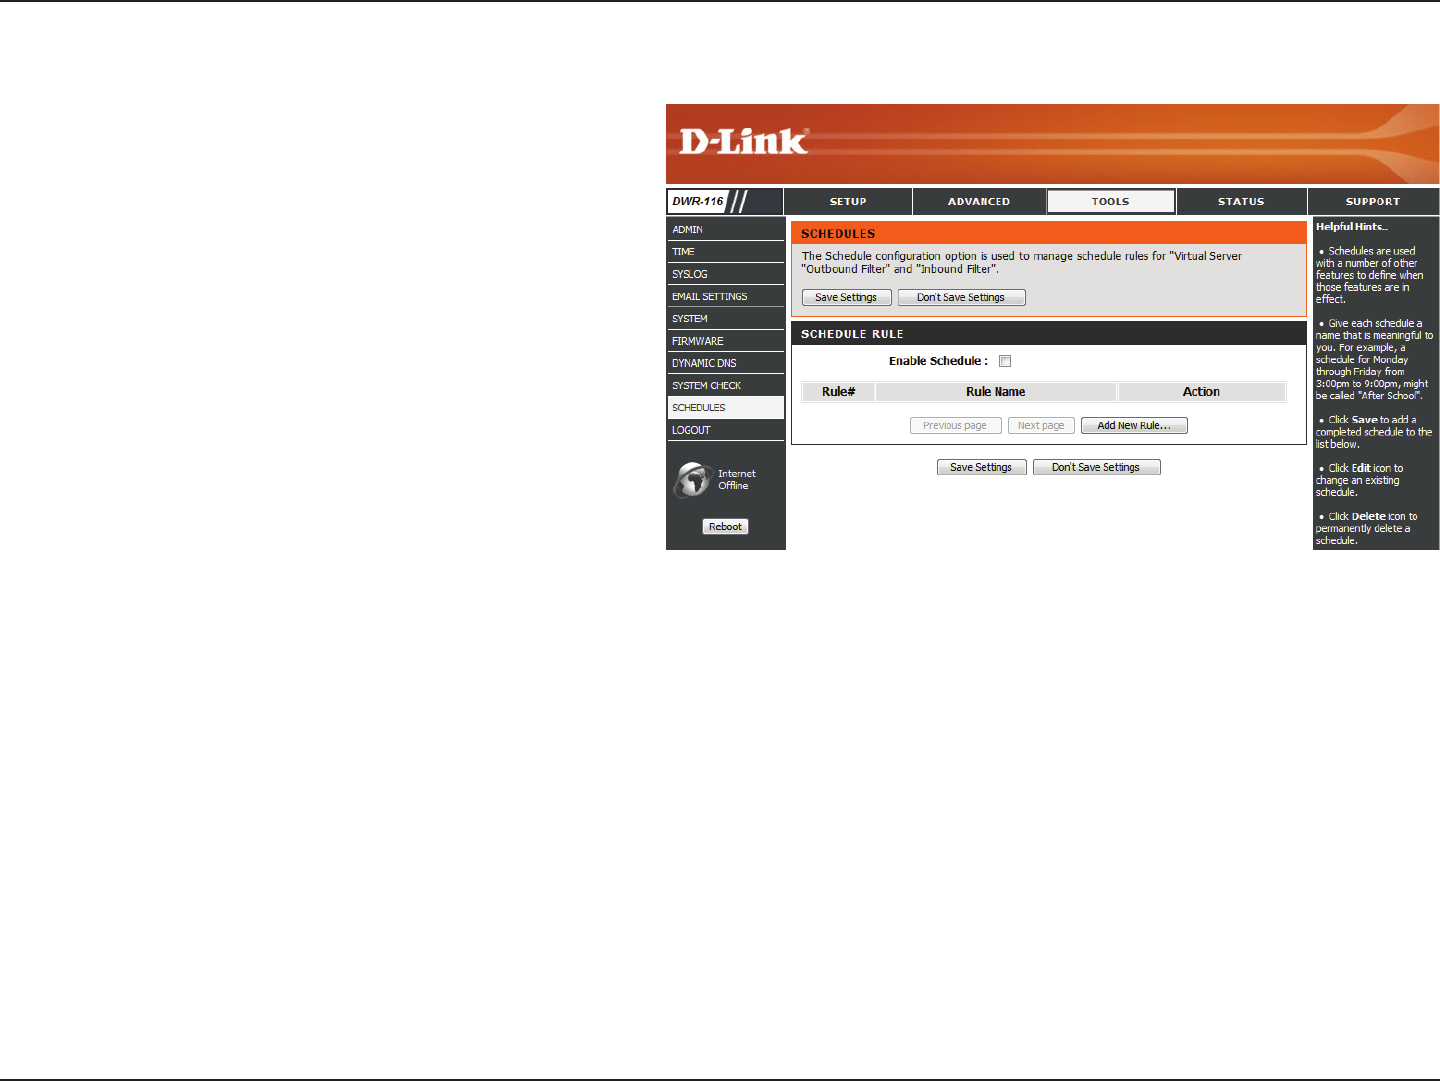
Schedules
Tick this check box to enable schedules.
Click on this button to create a new rule. The
following options will be available.
Edit the rule’s start and end time.
Delete the rule.
Enter a name for your new schedule.
Enter the time at which you would like the
schedule to become active.
Select the time at which you would like the
schedule to become inactive.
Click Save Settings to save your changes,
or click Don’t Save Settings to discard your
changes.
This section allows you to manage schedule rules for various
firewall and parental control features.
Enable
Schedule:
Add New Rule...:
Edit:
Delete:
Name of Rule 1:
Start Time
(hh:mm):
End Time
(hh:mm):
55D-Link DWR-116 User Manual
Section 3 - Conguration
Status
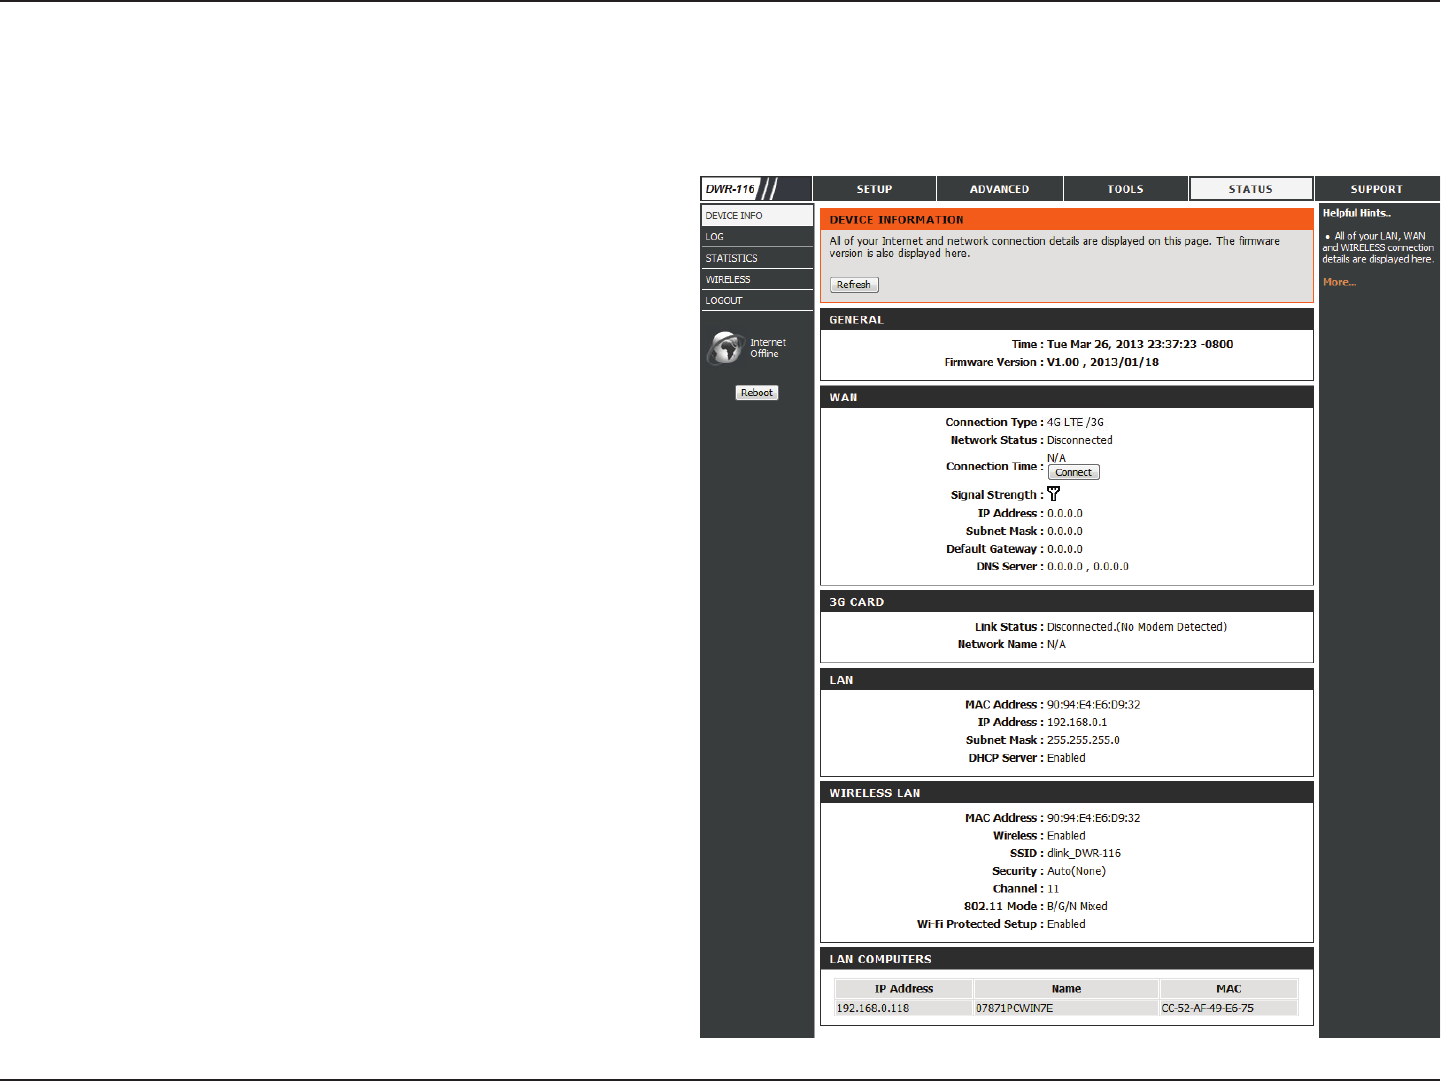
Device Information
All of your Internet and network connection details are displayed on
this page. The firmware version is also displayed here.
Displays the current time and rmware version.
Displays the MAC address and the private (local)
IP settings for the router.
Displays 3G/4G LTE card info, link status, and the
network name.
Displays the MAC address and the public IP
settings for the router.
Displays the wireless MAC address and your
wireless settings such as SSID, channel, and
encryption type. Also displays the list of currently
connected DHCP clients.
General:
WAN:
3G/4G LTE Card:
LAN:
Wireless LAN:
LAN Computers:
56D-Link DWR-116 User Manual
Section 3 - Conguration
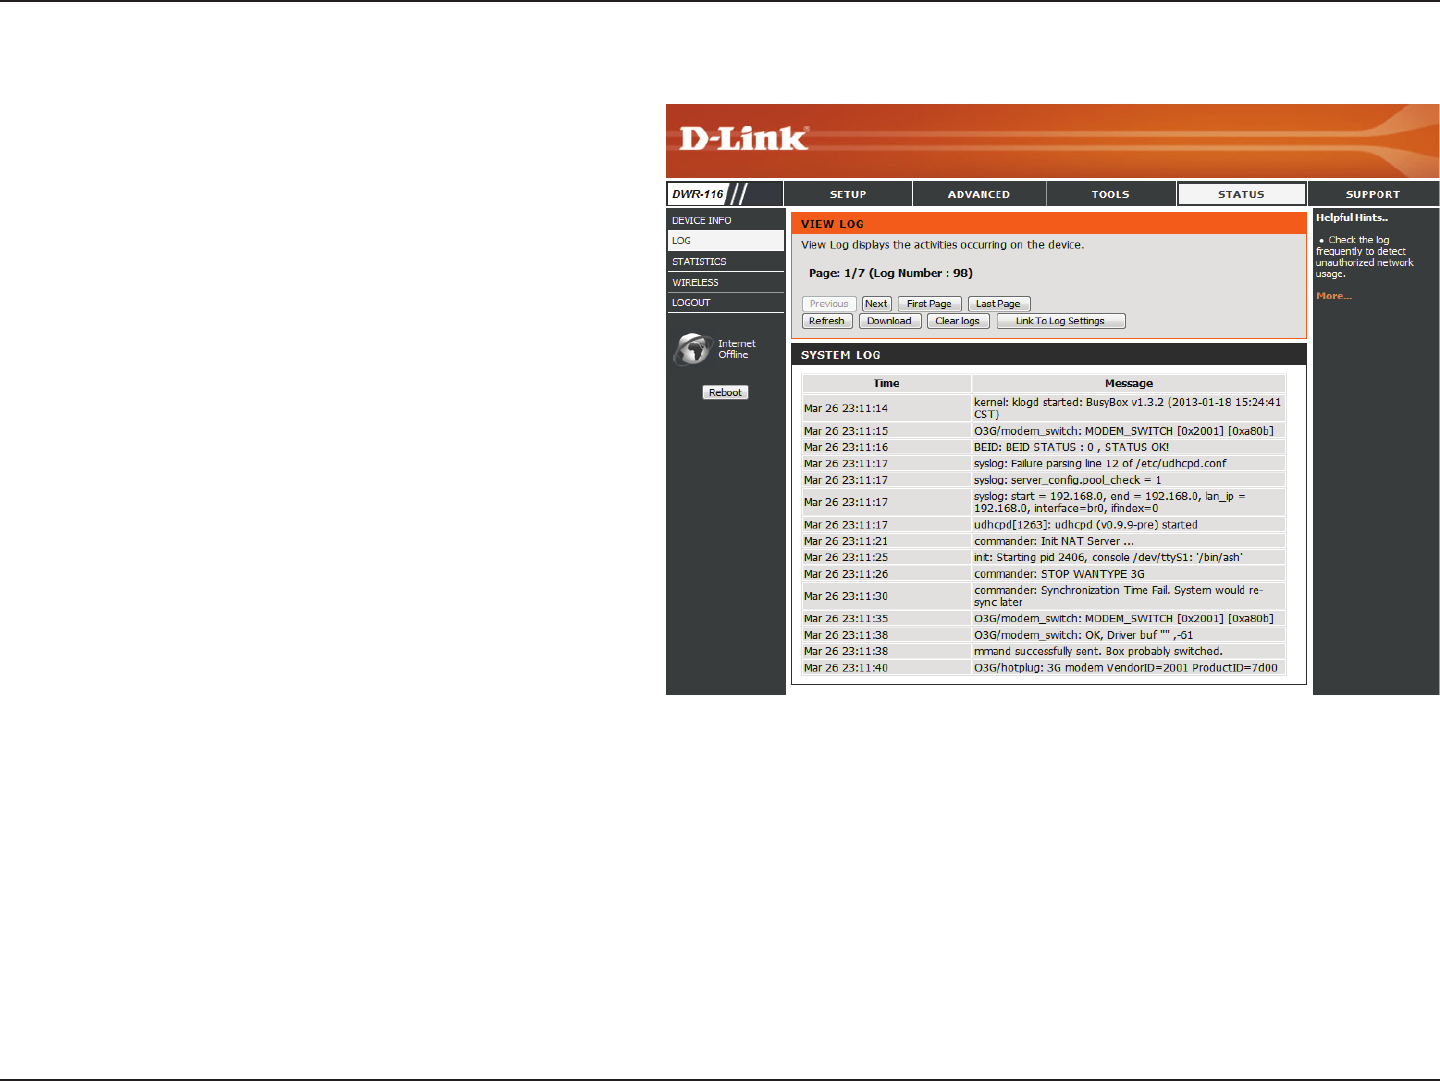
Logs
Here you can view logs and define events that you want to view.
This router also has an internal syslog server, so you can send the
log files to a computer that is running a syslog utility.
57D-Link DWR-116 User Manual
Section 3 - Conguration
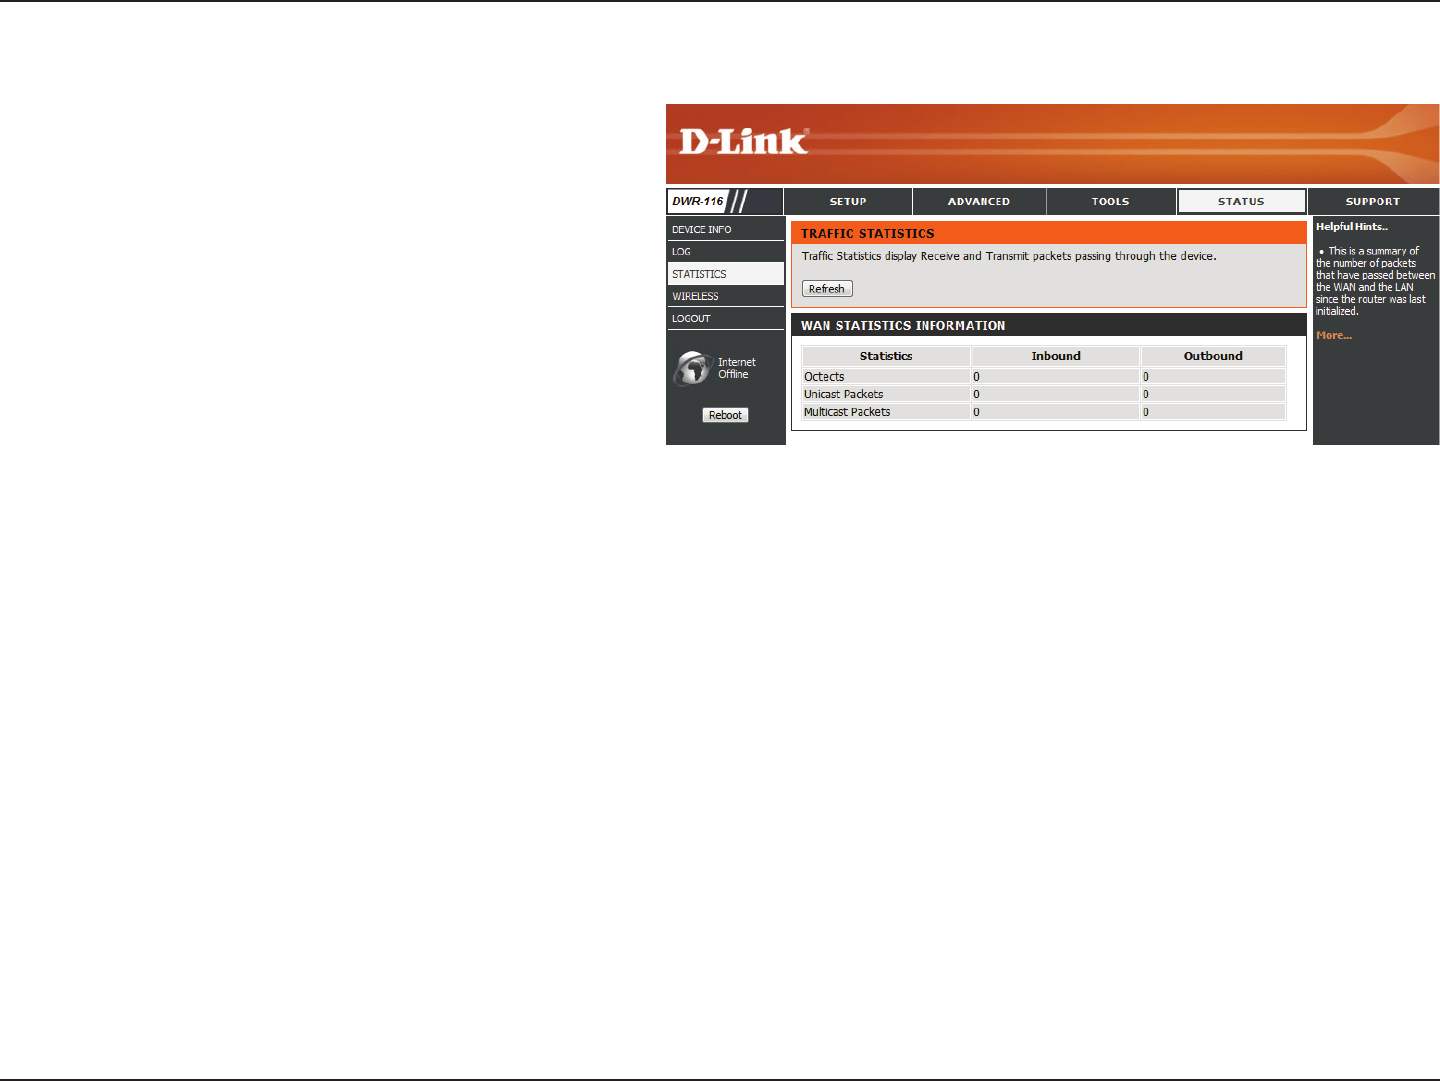
Statistics
Here you can view the packets transmitted and received passing
through your router on both WAN and LAN ports. The traffic
counter will reset if the device is rebooted.
58D-Link DWR-116 User Manual
Section 3 - Conguration
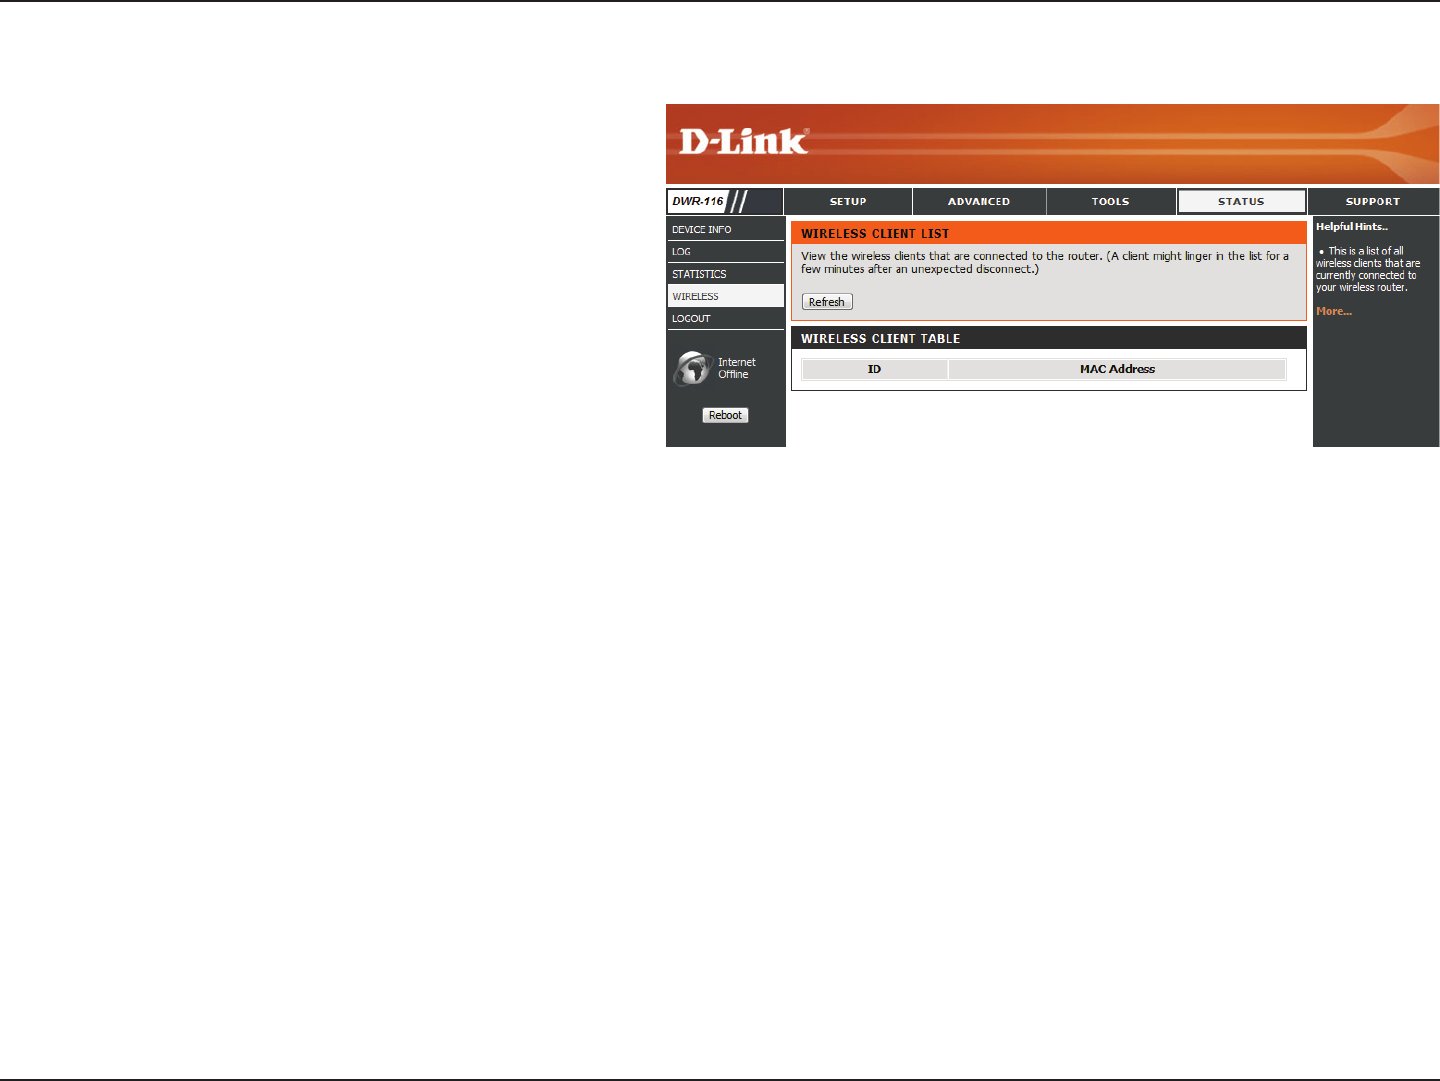
Wireless
This table displays a list of wireless clients that are connected to
your wireless router. It also displays the connection time and
MAC address of the connected wireless clients.
59D-Link DWR-116 User Manual
Section 3 - Conguration
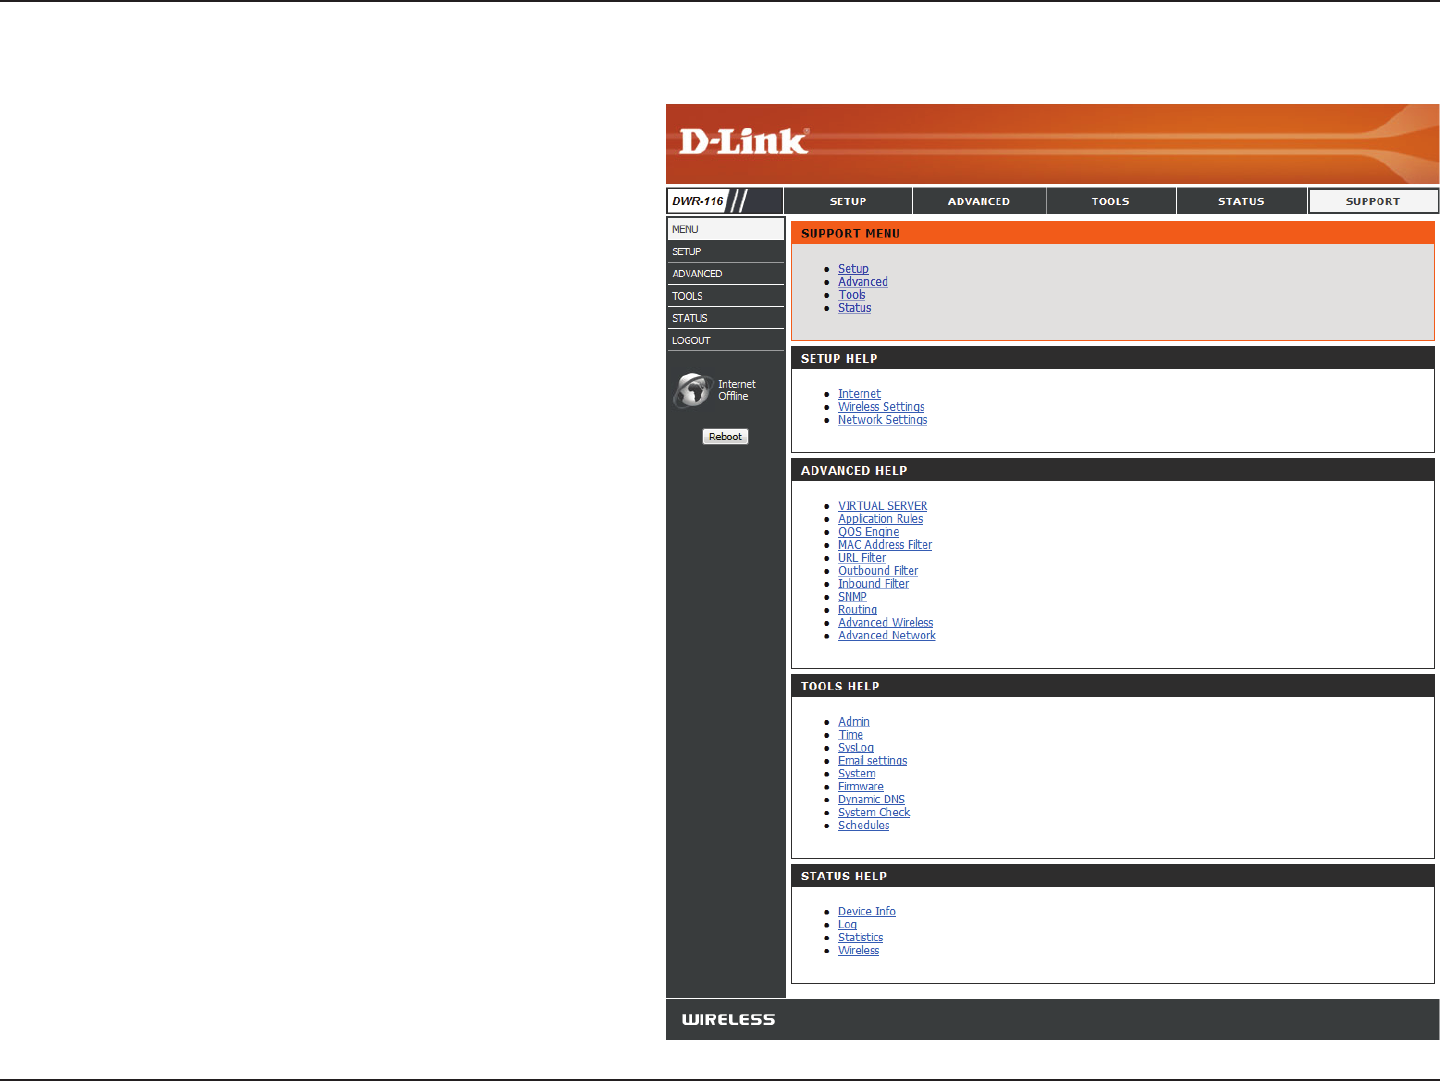
Support
The SUPPORT pages provide help information for each section
of the device’s interface. To view the Support pages, click on
SUPPORT at the top of the screen.

60D-Link DWR-116 User Manual
Section 4 - Security
Wireless Security
This section will show you the different levels of security you can use to protect your data from intruders. The
DWR-116 offers the following types of security:
• WPA2 (Wi-Fi Protected Access 2) • WPA2-PSK (Pre-Shared Key)
• WPA (Wi-Fi Protected Access) • WPA-PSK (Pre-Shared Key)
• WEP (Wired Equivalent Privacy)
What is WEP?
WEP stands for Wired Equivalent Privacy. It is based on the IEEE 802.11 standard and uses the RC4 encryption algorithm. WEP provides security by
encrypting data over your wireless network so that it is protected as it is transmitted from one wireless device to another.
To gain access to a WEP network, you must know the key. The key is a string of characters that you create. When using WEP, you must determine
the level of encryption. The type of encryption determines the key length. 128-bit encryption requires a longer key than 64-bit encryption. Keys
are defined by entering in a string in HEX (hexadecimal - using characters 0-9, A-F) or ASCII (American Standard Code for Information Interchange
– alphanumeric characters) format. ASCII format is provided so you can enter a string that is easier to remember. The ASCII string is converted to
HEX for use over the network. Four keys can be defined so that you can change keys easily.

61D-Link DWR-116 User Manual
Section 4 - Security
Configure WEP
It is recommended to enable encryption on your wireless router before your wireless network adapters. Please establish wireless connectivity before
enabling encryption. Your wireless signal may degrade when enabling encryption due to the added overhead.
1. Log into the web-based configuration by opening a web browser and entering the IP address of the router (192.168.0.1). Click on Wireless
Settings on the left side.
2. Next to Security Mode, select Enable WEP Security.
3. Next to Authentication, select Open or Shared Key.
4. Select either 64-bit or 128-bit encryption from the drop-down box next to WEP Encryption.
5. Next to Key Type, select either Hex or ASCII.
Hex (recommended) - Letters A-F and numbers 0-9 are valid.
ASCII - All numbers and letters are valid.
6. Next to Key 1, enter a WEP key that you create. Make sure you enter this key exactly on all your wireless devices. You may enter up to 4 different
keys.
7. Click Save Settings to save your settings. If you are configuring the router with a wireless adapter, you will lose connectivity until you enable
WEP on your adapter and enter the same WEP key as you did on the router.

62D-Link DWR-116 User Manual
Section 4 - Security
What is WPA?
WPA, or Wi-Fi Protected Access, is a Wi-Fi standard that was designed to improve the security features of WEP (Wired Equivalent Privacy).
The 2 major improvements over WEP:
• Improved data encryption through the Temporal Key Integrity Protocol (TKIP). TKIP scrambles the keys using a hashing algorithm
and, by adding an integrity-checking feature, ensures that the keys haven’t been tampered with. WPA2 is based on 802.11i and
uses Advanced Encryption Standard (AES) instead of TKIP.
• User authentication, which is generally missing in WEP, through the extensible authentication protocol (EAP). WEP regulates access
to a wireless network based on a computer’s hardware-specific MAC address, which is relatively simple to be sniffed out and stolen.
EAP is built on a more secure public-key encryption system to ensure that only authorized network users can access the network.
WPA-PSK/WPA2-PSK uses a passphrase or key to authenticate your wireless connection. The key is an alpha-numeric password between 8 and 63
characters long. The password can include symbols (!?*&_) and spaces. This key must be the exact same key entered on your wireless router or
access point.
WPA/WPA2 incorporates user authentication through the Extensible Authentication Protocol (EAP). EAP is built on a more secure public key encryption
system to ensure that only authorized network users can access the network.

63D-Link DWR-116 User Manual
Section 4 - Security
Configure WPA-PSK
It is recommended to enable encryption on your wireless router before your wireless network adapters. Please establish wireless connectivity before
enabling encryption. Your wireless signal may degrade when enabling encryption due to the added overhead.
1. Log into the web-based configuration by opening a web browser and entering the IP address of the router (192.168.0.1). Click on Wireless
Settings on the left side.
2. Next to Security Mode, select Enable WPA-Personal Security or Enable WPA2-Personal Security.
3. Next to Cipher Mode, select TKIP, AES, or Auto.
4. Next to PSK/EAP, select PSK.
5. Next to Passphrase, enter a key (passphrase). The key is an alpha-numeric password between 8 and 63 characters long. The password can include
symbols (!?*&_) and spaces. Make sure you enter this key exactly the same on all other wireless clients.
6. Enter the passphrase again next to Confirmed Passphrase.
7. Click Save Settings to save your settings. If you are configuring the router with a wireless adapter, you will lose connectivity until you enable
WPA-PSK (or WPA2-PSK) on your adapter and enter the same passphrase as you did on the router.

64D-Link DWR-116 User Manual
Section 4 - Security
Configure WPA (RADIUS)
It is recommended to enable encryption on your wireless router before your wireless network adapters. Please establish wireless connectivity before
enabling encryption. Your wireless signal may degrade when enabling encryption due to the added overhead.
1. Log into the web-based configuration by opening a web browser and entering the IP address of the router (192.168.0.1). Click on Wireless
Settings on the left side.
2. Next to Security Mode, select Enable WPA-Personal Security or Enable WPA2-Personal Security.
3. Next to Cipher Mode, select TKIP, AES, or Auto.
4. Next to PSK/EAP, select EAP.
5. Next to RADIUS Server 1 enter the IP Address of your RADIUS server.
6. Next to Port, enter the port you are using with your RADIUS server. 1812 is the default port.
7. Next to Shared Secret, enter the security key.
8. If you have a secondary RADIUS server, enter its IP address, port, and secret key.
9. Click Apply Settings to save your settings.

65D-Link DWR-116 User Manual
Section 4 - Security
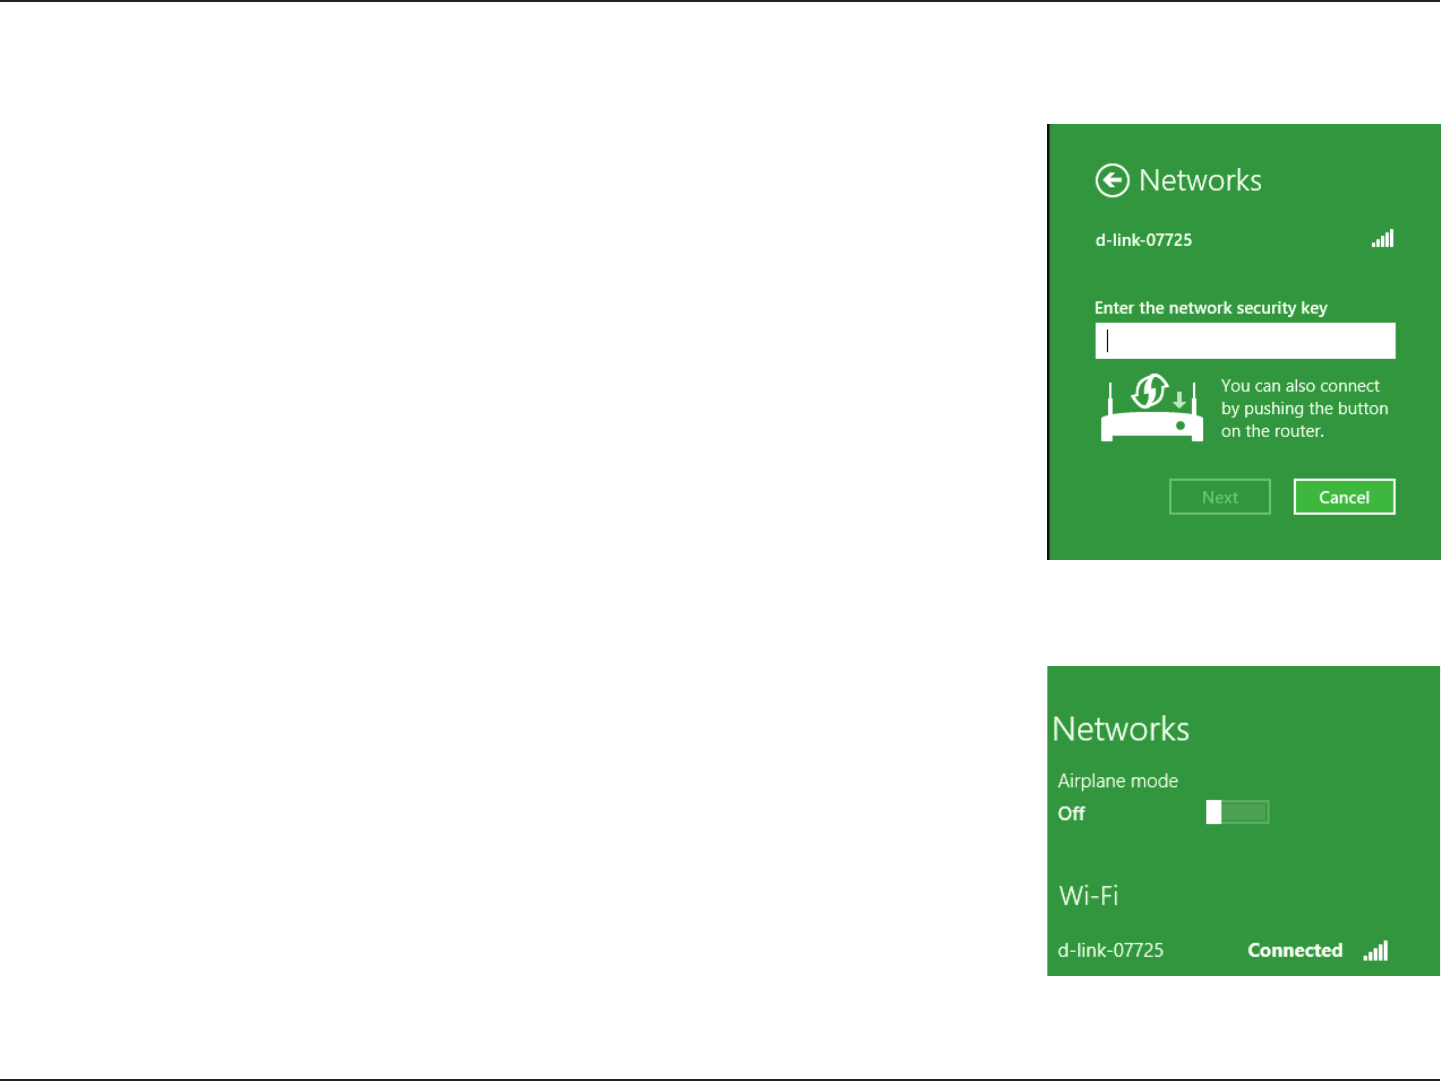
Windows® 8
WPA/WPA2
It is recommended to enable wireless security (WPA/WPA2) on your wireless router or access point before configuring your
wireless adapter. If you are joining an existing network, you will need to know the security key (Wi-Fi password) being used.
To join an existing network, locate the wireless network icon in the taskbar, next to the
time display.
Wireless Icon
Clicking on this icon will display a list of wireless networks which are within connecting
proximity of your computer. Select the desired network by clicking on the network name.
66D-Link DWR-116 User Manual
Section 4 - Security
You will then be prompted to enter the network security key (Wi-Fi password) for
the wireless network. Enter the password into the box and click Next.
If you wish to use Wi-Fi Protected Setup (WPS) to connect to the router, you can also
press the WPS button on your router at this point to enable the WPS function.
When you have established a successful connection with a wireless network, the word
Connected will appear next to the name of the network to which you are connected.
67D-Link DWR-116 User Manual
Section 4 - Security
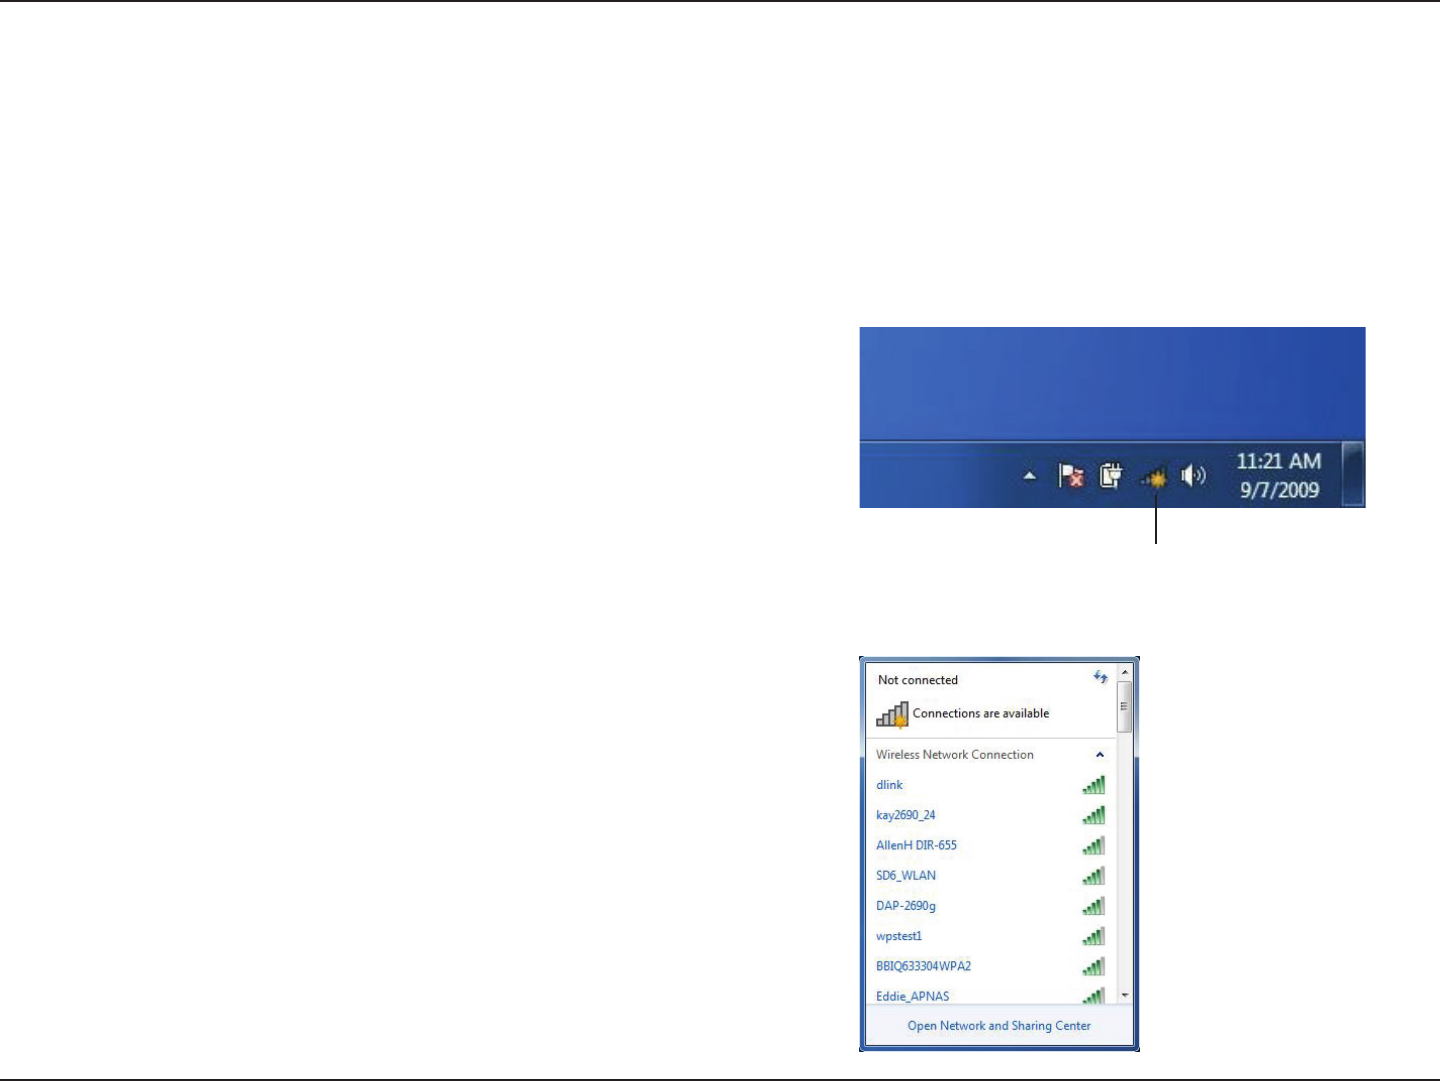
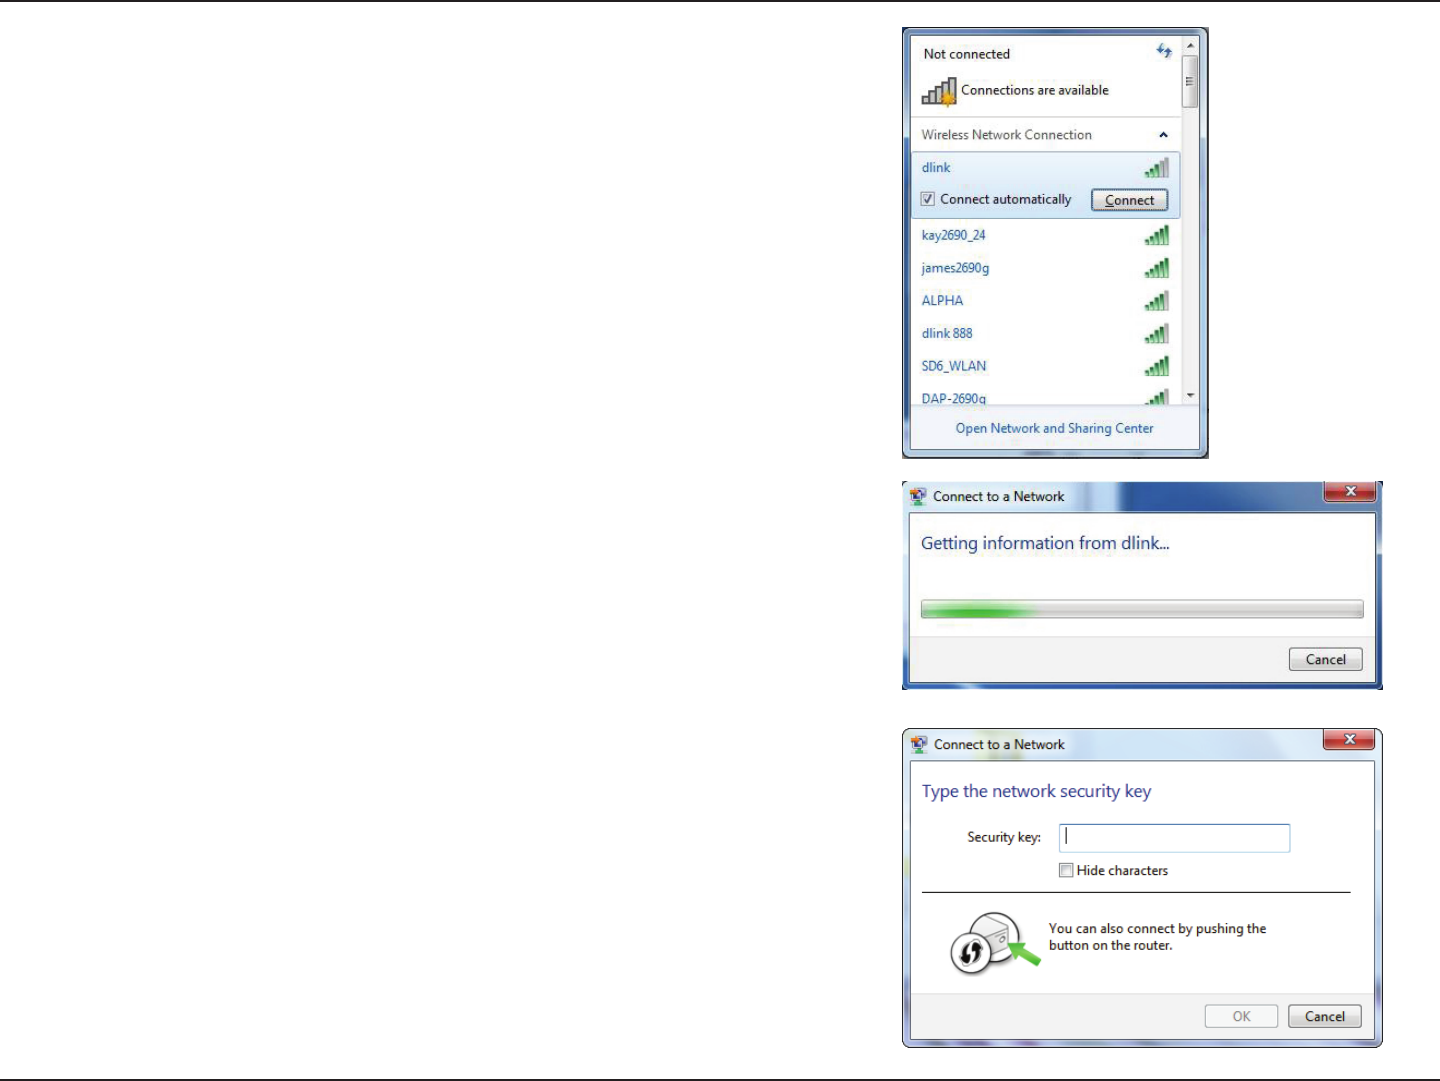
Windows® 7
It is recommended to enable wireless security (WPA/WPA2) on your wireless router or access point before configuring your
wireless adapter. If you are joining an existing network, you will need to know the security key or passphrase being used.
1. Click on the wireless icon in your system tray (lower-right corner).
2. The utility will display any available wireless networks in your area.
Wireless Icon
WPA/WPA2
68D-Link DWR-116 User Manual
Section 4 - Security
3. Highlight the wireless connection with Wi-Fi name (SSID) you would
like to connect to and click the Connect button.
If you get a good signal but cannot access the Internet, check your
TCP/IP settings for your wireless adapter. Refer to the Networking
Basics section in this manual for more information.
4. The following window appears while your computer tries to
connect to the router.
5. Enter the same security key or passphrase (Wi-Fi password) that is
on your router and click Connect. You can also connect by pushing
the WPS button on the router.
It may take 20-30 seconds to connect to the wireless network. If the
connection fails, please verify that the security settings are correct. The
key or passphrase must be exactly the same as on the wireless router.
69D-Link DWR-116 User Manual
Section 4 - Security
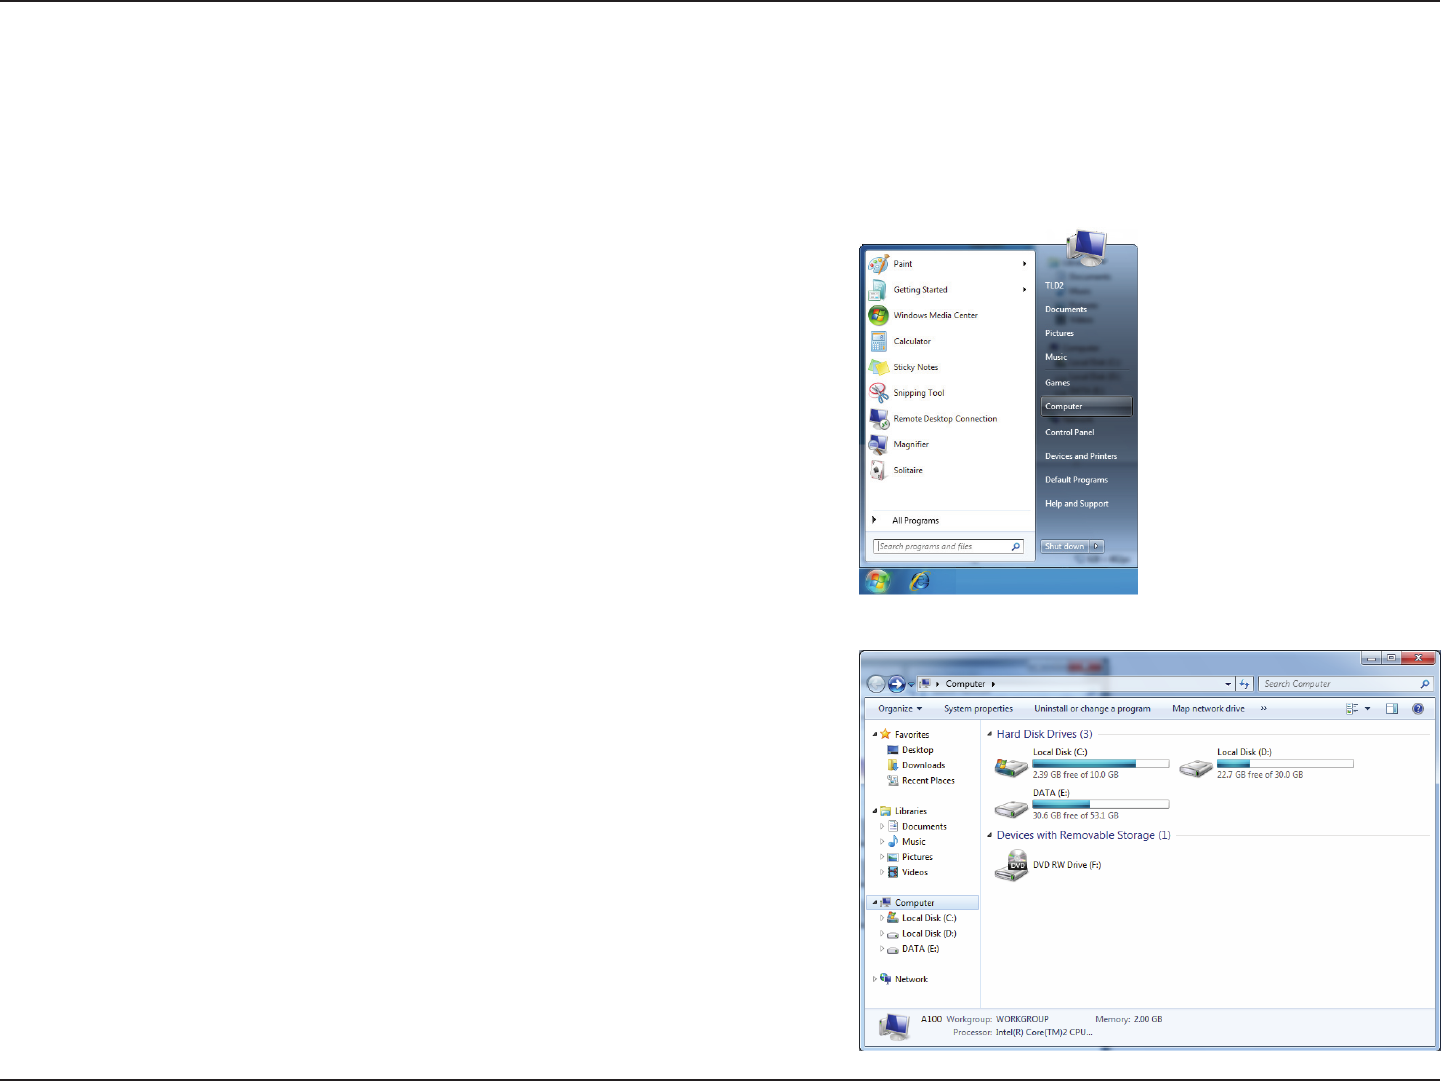
WPS
The WPS feature of the DWR-116 can be configured using Windows® 7. Carry out the following steps to use Windows® 7 to
configure the WPS feature:
1. Click the Start button and select Computer from the Start menu.
2. Click Network on the left side.
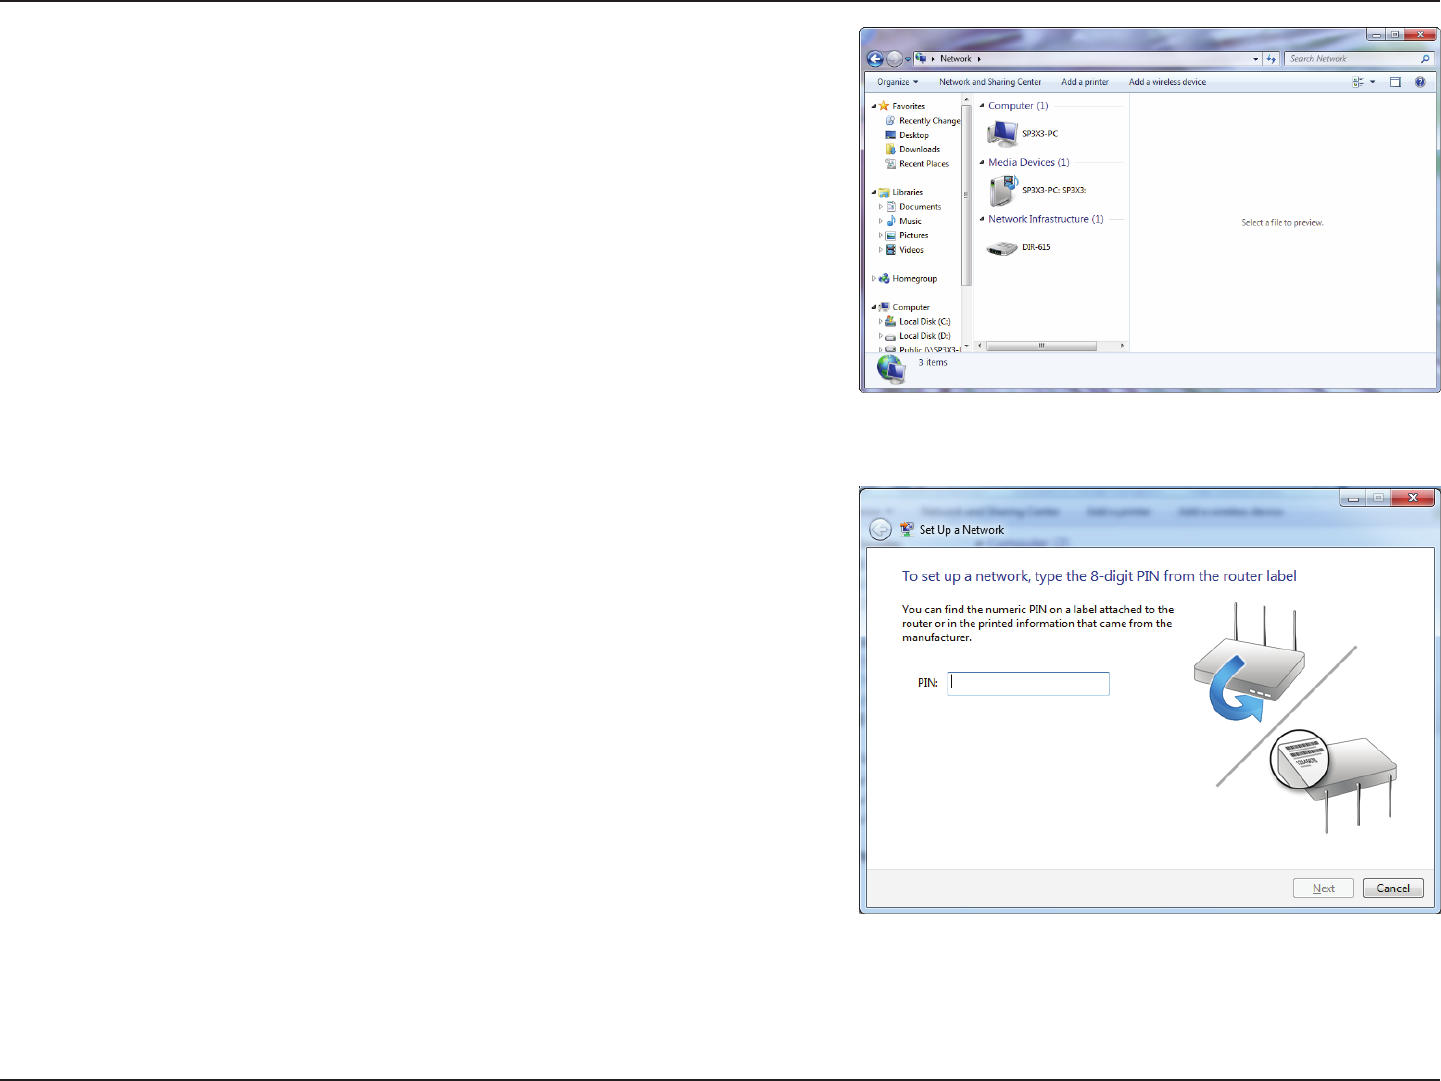
70D-Link DWR-116 User Manual
Section 4 - Security
3. Double-click the DWR-116
4. Input the WPS PIN number (displayed in the WPS window on the
Router’s LCD screen or in the Setup > Wireless Setup menu in
the Router’s Web UI) and click Next.
71D-Link DWR-116 User Manual
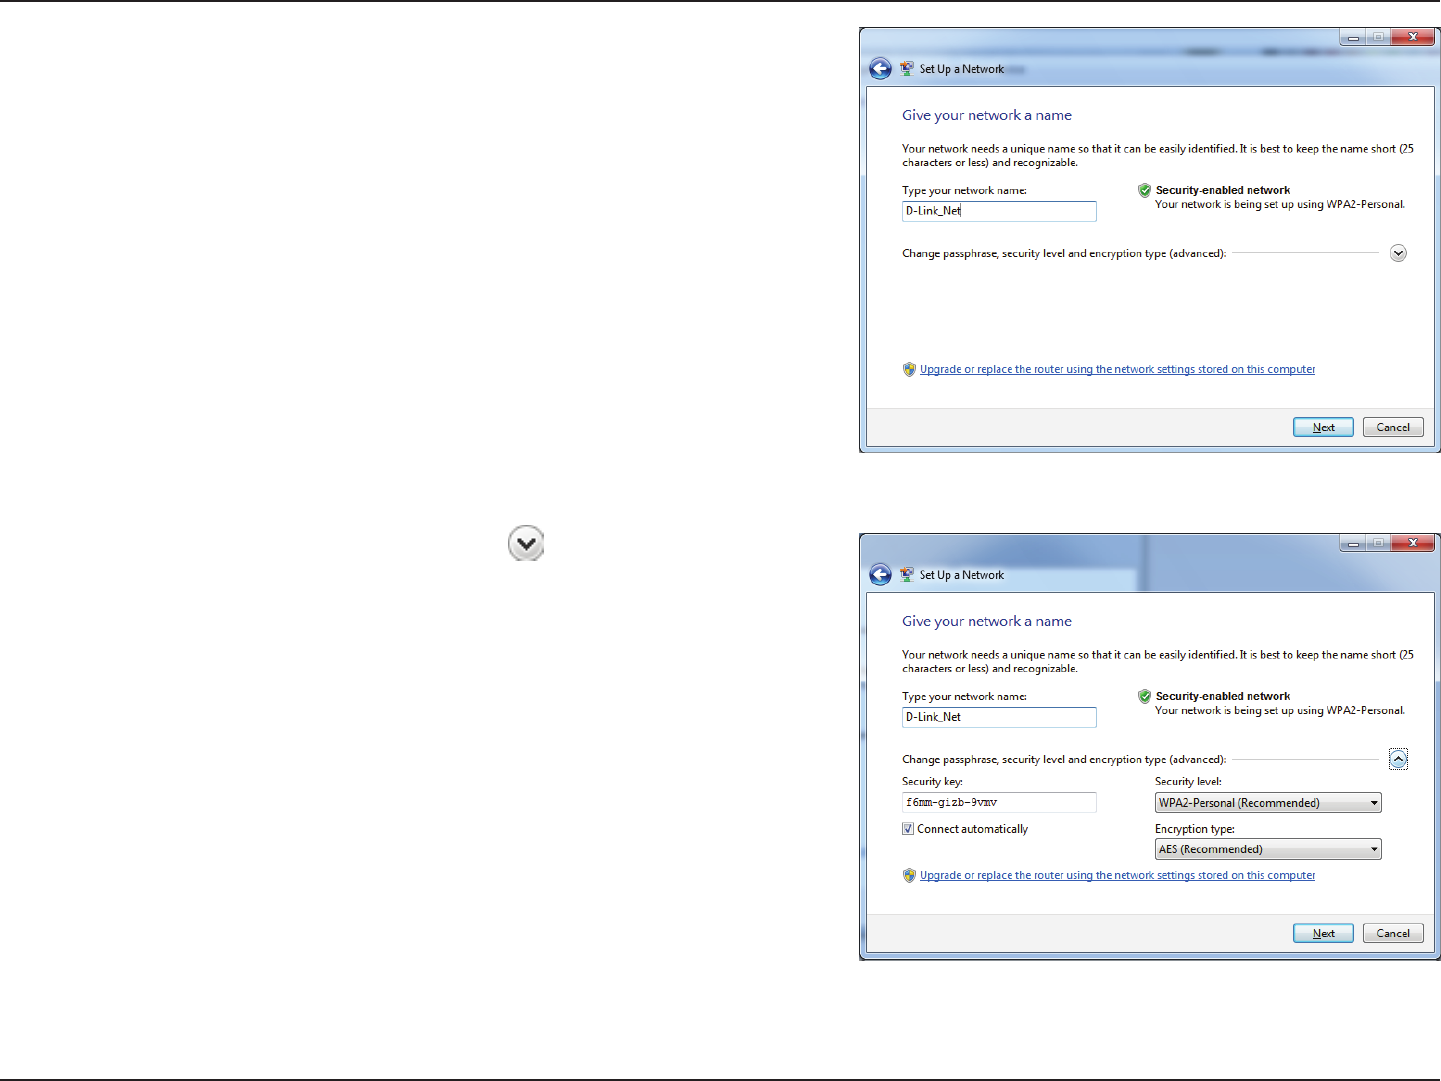
Section 4 - Security
5. Type a name to identify the network.
6. To configure advanced settings, click the icon.
Click Next to continue.
72D-Link DWR-116 User Manual
Section 4 - Security
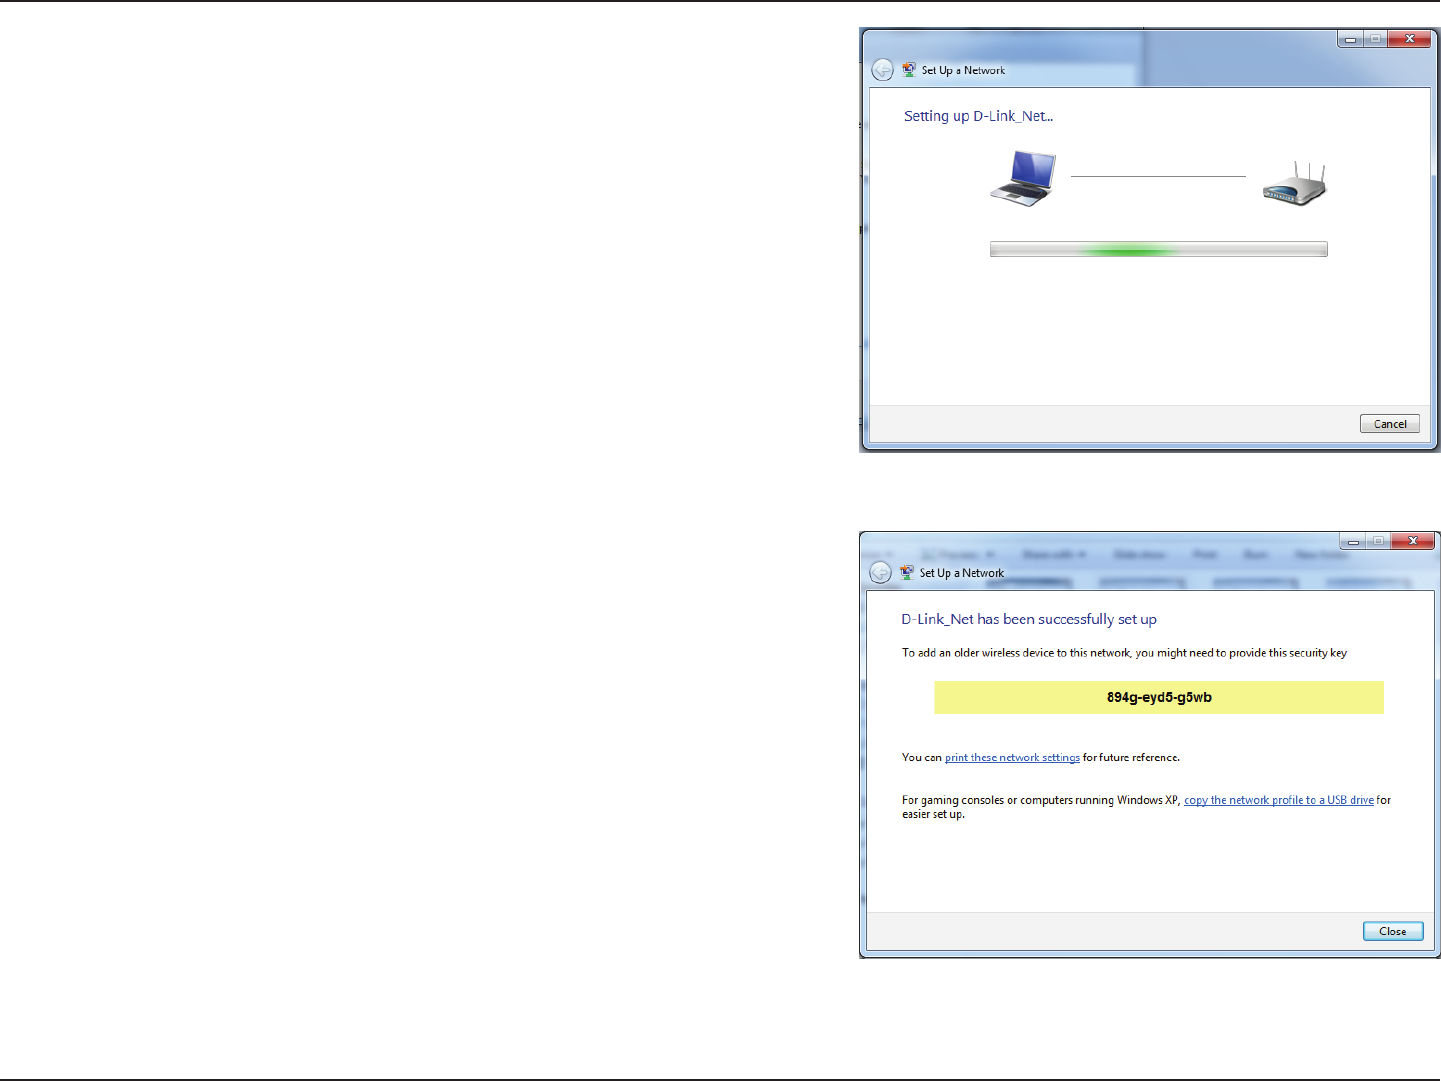
7. The following window appears while the Router is being
configured.
Wait for the configuration to complete.
8. The following window informs you that WPS on the router has
been setup successfully.
Make a note of the security key as you may need to provide this
security key if adding an older wireless device to the network in
the future.
9. Click Close to complete WPS setup.
73D-Link DWR-116 User Manual
Section 5 - Connecting to a Wireless Network
Windows Vista®
Windows Vista® users may use the built-in wireless utility. If you are using another company’s utility, please refer to the user
manual of your wireless adapter for help with connecting to a wireless network. Most utilities will have a “site survey” option
similar to the Windows Vista® utility as seen below.
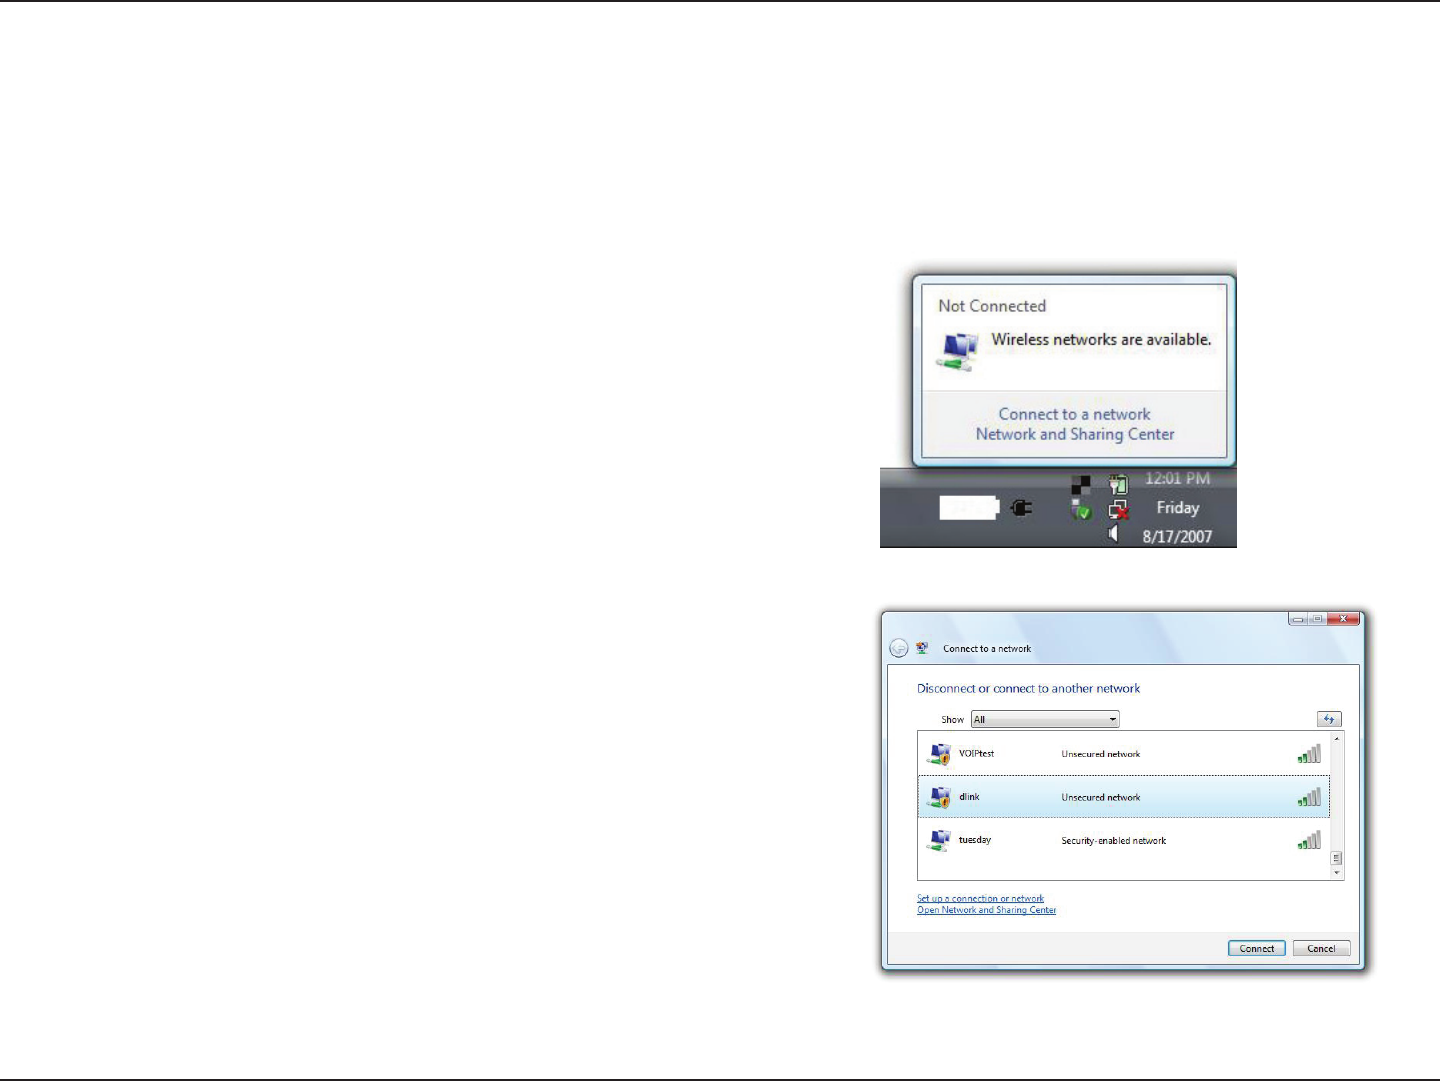
Right-click on the wireless computer icon in your system tray (lower-right
corner next to the time). Select Connect to a network.
If you receive the Wireless Networks Detected bubble, click on the
center of the bubble to access the utility.
or
The utility will display any available wireless networks in your area. Click
on a network (displayed using the SSID) and click the Connect button.
If you get a good signal but cannot access the Internet, check you TCP/
IP settings for your wireless adapter. Refer to the Networking Basics
section in this manual for more information.
74D-Link DWR-116 User Manual
Section 5 - Connecting to a Wireless Network
WPA/WPA2
It is recommended to enable wireless security (WPA/WPA2) on your wireless router or access point before configuring your
wireless adapter. If you are joining an existing network, you will need to know the security key or passphrase being used.
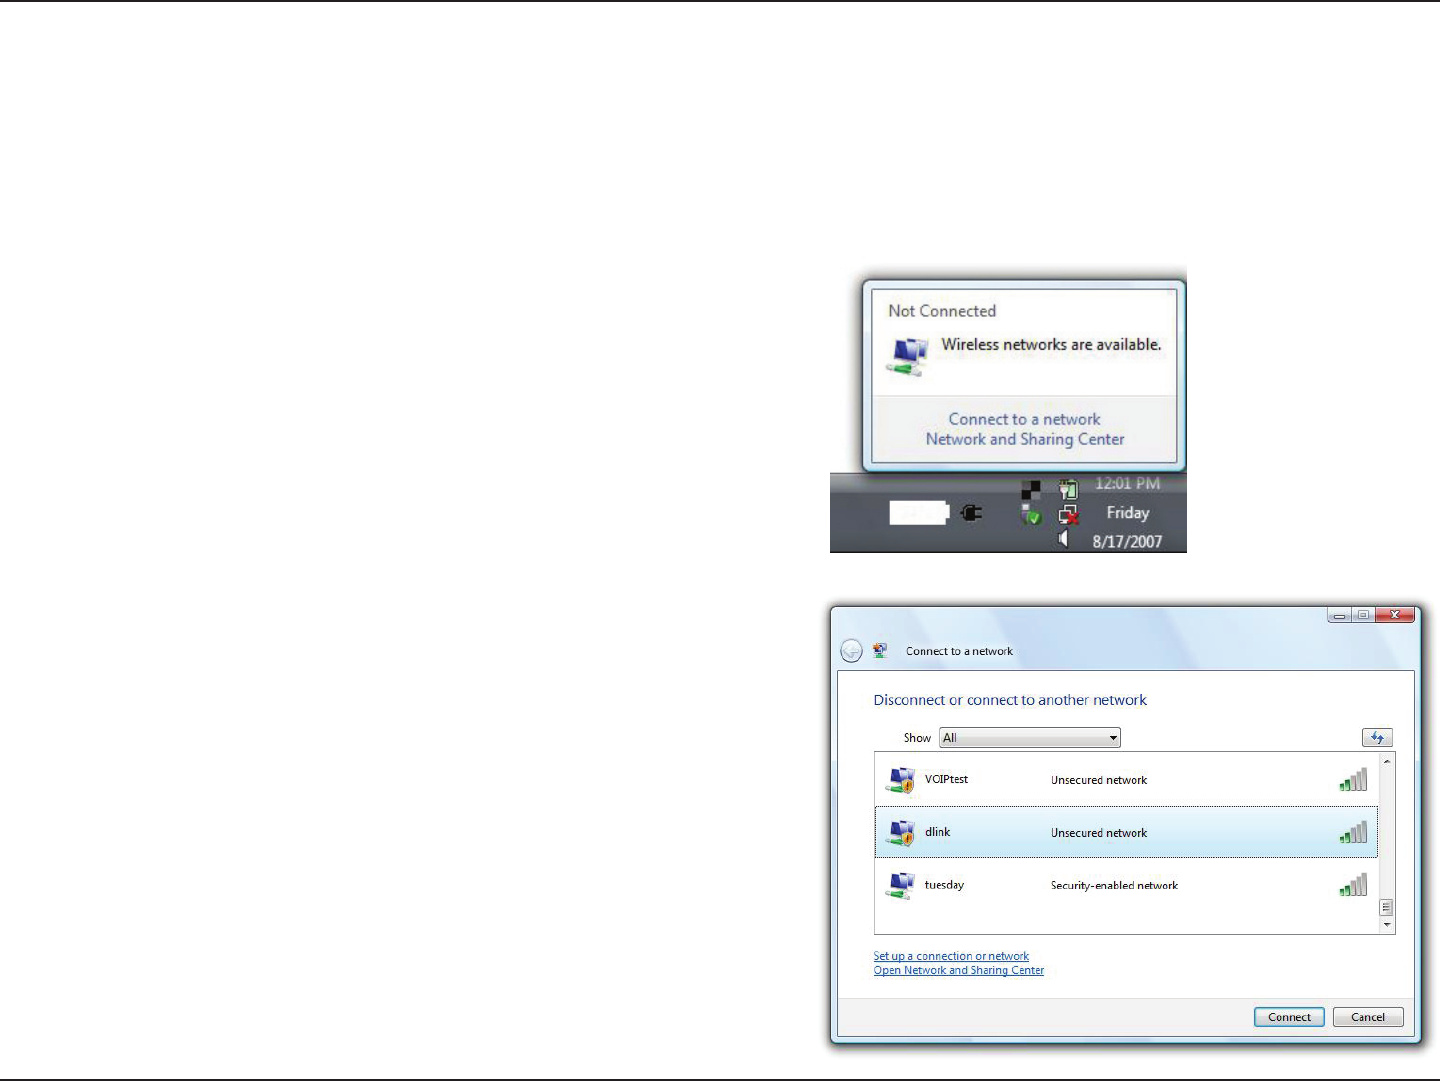
2. Highlight the Wi-Fi name (SSID) you would like to connect to and
click Connect.
1. Open the Windows Vista® Wireless Utility by right-clicking on the
wireless computer icon in your system tray (lower right corner of
screen). Select Connect to a network.
75D-Link DWR-116 User Manual
Section 5 - Connecting to a Wireless Network
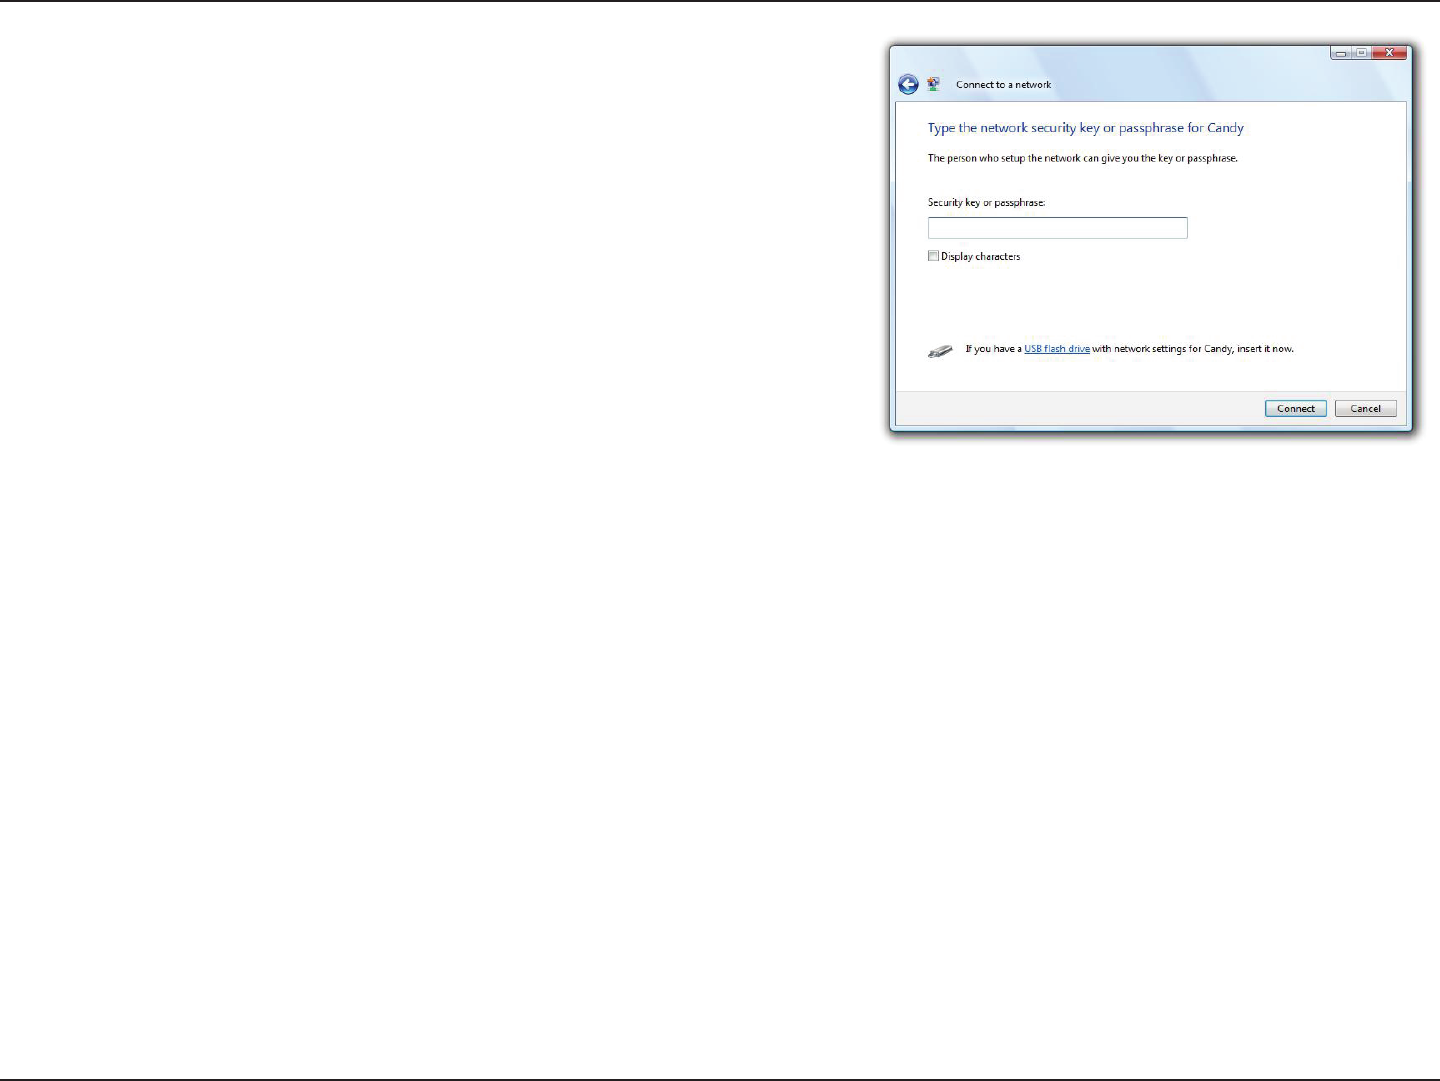
3. Enter the same security key or passphrase (Wi-Fi password) that is on
your router and click Connect.
It may take 20-30 seconds to connect to the wireless network. If the
connection fails, please verify that the security settings are correct. The
key or passphrase must be exactly the same as on the wireless router.
76D-Link DWR-116 User Manual
Section 5 - Connecting to a Wireless Network
WPS/WCN 2.0
The router supports Wi-Fi protection, referred to as WCN 2.0 in Windows Vista®. The following instructions for setting this up
depends on whether you are using Windows Vista® to configure the router or third party software.
When you first set up the router, Wi-Fi protection is disabled and not configured. To enjoy the benefits of Wi-Fi protection, the
router must be both enabled and configured. There are three basic methods to accomplish this: use Windows Vista’s built-in
support for WCN 2.0, use software provided by a third party, or manually configure.
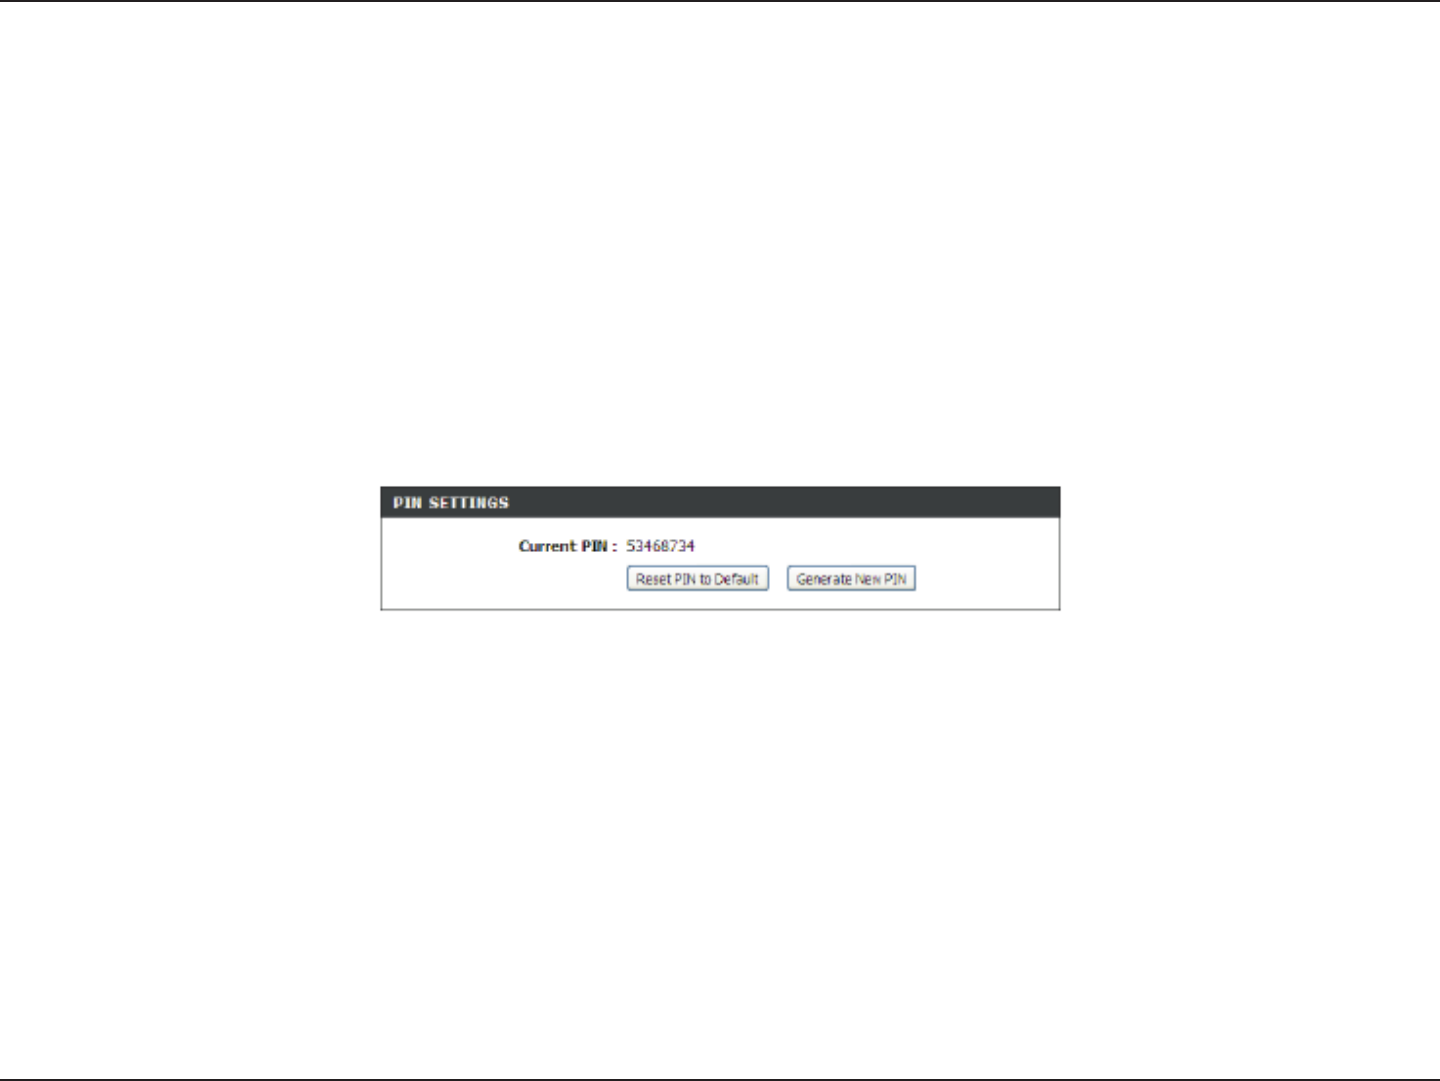
If you are running Windows Vista®, log into the router and click the Enable checkbox in the Basic > Wireless section. Use the
Current PIN that is displayed on the Advanced > Wi-Fi Protected Setup section or choose to click the Generate New PIN
button or Reset PIN to Default button.
If you are using third party software to set up Wi-Fi Protection, carefully follow the directions. When you are finished, proceed
to the next section to set up the newly-configured router.
77D-Link DWR-116 User Manual
Section 5 - Connecting to a Wireless Network
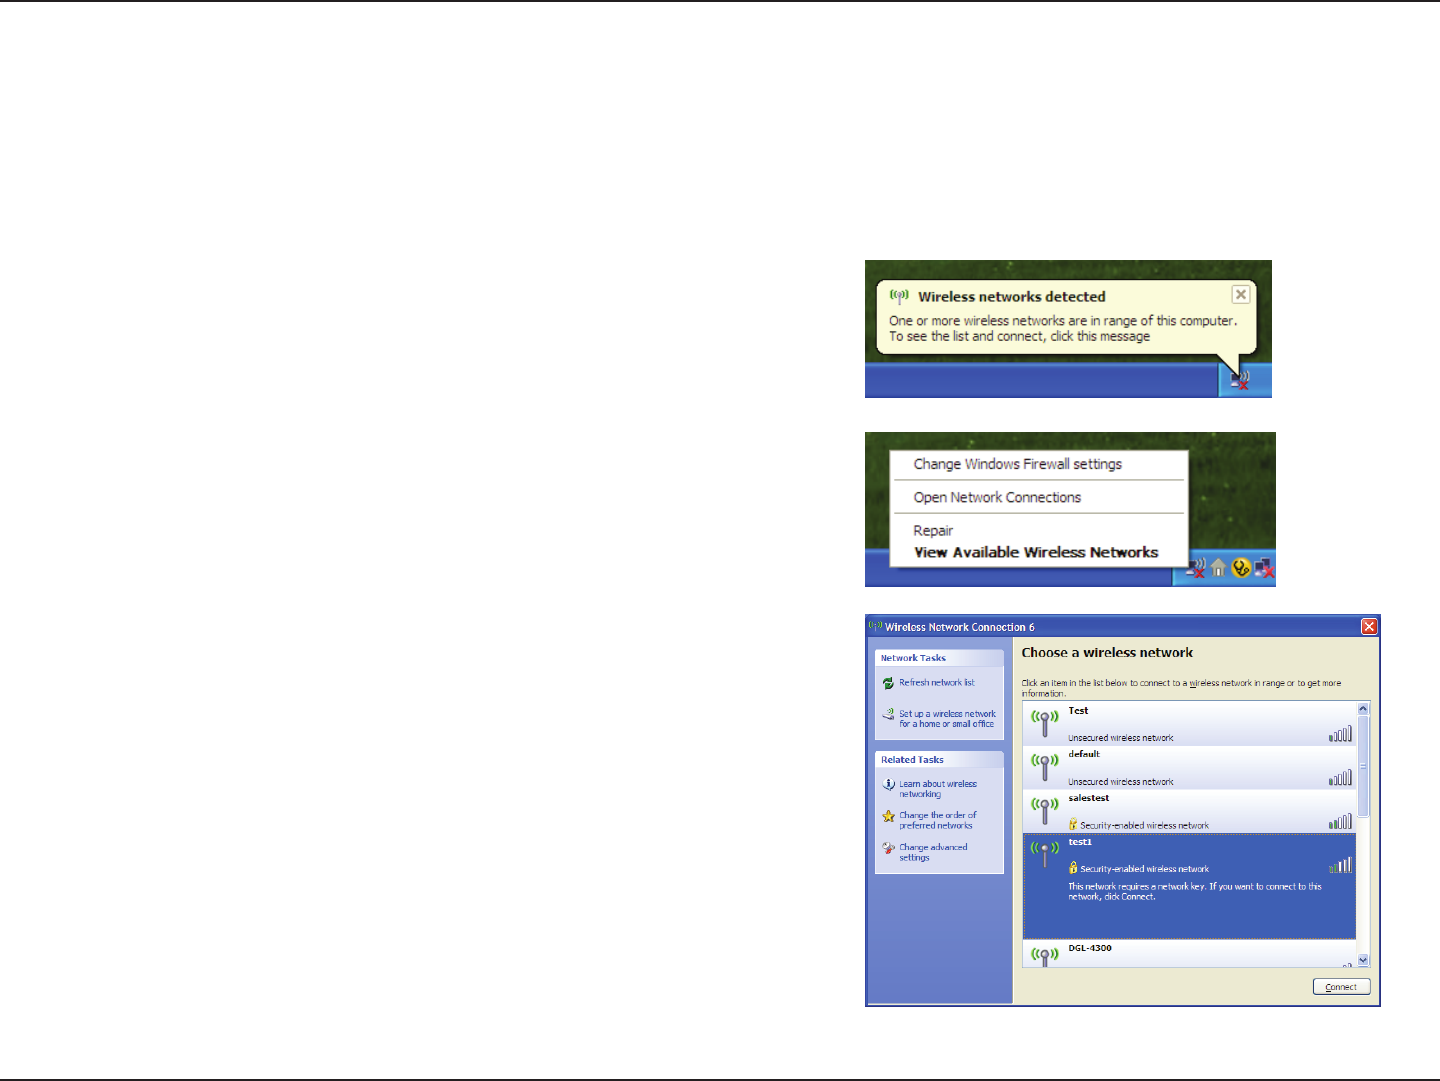
Windows® XP
Windows® XP users may use the built-in wireless utility (Zero Configuration Utility). The following instructions are for Service
Pack 2 users. If you are using another company’s utility, please refer to the user manual of your wireless adapter for help with
connecting to a wireless network. Most utilities will have a “site survey” option similar to the Windows® XP utility as seen below.
Right-click on the wireless computer icon in your system tray (lower-right
corner next to the time). Select View Available Wireless Networks.
If you receive the Wireless Networks Detected bubble, click on the
center of the bubble to access the utility.
or
The utility will display any available wireless networks in your area. Click
on a Wi-Fi network (displayed using the SSID) and click the Connect
button.
If you get a good signal but cannot access the Internet, check you TCP/
IP settings for your wireless adapter. Refer to the Networking Basics
section in this manual for more information.
78D-Link DWR-116 User Manual
Section 5 - Connecting to a Wireless Network
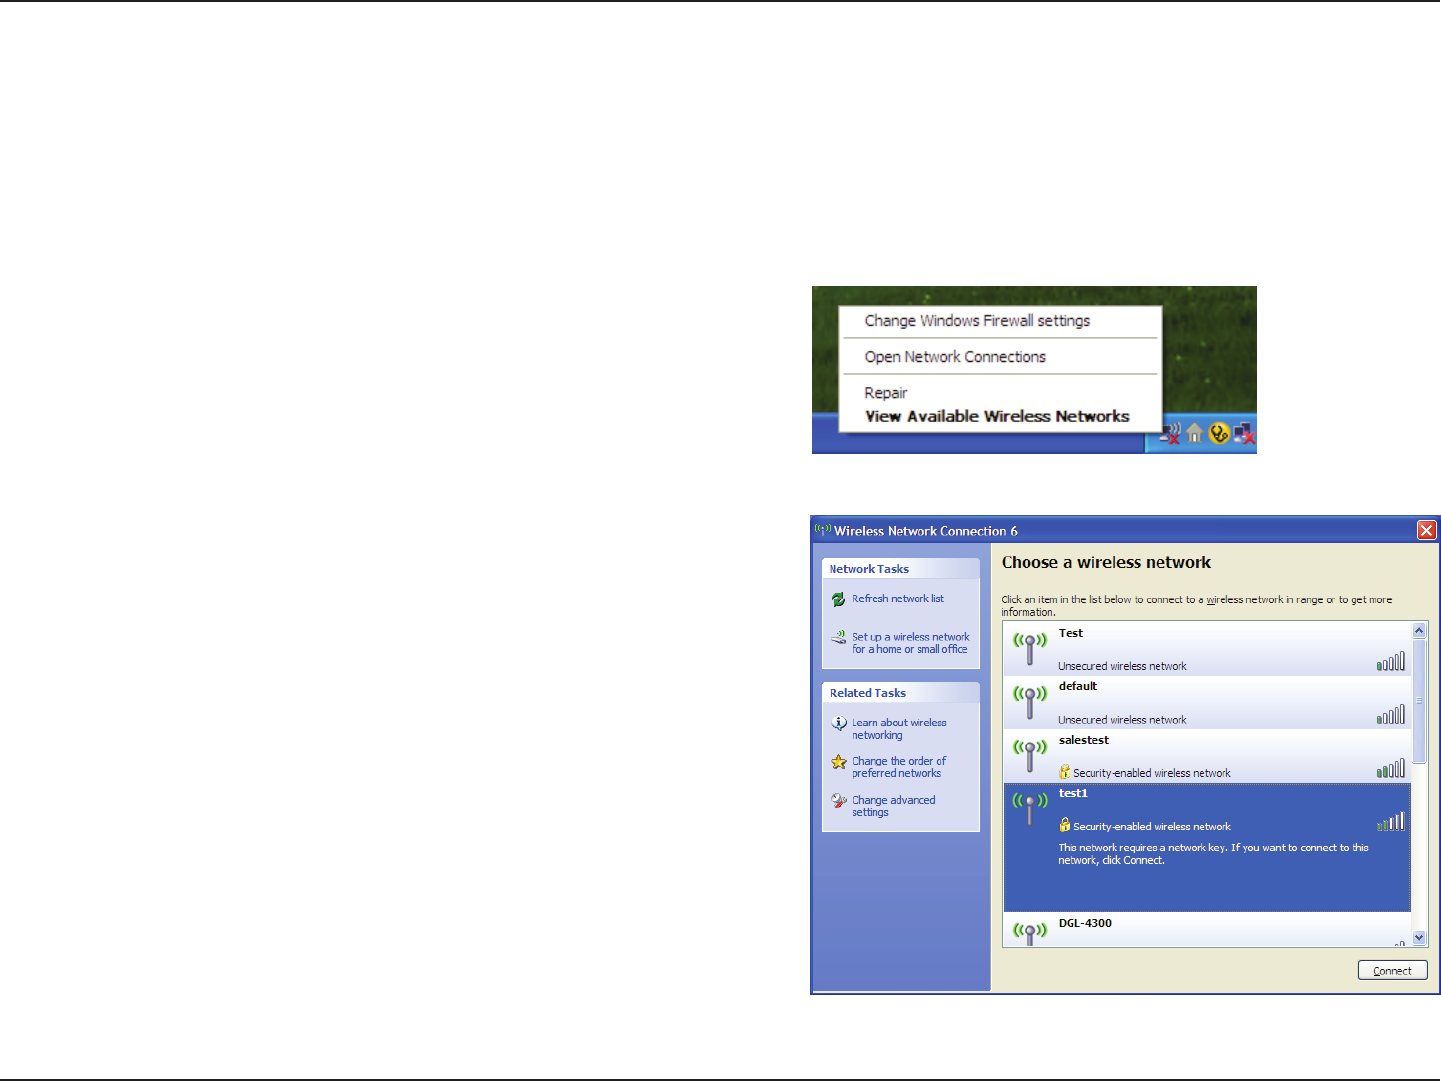
It is recommended to enable WPA on your wireless router or access point before configuring your wireless adapter. If you are
joining an existing network, you will need to know the WPA key being used.
2. Highlight the Wi-Fi network (SSID) you would like to connect
to and click Connect.
1. Open the Windows® XP Wireless Utility by right-clicking on the
wireless computer icon in your system tray (lower-right corner
of screen). Select View Available Wireless Networks.
WPA/WPA2
79D-Link DWR-116 User Manual
Section 5 - Connecting to a Wireless Network
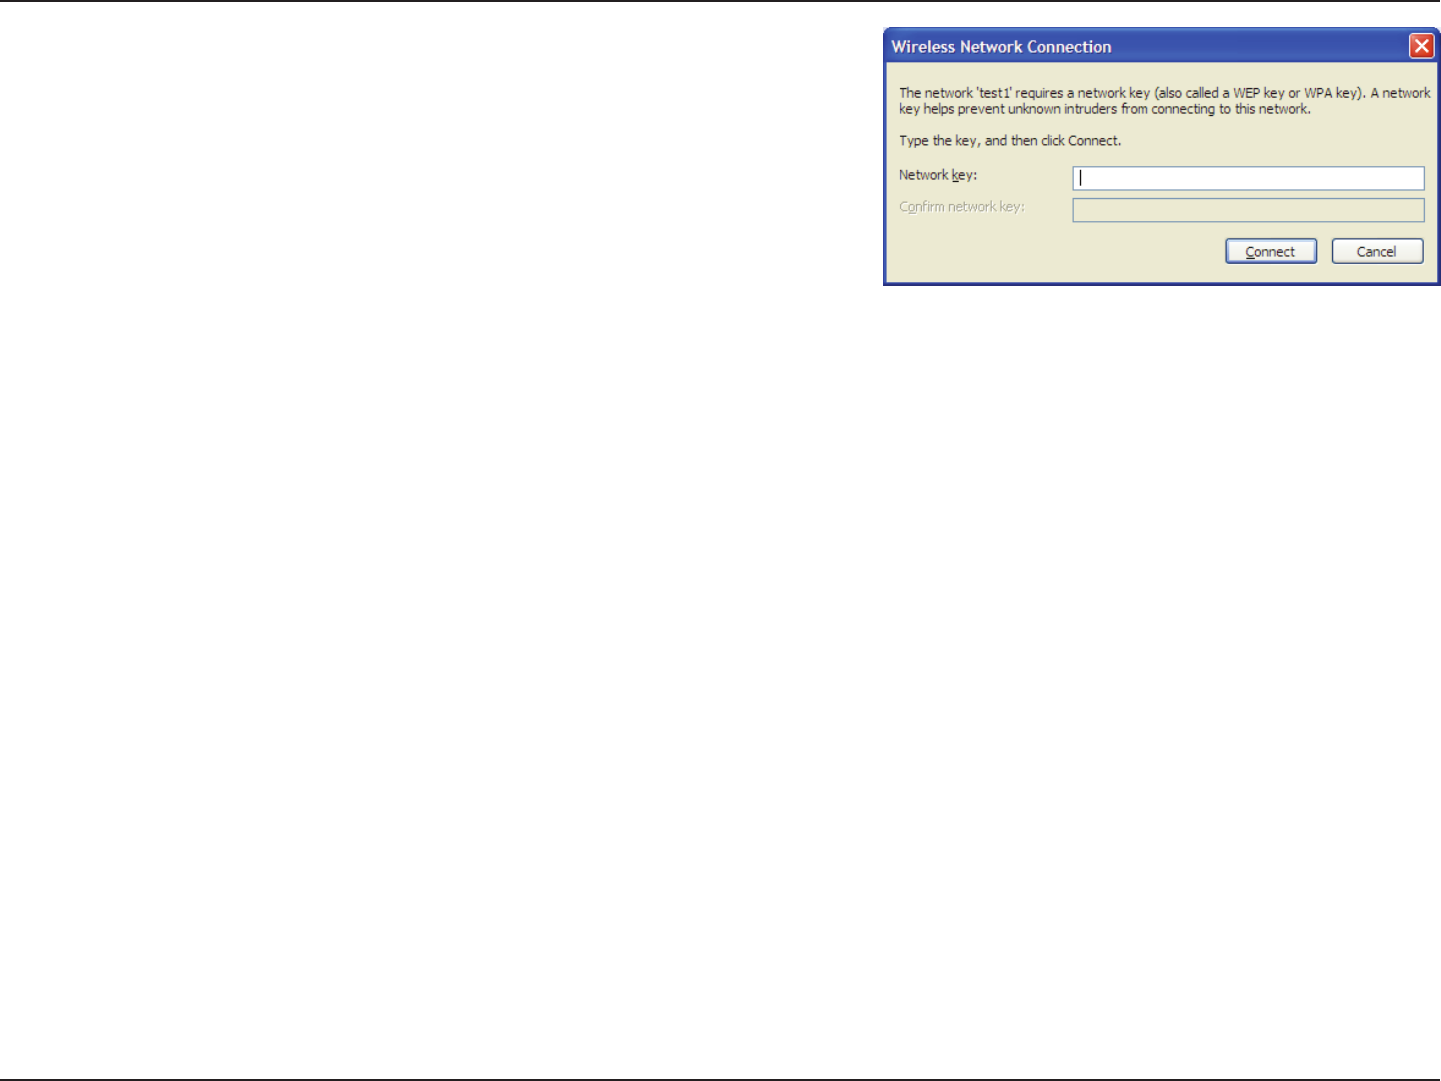
3. The Wireless Network Connection box will appear. Enter the WPA-PSK
Wi-Fi password and click Connect.
It may take 20-30 seconds to connect to the wireless network. If the
connection fails, please verify that the WPA-PSK settings are correct. The
Wi-Fi password must be exactly the same as on the wireless router.

80D-Link DWR-116 User Manual
Section 6 - Troubleshooting
Troubleshooting
This chapter provides solutions to problems that can occur during the installation and operation of the DWR-116. Read the following descriptions
if you are having problems. (The examples below are illustrated in Windows® XP. If you have a different operating system, the screenshots on your
computer will look similar to the following examples.)
1. Why can’t I access the web-based configuration utility?
When entering the IP address of the D-Link router (192.168.0.1 for example), you are not connecting to a website on the Internet or have to be
connected to the Internet. The device has the utility built-in to a ROM chip in the device itself. Your computer must be on the same IP subnet to
connect to the web-based utility.
• Make sure you have an updated Java-enabled web browser. We recommend the following:
• Internet Explorer 6.0 or higher
• Netscape 8 or higher
• Mozilla 1.7.12 (5.0) or higher
• Opera 8.5 or higher
• Safari 1.2 or higher (with Java 1.3.1 or higher)
• Camino 0.8.4 or higher
• Firefox 1.5 or higher
• Verify physical connectivity by checking for solid link lights on the device. If you do not get a solid link light, try using a different cable or connect
to a different port on the device if possible. If the computer is turned off, the link light may not be on.
• Disable any internet security software running on the computer. Software firewalls such as Zone Alarm, Black Ice, Sygate, Norton Personal Firewall,
and Windows® XP firewall may block access to the configuration pages. Check the help files included with your firewall software for more information
on disabling or configuring it.

81D-Link DWR-116 User Manual
Section 6 - Troubleshooting
• Configure your Internet settings:
• Go to Start > Settings > Control Panel. Double-click the Internet Options Icon. From the Security tab, click the button to restore
the settings to their defaults.
• Click the Connection tab and set the dial-up option to Never Dial a Connection. Click the LAN Settings button. Make sure nothing
is checked. Click OK.
• Go to the Advanced tab and click the button to restore these settings to their defaults. Click OK three times.
• Close your web browser (if open) and open it.
• Access the web management. Open your web browser and enter the IP address of your D-Link router in the address bar. This should open the
login page for your the web management.
• If you still cannot access the configuration, unplug the power to the router for 10 seconds and plug back in. Wait about 30 seconds and try accessing
the configuration. If you have multiple computers, try connecting using a different computer.
2. What can I do if I forgot my password?
If you forgot your password, you must reset your router. Unfortunately this process will change all your settings back to the factory defaults.
To reset the router, locate the reset button (hole) on the rear panel of the unit. With the router powered on, use a paperclip to hold the button
down for 10 seconds. Release the button and the router will go through its reboot process. Wait about 30 seconds to access the router. The default
IP address is 192.168.0.1. When logging in, the username is admin and leave the password box empty.

82D-Link DWR-116 User Manual
Appendix A - Wireless Basics
There are basically two modes of networking:
• Infrastructure – All wireless clients will connect to an access point or wireless router.
• Ad-Hoc – Directly connecting to another computer, for peer-to-peer communication, using wireless network adapters on each
computer, such as two or more WNA-2330 wireless network Cardbus adapters.
An Infrastructure network contains an Access Point or wireless router. All the wireless devices, or clients, will connect to the wireless router or access
point.
An Ad-Hoc network contains only clients, such as laptops with wireless cardbus adapters. All the adapters must be in Ad-Hoc mode to communicate.
Wireless Modes
83D-Link DWR-116 User Manual
Appendix B - Networking Basics
Networking Basics
Check your IP address
After you install your new D-Link adapter, by default, the TCP/IP settings should be set to obtain an IP address from a DHCP server (i.e. wireless
router) automatically. To verify your IP address, please follow the steps below.
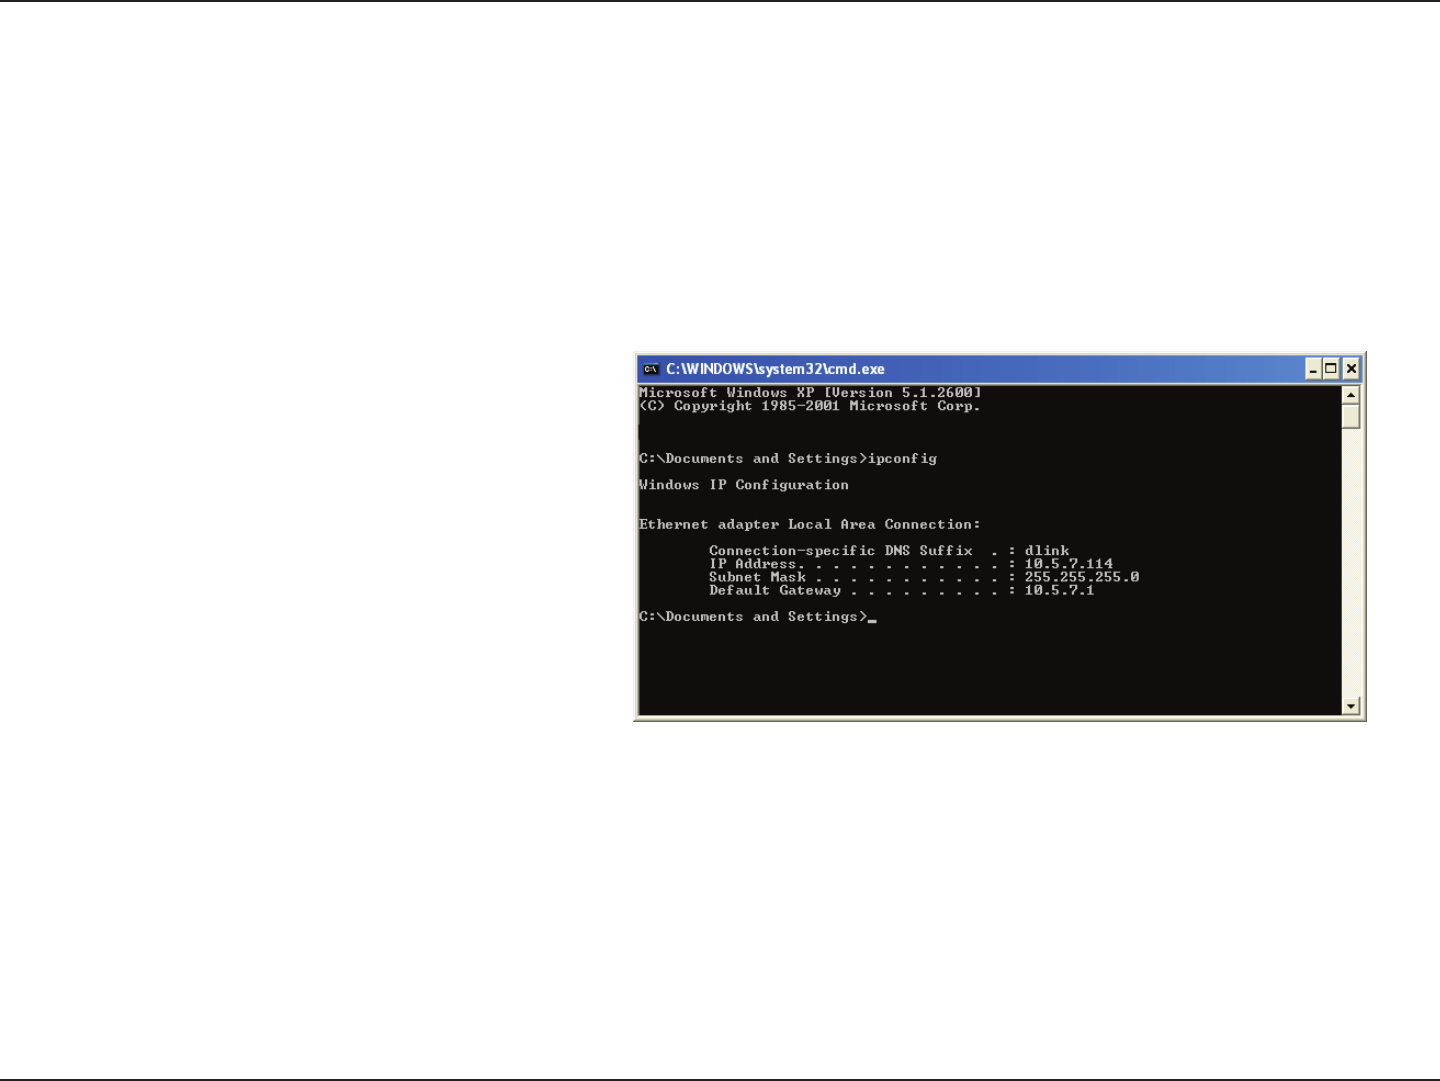
Click on Start > Run. In the run box type cmd and click OK. (Windows® Vista™ users type cmd in the Start Search box.)
At the prompt, type ipconfig and press Enter.
This will display the IP address, subnet mask, and the default
gateway of your adapter.
If the address is 0.0.0.0, check your adapter installation, security
settings, and the settings on your router. Some firewall software
programs may block a DHCP request on newly installed
adapters.
84D-Link DWR-116 User Manual
Appendix B - Networking Basics
Statically Assign an IP address
If you are not using a DHCP capable gateway/router, or you need to assign a static IP address, please follow the steps below:
Step 1
Windows® Vista™ - Click on Start > Control Panel > Network and Internet > Network and Sharing Center > Manage Network Connections.
Windows® XP - Click on Start > Control Panel > Network Connections.
Windows® 2000 - From the desktop, right-click My Network Places > Properties.
Step 2
Right-click on the Local Area Connection which represents your network adapter and select Properties.
Step 3
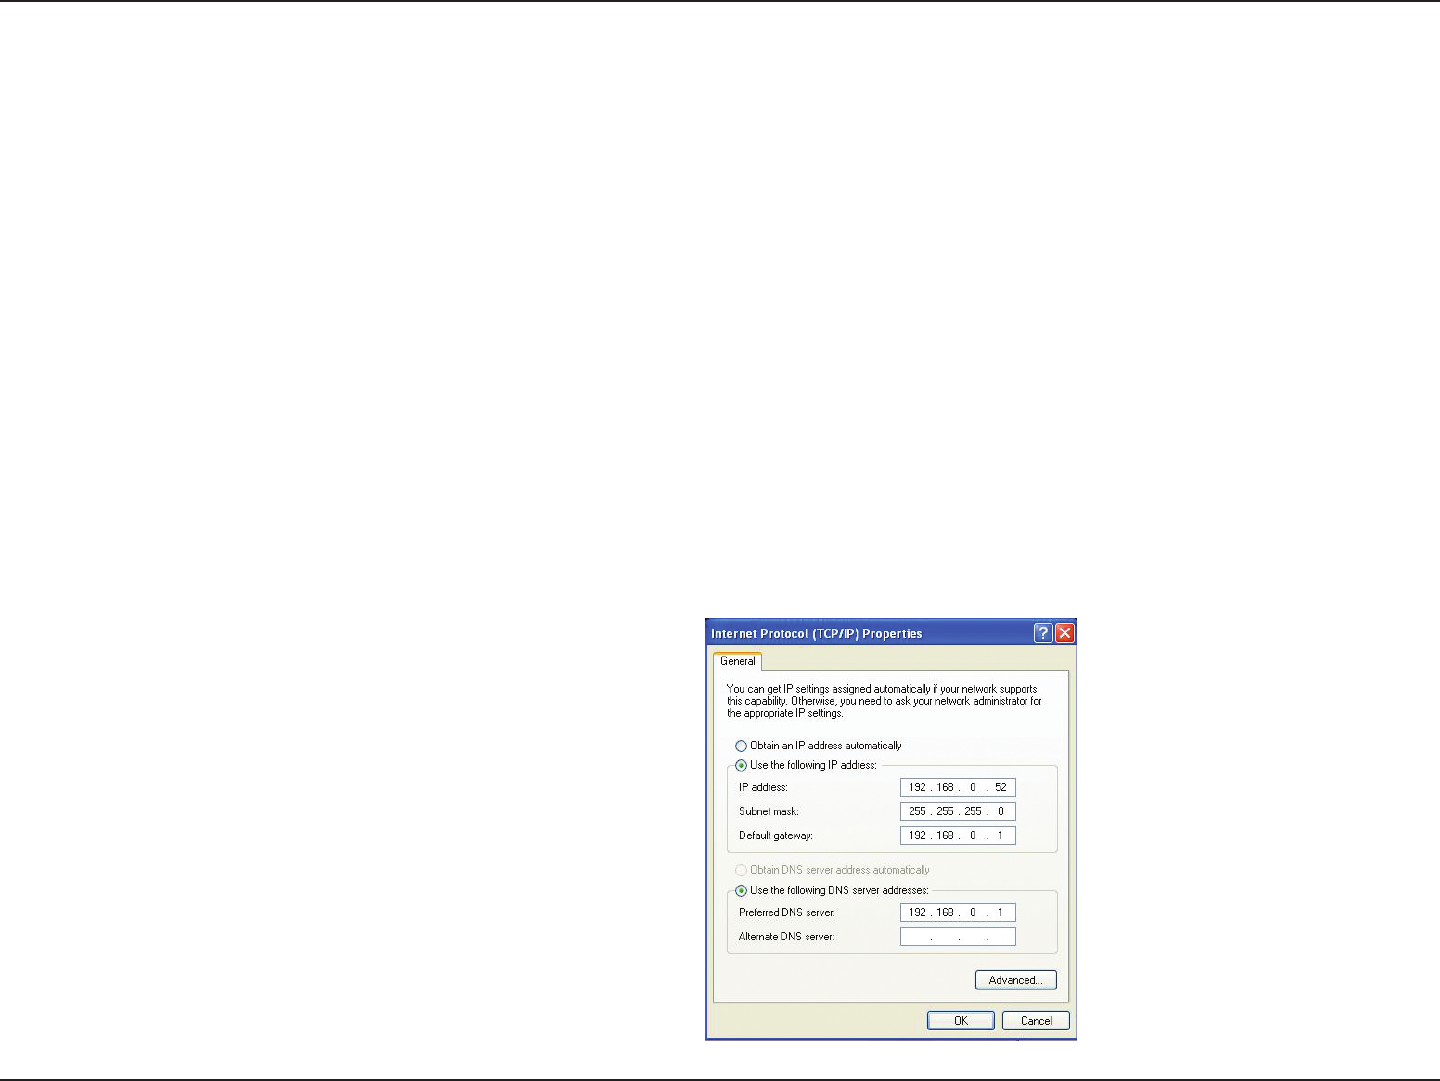
Highlight Internet Protocol (TCP/IP) and click Properties.
Step 4
Click Use the following IP address and enter an IP address that is on the same subnet as your network or the LAN IP address on your router.
Example: If the router´s LAN IP address is 192.168.0.1, make your IP address 192.168.0.X where X is a number between 2 and 99. Make sure that the
number you choose is not in use on the network. Set Default Gateway the same as the LAN IP address of your router (192.168.0.1).
Set Primary DNS the same as the LAN IP address of your router (192.168.0.1). The Secondary DNS is not needed or you may enter a DNS server from
your ISP.
Step 5
Click OK twice to save your settings.

85D-Link DWR-116 User Manual
Appendix C - Technical Specications
Technical Specifications
Data Rates **
300,150,135,120,90,60,45,30,15 Mbps in 802.11n mode
6/9/11/12/18/24/36/48/54Mbps in 802.11g mode
1/2/5.5/11Mbps in 802.11b mode
Standards
IEEE 802.11n compliant (2Tx2R)
IEEE 802.11b/g
IEEE 802.3
IEEE 802.3u
Frequency
2.4 - 2.4835 GHz
Wireless Security
64/128-bit WEP (Wired Equivalent Privacy)
WPA & WPA2 (Wi-Fi Protected Access)
Firewall
IP Filtering
Network Address Translation (NAT)
MAC Filtering
VPN
L2TP/PPTP/IPSEC VPN Pass-through
Ports
4 x LAN (RJ-45)
1x WAN
1 x USB
Antenna
2 x External 5 dBiWi-Fi antenna
LED Status Indicators
3G / 4G LTE
WAN
Wi-Fi
LAN 1, LAN 2, LAN 3, LAN 4
Power
External 5 V DC 2 A power adapter
Dimensions (L x W x H)
• 148.5 x 113.5 x 25 mm (5.85 x 4.47 x .98 inches)
Operating Temperature
Operating: 0 to 40 °C (32 to 104 °F)
Operating Humidity
Operating: 10% to 95% non-condensing

86D-Link DWR-116 User Manual
Federal Communication Commission Interference Statement
This device complies with Part 15 of the FCC Rules. Operation is subject to the following two conditions:
(1) this device may not cause harmful interference and
(2) this device must accept any interference received, including interference that may cause undesired operation
You are cautioned that changes or modications not expressly approved by the party responsible for compliance could void
your authority to operate the equipment.
This equipment has been tested and found to comply with the limits for a lass B digital device, pursuant to Part 15 of the FCC
Rules. These limits are designed to provide reasonable protection against harmful interference in a residential installation.
This equipment generates, uses and can radiate radio frequency energy and, if not installed and used in accordance with the
instructions, may cause harmful interference to radio communications. However, there is no guarantee that interference will
not occur in a particular installation. If this equipment does cause harmful interference to radio or television reception, which
can be determined by turning the equipment o and on, the user is encouraged to try to correct the interference by one or
more of the following measures:
- Reorient or relocate the receiving antenna.
- Increase the separation between the equipment and receiver.
- Connect the equipment into an outlet on a circuit dierent from that to which the receiver is connected.
- Consult the dealer or an experienced radio/TV technician for help.
IMPORTANT NOTE:
FCC Radiation Exposure Statement:
This equipment complies with FCC radiation exposure limits set forth for an uncontrolled environment. This equipment should
be installed and operated with minimum distance 20cm between the radiator & your body.