D Link WR118A1 Dual Band Wi-Fi AC Multi-WAN Router User Manual 8
D Link Corporation Dual Band Wi-Fi AC Multi-WAN Router 8
D Link >
Users Manual
Version 1.00 | 10/16/2015
User Manual
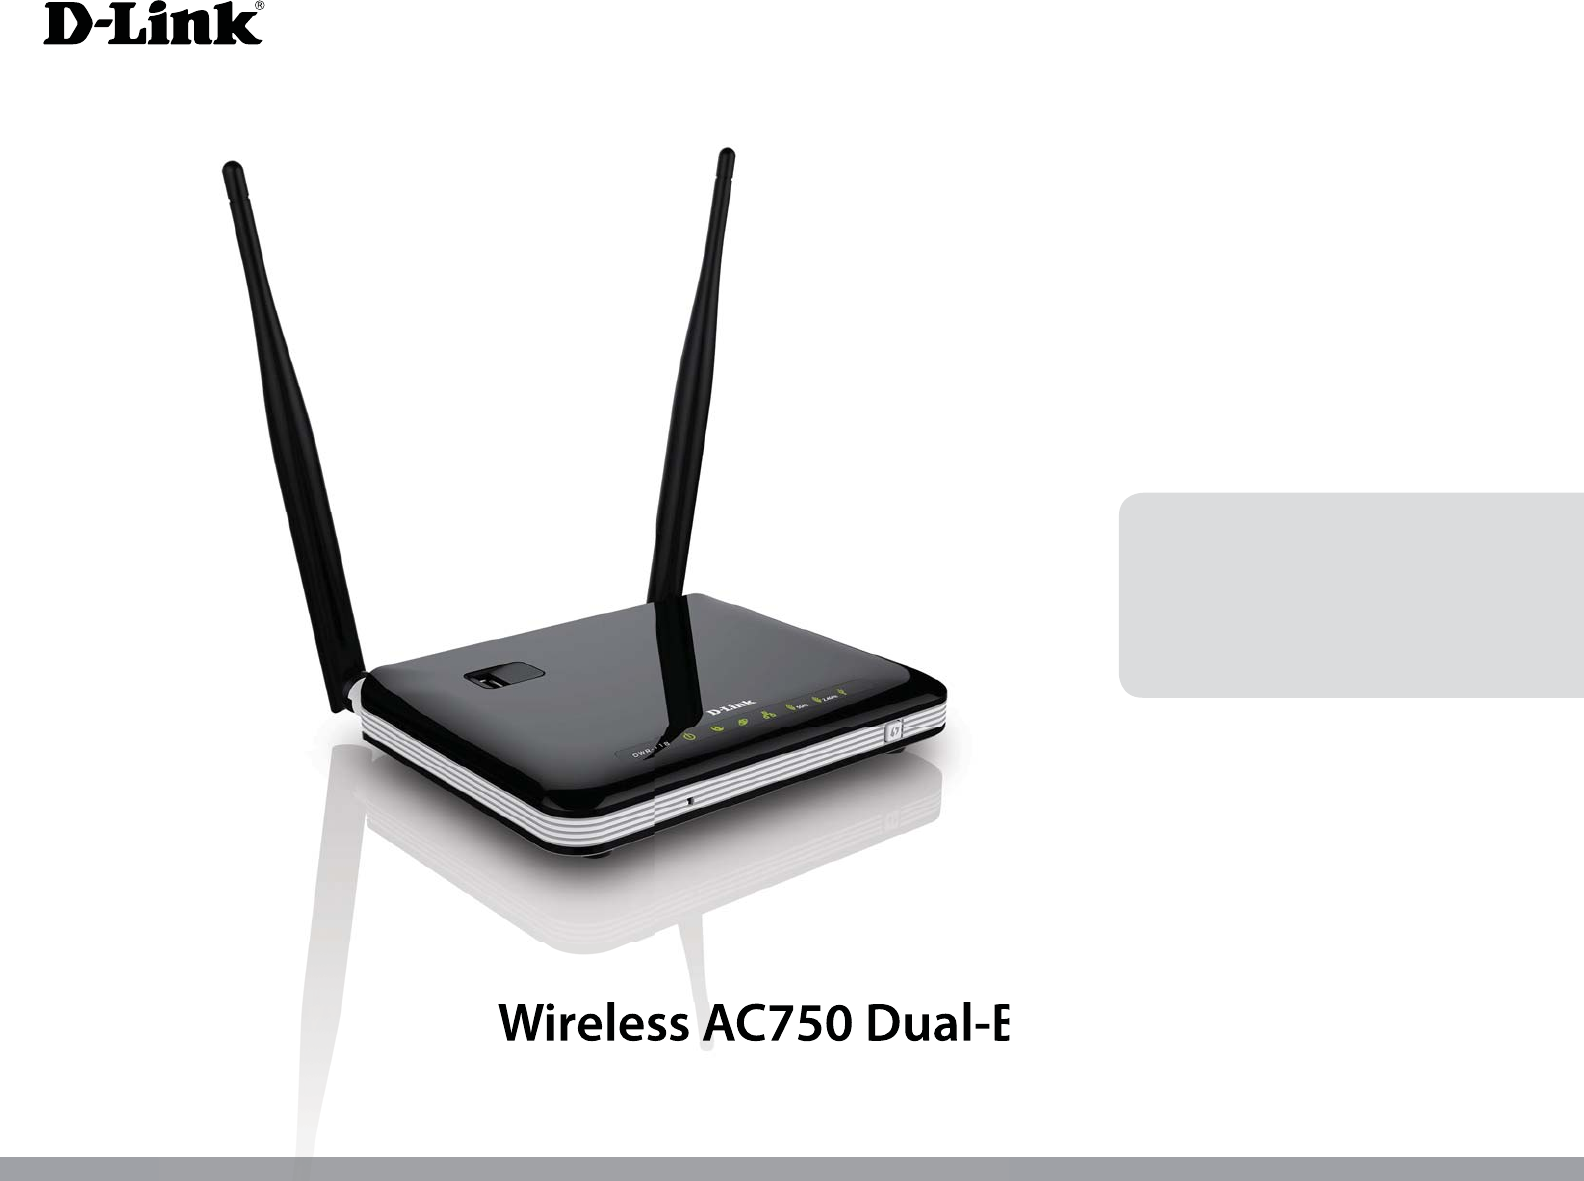
DWR-118
Wireless AC750 Dual-Band Multi-WAN Router

iD-Link DWR-118 User Manual
D-Link reserves the right to revise this publication and to make changes in the content hereof without obligation to notify any
person or organization of such revisions or changes.
Manual Revisions
Trademarks
D-Link and the D-Link logo are trademarks or registered trademarks of D-Link Corporation or its subsidiaries in the United
States or other countries. All other company or product names mentioned herein are trademarks or registered trademarks of
their respective companies.
Copyright © 2015 by D-Link Corporation. All rights reserved. This publication may not be reproduced, in whole or in part,
without prior expressed written permission from D-Link Corporation.
ErP power usage
1. a. User can deactivate the wireless network connection by shortly pressing the WLAN button.
b. DUT can be automatically into network standby mode in 1 minute when main function was not provided.
c. The power management function can be deactivated if any of network ports is activated.
2. Network Standby mode is around 3.37W ~ 3.56W
Revision Date Description
1.00 October 16, 2015 t*OJUJBMSFMFBTF
Preface

iiD-Link DWR-118 User Manual
Table of Contents
Product Overview ..............................................................1
Package Contents .........................................................................1
System Requirements ................................................................. 1
*OUSPEVDUJPO ...................................................................................2
Hardware Overview .....................................................................3
Front View ................................................................................3
LEDs ........................................................................................... 4
Back View .................................................................................5
Installation ......................................................................... 6
Before You Begin ...........................................................................6
8JSFMFTT*OTUBMMBUJPO$POTJEFSBUJPOT ......................................7
Conguration .....................................................................8
Getting Started ..............................................................................8
*OUFSOFU .............................................................................................9
WAN Service ...........................................................................9
%ZOBNJD*1%)$1 ........................................................10
4UBUJD*1 ..............................................................................11
PPPoE .................................................................................12
PPTP ....................................................................................13
L2TP ....................................................................................14
4G LTE/3G .........................................................................15
Failover ...................................................................................17
*1W .....................................................................................18
Wi-Fi ................................................................................................. 22
Device List .............................................................................22
Wi-Fi Settings .......................................................................23
WPS ..........................................................................................25
Wi-Fi Advanced ....................................................................26
LAN ..................................................................................................28
Device List .............................................................................28
LAN Settings .........................................................................28
DHCP .......................................................................................29
Advanced ......................................................................................30
DNS ..........................................................................................30
Applications .......................................................................... 31
%.;&YQPTFE)PTU ..........................................................32
Virtual Server ........................................................................33
Parental Control ..................................................................34
Routing ...................................................................................35
QoS...........................................................................................36
MAC Address Filter .............................................................37
Outbound Filter ...................................................................38
*OCPVOE'JMUFS ......................................................................39
SNMP .......................................................................................40
Advanced Network ............................................................41
System ............................................................................................42
Time Settings .......................................................................42
Administration .....................................................................43
Reboot & Reset ....................................................................44
Firmware Upgrade ..............................................................45
System Logs ..........................................................................46
Table of Contents

iiiD-Link DWR-118 User Manual
Table of Contents
Schedules ..............................................................................47
Connect a Wireless Client to your Router ......................48
WPS Button ...................................................................................48
Windows® 8 ...................................................................................49
WPA/WPA2 ............................................................................49
Windows® 7 ...................................................................................51
WPA/WPA2 ............................................................................51
WPS ..........................................................................................54
Windows Vista® ............................................................................58
WPA/WPA2 ............................................................................59
Windows® XP ................................................................................61
WPA/WPA2 ............................................................................62
Troubleshooting ..............................................................64
Wireless Basics .................................................................68
What is Wireless? .........................................................................69
Tips ...................................................................................................71
Wireless Modes ............................................................................72
Networking Basics ...........................................................73
$IFDLZPVS*1BEESFTT ...............................................................73
4UBUJDBMMZ"TTJHOBO*1BEESFTT ...............................................74
Wireless Security ............................................................75
What is WPA? ...................................................................75
Technical Specications ..................................................76
Regulatory Information ..................................................77

1D-Link DWR-118 User Manual
Section 1 - Product Overview
Product Overview
Package Contents
*GBOZPGUIFBCPWFJUFNTBSFNJTTJOHQMFBTFDPOUBDUZPVSSFTFMMFS
System Requirements
* Subject to services and service terms available from your carrier.
t A compatible 3G / 4G USB dongle with service.*
t Computer with Windows, Mac OS, or Linux-based operating system with an installed
Ethernet adapter
t +BWBFOBCMFECSPXTFSTVDIBT*OUFSOFU&YQMPSFS4BGBSJ$ISPNFPS'JSFGPYPS
BCPWFGPSDPOöHVSBUJPO
Power Adapter
DWR-118 Wireless AC750 Dual-Band Multi-WAN Router
RJ45 cable

2D-Link DWR-118 User Manual
Section 1 - Product Overview
Introduction
The D-Link Wireless AC750 Dual-Band Multi-WAN Router allows users to access worldwide mobile broadband networks.
Once connected, users can transfer data, stream media, and send SMS messages. Simply insert a 3G / 4G USB dongle, and
TIBSFZPVS((*OUFSOFUDPOOFDUJPOUISPVHIBTFDVSFOXJSFMFTTOFUXPSLPSVTJOHBOZPGUIFGPVS
Ethernet ports.
,FFQZPVSXJSFMFTTOFUXPSLTBGFXJUI81"81"XJSFMFTTFODSZQUJPO5IF%83VUJMJ[FTEVBMBDUJWFöSFXBMMT41*BOE
/"5UPQSFWFOUQPUFOUJBMBUUBDLTBDSPTTUIF*OUFSOFUBOEJODMVEFT."$BEESFTTöMUFSJOHUPDPOUSPMBDDFTTUPZPVSOFUXPSL
The Wireless AC750 Dual-Band Multi-WAN Router can be installed quickly and easily almost anywhere. This router is
great for situations where an impromptu wireless network must be set up, or wherever conventional network access is
unavailable.
3D-Link DWR-118 User Manual
Section 1 - Product Overview
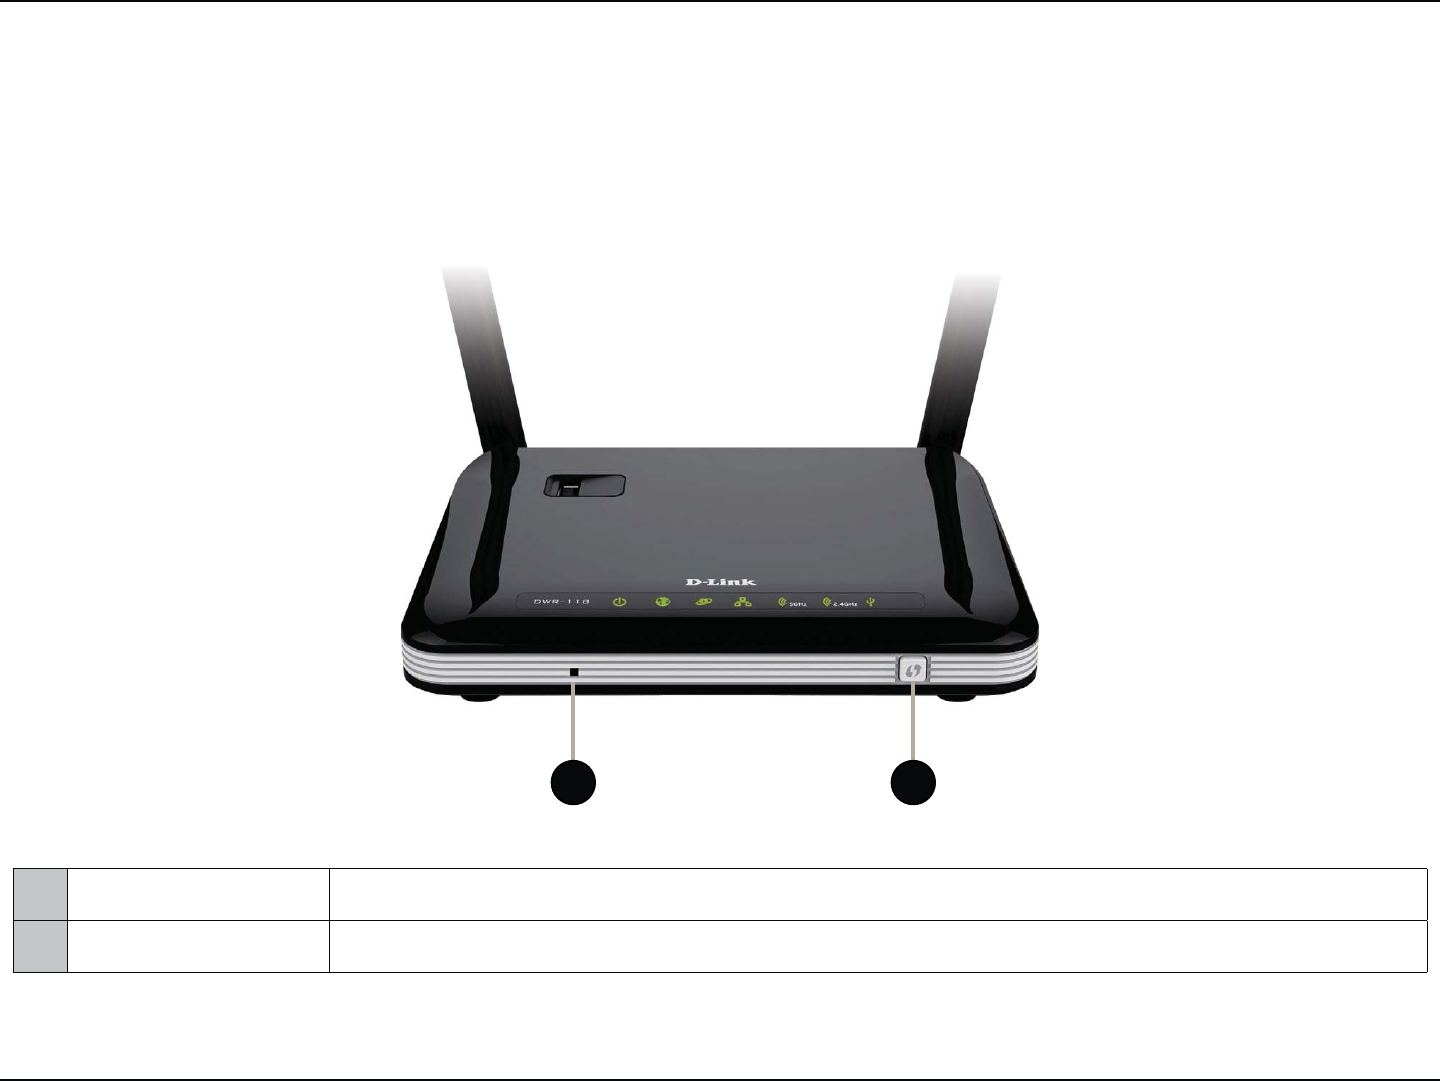
Hardware Overview
Front View
1 Reset Button Press this button with an unfolded paperclip and hold for ten seconds to reset the device.
2 WPS Button Press this button to initiate a new WPS connection. See WPS Button on page 48 for details.
1 2
4D-Link DWR-118 User Manual
Section 1 - Product Overview
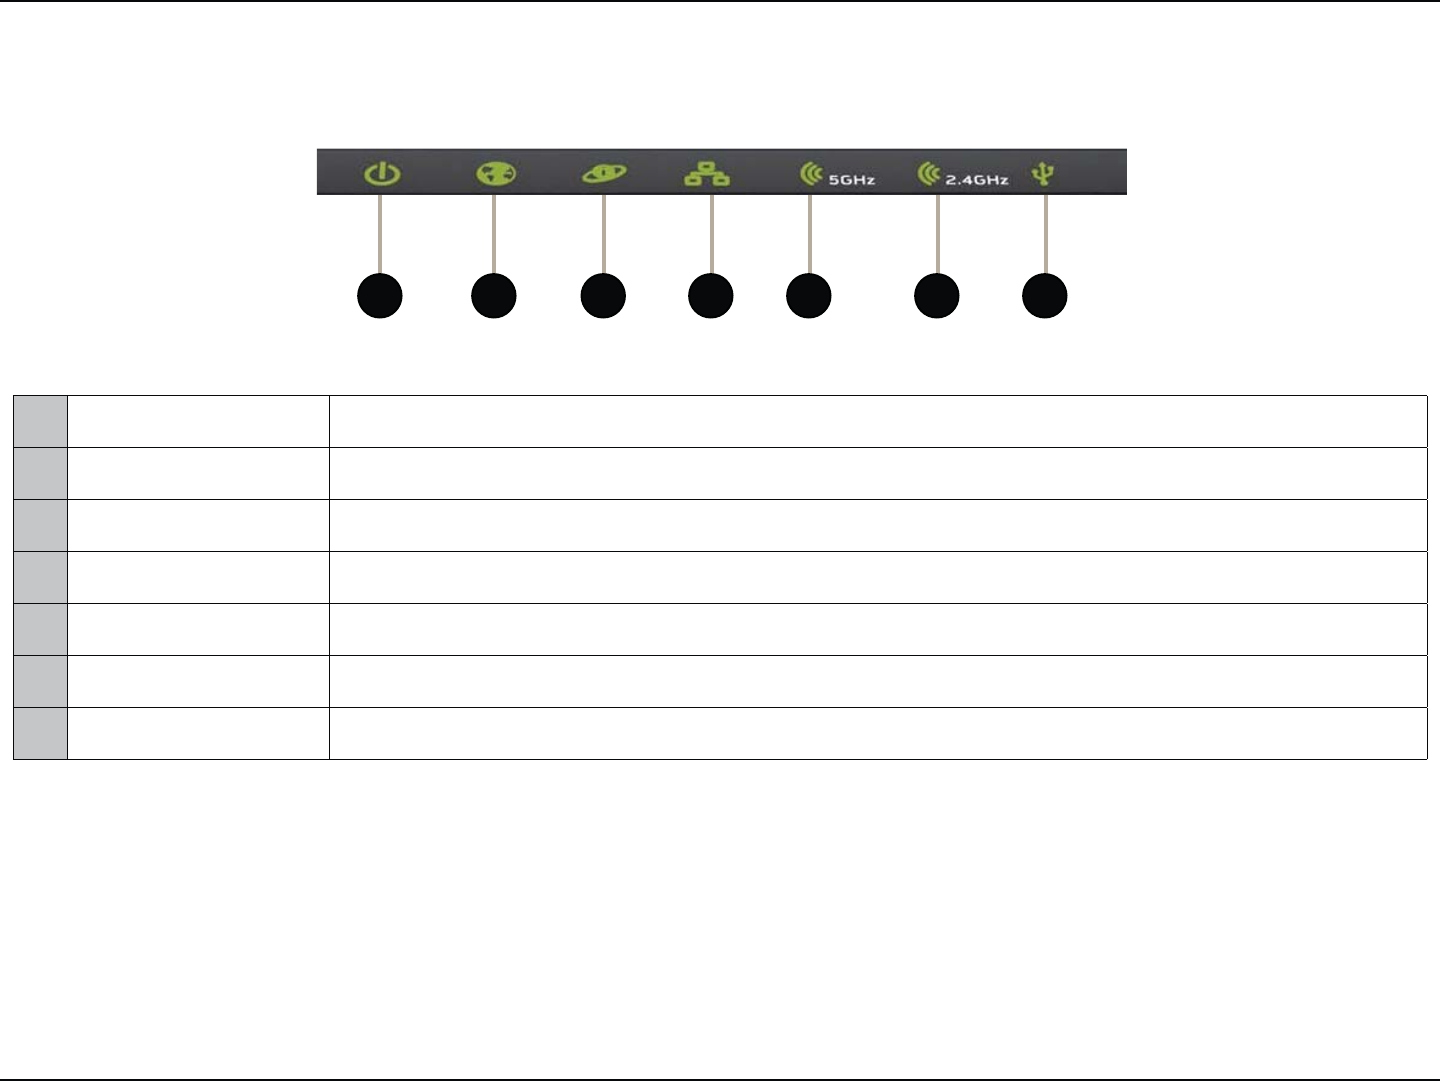
LEDs
1 Power LED Will be lit if the device is powered on and working.
2 WAN LED Will be lit if a WAN Ethernet connection is established.
3 Internet LED 8JMMCFMJUJGBO*OUFSOFUDPOOFDUJPOJTFTUBCMJTIFE
4 LAN LED Will be lit if an Ethernet connection is established, and will blink when data is being transferred.
5 5 GHz WLAN LED Will be lit if the 5 GHz wireless function is enabled, and will blink when wireless data is being transferred.
6 2.4 GHz WLAN LED Will be lit if the 2.4 GHz wireless function is enabled, and will blink when wireless data is being transferred.
7 USB LED Will be lit if a USB dongle is successfully connected.
1 3 4 5 762
5D-Link DWR-118 User Manual
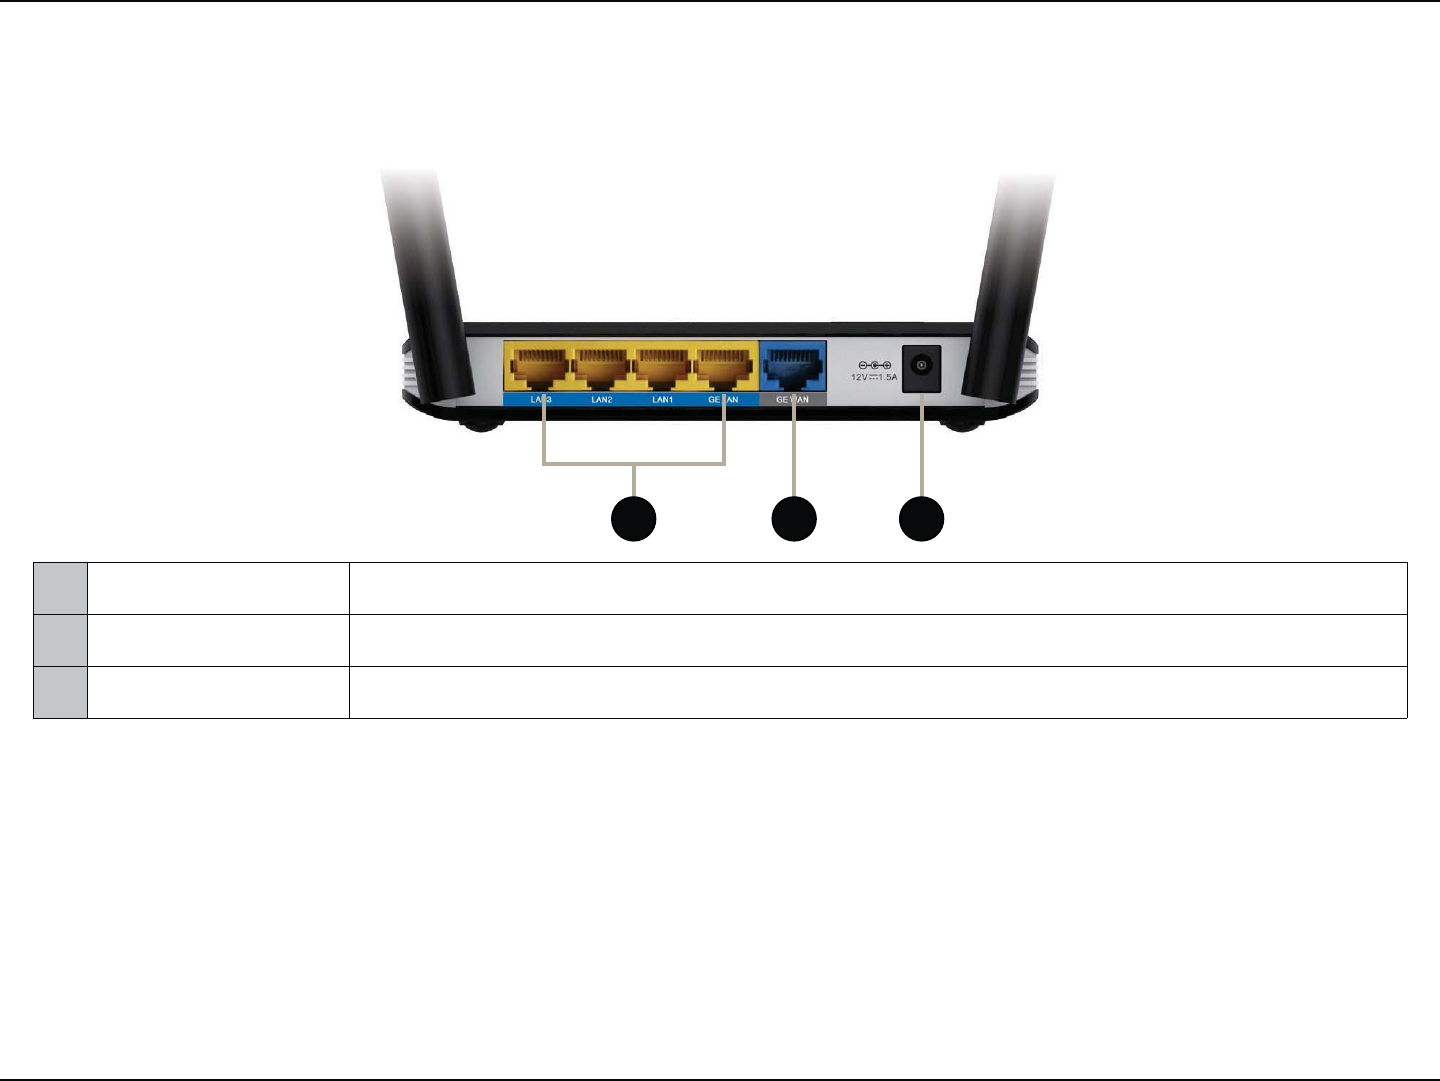
Section 1 - Product Overview
1 Ethernet LAN Ports For connection to a network-enabled desktop or notebook computer.
2 Ethernet WAN Port For connection to a DSL/cable modem or router
3 Power Connector Connects to the included power adapter.
Back View
1 2 3

6D-Link DWR-118 User Manual
Section 2 - Installation
Before You Begin
Installation
This section will guide you through the installation process. Placement of the router is very important. Do not place the router in an enclosed area
such as a closet, cabinet, or in an attic or garage.
1. Ensure that your DWR-118 Wireless AC750 Dual-Band Multi-WAN Router is disconnected and powered o.
2. 5PVTFZPVS((*OUFSOFUDPOOFDUJPOJOTFSUB((64#EPOHMFJOUPUIF64#QPSUPOUIFUPQPGUIFEFWJDF
3. 5PVTFZPVS8"/DPOOFDUJPOJOTFSUZPVS*OUFSOFU8"/OFUXPSLDBCMFJOUPUIF8"/QPSUPOUIFCBDLPGUIFSPVUFS
Note:5IF((DPOOFDUJPODBOBMTPCFVTFEBTBCBDLVQ8"/0ODFBCBDLVQJTDPOöHVSFEUIFSPVUFSXJMMBVUPNBUJDBMMZVTF((GPSUIF
*OUFSOFUDPOOFDUJPOJGUIF&UIFSOFU8"/JTOPUBWBJMBCMF
4. *OTFSUUIF&UIFSOFUDBCMFJOUPUIF-"/1PSUPOUIFCBDLQBOFMPGUIF%838JSFMFTT"$%VBM#BOE.VMUJ8"/3PVUFSBOEBOBWBJMBCMF
&UIFSOFUQPSUPOUIFOFUXPSLBEBQUFSJOUIFDPNQVUFSZPVXJMMVTFUPDPOöHVSFUIFSPVUFS
Note: 5IF%838JSFMFTT"$%VBM#BOE.VMUJ8"/3PVUFS-"/1PSUTBSF"VUP.%*.%*9TPCPUIQBUDIBOEDSPTTPWFS&UIFSOFUDBCMFT
can be used.
5. Connect the power adapter to the socket on the back panel of your DWR-118 Wireless AC750 Dual-Band Multi-WAN Router. Plug the other end
of the power adapter into a wall outlet or power strip and turn the device on.
a. The Status LED will light up to indicate that power has been supplied to the router.
b. The LEDs on the front panel will ash on and o as the DWR-118 Wireless AC750 Dual-Band Multi-WAN Router performs initialization and
*OUFSOFUDPOOFDUJPOQSPDFTTFT
c. After a few moments, if a connection has been established, the following LEDs will turn solid green: Power, Status, WAN, WLAN, and any LAN
Port LEDs that are connected to computers or other devices.

7D-Link DWR-118 User Manual
Section 2 - Installation
Wireless Installation Considerations
The DWR-118 can be accessed using a wireless connection from anywhere within the operating range of your wireless network. Keep in mind that
the quantity, thickness, and location of walls, ceilings, or other objects that the wireless signals must pass through may limit the range of the wireless
TJHOBM3BOHFTWBSZEFQFOEJOHPOUIFUZQFTPGNBUFSJBMTBOECBDLHSPVOE3'SBEJPGSFRVFODZOPJTFJOZPVSIPNFPSPóDF5IFLFZUPNBYJNJ[JOH
the wireless range is to follow these basic guidelines:
1. Minimize the number of walls and ceilings between the D-Link router and other network devices. Each wall or ceiling can reduce your adapter’s
SBOHFGSPNUPGFFUUPNFUFST
2. #FBXBSFPGUIFEJSFDUMJOFCFUXFFOOFUXPSLEFWJDFT"XBMMUIBUJTGFFUUIJDLNFUFSTBUBEFHSFFBOHMFBQQFBSTUPCFBMNPTUGFFU
NFUFSUIJDL"UBEFHSFFBOHMFJUMPPLTPWFSGFFUNFUFSTUIJDL1PTJUJPOEFWJDFTTPUIBUUIFTJHOBMXJMMUSBWFMTUSBJHIUUISPVHIBXBMM
PSDFJMJOHJOTUFBEPGBUBOBOHMFGPSCFUUFSSFDFQUJPO
3. Try to position access points, wireless routers, and computers so that the signal passes through open doorways and drywall. Materials such as
HMBTTNFUBMCSJDLJOTVMBUJPODPODSFUFBOEXBUFSDBOBòFDUXJSFMFTTQFSGPSNBODF-BSHFPCKFDUTTVDIBTöTIUBOLTNJSSPSTöMFDBCJOFUTNFUBM
doors, and aluminum studs may also have a negative eect on range.
4. *GZPVBSFVTJOH()[DPSEMFTTQIPOFTNBLFTVSFUIBUUIF()[QIPOFCBTFJTBTGBSBXBZGSPNZPVSXJSFMFTTEFWJDFBTQPTTJCMF5IFCBTF
USBOTNJUTBTJHOBMFWFOJGUIFQIPOFJTOPUJOVTF*OTPNFDBTFTDPSEMFTTQIPOFT9XJSFMFTTEFWJDFTBOEFMFDUSPOJDFRVJQNFOUTVDIBTDFJMJOH
fans, uorescent lights, and home security systems may dramatically degrade wireless connectivity.
8D-Link DWR-118 User Manual
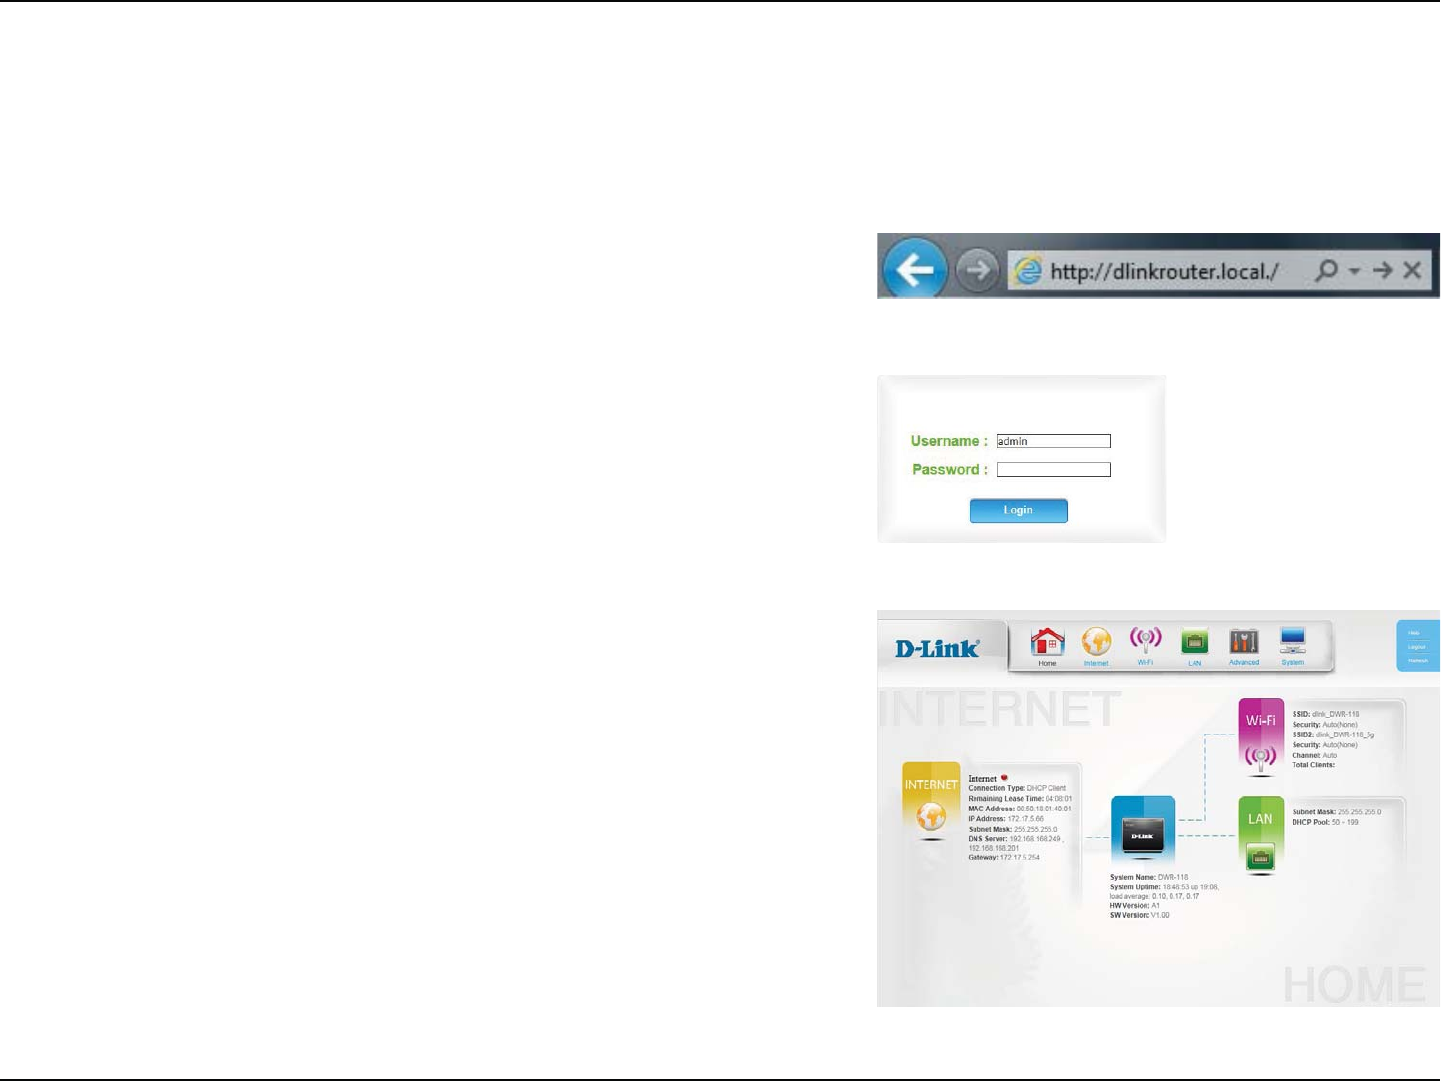
Section 4 - Conguration
Conguration
5PBDDFTTUIFDPOöHVSBUJPOVUJMJUZPQFOBXFCCSPXTFSTVDIBT*OUFSOFU&YQMPSFSBOE
FOUFSUIFBEESFTTPGUIFSPVUFShttp://dlinkrouter.local./ or 192.168.0.1CZEFGBVMU
5PMPHJOUPUIFDPOöHVSBUJPOVUJMJUZFOUFSadmin as the username, and then enter
the password. By default, the password is blank.
*GZPVHFUBPage Cannot be Displayed error, please refer to the Troubleshooting
section for assistance.
Once you have successfully logged in, you will see the Home page. On this page
ZPVDBOWJFXJOGPSNBUJPOBCPVUZPVS*OUFSOFUDPOOFDUJPOUIFXJSFMFTT-"/TUBUVT
and system information.
At the top of the page is a menu. Clicking on one of these icons will take you to the
BQQSPQSJBUFDPOöHVSBUJPOTFDUJPO
0OFBDIQBHFöMMPVUUIFEFTJSFETFUUJOHTBOEDMJDLApply when you are done or
Reset to revert to the old settings.
Getting Started
9D-Link DWR-118 User Manual
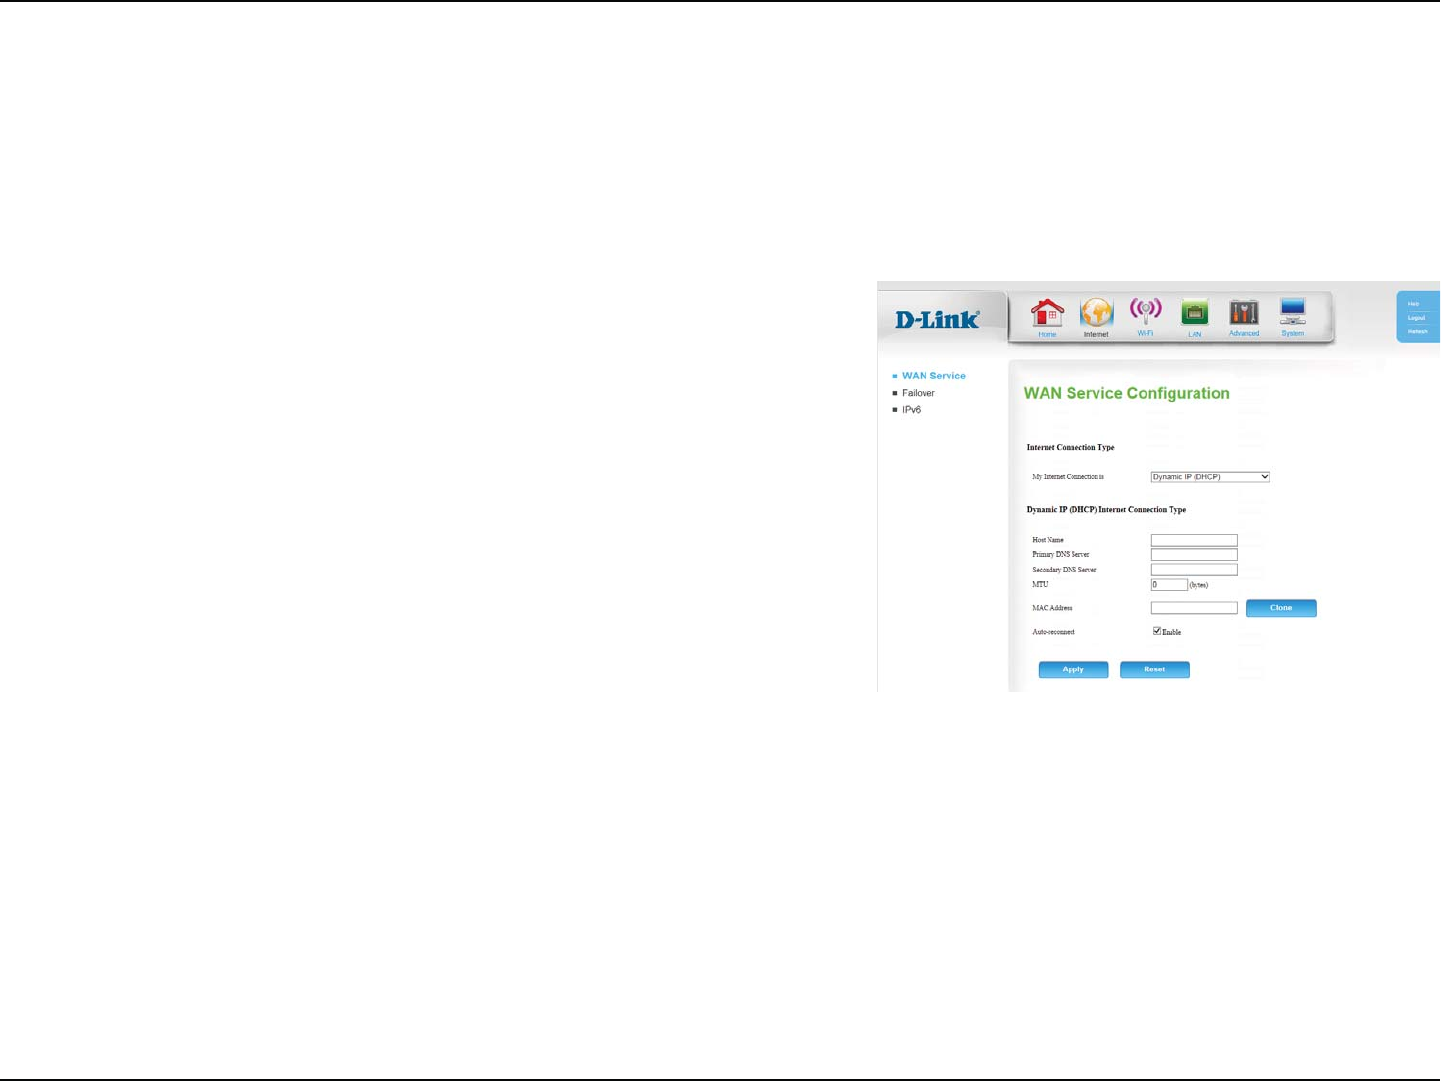
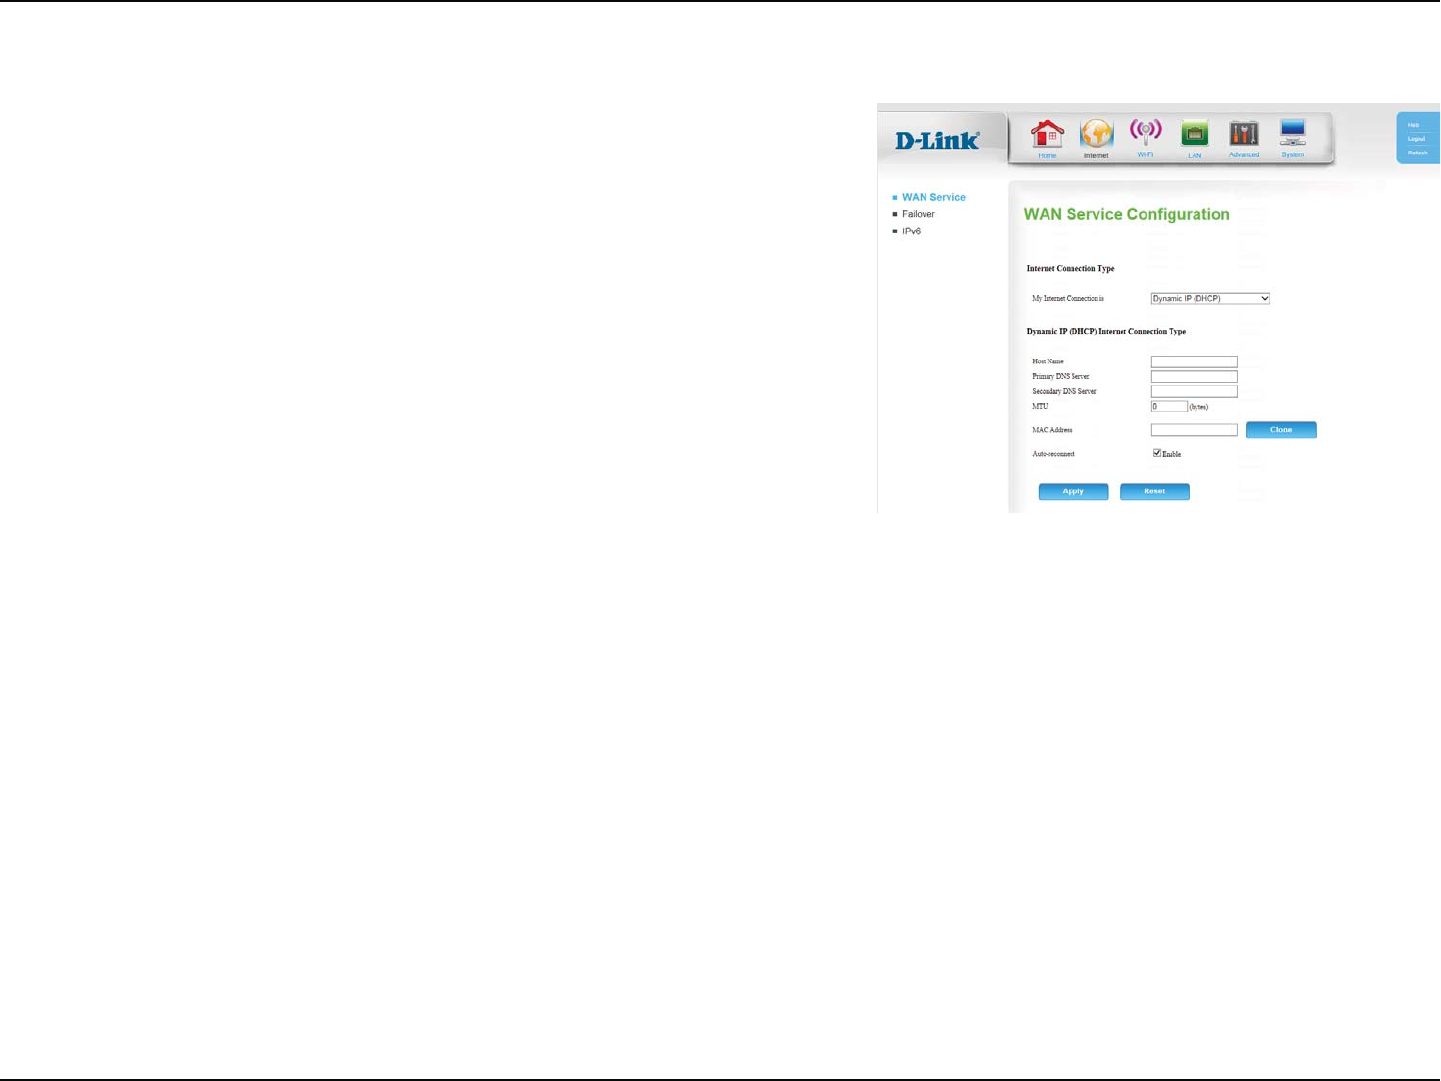
Section 4 - Conguration
Internet
4FMFDUZPVS*OUFSOFUDPOOFDUJPOUZQF
'PS%ZOBNJD*1%)$1SFGFSUPDynamic IP (DHCP) on page 10.
'PS4UBUJD*1SFGFSUPStatic IP on page 11.
For PPPoE refer to PPPoE on page 12.
For PPTP refer to PPTP on page 13.
For L2TP refer to L2TP on page 14.
For 4G LTE/3G refer to 4G LTE/3G on page 15.
8IFOZPVIBWFöOJTIFEDPOöHVSJOHZPVS*OUFSOFUTFUUJOHTDMJDL
Apply to save your changes. To restore your settings to the most
recent save, click Reset.
My Internet
Connection is:
WAN Service
0OUIJTQBHFZPVDBODPOöHVSFZPVS*OUFSOFUDPOOFDUJPO*GZPVBSFOPUTVSFXIJDITFUUJOHTUPVTFQMFBTFDPOUBDUZPVS*OUFSOFU4FSWJDF1SPWJEFS
*41
10D-Link DWR-118 User Manual
Section 4 - Conguration
Dynamic IP (DHCP)
5IFIPTUOBNFJTPQUJPOBMCVUNBZCFSFRVJSFECZTPNF*41T
Leave it blank if you are not sure.
&OUFSUIFQSJNBSZ%/4TFSWFSQSPWJEFECZZPVS*41IFSF
&OUFSUIFTFDPOEBSZ%/4TFSWFSQSPWJEFECZZPVS*41IFSF
Maximum Transmission Unit - you may need to change the MTU
GPSPQUJNBMQFSGPSNBODFXJUIZPVS*415IFEFGBVMUWBMVFJT
Enter the MAC address, or click Clone to clone your client’s MAC
address to the WAN port.
Check the box to allow the router to automatically attempt to
SFDPOOFDUXIFOFWFSUIF*OUFSOFUDPOOFDUJPOJTMPTU
Host Name:
Primary DNS
Server:
Secondary DNS
Server:
MTU:
MAC Address:
Auto-reconnect:
11D-Link DWR-118 User Manual
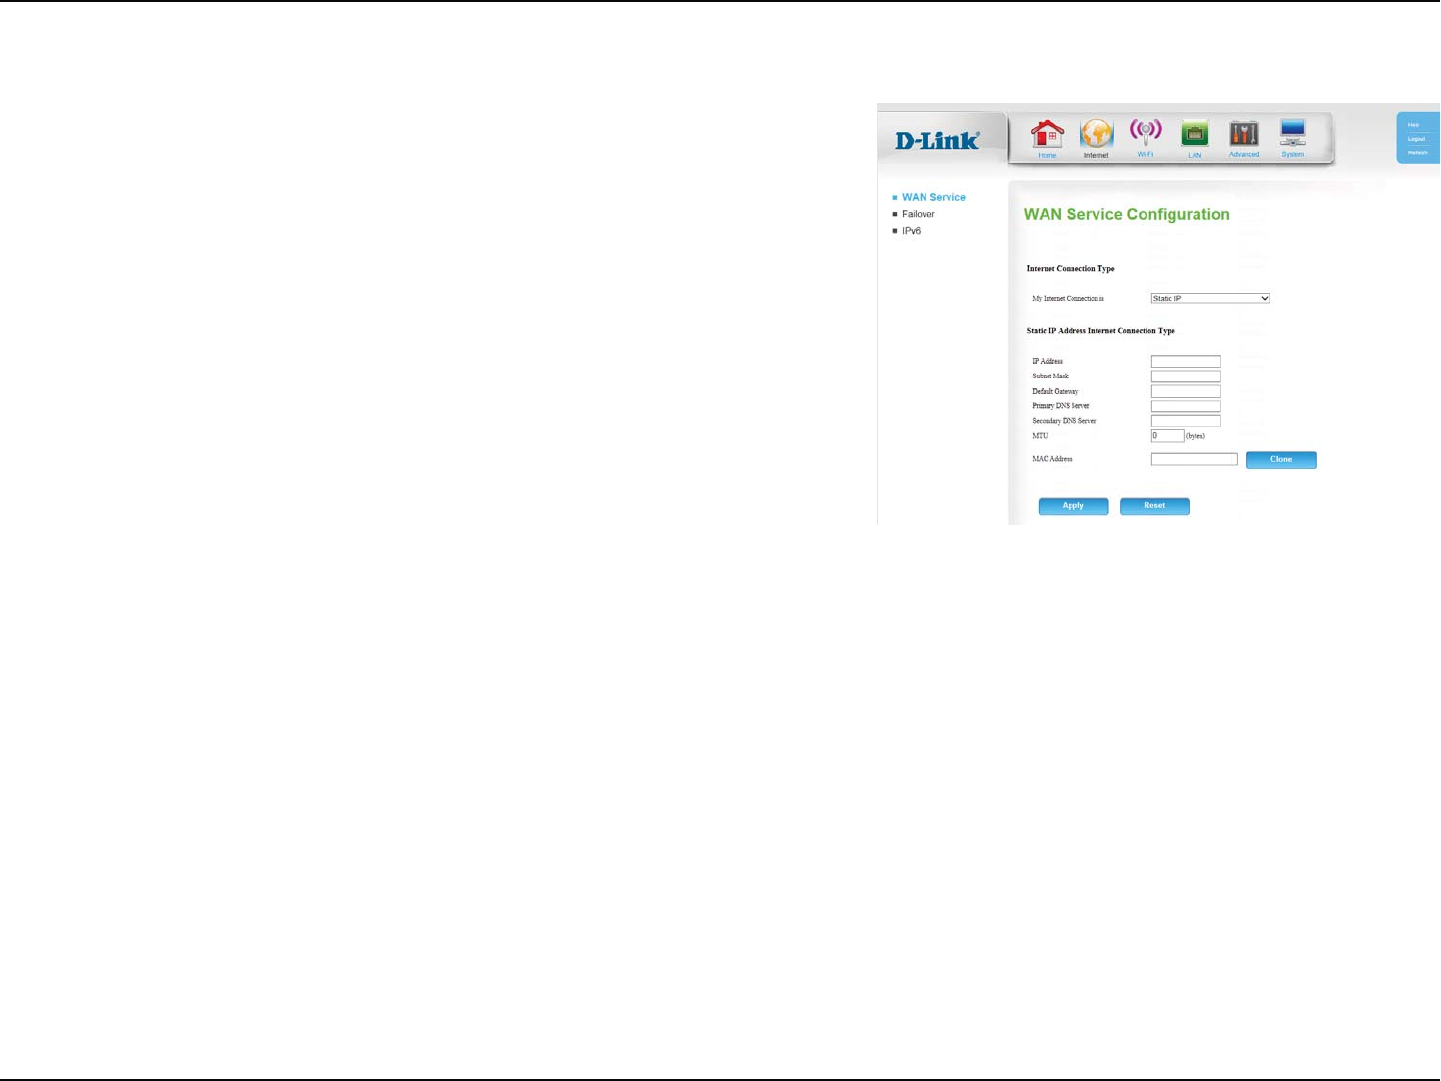
Section 4 - Conguration
Static IP
&OUFSUIF*1BEESFTTQSPWJEFECZZPVS*41
&OUFSUIFTVCOFUNBTLQSPWJEFECZZPVS*41
&OUFSUIFHBUFXBZBEESFTTQSPWJEFECZZPVS*41
&OUFSUIFQSJNBSZ%/4TFSWFSQSPWJEFECZZPVS*41IFSF
&OUFSUIFTFDPOEBSZ%/4TFSWFSQSPWJEFECZZPVS*41IFSF
Maximum Transmission Unit - you may need to change the MTU
GPSPQUJNBMQFSGPSNBODFXJUIZPVS*415IFEFGBVMUWBMVFJT
Enter the MAC address, or click Clone to clone your client’s MAC
address to the WAN port.
IP Address:
Subnet Mask:
Default
Gateway:
Primary DNS
Server:
Secondary DNS
Server:
MTU:
MAC Address:
12D-Link DWR-118 User Manual
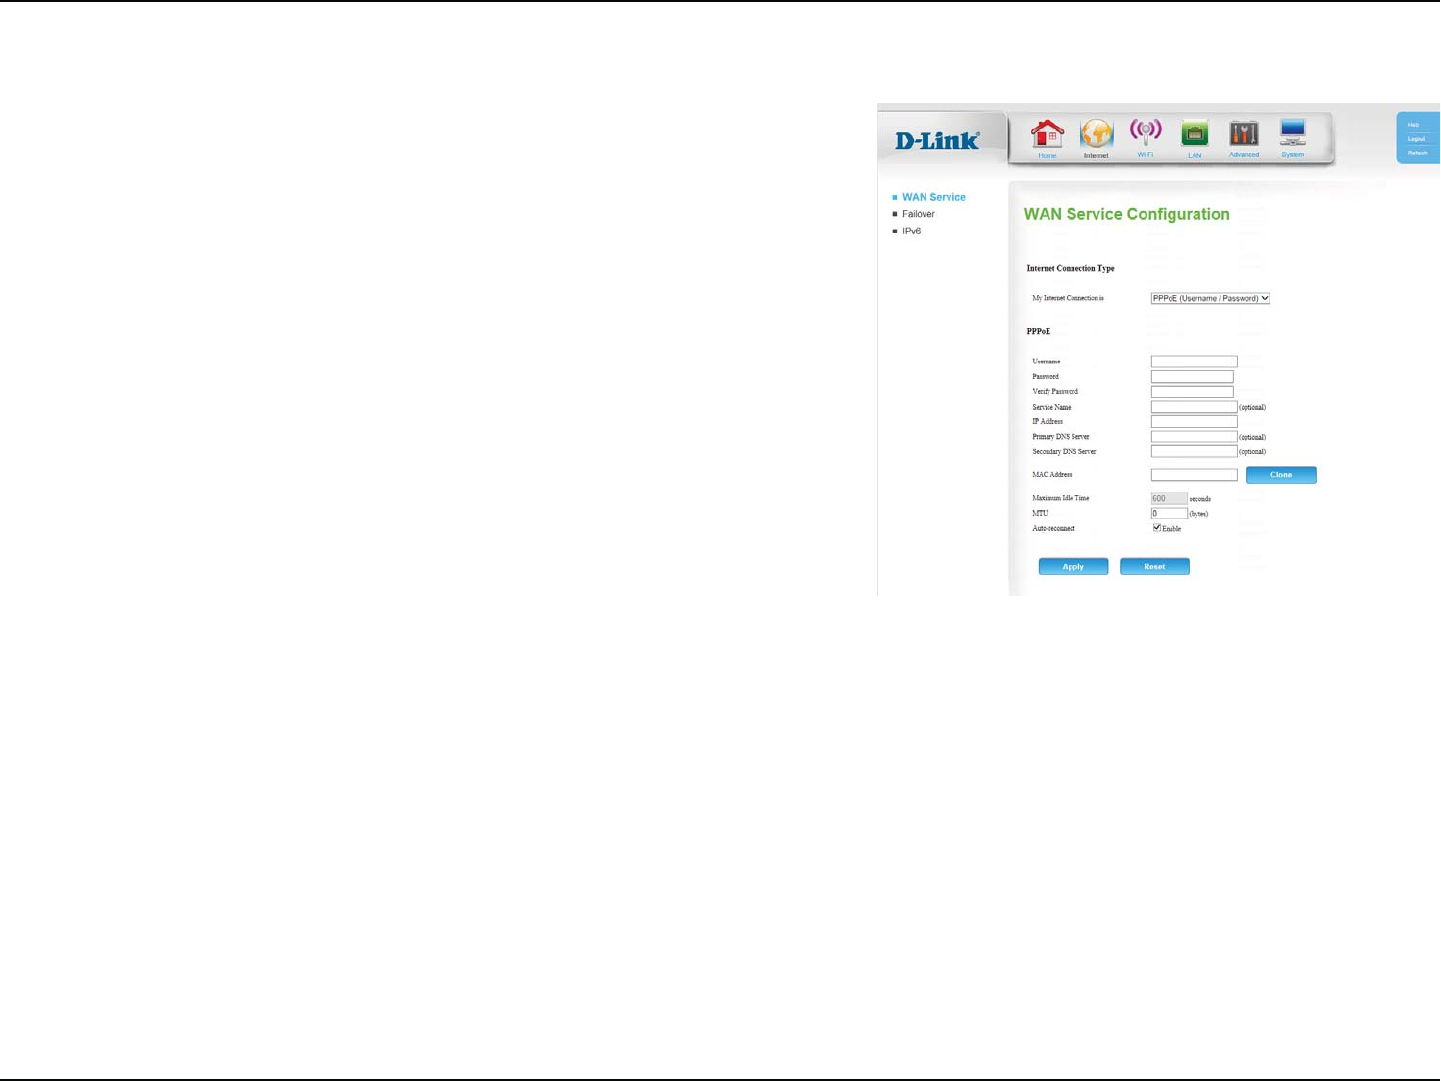
Section 4 - Conguration
PPPoE
&OUFSUIF111P&VTFSOBNFQSPWJEFECZZPVS*41
&OUFSUIF111P&QBTTXPSEQSPWJEFECZZPVS*41
3FFOUFSUIF111P&QBTTXPSEGPSWFSJöDBUJPO
&OUFSUIF111P&TFSWJDFOBNFQSPWJEFECZZPVS*41JGBQQMJDBCMF
&OUFSUIF*1BEESFTTQSPWJEFECZZPVS*41IFSF
&OUFSUIFQSJNBSZ%/4TFSWFSQSPWJEFECZZPVS*41IFSF
&OUFSUIFTFDPOEBSZ%/4TFSWFSQSPWJEFECZZPVS*41IFSF
Enter the MAC address, or click Clone to clone your client’s MAC
address to the WAN port.
&OUFSBNBYJNVNJEMFUJNFEVSJOHXIJDIUIF*OUFSOFUDPOOFDUJPO
JTNBJOUBJOFEEVSJOHJOBDUJWJUZJGZPVTFMFDUAuto-reconnect
CFMPXUIJTTFUUJOHXJMMIBWFOPFòFDU
Maximum Transmission Unit - you may need to change the MTU
GPSPQUJNBMQFSGPSNBODFXJUIZPVS*415IFEFGBVMUWBMVFJT
Check the box to allow the router to automatically attempt to
SFDPOOFDUXIFOFWFSUIF*OUFSOFUDPOOFDUJPOJTMPTU
Username:
Password:
Verify Password:
Service Name:
IP Address:
Primary DNS
Server:
Secondary DNS
Server:
MAC Address:
Maximum Idle
Time:
MTU:
Auto-reconnect:
13D-Link DWR-118 User Manual
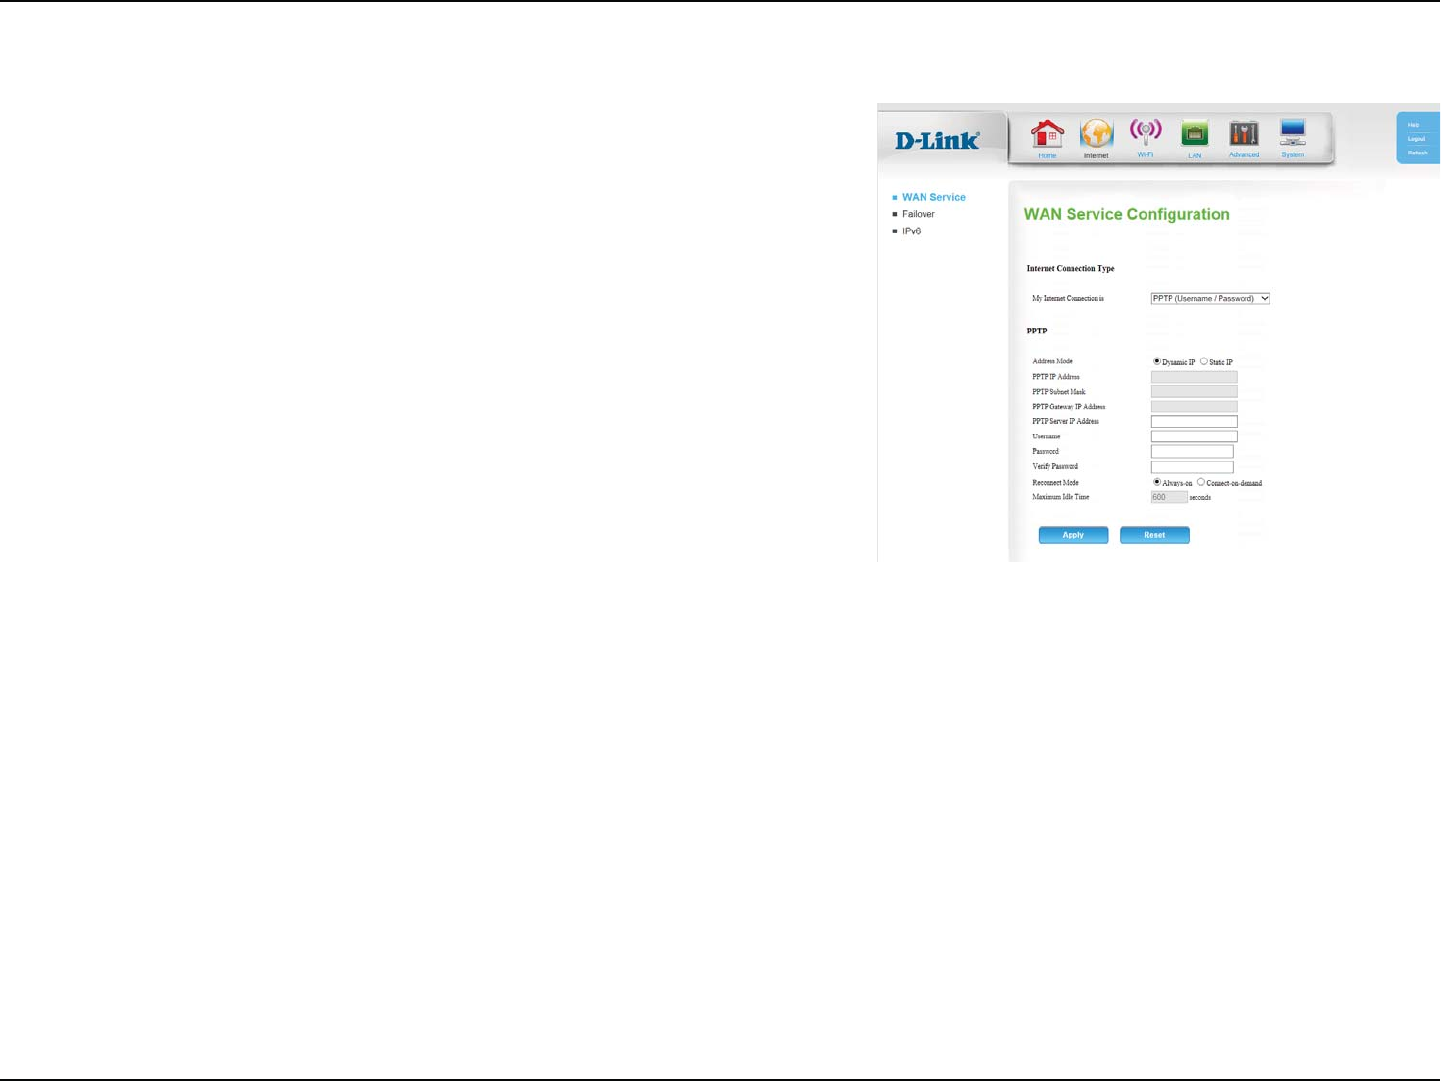
Section 4 - Conguration
PPTP
*GZPVS*41QSPWJEFEBTUBUJD*1BEESFTTTFMFDUStatic IP, otherwise
leave this setting at the default, Dynamic IP.
&OUFSUIF*1BEESFTTQSPWJEFECZZPVS*414UBUJD*1POMZ
&OUFSUIFTVCOFUNBTLQSPWJEFECZZPVS*414UBUJD*1POMZ
&OUFSUIFHBUFXBZBEESFTTQSPWJEFECZZPVS*414UBUJD*1POMZ
&OUFSUIFTFSWFS*1BEESFTTQSPWJEFECZZPVS*414UBUJD*1POMZ
&OUFSUIF1151VTFSOBNFQSPWJEFECZZPVS*41
&OUFSUIF1151QBTTXPSEQSPWJEFECZZPVS*41
3FFOUFSUIF1151QBTTXPSEGPSWFSJöDBUJPO
Select Always on if you would like the router to never disconnect,
or Connect-on-demand to allow the router to establish a
DPOOFDUJPOUPUIF*OUFSOFUPOMZXIFOBEFWJDFPOZPVSOFUXPSL
USJFTUPBDDFTTBSFTPVSDFPOUIF*OUFSOFU
&OUFSBNBYJNVNJEMFUJNFEVSJOHXIJDIUIF*OUFSOFUDPOOFDUJPO
JTNBJOUBJOFEEVSJOHJOBDUJWJUZJGZPVTFMFDUFEAlways on above,
UIJTTFUUJOHXJMMIBWFOPFòFDU
Address Mode:
PPTP IP Address:
PPTP Subnet
Mask:
PPTP Gateway IP
Address:
PPTP Server IP
Address:
Username:
Password:
Verify Password:
Reconnect
Mode:
Maximum Idle
Time:
14D-Link DWR-118 User Manual
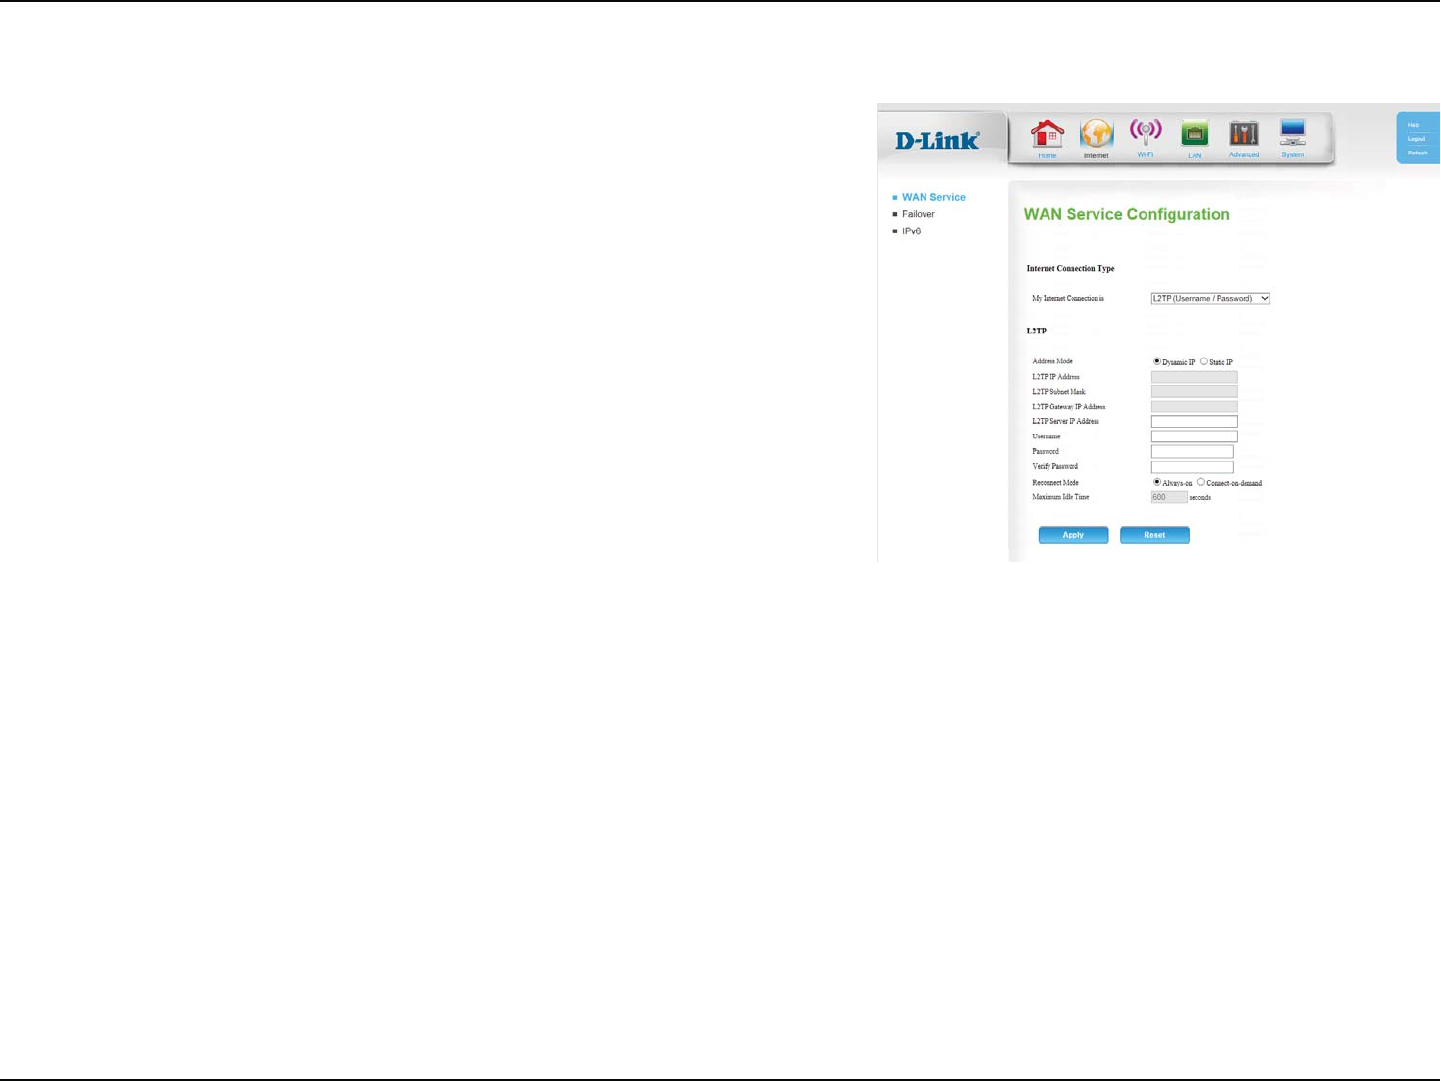
Section 4 - Conguration
L2TP
*GZPVS*41QSPWJEFEBTUBUJD*1BEESFTTTFMFDUStatic IP, otherwise
leave this setting at the default, Dynamic IP.
&OUFSUIF*1BEESFTTQSPWJEFECZZPVS*414UBUJD*1POMZ
&OUFSUIFTVCOFUNBTLQSPWJEFECZZPVS*414UBUJD*1POMZ
&OUFSUIFHBUFXBZBEESFTTQSPWJEFECZZPVS*414UBUJD*1POMZ
&OUFSUIFTFSWFS*1BEESFTTQSPWJEFECZZPVS*414UBUJD*1POMZ
&OUFSUIF-51VTFSOBNFQSPWJEFECZZPVS*41
&OUFSUIF-51QBTTXPSEQSPWJEFECZZPVS*41
3FFOUFSUIF-51QBTTXPSEGPSWFSJöDBUJPO
Select Always on if you would like the router to never disconnect,
or Connect-on-demand to allow the router to establish a
DPOOFDUJPOUPUIF*OUFSOFUPOMZXIFOBEFWJDFPOZPVSOFUXPSL
USJFTUPBDDFTTBSFTPVSDFPOUIF*OUFSOFU
&OUFSBNBYJNVNJEMFUJNFEVSJOHXIJDIUIF*OUFSOFUDPOOFDUJPO
JTNBJOUBJOFEEVSJOHJOBDUJWJUZJGZPVTFMFDUFEAlways on above,
UIJTTFUUJOHXJMMIBWFOPFòFDU
Address Mode:
L2TP IP Address:
L2TP Subnet
Mask:
L2TP Gateway IP
Address:
L2TP Server IP
Address:
Username:
Password:
Verify Password:
Reconnect
Mode:
Maximum Idle
Time:
15D-Link DWR-118 User Manual
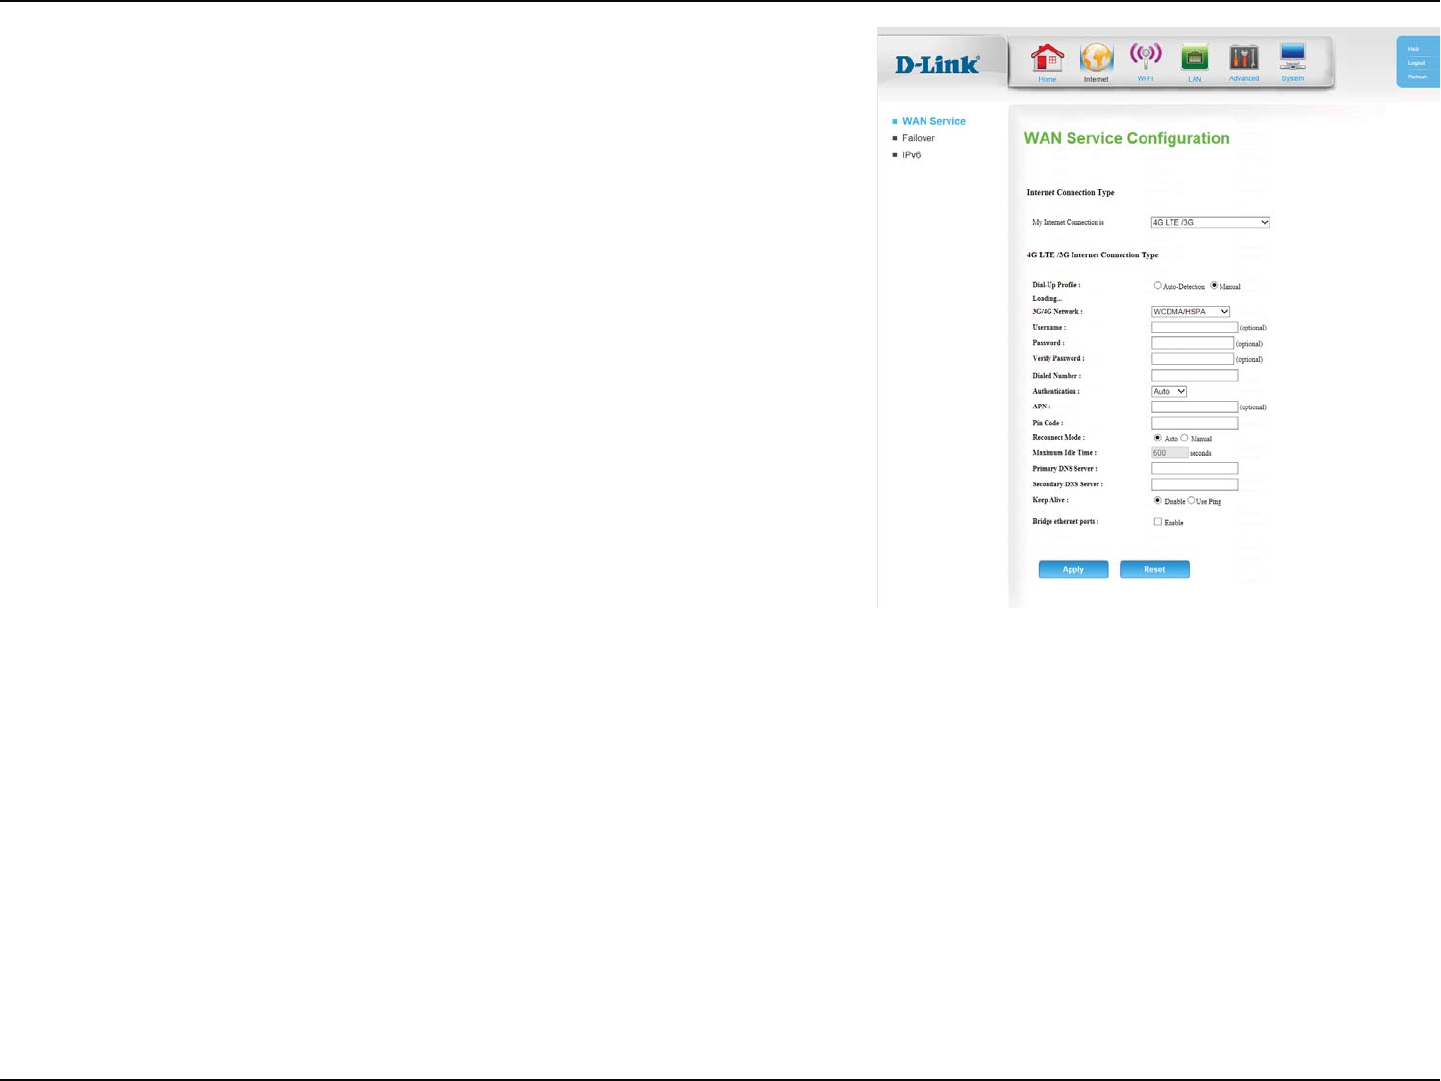
Section 4 - Conguration
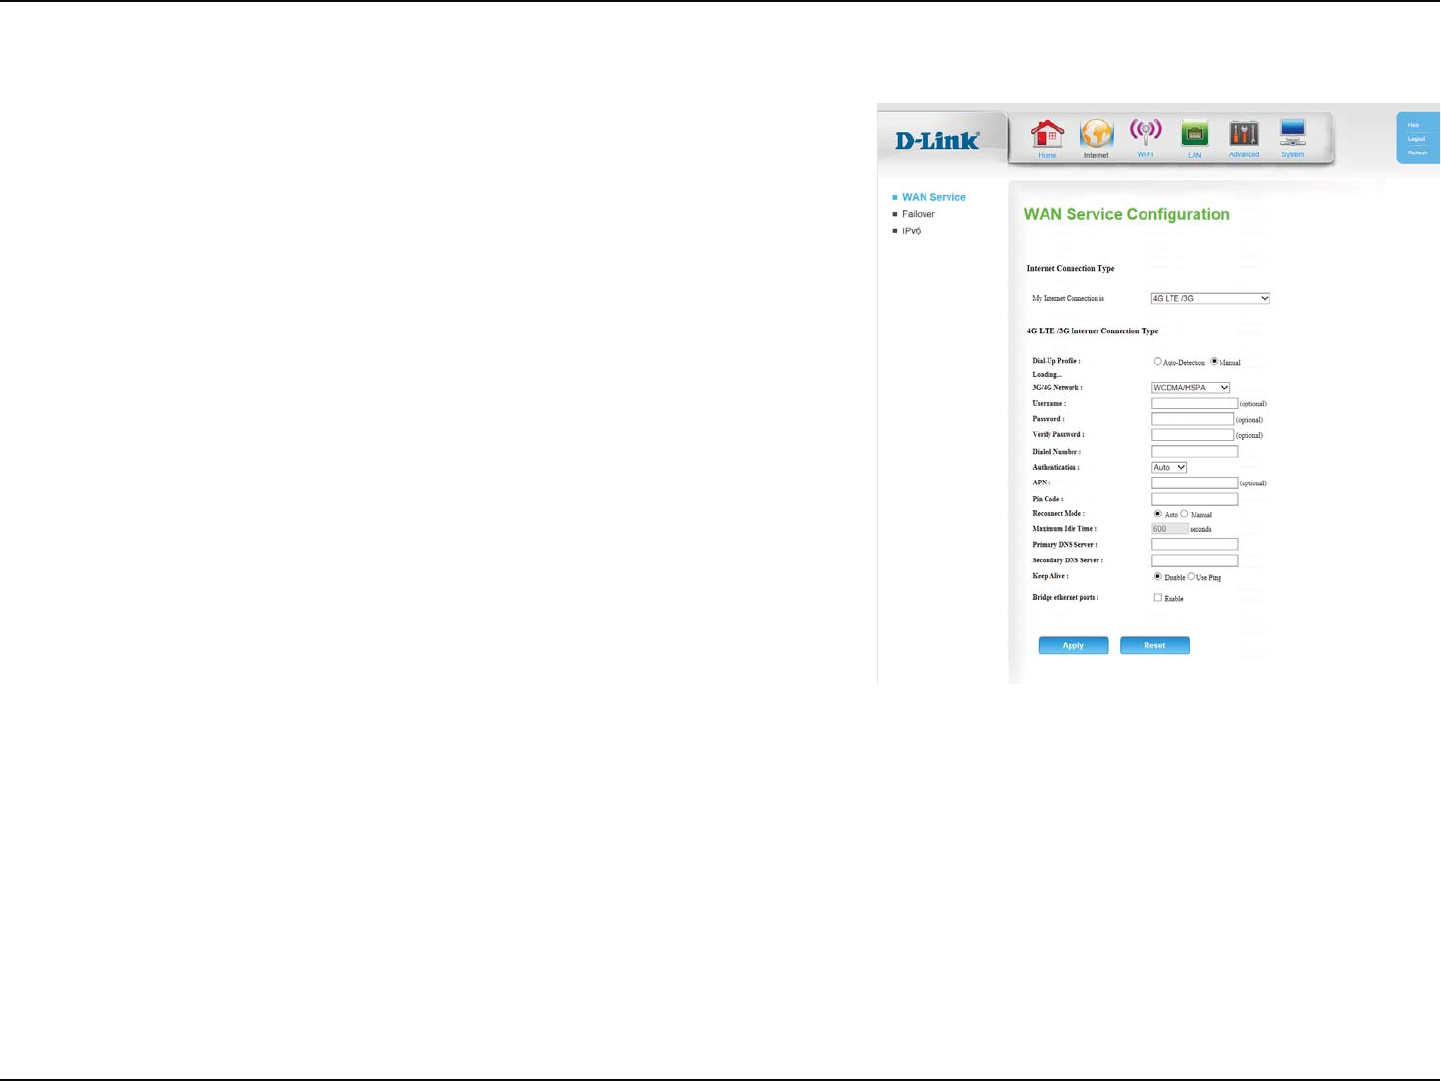
4G LTE/3G
*GAuto-Detection does not work, then try selecting Manual and
öMMJOHPVUUIFJOGPSNBUJPOTVQQMJFECZZPVS-5&(*41
4FMFDUUIFUFDIOPMPHZVTFECZZPVS*41FJUIFSWCDMA/HSPA or
CDMA2000/EV-DO.
&OUFSUIFVTFSOBNFQSPWJEFECZZPVS*41
&OUFSUIFQBTTXPSEQSPWJEFECZZPVS*41
3FFOUFSUIFQBTTXPSEGPSWFSJöDBUJPO
&OUFSUIFOVNCFSUPEJBMQSPWJEFECZZPVS*41
Select Auto, PAP, or CHAP detection. The default authentication
method is Auto.
&OUFSUIF"1/QSPWJEFECZZPVS*41
&OUFSUIF1*/$PEFQSPWJEFECZZPVS*41
Select either Auto or Manual.
&OUFSBNBYJNVNJEMFUJNFEVSJOHXIJDIUIF*OUFSOFUDPOOFDUJPO
JTNBJOUBJOFEEVSJOHJOBDUJWJUZJGZPVTFMFDUFEAuto above, this
TFUUJOHXJMMIBWFOPFòFDU
&OUFSUIFQSJNBSZ%/4TFSWFSQSPWJEFECZZPVS*41IFSF
&OUFSUIFTFDPOEBSZ%/4TFSWFSQSPWJEFECZZPVS*41IFSF
Dial-Up Prole:
3G/4G Network
Username:
Password:
Verify Password:
Dialed Number:
Authentication:
APN:
Pin Code:
Reconnect
Mode:
Maximum Idle
Time:
Primary DNS
Server:
Secondary DNS
Server:
16D-Link DWR-118 User Manual
Section 4 - Conguration
Select Disable or Use Ping depending on the settings required
CZZPVS*41*GZPVTFMFDUUse PingTFUUIFQJOHJOUFSWBMBOEUIF*1
address to ping.
Click Enable to use the router’s WAN port as an additional LAN
port.
Keep Alive:
Bridge ethernet
ports:
17D-Link DWR-118 User Manual
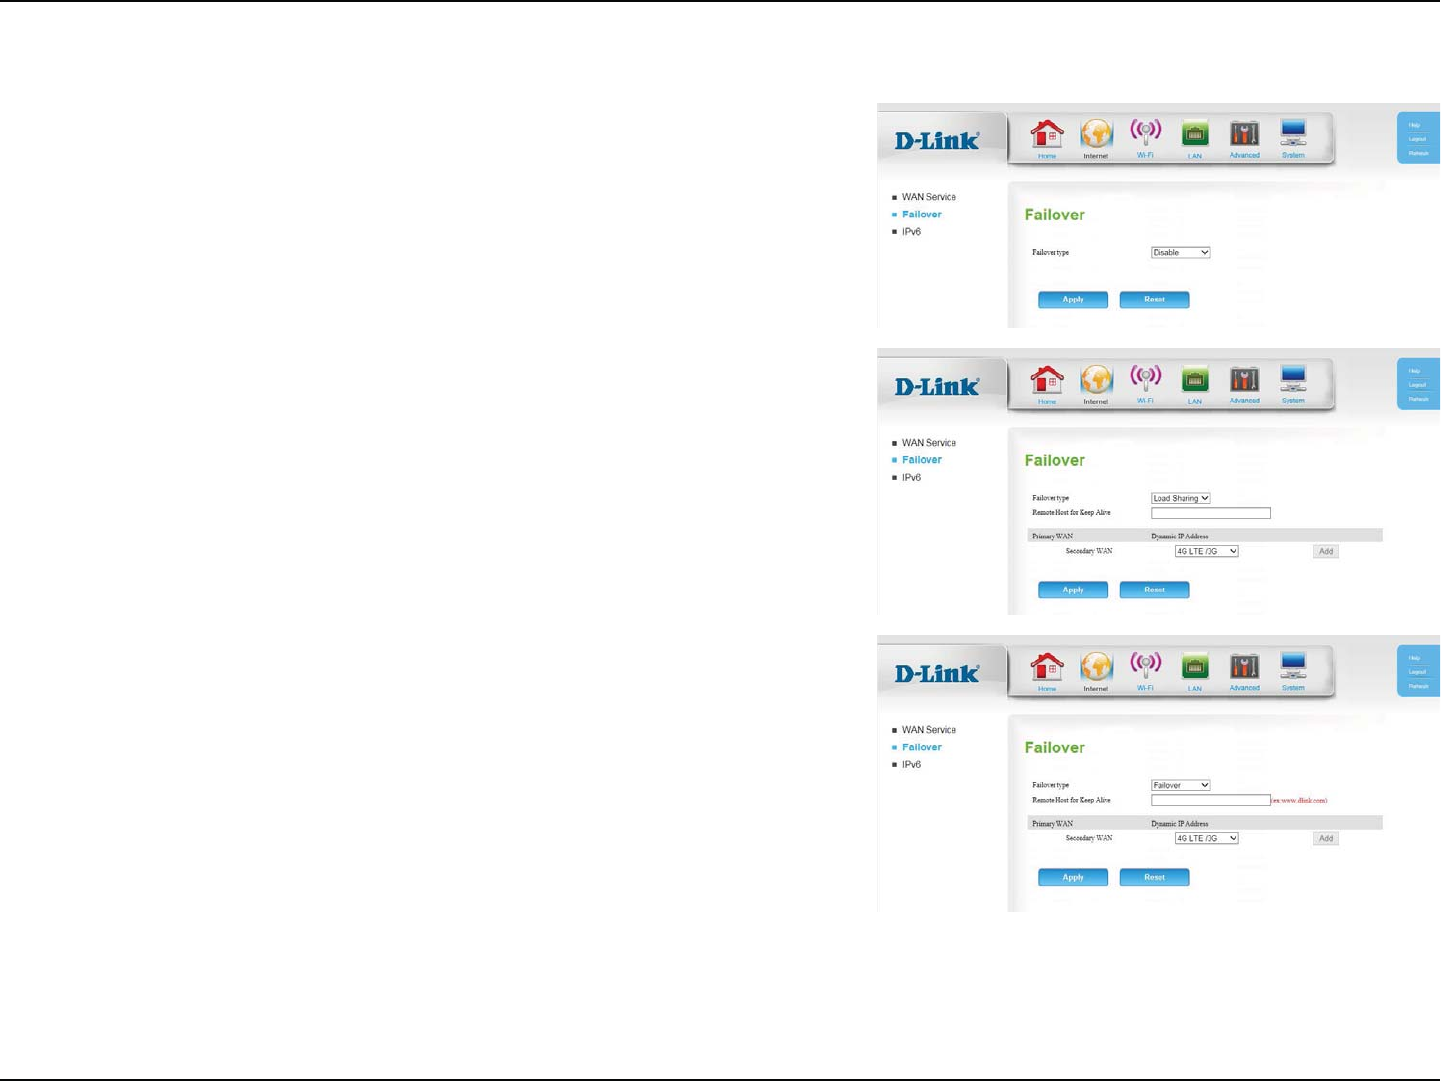
Section 4 - Conguration
Failover
This connection can serve as a backup for your default connection.
The Failover type can be set to either Disable, Load Sharing or Failover. With
Load SharingUIFEBUBVTBHFJTEJTUSJCVUFEFWFOMZPWFSUIFUXPEJòFSFOU*OUFSOFU
connections. With FailoverUIFTFDPOEBSZ*OUFSOFUDPOOFDUJPOXJMMCFJOTUBOECZ
NPEFVOUJMUIFQSJNBSZ*OUFSOFUDPOOFDUJPOGBJMT
*GZPVTFMFDUFELoad Sharing or Failover, the Remote Host for Keep Alive box
XJMMBQQFBSBOETIPVMECFTFUUPBOFYUFSOBM*1BEESFTTUIBUDBOCFVTFEUPFOTVSF
that the 3G/4G LTE connection will be kept from going oine due to inactivity. An
FYBNQMFXPVMECF(PPHMFTQVCMJD%/4TFSWFST8.8.8.8 or 8.8.4.4PSZPVS*41T
DNS servers.
The Primary WANXJMMEJTQMBZZPVSDVSSFOU*OUFSOFUDPOöHVSBUJPOUZQF
The Secondary WAN can be set by clicking Add, and the available options will be
shown in the drop down box that appears. Select 4G LTE/3G to use your mobile
connection as a backup.
8IFOZPVIBWFöOJTIFEDPOöHVSJOHZPVSGBJMPWFSTFUUJOHTDMJDLApply to save
your changes. To restore your settings to the most recent save, click Reset.

18D-Link DWR-118 User Manual
Section 4 - Conguration
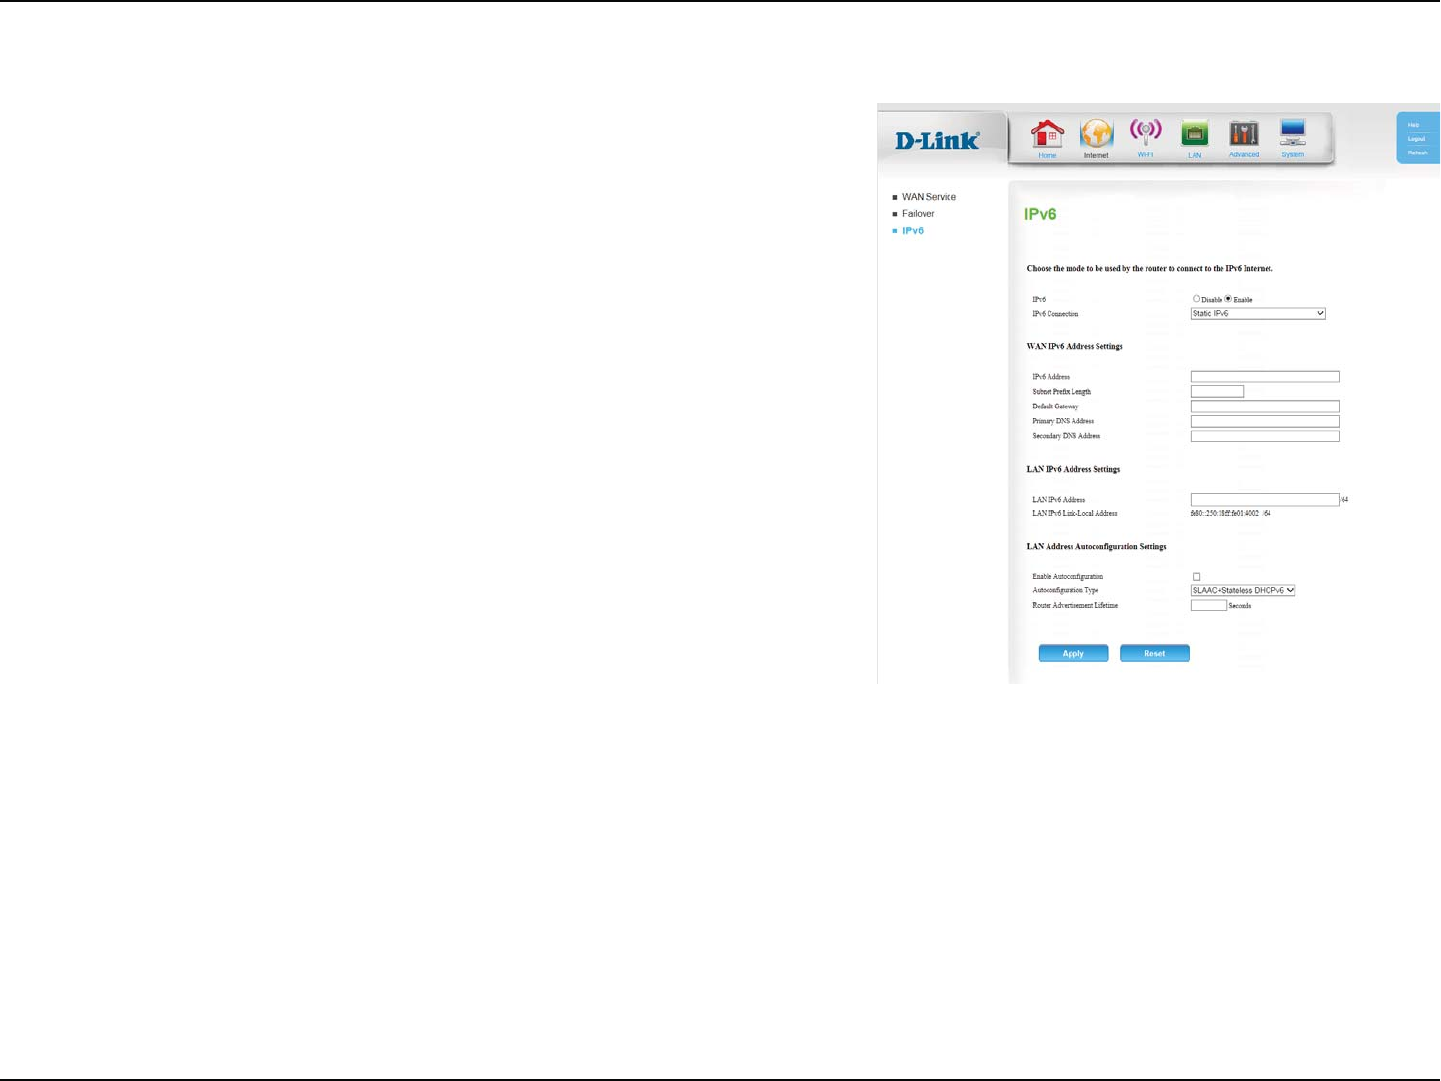
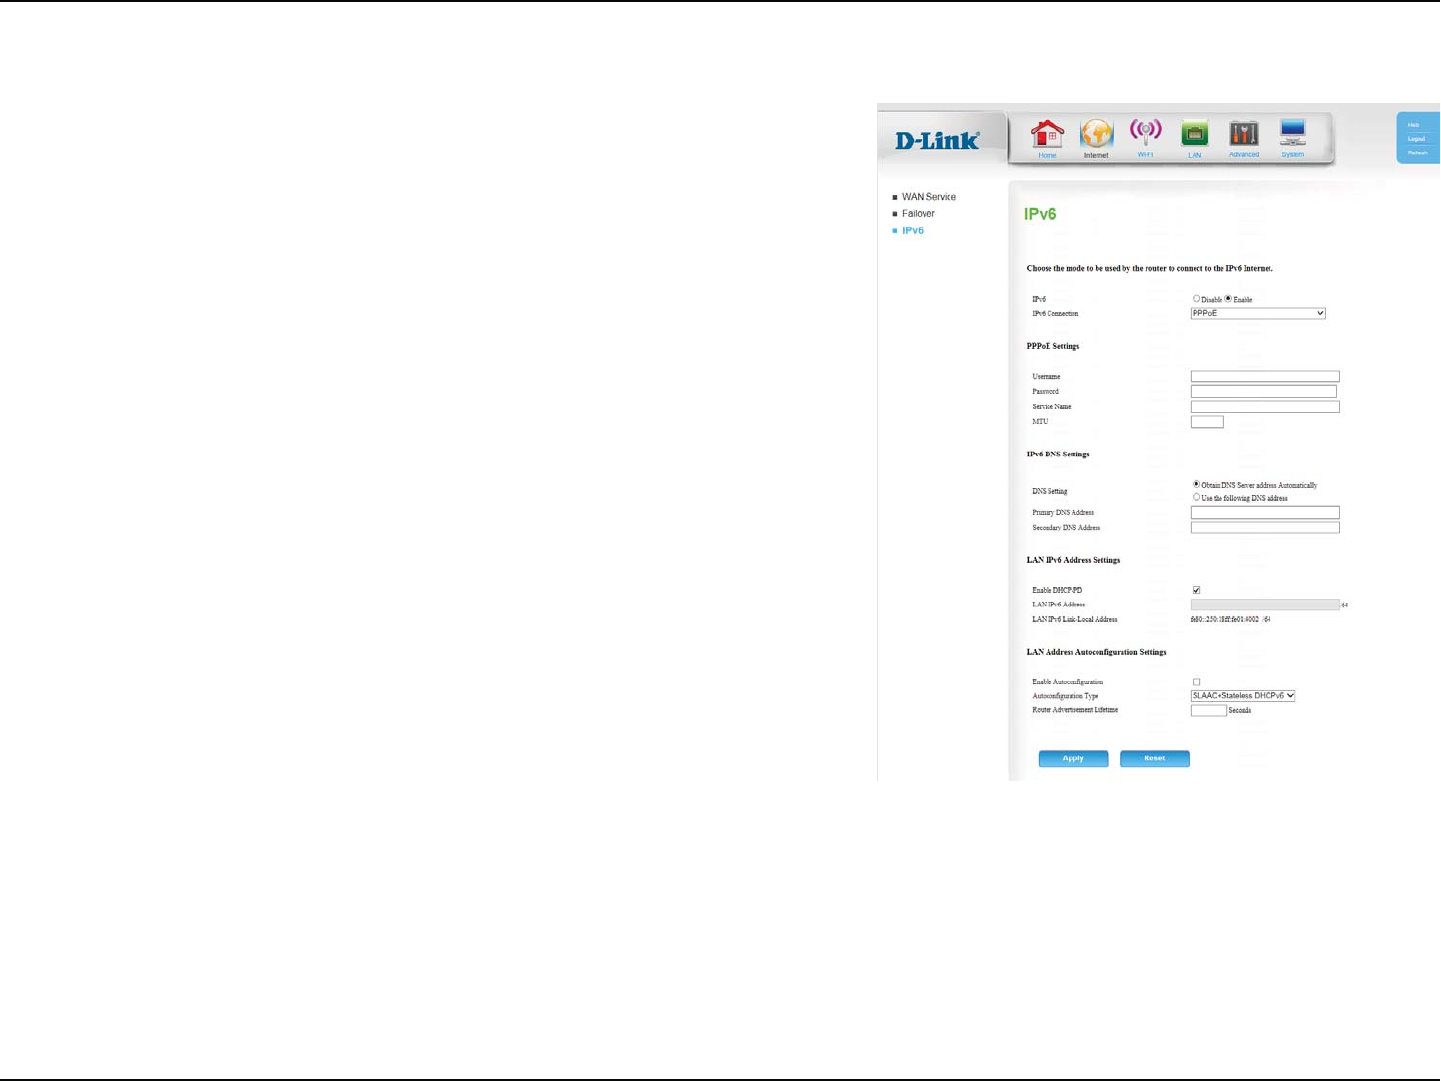
IPv6
5PFOBCMFBO*1W*OUFSOFUDPOOFDUJPODMJDLEnable.
4FMFDUZPVS*1WDPOOFDUJPOUZQF
'PS4UBUJD*1WSFGFSUPStatic IPv6 on page 19.
'PS"VUPDPOöHVSBUJPO4-""$%)$1WSFGFSUP
Autoconguration (SLAAC/DHCPv6) on page 20.
For PPPoE refer to PPPoE on page 21.
8IFOZPVIBWFöOJTIFEDPOöHVSJOHZPVS*OUFSOFUTFUUJOHTDMJDL
Apply to save your changes. To restore your settings to the most
recent save, click Reset.
IPv6:
IPv6 Connection:
0OUIJTQBHFZPVDBODPOöHVSFZPVS*1W*OUFSOFUDPOOFDUJPO*GZPVBSFOPUTVSFXIJDITFUUJOHTUPVTFQMFBTFDPOUBDUZPVS*OUFSOFU4FSWJDF
1SPWJEFS*41
Link-local Only
Displays the router’s LAN link-local address.LAN IP Link-Local
Address:
19D-Link DWR-118 User Manual
Section 4 - Conguration
Static IPv6
&OUFSUIF*1WBEESFTTTVQQMJFECZZPVS*41
&OUFSUIFTVCOFUQSFöYMFOHUITVQQMJFECZZPVS*41
&OUFSUIFEFGBVMUHBUFXBZGPSZPVS*1WDPOOFDUJPO
Enter the primary DNS server address.
Enter the secondary DNS server address.
&OUFSUIF-"/MPDBM*1WBEESFTTGPSUIFSPVUFS
Displays the router’s LAN link-local address.
$IFDLUIFCPYUPFOBCMFBVUPDPOöHVSBUJPO
4FMFDU4UBUFGVM%)$1W4-""$3%/44PS4-""$4UBUFMFTT
DHCPv6.
&OUFSUIF*1WBEESFTTMJGFUJNFJOTFDPOET
IPv6 Address:
Subnet Prex
Length:
Default Gateway:
Primary DNS
Address:
Secondary DNS
Address:
LAN IPv6 Address:
LAN IP Link-Local
Address:
Enable
Autoconguration:
Autoconguration
Type:
Router
Advertisement
Lifetime:

20D-Link DWR-118 User Manual
Section 4 - Conguration
Autoconguration (SLAAC/DHCPv6)
Select either Obtain DNS server address automatically or Use
the following DNS address.
Enter the primary DNS server address.
Enter the secondary DNS server address.
$IFDLUIFCPYUPFOBCMFQSFöYEFMFHBUJPOTFSWJDFT
&OUFSUIF-"/MPDBM*1WBEESFTTGPSUIFSPVUFS
Displays the router’s LAN link-local address.
$IFDLUIFCPYUPFOBCMFBVUPDPOöHVSBUJPO
4FMFDU4UBUFGVM%)$1W4-""$3%/44PS4-""$4UBUFMFTT
DHCPv6.
&OUFSUIF*1WBEESFTTMJGFUJNFJOTFDPOET
DNS Setting:
Primary DNS
Address:
Secondary DNS
Address:
Enable DHCP-PD:
LAN IPv6 Address:
LAN IP Link-Local
Address:
Enable
Autoconguration:
Autoconguration
Type:
Router
Advertisement
Lifetime:
21D-Link DWR-118 User Manual
Section 4 - Conguration
PPPoE
&OUFSUIF111P&VTFSOBNFQSPWJEFECZZPVS*41
&OUFSUIF111P&QBTTXPSEQSPWJEFECZZPVS*41
&OUFSUIF111P&TFSWJDFOBNFQSPWJEFECZZPVS*41JGBQQMJDBCMF
Maximum Transmission Unit - you may need to change the MTU
GPSPQUJNBMQFSGPSNBODFXJUIZPVS*41
Select either Obtain DNS server address automatically or Use
the following DNS address.
Enter the primary DNS server address.
Enter the secondary DNS server address.
$IFDLUIFCPYUPFOBCMFQSFöYEFMFHBUJPOTFSWJDFT
&OUFSUIF-"/MPDBM*1WBEESFTTGPSUIFSPVUFS
Displays the router’s LAN link-local address.
$IFDLUIFCPYUPFOBCMFBVUPDPOöHVSBUJPO
4FMFDU4UBUFGVM%)$1W4-""$3%/44PS4-""$4UBUFMFTT
DHCPv6.
&OUFSUIF*1WBEESFTTMJGFUJNFJOTFDPOET
Username:
Password:
Service Name:
MTU:
DNS Setting:
Primary DNS
Address:
Secondary DNS
Address:
Enable DHCP-PD:
LAN IPv6 Address:
LAN IP Link-Local
Address:
Enable
Autoconguration:
Autoconguration
Type:
Router
Advertisement
Lifetime:
22D-Link DWR-118 User Manual
Section 4 - Conguration
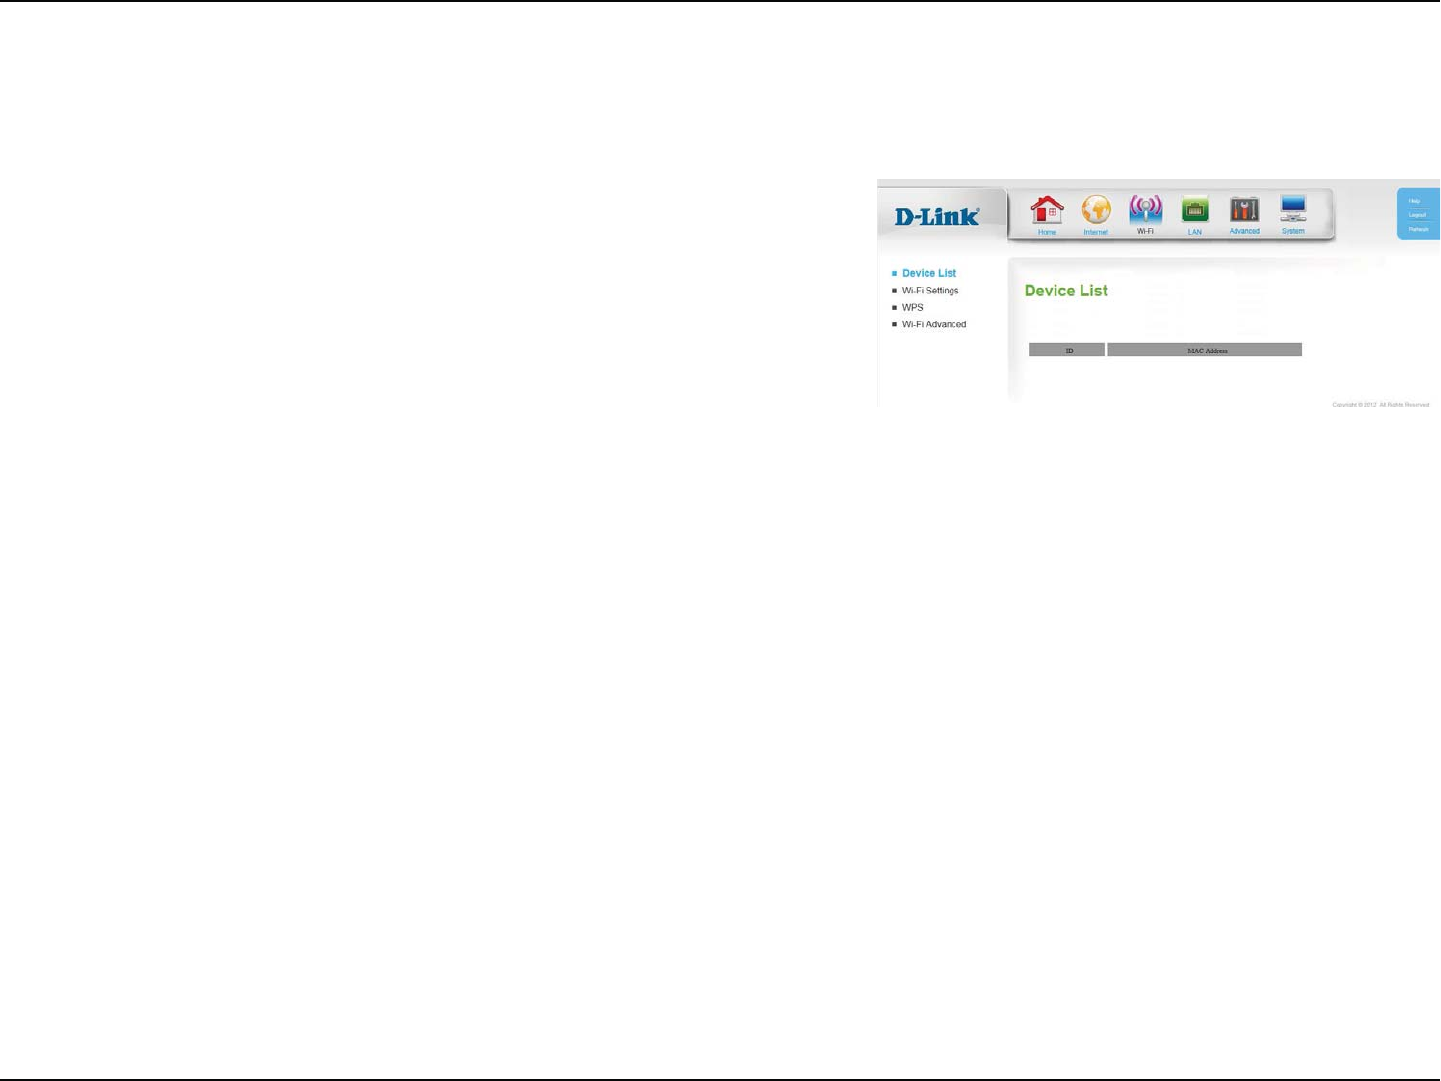
Wi-Fi
Device List
The Device List displays a list of currently-connected wireless clients. Each
device’s ID and MAC Address will be shown.
23D-Link DWR-118 User Manual
Section 4 - Conguration
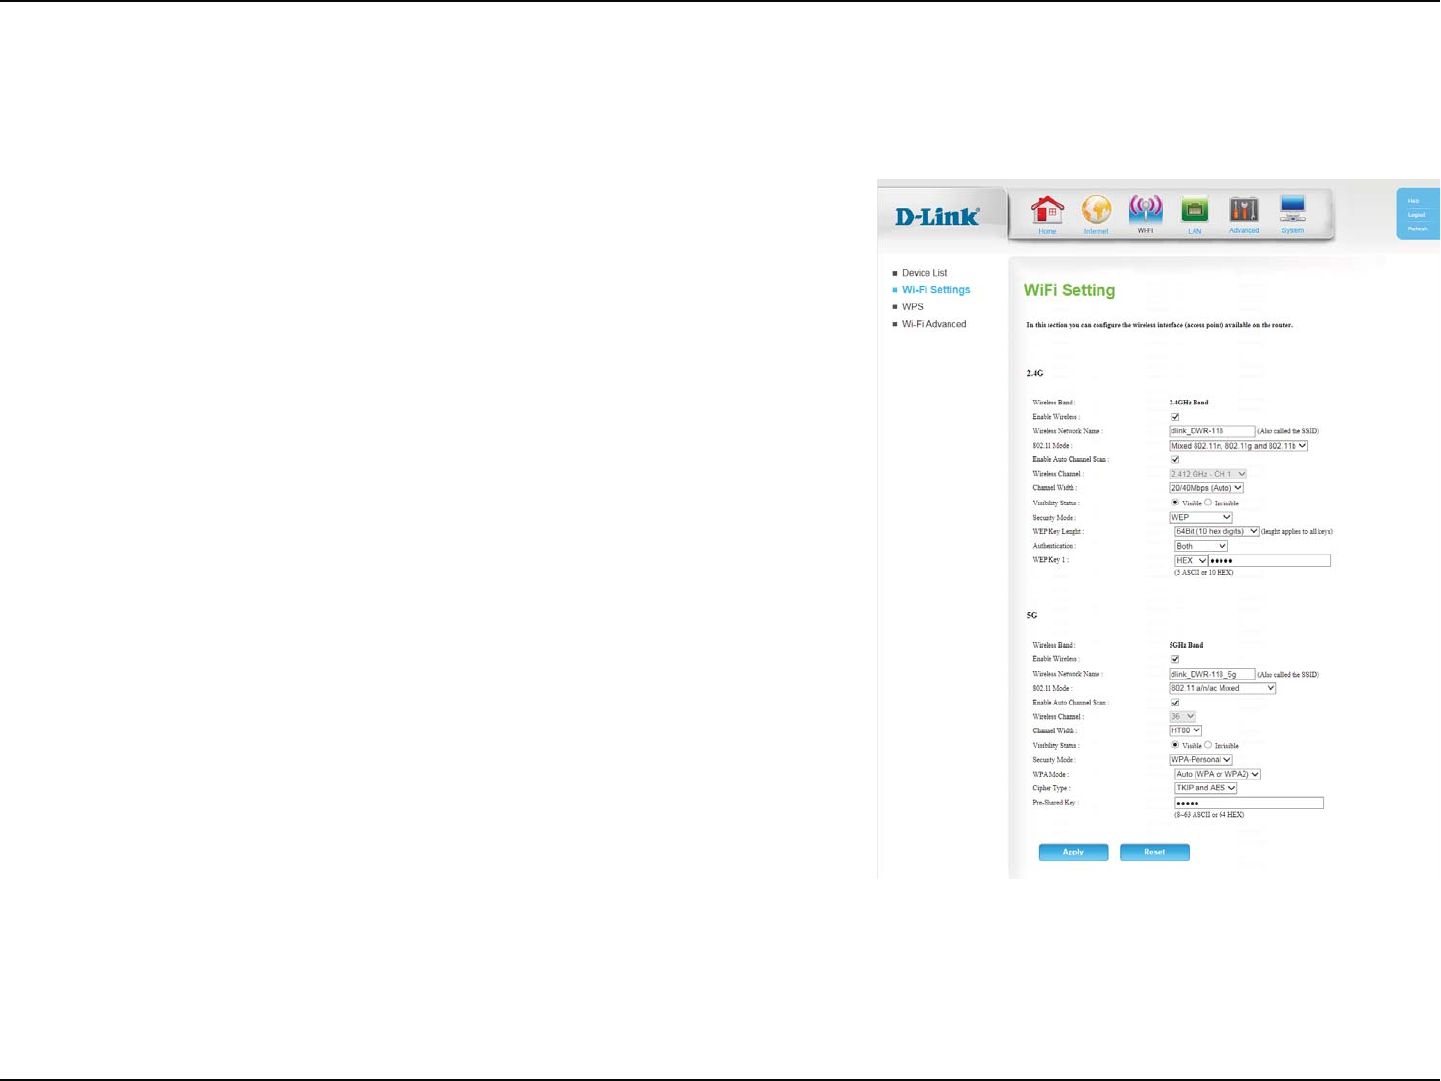
Wi-Fi Settings
%JTQMBZTUIFXJSFMFTTCBOEDVSSFOUMZCFJOHDPOöHVSFE
Check the box to enable the router’s wireless functionality.
Create a name for your wireless network using up to 32 characters.
Select the desired wireless networking standards to use. The
available options will depend on the wireless frequency band, as
well as the currently selected security mode.
Check the box to automatically scan for an appropriate channel.
*G"VUP$IBOOFM4DBOJTEJTBCMFETFMFDUUIFEFTJSFEDIBOOFMIFSF
A higher channel width allows for faster data transmission, at the
possible expense of wireless coverage and compatibility with
older wireless clients. Select the optimum channel width for your
wireless network from the drop-down menu.
The default setting is Visible. Select Invisible if you do not want
UPCSPBEDBTUUIF44*%PGZPVSXJSFMFTTOFUXPSL
Select your security mode, and refer to the next page for details.
Wireless Band:
Enable Wireless:
Wireless Network
Name:
802.11 Mode:
Enable Auto
Channel Scan:
Wireless Channel:
Channel Width:
Visibility Status:
Security Mode:
0OUIJTQBHFZPVDBODPOöHVSFZPVSXJSFMFTTTFUUJOHT

24D-Link DWR-118 User Manual
Section 4 - Conguration
WEP
Select either a 64Bit or 128Bit WEP key length.
Select whether to use Both or Shared Key authentication.
'PSBCJULFZFOUFSIFYBEFDJNBM"'WBMVFTPS"4$**
WBMVFT'PSBCJULFZFOUFSIFYBEFDJNBMWBMVFTPS"4$**
values.
WEP Key Length:
Authentication:
WEP Key:
WPA-Personal
Select Auto (WPA or WPA2), WPA only, or WPA2 only.
Select TKIP, AES, or TKIP and AES. AES is the most secure, but
TKIP allows for compatibility with clients that don’t support AES.
*GZPVBSFVTJOHB1SF4IBSFE,FZ14,DIPPTFBLFZCFUXFFO
BOEDIBSBDUFSTIFSF
WPA Mode:
Cipher Type:
Pre-Shared Key:
25D-Link DWR-118 User Manual
Section 4 - Conguration
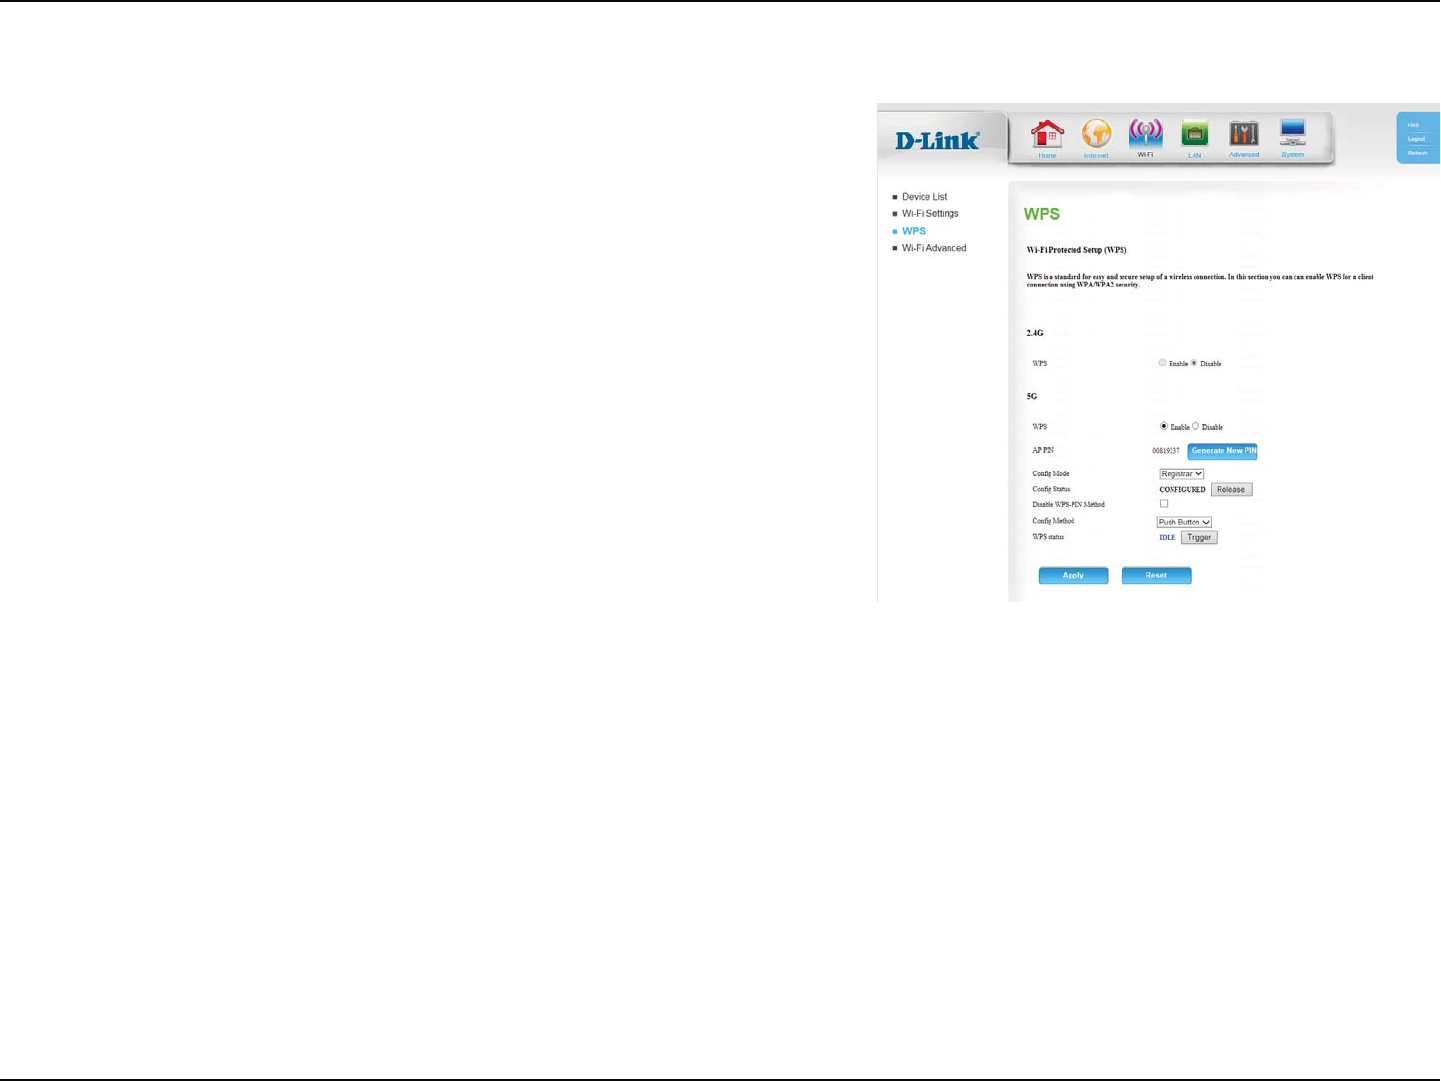
WPS
Enable or Disable8J'J1SPUFDUFE4FUVQ814
%JTQMBZTUIFDVSSFOU1*/$MJDLGenerate New PIN if you want to
generate a new one.
Select either Registrar or Enrollee
%JTQMBZTUIFDVSSFOU814DPOöHVSBUJPOTUBUVT$MJDLRelease to
SFDPOöHVSF
$IFDLUIFCPYUPEJTBCMFUIF8141*/NFUIPE
Select either Push Button or PIN Code
Displays the current WPS status. Click Trigger to activate WPS.
WPS:
AP PIN:
Cong Mode:
Cong Status:
Disable WPS-PIN
Method:
Cong Method:
WPS Status:

26D-Link DWR-118 User Manual
Section 4 - Conguration
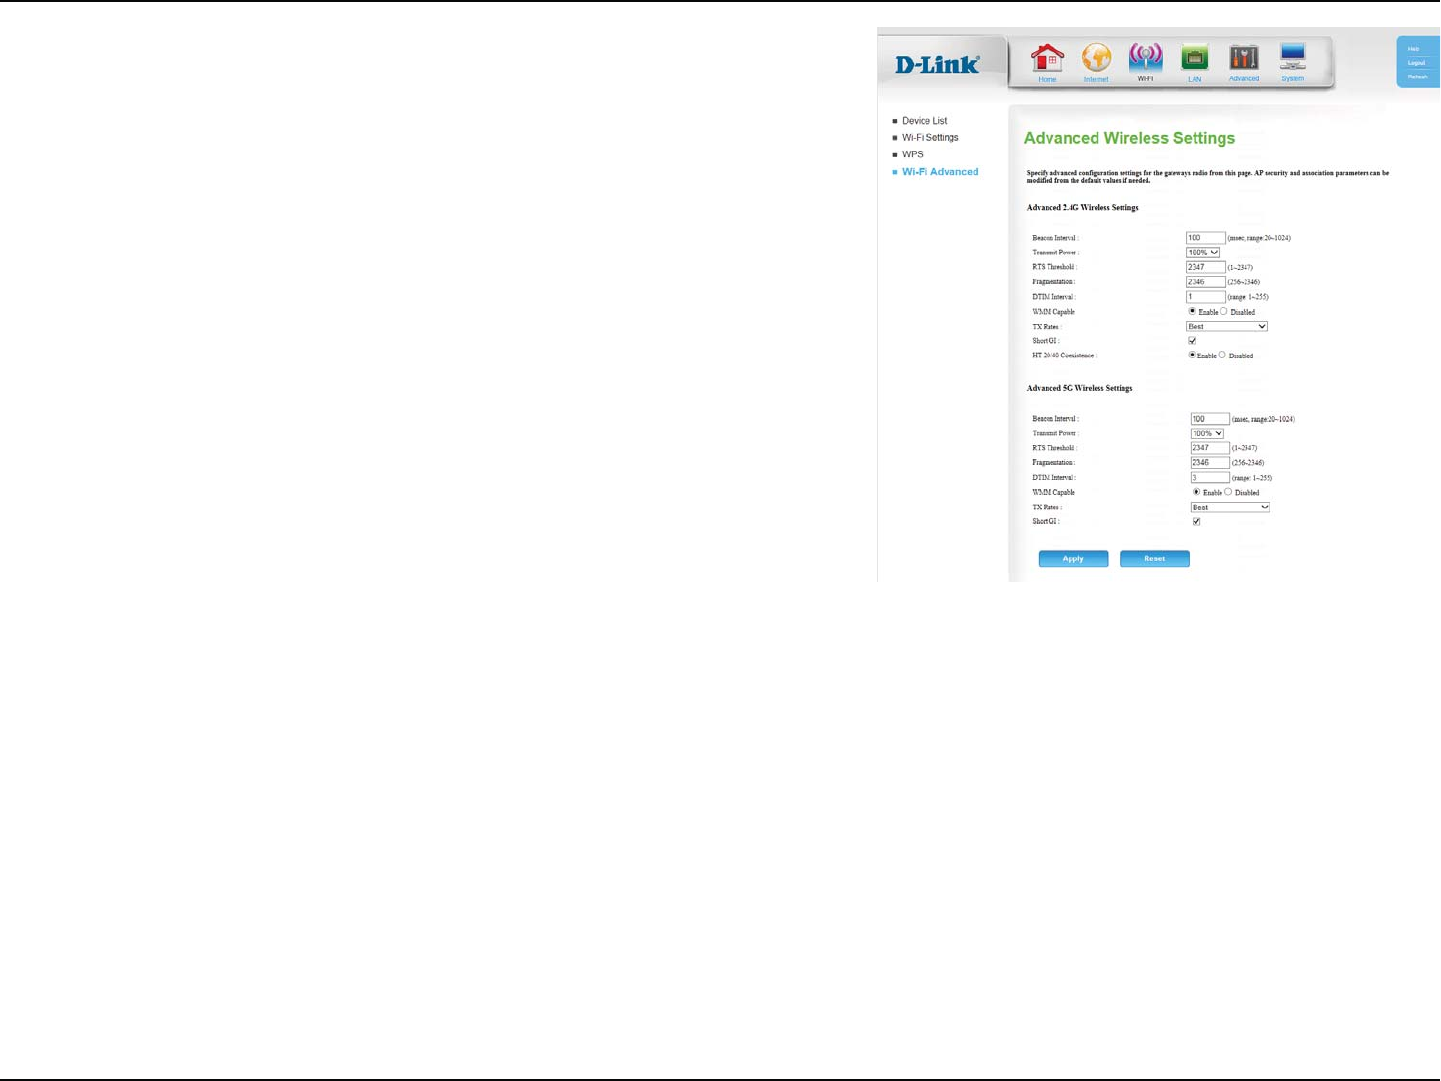
Wi-Fi Advanced
Specify a value for the beacon interval. Beacons are packets sent
by an access point to synchronize a wireless network. 100 is the
default and recommended setting.
Set the transmitting power of the antennas.
5IJTWBMVFTIPVMESFNBJOBUJUTEFGBVMUTFUUJOHPG*GZPV
FODPVOUFSJODPOTJTUFOUEBUBøPXPOMZNJOPSNPEJöDBUJPOTBSF
recommended.
The fragmentation threshold determines whether packets will
CFGSBHNFOUFE1BDLFUTFYDFFEJOHUIFTQFDJöFEWBMVFXJMMCF
fragmented before transmission. 2346 is the default setting.
"%FMJWFSZ5SBóD*OEJDBUJPO.FTTBHF%5*.JTBDPVOUEPXO
informing clients of the next window for listening to broadcast
and multicast messages.
8..8J'J.VMUJNFEJBJTB2P42VBMJUZPG4FSWJDFTZTUFNGPS
your wireless network. Enable this option to improve the quality of
video and voice applications for your wireless clients.
Select the basic transfer rates based on the speed of wireless
BEBQUFSTPOZPVSXJSFMFTTOFUXPSL*UJTTUSPOHMZSFDPNNFOEFEUP
keep this setting to Best.
Check this box to reduce the guard interval to 400 ns. This can
increase the throughput rate provided that the delay spread of the
connection is also low. However, it can also increase error rate in
some installations, due to increased sensitivity to radio-frequency
reections.
Beacon Interval:
Transmit Power:
RTS Threshold:
Fragmentation:
DTIM Interval:
WMM Capable:
TX Rates:
Short GI:
27D-Link DWR-118 User Manual
Section 4 - Conguration
Select Enable to reduce interference from other wireless networks
JOZPVSBSFB*GUIFDIBOOFMXJEUIJTPQFSBUJOHBU̓.)[BOEUIFSF
is another wireless network’s channel overlapping and causing
JOUFSGFSFODFUIFSPVUFSXJMMBVUPNBUJDBMMZDIBOHFUP̓.)[
HT 20/40
Coexistence:
28D-Link DWR-118 User Manual
Section 4 - Conguration
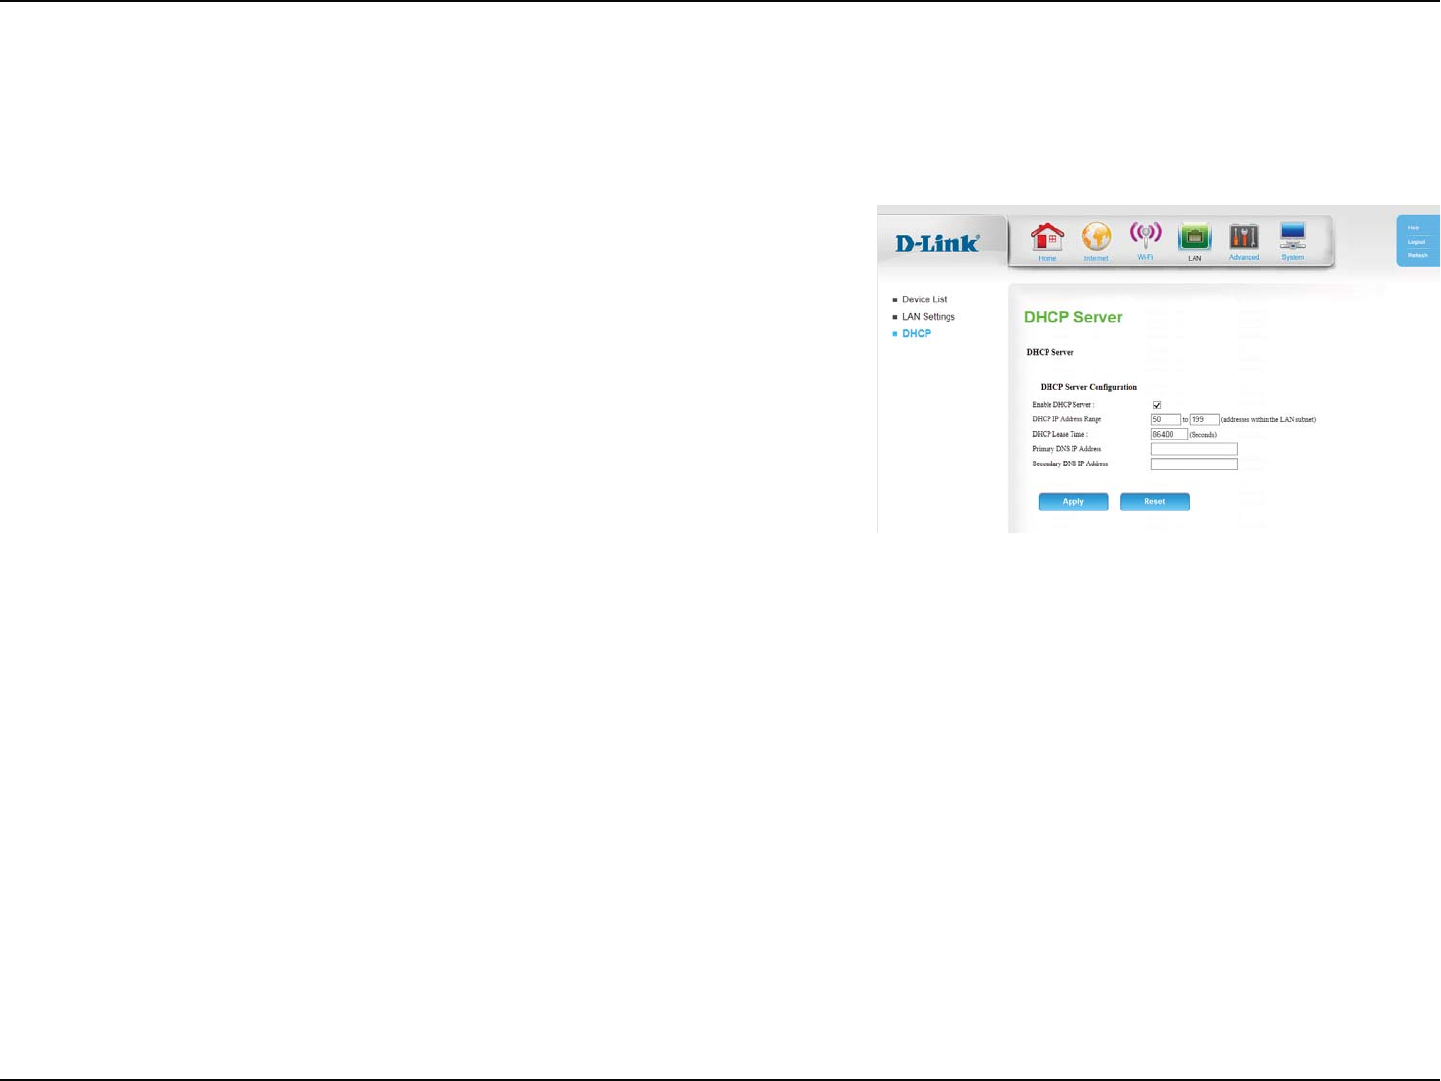
LAN
&OUFSUIF*1BEESFTTPGUIFSPVUFS5IFEFGBVMUJT192.168.0.1.
*GZPVDIBOHFUIF*1BEESFTTZPVXJMMOFFEUPFOUFSUIFOFX*1
BEESFTTJOZPVSCSPXTFSUPHFUJOUPUIFDPOöHVSBUJPOVUJMJUZ
Enter the subnet mask of the router. The default subnet mask is
255.255.255.0.
Enter the local domain name for your network.
IP Address:
Default Subnet
Mask:
Local Domain
Name:
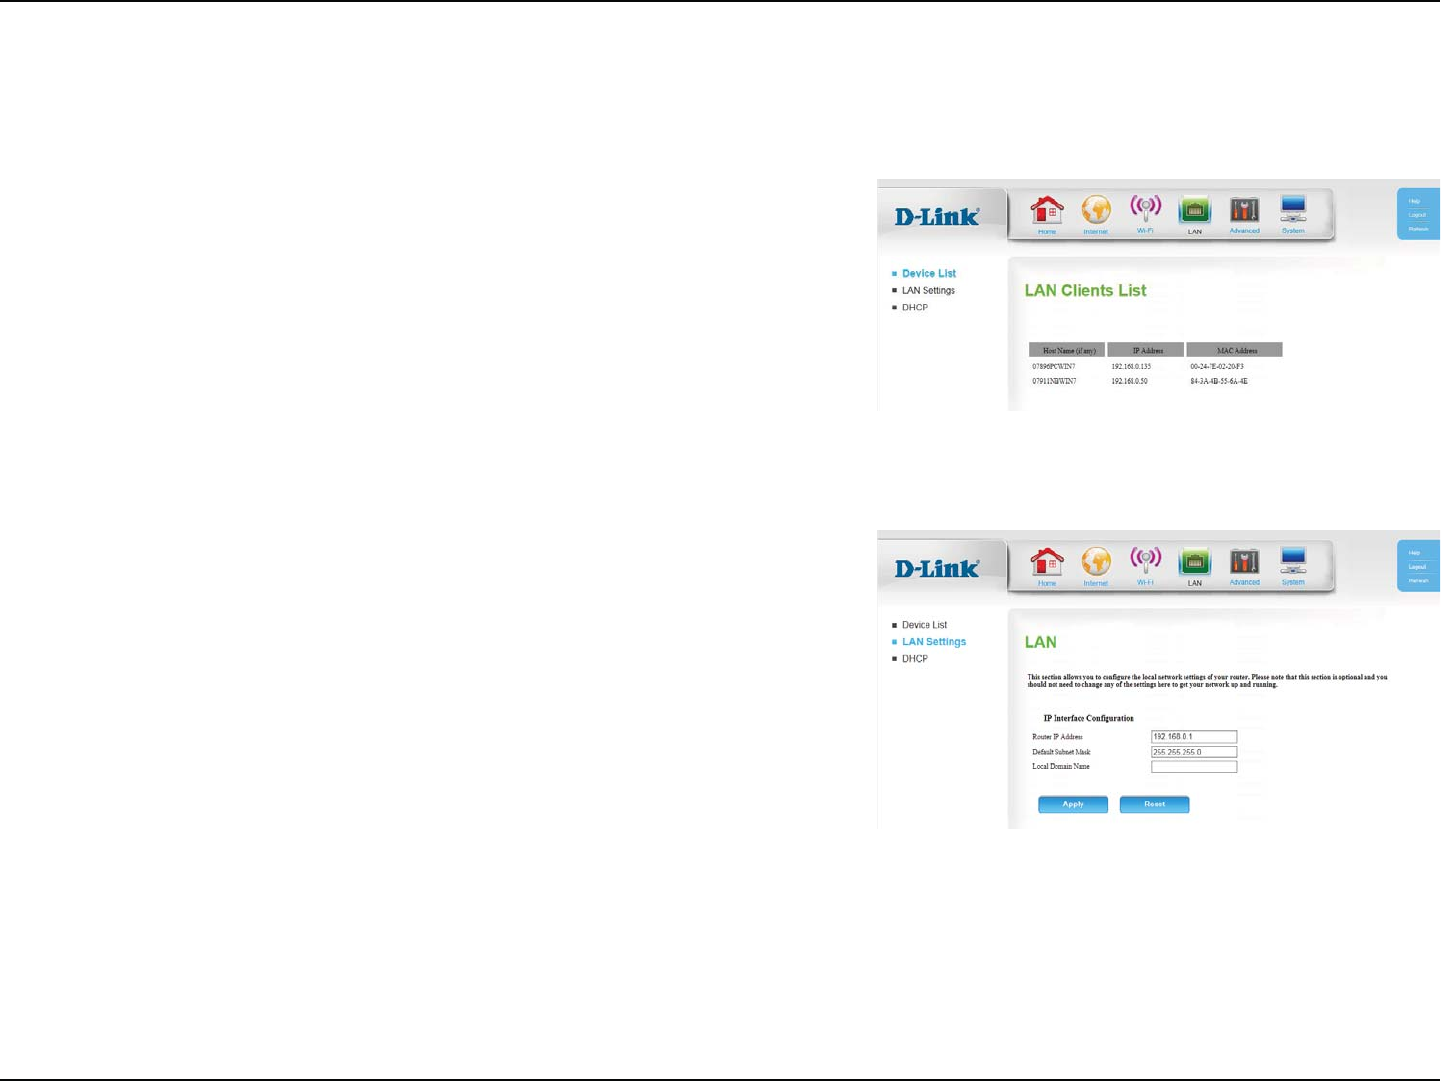
Device List
LAN Settings
The Device List displays a list of recognised LAN clients, showing their Host
Name, IP Address, and MAC Address.
29D-Link DWR-118 User Manual
Section 4 - Conguration
Check the box to enable the DHCP server on your router.
&OUFSUIFSBOHFPG*1TGPSUIF%)$1TFSWFSUPVTFUPBTTJHO*1
addresses to devices on your network.
Enter the lease time for DHCP assignments. The default is 86400.
&OUFSUIF*1BEESFTTPGUIF%)$1TFSWFSUIFEFGBVMUJTUIFSPVUFST
*1BEESFTT
&OUFSUIF*1BEESFTTPGBTFDPOEBSZ%/4TFSWFSJGBQQMJDBCMF
Enable DHCP
Server:
DHCP IP Address
Range:
DHCP Lease
Time:
Primary DNS IP
Address:
Secondary DNS
IP Address:
DHCP
0OUIJTQBHFZPVDBODPOöHVSFUIF%ZOBNJD)PTU$POöHVSBUJPO1SPUPDPM%)$1TFUUJOHT

30D-Link DWR-118 User Manual
Section 4 - Conguration
Advanced
DDNS is a method of keeping a domain name linked to a changing
*1"EESFTT4FMFDUUIJTCPYUPFOBCMF%%/4
Select your DDNS provider from the dropdown
box.
Enter the Host Name that you registered with
your DDNS service provider.
Enter the Username for your DDNS account.
Enter the Password for your DDNS account.
Enable DDNS:
Provider:
Host Name:
Username /
E-mail:
Password / Key:
DNS
0OUIJTQBHFZPVDBODPOöHVSFUIF%PNBJO/BNF4ZTUFN%/4TFSWFSXIJDINBOBHFTUIFSFTPMVUJPOPGIPTUEPNBJOOBNFTUP*1BEESFTTFT
31D-Link DWR-118 User Manual
Section 4 - Conguration
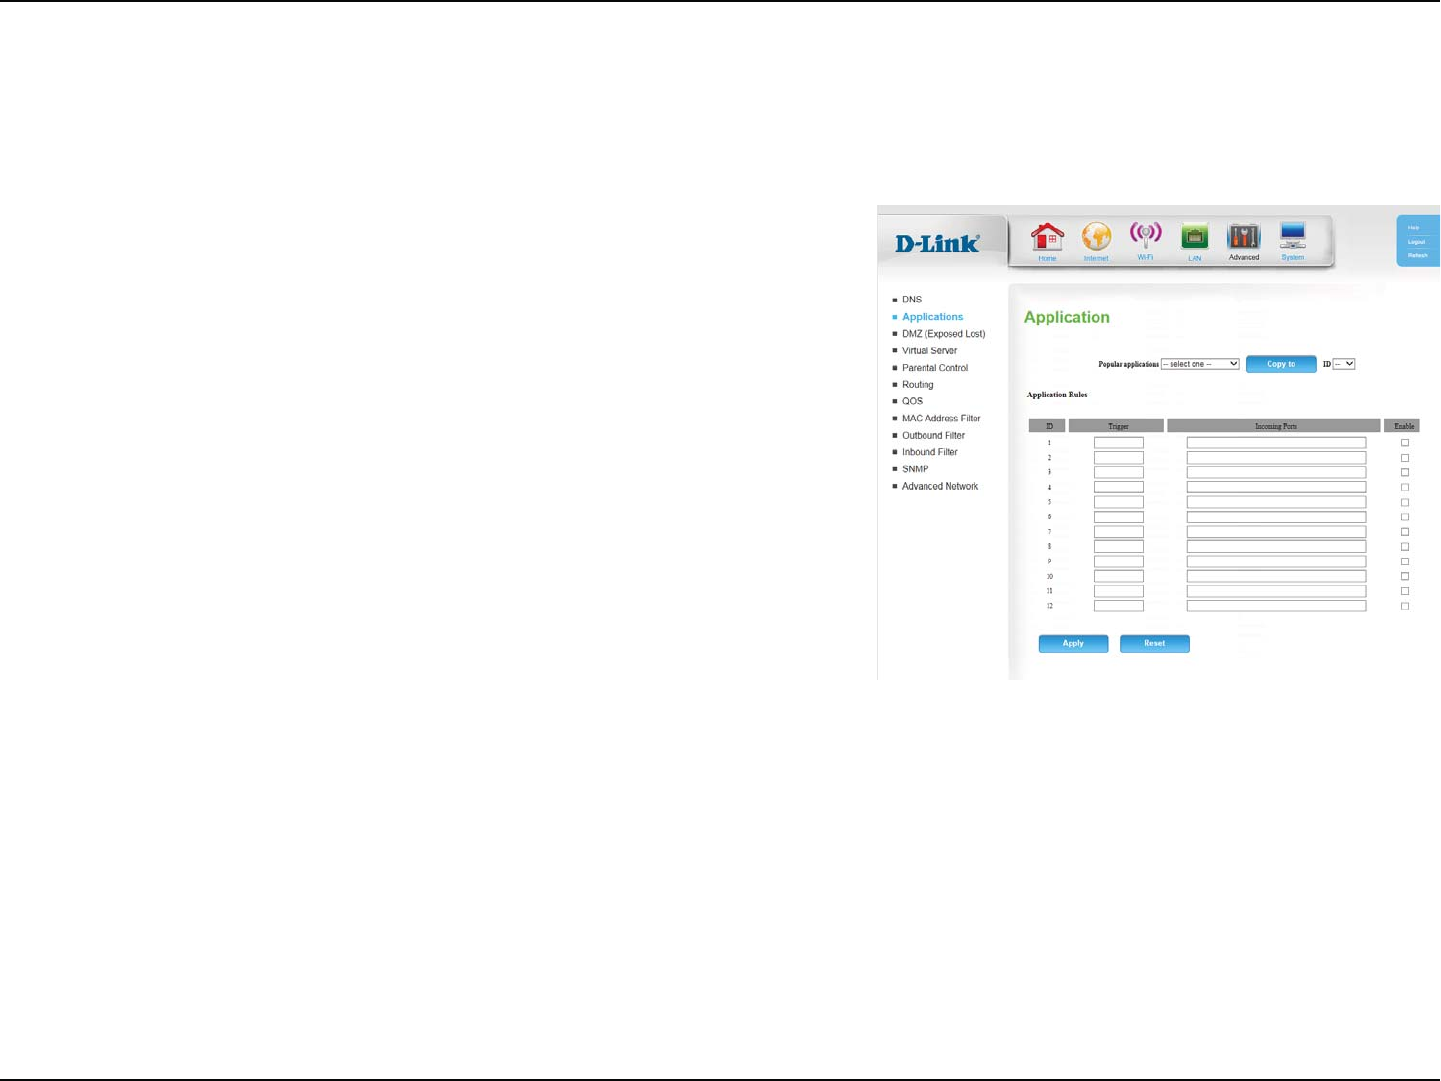
5PTQFFEVQDPOöHVSBUJPOZPVDBOTFMFDUBQPQVMBSBQQMJDBUJPO
from the drop-down menu, an ID, and click Copy to, to copy the
BQQMJDBUJPOTSVMFTUPUIFTQFDJöFE*%
%JTQMBZTBOVNFSJD*%GPSUIFSVMF
Enter the port or range of ports to listen to in order to trigger the
rule.
Enter the port or range of ports that will be used to access the
application.
Check the box to enable the rule.
Popular
applications:
ID:
Trigger Protocol:
Incoming Ports:
Enable:
Applications
0OUIJTQBHFZPVDBODPOöHVSFTQFDJBMBQQMJDBUJPOSVMFTUPPQFOQPSUTPOZPVSöSFXBMMBOEBMMPXDFSUBJOBQQMJDBUJPOTBDDFTTUPZPVSOFUXPSL
32D-Link DWR-118 User Manual
Section 4 - Conguration
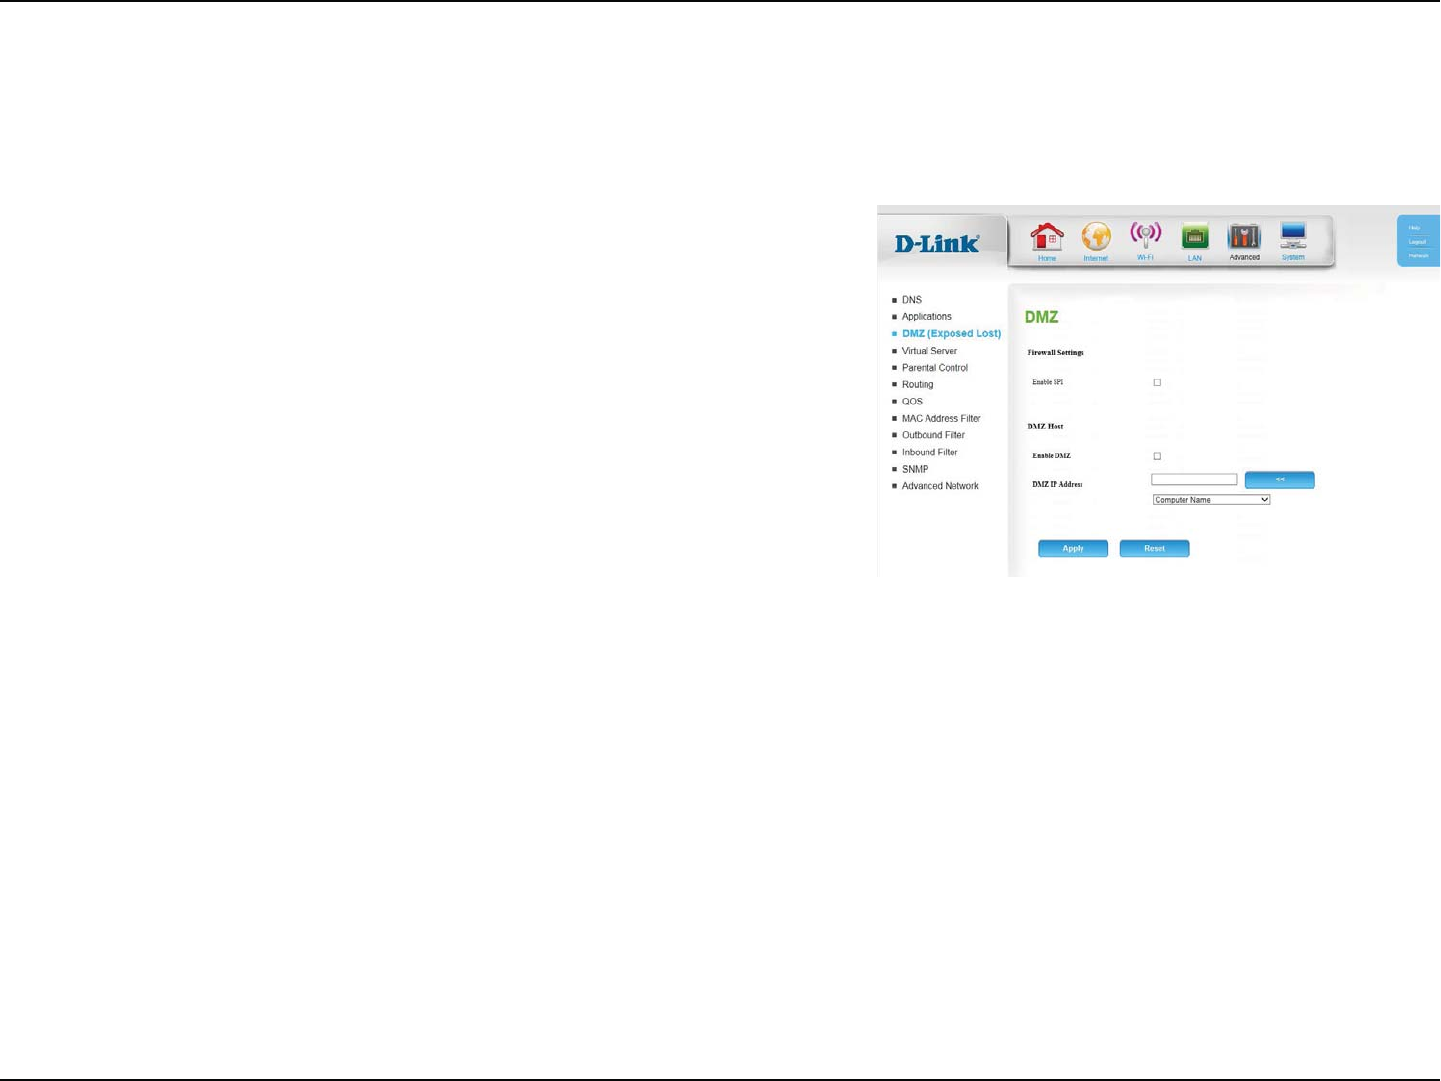
$IFDLUIFCPYUPFOBCMF4UBUFGVM1BDLFU*OTQFDUJPO41*
Check the box to enable DMZ.
&OUFSUIF*1BEESFTTPGUIFDMJFOUZPVXJTIUPFYQPTFPSTFMFDU
the Computer Name from the drop-down menu and click << to
BVUPNBUJDBMMZFOUFSUIF*1JOGPSNBUJPO
Enable SPI:
Enable DMZ:
DMZ IP Address:
DMZ (Exposed Host)
0OUIJTQBHFZPVDBOFOBCMFPSEJTBCMF%FNJMJUBSJ[FE;POF%.;5IJTDPNQMFUFMZFYQPTFTUIFDMJFOUUPUISFBUTPWFSUIF*OUFSOFUBOEJTOPU
recommended in ordinary situations.
33D-Link DWR-118 User Manual
Section 4 - Conguration
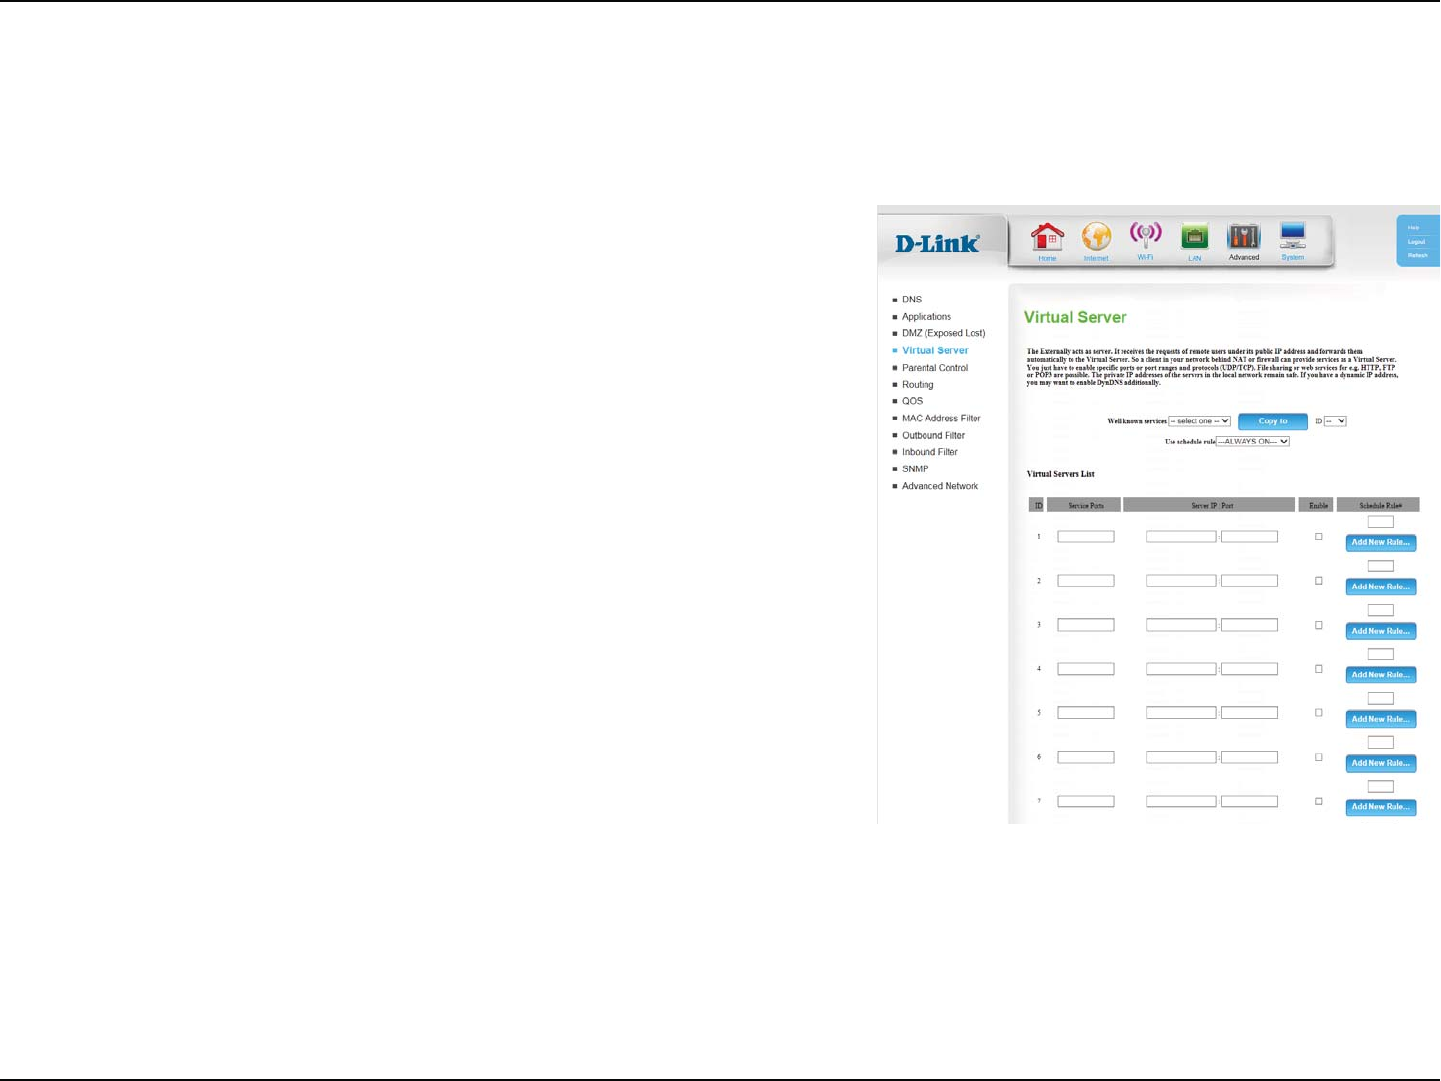
5PTQFFEVQDPOöHVSBUJPOZPVDBOTFMFDUBTFSWJDFGSPNUIFESPQ
down menu, an ID, and click Copy to, to copy the service rules to
UIFTQFDJöFE*%
Enter the ports used by the service.
&OUFSUIF*1BEESFTTPGUIFDPNQVUFSPOZPVSMPDBMOFUXPSLUIBU
ZPVXBOUUPBMMPXUIFJODPNJOHTFSWJDF*OUIFOFYUCPYFOUFSUIF
port number that you would like to open.
Select this box to enable the rule.
Specify the schedule rule number or click Add New Rule... to add
a new schedule rule.
Well-known
Services:
Service Ports:
Server IP: Port:
Enable:
Schedule Rule #:
Virtual Server
5IFEFWJDFDBOCFDPOöHVSFEBTBWJSUVBMTFSWFSTPUIBUVTFSTDBOBDDFTTTFSWJDFTTVDIBTXFCPS'51WJBUIFQVCMJD8"/*1BEESFTTPGUIFSPVUFS
34D-Link DWR-118 User Manual
Section 4 - Conguration
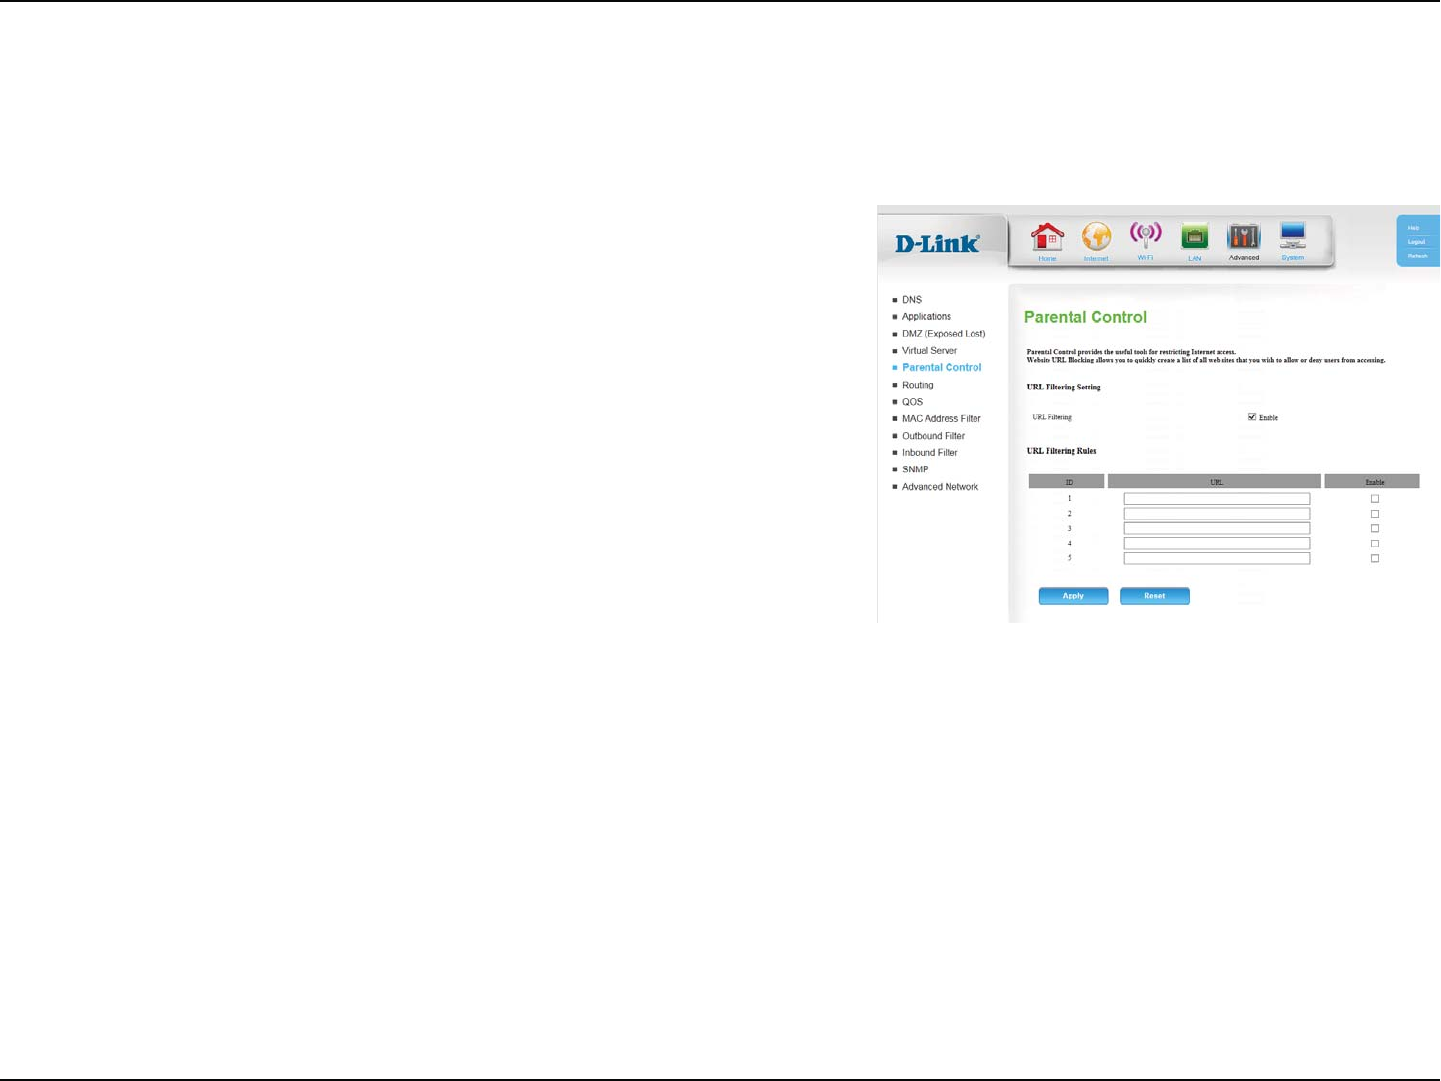
Check the box to enable URL Filtering.
*EFOUJöFTUIFSVMF
Enter URL that you would like to block.
$MJDLUPFOBCMFUIFTQFDJöD63-öMUFS
URL Filtering:
ID:
URL:
Enable:
Parental Control
0OUIJTQBHFZPVDBOSFTUSJDU*OUFSOFUBDDFTTUPQBSUJDVMBS63-T
35D-Link DWR-118 User Manual
Section 4 - Conguration
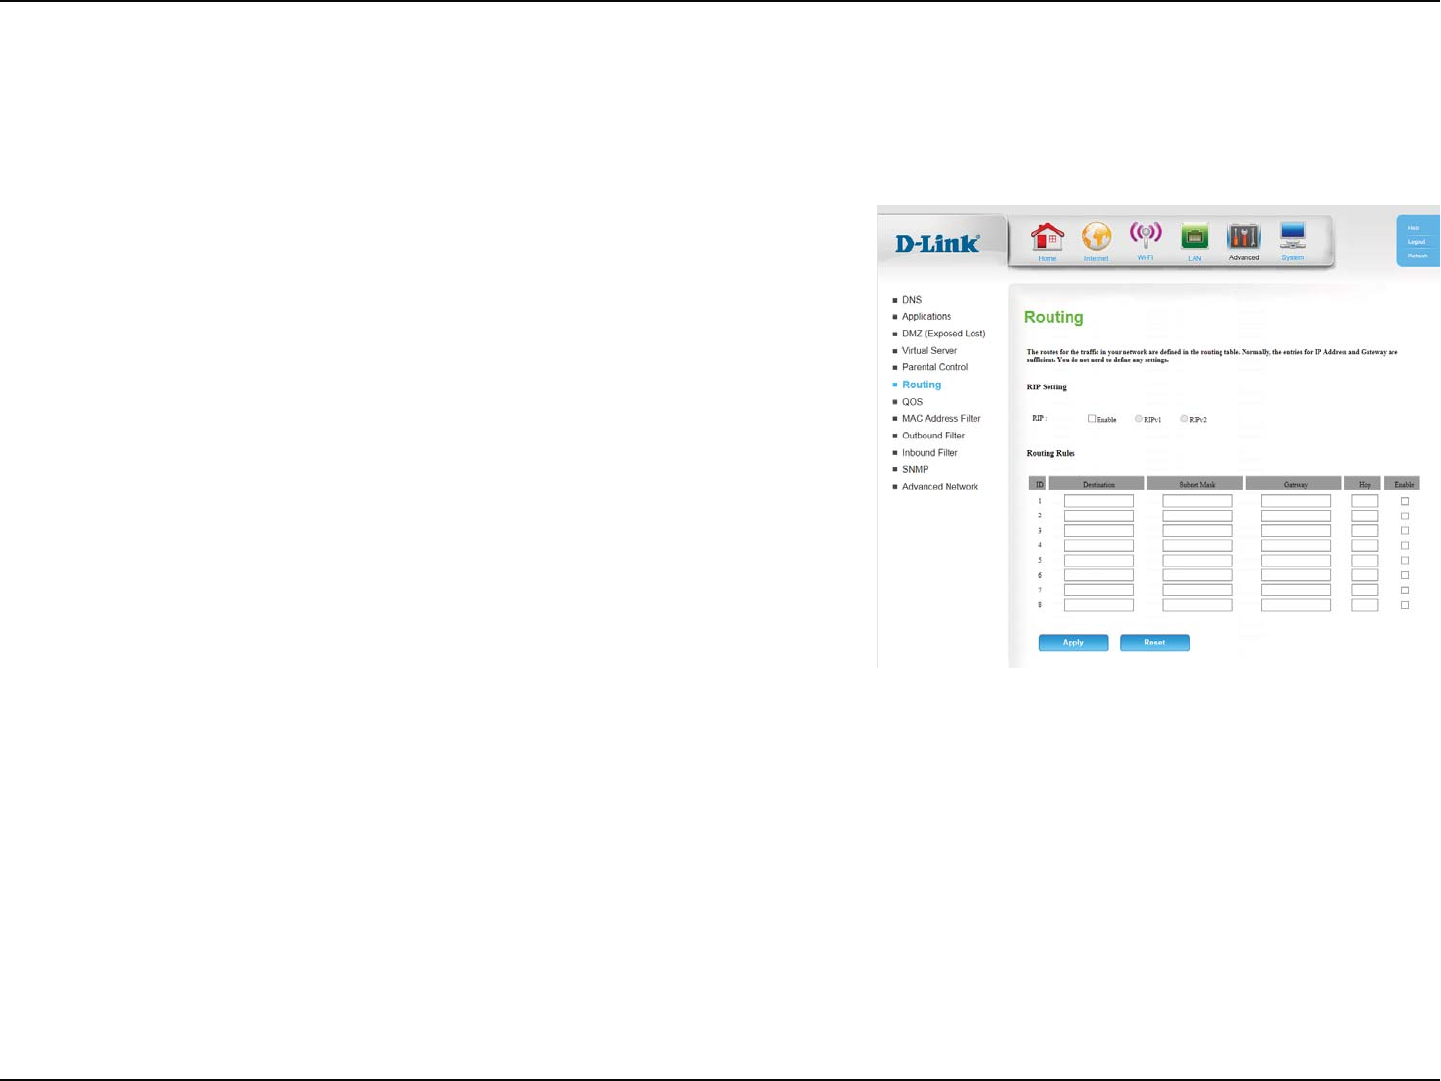
Select this box to enable routing.
RIPv11SPUPDPMJOXIJDIUIF*1BEESFTTJTSPVUFEUISPVHIUIF
*OUFSOFU
RIPv2&OIBODFEWFSTJPOPG3*1WXJUIBEEFEGFBUVSFTTVDIBT
authentication, routing domain, next hop forwarding, and subnet
mask exchange.
*EFOUJöFTUIFSVMF
&OUFSUIF*1PGUIFTQFDJöFEOFUXPSLUIBUZPVXBOUUPBDDFTTVTJOH
the static route.
&OUFSUIFTVCOFUNBTLUPCFVTFEGPSUIFTQFDJöFEOFUXPSL
&OUFSUIFHBUFXBZ*1BEESFTTUPUIFTQFDJöFEOFUXPSL
&OUFSUIFBNPVOUPGIPQTJUXJMMUBLFUPSFBDIUIFTQFDJöFE
network.
Select this box to enable the rule.
RIP:
ID:
Destination:
Subnet Mask:
Gateway:
Hop:
Enable:
Routing
This page allows you to specify custom routes that determine how data is moved around your network.
36D-Link DWR-118 User Manual
Section 4 - Conguration
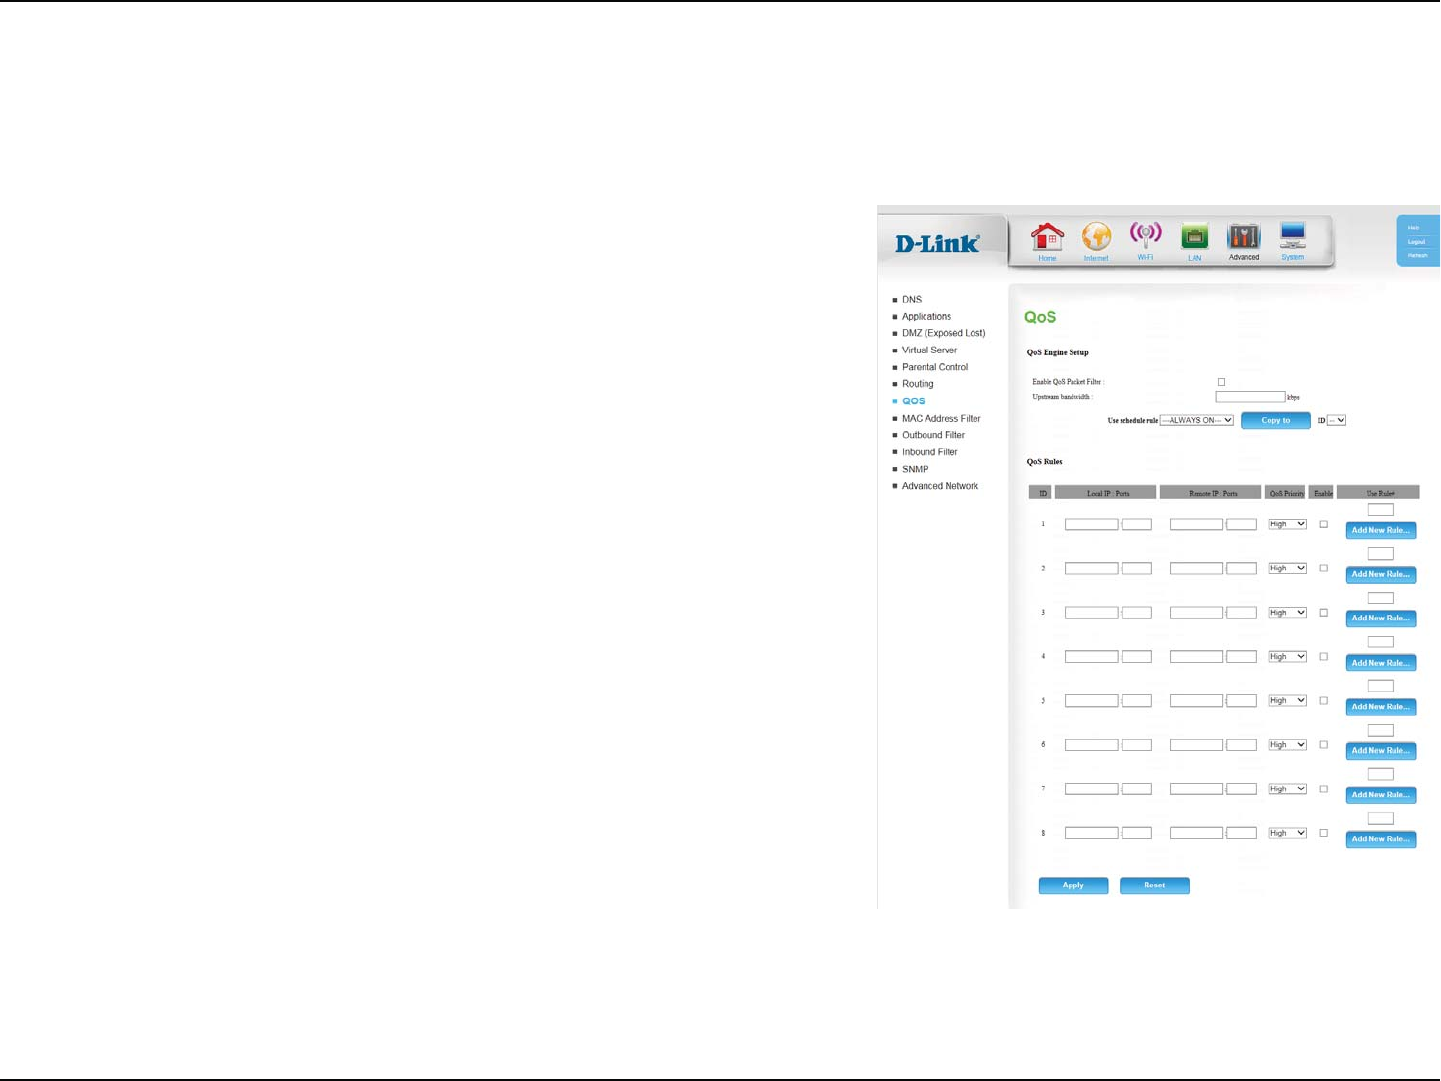
4FMFDUUIJTCPYUPFOBCMFUIF2P4QBDLFUöMUFS
4QFDJGZUIFNBYJNVNVQTUSFBNCBOEXJEUIIFSFFHLCQT
You may select Always On or choose the number of a schedule
SVMFUIBUZPVIBWFEFöOFE$MJDLCopy to to copy the rule to the
TQFDJöFE*%
*EFOUJöFTUIFSVMF
4QFDJGZUIFMPDBM*1BEESFTTBOEUIFOTQFDJGZUIFQPSUBGUFSUIF
colon.
4QFDJGZUIFSFNPUF*1BEESFTTBOEUIFOUIFQPSUBGUFSUIFDPMPO
Select Low, Normal, or High.
Select a checkbox to enable the particular QoS rules individually.
Specify the schedule rule number or click Add New Rule... to add
a new schedule rule.
Enable QoS
Packet Filter:
Upstream
Bandwidth:
Use schedule
rule:
ID:
Local IP : Ports:
Remote IP: Ports:
QoS Priority:
Enable:
Use Rule #:
QoS
0OUIJTQBHFZPVDBODPOöHVSFUIFSPVUFST2VBMJUZPG4FSWJDF2P4FOHJOFXIJDIQSJPSJUJ[FTJNQPSUBOUOFUXPSLUSBóDTVDIBTPOMJOFHBNJOH
*OUFSOFUQIPOFDBMMTBOEWJEFPTUSFBNJOHPWFSPSEJOBSZUSBóDTVDIBTXFCCSPXTJOHBOEöMFUSBOTGFSSJOH
37D-Link DWR-118 User Manual
Section 4 - Conguration
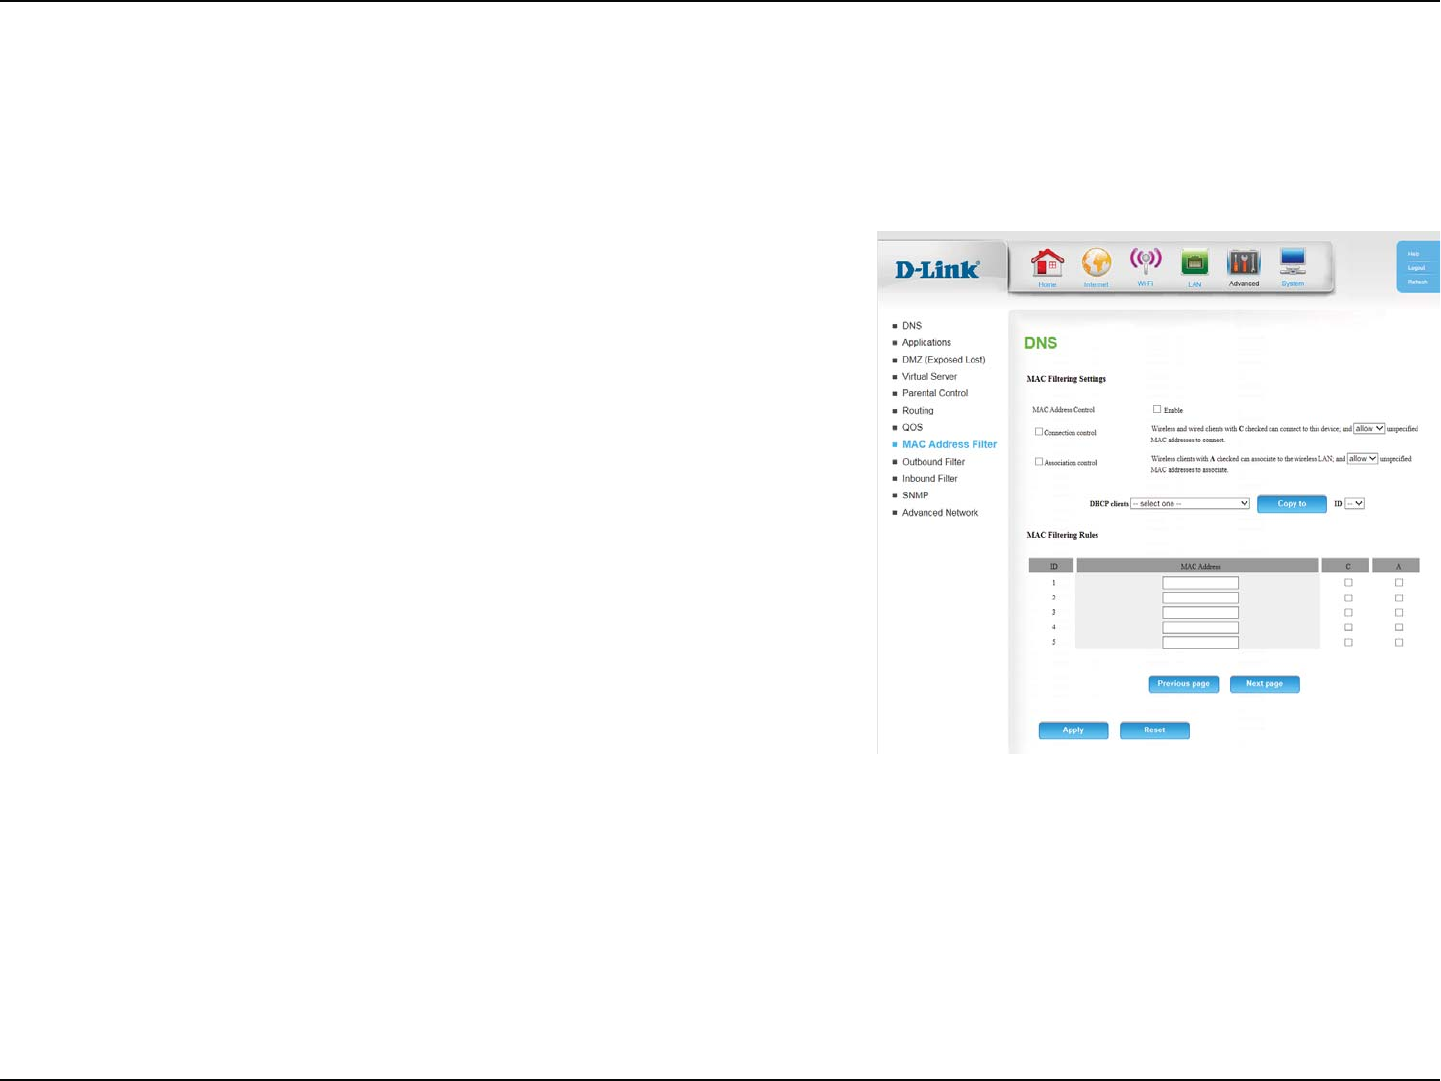
$IFDLUIJTCPYUPFOBCMF."$öMUFSJOH
Wireless and wired clients with C selected can connect to this
device and allow/denyDPOOFDUJPOTGSPNVOTQFDJöFE."$
addresses.
Wireless clients with A selected can associate to the wireless LAN
BOEBMMPXEFOZDPOOFDUJPOTGSPNVOTQFDJöFE."$BEESFTTFT
5PTQFFEVQDPOöHVSBUJPOZPVDBOTFMFDUB%)$1DMJFOUGSPNUIF
drop-down menu, an ID, and click Copy to, to copy the client’s
."$BEESFTTUPUIFTQFDJöFE*%
*EFOUJöFTUIFSVMF
4QFDJGZUIF."$BEESFTTPGUIFDPNQVUFSUPCFöMUFSFE
*GUIJTCPYJTTFMFDUFEUIFSVMFXJMMGPMMPXUIFDPOOFDUJPODPOUSPM
TFUUJOHTQFDJöFEJO."$öMUFSJOHTFUUJOHT
*GUIJTCPYJTTFMFDUFEUIFSVMFXJMMGPMMPXUIFDPOOFDUJPODPOUSPM
TFUUJOHTQFDJöFEJO."$öMUFSJOHTFUUJOHT
MAC Address
Control:
Connection
Control:
Association
Control:
DHCP clients:
ID:
MAC Address:
C:
A:
MAC Address Filter
5IF."$.FEJB"DDFTT$POUSPMMFS"EESFTT'JMUFSPQUJPOJTVTFEUPDPOUSPMOFUXPSLBDDFTTCBTFEPOUIF."$BEESFTTPGUIFOFUXPSLBEBQUFS
"."$BEESFTTJTBVOJRVF*%BTTJHOFECZUIFNBOVGBDUVSFSPGUIFOFUXPSLBEBQUFS5IJTGFBUVSFDBOCFDPOöHVSFEUPallow or deny network/
*OUFSOFUBDDFTT

38D-Link DWR-118 User Manual
Section 4 - Conguration
Outbound Filter
$IFDLUIJTCPYUPFOBCMFUIFöMUFS
You may select Always On or choose the number of a schedule
SVMFUIBUZPVIBWFEFöOFE$MJDLCopy to to copy the rule to the
TQFDJöFE*%
Select whether to Allow or Deny all data to pass except those
NBUDIJOHUIFSVMFTDPOöHVSFEPOUIJTQBHF
*EFOUJöFTUIFöMUFS
4QFDJGZUIFMPDBM*1BEESFTTBOEUIFOTQFDJGZUIFQPSUBGUFSUIF
colon.
4QFDJGZUIFSFNPUF*1BEESFTTBOEUIFOUIFQPSUBGUFSUIFDPMPO
4FMFDUUIJTCPYUPFOBCMFUIFöMUFS
Specify the schedule rule number or click Add New Rule... to add
a new schedule rule.
Outbound Filter:
Use schedule
rule:
Outbound Filter
rules list:
ID:
Source IP : Ports:
Destination IP :
Ports:
Enable:
Schedule Rule #:
The Outbound FilterFOBCMFTZPVUPDPOUSPMXIBUQBDLFUTBSFBMMPXFEUPQBTTUISPVHIUIFSPVUFS5IFPVUCPVOEöMUFSBQQMJFTUPBMMPVUCPVOE
packets.

39D-Link DWR-118 User Manual
Section 4 - Conguration
Inbound Filter
$IFDLUIJTCPYUPFOBCMFUIFöMUFS
You may select Always On or choose the number of a schedule
SVMFUIBUZPVIBWFEFöOFE$MJDLCopy to to copy the rule to the
TQFDJöFE*%
Select whether to Allow or Deny all data to pass except those
NBUDIJOHUIFSVMFTDPOöHVSFEPOUIJTQBHF
*EFOUJöFTUIFöMUFS
4QFDJGZUIFMPDBM*1BEESFTTBOEUIFOTQFDJGZUIFQPSUBGUFSUIF
colon.
4QFDJGZUIFSFNPUF*1BEESFTTBOEUIFOUIFQPSUBGUFSUIFDPMPO
4FMFDUUIJTCPYUPFOBCMFUIFöMUFS
Specify the schedule rule number or click Add New Rule... to add
a new schedule rule.
Inbound Filter:
Use schedule
rule:
Inbound Filter
rules list:
ID:
Source IP : Ports:
Destination IP :
Ports:
Enable:
Schedule Rule #:
The Inbound FilterFOBCMFTZPVUPDPOUSPMXIBUQBDLFUTBSFBMMPXFEUPQBTTUISPVHIUIFSPVUFS5IFJOCPVOEöMUFSPOMZBQQMJFTUPQBDLFUTUIBU
are destined for virtual servers or DMZ hosts.
40D-Link DWR-118 User Manual
Section 4 - Conguration
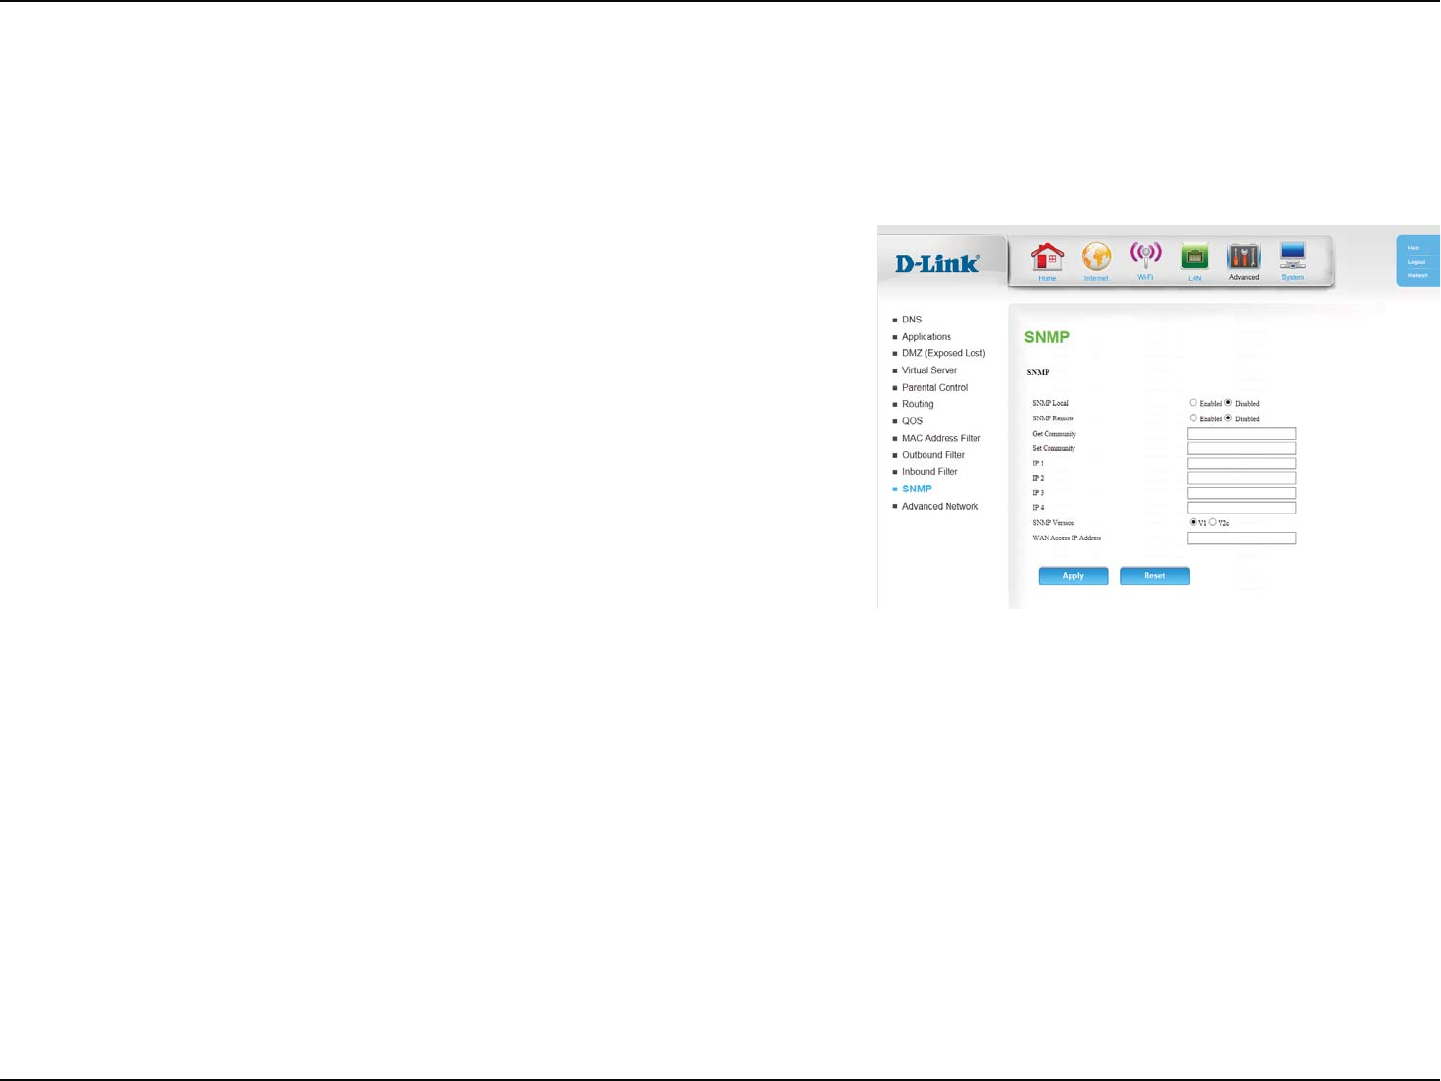
Select whether the local SNMP administration should be Enabled
or Disabled.
Select whether the remote SNMP administration should be
Enabled or Disabled.
&OUFSUIFQBTTXPSEQVCMJDJOUIJTöFMEUPBMMPXSFBEPOMZBDDFTT
to network administration using SNMP. You can view the network,
CVUOPDPOöHVSBUJPOJTQPTTJCMFXJUIUIJTTFUUJOH
&OUFSUIFQBTTXPSEQSJWBUFJOUIJTöFMEUPFOBCMFSFBEXSJUFBDDFTT
to the network using SNMP.
&OUFSVQUP*1BEESFTTFTUPVTFBTUSBQUBSHFUTGPSZPVSOFUXPSL
Select the SNMP version of your system.
*GZPVXBOUUPMJNJUSFNPUFBDDFTT4/.1BDDFTTFOUFSUIF*1
BEESFTTPGUIFSFNPUFDPNQVUFSZPVXJMMVTFUPBDDFTTUIJTEFWJDF
BMMPUIFS*1BEESFTTFTXJMMCFEFOJFESFNPUF4/.1BDDFTT
SNMP Local:
SNMP Remote:
Get Community:
Set Community:
IP 1 ~ 4:
SNMP Version:
WAN Access IP
Address:
SNMP
4/.14JNQMF/FUXPSL.BOBHFNFOU1SPUPDPMJTBXJEFMZVTFEOFUXPSLNPOJUPSJOHBOEDPOUSPMQSPUPDPMUIBUSFQPSUTBDUJWJUZPOFBDIOFUXPSL
EFWJDFUPUIFBENJOJTUSBUPSPGUIFOFUXPSL4/.1DBOCFVTFEUPNPOJUPSUSBóDBOETUBUJTUJDTPGUIF%835IF%83TVQQPSUT4/.1W
or v2c.
41D-Link DWR-118 User Manual
Section 4 - Conguration
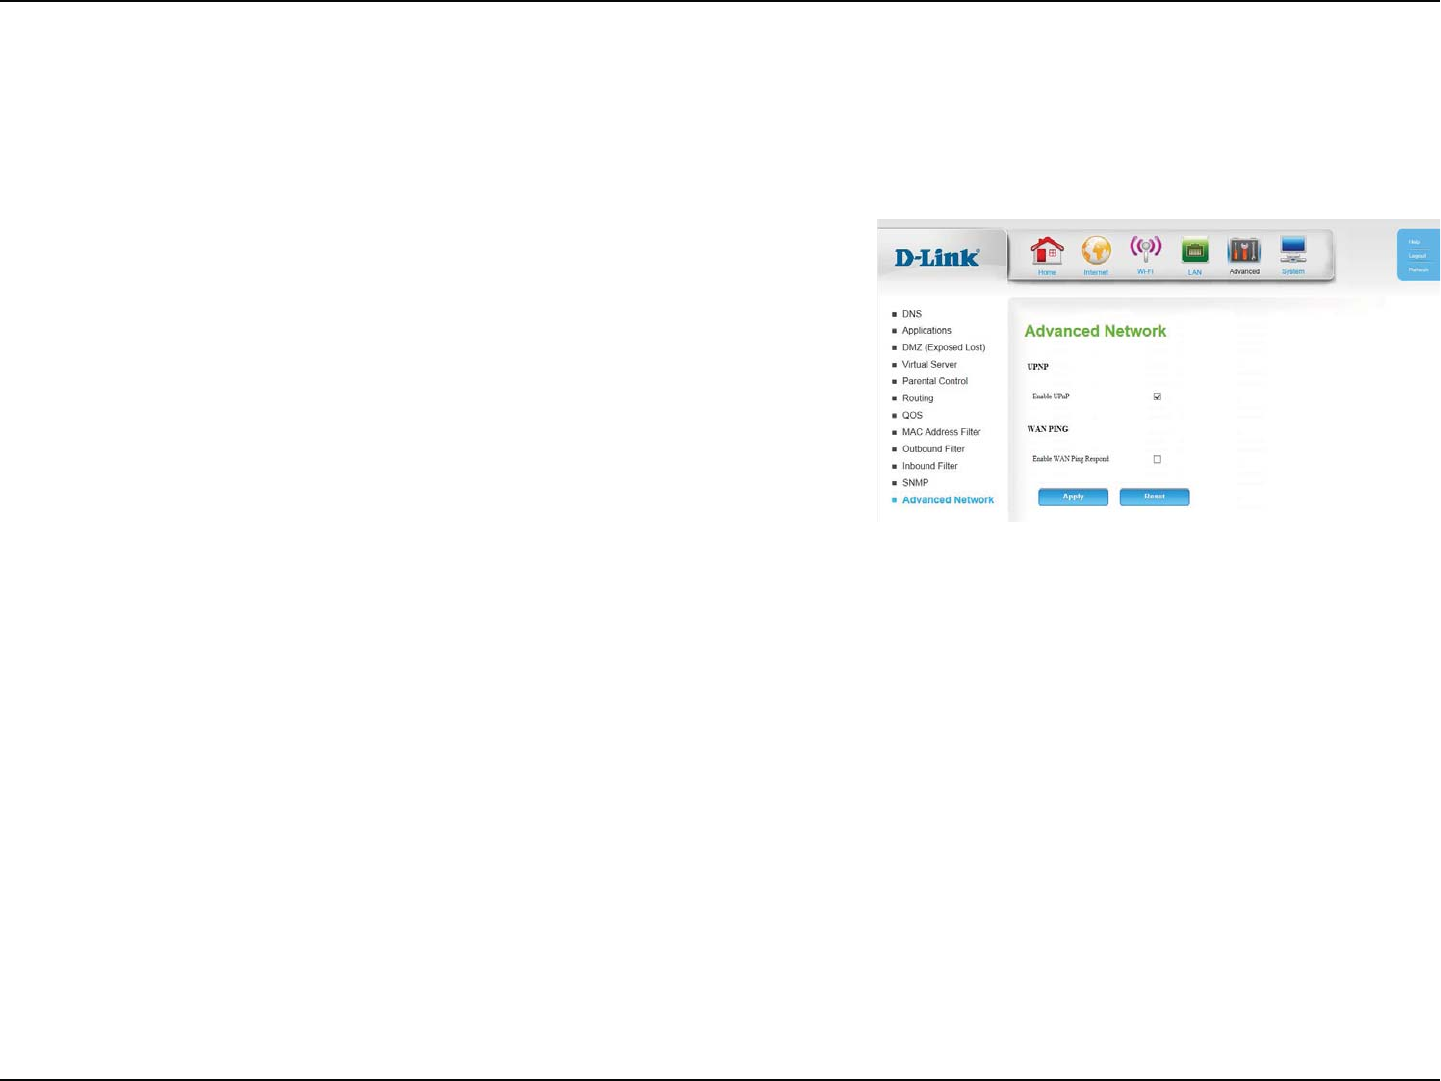
$MJDL&OBCMF61O1UPVTFUIF6OJWFSTBM1MVHBOE1MBZ61O1
feature. UPnP provides compatibility with networking equipment,
software and peripherals.
Select the box to allow the WAN port to be “pinged.” Blocking the
Ping option may provide some extra security from hackers.
Enable UPnP:
Enable WAN
Ping Respond:
Advanced Network
"EWBODFE/FUXPSLDPOUBJOTTFUUJOHTXIJDIDBODIBOHFUIFXBZUIFSPVUFSIBOEMFTDFSUBJOUZQFTPGUSBóD8FSFDPNNFOEUIBUZPVEPOPU
change any of these settings unless you are already familiar with them or have been instructed to do so.
42D-Link DWR-118 User Manual
Section 4 - Conguration
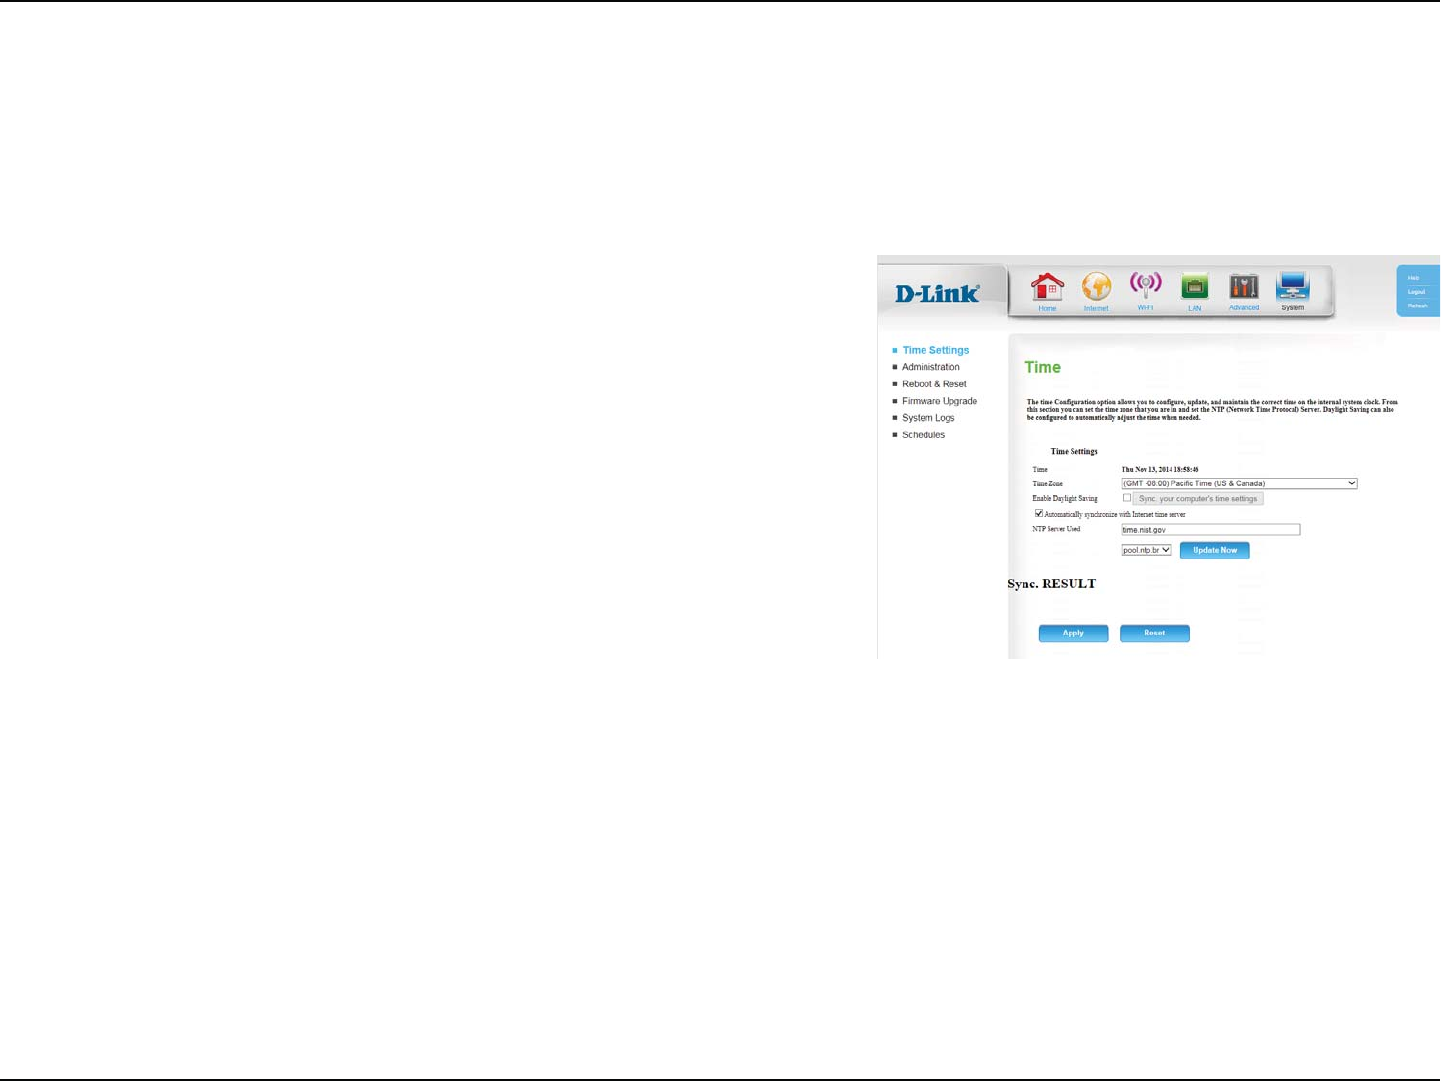
Displays the current time and date of the router.
Select the appropriate time zone from the drop-down box.
Check the box to enable daylight saving time.
Check the box to automatically synchronize the router with an
*OUFSOFUUJNFTFSWFS
Choose the NTP Server used for synchronizing time and date. Click
Update Now to synchronize with the NTP server now.
Shows the result of the last time synchronization.
Time:
Time Zone:
Enable Daylight
Saving:
Automatically
synchronize
with Internet
time server:
NTP Server
Used:
Sync. Result:
System
5IJTTFDUJPOXJMMIFMQZPVTFUUIFUJNF[POFUIBUZPVBSFJOBOEUIF/51/FUXPSL5JNF1SPUPDPMTFSWFS%BZMJHIUTBWJOHDBOBMTPCFDPOöHVSFEUP
adjust the time when needed.
Time Settings
43D-Link DWR-118 User Manual
Section 4 - Conguration
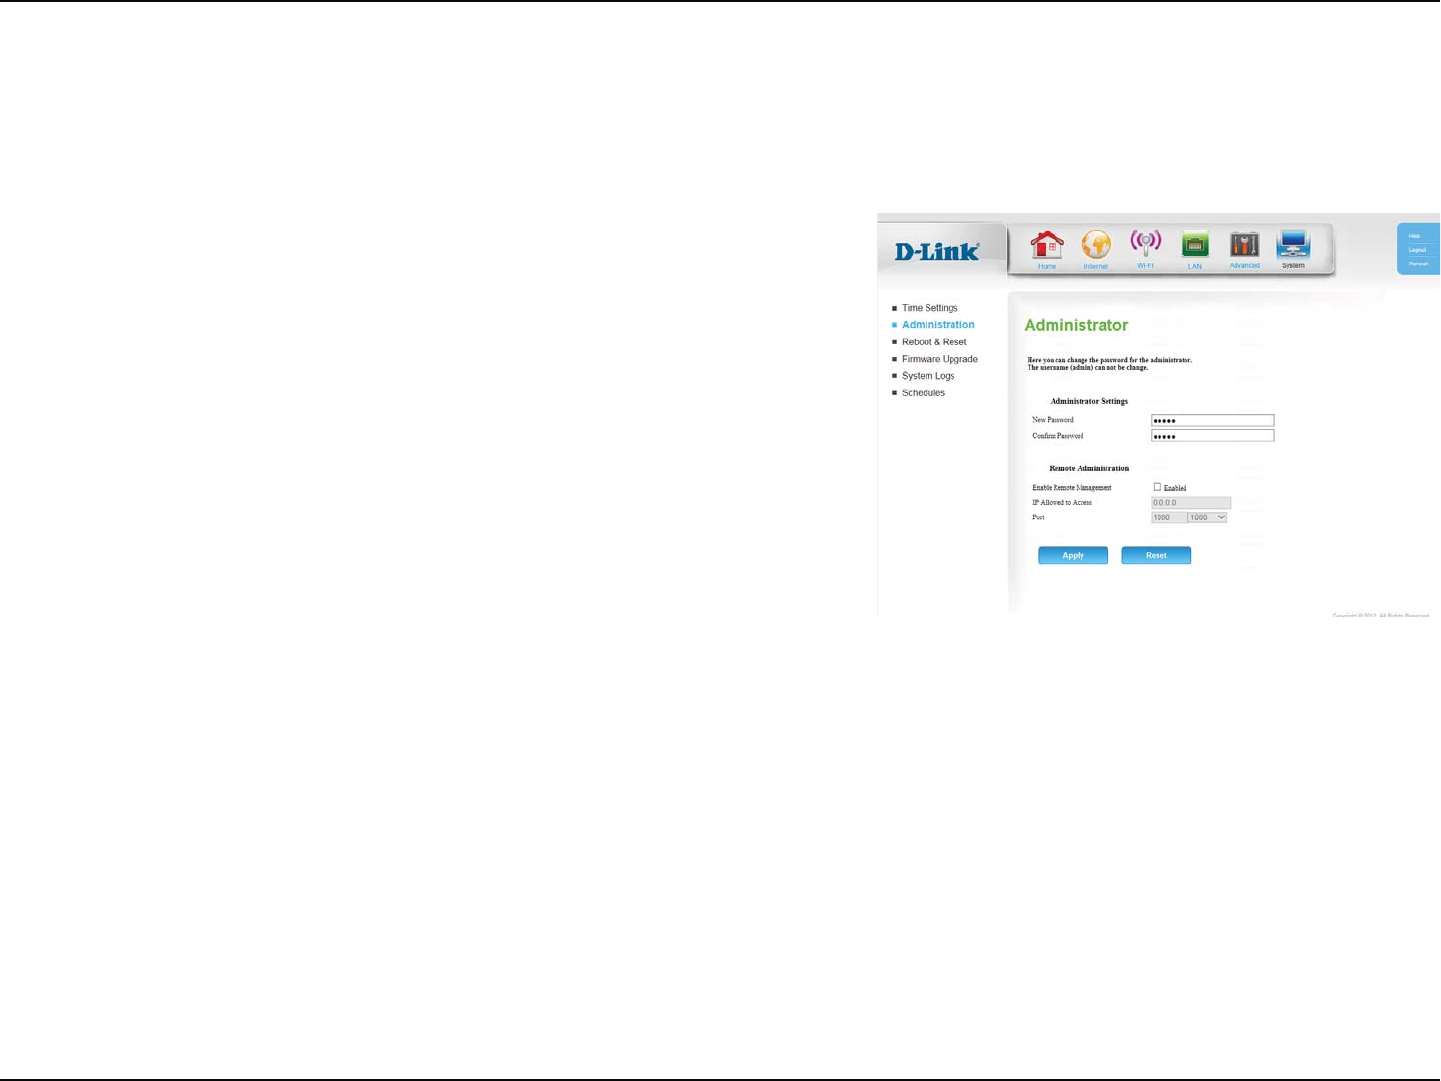
Enter a password that the admin account will use to access the
router’s management interface.
$POöSNUIFDIPTFOQBTTXPSE
3FNPUFNBOBHFNFOUBMMPXTUIFSPVUFSUPCFDPOöHVSFEGSPNUIF
*OUFSOFUVTJOHBXFCCSPXTFS"VTFSOBNFBOEQBTTXPSEJTTUJMM
required to access the web-management interface. Usually only
a member of your network can browse the built-in web pages to
perform Administrator tasks. This feature enables you to perform
"ENJOJTUSBUPSUBTLTGSPNUIFSFNPUF*OUFSOFUIPTU
&OUFSUIF*OUFSOFU*1BEESFTTPGUIF1$UIBUIBTBDDFTTUPUIF
CSPBECBOESPVUFS*GZPVFOUFSBOBTUFSJTLJOUIJTöFMEUIFO
BOZPOFXJMMCFBCMFUPBDDFTTUIFSPVUFS"EEJOHBOBTUFSJTLJOUP
UIJTöFMEDPVMEQSFTFOUBTFDVSJUZSJTLBOEJTOPUSFDPNNFOEFE
This is the port number used to access the router. Example: 8080 is
the port used for the web-management interface.
New Password:
Conrm
Password:
Remote
Management:
IP Allowed to
Access:
Port:
Administration
The Administration page allows you to change the Administrator password and enable Remote Management. The Administrator has read/write
access while the user has read-only access. Only the admin has the ability to change both admin and user account passwords.

44D-Link DWR-118 User Manual
Section 4 - Conguration
6TFUIJTPQUJPOUPTBWFZPVSDVSSFOUSPVUFSDPOöHVSBUJPOTFUUJOHT
UPBöMFBOEPOUPZPVSDPNQVUFS$MJDLSaveUPPQFOBöMFEJBMPH
BOEUIFOTFMFDUBMPDBUJPOBOEöMFOBNFGPSUIFTFUUJOHT
6TFUIJTPQUJPOUPMPBEUIFQSFWJPVTMZTBWFESPVUFSDPOöHVSBUJPO
settings. BrowseUPöOEUIFTBWFEöMFBOEUIFODMJDL
UploadSettings to transfer those settings to the router.
This option will restore all settings back to their defaults. Any
settings that have not been backed up will be lost, including any
rules that you have created.
Click Reboot to save your settings and reboot the device.
Save Settings To
Local Hard Drive:
Load Settings
From Local Hard
Drive:
Restore To
Factory Default
Settings:
Save and Reboot
the Device:
Reboot & Reset
On this page you can save the current system settings onto the local hard drive, retrieve previously saved settings, restore the device to the
factory default settings, or save the settings and reboot the device.
45D-Link DWR-118 User Manual
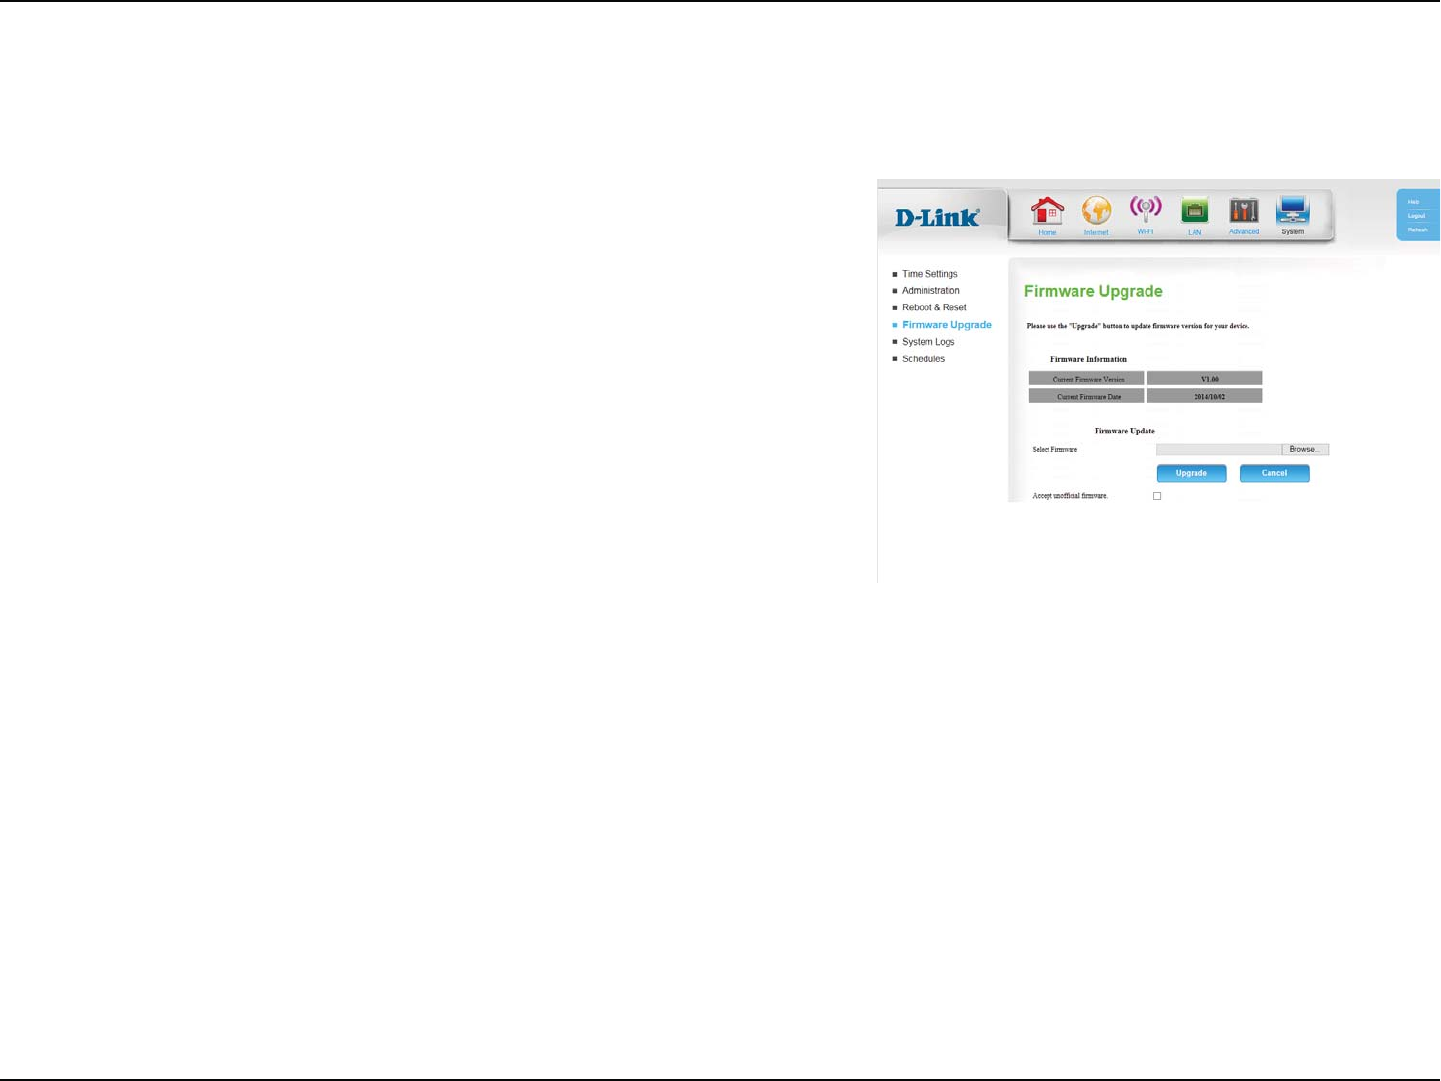
Section 4 - Conguration
Firmware Upgrade
%JTQMBZTZPVSSPVUFSTDVSSFOUöSNXBSFWFSTJPOBOECVJMEEBUF
5PVQHSBEFZPVSSPVUFSTöSNXBSFDMJDLBrowse... and navigate
UPUIFöSNXBSFöMFPOZPVSDPNQVUFSTIBSEESJWF*GZPVBSF
JOTUBMMJOHVOPóDJBMöSNXBSFDIFDLUIFAccept unocial
rmwareCPYOPUSFDPNNFOEFE$MJDLUpgrade to start the
upgrade process or Cancel to cancel the upgrade.
Firmware
Information:
Firmware
Update:
5IJTQBHFEJTQMBZTZPVSSPVUFSTDVSSFOUöSNXBSFWFSTJPOBOEBMMPXTZPVUPVQHSBEFZPVSSPVUFSTöSNXBSF

46D-Link DWR-118 User Manual
Section 4 - Conguration
System Logs
Select this box to send the router logs to a syslog server.
Enter the address of the syslog server that will be used to send the
logs.
Enable Logging
to Syslog Server:
Syslog Server IP
Address:
5IF%83LFFQTBSVOOJOHMPHPGFWFOUTBOEBDUJWJUJFTPDDVSSJOHPOUIFSPVUFS:PVNBZTFOEUIFTFMPHTUPBTZTUFNMPHTZTMPHTFSWFSPO
your network.
47D-Link DWR-118 User Manual
Section 4 - Conguration
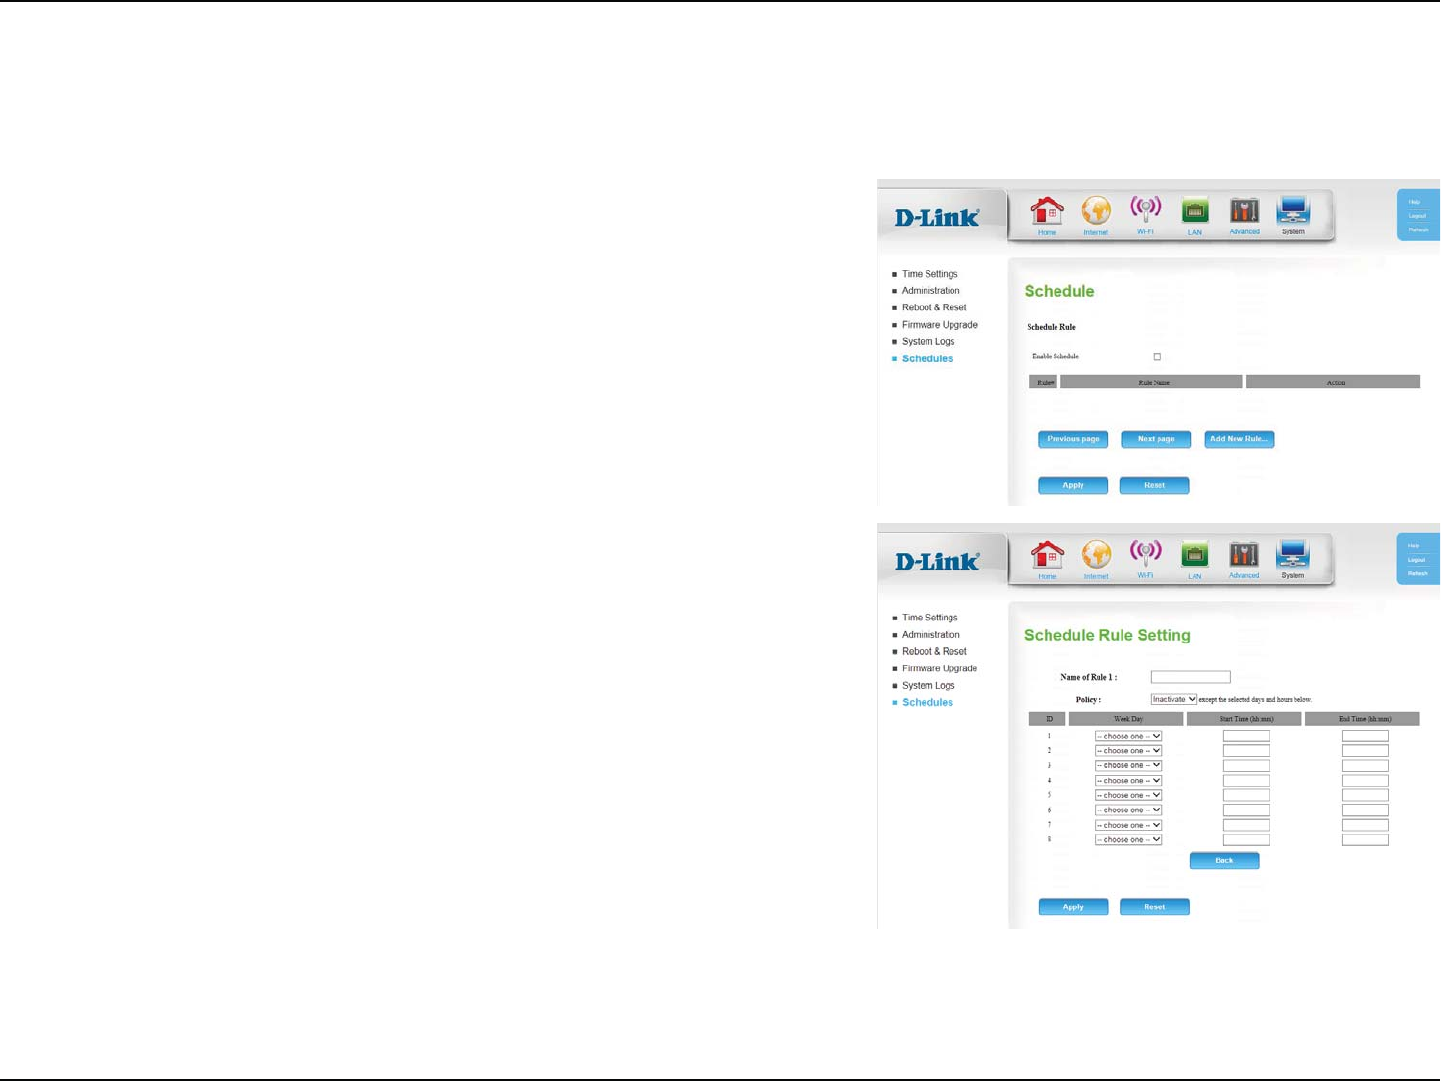
Schedules
Tick this check box to enable schedules.
Click on this button to create a new rule. The following options will
be available.
Enable
Schedule:
Add New Rule...:
5IJTTFDUJPOBMMPXTZPVUPNBOBHFTDIFEVMFSVMFTGPSWBSJPVTöSFXBMMBOEQBSFOUBMDPOUSPMGFBUVSFT
Schedule Rule Setting
Enter a name for your new schedule.
Select whether the schedule is Active or Inactive except for the
TDIFEVMFSVMFTDPOöHVSFECFMPX
%JTQMBZTUIF*%OVNCFSPGUIFSVMF
Select the day of the week on which you would like the schedule
to become active.
Enter the time at which you would like the schedule to become
active.
Select the time at which you would like the schedule to become
inactive.
Name of Rule 1:
Policy:
ID:
Week Day:
Start Time
(hh:mm):
End Time
(hh:mm):
48D-Link DWR-118 User Manual
Section 5 - Connecting to a Wireless Network
Connect a Wireless Client to your Router
WPS Button
Step 2 8JUIJONJOVUFTQSFTTUIF814CVUUPOPOZPVSXJSFMFTTDMJFOUPSMBVODIUIFTPGUXBSFVUJMJUZBOETUBSUUIF814
QSPDFTT
5IFFBTJFTUBOENPTUTFDVSFXBZUPDPOOFDUZPVSXJSFMFTTEFWJDFTUPUIFSPVUFSJTXJUI8148J'J1SPUFDUFE4FUVQ.PTUXJSFMFTT
devices such as wireless adapters, media players, Blu-ray DVD players, wireless printers and cameras will have a WPS button
PSBTPGUXBSFVUJMJUZXJUI814UIBUZPVDBOQSFTTUPDPOOFDUUPUIF%83SPVUFS1MFBTFSFGFSUPZPVSVTFSNBOVBMGPSUIF
wireless device you want to connect to make sure you understand how to enable WPS. Once you know, follow the steps below:
Step 1 1SFTTUIF814CVUUPOPOUIF%83GPSBCPVUTFDPOE5IF*OUFSOFU-&%POUIFGSPOUXJMMTUBSUUPCMJOL
Step 3 "MMPXVQUPNJOVUFGPSZPVSDPOOFDUJPOUPCFDPOöHVSFE0ODFUIF*OUFSOFUMJHIUTUPQTCMJOLJOHZPVXJMMCFDPOOFDUFE
and your wireless connection will be secure with WPA2.
WPS Button
49D-Link DWR-118 User Manual
Section 5 - Connecting to a Wireless Network
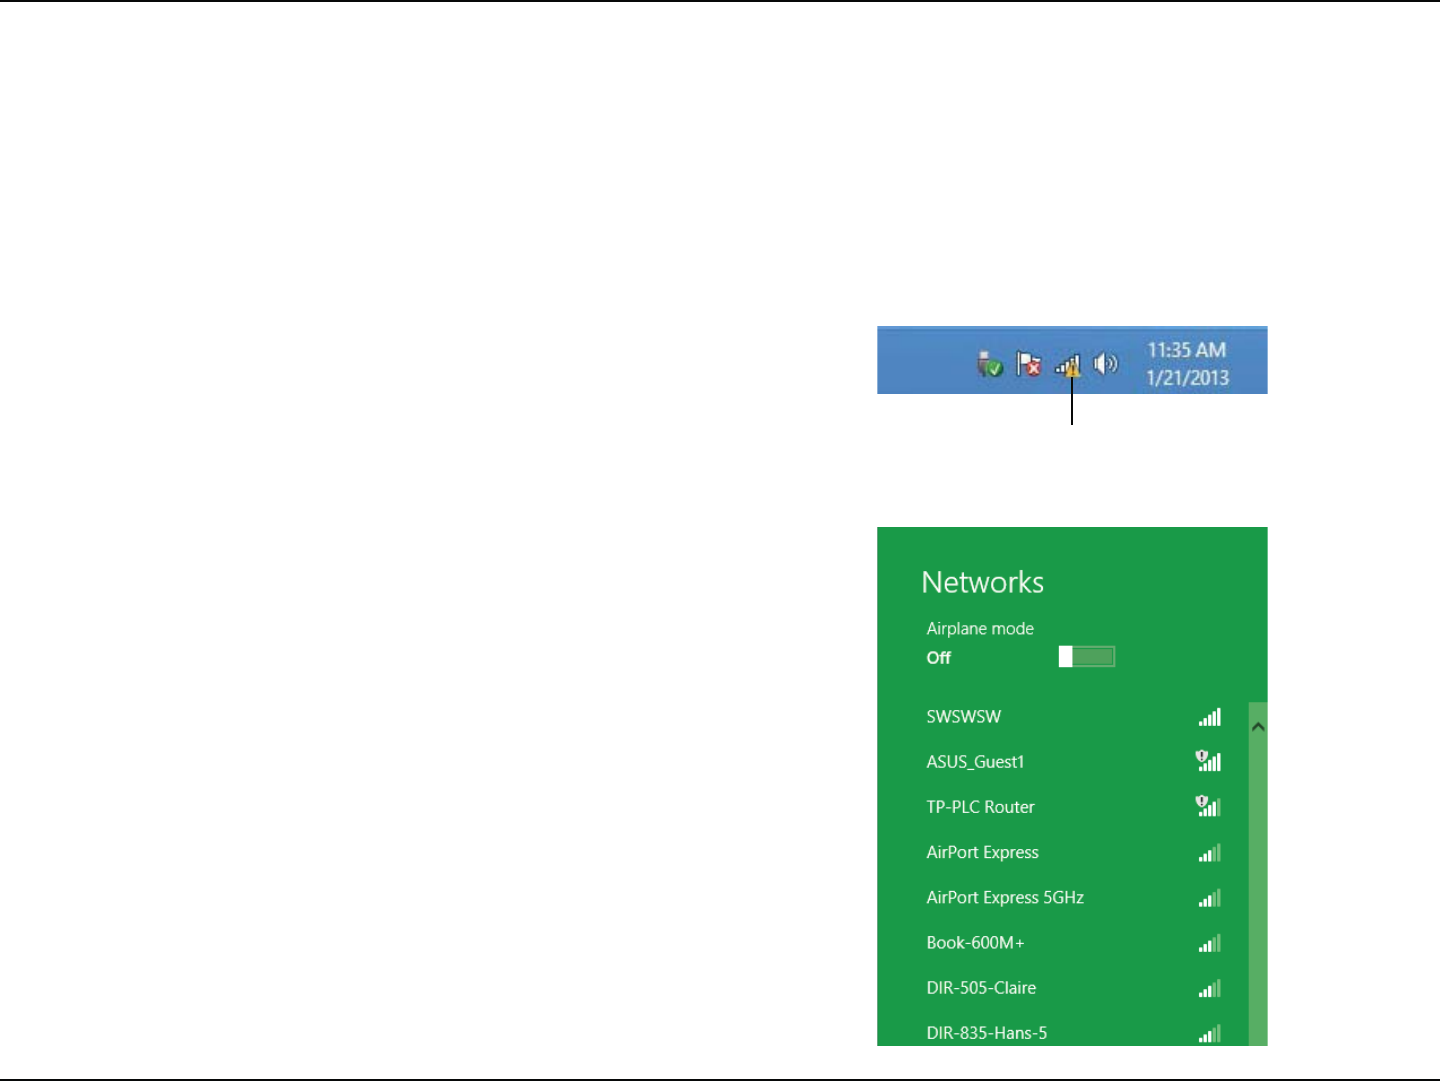
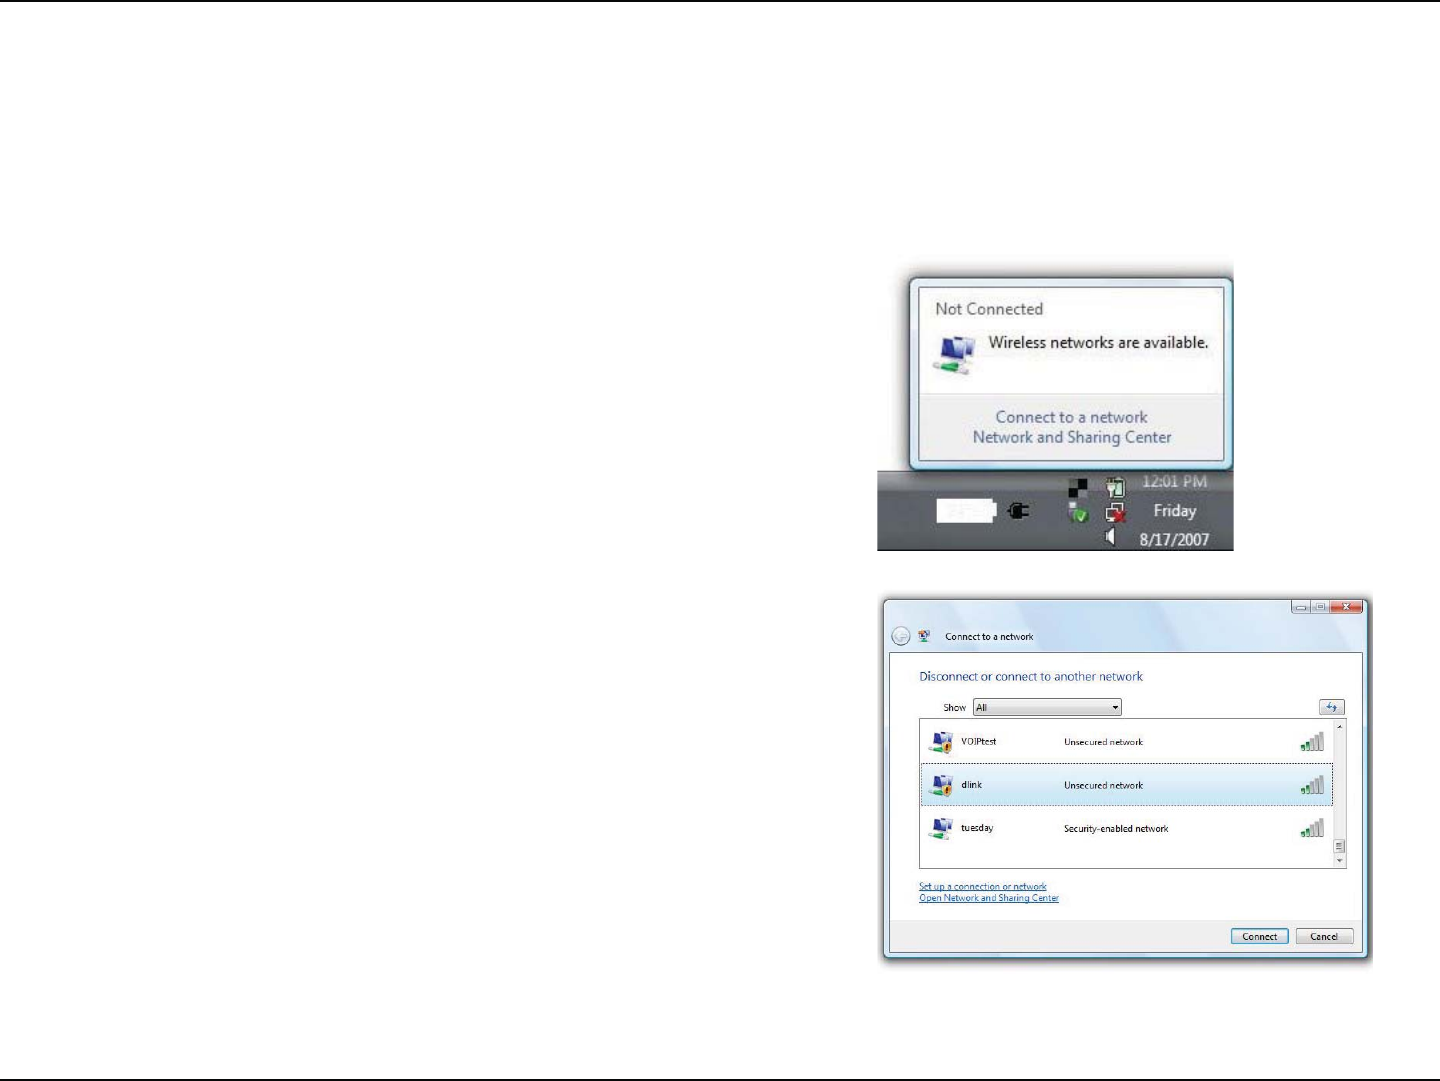
Windows® 8
WPA/WPA2
*UJTSFDPNNFOEFEUIBUZPVFOBCMFXJSFMFTTTFDVSJUZ81"81"POZPVSXJSFMFTTSPVUFSPSBDDFTTQPJOUCFGPSFDPOöHVSJOH
ZPVSXJSFMFTTBEBQUFS*GZPVBSFKPJOJOHBOFYJTUJOHOFUXPSLZPVXJMMOFFEUPLOPXUIFTFDVSJUZLFZ8J'JQBTTXPSECFJOHVTFE
To join an existing network, locate the wireless network icon in the
taskbar next to the time display.
8JSFMFTT*DPO
Clicking on this icon will display a list of wireless networks that are within
connecting proximity of your computer. Select the desired network by
clicking on the network name.

50D-Link DWR-118 User Manual
Section 5 - Connecting to a Wireless Network
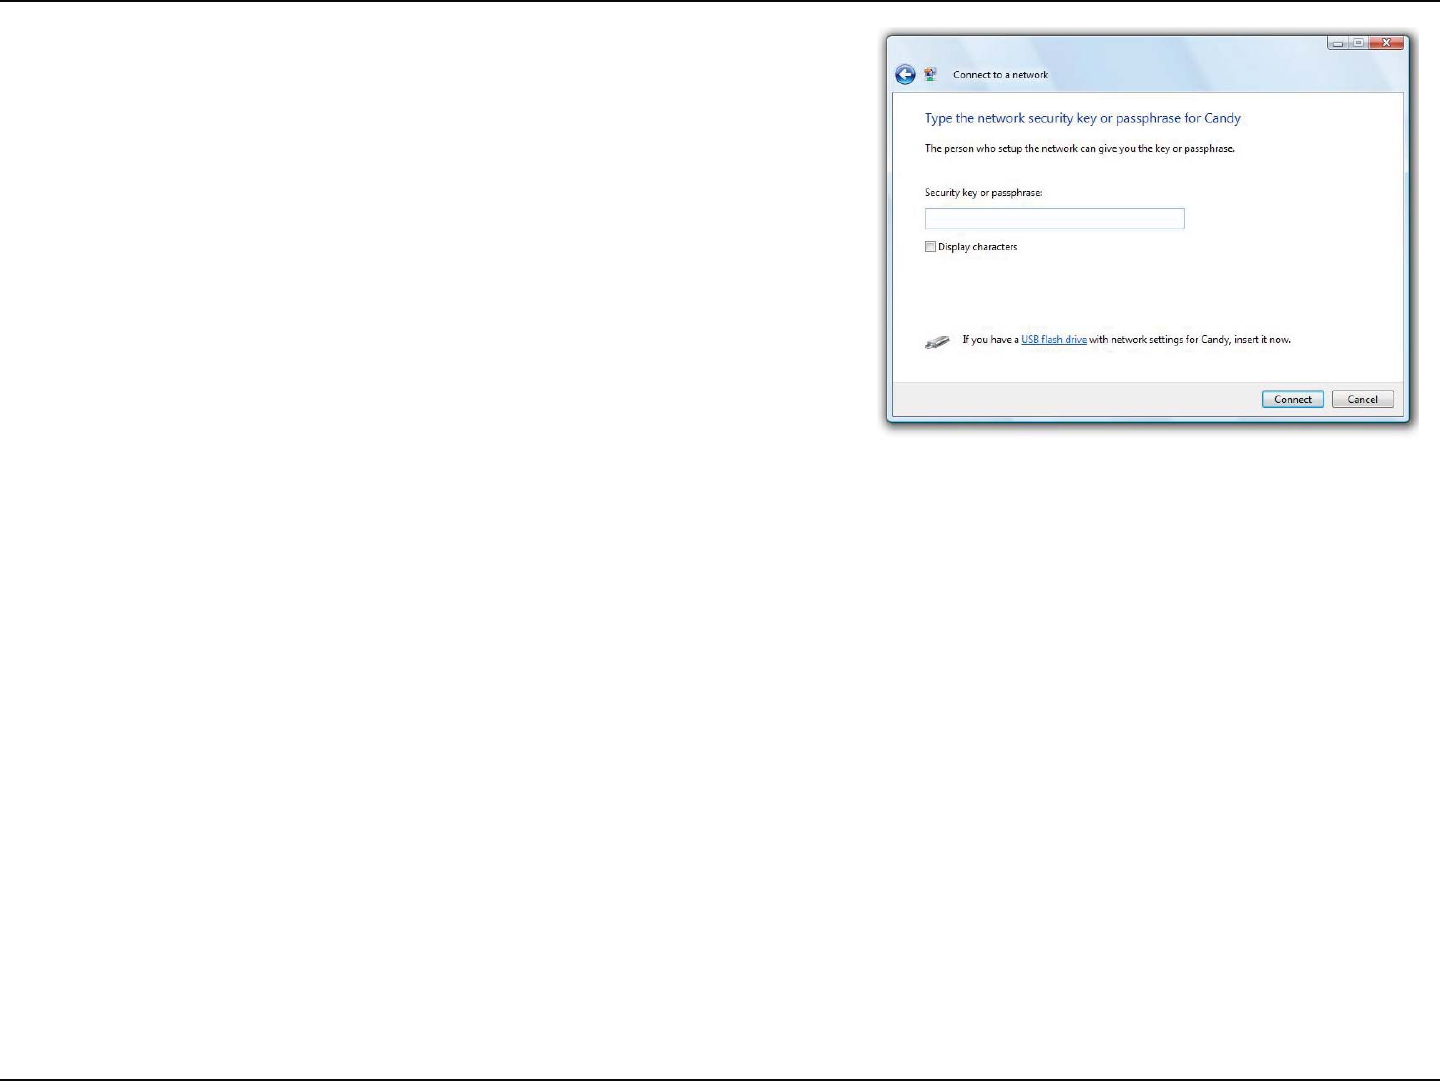
:PVXJMMUIFOCF QSPNQUFEUPFOUFSUIFOFUXPSLTFDVSJUZLFZ8J'J
QBTTXPSEGPSUIFXJSFMFTTOFUXPSL&OUFSUIF QBTTXPSEJOUPUIFCPY
and click Next.
*GZPVXJTIUPVTF8J'J1SPUFDUFE4FUVQ814UPDPOOFDUUPUIFSPVUFS
you can also press the WPS button on your router during this step to
enable the WPS function.
When you have established a successful connection to a wireless network,
the word Connected will appear next to the name of the network to
which you are connected to.
51D-Link DWR-118 User Manual
Section 5 - Connecting to a Wireless Network
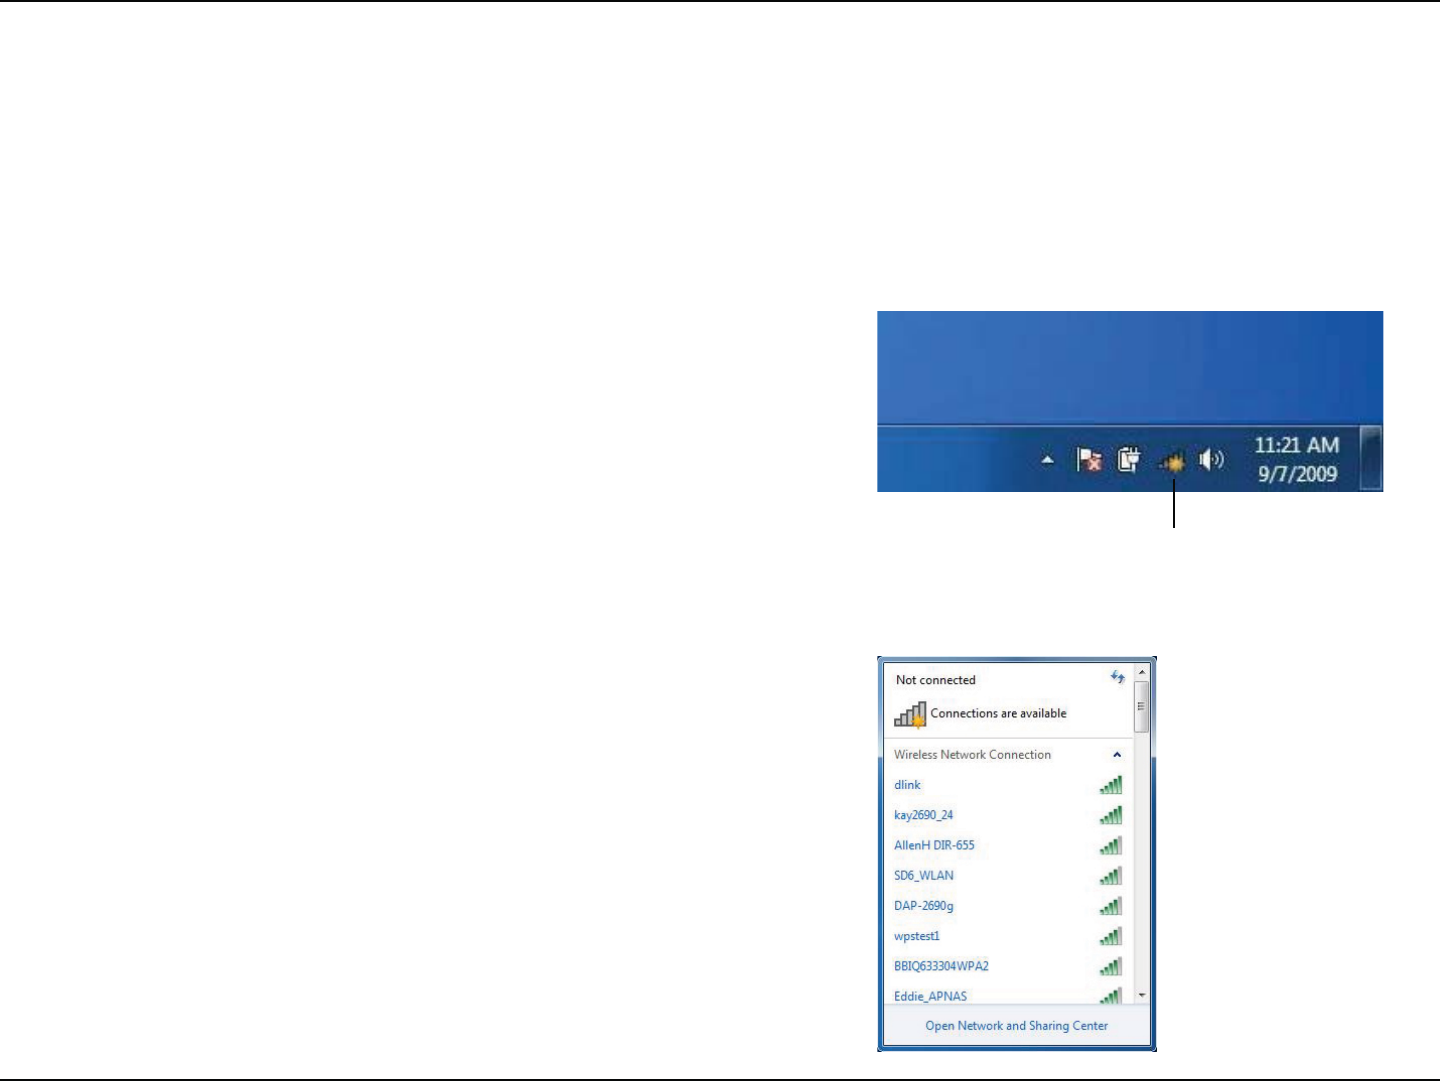
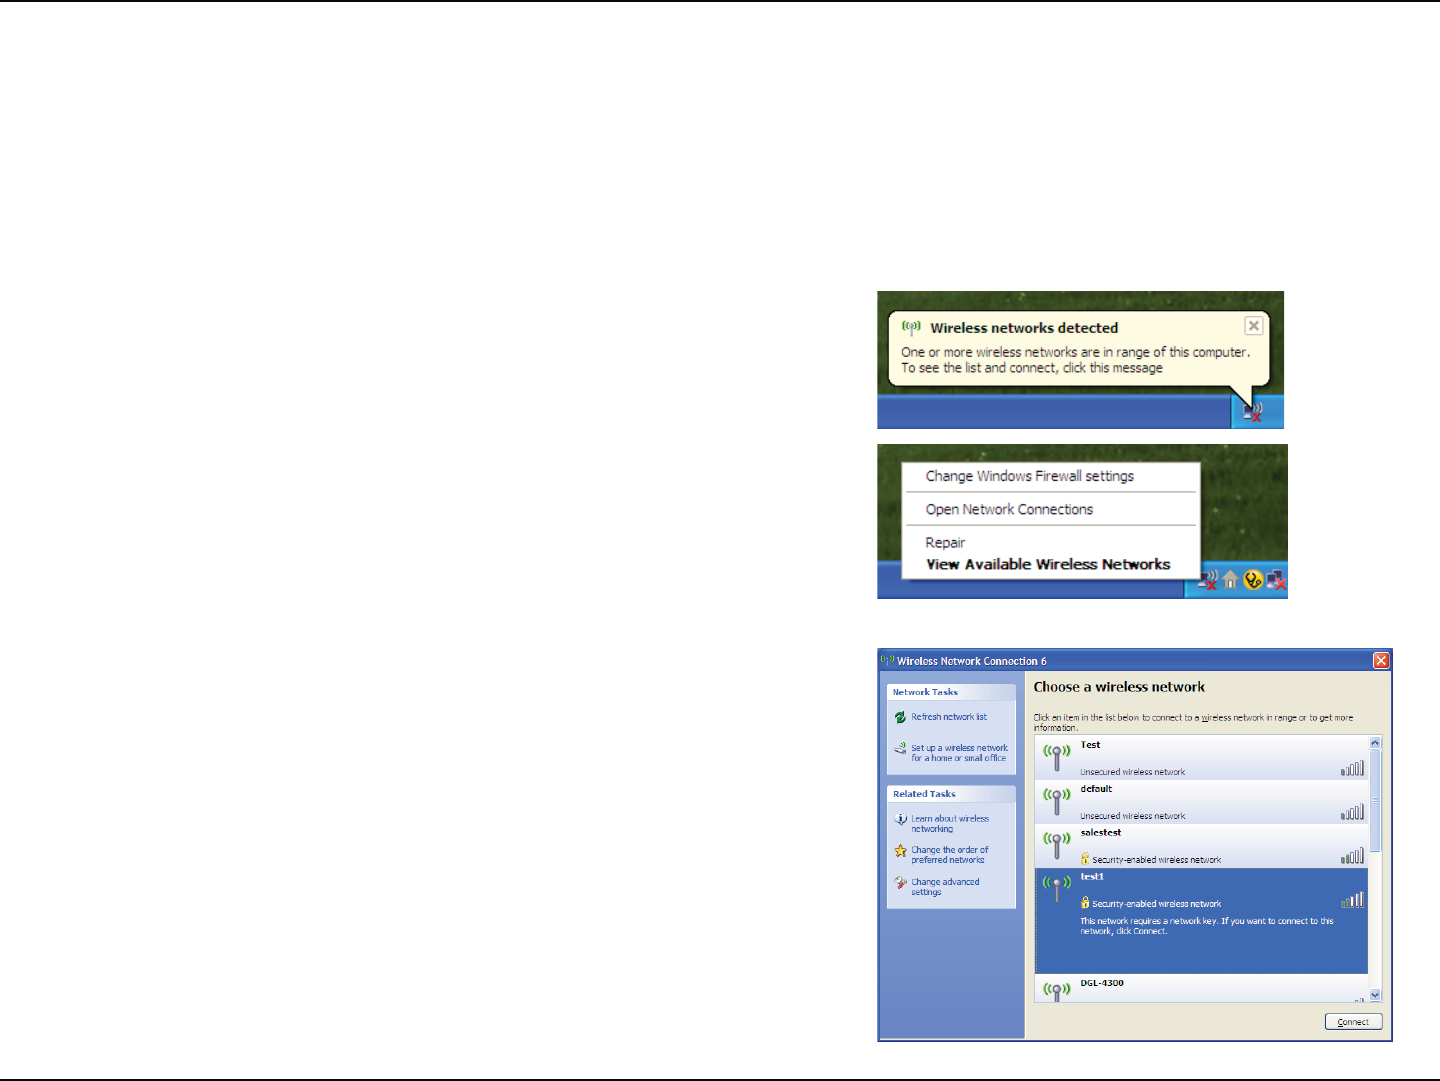
Windows® 7
*UJTSFDPNNFOEFEUIBUZPVFOBCMFXJSFMFTTTFDVSJUZ81"81"POZPVSXJSFMFTTSPVUFSPSBDDFTTQPJOUCFGPSFDPOöHVSJOH
ZPVSXJSFMFTTBEBQUFS*GZPVBSFKPJOJOHBOFYJTUJOHOFUXPSLZPVXJMMOFFEUPLOPXUIFTFDVSJUZLFZPSQBTTQISBTFCFJOHVTFE
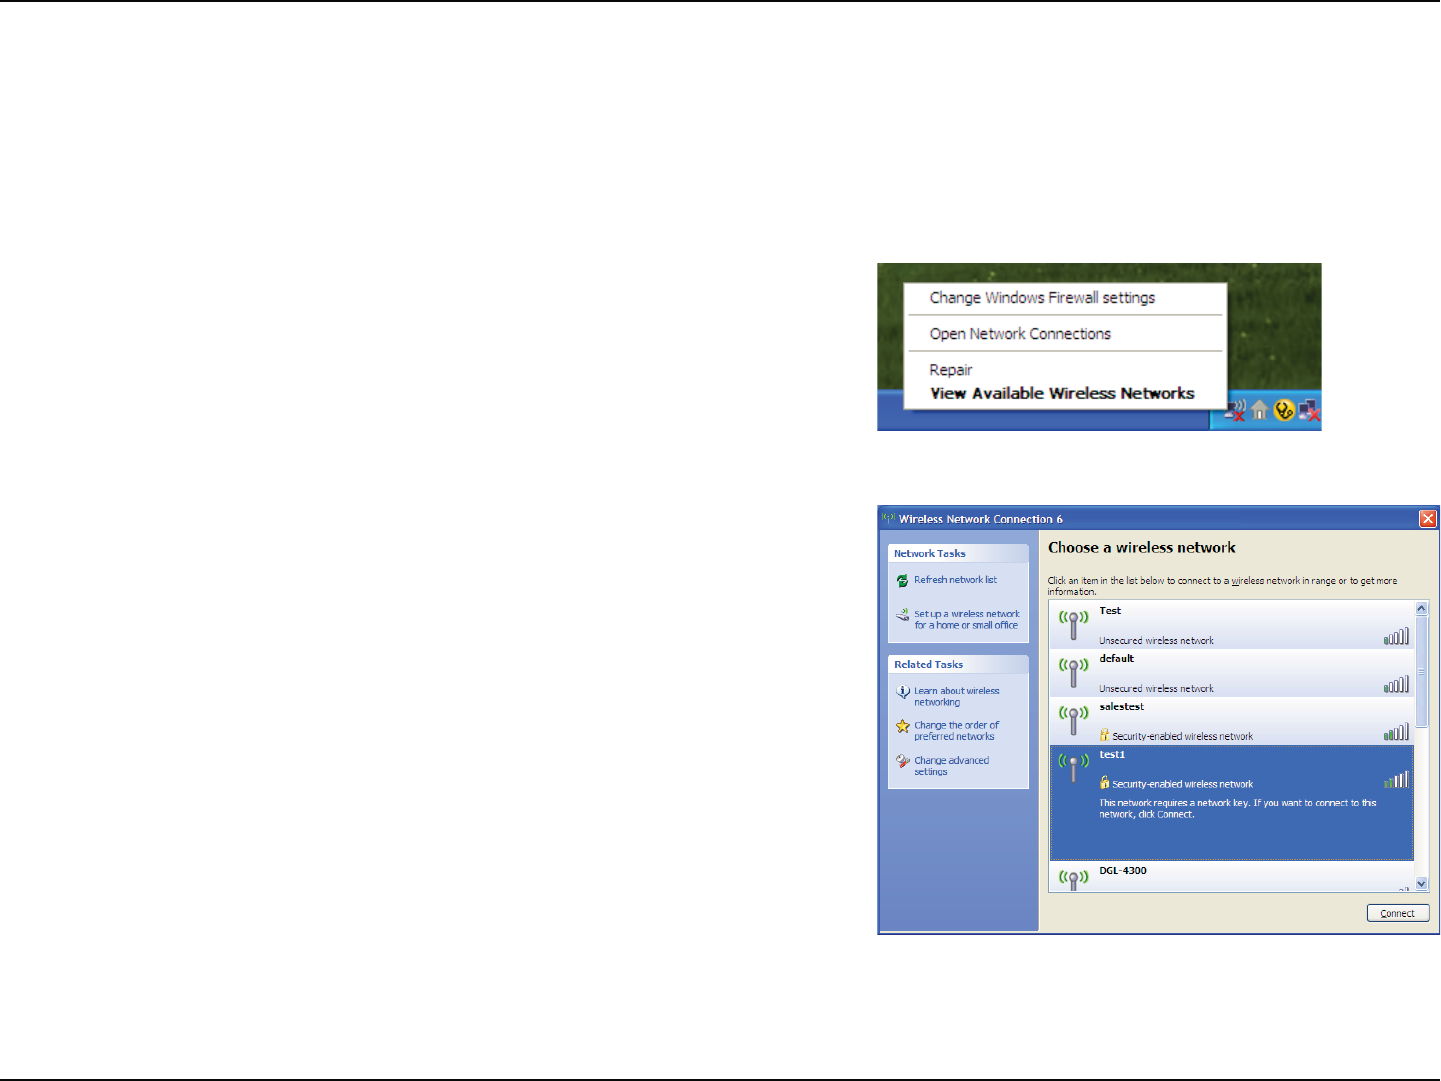
$MJDLPOUIFXJSFMFTTJDPOJOZPVSTZTUFNUSBZMPXFSSJHIUDPSOFS
2. The utility will display any available wireless networks in your area.
8JSFMFTT*DPO
WPA/WPA2
52D-Link DWR-118 User Manual
Section 5 - Connecting to a Wireless Network
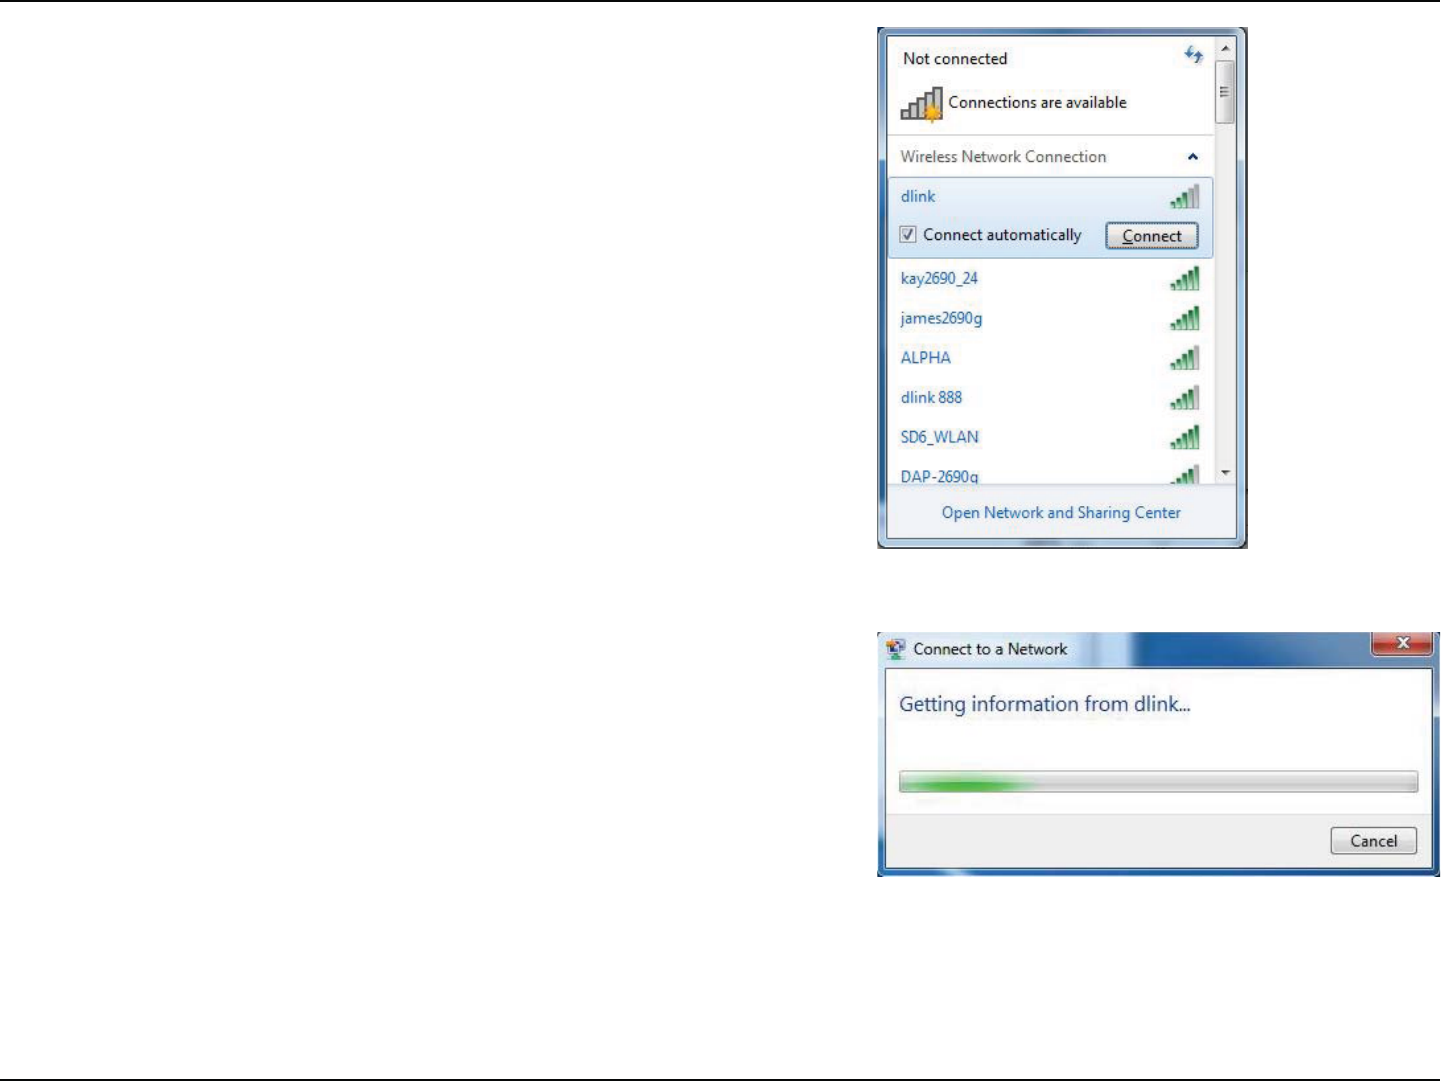
)JHIMJHIUUIFXJSFMFTTDPOOFDUJPOXJUI8J'JOBNF44*%ZPVXPVME
like to connect to and click the Connect button.
*GZPVHFUBHPPETJHOBMCVUDBOOPUBDDFTTUIF*OUFSOFUDIFDLZPVS
5$1*1TFUUJOHTGPSZPVSXJSFMFTTBEBQUFS3FGFSUPNetworking Basics
on page 73 for more information.
4. The following window appears while your computer tries to connect
to the router.
53D-Link DWR-118 User Manual
Section 5 - Connecting to a Wireless Network
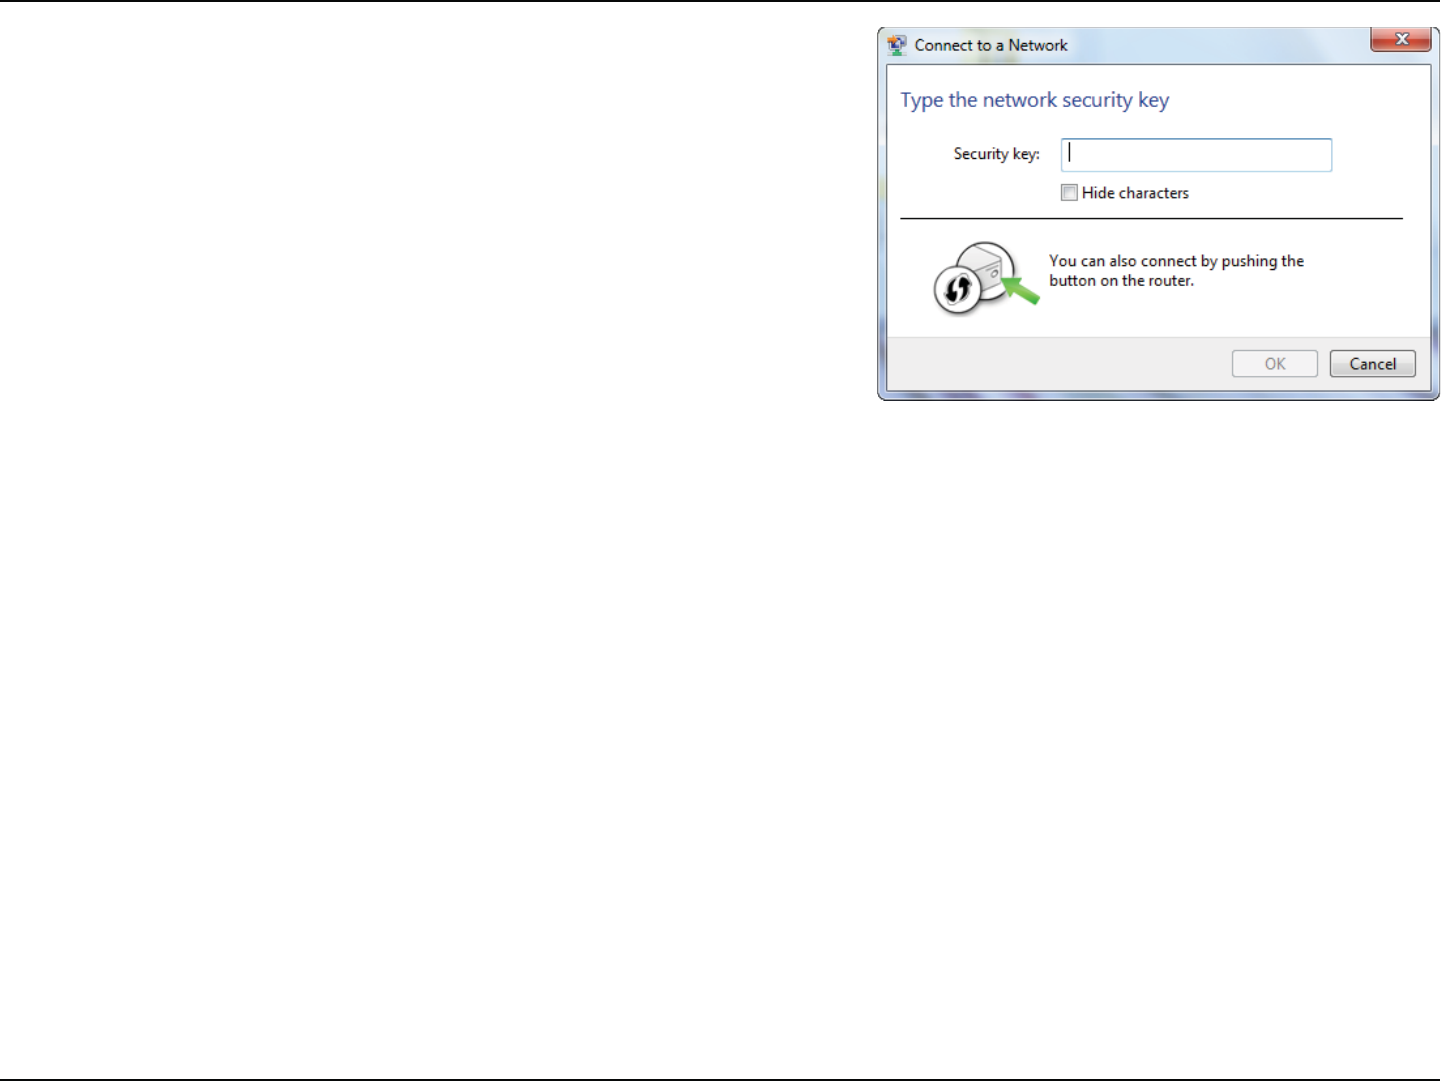
&OUFSUIFTBNFTFDVSJUZLFZPSQBTTQISBTF8J'JQBTTXPSEUIBUJTPO
your router and click Connect. You can also connect by pushing the
WPS button on the router.
*U NBZUBLF TFDPOETUPDPOOFDU UPUIF XJSFMFTTOFUXPSL*G UIF
connection fails, please verify that the security settings are correct. The
key or passphrase must be exactly the same as the one on the wireless
router.
54D-Link DWR-118 User Manual
Section 5 - Connecting to a Wireless Network
WPS
5IF814GFBUVSFPGUIF%83DBOCFDPOöHVSFEVTJOH8JOEPXT¥$BSSZPVUUIFGPMMPXJOHTUFQTUPVTF8JOEPXT¥UP
DPOöHVSFUIF814GFBUVSF
1. Click the Start button and select Computer from the Start menu.
2. Click Network on the left side.
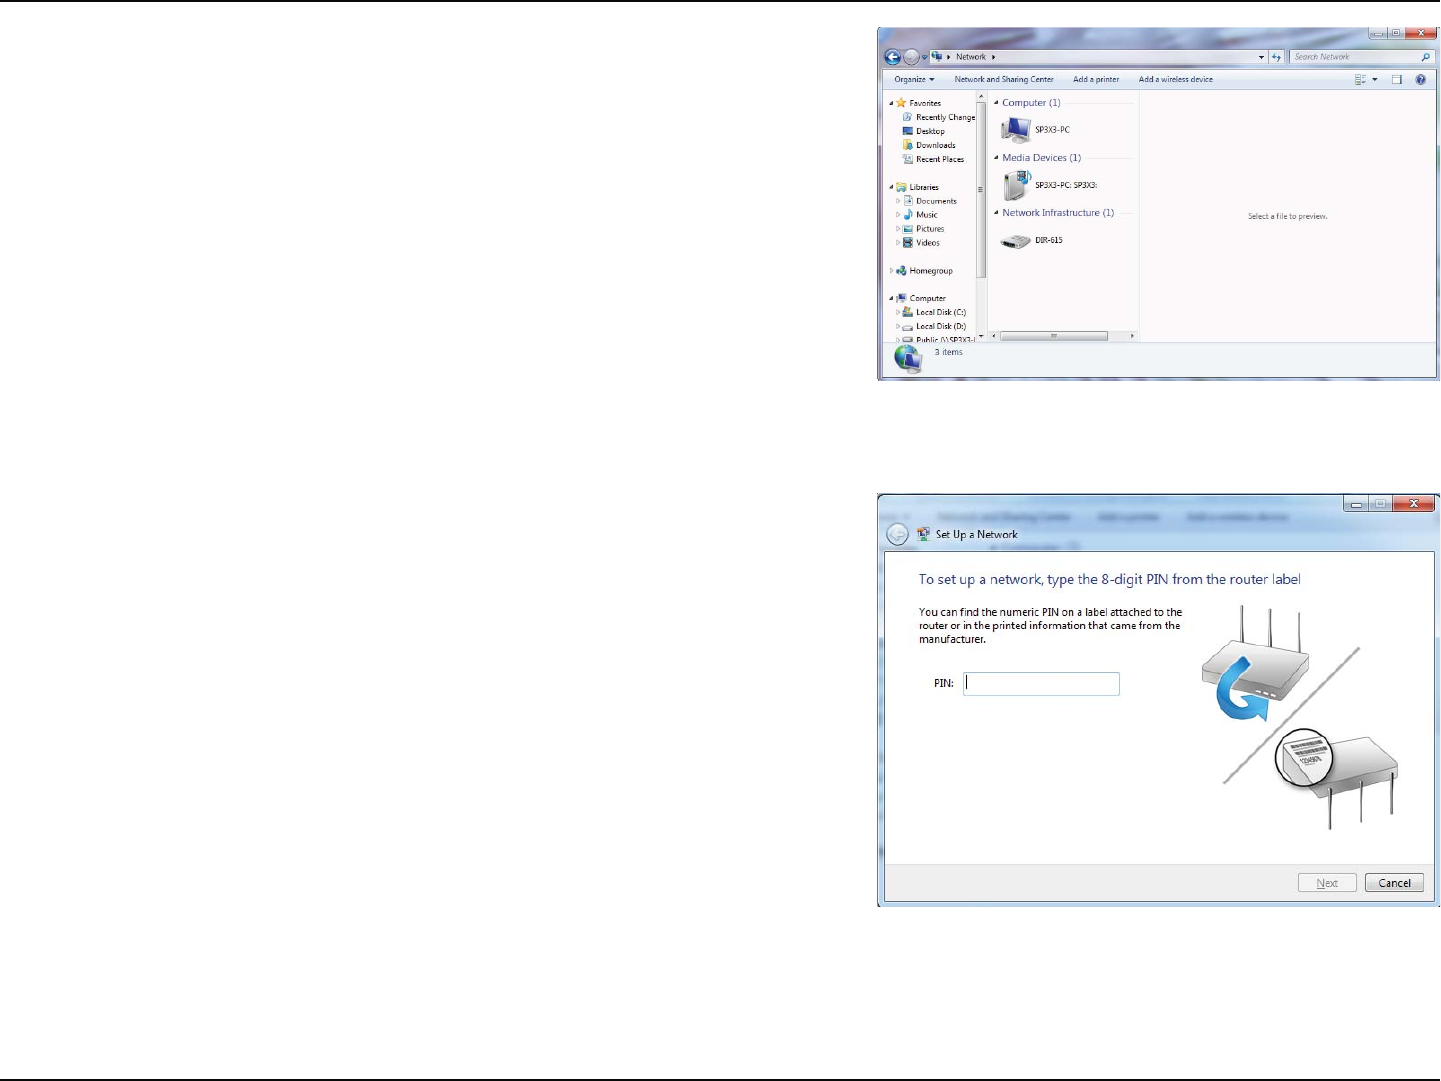
55D-Link DWR-118 User Manual
Section 5 - Connecting to a Wireless Network
3. Double-click the DWR-118.
*OQVUUIF8141*/OVNCFSPOUIFSPVUFSMBCFMJOUIFSetup > Wireless
SetupNFOVJOUIF3PVUFST8FC6*BOEDMJDLNext.
56D-Link DWR-118 User Manual
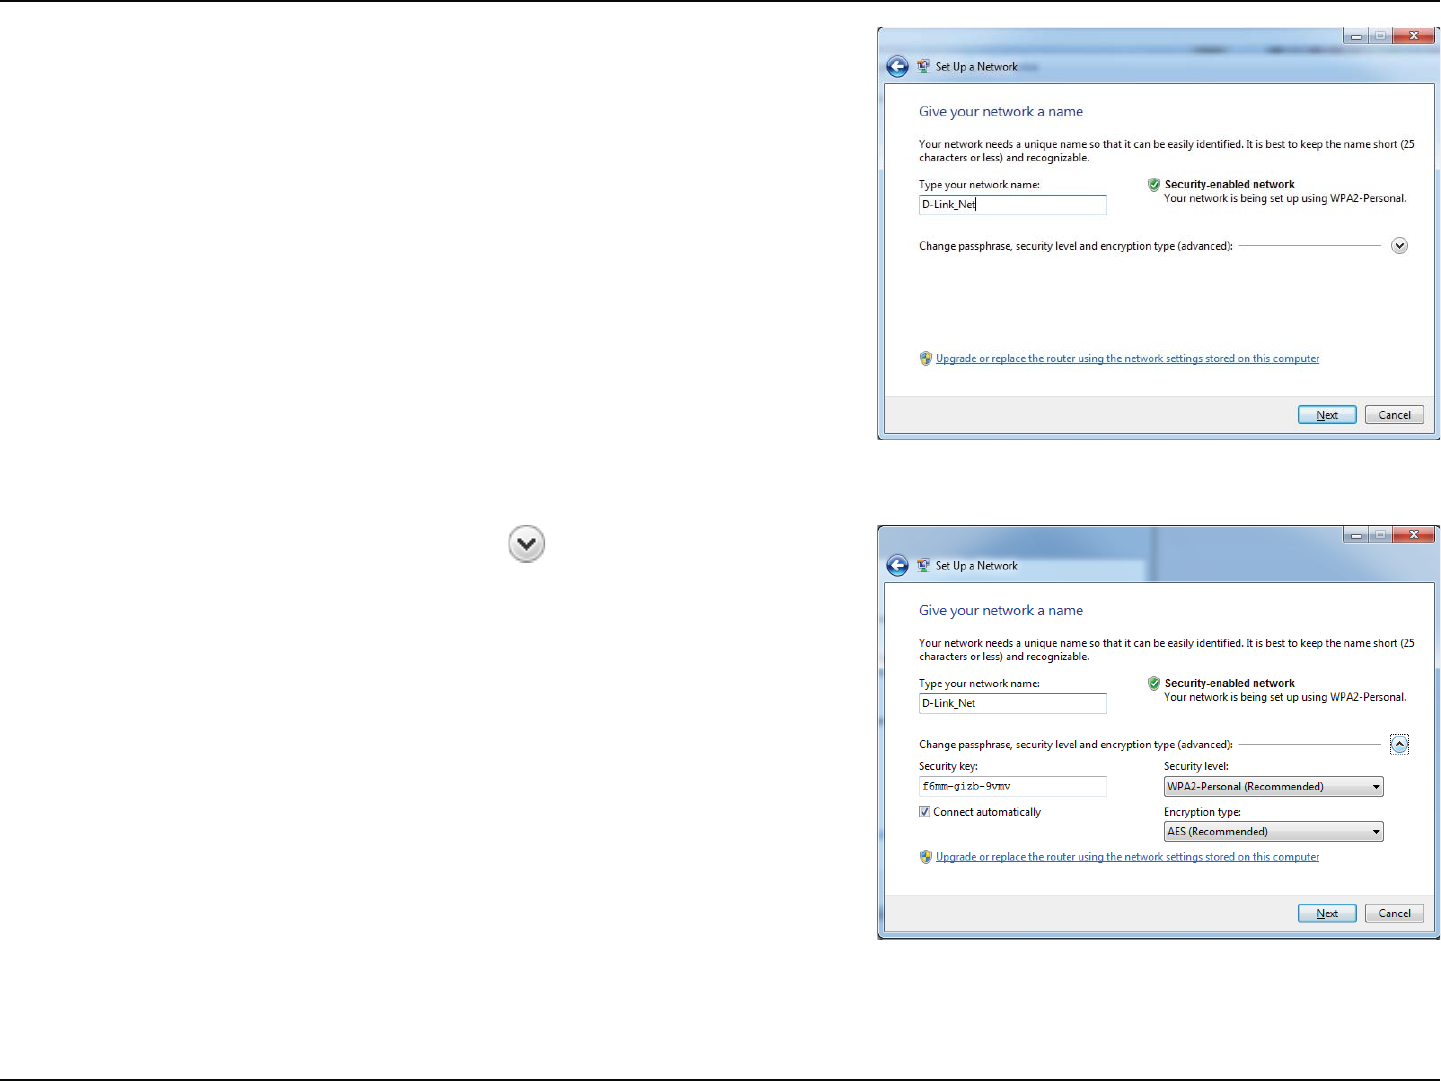
Section 5 - Connecting to a Wireless Network
5. Type a name to identify the network.
5PDPOöHVSFBEWBODFETFUUJOHTDMJDLUIFJDPO
Click Next to continue.
57D-Link DWR-118 User Manual
Section 5 - Connecting to a Wireless Network
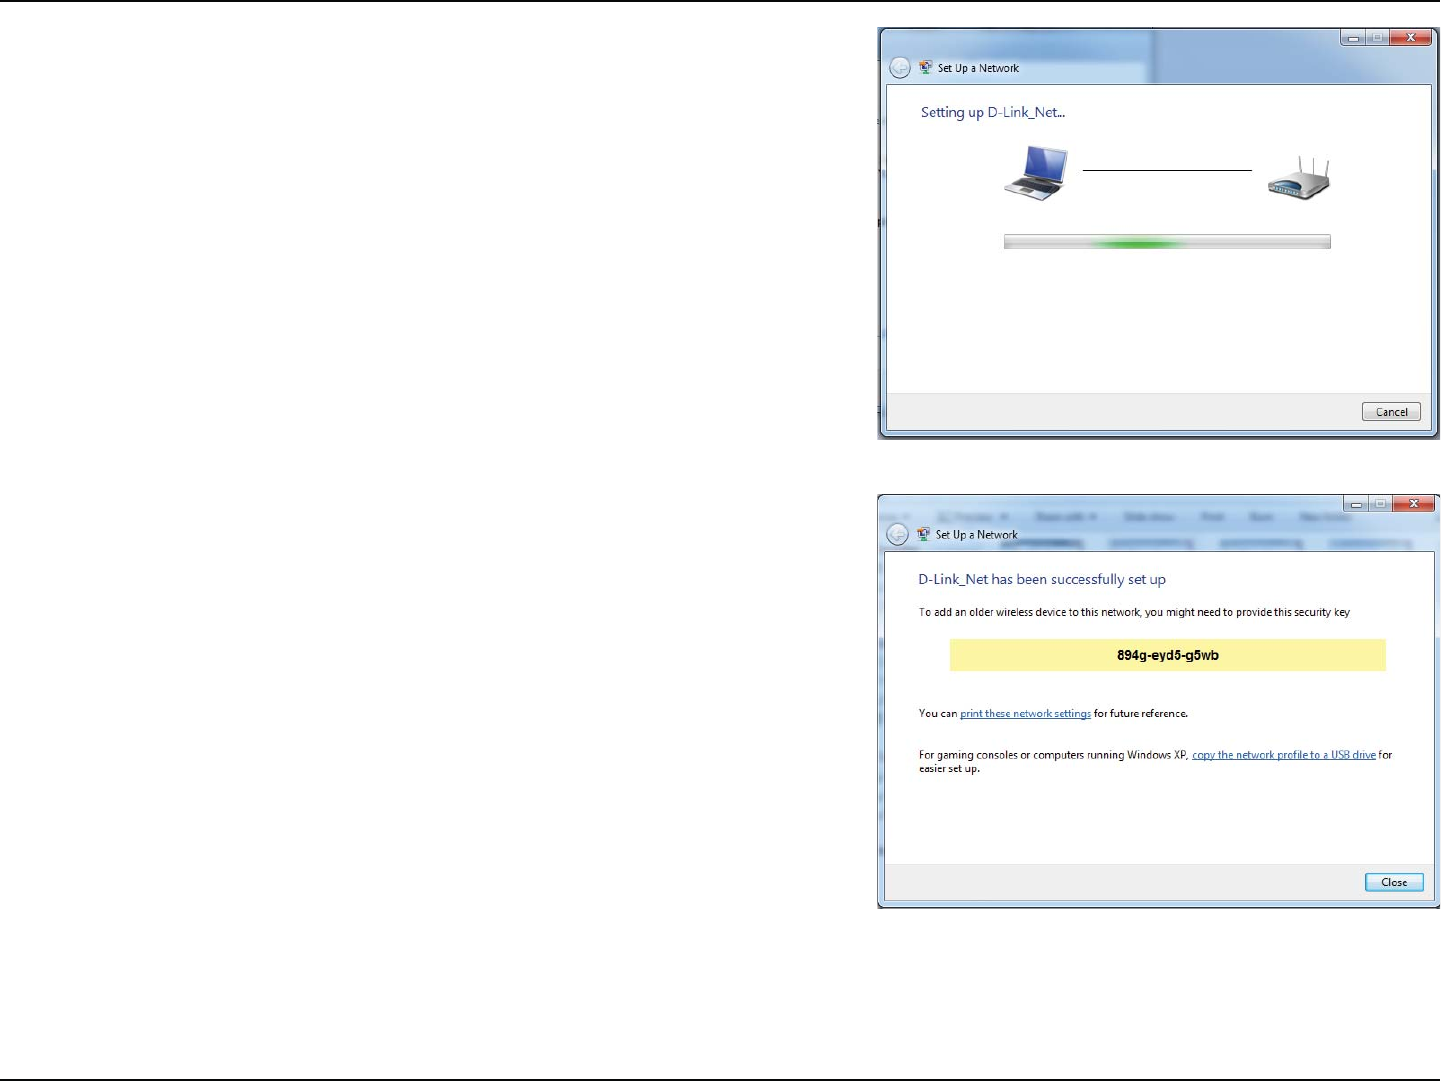
5IFGPMMPXJOHXJOEPXBQQFBSTXIJMFUIFSPVUFSJTCFJOHDPOöHVSFE
8BJUGPSUIFDPOöHVSBUJPOUPDPNQMFUF
8. The following window informs you that WPS on the router has been
set up successfully.
Make a note of the security key as you may need to provide this security
key if adding an older wireless device to the network in the future.
9. Click Close to complete WPS setup.
58D-Link DWR-118 User Manual
Section 5 - Connecting to a Wireless Network
Windows Vista®
8JOEPXT7JTUB¥VTFSTNBZVTFUIFCVJMUJOXJSFMFTTVUJMJUZ*GZPVBSFVTJOHBOPUIFSDPNQBOZTXJSFMFTTVUJMJUZQMFBTFSFGFSUPUIF
user manual of your wireless adapter for help connecting to a wireless network. Most wireless utilities will have a “site survey”
option similar to the Windows Vista® utility as seen below.
3JHIUDMJDLPOUIFXJSFMFTTDPNQVUFSJDPOJOZPVSTZTUFNUSBZMPXFSSJHIU
DPSOFSOFYUUPUIFUJNF4FMFDUConnect to a network.
*GZPVSFDFJWFUIFWireless Networks Detected bubble, click on the
center of the bubble to access the utility.
or
The utility will display any available wireless networks in your area. Click
POBOFUXPSLEJTQMBZFEVTJOHUIF44*%BOEDMJDLUIFConnect button.
*GZPVHFU BHPPETJHOBMCVUDBOOPU BDDFTTUIF *OUFSOFUDIFDLZPV
5$1*1TFUUJOHTGPSZPVSXJSFMFTTBEBQUFS3FGFSUPUIFNetworking Basics
section in this manual for more information.

59D-Link DWR-118 User Manual
Section 5 - Connecting to a Wireless Network
WPA/WPA2
*UJTSFDPNNFOEFEUIBUZPVFOBCMFXJSFMFTTTFDVSJUZ81"81"POZPVSXJSFMFTTSPVUFSPSBDDFTTQPJOUCFGPSFDPOöHVSJOH
ZPVSXJSFMFTTBEBQUFS*GZPVBSFKPJOJOHBOFYJTUJOHOFUXPSLZPVXJMMOFFEUPLOPXUIFTFDVSJUZLFZPSQBTTQISBTFCFJOHVTFE
2. )JHIMJHIUUIF8J'JOBNF44*%ZPVXPVMEMJLFUPDPOOFDUUPBOE
click Connect.
1. Open the Windows Vista® Wireless Utility by right-clicking on the
XJSFMFTTDPNQVUFSJDPOJOZPVSTZTUFNUSBZMPXFSSJHIUDPSOFSPG
TDSFFO4FMFDUConnect to a network.
60D-Link DWR-118 User Manual
Section 5 - Connecting to a Wireless Network
&OUFSUIFTBNFTFDVSJUZLFZPSQBTTQISBTF8J'JQBTTXPSEUIBUJTPO
your router and click Connect.
*U NBZUBLF TFDPOETUPDPOOFDUUPUIF XJSFMFTTOFUXPSL*GUIF
connection fails, please verify that the security settings are correct. The
key or passphrase must be exactly the same as the one on the wireless
router.
61D-Link DWR-118 User Manual
Section 5 - Connecting to a Wireless Network
Windows® XP
8JOEPXT¥91VTFSTNBZVTFUIFCVJMUJOXJSFMFTTVUJMJUZ;FSP$POöHVSBUJPO6UJMJUZ5IFGPMMPXJOHJOTUSVDUJPOTBSFGPS4FSWJDF
1BDLVTFST*GZPVBSFVTJOHBOPUIFSDPNQBOZTVUJMJUZQMFBTFSFGFSUPUIFVTFSNBOVBMPGZPVSXJSFMFTTBEBQUFSGPSIFMQXJUI
connecting to a wireless network. Most utilities will have a “site survey” option similar to the Windows® XP utility as seen below.
3JHIUDMJDLPOUIFXJSFMFTTDPNQVUFSJDPOJOZPVSTZTUFNUSBZMPXFSSJHIU
DPSOFSOFYUUPUIFUJNF4FMFDUView Available Wireless Networks.
*GZPVSFDFJWFUIFWireless Networks Detected bubble, click on the
center of the bubble to access the utility.
or
The utility will display any available wireless networks in your area. Click
POB8J'JOFUXPSLEJTQMBZFEVTJOHUIF44*%BOEDMJDL UIFConnect
button.
*GZPVHFU BHPPETJHOBMCVUDBOOPU BDDFTTUIF *OUFSOFUDIFDLZPV
5$1*1TFUUJOHTGPSZPVSXJSFMFTTBEBQUFS3FGFSUPUIFNetworking Basics
section in this manual for more information.
62D-Link DWR-118 User Manual
Section 5 - Connecting to a Wireless Network
*UJTSFDPNNFOEFEUPFOBCMF81"POZPVSXJSFMFTTSPVUFSPSBDDFTTQPJOUCFGPSFDPOöHVSJOHZPVSXJSFMFTTBEBQUFS*GZPVBSF
joining an existing network, you will need to know the WPA key being used.
)JHIMJHIUUIF8J'JOFUXPSL44*%ZPVXPVMEMJLFUPDPOOFDUUPBOE
click Connect.
1. Open the Windows® XP Wireless Utility by right-clicking on the wireless
DPNQVUFSJDPOJOZPVSTZTUFNUSBZMPXFSSJHIUDPSOFSPGTDSFFO4FMFDU
View Available Wireless Networks.
WPA/WPA2
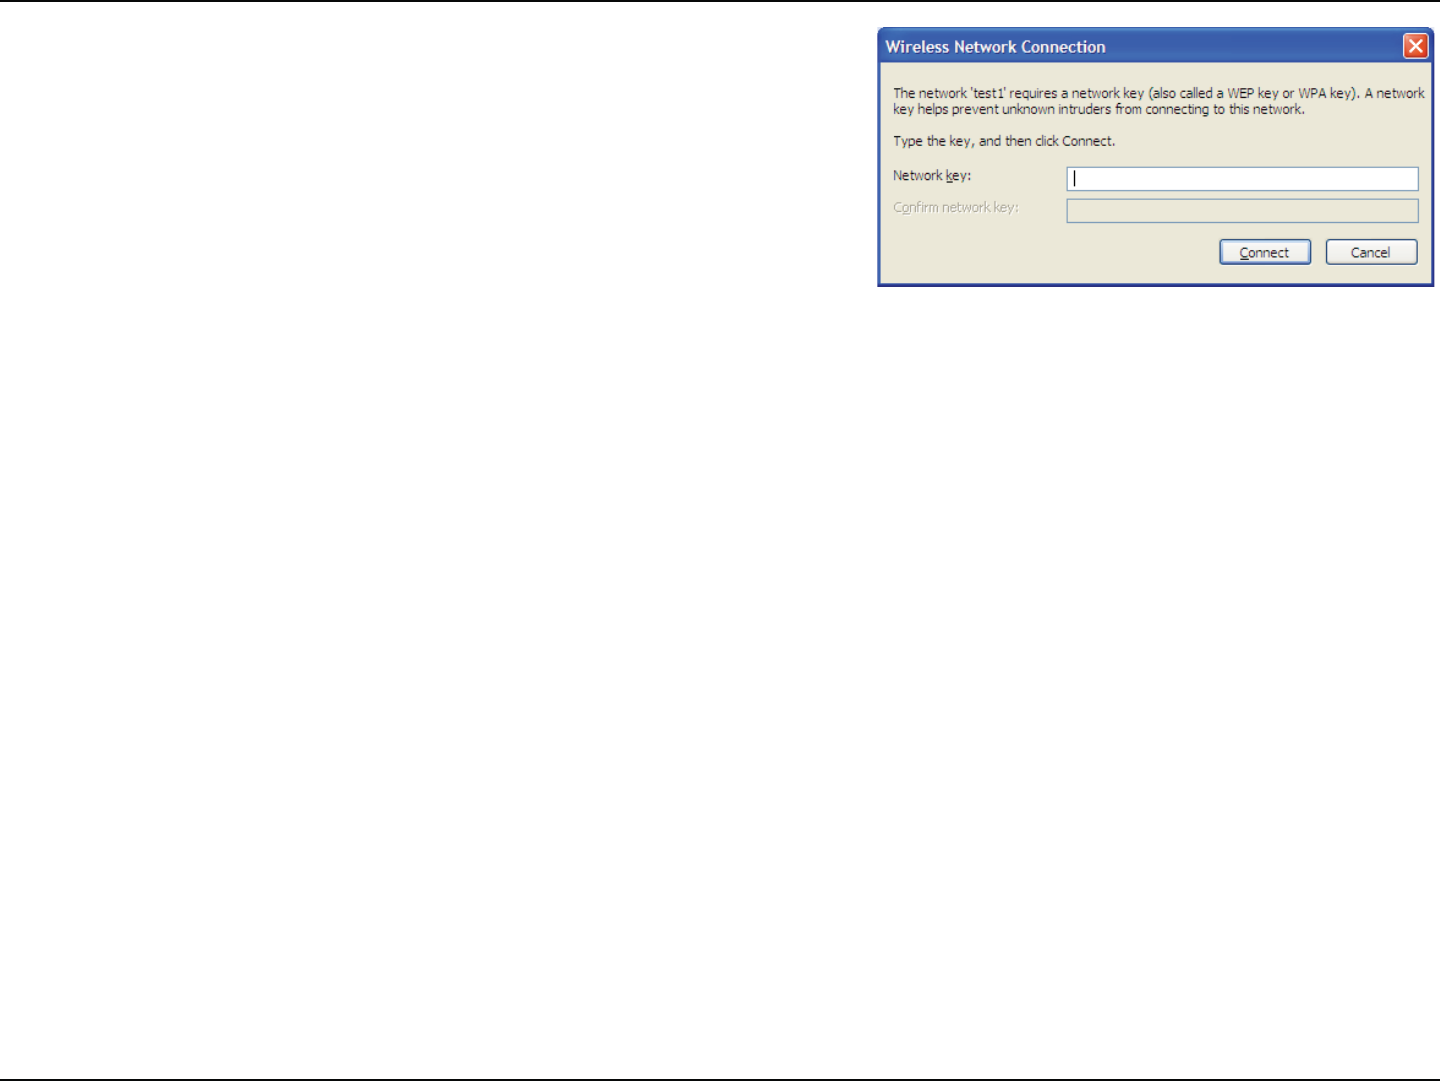
63D-Link DWR-118 User Manual
Section 5 - Connecting to a Wireless Network
3. The Wireless Network Connection box will appear. Enter the WPA-
PSK Wi-Fi password and click Connect.
*U NBZUBLF TFDPOETUPDPOOFDU UPUIF XJSFMFTTOFUXPSL*G UIF
connection fails, please verify that the WPA-PSK settings are correct. The
Wi-Fi password must be exactly the same as on the wireless router.

64D-Link DWR-118 User Manual
Section 6 - Troubleshooting
Troubleshooting
This chapter provides solutions to problems that can occur during the installation and operation of the DWR-118. Read the
GPMMPXJOHEFTDSJQUJPOTJGZPVBSFIBWJOHQSPCMFNT5IFFYBNQMFTCFMPXBSFJMMVTUSBUFEJO8JOEPXT¥91*GZPVIBWFBEJòFSFOU
operating system, the screenshots on your computer will look similar to these examples.
1. Why can’t I access the web-based conguration utility?
8IFOFOUFSJOHUIF*1BEESFTTPGUIF%-JOLSPVUFS192.168.0.1GPSFYBNQMFZPVBSFOPUDPOOFDUJOHUPBXFCTJUFOPSEPZPV
IBWFUPCFDPOOFDUFEUPUIF*OUFSOFU5IFEFWJDFIBTUIFVUJMJUZCVJMUJOUPB30.DIJQJOUIFEFWJDFJUTFMG:PVSDPNQVUFSNVTU
CFPOUIFTBNF*1TVCOFUUPDPOOFDUUPUIFXFCCBTFEVUJMJUZ
t .BLFTVSFZPVIBWFBOVQEBUFE+BWBFOBCMFEXFCCSPXTFS8FSFDPNNFOEUIFGPMMPXJOH
.JDSPTPGU*OUFSOFU&YQMPSFS¥PSIJHIFS
- Mozilla Firefox 23 or higher
(PPHMF$ISPNFPSIJHIFS
- Apple Safari 6 or higher
t 7FSJGZQIZTJDBMDPOOFDUJWJUZCZDIFDLJOHGPSTPMJEMJOLMJHIUTPOUIFEFWJDF*GZPVEPOPUHFUBTPMJEMJOLMJHIUUSZVTJOHB
EJòFSFOUDBCMFPSDPOOFDUUPBEJòFSFOUQPSUPOUIFEFWJDFJGQPTTJCMF*GUIFDPNQVUFSJTUVSOFEPòUIFMJOLMJHIUNBZOPU
be on.
t %JTBCMFBOZ*OUFSOFUTFDVSJUZTPGUXBSFSVOOJOHPOUIFDPNQVUFS4PGUXBSFöSFXBMMTTVDIBT;POF"MBSN#MBDL*$&4ZHBUF
Norton Personal Firewall, and Windows®91öSFXBMMNBZCMPDLBDDFTTUPUIFDPOöHVSBUJPOQBHFT$IFDLUIFIFMQöMFTJODMVEFE
XJUIZPVSöSFXBMMTPGUXBSFGPSNPSFJOGPSNBUJPOPOEJTBCMJOHPSDPOöHVSJOHJU

65D-Link DWR-118 User Manual
Section 6 - Troubleshooting
t $POöHVSFZPVS*OUFSOFUTFUUJOHT
t (PUPStart > Settings > Control Panel. Double-click the Internet Options*DPO'SPNUIFSecurity tab, click
the button to restore the settings to their defaults.
t $MJDLUIFConnection tab and set the dial-up option to Never Dial a Connection. Click the LAN Settings button.
Make sure nothing is checked. Click OK.
t (PUPUIFAdvanced tab and click the button to restore these settings to their defaults. Click OK three times.
t $MPTFZPVSXFCCSPXTFSJGPQFOBOEPQFOJU
t "DDFTTUIFXFCNBOBHFNFOU0QFOZPVSXFCCSPXTFSBOEFOUFSUIF*1BEESFTTPGZPVS%-JOLSPVUFSJOUIFBEESFTTCBS5IJT
should open the login page for your web management.
t *GZPVTUJMMDBOOPUBDDFTTUIFDPOöHVSBUJPOVOQMVHUIFQPXFSUPUIFSPVUFSGPSTFDPOETBOEQMVHCBDLJO8BJUBCPVU
TFDPOETBOEUSZBDDFTTJOHUIFDPOöHVSBUJPO*GZPVIBWFNVMUJQMFDPNQVUFSTUSZDPOOFDUJOHVTJOHBEJòFSFOUDPNQVUFS
2. What can I do if I forgot my password?
*GZPVGPSHPUZPVSQBTTXPSEZPVNVTUSFTFUZPVSSPVUFS5IJTQSPDFTTXJMMDIBOHFBMMZPVSTFUUJOHTCBDLUPUIFGBDUPSZEFGBVMUT
5PSFTFUUIFSPVUFSMPDBUFUIFSFTFUCVUUPOIPMFPOUIFSFBSQBOFMPGUIFVOJU8JUIUIFSPVUFSQPXFSFEPOVTFBQBQFSDMJQ
to hold the button down for 10 seconds. Release the button and the router will go through its reboot process. Wait about 30
TFDPOETUPBDDFTTUIFSPVUFS5IFEFGBVMU*1BEESFTTJT192.168.0.1. When logging in, leave the password box empty.
66D-Link DWR-118 User Manual
Section 6 - Troubleshooting
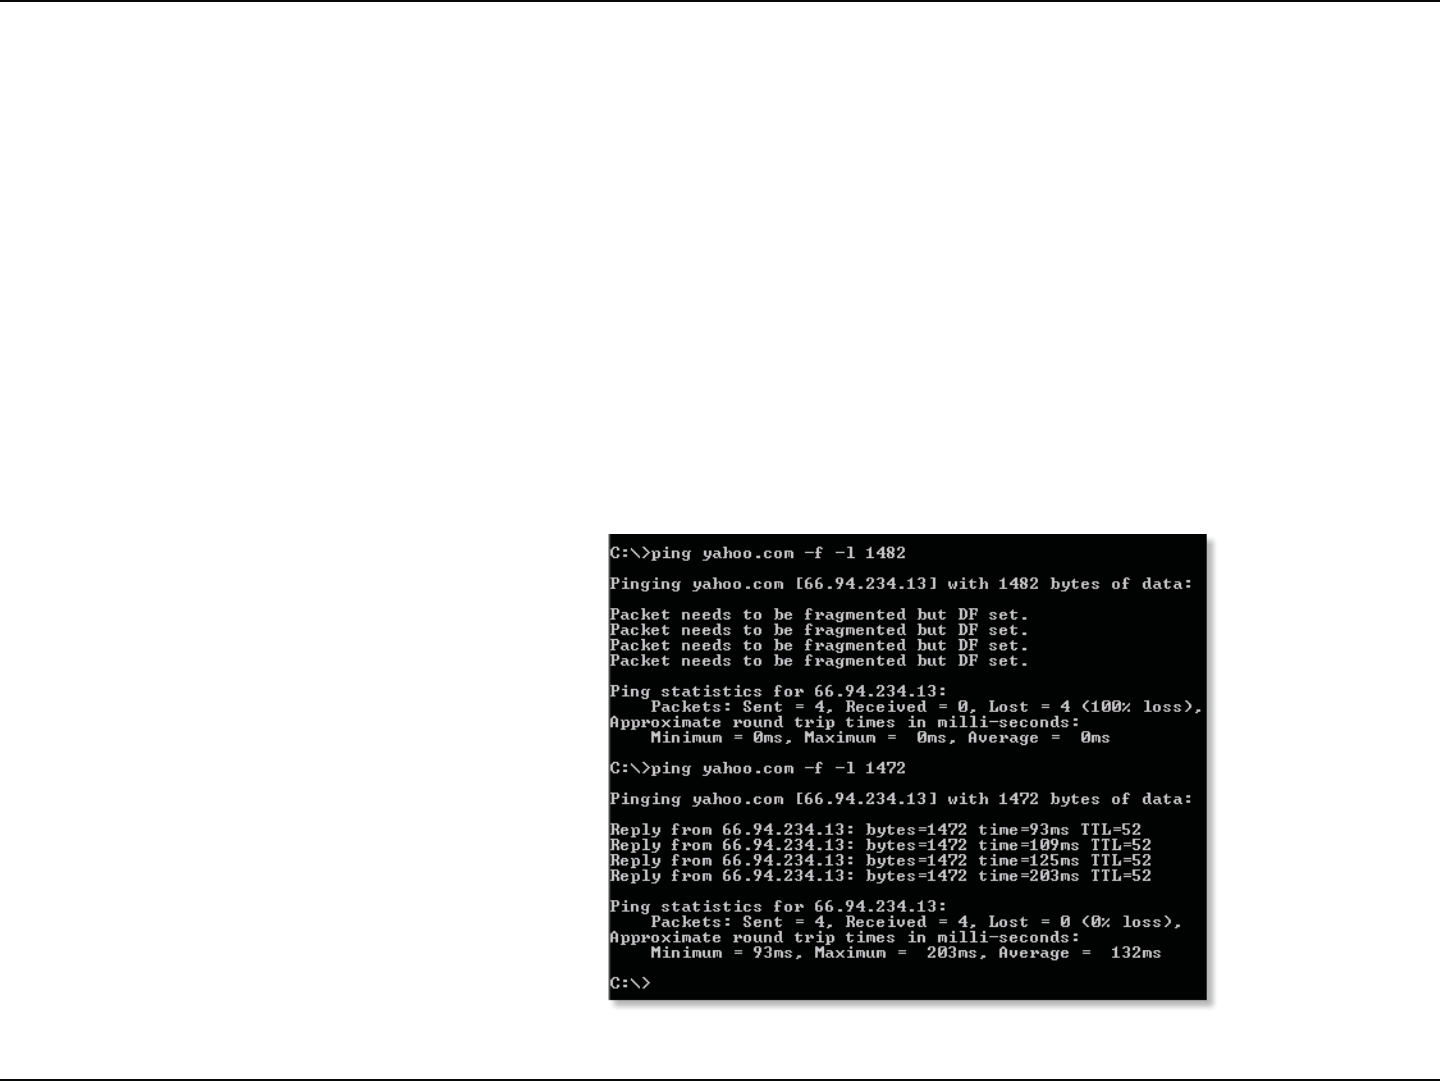
3. Why can’t I connect to certain sites or send and receive emails when connecting through my router?
*GZPVBSFIBWJOHBQSPCMFNTFOEJOHPSSFDFJWJOHFNBJMPSDPOOFDUJOHUPTFDVSFTJUFTTVDIBTF#BZCBOLJOHTJUFTBOE)PUNBJM
XFTVHHFTUMPXFSJOHUIF.56JOJODSFNFOUTPGUFO&YFUD
5PöOEUIFQSPQFS.564J[FZPVMMIBWFUPEPBTQFDJBMQJOHPGUIFEFTUJOBUJPOZPVSFUSZJOHUPHPUP"EFTUJOBUJPODPVMECF
another computer, or a URL.
t$MJDLPOStart and then click Run.
t8JOEPXT¥BOE.FVTFSTUZQFJOcommand8JOEPXT¥/5917JTUB¥BOEVTFSTUZQFJOcmdBOE
press Enter PSDMJDLOK
t0ODFUIFXJOEPXPQFOTZPVMMOFFEUPEPBTQFDJBMQJOH6TFUIFGPMMPXJOHTZOUBY
ping [url] [-f] [-l] [MTU value]
Example: ping yahoo.com -f -l 1472

67D-Link DWR-118 User Manual
Section 6 - Troubleshooting
You should start at 1472 and work your way down by 10 each time. Once you get a reply, go up by 2 until you get a fragmented
QBDLFU5BLFUIBUWBMVFBOEBEEUPUIFWBMVFUPBDDPVOUGPSUIFWBSJPVT5$1*1IFBEFST'PSFYBNQMFMFUTTBZUIBUXBTUIF
QSPQFSWBMVFUIFBDUVBM.56TJ[FXPVMECFXIJDIJTUIFPQUJNVNGPSUIFOFUXPSLXFSFXPSLJOHXJUI
0ODFZPVöOEZPVS.56ZPVDBOOPXDPOöHVSFZPVSSPVUFSXJUIUIFQSPQFS.56TJ[F
To change the MTU rate on your router follow the steps below:
t0QFOZPVSCSPXTFSFOUFSUIF*1BEESFTTPGZPVSSPVUFS192.168.0.1BOEDMJDLOK.
t&OUFSZPVSVTFSOBNFBENJOBOEQBTTXPSECMBOLCZEFGBVMU$MJDLOKUPFOUFSUIFXFCDPOöHVSBUJPOQBHF
for the device.
t$MJDLPOSetup and then click Manual Congure.
t5PDIBOHFUIF.56FOUFSUIFOVNCFSJOUIF.56CPYBOEDMJDLSave Settings to save your settings.
t5FTUZPVSFNBJM*GDIBOHJOHUIF.56EPFTOPUSFTPMWFUIFQSPCMFNDPOUJOVFDIBOHJOHUIF.56JOJODSFNFOUT
of ten.

68D-Link DWR-118 User Manual
Appendix A - Wireless Basics
D-Link wireless products are based on industry standards to provide easy-to-use and compatible high-speed wireless
DPOOFDUJWJUZXJUIJOZPVSIPNFCVTJOFTTPSQVCMJDBDDFTTXJSFMFTTOFUXPSLT4USJDUMZBEIFSJOHUPUIF*&&&TUBOEBSEUIF%-JOL
wireless family of products will allow you to securely access the data you want, when, and where you want it. You will be able
to enjoy the freedom that wireless networking delivers.
"XJSFMFTTMPDBMBSFBOFUXPSL8-"/JTBDFMMVMBSDPNQVUFSOFUXPSLUIBUUSBOTNJUTBOESFDFJWFTEBUBXJUISBEJPTJHOBMTJOTUFBE
PGXJSFT8JSFMFTT-"/TBSFVTFEJODSFBTJOHMZJOCPUIIPNFBOEPóDFFOWJSPONFOUTBOEQVCMJDBSFBTTVDIBTBJSQPSUTDPòFF
TIPQTBOEVOJWFSTJUJFT*OOPWBUJWFXBZTUPVUJMJ[F8-"/UFDIOPMPHZBSFIFMQJOHQFPQMFXPSLBOEDPNNVOJDBUFNPSFFóDJFOUMZ
*ODSFBTFENPCJMJUZBOEUIFBCTFODFPGDBCMJOHBOEPUIFSöYFEJOGSBTUSVDUVSFIBWFQSPWFOUPCFCFOFöDJBMGPSNBOZVTFST
Wireless users can use the same applications they use on a wired network. Wireless adapter cards used on laptop and desktop
systems support the same protocols as Ethernet adapter cards.
Under many circumstances, it may be desirable for mobile network devices to link to a conventional Ethernet LAN in order to
VTFTFSWFSTQSJOUFSTPSBO*OUFSOFUDPOOFDUJPOTVQQMJFEUISPVHIUIFXJSFE-"/"XJSFMFTTSPVUFSJTBEFWJDFVTFEUPQSPWJEF
this link.
Wireless Basics

69D-Link DWR-118 User Manual
Appendix A - Wireless Basics
What is Wireless?
Wireless or Wi-Fi technology is another way of connecting your computer to the network without using wires. Wi-Fi uses radio
GSFRVFODZUPDPOOFDUXJSFMFTTMZTPZPVIBWFUIFGSFFEPNUPDPOOFDUDPNQVUFSTBOZXIFSFJOZPVSIPNFPSPóDFOFUXPSL
Why D-Link Wireless?
D-Link is the worldwide leader and award winning designer, developer, and manufacturer of networking products. D-Link
delivers the performance you need at a price you can aord. D-Link has all the products you need to build your network.
How does wireless work?
Wireless works similarly to how cordless phones work, through radio signals that transmit data from one point A to point B.
But wireless technology has restrictions as to how you can access the network. You must be within the wireless network range
area to be able to connect your computer. There are two dierent types of wireless networks: Wireless Local Area Network
8-"/BOE8JSFMFTT1FSTPOBM"SFB/FUXPSL81"/
Wireless Local Area Network (WLAN)
*OBXJSFMFTTMPDBMBSFBOFUXPSLBEFWJDFDBMMFEBO"DDFTT1PJOU"1DPOOFDUTDPNQVUFSTUPUIFOFUXPSL5IFBDDFTTQPJOU
has a small antenna attached to it, which allows it to transmit data back and forth over radio signals. With an indoor access
point the signal can travel up to 300 feet. With an outdoor access point the signal can reach out up to 30 miles to serve places
like manufacturing plants, industrial locations, university and high school campuses, airports, golf courses, and many other
outdoor venues.

70D-Link DWR-118 User Manual
Appendix A - Wireless Basics
Wireless Personal Area Network (WPAN)
Bluetooth is the industry standard wireless technology used for WPAN. Bluetooth devices in WPAN operate in a range up to
30 feet away.
Compared to WLAN the speed and wireless operation range are both less than WLAN, but in return it doesn’t use nearly as
much power. This makes it ideal for personal devices, such as mobile phones, PDAs, headphones, laptops, speakers, and other
devices that operate on batteries.
Who uses wireless?
8JSFMFTTUFDIOPMPHZBTCFDPNFTPQPQVMBSJOSFDFOUZFBSTUIBUBMNPTUFWFSZPOFJTVTJOHJUXIFUIFSJUTGPSIPNFPóDFCVTJOFTT
D-Link has a wireless solution for it.
Home Uses/Benets
t(JWFTFWFSZPOFBUIPNFCSPBECBOEBDDFTT
t4VSGUIFXFCDIFDLFNBJMJOTUBOUNFTTBHFFUD
t(FUTSJEPGUIFDBCMFTBSPVOEUIFIPVTF
t4JNQMFBOEFBTZUPVTF
Small Oce and Home Oce Uses/Benets
t4UBZPOUPQPGFWFSZUIJOHBUIPNFBTZPVXPVMEBUPóDF
t3FNPUFMZBDDFTTZPVSPóDFOFUXPSLGSPNIPNF
t4IBSF*OUFSOFUDPOOFDUJPOBOEQSJOUFSXJUINVMUJQMFDPNQVUFST
t/POFFEUPEFEJDBUFPóDFTQBDF

71D-Link DWR-118 User Manual
Appendix A - Wireless Basics
Where is wireless used?
8JSFMFTTUFDIOPMPHZJTFYQBOEJOHFWFSZXIFSFOPUKVTUBUIPNFPSPóDF1FPQMFMJLFUIFGSFFEPNPGNPCJMJUZBOEJUTCFDPNJOH
so popular that more and more public facilities now provide wireless access to attract people. The wireless connection in public
places is usually called “hotspots”.
6TJOHB%-JOL$BSE#VTBEBQUFSXJUIZPVSMBQUPQZPVDBOBDDFTTUIFIPUTQPUUPDPOOFDUUPUIF*OUFSOFUGSPNSFNPUFMPDBUJPOT
like: airports, hotels, coee shops, libraries restaurants, and convention centers.
8JSFMFTTOFUXPSLJTFBTZUPTFUVQCVUJGZPVSFJOTUBMMJOHJUGPSUIFöSTUUJNFJUDPVMECFRVJUFBUBTLOPULOPXJOHXIFSFUPTUBSU
That’s why we’ve put together a few setup steps and tips to help you through the process of setting up a wireless network.
Tips
Here are a few things to keep in mind, when you install a wireless network.
Centralize your router or access point
Make sure you place the router/access point in a centralized location within your network for the best performance. Try to
QMBDFUIFSPVUFSBDDFTTQPJOUBTIJHIBTQPTTJCMFJOUIFSPPNTPUIFTJHOBMHFUTEJTQFSTFEUISPVHIPVUZPVSIPNF*GZPVIBWF
a two-story home, you may need a repeater to boost the signal to extend the range.
Eliminate Interference
Place home appliances such as cordless telephones, microwaves, and televisions as far away as possible from the router/access
QPJOU5IJTXPVMETJHOJöDBOUMZSFEVDFBOZJOUFSGFSFODFUIBUUIFBQQMJBODFTNJHIUDBVTFTJODFUIFZPQFSBUFPOTBNFGSFRVFODZ

72D-Link DWR-118 User Manual
Appendix A - Wireless Basics
Security
Don’t let your next-door neighbors or intruders connect to your wireless network. Secure your wireless network by turning on
the WPA or WEP security feature on the router. Refer to the product manual for detail information on how to set it up.
There are basically two modes of networking:
t Infrastructure – All wireless clients will connect to an access point or wireless router.
t Ad hoc – Directly connecting to another computer for peer-to-peer communication using wireless network
adapters on each computer, such as two or more DWR-118 wireless network CardBus adapters.
"O*OGSBTUSVDUVSFOFUXPSLDPOUBJOTBOBDDFTTQPJOUPSXJSFMFTTSPVUFS"MMUIFXJSFMFTTEFWJDFTPSDMJFOUTXJMMDPOOFDUUPUIF
wireless router or access point.
An ad hoc network contains only clients, such as laptops with wireless CardBus adapters. All the adapters must be in ad hoc
mode to communicate.
Wireless Modes
73D-Link DWR-118 User Manual
Appendix B - Networking Basics
Networking Basics
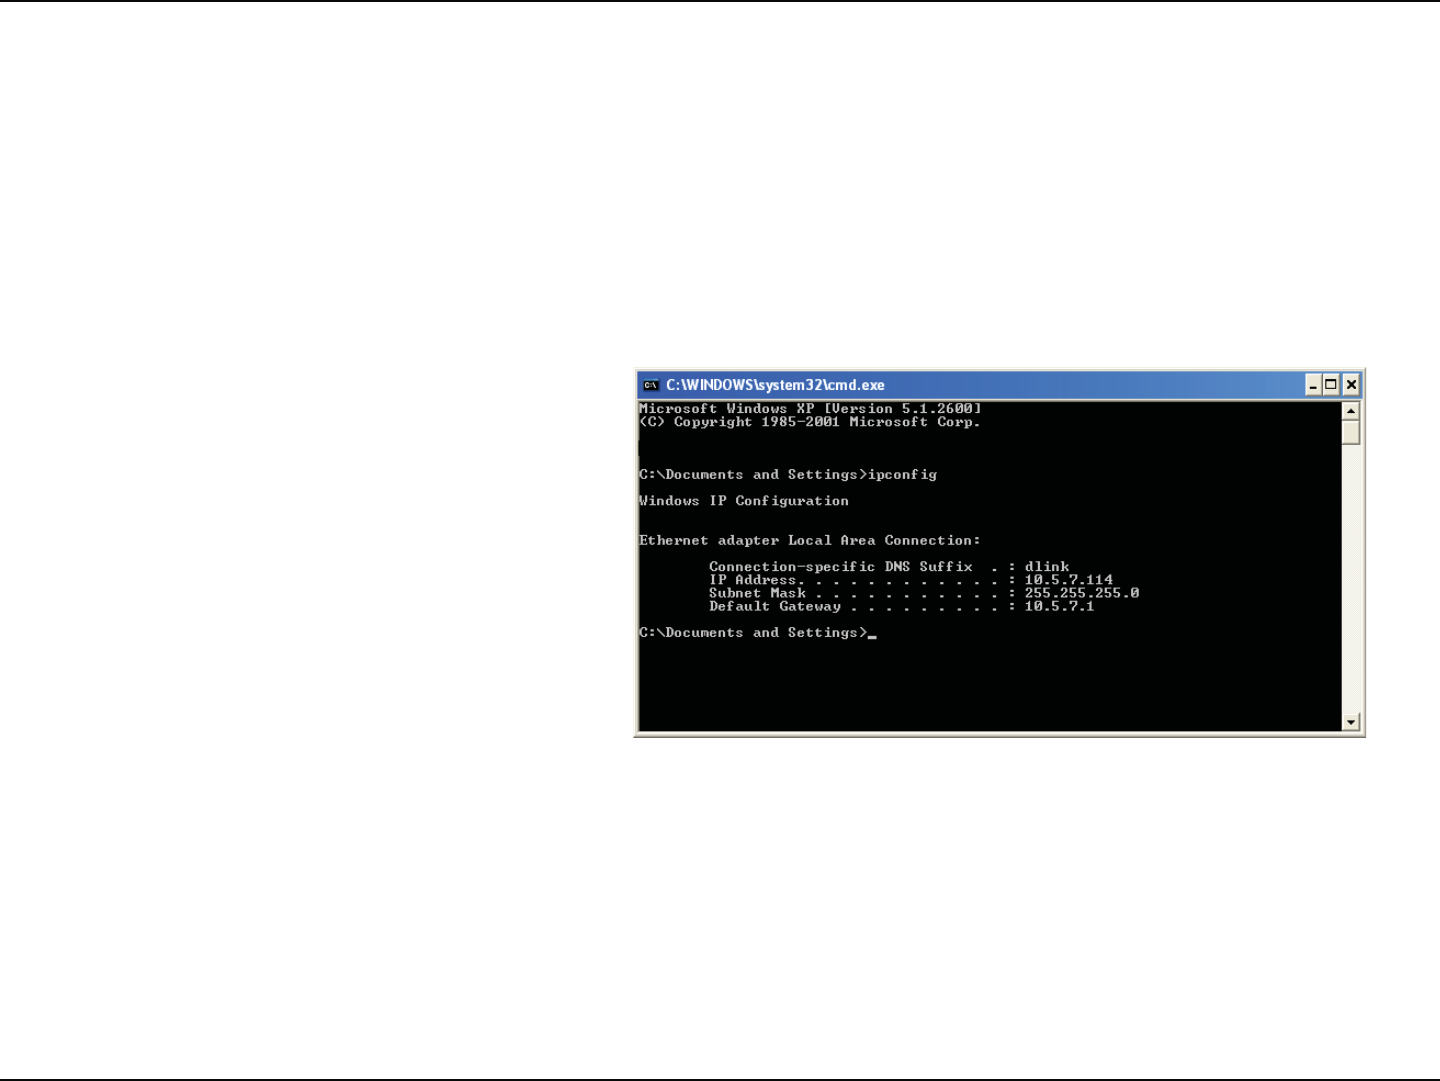
Check your IP address
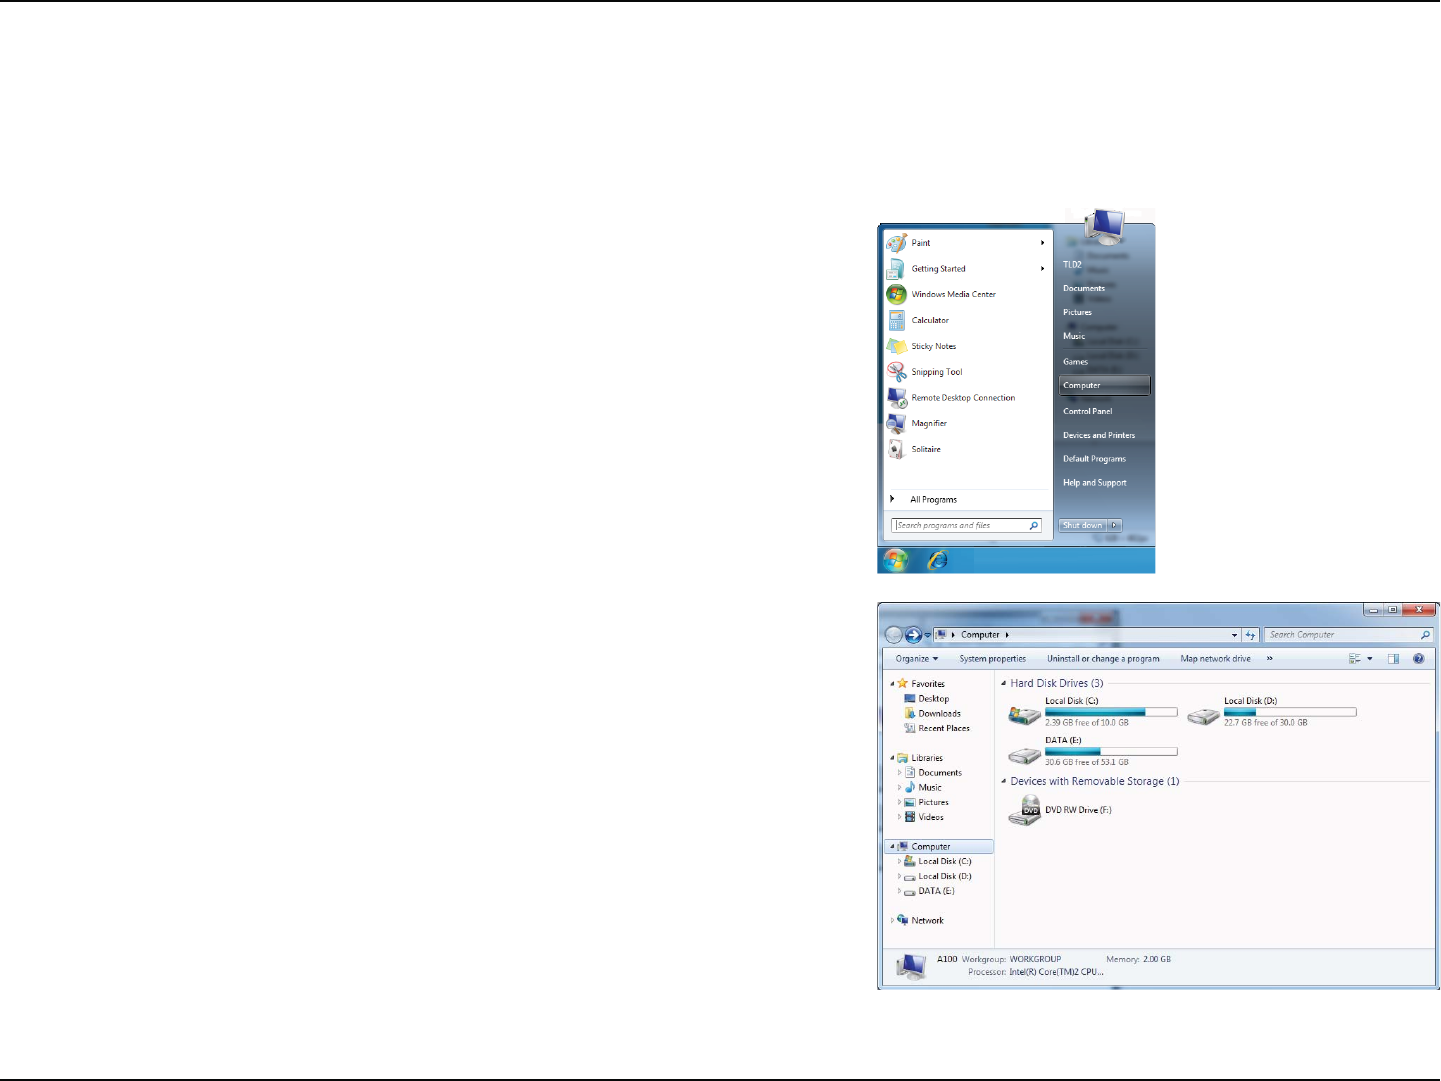
"GUFSZPVJOTUBMMZPVSOFX%-JOLBEBQUFSCZEFGBVMUUIF5$1*1TFUUJOHTTIPVMECFTFUUPPCUBJOBO*1BEESFTTGSPNB%)$1
TFSWFSJFXJSFMFTTSPVUFSBVUPNBUJDBMMZ5PWFSJGZZPVS*1BEESFTTQMFBTFGPMMPXUIFTUFQTCFMPX
Click on Start > Run*OUIFSVOCPYUZQFcmd and click OK.8JOEPXT¥7JTUB¥VTFSTUZQFcmd in the Start SearchCPY
At the prompt, type ipcong and press Enter.
5IJTXJMMEJTQMBZUIF*1BEESFTTTVCOFUNBTLBOEUIF
default gateway of your adapter.
*GUIFBEESFTTJTDIFDLZPVSBEBQUFSJOTUBMMBUJPO
security settings, and the settings on your router.
4PNFöSFXBMMTPGUXBSFQSPHSBNTNBZCMPDLB%)$1
request on newly installed adapters.

74D-Link DWR-118 User Manual
Appendix B - Networking Basics
Statically Assign an IP address
*GZPVBSFOPUVTJOHB%)$1DBQBCMFHBUFXBZSPVUFSPSZPVOFFEUPBTTJHOBTUBUJD*1BEESFTTQMFBTFGPMMPXUIFTUFQTCFMPX
Step 1
Windows® 7 - Click on Start > Control Panel > Network and Internet > Network and Sharing Center.
Windows Vista® - Click on Start > Control Panel > Network and Internet > Network and Sharing Center > Manage Network
Connections.
Windows® XP - Click on Start > Control Panel > Network Connections.
Windows® 2000 - From the desktop, right-click My Network Places > Properties.
Step 2
Right-click on the Local Area Connection which represents your network adapter and select Properties.
Step 3
Highlight Internet Protocol Version 4 (TCP/IPv4) and click Properties.
Step 4
Click Use the following IP addressBOEFOUFSBO*1BEESFTTUIBUJTPOUIFTBNFTVCOFUBT
ZPVSOFUXPSLPSUIF-"/*1BEESFTTPOZPVSSPVUFS
&YBNQMF*G UIFSPVUFS}T-"/ *1BEESFTTJTNBLF ZPVS*1 BEESFTT9
where X is a number between 2 and 99. Make sure that the number you choose is not in
VTFPOUIFOFUXPSL4FUUIF%FGBVMU(BUFXBZUIFTBNFBTUIF-"/*1BEESFTTPGZPVSSPVUFS
*&
4FU1SJNBSZ%/4UIFTBNFBTUIF-"/*1BEESFTTPGZPVSSPVUFS5IF"MUFSOBUF
%/4JTOPUOFFEFEPSZPVNBZFOUFSB%/4TFSWFSGSPNZPVS*41
Step 5
Click OK twice to save your settings.

75D-Link DWR-118 User Manual
Appendix B - Networking Basics
Wireless Security
This section will show you the dierent levels of security you can use to protect your data from intruders. The DWR-118 oers the
following types of security:
t81"8J'J1SPUFDUFE"DDFTT t81"14,1SF4IBSFE,FZ
t81"8J'J1SPUFDUFE"DDFTT t81"14,1SF4IBSFE,FZ
What is WPA?
81"8J'J1SPUFDUFE"DDFTTJTB8J'JTUBOEBSEUIBUXBTEFTJHOFEUPJNQSPWFUIFTFDVSJUZGFBUVSFTPG8&18JSFE&RVJWBMFOU1SJWBDZ
The 2 major improvements over WEP:
t *NQSPWFEEBUBFODSZQUJPOUISPVHIUIF5FNQPSBM,FZ*OUFHSJUZ1SPUPDPM5,*15,*1TDSBNCMFTUIFLFZTVTJOHBIBTIJOH
algorithm and by adding an integrity-checking feature, ensures that the keys haven’t been tampered with. WPA2 is based
POJBOEVTFT"EWBODFE&ODSZQUJPO4UBOEBSE"&4JOTUFBEPG5,*1
t 6TFSBVUIFOUJDBUJPO XIJDI JT HFOFSBMMZ NJTTJOHJO8&1UISPVHIUIFFYUFOTJCMF BVUIFOUJDBUJPO QSPUPDPM&"18&1
SFHVMBUFTBDDFTTUPBXJSFMFTTOFUXPSLCBTFEPOBDPNQVUFSTIBSEXBSFTQFDJöD."$BEESFTTXIJDIJTSFMBUJWFMZTJNQMF
to be snied out and stolen. EAP is built on a more secure public-key encryption system to ensure that only authorized
network users can access the network.
WPA-PSK/WPA2-PSK uses a passphrase or key to authenticate your wireless connection. The key is an alpha-numeric password between
BOEDIBSBDUFSTMPOH5IFQBTTXPSEDBOJODMVEFTZNCPMT @BOETQBDFT5IJTLFZNVTUCFUIFFYBDUTBNFLFZFOUFSFEPOZPVS
wireless router or access point.
81"81"JODPSQPSBUFTVTFSBVUIFOUJDBUJPOUISPVHIUIF&YUFOTJCMF"VUIFOUJDBUJPO1SPUPDPM&"1&"1JTCVJMUPOBNPSFTFDVSFQVCMJD
key encryption system to ensure that only authorized network users can access the network.

76D-Link DWR-118 User Manual
Appendix C - Technical Specications
Technical Specications
Data Rates
t 433 Mbps in 802.11ac mode
t 300,150,135,120,90,60,45,30,15 Mbps in 802.11n mode
t 6/9/11/12/18/24/36/48/54 Mbps in 802.11g mode
t 1/2/5.5/11 Mbps in 802.11b mode
Standards
t *&&&BD5Y3
t *&&&ODPNQMJBOU5Y3
t *&&&CHO
t *&&&
t *&&&V
Frequency
t 2.4 - 2.4835 GHz
t 5.15 - 5.875 GHz
Wireless Security
t CJU8&18JSFE&RVJWBMFOU1SJWBDZ
t 81"81"8J'J1SPUFDUFE"DDFTT
Firewall
t *1'JMUFSJOH
t /FUXPSL"EESFTT5SBOTMBUJPO/"5
t 4UBUFGVM1BDLFU*OTQFDUJPO41*
t MAC Filtering
VPN
t -511151*14&$71/QBTTUISPVHI
Ports
t 1 x Gigabit Ethernet LAN port
t 3 x Fast Ethernet LAN port
t 1 x Gigabit Ethernet WAN port
t 1 x USB port
Antenna
t YFYUFSOBME#J8J'JBOUFOOBT()[()[
t YJOUFSOBME#J8J'JBOUFOOB()[
LED Status Indicators
t Power
t USB
t WAN
t Y8J'J()[()[
t LAN
t *OUFSOFU
Power Input
t %$7"
Dimensions (L x W x H)
t YYNNYYJODIFT
Operating Temperature
t UP¡$UP¡'
Operating Humidity
t UPOPODPOEFOTJOH
Appendix (insert letter) - Regulatory Information
77D-Link DWR-118 User Manual
Federal Communication Commission Interference Statement
This equipment has been tested and found to comply with the limits for a Class B digital device, pursuant to Part 15 of
the FCC Rules. These limits are designed to provide reasonable protection against harmful interference in a residential
installation. This equipment generates, uses and can radiate radio frequency energy and, if not installed and used in
accordance with the instructions, may cause harmful interference to radio communications. However, there is no guarantee
UIBUJOUFSGFSFODFXJMMOPUPDDVSJOBQBSUJDVMBSJOTUBMMBUJPO*GUIJTFRVJQNFOUEPFTDBVTFIBSNGVMJOUFSGFSFODFUPSBEJPPS
television reception, which can be determined by turning the equipment o and on, the user is encouraged to try to correct
the interference by one of the following measures:
- Reorient or relocate the receiving antenna.
- *ODSFBTFUIFTFQBSBUJPOCFUXFFOUIFFRVJQNFOUBOESFDFJWFS
- Connect the equipment into an outlet on a circuit dierent from that to which the receiver is connected.
- Consult the dealer or an experienced radio/TV technician for help.
Non-modications Statement:
"OZDIBOHFTPSNPEJöDBUJPOTOPUFYQSFTTMZBQQSPWFECZUIFQBSUZSFTQPOTJCMFGPSDPNQMJBODFDPVMEWPJEUIFVTFST
authority to operate this equipment.
Caution:
This device complies with Part 15 of the FCC Rules. Operation is subject to the following two conditions:
5IJTEFWJDFNBZOPUDBVTFIBSNGVMJOUFSGFSFODFBOE
UIJTEFWJDFNVTUBDDFQUBOZJOUFSGFSFODFSFDFJWFEJODMVEJOHJOUFSGFSFODFUIBUNBZDBVTFVOEFTJSFEPQFSBUJPO
Regulatory Information

Appendix (insert letter) - Regulatory Information
78D-Link DWR-118 User Manual
5IJTEFWJDFBOEJUTBOUFOOBTNVTUOPUCFDPMPDBUFEPSPQFSBUJOHJODPOKVODUJPOXJUIBOZPUIFSBOUFOOBPSUSBOTNJUUFS
except in accordance with FCC multi-transmitter product procedures. For product available in the USA/Canada market, only
channel 1~11 can be operated. Selection of other channels is not possible.
Note
The country code selection is for non-USA models only and is not available to all USA models. Per FCC regulations, all WiFi
QSPEVDUNBSLFUFEJOUIF64"NVTUCFöYFEUP64"PQFSBUJPOBMDIBOOFMTPOMZ
RF Frequency Requirements
This device is for indoor/outdoor use only when using all channels in the 5.150GHz-5.250GHz and 5.725GHz-5.850GHz
frequency range. High power radars are allocated as primary users of the 5.150GHz-5.250GHz and 5.725GHz-5.850GHz
bands. These radar stations can cause interference with and/or damage this device.
*UJTSFTUSJDUFEUPJOEPPSFOWJSPONFOUTPOMZ
FCC Radiation Exposure Statement
This equipment complies with FCC radiation exposure limits set forth for an uncontrolled environment. This equipment
should be installed and operated with minimum distance 20 cm between the radiator and your body.

79D-Link DWR-118 User Manual
Appendix D - Regulatory Information
This device complies with the essential requirements of the R&TTE Directive 1999/5/EC. For more information, please refer
to the Declaration of Conformity.
Notice of Wireless Radio LAN Usage in The European Community
t"UUIFUJNFPGXSJUJOHUIJTBEEFOEVNTPNFDPVOUSJFTTVDIBT*UBMZ(SFFDF1PSUVHBMBOE4QBJOIBWFOPUBMMPXFEPQFSBUJPO
of radio devices in the 5 GHz bands, although operation of 2.4 GHz radio devices are allowed. Please check with your local
BVUIPSJUZUPDPOöSN
t5IJTEFWJDFJTSFTUSJDUFEUPJOEPPSVTFXIFOPQFSBUFEJOUIF&VSPQFBO$PNNVOJUZVTJOHDIBOOFMTJOUIF()[
band to reduce the potential for interference.
t5IJTEFWJDFJTB()[XJEFCBOEUSBOTNJTTJPOTZTUFNUSBOTDFJWFSJOUFOEFEGPSVTFJOBMM&6NFNCFSTUBUFTBOE&'5"
countries, except in France where restrictive use applies. This device may not be used for setting up outdoor radio links in
'SBODFBOEJOTPNFBSFBTUIF3'PVUQVUQPXFSNBZCFMJNJUFEUPN8&*31JOUIFGSFRVFODZSBOHFPGo.)[
For detailed information the end-user should contact the national spectrum authority in France.
5IJTFRVJQNFOUNBZCFPQFSBUFEJO"-"%#&#(%,%&'*'3(3(8*4*5)3-*
-6.5.,.%.$/-/0"50-15304.4&344,&4$*)6$:
Usage Notes:
t5PSFNBJOJODPOGPSNBODFXJUI&VSPQFBO/BUJPOBMTQFDUSVNVTBHFSFHVMBUJPOTGSFRVFODZBOEDIBOOFMMJNJUBUJPOTXJMMCF
applied on the products according to the country where the equipment will be deployed.
t5IJTEFWJDFJTSFTUSJDUFEGSPNGVODUJPOJOHJO"EIPDNPEFXIJMFPQFSBUJOHJO()["EIPDNPEFJTEJSFDUQFFSUPQFFS
communication between two client devices without an Access Point.
t"DDFTTQPJOUTXJMMTVQQPSU%'4%ZOBNJD'SFRVFODZ4FMFDUJPOBOE51$5SBOTNJU1PXFS
$POUSPMGVODUJPOBMJUZBTSFRVJSFEXIFOPQFSBUJOHJO()[XJUIJOUIF&6
5 GHz wireless frequency and channel operation in EEC countries

80D-Link DWR-118 User Manual
Appendix D - Regulatory Information
Allowable 802.11a Frequencies and Channels Countries
5.15-5.25 GHz
$IBOOFMT Liechtenstein
5.15-5.25 GHz & 5.725-5.875 Ghz
$IBOOFMT Austria
5.15-5.35 GHz
$IBOOFMT France
5.15-5.35 & 5.47-5.725 GHz
$IBOOFMT
%FONBSL(FSNBOZ*DFMBOE'JOMBOE
Netherlands, Norway, Poland, Sweden,
4MPWFOJB-VYFNCPVSH6,*SFMBOE
4MPWBL4XJU[FSMBOE)VOHBSZ*UBMZ
5.15-5.35 GHz & 5.725-5.875 GHz
$IBOOFMT
Czech Republic

81D-Link DWR-118 User Manual
Appendix D - Regulatory Information
European Community Declaration of Conformity:
Česky [Czech] D-Link tímto prohlašuje, že tento DWR-118 je ve shodě se základními požadavky a dalšími
příslušnými ustanoveními směrnice 1999/5/ES.
Dansk [Danish] Undertegnede D-Link erklærer herved, at følgende udstyr DWR-118 overholder de væsentlige
krav og øvrige relevante krav i direktiv 1999/5/EF.
Deutsch [German]
Hiermit erklärt D-Link, dass sich das Gerät DWR-118 in Übereinstimmung mit den
grundlegenden Anforderungen und den übrigen einschlägigen Bestimmungen der
3JDIUMJOJF&(CFöOEFU
Eesti [Estonian] Käesolevaga kinnitab D-Link seadme DWR-118 vastavust direktiivi 1999/5/EÜ põhinõuetele
ja nimetatud direktiivist tulenevatele teistele asjakohastele sätetele.
English Hereby, D-Link, declares that this DWR-118 is in compliance with the essential requirements
and other relevant provisions of Directive 1999/5/EC.
Español [Spanish] Por medio de la presente D-Link declara que el DWR-118 cumple con los requisitos esenciales
y cualesquiera otras disposiciones aplicables o exigibles de la Directiva 1999/5/CE.
Ελληνική [Greek] ΜΕ ΤΗΝ ΠΑΡΟΥΣΑ D-Link ΔΗΛΩΝΕΙ ΟΤΙ DWR-118 ΣΥΜΜΟΡΦΩΝΕΤΑΙ ΠΡΟΣ ΤΙΣ ΟΥΣΙΩΔΕΙΣ
ΑΠΑΙΤΗΣΕΙΣ ΚΑΙ ΤΙΣ ΛΟΙΠΕΣ ΣΧΕΤΙΚΕΣ ΔΙΑΤΑΞΕΙΣ ΤΗΣ ΟΔΗΓΙΑΣ 1999/5/ΕΚ.
Français [French] Par la présente D-Link déclare que l'appareil DWR-118 est conforme aux exigences essentielles
et aux autres dispositions pertinentes de la directive 1999/5/CE.
*UBMJBOP<*UBMJBO> Con la presente D-Link dichiara che questo DWR-118 è conforme ai requisiti essenziali ed
alle altre disposizioni pertinenti stabilite dalla direttiva 1999/5/CE.
Latviski [Latvian] Ar šo D-Link deklarē, ka DWR-118 atbilst Direktīvas 1999/5/EK būtiskajām prasībām un citiem
ar to saistītajiem noteikumiem.
Lietuvių [Lithuanian] Šiuo D-Link deklaruoja, kad šis DWR-118 atitinka esminius reikalavimus ir kitas 1999/5/EB
Direktyvos nuostatas.
Nederlands [Dutch] Hierbij verklaart D-Link dat het toestel DWR-118 in overeenstemming is met de essentiële
eisen en de andere relevante bepalingen van richtlijn 1999/5/EG.

82D-Link DWR-118 User Manual
Appendix D - Regulatory Information
Malti [Maltese] Hawnhekk, D-Link, jiddikjara li dan DWR-118 jikkonforma mal-ħtiġijiet essenzjali u ma
QSPWWFEJNFOUJPìSBKOSFMFWBOUJMJIFNNöE%JSSFUUJWB&$
Magyar [Hungarian] Alulírott, D-Link nyilatkozom, hogy a DWR-118 megfelel a vonatkozó alapvetõ
követelményeknek és az 1999/5/EC irányelv egyéb elõírásainak.
Polski [Polish] Niniejszym D-Link oświadcza, że DWR-118 jest zgodny z zasadniczymi wymogami oraz
pozostałymi stosownymi postanowieniami Dyrektywy 1999/5/EC.
Português [Portuguese] D-Link declara que este DWR-118 está conforme com os requisitos essenciais e outras
disposições da Directiva 1999/5/CE.
Slovensko [Slovenian] D-Link izjavlja, da je ta DWR-118 v skladu z bistvenimi zahtevami in ostalimi relevantnimi
določili direktive 1999/5/ES.
Slovensky [Slovak] D-Link týmto vyhlasuje, že DWR-118 spĺňa základné požiadavky a všetky príslušné
ustanovenia Smernice 1999/5/ES.
Suomi [Finnish] D-Link vakuuttaa täten että DWR-118 tyyppinen laite on direktiivin 1999/5/EY oleellisten
vaatimusten ja sitä koskevien direktiivin muiden ehtojen mukainen.
Safety Instructions
Please adhere to the following safety guidelines to help ensure your own personal safety and protect your system from potential
damage. Any acts taken that are inconsistent with ordinary use of the product, including improper testing, etc., and those not
expressly approved by D-Link may result in the loss of product warranty.
Unless expressly approved by an authorized representative of D-Link in writing, you may not and may not permit others to:
t%JTBTTFNCMFPSSFWFSTFFOHJOFFSUIFEFWJDFPSBUUFNQUUPEFSJWFTPVSDFDPEFVOEFSMZJOHJEFBTBMHPSJUINTPSTUSVDUVSFGSPN
the device or from any other information provided by D-Link, except to the extent that this restriction is expressly prohibited
by local law.
t.PEJGZPSBMUFSUIFEFWJDF
t3FNPWFGSPNUIFEFWJDFBOZQSPEVDUJEFOUJöDBUJPOPSPUIFSOPUJDFTJODMVEJOHDPQZSJHIUOPUJDFTBOEQBUFOUNBSLJOHTJGBOZ
5PSFEVDFUIFSJTLPGCPEJMZJOKVSZFMFDUSJDBMTIPDLöSFBOEEBNBHFUPUIFEFWJDFBOEPUIFSFRVJQNFOUPCTFSWFUIFGPMMPXJOH
precautions:

83D-Link DWR-118 User Manual
Appendix D - Regulatory Information
Power Sources
t0CTFSWFBOEGPMMPXTFSWJDFNBSLJOHT
t%POPUQVTIBOZPCKFDUTJOUPUIFPQFOJOHTPGZPVSEFWJDFVOMFTTDPOTJTUFOUXJUIUIFBVUIPSJ[FEPQFSBUJPOPGUIFEFWJDF
%PJOHTPDBODBVTFBöSFPSBOFMFDUSJDBMTIPDLCZTIPSUJOHPVUJOUFSJPSDPNQPOFOUT
t5IFQPXFSJOHPGUIJTEFWJDFNVTUBEIFSFUPUIFQPXFSTQFDJöDBUJPOTJOEJDBUFEGPSUIJTQSPEVDU
t%POPUPWFSMPBEXBMMPVUMFUTBOEPSFYUFOTJPODPSETBTUIJTXJMMJODSFBTFUIFSJTLPGöSFPSFMFDUSJDBMTIPDL
t%POPUSFTUBOZUIJOHPOUIFQPXFSDPSEPSPOUIFEFWJDFVOMFTTUIFEFWJDFJTNBEFBOEFYQSFTTMZBQQSPWFEBTTVJUBCMFGPS
TUBDLJOH
t1PTJUJPOTZTUFNDBCMFTBOEQPXFSDBCMFTDBSFGVMMZSPVUFDBCMFTTPUIBUUIFZDBOOPUCFTUFQQFEPOPSUSJQQFEPWFS#FTVSF
that nothing rests on any cables.
t0QFSBUFUIFEFWJDFPOMZGSPNUIFUZQFPGFYUFSOBMQPXFSTPVSDFJOEJDBUFEPOUIFFMFDUSJDBMSBUJOHTMBCFM
t5PIFMQBWPJEEBNBHJOHZPVSEFWJDFCFTVSFUIFWPMUBHFTFMFDUJPOTXJUDIJGQSPWJEFEPOUIFQPXFSTVQQMZJTTFUUPNBUDI
the power available at your location.
t"MTPCFTVSFUIBUBUUBDIFEEFWJDFTBSFFMFDUSJDBMMZSBUFEUPPQFSBUFXJUIUIFQPXFSBWBJMBCMFJOZPVSMPDBUJPO
t6TFPOMZBQQSPWFEQPXFSDBCMFT*GZPVIBWFOPUCFFOQSPWJEFEBQPXFSDBCMFGPSZPVSEFWJDFPSGPSBOZ"$QPXFSFEPQUJPO
intended for your device, purchase a power cable that is approved for use in your country and is suitable for use with your
device. The power cable must be rated for the device and for the voltage and current marked on the device's electrical ratings
label. The voltage and current rating of the cable should be greater than the ratings marked on the device.
t5PIFMQQSFWFOUBOFMFDUSJDBMTIPDLQMVHUIFEFWJDFBOEQFSJQIFSBMQPXFSDBCMFTJOUPQSPQFSMZHSPVOEFEFMFDUSJDBMPVUMFUT
These cables are equipped with three-prong plugs to help ensure proper grounding. Do not use adapter plugs or remove the
HSPVOEJOHQSPOHGSPNBDBCMF*GZPVNVTUVTFBOFYUFOTJPODBCMFVTFBXJSFDBCMFXJUIQSPQFSMZHSPVOEFEQMVHT
t0CTFSWFFYUFOTJPODBCMFBOEQPXFSTUSJQSBUJOHT&OTVSFUIBUUIFUPUBMBNQFSFSBUJOHPGBMMQSPEVDUTQMVHHFEJOUPUIFFYUFOTJPO
cable or power strip does not exceed 80 percent of the ampere ratings limit for the extension cable or power strip.
t5PIFMQQSPUFDUZPVSEFWJDFGSPNTVEEFOUSBOTJFOUJODSFBTFTBOEEFDSFBTFTJOFMFDUSJDBMQPXFSVTFBTVSHFTVQQSFTTPSMJOF
DPOEJUJPOFSPSVOJOUFSSVQUJCMFQPXFSTVQQMZ614
t%POPUNPEJGZQPXFSDBCMFTPSQMVHT$POTVMUBMJDFOTFEFMFDUSJDJBOPSZPVSQPXFSDPNQBOZGPSTJUFNPEJöDBUJPOT"MXBZT
follow your local/national wiring rules.
t8IFODPOOFDUJOHPSEJTDPOOFDUJOHQPXFSUPIPUQMVHHBCMFQPXFSTVQQMJFTJGPòFSFEXJUIZPVSEFWJDFPCTFSWFUIFGPMMPXJOH
guidelines.
t*OTUBMMUIFQPXFSTVQQMZCFGPSFDPOOFDUJOHUIFQPXFSDBCMFUPUIFQPXFSTVQQMZ
t6OQMVHUIFQPXFSDBCMFCFGPSFSFNPWJOHUIFQPXFSTVQQMZ

84D-Link DWR-118 User Manual
Appendix D - Regulatory Information
t*GUIFTZTUFNIBTNVMUJQMFTPVSDFTPGQPXFSEJTDPOOFDUQPXFSGSPNUIFEFWJDFCZVOQMVHHJOHBMMQPXFSDBCMFTGSPNUIF
power supplies.
Servicing/Disassembling
t%POPUTFSWJDFBOZQSPEVDUFYDFQUBTFYQSFTTMZTFUGPSUIJOZPVSTZTUFNEPDVNFOUBUJPO
t0QFOJOHPSSFNPWJOHDPWFSTUIBUBSFNBSLFEXJUIUIFUSJBOHVMBSTZNCPMXJUIBMJHIUOJOHCPMUNBZFYQPTFZPVUPBOFMFDUSJDBM
shock. Only a trained service technician should service components inside these compartments.
t5PSFEVDFUIFSJTLPGFMFDUSJDBMTIPDLOFWFSEJTBTTFNCMFUIJTEFWJDF/POFPGJUTJOUFSOBMQBSUTBSFVTFSSFQMBDFBCMFUIFSFGPSF
there is no reason to access the interior.
t%POPUTQJMMGPPEPSMJRVJETPOZPVSTZTUFNDPNQPOFOUTBOEOFWFSPQFSBUFUIFEFWJDFJOBXFUFOWJSPONFOU*GUIFEFWJDF
gets wet, see the appropriate section in your troubleshooting guide or contact your trained service provider.
t6TFUIFEFWJDFPOMZXJUIBQQSPWFEFRVJQNFOU
t.PWFQSPEVDUTXJUIDBSFFOTVSFUIBUBMMDBTUFSTBOEPSTUBCJMJ[FSTBSFöSNMZDPOOFDUFEUPUIFTZTUFN"WPJETVEEFOTUPQT
and uneven surfaces.
Environment
t%POPUVTFUIJTEFWJDFOFBSXBUFSFHOFBSBCBUIUVCTJOLMBVOESZUVCöTIUBOLJOBXFUCBTFNFOUPSOFBSBTXJNNJOHQPPM
t%POPUVTFUIJTEFWJDFJOBSFBTXJUIIJHIIVNJEJUZ
t5IJTEFWJDFNVTUOPUCFTVCKFDUFEUPXBUFSPSDPOEFOTBUJPO
t,FFQZPVSEFWJDFBXBZGSPNSBEJBUPSTBOEIFBUTPVSDFT"MTPEPOPUCMPDLDPPMJOHWFOUT
Cleaning
t"MXBZTVOQMVHUIFQPXFSCFGPSFDMFBOJOHUIJTEFWJDF
t%POPUVTFMJRVJEPSBFSPTPMDMFBOFSTPGBOZLJOE6TFPOMZDPNQSFTTFEBJSUIBUJTSFDPNNFOEFEGPSFMFDUSPOJDEFWJDFT
t6TFBESZDMPUIGPSDMFBOJOH
Protecting Against Electrostatic Discharge
Static electricity can harm delicate components inside your system. To prevent static damage, discharge static electricity from
your body before you touch any of the electronic components, such as the microprocessor. You can do so by periodically
touching an unpainted metal surface on the chassis.
:PVDBOBMTPUBLFUIFGPMMPXJOHTUFQTUPIFMQQSFWFOUEBNBHFGSPNFMFDUSPTUBUJDEJTDIBSHF&4%

85D-Link DWR-118 User Manual
Appendix D - Regulatory Information
1. When unpacking a static-sensitive component from its shipping carton, do not remove the component from the antistatic
packing material until you are ready to install the component in your system. Just before unwrapping the antistatic packaging,
be sure to discharge static electricity from your body.
8IFOUSBOTQPSUJOHBTFOTJUJWFDPNQPOFOUöSTUQMBDFJUJOBOBOUJTUBUJDDPOUBJOFSPSQBDLBHJOH
)BOEMFBMMTFOTJUJWFDPNQPOFOUTJOBTUBUJDTBGFBSFB*GQPTTJCMFVTFBOUJTUBUJDøPPSQBETXPSLCFODIQBETBOEBOBOUJTUBUJD
grounding strap.

86D-Link DWR-118 User Manual
Appendix D - Regulatory Information
Disposing of and Recycling Your Product
ENGLISH
This symbol on the product or packaging means that according to local laws and regulations this product
should be not be disposed of in the household waste but sent for recycling. Please take it to a collection point
designated by your local authorities once it has reached the end of its life, some will accept products for free.
By recycling the product and its packaging in this manner you help to conserve the environment and protect
human health.
D-Link and the Environment
At D-Link, we understand and are committed to reducing any impact our operations and products may have on the
environment. To minimise this impact D-Link designs and builds its products to be as environmentally friendly as possible,
by using recyclable, low toxic materials in both products and packaging.
D-Link recommends that you always switch o or unplug your D-Link products when they are not in use. By doing so you
will help to save energy and reduce CO2 emissions.
To learn more about our environmentally responsible products and packaging please visit www.dlinkgreen.com
DEUTSCH DE
Dieses Symbol auf dem Produkt oder der Verpackung weist darauf hin, dass dieses Produkt gemäß bestehender
örtlicher Gesetze und Vorschriften nicht über den normalen Hausmüll entsorgt werden sollte, sondern einer
8JFEFSWFSXFSUVOH[V[VGàISFOJTU#SJOHFO4JFFTCJUUF[VFJOFSWPO*ISFS,PNNVOBMCFIÚSEFFOUTQSFDIFOE
amtlich ausgewiesenen Sammelstelle, sobald das Produkt das Ende seiner Nutzungsdauer erreicht hat. Für
die Annahme solcher Produkte erheben einige dieser Stellen keine Gebühren. Durch ein auf diese Weise
durchgeführtes Recycling des Produkts und seiner Verpackung helfen Sie, die Umwelt zu schonen und die
menschliche Gesundheit zu schützen.
D-Link und die Umwelt
D-Link ist sich den möglichen Auswirkungen seiner Geschäftstätigkeiten und seiner Produkte auf die Umwelt bewusst und
fühlt sich verpichtet, diese entsprechend zu mindern. Zu diesem Zweck entwickelt und stellt D-Link seine Produkte mit
dem Ziel größtmöglicher Umweltfreundlichkeit her und verwendet wiederverwertbare, schadstoarme Materialien bei
Produktherstellung und Verpackung.
%-JOLFNQöFIMU*ISF1SPEVLUFWPO%-JOLXFOOOJDIUJO(FCSBVDIJNNFSBVT[VTDIBMUFOPEFSWPN/FU[[VOFINFO"VG

87D-Link DWR-118 User Manual
Appendix D - Regulatory Information
diese Weise helfen Sie, Energie zu sparen und CO2-Emissionen zu reduzieren.
8FOO4JFNFISàCFSVOTFSFVNXFMUHFSFDIUFO1SPEVLUFVOE7FSQBDLVOHFOXJTTFONÚDIUFOöOEFO4JFFOUTQSFDIFOEF
*OGPSNBUJPOFOJN*OUFSOFUVOUFSXXXEMJOLHSFFODPN
FRANÇAIS FR
$FTZNCPMFBQQPTÏTVSMFQSPEVJUPVTPOFNCBMMBHFTJHOJöFRVFDPOGPSNÏNFOUBVYMPJTFUSÒHMFNFOUBUJPOT
locales, ce produit ne doit pas être éliminé avec les déchets domestiques mais recyclé. Veuillez le rapporter à un
QPJOUEFDPMMFDUFQSÏWVËDFUFòFUQBSMFTBVUPSJUÏTMPDBMFTDFSUBJOTBDDFQUFSPOUWPTQSPEVJUTHSBUVJUFNFOU&O
recyclant le produit et son emballage de cette manière, vous aidez à préserver l’environnement et à protéger la
santé de l’homme.
D-Link et l’environnement
Chez D-Link, nous sommes conscients de l'impact de nos opérations et produits sur l'environnement et nous engageons
à le réduire. Pour limiter cet impact, D-Link conçoit et fabrique ses produits de manière aussi écologique que possible, en
utilisant des matériaux recyclables et faiblement toxiques, tant dans ses produits que ses emballages.
D-Link recommande de toujours éteindre ou débrancher vos produits D-Link lorsque vous ne les utilisez pas. Vous réaliserez
ainsi des économies d’énergie et réduirez vos émissions de CO2.
Pour en savoir plus sur les produits et emballages respectueux de l’environnement, veuillez consulter le www.dlinkgreen.
com
ESPAÑOL ES
&TUFTÓNCPMPFOFMQSPEVDUPPFMFNCBMBKFTJHOJöDBRVFEFBDVFSEPDPOMBMFHJTMBDJØOZMBOPSNBUJWBMPDBMFTUF
producto no se debe desechar en la basura doméstica sino que se debe reciclar. Llévelo a un punto de recogida
EFTJHOBEPQPSMBTBVUPSJEBEFTMPDBMFTVOBWF[RVFIBMMFHBEPBMöOEFTVWJEBÞUJMBMHVOPTEFFMMPTBDFQUBO
recogerlos de forma gratuita. Al reciclar el producto y su embalaje de esta forma, contribuye a preservar el
medio ambiente y a proteger la salud de los seres humanos.
D-Link y el medio ambiente
En D-Link, comprendemos y estamos comprometidos con la reducción del impacto que puedan tener nuestras actividades
y nuestros productos en el medio ambiente. Para reducir este impacto, D-Link diseña y fabrica sus productos para que sean
lo más ecológicos posible, utilizando materiales reciclables y de baja toxicidad tanto en los productos como en el embalaje.

88D-Link DWR-118 User Manual
Appendix D - Regulatory Information
D-Link recomienda apagar o desenchufar los productos D-Link cuando no se estén utilizando. Al hacerlo, contribuirá a
ahorrar energía y a reducir las emisiones de CO2.
Para obtener más información acerca de nuestros productos y embalajes ecológicos, visite el sitio www.dlinkgreen.com
ITALIANO IT
La presenza di questo simbolo sul prodotto o sulla confezione del prodotto indica che, in conformità alle leggi
FBMMFOPSNBUJWFMPDBMJRVFTUPQSPEPUUPOPOEFWFFTTFSFTNBMUJUPOFJSJöVUJEPNFTUJDJNBBWWJBUPBMSJDJDMP6OB
volta terminato il ciclo di vita utile, portare il prodotto presso un punto di raccolta indicato dalle autorità locali.
Alcuni questi punti di raccolta accettano gratuitamente i prodotti da riciclare. Scegliendo di riciclare il prodotto
e il relativo imballaggio, si contribuirà a preservare l'ambiente e a salvaguardare la salute umana.
D-Link e l'ambiente
D-Link cerca da sempre di ridurre l'impatto ambientale dei propri stabilimenti e dei propri prodotti. Allo scopo di ridurre
al minimo tale impatto, D-Link progetta e realizza i propri prodotti in modo che rispettino il più possibile l'ambiente,
utilizzando materiali riciclabili a basso tasso di tossicità sia per i prodotti che per gli imballaggi.
%-JOLSBDDPNBOEBEJTQFHOFSFTFNQSFJQSPEPUUJ%-JOLPEJTDPMMFHBSOFMBTQJOBRVBOEPOPOWFOHPOPVUJMJ[[BUJ*ORVFTUP
modo si contribuirà a risparmiare energia e a ridurre le emissioni di anidride carbonica.
Per ulteriori informazioni sui prodotti e sugli imballaggi D-Link a ridotto impatto ambientale, visitate il sito all'indirizzo www.
dlinkgreen.com
NEDERLANDS NL
Dit symbool op het product of de verpakking betekent dat dit product volgens de plaatselijke wetgeving niet
mag worden weggegooid met het huishoudelijk afval, maar voor recyclage moeten worden ingeleverd. Zodra
het product het einde van de levensduur heeft bereikt, dient u het naar een inzamelpunt te brengen dat hiertoe
werd aangeduid door uw plaatselijke autoriteiten, sommige autoriteiten accepteren producten zonder dat u
hiervoor dient te betalen.
Door het product en de verpakking op deze manier te recyclen helpt u het milieu en de gezondheid van de
mens te beschermen.

89D-Link DWR-118 User Manual
Appendix D - Regulatory Information
D-Link en het milieu
Bij D-Link spannen we ons in om de impact van onze handelingen en producten op het milieu te beperken. Om deze
impact te beperken, ontwerpt en bouwt D-Link zijn producten zo milieuvriendelijk mogelijk, door het gebruik van
recycleerbare producten met lage toxiciteit in product en verpakking.
D-Link raadt aan om steeds uw D-Link producten uit te schakelen of uit de stekker te halen wanneer u ze niet gebruikt. Door
dit te doen bespaart u energie en beperkt u de CO2-emissies.
Breng een bezoek aan www.dlinkgreen.com voor meer informatie over onze milieuverantwoorde producten en
verpakkingen
POLSKI PL
Ten symbol umieszczony na produkcie lub opakowaniu oznacza, że zgodnie z miejscowym prawem i lokalnymi
przepisami niniejszego produktu nie wolno wyrzucać jak odpady czy śmieci z gospodarstwa domowego, lecz
należy go poddać procesowi recyklingu. Po zakończeniu użytkowania produktu, niektóre odpowiednie do
tego celu podmioty przyjmą takie produkty nieodpłatnie, dlatego prosimy dostarczyć go do punktu zbiórki
wskazanego przez lokalne władze.
Poprzez proces recyklingu i dzięki takiemu postępowaniu z produktem oraz jego opakowaniem, pomogą
Państwo chronić środowisko naturalne i dbać o ludzkie zdrowie.
D-Link i środowisko
W D-Link podchodzimy w sposób świadomy do ochrony otoczenia oraz jesteśmy zaangażowani w zmniejszanie wpływu
OBT[ZDIE[JBBǩJQSPEVLUØXOBǴSPEPXJTLPOBUVSBMOF8DFMV[NJOJNBMJ[PXBOJBUBLJFHPXQZXVöSNB%-JOLLPOTUSVVKF
i wytwarza swoje produkty w taki sposób, aby były one jak najbardziej przyjazne środowisku, stosując do tych celów
materiały nadające się do powtórnego wykorzystania, charakteryzujące się małą toksycznością zarówno w przypadku
samych produktów jak i opakowań.
Firma D-Link zaleca, aby Państwo zawsze prawidłowo wyłączali z użytku swoje produkty D-Link, gdy nie są one
wykorzystywane. Postępując w ten sposób pozwalają Państwo oszczędzać energię i zmniejszać emisje CO2.
"Aby dowiedzieć się więcej na temat produktów i opakowań mających wpływ na środowisko
prosimy zapoznać się ze stroną internetową www.dlinkgreen.com."

90D-Link DWR-118 User Manual
Appendix D - Regulatory Information
ČESKY CZ
Tento symbol na výrobku nebo jeho obalu znamená, že podle místně platných předpisů se výrobek nesmí
vyhazovat do komunálního odpadu, ale odeslat k recyklaci. Až výrobek doslouží, odneste jej prosím na sběrné
NÓTUPVSǏFOÏNÓTUOÓNJÞDzBEZLUPNVUPÞǏFMV/ǔLUFSÈTCǔSOÈNÓTUBQDzJKÓNBKÓWâSPCLZ[EBSNB3FDZLMBDÓWâSPCLV
i obalu pomáháte chránit životní prostředí i lidské zdraví.
D-Link a životní prostředí
"Ve společnosti D-Link jsme si vědomi vlivu našich provozů a výrobků na životní prostředí a
snažíme se o minimalizaci těchto vlivů. Proto své výrobky navrhujeme a vyrábíme tak, aby byly co nejekologičtější, a ve
výrobcích i obalech používáme recyklovatelné a nízkotoxické materiály."
"Společnost D-Link doporučuje, abyste své výrobky značky D-Link vypnuli nebo vytáhli ze
zásuvky vždy, když je nepoužíváte. Pomůžete tak šetřit energii a snížit emise CO2."
Více informací o našich ekologických výrobcích a obalech najdete na adrese www.dlinkgreen.com.
MAGYAR HU
Ez a szimbólum a terméken vagy a csomagoláson azt jelenti, hogy a helyi törvényeknek és szabályoknak
NFHGFMFMǮFOF[BUFSNÏLOFNTFNNJTÓUIFUǮNFHBIÈ[UBSUÈTJIVMMBEÏLLBMFHZàUUIBOFNÞKSBIBT[OPTÓUÈTSB
kell küldeni. Kérjük, hogy a termék élettartamának elteltét követően vigye azt a helyi hatóság által kijelölt
HZǻKUǮIFMZSF"UFSNÏLFLFHZFTIFMZFLFOJOHZFOFMIFMZF[IFUǮL"UFSNÏLÏTBDTPNBHPMÈTÞKSBIBT[OPTÓUÈTÈWBM
segíti védeni a környezetet és az emberek egészségét.
A D-Link és a környezet
A D-Linknél megértjük és elkötelezettek vagyunk a műveleteink és termékeink környezetre
gyakorolt hatásainak csökkentésére. Az ezen hatás csökkentése érdekében a D-Link a lehető leginkább környezetbarát
UFSNÏLFLFUUFSWF[ÏTHZÈSUB[ÈMUBMIPHZÞKSBIBT[OPTÓUIBUØBMBDTPOZLÈSPTBOZBHUBSUBMNÞUFSNÏLFLFUHZÈSUÏT
csomagolásokat alkalmaz.
"%-JOLB[UKBWBTPMKBIPHZNJOEJHLBQDTPMKBLJWBHZIÞ[[BLJB%-JOLUFSNÏLFLFUB
tápforrásból, ha nem használja azokat. Ezzel segít az energia megtakarításában és a széndioxid kibocsátásának
csökkentésében.
Környezetbarát termékeinkről és csomagolásainkról további információkat a www.dlinkgreen.com weboldalon tudhat meg.

91D-Link DWR-118 User Manual
Appendix D - Regulatory Information
NORSK NO
Dette symbolet på produktet eller forpakningen betyr at dette produktet ifølge lokale lover og forskrifter ikke
skal kastes sammen med husholdningsavfall, men leveres inn til gjenvinning.
Vennligst ta det til et innsamlingssted anvist av lokale myndigheter når det er kommet til slutten av levetiden.
Noen steder aksepteres produkter uten avgift. Ved på denne måten å gjenvinne produktet og forpakningen
hjelper du å verne miljøet og beskytte folks helse.
D-Link og miljøet
Hos D-Link forstår vi oss på og er forpliktet til å minske innvirkningen som vår drift og våre produkter kan ha på miljøet.
For å minimalisere denne innvirkningen designer og lager D-Link produkter som er så miljøvennlig som mulig, ved å bruke
resirkulerbare, lav-toksiske materialer både i produktene og forpakningen.
D-Link anbefaler at du alltid slår av eller frakobler D-Link-produkter når de ikke er i bruk. Ved å gjøre dette hjelper du å spare
energi og å redusere CO2-utslipp.
"For mer informasjon angående våre miljøansvarlige produkter og forpakninger kan du gå til
www.dlinkgreen.com"
DANSK DK
Dette symbol på produktet eller emballagen betyder, at dette produkt i henhold til lokale love og regler ikke må
CPSUTLBòFTTPNIVTIPMEOJOHTBòBMENFOTTLBMTFOEFTUJMHFOCSVH*OEMFWFS
produktet til et indsamlingssted som angivet af de lokale myndigheder, når det er nået til slutningen af dets
MFWFUJE*OPHMFUJMGMEFWJMQSPEVLUFUCMJWFNPEUBHFUHSBUJT7FEBUJOEMFWFSFQSPEVLUFUPHEFUTFNCBMMBHFUJM
genbrug på denne måde bidrager du til at beskytte miljøet og den menneskelige sundhed.
D-Link og miljøet
Hos D-Link forstår vi og bestræber os på at reducere enhver indvirkning, som vores aktiviteter og produkter kan have på
miljøet. For at minimere denne indvirkning designer og producerer D-Link sine produkter, så de er så miljøvenlige som
muligt, ved at bruge genanvendelige materialer med lavt giftighedsniveau i både produkter og emballage.
D-Link anbefaler, at du altid slukker eller frakobler dine D-Link-produkter, når de ikke er i brug. Ved at gøre det bidrager du
til at spare energi og reducere CO2-udledningerne.
%VLBOöOEFøFSFPQMZTOJOHFSPNWPSFTNJMKNTTJHUBOTWBSMJHFQSPEVLUFSPHFNCBMMBHFQÌXXXEMJOLHSFFODPN

92D-Link DWR-118 User Manual
Appendix D - Regulatory Information
SUOMI FI
Tämä symboli tuotteen pakkauksessa tarkoittaa, että paikallisten lakien ja säännösten mukaisesti tätä
tuotetta ei pidä hävittää yleisen kotitalousjätteen seassa vaan se tulee toimittaa kierrätettäväksi. Kun tuote on
elinkaarensa päässä, toimita se lähimpään viranomaisten
hyväksymään kierrätyspisteeseen. Kierrättämällä käytetyn tuotteen ja sen pakkauksen autat tukemaan sekä
ympäristön että ihmisten terveyttä ja hyvinvointia.
D-Link ja ympäristö
D-Link ymmärtää ympäristönsuojelun tärkeyden ja on sitoutunut vähentämään tuotteistaan ja niiden valmistuksesta
ympäristölle mahdollisesti aiheutuvia haittavaikutuksia. Nämä negatiiviset vaikutukset minimoidakseen D-Link suunnittelee
ja valmistaa tuotteensa mahdollisimman ympäristöystävällisiksi käyttämällä kierrätettäviä, alhaisia pitoisuuksia haitallisia
aineita sisältäviä materiaaleja sekä tuotteissaan että niiden pakkauksissa.
Suosittelemme, että irrotat D-Link-tuotteesi virtalähteestä tai sammutat ne aina, kun ne eivät ole käytössä. Toimimalla näin
autat säästämään energiaa ja vähentämään hiilidioksiidipäästöjä.
"Lue lisää ympäristöystävällisistä D-Link-tuotteista ja pakkauksistamme osoitteesta www.
dlinkgreen.com"
SVENSKA SE
Den här symbolen på produkten eller förpackningen betyder att produkten enligt lokala lagar och föreskrifter
inte skall kastas i hushållssoporna utan i stället återvinnas. Ta den vid slutet av dess livslängd till en av din
lokala myndighet utsedd uppsamlingsplats, vissa accepterar produkter utan kostnad. Genom att på detta sätt
återvinna produkten och förpackningen hjälper du till att bevara miljön och skydda människors hälsa.
D-Link och miljön
På D-Link förstår vi och är fast beslutna att minska den påverkan våra verksamheter och
produkter kan ha på miljön. För att minska denna påverkan utformar och bygger D-Link sina produkter för att de ska
vara så miljövänliga som möjligt, genom att använda återvinningsbara material med låg gifthalt i både produkter och
förpackningar.
D-Link rekommenderar att du alltid stänger av eller kopplar ur dina D-Link produkter när du inte använder dem. Genom att
göra detta hjälper du till att spara energi och minska utsläpp av koldioxid.
För mer information om våra miljöansvariga produkter och förpackningar www.dlinkgreen.com

93D-Link DWR-118 User Manual
Appendix D - Regulatory Information
PORTUGUÊS PT
&TUFTÓNCPMPOPQSPEVUPPVFNCBMBHFNTJHOJöDBRVFEFBDPSEPDPNBTMFJTFSFHVMBNFOUBÎÜFTMPDBJT
este produto não deverá ser eliminado juntamente com o lixo doméstico mas enviado para a reciclagem.
Transporte-o para um ponto de recolha designado pelas suas autoridades locais quando este tiver atingido o
öNEBTVBWJEBÞUJMBMHVOTEFTUFTQPOUPTBDFJUBNQSPEVUPTHSBUVJUBNFOUF"PSFDJDMBSPQSPEVUPFSFTQFDUJWB
embalagem desta forma, ajuda a preservar o
BNCJFOUFFQSPUFHFBTBÞEFIVNBOB
A D-Link e o ambiente
Na D-Link compreendemos e comprometemo-nos com a redução do impacto que as nossas
operações e produtos possam ter no ambiente. Para minimizar este impacto a D-Link concebe e constrói os seus produtos
para que estes sejam o mais inofensivos para o ambiente possível, utilizando meteriais recicláveis e não tóxicos tanto nos
produtos como nas embalagens.
A D-Link recomenda que desligue os seus produtos D-Link quando estes não se encontrarem em utilização. Com esta acção
ajudará a poupar energia e reduzir as emissões de CO2.
Para saber mais sobre os nossos produtos e embalagens responsáveis a nível ambiental visite www.dlinkgreen.com