D Link WR330A1 EVDO Mobile Hotspot User Manual DWR330 User Manual V1 3 20140428
D Link Corporation EVDO Mobile Hotspot DWR330 User Manual V1 3 20140428
D Link >
DWR330_User_Manual_V1.3_20140428.pdf
1
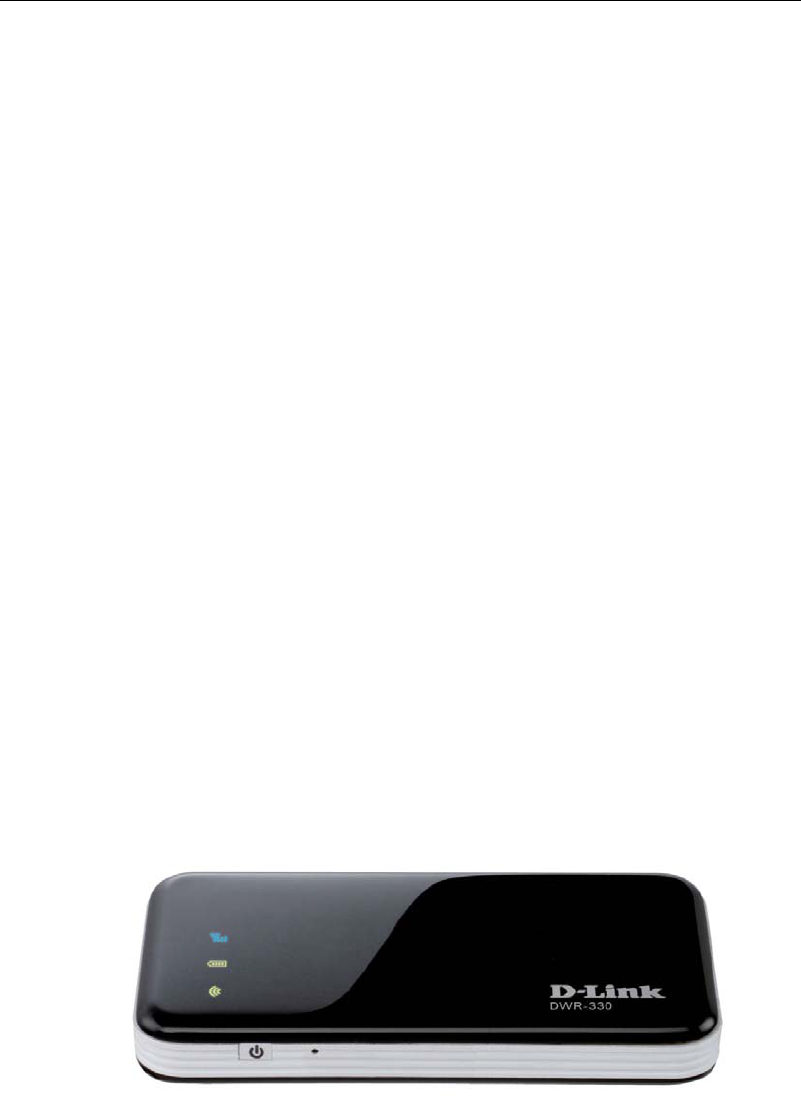
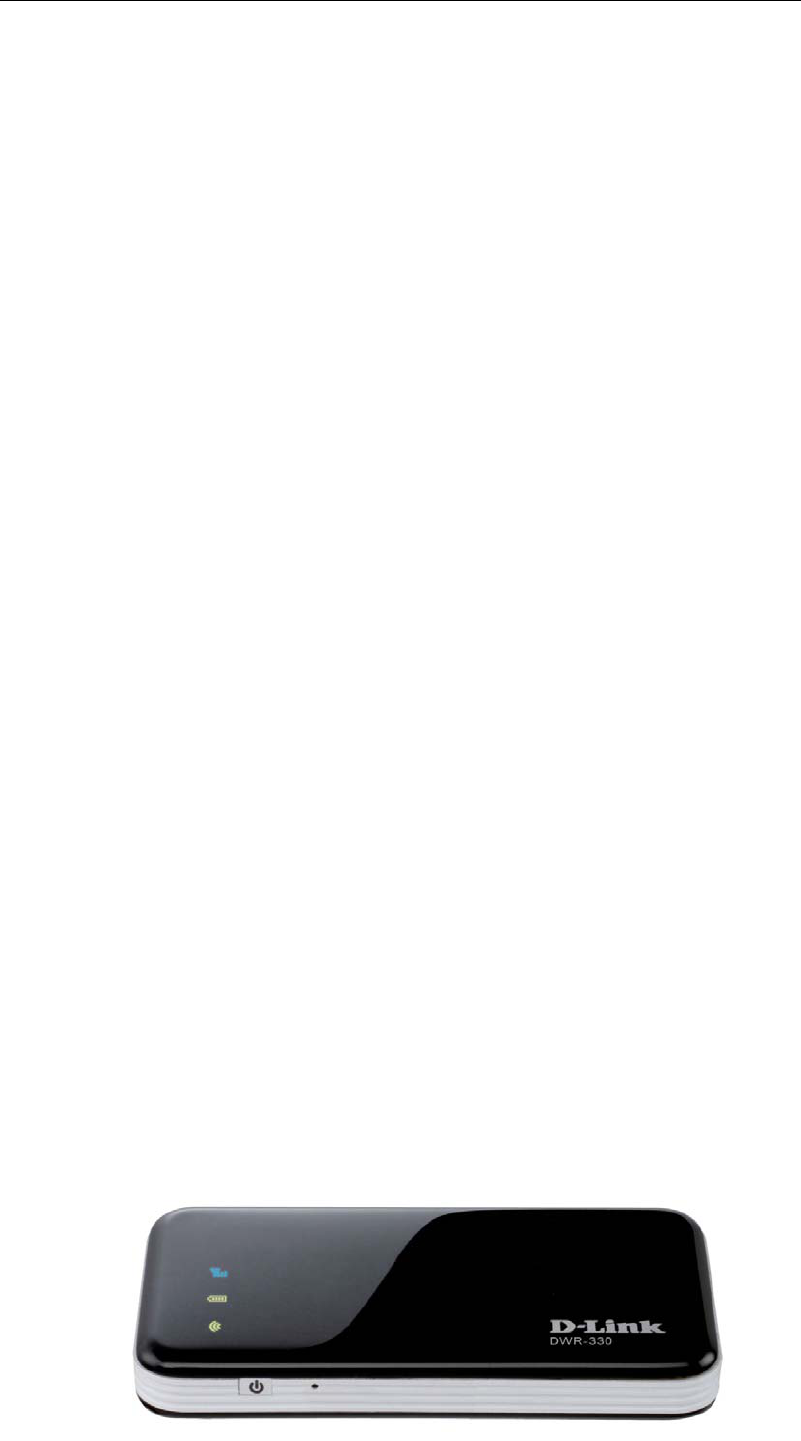
Portable Wi-Fi Router
DWR-330 User Manual
By Jack

2
Contents
1 Introduction .................................................................................................................................... 3
1.1. Features .............................................................................................................................. 3
1.2. Product Overview .............................................................................................................. 3
2. Connect to the internet .................................................................................................................. 6
2.1 Wi-Fi Router mode .............................................................................................................. 6
3. Router Web-based settings ............................................................................................................ 7
3.1 Status ................................................................................................................................... 7
3.2 Dial up ................................................................................................................................. 9
3.3 WLAN ............................................................................................................................... 10
3.4 System ............................................................................................................................... 12
4 Troubleshooting ........................................................................................................................... 14
5 FCC announcement ...................................................................................................................... 15
3
1 Introduction
DWR-330 is a HSIA Wi-Fi device, working in EV-DO network. This device is a
Wi-Fi router. It can provide up to 8 connections to various Wi-Fi devices such as smart
phones, laptops, or tablet PCs. This quick guide provides instructions on how to use
and get started with the product. For information about connection of services, please
consult your service provider.
1.1. Features
Built-in HSIA modem module
Downlink throughput up to 3.1Mbps
Uplink throughput up to 1.8Mbps
WWAN connection
CDMA2000 EVDO Rev. A
Compatible to CDMA 2000 EVDO Rev 0 and CDMA 2000 1x RTT, IS-95
A/B.
Wi-Fi 802.11 b/g/n
Built-in firewall to protect your Internet
Share internet connection with 8 Wi-Fi devices
Micro USB interface
Multi-color LED indicating status of network connection
Support Microsoft Windows XP / Vista / Windows 7/Windows 8
Support Linux
Support Mac OS 10.5/10.6/10.7/10.8/10.9
Antenna
One Internal EVDO main antenna
One Internal EVDO diversity antenna
One Internal Wi-Fi antenna
1.2. Product Overview
Appearance
4
LED indicator:
indicatorColorSolid Blinking Comment
Wi‐Fi
GreenRoutermodeTransmitting‐‐
Battery
Red0%~30%capacity
withoutcharger
Lessthan30%
capacitywhen
charging
‐‐
Battery
Green
60%to30%
capacitywithout
charger
60%~30%
capacitywhen
charging
‐‐
Battery
Blue
99%~60%
capacitywithout
charger;
100%Chargingtofull;
99%~60%
capacitywhencharging‐‐
Signal
off ‐‐ ‐‐ standby
Signal
RedNoService
(Error)
‐‐ ‐‐
Signal
GreenCDMA1X
DATA
Transmitting(quick)
Connectedwithout
DATA(slow)
‐‐
Signal
BlueEVDO
DATA
Transmitting(quick)
Connectedwithout
DATA(slow)
‐‐
Button:
Power button Rese
5
Power button:
Press 3 seconds to turn on or turn off the device
Reset: For system reset to default setting (Press 3 seconds)
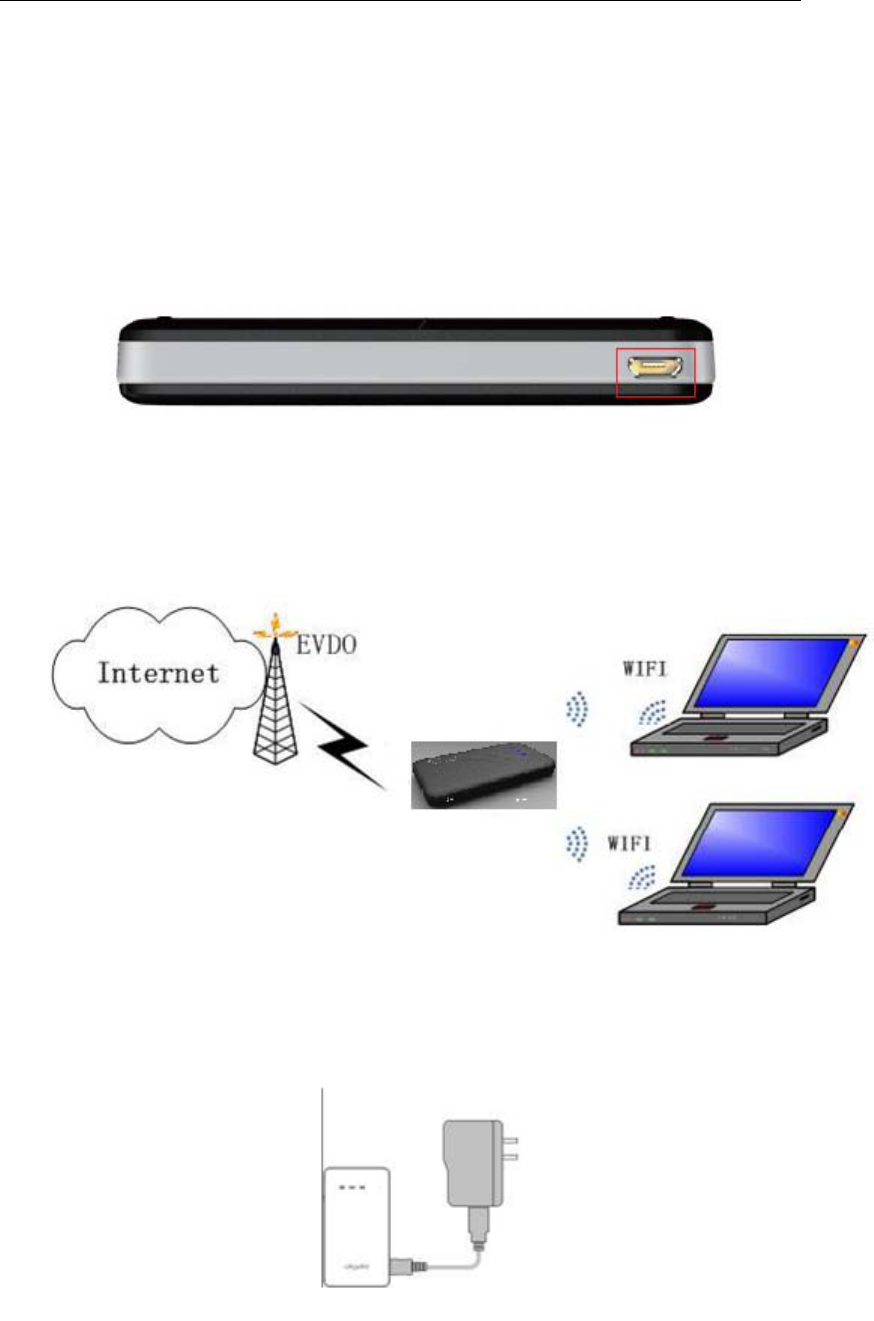
Micro USB port:
Charging via a USB cable.
Router mode
Please refer to the illustration below for Wi-Fi Router mode. The HSIA
Mobile Router can provide up to 8 Wi-Fi connections for various Wi-Fi devices to
share the HSIA mobile broadband service.
Battery charging by computer or USB adapter
Method 1: Connect device to the USB adapter with USB cable and plug
power adaptor into an appropriate wall outlet
Method 2: Connect device with PC USB port by the USB cable.

6
2. Connect to the internet
The Wi-Fi Router mode can provide 8 Wi-Fi connections to share the HSIA mobile
broadband.
2.1 Wi-Fi Router mode
The product is used standalone and computers are connected to with Wi-Fi
link and in turn connect to Internet via HSIA network. The Battery is used in this
case, and charging can be provided by one of the computer USB port or with
separated charger.
Step 1. Putthebatteryinthedevice.
Step 2.Pushthepowerbutton3seconds.
Step 3.JointheWi‐Finetwork.
Step 4. Openthewebbrowserandenter192.168.0.1intheaddressbar.
Step 5.Enteradmininusername&passwordField.
Step 6. Click WLAN -> WLAN Basic Settings on the left menu and select
WPA2-PSK for the encryption type, and set WPA KEY in 8-63 alphanumeric
characters.
Step 7. Join the Wi-Fi network again with your password.
***WIFI Channel 12 & Channel 13 is not available in final product. The
hardware is disabled inside.
7
3. Router Web-based settings
DWR330 has built-in web page interface for users to configure router settings. Before
you start using web browser to configure the Router, please make your client device is
connecting to it.
The default IP address is “192.168.0.1”, and you may use any web browser, such as
Microsoft Internet Explorer, Firefox, Safari, Google Chrome and Opera, to perform
following configurations. Please open your preferred web browser and enter the IP
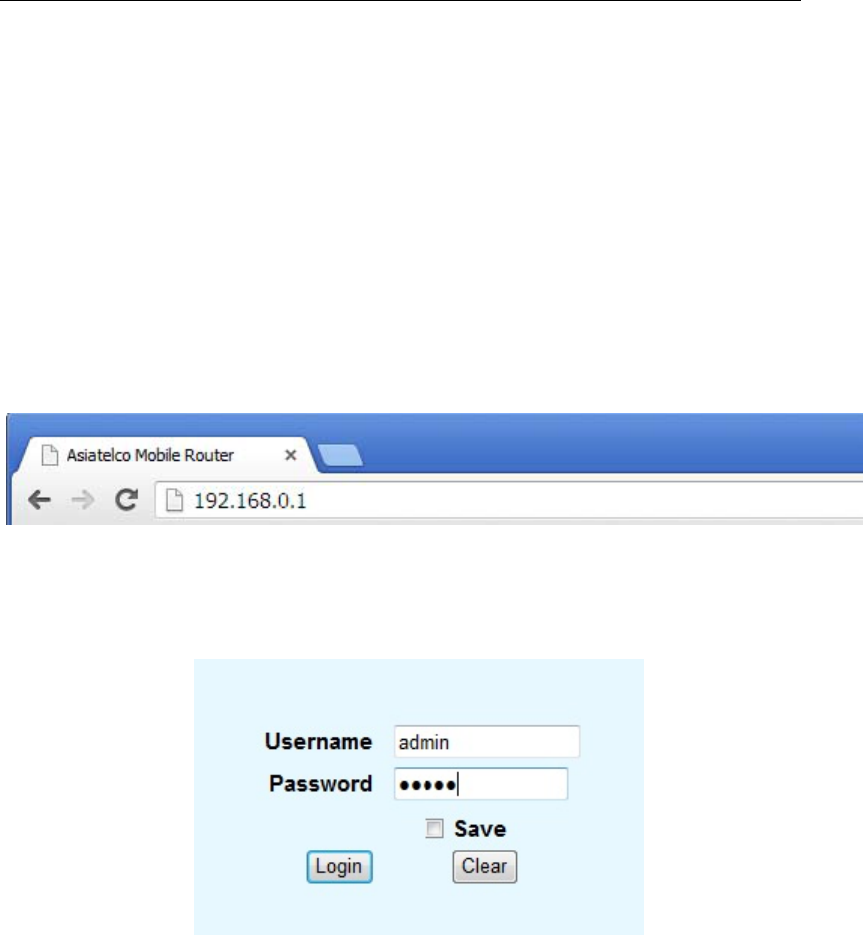
address 192.168.0.1 in the address bar. And press Enter.
When following window appears, enter user name and password and click OK to
enter the configuration page. The default user name and password are admin.
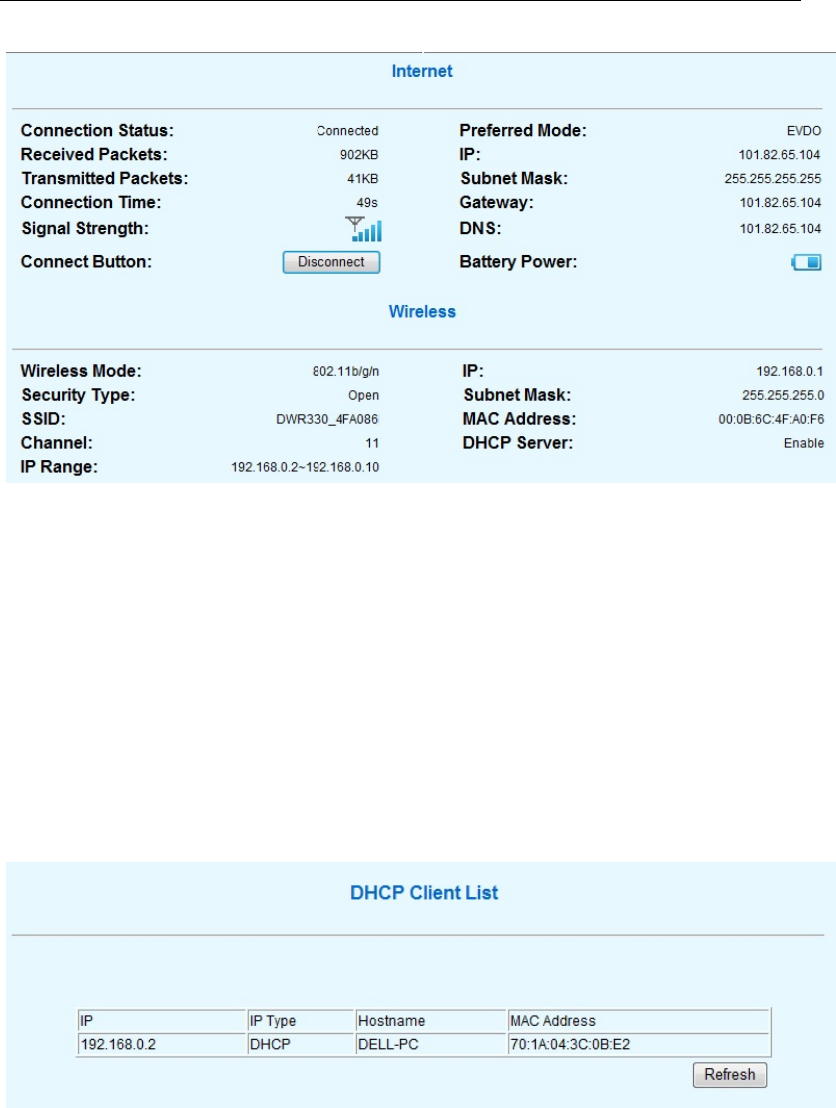
3.1 Status
1) Status
After entering the correct IP address and loading to the first web-page, you will see
the Status page. It is the default page for device.
8
Connect: Press "Connect" button to connect to the internet.
Disconnect: Press "Disconnect" button to disconnect the internet.
Note: Connect and Disconnect button will brighten clickable when you set Connection
Mode to Manual.
2) DHCP Client List
It shows IP/IP Type/Hostname/MAC address for each associated network client
connected to this device.
Refresh: Refresh the Client list.
9
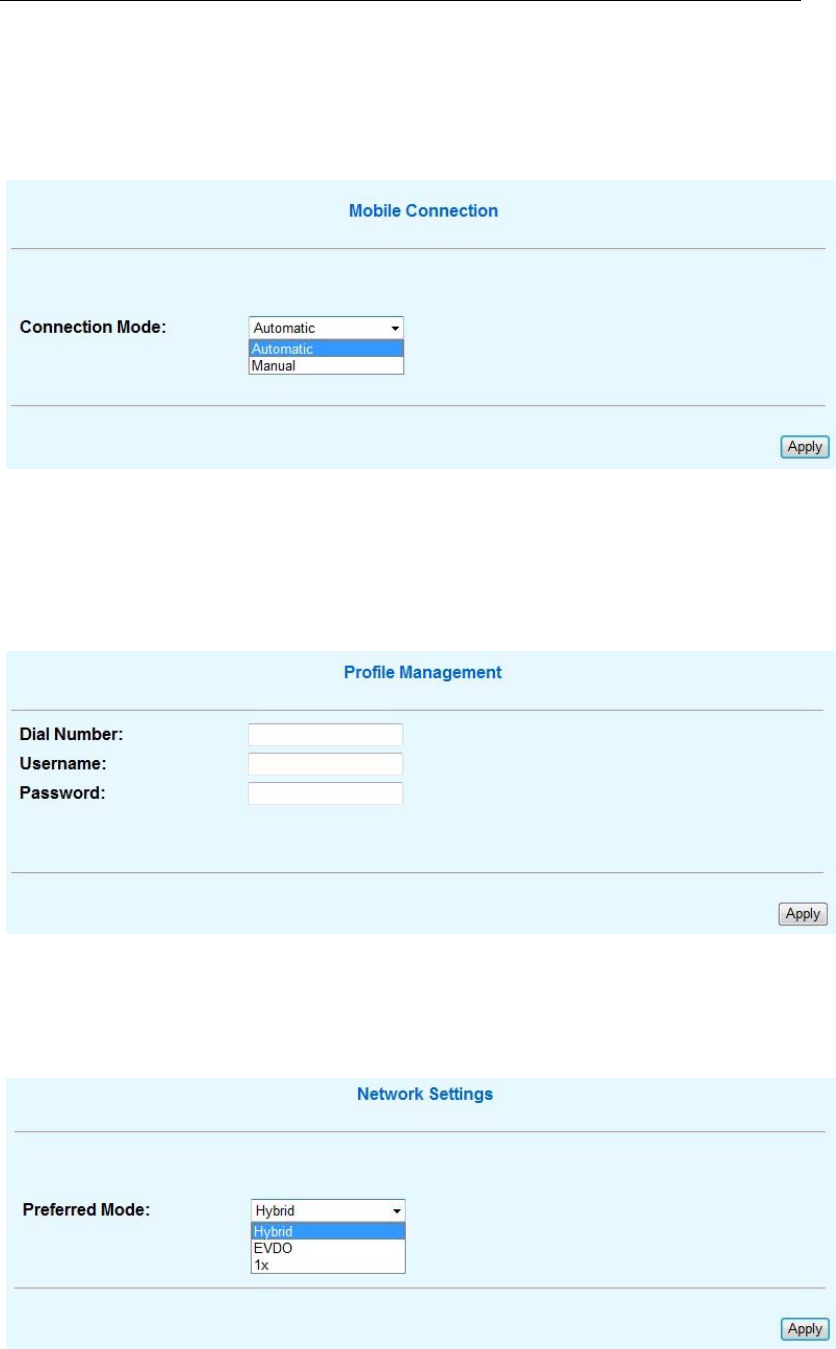
3.2 Dial up
1) Mobile Connection
Automatic: The mobile network connection is always maintained.
Manual: You have to open "Status-> Status" web setting page and click the
"Connect" button manually to connect to network.
2) Profile Management
Dial Number, Username and Password: You can check Dial Number,
Username and Password here.
3) Network Settings
Preferred Mode: You can select network mode: Hybrid/EVDO/1x, then press
<Apply> to save the setting.
10
3.3 WLAN
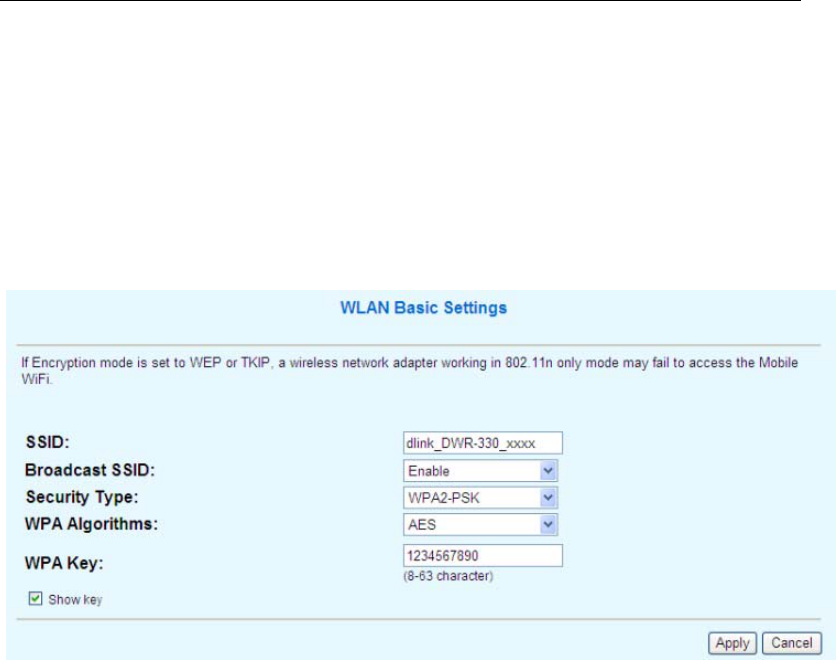
1) WLAN Basic Settings
SSID: Service Set Identifier. The SSID of device appears in the wireless network.
You can assign an ID up to 32 characters here.
Broadcast SSID: It is enabled by default, and anyone can see this device in the
wireless network. If it is disabled, any network client wants to connect to this
device has to enter the correct SSID manually from a client before the client accesses
the Wi-Fi.
Security Type: We highly recommend you to select one of the encryption types
to secure your wireless connection when using this device. Please make sure
your Wi-Fi client device can support the encryption mode you selected.
Open: Open System authentication. If this mode is selected, clients can access
the Wi-Fi without entering any security key.
WEP: Wired Equivalent Privacy. To access the Wi-Fi, clients must enter the Wired
Equivalent Privacy (WEP) key that matches the key set on the web UI.
WPA-PSK: This data encryption method uses a random 256-bit key.
WPA2-PSK: This is the second version of WPA-PSK and is more secure
than WPA-PSK.
WPA/WPA2 Mixed: Both WPA-PSK and WPA2-PSK encryption modes are
supported. Clients can access the Wi-Fi in WPA-PSK or WPA2-PSK mode.
Note: - The Default Security type is WPA2-PSK.the default key is “1234567890”.
11
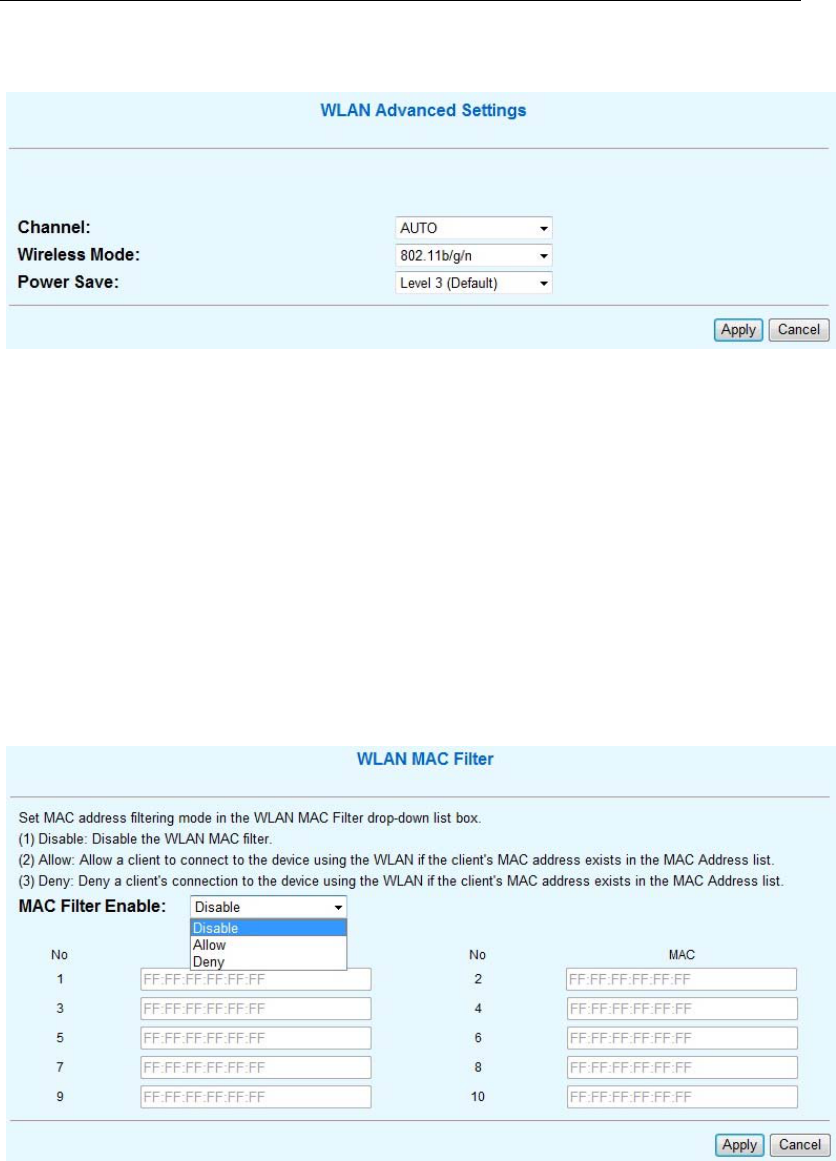
2) Advanced Settings
Channel: You can change the Wi-Fi radio channel in this drop-down menu.
Wireless Mode:
802.11b: Only clients that support the 802.11b standard are allowed to access
the Mobile Wi-Fi. The maximum rate for wireless transmission is 11 Mbit/s.
802.11g: Only clients that support the 802.11g standard are allowed to access
the Mobile Wi-Fi. The maximum rate for wireless transmission is 54 Mbit/s.
802.11b/g: Clients that support the 802.11b or 802.11g standard are allowed to
access the Mobile Wi-Fi.
802.11b/g/n: Clients that support the 802.11b or 802.11g or 802.11n standard.
3) WLAN MAC Filter
The MAC address filter function is for access control from the wireless network.
MAC Filter Enable:
Disable: Select Disable to disable the function of filtering MAC addresses.
Allow: If the MAC address of a client is listed in MAC Address, the client is
allowed to connect to the device over the Wi-Fi.
Deny: If the MAC address of a client is listed in MAC Address, the client is
prohibited from connecting to the Wi-Fi over the Wi-Fi.
MAC Address List: After enabling the MAC filter function, please enter each
MAC address which is allowed to access this Wi-Fi router.
12
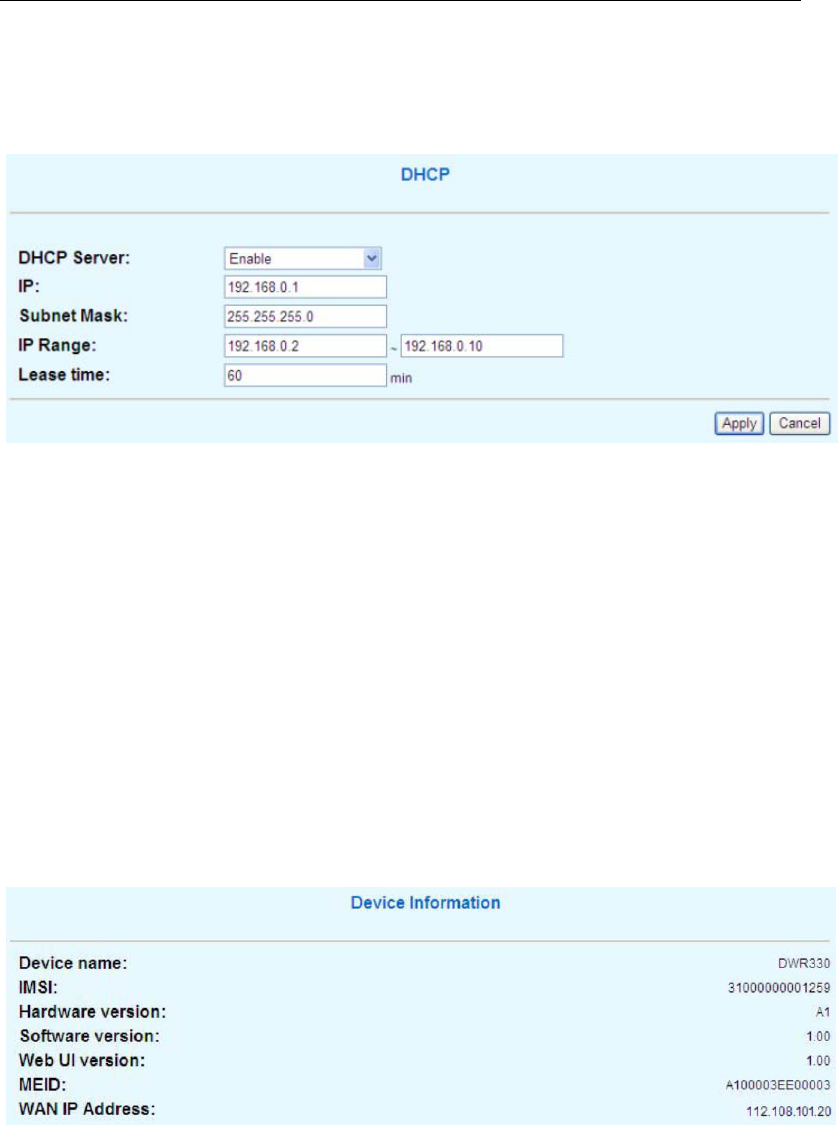
4) DHCP
DHCP Server:The device could be used as a DHCP server and assign IP
address to the network client in your wireless network. The default is “Enable”.
IP: The IP address for administrator to log in the web setting page.
Subnet mask: The subnet mask of this device is 255.255.255.0.
IP Range: Specify the range of IP address that DHCP server can assign to the
network client.
Lease time: Enter a lease time in this place.
3.4 System
1) Device information
2) Modify Password

13
Password: The default username and password are "admin". You can change
username and password here to login setting page.
3) Restore Defaults
Restore Default: Press this button to restore to factory default settings.
4) Reboot
Reboot: Restart your Device.
5) Logout
Logout: Click logout button and confirm to login out.

14
4 Troubleshooting
1. Why can’t I access to the web setting page in HSIA Router mode?
Ans:
1. Please check if the LED is illuminating.
2. Please make sure if you Clients has connected to device.
3. The default IP address is 192.168.0.1, please make sure you have typed it correctly
in your web browser. If you have change the Login IP Address and forgotten it, please
restore device to the default.
4. If the DHCP service is not enabled and the clients are set to obtain IP addresses
dynamically, the clients cannot access the Internet. In this case, enable the DHCP
service. For details, see ”DHCP-DHCP Server”.
2. How to restore to default router settings?
Ans: Find a pinpoint and stab into “Reset” hole for 3 seconds.
OR
1. Please connect to Mobile WIFI Router and log in the router web setting page, the
default IP address is http://192.168.0.1.
2. Open the page for “System-> Restore Defaults” and click on “Restore” button.
3. Why the Signal LED is illuminating in RED?
Ans: Please make sure you are in a location covered by communication networks.
4. Why Clients Cannot Access the Internet Properly?
1. Please check if the LED is illuminating.
2. Please make sure if you Clients has connected to device.
3. Check if the PPP user name and password are correct.
5. Why can’t I see SSID appears in the wireless network?
Ans:
1. Please make sure your device is start correctly.
2. Please check the web setting page and make sure you have select the “Enabled”
radio button to enable the “Broadcast SSID”.
6. Why multi-Network IP Address Conflict Occurs?
When multiple types of Internet connections are used simultaneously on the client,
such as physical network adapter and Wi-Fi, inserting the Mobile WiFi into the client
may result in IP address conflict across multiple networks. Please disable other
network devices or disconnect other Internet connections from the client, and then
restart the client.

15
5 FCC announcement
FCC Compliance:
This device complies with part 15 of the FCC Rules. Operation is subject to the
following two conditions: (1) This
device may not cause harmful interference, and (2) this device must accept any
interference received, including
interference that may cause undesired operation.
Note:
***This equipment has been tested and found to comply with the limits for a Class B
digital device, pursuant to part 15
of the FCC Rules. These limits are designed to provide reasonable protection against
harmful interference in a
residential installation. This equipment generates, uses and can radiate radio
frequency energy and, if not installed and
used in accordance with the instructions, may cause harmful interference to radio
communications. However, there is
no guarantee that interference will not occur in a particular installation. If this
equipment does cause harmful
interference to radio or television reception, which can be determined by turning the
equipment off and on, the user is
encouraged to try to correct the interference by one or more of the following
measures:
—Reorient or relocate the receiving antenna.
—Increase the separation between the equipment and receiver.
—Connect the equipment into an outlet on a circuit different from that to which the
receiver is connected.
—Consult the dealer or an experienced radio/TV technician for help.
Radio Frequency (RF) Energy
This phone is designed and manufactured not to exceed the emission limits for
exposure to radio frequency (RF) energy set by the Federal Communications
Commission of the United States. During SAR testing, this device is set to transmit at
its highest certified power level in all tested frequency bands, and placed in positions
that simulate RF exposure in usage near the body with the separation of 10 mm.
Although the SAR is determined at the highest certified power level, the actual SAR
level of the device while operating can be well below the maximum value. This is
because the phone is designed to operate at multiple power levels so as to use only
the power required to reach the network. In general, the closer you are to a wireless
base station antenna, the lower the power output.
The exposure standard for wireless devices employs a unit of measurement known as

16
the Specific Absorption Rate, or SAR. The SAR limit set by the FCC is 1.6W/kg. This
device is compliance with SAR for general population /uncontrolled exposure limits in
ANSI/IEEE C95.1-1992 , and had been tested in accordance with the measurement
methods and procedures specified in OET Bulletin 65 Supplement C. The FCC has
granted an Equipment Authorization for this model phone with all reported SAR levels
evaluated as in compliance with the FCC RF exposure guidelines. SAR information
on this model phone is on file with the FCC and can be found under the Display Grant
section of www.fcc.gov/oet/ea/fccid after searching on FCC ID: KA2WR330A1 . For
this device, the highest reported SAR value for usage near the body is 1.281 W/kg.
While there may be differences between the SAR levels of various product and at
various positions, they all meet the government requirement. SAR compliance for
body-worn operation is based on a separation distance of 10 mm between the unit
and the human body. Carry this device at least 10 mm away from your body to ensure
RF exposure level compliant or lower to the reported level.