D Link WR961C1 Wireless AC1200 4G LTE Router User Manual 1
D-Link Corporation Wireless AC1200 4G LTE Router 1
D Link >
Contents
- 1. User Manual-1
- 2. User Manual-2
- 3. User Manual
User Manual-1
Version 0.01 | 09/19/2017
User Manual
DWR-961
4G LTE Router
Wireless AC1200

1D-Link DWR-961 User Manual
Section 1 - Product Overview
Product Overview
Package Contents
If any of the above items are missing, please contact your reseller.
System Requirements
* Subject to services and service terms available from your carrier.
• A compatible SIM/UICC card with service.*
• Computer with Windows 10/8/7/Vista/XP, Mac OS 10.3 or above, or Linux-based operating
system with a compatible network adapter.
• Java-enabled browser such as Internet Explorer 9, Safari 7, Chrome 28, or Firefox 23 or above
(for conguration).
Power Adapter
DWR-961 Wireless AC1200 4G LTE Router
4G Antennas
RJ-45 Cable

2D-Link DWR-961 User Manual
Section 1 - Product Overview
Introduction
D-Link’s DWR-961 4G LTE Router allows you to access mobile broadband networks from anywhere. Once connected, you
can check e-mail, surf the web, and stream media. Use your carrier’s SIM/UICC card to share your 4G Internet connection
through a secure wireless network or by using any of the four 10/100 Ethernet ports.
The DWR-961 lets you connect to your 4G mobile connection with fast downlink speeds of up to 100 Mbps and
uplink speeds up to 50 Mbps, giving you the speed to ensure fast, responsive Internet access. Surf the web with ease and
stream music and video over the Internet to your PCs and mobile devices.
The DWR-961 utilizes dual-active rewalls (SPI and NAT) to prevent potential attacks across the Internet. Industry standard
WPA/WPA2 wireless encryption keeps your wireless network secure and your trac safe, allowing you to share your 4G
connection without worrying about unauthorized users accessing your network.
The DWR-961 can be installed quickly and easily almost anywhere. It can be congured through almost any web browser
without the need for special software. This router makes it possible to stay connected, even when conventional broadband
services are unavailable.

6D-Link DWR-961 User Manual
Section 2 - Installation
Wireless Installation Considerations
The DWR-961 can be accessed using a wireless connection from anywhere within the operating range of your wireless network. Keep in mind that
the quantity, thickness, and location of walls, ceilings, or other objects that the wireless signals must pass through may limit the range of the wireless
signal. Ranges vary depending on the types of materials and background RF (radio frequency) noise in your home or oce. The key to maximizing
the wireless range is to follow these basic guidelines:
1. Minimize the number of walls and ceilings between the D-Link router and other network devices. Each wall or ceiling can reduce your adapter’s
range from 3 to 90 feet (1 to 30 meters).
2. Be aware of the direct line between network devices. A wall that is 1.5 feet thick (0.5 meters), at a 45-degree angle appears to be almost 3 feet
(1 meter) thick. At a 2-degree angle it looks over 42 feet (14 meters) thick. Position devices so that the signal will travel straight through a wall
or ceiling (instead of at an angle) for better reception.
3. Try to position access points, wireless routers, and computers so that the signal passes through open doorways and drywall. Materials such as
glass, metal, brick, insulation, concrete, and water can aect wireless performance. Large objects such as sh tanks, mirrors, le cabinets, metal
doors, and aluminum studs may also have a negative eect on range.
4. If you are using 2.4 GHz cordless phones, make sure that the 2.4 GHz phone base is as far away from your wireless device as possible. The base
transmits a signal even if the phone is not in use. In some cases, cordless phones, X-10 wireless devices, and electronic equipment such as ceiling
fans, uorescent lights, and home security systems may dramatically degrade wireless connectivity.
7D-Link DWR-961 User Manual
Section 4 - Conguration
Conguration
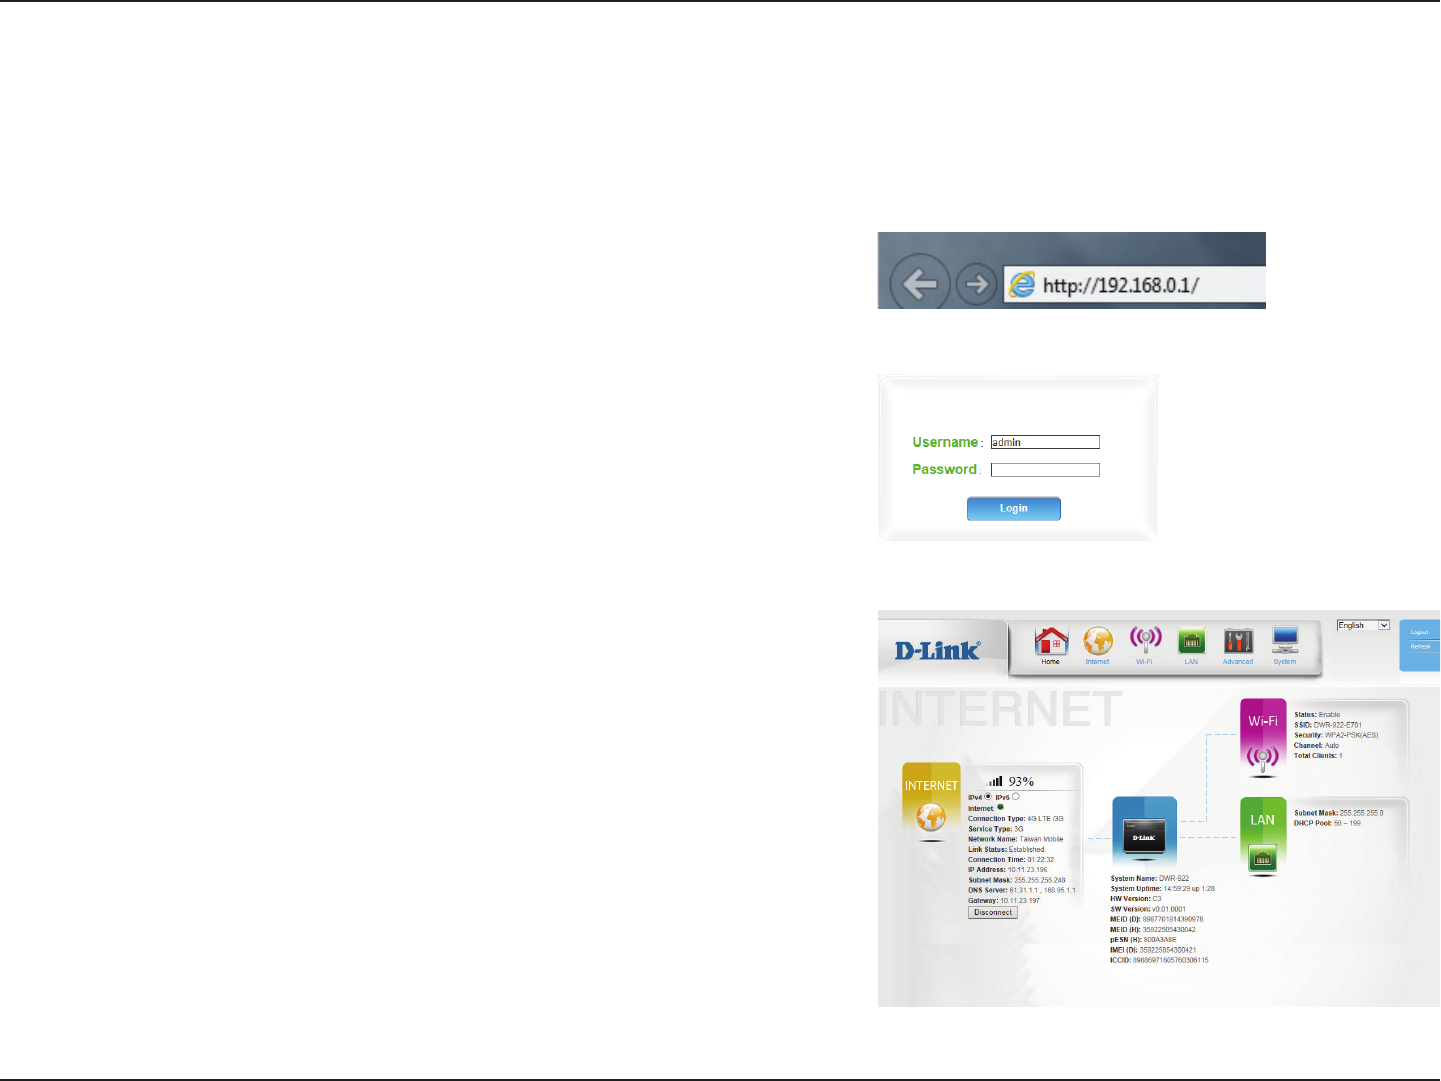
To access the conguration utility, open a web browser such as Internet Explorer and
enter the address of the router (192.168.0.1 by default).
To log in to the conguration utility, admin is the default username and the default
password is left blank.
Note: If you get a Page Cannot be Displayed error, please refer to the Troubleshooting
section for assistance.
Once you have successfully logged in, you will see the Home page. On this page
you can view information about your Internet connection, the wireless/LAN status,
and system information.
At the top of the page is a menu. Clicking on one of these icons will take you to the
appropriate conguration section.
Getting Started
8D-Link DWR-961 User Manual
Section 4 - Conguration
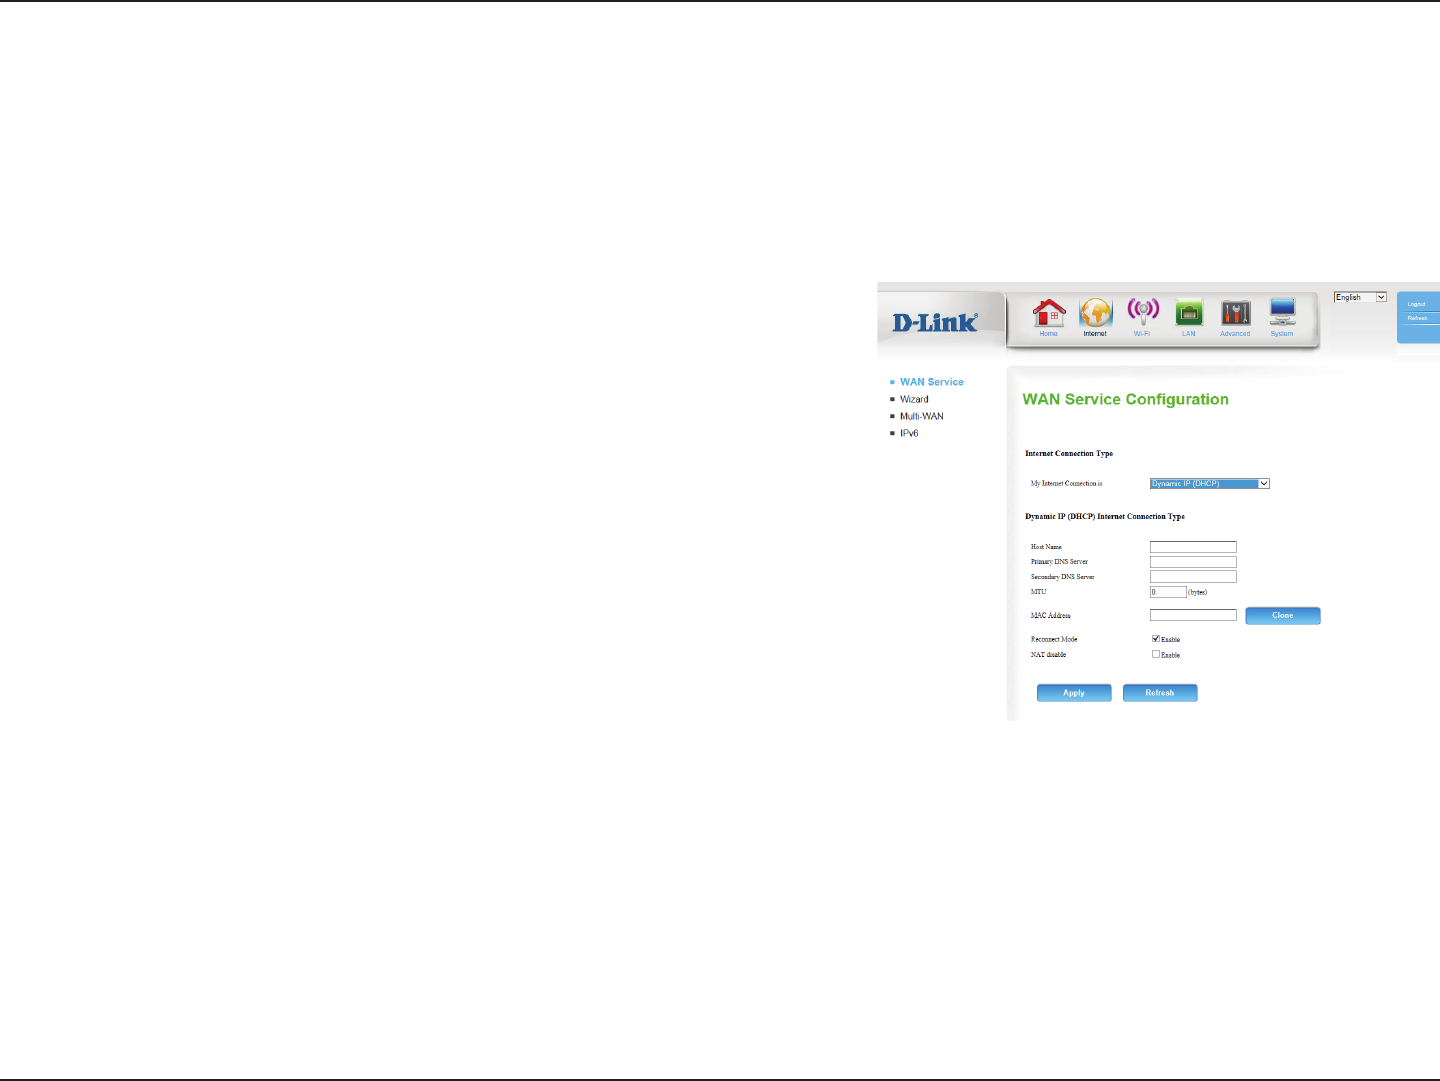
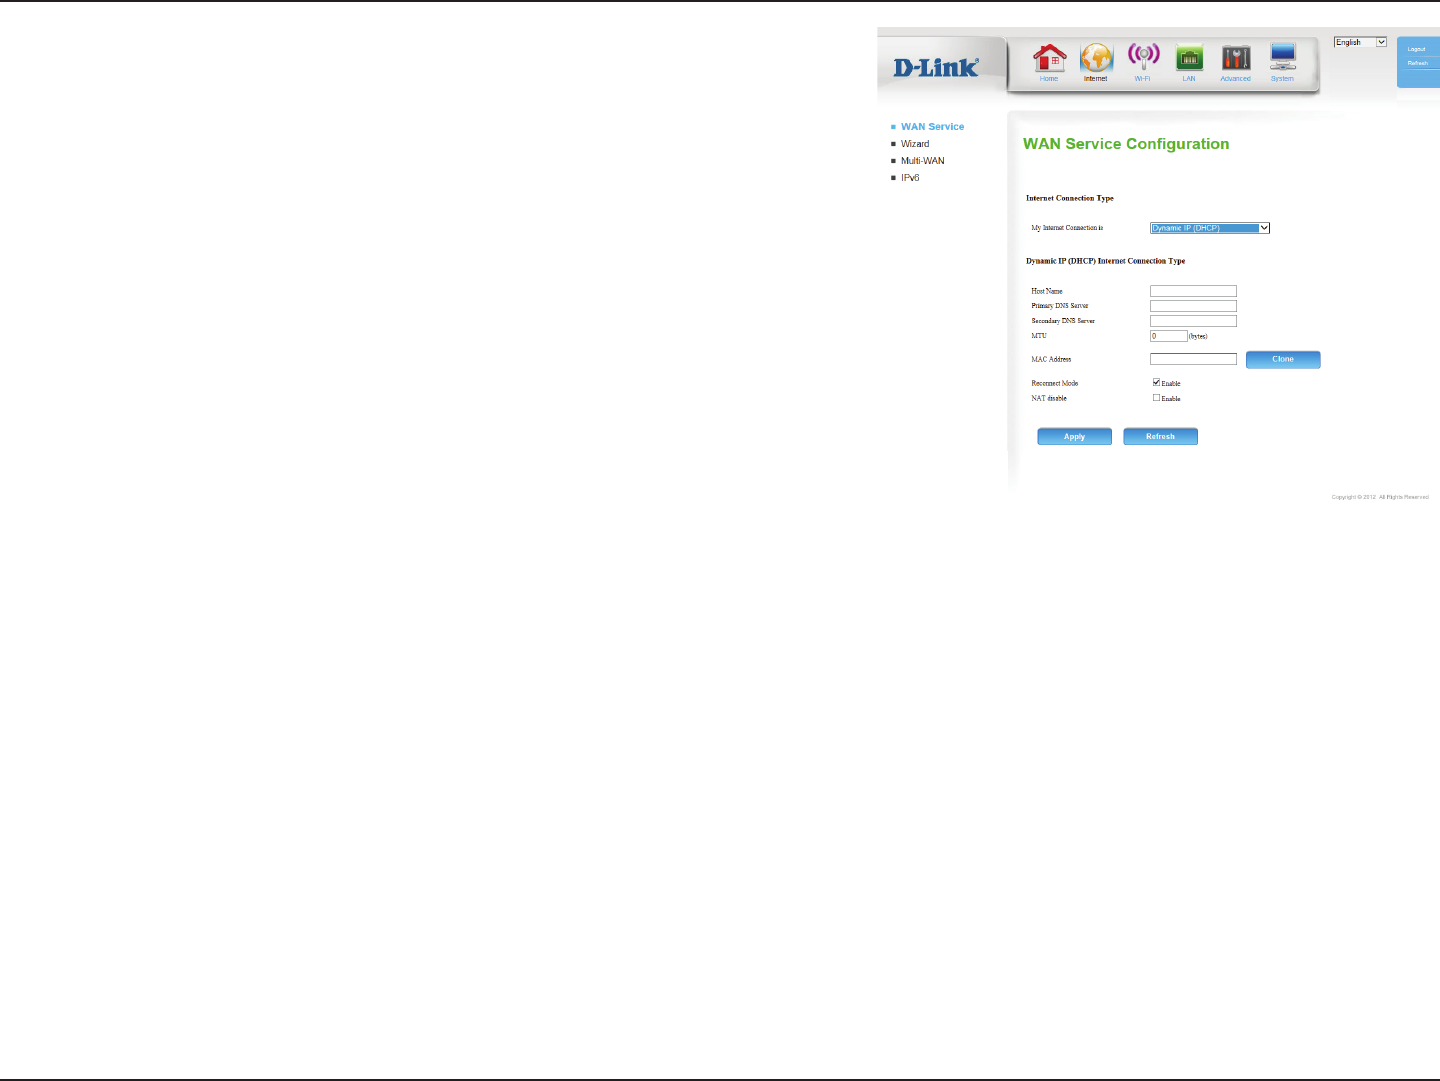
Internet
Select the Internet connection type specied by your ISP. The
corresponding settings will be displayed below. Please see the
following sections for details on how to congure these dierent
connection types.
My Internet
Connection is:
WAN Service
On this page you can congure your Internet connection. If you are not sure which settings to use, please contact your Internet Service Provider
(ISP).
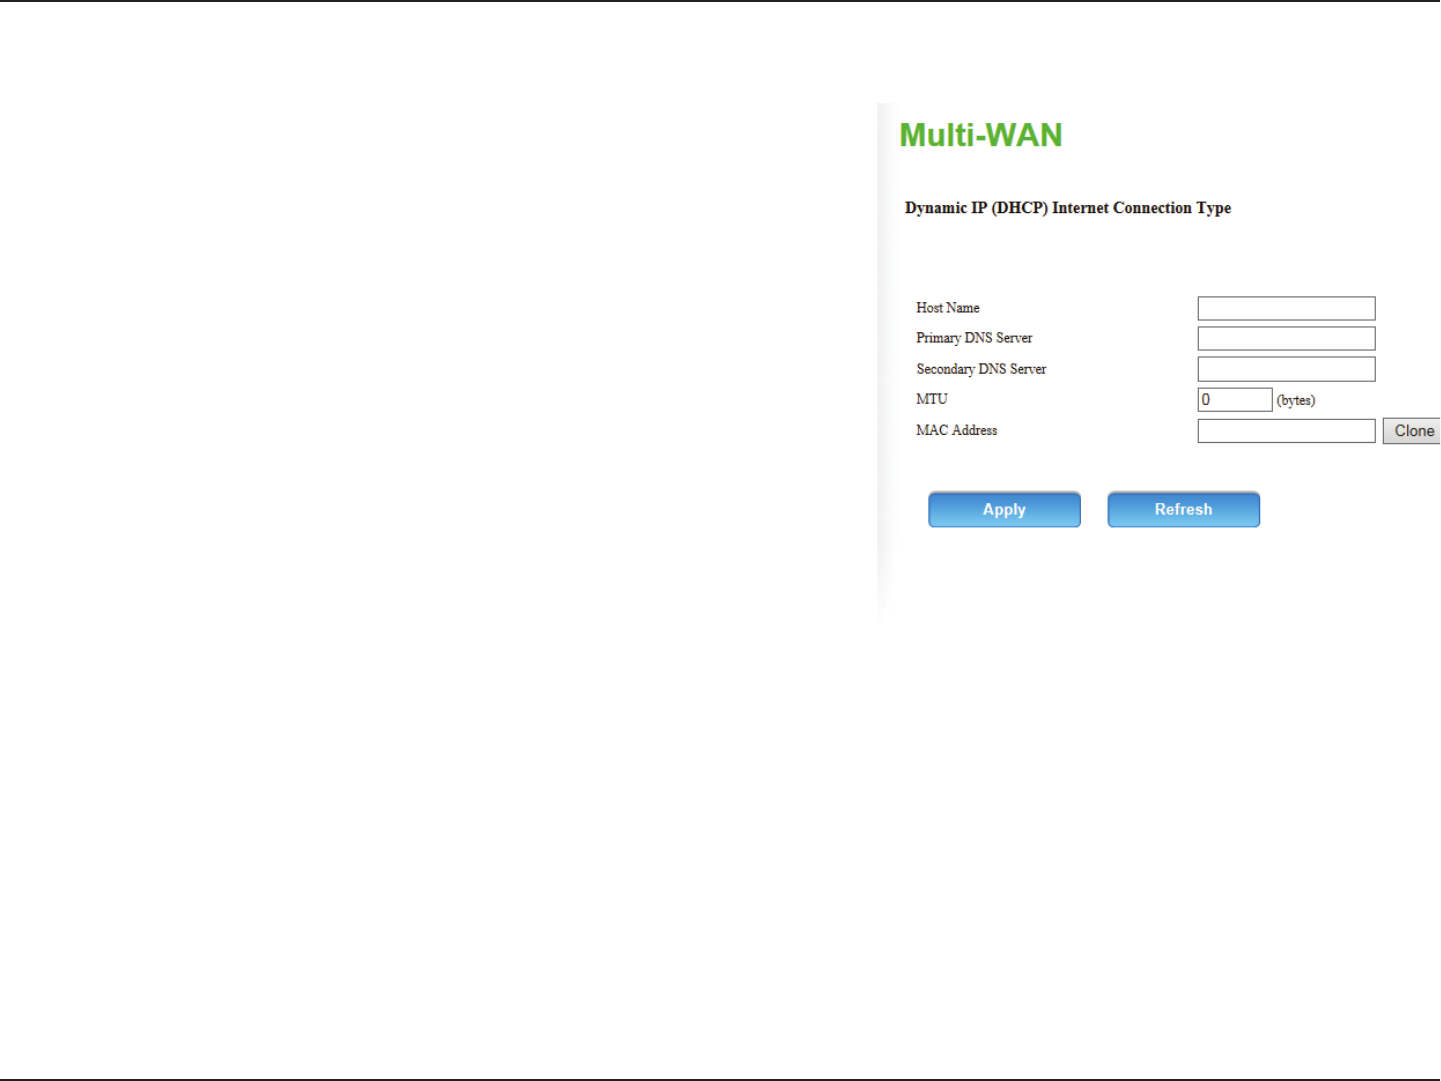
Dynamic IP (DHCP)
If your ISP requires you to enter a host name, enter it here. In most
cases, you may leave this blank.
(Optional) Fill in with IP address of primary DNS server.
(Optional) Fill in with IP address of secondary DNS server.
You may need to change the Maximum Transmission Unit (MTU)
for optimal performance. The default value is 0.
The default MAC address is set to the WAN port’s physical interface
MAC address on the router. It is not recommended that you
change the default MAC address unless required by your ISP. You
can use the Clone button to replace the WAN port’s MAC address
with the MAC address of your PC.
Host Name:
Primary DNS
Server:
Secondary DNS
Server:
MTU:
MAC Address:
9D-Link DWR-961 User Manual
Section 4 - Conguration
This feature enables this product to renew the WAN IP address
automatically when the lease time has expired.
Enabling this option will disable the NAT rewall function of the
DWR-961, exposing all connected devices directly to the Internet.
This is an advanced feature and not recommended for normal use.
Click Apply to save your settings, or Refresh to revert to your
previous settings.
Reconnect
Mode:
NAT disable:
10D-Link DWR-961 User Manual
Section 4 - Conguration
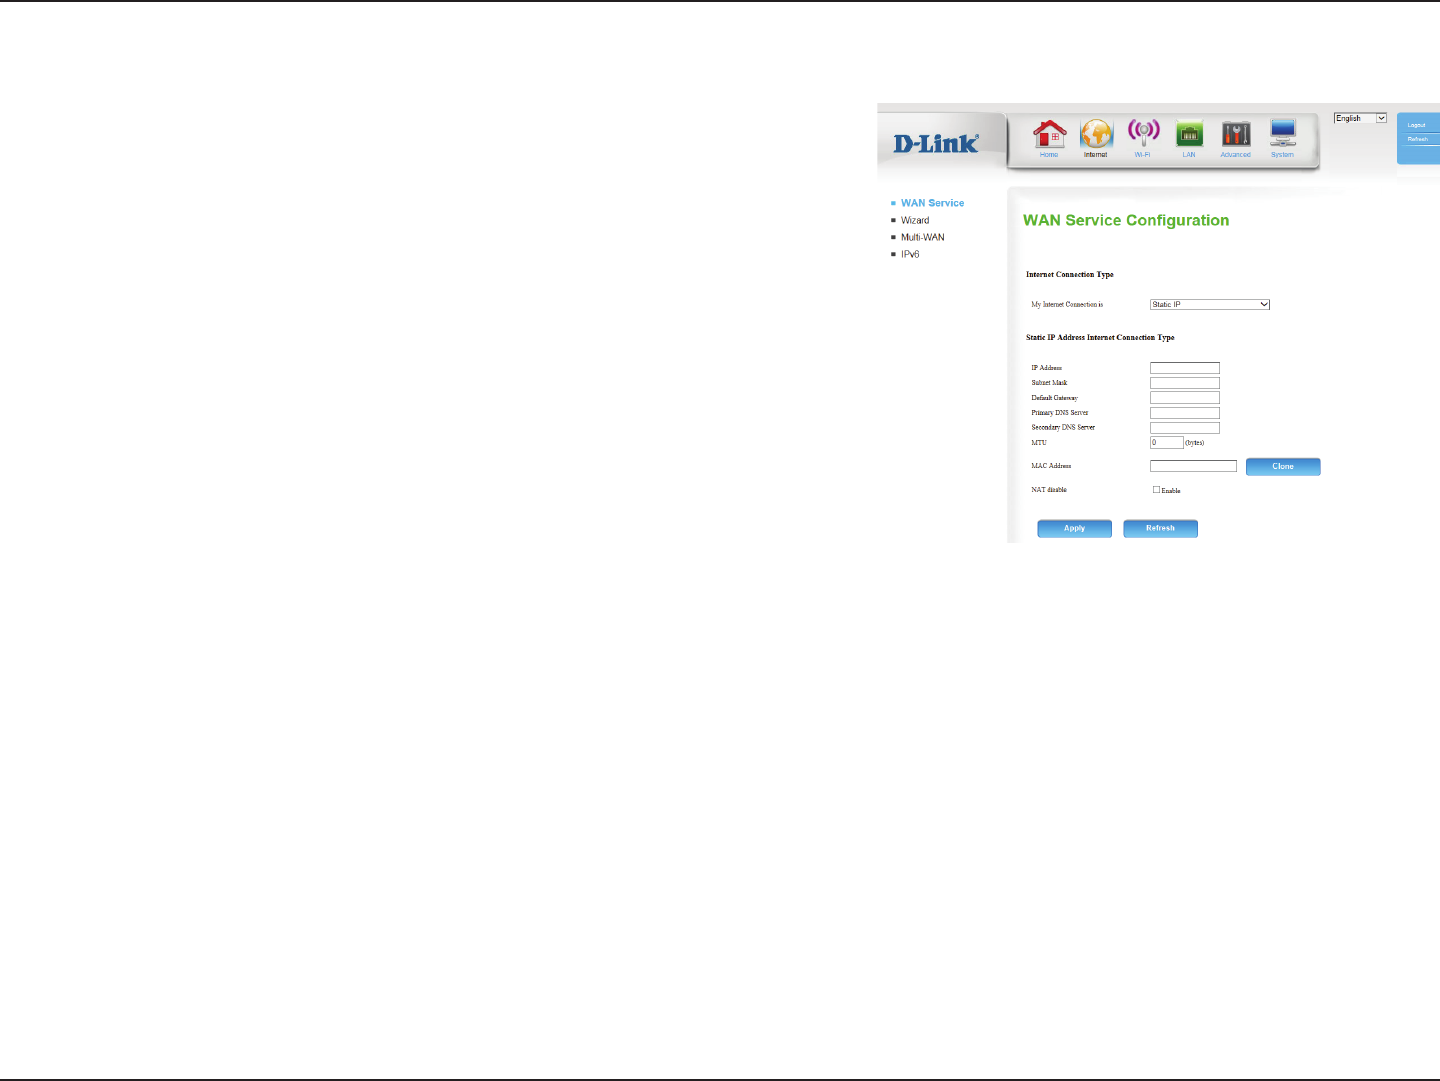
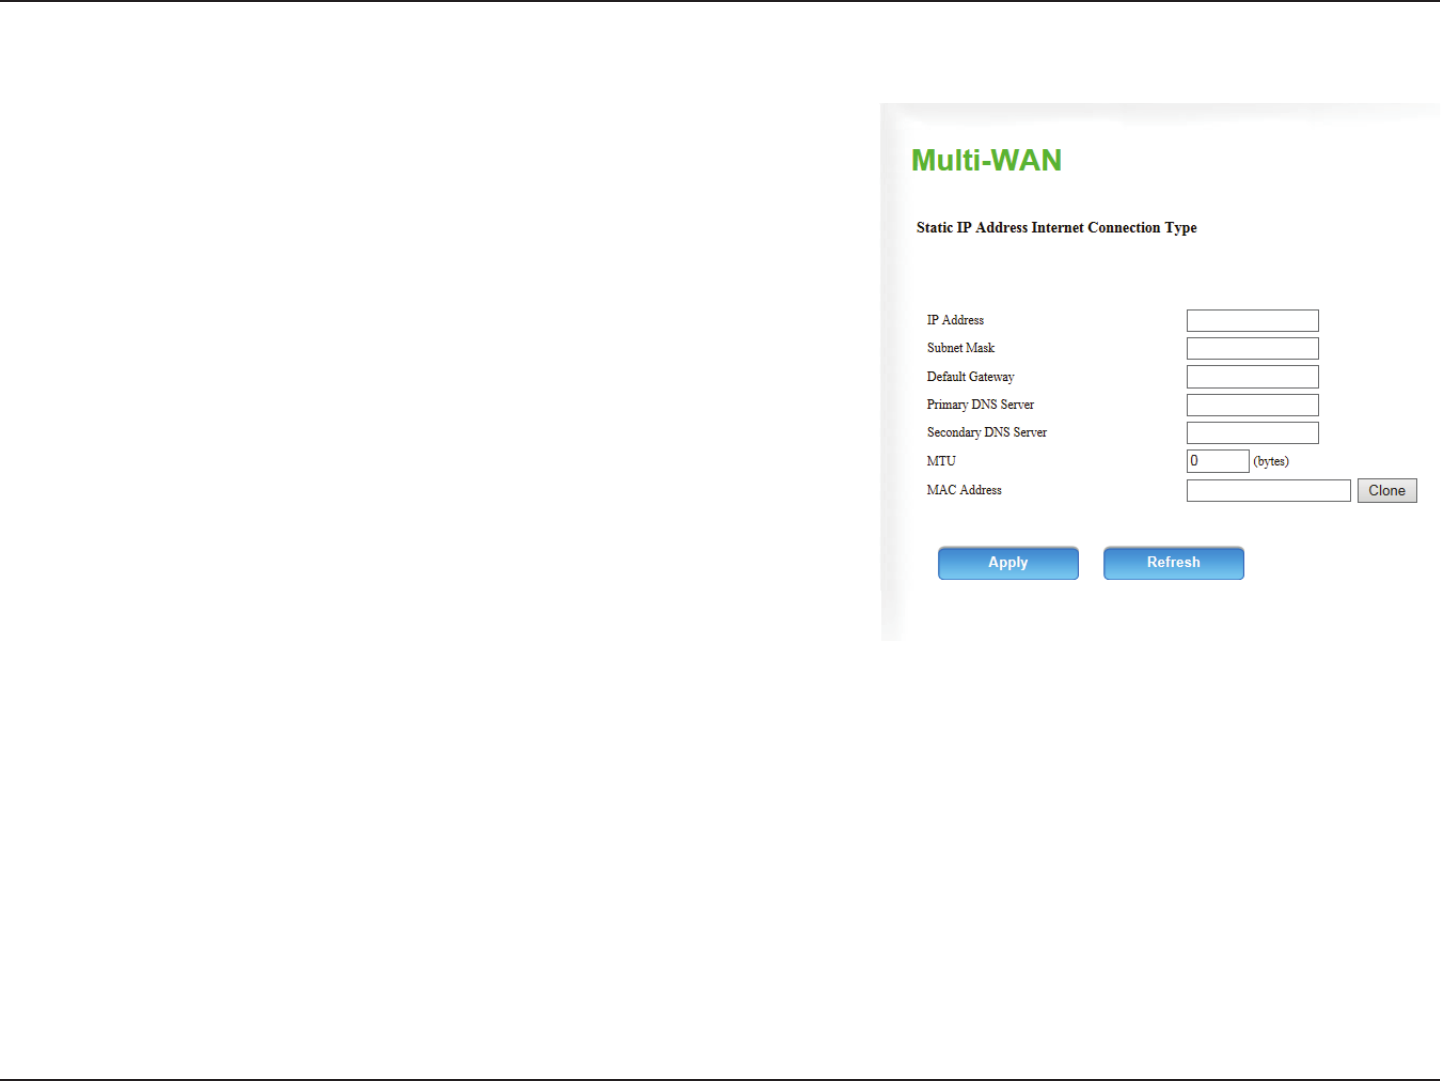
Enter the IP address assigned to your network connection.
Enter the subnet mask.
Enter the default gateway.
Enter the primary DNS server.
Enter the secondary DNS server.
You may need to change the Maximum Transmission Unit (MTU)
for optimal performance. The default value is 0.
The default MAC address is set to the WAN port’s physical interface
MAC address on the router. It is not recommended that you
change the default MAC address unless required by your ISP. You
can use the Clone button to replace the WAN port’s MAC address
with the MAC address of your PC.
Enabling this option will disable the NAT rewall function of the
DWR-961, exposing all connected devices directly to the Internet.
This is an advanced feature and not recommended for normal use.
Click Apply to save your settings, or Refresh to revert to your
previous settings.
IP Address:
Subnet Mask:
Default
Gateway:
Primary DNS
Server:
Secondary DNS
Server:
MTU:
MAC Address:
NAT disable:
Static IP
11D-Link DWR-961 User Manual
Section 4 - Conguration
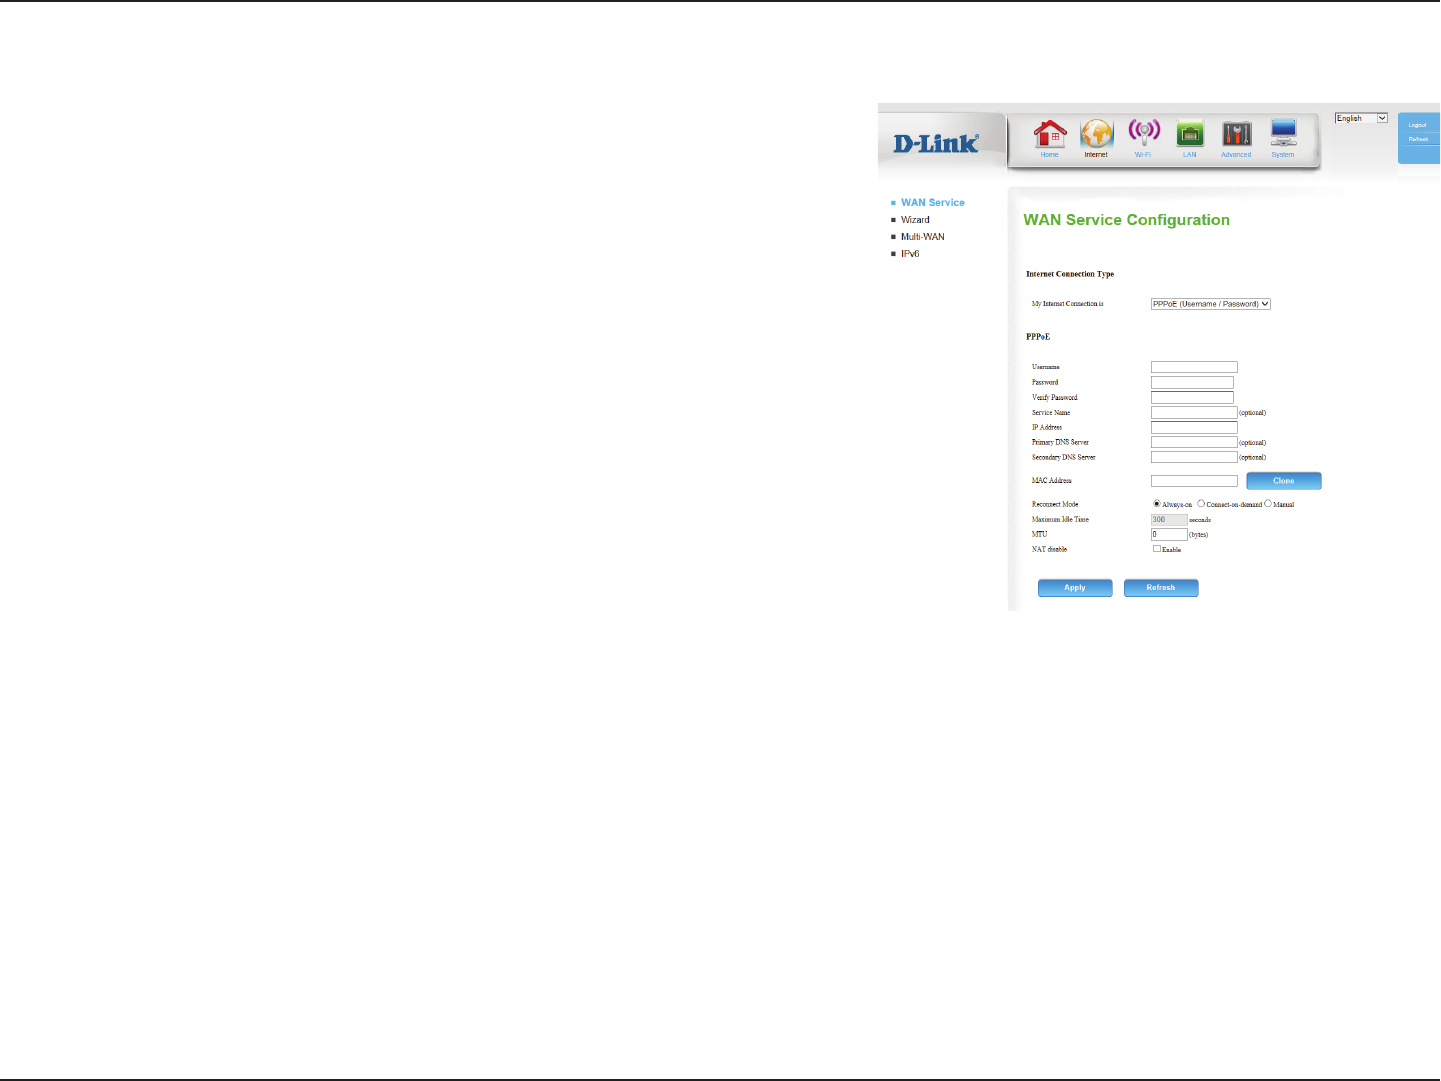
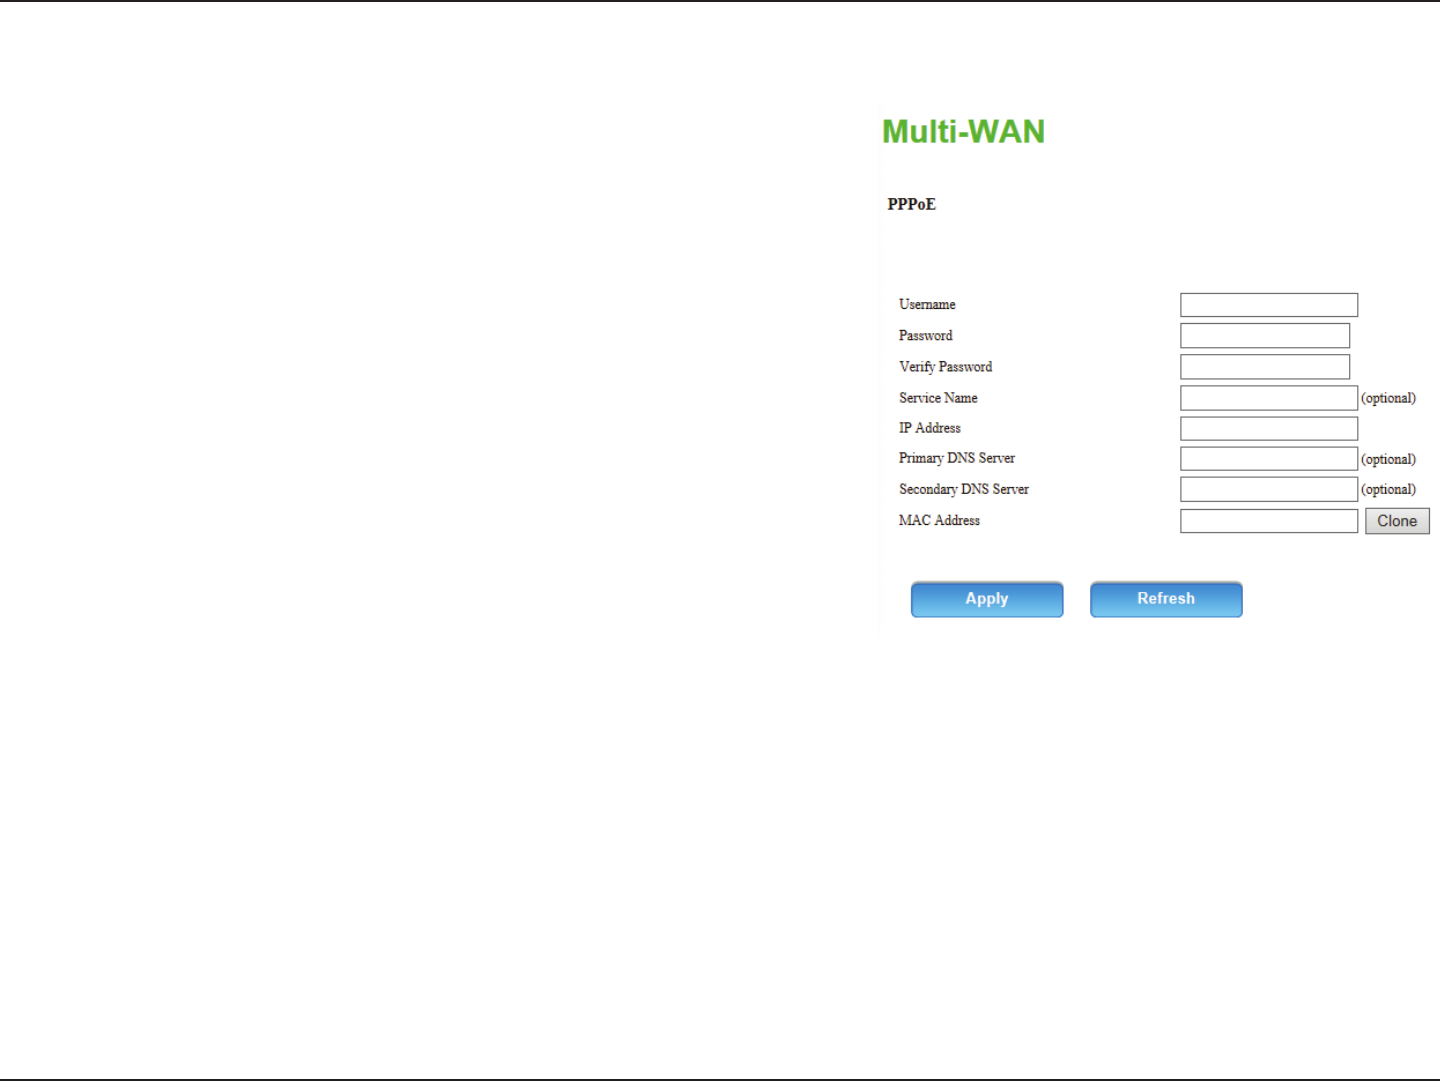
The username provided by your ISP for your PPPoE account.
Password provided by your ISP for your PPPoE account.
Re-type your password in this eld.
Fill in if provided by your ISP. (Optional)
Fill in if provided by your ISP. If not, keep the default value.
Fill in if provided by your ISP. If not, keep the default value
(optional).
Fill in if provided by your ISP. If not, keep the default value
(optional).
The default MAC address is set to the WAN port’s physical interface
MAC address on the router. It is not recommended that you
change the default MAC address unless required by your ISP. You
can use the Clone button to replace the WAN port’s MAC address
with the MAC address of your PC.
The amount of time of inactivity before disconnecting an
established PPPoE session. Set it to zero or enable auto-reconnect
to disable this feature.
You may need to change the Maximum Transmission Unit (MTU)
for optimal performance. The default value is 0.
Choose Always-on when you want to establish PPTP connection
all the time. If you choose Connect-on-demand, the device will
establish a PPTP connection when local users want to connect
to the Internet, and disconnect if there is no trac after the time
period dened by the Maximum Idle Time setting.
Username:
Password:
Verify Password:
Service Name:
IP Address:
Primary DNS
Server:
Secondary DNS
Server:
MAC Address:
Maximum Idle
Time:
MTU:
Reconnect
Mode:
PPPoE (Username / Password)

12D-Link DWR-961 User Manual
Section 4 - Conguration
NAT disable: Enabling this option will disable the NAT rewall function of the
DWR-961, exposing all connected devices directly to the Internet.
This is an advanced feature and not recommended for normal use.
Click Apply to save your settings, or Refresh to revert to your
previous settings.
13D-Link DWR-961 User Manual
Section 4 - Conguration
Choose Static IP only if your ISP provides you with a static IP
address for PPTP. Otherwise, please choose Dynamic IP.
Enter the information provided by your ISP (Only applicable for
Static IP PPTP).
Enter the information provided by your ISP (Only applicable for
Static IP PPTP).
Enter the information provided by your ISP (Only applicable for
Static IP PPTP).
IP address of the PPTP server.
User/account name that your ISP provides to you for PPTP dial-up.
Password that your ISP provides to you for PPTP dial-up.
Re-enter your password for verication.
Choose Always-on when you want to establish PPTP connection
all the time. If you choose Connect-on-demand, the device will
establish a PPTP connection when local users want to connect
to the Internet, and disconnect if there is no trac after the time
period dened by the Maximum Idle Time setting.
The time of no activity to disconnect your PPTP session. Set it to
zero or choose Always-on to disable this feature.
Address Mode:
PPTP IP Address:
PPTP Subnet
Mask:
PPTP Gateway IP
Address:
PPTP Server IP
Address:
Username:
Password:
Verify Password:
Reconnect
Mode:
Maximum Idle
Time:
PPTP
14D-Link DWR-961 User Manual
Section 4 - Conguration
Enabling this option will disable the NAT rewall function of the
DWR-961, exposing all connected devices directly to the Internet.
This is an advanced feature and not recommended for normal use.
Click Apply to save your settings, or Refresh to revert to your
previous settings.
NAT disable:

15D-Link DWR-961 User Manual
Section 4 - Conguration
Choose Static IP only if your ISP assigns you an IP address.
Otherwise, please choose Dynamic IP.
Enter the information provided by your ISP (Only applicable for
Static IP L2TP).
Enter the information provided by your ISP (Only applicable for
Static IP L2TP).
Enter the information provided by your ISP (Only applicable for
Static IP L2TP).
IP address of the L2TP server.
User/account name that your ISP provides to you for L2TP dial-up.
Password that your ISP provides to you for L2TP dial-up.
Re-type your password in this eld.
Choose Always-on when you want to establish L2TP connection
all the time. If you choose Connect-on-demand the device will
establish L2TP connection when local users want to use Internet,
and disconnect if no trac after time period of Maximum Idle
Time.
The time of no activity to disconnect your L2TP session. Set it to 0
or choose Always-on to disable this feature.
Address Mode:
L2TP IP Address:
L2TP Subnet
Mask:
L2TP Gateway IP
Address:
L2TP Server IP
Address:
Username:
Password:
Verify Password:
Reconnect
Mode:
Maximum Idle
Time:
L2TP
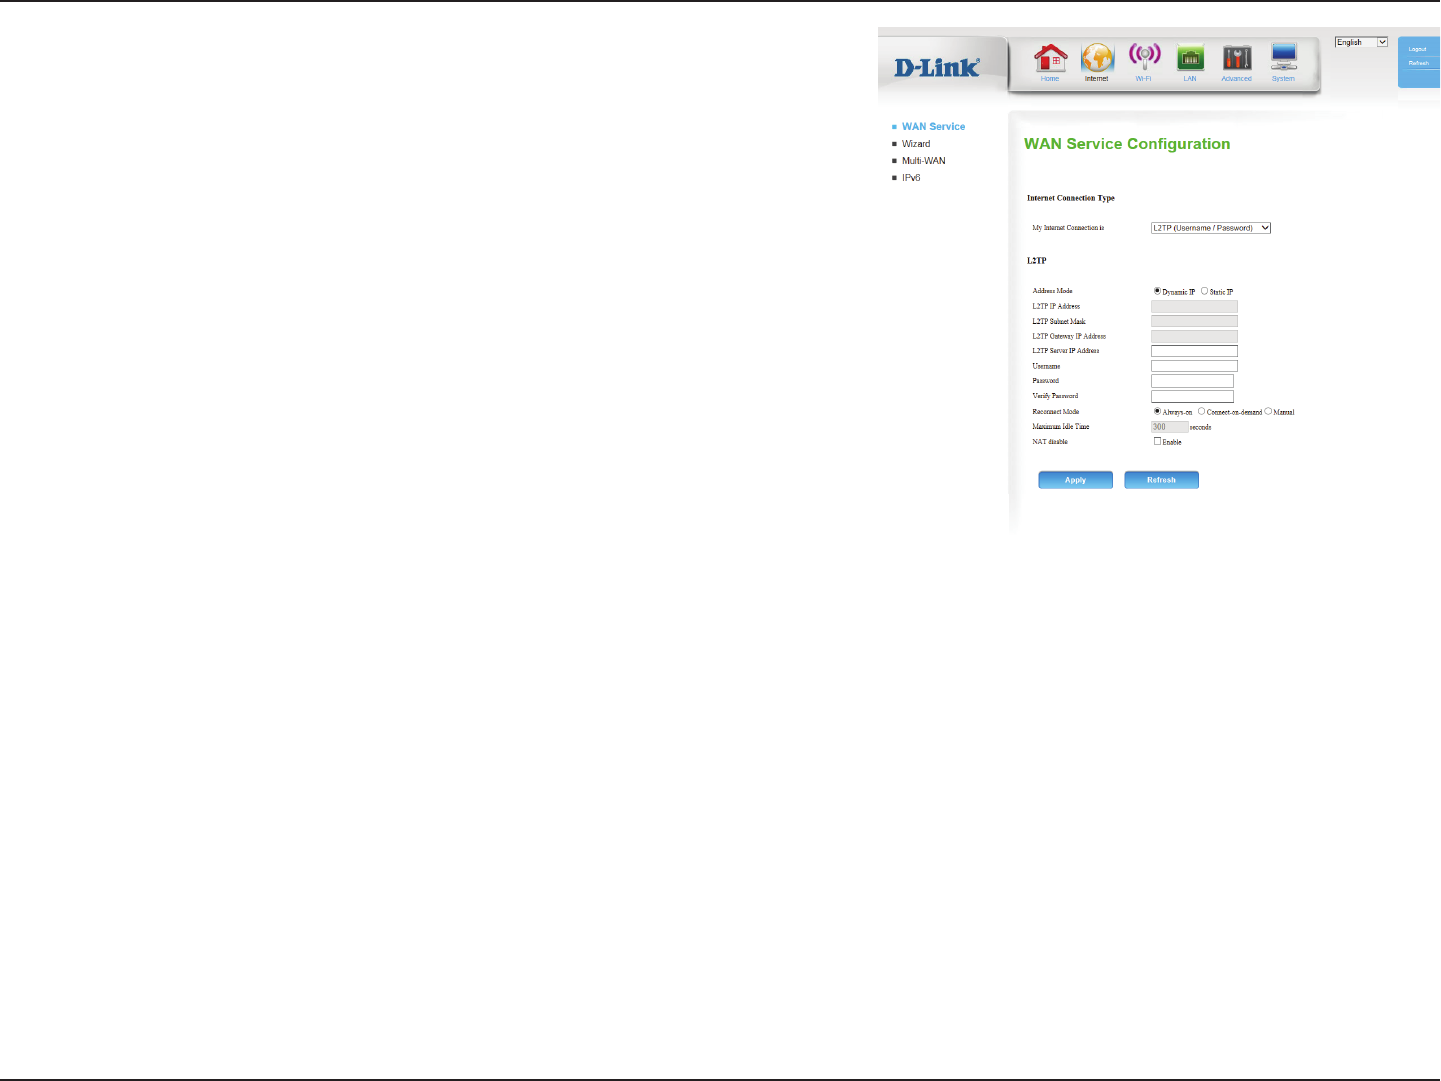
16D-Link DWR-961 User Manual
Section 4 - Conguration
Enabling this option will disable the NAT rewall function of the
DWR-961, exposing all connected devices directly to the Internet.
This is an advanced feature and not recommended for normal use.
Click Apply to save your settings, or Refresh to revert to your
previous settings.
NAT disable:
17D-Link DWR-961 User Manual
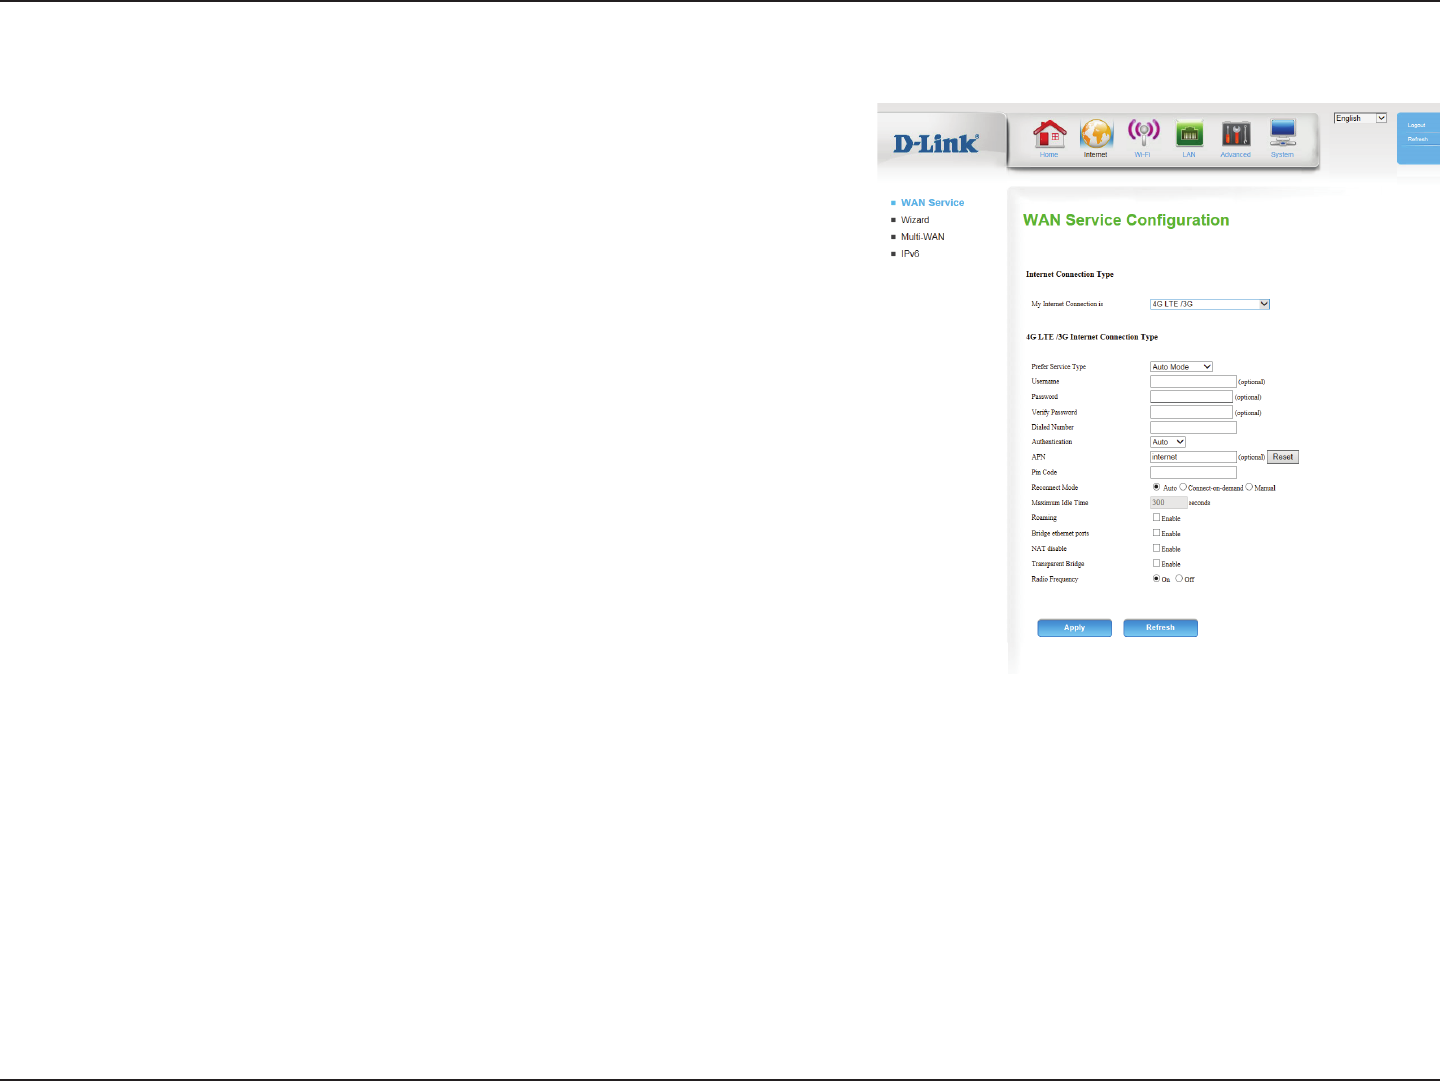
Section 4 - Conguration
Choose whether the DWR-961 should only use 4G networks,
networks, or use Auto Mode to automatically select a network.
Fill in only if requested by carrier ISP (optional).
Fill in only if requested by carrier (optional).
Re-type your password in this eld (optional).
If your carrier provides a dial-in number or code, enter it here.
Empty by default.
Select PAP, CHAP, or Auto detection. The default authentication
method is Auto.
Enter the APN information (optional).
If your SIM card has a PIN code, enter it here
Select Auto, Manual, or Connect-on-deman to determine
whether the router should reconnect to your 4G network
automatically or manually.
Set the maximum time your connection can be idle before
disconnecting. Set it to 0 or choose Auto in Reconnect Mode to
disable this feature.
Enabling this option will allow you to connect when roaming away
from your carrier’s home network.
Note: Roaming connections may incur additional fees from your
service provider.
Prefer Service
Type:
Username:
Password:
Verify Password:
Dialed Number:
Authentication:
APN:
Pin Code:
Reconnect
Mode:
Maximum Idle
Time:
Roaming:
4G LTE
18D-Link DWR-961 User Manual
Section 4 - Conguration
Activate this feature to use the Ethernet WAN port as an additional
LAN port.
Enabling this option will disable the NAT function of the DWR-961,
allowing it to act as a link for your devices to your Internet
connection, but without routing functions.
Enabling the Transparent Bridge function disables the routing/
NAT functions and passes the public WAN IP address given by your
service provider directly through to the local client or PC. This can
only be used if a single IP address has been assigned by your ISP. If
transparent bridge is enabled, the above NAT Disable option will
not be available
. Turns the cellular radio on or o. This setting is intended to
disable the cellular radio for areas where radio transmissions may
be restricted.
Click Apply to save your settings, or Refresh to revert to your
previous settings.
Bridge Ethernet
Ports:
NAT disable:
Transparent
Bridge:
Radio
Frequency:
19D-Link DWR-961 User Manual
Section 4 - Conguration
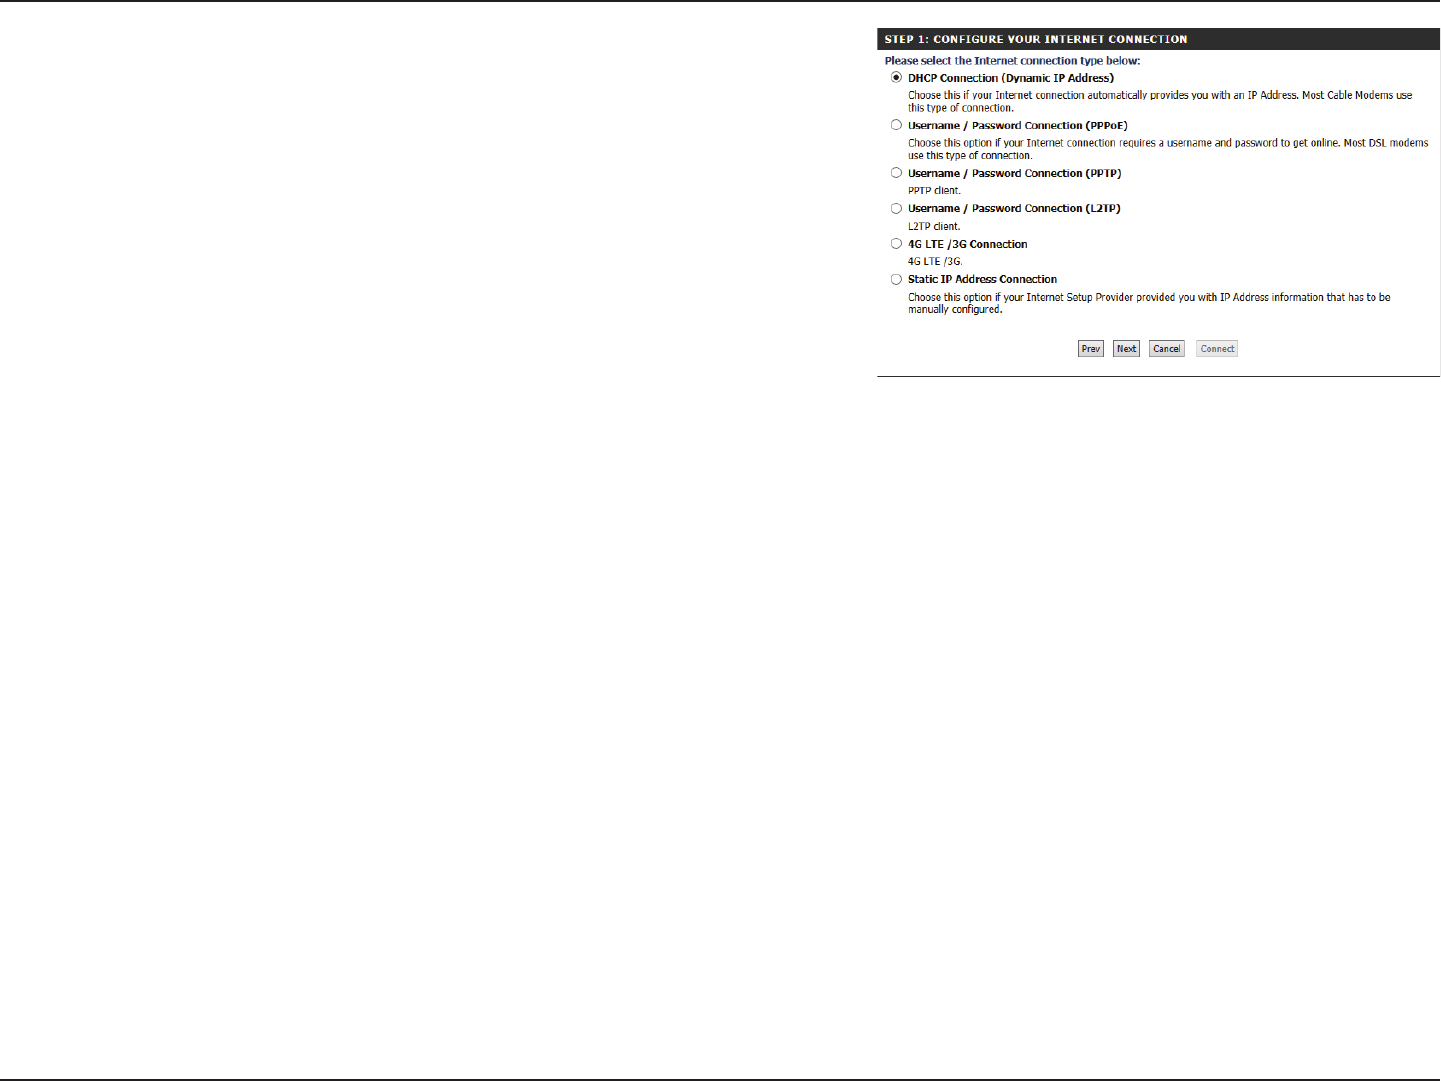
Wizard
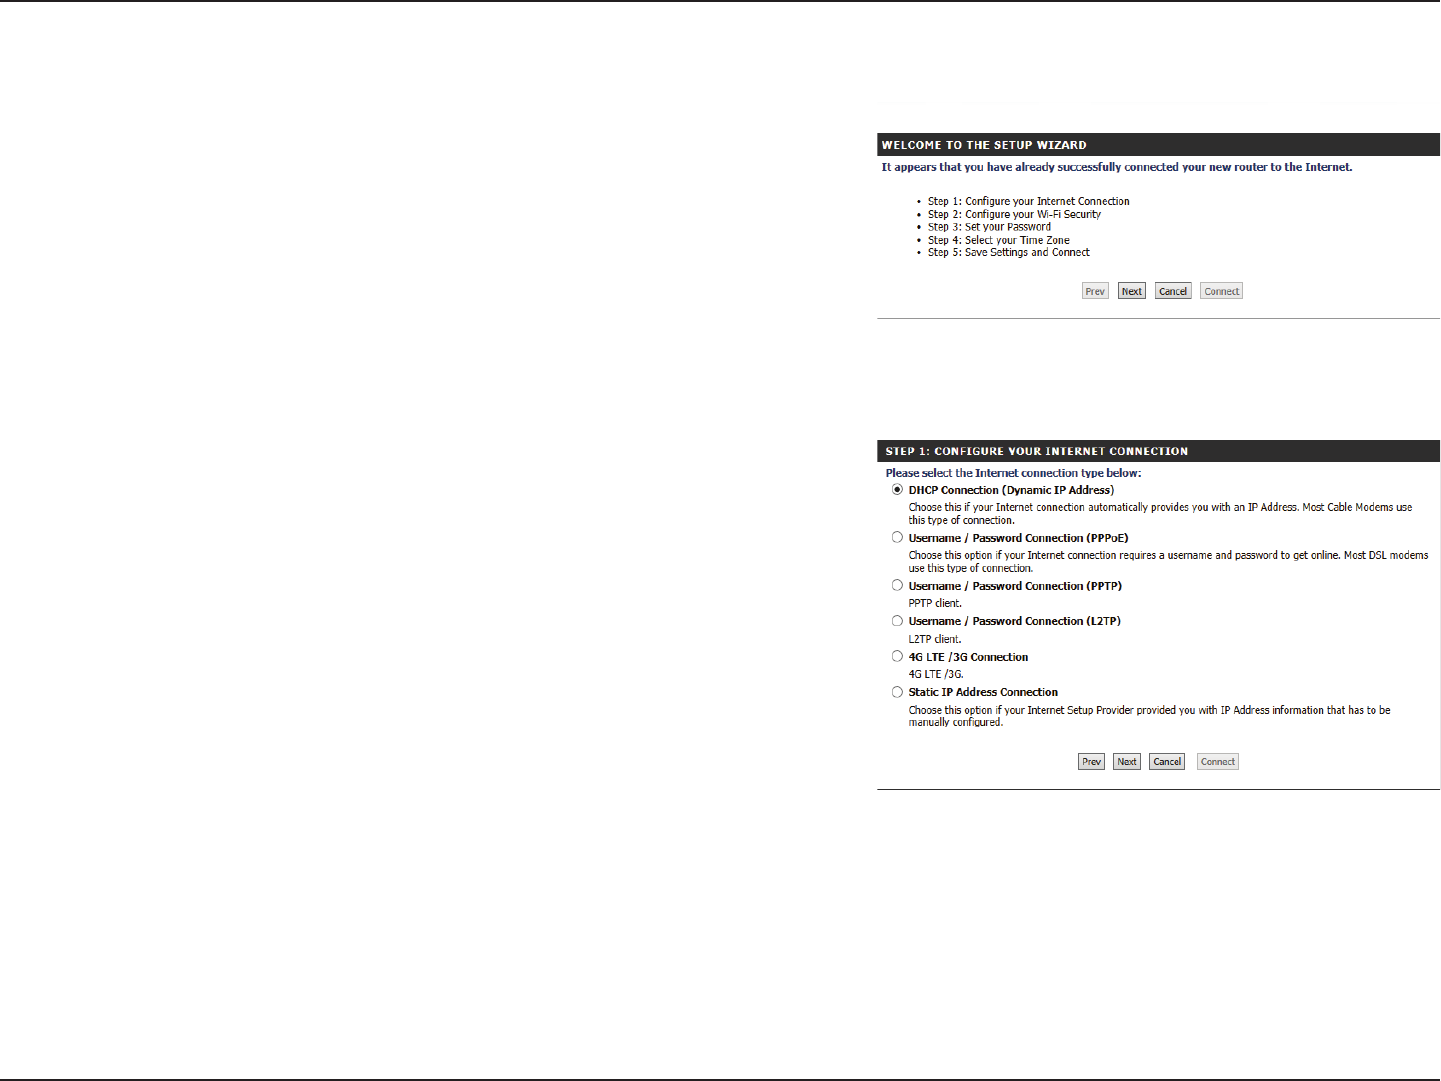
This wizard will guide you through a step-by-step process to congure your router
to connect to the Internet.
Click Next to continue.
Note: While using the wizard, you can click Prev to go back to the previous step,
or you can click Cancel to close the wizard.
Select the Internet connection type you use. The connection types are explained on
the following page. If you are unsure which connection type you should use, contact
your Internet Service Provider (ISP).
Click Prev to go back to the previous page or click Cancel to close the wizard.
Note: The DWR-961 has a Multi-WAN Failover feature that allows the router to
switch to a 4G connection if the WAN connection is down or unavailable.
To congure this feature, please refer to Multi-WAN Conguration on page
24.
20D-Link DWR-961 User Manual
Section 4 - Conguration
Choose this if your IPS automatically provides you with an IP
address. Most cable modems use this type of connection. See
Dynamic IP (DHCP) on page 8 for information about how to
congure this type of connection.
Choose this option if your Internet connection requires a
username and password to connect. Most DSL modems use
this style of connection. See PPPoE (Username / Password) on
page 11 for information about how to congure this type of
connection.
Choose this option if your Internet connection requires Point-
to-Point Tunneling Protocol (PPTP). See PPTP on page 13 for
information about how to congure this type of connection.
Choose this option if your Internet connection requires Layer 2
Tunneling Protocol (L2TP). See L2TP on page 15 for information
about how to congure this type of connection.
Choose this connection if you have installed a SIM card into the
DWR-961. See 4G LTE on page 17 for information about
how to congure this type of connection.
Choose this option if your Internet Service Provider (ISP)
provided you with IP address information that has to be manually
congured. See Static IP on page 10 for information about how
to congure this type of connection.
DHCP Connection
(Dynamic IP
Address):
Username
/ Password
Connection
(PPPoE):
Username
/ Password
Connection (PPTP):
Username
/ Password
Connection (L2TP):
4G Connection:
Static IP Address
Connection:
The subsequent conguration pages will dier depending on the selection you
make on this page.
After entering the requested information,click Next to continue.
Note: If you are not sure what connection type to use or what settings
to enter, check with your Internet Service Provider (ISP).
21D-Link DWR-961 User Manual
Section 4 - Conguration
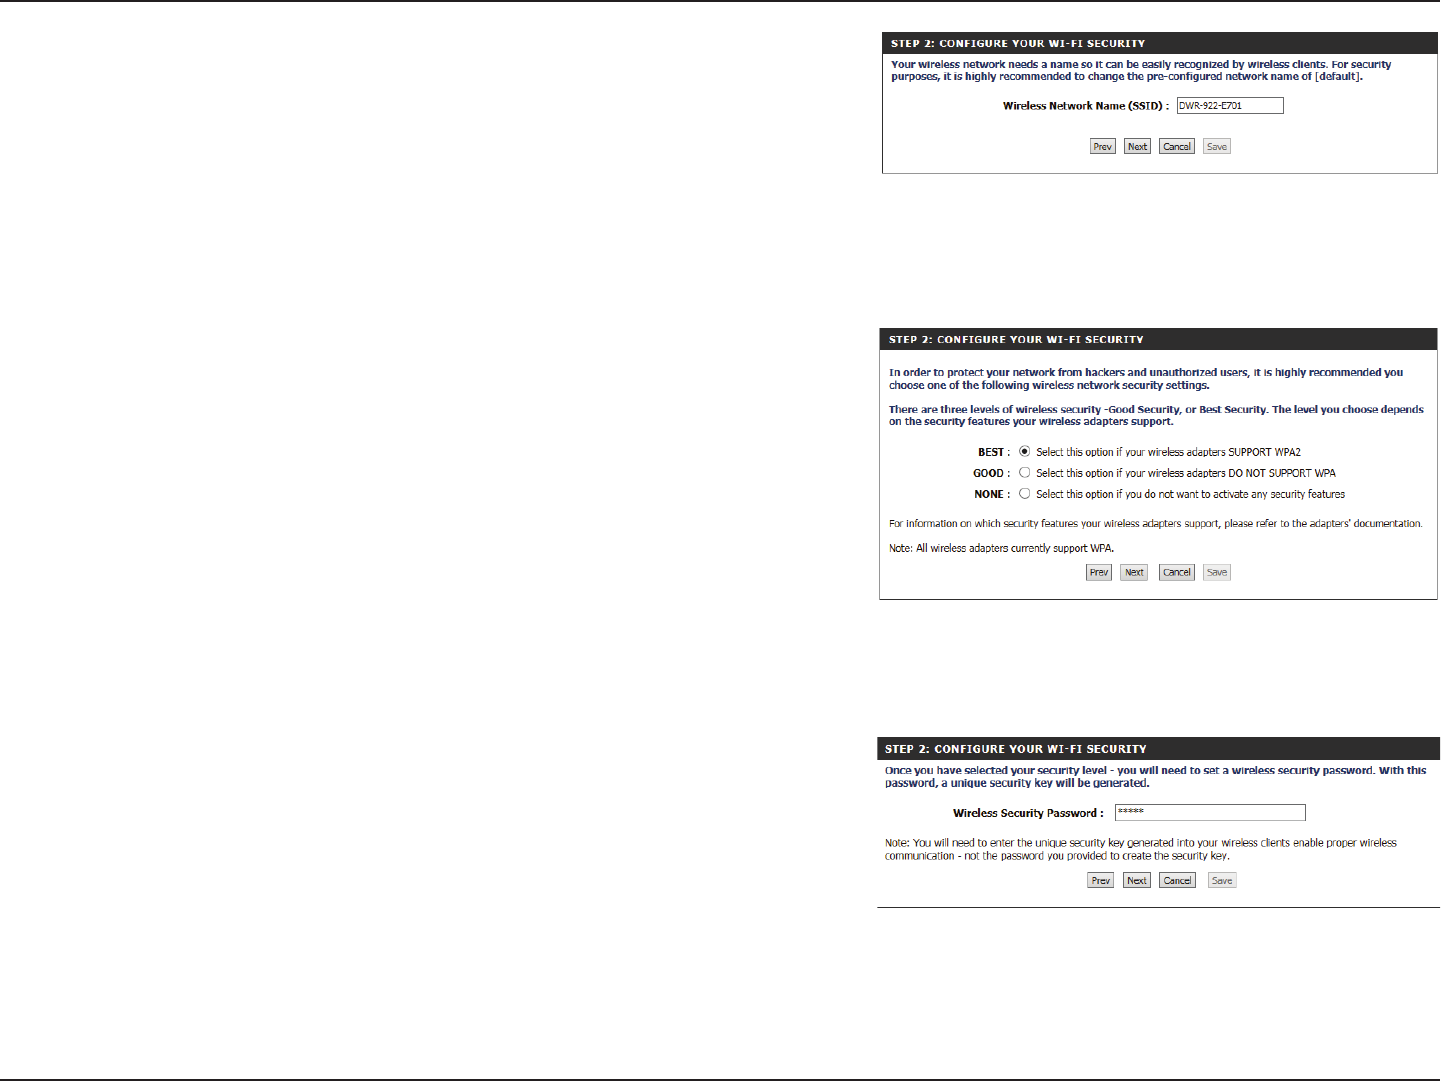
Enter a Wireless Network Name (SSID), then click Next to continue.
Choose the best security level supported by your wireless clients. Click Next to
continue.
Unless you chose None in the previous step, enter a security password. Clients must
enter this password to connect to your wireless network. Click Next to continue.

22D-Link DWR-961 User Manual
Section 4 - Conguration
This completes the Internet Connection Setup Wizard. Click Connect to save your
changes and reboot the router.
Create a new admin password and then click Next to continue. Users must enter this
password to enter the setup utility.
Select your time zone from the drop-down box and then click Next to continue.
23D-Link DWR-961 User Manual
Section 4 - Conguration
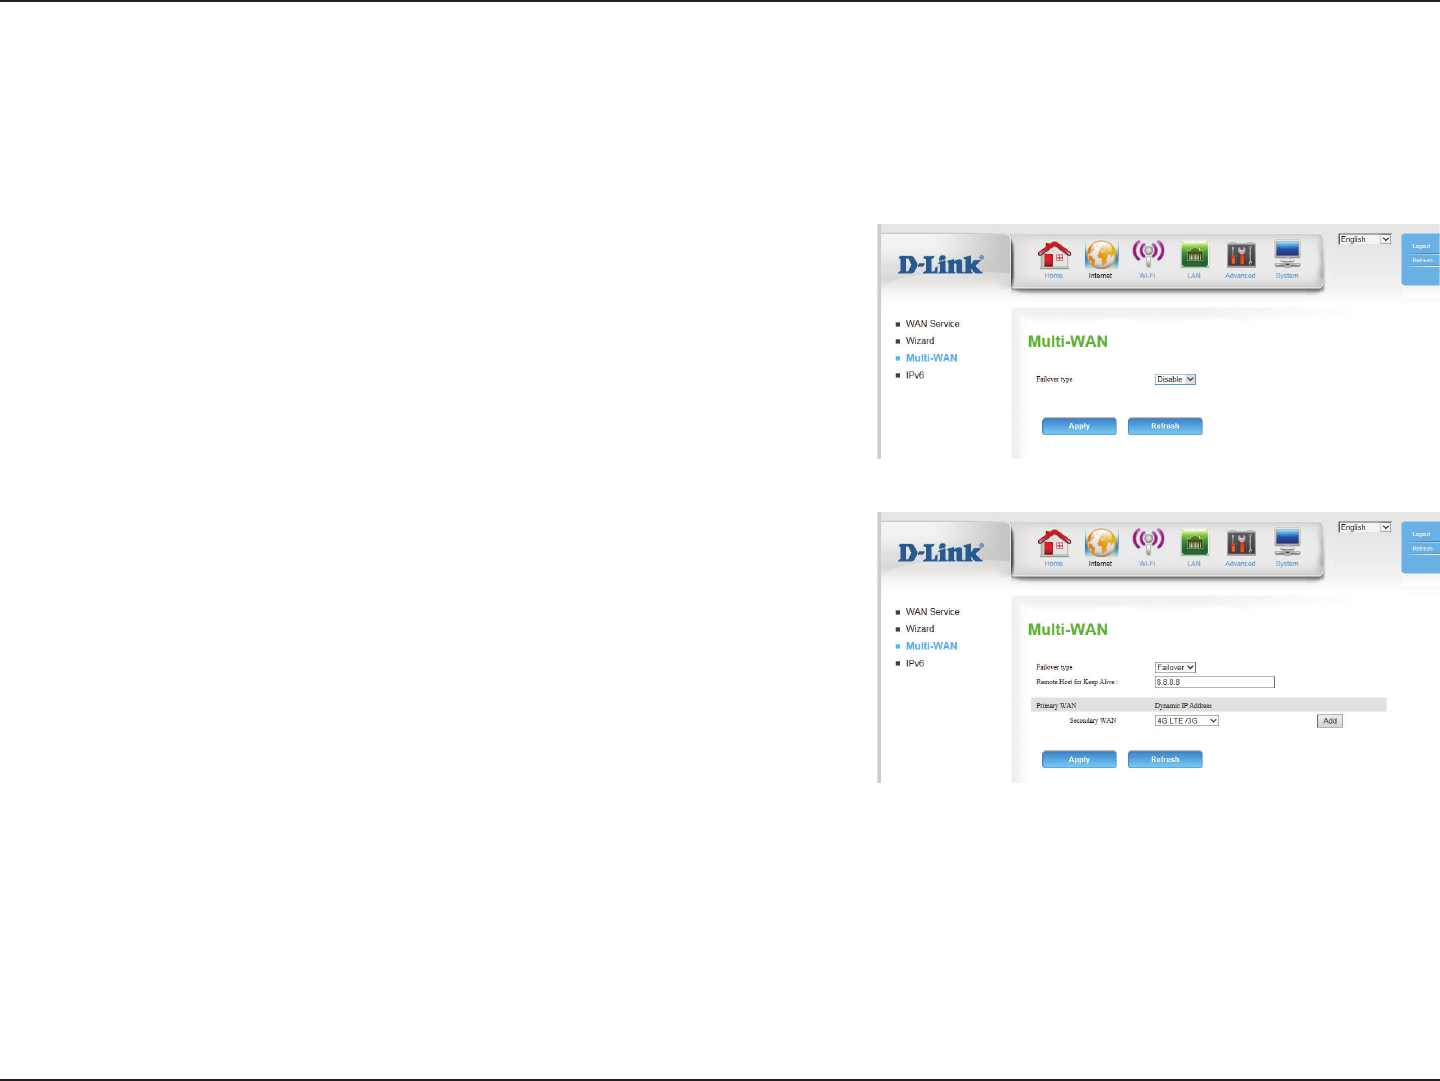
Multi-WAN
Select Failover to enable the failover function.
This option should be set to an external IP address that can be
used to ensure that the 4G LTE connection will be kept from
going oine due to inactivity. An example would be Google’s
public DNS servers (8.8.8.8 or 8.8.4.4) or your Internet service
provider’s DNS servers.
This will automatically be set to the currently congured Internet
connection type.
This can be set by clicking on Add, the available options will be
shown in the drop down box that appears.
Click Apply to save your settings, or Refresh to revert to your
previous settings.
Failover type:
Remote Host for
Keep Alive:
Primary WAN:
Secondary WAN:
The DWR-961’s multi-WAN feature allows you to set your router to automatically switch to a secondary Internet connection if your primary Internet
connection is lost. Note that you must rst specify your primary Internet connection either on the WAN Service tab (see page 8) or the Wizard
(see “Wizard” on page 19) before you can specify a secondary Internet connection. By default, the primary connection is 4G.
24D-Link DWR-961 User Manual
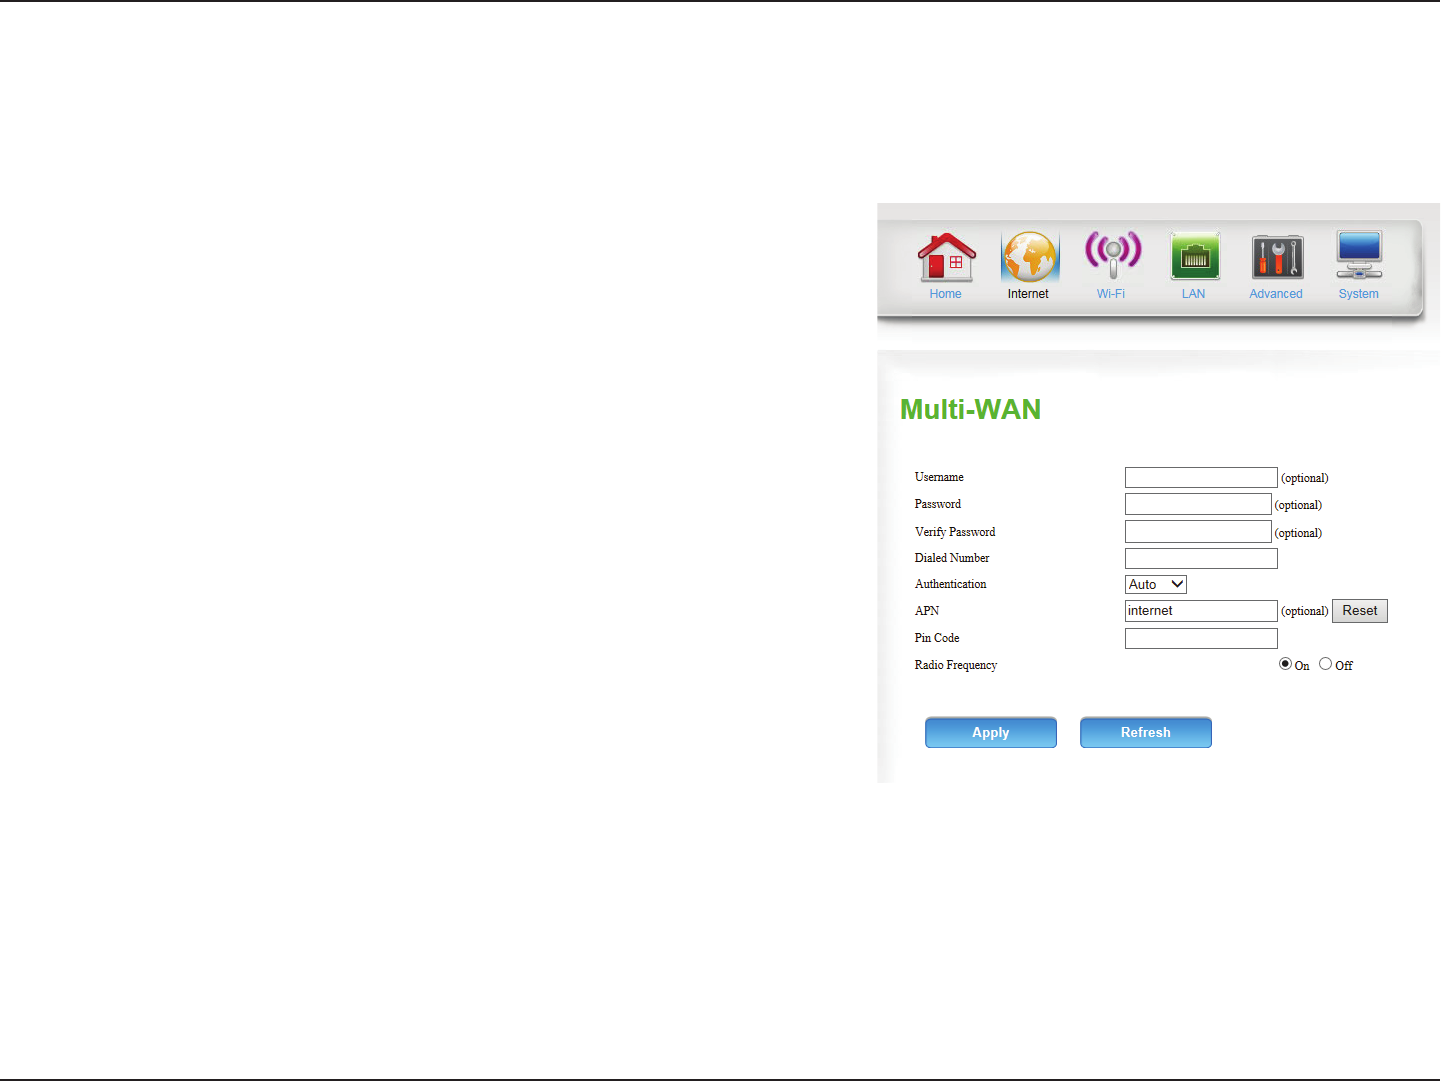
Section 4 - Conguration
Multi-WAN Conguration
Fill in only if requested by your ISP (optional).
Fill in only if requested by you ISP (optional).
Retype password if required above.
If your ISP provides you with a dial-in number, enter it here. Empty
by default.
Select PAP, CHAP or Auto if requested by your carrier. The default
authentication method is Auto.
Enter the APN (Access Point Name) for your 4G connection.
Press Reset to restore your APN setting to factory default. This
button leaves all other settings unchanged, including those on
this page.
If your SIM/UICC card has a PIN, enter it here (optional).
Turns the cellular radio on or o. This setting is intended to disable
the cellular radio for areas where radio transmissions may be
restricted.
Click Apply to save your settings, or Refresh to revert to your
previous settings.
Username:
Password:
Verify Password:
Dialed Number:
Authentication:
APN:
Reset:
Pin Code:
Radio
Frequency:
After selecting a secondary WAN and clicking apply, you will be directed to a setup screen for the relevant connection type.
4G LTE failover
25D-Link DWR-961 User Manual
Section 4 - Conguration
Static IP Address Failover
Enter the IP address assigned to your network connection.
Enter the subnet mark.
Enter the default gateway.
Enter the primary DNS server.
Enter the secondary DNS server.
You may need to change the Maximum Transmission Unit (MTU)
for optimal performance. The default value is 0.
The default MAC address is set to the WAN port’s physical interface
MAC address. Changing it is not recommended unless required
to do so by your ISP. You can use the Clone button to replace the
WAN port’s MAC address with the MAC address of your PC.
Click Apply to save your settings, or Refresh to revert to your
previous settings.
IP Address:
Subnet Mask:
Default Gateway:
Primary DNS
Server:
Secondary DNS
Server:
MTU:
MAC Address:
26D-Link DWR-961 User Manual
Section 4 - Conguration
Dynamic IP Failover
If your ISP requires you to enter a host name, enter it here. In most
cases, you may leave this blank.
Enter the primary DNS server.
Enter the secondary DNS server.
You may need to change the Maximum Transmission Unit (MTU)
for optimal performance. The default value is 0.
The default MAC address is set to the WAN port’s physical interface
MAC address. Changing it is not recommended unless required
to do so by your ISP. You can use the Clone button to replace the
WAN port’s MAC address with the MAC address of your PC.
Click Apply to save your settings, or Refresh to revert to your
previous settings.
Host Name:
Primary DNS
Server:
Secondary DNS
Server:
MTU:
MAC Address:
27D-Link DWR-961 User Manual
Section 4 - Conguration
PPPoE Failover
The username provided by your ISP for your PPPoE account.
The password provided by your ISP for your PPPoE account
Re-type your password in this eld.
Fill in if provided by your ISP (optional).
Fill in if provided by your ISP. If not, keep the default value.
Enter the primary DNS server.
Enter the secondary DNS server.
The default MAC address is set to the WAN port’s physical interface
MAC address. Changing it is not recommended unless required
to do so by your ISP. You can use the Clone button to replace the
WAN port’s MAC address with the MAC address of your PC.
Click Apply to save your settings, or Refresh to revert to your
previous settings.
Username:
Password:
Verify Password:
Service Name:
IP Address:
Primary DNS
Server:
Secondary DNS
Server:
MAC Address:

28D-Link DWR-961 User Manual
Section 4 - Conguration
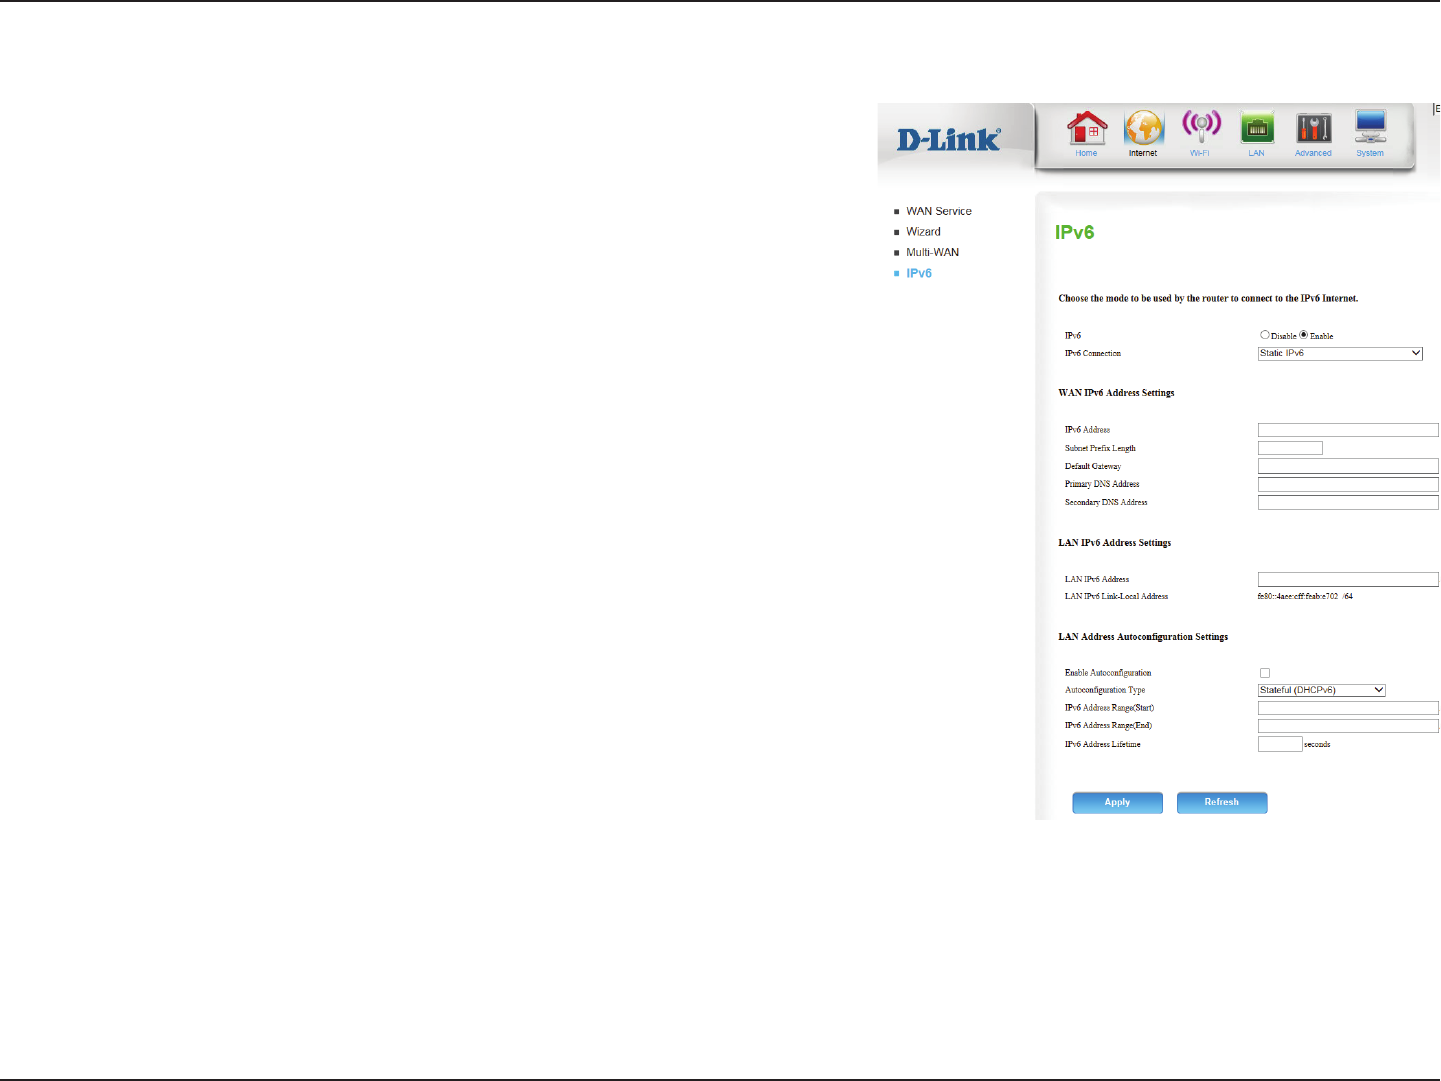
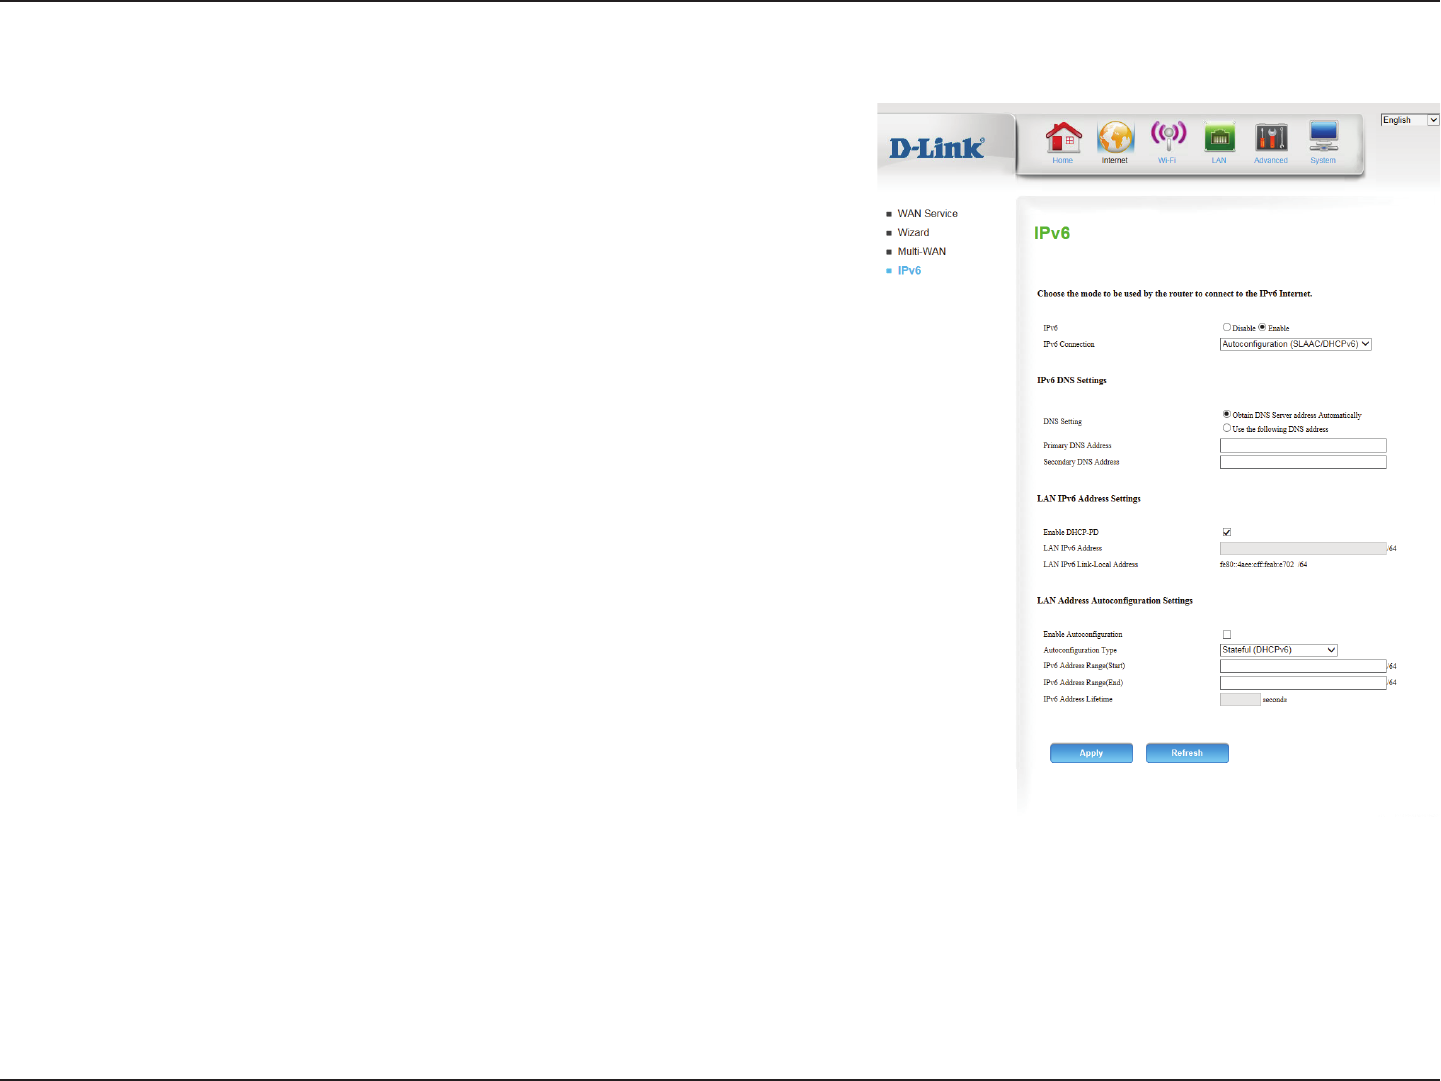
IPv6
Link-local Only
Displays the IPv6 address of the router.
Click Apply to save your settings, or Refresh to revert to your
previous settings.
LAN IPv6 Link-
Local Address:
To enable IPv6, select Enable.
Select the IPv6 connection type specied by your ISP. The
corresponding settings will be displayed below. Please see the
following sections for details on how to congure these dierent
connection types.
IPv6:
IPv6 Connection:
29D-Link DWR-961 User Manual
Section 4 - Conguration
Static IPv6
Enter the static IPv6 address of the router.
Enter the subnet prex length.
Enter the default gateway address.
Enter the primary and secondary DNS server addresses.
Enter the LAN (local) IPv6 address for the router.
Displays the router’s LAN link-local address.
Check to enable the autoconguration feature for LAN devices.
Select Stateful (DHCPv6) or SLAAC + Stateless DHCPv6. This will
determine the conguration type for you IPv6 LAN.
If you selected Stateful (DHCPv6), enter the address range start.
If you selected Stateful (DHCPv6), enter the address range end.
Enter the IPv6 address lifetime (in seconds).
Click Apply to save your settings, or Refresh to revert to your
previous settings.
IPv6 Address:
Subnet Prex
Length:
Default Gateway:
DNS Addresses:
LAN IPv6 Address:
LAN IPv6 Link-
Local Address:
Enable
Autoconguration:
Autoconguration
Type:
IPv6 Address
Range (Start):
IPv6 Address
Range (End):
Router
Advertisement
Lifetime:
30D-Link DWR-961 User Manual
Section 4 - Conguration
Autoconguration (SLAAC/DHCPv6)
Select either Obtain DNS server address automatically or Use
the following DNS address.
Enter the primary and secondary DNS server addresses.
Check to enable the DHCP-PD feature.
If you did not enable DHCP-PD, enter the LAN (local) IPv6 address
for the router.
Displays the router’s LAN link-local address.
Check to enable the autoconguration feature.
Select Stateful (DHCPv6) or SLAAC + Stateless DHCPv6. This will
determine the conguration type for you IPv6 LAN.
If you selected Stateful (DHCPv6), enter the address range start.
If you selected Stateful (DHCPv6), enter the address range end.
Enter the IPv6 address lifetime (in seconds).
Click Apply to save your settings, or Refresh to revert to your
previous settings.
DNS Setting:
DNS Addresses:
Enable DHCP-PD:
LAN IPv6 Address:
LAN IPv6 Link-
Local Address:
Enable
Autoconguration:
Autoconguration
Type:
IPv6 Address
Range (Start):
IPv6 Address
Range (End):
IPv6 Address
Lifetime:
31D-Link DWR-961 User Manual
Section 4 - Conguration
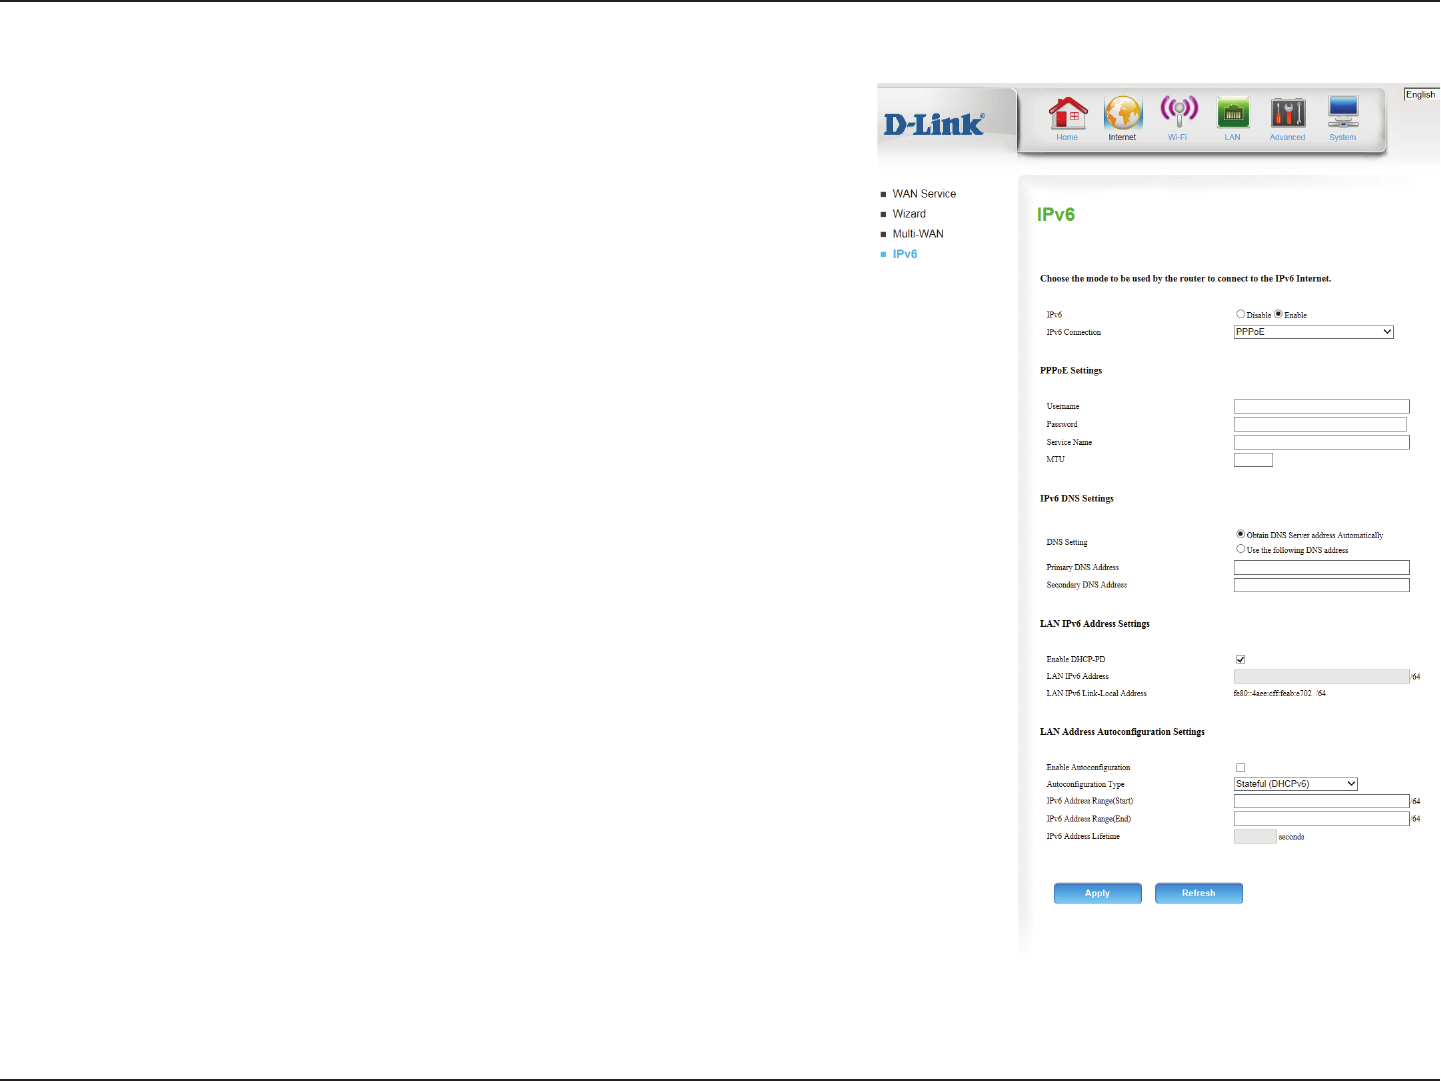
PPPoE
Enter your PPPoE user name.
Enter your PPPoE password.
Enter the ISP Service Name (optional).
Maximum Transmission Unit - you may need to change the MTU
for optimal performance with your specic ISP.
Select either Obtain DNS Server address Automatically or Use
the following DNS address.
Enter the primary and secondary DNS server addresses.
Check to enable the DHCP-PD feature.
If you did not enable DHCP-PD, enter the LAN (local) IPv6 address.
Displays the router’s LAN link-local address.
Check to enable the autoconguration feature.
Select Stateful (DHCPv6) or SLAAC + Stateless DHCPv6. This will
determine the conguration type for you IPv6 LAN.
If you selected Stateful (DHCPv6), enter the address range start.
If you selected Stateful (DHCPv6), enter the address range end.
Username:
Password:
Service Name:
MTU:
DNS Setting:
DNS Addresses:
Enable DHCP-PD:
LAN IPv6 Address:
LAN IPv6 Link-
Local Address:
Enable
Autoconguration:
Autoconguration
Type:
IPv6 Address
Range (Start):
IPv6 Address
Range (End):

32D-Link DWR-961 User Manual
Section 4 - Conguration
PPPoE
Enter the IPv6 address lifetime (in seconds).
Click Apply to save your settings, or Refresh to revert to your
previous settings.
IPv6 Address
Lifetime:
33D-Link DWR-961 User Manual
Section 4 - Conguration
Wi-Fi
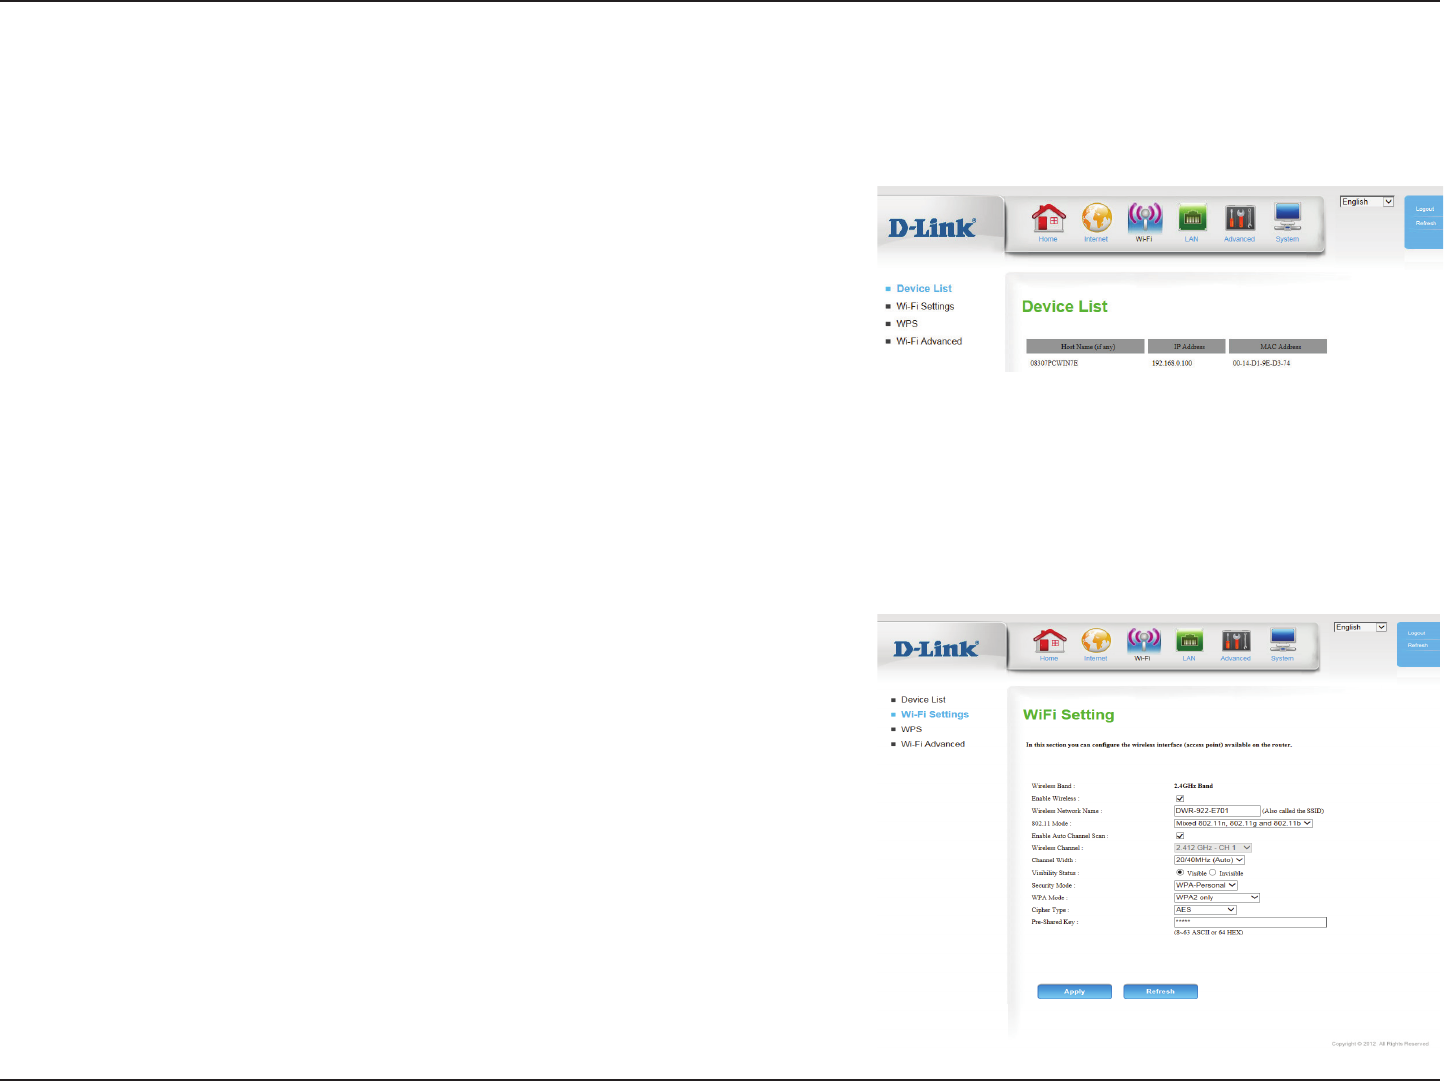
Device List
This page displays a list of currently-connected wireless clients, and their
respective MAC addresses.
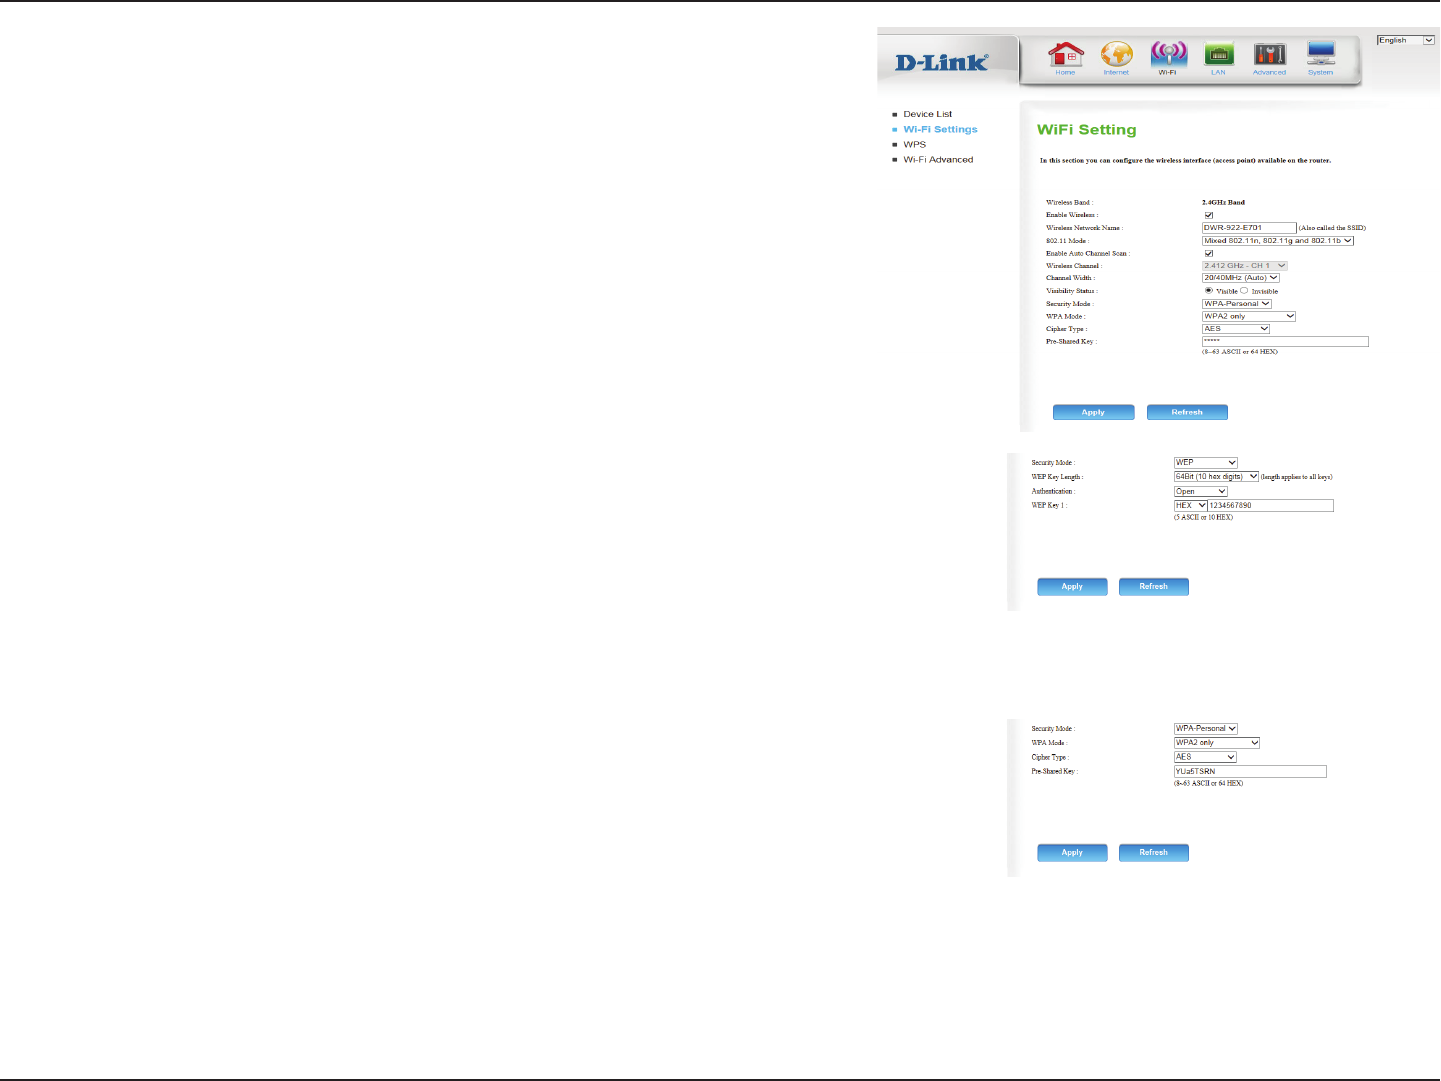
Wi-Fi Settings
Check this box to enable wireless access. When you enable this
option, the following parameters take eect.
Also known as the SSID (Service Set Identier), this is the name of
your Wireless Local Area Network (WLAN). Enter a name using up
to 32 alphanumeric characters. The SSID is case-sensitive.
Select the IEEE 802.11 standard used by your wireless clients.
Enabling this feature will allow the router to automatically scan for
the best wireless channel to use.
If Auto Channel Scan is disabled, select the desired channel here.
Enable Wireless:
Wireless
Network Name:
802.11 Mode:
Enable Auto
Channel Scan:
Wireless
Channel:
This page lets you set up your wireless network and choose a wireless security mode. Click Apply to save your settings, or Refresh to revert to your
previous settings.
34D-Link DWR-961 User Manual
Section 4 - Conguration
A higher channel width allows for faster data transmission, at the
possible expense of wireless coverage and compatibility with
older wireless clients. Select the optimum channel width for your
wireless network from the drop-down menu.
The default setting is Visible. Select Invisible if you do not want
to broadcast the SSID of your wireless network.
Select the desired wireless encryption mode. WPA/WPA2 is
recommended if your clients support it.
Channel Width:
Visibility Status:
Security Mode:
Select whether to use WPA2 only or Auto (WPA or WPA2). WPA2
only is the most secure, provided that all of your clients support it.
Select whether to use the TKIP or AES cipher. The AES cipher is
the most secure, provided that all of your clients can support it.
Enter the key/password you want to use for your wireless network.
The key must be between 8 and 63 characters long, and may only
contain letters and numbers.
WPA Mode:
Cipher Type:
Pre-Shared Key:
If you choose WPA-Personal, the following options will appear:
Select whether to use 64-bit or 128-bit encryption.
Select whether to use Open or Shared authentication.
Set the WEP key/password for your wireless network. Based on
whether you are using 64 or 128-bit encryption, and whether
you are using a HEX or ASCII key, you will need to enter dierent
numbers of characters for your key, as indicated below the WEP
Key text box. ASCII keys may use letters and numbers only, and
HEX keys may use numbers 0-9 and letters A-F only.
WEP Key Length:
Authentication:
WEP Key 1:
If you choose WEP, the following options will appear:
35D-Link DWR-961 User Manual
Section 4 - Conguration
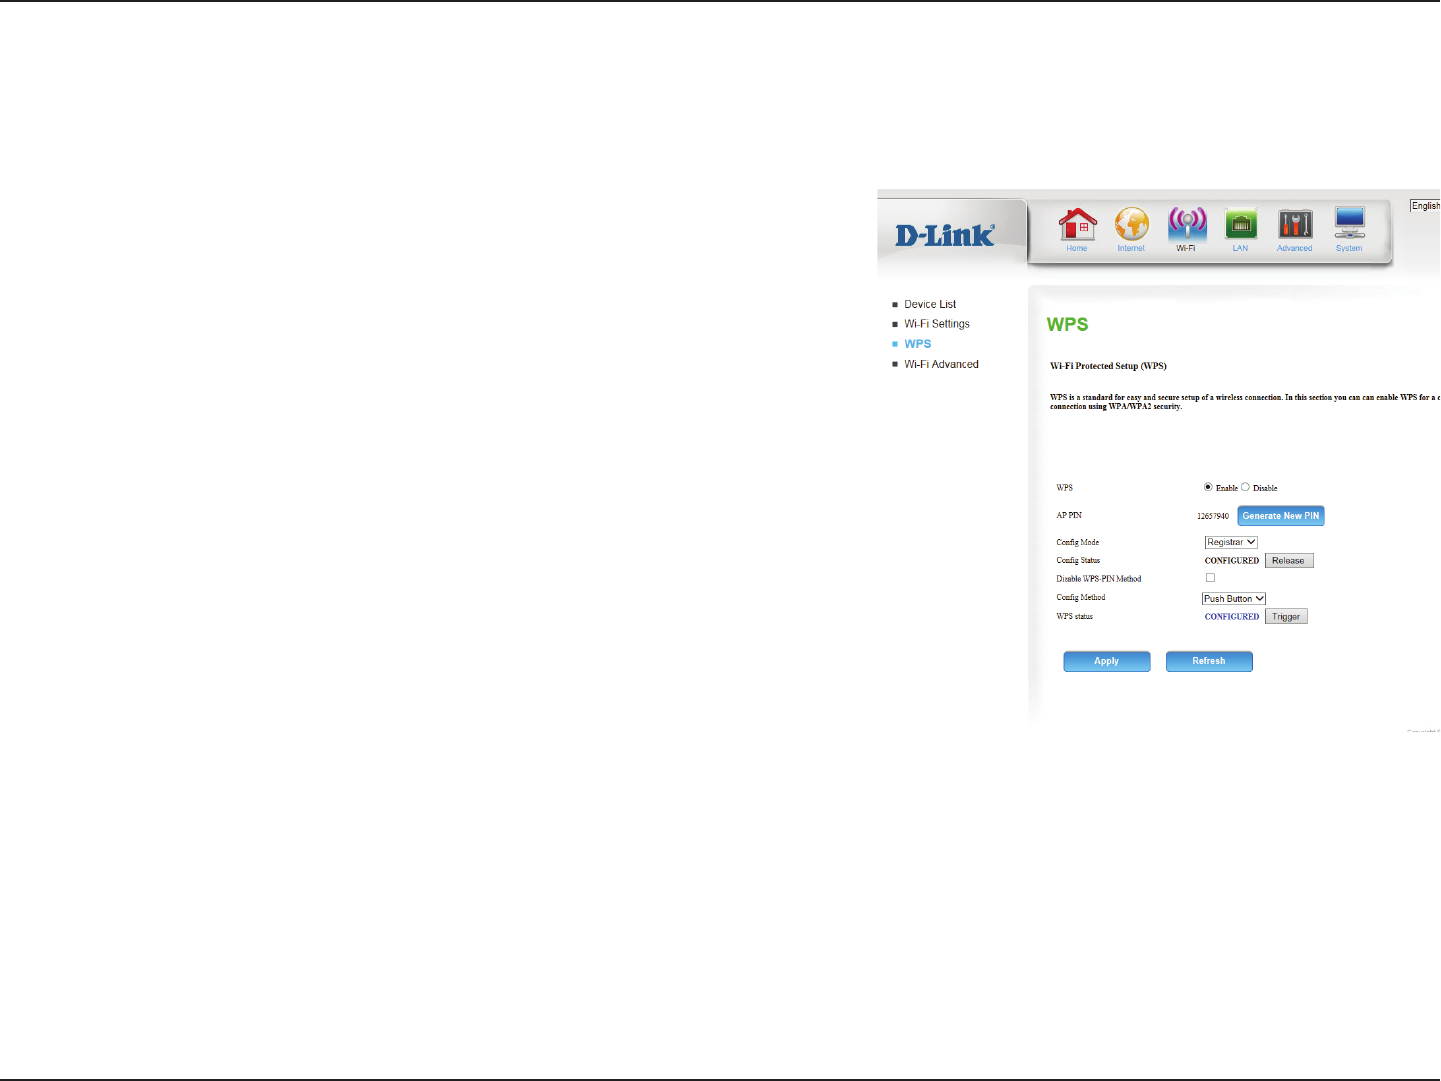
Select whether you would like to Enable or Disable WPS features.
If you use Windows 7’s Connect to a network wizard to do initial
conguration of the router, you will have the option to enter the
WPS PIN/AP PIN into the wizard when prompted. The factory
default WPS PIN/AP PIN is printed on a label located on the
bottom of the router. You can click the Generate New PIN button
to change it to a randomly generated PIN.
Select whether the WPS cong mode should be set to Registrar or
Enrollee. In most cases, this should be set to Registrar so that you
can use WPS to connect new wireless clients.
If this is set to CONFIGURED, the router will be marked as “already
congured” to computers that try to use WPS conguration, such
as Windows 7’s Connect to a network wizard. You can click the
Release button to change the status to UNCONFIGURED to allow
for WPS conguration of the router.
If this is set to UNCONFIGURED, you can click the Set button to
change the status to CONFIGURED to block WPS conguration of
the router.
Enable this option to prevent clients from connecting to the router
using the PIN method. If this option is enabled, clients must use
the push-button method to connect.
WPS:
AP PIN:
Cong Mode:
Cong Status:
Disable WPS-PIN
Method:
The Wi-Fi Protected Setup page allows you to create a wireless connection between your router and a device automatically by simply pushing a
button or entering a PIN code.
WPS
36D-Link DWR-961 User Manual
Section 4 - Conguration
This lets you choose whether to use the Push Button connection
method (PBC) or PIN method to connect to a wireless client when
the Trigger button is clicked. If you choose the PIN method, you
will need to enter an 8-digit PIN number that the wireless client
needs to use to connect to your router.
This will show the current WPS connection process status. Click
the Trigger button to initiate a WPS connection.
Click Apply to save your settings, or Refresh to revert to your
previous settings.
Cong Method:
WPS status:

37D-Link DWR-961 User Manual
Section 4 - Conguration
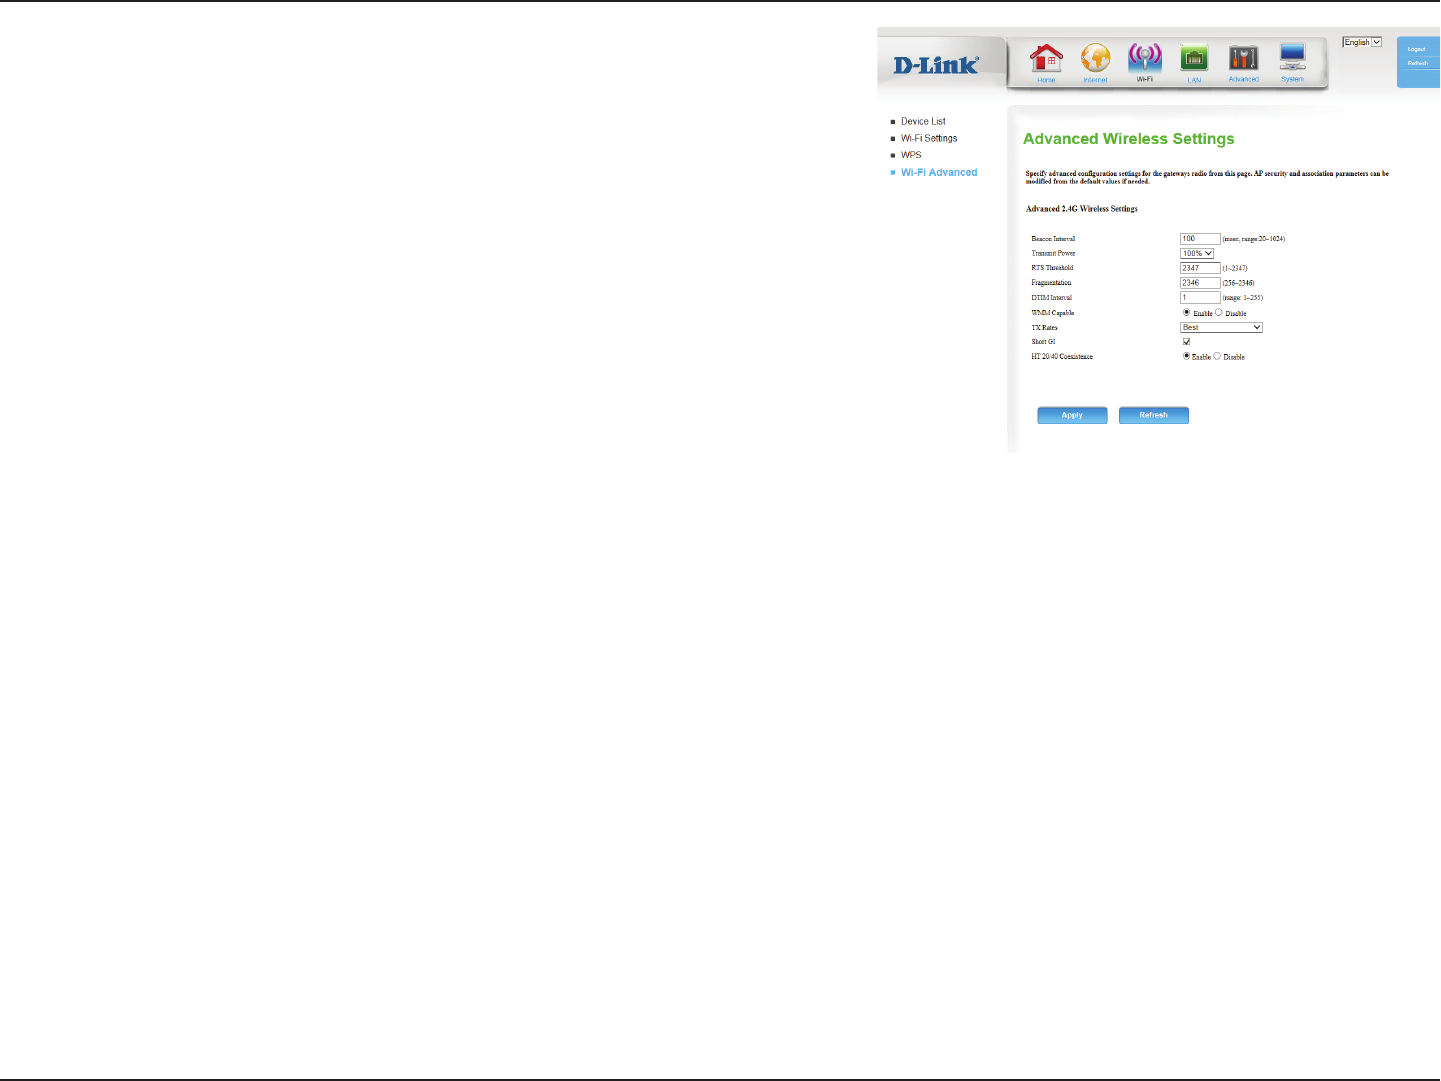
Wi-Fi Advanced
This page contains settings which can negatively aect the performance of your router if congured improperly. Do not change these settings
unless you are already familiar with them or have been instructed to make the change by one of our support personnel.
Specify a value for the beacon interval. Beacons are packets sent
by an access point to synchronize a wireless network. 100 is the
default setting and is recommended.
Set the transmit power of the antennas.
This value should remain at its default setting of 2347. If
inconsistent data ow is a problem, only a minor modication
should be made.
The fragmentation threshold, which is specied in bytes,
determines whether packets will be fragmented. Packets
exceeding the 2346 byte setting will be fragmented before
transmission. 2346 is the default setting.
Set the interval for DTIM. A Delivery Trac Indication Message
(DTIM) is a countdown informing clients of the next window for
listening to broadcast and multicast messages. The default interval
is 1.
WMM (Wi-Fi Multimedia) is a QoS (Quality of Service) system for
your wireless network. Enable this option to improve the quality of
video and voice applications for your wireless clients.
Select the basic transfer rates based on the speed of wireless
adapters on your wireless network. It is strongly recommended to
keep this setting to Best.
Beacon Interval:
Transmit Power:
RTS Threshold:
Fragmentation:
DTIM Interval:
WMM Capable:
TX Rates:
38D-Link DWR-961 User Manual
Section 4 - Conguration
Check this box to reduce the guard interval to 400 ns. This can
increase the throughput rate provided that the delay spread of the
connection is also low. However, it can also increase error rate in
some installations, due to increased sensitivity to radio-frequency
reections. Select the option that works best for your installation.
Enable this option to reduce interference from other wireless
networks in your area. If the channel width is operating at 40 MHz
and there is another wireless network’s channel over-lapping
and causing interference, the router will automatically change to
20MHz.
Click Apply to save your settings, or Refresh to revert to your
previous settings.
Short GI:
HT 20/40
Coexistence:
39D-Link DWR-961 User Manual
Section 4 - Conguration
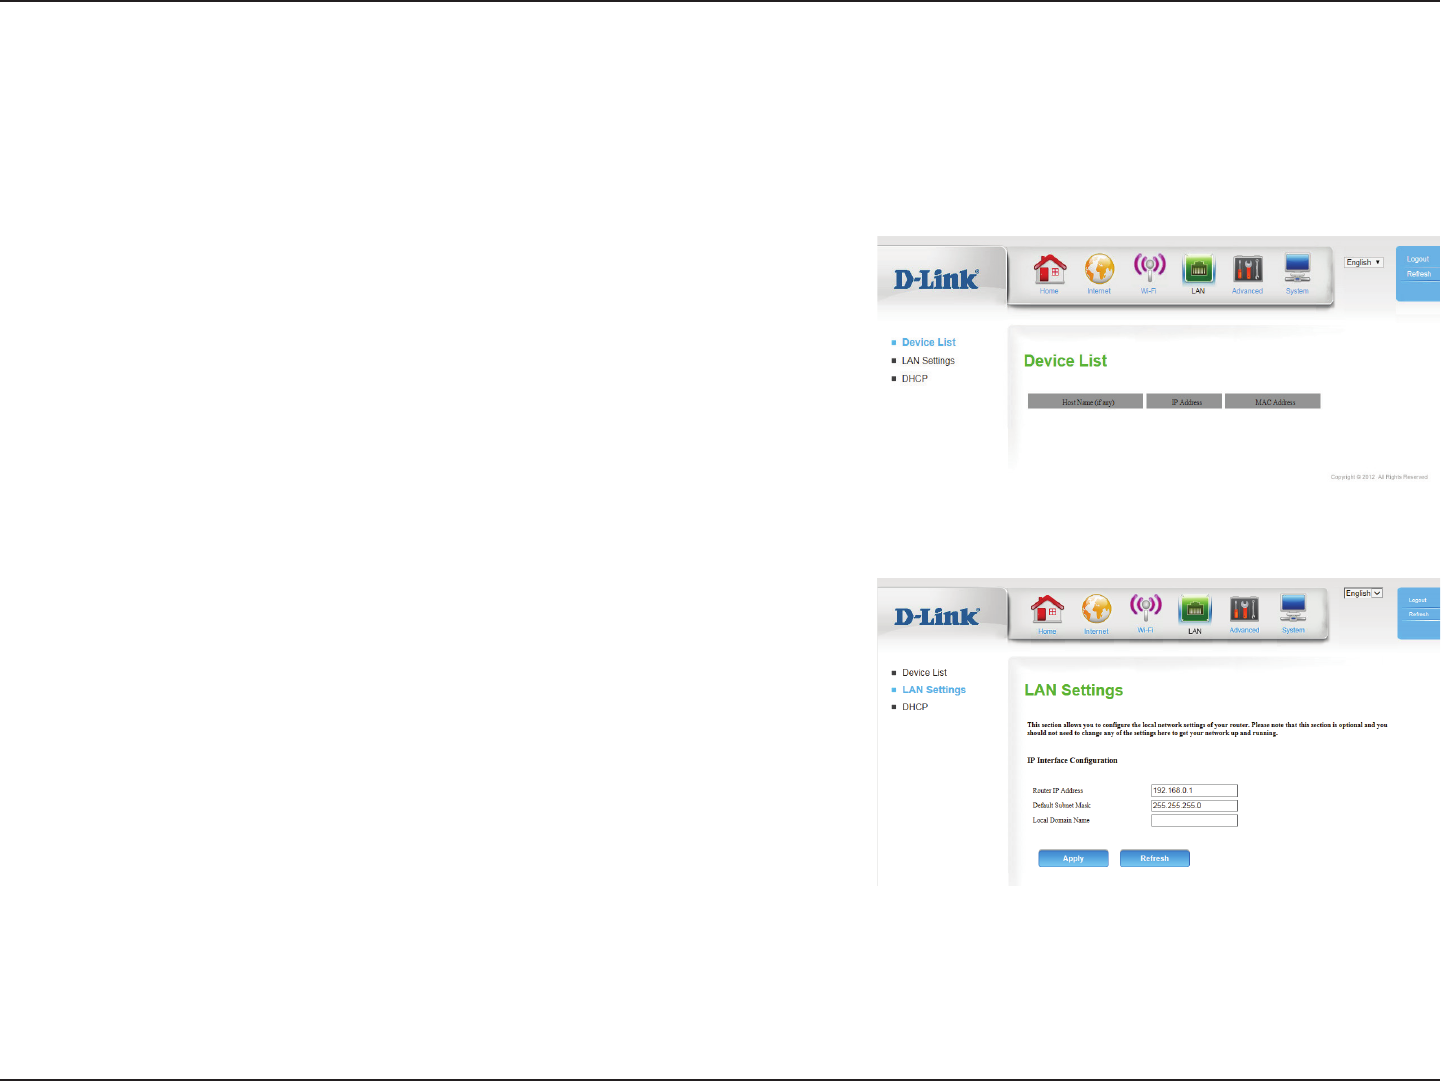
LAN
Device List
This page displays a list of currently-connected wired clients, and their respective
MAC addresses.
LAN Settings
Enter the IP address you want to use for the router. The default
IP address is 192.168.0.1. If you change the IP address, you will
need to enter the new IP address in your browser to get into the
conguration utility.
Enter the subnet mask of the router. The default subnet mask is
255.255.255.0.
Enter the local domain name for your network.
Click Apply to save your settings, or Refresh to revert to your
previous settings.
Router IP Address:
Default Subnet
Mask:
Local Domain
Name:
This section will help you to change the local network settings of your router and to congure the DHCP Server settings.
40D-Link DWR-961 User Manual
Section 4 - Conguration
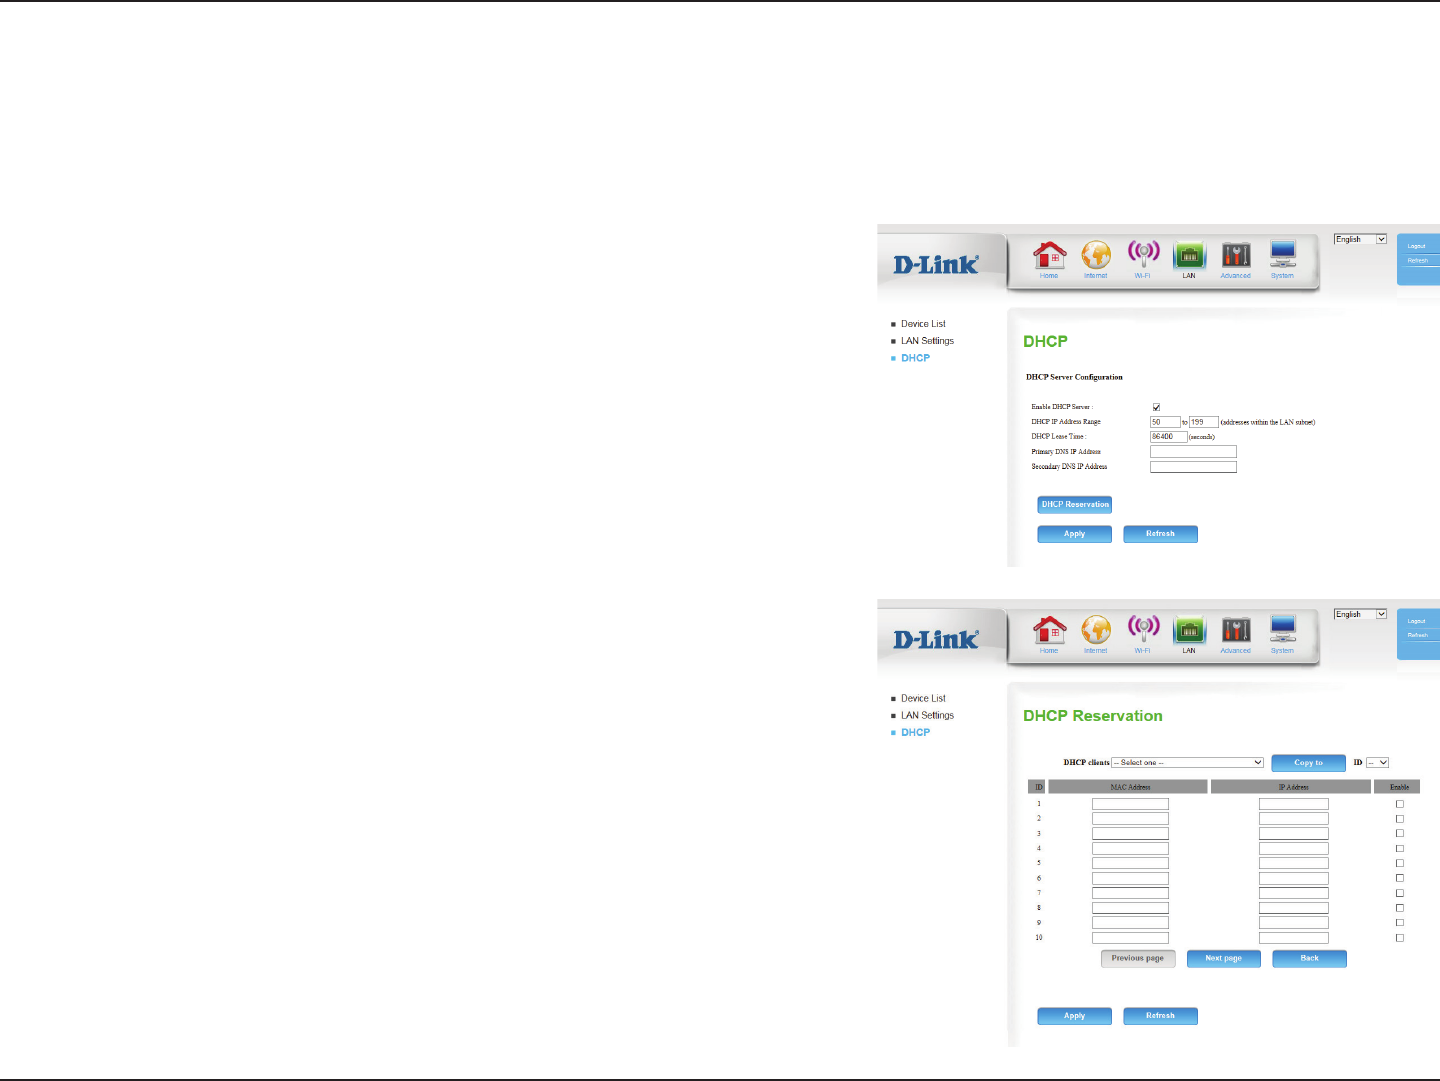
DHCP
Select this box to enable the DHCP server on your router.
Enter the range of IPs for the DHCP server to use to assign IP
addresses to devices on your network. These values will represent
the last octet of the IP addresses in the pool.
Enter the lease time for IP address assignments.
Enter the primary DNS IP address that will be assigned to DHCP
clients.
Enter the secondary DNS IP address that will be assigned to DHCP
clients.
Click DHCP Reservation to assign a dedicated IP to a specied
MAC address to be saved by the DHCP server. The Fixed Mapping
page will appear.
Select a DHCP client and click Copy to, or enter the MAC address
and IP address manually, to assign the IP address to the MAC
address. Click Enable to enable the rule.
Click Apply to save your settings, or Refresh to revert to your
previous settings.
Enable DHCP
Server:
DHCP IP Address
Range:
DHCP Lease Time:
Primary DNS IP
Address:
Secondary DNS IP
Address:
DHCP
Reservation:
The DWR-961 has a built-in DHCP (Dynamic Host Control Protocol) server. The DHCP server assigns IP addresses to devices on the network that
request them. By default, the DHCP Server is enabled on the device. The DHCP address pool contains a range of IP addresses, which are automatically
assigned to the clients on the network.
41D-Link DWR-961 User Manual
Section 4 - Conguration
Advanced
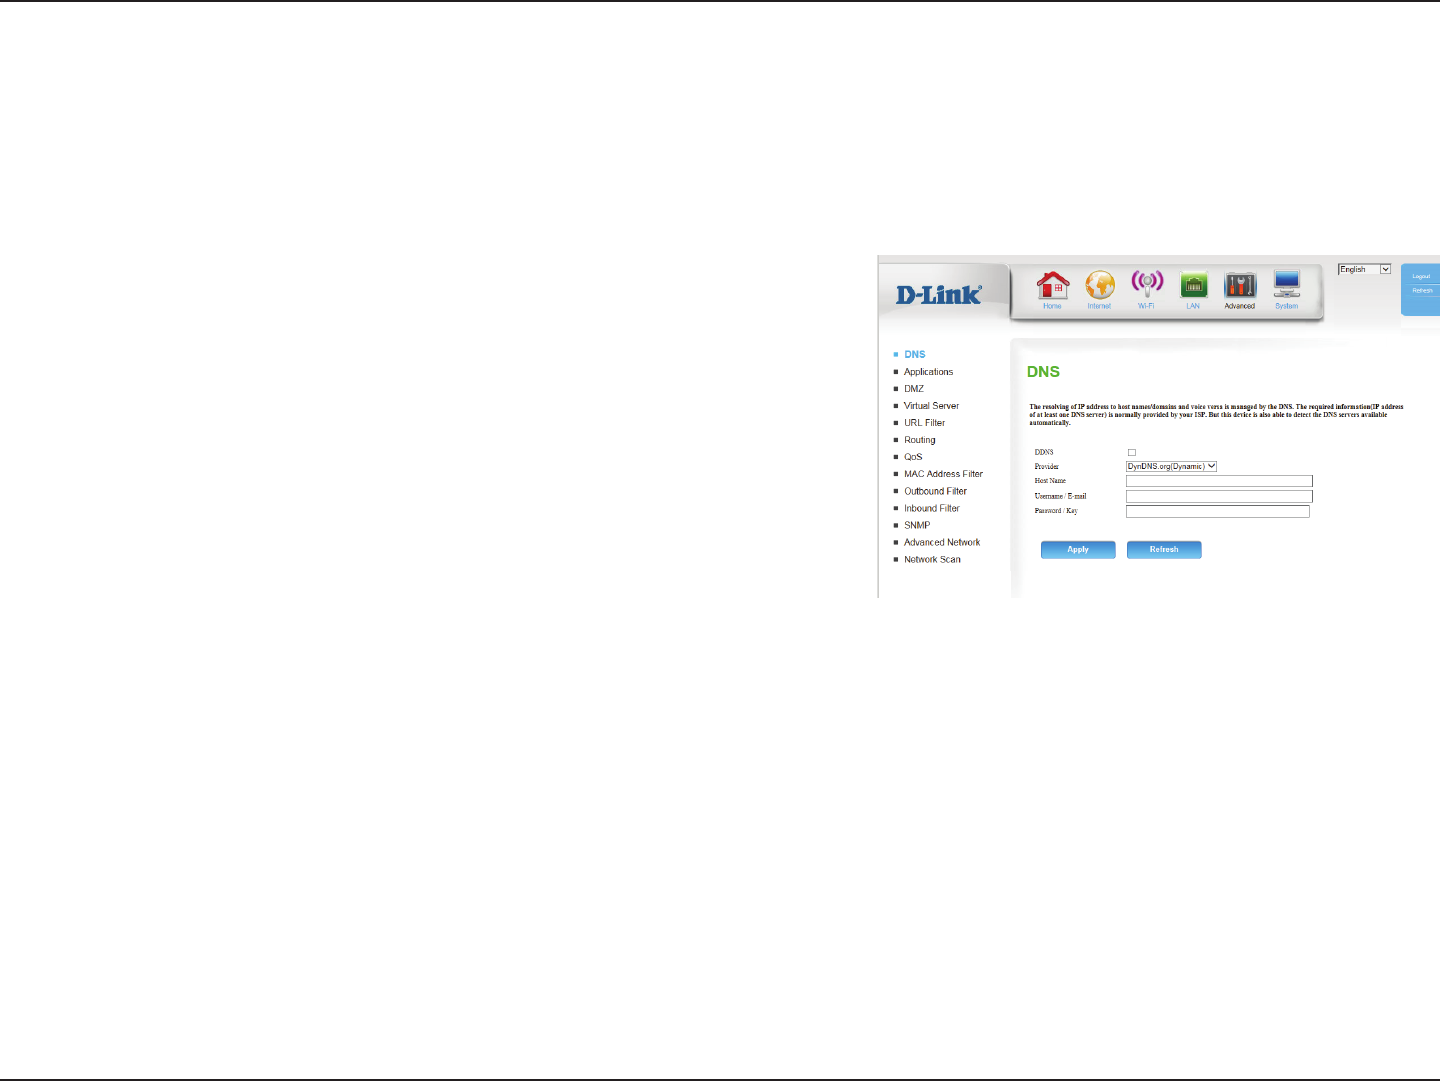
DNS
Tick this checkbox to enable the DDNS feature.
Select a DDNS service provider to use.
Enter the Host Name that you registered with your DDNS service
provider.
Enter the Username for your DDNS account.
Enter the Password for your DDNS account.
Click Apply to save your settings, or Refresh to revert to your
previous settings.
DDNS:
Provider:
Host Name:
Username /
E-mail:
Password / Key:
On this page you can congure the Domain Name System (DNS) server, which manages the resolution of host/domain names to IP addresses.
42D-Link DWR-961 User Manual
Section 4 - Conguration
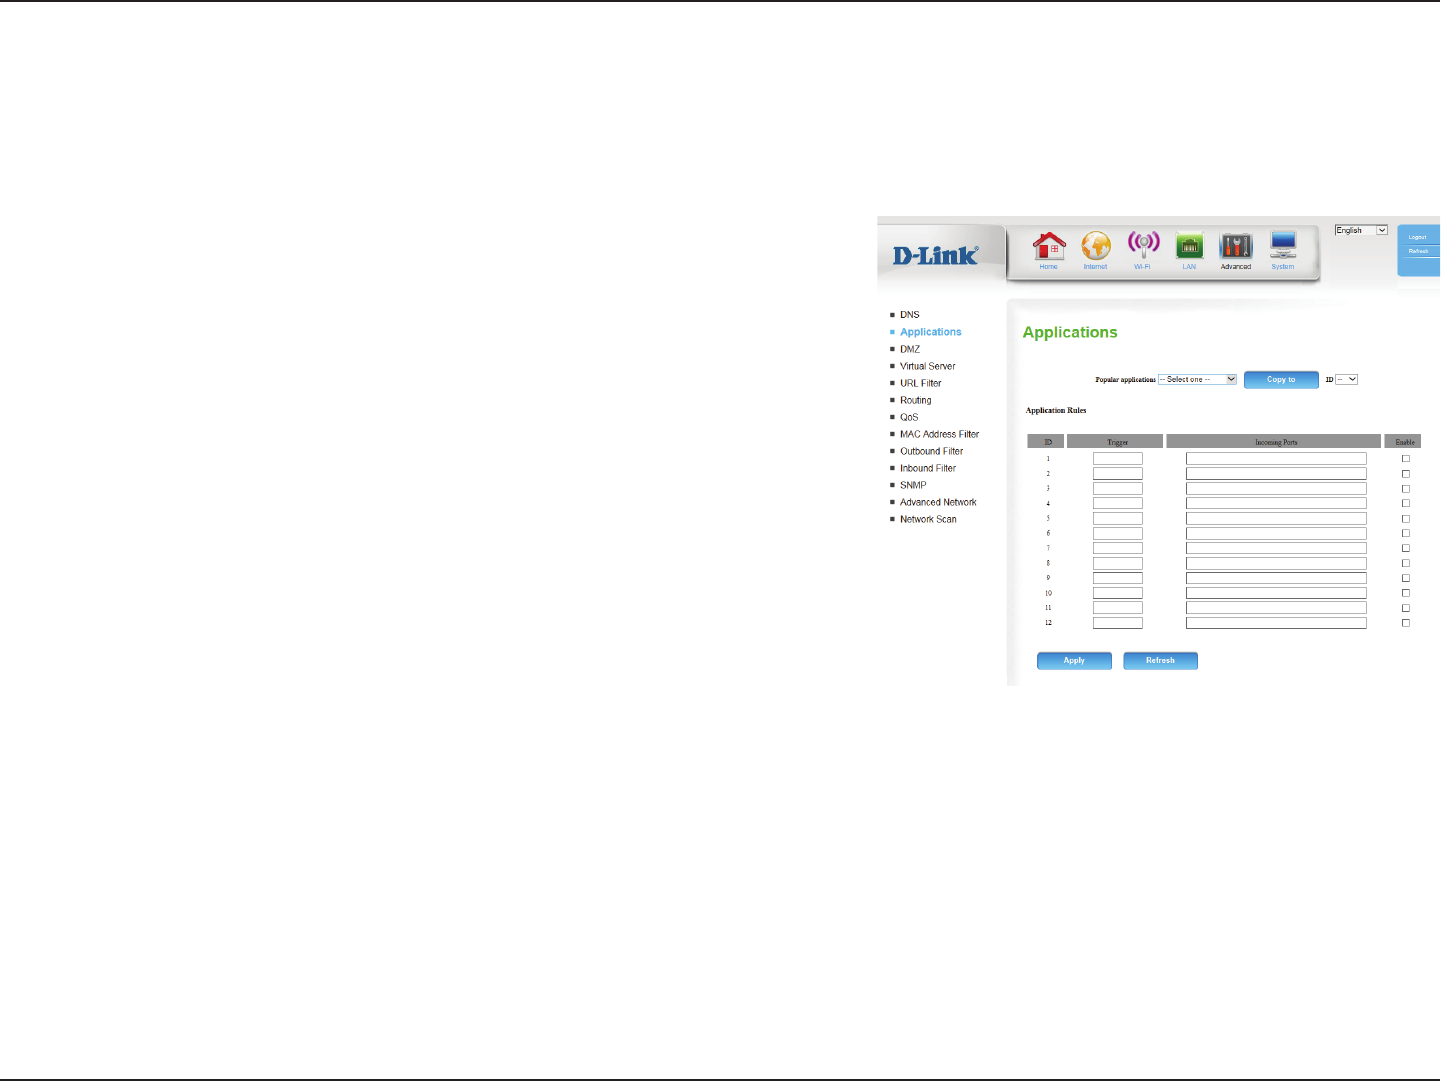
Some applications require multiple connections, such as Internet gaming, video conferencing, and Internet telephony. These applications may
have diculty working through NAT (Network Address Translation). Applications allows some of these applications to work with the DWR-961 by
opening ports after detecting trac being sent through a trigger port.
Select from a list of popular applications. You can select a service,
select a rule ID, then click the Copy to button to copy the default
settings for that service to the specied rule ID.
Species which rule to copy the selected Popular applications
settings to when you click the Copy to button.
APPLICATION RULES
This identies the rule.
Enter the port to listen to in order to trigger the rule.
Specify the incoming port(s) to open when trac comes over the
Trigger port.
Check the box to enable the specied rule.
Click Apply to save your settings, or Refresh to revert to your
previous settings.
Popular
Applications:
ID:
ID:
Trigger:
Incoming Ports:
Enable:
Applications
43D-Link DWR-961 User Manual
Section 4 - Conguration
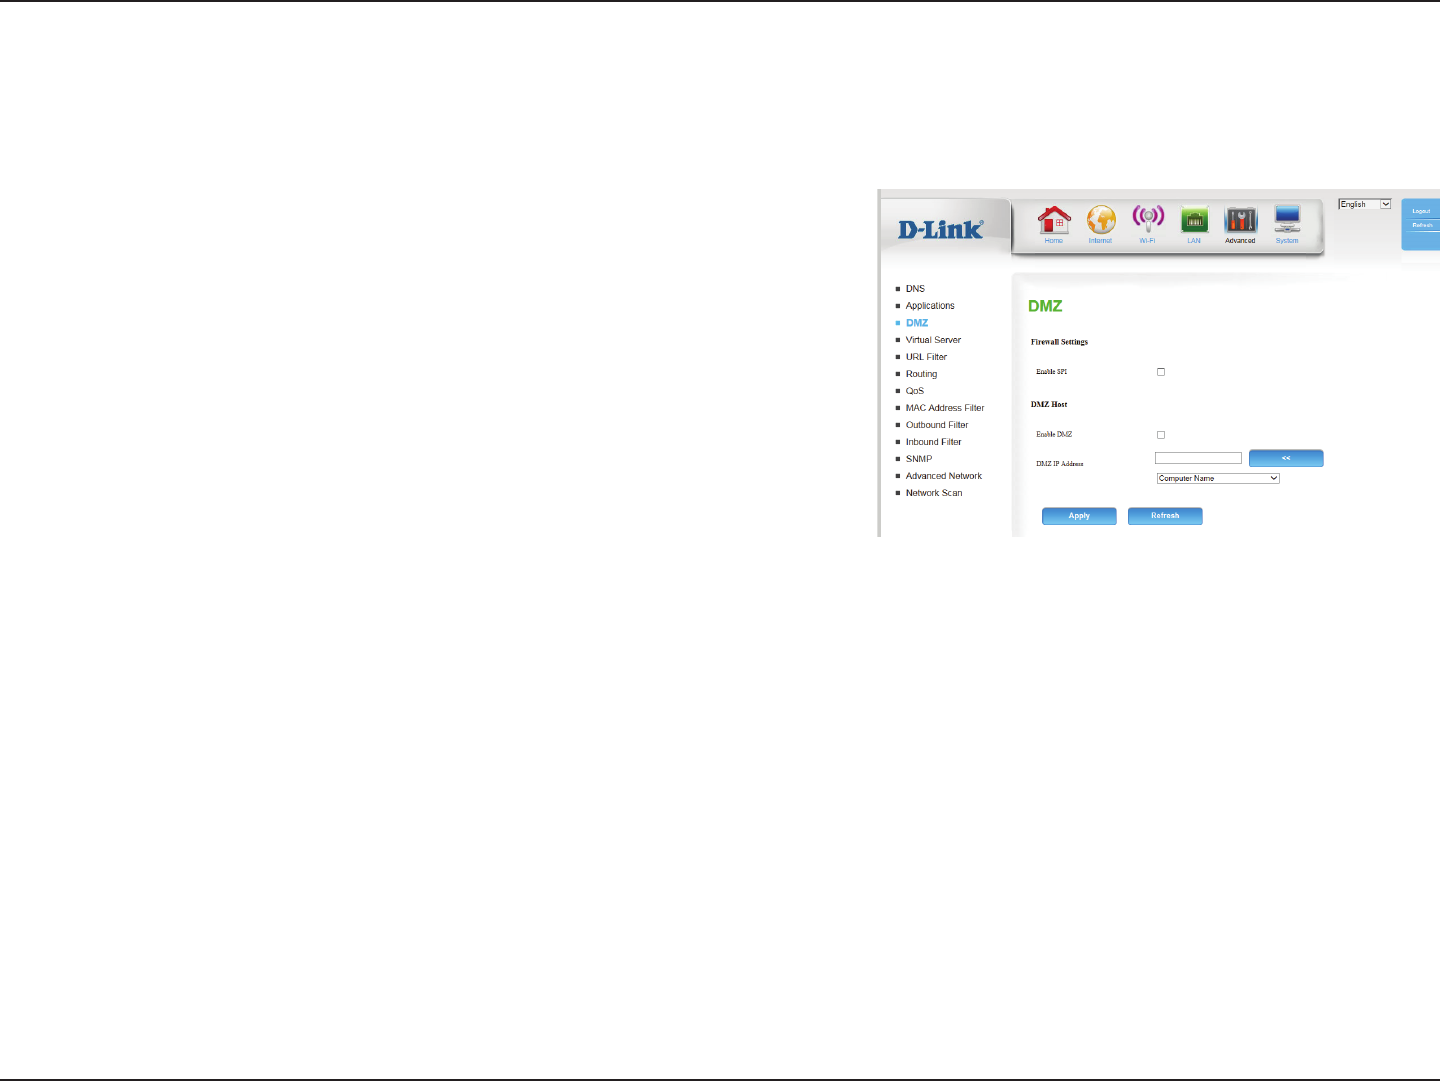
Sometimes you may want a computer exposed to the Internet for certain types of applications. If you choose to expose a computer, you can enable
Demilitarized Zone (DMZ). This option will expose the chosen computer completely to the Internet. This is not recommended for normal use.
Enabling Stateful Packet Inspection (SPI) helps to prevent cyber
attacks by validating that the trac passing through the session
conforms to the protocol.
If an application has trouble working from behind the router, you
can expose one computer to the Internet and run the application
on that computer.
Note: Placing a computer in the DMZ may expose that
computer to a variety of security risks. Use of this option is only
recommended as a last resort.
Specify the IP address of the computer on the LAN that you want
to have unrestricted Internet communication. If this computer
obtains its IP address automatically using DHCP, be sure to make
a static reservation on the LAN > DHCP > DHCP Reservervation
page so that the IP address of the DMZ machine does not change.
Click Apply to save your settings, or Refresh to revert to your
previous settings.
Enable SPI:
Enable DMZ:
DMZ IP Address:
DMZ