D O Tel DOTH-100 Handheld Printer Terminal User Manual DOTH 100UserManual ENG
D.O.Tel Co., Ltd. Handheld Printer Terminal DOTH 100UserManual ENG
UserManual.wiki
>
D O Tel
>
DOTH 100 User Manual
Manual
Navigation menu
Upload a User Manual
Namespaces
Wiki Guide
HTML
PDF
Info
Views
User Manual
Discussion / Help
Navigation

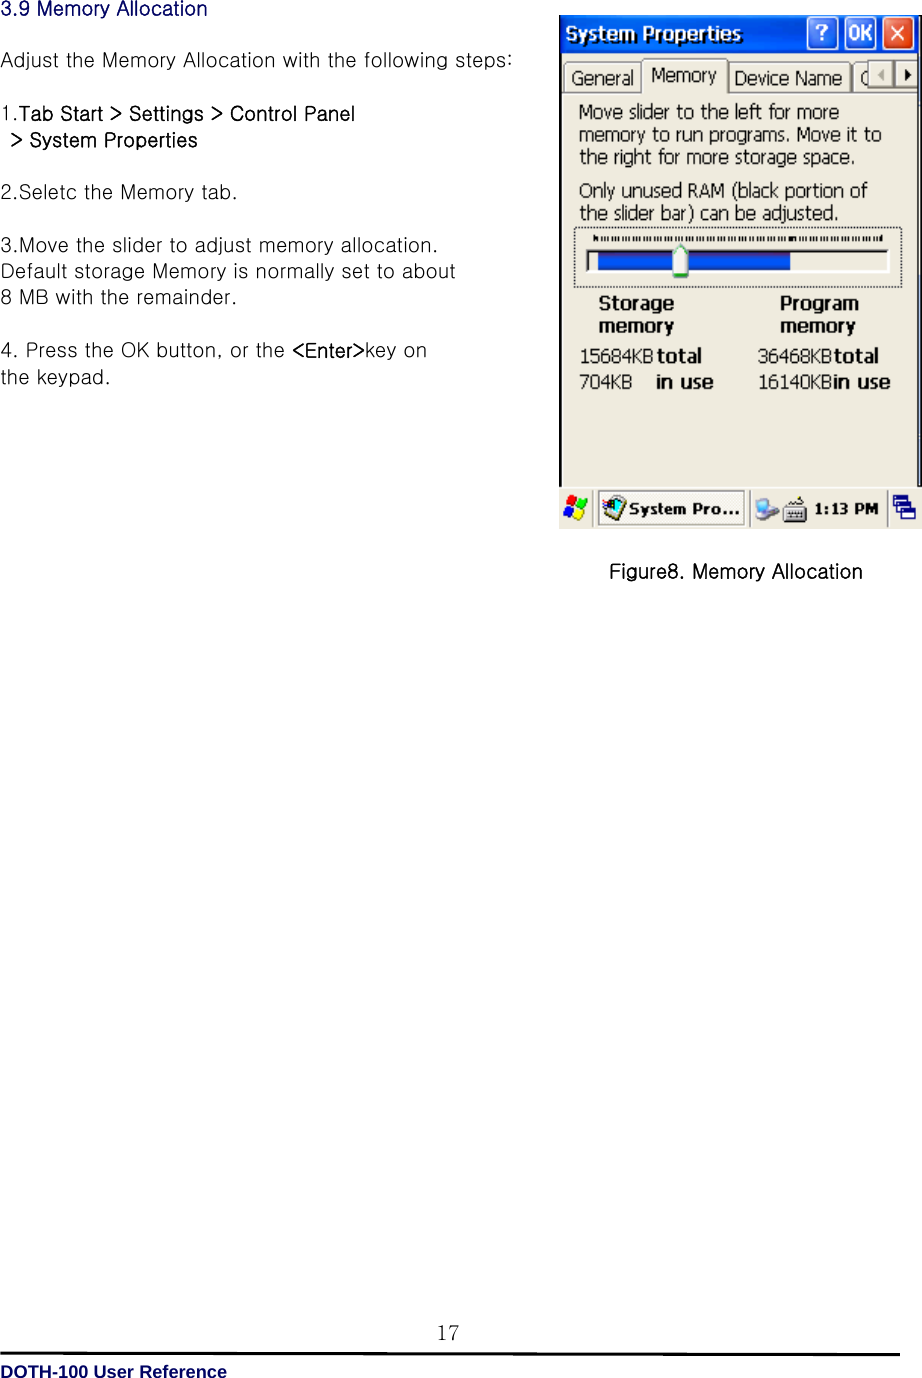
![DOTH-100 User Reference 122.1.4 Suspend mode 1. When you do not use DOTH-100 for a long time, make your DOTH-100 go into the suspend mode for saving power. 2. If you want to restart your DOTH-100, press power key. 2.2 Battery DOTH-100 uses replaceable 7.4V 1,800mAh Li-ion Cell x2 Li-ion batteries. If the battery continues to drop to the “ Low Battery Status” , the battery status LED becomes red and blinks. You need to recharge the battery. 2.2.1 Checking Battery Power You can check the battery status by using the power applet. Tap Start > Settings] > Control panel > Power The power control panel applet displays a battery power gauge. 2.2.2 Very Low Battery Status To prevent the DORH-100 from being discharged completely, your DORH-100 will be suspended, when the battery continues to get low. You need to recharge your battery before the battery continues to drop. 2.3 Removing and installing the battery 2.3.1 Removing the battery At first, pull out the hand scrap and then press the battery latch to the above until the battery is released from the DORH-100, then lift it out. 2.3.2 Installing the battery Insert the bottom of battery into the sunken place located in battery compartment, and press the battery latch to the above until the battery is installed completely. 2.4 Battery discharging Several factors determine the life of your battery such as extreme temperatures, input devices, and your usage, but generally you can use DORH-100 for 6~12hours. If the DOTH-100 is not on external power and battery pack is removed, it will enter suspend mode. 2.5 Recharging the battery Use the adapter provided from DOTel to recharge your battery. Caution Your DOTH-100 can be damaged, in case of using the adapter that is not provided from DOTel. 2.5.1 Using the adapter The charge/operating power can be applied to DOTH-100 by using DC adapter. 1. Connect the adapter to the power cord. 2. Connect the DC power jack to the DOTH-100. When the battery is charging, the LED becomes red.](https://usermanual.wiki/D-O-Tel/DOTH-100/User-Guide-1209066-Page-12.png)
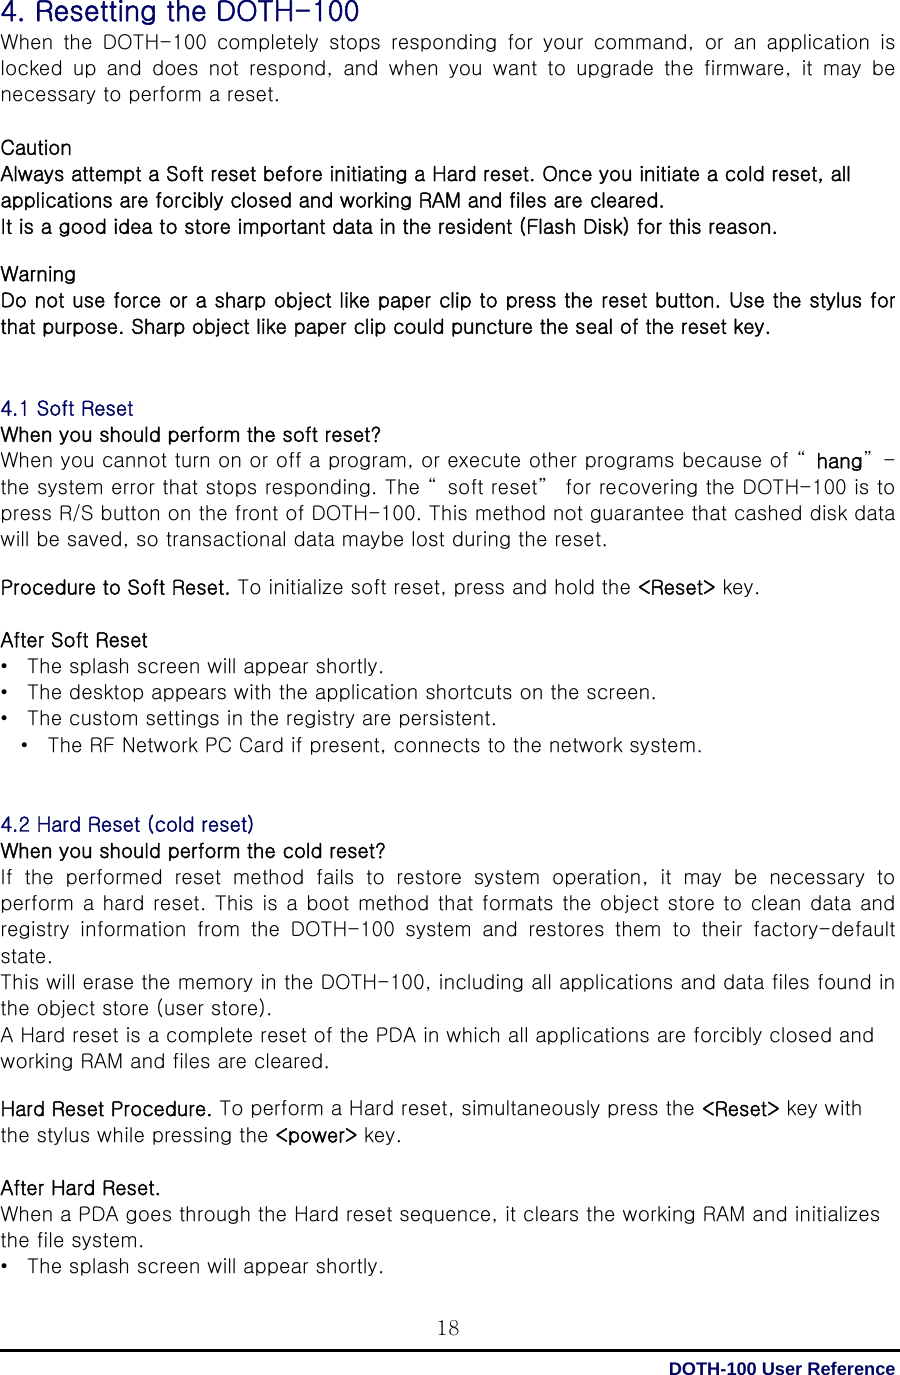

![DOTH-100 User Reference 314. Customizing Your DOTH-100 You can customize your mobile by adjusting setting and installing additional software. 4.1 Adjust settings To adjust settings to fit the way you work: Tap [Start] > [Settings] > [Control Panel] To open a program, you can use the “ File” pop-up menu, or double-tap an icon you want execute in the Control Panel. To arrange programs with detail, tap the “ View” and select “ Detail” , and than tap “ Arrange Icons” . If you want to arrange all the icons by description, tap “ By Description” , and if you want to arrange all icons by alphabetic order, tap “ By Name”. Figure 1. Setting Icons 4.2 Adding or Removing the Programs Programs added to your DOTH-100 Mobile computer at the factory are stored in ROM (Read Only Memory). You cannot remove this software, and you cannot accidentally lose ROM contents. Applications added to your DOTH-100 Mobile computer go into the Object Store, Which is located in Flash ROM. You can install any program created for DOTH-100, as long as there is enough memory. 4.3 Adding the Programs Using ActiveSync 1. Use the Explore in ActiveSync on your desktop computer to explore the files on your PDA, and locate the program. 2. Right-click on the program, then select Create Shortcut. 3. Move the shortcut to the Programs folder in the Windows folder. The shortcut appears on the menu.](https://usermanual.wiki/D-O-Tel/DOTH-100/User-Guide-1209066-Page-31.png)
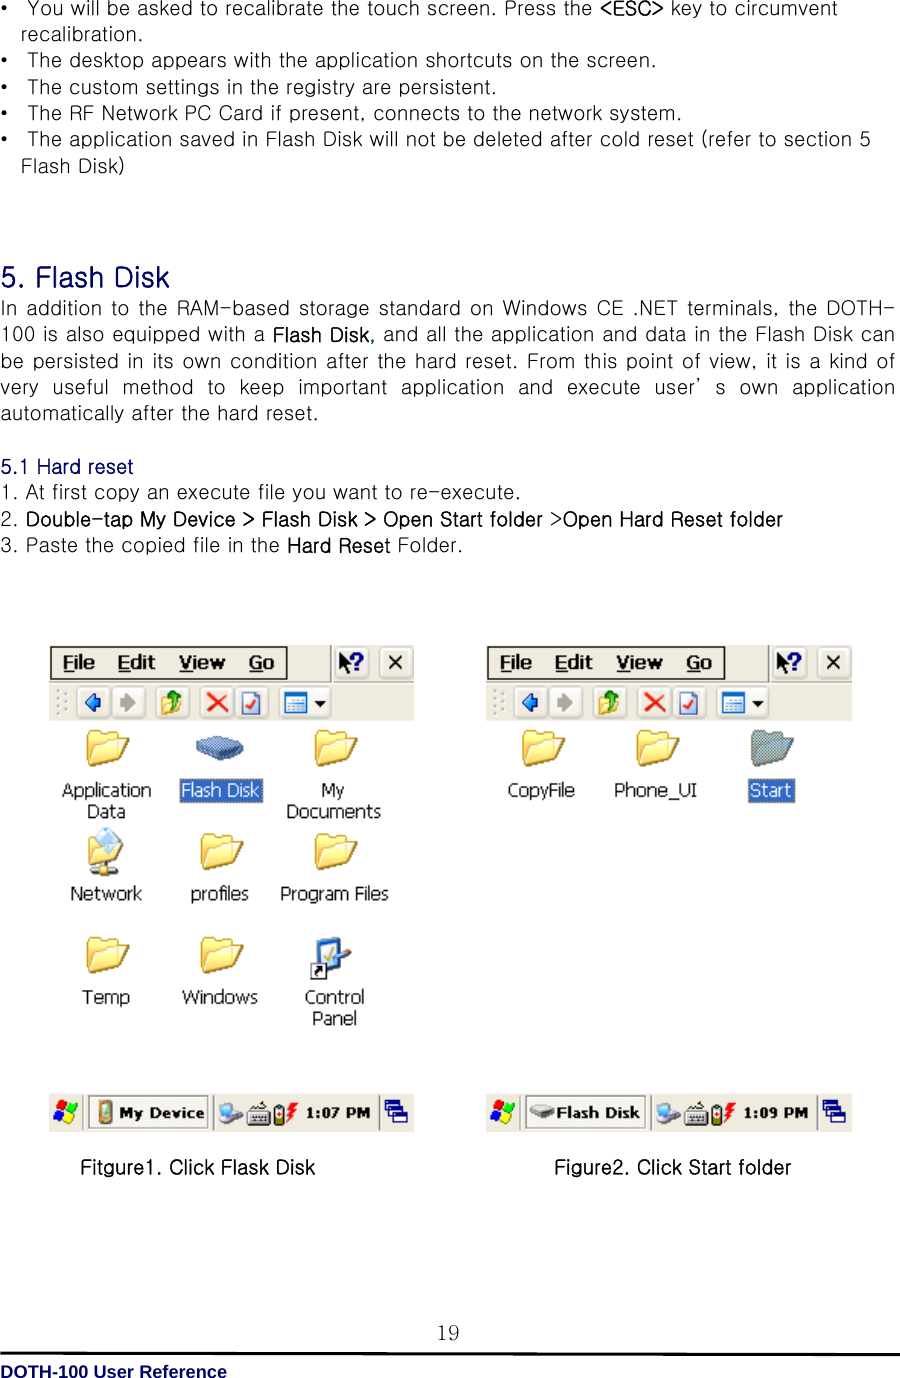
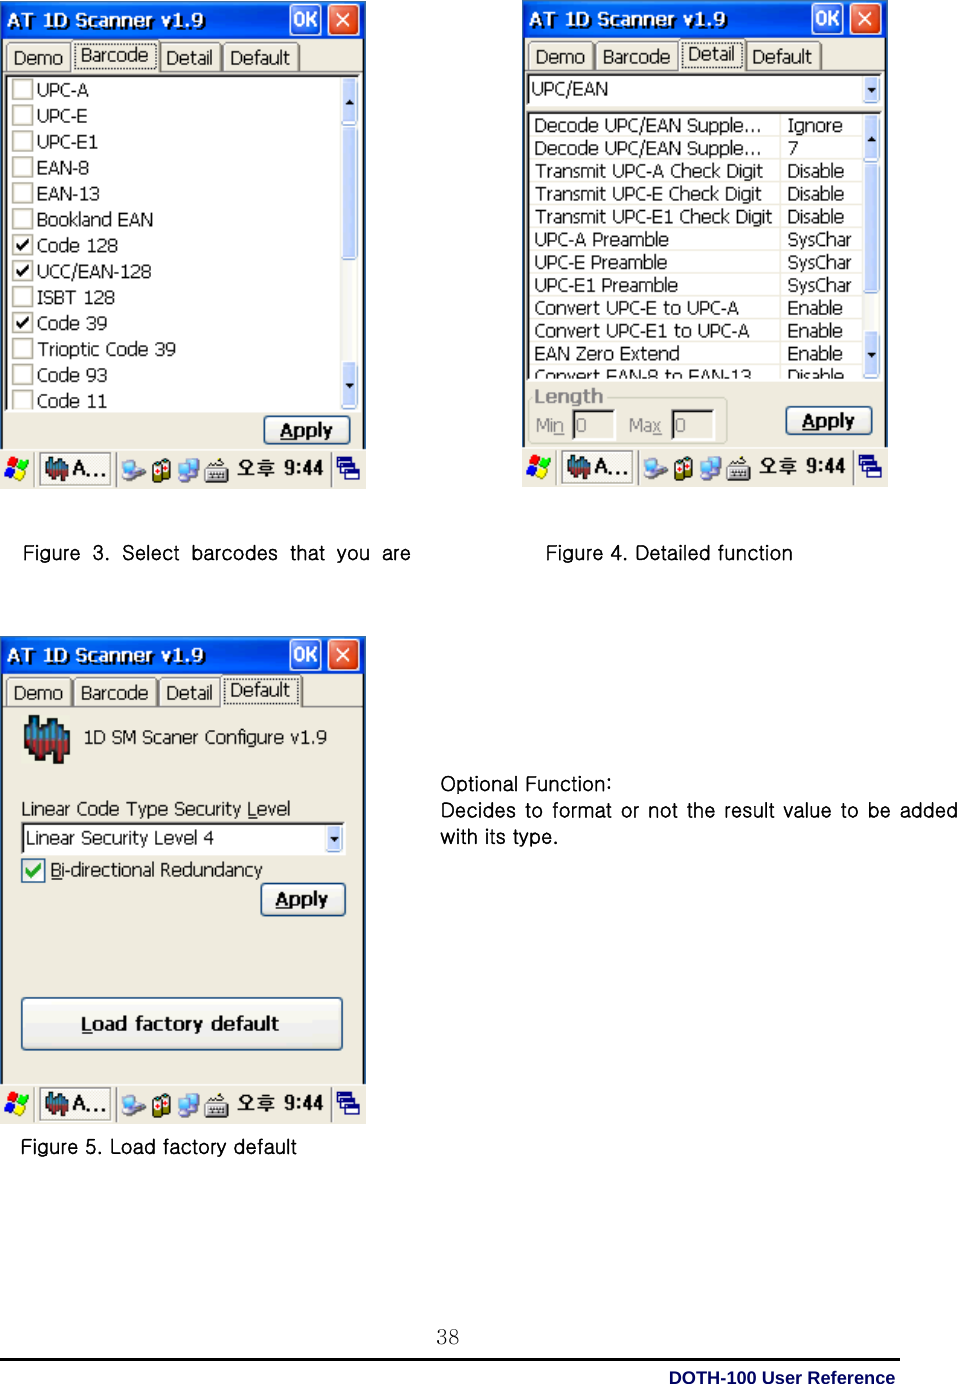
![DOTH-100 User Reference 371. 1D barcode Scanner – DOTH-100 option facts This chapter introduces the DOTH-100 built in with the 1D barcode Scanner program to assist you in making the most out of your DOTH-100 1.1 1DScanner(Demo program) You can execute AT1DTScanner coded from DOTEL to make sure that your DOTH-100 scans barcodes exactly. Figure 1. Scan Window for 1D image 1) To execute Scanner Diagnostics Tap [start] -> [program] -> [Scanner] -> [AT1DSMScanner] 2) Reading barcodes 1. Press the L/R scanning button or Fn2, KBD key to scan barcode. You can also tap the “ Start” on the screen to scan a barcode when the lager beam is aimed to a barcode. 2. Make sure that your DOTH-100 scans barcode exactly on the demo program. * The scanned data will be displayed on the screen, if your DOTH-100 reads a tag exactly. Figure 2. 1D Scanner Program](https://usermanual.wiki/D-O-Tel/DOTH-100/User-Guide-1209066-Page-37.png)
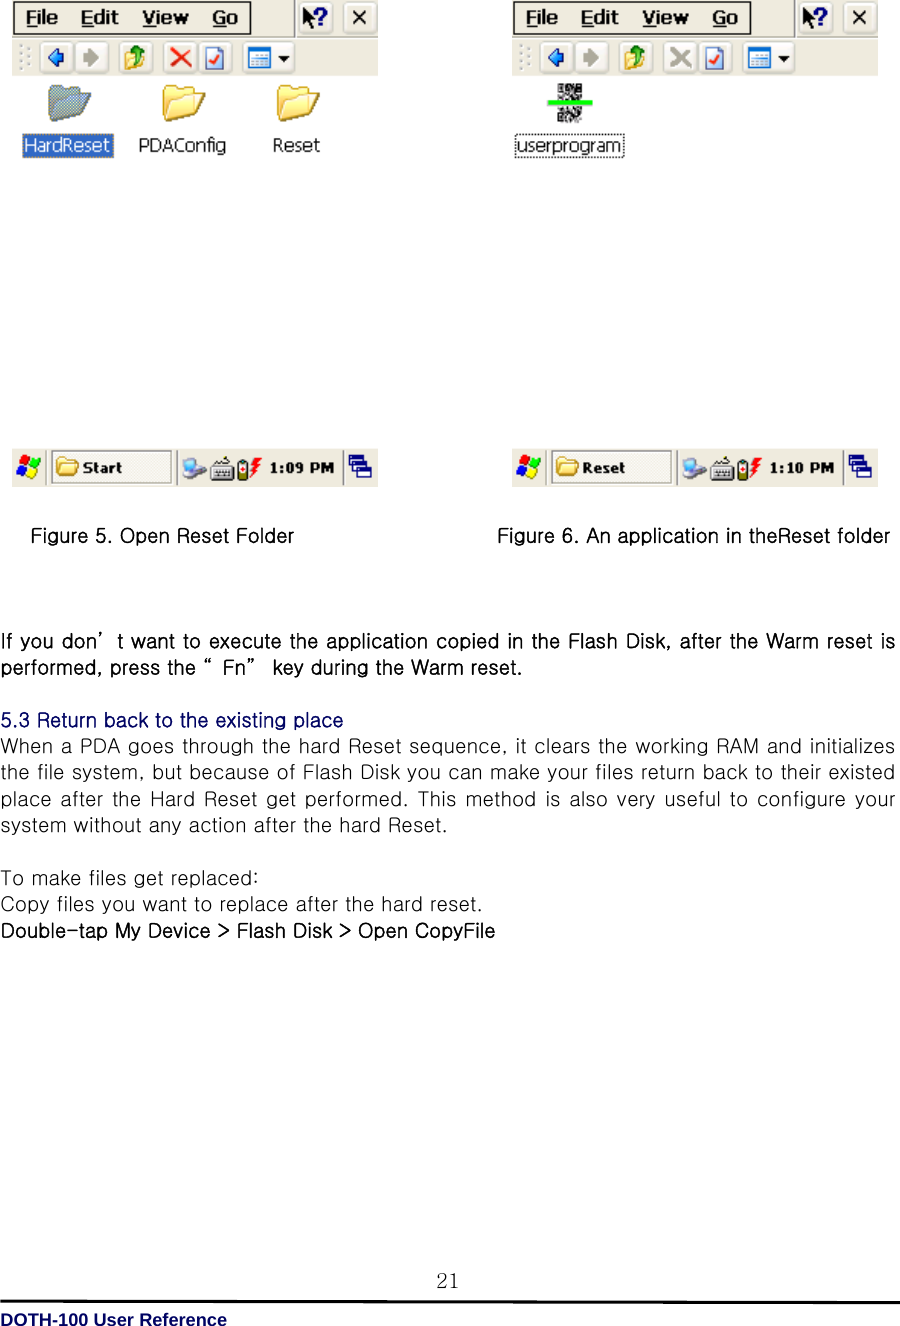
![DOTH-100 User Reference 391.2 Setting up the AT1DEmulator You can input the barcode value you scanned in any application program that has a cursor after setting the AT1Demulator. Like an input device, the AT1Demulator makes data displayed in an application program (see the following figure) 1) Using the AT1DEmulator Because the AT1DEmulator can apply to all application programs that have a cursor such like Web program, Wordpad and others, you can input the scanned data directly without coding any application program. 2) To executing Emulator Tap [Start] -> [Program] -> [Scanner] -> [AT1DTCEmulator] Figure 7. AT1DTCEmulator.exe -> Tap this AT1DTCEmulator Icon Fiture6. Barcode value in the WordPad Program](https://usermanual.wiki/D-O-Tel/DOTH-100/User-Guide-1209066-Page-39.png)


![DOTH-100 User Reference 464. 13.56MHz Reader – DOTH-100 option facts 4.1 Leader type [The internal organs style] RF13.56, is a type where modules are established with the internal organs. Figure 1. RF13.56 Module The internal organs style RF13.56 Module](https://usermanual.wiki/D-O-Tel/DOTH-100/User-Guide-1209066-Page-46.png)
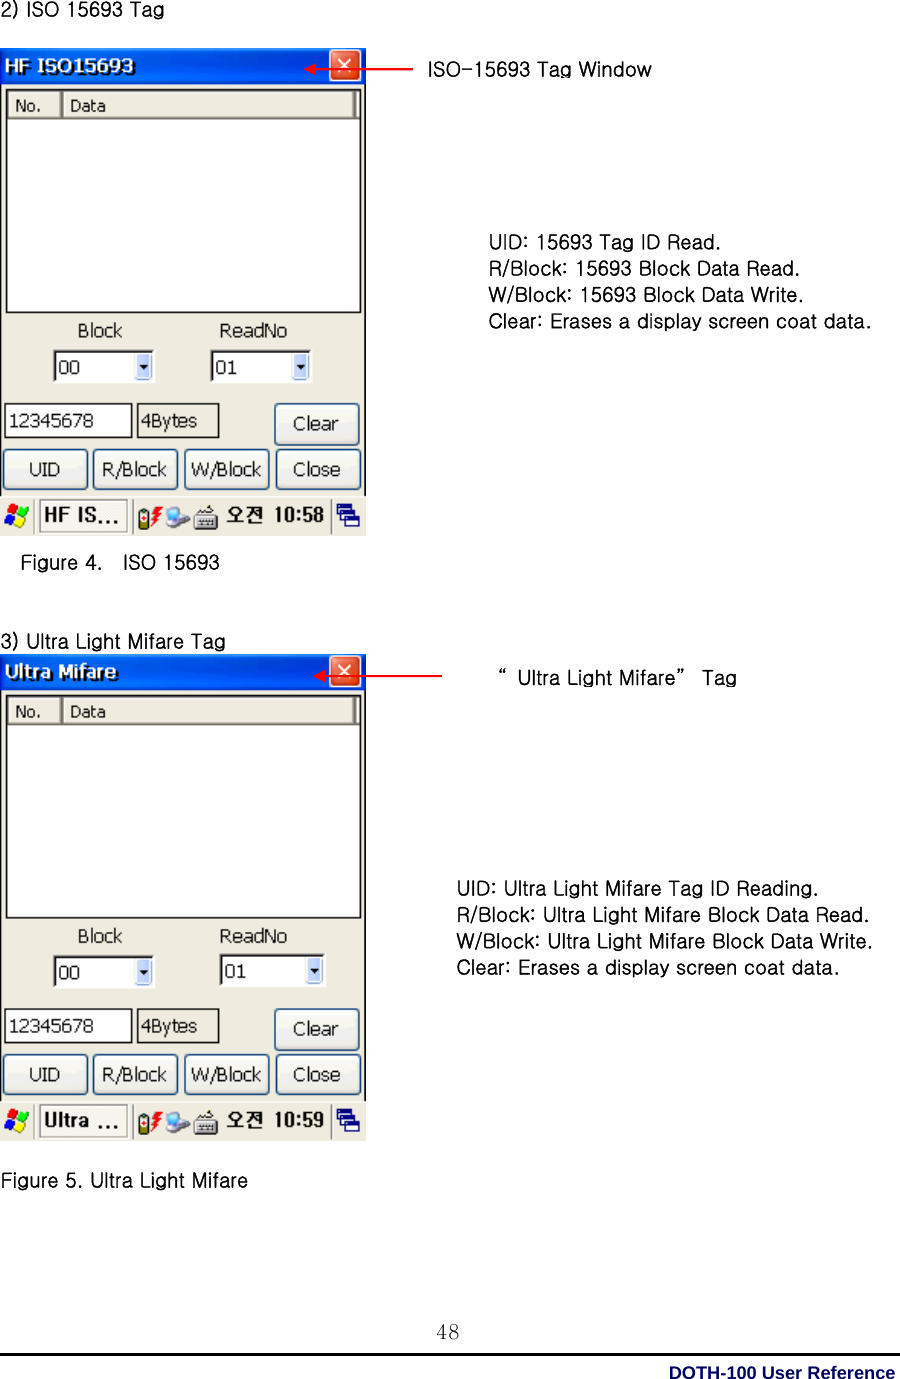
![DOTH-100 User Reference 47 4.2 Running MultiReader [Start] -> [Program] -> [ATRFMultiReader] Execute the program. Figure 2. RFID Program execution 1) Mifare Tag Figure 3. Mifare ISO: ISO-15693 The open does the Version: Reads firmware information and comes. Antenna : When the access doing in Mifare, the authentication height which uses in the leader/the lighter registration MF_UID: Mifare Tag ID Read Block Read: Block Data Read. Block Write: Block Data Write Keyload: Increment: Price in block data. Decrement: Reduce productions a price in block data. Ultra MF: Ultra Light Mifare The open does the tag window.](https://usermanual.wiki/D-O-Tel/DOTH-100/User-Guide-1209066-Page-47.png)
![DOTH-100 User Reference 53 6. GSM Module – DOTH-100 option facts 6.1 Using the GSM Select My device> Windows > Phone UI 6.2 Telephone image (1)Explaining the Icon (2) Make a phone call 1) Push it that you want to call number or speed dial. 2) You can retouch telephone number to [CLR]botton 3) Make a phone call to [SEND]botton. - when push [SEND] button without inputting number, the screen displays the call list. 4) Once connected, the phone will start - You can hear a dial tone when connected to the phone. - The time is displayed on the screen that you are speaking. 5) [END] to end the call, press the button. (4) Calling Fea tur e ic onBattery indicator iconDa ta c ommu n ic a tion s ta tus ic onContentPhone reception ic onnotification iconThe new message notification icon](https://usermanual.wiki/D-O-Tel/DOTH-100/User-Guide-1209066-Page-53.png)
![DOTH-100 User Reference 54 1) The phone has been ringing, your phone display a message. 2) In a state of this, call begins if you push the [SEND] button. 3) Automatically disconnect a call if the person is cut off or push [END]button. (5) Others 1) When you press [*] Button long, it inputs “ +” . 2) When you press [0] Button long, it inputs blank. 6.3 Function of GSM Type in your own password Recent Calls Dialed List PIN1 : Password 4-digit PUK1 : Password 8-digit If the wrong password three times in the PIN1,password of PUK1 appears. If ten times of PUK1 is different; SIM card is lock Just press long the button to get recent call list Tab consists of Dialed, Received, Missed you can see list of each tab if you move to each tab. Push - dialed list ,window pop up Name, Count (You can select a list of phone) It is deleted in Dialed list if you delete a list in Recent Call](https://usermanual.wiki/D-O-Tel/DOTH-100/User-Guide-1209066-Page-54.png)
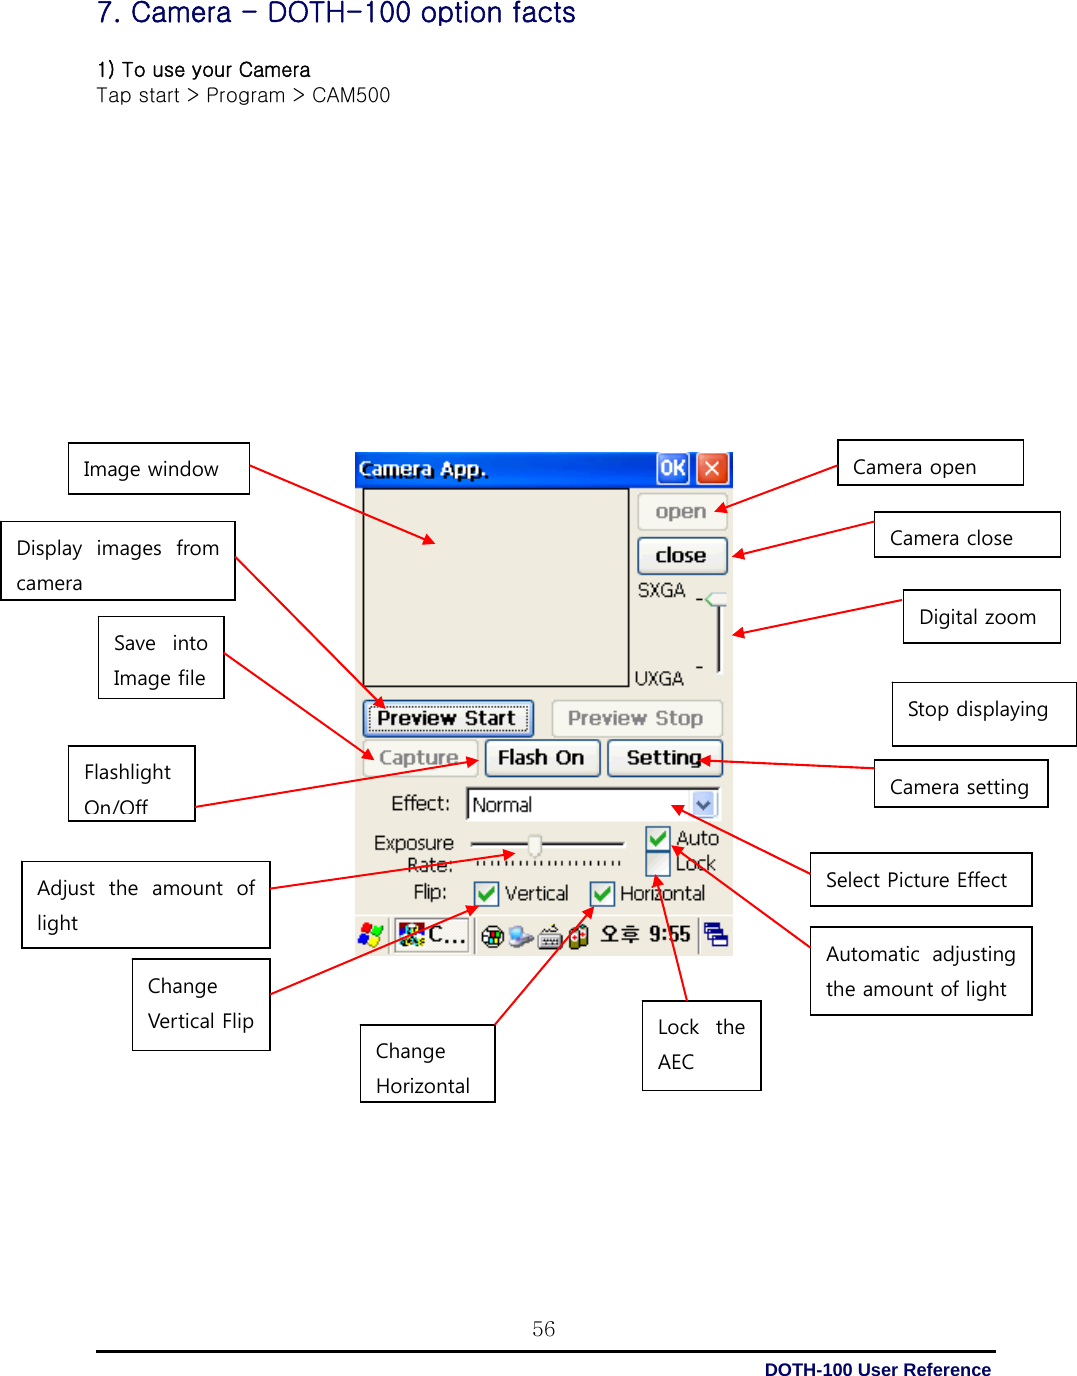
![DOTH-100 User Reference 579) If you check [Flip: Horizontal], the image will reverse to Horizontal axis. 10) If you check [Flip: Horizontal], the image will reverse to Vertical axis. 11) [Auto] button when you check in, it’ automatically adjust the amount of light coming into Camera 12) [Lock] button when you check in, it's fixed amount of light before checking value of the Camera. 13) [Auto]button when you don’ t check in, Camera control the amount of light coming into the "Exposure Rate" Slide set the value. 14) The image is shown in Picture Effect "Effect" list to select from. 15) Image Zoom-In, Zoom-Out can adjust through "Digital Zoom" Slider but, Provides the size of the image depends on the value of the Digital Zoom to Capture 16) [Preview Stop]button when you push, stop the display to "Image Window" on the incoming image with Camera. 17) [Open] button when you push, Camera Port is open. 18) [Close] button when you push, Camera Port is close. 2) When you push [Setting],window will appear like this. 3) "Capture Size" list to the Image File will be saved in the selected size 4) Capture image File will be saved in "FilePath" 5) push the [OK] button to set. If you want to exit without changing, push the [Cancel] button. 6) When you push [Preview Start] in Main window, The image is printed by incoming Camera Sensor in image window 7) [Capture] button to save the image as BMP 8) [Flash On] button, the Flash will be turned on, [Flash Off] button, Flash will be turned off. Capture Image Size setting Image Format setting in Camera application Specify the path to save capture image](https://usermanual.wiki/D-O-Tel/DOTH-100/User-Guide-1209066-Page-57.png)