User Manual
AUTO - SCANNING WITH DIGITAL CONTROL
LCD COLOR MONITOR
FS-L1903C
User manual (Rev.01)
SMITHS HEIMANN
www.smithsdetection.com
Page | 2
Table of Contents
Safety Instructions ......................................................................................... 5
Accessories ................................................................................................... 8
Power Connections ........................................................................................ 8
Monitor Connections ...................................................................................... 9
Mechanical Drawings ..................................................................................... 9
OSD Buttons ................................................................................................ 10
Power Managements ................................................................................... 11
Adjusting OSD ............................................................................................. 11
Signal connector Pin Assignments ............................................................... 14
Supported Signal Formats ............................................................................ 15
Specifications ............................................................................................... 18

Page | 3
FCC INFORMATION
This LCD monitor unit has been tested and found to comply with the limits of a Class B digital
Device, pursuant to Part 15 of the FCC rules.
These limits are designed to provide reasonable protection against interference. This monitor can
radiate radio frequency energy and, if not installed and used in accordance with the instructions, it
may interfere with other radio communications equipment. There is no guarantee that interference
will not occur in a particular installation.
If this equipment is found to cause harmful interference to radio or television reception, the user is
encouraged to try to correct the interference by carrying out one or more of the following
measures:
1. Reorient or relocate the receiving antenna.
2. Increase the distance between the LCD monitor and the subject of interference.
3. Plug the monitor into an outlet on a different electrical circuit than that to which the subject of
Interference is connected.
4. Consult the dealer or an experienced radio/TV technician for help.
NOTICES TO USER
This device complies with part 15 of the FCC Rules. Operation is subject to the following two
conditions:
(1) This device may not cause harmful interference, and (2) this device must accept any
Interference received, including interference that may cause undesired operation.
FCC WARNING
This LCD monitor generates or uses radio frequency energy. Changes or modifications to this
LCD monitor may cause harmful interference unless the modifications are expressly approved in
the instruction manual. The user could lose authority to operate this equipment if an unauthorized
change or modification is made. Environmental information
The user’s manual or instruction manual for an intentional or unintentional radiator shall caution
the user that changes or modifications not expressly approved by the party responsible for
compliance could void the user’s authority to operate the equipment.
In cases where the manual is provided only in a form other than paper, such as on a computer
disk or over the internet, the information required by this section may be included in the manual in
that alternative form, provided the user can reasonably be expected to have the capability to
access information in that form.
(a) For a Class B digital device or peripheral, the instructions furnished the user shall
include the following or similar statement, placed in a prominent location in the text of
the manual:
NOTE: This equipment has been tested and found to comply with the limits for a Class
B digital device, pursuant to Part15 of the FCC Rules. These limits are designed to
provide reasonable protection against harmful interference in a residential installation.
This equipment generates, uses and can radiate radio frequency energy and, if not
installed and used in accordance with the instructions, may cause harmful interference
to radio communications. However, there is no guarantee that interference will not
occur in a particular installation. If this equipment does cause harmful interference to
radio or television reception,

Page | 4
Which can be determined by turning the equipment off and on, the user is encouraged to try to
correct the interference by one or more of the following measures:
- Reorient or relocate the receiving antenna.
- Increase the separation between the equipment and receiver.
- Connect the equipment into an outlet on a circuit different from that to which the receiver is
connected.
- Consult the dealer or an experienced radio/TV technician for help.
ENVIRONMENTAL INFORMATION
1. Operating Conditions
- Temperature: 0℃~ 40℃
- Humidity: 5%~85% non-condensing
2. Transportation Conditions
- Temperature: -20℃~ 60℃
- Humidity: 5%~95% non-condensing
3. Storage Conditions
- Temperature: -20℃~ 60℃
- Humidity: 10%~85% non-condensing
APPROVALS
Safety
1. CE-LVD
EN 60950-1:2006+A11:2009+A1:2010+A12:2011
EMC
1. CE-EMC
EN 55022 Class B,EN55024 & EN61000-3-2/-3-3
2. FCC Part 15 Class B
DISPOSAL INFORMATION
Dispose of it as required by local ordinances or regulations.
This equipment has required the extraction and use of natural resources for its production.
It may contain hazardous substances for health and environment.
In order to avoid the dissemination of those substances in the environment and to diminish the
pressure on natural resources, we encourage you to use the appropriate take-back systems.
Those systems will reuse or recycle most of the materials of your end-of-life equipment in a sound
way.
The crossed-out wheeled bin symbol invites you to use those systems.
If you need more information on the collection, reuse and recycling systems, please
contact your local or regional waste administrator.
You can also contact us for more information on the environmental performances of our products.
Page | 5
Safety Instructions
On safety
1. Before connecting the AC power cord to the monitor, make sure the voltage designation
of the AC voltage corresponds to the local electrical supply.
2. Never insert anything metallic into the cabinet openings of the Liquid Crystal Display
(LCD) monitor. Doing so may create the danger of electric shock.
3. To reduce the risk of electric shock, do not remove cover.
No user-serviceable parts inside. Only a qualified technician should open the case of
the LCD monitor.
4. Never use your LCD monitor if the power cord has been damaged.
Do not allow anything to rest on the power cord, and keep the cord away from areas
where people can trip over it.
5. Be sure to hold the plug, not the cord, when disconnecting the LCD monitor from an
electric socket.
6. Unplug your LCD monitor when it is going to be left unused for an extended period of
time.
7. Unplug your LCD monitor from the AC outlet before any service.
8. If your LCD monitor does not operate normally - in particular, if there are any unusual
sounds or smells coming from it unplug it immediately and contact an authorized dealer
or service center.
On installation
1. Openings in the LCD monitor cabinet are provided for ventilation.
To prevent overheating, these openings should not be blocked or covered. If you put
the LCD monitor in a bookcase or some other enclosed space, be sure to provide
adequate ventilation.
2. Put your LCD monitor in a location with low humidity and minimal dust.
3. Do not expose the LCD monitor to rain or use it near water (in kitchens, near swimming
pools, etc.).
If the LCD monitor accidentally gets wet, unplug it and contact an authorized dealer
immediately. You can clean the LCD monitor with a damp cloth if necessary, but be
sure to unplug the LCD monitor first.
4. Locate your LCD monitor near an easily accessible AC outlet.
5. High temperature can cause problems. Don't use your LCD monitor in direct sunlight
and keep it away from heaters, stoves, fireplaces, and sources of heat.
Page | 6
Operator Safety Instructions
For your safety, please read these safety instructions completely before you connect the
equipment to the power source.
The information in this summary is intended for operators.
Carefully observe all warnings, precautions and instructions both on the Apparatus and in these
operating instructions. Retain this manual for future reference.
Water and Moisture
Do not operate the apparatus under or near water - for example near a bathtub, Kitchen sink, or
laundry tub, in a wet basement, near a swimming pool or in other areas with high humidity.
Never install jacks for communication cables in wet locations unless the jack is specifically
designed for wet locations. Do not touch the product with wet hands.
Cleaning
Unplug the apparatus from communication lines, mains power-outlet or any power source before
cleaning or polishing. Do not use liquid cleaners or aerosol cleaners.
Use a lint-free cloth lightly moistened with water for cleaning the exterior of the apparatus.
Ventilation
Do not block any of the ventilation openings of the apparatus. Never cover the slots and openings
with a cloth or other material. Never install the apparatus near heat sources such as radiators,
heat registers, stoves, or other apparatus (including amplifiers) that produce heat.
Do not place the product in direct sunlight or close to a surface directly heated by the sun.
Lightning
Never use this apparatus, or connect/disconnect communication cables or power cables during
lightning storms.
Dust
Do not operate the apparatus in areas with high concentration of dust
Vibration
If possible, do not operate the apparatus in areas with vibration or place it on an unstable surface.
But, little vibration in allowed.
Power Connection and Hazardous Voltage
The product may have hazardous voltage inside. Never attempt to open this product, or any
peripherals connected to the product, where this action requires a tool.
This product should always be powered from an earthed power outlet.
Never connect attached power supply cord to other products.
In case any, parts of the product has visual damage never attempt to connect mains power, or
any other power source, before consulting service personnel. The plug connecting the power cord
to the product serves as the main.
Disconnect device for this equipment. The power cord must always be easily accessible.
Route the power cord so as to avoid it being walked on or pinched by items placed upon or
against it.
Pay particular attention to the plugs, receptacles and the point where the cord exits from the
apparatus.
Do not tug the power cord.
Page | 7
If the provided plug does not fit into your outlet, consult an electrician.
Never install cables, or any peripherals, without first unplugging the device from its power source.
Servicing
Do not attempt to service the apparatus yourself as opening or removing covers may expose you
to dangerous voltages or other hazards, and will void the warranty.
Refer all servicing to qualified service personnel.
Unplug the apparatus from its power source and refer servicing to qualified personnel under the
following conditions:
If the power cord or plug is damaged or frayed.
If liquid has been spilled into the apparatus.
If objects have fallen into the apparatus.
If the apparatus has been exposed to rain or moisture
If the apparatus has been subjected to excessive shock by being dropped.
If the cabinet has been damaged.
If the apparatus seems to be overheated.
If the apparatus emits smoke or abnormal odor.
Page | 8
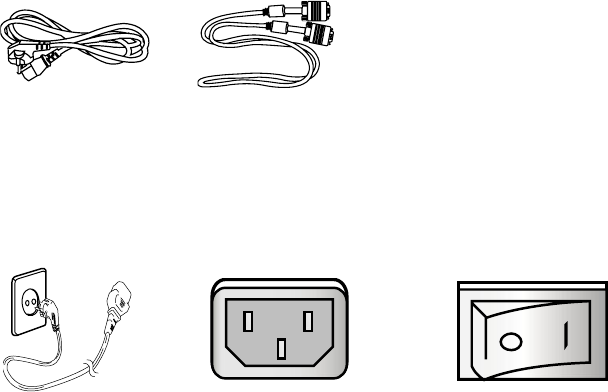
Accessories
AC Power cord (EU) VGA Cable
Power Connections
To the AC inlet connector AC Inlet AC ON/OFF Switch
1) Use 220V or 110V
2) Connect monitor to VGA source using VGA connector.
3) Power on the monitor
4) Done.
Page | 9
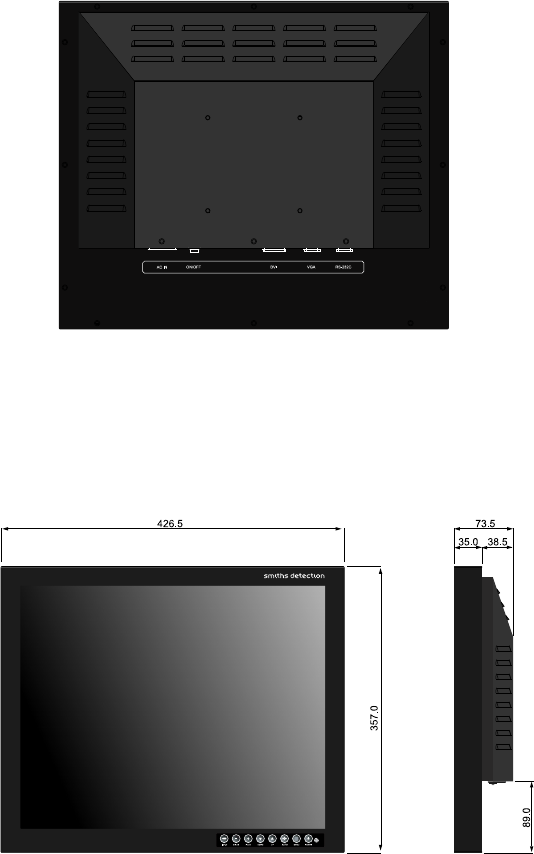
Monitor Connections
● AC IN: AC Inlet.
● ON/OFF: AC on/off switch.
● DVI: DVI Connection for Digital TMDS.
● VGA: 15Pin D-Sub connector for Analog RGB.
● RS-232C: 9Pin D-Sub connector for firmware update.
Mechanical Drawings

Page | 10
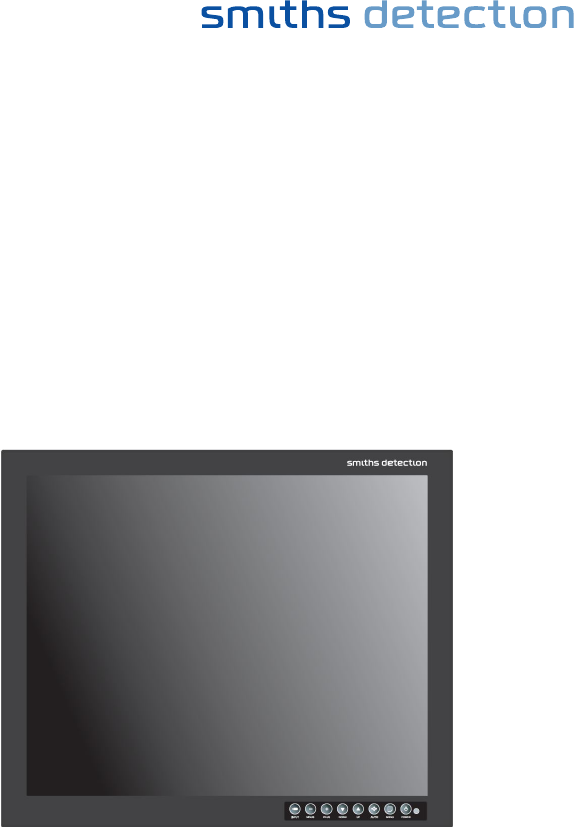
OSD Buttons
Power LED
Green: Normal mode
Blink Green: Standby mode
Blink Green: Soft power-off
● On-Screen Display (OSD) Function Button
1. POWER: Turns ON/OFF the monitor.
2. MENU: With OSD deactivated, Activate the OSD menu.
With OSD activated, Exit from main menu or sub menu.
3. AUTO: Release the button (Auto Adjust): Fit to the most appropriate screen on the D-
SUB Analog signal.
Hold the button (Manual separate timing table): Change the timing
Table to another one which is having different timing except V Total
And H period.
If VGA Analog's picture size not matched with full screen size or image is noisy
Press the input button during 2~3 seconds then you can see the most
Appropriate screen.
4. UP: With OSD deactivated, hot key of the luminance control and increases the
luminance. With OSD activated, move the cursor upward.
5. DOWN: With OSD deactivated, hot key of the luminance control and decreases the
luminance. With OSD activated, move the cursor downward.
6. PLUS: With OSD deactivated, hot key of the contrast control and increase the contrast.
With OSD activated, enter sub menu and increases the adjustment of the
selected function.
7. MINUS: With OSD deactivated, hot key of the contrast control and decreases the
contrast.
With OSD activated, decreases the adjustment of the selected function.
8. INPUT: Change the display signal source.

Page | 11
Power Managements
Status LED Sign Power Consumption
Normal Operation Green Normal Power
Sleep Mode Green blink < 1 Watt
NOTE: Sleep mode will be entered by two conditions as below.
Sleep mode is only available when sleep enable function in service menu is enabled.
For default disabled, ask your service or administrator.
1) Entered by “soft-power switch” Turn off.
2) Entered by “Input H/V sync lost”.
“soft-power switch” should be turned on to return to the operation state
Adjusting OSD
On every page of OSD, the actual input source, resolution and frame rate are displayed.
VGA input sources
ADJUST
1. BRIGHTNESS
Increase or decrease the brightness (Range: 0~100)
Use of brightness adjustment limits the dynamic range
Prefer to use of LUMINANCE adjustment.
2. CONTRAST
Increase or decrease the contrast (Range: 0~100)
3. CLOCK
Increase or decrease the sampling frequency (Range: 0~100)
4. PHASE
Increase or decrease the Phase level (Range: 0~100)
5. LUMINANCE
Adjust backlight dimming level (Range: 0~100)
COLOR TEMP
1. MODE
Change the color temperature mode (Range: 0~100) (C1 (Reddish, 6500K),
C2 (Bluish, 9300K), USER)
Page | 12
2. RED
Red balance (Only works with USER mode) (Range: 0~100)
3. GREEN
Green balance (Only works with USER mode) (Range: 0~100)
4. BLUE
Blue balance (Only works with USER mode) (Range: 0~100)
IMAGE
1. IMAGE SIZE
Change the image size (Fill aspect, 1:1, Full)
2. H POSITION
Adjust the horizontal position of the displayed source image. (Range: 0~100)
3. V POSITION
Adjust the vertical position of the displayed source image. (Range: 0~100)
4. SHARPNESS
Set the sharpness of image (0 ~ 9)
SETUP
1. AUTO SOURCE SELECT
Disable or enable auto source select.
(ON: Searches through all possible input sources until an active video source is found.
OFF: Video input is manually selected.)
2. OSD COLOR
Adjust the OSD back ground from white opaque to half translucent.
3. OSD POSITION
Change the OSD position (9 positions)
4. DURATION
Adjust time until the OSD Menu will disappear after adjusting the menu.
(5, 10, 20, 30, 60, 90, 120 seconds)
5. RESET SETTINGS
Change to all OSD value to factory outgoing status.
DVI input sources
ADJUST
1. BRIGHTNESS
Increase or decrease the brightness (Range: 0~100)
Use of brightness adjustment limits the dynamic range
Page | 13
Prefer to use of LUMINANCE adjustment.
2. CONTRAST
Increase or decrease the contrast (Range: 0~100)
3. LUMINANCE
Adjust backlight dimming level (Range: 0~100)
COLOR TEMP
1. MODE
Change the color temperature mode (Range: 0~100) (C1 (Reddish, 6500K),
C2 (Bluish, 9300K), USER)
2. RED
Red balance (Only works with USER mode) (Range: 0~100)
3. GREEN
Green balance (Only works with USER mode) (Range: 0~100)
4. BLUE
Blue balance (Only works with USER mode) (Range: 0~100)
IMAGE
1. IMAGE SIZE
Change the image size (Fill aspect, 1:1, Full)
2. SHARPNESS
Set the sharpness of image (0 ~ 9)
SETUP
1. AUTO SOURCE SELECT
Disable or enable auto source select.
(ON: Searches through all possible input sources until an active video source is found.
OFF: Video input is manually selected.)
2. OSD COLOR
Adjust the OSD back ground from white opaque to half translucent.
3. OSD POSITION
Change the OSD position (9 positions)
4. DURATION
Adjust time until the OSD Menu will disappear after adjusting the menu.
(5, 10, 20, 30, 60, 90, 120 seconds)
5. RESET SETTINGS
Change to all OSD value to factory outgoing status.
Page | 14
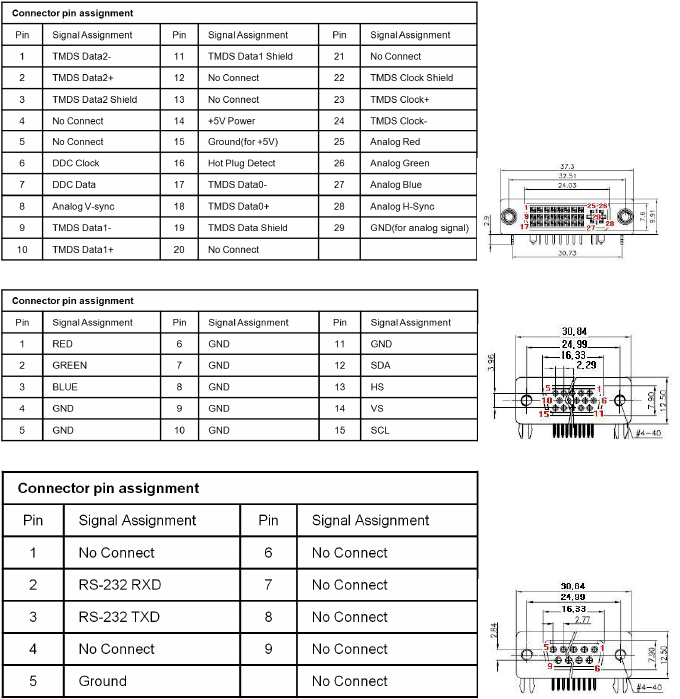
Signal Connector Pin Assignments

Page | 15
Supported Signal Formats
Standard Timing Tables
Resolution
Horizontal Vertical
Period
(uSec)
Total
(Pixel)
Data
Start
(Pixel)
Total
(line)
Data
Start
(line)
640 x 480 @ 59.9Hz 31.78 800 144 525 35
640 x 480 @ 75Hz 26.67 840 184 500 19
640 x 480 @ 85Hz 23.11 832 136 509 28
800 x 600 @ 56.3Hz 28.44 1024 200 625 24
800 x 600 @ 60.3Hz 26.40 1056 216 628 27
800 x 600 @ 72.2Hz 20.80 1040 184 666 29
800 x 600 @ 75Hz 21.33 1056 240 625 24
800 x 600 @ 85.1Hz 18.63 1048 216 631 30
1024 x 768 @ 60Hz 20.67 1344 296 806 35
1024 x 768 @ 70.1Hz 17.71 1328 280 806 35
1024 x 768 @ 75Hz 16.66 1312 272 800 31
1024 x 768 @ 85Hz 14.56 1376 304 808 39
1152 x 864 @ 75Hz 14.81 1600 384 900 35
1280 x 960 @ 60Hz 16.66 1800 424 1000 39
1280 x 1024 @ 60Hz 15.78 1760 454 1056 29
1280 x 1024 @ 75Hz 12.50 1688 392 1066 41
1600 x 1200 @ 60Hz 13.33 2160 496 1250 49
1680 x 1050 @ 59.9Hz 15.32 2240 456 1089 36
1680 x 1050 @ 59.9Hz 15.46 1840 80 1080 9
1920 x 1080 @ 30Hz 29.66 2200 237 1125 40
1920 x 1080 @ 30Hz 29.63 2200 237 1125 42
1920 x 1080 @ 50Hz 17.78 2640 192 1125 41
1920 x 1080 @ 60Hz 14.81 2200 192 1125 41
1920 x 1200 @ 60Hz 13.84 2112 152 1205 4
1920 x 1200 @ 60Hz 13.42 2592 542 1242 41
1920 x 1440 @ 60Hz 11.11 2600 552 1500 59
1920 x 1440 @ 75Hz 8.89 2640 576 1500 59

Page | 16
Special Timing Tables
Resolution
Horizontal Vertical
Period
(uSec)
Total
(Pixel)
Data
Start
(Pixel)
Total
(line)
Data
Start
(line)
512 x 512 @ 71.1Hz 26.24 656 30 536 4
624 x 658 @ 74.9Hz 19.57 824 188 682 23
760 x 908 @ 80.1Hz 13.15 1002 233 950 41
808 x 802 @ 75Hz 15.98 1034 214 834 31
808 x 802 @ 87.8Hz 13.66 1034 214 834 31
880 x 658 @ 75Hz 19.56 1160 263 682 23
880 x 730 @ 75.1Hz 17.48 1126 233 762 31
880 x 946 @ 75Hz 13.49 1160 268 988 41
912 x 586 @ 75Hz 21.85 1204 274 610 23
944 x 946 @ 85Hz 11.84 1274 282 994 47
968 x 730 @ 75Hz 17.49 1240 257 762 31
1024 x 768 @ 60Hz 20.68 1344 296 806 35
1024 x 768 @ 75Hz 16.67 1312 272 800 31
1024 x 768 @ 85Hz 14.56 1376 304 808 39
1024 x 1090 @ 75Hz 11.78 1348 312 1132 41
1032 x 1090 @ 68Hz 12.99 1360 316 1132 41
1048 x 946 @ 75Hz 13.50 1382 321 988 41
1120 x 874 @ 75Hz 14.72 1434 297 906 31
1144 x 946 @ 75Hz 13.49 1510 352 988 41
1144 x 1090 @ 75Hz 11.78 1510 352 1132 41
1272 x 946 @ 75Hz 13.49 1680 392 988 41
1280 x 720 @ 60Hz 22.28 1664 320 748 25
1280 x 720 @ 60Hz 22.50 1440 112 741 18
1280 x 720 @ 75Hz 17.67 1696 336 755 32
1280 x 720 @ 85Hz 15.51 1712 352 759 36
1280 x 768 @ 60Hz 21.08 1440 112 790 19

Page | 17
Resolution
Horizontal Vertical
Period
(uSec)
Total
(Pixel)
Data
Start
(Pixel)
Total
(line)
Data
Start
(line)
1280 x 768 @ 75Hz 16.56 1696 336 805 34
1280 x 768 @ 85Hz 14.55 1712 352 809 38
1280 x 960 @ 60Hz 16.73 1696 336 996 33
1280 x 960 @ 60Hz 16.86 1440 112 988 25
1280 x 960 @ 75Hz 13.27 1728 360 1005 42
1280 x 960 @ 85Hz 11.64 1728 360 1011 48
1280 x 1024 @ 60Hz 15.63 1688 360 1066 41
1280 x 1024 @ 75Hz 12.50 1688 392 1066 41
1280 x 1024 @ 85Hz 10.97 1728 384 1072 47
1360 x 768 @ 60Hz 20.89 1776 344 798 27
1360 x 768 @ 60Hz 21.11 1520 112 790 19
1400 x 1050 @ 75Hz 12.13 1896 392 1099 46
1440 x 900 @ 85Hz 12.56 1600 112 937 34
1440 x 900 @ 85Hz 12.41 1952 408 948 45
1512 x 874 @ 75Hz 14.71 1936 401 906 31
1600 x 900 @ 60Hz 17.84 2112 424 934 31
1600 x 900 @ 60Hz 18.00 1760 112 926 23
1600 x 900 @ 75Hz 14.29 1760 112 933 30
1600 x 900 @ 75Hz 14.15 2144 440 942 39
1600 x 900 @ 85Hz 12.55 1760 112 937 34
1600 x 1200 @ 60Hz 13.33 2160 496 1250 49
1680 x 1050 @ 60Hz 15.30 2240 456 1089 36
1680 x 1050 @ 60Hz 15.44 1840 112 1080 27
1680 x 1050 @ 75Hz 12.26 1840 112 1088 35
1920 x 1080 @ 60Hz 15.00 2080 112 1111 28
1920 x 1200 @ 60Hz 13.50 2080 112 1235 32
Page | 18
Specifications
Model FS-L1903C
LCD PANEL
Type DLM190-A01(Original : LM190E08)
Size 19” Diagonal
Resolution 1280 x 1024
Pixel pitch 0.63(H)mmX0.63(V)mm
Display colors 16.7M (RGB 8-bit data)
Contrast Ratio(Typ.) 800:1
Viewing Angle(Typ.) R/L 170, U/D 160 degree
Luminance(Typ.) 300 cd/m2
Power
Consumption
Typical 35 Watt
Standby Mode Under 1 Watt
Control Key Input, Minus, Plus, Down, Up, Auto, Menu, Power
Power AC 100-230V(50-60Hz) 1.5A Max
Approval Marks Approval Mark FCC,CE
Dimension Size 426.5 x 357.0 x 73.5 (mm)