User Manual
2
Item No. 951059-0-0
DALI ZENSOR AX
ACTIVE SPEAKER
MANUAL
ENGLISH - DEUTSCH - DANSK - FRANÇAIS
DALI Denmark +45 9672 1155
www.dali-speakers.com
TABLE 1
FIGURE 1
MEGALINE
EUPHONIA
HELICON MK2
MENTOR
IKON
®
LEKTOR®
CONCEPT
SUBW
OOFER
D A L I Z E N S OR
M A N U A L
ENGLISH - DEUTSCH - DANSK
MK2
ZENSOR
N
ZENSOR 1 AX 5 AX
Speaker(s)
pr. carton
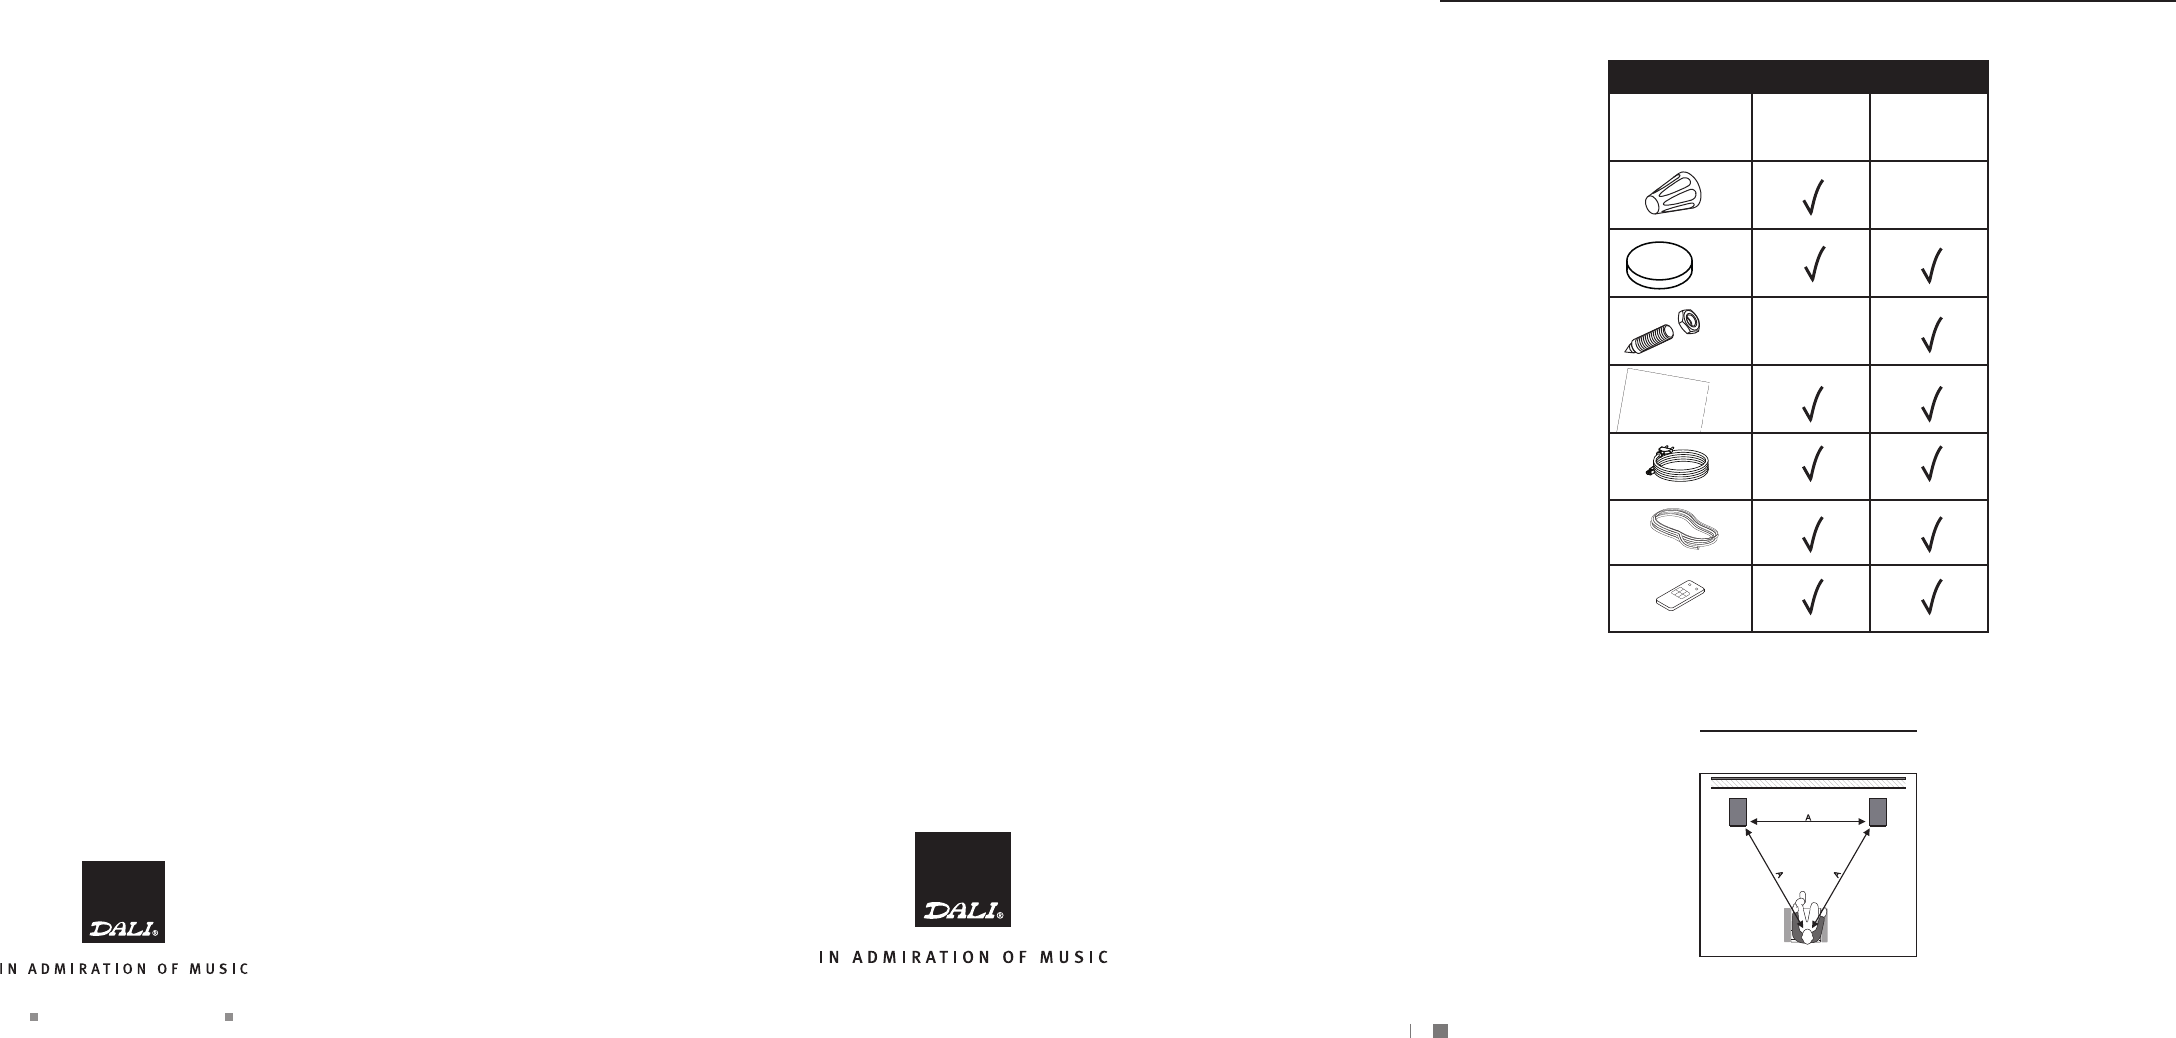
TABLE 1 - 1 AX + 5 AX
22
x8
x8
x4
x8
POWER CABLE
DALI CONNECT CABLE
DALI REMOTE
43 38
FIGURE 2 FIGURE 3A TABLE 2 - TECHNICAL SPECIFICATIONS
FIGURE 3D FIGURE 4
FIGURE 3B
ZENSOR 1 AX ZENSOR 5 AX
Frequency Range (+/-3 dB) [Hz] 53 - 26,500 43 - 26,500
Maximum SPL [dB] 104 106
Crossover Frequency [Hz] 2,900 2,400
Crossover Principle 2-way 2-way
High Frequency Driver 25 mm soft dome 25 mm soft dome
Low Frequency Driver 1 x 5¼” 2 x 5¼”
Enclosure Type Bass reflex Bass reflex
Continous IEC Amplifier Output
[RMS watt]
2x50W 2x50W
Input Impedance [Ω] 12.6K 12.6K
Input Sensitivity [mV] 300 300
Connection Input(s) 3.5mm Stereo mini jack,
Optical (Toslink)
3.5mm Stereo mini jack,
Optical (Toslink)
Wireless input Bluetooth™ Apt-X Bluetooth™ Apt-X
Connection output Sub out Sub out
Amplifier Type Fully digital class D
(Open loop type)
Fully digital class D
(Open loop type)
Maximum digital resolution
[bits/KHz]
24 / 96 24 / 96
Magnetic shielding No No
Recommended Placement Wall/Shelf/Wall Floor
Input mains Universal mains
100-240V
Universal mains
100-240V
Maximum Power Consumption [W] 160W 160W
Standby Power Consumption [W] <0.5W <0.5W
Dimensions (HxWxD) [mm] 274 x 162 x 240 840 x 212 x 282
Weight [kg/lb] 4.6 / 10.1 11.0 / 24.3
Accessories Included Mains cable, rubber feet, wall
bracket, rubber bumbers, remote
control, manual, right speaker wire
Mains cable, rubber feet, spike
set, remote control, manual, right
speaker wire
All technical specifications are subject to change without notice.
FIGURE 3C
1358
6 7
24
FIGURE 5
ZENSOR 1 AX ZENSOR 5 AX
6
7
5
3
4
2
1
8
9
10
4131000
Assembled and inspected by:Serial no:
DALI ZENSOR 1 AX
L
11
6
7
5
3
4
2
1
8
9
10
11
FIGURE 6

UK DE DK
5
FR
CONTENTS / INHALT / INDHOLD / CONTENU
ENGLISH 8
DEUTSCH 16
DANSK 24
FRANÇAIS 32
QUICK START GUIDE
Bluetooth connect
• Connect the speakers with the included speaker cable
(see part 4.0 - 4).
• Connect the left speaker to mains power and turn on the
power switch on the back.
• Change to Bluetooth mode using the remote control, or
source select on the back of the left speaker.
• Locate DALI ZENSOR AX in your playback device’s
Bluetooth device list and establish the connection.
• Start playback on your playback device.
• To achieve optimal audio quality, set the playback
device’s volume to maximum and use the speaker
volume buttons to control the volume.
• The ZENSOR AX will automatically reconnect to the last
connected devices.
• Any existing connection must be disconnected before a
new connection can be made.
• To disconnect a Bluetooth connection, use the Release
button on the remote or the Release combination on the
back of the left speaker.
• Read more about ZENSOR AX Bluetooth mode in part 5.2

6
Read instructions - all the safety and operating instructions
should be read before the appliance is operated.
Retain instructions - the safety and operating instructions
should be retained for future reference.
Heed warnings - all warnings on the appliance and in the
operating instructions should be adhered to.
Follow instructions - all operating and use instructions should
be followed.
Water and moisture - the appliance should not be used near
water - for example, near a bathtub, washbowl, kitchen sink,
laundry tub, in a wet basement, or near a swimming pool and
the like. To reduce the risk of re or electric shock, do not expose
this apparatus to rain or moisture. The apparatus should not be
exposed to dripping or splashing. Objects lled with liquids, such
as vases should not be placed on the apparatus. Wall or ceiling
Cleaning - do not use any liquid cleaners. Use only a dry cloth to
wipe off dust and grease.
Non-use periods - the power cord of the appliance should be
unplugged from the outlet when left unused for a long period of
time and during lightning storms.
Object and liquid entry - care should be taken so that objects
do not fall and liquids are not spilled into the enclosure through
openings.
Servicing - the user should not attempt to service the appliance
beyond that described in the operating instructions. All other
servicing should be referred to qualied service personnel. To
reduce the risk of electric shock, do not remove cover (or back) as
there are no user-serviceable parts inside.
Damage requiring service - the appliance should be serviced by
qualied personnel when:
The power-supply cord or the plug has been damaged; or
Objects have fallen, or liquid has been spilled into the appliance; or
The appliance has been exposed to rain; or
The appliance does not appear to operate normally, or exhibits a
marked change in performance; or
The appliance has been dropped, or the enclosure damaged.
Battery heat - do not expose the battery or battery pack to
excessive heat such as sunshine, re or the like.
Battery replacement - danger of explosion if battery is incorrectly
replaced. Replace only with the same or equivalent type.
Battery storing - keep new and used batteries away from children.
If the battery compartment does not close securely, stop using the
product and keep it away from children.
1.
2.
3.
4.
5.
6
UK DE DK
5
JP
RISK OF ELECTRIC SHOCK DO NOT OPEN.
TO REDUCE THE RISK OF ELECTRIC SHOCK,
DO NOT REMOVE THE BACK PANEL.
NO USER-SERVICEABLE PARTS INSIDE.
REFER SERVICING TO QUALIFIED PERSONNEL.
The lightning fl ash within an equilateral triangle is
intended to alert you to the presence of non insulated
“dangerous voltage” within the product’s enclosure that
may be of suffi cient magnitude to constitute an electric
shock to persons.
The exclamation point within an equilateral triangle
is intended to alert you to the presence of important
operating and maintenance (servicing) instructions in
the literature accompanying the appliance.
1 Read instructions - all the safety and operating instructions
should be read before the appliance is operated.
2 Retain instructions - the safety and operating instructions
should be retained for future reference.
3 Heed warnings - all warnings on the appliance and in the
operating instructions should be adhered to.
4 Follow instructions - all operating and use instructions should
be followed.
5 Water and moisture - the appliance should not be used near
water - for example, near a bathtub, washbowl, kitchen sink,
laundry tub, in a wet basement, or near a swimming pool and
the like.
6 Carts and stands - the appliance should
be used only with a cart or stand if
recommended by the manufacturer.
7 Wall or ceiling mounting - the appliance should be mounted to
a wall or ceiling only as recommended by the manufacturer.
8 Ventilation - the appliance should be situated so that its
location or position does not interfere with proper ventilation.
For example, the appliance should not be situated on a bed,
sofa, rug, or similar surface that may block the ventilation
openings; or placed in a built-in installation, such as a
bookcase or cabinet, that may impede the fl ow of air through
the ventilation openings.
9 Heat - the appliance should be situated away from heat
sources such as radiators, heat registers, stoves, or other
appliances that produce heat.
10 Power sources - the appliance should be connected to a
power supply only of the type described in the operating
instructions or as marked on the appliance.
11 Power cord protection - power-supply cords should be routed
so that they are not likely to be walked on or pinched by items
placed on or against them, paying particular attention to cords
at plugs, convenience receptacles and the point where they
exit from appliance.
12 Cleaning - do not use any liquid cleaners. Use only a dry
cloth to wipe off dust and grease.
13 Non-use periods - the power cord of the appliance should
be unplugged from the outlet when left unused for a long
period of time.
14 Object and liquid entry - care should be taken so that
objects do not fall and liquids are not spilled into the
enclosure through openings.
15 Damage requiring service - the appliance should be
serviced by qualifi ed personnel when:
a) The power-supply cord or the plug has been
damaged; or
b) Objects have fallen, or liquid has been spilled into
the appliance; or
c) The appliance has been exposed to rain; or
d) The appliance does not appear to operate normally,
or exhibits a marked change in performance; or
e) The appliance has been dropped, or the enclosure
damaged.
16 Servicing - the user should not attempt to service
the appliance beyond that described in the opera ting
instructions. All other servicing should be referred to
qualifi ed service personnel.
17 Do not expose the battery or battery pack to excessive heat
such as sunshine, fi re or the like.
18 Danger of explosion if battery is incorrectly replaced.
Replace only with the same or equivalent type.
19 Keep new and used batteries away from children. If the
battery compartment does not close securely, stop using
the product and keep it away from children.
20 This equipment is a Class II or double insulated
electrical appliance and does not require a safety
connection to electrical ground.
21 Appliance coupler is used as disconnect device and it
should remain readily operable during intended use. In order
to disconnect the apparatus from the mains completely, the
mains plug should be disconnected from the mains socket
outlet completely.
CAUTION
Carts and stands - the appliance should be used only with a
cart or stand if recommended by the manufacturer. When a cart
is used, use caution when moving the cart/apparatus combination
to avoid injury from tip-over.
IMPORTANT SAFETY INSTRUCTIONS
Wall or ceiling mounting – if the appliance includes options for wall
or ceiling mounting, it should be mounted only as recommended
by the manufacturer.
Ventilation - the appliance should be situated so that its location
or position does not interfere with proper ventilation. For example,
the appliance should not be situated on a bed, sofa, rug, or similar
surface that may block the ventilation openings; or placed in a
built-in installation, such as a bookcase or cabinet, that may
impede the ow of air through the ventilation openings.
Heat - the appliance should be situated away from heat sources
such as radiators, heat registers, stoves, or other appliances
(including ampliers) that produce heat.
Power sources - the appliance should be connected to a power
supply only of the type described in the operating instructions or
as marked on the appliance.
Power cord protection - power-supply cords should be routed
so that they are not likely to be walked on or pinched by items
placed on or against them, paying particular attention to cords
at plugs, convenience receptacles and the point where they exit
from appliance.
7.
8.
9.
10.
11.
12.
13.
14.
15.
16.
a)
b)
c)
d)
e)
17.
18.
19.
Isolation - this equipment is a Class II or double insulated
electrical appliance. It has been designed in such a way
that it does not require a safety connection to electrical
earth.
Mains disconnection - Mains plug is used as disconnect
device and it should remain readily operable during
intended use. In order to disconnect the apparatus from the
mains completely, the mains plug should be disconnected
from the mains socket outlet completely.
This product contains electrical or electronic materials.
The presence of these materials may, if not disposed of
properly, have potential adverse effects on the environment
and human health.
Presence of this label on the product means it should not
be disposed of as unsorted waste and must be collected
separately. As a consumer, you are responsible for ensuring
that this product is disposed of properly.
20.
21.
CAUTION
RISK OF ELECTRIC SHOCK
DO NOT OPEN
ATTENTION
RISQUE D’ ÉLECTROCUTION
NE PAS OUVRIR

UK DE DK
7
FR
FCC Statement
This device complies with part 15 of the FCC Rules. Operation is subject to the following two conditions: (1) This device
may not cause harmful interference, and (2) this device must accept any interference received, including interference that
may cause undesired operation.
Any Changes or modications not expressly approved by the party responsible for compliance could void the user’s
authority to operate the equipment.
Note: This equipment has been tested and found to comply with the limits for a Class B digital device, pursuant to
part 15 of the FCC Rules. These limits are designed to provide reasonable protection against harmful interference in a
residential installation. This equipment generates uses and can radiate radio frequency energy and, if not installed and
used in accordance with the instructions, may cause harmful interference to radio communications. However, there is no
guarantee that interference will not occur in a particular installation. If this equipment does cause harmful interference to
radio or television reception, which can be determined by turning the equipment off and on, the user is encouraged to try
to correct the interference by one or more of the following measures:
- Reorient or relocate the receiving antenna.
- Increase the separation between the equipment and receiver.
- Connect the equipment into an outlet on a circuit different from that to which the receiver is connected.
- Consult the dealer or an experienced radio/TV technician for help.
IC Caution
This device complies with Industry Canada license-exempt RSS standard(s).
Operation is subject to the following two conditions: (1) This device may not cause interference, and (2) This device must
accept any interference, including interference that may cause undesired operation of the device.
This equipment should be installed and operated with a minimum distance of 20 cm between the radiator and your body.
CAN ICES-3(B)/NMB-3(B)

8
CONTENTS
1.0 INTRODUCTION 9
2.0 UNPACKING 9
3.0 POSITIONING 9
4.0 CONNECTION 10
5.0 USAGE 10
6.0 RUNNING-IN 12
7.0 CLEANING AND MAINTENANCE 12
8.0 DISPOSAL 12
9.0 THE LISTENING ROOM 13
10.0 TECHNICAL SPECIFICATIONS 13

UK DE DK
9
FR
1.0 INTRODUCTION
Congratulations with your new DALI ZENSOR AX loudspeaker. It is important to us that your new
DALI loudspeakers are set up and connected optimally. For this reason, we recommend that you
read this manual and follow its recommendations. The manual contains instructions for setup
and connection, as well as tips and advice on how to get the most out of your new loudspeakers.
DALI is acclaimed around the world for unique loudspeakers built to our uncompromising
standards for design and performance. The goal for every single DALI loudspeaker is always
our foremost commitment: To create a listening experience in your home that will make you
forget time and place.
Remember to sign up for the DALI newsletter at www.dali-speakers.com.
Enjoy!
2.0 UNPACKING
Be careful not to damage the contents when you unpack the parts. Depending on which DALI
ZENSOR AX model you have bought, different accessories come with the loudspeaker. Check
that all parts are contained in the cardboard box (see Table 1). Keep the packaging materials
should your speaker need to be relocated or serviced.
3.0 POSITIONING
To achieve the best results, the loudspeaker setup should be symmetrical round your favourite
listening position, see Figure 1. We recommend that you experiment with the position of your
loudspeakers – the sound quality will change depending on the loudspeaker position. Objects
positioned between the speaker and the listening position might negatively affect sound quality.
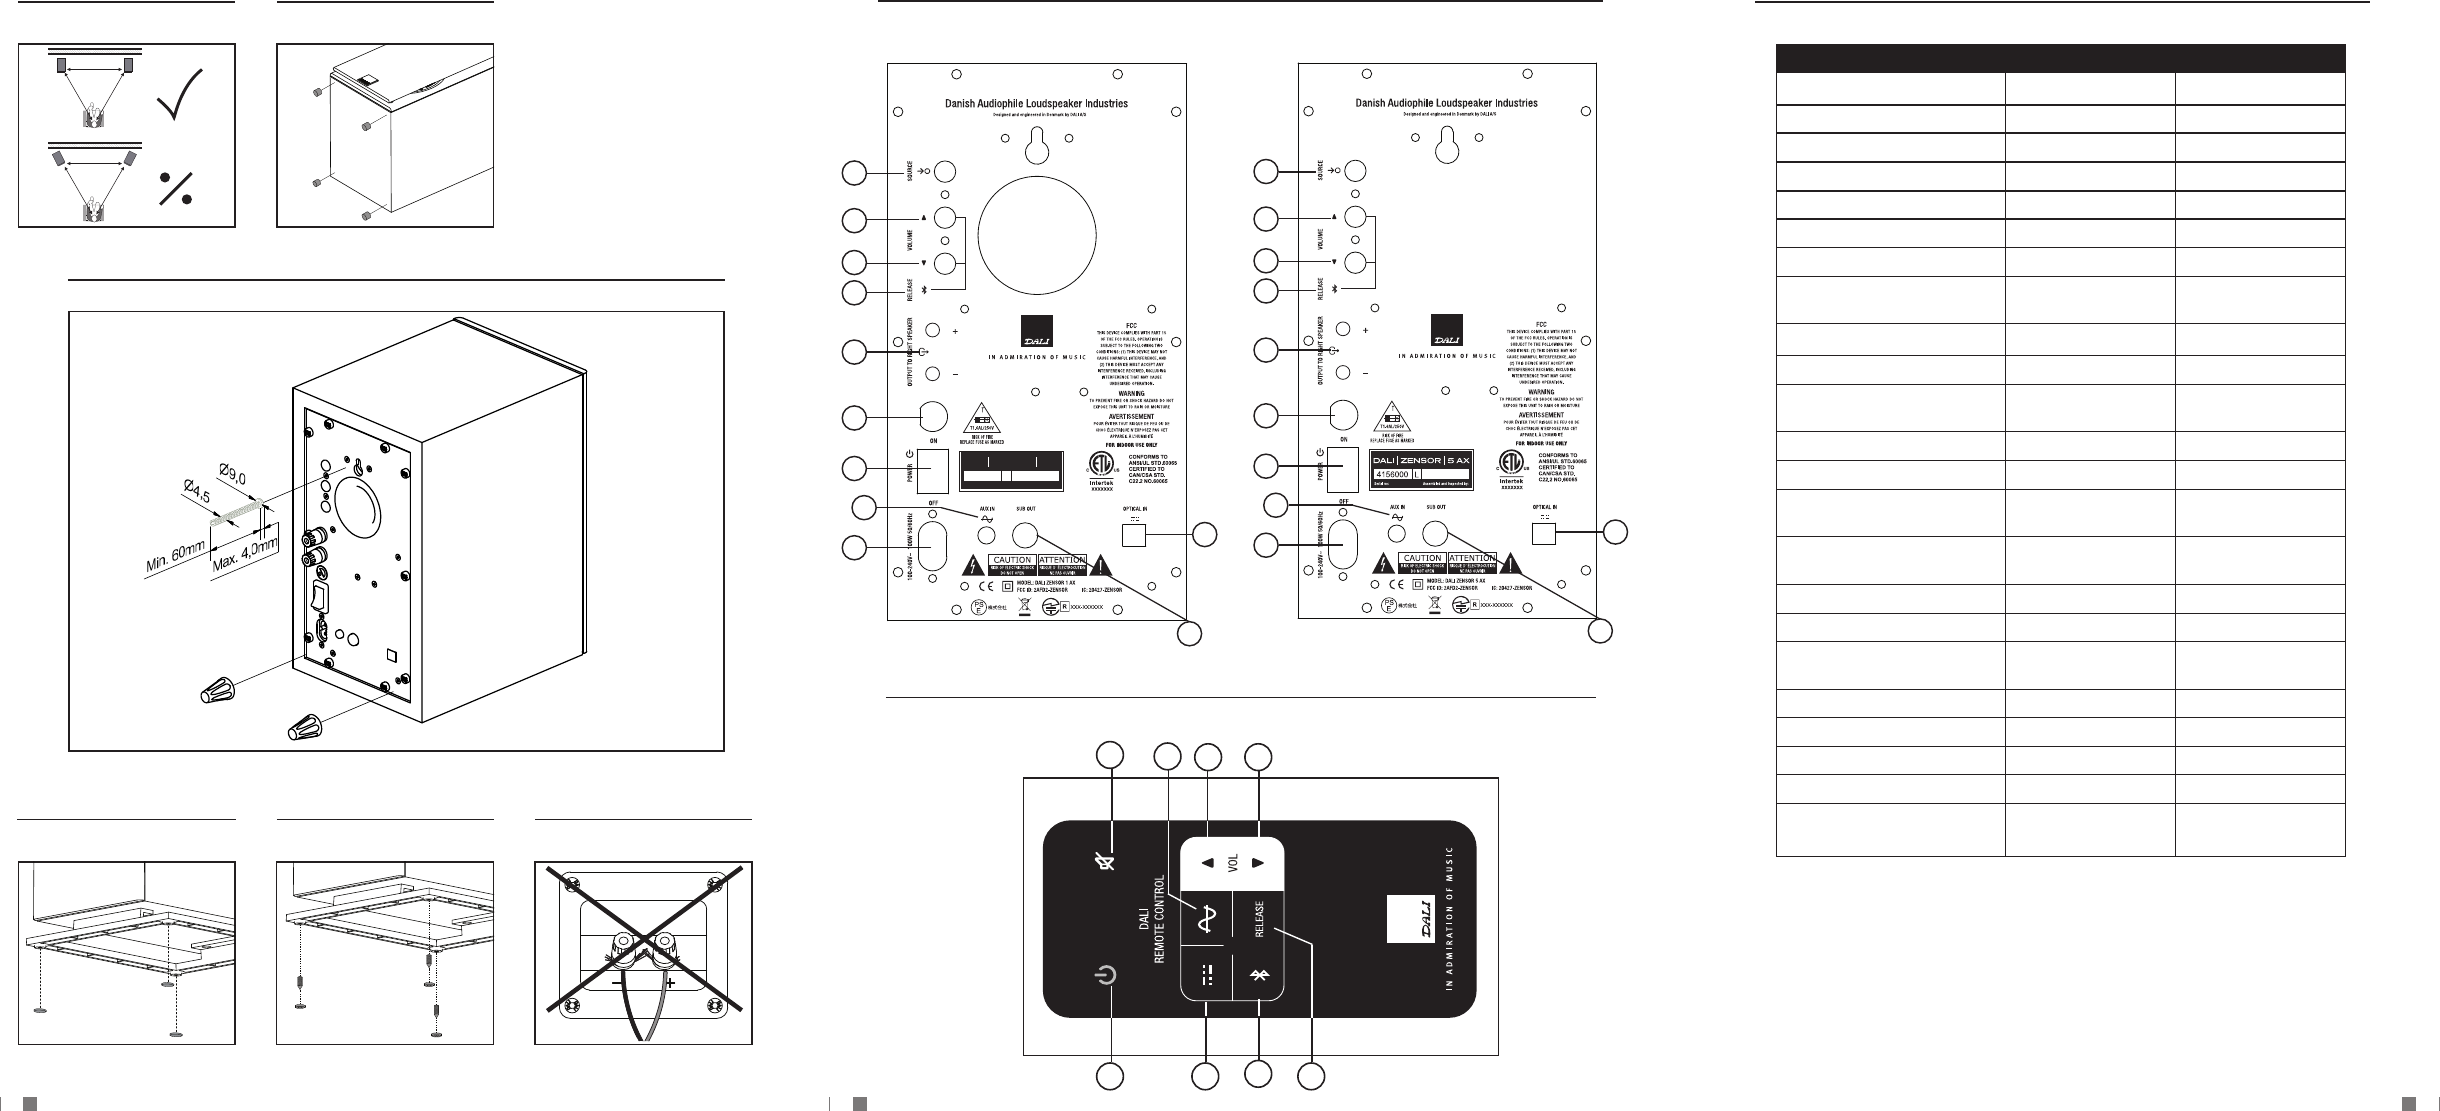
The speakers are designed to meet our wide dispersion principle, so they should NOT be angled
towards the listening position, but be positioned parallel with the rear wall, see Figure 2. By
parallel positioning, the distortion in the main listening area will be lowered and the room
integration will be improved. The wide dispersion principle will ensure that sound is spread
evenly within a large area in the listening room.
3.1 DALI ZENSOR 1 AX
ZENSOR 1 AX is designed to be positioned close to the wall. The speaker can be positioned on
a stand/shelf or hung on a wall using the integrated wall bracket. If positioned on a stand or
shelf, the enclosed small rubber bumpers can be mounted under the speaker for stable and
vibration free positioning, see Figure 3A. If hung on a wall, mount the larger bumpers on the
rear edges of the speakers. The speakers are hung on a wall using one screw (be sure to use
a screw appropriate for the wall type) mounted in the wall. The screw must t the wall bracket
on the rear side of the speaker, see Figure 3B.
The ZENSOR 1 AX should ideally be positioned, so that the height of the tweeter is approximately
at ear height when seated in your favourite listening position.
3.2 DALI ZENSOR 5 AX
ZENSOR 5 AX is designed as a oor standing speaker. ZENSOR 5 AX can be used with spikes or
rubber bumpers under the speaker, see Figure 3C/D. Be careful not to over tighten the locking
nuts. Spikes or rubber bumpers can improve the sound quality. You can try both to hear what
gives the best sound quality in your setup. Please be aware, that spikes may damage the oor,
if it is not protected by e.g. coins under the spikes. They should be positioned minimum 10 – 20
cm (4 – 8”) from the rear wall.

10
4.0 CONNECTION
The main connections is located on the back of the left ZENSOR AX speaker (see Figure 5)
1) Mains connector. Connect the supplied power cord to the mains connector and your mains
outlet.
2) Main power switch. “ON” powers up the ZENSOR AX. “OFF” turns the ZENSOR AX off
completely.
3) Fuse compartment. If the ZENSOR AX fails to power up when connected to the mains and
the POWER switch is set to ON, the fuse may have blown or be faulty. Replace the fuse
with the same type as originally supplied – see fuse type on the amplier back plate. If
the fuse blows repeatedly, have the ZENSOR AX checked at an authorised service centre –
contact your authorised dealer.
4) Right speaker output. The red (+) terminal of the right speaker must be connected to
the red (+) terminal of the left speaker. The black (-) terminal of the right speaker must be
connected to the black (-) terminal of the left speaker (see Figure 6).
5) Volume down.
6) Volume up.
7) Source select. Press to toggle between AUX IN (Front LED = Green), OPTICAL IN (Front LED
= Yellow) and Bluetooth input (Front LED = Blue).
8) AUX IN. Analogue input via stereo mini-jack.
9) SUB OUT. Output to an active subwoofer. Works with any active subwoofer. DALI SUB E-9
For SUB E-12 F is a perfect match for the ZENSOR AX series. Ask your local DALI dealer
for further advice.
10) OPTICAL IN. Optical input via TOSLink.
11) Bluetooth release. Disconnects the current Bluetooth connection and readies the
ZENSOR AX for a new pairing/connection.
NOTE: Before connecting cables or changing any connections, ALWAYS turn off your ZENSOR
AX speaker.
NOTE: Make sure that the bare conductors are tightly gripped by the terminals with no loose
wires which could cause a short circuit and damage the ZENSOR AX speaker (see Figure 4).
5.0 USAGE
When powered on for the rst time the ZENSOR AX will start in Bluetooth mode. Use the Source
button on the back of the left speaker or the dedicated button on the remote to change input.
5.1 REMOTE CONTROL
Use the included remote control (see Figure 6) to easily control power, volume and input on
the ZENSOR AX. It is also possible to use the DALI REMOTE (Not included, contact your local
DALI dealer) with the ZENSOR AX system.
1) Power. Toggle power On/Off
2) Mute. Mute and un-mute the sound
3) Optical In. Selects the optical input
4) AUX In. Selects the AUX input
5) Bluetooth. Select the Bluetooth input
6) Volume up
7) Volume down

UK DE DK
11
FR
8) Release. Disconnects the current Bluetooth connection and readies the ZENSOR AX for a
new pairing/connection
5.2 BLUETOOTH
When put in Bluetooth mode the ZENSOR AX automatically tries to re-connect to the latest used
device. If the ZENSOR AX has never been connected to a Bluetooth device before, the ZENSOR
AX will enter pairing mode and be ready to pair with a new device.
To pair/connect your device look for ZENSOR AX on your Bluetooth device list and establish the
connection.
If the connected device is brought out of range, the ZENSOR AX will try to re-connect to the
device.
To release a current Bluetooth connection or establish a new connection press the Release
button on the remote control (see 5.1)
The ZENSOR AX supports Bluetooth Apt-X connections from Apt-X approved devices.
Note: Only one device can be connected to the ZENSOR AX at a time
5.3 OPTICAL IN
Use this input to connect devices with optical output, like TV’s, CD players or streaming devices.
NOTE: The ZENSOR AX only plays back a stereo signal. If your TV outputs a surround signal via
the optical out, please change this to stereo in the TV’s audio settings.
5.4 AUX IN
Use this input to connect any analogue device.
5.5 SUB OUT
Use this output to connect a subwoofer to the ZENSOR AX system. Any active subwoofer works
with the ZENSOR AX, but DALI SUB E-9 F or SUB E-12 F is a perfect match for the ZENSOR AX
series. Ask your local DALI dealer for further advice.
5.6 FRONT LED
The LED on the front of the left speaker indicates the state of the ZENSOR AX system
RED System off
GREEN System on, AUX IN selected
YELLOW System on, OPTICAL IN selected
BLUE System on, Bluetooth selected, device connected
BLUE blink (fast) System on, Bluetooth selected, no device connected
BLUE blink (short) System on, Bluetooth selected, device paired not connected
Any colour blink (slow) Mute

12
5.7 AUTO POWER OFF
The ZENSOR AX will automatically power off if no signal has been detected for 15 minutes.
To power on the ZENSOR AX again either activate a signal on any input, select an input on the
remote control, use the source button on the back of the left speaker or press the power button
on the remote control.
NOTE: Auto power off on OPTICAL IN is controlled by the carrier light. If your optical device
does not disables the red carrier light when turned off the ZENSOR AX will not auto power off
if OPTICAL IN is selected.
6.0 RUNNING-IN
Like any mechanical system, a loudspeaker requires a “running-in” period to perform at its
best. You will experience a gradual increase in sound quality during the rst period of use. The
break-in period will vary depending on use and playback volume. You should expect up to 100
hours of playback until maximum performance is reached. Unlike other mechanical systems,
the life-span of a loudspeaker is increased by normal, regular playback of music.
7.0 CLEANING AND MAINTENANCE
Clean the cabinets with a soft, dry cloth. If the cabinets are dirty, wipe with a soft cloth dipped in
all-purpose cleaner and then well wrung out. Be very careful when wiping the speaker cones,
as they are very fragile. Front grilles can be cleaned with a clothes brush and wiped with a well
wrung, lint-free cloth and mild all-purpose cleaner.
7.1 AVOID DIRECT SUNLIGHT:
The surfaces of the speakers may fade or become discoloured over time when exposed to
direct sunlight. Therefore avoid positioning the speakers in direct sunlight.
8.0 DISPOSAL
If you want to dispose of this product, do not mix it with general household waste. There is
a separate collection system for used electronic products in accordance with legislation that
requires proper treatment, recovery and recycling. Private households in the EU member states,
Switzerland, Liechtenstein and Norway may return their used electronic products free of charge
to designated collection facilities or to a retailer (if you purchase a similar new one). If you reside
in countries not mentioned above, please contact your local authorities for the correct method
of disposal. By following this process, you will ensure that your disposed product undergoes the
necessary treatment, recovery and recycling and thus prevent potential negative effects on the
environment and human health.

UK DE DK
13
FR
9.0 THE LISTENING ROOM
Every room has its own distinctive acoustics, which inuence the way we experience sound
from a speaker. The sound you hear consists of direct sound from the speakers and reected
sound from the oor, ceiling and walls. The latter will affect how you experience the sound.
As a basic rule, try to avoid large, hard and reective areas in the immediate vicinity of your
loudspeakers as it will typically cause strong reections, which might disturb the precision and
spatial effect of the sound reproduction. Reection might be suppressed by positioning e.g. a
plant between the speaker and the reecting surface. Soft items such as carpets, curtains etc.
might help if the sound is too bright. Both the amount and quality of the deep bass depend on
the size and shape of the room, and the position of the speakers. Positioning the speakers near
a side or back wall will accentuate the bass.
A corner location will accentuate it even more, but will also increase the reections.
10.0 TECHNICAL SPECIFICATIONS
In Table 2 you will nd the most common specications for our speakers. Please have in
mind that there are countless methods for measuring speakers. However, none of them tell
you anything useful about how a speaker really sounds. Only your ears can decide whether
one speaker sounds better than another. Like all our speakers, the DALI ZENSOR AX series is
designed to reproduce music as honestly as possible.
Enjoy your new DALI ZENSOR AX!

14
Read instructions - all the safety and operating instructions
should be read before the appliance is operated.
Retain instructions - the safety and operating instructions
should be retained for future reference.
Heed warnings - all warnings on the appliance and in the
operating instructions should be adhered to.
Follow instructions - all operating and use instructions should
be followed.
Water and moisture - the appliance should not be used near
water - for example, near a bathtub, washbowl, kitchen sink,
laundry tub, in a wet basement, or near a swimming pool and
the like. To reduce the risk of re or electric shock, do not expose
this apparatus to rain or moisture. The apparatus should not be
exposed to dripping or splashing. Objects lled with liquids, such
as vases should not be placed on the apparatus. Wall or ceiling
Cleaning - do not use any liquid cleaners. Use only a dry cloth to
wipe off dust and grease.
Non-use periods - the power cord of the appliance should be
unplugged from the outlet when left unused for a long period of
time and during lightning storms.
Object and liquid entry - care should be taken so that objects
do not fall and liquids are not spilled into the enclosure through
openings.
Servicing - the user should not attempt to service the appliance
beyond that described in the operating instructions. All other
servicing should be referred to qualied service personnel. To
reduce the risk of electric shock, do not remove cover (or back) as
there are no user-serviceable parts inside.
Damage requiring service - the appliance should be serviced by
qualied personnel when:
The power-supply cord or the plug has been damaged; or
Objects have fallen, or liquid has been spilled into the appliance; or
The appliance has been exposed to rain; or
The appliance does not appear to operate normally, or exhibits a
marked change in performance; or
The appliance has been dropped, or the enclosure damaged.
Battery heat - do not expose the battery or battery pack to
excessive heat such as sunshine, re or the like.
Battery replacement - danger of explosion if battery is incorrectly
replaced. Replace only with the same or equivalent type.
Battery storing - keep new and used batteries away from children.
If the battery compartment does not close securely, stop using the
product and keep it away from children.
1.
2.
3.
4.
5.
6
UK DE DK
5
JP
RISK OF ELECTRIC SHOCK DO NOT OPEN.
TO REDUCE THE RISK OF ELECTRIC SHOCK,
DO NOT REMOVE THE BACK PANEL.
NO USER-SERVICEABLE PARTS INSIDE.
REFER SERVICING TO QUALIFIED PERSONNEL.
The lightning fl ash within an equilateral triangle is
intended to alert you to the presence of non insulated
“dangerous voltage” within the product’s enclosure that
may be of suffi cient magnitude to constitute an electric
shock to persons.
The exclamation point within an equilateral triangle
is intended to alert you to the presence of important
operating and maintenance (servicing) instructions in
the literature accompanying the appliance.
1 Read instructions - all the safety and operating instructions
should be read before the appliance is operated.
2 Retain instructions - the safety and operating instructions
should be retained for future reference.
3 Heed warnings - all warnings on the appliance and in the
operating instructions should be adhered to.
4 Follow instructions - all operating and use instructions should
be followed.
5 Water and moisture - the appliance should not be used near
water - for example, near a bathtub, washbowl, kitchen sink,
laundry tub, in a wet basement, or near a swimming pool and
the like.
6 Carts and stands - the appliance should
be used only with a cart or stand if
recommended by the manufacturer.
7 Wall or ceiling mounting - the appliance should be mounted to
a wall or ceiling only as recommended by the manufacturer.
8 Ventilation - the appliance should be situated so that its
location or position does not interfere with proper ventilation.
For example, the appliance should not be situated on a bed,
sofa, rug, or similar surface that may block the ventilation
openings; or placed in a built-in installation, such as a
bookcase or cabinet, that may impede the fl ow of air through
the ventilation openings.
9 Heat - the appliance should be situated away from heat
sources such as radiators, heat registers, stoves, or other
appliances that produce heat.
10 Power sources - the appliance should be connected to a
power supply only of the type described in the operating
instructions or as marked on the appliance.
11 Power cord protection - power-supply cords should be routed
so that they are not likely to be walked on or pinched by items
placed on or against them, paying particular attention to cords
at plugs, convenience receptacles and the point where they
exit from appliance.
12 Cleaning - do not use any liquid cleaners. Use only a dry
cloth to wipe off dust and grease.
13 Non-use periods - the power cord of the appliance should
be unplugged from the outlet when left unused for a long
period of time.
14 Object and liquid entry - care should be taken so that
objects do not fall and liquids are not spilled into the
enclosure through openings.
15 Damage requiring service - the appliance should be
serviced by qualifi ed personnel when:
a) The power-supply cord or the plug has been
damaged; or
b) Objects have fallen, or liquid has been spilled into
the appliance; or
c) The appliance has been exposed to rain; or
d) The appliance does not appear to operate normally,
or exhibits a marked change in performance; or
e) The appliance has been dropped, or the enclosure
damaged.
16 Servicing - the user should not attempt to service
the appliance beyond that described in the opera ting
instructions. All other servicing should be referred to
qualifi ed service personnel.
17 Do not expose the battery or battery pack to excessive heat
such as sunshine, fi re or the like.
18 Danger of explosion if battery is incorrectly replaced.
Replace only with the same or equivalent type.
19 Keep new and used batteries away from children. If the
battery compartment does not close securely, stop using
the product and keep it away from children.
20 This equipment is a Class II or double insulated
electrical appliance and does not require a safety
connection to electrical ground.
21 Appliance coupler is used as disconnect device and it
should remain readily operable during intended use. In order
to disconnect the apparatus from the mains completely, the
mains plug should be disconnected from the mains socket
outlet completely.
CAUTION
Carts and stands - the appliance should be used only with a
cart or stand if recommended by the manufacturer. When a cart
is used, use caution when moving the cart/apparatus combination
to avoid injury from tip-over.
IMPORTANT SAFETY INSTRUCTIONS
Wall or ceiling mounting – if the appliance includes options for wall
or ceiling mounting, it should be mounted only as recommended
by the manufacturer.
Ventilation - the appliance should be situated so that its location
or position does not interfere with proper ventilation. For example,
the appliance should not be situated on a bed, sofa, rug, or similar
surface that may block the ventilation openings; or placed in a
built-in installation, such as a bookcase or cabinet, that may
impede the ow of air through the ventilation openings.
Heat - the appliance should be situated away from heat sources
such as radiators, heat registers, stoves, or other appliances
(including ampliers) that produce heat.
Power sources - the appliance should be connected to a power
supply only of the type described in the operating instructions or
as marked on the appliance.
Power cord protection - power-supply cords should be routed
so that they are not likely to be walked on or pinched by items
placed on or against them, paying particular attention to cords
at plugs, convenience receptacles and the point where they exit
from appliance.
7.
8.
9.
10.
11.
12.
13.
14.
15.
16.
a)
b)
c)
d)
e)
17.
18.
19.
Isolation - this equipment is a Class II or double insulated
electrical appliance. It has been designed in such a way
that it does not require a safety connection to electrical
earth.
Mains disconnection - Mains plug is used as disconnect
device and it should remain readily operable during
intended use. In order to disconnect the apparatus from the
mains completely, the mains plug should be disconnected
from the mains socket outlet completely.
This product contains electrical or electronic materials.
The presence of these materials may, if not disposed of
properly, have potential adverse effects on the environment
and human health.
Presence of this label on the product means it should not
be disposed of as unsorted waste and must be collected
separately. As a consumer, you are responsible for ensuring
that this product is disposed of properly.
20.
21.
CAUTION
RISK OF ELECTRIC SHOCK
DO NOT OPEN
ATTENTION
RISQUE D’ ÉLECTROCUTION
NE PAS OUVRIR

15
UK DE DK FR
FCC Statement
This device complies with part 15 of the FCC Rules. Operation is subject to the following two conditions: (1) This device
may not cause harmful interference, and (2) this device must accept any interference received, including interference that
may cause undesired operation.
Any Changes or modications not expressly approved by the party responsible for compliance could void the user’s
authority to operate the equipment.
Note: This equipment has been tested and found to comply with the limits for a Class B digital device, pursuant to
part 15 of the FCC Rules. These limits are designed to provide reasonable protection against harmful interference in a
residential installation. This equipment generates uses and can radiate radio frequency energy and, if not installed and
used in accordance with the instructions, may cause harmful interference to radio communications. However, there is no
guarantee that interference will not occur in a particular installation. If this equipment does cause harmful interference to
radio or television reception, which can be determined by turning the equipment off and on, the user is encouraged to try
to correct the interference by one or more of the following measures:
- Reorient or relocate the receiving antenna.
- Increase the separation between the equipment and receiver.
- Connect the equipment into an outlet on a circuit different from that to which the receiver is connected.
- Consult the dealer or an experienced radio/TV technician for help.
IC Caution
This device complies with Industry Canada license-exempt RSS standard(s).
Operation is subject to the following two conditions: (1) This device may not cause interference, and (2) This device must
accept any interference, including interference that may cause undesired operation of the device.
This equipment should be installed and operated with a minimum distance of 20 cm between the radiator and your body.
CAN ICES-3(B)/NMB-3(B)

16
INHALT
1.0 EINLEITUNG 17
2.0 AUSPACKEN 17
3.0 AUFSTELLUNG 17
4.0 ANSCHLUSS 18
5.0 BETRIEB 18
6.0 EINSPIELZEIT 20
7.0 REINIGUNG UND PFLEGE 20
8.0 ENTSORGUNG 20
9.0 DER HÖRRAUM 21
10.0 TECHNISCHE DATEN 21

17
UK DE DK FR
1.0 EINLEITUNG
Herzlichen Glückwunsch zu Ihren neuen ZENSOR AX Lautsprechern. Es ist uns ein wichtiges
Anliegen, dass Ihre neuen DALI Lautsprecher optimal aufgestellt und angeschlossen werden.
Daher empfehlen wir Ihnen, diese Bedienungsanleitung aufmerksam zu lesen und die darin
enthaltenen Hinweise genau zu beachten. Die Anleitung enthält Beschreibungen für die
Aufstellung und den Anschluss sowie zahlreiche Tipps und Hinweise, damit Sie Ihre neuen
Lautsprecher in der bestmöglichen Klangqualität genießen können.
Weltweit schätzen Musikfans DALI für seine einzigartigen Lautsprecher, die nach unseren
kompromisslosen Standards für Design und Leistung gebaut werden. Mit jedem einzelnen
DALI Lautsprecher verfolgen wir vorrangig ein Ziel: bei Ihnen Zuhause ein Hörerlebnis zu
ermöglichen, das Sie Zeit und Raum vergessen lässt.
Viel Vergnügen!
2.0 AUSPACKEN
Bitte achten Sie beim Auspacken darauf, keine Teile zu beschädigen. Abhängig von dem DALI
ZENSOR AX Modell, für welches Sie sich entschieden haben, benden sich unterschiedliche
Zubehörteile in der Verpackung. Überprüfen Sie, ob alle Teile in der Verpackung enthalten sind
(siehe Tabelle 1). Bewahren Sie die Verpackung für einen möglichen späteren Transport oder
Servicefall auf.
3.0 POSITIONIERUNG
Bevor Sie Ihre neuen ZENSOR AX Lautsprecher aufstellen und anschließen, sollten Sie prüfen,
wo sich die Lautsprecher passend zu Ihrer Hörposition am besten platzieren lassen. Idealerweise
stellen Sie die Boxen an den Ecken eines gleichseitigen Dreiecks auf, wobei der linke und der
rechte Lautsprecher mindestens 1,5 Meter voneinander entfernt sein sollten, damit ein guter
Stereoeindruck entsteht. Zwischen den Lautsprechern und der Hörposition sollten sich keinerlei
Gegenstände benden, da dies die Klangwiedergabe verschlechtert. Wir empfehlen Ihnen ggf.
mit verschiedenen Lautsprecherpositionen zu experimentieren – die Klangqualität ändert sich je
nach Lautsprecherposition. Die Lautsprecher haben eine breitwinkelige Abstrahlcharakteristik,
deshalb sollten sie nicht zur Hörposition angewinkelt werden, sondern parallel zur Rückwand
stehen (siehe Abb. 2). Hierdurch verbessert sich die räumliche Wiedergabe und das Klangbild
wird gleichmäßig innerhalb eines großen Bereichs im Hörraum abgestahlt.
3.1 DALI ZENSOR 1 AX
Die ZENSOR 1 AX ist für eine wandnahe Aufstellung konzipiert. Die Lautsprecher können auf
einem Standfuß und im Regal aufgestellt oder mit Hilfe der integrierten Wandhalterung an
der Wand befestigt werden. Wenn der Lautsprecher auf einem Standfuß oder in einem Regal
aufgestellt wird, können die beiliegenden kleinen Gummifüße angebracht werden, sodass der
Lautsprecher stabil und erschütterungsfrei steht, siehe Abb. 3A. Wenn der Lautsprecher an der
Wand hängen soll, sollten die Gummifüße an der Hinterkante des Lautsprechers angebracht
werden. Die Lautsprecher werden mit einer Schraube (und Dübel) an der Wand festgeschraubt.
Die Schraube muss zur/zu den Wandhalterung/en an der Lautsprecherrückseite passen, siehe
Abb. 3B.

18
3.2 DALI ZENSOR 5 AX
Die ZENSOR 5 AX ist als Standlautsprecher für eine Aufstellung auf dem Boden vorgesehen. Die
Verwendung von Spikes oder Gummifüßen kann die Klangqualität verbessern. Testen Sie am
besten beides und nden Sie die optimale Klangqualität für Ihre Aufstellung. Bitte beachten Sie,
dass die Spikes den Fußboden beschädigen können. Legen Sie zum Schutz des Bodens eine
Münze o. ä. unter die Spikes. Die ZENSOR 5 AX sollte idealerweise so positioniert werden, dass
die Höhe des Hochtöners in etwa auf Ohrhöhe ist, wenn Sie in Ihrer bevorzugten Hörposition
sitzen.
4.0 ANSCHLUSS
Alle wichtigen Anschlüsse benden sich an der Rückseite des mit der Verstärkerelektronik
ausgestatteten, für den linken Stereokanal vorgesehenen ZENSOR AX Lautsprechers (siehe
Abb. 5):
1) Netzanschluss. Verbinden Sie das mitgelieferte Netzkabel mit dem Netzanschluss an der
Box und einer Steckdose.
2) Hauptnetzschalter. Bei Schalterstellung „ON“ ist die ZENSOR AX eingeschaltet. In
Schalterstellung „OFF“ ist die ZENSOR AX vollständig ausgeschaltet.
3) Feinsicherung. Wenn sich die ZENSOR AX nicht einschaltet, obwohl das Netzkabel
anschlossen ist und der Netzschalter auf „ON“ steht, kann die Feinsicherung des
Lautsprechers durchgebrannt oder defekt sein. Ersetzen Sie die Sicherung dann mit einer neuen
Sicherung gleichen Werts – Angaben hierzu nden Sie auf der Rückseite des Lautsprechers.
Wenn die Sicherung erneut durchbrennt, lassen Sie den Lautsprecher in einer autorisierten
Servicewerkstatt überprüfen – am besten wenden Sie sich hierzu an Ihren DALI-Fachhändler.
4) Anschluss für die rechte Lautsprecherbox. Verbinden Sie die rote (+) Anschlussklemme mit
der roten (+) Anschlussklemme der rechten Lautsprecherbox. Verbinden Sie die schwarze (-)
Anschlussklemme mit der schwarzen (-) Anschlussklemme der rechten Lautsprecherbox.
5) Lautstärke verringern.
6) Lautstärke erhöhen.
7) Eingangswahlschalter. Durch Drücken dieses Schalters wechselt der betriebsbereite
Eingang zwischen AUX IN (Front-LED = grün), OPTICAL IN (Front-LED = gelb) und Bluetooth
(Front-LED = blau).
8) AUX IN. Analoger Eingang für 3,5 mm Stereo-Klinke.
9) SUB OUT. Ausgang zum Anschluss eines aktiven Subwoofers. Es lässt sich im Prinzip jeder
Aktiv-Subwoofer betreiben, doch die DALI-Subwoofer SUB E-9 F oder SUB E-12 F sind die
perfekte Ergänzung für die ZENSOR AX Serie. Ihr DALI-Fachhändler berät Sie gern.
10) OPTICAL IN. Optischer Digitaleingang für TOSLink-Stecker.
Bitte beachten: Ziehen Sie stets den Netzstecker der ZENSOR AX, bevor Sie Kabel verbinden
oder Anschlüsse ändern!
Bitte beachten: Vergewissern Sie sich, dass die Lautsprecherkabel sorgfältig und fest mit den
Anschlüssen verbunden sind und keine losen Drähte einen Kurzschluss verursachen können,
durch den die ZENSOR AX beschädigt werden könnte (siehe Abb 4).
5.0 BETRIEB
Nachdem die ZENSOR AX zum ersten Mal eingeschaltet wurde, bendet sie sich im Bluetooth-
Modus. Drücken Sie die „Source“-Taste an der Rückseite des linken Lautsprechers oder auf der
Fernbedienung, um einen anderen Eingang auszuwählen.

19
UK DE DK FR
5.2 BLUETOOTH
Sobald sich die ZENSOR AX im Bluetooth-Modus bendet, versucht sie automatisch, eine
Verbindung zur letzten genutzten Bluetooth-Quelle herzustellen. War die ZENSOR AX noch mit
keinem Bluetooth-Gerät verbunden, schaltet sie sich in den Kopplungsmodus und ist bereit,
sich mit einem neuen Bluetooth-Gerät zu verbinden.
Um Ihr Bluetooth-Gerät zu koppeln, wählen Sie „ZENSOR AX“ in der Liste der angezeigten
Bluetooth-Geräte und stellen Sie die Verbindung her.
Gerät die gekoppelte Quelle außer Reichweite, versucht die ZENSOR AX, die Verbindung wieder
herzustellen.
Um eine bestehende Bluetooth-Verbindung zu unterbrechen oder eine neue Verbindung
herzustellen, drücken Sie die „Release“-Taste auf der Fernbedienung (siehe Kapitel 5.1)
Die ZENSOR AX ermöglicht qualitativ höherwertige Bluetooth aptX Verbindungen, sofern auch
das sendende Bluetooth-Gerät diesen Standard unterstützt.
Bitte beachten: Es lässt sich immer nur eine Bluetooth-Quelle mit der ZENSOR AX verbinden.
5.3 OPTICAL IN
Nutzen Sie diesen Eingang, wenn Sie ein Gerät mit mit optischem Digitaleingang, also z.B.
einen TV, CD-Spieler oder einen Streaming-Client an Ihre ZENSOR AX anschließen möchten.
Bitte beachten: Die ZENSOR AX gibt nur Stereo-Signale wieder. Gibt Ihr TV-Gerät ein
Surroundsignal über den optischen Ausgang aus, wählen Sie in den Audio-Einstellungen Ihres
TV hierfür bitte „Stereo“.
5.4 AUX IN
Nutzen Sie diesen Eingang für den Anschluss eines Geräts mit analogem Stereo-Ausgang.
5.5 SUB OUT
Nutzen Sie diesen Ausgang, um Ihr ZENSOR AX System um einen aktiven Subwoofer zu
erweitern. Es lässt sich im Prinzip jeder Aktiv-Subwoofer betreiben, doch die DALI-Subwoofer
SUB E-9 F oder SUB E-12 F sind die perfekte Ergänzung für die ZENSOR AX Serie. Ihr DALI-
Fachhändler berät Sie gern.
5.6 FRONT LED
Die Leuchtdiode an der Frontseite des linken Lautsprechers informiert Sie über den
Betriebszustand des ZENSOR AX Systems:
ROT System ausgeschaltet
GRÜN System eingeschaltet, AUX Eingang gewählt
GELB System eingeschaltet, OPTICAL Eingang gewählt
BLAU System eingeschaltet, Bluetooth Eingang gewählt,
Gerät gekoppelt
BLAU blinkt (schnell) System eingeschaltet, Bluetooth Eingang gewählt, kein Gerät gekoppelt
BLAU blinkt (kurz) System eingeschaltet, Bluetooth Eingang gewählt, keine Verbindung
zu gekoppeltem Gerät
Jede Farbe blinkt (langsam) Muting-Funktion aktiviert

20
5.7 AUTOMATISCHE ABSCHALTUNG
Erhält die ZENSOR AX über einen Zeitraum von 15 Minuten kein Audiosignal mehr, schaltet
sie automatisch auf Standby. Die ZENSOR AX schaltet sich wieder ein, sobald an einem
der Eingänge ein Signal anliegt, auf der Fernbedienung ein Eingang gewählt wird, der
Eingangswahlschaltet auf der Rückseite des linken Lautsprechers genutzt wird oder die
Netztaste auf der Fernbedienung gedrückt wird.
Bitte beachten: Die automatische Abschaltung wird bei Nutzung des optischen Digitaleingangs
durch das Träger-Lichtsignal gesteuert. Sollte die angeschlossene Audioquelle nach dem
Abschalten der ZENSOR AX weiterhin das rote Träger-Lichtsignal ausstrahlen, ist keine
automatische Abschaltung möglich.
6.0 EINSPIELZEIT
Wie jedes andere mechanische System muss auch ein Lautsprecher eingespielt werden,
damit er optimal funktionieren und klingen kann. Sie werden feststellen, dass sich die
Klangqualität Ihrer neuen Lautsprecher in der ersten Zeit kontinuierlich merklich verbessert.
Die Dauer der Einspielzeit hängt davon ab, wie häug Sie Ihre HiFi-Anlage nutzen und wie
laut Sie hören. Wir empfehlen eine Einspielzeit von etwa 100 Stunden bei mittlerer Lautstärke,
bis der Lautsprecher seine volle Leistung entfalten kann. Übrigens: Im Gegensatz zu anderen
mechanischen Systemen verlängert sich die Lebensdauer eines Lautsprechers durch eine
regelmäßige normallaute Musikwiedergabe.
7.0 REINIGUNG UND PFLEGE
Reinigen Sie die Gehäuse nur mit einem weichen, trockenen Mikrofasertuch. Verschmutzte
Stellen säubern Sie am besten mit einem weichen, leicht angefeuchteten Mikrofasertuch. Seien
Sie sehr vorsichtig beim Entstauben der Lautsprechermembrane, da diese sehr empndlich
sind. Den Hochtöner bitte am besten gar nicht berühren. Die Frontabdeckungen können mit
einer Kleiderbürste, einem Staubsauger und einem gut ausgewrungenen faserfreien Tuch mit
mildem Allzweckreiniger gereinigt werden.
7.1 Direktes Sonnenlicht vermeiden
Die Oberächen der Lautsprecherboxen können mit der Zeit ausbleichen oder ihre Farbe
verändern, wenn sie direktem Sonnenlicht ausgesetzt sind. Vermeiden Sie daher eine
Aufstellung der Lautsprecher direkt am Fenster im Sonnenlicht.
8.0 ENTSORGUNG
Wenn Sie dieses Produkt entsorgen möchten, geben Sie es bitte nicht in den allgemeinen
Hausmüll. Es gibt ein separates Sammelsystem für gebrauchte elektronische Produkte, über
das die richtige Behandlung, Rückgewinnung und Wiederverwertung gemäß der bestehenden
Gesetzgebung gewährleistet wird. Private Haushalte in den EU-Staaten, der Schweiz,
Liechtenstein und Norwegen können ihre ausrangierten Elektronik-Produkte kostenfrei bei
den entsprechenden Sammeleinrichtungen oder – beim Neukauf eines entsprechenden
Produkts – über den Händler zurückgeben. Bitte wenden Sie sich in den Ländern, die oben
nicht aufgeführt sind, hinsichtlich der korrekten Verfahrensweise der Entsorgung an die örtliche
Kommunalverwaltung. Auf diese Weise stellen Sie sicher, dass das zu entsorgende Produkt
der notwendigen Behandlung, Rückgewinnung und Wiederverwertung unterzogen wird, und
so mögliche negative Einüsse auf die Umwelt und die menschliche Gesundheit vermieden
werden.

21
UK DE DK FR
9.0 DER HÖRRAUM
Jeder Raum hat seine eigenen charakteristischen akustischen Eigenschaften, die unsere
Klangwahrnehmung in Bezug auf einen bestimmten Lautsprecher beeinussen. Sie können
die Akustik Ihres Hörraums auf verschiedene Weise beeinussen. Ein Teil des von Ihnen
wahrgenommenen Klangs kommt nicht von den Lautsprechern, sondern von Reexionen an Boden,
Decke und Wänden. Diese Reexionen werden durch Objekte wie Mobiliar, Panzen und Teppiche
abgeschwächt. Ist der Klang zu hell, können weiche Gegenstände wie Vorhänge und Teppiche
Abhilfe schaffen. Benden sich großächige Fensterscheiben im Raum, verhindern Vorhänge vor
den Fenstern Reexionen von der Glasoberäche.
Sowohl die Stärke als auch die Qualität tiefer Bässe hängen von Größe und Form des Raums sowie
vom Aufstellungsort der Lautsprecher ab. Sind die Lautsprecher nahe der Seitenwände oder der
hinteren Wand platziert, kommt der Bass mehr zur Geltung. Eine Platzierung in Eckbereichen hebt den
Bass noch stärker hervor; es erhöhen sich dadurch aber auch die Reexionen. Die Entscheidung liegt
ganz bei Ihnen – experimentieren Sie am besten mit verschiedenen Positionen, um herauszunden,
welche Ihnen das ideale Klangerlebnis liefert.
Generell sollten Sie große, harte und stark reektierende Flächen in der unmittelbaren Nähe der
Lautsprecher vermeiden. Solche Flächen reektieren die Klänge von Lautsprechern in der gleichen
Weise, wie z.B. Spiegel auch das Licht reektieren, nämlich mit nahezu voller Stärke. Aufgrund der
relativ langsamen Geschwindigkeit des Schalls entsteht dabei allerdings eine leichte Verzögerung,
die die Präzision und den räumlichen Effekt der Klangwiedergabe stört. Durch eine weiche
Oberäche, z. B. eine hinter dem Lautsprecher aufgehängte Textiloberäche, einen kleinen Teppich
vor dem Lautsprecher oder eine große, seitlich platzierte Panze kann eine verblüffend große
Wirkung in Bezug auf Klangqualität und Klangpräzision erzielt werden. Sind Sie mit der Platzierung
Ihrer Lautsprecher zufrieden, ist es wichtig, dass diese einen absolut stabilen Halt haben. Bei
Standlautsprechern ist die Verwendung der mitgelieferten Spikes ausgesprochen wichtig.
10.0 TECHNISCHE DATEN
In Tabelle 2 nden Sie eine Aufstellung der wichtigsten technischen Daten Ihrer Lautsprecher.
Bedenken Sie, dass es unzählige Methoden zur technischen Messung von Lautsprechern gibt.
Keine von ihnen wird Ihnen jedoch etwas Nützliches darüber verraten, wie ein Lautsprecher
wirklich klingt. Allein Ihre Ohren können entscheiden, ob ein Lautsprecher besser klingt als ein
anderer. Wie alle unsere Lautsprecher wurde auch die DALI ZENSOR AX so konstruiert, dass sie
die Musik so originalgetreu wie nur irgend möglich wiedergibt.
Viel Vergnügen mit Ihren neuen DALI ZENSOR AX!

22
Read instructions - all the safety and operating instructions
should be read before the appliance is operated.
Retain instructions - the safety and operating instructions
should be retained for future reference.
Heed warnings - all warnings on the appliance and in the
operating instructions should be adhered to.
Follow instructions - all operating and use instructions should
be followed.
Water and moisture - the appliance should not be used near
water - for example, near a bathtub, washbowl, kitchen sink,
laundry tub, in a wet basement, or near a swimming pool and
the like. To reduce the risk of re or electric shock, do not expose
this apparatus to rain or moisture. The apparatus should not be
exposed to dripping or splashing. Objects lled with liquids, such
as vases should not be placed on the apparatus. Wall or ceiling
Cleaning - do not use any liquid cleaners. Use only a dry cloth to
wipe off dust and grease.
Non-use periods - the power cord of the appliance should be
unplugged from the outlet when left unused for a long period of
time and during lightning storms.
Object and liquid entry - care should be taken so that objects
do not fall and liquids are not spilled into the enclosure through
openings.
Servicing - the user should not attempt to service the appliance
beyond that described in the operating instructions. All other
servicing should be referred to qualied service personnel. To
reduce the risk of electric shock, do not remove cover (or back) as
there are no user-serviceable parts inside.
Damage requiring service - the appliance should be serviced by
qualied personnel when:
The power-supply cord or the plug has been damaged; or
Objects have fallen, or liquid has been spilled into the appliance; or
The appliance has been exposed to rain; or
The appliance does not appear to operate normally, or exhibits a
marked change in performance; or
The appliance has been dropped, or the enclosure damaged.
Battery heat - do not expose the battery or battery pack to
excessive heat such as sunshine, re or the like.
Battery replacement - danger of explosion if battery is incorrectly
replaced. Replace only with the same or equivalent type.
Battery storing - keep new and used batteries away from children.
If the battery compartment does not close securely, stop using the
product and keep it away from children.
1.
2.
3.
4.
5.
6
UK DE DK
5
JP
RISK OF ELECTRIC SHOCK DO NOT OPEN.
TO REDUCE THE RISK OF ELECTRIC SHOCK,
DO NOT REMOVE THE BACK PANEL.
NO USER-SERVICEABLE PARTS INSIDE.
REFER SERVICING TO QUALIFIED PERSONNEL.
The lightning fl ash within an equilateral triangle is
intended to alert you to the presence of non insulated
“dangerous voltage” within the product’s enclosure that
may be of suffi cient magnitude to constitute an electric
shock to persons.
The exclamation point within an equilateral triangle
is intended to alert you to the presence of important
operating and maintenance (servicing) instructions in
the literature accompanying the appliance.
1 Read instructions - all the safety and operating instructions
should be read before the appliance is operated.
2 Retain instructions - the safety and operating instructions
should be retained for future reference.
3 Heed warnings - all warnings on the appliance and in the
operating instructions should be adhered to.
4 Follow instructions - all operating and use instructions should
be followed.
5 Water and moisture - the appliance should not be used near
water - for example, near a bathtub, washbowl, kitchen sink,
laundry tub, in a wet basement, or near a swimming pool and
the like.
6 Carts and stands - the appliance should
be used only with a cart or stand if
recommended by the manufacturer.
7 Wall or ceiling mounting - the appliance should be mounted to
a wall or ceiling only as recommended by the manufacturer.
8 Ventilation - the appliance should be situated so that its
location or position does not interfere with proper ventilation.
For example, the appliance should not be situated on a bed,
sofa, rug, or similar surface that may block the ventilation
openings; or placed in a built-in installation, such as a
bookcase or cabinet, that may impede the fl ow of air through
the ventilation openings.
9 Heat - the appliance should be situated away from heat
sources such as radiators, heat registers, stoves, or other
appliances that produce heat.
10 Power sources - the appliance should be connected to a
power supply only of the type described in the operating
instructions or as marked on the appliance.
11 Power cord protection - power-supply cords should be routed
so that they are not likely to be walked on or pinched by items
placed on or against them, paying particular attention to cords
at plugs, convenience receptacles and the point where they
exit from appliance.
12 Cleaning - do not use any liquid cleaners. Use only a dry
cloth to wipe off dust and grease.
13 Non-use periods - the power cord of the appliance should
be unplugged from the outlet when left unused for a long
period of time.
14 Object and liquid entry - care should be taken so that
objects do not fall and liquids are not spilled into the
enclosure through openings.
15 Damage requiring service - the appliance should be
serviced by qualifi ed personnel when:
a) The power-supply cord or the plug has been
damaged; or
b) Objects have fallen, or liquid has been spilled into
the appliance; or
c) The appliance has been exposed to rain; or
d) The appliance does not appear to operate normally,
or exhibits a marked change in performance; or
e) The appliance has been dropped, or the enclosure
damaged.
16 Servicing - the user should not attempt to service
the appliance beyond that described in the opera ting
instructions. All other servicing should be referred to
qualifi ed service personnel.
17 Do not expose the battery or battery pack to excessive heat
such as sunshine, fi re or the like.
18 Danger of explosion if battery is incorrectly replaced.
Replace only with the same or equivalent type.
19 Keep new and used batteries away from children. If the
battery compartment does not close securely, stop using
the product and keep it away from children.
20 This equipment is a Class II or double insulated
electrical appliance and does not require a safety
connection to electrical ground.
21 Appliance coupler is used as disconnect device and it
should remain readily operable during intended use. In order
to disconnect the apparatus from the mains completely, the
mains plug should be disconnected from the mains socket
outlet completely.
CAUTION
Carts and stands - the appliance should be used only with a
cart or stand if recommended by the manufacturer. When a cart
is used, use caution when moving the cart/apparatus combination
to avoid injury from tip-over.
IMPORTANT SAFETY INSTRUCTIONS
Wall or ceiling mounting – if the appliance includes options for wall
or ceiling mounting, it should be mounted only as recommended
by the manufacturer.
Ventilation - the appliance should be situated so that its location
or position does not interfere with proper ventilation. For example,
the appliance should not be situated on a bed, sofa, rug, or similar
surface that may block the ventilation openings; or placed in a
built-in installation, such as a bookcase or cabinet, that may
impede the ow of air through the ventilation openings.
Heat - the appliance should be situated away from heat sources
such as radiators, heat registers, stoves, or other appliances
(including ampliers) that produce heat.
Power sources - the appliance should be connected to a power
supply only of the type described in the operating instructions or
as marked on the appliance.
Power cord protection - power-supply cords should be routed
so that they are not likely to be walked on or pinched by items
placed on or against them, paying particular attention to cords
at plugs, convenience receptacles and the point where they exit
from appliance.
7.
8.
9.
10.
11.
12.
13.
14.
15.
16.
a)
b)
c)
d)
e)
17.
18.
19.
Isolation - this equipment is a Class II or double insulated
electrical appliance. It has been designed in such a way
that it does not require a safety connection to electrical
earth.
Mains disconnection - Mains plug is used as disconnect
device and it should remain readily operable during
intended use. In order to disconnect the apparatus from the
mains completely, the mains plug should be disconnected
from the mains socket outlet completely.
This product contains electrical or electronic materials.
The presence of these materials may, if not disposed of
properly, have potential adverse effects on the environment
and human health.
Presence of this label on the product means it should not
be disposed of as unsorted waste and must be collected
separately. As a consumer, you are responsible for ensuring
that this product is disposed of properly.
20.
21.
CAUTION
RISK OF ELECTRIC SHOCK
DO NOT OPEN
ATTENTION
RISQUE D’ ÉLECTROCUTION
NE PAS OUVRIR

23
UK DE DK FR
FCC Statement
This device complies with part 15 of the FCC Rules. Operation is subject to the following two conditions: (1) This device
may not cause harmful interference, and (2) this device must accept any interference received, including interference that
may cause undesired operation.
Any Changes or modications not expressly approved by the party responsible for compliance could void the user’s
authority to operate the equipment.
Note: This equipment has been tested and found to comply with the limits for a Class B digital device, pursuant to
part 15 of the FCC Rules. These limits are designed to provide reasonable protection against harmful interference in a
residential installation. This equipment generates uses and can radiate radio frequency energy and, if not installed and
used in accordance with the instructions, may cause harmful interference to radio communications. However, there is no
guarantee that interference will not occur in a particular installation. If this equipment does cause harmful interference to
radio or television reception, which can be determined by turning the equipment off and on, the user is encouraged to try
to correct the interference by one or more of the following measures:
- Reorient or relocate the receiving antenna.
- Increase the separation between the equipment and receiver.
- Connect the equipment into an outlet on a circuit different from that to which the receiver is connected.
- Consult the dealer or an experienced radio/TV technician for help.
IC Caution
This device complies with Industry Canada license-exempt RSS standard(s).
Operation is subject to the following two conditions: (1) This device may not cause interference, and (2) This device must
accept any interference, including interference that may cause undesired operation of the device.
This equipment should be installed and operated with a minimum distance of 20 cm between the radiator and your body.
CAN ICES-3(B)/NMB-3(B)

24
INDHOLDSFORTEGNELSE
1.0 INTRODUKTION 25
2.0 UDPAKNING 25
3.0 PLACERING 25
4.0 TILSLUTNING 26
5.0 IBRUGTAGEN 26
6.0 RENGØRING OG VEDLIGEHOLDELSE 28
7.0 BORTSKAFFELSE 28
8.0 EFFEKT OG LYD 28
9.0 LYTTERUMMET 28
10.0 TEKNISKE SPECIFIKATIONER 29

25
UK DE DK FR
1.0 INTRODUKTION
Tillykke med valget af DALI ZENSOR AX højttalere. For os er det vigtigt, at dine nye DALI
højttalere opstilles og tilsluttes bedst muligt. Vi anbefaler derfor, at du læser manualen og følger
anvisningerne. Du kan læse om opstilling og tilslutning af højttalerne - samt nogle gode råd
om, hvordan du får mest ud af dine nye højttalere. DALI er anerkendt blandt musikelskere over
hele verden for sine unikke højttalere, der alle er konstrueret og designet ud fra kompromisløse
krav til design og lyd. Vores mål for hver eneste DALI højttaler er os altid for øje: At skabe
lydoplevelser i dit hjem, som får dig til at glemme tid og sted.
Husk at tilmelde dig DALIs nyhedsbrev på www.dali-speakers.com.
God fornøjelse!
2.0 UDPAKNING
Udvis forsigtighed ved udpakning, for at undgå skader på indholdet. Afhængigt af hvilken DALI
ZENSOR AX model du har købt, medfølger der forskelligt tilbehør til højttalerne. Kontroller at alle
dele, angivet i Tabel 1, er medleveret. Gem emballagen til senere brug, hvis højttalerne f. eks.
skal byttes eller serviceres.
3.0 PLACERING
For det optimale resultat, bør højttaleropstillingen være symmetrisk omkring din foretrukne
lytteposition (se Figur 1). Vi anbefaler at du eksperimenterer med forskellige placeringer –
lydkvaliteten varierer, afhængig af højttalernes placering.
Genstande opstillet mellem højttaler og lyttepositionen kan forringe lydgengivelsen.
Højttalerne er udviklet til at opfylde vores krav om stor spredning af lyden. De bør derfor
IKKE vinkles indad mod lyttepositionen, men positioneres så bagpladen er parallel med
bagvæggen (se Figur 2). Ved at sigte højttalerne ret fremad, reduceres forvrængning ved
hovedlyttepositionen og rumintegrationen forbedres. Kravet om stor spredning af lyden
sikrer, at lyden fordeles jævnt over et stort areal i lytterummet.
3.1 DALI ZENSOR 1 AX
ZENSOR 1 AX er udviklet til at blive placeret tæt på vægen. Højttalerne kan placeres på stander/
hylde eller vægmonteres via det integrerede vægbeslag. Ved placering på stander eller hylde,
kan de medfølgende små gummidupper monteres under højttaleren for en stabil og vibrationsfri
opstilling (se Figur 3A). Ved vægmontering, monteres de store gummidupper på højttalerens
bagkant. Højttalerne vægmonteres ved at fæstne en skrue (vær opmærksom på at bruge en
skrue passende til vægtypen) i væggen. Skruen skal passe til vægbeslaget på højttalerens
bagside (se Figur 3B).
DALI ZENSOR 1 AX bør ideelt placeres med diskanten omtrent i ørehøjde, når du sidder i din
foretrukne lytteposition.
3.2 DALI ZENSOR 5 AX
Højttalerne er beregnet til gulvplacering. ZENSOR 5 AX kan monteres med de medfølgende
spikes eller gummidupper under højttalerne (se Figur 3C/D). Spikes eller gummidupper kan
forbedre lydgengivelsen. Prøv begge løsninger og vælg den som giver det bedste resultat i din
opstilling. Udvis forsigtighed med spikes, da de kan skade gulvet. Gulvoveraden kan beskyttes
ved at stille spikes’ene på skiver/mønter eller lignende.

26
4.0 TILSLUTNING
Alle tilslutninger til ZENSOR AX ndes på bagsiden af den venstre højttaler (Se gur 5)
1) Strømstik. Tilslut det medfølgende strømkabel til strømstikket og til stikkontakten.
2) Hovedafbryder. ”ON” tænder for ZENSOR AX. ”OFF” Slukker helt for ZENSOR AX.
3) Sikringsboks. Hvis ZENSOR AX ikke vil tænde når tilsluttet til stikkontakten sikringen
kan være sprunget. Udskift sikringen med en tilsvarende – se sikringstypen på bagsiden af
højttaleren. Hvis sikringen springer ere gange, indlever ZENSOR AX til service hos din lokale
DALI leverandør.
4) Udgang til højre højttaler. Den røde terminal (+) på den højre højttaler skal forbindes til den
røde terminal (+) på den venstre højttaler. Den sorte terminal (-) på den højre højttaler skal
tilsluttes til den sorte terminal (-) på den venstre højttaler (se Figur 6).
5) Volume ned i styrke
6) Volumen op i styrke
7) Kildevælger. Tryk for at skifte mellem AUX IN (LED = Grøn), OPTICAL IN (LED = Gul) og
Bluetooth (LED = Blå)
8) AUX IN. Analog indgang via mini-jack stereo stik.
9) SUB OUT. Udgang til ekstern subwoofer. Alle aktive subwoofere kan bruges. DALI anbefaler
DALI SUB E-9 F eller DALI SUB E-12 F til brug sammen med ZENSOR AX.
10) OPTICAL IN. Optisk indgang via TOSLink.
11) Frigiv Bluetooth forbindelse. Afbryd forbindelsen til den tilkoblede enhed og klargør ZENSOR
AX til ny Bluetooth forbindelse.
BEMÆRK: Inden du tilslutter kabler eller foretager ændringer i tilslutninger, skal du altid afbryde
strømmen til ZENSOR AX.
BEMÆRK: Sørg for, at ledningerne sidder på plads i terminalerne, og at der ikke er nogle løse
ender, som kan forårsage kortslutning og beskadige ZENSOR AX (Se Figur 4).
5.0 IBRUGTAGEN
Når ZENSOR AX startes første gang starte den op med Bluetooth indgangen aktiveret. Bruge
kildevælger knappen, placeret bag på den venstre ZENSOR AX højttaler, eller den dedikerede
knap på fjernbetjeningen, for at skifte til en anden indgang.
5.1 Fjernbetjeningen
Brug den medfølgende fjernbetjening (Se Figur 6) til nemt at styre volumen, kildevalg og tænd/
sluk på ZENSOR AX. Det er også muligt at bruge DALI Remote (ikke inkluderet, kontakt din
lokale DALI forhandler) sammen med ZENSOR AX.
1) Power. Tænd/Sluk ZENSOR AX
2) Mute. Sluk/tænd for lyden
3) Optisk indgang valg
4) AUX indgang valg
5) Bluetooth indgang valg
6) Volumen op
7) Volumen ned
8) Release. Afbryder Bluetooth forbindelsen til den tilkoblede enhed og klargør
ZENSOR AX til ny Bluetooth forbindelse.

27
UK DE DK FR
5.2 Bluetooth
Når Bluetooth indgangen vælges vil ZENSOR AX automatisk forsøge at genoprette forbindelsen
til den sidste brugte enhed. Har ZENSOR AX aldrig tidligere været koblet sammen med en
Bluetooth enhed vil højttaleren automatisk være klar til at oprette en ny parring med en
Bluetooth enhed.
For at oprette en nye parring eller genetablerer en forbindelse Se efter DALI ZENSOR AX i
Bluetooth oversigten på din enhed og opret forbindelse.
Kommer den tilsluttede enhed uden for rækkevide vil ZENSOR AX automatisk forsøge at
genetablerer forbindelsen.
For at afbryde forbindelsen til den tilsluttede enhed eller for at etablerer en ny forbindelse, tryk
på Release knappen på fjernbetjeningen eller på de to knapper på bagsiden af ZENSOR AX (Se
Figur 5.1).
ZENSOR AX understøtter Bluetooth Apt-X fra enheder der understøtter Apt-X protokollen.
BEMÆRK: Der kan kun være en enhed tilsluttet til ZENSOR AX ad gangen.
5.3 OPTICAL IN
Brug denne indgang til at tilslutte optiske udgange som f.eks. TV, CD afspillere eller streaming
enheder.
BEMÆRK: ZENSOR AX afspiller udelukkende et stereo signal. Hvis TV’et sender et 5.1 signal ud
via den optiske udgang skal der skiftes til stereo i TV’ets lyd menu.
5.4 AUX IN
Brug denne indgang til at tilslutte en analog afspiller.
5.5 SUB OUT
Brug denne indgang til at tilslutte en ekstern subwoffer. Alle aktive subwoofere kan bruges.
DALI anbefaler DALI SUB E-9 F eller DALI SUB E-12 F til brug sammen med ZENSOR AX.
5.6 Front LED
LED indikatoren på den venstre højttaler viser ZENSOR AX’s tilstand.
RØD Slukket
GRØN Tændt, AUX IN valgt
GUL Tændt, OPTICAL IN valgt
BLÅ Tændt, Bluetooth valgt, enhed tilsluttet
BLÅ blink (hurtigt) Tændt, Bluetooth valgt, ingen enhed tilsluttet
BLÅ blink (kort) Tændt, Bluetooth valgt, enhed parret, men ikke tilsluttet
Enhver farve blink (langsomt) Mute
5.7 Automatisk sluk
ZENSOR AX vil automatisk slukke efter 15 minutter hvis der ikke har været signal på den
valgte indgang. ZENSOR AX kan tændes igen ved en af følgende handlinger. Aktiver signalet
på den valgte indgang, vælg en kilde direkte på fjernbetjeningen, tryk på kildevalg knappen på
bagsiden af den venstre højttaler eller tryk på POWER knappen på fjernbetjeningen.

28
BEMÆRK: Automatisk sluk på OPTICAL IN er styret af lyset i det optiske kabel. Hvis den
tilsluttede enhed ikke slukker for lyset i kablet virker Automatisk sluk ikke hvis OPTICAL IN er
valgt.
6.0 RENGØRING OG VEDLIGEHOLDELSE
Ligesom ethvert andet mekanisk system skal en højttaler ”spilles til” for at kunne yde sit
bedste. Derfor vil du i den første periode opleve en gradvis forbedring af højttalernes lydkvalitet.
Tilspilningsperioden varierer i forhold til brug og lydniveau. Du skal regne med op til 100 timers
playback førend dine højttalere opnår maximum ydelse. I modsætning til andre mekaniske
systemer forlænges en højttalers levetid ved normal, regelmæssig brug.
7.0 BORTSKASKAFFELSE
Rengøring af kabinetterne foretages bedst med en blød og tør klud. Er kabinetterne tilsmudsede,
kan en blød klud, der er hårdt opvredet i et mildt universalrengøringsmiddel, benyttes. Vær
meget forsigtig ved evt. aftørring af højttalermembranerne, da disse er meget følsomme.
Stoframmerne rengøres med en almindelig klædebørste eller aftørres med en hårdt opvredet
og fnugfri klud med mildt universalrengøringsmiddel.
7.1 Undgå direkte sollys:
Højttalernes overade kan falme eller blive misfarvet med tiden, hvis den udsættes for direkte
sollys. Undgå derfor at placere højttalerne i direkte sollys
8.0 EFFEKT OG LYD
Produktet må ikke blandes med almindeligt husholdningsaffald ved bortskaffelse. Lovgivningen
kræver, at elektroniske apparater indsamles for korrekt bortskaffelse, genindvinding og genbrug.
Private husstande i EU-medlemslandene, Schweiz, Liechtenstein og Norge kan gratis aevere
deres brugte elektroniske apparater på kommunale genbrugspladser eller til forhandlere (ved
køb af et nyt lignende produkt). Hvis du er bosiddende i andre lande end ovennævnte, bedes du
kontakte dine lokale myndigheder for oplysninger om korrekt bortskaffelse. Ved at følge disse
retningslinjer sikrer du, at dit produkt bortskaffes, genindvindes og genbruges på korrekt vis for at
forhindre potentielle negative konsekvenser for miljøet og folkesundheden.
9.0 LYTTERUMMET
Ethvert rum har sin egen og særegne akustik, der præger den måde, vi oplever lyden fra
højttalerne. Reelt handler det om, hvordan rummet modtager lydenergien og skaffer sig af med
den igen. Du kan påvirke dit lytterums akustik på forskellige måder.
En del af den lyd, du hører, kommer ikke direkte fra selve højttaleren men fra reeksioner fra
gulv, loft og vægge. Disse reeksioner dæmpes af bl.a. møbler, planter og tæpper. Er lydbilledet
for lyst, kan bløde ting som gardiner og tæpper hjælpe. For eksempel har det en vis indydelse
at trække gardinerne for, når du vil undgå reeksioner fra store glasader.
Både mængden og kvaliteten af den dybe bas afhænger af rummets størrelse, form og
højttalernes placering. F.eks. fremhæves bassen ved en placering nær side- eller bagvæg og
endnu mere ved placering i et hjørne. Her øges reeksionerne fra væggene dog ganske meget.
Da det i sidste ende er dine ører, der bestemmer, anbefaler vi, at du eksperimenterer dig frem
til den placering, der giver det lydbillede, du ønsker.
Som grundregel skal du undgå store, hårde reekterende ader umiddelbart omkring
højttalerne, da disse vil virke som såkaldte spejlkilder og ødelægge det rumlige perspektiv i
lydbilledet. Prøv f.eks. at hænge et vægtæppe bag højttaleren, lægge et tæppe foran eller stille
en større plante ved siden af højttaleren og oplev, hvor overraskende stor indydelse det har på
præcisionen i lydbilledet.

29
UK DE DK FR
10.0 TEKNISKE SPECIFIKATIONER
I Tabel 2 nder du de mest almindelige specikationer for vores højttalere. Husk, at der ndes
utallige måder til bedømmelse af højttalere, men ingen af dem fortæller noget om, hvordan
en højttaler egentlig lyder. Det er kun dine ører, der afgør, om én højttaler lyder bedre end en
anden. Ligesom alle vores andre højttalere er DALI ZENSOR AX designet til at gengive musik
så ærligt som muligt.
God fornøjelse med din nye DALI ZENSOR AX højttaler!
30
Read instructions - all the safety and operating instructions
should be read before the appliance is operated.
Retain instructions - the safety and operating instructions
should be retained for future reference.
Heed warnings - all warnings on the appliance and in the
operating instructions should be adhered to.
Follow instructions - all operating and use instructions should
be followed.
Water and moisture - the appliance should not be used near
water - for example, near a bathtub, washbowl, kitchen sink,
laundry tub, in a wet basement, or near a swimming pool and
the like. To reduce the risk of re or electric shock, do not expose
this apparatus to rain or moisture. The apparatus should not be
exposed to dripping or splashing. Objects lled with liquids, such
as vases should not be placed on the apparatus. Wall or ceiling
Cleaning - do not use any liquid cleaners. Use only a dry cloth to
wipe off dust and grease.
Non-use periods - the power cord of the appliance should be
unplugged from the outlet when left unused for a long period of
time and during lightning storms.
Object and liquid entry - care should be taken so that objects
do not fall and liquids are not spilled into the enclosure through
openings.
Servicing - the user should not attempt to service the appliance
beyond that described in the operating instructions. All other
servicing should be referred to qualied service personnel. To
reduce the risk of electric shock, do not remove cover (or back) as
there are no user-serviceable parts inside.
Damage requiring service - the appliance should be serviced by
qualied personnel when:
The power-supply cord or the plug has been damaged; or
Objects have fallen, or liquid has been spilled into the appliance; or
The appliance has been exposed to rain; or
The appliance does not appear to operate normally, or exhibits a
marked change in performance; or
The appliance has been dropped, or the enclosure damaged.
Battery heat - do not expose the battery or battery pack to
excessive heat such as sunshine, re or the like.
Battery replacement - danger of explosion if battery is incorrectly
replaced. Replace only with the same or equivalent type.
Battery storing - keep new and used batteries away from children.
If the battery compartment does not close securely, stop using the
product and keep it away from children.
1.
2.
3.
4.
5.
6
UK DE DK
5
JP
RISK OF ELECTRIC SHOCK DO NOT OPEN.
TO REDUCE THE RISK OF ELECTRIC SHOCK,
DO NOT REMOVE THE BACK PANEL.
NO USER-SERVICEABLE PARTS INSIDE.
REFER SERVICING TO QUALIFIED PERSONNEL.
The lightning fl ash within an equilateral triangle is
intended to alert you to the presence of non insulated
“dangerous voltage” within the product’s enclosure that
may be of suffi cient magnitude to constitute an electric
shock to persons.
The exclamation point within an equilateral triangle
is intended to alert you to the presence of important
operating and maintenance (servicing) instructions in
the literature accompanying the appliance.
1 Read instructions - all the safety and operating instructions
should be read before the appliance is operated.
2 Retain instructions - the safety and operating instructions
should be retained for future reference.
3 Heed warnings - all warnings on the appliance and in the
operating instructions should be adhered to.
4 Follow instructions - all operating and use instructions should
be followed.
5 Water and moisture - the appliance should not be used near
water - for example, near a bathtub, washbowl, kitchen sink,
laundry tub, in a wet basement, or near a swimming pool and
the like.
6 Carts and stands - the appliance should
be used only with a cart or stand if
recommended by the manufacturer.
7 Wall or ceiling mounting - the appliance should be mounted to
a wall or ceiling only as recommended by the manufacturer.
8 Ventilation - the appliance should be situated so that its
location or position does not interfere with proper ventilation.
For example, the appliance should not be situated on a bed,
sofa, rug, or similar surface that may block the ventilation
openings; or placed in a built-in installation, such as a
bookcase or cabinet, that may impede the fl ow of air through
the ventilation openings.
9 Heat - the appliance should be situated away from heat
sources such as radiators, heat registers, stoves, or other
appliances that produce heat.
10 Power sources - the appliance should be connected to a
power supply only of the type described in the operating
instructions or as marked on the appliance.
11 Power cord protection - power-supply cords should be routed
so that they are not likely to be walked on or pinched by items
placed on or against them, paying particular attention to cords
at plugs, convenience receptacles and the point where they
exit from appliance.
12 Cleaning - do not use any liquid cleaners. Use only a dry
cloth to wipe off dust and grease.
13 Non-use periods - the power cord of the appliance should
be unplugged from the outlet when left unused for a long
period of time.
14 Object and liquid entry - care should be taken so that
objects do not fall and liquids are not spilled into the
enclosure through openings.
15 Damage requiring service - the appliance should be
serviced by qualifi ed personnel when:
a) The power-supply cord or the plug has been
damaged; or
b) Objects have fallen, or liquid has been spilled into
the appliance; or
c) The appliance has been exposed to rain; or
d) The appliance does not appear to operate normally,
or exhibits a marked change in performance; or
e) The appliance has been dropped, or the enclosure
damaged.
16 Servicing - the user should not attempt to service
the appliance beyond that described in the opera ting
instructions. All other servicing should be referred to
qualifi ed service personnel.
17 Do not expose the battery or battery pack to excessive heat
such as sunshine, fi re or the like.
18 Danger of explosion if battery is incorrectly replaced.
Replace only with the same or equivalent type.
19 Keep new and used batteries away from children. If the
battery compartment does not close securely, stop using
the product and keep it away from children.
20 This equipment is a Class II or double insulated
electrical appliance and does not require a safety
connection to electrical ground.
21 Appliance coupler is used as disconnect device and it
should remain readily operable during intended use. In order
to disconnect the apparatus from the mains completely, the
mains plug should be disconnected from the mains socket
outlet completely.
CAUTION
Carts and stands - the appliance should be used only with a
cart or stand if recommended by the manufacturer. When a cart
is used, use caution when moving the cart/apparatus combination
to avoid injury from tip-over.
IMPORTANT SAFETY INSTRUCTIONS
Wall or ceiling mounting – if the appliance includes options for wall
or ceiling mounting, it should be mounted only as recommended
by the manufacturer.
Ventilation - the appliance should be situated so that its location
or position does not interfere with proper ventilation. For example,
the appliance should not be situated on a bed, sofa, rug, or similar
surface that may block the ventilation openings; or placed in a
built-in installation, such as a bookcase or cabinet, that may
impede the ow of air through the ventilation openings.
Heat - the appliance should be situated away from heat sources
such as radiators, heat registers, stoves, or other appliances
(including ampliers) that produce heat.
Power sources - the appliance should be connected to a power
supply only of the type described in the operating instructions or
as marked on the appliance.
Power cord protection - power-supply cords should be routed
so that they are not likely to be walked on or pinched by items
placed on or against them, paying particular attention to cords
at plugs, convenience receptacles and the point where they exit
from appliance.
7.
8.
9.
10.
11.
12.
13.
14.
15.
16.
a)
b)
c)
d)
e)
17.
18.
19.
Isolation - this equipment is a Class II or double insulated
electrical appliance. It has been designed in such a way
that it does not require a safety connection to electrical
earth.
Mains disconnection - Mains plug is used as disconnect
device and it should remain readily operable during
intended use. In order to disconnect the apparatus from the
mains completely, the mains plug should be disconnected
from the mains socket outlet completely.
This product contains electrical or electronic materials.
The presence of these materials may, if not disposed of
properly, have potential adverse effects on the environment
and human health.
Presence of this label on the product means it should not
be disposed of as unsorted waste and must be collected
separately. As a consumer, you are responsible for ensuring
that this product is disposed of properly.
20.
21.
CAUTION
RISK OF ELECTRIC SHOCK
DO NOT OPEN
ATTENTION
RISQUE D’ ÉLECTROCUTION
NE PAS OUVRIR

31
UK DE DK FR
FCC Statement
This device complies with part 15 of the FCC Rules. Operation is subject to the following two conditions: (1) This device
may not cause harmful interference, and (2) this device must accept any interference received, including interference that
may cause undesired operation.
Any Changes or modications not expressly approved by the party responsible for compliance could void the user’s
authority to operate the equipment.
Note: This equipment has been tested and found to comply with the limits for a Class B digital device, pursuant to
part 15 of the FCC Rules. These limits are designed to provide reasonable protection against harmful interference in a
residential installation. This equipment generates uses and can radiate radio frequency energy and, if not installed and
used in accordance with the instructions, may cause harmful interference to radio communications. However, there is no
guarantee that interference will not occur in a particular installation. If this equipment does cause harmful interference to
radio or television reception, which can be determined by turning the equipment off and on, the user is encouraged to try
to correct the interference by one or more of the following measures:
- Reorient or relocate the receiving antenna.
- Increase the separation between the equipment and receiver.
- Connect the equipment into an outlet on a circuit different from that to which the receiver is connected.
- Consult the dealer or an experienced radio/TV technician for help.
IC Précaution
Le present appareil est conforme aux CNR d’Industrie Canada applicables aux appareils radio exempts de licence.
L’exploitation est autorisée aux deux conditions suivantes: (1) l’appareil ne doit pas produire de brouillage, et (2) l’utilisateur
de l’appareil doit accepter tout brouillage radio électrique subi, meme si le brouillage est susceptible d’en compromettre
le fonctionnement.
Cet équipement doit être installé et utilisé à une distance minimale de 20 cm entre le radiateur et votre corps.
CAN ICES-3(B)/NMB-3(B)

32
CONTENTS
1.0 INTRODUCTION 33
2.0 DEBALLAGE 33
3.0 POSITIONNEMENT 33
4.0 CONNEXION 34
5.0 UTILISATION 35
6.0 RODAGE 36
7.0 NETTOYAGE ET ENTRETIEN 36
8.0 MISE AU REBUT 37
9.0 LA PIECE D’ECOUTE 37
10.0 CARACTERISTIQUES TECHNIQUES 37

33
UK DE DK FR
1.0 INTRODUCTION
Félicitations pour l’achat de vos nouvelles enceintes DALI ZENSOR AX. Nous attachons une
grande importance à l’installation et la connexion optimales de vos nouvelles enceintes DALI.
C’est pourquoi nous vous recommandons de lire ce manuel et d’en suivre les recommandations.
Ce manuel contient des instructions d’installation et de connexion, ainsi que des conseils et
des recommandations qui vous permettront de proter pleinement de vos nouvelles enceintes.
DALI est réputé dans le monde entier pour ses enceintes uniques, dotées d’un design et de
performances répondant aux normes les plus strictes. L’objectif de chaque enceinte DALI
est toujours à l’image de notre engagement fondamental : vous proposer, chez vous, une
expérience d’écoute qui ne manquera jamais de vous transporter.
N’oubliez pas de vous inscrire sur www.dali-speakers.com pour recevoir la newsletter de DALI.
Nous vous souhaitons beaucoup de plaisir avec vos enceintes.
2.0 DEBALLAGE
Prenez soin de ne pas endommager le contenu lors du déballage des différents composants.
Selon le modèle DALI ZENSOR AX que vous avez acheté, différents accessoires sont fournis
avec les enceintes. Assurez-vous que l’emballage en carton contient toutes les pièces (voir
Tableau 1). Conservez les matériaux d’emballage, dans l’éventualité où vous devriez transporter
ou faire réparer vos enceintes.
3.0 POSITIONNEMENT
Pour obtenir les meilleurs résultats, les enceintes doivent être disposées de façon symétrique
autour de votre position d’écoute préférée (voir Figure 1). Nous vous recommandons d’essayer
de positionner vos enceintes de différentes façons ; la qualité sonore variera en fonction de
la position des enceintes. La présence d’objets situés entre l’enceinte et la position d’écoute
peut avoir un effet négatif sur la qualité sonore. Les enceintes sont conçues pour satisfaire à
notre principe de « diffusion large » ; elles ne doivent donc pas être orientées vers la position
d’écoute, mais doivent être positionnées parallèlement au mur situé derrière l’enceinte (voir
Figure 2). Le positionnement parallèle permet de réduire la distorsion dans la position d’écoute
principale et d’assurer une meilleure intégration dans la pièce. Le principe de diffusion large
garantit une répartition homogène du son à chaque endroit de la pièce d’écoute.
3.1 DALI ZENSOR 1 AX
Le modèle ZENSOR 1 AX est conçu pour être positionné près du mur. L’enceinte peut être placée
sur un support/une étagère ou accrochées au mur à l’aide de supports intégrés prévus à cet
effet. En cas de positionnement sur un support ou une étagère, les petits pieds fournis peuvent
être placés sous l’enceinte pour obtenir un positionnement stable et exempt de vibrations (voir
gure 3A). En cas d’accrochage au mur, montez les pieds en caoutchouc larges sur l’arrière
de l’enceinte. Les enceintes sont accrochées au mur à l’aide d’une vis (assurez-vous d’utiliser
une vis appropriée au type de mur). Celle-ci doit correspondre au support mural à l’arrière de
l’enceinte, voir gure 3B.
Le modèle ZENSOR 1 AX doit idéalement être positionné de manière à ce que le tweeter se
trouve sensiblement à la hauteur de votre oreille lorsque vous êtes assis dans votre position
d’écoute préférée.

34
3.2 DALI ZENSOR 5 AX
ZENSOR 5 AX est conçu pour être posé au sol. ZENSOR 5 AX peut être utilisé avec des pointes
ou des pieds en caoutchouc sous les enceintes. Voir la gure 3C/D. Veillez à ne pas trop serrer
les écrous. L’utilisation de pointes ou de pieds en caoutchouc permet d’améliorer la qualité
sonore. Vous pouvez essayer l’une et l’autre de ces solutions an d’identier celle qui produit
le meilleur son dans votre installation. Gardez à l’esprit que des pointes peuvent endommager
le sol, s’il n’est pas protégé, par exemple par des pièces sous les pointes. Elles doivent être
positionnés entre 10 et 20 cm (4 et 8”) minimum du mur situé derrière l’enceinte.
4.0 CONNEXION
Le branchement au secteur se situe à l’arrière de l’enceinte ZENSOR AX de gauche
(voir gure 5)
1) Connecteur secteur. Raccordez le cordon d’alimentation fourni au connecteur SECTEUR et
à votre prise de courant.
2) Interrupteur d’alimentation principale. « MARCHE » met le ZENSOR AX sous tension. «
ARRÊT » met le ZENSOR AX complètement hors tension.
3) Compartiment de fusible. Si vous ne parvenez pas à allumer le ZENSOR AX alors qu’il est
branché et que l’interrupteur d’ALIMENTATION est en position de MARCHE, il est possible
que le fusible ait sauté ou soit endommagé. Remplacez-le par un fusible du même type
que celui d’origine (le type de fusible est indiqué sur la plaque arrière de l’amplicateur).
Si le fusible saute continuellement, faites vérier le ZENSOR AX dans un centre de service
agréé (prenez contact avec votre revendeur agréé).
4) Sortie enceinte de droite. La borne rouge (+) du haut-parleur de droite doit être connectée
à la borne rouge (+) du haut-parleur de gauche. La borne noire (-) du haut-parleur de
droite doit être connectée à la borne noire (-) du haut-parleur de droite (voir Figure 9A).
5) Volume -.
6) Volume +.
7) Sélection de la source. Appuyez pour basculer entre ENTRÉE AUX. (LED avant = Vert),
ENTRÉE OPTIQUE (LED avant = Jaune) et entrée Bluetooth (LED avant = Bleu).
8) ENTRÉE AUX Entrée analogique via prise mini-jack stéréo.
9) SORTIE CAISS. BASS. Sortie vers un caisson de basses actif. Fonctionne avec n’importe
quel caisson de basse actif. DALI SUB E-9 F ou SUB E-12 F est parfait pour aller avec la
série ZENSOR AX. Adressez-vous à votre distributeur DALI local pour obtenir davantage de
conseils.
10) ENTRÉE OPTIQUE Entrée optique via TOSLink.
11) Libération de la connexion Bluetooth. Déconnecte la connexion Bluetooth en cours et
prépare le ZENSOR AX pour un nouvel appairage/une nouvelle connexion.
REMARQUE: Avant de connecter des câbles ou de modier des connexions, éteignez
TOUJOURS votre enceinte ZENSOR AX.
REMARQUE: Assurez-vous que les conducteurs dénudés sont fermement saisis par les
bornes et qu’aucun brin de câble ne dépasse, au risque de provoquer un court-circuit et
d’endommager l’enceinte ZENSOR AX (voir gure 4).

35
UK DE DK FR
5.0 UTILISATION
Utilisez la télécommande incluse (voir gure 6) pour contrôler facilement l’alimentation, le
volume et l’entrée sur le ZENSOR AX. Il est également possible d’utiliser la TÉLÉCOMMANDE
DALI (non incluse, contactez votre distributeur DALI local) avec le système ZENSOR AX.
1) Alimentation. Pour basculer l’alimentation entre Marche/Arrêt
2) Sourdine. Pour mettre le son en sourdine et le rétablir
3) Entrée optique Sélectionne l’entrée optique
4) ENTRÉE AUX. Sélectionne l’entrée auxiliaire
5) Bluetooth. Sélectionne l’entrée Bluetooth
6) Volume +
7) Volume -
8) Libérer. Déconnecte la connexion Bluetooth en cours et prépare le ZENSOR AX pour
un nouvel appairage/une nouvelle connexion.
5.2 BLUETOOTH
Quand il est en mode Bluetooth, le ZENSOR AX essaie automatiquement de se reconnecter
au dernier appareil utilisé. Si le ZENSOR AX n’a jamais été connecté à un appareil Bluetooth
auparavant, il passera en mode d’appairage et sera prêt à être appairé à un nouvel appareil.
Pour appairer/connecter votre appareil, recherchez ZENSOR AX dans votre liste des appareils
Bluetooth et établissez la connexion.
Si l’appareil connecté est hors de portée, le ZENSOR AX retentera de s’y connecter.
Pour libérer une connexion Bluetooth en cours ou établir une nouvelle connexion, appuyez sur
le bouton de libération sur la télécommande (voir 5.1)
Le ZENSOR AX prend en charge les connexions Apt-X depuis des appareils compatibles Apt-X.
Remarque: Un seul appareil à la fois peut être connecté au ZENSOR AX.
5.3 ENTRÉE OPTIQUE
Utilisez cette entrée pour connecter des appareils avec sortie optique comme des téléviseurs,
des lecteurs de CD ou des appareils de streaming.
REMARQUE: Le ZENSOR AX ne lit qu’un signal stéréo. Si votre téléviseur émet un signal
surround via la sortie optique, remplacer par un signal stéréo dans les paramètres audio du
téléviseur.
5.4 ENTRÉE AUX
Utilisez cette entrée pour connecter n’importe quel appareil analogique.
5.5 SORTIE CAISS. BASS.
Utilisez cette sortie pour connecter un caisson de basses au système ZENSOR AX. Tout
caisson de basses actif fonctionne avec le ZENSOR AX, mais DALI SUB E-9 F ou SUB E-12 F
est parfait pour aller avec la série ZENSOR AX. Adressez-vous à votre distributeur DALI local
pour obtenir davantage de conseils.

36
5.6 LED AVANT
La LED située à l’avant de l’enceinte indique l’état du système ZENSOR AX
ROUGE Système hors tension
VERT Système sous tension, ENTRÉE AUX. sélectionnée
JAUNE Système sous tension, ENTRÉE OPTIQUE sélectionnée
BLEU Système sous tension, Bluetooth sélectionné, appareil connecté
BLEU clignotant (rapide) Système sous tension, Bluetooth sélectionné, pas
d’appareil connecté
BLEU clignotant (court) Système sous tension, Bluetooth sélectionné,
appareil appairé non connecté
Toute couleur clignotante (lentement) Sourdine
5.7 MODE ALIM. ÉTEINT
Le ZENSOR AX se mettra automatiquement hors tension si aucun signal n’est détecté pendant
15 minutes. Pour remettre le ZENSOR AX sous tension activez un signal sur n’importe quelle
entrée, sélectionnez une entrée sur la télécommande, utilisez le bouton de source à l’arrière
de l’enceinte de gauche ou appuyez sur le bouton d’alimentation sur la télécommande.
REMARQUE: La mise hors tension automatique sur l’ENTRÉE OPTIQUE est contrôlée par la
lumière porteuse. Si votre appareil optique ne désactive pas la lumière porteuse rouge quand
il est hors tension, le ZENSOR AX ne se mettra pas automatiquement hors tension si ENTRÉE
OPTIQUE est sélectionnée.
DALI dealer) with the ZENSOR AX system.
1) Power. Toggle power On/Off
2) Mute. Mute and un-mute the sound
3) Optical In. Selects the optical input
4) AUX In. Selects the AUX input
5) Bluetooth. Select the Bluetooth input
6) Volume up
7) Volume down
6.0 RODAGE
À l’image de tout système mécanique, une enceinte nécessite une période de « rodage » pour
donner le meilleur d’elle-même. Vous constaterez une amélioration progressive de la qualité
sonore durant la première période d’utilisation. La période de rodage varie selon l’utilisation et
le volume de lecture. Vous devez prévoir jusqu’à 100 heures de diffusion avant d’atteindre des
performances optimales. Contrairement à d’autres systèmes mécaniques, la durée de vie d’une
enceinte est augmentée par la diffusion normale et régulière de musique.
7.0 NETTOYAGE ET ENTRETIEN
Nettoyez les enceintes avec un chiffon doux et sec. Si les enceintes sont sales, essuyez-les
avec un chiffon doux imprégné d’un produit nettoyant multi-usages, bien essoré. Essuyez
toujours délicatement les cônes des haut-parleurs ; ils sont très fragiles. Les grilles avant
peuvent nettoyées avec une brosse à vêtements, puis essuyée avec un chiffon non pelucheux
imprégné d’un nettoyant doux multi-usages, bien essoré.

37
UK DE DK FR
7.1 ÉVITEZ LA LUMIÈRE DIRECTE DU SOLEIL :
Si elles sont exposées à la lumière directe du soleil, les surfaces des enceintes risquent de
ternir ou de se décolorer progressivement. Par conséquent, évitez de positionner les enceintes
dans un endroit exposé à la lumière directe du soleil.
8.0 MISE AU REBUT
Si vous souhaitez mettre ce produit au rebut, ne le jetez pas avec les déchets ménagers
ordinaires. Un système de collecte distinct existe pour les produits électroniques usagés,
conformément à la législation, qui impose un traitement, une récupération et un recyclage
adéquats. Les foyers de particuliers dans les états membres de l’UE, en Suisse, au Liechtenstein
et en Norvège peuvent déposer gratuitement leurs produits électroniques auprès d’un site
de collecte dédié ou d’un revendeur (en cas d’achat d’un produit neuf semblable). Si vous
n’habitez pas dans l’un des pays mentionnés ci-dessus, veuillez contacter les autorités locales
pour connaître la méthode de mise au rebut correcte. En suivant cette procédure, vous vous
assurerez que votre produit mis au rebut sera correctement traité, récupéré et recyclé, ce qui
évitera d’éventuels effets négatifs sur l’environnement et la santé.
9.0 LA PIECE D’ECOUTE
Chaque pièce possède des caractéristiques acoustiques uniques, qui inuencent la manière
dont nous entendons le son provenant d’une enceinte. Le son que vous entendez est constitué
du son direct provenant des enceintes et du son rééchi provenant du sol, du plafond et des
murs. Ce dernier affectera votre expérience du son. La règle fondamentale consiste à essayer
d’éviter d’avoir de grandes surfaces dures et rééchissantes à proximité de vos enceintes, car
celles-ci provoqueront généralement de puissants effets de réexion pouvant altérer la précision
et la spatialisation de la restitution sonore. La réexion peut notamment être supprimée en
positionnant, par exemple, une plante entre l’enceinte et la surface rééchissante. Les objets
souples, tels que les tapis, les rideaux, etc. peuvent également être utiles si le son semble trop
aigu. Le volume et la qualité des graves dépendent de la taille et de la forme de la pièce, ainsi
que de la position des enceintes. Les graves seront accentués si un mur se trouve sur le côté
ou à l’arrière de vos enceintes.
Positionner vos enceintes dans un coin accentuera encore ce phénomène et augmentera
également le phénomène de réexion.
10.0 CARACTERISTIQUES TECHNIQUES
Le Tableau 2 présente les caractéristiques essentielles de nos enceintes. Veuillez garder à
l’esprit qu’il existe d’innombrables façons de mesurer les performances d’enceintes ; toutefois,
aucune ne vous permettra d’en évaluer réellement la sonorité. Seules vos oreilles peuvent
décider quelle enceinte est meilleure que les autres. Comme tous nos modèles, la série DALI
ZENSOR AX est conçue pour restituer la musique de manière aussi dèle que possible.
Nous espérons que vos nouvelles enceintes DALI ZENSOR AX vous procureront beaucoup de
plaisir