DANE ELEC MEMORY SMA MULTIMEDIA PLAYER User Manual 1
DANE-ELEC MEMORY MULTIMEDIA PLAYER 1
UserManual.wiki
>
DANE ELEC MEMORY
>
SMA User Manual
USERS MANUAL
Navigation menu
Upload a User Manual
Namespaces
Wiki Guide
HTML
PDF
Info
Views
User Manual
Discussion / Help
Navigation


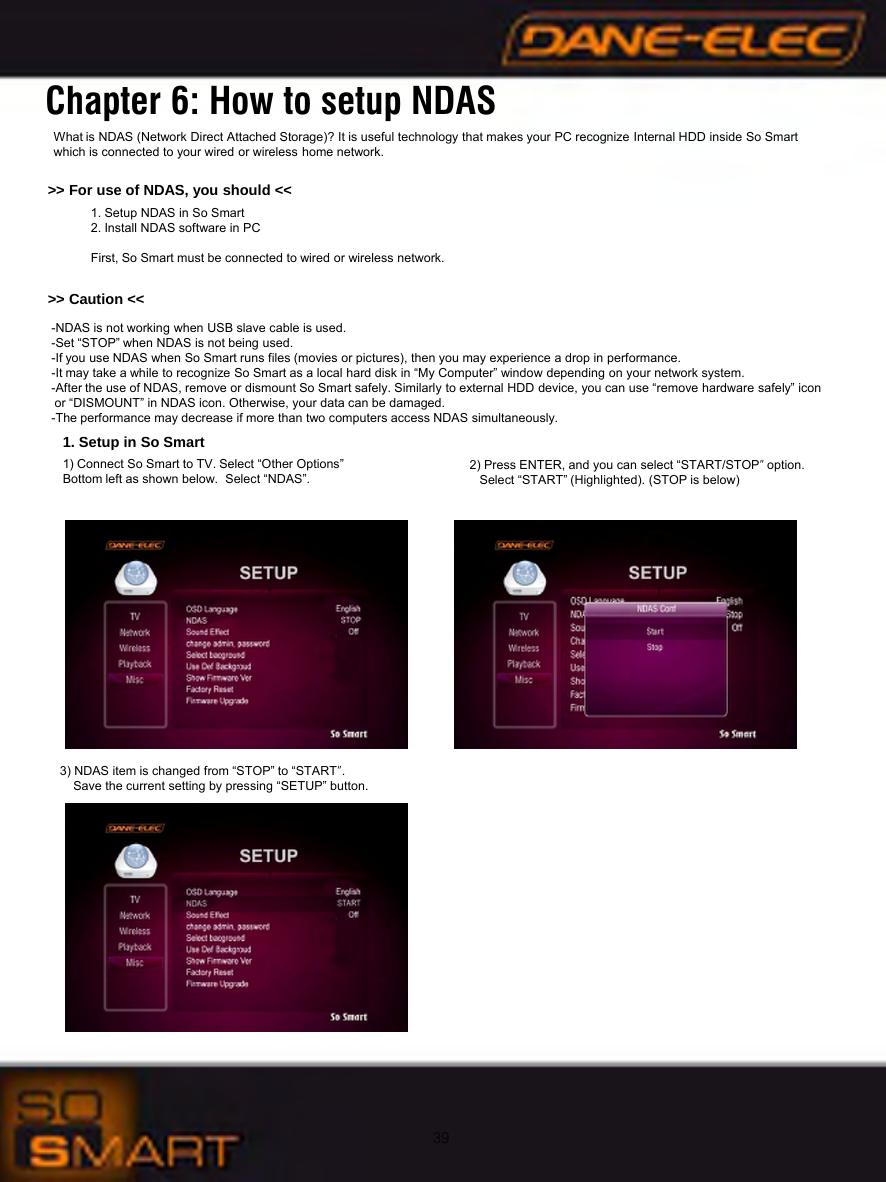
![402. Install NDAS in PC1) Run setup.exe. 2) Follow the procedure from NDAS software setup wizard. 3) Click “Finish” to get the setup completed. 4) Click “Yes” to reboot your computer. 3. Register NDAS1) In the bottom right icon tray, click the NDAS icon and select“Register a New Device…”2) Click [Next] in NDAS Device Registration wizard.3) Specify the name for the NDAS device and click [Next]. Chapter 6: How to setup NDAS](https://usermanual.wiki/DANE-ELEC-MEMORY/SMA/User-Guide-906734-Page-38.png)
![414) Enter NDAS ID and Write key, and click [Next]. 5) If ID and key are correct, you will be asked the following after searching for the NDAS device. Click first option and [Next].6) Finish the installation of NDAS Controller by following the wizard.7) After the installation, So Smart’s HDD is recognized.3. Mount / DismountA. Mount1) By clicking the NDAS icon in the bottom right icon tray, you canconfirm the registered NDAS device. You can select “wire” or “wireless” to get it online. (e.g. wire is online (white) and wireless isoffline (black) in the figure below)Then, select Mount (Read/Write). 2) When it is connected to NDAS device, the selected item is indicatedas “blue color” and “Mounted (RW)”.Shortly after, the NDAS device will be accessed. It may take a while to recognize So Smart as a hard disk depending on your network system.>> Caution << Backup NDAS ID and Write key. It will not be issued again.Chapter 6: How to setup NDAS](https://usermanual.wiki/DANE-ELEC-MEMORY/SMA/User-Guide-906734-Page-39.png)
![42B. Dismount1) Use “ Remove NDAS SCSI Controller safely……” as in the figure below.Or, by clicking the NDAS icon, select “Dismount” option. 2) Click [yes] to dismount your device. 3) After dismounting, you can see the current status as shown in the figure.In the case that you receive a message saying that the device can not be removed, check if NDAS window is open, or whether NDAS is still operating. (e.g. transfer, play, remove files)When the operation of NDAS is completely finished, try dismounting again. 4. Confirm NDAS device in Device ManagerYou can check to see if your NDAS device has been installed in “Disk Drive” and “SCSI and RAID controller” under Device Manager. Chapter 6: How to setup NDAS](https://usermanual.wiki/DANE-ELEC-MEMORY/SMA/User-Guide-906734-Page-40.png)