DANE ELEC MEMORY SRM HDD MEDIA PLAYER User Manual
DANE-ELEC MEMORY HDD MEDIA PLAYER Users Manual
UserManual.wiki
>
DANE ELEC MEMORY
>
SRM User Manual
Users Manual
Navigation menu
Upload a User Manual
Namespaces
Wiki Guide
HTML
PDF
Info
Views
User Manual
Discussion / Help
Navigation

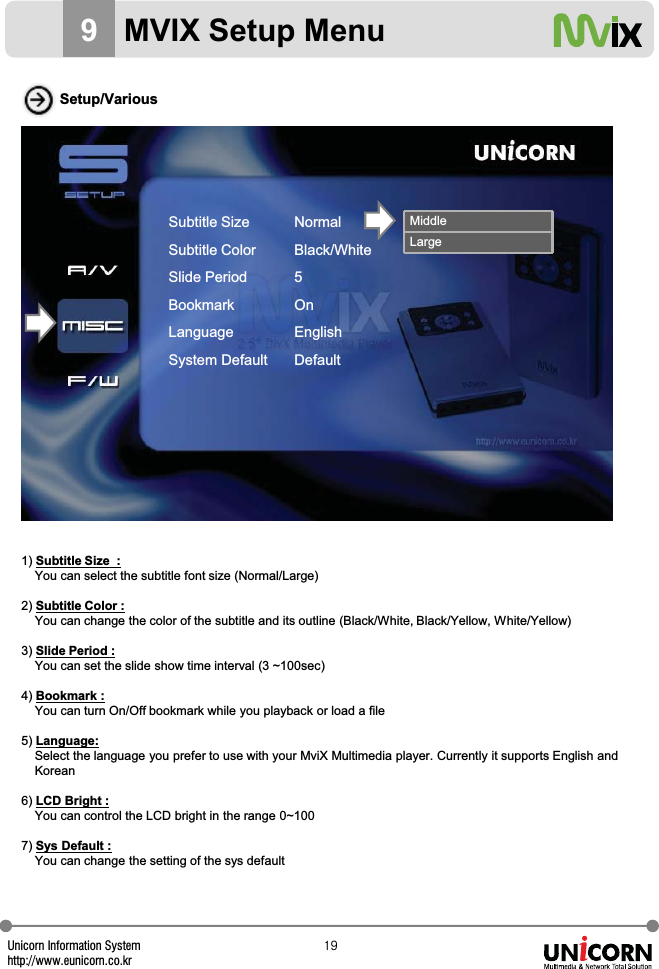
![Unicorn Information Systemhttp://www.eunicorn.co.kr]4SpecificationsSupported FileFormatsVideo MPEG1/2, Div3.11, Div4.0, Div5.0, Divx, Xvid, DVD(IFO, VOB),VCD(DAT), M2V, ISOAudio AC3, MP2, MP3, DTS pass through, Ogg, WMA, MPGA, MPAPhoto JPEGSupportedLanguages SMI, SRT, SUB, Multi-SubtitleInput & OutputUSB 2.0 (Cypress chipset)A/V portHDTV : Component VideoAudio : Coaxial, OpticalIR-ExtUser Interface Full Featured IR-Remote controlButton : Power, OK, Stop, Setup, Up/down/left/right NavigationOperatingSystem Windows 98se, ME, 2000, XP, Vista or laterHDD Type 2.5” SATA Hard DiskPartition Type FAT32, NTFSPower External 5V/2A DC adapterDimensions 78mm(W) X 136mm(H) X 20mm(L)Retail KitIncludesMVIX Media Player(MV-2500U) , Remote Control, A/V Cable, ComponentCable, USB Cable (for PC), 5V Adaptor, Manual, Driver CD](https://usermanual.wiki/DANE-ELEC-MEMORY/SRM/User-Guide-984745-Page-6.png)

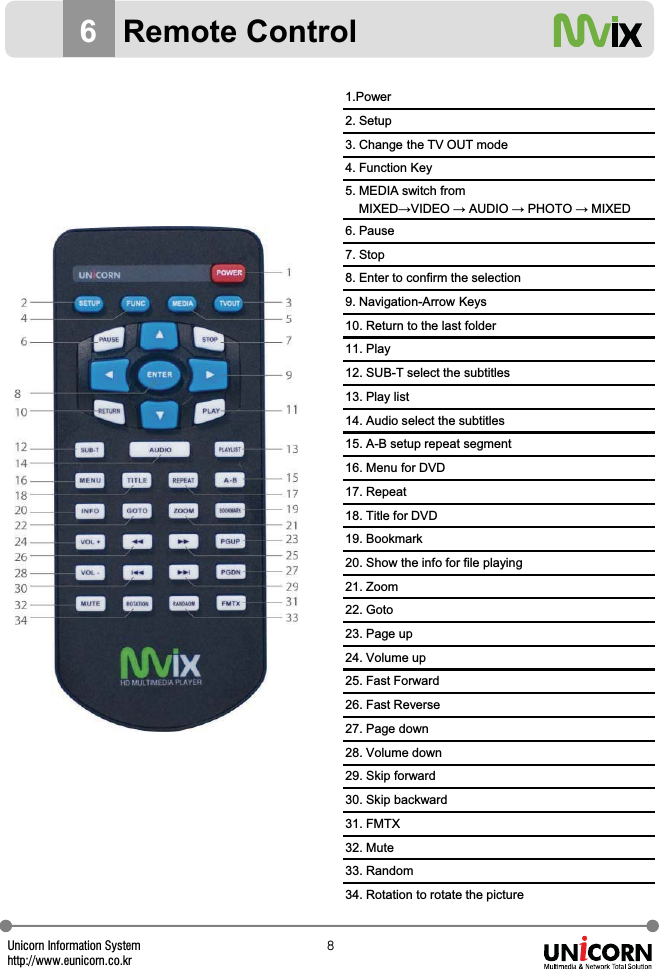
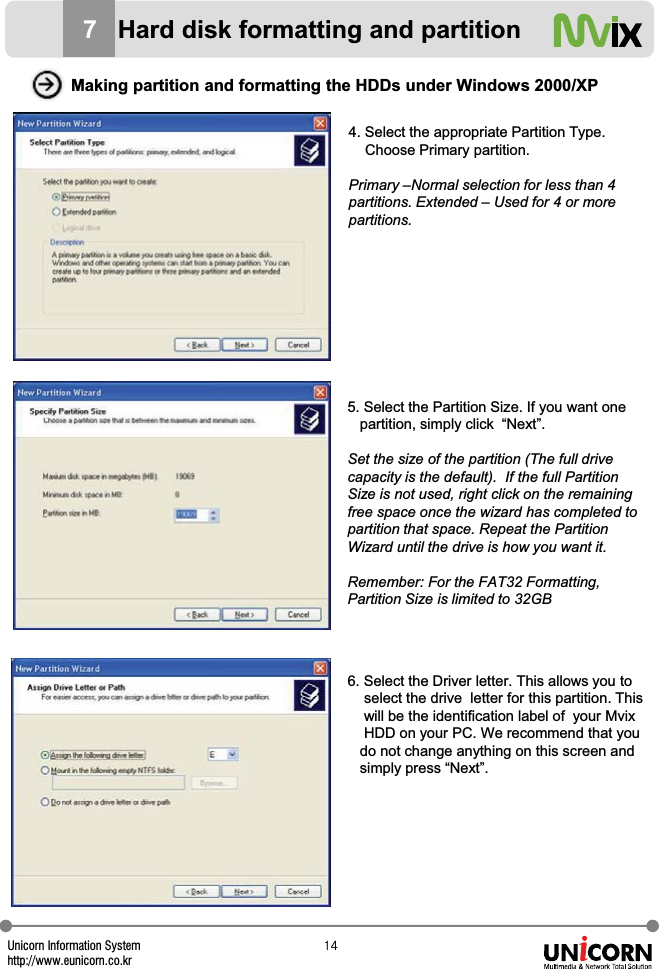
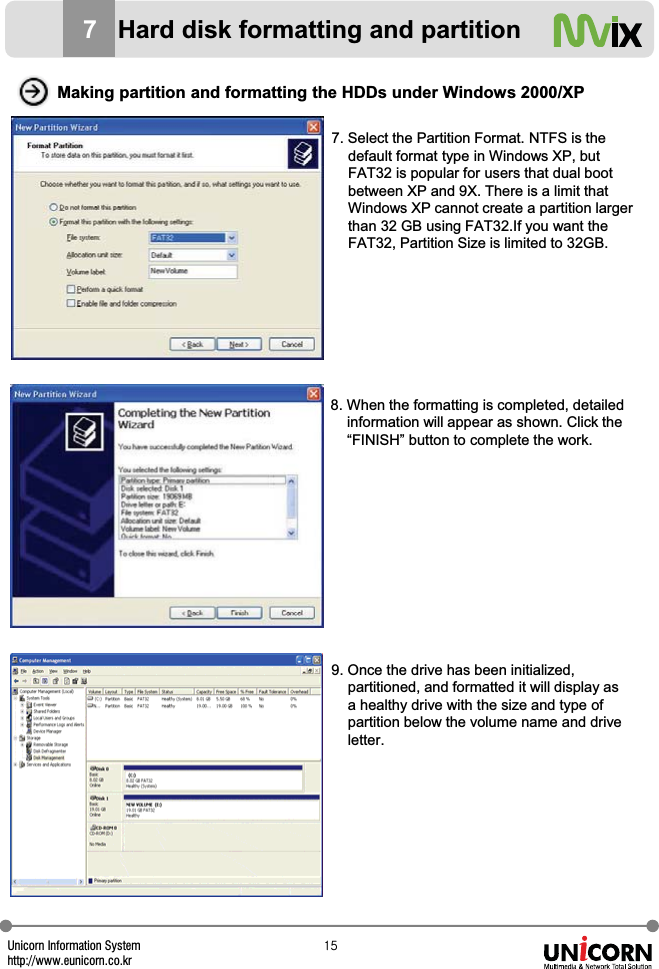
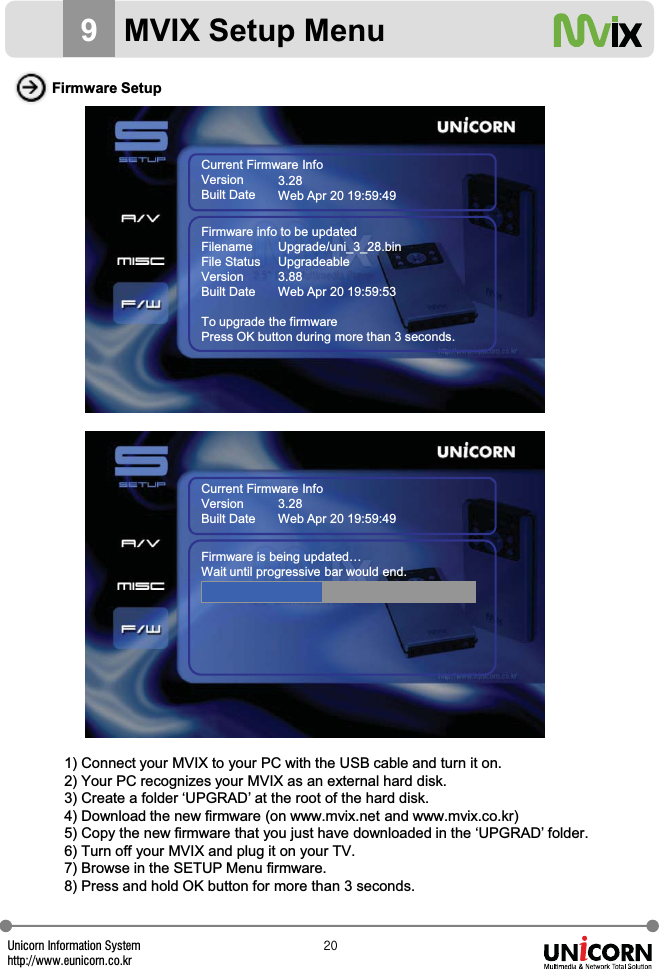
![Unicorn Information Systemhttp://www.eunicorn.co.kr`Making partition and Formatting the HDDs under Windows 98SE/MEClick “Start” and select “Run” and the “Run”window will appear as shown below. Type “fdisk” in the text box of the “Run” window then click the “OK” button1) Select “5. Chang current fixed disk drive” and press [Enter].2) Type the last Disk number in 0% usage.7Hard disk formatting and partition](https://usermanual.wiki/DANE-ELEC-MEMORY/SRM/User-Guide-984745-Page-9.png)
![Unicorn Information Systemhttp://www.eunicorn.co.krXW3) Select “1. Create DOS partition or Logical DOS Drive” and press [Enter].4) Select “ 1. Create Primary DOS Partition ” and press [Enter]5) Wait until finishing verifying the driveintegrity.Making partition and Formatting the HDDs under Windows 98SE/ME7Hard disk formatting and partition](https://usermanual.wiki/DANE-ELEC-MEMORY/SRM/User-Guide-984745-Page-10.png)
![Unicorn Information Systemhttp://www.eunicorn.co.krXX6) After finishing drive integrity verification, type “Y” at “Do you wish to use the maximum available size for a Primary DOS Partition (Y/N)”7) Type the capacity or % which you want to use and press [Enter].8) Drive integrity verification will start again. After finishing that, press [ESC] key when the “Primary DOS Partition created, drive letters changed or added” message displays.9) Press [ESC] key again. “ Shut downWindows before restarting” message will be displayed. Press [ESC] key finally for exiting FDISK.10) Type “ exit ” command at“C:ӫWINDOWS>” and press [Enter] for returning to windows screen.Making partition and Formatting the HDDs under Windows 98SE/ME7Hard disk formatting and partition](https://usermanual.wiki/DANE-ELEC-MEMORY/SRM/User-Guide-984745-Page-11.png)
![Unicorn Information Systemhttp://www.eunicorn.co.krXY11) Unplug the MviX and plug again. New volume will be appeared at [My Computer]. Click mouse right button at the new volume and select [Format]Making partition and Formatting the HDDs under Windows 98SE/ME7Hard disk formatting and partition](https://usermanual.wiki/DANE-ELEC-MEMORY/SRM/User-Guide-984745-Page-12.png)
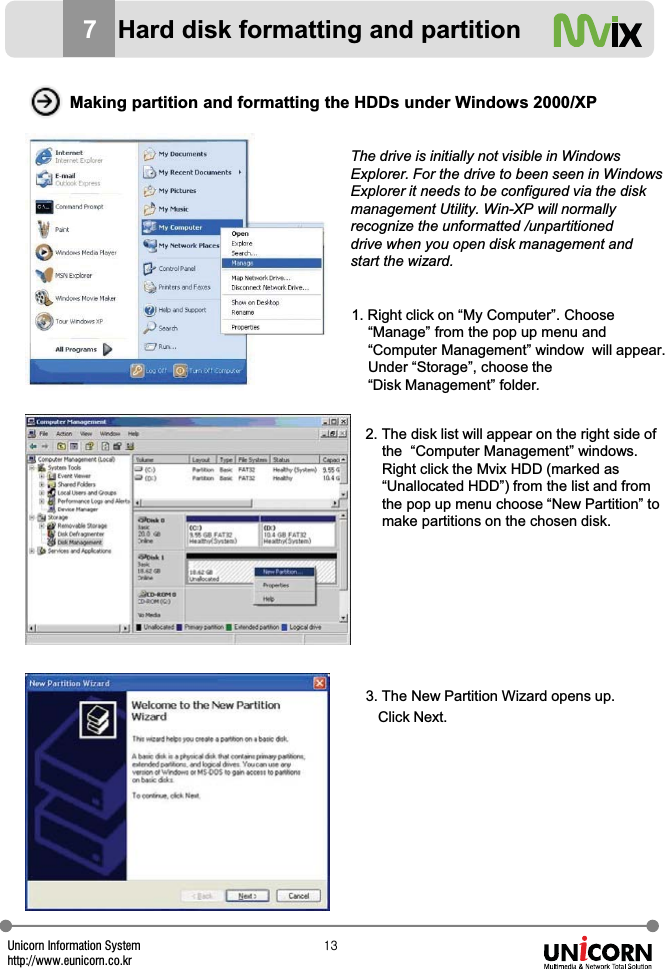
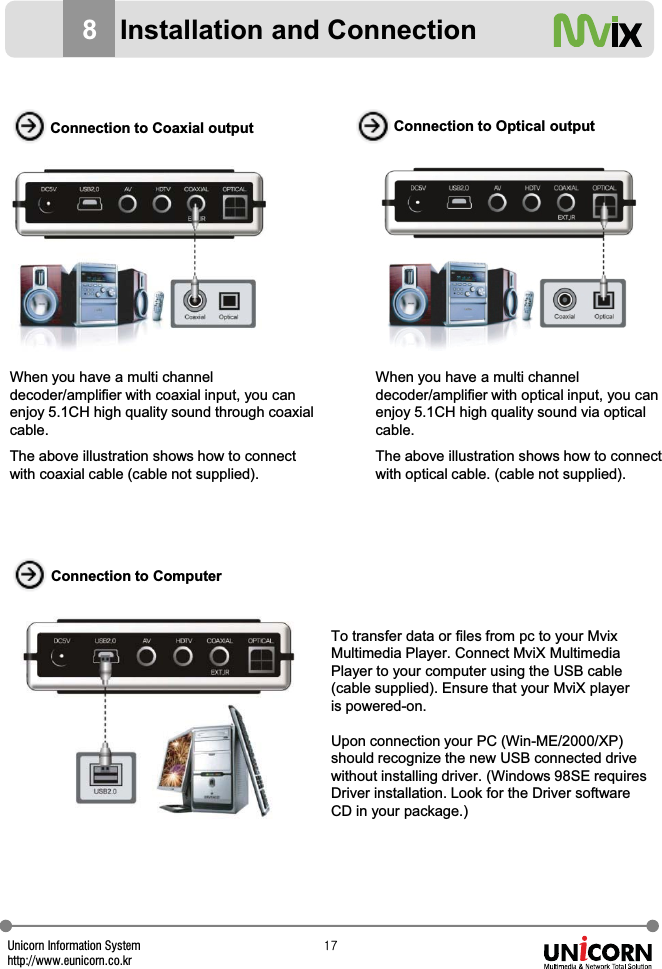
![Unicorn Information Systemhttp://www.eunicorn.co.krX]8Installation and ConnectionConnection with ordinary (Composite) TV output Connection to Component OutputVideo and Audio ConnectionsYour MviX multimedia player supports Composite, S-Video or Component connections.Depending on the capabilities of your TV, you only need to make one video connection from these options. To hear sound through your TV, use audio connectors (RCA 2-CH) to connectthe MviX multimedia player to the corresponding AUDIO-IN jacks on your TV or Hi-Fi Device.- Connect MviX and your TV using the yellow video cable (cable supplied). - Connect your MviX Multimedia player and your TV to a power . -Select appropriate video input mode on your TV until you get the initial MviX screen.- Connect left (white), right (red) sound output to the appropriate terminal of your TV or Hi-Fi Device using the 2-CH RCA cable (cable supplied).- Connect the MviX media player to your TV using a component cable as shown in the image above. - Turn on the MviX and TV. - Select appropriate video input mode on your TV (in this case, Component input mode) (cable not supplied).-Component connection is commonly used on most HDTV's, DLP-TVs, Plasma TVs etc. -When you have a multi channel decoder/amplifier with coaxial input, you can enjoy 5.1CH high quality sound through coaxial cable. The above illustration shows how to connect with coaxial cable (cable not supplied).](https://usermanual.wiki/DANE-ELEC-MEMORY/SRM/User-Guide-984745-Page-16.png)


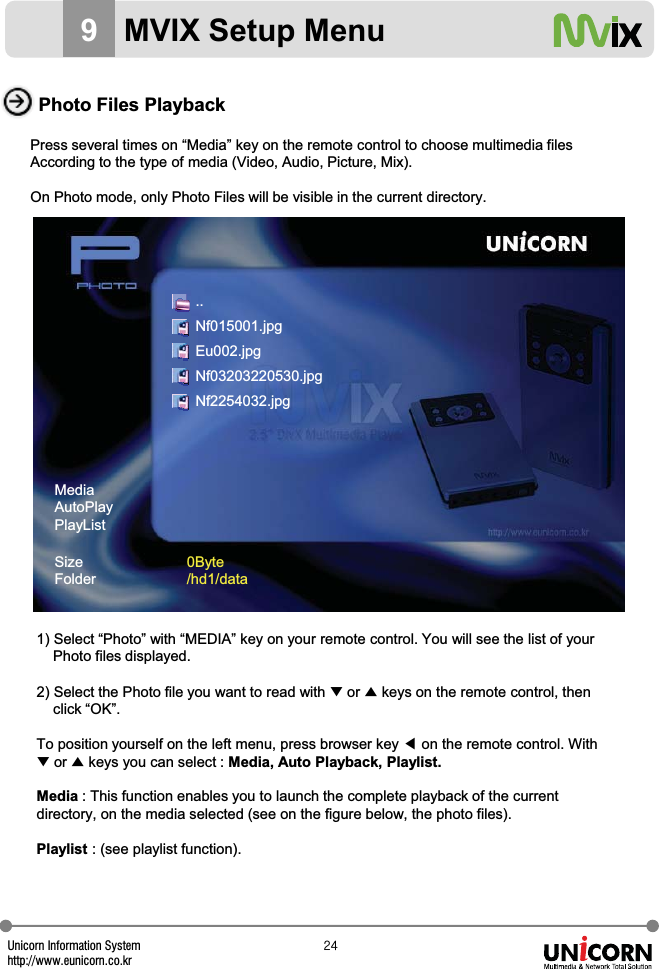
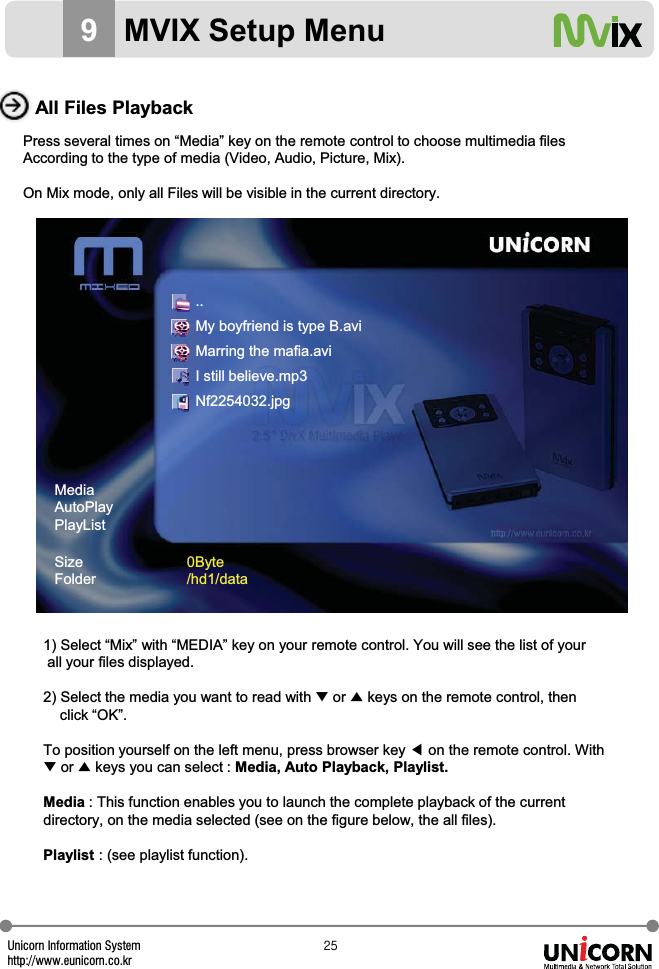
![Unicorn Information Systemhttp://www.eunicorn.co.krY]PlaylistWith your MVIX, it is possible to create a playlist. Creation of your playlist1) Press browser ඔkey on the remotecontrol, so that you position yourselfon the left menu.2) Press twice on ̷key on the remotecontrol to select “ Playlist” then“OK”.3) The screen displays “MIX”. All the media files in the current directoryappear. *With browser keys ̵or ̷on the remote control, choose themedia to include in your playlist,then click “ OK”. Repeat from thestar step(*) until you come to theend of your choice. At this time, withthis ඔkey on the remote control,you can return to the left menu and with ̷key, choose “Close”The list of all selected files appear in the left window.Auto Playback : launches the playbackof your Playlist.Edit : make you return to the previousmenu so that you can add or delete files from your Playlist.Delete All : delete your playlistClose : closes your playlist9MVIX Setup MenuAuto PlayEditDel AllCloseSizeFolder0Byte/hd1/data..Nf015001.jpgEu002.jpgNf03203220530.jpgNf2254032.jpgMediaAutoPlayPlayListSizeFolder0Byte/hd1/data..Nf015001.jpgEu002.jpgNf03203220530.jpgNf2254032.jpg..My boyfriend is type B.aviMarring the mafia.aviI still believe.mp3Nf2254032.jpgMediaAutoPlayPlayListSizeFolder0Byte/hd1/data](https://usermanual.wiki/DANE-ELEC-MEMORY/SRM/User-Guide-984745-Page-26.png)