DBTEL orporated DB-2072A GSM900 /DCS 1800 /PCS 1900/ GSM/GPRS Mobile Phone User Manual J9 ENUM R1 1 M72AFBPRV006 06
DBTEL Incorporated GSM900 /DCS 1800 /PCS 1900/ GSM/GPRS Mobile Phone J9 ENUM R1 1 M72AFBPRV006 06
Revised Manual

J9_ENUM_R1.0 (M72AFBPRV006_06)
DBTEL is a registered trademark of DBTEL Incorporated.
Copyright © 2004 DBTEL Incorporated. All rights reserved.
No part of this publication may be reproduced or distributed in any form or by any means, or stored in a database or retrieval
system, without the prior written permission of the publisher.
DBTEL Incorporated reserves the right to make changes in technical and product specifications without prior notification.
Address: No.29, Tzu Chiang St, Tu-Cheng, Taipei, Taiwan.
Website: http://www.dbtel.com.tw
Warning: Use only approved accessories and battery. Do not connect to any incompatible products; otherwise, it will
invalidate the recognition or warranty applying to your mobile phone.
The font type of the legend, graphics and icons in the user manual may differ from that shown on the handset.
Technical specifications and some certain features are subject to change in technology, design, software upgrade and
availability.
USER MANUAL
J
9

Safety Information
For your safety, please read the guidelines below carefully before you use your phone:
Exposure to Radio Frequency Signals
Max. SAR Measurement (1g) PCS1900
Head: 0.46 W/kg
Body: 0.41 W/kg
Your wireless handheld portable telephone is a low power transmitter and recommendations for the protection of public
exposure to RF electromagnetic energy.
• International Commission on Non-Ionizing Radiation Protection (ICNIRP) 1996
• Verband Deutscher Elektringenieure (VDE) DIN- 0848
• Directives of the European Community, Directorate General V in Matters of Radio Frequency Electromagnetic Energy
• National Radiological Protection Board of the United Kingdom, GS 11, 1988
• American National Standards Institute (ANSI) IEEE. C95.1- 1992
• National Council on Radiation Protection and Measurements (NCRP). Report 86
• Department of Health and Welfare Canada. Safety Code 6
These standards are based on extensive scientific review. For example, over 120 scientists, engineers and physicians from
universities, government health agencies and industry reviewed the available body of research to develop the updated ANSI
Standard.
The design of your phone complies with these standards when used normally.
This device complies with part 15 of the FCC Rules. Operation is subject to the condition that this device does not cause
harmful interference
Notice
To reduce exposure to electromagnetic radiation, use the handset properly.
SAR Radiation Limit: 2.0 W/Kg
Tested SAR Rating: 0.87 w/kg
Safety Information
DBTEL handset is the first Specific Absorption Rate (SAR) compliance in Taiwan.
Compliance with International standard
SAR Radiation Limit: 2.0 W/Kg
Tested SAR Rating: 0.87 w/kg
Product Safety
Product safety is always the first priority of DBTEL Incorporated. With the SAR Safety Certificate,
we show our persistence in making customer safety the paramount importance.
R&TTE Directive requirements
A declaration of conformity to the essential requirements.
Identification of the European countries in which the equipment is intended to be used.
Identification of the public telecommunication network to which the equipment is intended to be
connected.
“Hereby, we <DBTEL Inc.>, declares that this J9 is in compliance with the essential requirements and
other relevant provisions of Directive 1999/5/EC.

Contents
1
European Union - SAR 3
For Your Safety 4
Your J9 5
Your phone........................................................5
Key description.................................................5
Function key table...................................... 5
Display indicators .............................................6
Backlight ..................................................... 7
Installation 8
Installation of the SIM card and the battery...8
Removal of the SIM card and the battery.....8
Battery Information 9
Battery charging ...............................................9
Battery specifications.......................................9
Notice on battery charging and discharging.9
Low battery indicator........................................9
Use of battery....................................................9
Battery disposal................................................9
Quick & Easy 10
Menu Map 11
Call Functions 19
Turning your phone ON and OFF............... 19
When PIN is requested............................ 19
Unlock the blocked SIM card................... 19
Making calls ................................................... 20
Domestic calls .......................................... 20
International calls ..................................... 20
Making calls via the PhoneBook ............. 20
Redial calls missed, received and dialled20
Speed dial................................................. 20
Calling your voice mailbox....................... 20
Answering calls.............................................. 21
Call waiting ............................................... 21
In-call menu.............................................. 21
Multiparty .................................................. 22
Other operations............................................ 23
Adjusting the earpiece volume ................ 23
Input text................................................... 23
Using Predictive Text input....................... 23
Using Capitalize input .............................. 24
Using The Menu 25
Accessing the menu function .................. 25
Returning from menu function..................25
Camera 26
Preview .....................................................26
Capture Movie ..........................................27
Photo Manager.........................................27
Movie Manager.........................................28
Snap Setting .............................................28
Manual ......................................................28
PhoneBook 29
View...........................................................29
Add New ...................................................29
Group Setting............................................29
Copy..........................................................30
Delete........................................................30
Fixed Dial List ...........................................30
One Touch Key .........................................30
Phone Status ............................................30
Hotline .......................................................31
Message 32
SMS ..........................................................32
MMS..........................................................33
Message Settings.....................................34
Records 36
Dialed calls................................................36
Received Calls..........................................36
Missed Calls..............................................36
Delete All...................................................36
Call Register .............................................36
Profile 37
Normal.......................................................37
Mute ..........................................................37
Meeting .....................................................37
Outdoor .....................................................37
Customized...............................................37
Clock 38
Alarm.........................................................38
Date Setting ..............................................38
Time Setting..............................................38
Display Mode............................................38
Time Zone.................................................38
Auto Power Off .........................................38
Auto Power On .........................................38
Calendar....................................................38
Setting 39
Normal Settings ........................................39

Contents
2
LCD........................................................... 39
Call Settings ............................................. 40
Network Settings...................................... 40
Security Settings ...................................... 41
Time&Cost Settings ................................. 41
Short Cut Key........................................... 42
Irda Settings ............................................. 42
Extras 43
My Collections.......................................... 43
JAVA™...................................................... 43
Games...................................................... 43
Notebook .................................................. 44
Calculator.................................................. 44
STK........................................................... 44
Easy_Up 45
Sms Easy_up........................................... 45
Mms Easy_up .......................................... 45
WAP Easy_up .......................................... 45
IVR Easy_up ............................................ 45
Help Easy_up........................................... 45
WAP 46
Basic steps for activating and accessing
WAP service............................................. 46
Homepage................................................ 46
Bookmarks ............................................... 46
Last Page ................................................. 46
Navigation................................................. 47
WAP Settings ........................................... 47
History....................................................... 47
Clear Cache ............................................. 47
Maintenance 48
Access codes 49
PIN code................................................... 49
PIN2 code................................................. 49
PUK code ................................................. 49
PUK2 code ............................................... 49
Reference Information 50
EFR encoding decoder function ................. 50
Accessories.................................................... 50
Battery ...................................................... 50
Charger..................................................... 50
Problem Solving 51
Problem Solving............................................ 51
Index 52

Contents
3
European Union - SAR
SAR (European Union)
This Model phone meets the EU Requirements for
exposure to radio waves.
Your Mobile Phone is a radio transmitter and
receiver. It is designed and manufactured not to
exceed the limits for exposure to radio frequency
(RF) energy recommended by the Council of the
European Union. These limits are part of
comprehensive guidelines and established permitted
levels of RF energy for the general public. The
guidelines were developed by independent scientific
organizations through the evaluation of scientific
studies. The limits include a substantial safety
margin designed to ensure the safety of all persons,
regardless of age and health.
The exposure standards for mobile phones employ
a unit of measurement known as the Specific
Absorption Rate, or SAR. The SAR limit
recommended by the Council of the European Union
is 2.0 W/kg.* Tests for SAR have been conducted
using normal operating conditions with the phone
transmitting at the highest certified power in all
tested frequency bands. This is because the phone
is designed to operate at multiple power levels so as
to use only the power required to reach the network.
In general, the closer you are to the station antenna,
the lower the power output.
Before a phone model is available for sale to the
public, compliance with the European R&TTE
directive must be shown. One of the essential
requirements of this directive is the protection of the
health and safety for the user and any other person.
The highest SAR value for this model phone when
tested for compliance against the standard is 0.87
w/kg. While there may be differences between the
SAR levels of various phones and at various
positions, they all meet the EU requirement for RF
exposure.
The SAR limit for mobile phones for public use is 2.0
watts/kilogram (W/kg) averaged over ten grams of
body tissue. The limit incorporates a substantial
margin of safety to give additional protection for the
public and to account for any variations in
measurements.

For Your Safety
4
For Your Safety
Road safety
Exercise proper control of the car at all times.
Do not use handheld phones while driving;
always use the hands free kit.
Special regulations
Always switch off your mobile wherever use
is prohibited, such as in hospitals, as it may
cause interference with medical equipment.
Electronic devices
Mobile phones may interfere with appliances
such as computers, televisions and other
radio equipments.
Other medical devices
Mobile phones may interfere with signals of
personal medical devices, such as
pacemaker or hearing aid. Consult your
doctor for advice before using the mobile.
Aircraft
The use of mobile phones is prohibited in the
air. Switch off your phone before boarding an
aircraft.
Accessories and battery
Use only approved accessories and batteries.
Do not connect to any incompatible product.
This will invalidate any warranty applying to
your mobile phone and may be dangerous.
Disposal
Your mobile phone and other accessories
must be disposed of properly. It must not be
thrown away in municipal waste! Please
dispose of used mobile phones and other
accessories in accordance with local
regulations.
Potentially explosive atmospheres
Switch off your phone when in or near
explosive areas, petrol stations and chemical
plants.
Emergency calls
Make sure your phone is switched on and in
a service area with adequate signal strength.
When in idle mode, key in the emergency
call number and press to be connected
to the local emergency services.
Provide all the necessary information as
accurately as possible. Do not hang up until
you are told to do so.
Note
If a PIN is set when switching on the mobile
phone with SIM card inserted, you will be
asked for the PIN code. You can make an
emergency call without entering the PIN
code. Press followed by or
to make emergency call.
Your J9
5
Your J9
Your phone
Your mobile phone is a radio transceiver. When the
phone is turned on, it transmits and receives radio
frequency (RF) signals.
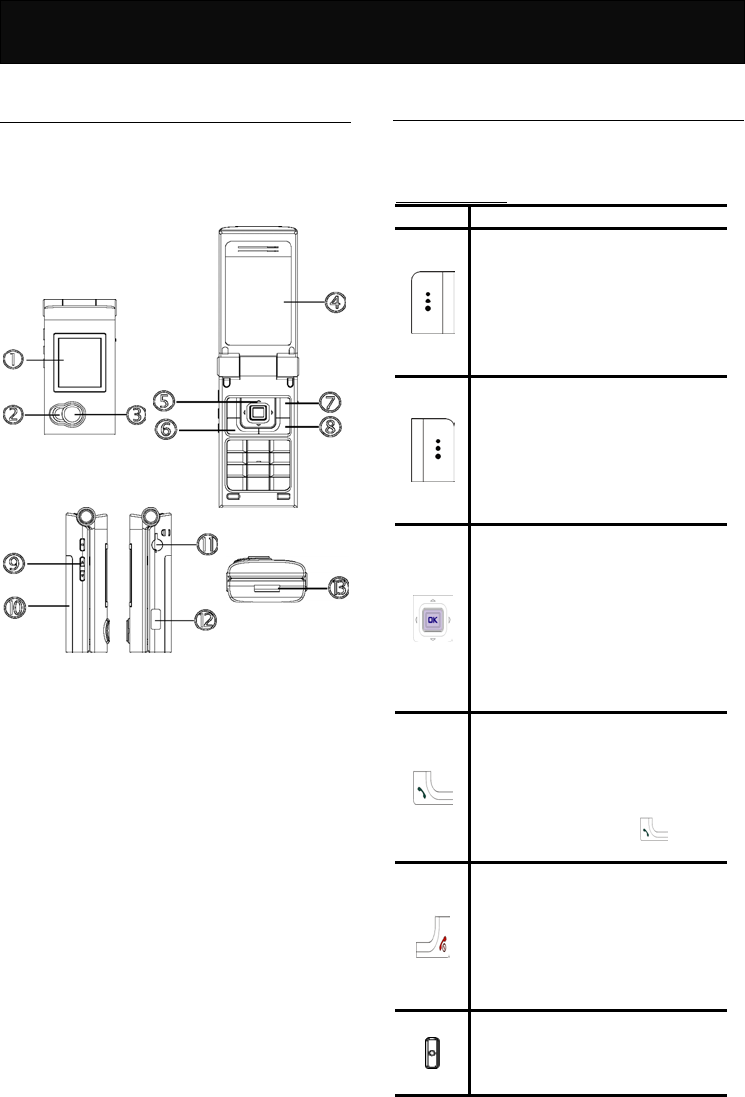
The side and opened view of the J9 handset are
shown below:
1. Sub LCD display
2. Flash light
3. Built-in camera
4. Main LCD display
5. 4-way navigation key
6. Call key
7. Soft key
8. Power key/End call key
9. Side soft key
10. Battery
11. Earphone jack
12. Irda port
13. Charger port
Specification
Dimension (with battery pack)
82 (L) × 42.2 (W) × 22.8 (D) mm
Weight (with battery pack)
<90g
Key description
The following tables provide you with a description
of the keys on the keypad.
Function key table
KEY FUNCTIONS
Soft key
Follow the prompt on the screen,
press to access the following
options: “Menu”, “Option” or “Ok”,
etc.
Press to access the In-call menu
during calls.
Clear key/Phone Book access key
Follow the prompt on the screen,
press to access the following
options: “Names”, “Cancel”, “End”
or “Back”, etc.
Press to stop the incoming call
alert.
4-way navigation key
Press to scroll through the lists
when accessing menus.
Press to move the cursor left and
right during the editing of words.
When in idle mode, press to access
the corresponding functions that
have been assigned as a short cut
key.
Call key
Press to place a call or answer an
incoming call.
When in idle mode, press to view
the latest dialled, received and
missed call list. Press to call
the selected number.
Power key/End call key
Press and hold to turn the phone
on and off.
During a call, press to end the
active call.
Press to return to idle mode from
menu mode.
Side soft key
In idle mode, press to light up the
sub LCD display, press and hold to
enter the self-capture mode.
Your J9
6
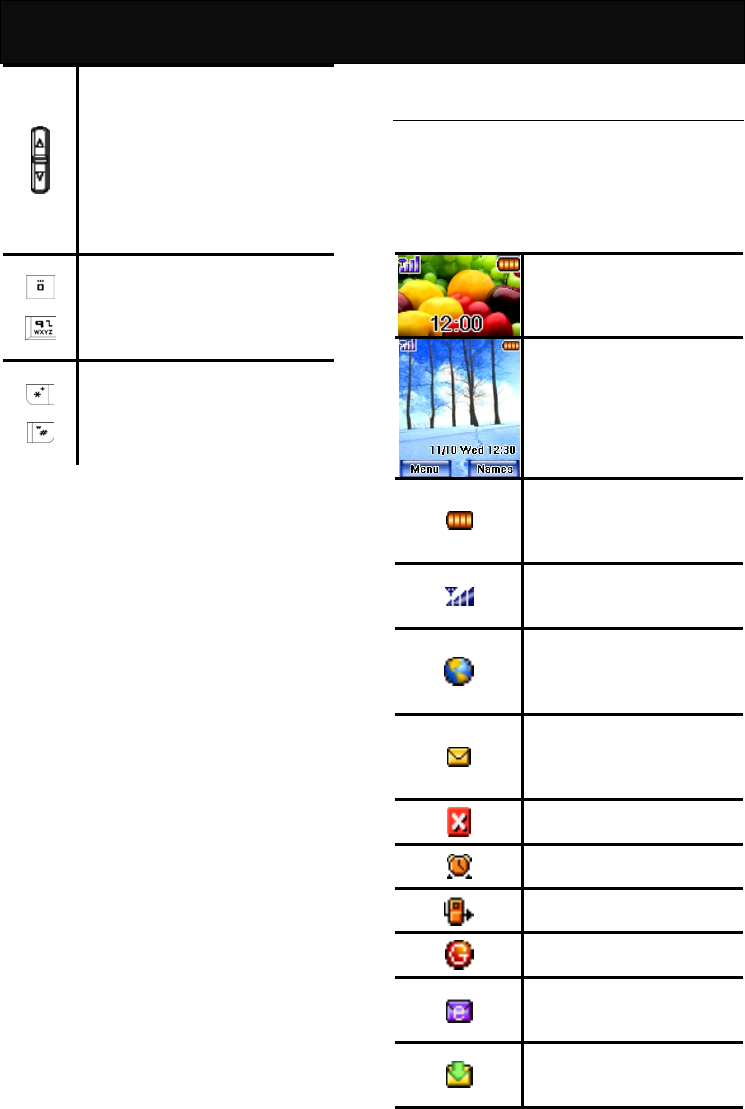
Side arrow key
When in idle mode, press to
increase or decrease the earpiece
volume during a call.
Press and hold to reject an
incoming call with the handset
cover opened or closed.
Press to switch the incoming call
ringing alert to silent.
to
Alphanumeric key
Press to key in digits, letters or
special characters. Its functions
may vary according to the
available menu.
and
Symbol key
Press to key in the symbols
displayed on the key. Its functions
may vary according to the
available menu.
Display indicators
A number of status indicators are shown at the top
of the screen to tell you of the relevant settings of
your handset. Some of the icons listed below may
not be available at a given time and vary depending
on your local network operator.
Idle display (sub display).
Shown when the phone is not in
use.
Idle display (main display).
Shown when the phone is not in
use.
Battery charge indicator. The
more bars that are shown, the
more power is available in the
battery.
Signal strength. The more bars
shown, the better the signal
strength.
Roaming. Shown when
registered with a system other
than the original one
(Inter-system Roaming).
Short message. Solid when
there is an unread incoming
message. Flashes when the
memory is full.
Missed call. Shown when there
is an unanswered incoming call.
Alarm. Shown when the alarm is
set.
Call divert. Shown when the
divert call is activated.
GPRS. Shown when the GPRS
is supported.
MMS. Shown when an MMS
message has been received and
not yet downloaded.
MMS. Shown when an MMS
message has been received and
downloaded.

Your J9
7
Backlight
When pressing a key or answering an incoming call,
the backlight will automatically turn on for a few
seconds. You may define the backlight duration with
the options in “Backlight” of “LCD” in “Setting”.
Installation
8
Installation
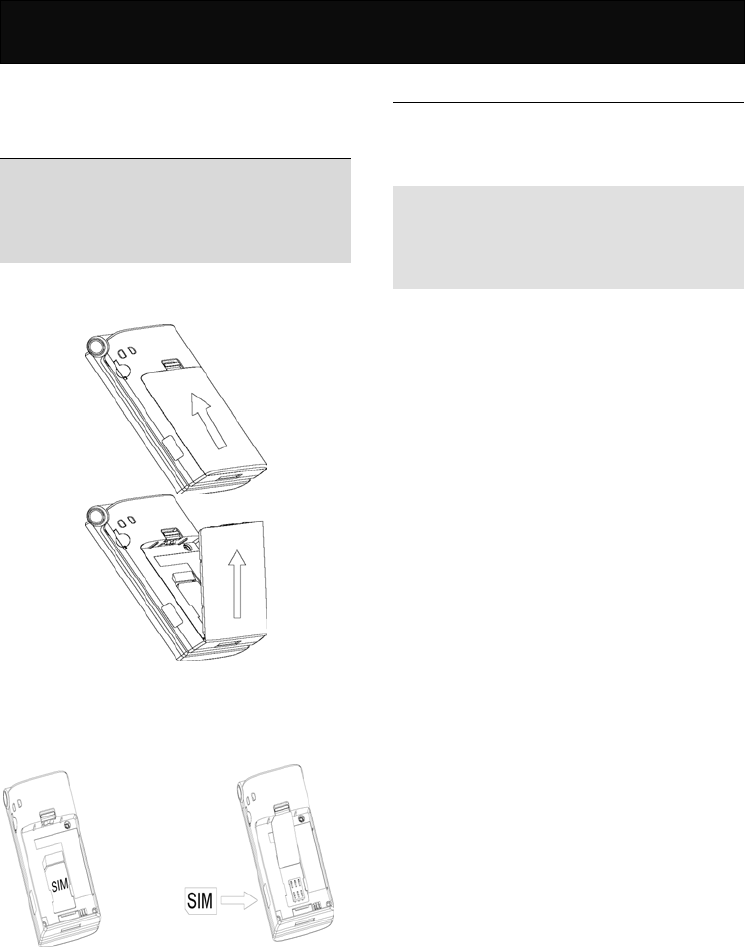
Installation of the SIM card and the
battery
Note
Keep the SIM card and batteries out of the reach
of small children.
Before proceeding, ensure that the phone is
switched off.
1. Pull the battery cover catch on the back of the
phone upwards with one hand and lift the battery
cover with the other hand.
2. Insert the SIM card into the SIM card holder,
ensuring that the angled corner is on the lower
left-hand side with the gold metallic contact
surface facing downward.
3. Replace the battery with its catch pins inserted
into the catch slots and push it downwards until it
clicks into place.
Removal of the SIM card and the
battery
Repeat the same procedure described in the
“Installation of the SIM card and the battery” to
remove the SIM card and the battery.
Note
You may access the following functions without
inserting the SIM card: Alarm, Date Setting,
Calculator, JAVATM, Calendar, Wallpaper Setting,
Game and Camera.

Battery Information
9
Battery Information
Battery charging
Note
Use only the approved battery and charger supplied
by the phone manufacturer.
1. Plug the connector of the travel charger into the
charger port at the bottom of the phone.
2. Plug the charger into the AC power supply socket
and the battery indicator will start scrolling.
3. If the battery is completely flat, the battery will
take a few minutes to charge after connecting it to
the power supply.
4. When the battery is fully charged, the battery
indicator will stop scrolling.
Note
You can use the phone, if switched on, while it is
charging.
While charging, be sure that the charger is firmly
connected to the charger port.
When charging the battery for the first time,
charge it for at least 12 hours.
For optimum battery power performance, 5 hours
of battery charging is recommended.
Do not remove the battery while charging is in
progress, otherwise it may cause damage to your
phone.
Battery specifications
Please refer to “Accessories” in “Reference
Information” or the battery label.
Notice on battery charging and
discharging
1. Your phone is powered by a rechargeable battery.
2. Use only the specified charger supplied by the
manufacturer for charging. Any other type of
charger may be dangerous.
3. Please note that the new battery will only reach
its best performance after being fully charged and
discharged 2 or 3 times.
4. When the charger is not in use, disconnect it from
the power supply. Do not leave the battery on
continuous charge for more than one week, as
overcharging will shorten the battery life. If a fully
charged battery is left unused, it will slowly
discharge itself over time.
5. An environment with extremely high or low
temperatures will affect the battery charging.
Optimum charging will be achieved in moderate
temperatures.
Low battery indicator
When the battery is low, with only a few minutes of
calling time left, the handset will warn you with an
alert tone.
Use of battery
1. Never use a damaged or non-recommended
charger or battery.
2. Keep the battery at a temperature between 10℃
to 40℃ (50℉ to 104℉).
3. The effectiveness of your battery is particularly
affected in temperatures below 0℃ (32℉).
Battery disposal
1. Do not dispose of the battery in a fire. This may
cause a serious risk of explosion and/or release
highly toxic chemicals.
2. Ensure that the battery is disposed of or recycled
properly.
3. The battery must not be disposed of in municipal
waste.
Quick & Easy
10
Quick & Easy
This page provides some of the basic operations for
using your phone. For more detailed information,
refer to “User Manual”.
Before Use
1. Remove the battery and insert your SIM card,
then re-install and charge the battery. For more
details, please refer to “Installation”.
2. Press and hold to turn on your phone. Wait
until the name of the network operator appears
on the screen.
Call Functions
Making calls
In idle mode, key in the area code, the phone
number and press to make a call.
Answering calls
Press to answer a call. Alternatively, simply
open the phone cover to answer a call if the handset
cover is closed (if “Flip Answer” is activated).
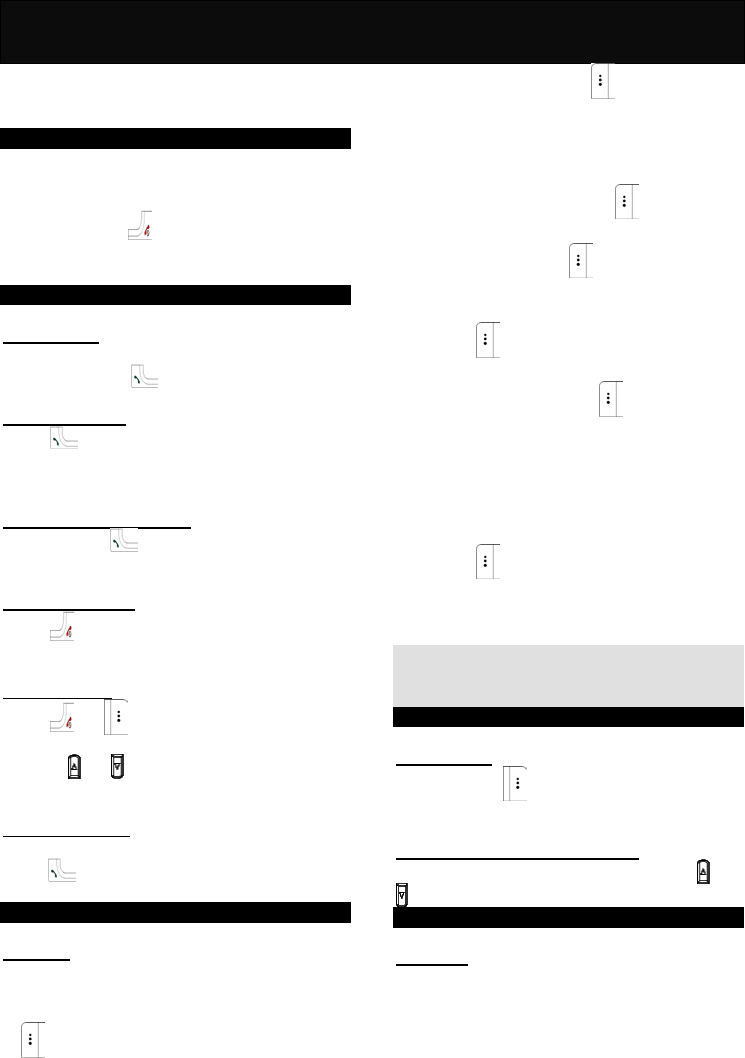
Hands free conversation
Press and hold to use the hands free function
for conversation.
Terminating calls
Press or simply close the phone cover to end
an active call.
Refusing calls
Press or or simply close the handset
cover to refuse an incoming call. Alternatively, press
and hold or to reject the incoming call
without opening the handset cover.
Emergency calls
In idle mode, key in the emergency call number and
press to contact the local emergency services
center.
PhoneBook Functions
Add new
Adding new numbers and names to handset or SIM
card.
1. In idle mode, key in the phone number and press
.
2. Select either “Add Name”, “Quick Save” or “Add
To Exist Name” and press .
3. If “Quick Save” is selected, the entry will be
stored in the handset without editing.
4. If “Add Name” is selected, perform the following
steps:
(1) Key in the name and press .
(2) Select either “Save To SIM” or “Save To
Handset” and press .
(3) If “Save To SIM” is selected, key in the location
number to where the entry is to be saved and
press .
(4) If “Save To Handset” is selected, select the
desired group and press to continue
setting the related information.
(5) Select “Handset”, “Office” or “Home” to define
the attributes of the entry.
5. If “Add To Exist Name” is selected, perform the
following steps:
(1) Select the location of the new number and
press .
(2) If the selected location already has a number, it
will be replaced; if the selected location is
blank, the new number will be saved there.
Note
If the selected entry exists in the SIM card, the old
number will be replaced.
Other Functions
Clear screen
Press and hold to clear an entry that you are
editing.
Adjusting the earpiece volume
You can adjust the earpiece volume by using or
to increase or decrease the volume during a call.
Backlight
Backlight
When pressing a key or answering an incoming call,
the backlight will automatically turn on for a few
seconds.

Menu Map
11
Menu Map
1 Camera
Preview Capture Mode Normal
Night Mode
Snap Type Snap
Continuous
Timer Snap
AVI
Effect Normal
Negative
Exposure
Gray
Brown
Emboss
Double Value
Set Capture Size 640*480
1280*960
160*120
320*240
Shutter Sound On
Off
Big Head Close
Big Head 1
Big Head 2
Big Head 3
Flash Light Off
On
Capture Movie
Photo Manager Edit Album1
Album2
Album3
Album4
Delete Delete By Album
Empty AllAlbums
Rename Album Album1
Album2
Albume3
Album4
Memory Manager
Movie Manager Reply
Delete
Detail
Send via Infrared

Menu Map
12
Snap Setting Target Album Album1
Album2
Album3
Album4
Effect Negative
Exposure
Gray
Brown
Emboss
Double Value
Normal
Photo Quality Low
Normal
High
Shutter Sound Off
On
Flash Light Off
On
Timer Snap Sound Off
On
Capture Mode Normal
Night Mode
Set Capture Size 160*120
320*240
640*480
1280*960
Set Environment 50HZ
60HZ
Big Head Close
Big Head 1
Big Head 2
Big Head 3
Manual

Menu Map
13
2 PhoneBook
View Search Name
Group
Add New Add Name
Quick Save
Add To Exist Name
Group Setting Melody
Add New
Delete
Copy Copy All
Select Copy
Delete Select Delete
SIM All
Handset All
Fixed Dial List Activate
Add New
View
Memory Info
One Touch Key Change
Delete
View
Phone Status
Hotline

Menu Map
14
3 Message
SMS Create
Inbox
Outbox
Draftbox
Delete
Voice Mailbox
Broadcast
Phone Status
MMS Create Message
Inbox
Outbox
Report
Delete
Message Settings SMS Settings
MMS Settings
4 Records
Dialed Calls Call
Add Name
Quick Save
Add To Exist Name
Delete
Send SMS
Received Calls Call
Add Name
Quick Save
Add To Exist Name
Delete
Send SMS
Missed Calls Call
Add Name
Quick Save
Add To Exist Name
Delete
Send SMS
Delete All
Call Register Call Timer
Call Cost
Show Balance
Last Call

Menu Map
15
5 Profile
Normal Activate
Preference Incoming Call Alert
Ringing Tone
Ringer Volume
SMS Alert
Key Tones
Keytone Volume
LCM Open/Close Alert
Power On /Off Alert
Mute
Meeting
Outdoor
Customized Activate
Edit Incoming Call Alert
Ringing Tone
Ringer Volume
SMS Alert
Key Tones
Keytone Volume
LCM Open/Close Alert
Power On /Off Alert
Rename
6 Clock
Alarm Off
On
Date Setting
Time Setting
Display Mode 12 Hour
24 Hour
Time Zone
Auto Power Off Off
On
Auto Power On Off
On
Calendar

Menu Map
16
7 Setting
Normal Settings Languages
Input Method
Earpiece Volume
Headset
Hand Free
Any Key Answer
Auto Answer
Flip Answer
Charging LED
Factory Settings
LCD Wallpapers
Background Color
Brightness
Backlight
Call Settings Own Number Sending
Call Divert
Call Barring
Call Waiting
Network Settings Preferred
Select Mode
Security Settings PIN Code
Change PIN2
Change Barring Code
Time&Cost Settings Calling Display
Charge Rate
Cost Limit
Short Cut Key Up Key
Down Key
Left Key
Right Key
Irda Settings

Menu Map
17
9 Extras
My Collections My Pictures
My Melodies
Record
IncomingPortrait
JAVATM JAVATM List
Download Settings
Memory State
About JAVATM
Game Tank War
RedCap
Blackjack
Gobang
Elf
Setting
Notebook New Notepad
Select Time
Read All Notebook
Delete
Alarm Melody
Calculator
STK
10 Easy_Up
Sms Easy_up news
fun
sport
stock
English Class
Absolute wit
Interdynamic game
Comprehensive scene
The newest trends
Quit the subscription
Mms Easy_up Cartoon
first page picture
chord ring
pop battlefront
news resource
vatiety living
boys&girls
update recommendation
canceling subscription
Menu Map
18
WAP Easy_up happy download
color pics
chord ring
fashion life
chat finder
games
IVR Easy_up the Garden of Eden
Lovely message
Pastime zone
net zone
game
telephone meeting
voice message
Help Easy_up
10 WAP
Homepage
Bookmarks Bookmark1 -5
Last Page
Navigation
WAP Settings Profile 1-Profile 5
History GSM Link
GPRS Data Flow
Clear Cache

Call Functions
19
Call Functions
Turning your phone ON and OFF
Press and hold for 3 seconds and then release
it.
Note
Always switch off your phone whenever it is
forbidden to use it or when it may cause interference
or danger.
When PIN is requested
SIM cards are usually protected with a PIN code.
The PIN code usually comes with your SIM card
provided by the network operator.
1. Key in your PIN code (note that the characters in
your password are replaced with “*”).
2. After you have entered the PIN code, press .
3. If you key in a wrong number, press to
remove the last digit. Press and hold to
clear the entire entry.
4. If the PIN code entered is incorrect, a warning
message will be displayed to notify you of the
remaining times for entering the PIN.
Note
If an incorrect PIN code is entered 3 times in
succession, your phone will automatically lock-up
the SIM card and a message will be displayed to
inform you that the SIM card is blocked.
Unlock the blocked SIM card
If your SIM card is locked, you will be asked to enter
the PUK code to unlock your phone in order to
continue using it. Perform the following steps to
unlock the blocked SIM card:
1. Key in the PUK code, press .
2. Key in a new PIN code, press .
3. Key in the new PIN code again and press .
Note
The PUK (Personal Unblocking Key) code is used to
release and change the blocked PIN code. If an
incorrect PUK code is entered 10 times in
succession, the SIM card will be blocked
permanently. If the PUK code does not come with
your SIM card or you have lost it, please check with
your network service provider for the code.
Call Functions
20
Making calls
1. In idle mode, key in the area code and the phone
number. Press to delete the last digit. Press
and hold for 3 seconds to clear the whole
number.
2. Press to dial the number.
3. Press or to end an active call or stop
dialling.
Domestic calls
When in idle mode, key in 02154422999 and press
to make the phone call.
International calls
1. When in idle mode, press and hold until a
“+” sign appears, then key in the country code,
the area code and the phone number accordingly.
2. Press to place the call.
3. Press or to end an active call or stop
dialling.
Example:
When in idle mode, key in +886222682081 and
press to make the phone call.
Making calls via the PhoneBook
1. Press to access the PhoneBook directly.
2. Scroll to the desired entry with .
3. Press to call the selected number.
Redial calls missed, received and dialled
The last 10 phone calls dialed, answered or missed
are stored in the phone’s memory. To redial,
perform either of the following:
Redial fast and easy
1. When in idle mode, press to view the last
phone calls dialled, answered and missed.
2. Scroll through the list for the desired number with
.
3. Press to dial the selected number.
Redial via the menu:
1. Press , scroll to the “Records” and press
.
2. Select “Dialed Calls”, “Received Calls” or
“ Missed Calls” and press .
3. Scroll to the desired name or phone number with
.
4. Press to place the call or press to
check the necessary information.
5. Press again to continue the next operation
with options such as “Call”, “Add Name ”, “Quick
Save” “Add To Exist Name”, “Delete” and “Send
SMS”.
Speed dial
When in idle mode, hold down the corresponding
alphanumeric keys ( to ) to dial the
preset speed dial numbers. Ensure that you have
entered the settings in “One Touch Key”.
Calling your voice mailbox
When in idle mode, dial the voice mailbox number
provided by the network operator or press and hold
to access the voice mailbox directly.
Note
Obtain your voice mailbox number from your
network operator, and ensure that the number has
been entered in the “Voice Mailbox Number” option.
Call Functions
21
Answering calls
1. Press to answer an incoming call.
Alternatively, simply open the phone cover to
answer a call if the handset cover is closed (if
“Flip Answer” is activated).
2. Press to end the call.
3. Press or to refuse an incoming call.
Note
If you have activated the “When Busy” function in
Call Divert, any incoming calls will be diverted to the
specified number while you are on a call. For
example, you may divert incoming calls to your
voice mailbox. If you have rejected an incoming call,
the call will be diverted too. Please refer to “Call
Divert”.
Call waiting
If call waiting function is activated, you may answer
a new incoming call while already on line.
1. If there is an incoming call while you are already
on line, a tone will be heard and a notification
message and the caller information will be
displayed on the screen.
2. Press to answer the incoming call. The
active call will be automatically switched to hold.
3. Press to reject the new call.
Note
The call waiting function allows you to manage up to
two calls simultaneously (1 active, 1 on hold). To
answer the third incoming call, end one of the active
calls, or establish a multiparty call for the two online
calls before answering the third call.
In-call menu
During a call, you can access the In-call menu by
pressing . Some of the options listed in the
In-call menu may not be available at a given time
and vary depending on your network operator.
Functions that are available in normal mode
Mute
Mutes the mobile phone, the party on the phone will
not hear you. When this option is selected, if the
phone is in call waiting mode, the party on the
phone will not hear you and the call on hold will
remain on hold.
Unmute
Cancels the mute function.
Hand Free
Enables users to talk without holding the phone.
Hold
Places an active call on hold.
Send SMS
Sends short messages to other party during calls.
For detailed operation, refer to “Messages”.
Phone Book
Enables users to check or edit the data in the phone
book during a call. For detailed operation, refer to
“PhoneBook”.
Fixed Dial List
Enables users to check or edit the data in the phone
book during a call. For detailed operation, refer to
“PhoneBook”.
Call Records
Views the call records of the calls answered, dialled
and missed.
Send DTMF
Activates or deactivates the DTMF tone.
End Active Call
Disconnects the active call.
Functions that are available in call waiting mode
Mute
For detailed operation, please refer to the function
described above.
Unmute
For detailed operation, please refer to the function
described above.
Hand Free
For detailed operation, please refer to the function
described above.
Swap
Switches between the active call and the call on
hold when in call waiting mode.
Call Divert
Transfers the call to another phone number.
Send SMS
For detailed operation, please refer to the function
described above.
Build Multiparty Call
Starts a multiparty conference call for up to 7
participants. For detailed operation, please refer to
“Multiparty”.

Call Functions
22
Phone Book
For detailed operation, please refer to the function
described above.
Fixed Dial List
For detailed operation, please refer to the function
described above.
Call Records
For detailed operation, please refer to the function
described above.
Send DTMF
For detailed operation, please refer to the function
described above.
End Active Call
For detailed operation, please refer to the function
described above.
End All Calls
Terminates all calls, both on line and on hold.
End Held Call
Ends the call on hold.
Functions that are available in multiparty
conference call mode. When the multiparty
conference call is activated, the phone gives you
access to some specific functions. The availability
depends on your network operator.
Mute
For detailed operation, please refer to the function
described above.
Unmute
For detailed operation, please refer to the function
described above.
Hand Free
For detailed operation, please refer to the function
described above.
Hold Multiparty Calls
Places the current multiparty conference calls on
hold.
Send SMS
For detailed operation, please refer to the function
described above.
Split MPTY
Chooses a participant from the multiparty
conference call for a private conversation.
Phone Book
For detailed operation, please refer to the function
described above.
Fixed Dial List
For detailed operation, please refer to the function
described above.
Call Records
For detailed operation, please refer to the function
described above.
Send DTMF
For detailed operation, please refer to the function
described above.
End Component
Terminates the connection with one of the
participants from the multiparty conference call.
End Active MPTY
Terminates the connection with the active
conference call.
Add To Multiparty Call
Add a new incoming call to the multiparty calls on
already on line.
End Held MPTY
Ends the multiparty conference calls on hold.
Multiparty
This option allows a conference call for up to 7
parties. Please check with your network operator for
the availability of multiparty conference calls.
Before activating a multiparty conference call, make
sure that you have established two on-line calls (1
active, 1 on hold).
1. Make sure that you have established two online
calls (1 active, 1 on hold), before activating a
multiparty conference call.
2. If the existing calling parties agree to participate
in the conference call, press to enter the
In-call menu and select “Build Multiparty Calls” to
start a multiparty conference call.
3. To add a new participant to the multiparty
conference call, place the existing conference call
on hold, establish a new call connection with the
new incoming call and repeat step 2.
4. To release a participant from the conference call,
press to enter the In-call menu. Select “End
component” and press . Press again to
release the selected participant.
5. To have a private conversation with one of the
participants, press to enter the In-call menu.
Select “Split MPTY” and press . Press
again to start your private conversation with the
selected participant. The existing multiparty
conference call will then be automatically placed
Call Functions
23
on hold.
6. To end an active conference call, press .
Other operations
Adjusting the earpiece volume
You can adjust the earpiece volume using the side
soft keys or to increase or decrease the
volume during a call.
Input text
The J9 model provides a number of input methods
for you to organize your phone book or write
messages.
By pressing , users may switch between the
different input methods.
Note
When in idle mode, use only numbers, the
international dialling prefix code “+” (press and
hold ), the pause code “W” and “P” (press
and hold , once for “W”, twice for “P”) and
characters that are allowed for dialling. Other
letters or symbols are not allowed.
To input a specific letter or symbol, after selecting
the desired input style, press the corresponding
key repeatedly until the required letter or symbol
appears. For example: to input A, press
once; to input B, press twice, and so on.
To key in the same character in sequence, wait
for a second between each key press, or press
to move the cursor to the right and input
the character.
If you make a mistake, press to delete the
character to the left of the cursor; press and hold
to delete all characters on the screen.
Using Predictive Text input
Predictive Text input is a much easier way to input a
text message in English. For each letter to be
entered, you only need to press the corresponding
alphanumeric key once. In Predictive Text input, the
alphanumeric keys enter words with a single key
press instead of multiple key presses. When the first
(or second) element is entered, the display shows
the most probable word in the suggestion area The
word you select from the suggestion area will move
to the text area.
Call Functions
24
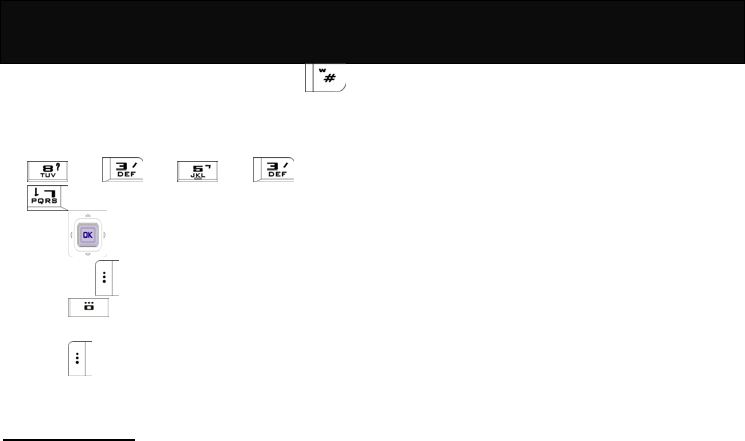
1. Switch to Predictive Text input by pressing
repeatedly until the desired input style appears.
2. For example, to input “Telephone”, key in the
following:
3. Press vertically to select the desired word
and press .
4. Press repeatedly to input a punctuation
mark that you need.
5. Press when you have completed writing the
message.
Using Capitalize input
The first letter of each sentence is shown in capital
letter automatically. For example: to input “go home”,
press the associated keys accordingly, the sentence
“Go home” will be shown on the LCD display.
Using The Menu
25
Using The Menu
This handset offers a range of functions that allow
you to customize the phone to your needs. These
functions are arranged in menus and submenus.
Accessing the menu function
1. In idle mode, press to go to the menu
facility.
2. Scroll to the desired menu with .
3. Press to enter the desired submenu.
4. Scroll to the desired submenu with .
5. Press to access the submenu.
6. Press up or down to access the next
menu of the selected submenu.
7. Press to confirm the setting.
Returning from menu function
1. Press to return to the previous menu level.
2. Press to exit the menu and return to idle
mode without changing the menu settings.
Camera 1
26
Camera
This function is the application of the built-in digital
camera. It allows you to take pictures (both still and
moving images) and make certain settings on the
pictures. You can also send images in a multimedia
message, as an e-mail attachment or via infrared
connection. The camera produces JPEG images.
In idle mode, proceed as follows:
1. Press to enter the main menu.
2. Scroll to “Camera” with .
3. Press to access the submenu.
Preview
This function allows you to view the image that you
want to take and save.
1. Press to preview the photo subject.
2. Point the viewfinder toward the photo subject and
press to take the picture.
Note
When previewing, press left or right to
adjust the brightness, press up or down
to adjust the focus, press to switch among
the snap shot, continuous shot, self-timer snap
and capture movie. You can still preview the
image on sub LCD display even if the handset
cover is closed.
Hold the handset when capturing image.
3. Press to save the picture in “Photo
Manager”.
Caution
Many jurisdictions have laws and regulations about
taking pictures in public or private areas and
regarding the processing and further use of such
pictures. Check with your network service provider
for the restrictions that apply to you.
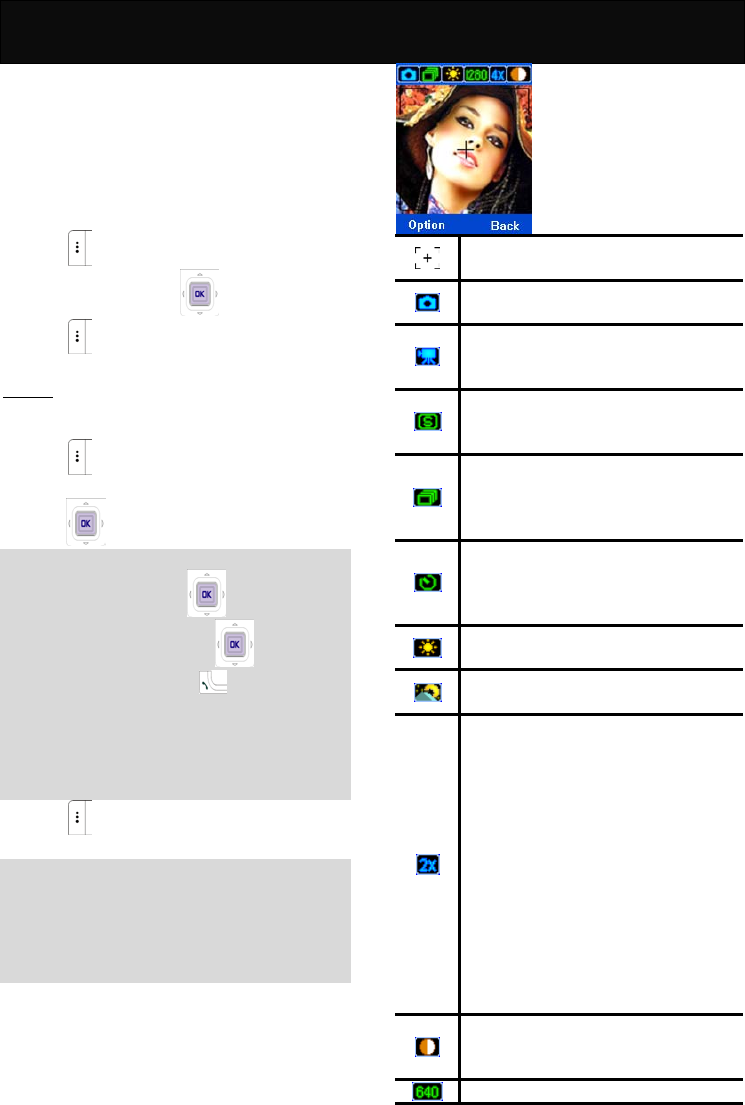
Display indictors
A number of status indictors are shown on the
screen to tell you of the relevant settings of your
handset during the capture mode.
Orientation. To orient the object when in
preview mode.
Take picture. Indicates that the handset is
ready to take picture.
Capture movie. Indicates that the
handset is ready to capture moving
images.
Snap. Indicates that the camera captures
a single picture when you press the
shutter key.
Continuous. Indicates that the camera
captures continuous pictures up to 9
frames with a single press of the shutter
key.
Timer snap. Indicates that the self-timer
function has been activated. The image
will be captured with 15 seconds delay
after you have pressed the shutter key.
Normal capture mode. Indicates that the
camera captures image in normal mode.
Night capture mode. Indicates that the
camera captures image in night mode.
Focus. Indicates that the camera
captures image uses 2 times focus.
If you have selected 320*240 capture
size, you can set the focus ranging
from 1~11 times.
If you have selected 640*480 capture
size, you can set the focus ranging
from 1~10 times.
If you have selected 160*120 capture
size, you can set the focus ranging
from 1~16 times.
If you have selected 1280*960
capture size, you are not allowed to
adjust the focus.
Brightness. Indicates that you can adjust
the exposure ranging from –2, -1, 0, +1
and +2.
Ca
p
ture size. Indicates that
y
ou can set

Camera 1
27
the picture resolution ranging from
160*120, 320*240, 640*480 and 1280*960.
Capture movie. Indicates that the camera
starts recording the moving images.
To adjust some certain settings before capturing,
perform the following steps.
1. Press to enter “Preview” menu.
2. Press to access the submenu before
capturing the image. You can make changes of
the settings by pressing horizontally or
vertically for each available option in order to
achieve the best effect of the picture.
Self-Capture
1. When in capture mode, close the handset cover
to enter the self-capture mode.
2. Point the viewfinder toward the photo subject
(yourself). You can see yourself on the sub
screen.
3. Press to take the picture.
4. Press to save the picture in “Photo Manager”,
or open the handset cover and press to
save the picture.
5. Press to cancel saving or open the handset
cover and press to cancel saving.
Note
When in idle mode, close the handset cover, press
and hold to enter the self-capture mode.
Continuous Pictures
1. When in capture mode, set the snap type to
“Continuous” and press .
2. Press (OK key) to capture the
continuous images up to 9 frames after 3
seconds.
3. Press to save the picture in “Photo
Manager”.
Capture Movie
This function allows you to capture moving images
and make some certain settings on recording.
1. Press to access the viewfinder mode.
2. Press to start recording. While recording,
will appear on the upper-left corner of the
LCD display.
3. Press to stop recording and save the video
clip in “Movie Manager” after the capture is done.
4. Press to abort saving and return to the
viewfinder mode.
To adjust some certain settings before capturing,
perform the following steps:
1. Press to enter “Capture Movie” menu.
2. Press to access the submenu before
capturing the image. You can make changes of
the settings by pressing horizontally or
vertically for each available option in order to
achieve the best effect of the picture.
Photo Manager
This function allows you to view and edit, delete,
rename, and check the memory status of the
pictures you have taken.
Edit
This option allows you to view and edit the pictures
that are stored in the photo albums.
Delete
Delete the pictures that are stored in the photo
albums.
Delete By Album
Delete the pictures that are stored album by album.
Empty AllAlbums
Clear all the pictures that are stored in all albums.
This will take time to perform the clearance if there
are a lot of pictures stored in the memory.
Rename Album
Change the name of the default albums.
Memory Manager
Check the status of the free space for taking a

Camera 1
28
photo.
Movie Manager
This option allows you to organize moving images
that are stored in the handset memory.
Replay
Play the recorded video clip.
Delete
Delete the video clip.
Detail
You may check the relevant information of the video
clip such as format, file size and so on.
Send via Infrared
Send the video clip to other device that are
compatible with the handset.
Snap Setting
This menu provides the options for optimizing the
effect of the picture capturing.
Target Album
Select the album to store the captured picture.
Effect
Select the desired effect of the picture.
Photo Quality
Select the quality of the picture taken.
Shutter Sound
Enable or disable the handset sound when capturing
a picture.
Flash Light
Enable or disable the flash light function.
Timer Snap Sound
Enable or disable the handset sound when the
self-timer has been activated.
Capture Mode
Select the desired mode according to the light
condition of the area.
Set Capture Size
Select the pixel size for capturing a picture.
Set Environment
You can set the lighting frequency so as to reduce
the flickering and get excellent photo quality. The
default setting of the frequency may vary from
country to country.
Big Head
You can set the picture taken with photo frames
selected from this menu.
Manual
A brief help text that guides you through the
operation of the camera function.
PhoneBook 2
29
PhoneBook
The “PhoneBook” is used to save phone numbers
and names in the handset or SIM card. You can
save up to 500 entries in the handset. The SIM card
capacity may vary depending on the network service
provider.
In idle mode, proceed as follows:
1. Press to enter the main menu.
2. Scroll to “PhoneBook” with .
3. Press to access the menu.
View
You may view the names and phone numbers that
have been stored in the handset or the SIM card.
Search Name
1. Press to access the menu.
2. Enter the name you want to search or key in the
letter that corresponds to the first letter of the
name require in the phone book and press .
Note
Icons for easy identification will be shown on the
screen when the entry is stored in the handset
memory. For example, icons that indicate the place
where the data is stored, the type of number it is
(handset, office, home or etc.) and which group the
data has been assigned to (family, friend, workmate
or VIP).
3. Scroll to the desired name or phone number and
press to dial the number.
Group
1. Scroll to the desired group and press .
2. Select the desired phone number or name and
press to make a phone call.
Note
You may access the submenus by pressing to
continue with the further operation if necessary.
Add New
Add a new entry to the handset or the SIM card.
1. Press to access the menu.
2. Key in the phone number and press .
3. Select “Add Name”, “Quick Save”, or “Add To
Exist Name” and press .
4. If “Add Name” is selected, perform the following
steps:
(1) Key in the name and press .
(2) Select either “Save To SIM” or “Save To
Handset” and press .
(3) If “Save To SIM” is selected, key in the location
number to where the entry is to be saved and
press .
(4) If “Save To Handset” is selected, select the
desired group and press .
(5) Select either “Handset”, “Office” or “Home” to
define the attributes of the entry.
5. If “Quick Save” is selected, the entry will be
stored in the handset without editing.
6. If “Add To Exist Name” is selected, perform the
following steps:
(1) Select the desired name or phone number and
press .
(2) Scroll to the field that is allowed for a new
number and press .
(3) If the selected field has a phone number
already, you will be asked whether or not to
overwrite the old number.
Note
To key in the country code, press and hold
until the international dialling code “+” is displayed
then key in the appropriate country code. The
steps for dialling from abroad are the same as
above.
To key in an extension number, key in the pause
code “W” or “P” (press and hold , once for
“W”, twice for “P”) before entering the extension
number. This feature requires the private branch
exchange with the DTMF function.
Group Setting
You may organize your phone book data into groups
and set a specific ring tone for each group.
Melody
Set the specific melody for the groups in order to
identify the caller efficiently.
PhoneBook 2
30
1. Scroll to the desired group and press .
2. Select the favourite melody and press .
Add New
Add a new group for well organizing.
1. Press to access the menu.
2. Key in the name of the new group and press
to save the setting.
Delete
Delete a group to free up more memory.
1. Press to access the menu.
2. Scroll to the desired entry and press to
delete the entry.
Note
Only the non-embedded groups can be deleted.
Copy
This option allows you to copy the entry/entries from
the SIM card to the handset or vice versa. You will
have the choice of keeping or erasing the original
entry/entries while copying.
Copy All
SIM To Handset
Press to copy all the entries in the SIM card to
the handset.
Handset To SIM
Press to copy all the entries in the handset to
the SIM card.
Select Copy
SIM To Handset
1. Scroll to the desired entry and press the OK key
or to select the entry that is to be
copied.
2. Press the OK key or again to
deselect the selected entry.
3. Press to confirm the selection and begin to
copy the entry/entries you have selected.
Handset To SIM
Perform the procedure described above to continue
with the copying operation.
Delete
Delete one entry or several entries at a time.
Select Delete
1. Press to access the option.
2. Press uprightly or to select the
entry that is to be deleted.
3. Press uprightly or again to deselect
the selected entry.
4. Press to confirm the deletion.
SIM All
1. Press to access the option.
2. Press to confirm the deletion.
Handset All
1. Press to access the option.
2. Press to confirm the deletion.
Fixed Dial List
This fixed dial list is to restrict the use of the SIM
card. If activated, it is only possible to make calls
with phone numbers that have been set in the list
and the emergency call. The PIN2 code is required
to adjust this setting.
One Touch Key
You may set the phone number for up to 8 entries
for speed dialing. When in idle mode, press and hold
the corresponding alphanumeric key, you can call
the designated number.
1. Scroll to a specific key number and press .
2. Scroll to the desired name in the phone book and
press .
3. Scroll to the speed dialing entry and press if
you want to continue the next operation with
“Change”, “Delete” or “View”.
Phone Status
You can check the memory capacity of the handset
and the SIM card. For example: 50/500 means that
there are a total of 500 entries; 50 entries have been

PhoneBook 2
31
saved with memory still available for 450 more
memories. The phone status of the SIM card may
vary depending upon the memory capacity of the
SIM card.
Hotline
If you have any questions about our products,
please dial our tool-free hotline: 800-820-8118.For
mobile phone users or users in areas that do not
offer 800 services, please call 021-64852866. We
will serve you wholeheartedly.
Message 3
32
Message
This menu allows you to send, read and write text
messages, listen to the voice message and access
relevant features that are provided by your network
service provider.
In idle mode, proceed as follows:
1. Press to enter the main menu.
2. Scroll to “Message” with .
3. Press to access the menu.
SMS
This option allows you to read, send and write the
text messages.
Create
You may write messages of up to 160 characters in
English.
After you have written your message, press .
Key in his/her phone number manually or press
to access the “PhoneBook” to select the required
name or number.
Press to access the following options.
Send
Send the written message to one person.
Save
Save the written message.
Send To Many
Send the written message to more than one person.
Select the required persons/numbers by pressing
uprightly.
After you have finished selecting, press to
send the message.
Note
Before sending any message, you have to save the
message center number in the “Service Center
Number”. Please check with your network service
provider for the number.
Inbox
This option stores the message sent to you and you
may read it by accessing this option. If a new
message has been received, the icon will be
shown at the top of the screen and notification tones
will be heard.
Scroll to the message which is to be read.
Press to read the message.
After reading press to access the following
options.
Delete
Delete the message.
Reply
Reply to the message by writing text.
Call Back
Return call to the sender.
Get Number
Extract the phone number that appeared in the
message or phone number of the sender and save it
to the memory.
Send SMS
Forward the received message to others.
Send To Many
Forward the received message to more than one
person at a time.
Move
Remove the selected message to the “Archive” for
organizing.
Note
The message will be stored in the SIM card (SIM
card capacity depends on your network service
provider).
If a new message has been received, the
icon will be shown at the top of the screen and
notification tones will be heard.
If the icon flashes, it means that there is
insufficient memory for new messages. Select
“Delete” in “SMS” to delete old messages to free
up memory for new messages.
If there is no icon shown on the screen, it
means all received messages have been read
and there is sufficient memory for new messages.
Outbox
This option stores the messages you have sent to
others if you have selected the “Send And Save”
option for the written message. You may access the
following options by pressing after reading.
Send
Forward the received message to other.
Delete
Delete the message.
Send To Many
Forward the received message to more than one

Message 3
33
person at a time.
Move
Remove the selected message to the “Archive” for
organizing.
Draftbox
This option stores the messages that you have
written but have not yet sent to others. You may
access the available submenu by pressing
after reading:
Edit
Edit the message.
Send
Forward the received message to others.
Delete
Delete the message.
Send To Many
Forward the received message to more than one
person at a time.
Move
Remove the selected message to the “Archive” for
organizing.
Delete
Delete the message in mailbox.
Delete Inbox
Delete all the messages in “Inbox”.
Delete Outbox
Delete all the messages in “Outbox”.
Delete Draftbox
Delete all the messages in “Draftbox”.
Select Delete
Delete the selected message.
1. Scroll to the desired message and press .
2. Press to delete the selected message.
Delete All
Delete all the messages in all the message boxes.
Voice Mailbox
This option allows you to enter the voice mailbox
number and listen to the voice messages that you
have received.
Note
Please contact your network operator for the voice
mailbox number before using this service. The voice
mailbox number will remain unchanged until you
modify it.
Broadcast
This option allows you to receive information
broadcasted by your network service provider (such
as weather forecast or road traffic information).
Please contact your network operator for information
on the topics available and its corresponding index.
Note
Please check with your network operator for the
broadcasting topics and its corresponding index.
Phone Status
You can check the memory capacity for text
messages of the handset and the SIM card. For
example: 2/200 means that there are a total of 200
entries; 2 entries have been saved with memory still
available for 198 more memories. The phone status
of the SIM card may vary depending on the memory
capacity of the SIM card, the capacity of the handset
is 200 entries.
MMS
This function allows you to send, read and edit
multimedia messages including text, pictures and
sounds.
Note
The availability of MMS message depends on
your network operator.
Only devices that support MMS message can
receive and display MMS message.
Create Message
You may write messages up to 512 characters in
English manually or press to add in text
message.
Add Image
Add the embedded icon/image into the MMS
message.
Add Audio
Add a sound file into the MMS message.
New Audio
Record a voice memo and add it to the slide
currently being edited.
Follow the prompt on the screen to record a voice
memo.
Press to save the voice memo and attach it
into the slide currently being edited.
New Slide
Insert a new slide. This will appear only when you
have composed a slide.
Preview Slide
Preview the slide you have composed.
Another Slide
Edit other slides for an MMS message that is more
than 1 slide. You may go through the previous or
next slide for editing by pressing .

Message 3
34
Slide Duration
Set the interval between two slides for playing the
slides. The range of interval you may set is 5-50
seconds.
Send
After you have finished editing the MMS message,
press to continue the next operation with the
following options.
1. Send: Input the destination addresses from the
phonebook or input manually up to 5 entries and
send the MMS message.
2. Preview: Preview the MMS message.
3. Subject: Input the title of the MMS message.
4. Save: Save the MMS message to the “MMS
Draft” in “Outbox”.
Inbox
This option stores the MMS messages sent to you.
Press to enter the following submenu:
Retrieve
Fetch your MMS messages from the local MMS
center if the auto download function is not activated.
Note
The MMS message will be retrieved automatically
after a fixed interval if you have activated the “Auto
Download” function in “MMS Settings”.
You may access the following submenu after
downloading the MMS message:
1. Play: View the received MMS message right
away.
2. Delete Message: Delete the received MMS
message from the handset.
3. Forward: Send the received MMS message to
other phones that offer compatible multimedia
message features. You may edit it before
sending.
4. Reply: Reply to the sender via MMS, SMS or by
calling without retrieving the MMS message.
5. Save Content: Save the image, audio clip, text or
URL that was attached in the received MMS
message from the handset into the corresponding
folder respectively.
6. Save Sender Address: Save the phone number
of the sender in handset or SIM card.
Reject
Reject the MMS message sent to you.
Reply
Reply to the sender via MMS, SMS or by calling
without retrieving the MMS message.
Note
If a new MMS message has been received and not
yet been downloaded, will appear on the top
of LCD display with a notification tone. If the MMS
has already been downloaded, will appear at
the top of the LCD display.
Outbox
This option stores the MMS message that has failed
to be sent, saved for sending later and sent
successfully.
MMS Pending
Stores the MMS message that has failed to be sent.
Press to continue with the next operation.
MMS Draft
Stores the MMS message that has been saved for
sending later. Press to continue with the next
operation.
MMS Sent
Stores the MMS message that is sent successfully.
Report
The delivery report of the MMS message sent when
the recipient has downloaded it.
Delete
Delete the MMS message.
Delete Inbox
Delete all the MMS messages in “Inbox”.
Delete Outbox
Delete all the MMS messages in “Outbox”.
Delete Report
Delete all the reports.
Delete Pending
Delete all the pending messages.
Delete Draft
Delete all the draft messages.
Delete Sent
Delete all the sent messages.
Select Delete
Delete the selected message.
Delete All
Delete all the MMS messages in all the message
boxes and also the reports.
Message Settings
SMS Settings
You may set the following options for your SMS.

Message 3
35
Service Center Number
This option stores the required service center
number for sending the text messages.
Note
Please check with your network operator for the
number.
Validity Period
Messages sent to you will not be saved if you do not
switch on your phone within a certain time limit. This
option allows you to set the period the service center
and keeps the unreachable message for you.
Note
This function depends on your network operator.
Status Report
When activated, the service center will send you the
status report of the sent messages.
Note
The availability depends on your network operator
The function will not be available when you send
the message to more than one person.
Send And Save
Send the written message and store it in the
memory.
MMS Settings
This option allows you to make some certain
settings to receive a MMS message. You have to
set the WAP data transmission settings first before
using MMS.
Note
The availability of this function depends on your
network ooperator.
Msg Priority
Set the priority level of the MMS message. You may
choose from “High”, “Normal” or “Low”.
Sender Visibility
This option allows you to set whether or not the
receivers can read your number or identity.
Delivery Report
Set whether or not the service center sends you a
report when the MMS message is delivered.
Read Reply Request
Set whether or not the send a read reply request to
the receiver when the MMS message is received.
Auto Download
Set whether or not the handset downloads the MMS
message automatically. If not, the MMS message
will be stored in MMS center.
Reject Ads
Set whether or not to bar any advertisements.
Append Signature
Set whether or not to add your signature into the
MMS message. If so, choose “Yes” and start editing
your signature.
Validity Period
Set whether or not to set the period the service
center keeps the unreachable MMS message for
you. If so, choose “Yes” and set the period.
Network Settings
Input the IP address and MMS URL of a network
operator in order to receive an MMS message.
Save After Send
Set whether or not to save the MMS message
automatically after you sent it.
Records 4
36
Records
This option provides a record of call duration, call
cost, recent calls and relevant settings. Some of the
functions require the PIN 2 code in order to access
them. For information on the PIN 2 code, please
refer to “Security Settings”.
In idle mode, proceed as follows:
1. Press to enter the main menu.
2. Scroll to “Records” with .
3. Press to access the menu.
Dialed calls
The last 10 outgoing phone calls, including the
successful or unsuccessful calls that you have made,
are stored in the phone’s memory.
1. Press to dial the selected number.
2. Press to access the submenu, which
includes “Call”, “Add Name”, “Quick Save”, “Add
To Exist Name”, “Delete” and “Send SMS”.
Note
If a number is dialled several times, only the last
dialled entry will be shown on the list.
Received Calls
The last 10 phone calls that you have answered are
stored in the phone’s memory. Perform the
procedures described above if necessary.
Missed Calls
The last 10 phone calls that you have not answered
are stored in the phone’s memory. Perform the
procedures described above if necessary.
Delete All
Clear the call records from the handset memory.
Call Register
This option will provide the information on the talk
times, call charges and the balance of your call
limitation.
Call Timer
Provide the information on the total talk time of the
outgoing and incoming calls and the accumulated
talk times. You may reset the timer by pressing .
Call Cost
Display the call cost of the accumulated calls. You
may reset the call cost to restart a call charge. The
PIN2 code is required to set the charge rate.
Show Balance
Display the balance of your call cost (the PIN2 code
is required to access this function).
Note
An emergency call is still possible even if the
balance reaches zero.
Last Call
Show you the talk time of the last call.

Profile 5
37
Profile
This menu allows you to customize your handset
settings for different occasions.
In idle mode, proceed as follows:
1. Press to enter the main menu.
2. Scroll to “Profile” with .
3. Press to access the menu.
You may have different settings for a particular
environment that is provided as below:
Normal
Default setting of the handset.
Mute
The alert tone of the incoming call is set to not ring
and vibrate for any incoming call.
Meeting
The alert tone of the incoming call is set to vibrate
alert.
Outdoor
The ring tone of the handset is set to maximum
level.
Customized
You may customize your own profile for a special
occasion and change the name of the profile.
Activate
Perform the following to activate the profile settings:
1. Scroll to the desired profile and press .
2. Scroll to “Activate” and press .
Preference
You may change the setting of the parameters by
preference for each profile by accessing the
following options:
Incoming Call Alert
Set the incoming alert type for your handset.
1. Scroll to the desired profile and press .
2. Scroll to “Preference” and press .
3. Scroll to “Incoming Call Alert” and press .
4. Select one of the desired alert types and press
.
Ringing Tone
Set the ring tone for the incoming calls.
Ringer Volume
Set the volume level of the ring tone.
SMS Alert
Set the tone for notifying you of the incoming
message.
Key Tones
Set whether or not the keypad tone makes sounds
when pressed.
Keytone Volume
Set the volume level at key pressed.
LCM Open/Close Alert
Set whether or not to activate the alert when
opening or closing the handset cover.
Power On/Off Alert
Set whether or not to activate or deactivate the
music when switching the handset on or off.

Clock 6
38
Clock
This menu shows the options for setting the alarm,
date and time, display mode (display the date and
time on the LCD display), time zone, auto power off
and calendar.
In idle mode, proceed as follows:
1. Press to enter the main menu.
2. Scroll to “Clock” with .
3. Press to access the menu.
Alarm
Sets the handset to ring at a specific time with the
desired ring tone.
1. Scroll to “On” and press .
2. Scroll to either of the following to continue setting.
Time Setting
1. Key in the time for the alarm using the HH:MM
format, where HH is for hour and MM is for
minute.
2. Press .
3. Scroll to either “Once”, “Everyday” or “Workday”
and press .
Alarm Ringer
Sets the ring tone for alarm.
Alarm Volume
Sets the volume level of the alarm.
Note
When the alarm goes off, press any key to turn off
the alarm. If no action is taken, the alarm will turn
into snooze mode and ring every 3 minutes 3 times.
Date Setting
Sets the appropriate date for the phone using the
following format YYYY/MM/DD; where YYYY is for
year, MM is for month and. DD is for day.
1. Key in the appropriate year, month and day to
replace the factory set date.
2. Press to save the setting.
Time Setting
Perform the procedures described above for time
setting.
Display Mode
You may set the time format for the LCD display.
Time Zone
You may check the current local times all over the
world.
Auto Power Off
You may set the phone to switch off automatically at
a specific time.
1. Scroll to “On” and press .
2. Key in the time for shutting down using the
HH:MM format, where HH is for hour and MM is
for minute.
3. Press .
4. Scroll to either “Once” or “Everyday” and press
.
Auto Power On
You may set the phone to switch on automatically at
a specific time.
1. Scroll to “On” and press .
2. Key in the time for switching on using the HH:MM
format, where HH is for hour and MM is for
minute.
3. Press .
4. Scroll to either “Once” or “Everyday” and press
.
Calendar
Th
is option can be used to look up a date.
1. Key in the year and month you would like to
check or simply press .
2. Browse with to check the date of the
previous month or next month.
Setting 7
39
Setting
This menu shows the options for setting the
functions related to the phone itself, for example
normal settings that includes language, input
method and etc, call settings, network settings,
security settings that includes PIN code and change
PIN2 code and time and cost settings.
In idle mode, proceed as follows:
1. Press to enter the main menu.
2. Scroll to “Setting” with .
3. Press to access the menu.
Normal Settings
You may set the following items by preference.
Languages
Set the language for display message. Languages
vary upon the language package used.
Input Method
A number of input styles are provided.
Earpiece Volume
Adjusts the earpiece volume during calls.
Headset
Adjusts the headset volume during calls.
Hand Free
Adjusts the speaker volume during hands free
conversation.
Any Key Answer
If activated, press any key except and to
answer the incoming call.
Auto Answer
If activated (with headset connected), any incoming
call will be answered automatically when the phone
rings or vibrates for a few seconds.
Flip Answer
If activated, you can simply open the handset cover
to answer an incoming call. If deactivated, you need
to open the handset cover and press to
answer the call.
Charging LED
This function can set to activate or deactivate the
charging LED.
Factory Settings
Restores some of the functions set in the phone to
their original configuration. The data stored in the
phone book will not be affected. For detailed
information on factory default settings, refer to the
table below.
Items Setting
Options
Default
Settings References
1 Display Mode
24 Hour Refer to
“Clock”
Languages
Varies by
language
package used
2 Input Method
Varies by
language
package used
3 Earpiece
Volume Level 6
Refer to
“Normal
Settings”
4 LCD Contrast
Level 4 Refer to
“LCD”
LCD
This function shows you the options for setting the
wallpapers, background colors, contrast, backlight
duration and LED flashing indicator.
Wallpapers
You may change the embedded background
pictures for the internal and external display by
preference.
Main Wallpaper Setting
You may like to set the background pictures of the
internal LCD display change everyday or remain
unchanged until you modify it.
Sub Wallpaper Setting
You may like to set the background pictures of the
external LCD display to change everyday or remain
unchanged until you modify it.
Foreground display
You may like to display wallpaper in the foreground
of the main LCD display when the handset is in idle
mode.
1. Text Display
Displays only the date and time when the phone is
idle.
2. Simulate Clock
Displays not only the date and time but also a
simulated clock in the foreground when the phone is
idle.
3. Calendar
Displays not only the date and time but also a
calendar in the foreground when the phone is idle.

Setting 7
40
4. No Display
Neither the date and time nor foreground wallpaper
is displayed when the phone is idle.
Sub Screen Time
This function allows you to set the sub screen time.
Background Color
You may change the background color by
preference.
Brightness
You may adjust the contrast of the main display and
sub display at 5 levels.
Backlight
You may set the duration time of the backlight and
keypad illumination.
Power Save
Set the backlight illumination into power saving
mode. If activated, the display will become dark
when the time has reached the selected backlight
duration.
Backlight Duration
Set the duration of the illumination by preference.
Call Settings
You may set the functions related to the network
service. The availability of the functions depends on
your network service provider.
Note
For further information, please check with your
network operator.
Own Number Sending
Chooses whether or not your phone number is sent
to the called party. The availability depends on your
network operator.
Call Divert
This option is set to divert incoming calls to the voice
mailbox (only for voice messages) or another phone
number, so as not to miss any important calls. There
are four divert modes available which you can
activate and cancel. You can check its current status
at any time.
If activated, follow the prompt on the screen and key
in the phone number to which you wish the incoming
calls to be diverted.
Unconditional
Systematically divert all incoming calls.
When Busy
Divert all incoming calls when the line is busy (when
you are on a call) or you have rejected the call.
Note
Call waiting must be disabled to use this divert
function.
No Reply
Divert all incoming calls if there is no reply (i.e.
missed call).
No Response
Divert all incoming calls when your phone is turned
off or out of coverage.
Cancel All
Cancel all the divert functions.
Call Barring
This option provides SIM card restrictions when
making or answering calls. A network access code is
required to set all the barring functions (you must
contact your network service provider).
All Outgoing Calls
All outgoing calls are barred; only incoming calls can
be accepted.
Outgoing Int’l
All outgoing international calls are barred. Incoming
calls can still be accepted.
Outgoing Int’l. Except Home
When abroad, you can only call the numbers within
that country or call to your home country (i.e., the
country where the phone is registered).
All Incoming Calls
All incoming calls are barred.
All Incoming When Roaming
No incoming calls will be permitted when registered
with a system other than the original one.
Cancel All
Cancel all the call restriction functions.
Call Waiting
This option alerts you of an incoming call while on
line. If activated, a tone and a notification message
and the caller number will notify you of a new
incoming call when you are on the phone. The
availability depends on your network service
provider.
Network Settings
This is a network-related option. It allows you to
register with, search, or select the available network
and some of the relevant settings.
Preferred
Allows you to browse, delete or edit the current
network list, you can add the available network also.
Show List

Setting 7
41
View the name list of the available network. Scroll to
the desired network, press and continue the
further operation with “Register”, “Delete” or “Move”.
Delete Available Network
Delete the available network from the name list.
Add Available Network
Add the available network to the name list.
Add Known Network
Add the known and existed network to the name list.
Select Mode
Register with the network using the following modes:
Auto Search
It is the default mode for network registering. It
usually searches for the network operators using the
priority network list in “Preferred”.
Network Register
Automatically register with the network system the
SIM card originally registered.
Manual Search
Select the network operator that has a roaming
agreement with your network operator in your
region/country. Once the “Manual Search” mode is
selected, the register mode will not change until you
modify it or replace a new SIM card.
Note
If you are not familiar with the network operator, it is
strongly recommended that you select “Auto
Search” mode.
Security Settings
A number of security features are provided to protect
against any unauthorized use of your SIM card and
certain other features. You are able to change the
PIN and PIN2 code or decide whether a PIN is
requested while the phone is switched on.
PIN Code (4 to 8 digits)
The PIN (Personal Identification Number) protects
the SIM card against unauthorized use. Normally,
the PIN code comes with your SIM card.
PIN On
If activated, you will be asked for the PIN every time
you switch on the handset.
Note
Please consult your service provider for the PIN
code when you are using it for the first time.
PIN Off
Deactivate the PIN request when switching on the
handset.
Change PIN
Perform the following steps to change the password.
1. Key in the old code, press .
2. Key in a new code, press .
3. Key in the new code again and press .
Note
If an incorrect PIN code is entered 3 times in
succession, the SIM card will be blocked
automatically. For detailed information, please refer
to “Unlock the blocked SIM card” of “Call Functions”.
Change PIN2 (4 to 8 digits)
You may change the PIN2 code in this option. The
PIN2 code is provided together with the SIM card
and is only used when accessing some specific
options (such as “Charge Rate”). It will only be
available if SIM cards and the network service
provider propose this facility. Perform the
procedures described in “PIN code” to change the
PIN2 code.
Note
If an incorrect PIN2 code is entered 3 times in
succession, the SIM card will be blocked
automatically. Perform the procedure described in
“Unlock the blocked SIM card” of “Call Functions”,
but key in the PUK2 code instead of the PUK
code.
The PUK2 code is used to release and change
the blocked PIN2 code. If an incorrect PUK code
is entered 10 times in succession, the SIM card
will be blocked permanently. If the PUK2 code
does not come with your SIM card or you have
lost it, please check with your network service
provider for the code.
Change Barring Code
Change the network access code (password) for call
barring. Check with your network service provider for
the password.
Time&Cost Settings
You may set the handset to provide some certain
calling information.
Calling Display
This option provides information on call durations,
call cost or both, during calls.
Charge Rate
Your handset will display the call cost according to
the number of units, the charge rate per unit, the
currency, and the exchange rate. Please check with
your network service provider for the current rate

Setting 7
42
and currency. The PIN2 code is required for setting.
Cost Limit
You may set the limit of your call cost. The PIN2
code is required for setting.
Short Cut Key
You may set the quick access function to the
four-ways navigation key for effective operation.
1. Scroll to the desired navigation key and press
.
2. Scroll to the required option and press .
3. Return to idle mode, press the key assigned, the
handset will lead you to the required menu
directly.
Irda Settings
This option allows you to transfer the data to your
PC via infrared light. Press to activate the Irda
function.
Note
Don’t point at eyes with infrared ray or interfere with
other infrared equipment. The device is the 1st class
laser light.
1. Ensure that the two infrared devices are put port
to port without barrier between them.The interval
between the two infrared devices is limited to one
meter.
2. The receiver must startup the infrared port.
3. The Irda will be closed if no other infrared devices
are detected in 2 minutes.
4. The IR connection will be closed if you haven’t
begun transmitting data within 2 minutes of the IR
port being opened.
5. The IrDA will be closed if the handset is moved
away from the detectable area in 2 minutes when
the IrDA link has begun.
6. The IrDA will be closed if the handset is moved
away from the detectable area in 16 seconds
during data transmitting.
Note
PC download cable or other types of series cable
will be invalid when the Irda connection is
activated.
.

Setting 7
43
Extras
This option provides additional options to enable the
user to personalize the phone. It may be used to
simplify the handset and includes a calculator and
even offers the possibility of downloading your
favorite melody or wallpaper and playing games.
In idle mode, proceed as follows:
1. Press to enter the main menu.
2. Scroll to “Extras” with .
3. Press to access the menu.
My Collections
You may download any favorite picture or melody
from the web or record audio by yourself.
My Pictures
This menu stores the pictures transmitted via Irda or
downloaded via WAP. Scroll to the desired picture
and press to make the necessary setting with
“Set Wallpaper”, “Delete”, “send mms” or “Send via
Infrared”.
My Melodies
This menu stores the melody transmitted via Irda or
downloaded via WAP. Scroll to the desired melody
and press to make the necessary setting with
“Rename”, “Delete”, “send mms” or “Send via
Infrared”.
Record
All Records
This menu stores all the audio files that have been
recorded and received. Press to listen or
delete the voice record.
New Record
This menu allows you to record a new voice memo.
Follow the prompt on the screen to perform the
recording procedures.
IncomingPortrait
This menu allows you to view the phone lists that
have been set as IncomingPortrait.
JAVA
This menu offers you some interesting 3D games.
JAVA™ List
Offer some enjoyable game for your entertainment.
Scroll to the desired game and press to carry
on the next operation.
Run
Start the game.
Info
View the information about the game.
Remove
You can remove the JAVA™ games downloaded via
WAP except the embedded JAVA™ game in your
handset.
Memory Status
You can check the amount of memory available for
JAVA applications.
Exit
Exit the menu.
Download Settings
Set the appropriate settings of your network
operator or service provider in order to download the
JAVATM games from website.
1. APN Setting: Key in the access point required to
connect to download service.
2. User Name: Key in the name of the user
required to connect to download service.
3. Password: Key in the password to connect to
download service.
4. Http Agent: Select “On” or “Off” to set the http
agent for download service.
Memory State
You can check the amount of memory available for
JAVA applications.
About JAVA™
Display the version information of the JAVA.
Games
This menu offers you some interesting games.
Tank War
1. Press to enter the submenu.
2. Select “ Start Game” to start the game, select
“Game Level” to choose the level of the game,
select “Help” to read the brief help text of the
game.
3. Press , , and to go
up, down, left and right. Press to fire.
RedCap
1. Press to enter the submenu.
2. Select “ Start Game” to start the game, select
“Game Level” to choose the level of the game,
select “Help” to read the brief help text of the
game.
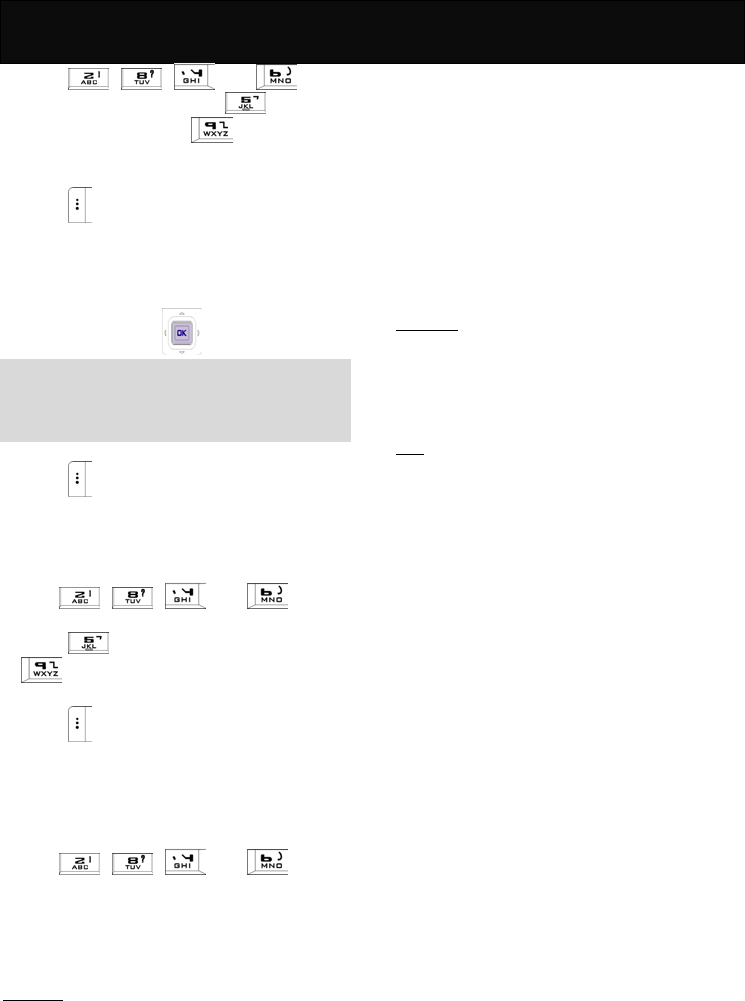
Setting 7
44
3. Press , , and to go
up, down, left and right. Press to confirm
the placement and press to undo the
previous step.
Blackjack
1. Press to enter the submenu.
2. Select “ Start Game” to start the game, select
“Game Level” to choose the number of decks of
cards, select “Help” to read the brief help text of
the game.
3. Chip in a wager with .
Note
In this game, you will play against the handset (i.e.
Dealer). The party who first gains all the chips wins
the game.
Gobang
1. Press to enter the submenu.
2. Select “ Start Game” to start the game, select
“Game Level” to choose the level of the game,
select “Help” to read the brief help text of the
game.
3. Press , , and to
move the chessman up, down, left and right.
Press to place the chessman and press
to undo the previous step.
Elf
1. Press to enter the submenu.
2. Select “ Start Game” to start the game, select
“Game Level” to choose the level of the game,
select “Help” to read the guide of the game, and
select “Highest Score” to check the highest score
of the game.
3. Press , , and to
move the elf up, down, left and right.
Setting
For more enjoyment, you can activate the “Music
Effect” and “Volume Setting” function.
Notebook
This option allows you to manage your schedule
with your mobile phone. You may view the
information of a scheduled event, add new events,
edit or delete the event after selecting the specific
date.
New Notepad
Add a new event.
Select Time
Select the remind time of the event.
Read All Notebook
Check all the events in the notebook.
Delete
Delete the notebook you have selected or all of the
notebooks.
Alarm Melody
Select the ring tone of reminding.
Calculator
You may make simple calculations. Due to the
limitation of accuracy, rounding-off errors may occur
during division. Follow the prompt on the screen to
make a calculation.
STK
This menu is shown only if your SIM card provides
additional services. The name and contents of this
menu depend on the services available.
For availability, rates and information on using the
SIM card service, check with your network service
provider.
.

Easy_Up 8
45
Easy_Up
This option provides you the following message
services: Sms Easy_up, Mms Easy_up, WAP
Easy_up, IVR Easy_up and Help Easy_up.
In idle mode, proceed as follows:
Press to enter the main menu.
1. Scroll to “Easy_Up” with .
2. Press to access the menu.
Sms Easy_up
This menu allows you to access the following
message services: news, fun, sport, stock, English
Class, Absolute wit, Interdynamic game,
Comprehensive scene, The newest trends, and Quit
the subscription.
Mms Easy_up
This menu allows you to access the following
message services: Cartoon, first page picture, chord
ring, pop battle front, news resource, variety living,
boys&girls, update recommendation and canceling
subscription.
WAP Easy_up
This menu allows you to access the following
message services: happy download, color pics,
chord ring, fashion life, chat finder and games.
IVR Easy_up
This menu allows you to access the following
message services: the Garden of Eden, Lovely
message, Pastime zone, net zone, game, telephone
meeting and voice message.
Help Easy_up
This menu allows you to access the help narration.
Note
The availability of functions above depends on
your network service provider.
Please check with the relevant service provider
for the detail information of additional service.
WAP 9
46
WAP
WAP (Wireless Application Protocol) is a global
wireless protocol specification for mobile wireless
terminals. WAP enables you to subscribe to certain
Internet services, for example: banking services,
news, weather forecast, flight schedules etc.
Note
You need to subscribe to the data transmission and
WAP browsing services via your service provider in
order to access WAP services.
In idle mode, proceed as follows:
1. Press to enter the main menu.
2. Scroll to “WAP” with .
3. Press to access the menu.
Basic steps for activating and accessing WAP service
The following section introduces the basic steps for
accessing and browsing the web.
Activation of WAP service
Before using the WAP service, you need to activate
the WAP connection profile first.
1. Scroll to “WAP Settings” with and press
.
2. Select the desired profile with and press
.
3. Scroll to “Activate” and press .
Accessing the WAP service
You may connect to the Web in either of the
following ways.
Accessing via the homepage
1. Scroll to the “WAP” menu and press .
2. Scroll to “Homepage” and press .
Accessing via the bookmark
1. Scroll to the “WAP” menu and press .
2. Scroll to “Bookmarks” and press .
3. Scroll to the desired bookmark and press
.
4. Scroll to “Go” and press to start connection.
Note
If the selected bookmark is not available as desired,
select another profile and perform the procedures
described in “Activation of WAP service” again.
Accessing via navigation
1. Scroll to the “WAP” menu and press .
2. Scroll to “Navigation” and press .
3. Enter the URL of the Website (Use ,
or to key in the special character).
4. Press to link to the web page.
Note
You may skip over the prefix of the URL (i.e.
http://).
Press and hold to return to the idle mode
while browsing the WAP website.
Please check with your network operator for the
WAP settings.
The following section lists the available options in
this menu
Homepage
This option has connectivity with WAP. It connects to
the home page that you have set.
Bookmarks
This option allows you to store up to 5 WAP URLs
as bookmarks in your handset memory.
1. Press to access the menu (check with your
network operator for the availability).
2. Scroll to the desired bookmark and press to
continue the operation with “Go”, “Edit Bookmark”
and “Edit URL”.
Last Page
This takes you directly to the WAP URL that you
connected to last time.

WAP 9
47
Navigation
You may key in the URL that you want to connect to.
WAP Settings
This option allows you to activate the connection
profile you want. Scroll to the required profile and
press to enter the submenu.
Activate
Activate the connection to the WAP service.
Name Edit
Change the name of the connection profile.
Setting Homepage
Enter a URL and set it as a homepage for WAP
connecting.
Security Setting
Avoid the WAP browsing from an unsafe content.
Image Download
Set the display option to image download or text
only while browsing on the web.
Bearer Select
Set the type of the data transmission.
Parameter Setting
Set the parameters for WAP browsing for both the
GSM and GPRS such as IP address, IP port, data
call type, phone number, user name and password.
History
You may check the time of the GSM linkage and the
throughput of the GPRS data flow.
GSM Link
Press to access the following options.
Last Record
Check the visiting time of the last connection.
Total Record
Check the total time of the connection.
Clear Record
Clear the timer record of the connection time.
GPRS Data Flow
Press to access the following options.
Last Record
Check the data flow of the last connection.
Total Record
Check the total data flow of the connection.
Clear Record
Clear the record of the data flow of the GPRS.
Clear Cache
You may clear the buffer memory of the web page
that you have visited before.

Maintenance
48
Maintenance
Your mobile telephone is a radio transceiver, built
with precision electronic parts, and it needs to be
used with care. Observing the following
recommendations may prolong the phone’s life.
Please note the following points:
Keep the phone and its accessories out of the
reach of small children.
Keep it dry. Avoid contact with liquids. Humidity
and liquids contain minerals that corrode
electronic circuits.
Do not expose the phone to an extremely cold
environment, as this will cause a build-up of
moisture within the phone.
Do not expose the phone to extreme heat as high
temperatures will shorten the life of electronic
parts, damage the battery, and cause some
plastic material parts to become deformed or to
melt.
Do not attempt to disassemble the phone.
Non-expert handling of the phone may damage it.
Do not use harsh chemicals, cleaning solvents or
strong detergents to clean the phone. The phone
may be cleaned with a soft cloth slightly
dampened in warm water.
Do not paint or otherwise coat, the phone.
Do not use accessories, such as batteries
designed for other mobile phones, or any other
unapproved accessories. This will damage the
phone, violate the radio equipment regulations
and invalidate your warranty.

Access Codes
49
Access codes
There are several codes required to access the
handset and SIM card. The access codes allow you
to avoid unauthorized use of your phone and SIM
card.
PIN code
The PIN (Personal Identification Number) protects
the card against unauthorized use. This code is
supplied with the SIM card. If the PIN is activated,
the code is requested when the phone is switched
on.
If you enter an incorrect PIN code three times in
succession, the SIM card is blocked; key in the PUK
code.
PIN2 code
This code is supplied with the SIM cards and is
required to access certain functions, such as
accumulated costs. If your SIM card supports those
particular functions, you can activate them in your
handset. If you enter an incorrect PIN2 code three
times in succession, the PIN2 code is blocked and
you will be asked for the PUK2 code.
PUK code
The PUK (Personal Unblocking Key) code is used to
unblock and change the locked PIN code. This code
may be supplied with the SIM card. If this is not the
case, check with your network service provider for
the code. If you enter an incorrect PUK code ten
times in succession, your SIM card will no longer be
valid.
Contact your network service provider to replace the
SIM card.
PUK2 code
The PUK2 code is used to unblock and change the
locked PIN2 code. This code is supplied with the
SIM card. If you enter an incorrect PUK code ten
times in succession, the functions that require PIN2
code in order to be activated will no longer be valid.
Contact your network service provider to replace the
SIM card.

Reference Information
50
Reference Information
EFR encoding decoder function
The J9(GSM/DCS)is equipped with the latest
encoding decoder and audio frequency technology,
to achieve superior audio quality.
At present, there are 3 types of encoding decoder
compatible with GSM/DCS:
yEnhance full rate (EFR)
yFull rate (FR)
yHalf rate (HR)
The J9 (GSM/DCS) mobile phone supports the
normally used EFR and FR encoding decoder.
All GSM and DCS cellular networks and phones
support FR encoding decoder.
If supported by the network operator, the network
operator will automatically select the relevant
encoding decoder, which will be either EFR or FR.
The J9 model is programmed to automatically select
the EFR where this is supported by the network,
allowing you to enjoy the superior audio quality
provided by EFR. Otherwise the phone will select
FR.
At present, only some networks support both the FR
and EFR encoding decoder.
If the network operator cannot support EFR, the J9
(GSM/DCS) mobile phone will automatically adopt
the FR encoding decoder.
Accessories
The accessories for the J9 model (GSM/DCS)
mobile phone include battery, charger etc. Please
refer to “Battery charging” for the battery charging
method.
Battery
At present, the rechargeable battery approved by
the manufacturer is the lithium battery (LI-ION).
The talk time and standby time for a new battery is
about 2–3 hours and 50-150 hours respectively.
When the battery is fully charged, you can have a
continuous talk time for a few hours and standby
time for a few days. The capacity of a battery may
vary depending on the environment, networks, SIM
card or options available.
Charger
This is a lightweight charger compatible with a
multi-voltage supply. Do not connect it to an
incompatible product. It charges the phone battery
rapidly. To start charging, plug the charger into a
power supply and insert the other end into the
charge port at the bottom of your phone.
The required charging time is approximately 5 hours.
The battery charging status can be checked on the
mobile phone display.

Problem Solving
51
Problem Solving
Problem Solving
1. When you switch on your phone, “Insert SIM
card” is displayed
a. Check that the SIM card is correctly installed.
b. Ensure that the gold chip is not damaged or
scratched.
c. Check the SIM card contact. If they are dirty,
clean them with an antistatic cloth.
2. When your phone shows “PIN”, “PIN2”,
“PUK”, “PUK2”, and “Barring code”.
a. Please contact your network service provider
for the numbers.
b. Enter the wrong PIN code three times in
succession, the SIM card will be blocked.
c. For the PUK code, check with your network
service provider.
3. No connection to network.
a. Check the signal strength meter in the display.
If the signal is weak, move to an open space or
move closer to a window and try again.
b. Contact your network service provider for
further details.
4. Your correspondent cannot hear you.
a. Check that the network signal strength is
normal and try again.
b. Check that the microphone is unmuted.
c. Hold the phone closer to your mouth.
5. The battery won’t charge
a. Check that the charger is properly connected.
b. The message “Charging” will only be shown
when you charge the battery with the handset
switched off.
6. You can’t make calls.
a. Check the signal strength meter in the display.
If the signal is weak, move to an open space or,
if you are in a building, move closer to a
window.
b. The network is busy, please try again later.
c. Check whether has the call charge limit been
reached.
7. The battery drains faster than normal.
a. Check whether are you in an area of variable
coverage. This uses extra battery power.
b. Ensure that the using environment is not in
extreme temperatures. At extreme hot or cold
temperatures, battery performance is
significantly reduced.
8. The LI-ION battery was being charged
overnight.
It is strongly recommended not to charge the battery
for more than 24 hours. It may decline the battery
performance or cause damage to the battery.
9. The headset starts beeping.
The signal is weak or out of coverage.

Index
52
Index
A
About JAVA™ 43
Activate 47
Add Audio 33
Add Available Network 41
Add Image 33
Add Known Network 41
Add New 30
Add To Multiparty Call 22
Alarm Melody 44
Alarm Ringer 38
Alarm Volume 38
All Records 43
Another Slide 33
Any Key Answer 39
APN Setting 43
Append Signature 35
Auto Answer 39
Auto Download 35
Auto Search 41
B
Background Color 40
Backlight 40
Backlight Duration 40
Bearer Select 47
Big Head 28
Brightness 40
Broadcast 33
Build Multiparty Call 22
C
Calendar 39
Call Back 32, 33
Call Barring 40
All Incoming Calls 40
All Incoming When Roaming 40
All Outgoing Calls 40
Cancel All 40
Outgoing Int’l 40
Outgoing Int’l. Except Home 40
Call Cost 36
Call Divert 21, 40
Cancel All 40
No Reply 40
No Response 40
Unconditional 40
When Busy 40
Call Records 21
Call Timer 36
Call Waiting 40
Calling Display 42
Capture Mode 28
Change PIN 41

Index
53
Change Barring Code 41
Change PIN2 41
Charge Rate 42
Clear Record 47
Continuous Pictures 27
Copy 30
All 30
Select 30
Cost Limit 42
Create 32
Create Message 33
D
Delete 27, 30, 32, 33, 34, 44
Handset All 30
Select 30
SIM All 30
Delete All 33, 34
Delete Available Network 41
Delete By Album 27
Delete Draftbox 33
Delete Inbox 33, 34
Delete Message 34
Delete Outbox 33, 34
Delete Report 34
Delivery Report 35
Detail 27
Display indicators 26
Draftbox 33
E
Earpiece Volume 39
Edit 27
Effect 28
Emergency calls 4
Empty AllAlbums 27
End Active Call 21
End Active MPTY 22
End All Calls 22
End Held Call 22
End held MPTY 22
F
Factory Settings 39
Fixed Dial List 21
Flash Light 28
Flip Answer 39
Foreground display 39, 40
Forward 34
G
Games 44
Blackjack 44
Elf 44
Gobang 44

Index
54
RedCap 43
Setting 44
Tank War 43
Get Number 32, 33
GPRS Data Flow 47
Group 29
GSM Link 47
H
Hand Free 39
Hand Free 21
Handset To SIM 30
Headset 39
Hold 21
Hold Multiparty Calls 22
Http Agent 43
I
Image Download 47
Inbox 32, 34
Incoming Call Alert 37
IncomingPortrait 43
Info 43
Input Method 39
J
JAVA™ List 43
K
Key Tones 37
Keytone Volume 37
L
Languages 39
Last Call 36
Last Record 47
LCM Open/Close Alert 37
M
Manual Search 41
Melody 29
Memory Manager 27
Memory Status 43
MMS Draft 34
MMS Pending 34
MMS Sent 34
MMS Settings 35
Move 32, 33
MPTY Component 22
Msg Priority 35
Mute 21
My Melodies 43
My Pictures 43

Index
55
N
Name Edit 47
Network 41
Preferred 41
Select Mode 41
Network Register 41
Network Settings 35, 43
New Audio 33
New Notepad 44
New Record 43
New Slide 33
No Display 40
O
Outbox 34
Outbox 32
Own Number Sending 40
P
Parameter Setting 47
Password 43
Phone Book 21
Phone Status 33
Photo Quality 28
PIN Off 41
PIN On 41
Play 34
Power On/Off Alert 37
Power Save 40
Preview Slide 33
Profiles 37
Activate 37
Preference 37
R
Read All Notebook 44
Read Reply Request 35
Record 43
Redial 20
fast and easy 20
via the menu 20
Reject 34
Reject Ads 35
Remove 43
Rename Album 27
Replay 27
Reply 34
Reply 32, 33
Report 34
Retrieve 34
Ringer Volume 37
Ringing Tone 37
Run 43

Index
56
S
Save 32
Save After Send 35
Save Content 34
Save Sender Address 34
Search Name 29
Security Setting 47
Select Delete 33, 34
Select Time 44
Self-Capture 27
Send 32, 34
Send 32, 33
Send DTMF 21
Send SMS 21, 32, 33
Send To Many 32, 33
Send via Infrared 28
Sender Visibility 35
Service Center Number 35
Set Capture Size 28
Set Environment 28
Setting Homepage 47
Show Balance 36
Show List 41
Shutter Sound 28
SIM To Handset 30
Simulate Clock 39
Slide Duration 34
SMS Alert 37
SMS Settings 35
Split MPTY 22
Status Report 35
Swap 21
T
Target Album 28
Text Display 39
Time Setting 38
Timer Snap Sound 28
Total Record 47
U
Unmute 21
User Name 43
V
Validity Period 35
Voice Mailbox 33
W
Wallpaper Setting 39
Main 39
Sub 39
Wallpapers 39
WAP 46
Accessing 46

Index
57
Activation 46
Issue Nov., 2004