Users Manual
SECURITY INFORMATION
Please remember to obey relevant rules and regulations
whenever use your phone. This will prevent bad effect from
you and the environment.
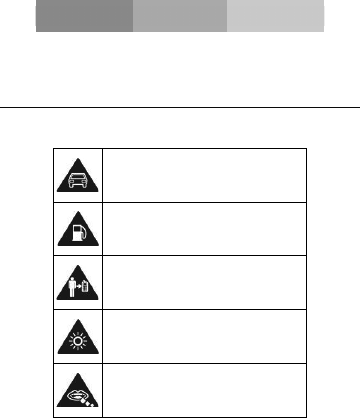
General security
Don’t make or receive handheld calls
while driving. And never text while
driving.
Don’t use at petrol stations.
Keep your phone at least 15 mm away
from your ear or body while making
calls.
Your phone may produce a bright or
flashing light.
Small parts may cause a choking.
EN
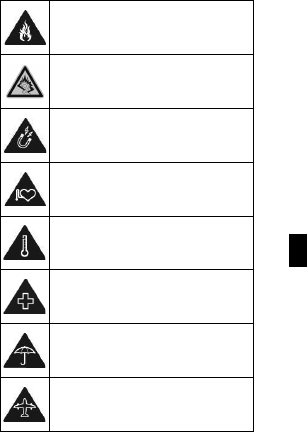
Don’t dispose of your phone in fire.
Your phone can produce a loud sound.
Avoid contact with anything magnetic.
Keep away from pacemakers and other
electronic medical devices.
Avoid extreme temperatures.
Switch off when asked to in hospitals
and medical facilities.
Avoid contact with liquids. Keep your
phone dry.
Switch off when told to in aircrafts and
airports.
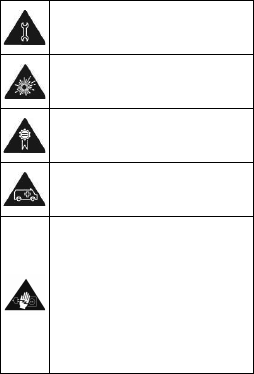
Don’t take your phone apart.
Switch off when near explosive
materials or liquids.
Only use approved accessories.
Don’t rely on your phone for emergency
communications.
Warning electrical hazard!
To avoid serious injury do not touch
charger pins.
Unplug the charger when not in use.
To unplug a charger or an accessory,
hold and pull the plug, not the cord.
The power adaptor is the switch off
device of the equipment. The wall power
socket should be located near the
equipment and easily accessible.

EN
Look at the adapter regularly, specifically at the
plug and the layer to detect any damages. If the
adapter is damaged, you can’t use it until it’s fixed.
Plug in the adapter to a power outlet which is
easily accessible. Always unplug the adapter after
using it.
Use only the adapter provided with the device.
Do not expose your device to direct sunlight, like
on your car’s dashboard, for example.
In case of overheating do not use the device.
Be careful when using the device while walking.
Do not subject the device to severe impact or drop
it from high position, it could cause damages or
malfunctions.
Do not disassemble, modify or fix the device by
yourself.
To clean the device use a clean and soft rag.
Do not use any chemical product or detergent.

INTRODUCING YOUR MOBILE PHONE
Learn about your mobile phone’s layout, keys, display and
icons.
Unpacking
Check the product box for the following items:
xMobile phone
xBattery
xTravel adapter (charger)
xUser manual
The supplied accessories perform best for your phone.

EN
Phone layout
From the front view of your phone you will observe the
following elements:
From the back view of your phone you will observe the
following elements:

Keys
The following table offers you a quick description about the
phone’s keys:
Key Function
Function Perform the action indicated in the
bottom of the screen.
Navigation In standby mode, you can access the
user-defined functions, in menu mode,
scroll through menu options.
Central
Button
In standby mode, press and hold the
button to turn on the flashlight, in menu
mode, select the highlighted menu
option or confirm an action.
Call Open the list of recent calls or make a
call to the displayed number. You can
answer an incoming call.
Hang up Ends a call or reject an incoming call.
Hold down for 3 seconds to turn on / off
the phone.
1……0 Enter numbers, text and / or special
characters.
EN
Screen
The screen of your mobile phone is designed as follows:
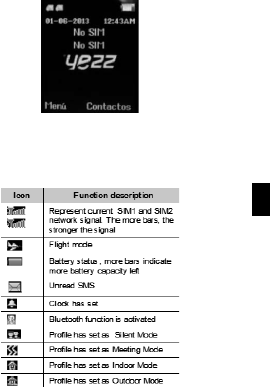
Icons
Learn about the icons that are displayed on the top of the
screen, indicating the status of the phone:
PREPARING YOUR MOBILE PHONE
Get started setting up your mobile phone for its first use.
Install the SIM card and battery
When you subscribe to a cellular service, you will receive a
Subscriber Identity Module (SIM) card, with subscription
details, such as your personal identification number (PIN) and
optional services.
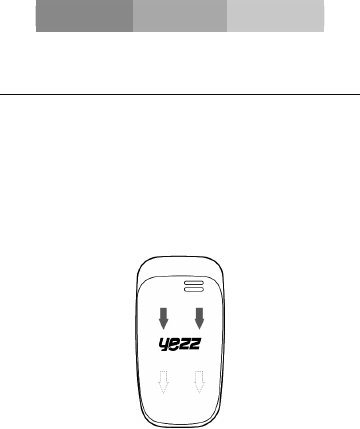
To install the SIM card and battery,
1. Remove the battery cover.

EN
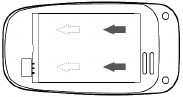
2. Insert the SIM card.
Your phone has 2 SIM card slots to allow you use 2 SIM
cards and switch between them.
xPlace the SIM card in the phone with the gold-colored
contacts facing down.
xWithout inserting a SIM card, you can use your phone’s
non-network services and some menus.
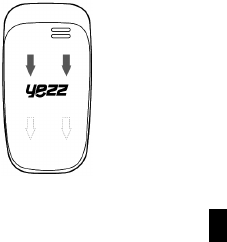
3. Insert the battery.
4. Replace the battery cover
Insert a memory card (optional)
To store additional multimedia files, you must insert a
memory card.
Your phone accepts memory cards up to 32 GB (depending
on memory card manufacturer and type).
xFormatting the memory card on a PC may cause
incompatibility with your phone. Format the memory
card only on the phone.
EN
1. Remove the battery cover.
2. Insert a memory holder with the label side facing up.

USING BASIC FUNCTIONS
Learn how to perform basic operations of your mobile phone.
Turn your phone on and off
To turn your phone on,
1. Long press the power button [ ].
2. Type in your PIN number and press OK (if it is needed).
To shut down your phone, go to step 1 above.
Access menus and applications
To get access to the Menu and Applications,
To access your phone’s menus,
1. In Idle mode, press the left soft key < Menu > to access
Menu mode.
2. Use the Navigation key to scroll to a menu or option.
3. Press < Select>, < OK>, or the Confirm key to confirm the
highlighted option.
4. Press <Back> to move up one level; Press [ ] to return
to Idle mode.

EN
Use basic call functions
Learn to make or answer calls in this section
Make a call:
1. In Idle mode, enter an area code and a phone number.
2. Press [ ] to dial the number.
3. To end the call, press [ ].
Answer a call:
1. When a call comes in, press [ ].
2. To end the call, press [ ].
Send and view messages
In this section, learn to send and view text (SMS).
To send a text message:
,Q0HQXPRGHVHOHFW0HVVDJHVĺ&UHDWHQHZmessage
ĺ0HVVDJH
2. Enter a destination number and scroll down.
3. Enter your message text.
43UHVV2SWLRQV!ĺ6HQGWRVHQGWKHPHVVDJH

Add contacts
Learn the basics of using the phonebook feature.
Add a new contact:
1. In Idle mode, enter a phone number and press <Options>.
6HOHFW6DYHĺDPHPRU\ORFDWLRQSKRQH6,0RU6,0
ĺ1HZ
3. Select a number type (if necessary).
4. Enter contact information.
3UHVV2SWLRQV!ĺ6DYHWRDGGWKHFRQWDFWWRPHPRU\
Find a contact
1. In Menu mode, select Phonebook.
2. Enter the first few letters of the name you want to find.
3. Select the contact’s name from the search list.
Once you have found a contact, you can call the contact by
pressing [ ]
Listen to music
Learn how to listen to music via the music player or FM radio.
Listen to the FM radio:
1. Plug the supplied headset into the phone’s multifunction

EN
jack.
2. In Menu mode, select FM radio.
3. Press the Confirm key to start the radio.
4. Control the FM radio using the following keys:
Key Function
NAVIGATION In standby mode, you can access
the user-defined functions, In Menu
mode, scroll through menu options.
Listen to music files:
After transferring music files to the “My Music” folder of your
phone or memory card,
,Q0HQXPRGHVHOHFW0XOWLPHGLDĺ$XGLR3OD\HU
6HOHFWDPXVLFFDWHJRU\ĺDPXVLFILOH
3. Control playback using the following keys:
Key Function
NAVIGATION In standby mode, you can access
the user-defined functions, In Menu
mode, scroll through menu options.

Using the flashlight
To turn on or off the flashlight, press and keep pressing the
center button for about 3 seconds.
Browse the web
Learn to access your favorite web pages.
Browse web pages:
,Q0HQXPRGHVHOHFW%URZVHUĺ+RPHĺD6,0FDUGLI
necessary) to launch your service provider’s homepage.
2. Navigate web pages using the following keys:
Key Function
NAVIGATION In standby mode, you can access
the user-defined functions, In Menu
mode, scroll through menu options.

EN
USING THE CAMERA
Learn the basics to capture and view photos.
Capture photos
1. In Menu mode, select Camera to turn on the camera.
2. Aim the lens at the subject and make any adjustments.
3. Press the Confirm key to take a photo.
The photo is saved automatically.
4. Press < Back> to take another photo (step 2).
View taken photos
Press the left soft key then choose Photos to access to the
photos gallery quickly.
Camera options
Entering in the Camera options you will be able to configure
the following options:
Camera settings:
Select a shutter sound every time you take a picture.
Change the exposure value to adjust the photo brightness.
Change the Anti-flicker value to eliminate the fluorescent
effect on the photos.
Adjust the contrast to differentiate dark and light areas.
Modify the delay timer to take self-photos.
Change the continuous shot number to take a series of
photos.
Image settings:
You can change the image size.
You can adjust the image quality.
White balance:
Chose a color scheme according to the ambient.
Scene mode:
Allow you to select the night mode (extra light) or let the
phone to choose the best mode.
Effect settings:
Add a color effect to the photos taken.
Storage:
Let you choose where to store the photos taken.

EN
CONNECTING TO INTERNET
Learn the basics to configure your phone and connect to
Internet.
Add a new connection
,Q 0HQX PRGH VHOHFW 6HWWLQJV ĺ &RQQHFWLYLW\ ĺ 'DWD
account.
2. Press < Options > then Add Data account.
3. Set the parameters according to your carrier.
The basic parameters are:
xAccount name
xAPN
xUsername
xPassword
xSIM selection (if necessary)
Some carriers use Proxy Servers, refer to your carrier
configuration for more information.
4. Once the needed parameters are set, press < OK > and
confirm the new connection pressing < Yes >.
To use the connection as default, press < Options > then
Change default.
To add another connection, repeat all the steps.
Configure the browser
Once the connection is added, you need to configure the
Internet browser:
,Q 0HQX PRGH VHOHFW 6HUYLFHV ĺ ,QWHUQHW VHUYLFH ĺ
6HWWLQJVĺ'DWDDFFRXQWVHOHFWWKH6,0FDUGLIQHFHVVDU\
and choose the connection created in the previous step.
Switch between carriers
(SIM cards)
If you use multiple SIM cards and want to switch to another
one, follow this steps:
1. Configure the connection for both SIM cards (refer to “Add
a new connection”).
,Q 0HQX PRGH VHOHFW 6HUYLFHV ĺ ,QWHUQHW VHUYLFH ĺ
6HWWLQJV ĺ 6HOHFW SURILOH DQG FKRRVH 6,0 RU 6,0
according your necessities.
Is possible to select Always ask, then the browser will ask
which SIM you want to use before start the Internet session.

EN
USING THE BLUETOOTH
Learn about your phone’s ability to connect to other wireless
devices for exchanging data.
Turn on the Bluetooth wireless feature
,Q 0HQX PRGH VHOHFW 6HWWLQJV ĺ &RQQHFWLYLW\ ĺ
Bluetooth.
2. Select the option Power.
3. Press the left soft key to turn it On.
4. To allow other devices to locate your phone, scroll down to
Visibility and press the left soft key to turn it On.
Find and pair with other Bluetooth enabled devices
,Q 0HQX PRGH VHOHFW 6HWWLQJV ĺ &RQQHFWLYLW\ ĺ
%OXHWRRWKĺ0\GHYLFHĺ6HDUFKQHZGHYLFH
2. Scroll to a device and press < Select>.
3. Enter a PIN for the Bluetooth wireless feature or the other
device’s Bluetooth PIN, if it has one, and press <OK>.
When the owner of the other device enters the same code or
accepts the connection, pairing is complete.
Send data using the Bluetooth wireless feature
1. Select the file or item from one of your phone’s
applications that you want to send.
3UHVV2SWLRQV!ĺ6HQGĺ9LD%OXHWRRWKĺSelect the
device name then accept the file on the receiver.
Receive data using the Bluetooth wireless feature
1. Enter or accept the PIN for the Bluetooth wireless feature
and press < OK> (if necessary).
2. Press < Yes> to confirm that you are willing to receive data
from the device (if necessary).
Change the Bluetooth device name
,Q 0HQX PRGH VHOHFW 6HWWLQJV ĺ &RQQHFWLYLW\ ĺ
%OXHWRRWKĺ0\QDPH
:ULWHWKHQDPH\RXGHVLUHWKHQSUHVV2SWLRQVĺ'RQH
Choose the storage location
1. In Menu mode VHOHFW 6HWWLQJV ĺ &RQQHFWLYLW\ ĺ
%OXHWRRWKĺ$GYDQFHGĺ6WRUDJH
2. Select Memory card if your phone have one inserted,
otherwise select Phone.
EN
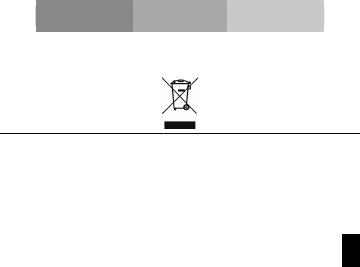
EU WEEE
Information to consumers in application of EU WEEE.
This product is subject to European Union regulations that
promote the re-use and recycling of used electrical and
electronic equipment. This product required the extraction
and use of natural resources and may contain hazardous
substances. The symbol above, on the product or its
packaging, indicates that this product must not be disposed
of with your other household waste. Instead, it is your
responsibility to dispose of your waste equipment by handling
it over to a designated collection point for the recycling of
waste electrical and electronic equipment.
The separate collection and recycling of your waste
equipment at the time of disposal will help to conserve
natural resources and ensure that it is recycled in a manner
that protects human health and the environment.
For more information about where you can drop of your
waste equipment for recycling, please contact your local city
office, your household waste disposal service, or the store
from which you purchased the product.
Recommendations:
xDo not disassemble, open or tear up the device or the
batteries.
xDo not expose the product or the battery to heat or fire.
Avoid storage the device directly to the sunlight.
xDo not short-circuit a battery. Do not stock batteries in a
drawer where it could short-circuit between each other or
get in contact by any other metallic objects.
xDo not cause mechanical shocks to batteries.
xIn case of the leak, do not let the liquid get in contact with
your eyes or skin. If that happens wash with clear water
the affected zone and seek medical advice.
xFollow the marks plus (+) and minus (-) on the battery and
the device and ensure that the use is correct.
xDo not use any accessories or batteries that are not made
to be used with the device.
xMonitor the use of a batteries by children.
xConsult a doctor immediately in case of ingestion of an
element or a battery.
xAlways buy the battery recommended by the manufacturer
of the device.
xAlways maintain the product and the battery clean and
dry.

EN
xWipe the terminals of the product or the battery, if it
became dirty, with a clean and dry rag.
xIt is necessary to charge the battery before its use. Always
use the charger and read the manufacturer instructions or
the manual of the device for the instructions regarding
charging.
xDo not leave a battery charged when it’s not going to be
used.
xAfter long periods of storage, it may be necessary to
charge and discharge the battery several times in order to
achieve maximum performance.
xAlways keep the original documentation of the device, you
might need it later for future reference.
xIf it’s possible, take out the battery of the device when it’s
not used.
xDo not store your device in extremely hot or cold places
like inside of a car during the summer. It might damage
the device and cause explosion of the battery.

FCC
Please take time to read this important section.
FCC Caution
Any Changes or modifications not expressly approved by the
party responsible for compliance could void the user's
authority to operate the equipment.
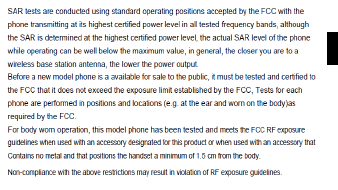
Before a new model phone is a available for sale to the
public, it must be tested and certified to the FCC that it does
not exceed the exposure limit established by the FCC, Tests
for each phone are performed in positions and locations (e.g.
at the ear and worn on the body) as required by the FCC.
This device complies with part 15 of the FCC Rules.
Operation is subject to the following two conditions: (1) This
device may not cause harmful interference, and (2) this
device must accept any interference received, including
interference that may cause undesired operation.
Note: This equipment has been tested and found to comply
with the limits for a Class B digital device, pursuant to part 15
of the FCC Rules. These limits are designed to provide
reasonable protection against harmful interference in a
residential installation.
This equipment generates, uses and can radiate radio
frequency energy and, if not installed and used in accordance
EN
with the instructions, may cause harmful interference to radio
communications. However, there is no guarantee that
interference will not occur in a particular installation. If this
equipment does cause harmful interference to radio or
television reception, which can be determined by turning the
equipment off and on, the user is encouraged to try to correct
the interference by one or more of the following measures:
- Reorient or relocate the receiving antenna.
- Increase the separation between the equipment and
receiver.
- Connect the equipment into an outlet on a circuit different
from that to which the receiver is connected.
- Consult the dealer or an experienced radio/TV technician
for help.