DDM CLASICO2 GSM MOBILE PHONE User Manual WarrantyFirst5Pagest
DDM Brands LLC GSM MOBILE PHONE WarrantyFirst5Pagest
DDM >
User Manual
User manual
1
Contents
INTRODUCTION .............................................................................3
FOR YOUR SAFETY........................................................................3
1ABOUT YOUR PHONE ................................................................4
1.1 APPEARANCE ..........................................................................4
1.2 ICONS ......................................................................................6
2GETTING STARTED ....................................................................7
2.1 THE BATTERY..........................................................................7
2.2 INSTALL / REMOVE BATTERY & SIM CARDS ..........................7
2.3 MEMORY CARD INSTALLATION...............................................9
2.4 CHARGING.............................................................................10
2.5 STORAGE MANAGEMENT .....................................................11
2.6 EARPHONE PLUGGED IN........................................................12
3 BASIC FUNCTION......................................................................13
3.1 POWER ON AND OFF ..............................................................13
3.2 MAKE A DOMESTIC CALL......................................................13
3.3 MAKE AN EXTENSION CALL..................................................13
3.4 MAKE AN INTERNATIONAL CALL..........................................13
3.5 MAKE A CALL FROM CONTACTS ...........................................13
3.6 REDIAL A CALL BY CALL LOGS .............................................14
3.7 ANSWER A CALL....................................................................14
3.8 CALL OPTIONS.......................................................................14
4 CALL LOGS .................................................................................14
4.1 DIALED CALLS ......................................................................15
4.2 RECEIVED CALLS ..................................................................15
4.3 MISSED CALLS ......................................................................15
4.4 REJECTED CALLS ..................................................................15
4.5 DELETE ALL ..........................................................................15
4.6 CALL TIMERS.........................................................................15
4.7 CALL COST ............................................................................15
4.8 GPRS COUNTER ....................................................................15
5 CONTACTS ..................................................................................15
6 INTERNET....................................................................................16
6.1 INPUT URL............................................................................16
6.2 BOOKMARKS.........................................................................16
6.3 HISTORY................................................................................16
User manual
2
6.4 OFFLINE PAGES .....................................................................17
6.5 SETTINGS...............................................................................17
7 MULTIMEDIA .............................................................................17
7.1 CAMERA ................................................................................17
7.2 AUDIO....................................................................................18
7.3 VIDEO....................................................................................18
7.4 FM RADIO .............................................................................19
8 MESSAGES...................................................................................19
8.1 .WRITE MESSAGE ..................................................................19
8.2. INBOX...................................................................................20
8.3. OUTBOX: ..............................................................................21
8.4 DRAFTS .................................................................................21
8.5 SENT ITEMS ...........................................................................21
9 TOOLS...........................................................................................21
9.1 ALAM ....................................................................................21
9.2 BLUETOOTH ..........................................................................21
9.3 CALENDAR ............................................................................22
9.4 CALCULATOR........................................................................22
9.5 RECORDER ............................................................................22
9.6 WORLD CLOCK......................................................................22
9.7 TIMER....................................................................................22
9.8 STK.......................................................................................23
9.9 TORCH ...................................................................................23
10 APPLICATIONS.........................................................................23
10.1 IMAGE .....................................................................................23
10.2 EBOOK.....................................................................................23
10.3 SOKOBAN ...............................................................................23
10.4 FACEBOOK.............................................................................23
10.5 TWITTER ................................................................................23
11 MY FILES....................................................................................23
12 SETTINGS ..................................................................................24
12.1 CALL SETTINGS ...................................................................24
12.2 PHONE SETTINGS ................................................................25
12.3 DISPLAY SETTINGS..............................................................26
12.4 SECURITY............................................................................26
User manual
3
Introduction
Thank you very much for your choice of this product designed by
our company!
Our phone complies with the Telecommunication industries
standards of both the People's Republic of China and Europe.
GSM network is a global cellular communications system of
international standards.
Allow you to receive an international telephone call in your
homeland.
However, before using these advanced network functions, you must
firstly apply for these required services.
In order to use your cell phone better, we suggest you to carefully
read this statement to know all the functions well.
Note: Due to the cellular network settings and the provided services,
some functions may be unavailable, please query local service
providers.
For your safety
Read these simple guidelines. Breaking the rules may be dangerous
or illegal. Further detailed information is given in this manual.
ROAD SAFETY
Always keep your hands free to operate the vehicle while driving.
Park the vehicle before using your phone.
SWITCH OFF IN AIRCRAFT
Using of wireless telephones in aircraft may disrupt the operation of
the aircraft. It is dangerous and illegal. Insure switching off the
phone before going aboard.
SWITCH OFF IN HOSPITALS
Follow any restrictions or rules. Switch off the phone near medical
equipment.
SWITCH OFF WHEN REFUELING
Switch off the phone at a gas station or any fuel or chemicals places.
SWITCH OFF NEAR BLASTING POINT
Don’t use the phone where blasting is in progress. Observe
restrictions and follow any regulations or rules.
User manual
4
INTERFERENCE
All radiotelephones may be susceptible to interference, which could
affect the performance.
USE NORMALLY
Use in the normal position explained in the product documentation.
Don't touch the antenna unnecessarily.
ENHANCEMENTS AND BATTERIES
Use only the approved enhancements and batteries. Do not connect
incompatible products.
EMERGENCY CALLS
Ensure the phone is switched on and in service. Enter the emergency
number, and then press the call key. It will give your location. Do not
end the call until the permission.
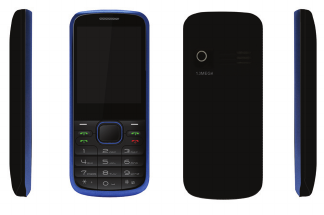
1 About your phone
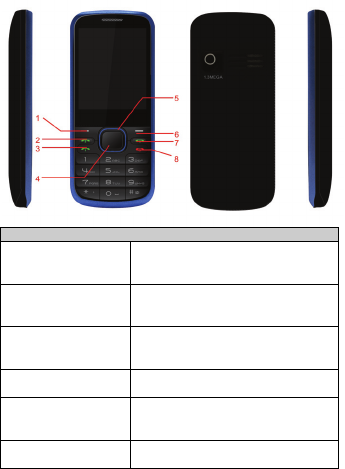
1.1 Appearance
User manual
5
Each button instructions
1.Left soft key
1. Enter into the main menu
2. Confirm function
3. Enter sub menu options
2. SIM 2 dial key
Standby, enter the number dialing.
Standby, press this key can be derived
if records of the SIM 2 cards.
3. SIM 1 dial key
Standby, enter the number dialing.
Standby, press this key can be derived
if records of the SIM 1 cards.
4. OK key Press this button for determination of
the function
5.Up,Down,left,Right
key
The main menu interface
implementation, down, left, right
movement function
6. Right soft key 1.Open phonebook from standby
screen
User manual
6
2. Previous page
3. Input method, the corresponding
delete button
7.SIM 3 dial key
Standby, enter the number dialing.
Standby, press this key can be derived
if records of the SIM 3 cards.
8. End key
End key is used to end a call during
calling or conversation, or to quit the
menu and return to idle screen.
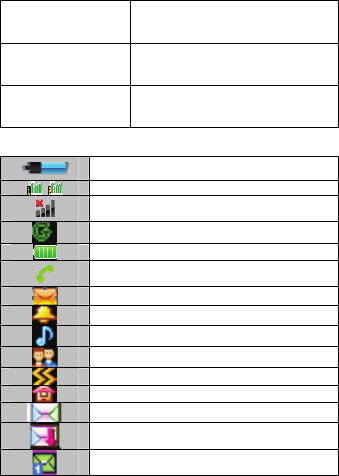
1.2 Icons
Battery charging in progress
Signal strength of SIM1 & SIM2.
Signal not received
GPRS is in use
Battery status
Call in progress
Unread messages
Alarm activated
General mode
Silent mode
Meeting mode
Indoor mode
A new MMS has not read
Download MMS in
New MMS received
User manual
7
MMS full
Bluetooth active
Airplane mode is ON
Earphones conected
2 Getting started
2.1 The Battery
The lithium battery can be charged and discharged hundreds of times.
Please use the approved batteries, and only use the battery charger
approved by the phone producer to charge your battery.
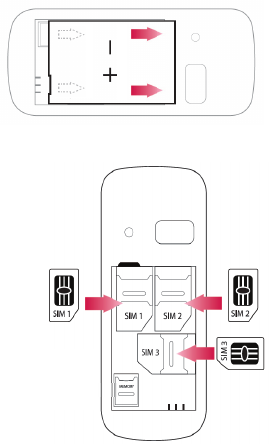
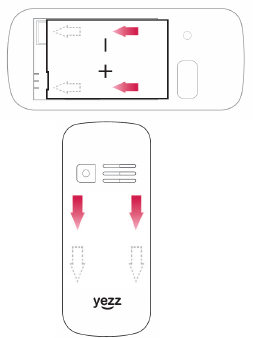
2.2 Install / remove battery & SIM Cards
1. If the battery has been installed, remove it following the direction.
User manual
8
2. As follows, insert SIM 1 or SIM 2 with the angle towards the
bottom right and SIM 3 with angle towards bottom left.
User manual
9
3. As follows, install battery, match battery metal touch point with
mobile phone’s metal touch point.
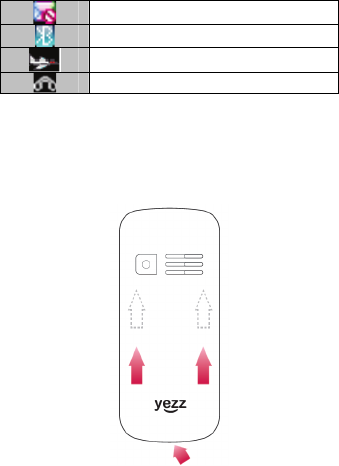
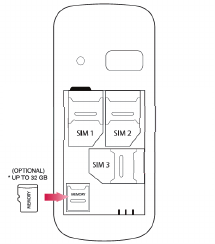
2.3 Memory card installation
Turn off the phone, and take out the battery.Keep the gold color side
of the Memory card downward, and put it inside until it is locked.To
remove the Card, push it inward and it will be popped up
automatically.
User manual
10
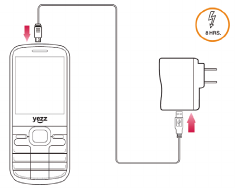
2.4 Charging
Connect the charger to power supply, and then insert the charger pin
into the buttom of side jack.
Note:
1. It is beneficial to the battery to charge it until full at the first three
times.
2. When charging, don’t remove or take out the battery to avoid the
battery circuit to burn out.
3. While charging, it is normal that the phone and charger will
become hot.
4. If the battery is completely empty, it may take a period of time
before the charging icon appears on the display.
User manual
11
2.5 Storage Management
To manage U disk and memory card storage space.
1. Connect to a computer
The USB function of the phone can be activated no matter the phone
is powered on or off.
While being power off, the phone will enter resource manager
directly after the USB cable has plugged in.
While being power on, the phone will enter the window of “USB
Config” after the USB cable has plugged in. Please select “Mass
Storage” item. If the memory card has already been installed, you
will find both U disk and memory card as removable disks on your
PC.
Some folders have already existed. Save the file in corresponding
folder in order to use it normally. For example, Mp3 in Mp3 folder,
Video in Mp4 folder, Photos in Photos folder, Download Pictures in
Images folder, Record in Audio folder, Files received by bluetooth in
Received folder.

User manual
12
After finished the operation, if you want to exit, click the USB icon
on underside-right of computer, select to stop the USB device, and
remove it after the information “USB device can be remove”
appears.
2. Format
If you format the U disk or memory card, all files saved in it will be
lost. By two ways you can format your U disk or Memory card:
Format by phone:
Enter my files—>options —>more—>format phone memory.
Format by computer:
Please complete the format work as following steps.
(1) Right click “My computer”, select “manage”, and enter to select
“storage”—>” Disk manage”
(2) Right click the disk which is corresponding to the memory card,
select
2.6 Earphone plug in
User manual
13
3 Basic Function
3.1 Power on and off
1. Press and hold at of power key to turn on/off the phone.
2. Please input password and press left soft key, if mobilephone need
input password.
3. Type PIN code and press left soft key to confirm,if mobilephone
was required to input PIN code.(PIN is personal identify code,in
order to avoid using SIM illegally,usually PIN code is the same
provided by net carrier as SIM card
Note:
1.Please contact with factory or agent’s service center, if forget
mobilephone open password
2.Delete character ahead of cursor, if type wrong keystrok when
input password
3. Screen indicates type again, if input PIN code wrong. Screen
indicates input PUK code, if type wrong three times. If PUK code
correct, then back to PIN code input interface, can preset new PIN
code (puk CODE as PIN code unlock code, provided by carrier).
Mobilephone will display SIM card will be not used any more, if
type PUK code ten times wrong.
4. Please contact with network carrier or service supplier, if SIM card
inserted corretly, but indicate uninsert SIM card.
5.On standby state, press“right soft keystroke” and “*”keystorke to
lock screen, press “left softkey”firstly and press Right Softkey to
release lock.
3.2 Make a domestic call
Enter the phone number including the area code. Press dial key to
make a call.
3.3 Make an extension call
When making an extension call, press and hold “*” key to get “P”
that is a prefix of extension numbers.
3.4 Make an international call
Enter the country code, the area code and the phone number, press
dial key. “+” is needed when input country code, and it can be got
by pressing and holding “0” key.
3.5 Make a call from contacts
Enter contacts, select the phone number, and then press dial key to
User manual
14
make a call.
3.6 Redial a call by call logs
In standby mode, press the Dialing key to find the recent call lists,
scroll to the number or name, then press dial key.
3.7 Answer a call
An incoming call window will be displayed as the phone receives a
call. The number will appear on the window if you have opened this
function. If this number is not saved in the phonebook , the call’s
district number will show it on the window。
Press left soft key or dial key to answer it. Press right soft key can set
to silence。
If an incoming call arrived during your operation in sub window, a
new window will be popped to inform you and your any operation
will be broken. If you missed a call, a missed call log will appear
after you return to the start screen.
3.8 Call options
During a call, press Left soft key to enter call options or press right
soft key to open or close hand free function. And the options content
is changeable according to your call status. The functions of Call
Waiting, Call Hold need the support of net work.
4 Call logs
It also can keep such records as 20 Dialed calls, 20 Received calls
and 20 Missed calls. The first two items can be check in it when
mobile phone work normal and network service supported.
1. Missed calls, answered and dialed phone can be viewed seperately
in on-phone record.
2. Menu phone record including:
--details: Check telephone details
--call: you can use the left-soft key to call.
--save: Keep contact number
--send SMS: you can send an SMS to selected number.
--add to existed contacts: Will join existing contact number in the
record
--add to blacklist: Will join contact list
--delete: you can choose yes or no to delete it.
--delete all: delete all call records
User manual
15
4.1 Dialed calls
You can check recent 20 dialed calls via this menu. Futhermore, you
also can view each phone NO you dialed, exactly your diaed date and
times.
4.2 Received calls
You can check recent 20 received calls via this menu. Futhermore,
you also can view each phone you answered, exactly on-phone date
and times.
4.3 Missed calls
You can check recent 20 missed calls via this menu. Futhermore, you
also can view each phone NO and date, even save or delete from the
phone book.
4.4 Rejected calls
Will a number to join the blacklist, the other party calls, and can
realize refused to function.
4.5 Delete all
You can delete unanswered, answered and dialed phone record
seperately. Also you can delete all record from this menu.
4.6 Call timers
You can check total time and the last call time (dialed phone and
answered phone).
1. Last call: last call time.
2. Total time of dialed calls
3. Total time of received calls
Note: all these data are for reference only.
4.7 Call cost
You can view total cost, max cost and set price per unit or reset cost.
4.8 GPRS counter
It adapt for keeping the quantity on GPRS which includes sending
and receiving information.
5 Contacts
The phone provides two kinds of storage media: SIM card and phone.
The capacity of the phone book on your SIM card depends on the
type of SIM card provided by your network operator.
Enter a number in idle screen and press the OK key to save the
number. Select the storage location. Then the edit interface appears.
If To SIM1 or
User manual
16
SIM2 or To SIM3 is selected, you need to edit the name and number.
If To phone is selected, you need to edit the items that you set in the
settings of phone book, including the name, number, home number,
email, caller picture, caller ringtone ,caller group and SIM selection.
In idle screen, press the right soft key mention in NAMES to directly
access the phone book.
The phone book allows quick search through it. Input what you want
to search, Enter the first letter to the black blank, Then all the records
starting with such letter are displayed.
Add new contact: This option is at top in the phonebook. You can
add a new phone number to SIM1, SIM2,SIM 3 or phone.
View: View the detailed information of the record.
Send text message: Send text message after selecting a designated
number.
Call: Make a call of the current phone number.
Edit: Edit the options included in a phone book record.
Delete: Delete the record.
Copy: Copy the record from the current storage to the other storage.
6 Internet
The Internet is a combination between wireless Internet
communication and application platform. You can get information
resources and e-commerce applications on the internet.
Note: 1. Your Internet service provider may not support some
functions. In order to guarantee the normal operation of the browser
line, please confirm your SIM card which can support the Internet
and opens up the function.
2. If you want to browse the web, relevant traffic expenses will be
charged.
6.1 Input URL
Input web page address.
6.2 Bookmarks
You can edit the bookmark on your own way.Set specific operation
as follows: add new bookmarks->choose add new bookmark->enter
the new bookmark address-> enter a name to save.
6.3 History
Record the web addresses you have visited.

User manual
17
6.4 Offline pages
Record the web addresses your have saved.
6.5 Settings
If the network support this function, the phone is configured
automatically. The phone can connect to the designated network
automatically or to a roaming network when you are outside the
coverage of your regular network. You can manually select the local
network system beyond regular network.
Account settings
SIM1 Internet account: SIM1 browser port information set.
SIM2 Internet account: SIM2 browser port information set.
Homepage Setup
Set the home page type: under the launch of the function, you can
choose the homepage for the default and custom types.
Custom home page: according to the function, you can set the
custom home page.
Content settings
Download image: turn on the function, the download page image can
be shown.
Font size: you can set the font size of interface.
Restore default settings
7 Multimedia
7.1 Camera
Choose menu "camera" to enter. You may adjust camera lens and fix
someone, press "photo key" to capture the image. The percentage on
the screen indicate the rest of memory capacity.
1. Camera function options:
1) Shoot mode: To realize the camera & camera mutual switching
function
2) Size:you can freely set image size (1600x1200, 1280x960,
640x480, 320x240, 176x220,) and image quality (advanced, common,
low). Generally the higher pixel resolution set, the better image
quality would be.
3) Night mode: better quality with low light
4) Brightness: Increase or decrease brightness
5) Contrast: Increase or decrease the contrast
6) Exposure: Increase or reduce exposure compensation
SIM3 Internet account: SIM3 browser port information set.
User manual
18
7) Frame: Add a frame to the photo taken
8) Cont.shot: Capture three continuous photos
9) White balance: Including auto, incandescence, fluorescent,
daylight and cloudy.
10)Delay:Delay 3 seconds or 10 seconds taking pictures
11) Effect: Allow to choose six different photo effects.
7.2 Audio
Audio player allows you to play mp3 audio files by making playlist.
The music file will be added to the current playlist.
1. Now Playing: To play songs from preloaded list.
Play: Play the music files.
Move up: To move the selected song up in the playlist
Move down: To move the selected song down in the playlist
Send: Send the selected song via Bluetooth to others.
Use as: To use the selected song as ringtone and alarm ringtone.
Add: Add new songs to the playlist
Remove: Remove selected song from the playlist
Details: Check the details of music files.
1. Player Settings include Repeat, Shuffle
2. Settings:
1) Display Settings include Skin, Normal& Spectrum display
2) Equalizer Settings include Regular, Classic, Odeum, Jazz, Rock,
& Soft rock
2. My Playlists: To make the new play list. Following options are
available for the selected playlist.
New Playlist: To make a new playlist
Rename: To change the name of existing playlist
Delete: To delete the selected playlist
Delete all: To delete all the playlists
Storage: To select the storage location for the playlist
7.3 Video
Video player allows you to browse or process video recording files.
Select Video Player submenu to access movie list and you can access
“Option” for the following operations:
--Play list: Open the current play list
--Fullscreen play: Full screen video files
--Order play: Open or closed cycle play function

User manual
19
--Video application: Set as screensaver, power on animation, power
off animation.
--File attribute: Check file attributes
Select Video Play list submenu to access movie list and you can
access “Option” for the following operations:
--Play: Select a video file play
--Add video: Add a video to the current play list
--Search all videos: Search all video files
--Delete from list: From the list deletes one or more video files
--File attribute: Check file attributes
--Set as: Set as screensaver, power on animation, power off
animation.
--Mark/unmak: Mark or cancel mark one or more video files
7.4 FM radio
This option allows you to listen to FM radio. You have to plug in the
headset to listen radio.
Auto search and save: Automatic search channel and store it.
Channel list: Edit channel list.
Save: Choose channel name to save it
Manual search: Manual input a channel to search in
Open speaker: Open/close the put function
Background play: Allow to reproduce FM Radio while you do other
tasks.
Record: Perform audio recording FM radio.
Record file list: Display the recording documents.
8 Messages
8.1 .Write message
1)Character message
Enter into input interface, press left soft key to confirm choose
send/save, and then finish the input.
--send: send the message to the selected number
--insert template: Insert common phrases
--Add contact info:Insert the name from phone list
--save: save the message in the draft box
Note: The message center will display “send” when you send
message by net service, which express the message have sent to the
SIM card inner message center, but not express that the message
User manual
20
have reached the destination. Please consult to the network carrier for
more details information about the message service.
2)Multimedia message:
Multimedia message’s characteristic is support multimedia function,
can transfer file, image, voice, and other various kinds of multimedia
format message. Please confirm SIM card support this service or not
from your network carrier service center.
Edit operation for multimedia message content as following:
--Complete:Select the finish option after complete the edition. You
can press the left soft key to enter in the edition interface again.
--Input method:Choose input method, input information refer to
“input method” part
--Add picture:Insert picture to message from management file.
--Add audio:Insert voice to message from management file
--Add video: Insert video to message from management file
--Add attachment: Insert attachment to message from management
fil.
--Add bookmark text: Insert new bookmark homepage from WAP
bookmark.
--preview:Preview the edited multimedia message.
--Setting:Edit alternation time, character, SMIL
After complete edit multimedia message, press left soft keystroke as
following:
--send: send the edited multimedia messge to reciever
--save and send: save and send the multimedia message to the
reciever
--save to draft: save the edited multimedia message to draft box
--save as template: edit multimedia save as template.
--send options: set the related parameter of the multimedia message
--read confirmation: optional for open or close.
--priority: optional for “normal” “high” “low”
8. 2 Inbox
The inbox message’s icon will show if you have unread messages.
Press left soft keystroke to enter message option list.
--reply: reply to sender;
--forward: forward direct to others’ or forward after edit.
--edit: edit choosed information
User manual
21
--delete: delete choosed information and press left soft keystroke to
confirm.
--delete all: delete inbox’s all information.
--copy to phone: copy the message to the phone
--move to the phone: moves the information to the phone
--copy all message: copy all message
--move all messages: move all messages
8.3 Outbox:
The message will be store in draft box automatically when it fail to
send.
Information list option including following items:
--send: sen the message to the destination
--edit: send the message directly or after re-edit
--delete: delete choosed information, press left soft keystroke, and
choose “yes” or “not”
--delete all: delete all messages
--use connects: connect the information’s website
--advance rank option: (including following content)
--copy to phone: copy the message to the phone
--move to the phone: moves the information to the phone
--copy all message: copy all message
--move all messages: move all messages
8.4 Drafts
The messages unprepared for sending are stored in the Draft, waiting
to be modified and sent.
8.5 Sent items
Save the successful text message
9 Tools
9.1 Alam
User can set three types of alarm clock time if required. Then the
alarm icon will be displayed on the idle screen.
Scroll to an alarm and select Edit for settings. You can set whether to
enable the alarm, message, time, ringtone, snooze minutes and alert
type.
9.2 Bluetooth
Power : Allow you to switch on/off Bluetooth.
Inquiry audio device: Allow you to find all other Bluetooth
User manual
22
hands-free devices within the allowable scope of Bluetooth, and list
all items; You can connect and match the hands-free device in the list
(the Bluetooth connection icon would appear in the status column on
the top of screen).
Remote control:the device can control the pc to play music and
video etc.
My Device: It would display the history records of various devices
connected to the Bluetooth for the following operations of the
devices in the records:
Active device: To display the devices and services in connected and
disconnect them.
Settings: Allow you to make the following operations: this cell phone
may be searched; Device names of this phone; Authentication; File
transmission setting.
About: display the device name, Bluetooth address and services
supported by the device.
9.3 Calendar
You can enter events in the calendar. In the calendar interface, press
the up, down, the left and right direction keys to scroll to different
days.
Go to date: Enter a specific date to be located and the cursor will
jump to the date quickly.
Weekly: According to the week show calendar trip
9.4 Calculator
You can calculate the mathematical calculation using calculator.
1. Enter the amount to be calculated.
2. Use navigation keys to operate and OK key to get the result.
9.5 Recorder
User can use mobile phone a microphone and stored in recording in
cell phones.
9.6 World clock
User can check the current local date and time of major cities in the
world.
9.7 Timer
Enter the function list and select Countdown timer.
1. Select Countdown timer
2. Select Start button to start the timer.

User manual
23
3. Press Exit to close the warning tone when the timer stops.
9.8 STK
In addition to the functions available on the phone, your SIM card
may provide additional services that you can access in this menu. It
is shown only if it is supported by your SIM card. The name and
contents of the menu depends on the available services
9.9 Torch
In the menu, you can choose to open or close the flashlight function
10 Applications
10.1 Image
Pictures can be accessed quickly in Image viewer. Select Options for
available options while viewing pictures.
Change folder: You can choose the phone internal memory or the
external memory card.
Delete: Delete the picture.
Set image as wallpaper: Put the pictures set to standby wallpaper
10.2 eBook
You can read TXT format file. While reading, press “Option” for
options like Find, Jump to, Go to bookmark, Add bookmark etc.
10.3 Sokoban
Following is a detailed game operation instruction:
1. Right the direction key: press the right button move to the right
box or press 6to move right
2.Left the direction key: press the left button move to the left box or
press 4to move left
3.Up key: press the up key move up the box or press 2 to move up
4.Down key:press the down key move down the box or press 8 to
move down
5.# key:press # to revoke
10.4 Facebook
Access to the social network Facebook
10.5 Twitter
Access to the social network Twitter.
11 My files
It provides you the functions such as browsing media files, checking
storage space and formatting function.
When browsing the media files, you can operate the selected files
User manual
24
such as view, rename, copy, move, delete etc.
12 Settings
12.1 Call settings
12.1.1 Multi- SIM
Set Three SIM open, SIM1 open, SIM2 open. SIM3 open
When you are on a flight where the use of mobile phones is
prohibited, select flight mode so that the phone will not connect to
any network. However, alarm and calendar reminder will remain on.
You can still use the entertainment features such as audio player and
camera in flight mode.
Warning: In specific areas where the use of phone is prohibited (such
as in aero planes), please remember to disable the automatic
switch-on function before entering the areas to prevent unexpected
accidents.
12.1.2 Network selection
Use the default setting provided by the network operator.
You may not be able to make calls if you have selected other network
manually.
12.1.3 Call divert
You can specify the conditions under which calls should be diverted
to your voice mail box or another number.
Divert all voice calls: All calls are diverted.
Divert if unreachable: A call is diverted if the phone is switched off
or is out of range.
Divert if no answer: A call is diverted if not answered.
Divert if busy: A call is diverted if another call is in progress.
Divert all data calls: All data calls are diverted.
Cancel all divert: Cancel all call diverts settings.
12.1.4 Call barred
Restrict the dialing or receiving of certain calls. To activate or cancel
call barring, you have to enter the network password provided by
your network operator.
Outgoing calls: If all calls are activated, no calls can be made.
Incoming calls: If all calls are activated, no calls can be received.
When roaming is activated, you may not receive calls outside your
home network.
Active all: Allow you to activate all call barring services by inputting

User manual
25
your password.
Cancel all: Cancel all restrictions to calls. Password from your
network operator is required.
Change barring password: Change barring password. The original
barring password is required.
12.1.5 Call waiting
--Activate: If activated, an incoming call is signaled by a call
waiting tone when you are on another call. The number/name of the
incoming call is displayed.
--Off: Cancel the call waiting function.
--Query status: Inquire the current status from the network.
12.1.6 Select line
This function is supported by operator to switch to Line 1 or Line 2.
12.1.7 Flight mode
Open or closed Flight mode
12.1.8 Others
50 secs warning: During a phone you will be prompted to 50
seconds
Answer/Reject mode:
1) Reply SMS after reject: choose reject call, and then select to reply
with message.
2) Any key answer: Choose to answer calls using any keys.
Auto redial: Once activated, the phone will automatically redial, if
there is no answer for a number you have dialed.
12.2 Phone Settings
12.2.1 Time and date
Set time:Set your time.
Set data: Set the current date
Time format: Format for the time.
Date display type: Set on display type
12.2.2 Select language
Select the language for your handset. You choose: [Espanol],
[English], [Portugues], [Francais] and [Nederlands].
12.2.3 Shortcut settings
Set all shortcut keys
12.2.4 Autopower on/off
Set time to power on/off the phone automatically.

User manual
26
12.2.5 Power management
You can view battery status .
12.2.6 Restore factory settings
Reset the phone to default values (factory settings).
The phone password is required, which is "1234" by default.
12.3 Display settings
--Wallpaper settings: Set the standby image of the phone.
--Switch system: There are two main menu display forms for you to
choose.
-- Idle display setting: Set standby interface time & date, service
provider, today’s schedule, customized word display
--Screen saver settings: Set Screen saver
--Contrast: Set the backlight brightness.
--Backlight: Set the backlight brightness.
--Keypad backlight time: Set the Keypad backlight time
--Animation effect: Set power on display and power off display.
12.4 Security
The phone provides several security options to protect your phone
from misuse.
1. PIN
Enable: enable PIN code, every time you turn on the cellular phone,
you will need to input PIN code.
Change: allow you to change the PIN code. You must know the
actual PIN code to change it.
Disable: allow you to disable the PIN code.
2. PIN2:
PIN2 (PersonalIdentificationNumber2) code is used in some special
functions (such as in setting fixed number, setting calls billing, etc).
3. Privacy
Using the password protection, you can lock phone specific functions
in order to prevent unauthorized use. When the functions are
password enabled, you must enter the correct password to use them,
default "1234".
4. Auto keypad lock
Keypad lock prevents the inadvertent phone usage. However, you
can still be called and you can make emergency calls.
5. Power-on password
User manual
27
If the phone lock is activated, the phone lock password is requested
after the phone switched on. The default password is "1234". If the
phone is locked, only emergency calls can be made.
12.5 Profiles
Profiles define how your phone reacts when you receive a call or a
message, how your keypad sounds when you press a key, and more.
Each of the available profiles can be left at their default setting or
customized to suit your needs. Select and customize the most suitable
profile for your situation. The available modes are Normal, Silent,
Meeting, Indoor, Outdoor, Headset.
12.6 Connections
Account settings
SIM1 network account: SIM1 browser port information set.
SIM2 network account: SIM2 browser port information set.
This device complies with part 15 of the FCC Rules. Operation is
subject to the following two conditions: (1) This device may not
cause harmful interference, and (2) this device must accept any
interference received, including interference that may causeundesired
operation.Any Changes or modifications not expressly approved by
the party responsible for compliance could void the user's authority
to operate the equipment.
Note: This equipment has been tested and found to comply with the
limits for a Class Bdigital device, pursuant to part 15 of the FCC
Rules. These limits are designed to provide reasonable protection
against harmful interference in a residential installation. This
equipment generates uses and can radiate radio frequency energy and,
if not installed and used in accordance with the instructions, may
cause harmful interference to radio communications. However, there
is no guarantee that interference will not occur in a particular
installation. If this equipment does cause harmful interference to
radio or television reception, which can be determined by turning the
equipment off and on, the user is encouraged to try to correct the
interference by one or more of the following measures:
-Reorient or relocate the receiving antenna.
-Increase the separation between the equipment and receiver.
-Connect the equipment into an outlet on a circuit different from that
to which the receiver is connected.
User manual
28
-Consult the dealer or an experienced radio technician for help.
Specific Absorption Rate (SAR) information:
This wireless phone meets the government's requirements for
exposure to radio waves. The guidelines are based on standards that
were developed by independent scientific organizations through
periodic and thorough evaluation of scientific studies. The standards
include a substantial safety margin designed to assure the safety of
allpersons regardless of age or health.FCC RF Exposure Information
and Statement The SAR limit of USA (FCC) is 1.6W/kg averaged
over one gram of tissue. Device types: CLASICO 2 (FCC ID:
A4JYEZZCLASICO2) has also been tested against this SAR limit. The
highest SAR value reported under this standard during product
certification for use at the ear is 1.195W/kg and when properly worn
on the body is 1.402W/kg. This device was tested for typical
body-worn operations with the back of the handset kept 1.5cm from
the body. To maintain compliance with FCC RF exposure
requirements, use accessories that maintain a 1.5cm separation
distance between the user's body and the back of the handset. The use
of belt clips, holsters and similar accessories should not contain
metallic components in its assembly. The use of accessories that do
not satisfy these requirements may not comply with FCC RF
exposure requirements, and should be avoided.
Body-worn Operation
This device was tested for typical body-worn operations. To comply
with RF exposure requirements, a minimum separation distance of
1.5 cm must be maintained between the user’s body and the handset,
including the antenna. Third-party belt-clips, holsters, and similar
accessories used by this device should not contain any metallic
components. Body-worn accessories that do not meet these
requirements may not comply with RF exposure requirements and
should be avoided. Use only the supplied or an approved antenna.
A4JCLASICO2
certification for use at the ear is 1.53W/kg and when properly worn
on the body is 0.82W/kg. This device was tested for typical