DEI Sales Polk Audio XBAR N1 SurroundBar User Manual N1SurroundBar MN2835C indd
Polk Audio N1 SurroundBar N1SurroundBar MN2835C indd
User manual
Date
Drawing #
File Name
Scale
Drawn By
Color
Emboss Ht.
Deboss Depth
Finish
Process
Notes
Artwork
10 May 2013
HBP2835
N1SurroundBar_MN2835C.pdf
Full Size
KLB
Prints 100% Black
n/a
n/a
n/a
Offset lithography
Titleblock does not Print
Digital file
Approvals
Project Manager
Product Line Manager
Mechanical Designer
System Engineer
Electrical Engineer
Safety & Regulations
Quality Assurance
Creative Director
Comments
Signature Date
Revision Date Description
A8/20/13 Added new warnings & energy star logo
B8/27/13 Change Power Supply to 20V 3A 60W
C9/5/13 Remote Guide Step 6: removed steady
blue LED light
Titleblock do NOT print this page
Date
D
rawin
g
#
F
ile Nam
e
S
cale
D
rawn
By
C
olo
r
Emboss Ht
.
D
eboss De
p
t
h
F
inis
h
P
r
ocess
Notes
Ar
t
w
o
rk
10 May 2013
H
BP2
835
N
1SurroundBar_MN2835C.
p
df
Fu
ll
S
iz
e
KLB
P
rints 100% Black
n/
a
n/
a
n/
a
Offset litho
g
ra
p
h
y
Titleblock does not Prin
t
Di
g
ital fil
e
A
pp
rovals
P
roject Manager
P
roduct Line Manager
M
ec
h
an
i
ca
l
D
es
i
gne
r
S
ystem Engineer
El
ectr
i
ca
l
E
ng
i
neer
S
afet
y
& Re
g
ulation
s
Q
ualit
y
Assuranc
e
C
reative Director
Co
mm
e
n
ts
S
i
g
nature
Date
R
e
vi
s
i
on
D
ate
Descri
p
tio
n
A
8/
20
/
1
3
Added new warnings & energy star log
o
B
8/
27
/
1
3
Change Power Supply to 20V 3A 60
W
C
9
/5/13 Remote Guide Step 6: removed steady
blue LED light
g
Titleblock do NOT print this pa
ge

3
Customer Service Hours of Operation: Monday-Friday, 9am-5:30pm est polkcs@polkaudio.com
Important Safety Instructions
This product was designed and manufactured to meet strict
quality and safety standards. There are, however, some installa-
tion and operation precautions which you should
be particularly aware of.
1. Read Instructions. All the safety and operating instructions
should be read before the system is operated.
2. Retain Instructions. The safety and operating instructions
should be retained for future reference.
3. Heed Warnings. All warnings on the appliances and in
the operating instructions should be adhered to.
4. Follow Instructions. All operating and use instructions
should be followed.
5. Cleaning. Unplug the appliance from wall outlet before
cleaning. Do not use liquid cleaners or aerosol cleaners.
Use a damp cloth for cleaning.
6. Attachments. Do not use attachments not recommended
by the product manufacturer as they may cause hazards.
7. Water and Moisture. Do not use these appliances near
water: for example, near a bath tub, washbowl, kitchen sink,
or laundry tub, in a wet basement, or near a swimming pool,
and the like.
8. Accessories. Do not place these appliances on an unstable
cart, stand, tripod, bracket, or table. The audio/video prod-
ucts may fall, causing serious injury to a child or adult, and
serious damage to the products. Use only with a cart,
stand, tripod, bracket, or table recommended by the
manufacturer, or sold with the appliances. Any mounting
of the appliances should follow the manufacturer’s instruc-
tions, and should use mounting accessories recommended
by the manufacturer.
9. Ventilation. Slots and openings in the cabinet are provided
for ventilation and to ensure reliable operation of the ap-
pliances and to protect them from overheating, and these
openings must not be blocked or covered. The openings
should never be blocked by placing the products on a
bed, sofa, rug, or other similar surface. This product should
never be placed near or over a radiator or heat register.
This product should not be placed in a built-in installation
such as a bookcase or rack unless proper ventilation is
provided or the manufacturer’s instructions have
been adhered to.
10 . Power Sources. This product should be operated only from
the type of power source indicated on the marking labels.
If you are not sure of the type of power supply to your home,
consult your appliance dealer or local power company.
11. Grounding or Polarization. This product is equipped
with polarized alternating-current line plugs (plugs having
one blade wider than the other). This plug will fi t into
the power outlet only one way. This is a safety feature.
If you are unable to insert the plug fully into the outlet, try
reversing the plug. If the plug should still fail to fi t, contact
your electrician to replace your obsolete outlet. Do not defeat
the safety purpose of the polarized plug.
12. Power Cord Protection. Power-supply cord should be routed
so that it is not likely to be walked on or pinched by items
placed upon or against it, paying particular attention to cords
at plugs, convenience receptacles,
and the point where they exit from the appliances.
13. Lightning. For added protection for this audio/video product
during a lightning storm, or when it is left un-attended and
unused for long periods of time, unplug it from the wall
outlet and disconnect the antenna or cable system. This
will prevent damage to the product due to lightning and
power-line surges.
14. Power Lines. An outside antenna system should not be lo-
cated in the vicinity of overhead power lines or other electric
light or power circuits, or where it can fall into such power
lines or circuits. When installing an outside antenna system,
extreme care should be taken to keep from touching such
power lines or circuits as contact with them might be fatal.
15. Overloading. Do not overload wall outlets and extension
cords as this can result in a risk of fi re or electric shock.
16. Object and Liquid Entry. Never push objects of any kind into
this product through openings, as they may touch danger-
ous voltage points or short out parts that could result in
a fi re or electric shock. Never spill liquid of any kind on
this audio/video product.
17. Servicing. Do not attempt to service this product yourself,
as opening or removing covers may expose you to danger-
ous voltage or other hazards. Refer all servicing to qualifi ed
service personnel.
18. Damage Requiring Service. Unplug this product from wall
outlets and refer servicing to qualifi ed service personnel
under the following conditions:
a. When the power supply cord or plug is damaged.
b. If liquid has been spilled, or objects have fallen
into the product.
c. If the product has been exposed to rain or water.
d. If the product does not operate normally by following
the operating instructions. Adjust only those controls that
are covered by the operating instructions, as an improper
adjustment of other controls may result in damage and
will often require extensive work by a qualifi ed technician
to restore the product to its normal operation.
e. If the product has been dropped or the cabinet
has been damaged.
f. When the product exhibits a distinct change in
performance this indicates a need for service.
English
3
C
ustomer
S
ervice Hours of
O
peration: Monday-Friday, 9am-5:30pm est polkcs
@
polkaudio.co
m
Important Safet
y
Instruction
s
Thi
s pro
d
uct was
d
es
i
gne
d
an
d
manu
f
acture
d
to meet str
i
ct
qua
li
ty an
d
sa
f
ety stan
d
ar
d
s.
Th
ere are,
h
owever, some
i
nsta
ll
a
-
t
i
on an
d
operat
i
on precaut
i
ons w
hi
c
h
you s
h
ou
ld
b
e
p
art
i
cu
l
ar
ly
aware o
f
.
1. Read Instructions. All the safety and operatin
g
instructions
sh
ou
ld
b
e rea
d
b
e
f
ore t
h
e system
i
s operate
d.
2.
R
eta
i
n
I
nstruct
i
ons.
Th
e sa
f
ety an
d
operat
i
ng
i
nstruct
i
ons
sh
ou
ld
b
e reta
i
ne
d
f
or
f
uture re
f
erence
.
3.
H
ee
d
W
arn
i
n
g
s.
All
warn
i
n
g
s on t
h
e app
li
ances an
d
i
n
th
e operat
i
ng
i
nstruct
i
ons s
h
ou
ld
b
e a
dh
ere
d
to
.
4.
F
o
ll
ow
I
nstruct
i
ons.
All
operat
i
ng an
d
use
i
nstruct
i
ons
should
be
follo
w
ed.
5. Cleanin
g
. Unplu
g
the appliance from wall outlet before
c
leanin
g
. Do not use liquid cleaners or aerosol cleaners.
U
se a
d
amp c
l
ot
h
f
or c
l
ean
i
ng.
6.
A
ttac
h
ments.
D
o not use attac
h
ments not recommen
d
e
d
by
the
p
roduct manufacturer as the
y
ma
y
cause hazards
.
7.
W
ater an
d
M
o
i
sture.
D
o not use t
h
ese a
ppli
ances nea
r
w
ater:
f
or examp
l
e, near a
b
at
h
tu
b
, was
hb
ow
l
,
ki
tc
h
en s
i
n
k
,
o
r
l
aun
d
ry tu
b
,
i
n a wet
b
asement, or near a sw
i
mm
i
ng poo
l
,
a
n
d
t
h
e
lik
e
.
8. Accessories. Do not
p
lace these a
pp
liances on an unstable
c
art, stand, tri
p
od, bracket, or table. The audio/video
p
rod
-
ucts may
f
a
ll
, caus
i
ng ser
i
ous
i
n
j
ury to a c
hild
or a
d
u
l
t, an
d
s
er
i
ous
d
amage to t
h
e pro
d
ucts.
U
se on
l
y w
i
t
h
a cart,
s
tan
d
, tr
ip
o
d
,
b
rac
k
et, or ta
bl
e recommen
d
e
d
by
t
h
e
m
anu
f
acturer, or so
ld
w
i
t
h
t
h
e app
li
ances.
A
ny mount
i
ng
of
t
h
e app
li
ances s
h
ou
ld
f
o
ll
ow t
h
e manu
f
acturer
’
s
i
nstruc
-
ti
ons, an
d
s
h
ou
ld
use mount
i
ng accessor
i
es recommen
d
e
d
b
y t
h
e manu
f
acturer.
9. Ventilation. Slots and openin
g
s in the cabinet are provided
f
or vent
il
at
i
on an
d
to ensure re
li
a
bl
e operat
i
on o
f
t
h
e ap
-
pli
ances an
d
to protect t
h
em
f
rom over
h
eat
i
ng, an
d
t
h
ese
o
pen
i
ngs must not
b
e
bl
oc
k
e
d
or covere
d
.
Th
e open
i
ngs
s
hould never be blocked by placin
g
the products on a
bed, sofa, ru
g
, or other similar surface. This product should
never
b
e p
l
ace
d
near or over a ra
di
ator or
h
eat reg
i
ster.
Thi
s pro
d
uct s
h
ou
ld
not
b
e p
l
ace
d
i
n a
b
u
il
t-
i
n
i
nsta
ll
at
i
on
s
uc
h
as a
b
oo
k
case or rac
k
un
l
ess proper vent
il
at
i
on
i
s
p
rov
id
e
d
or t
h
e manu
f
acturer
’
s
i
nstruct
i
ons
h
ave
bee
n
adhe
r
ed
t
o
.
10 . Power
S
ources. This product should be operated only from
th
e type o
f
power source
i
n
di
cate
d
on t
h
e mar
ki
ng
l
a
b
e
l
s.
If
y
ou are not sure of the t
yp
e of
p
ower su
pp
l
y
to
y
our home,
c
onsu
l
t
y
our a
ppli
ance
d
ea
l
er or
l
oca
l
p
ower com
p
an
y.
11.
G
rounding or Polarization. This product is equipped
w
ith polarized alternating-current line plugs
(
plugs having
o
ne blade wider than the other
)
. This plug will fi t into
th
e power out
l
et on
l
y one way.
Thi
s
i
s a sa
f
ety
f
eature.
If
you are una
bl
e to
i
nsert t
h
e p
l
ug
f
u
ll
y
i
nto t
h
e out
l
et, try
revers
i
ng t
h
e p
l
ug.
If
t
h
e p
l
ug s
h
ou
ld
st
ill
f
a
il
to
fi
t, contact
your e
l
ectr
i
c
i
an to rep
l
ace your o
b
so
l
ete out
l
et.
D
o not
d
e
f
eat
t
h
e sa
f
ety purpose o
f
t
h
e po
l
ar
i
ze
d
p
l
ug
.
12. Power
C
ord Protection. Power-supply cord should be routed
so t
h
at
i
t
i
s not
lik
e
ly
to
b
e wa
lk
e
d
on or
pi
nc
h
e
d
by
i
tems
p
l
ace
d
upon or aga
i
nst
i
t, pay
i
ng part
i
cu
l
ar attent
i
on to cor
d
s
at p
l
ugs, conven
i
ence receptac
l
es,
and the point where they exit from the appliances.
13. Lightning. For added protection for this audio
/
video product
d
ur
i
ng a
li
g
h
tn
i
ng storm, or w
h
en
i
t
i
s
l
e
f
t un-atten
d
e
d
an
d
unuse
d
f
or
l
ong per
i
o
d
s o
f
t
i
me, unp
l
ug
i
t
f
rom t
h
e wa
ll
out
l
et an
d
di
sconnect t
h
e antenna or ca
bl
e system.
Thi
s
will prevent dama
g
e to the product due to li
g
htnin
g
and
power-
li
ne surges
.
14.
P
ower
Li
nes.
A
n outs
id
e antenna system s
h
ou
ld
not
b
e
l
o
-
cate
d
i
n t
h
e v
i
c
i
n
i
ty o
f
over
h
ea
d
power
li
nes or ot
h
er e
l
ectr
i
c
li
g
h
t or power c
i
rcu
i
ts, or w
h
ere
i
t can
f
a
ll
i
nto suc
h
powe
r
li
nes or c
i
rcu
i
ts.
Wh
en
i
nsta
lli
ng an outs
id
e antenna system,
extreme care should be taken to keep from touchin
g
such
power
li
nes or c
i
rcu
i
ts as contact w
i
t
h
t
h
em m
i
g
h
t
b
e
f
ata
l.
15.
O
verloading. Do not overload wall outlets and extension
co
r
ds
as
t
his
ca
n r
esul
t
i
n
a
r
isk
of
fi
r
e
o
r
elec
tr
ic
shock.
16.
O
bject and Liquid Entry. Never push objects of any kind into
t
hi
s pro
d
uct t
h
roug
h
open
i
ngs, as t
h
ey may touc
h
d
anger
-
ous vo
l
tage po
i
nts or s
h
ort out parts t
h
at cou
ld
resu
l
t
i
n
a
fi
re or e
l
ectr
i
c s
h
oc
k
.
N
ever sp
ill
li
qu
id
o
f
any
ki
n
d
on
this audio/video product.
17.
S
ervicing. Do not attempt to service this product yourself,
as open
i
ng or remov
i
ng covers may expose you to
d
anger
-
ous vo
l
ta
g
e or ot
h
er
h
azar
d
s.
R
e
f
er a
ll
serv
i
c
i
n
g
to qua
lifi
e
d
serv
i
ce personne
l.
18. Damage Requiring
S
ervice. Unplug this product from wall
out
l
ets an
d
re
f
er serv
i
c
i
ng to qua
lifi
e
d
serv
i
ce personne
l
un
d
er t
h
e
f
o
ll
ow
i
ng con
di
t
i
ons
:
a. When the power supply cord or plu
g
is dama
g
ed
.
b
.
If
liq
u
id
h
as
b
een s
pill
e
d
, or o
bj
ects
h
ave
f
a
ll
en
i
nto t
h
e pro
d
uct
.
c.
If
t
h
e pro
d
uct
h
as
b
een expose
d
to ra
i
n or water
.
d
.
If
t
h
e pro
d
uct
d
oes not operate norma
ll
y
b
y
f
o
ll
ow
i
ng
th
e operat
i
ng
i
nstruct
i
ons.
Adj
ust on
l
y t
h
ose contro
l
s t
h
at
are covere
d
b
y t
h
e operat
i
n
g
i
nstruct
i
ons, as an
i
mprope
r
a
dj
ustment o
f
ot
h
er contro
l
s may resu
l
t
i
n
d
amage an
d
w
ill
o
f
ten requ
i
re extens
i
ve wor
k
b
y a qua
lifi
e
d
tec
h
n
i
c
i
an
t
o restore t
h
e
p
ro
d
uct to
i
ts norma
l
o
p
erat
i
on
.
e.
If
t
h
e pro
d
uct
h
as
b
een
d
roppe
d
or t
h
e ca
bi
net
has been damaged.
f
.
Wh
en t
h
e pro
d
uct ex
hibi
ts a
di
st
i
nct c
h
ange
i
n
per
f
ormance t
hi
s
i
n
di
cates a nee
d
f
or serv
i
ce
.
En
g
lis
h
4 Polk Customer Service 800-377-7655 (Outside USA & Canada: 410-358-3600)
19. Replacement Parts. When replacement parts are required,
be sure the service technician has used replacement parts
specifi ed by the manufacturer or that the parts have the
same characteristics as the original part. Unauthorized sub-
stitutions may result in fi re, electric shock or other hazards.
CAUTION: Danger of EXPLOSION if battery
is incorrectly replaced. Replace only with the
same or equivalent type. (CR2025)
WARNING: Do not expose batteries or battery pack
to excessive heat such as sunshine, fi re or the like.
20. Safety Check. Upon completion of any service or repairs
to this product, ask the service technician to perform
safety checks to determine that the products are in
proper operating condition.
21. Carts and Stands. The appliances should be
used only with a cart or stand that is recom-
mended by the manufacturer. An appliance
and cart combination should be moved with
care. Quick stops, excessive force, and uneven
surfaces may cause the appliance and cart combination
to overturn. Use caution when moving the cart/apparatus
combination to avoid injury from tip-over.
22. This product is not intended for use outdoors.
The CAUTION marks shown here are located on the back
of your SurroundBar® Speaker System
CAUTION: To prevent electric shock, match wide blade
of plug to wide slot, insert fully.
CAUTION: No naked fl ame sources, such as candles,
should be placed on the apparatus.
23. Do not install this apparatus in a confi ned space such as a
book case. Ensure the apparatus has adequate ventila-
tion and that items such as newspaper, table-cloths, and
curtains, etc. do not block the ventilation.
24. WARNING: To reduce the risk of fi re or electric shock, do
not expose this apparatus to rain or moisture. The apparatus
shall not be exposed to dripping or splashing. Do not place
objects fi lled with liquids, such as vases, on the apparatus.
25. WARNING: The mains plug (power adapter) is used as a
disconnect device and shall remain readily operable.
Radiation Exposure Statement
This device complies with FCC radiation exposure limits set
forth for an uncontrolled environment and it also complies
with Part 15 of the FCC RF Rules.
This equipment should be installed and operated with a
minimum distance of 20 centimeters between the radiator
and your body.
Operation
This equipment complies with Part 15 of the FCC Rules
and Industry Canada licence-exempt RSS standard(s). Operation
is subject to the following two conditions:
1) This device may not cause interference, and
2) This device must accept any interference, including
interference that may cause undesired operation
of the device.
Class B Emissions Limits
This Class B digital apparatus meets all requirements of the
Canadian Interference—Causing Equipment Regulations.
The device meets the exemption from the routine evaluation
limits in section 2.5 of RSS 102 and compliance with RSS-102
RF exposure, users can obtain Canadian information on RF
exposure and compliance.
Product Disposal
Certain international, national and/or local laws and/
or regulations may apply regarding the disposal of this
product. For further detailed information, please con-
tact the retailer where you purchased this product or
the Polk Importer/Distributor in your country. A listing
of Polk Importer/ Distributors can be found on the Polk
website: www.polkaudio.com or by contacting Polk at:
5601 Metro Drive, Baltimore, Maryland 21215, USA.
Phone: 1-410-358-3600; in California: 1-800-377-7655.
NOTE:
This equipment has been tested and found to comply with the
limits for a Class B digital device, pursuant to part 15 of the
FCC Rules. These limits are designed to provide reasonable
protection against harmful interference in a residential installation.
This equipment generates, uses and can radiate radio frequency
energy, and, if not installed and used in accordance with the
instructions, may cause harmful interference to radio communi-
cations. However, there is no guarantee that interference will
not occur in a particular installation.
If this equipment does cause harmful interference to radio or
television reception, which can be determined by turning the
equipment off and on, the user is encouraged to try to correct
the interference by one or more of the following measures: reori-
ent or relocate the receiving antenna. Increase the separation
between the equipment and receiver. Connect the equipment
into an outlet on a circuit different from that to which the receiver
is connected. Consult the dealer or an experienced radio/TV
technician for help.
t 5IFBOUFOOBTVTFEGPSUIJTUSBOTNJUUFSNVTUCFJOTUBMMFE
to provide a separation distance of at least 20 cm from all
persons and must not be co-located or operating in con-
junction with any other antenna or transmitter.
t $IBOHFTPSNPEJmDBUJPOTOPUFYQSFTTMZBQQSPWFECZUIF
party responsible for compliance could void the user’s
authority to operate the equipment.
4
Polk
C
ustomer
S
ervice 800-377-7655 (
O
utside U
S
A &
C
anada: 410-358-3600
)
19.
R
e
pl
acement
P
arts.
Wh
en re
pl
acement
p
arts are re
q
u
i
re
d
,
b
e sure t
h
e serv
i
ce tec
h
n
i
c
i
an
h
as use
d
rep
l
acement parts
spec
ifi
e
d
b
y t
h
e manu
f
acturer or t
h
at t
h
e parts
h
ave t
h
e
same c
h
aracter
i
st
i
cs as t
h
e or
i
g
i
na
l
part.
U
naut
h
or
i
ze
d
su
b-
st
i
tut
i
ons may resu
l
t
i
n
fi
re, e
l
ectr
i
c s
h
oc
k
or ot
h
er
h
azar
d
s
.
C
A
U
TI
O
N:
D
anger of EXPL
OS
I
O
N if battery
i
s
i
ncorrect
l
y rep
l
ace
d
.
R
ep
l
ace on
l
y w
i
t
h
t
h
e
s
ame or equivalent type.
(C
R2025
)
WARNIN
G:
Do not ex
p
ose batteries or batter
y
p
ac
k
t
o excess
i
ve
h
eat suc
h
as suns
hi
ne
,
fi
re or t
h
e
lik
e
.
20.
S
afety
C
heck. Upon completion of any service or repairs
t
o t
hi
s pro
d
uct, as
k
t
h
e serv
i
ce tec
h
n
i
c
i
an to per
f
orm
sa
f
ety c
h
ec
k
s to
d
eterm
i
ne t
h
at t
h
e pro
d
ucts are
i
n
p
roper operatin
g
condition
.
21. Carts and Stands. The a
pp
liances should be
use
d
on
l
y w
i
t
h
a cart or stan
d
t
h
at
i
s recom
-
m
en
d
e
d
b
y t
h
e manu
f
acturer.
A
n app
li
ance
a
n
d
ca
rt
co
m
b
in
a
ti
o
n
s
h
ou
l
d
be
m
o
v
ed
with
c
are.
Q
uick stops, excessive force, and uneven
sur
f
aces may cause t
h
e app
li
ance an
d
cart com
bi
nat
i
on
t
o overturn. Use caution when moving the cart/apparatus
c
om
bi
nat
i
on to avo
id
i
n
j
ury
f
rom t
i
p-over.
22.
Thi
s
p
ro
d
uct
i
s not
i
nten
d
e
d
f
or use out
d
oors.
The
C
A
U
TI
ON
m
a
r
ks
sho
wn
he
r
e
a
r
e
loca
t
ed
o
n t
he
back
o
f your
S
urroundBar
®
Speaker System
CAUTION:
T
o
p
revent e
l
ectr
i
c s
h
oc
k
, matc
h
w
id
e
bl
a
d
e
o
f
p
l
ug to w
id
e s
l
ot,
i
nsert
f
u
ll
y
.
C
AUTI
O
N
:
N
o na
k
e
d
fl
ame sources, suc
h
as can
dl
es,
sh
ou
ld
b
e p
l
ace
d
on t
h
e apparatus
.
2
3
.
D
o not
i
nsta
ll
t
hi
s a
pp
aratus
i
n a con
fi
ne
d
s
p
ace suc
h
as a
b
oo
k
case.
E
nsure t
h
e apparatus
h
as a
d
equate vent
il
a
-
t
i
on an
d
t
h
at
i
tems suc
h
as newspaper, ta
bl
e-c
l
ot
h
s, an
d
c
urta
i
ns, etc.
d
o not
bl
oc
k
t
h
e vent
il
at
i
on
.
24.
W
ARNIN
G
:
T
o re
d
uce t
h
e r
i
s
k
o
f
fi
re or e
l
ectr
i
c s
h
oc
k
,
d
o
n
ot expose t
hi
s apparatus to ra
i
n or mo
i
sture.
Th
e apparatus
s
h
a
ll
not
b
e expose
d
to
d
r
i
pp
i
ng or sp
l
as
hi
ng.
D
o not p
l
ace
o
bj
ects
fi
ll
e
d
w
i
t
h
liq
u
id
s, suc
h
as vases, on t
h
e a
pp
aratus
.
2
5
.
W
ARNIN
G
: The mains plug
(
power adapter
)
is used as a
di
sconnect
d
ev
i
ce an
d
s
h
a
ll
rema
i
n rea
dil
y opera
bl
e
.
R
adiation Ex
p
osure Statement
T
his device com
p
lies with FCC radiation ex
p
osure limits set
f
ort
h
f
or an uncontro
ll
e
d
env
i
ronment an
d
i
t a
l
so comp
li
es
w
ith P
a
rt 1
5
o
f th
e
F
CC
RF R
u
l
es
.
Thi
s equ
i
pment s
h
ou
ld
b
e
i
nsta
ll
e
d
an
d
operate
d
w
i
t
h
a
m
i
n
i
m
u
m
dis
t
a
n
ce
of
2
0
ce
nt
i
m
e
t
e
r
s
be
tw
ee
n t
he
r
adia
t
or
an
d
y
our
b
o
dy.
O
p
eratio
n
T
his equipment complies with Part 15 of the F
CC
Rules
and Industry Canada licence-exempt RSS standard(s). Operation
i
s subject to the followin
g
two conditions
:
1
)
This device may not cause interference, an
d
2) This device must accept any interference, includin
g
interference that may cause undesired operation
o
f th
e
de
vi
ce
.
C
lass B Emissions Limits
This
C
lass B digital apparatus meets all requirements of the
C
anadian Interference—
C
ausing Equipment Regulations
.
Th
e
d
ev
i
ce meets t
h
e exempt
i
on
f
rom t
h
e rout
i
ne eva
l
uat
i
on
l
imits in section 2.5 of R
SS
102 and compliance with R
SS
-102
R
F exposure, users can obtain
C
anadian information on RF
exposure an
d
comp
li
ance.
P
ro
d
uct
Di
s
p
osa
l
C
ertain international, national and
/
or local laws and
/
or regu
l
at
i
ons may app
l
y regar
di
ng t
h
e
di
sposa
l
o
f
t
hi
s
pro
d
uct.
F
or
f
urt
h
er
d
eta
il
e
d
i
n
f
ormat
i
on, p
l
ease con
-
t
act t
h
e reta
il
er w
h
ere you purc
h
ase
d
t
hi
s pro
d
uct o
r
t
he Polk Importer/Distributor in your country. A listing
of Polk Importer
/
Distributors can be found on the Pol
k
we
b
s
i
te: www.po
lk
au
di
o.com or
b
y contact
i
ng
P
o
lk
at:
5
601 Metro Drive, Baltimore, Mar
y
land 21215, USA.
P
hone: 1-410-358-3600
;
in
C
alifornia: 1-800-377-7655.
N
O
TE
:
Thi
s equ
i
pment
h
as
b
een teste
d
an
d
f
oun
d
to comp
l
y w
i
t
h
t
h
e
l
imits for a Class B di
g
ital device, pursuant to part 15 of the
FCC
Rules. These limits are designed to provide reasonable
protect
i
on aga
i
nst
h
arm
f
u
l
i
nter
f
erence
i
n a res
id
ent
i
a
l
i
nsta
ll
at
i
on.
Thi
s equ
i
pment generates, uses an
d
can ra
di
ate ra
di
o
f
requency
energy, an
d
,
if
not
i
nsta
ll
e
d
an
d
use
d
i
n accor
d
ance w
i
t
h
t
h
e
i
nstruct
i
ons, may cause
h
arm
f
u
l
i
nter
f
erence to ra
di
o commun
i-
cat
i
ons.
H
owever, t
h
ere
i
s no guarantee t
h
at
i
nter
f
erence w
ill
n
ot occur
i
n a part
i
cu
l
ar
i
nsta
ll
at
i
on.
If
t
hi
s e
q
u
ip
ment
d
oes cause
h
arm
f
u
l
i
nter
f
erence to ra
di
o o
r
t
e
l
ev
i
s
i
on recept
i
on, w
hi
c
h
can
b
e
d
eterm
i
ne
d
b
y turn
i
ng t
h
e
equ
i
pment o
ff
an
d
on, t
h
e user
i
s encourage
d
to try to correct
th
e
i
nter
f
erence
b
y one or more o
f
t
h
e
f
o
ll
ow
i
ng measures: reor
i-
ent or relocate the receivin
g
antenna. Increase the separation
between the equipment and receiver.
C
onnect the equipment
i
nto an out
l
et on a c
i
rcu
i
t
diff
erent
f
rom t
h
at to w
hi
c
h
t
h
e rece
i
ve
r
i
s connected.
C
onsult the dealer or an experienced radio
/
T
V
t
ec
h
n
i
c
i
an
f
or
h
e
lp.
t 5IFBOUFOOB
T
VTFEGPSUIJTUSBOTNJUUFSNVTUCFJOTUBMMFE
t
o prov
id
e a separat
i
on
di
stance o
f
at
l
east 20 cm
f
rom a
ll
persons an
d
must not
b
e co-
l
ocate
d
or operat
i
ng
i
n con
-
j
unct
i
on w
i
t
h
any ot
h
er antenna or transm
i
tter.
t $IBO
H
FTPSNPEJmDBUJPOTOPUFYQSFTTMZBQQSPWFECZUIF
p
art
y
res
p
ons
ibl
e
f
or com
pli
ance cou
ld
vo
id
t
h
e user
’
s
aut
h
or
i
ty to operate t
h
e equ
i
pment
.
5
Customer Service Hours of Operation: Monday-Friday, 9am-5:30pm est polkcs@polkaudio.com
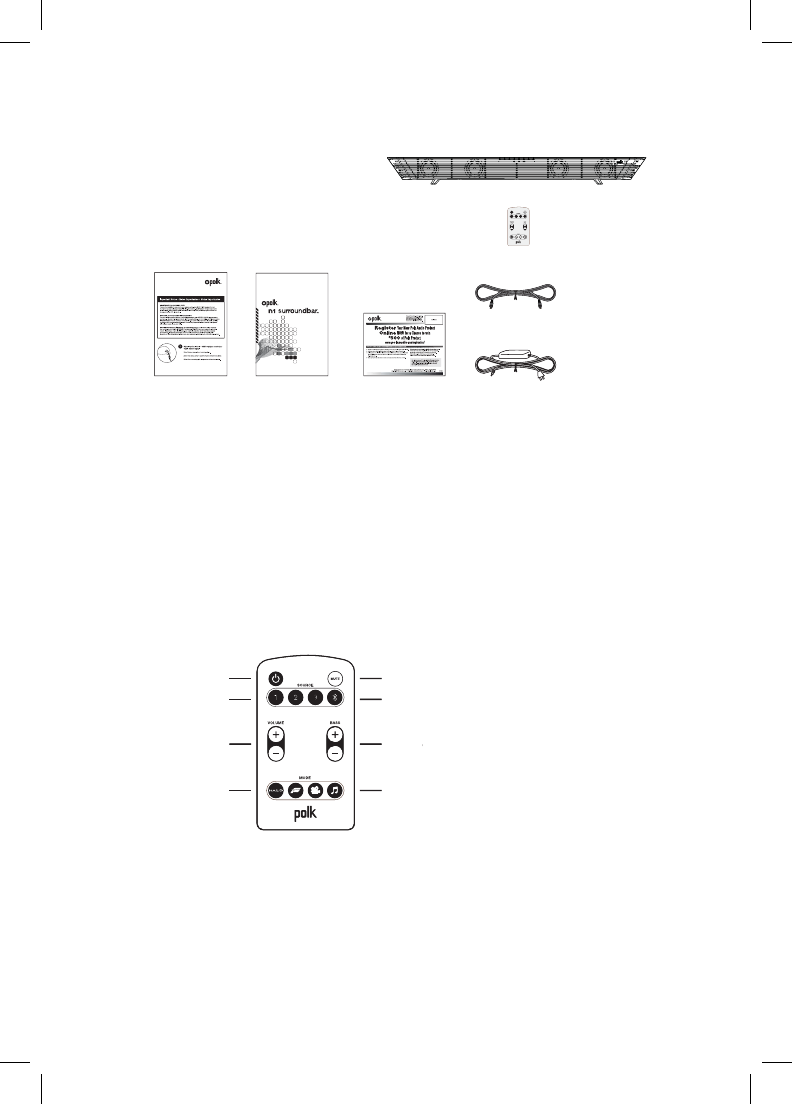
Inside Your N1 SurroundBar™ Carton:
Important Note: If anything is missing or
damaged, or if your Polk N1 SurroundBar fails
to operate, please notify your dealer immediately.
We recommend keeping your original carton
and packing materials in case you need to
ship the unit in the future.
Specifi cations
Dimensions 4" H x 39 1/4" W x 4 1/2" D
(10.2 cm x 99.7 cm x 11.4 cm)
Weight 9 lbs 10 oz (4.35 kg)
Power Requirements 20 V, 3 A
Model N1 SurroundBar
Remote Battery CR2025
Remote Control
Immersion Modes
Four Audio Immersion Modes (Warrior, Racer,
Cinema and Music) enable you to tailor the N1
for maximum high performance audio for a more
immersive, more thrilling listening experience.
6' Digital
(Optical) Cable
Remote Control
(Battery Included)
SurroundBar
Power SupplyOwner’s
Manual
Quick Start
Guide
Online
Registration
Card
Source
1, 2 & 3
Power Mute
Source
Bluetooth
Bass Volume
Volume
Immersion Modes
Gaming: Warrior & Racer
Immersion Modes
Cinema & Music
5
C
ustomer
S
ervice Hours of
O
peration: Monday-Friday, 9am-5:30pm est polkcs
@
polkaudio.co
m
Inside Your N1
S
urroundBa
r
™
C
arton
:
I
m
p
ortant Note:
If
anyt
hi
ng
i
s m
i
ss
i
ng o
r
d
amaged, or if your Polk N1
S
urroundBar fails
t
o o
p
erate,
p
lease notif
y
y
our dealer immediatel
y
.
W
e recommen
d
k
eep
i
ng your or
i
g
i
na
l
carton
a
n
d
pac
ki
ng mater
i
a
l
s
i
n case you nee
d
to
s
hi
p
the unit in the future.
S
pecifi cation
s
Dim
e
n
s
i
o
n
s
4" H x
39
1
/
4" W x 4 1
/
2" D
(10.2 cm x 99.7 cm x 11.4 cm)
W
e
i
g
ht
9 lbs 10 oz
(
4.35 kg
)
P
ower
R
equ
i
rement
s
2
0 V
,
3 A
M
odel
N1
Su
rr
ou
n
d
B
ar
R
emote
B
atter
y
C
R202
5
R
emote
C
ontrol
f
or max
i
mum
hi
g
h
per
f
ormance au
di
o
f
or a more
i
mmers
i
ve, more t
h
r
illi
ng
li
sten
i
ng exper
i
ence
.
6'
Digi
ta
l
(Optical) Cable
Remote Contr
ol
(Battery Included
)
S
urr
o
un
dB
a
r
Power Supply
O
wner
’
s
M
anua
l
Q
uick Star
t
G
uid
e
O
nlin
e
R
eg
i
strat
i
o
n
Ca
rd
I
mmersion Mode
s
F
our Audio Immersion Modes
(
Warrior, Racer,
C
inema and Music
)
enable you to tailor the N1
Sou
r
ce
1, 2
&
3
Po
w
er
Mu
t
e
Sou
r
ce
Bl
uetoot
h
Bass V
olum
V
V
e
V
olume
V
V
Imm
e
r
s
i
o
n M
odes
G
aming:
W
arr
i
or
&
R
ac
e
r
Imm
e
r
s
i
o
n M
odes
C
inema & Musi
c
6 Polk Customer Service 800-377-7655 (Outside USA & Canada: 410-358-3600)
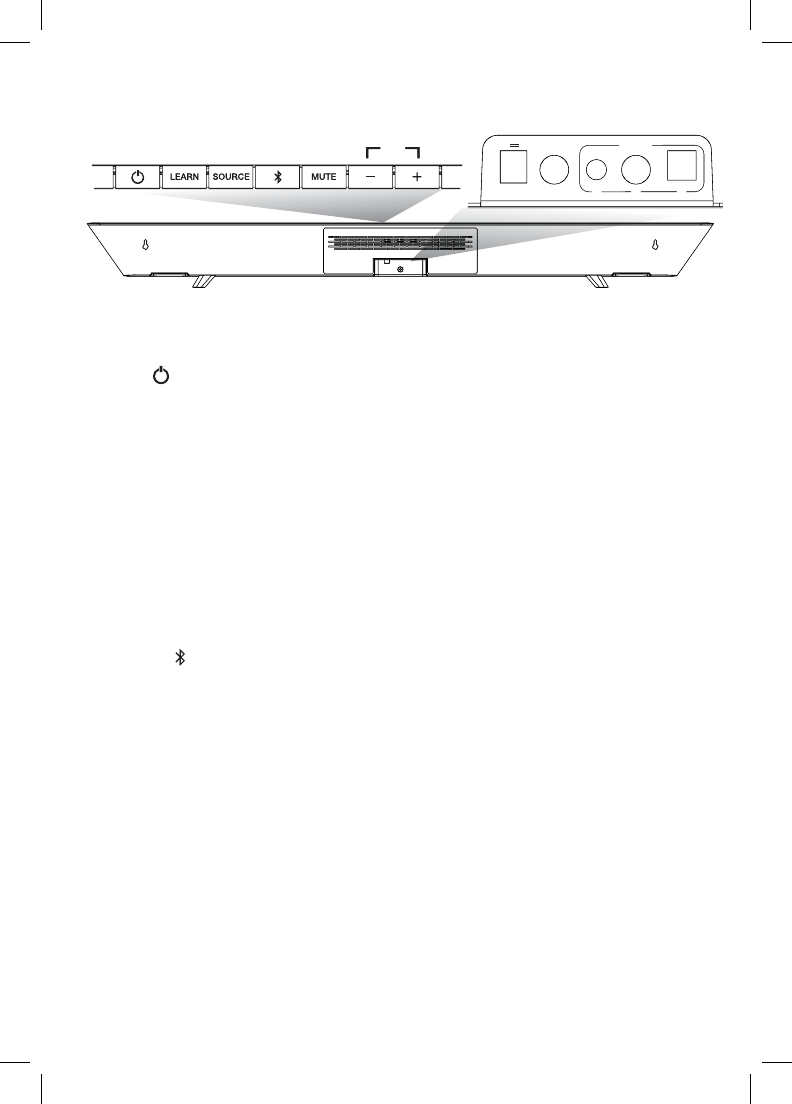
Controls
1. Power ( )—Turns on the bar or puts
it in standby mode.
LED—Blue, green or red light to indicate
operating status.
2. Learn—Puts the bar into “learning mode” so
you can program it to respond to commands
from your TV’s IR remote control.
3. Source—Changes which input source
you are listening to.
Source 1: optical (Blue LED for PCM
or Green for Dolby Digital)
Source 2: coaxial (Blue LED for PCM
or Green for Dolby Digital)
Source 3: analog
4. Bluetooth ( ): Blue light indicates Bluetooth
Source has been selected.
5. Mute—Mutes the sound coming from
the N1 SurroundBar.
6. Volume Up and Down ( – / + )—Adjusts
the volume of the N1 SurroundBar.
7. Power Connection—The bar power supply
connects here.
8. SUB Out—Connect optional subwoofer.
9. Audio Inputs (Source 1, 2, or 3)—Where
you connect your TV (or other source) to the
N1 SurroundBar. Use the provided 6' optical
cable (Source 1), digital coaxial audio cable
(Source 2) not included, or 1/8" analog cable
(Source 3) not included.
Power LED
Normal Mode:
Green or Blue Steady—Power is on;
all is well in Source 1.
Red Steady—The bar is in standby mode.
Learning Mode:
Red Blinking—The bar has failed to learn
a remote control command.
Three Quick Blue Flashes—Learned IR
codes have been successfully erased.
Learn LED
Learning Mode:
Blue Flashing—The bar is in learning mode.
Blue Solid—The bar is in learning mode
and a bar button has been selected.
Bar Button LED—Flashes blue. When
learning is successful, both the LEARN
LED and the bar command button
LED fl ash.
1
78 9
2345 6 3A
20V
13 2
SOURCE
SUB OUT60W
6
Polk
C
ustomer
S
ervice 800-377-7655 (
O
utside U
S
A &
C
anada: 410-358-3600
)
C
ontrol
s
1
.
Po
w
er
( )—Turns on the bar or puts
r
i
t in standb
y
mode.
LED
—
Blue,
g
reen or red li
g
ht to indicate
o
peratin
g
status.
2. L
ea
rn—
P
uts t
h
e
b
ar
i
nto
“l
earn
i
n
g
mo
d
e
”
so
y
ou can pro
g
ram
i
t to respon
d
to comman
d
s
f
rom
y
our TV’s IR remote control.
3.
S
ource—
C
han
g
es which input source
you are
li
sten
i
n
g
to.
S
ource 1:
op
tical
(
Blue LED for PCM
o
r Green for Dolby Di
g
ital
)
S
ource 2:
c
oaxial
(
Blue LED for PCM
o
r
G
reen for Dolby Digital
)
S
ource 3: ana
l
o
g
4. Bluetooth ( ):
Blue li
g
ht indicates Bluetoot
h
S
ource has been selected.
5.
M
ute—Mutes the sound comin
g
from
t
he N1
S
urroundBar
.
6. Volume Up and Down
(
–
/
+
)
—Adjusts
t
he volume of the N1
S
urroundBar
.
7. Power Connectio
n
—
The bar power supply
c
onnects here
.
8.
SU
B
O
ut
—C
onnect o
p
tional subwoofer.
9.
A
u
di
o
I
n
p
ut
s
(S
ource 1, 2, or 3
)
—Where
y
ou connect
y
our TV
(
or other source
)
to the
N1
S
urroundBar. Use the
p
rovided 6' o
p
tical
c
able
(S
ource 1
)
, digital coaxial audio cable
(S
ource 2
)
not included, or 1
/
8" analog cable
(S
ource 3
)
not included
.
P
ower LED
No
rm
a
l M
ode:
G
reen or Blue
S
tead
y
—
P
ower
i
s on;
a
ll i
s
w
e
ll in
Sou
r
ce
1
.
Red Stead
y
—The bar is in standby mode.
L
earn
i
n
g
M
o
d
e
:
Red Blinkin
g
—
The bar has failed to learn
a remote control command
.
Three
Q
uick Blue Flashe
s
—
Learned IR
c
o
d
es
h
ave
b
een success
f
u
lly
erase
d.
L
earn LE
D
L
earnin
g
Mode
:
Blue Flashin
g
—The bar is in learnin
g
mode
.
Blue Soli
d
—The bar is in learning mode
a
n
d
a
ba
r
bu
tt
o
n h
as
bee
n
se
l
ec
t
ed.
Bar Button LED
—Flashes blue. When
learnin
g
is successful, both the LEARN
LED
an
d
t
h
e
b
ar comman
d
b
utton
LED
fl
as
h.
1
7
8
9
23
4
5
6
3A
2
0
V
1
3
2
SOURCE
SU
B
OUT
60
W
7
Customer Service Hours of Operation: Monday-Friday, 9am-5:30pm est polkcs@polkaudio.com
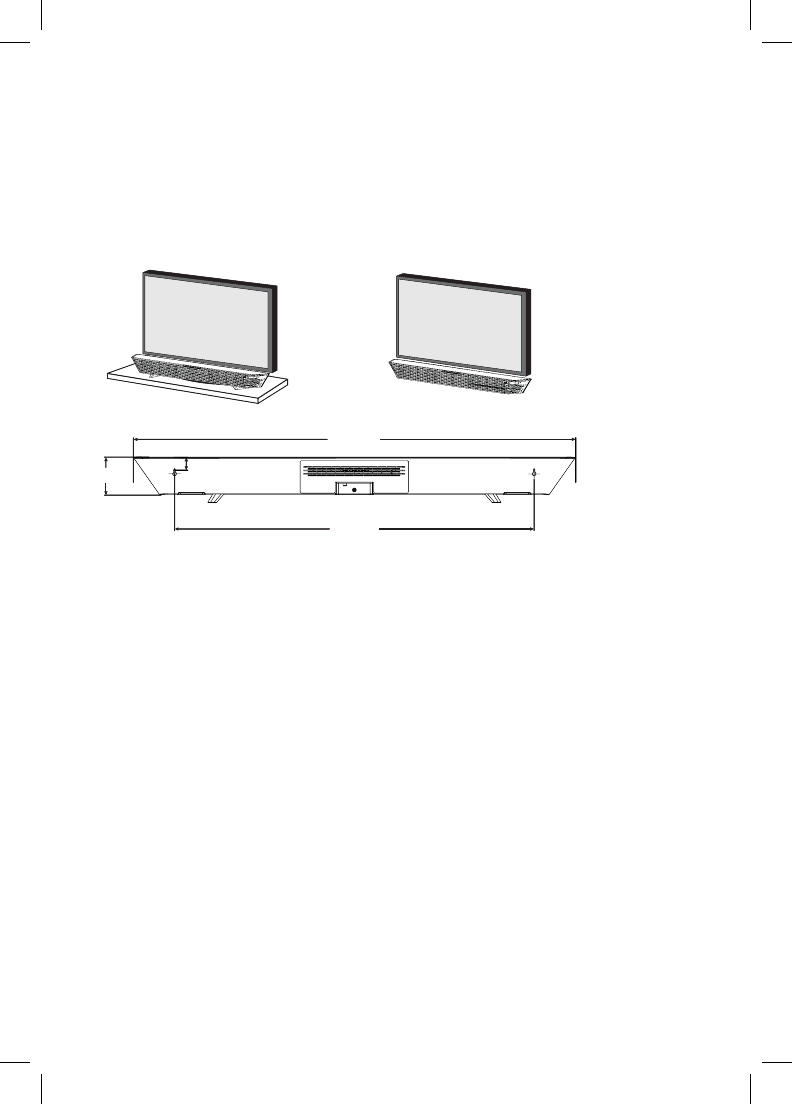
Where To Locate Your Bar
For The Best Sound
Note: The rubber feet are detachable and may
be removed entirely (for wall-mounting the bar)
or moved along the bottom surface of the bar,
depending upon your installation.
Overall Dimensions
1. 4" H (10.2 cm)
2. 39 1/4" W (99.7 cm)
Keyhole Slots
3. 32" W (81.28 cm)
Top of Bar to Keyhole Slots
4. 1 1/16" (2.67 cm)
Note: If you wall mount your SurroundBar,
ensure that your wall anchors secure properly
into the wall and that they can bear the
weight of the SurroundBar.
1
2
3
4
Table Mount Wall Mount
7
C
ustomer
S
ervice Hours of
O
peration: Monday-Friday, 9am-5:30pm est polkcs
@
polkaudio.co
m
Wh
ere
T
o
L
ocate
Y
our
B
a
r
For The Best
S
oun
d
Note
:
The rubber feet are detachable and ma
y
be removed entirely (for wall-mountin
g
the bar)
or move
d
a
l
on
g
t
h
e
b
ottom sur
f
ace o
f
t
h
e
b
ar,
d
epen
di
n
g
upon your
i
nsta
ll
at
i
on.
O
verall Dimension
s
1
.4" H
(
10.2 cm
)
2.
39 1
/
4" W
(
99.7 cm
)
Ke
y
hole
S
lots
3
. 32" W
(
81.28 cm
)
Top of Bar to Ke
y
hole Slot
s
4
. 1 1
/
16"
(
2.67 cm
)
N
o
t
e:
If you wall mount your
S
urroundBar,
ensure that your wall anchors secure properly
into the wall and that they can bear the
wei
g
ht of the SurroundBar
.
1
2
3
4
T
able Mount
W
all Moun
t
8 Polk Customer Service 800-377-7655 (Outside USA & Canada: 410-358-3600)
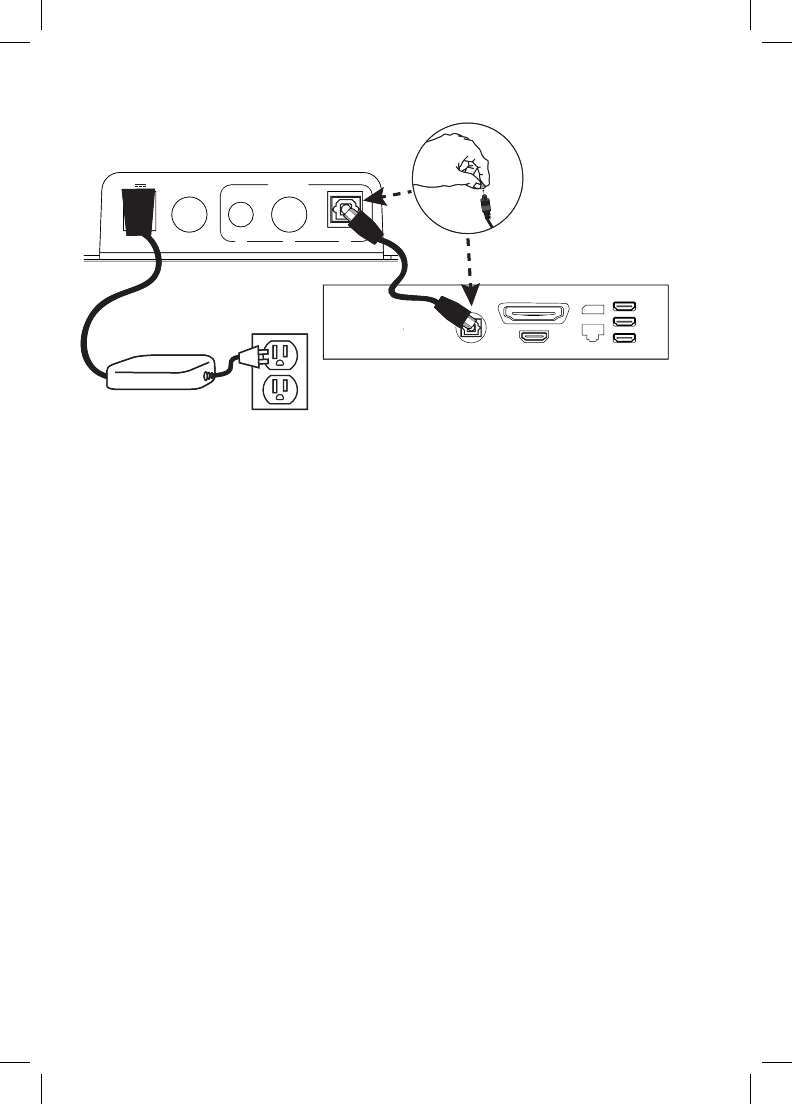
How To Connect Your Bar
How To Optimize The Sound
When TV Speakers Are On
You should hear sound from the bar. If you don’t,
turn up the volume on the bar using its volume
control buttons.
If your bar is connected to your TV, there’s a very
good chance your TV speakers are also playing.
It’s impossible to give specifi c instructions on how
to turn off the speakers for every TV, but here’s a
way to do it that covers many of the TVs out there.
1. On your TV remote control, fi nd a “menu”
or “setup” button.
2. Press this button. You should see
an on-screen menu.
3. Next, look for an option to control audio
functions and select it.
The setting to turn off your TV’s internal speakers
should be here.
If you can’t turn off your TV internal speakers, don’t
worry. Your N1 SurroundBar will make your TV
sound much better. To enjoy the best performance
from your bar, you’ll want it to play louder than your
TV. Use the following steps to adjust the volume
balance between your TV and the bar:
1. If necessary, program your bar to respond to
the volume up and down control commands
of your TV remote. (See “How To Setup
A Remote Control For Your SurroundBar”
on pages 8-9.)
2. Turn your TV volume all the way down using
the control buttons on your TV.
3. Then, using the volume keys on your bar,
set the volume to a normal listening level
(do not use the remote control).
After you make these adjustments, your N1
SurroundBar should always be louder than your
TV speakers. Then use the TV remote control
to adjust the volume as you normally do.
3A
20V
13 2
SOURCE
SUB OUT60W
SURROUNDBAR
XBOX CONSOLE
DIGITAL OPTICAL
AUDIO OUTPUT
Note: Remove the protective
cap prior to inserting cable.
8
Polk
C
ustomer
S
ervice 800-377-7655 (
O
utside U
S
A &
C
anada: 410-358-3600
)
How To
C
onnect Your Ba
r
How To Optimize The Sound
When TV
S
peakers Are
On
Y
ou s
h
ou
ld
h
ear soun
d
f
rom t
h
e
b
ar.
If
y
ou
d
on
’
t,
turn up the volume on the bar usin
g
its volume
control buttons
.
If
your
b
ar
i
s connecte
d
to your
TV
, t
h
ere
’
s a very
goo
d
c
h
ance your
TV
spea
k
ers are a
l
so p
l
ay
i
ng.
I
t
’
s
i
mposs
ibl
e to g
i
ve spec
ifi
c
i
nstruct
i
ons on
h
ow
to turn o
ff
t
h
e spea
k
ers
f
or every
TV
,
b
ut
h
ere
’
s a
way to
d
o
i
t t
h
at covers many o
f
t
h
e
TV
s out t
h
ere.
1
.
O
n
y
our TV remote control, fi nd a “menu”
or “setu
p
” button.
2.
Press this button. You should see
an on-screen menu.
3
. Next, look for an option to control audio
f
u
n
c
ti
o
n
s
a
n
d
se
l
ec
t it.
Th
e sett
i
ng to turn o
ff
your
TV’
s
i
nterna
l
spea
k
ers
s
h
ou
l
d
be
h
e
r
e.
If
y
ou can
’
t turn o
ff
y
our
TV
i
nterna
l
s
p
ea
k
ers,
d
on
’
t
worr
y
. Your N1 SurroundBar will make
y
our T
V
soun
d
muc
h
b
etter.
T
o en
j
o
y
t
h
e
b
est
p
er
f
ormance
f
rom
y
our
b
ar,
y
ou
’ll
want
i
t to
pl
a
y
l
ou
d
er t
h
an
y
ou
r
TV. Use the followin
g
steps to adjust the volume
b
a
l
ance
b
etween
y
our
TV
an
d
t
h
e
b
ar
:
1.
If
necessary, pro
g
ram your
b
ar to respon
d
to
the volume u
p
and down control commands
of
y
our TV remote.
(
See “How To Setu
p
A
Remote
C
ontrol For Your
S
urroundBar
”
on pages 8-9.
)
2
.
Turn your TV volume all the way down usin
g
the control buttons on
y
our TV
.
3
.
Th
en, us
i
n
g
t
h
e vo
l
ume
k
eys on your
b
ar,
set the volume to a normal listening level
(
do not use the remote control
)
.
A
fter
y
ou make these ad
j
ustments,
y
our N1
SurroundBar should alwa
y
s be louder than
y
ou
r
TV s
p
eakers. Then use the TV remote control
to adjust the volume as you normally do.
3A
20
V
1
3
2
SOUR
C
E
SUB OU
T
60W
SU
RR
OU
NDBA
R
XB
O
X
CO
N
SO
L
E
DIGIT
AL OPTICA
T
T
L
A
UDI
O
O
UTP
U
T
Note:
R
emove t
h
e protect
i
ve
cap prior to inserting cable.
9
Customer Service Hours of Operation: Monday-Friday, 9am-5:30pm est polkcs@polkaudio.com
Bluetooth® Wireless Technology
To use your Bluetooth wireless technology device
with the SurroundBar, you must fi rst pair your
device with your SurroundBar. Pairing creates the
ability of your Bluetooth device to connect with
your SurroundBar wirelessly. Pairing is like a hand-
shake between your Bluetooth device and your
SurroundBar in which they meet and exchange
information.
You only have to pair your SurroundBar with your
Bluetooth device one time for this exchange of
information to take place. After that you simply
select the “polk soundbar” from your device list
to make the connection to your SurroundBar.
The SurroundBar can hold 8 Bluetooth devices in
its memory. If enough devices pair after yours, your
device could be dropped from the memory list.
Pair and connect your Bluetooth device
with the SurroundBar:
1. Make sure your Bluetooth device and
SurroundBar are both powered on.
2. Activate the Bluetooth function on your
Bluetooth source device. See your device’s
manual for instructions.
3. Press the Bluetooth source button from the
SurroundBar remote.
The Bluetooth LED will illuminate, then begin
slowly pulsing as it looks for the paired device.
4. Your SurroundBar will now be displayed on
your source device and available to pair and/
or connect. Select the “polk soundbar” on
your device to initiate the connection process.
5. After a short delay (5 seconds), the two de-
vices should now be connected. You should
hear a short tone and the Bluetooth source
LED will now be steady blue.
6. Play your music from your device!
Note: If your device asks for a passcode to pair
to the SurroundBar, enter “0000.”
How to disconnect with a Bluetooth device:
1. Press and release the remote control
Bluetooth button, or
2. Press and release the Bluetooth source
button, or
3. Turn off or disconnect the Bluetooth feature
on your Bluetooth device.
The SurroundBar will emit a short tone and the
Bluetooth source symbol will begin slowly pulsing
when disconnected.
Automatic connection:
Any time you want to connect the last connected
device and play it through the SurroundBar,
do the following:
1. Turn your device’s Bluetooth function on.
2. Enter Bluetooth source by pressing the Blue-
tooth source button from the remote or press
the Bluetooth button on the SurroundBar.
3. After a short delay, the two devices will auto-
matically connect, you will hear a short tone,
and the Bluetooth source LED will now
be steady blue.
Note: By default, the last connected Bluetooth
device will automatically connect if available.
Pair and/or connect to a device when in Bluetooth
source, but disconnected:
1. Engage the Bluetooth function on your
Bluetooth source device. See your device’s
manual for instructions.
a. The SurroundBar will be displayed on
your source device as available to pair
and connect. Select the “polk soundbar”
on your device to initiate the pairing and
connection process.
After a short delay, the two devices should now
be paired and connected. You should hear a short
tone and the Bluetooth source symbol will now
be steady blue.
How to disconnect:
Note: Anytime The SurroundBar exits SLEEP
mode and is in Bluetooth source, the SurroundBar
will automatically connect to the last connected
Bluetooth device if the paired device’s Bluetooth
feature is on.
9
C
ustomer
S
ervice Hours of
O
peration: Monday-Friday, 9am-5:30pm est polkcs
@
polkaudio.co
m
Bl
ue
t
oo
th
®
Wireless Technolo
gy
To use
y
ou
r
B
luetooth wireless technolo
g
y device
with the SurroundBar,
y
ou must fi rst
p
air
y
ou
r
device with your SurroundBar. Pairin
g
creates the
abilit
y
of
y
ou
r
Bluetoot
h
device to connect with
your SurroundBar wirelessly. Pairin
g
is like a hand
-
shake between
y
our Bluetooth device and
y
ou
r
SurroundBar in which they meet and exchan
g
e
inf
o
rm
a
ti
o
n.
You onl
y
have to
p
air
y
our SurroundBar with
y
ou
r
Bl
ue
t
oo
t
h
device one time for this exchan
g
e o
f
information to take
p
lace. After that
y
ou sim
p
l
y
select the “
p
olk soundbar” from
y
our device list
to make the connection to
y
our SurroundBar
.
Th
e
Su
rr
ou
n
d
B
a
r
ca
n h
o
l
d
8
Bl
ue
t
oo
th
de
vi
ces
in
its memory. If enou
g
h devices pair after yours, you
r
device could be dro
pp
ed from the memor
y
list.
P
air and connect
y
our Bluetooth device
with th
e
Su
rr
ou
n
d
B
a
r
:
1
.
M
a
k
e sure
y
ou
r
Bl
ue
t
oo
t
h
de
vi
ce
a
n
d
SurroundBar are both
p
owered on.
2
. A
c
tiv
a
t
e
th
e
B
l
ue
t
oo
th
f
unct
i
on on
y
ou
r
Bluetooth source device. See
y
our device’s
m
a
n
ua
l f
o
r in
s
tr
uc
ti
o
n
s.
3
.
P
ress t
h
e
Bl
uetoot
h
source
b
utton
f
rom t
h
e
S
urroundBar remote
.
Th
e
Bl
uetoot
h
LED
w
ill
ill
um
i
nate, t
h
en
b
e
gi
n
s
l
ow
l
y pu
l
s
i
n
g
as
i
t
l
oo
k
s
f
or t
h
e pa
i
re
d
d
ev
i
ce.
4
. Your
S
urroundBar will now be displayed on
your source device and available to pair and
/
or connect.
S
elect the “polk soundbar” on
y
our device to initiate the connection
p
rocess
.
5
. After a short delay
(
5 seconds
)
, the two de
-
vices should now be connected. You should
hear a short tone and the Bluetooth source
LED
w
ill
now
b
e stea
d
y
bl
ue
.
6
.
Pl
ay your mus
i
c
f
rom your
d
ev
i
ce
!
N
ote
:
If
your
d
ev
i
ce as
k
s
f
or a passco
d
e to pa
ir
to the
S
urroundBar, enter “0000.”
How to disconnect with a
B
luetoot
h
device:
1.
P
r
ess
a
n
d
r
elease
t
he
r
e
m
o
t
e
co
ntr
ol
Bluetooth button, or
2
.
P
r
ess
a
n
d
r
elease
t
he
Blue
t
oo
t
h
sou
r
ce
b
utton
,
o
r
3.
Tu
rn
off
o
r
disco
nn
ec
t t
he
Bluetooth
fea
t
u
r
e
on
y
our Bluetooth device
.
T
h
e
Su
rr
ou
n
d
B
a
r will
e
mit
a
s
h
o
rt t
o
n
e
a
n
d
th
e
Bluetooth
source symbol will begin slowly pulsing
when disconnected.
A
utomat
i
c connect
i
on
:
A
n
y
time
y
ou want to connect the last connected
d
evice and play it through the
S
urroundBar,
d
o t
h
e
f
o
ll
ow
i
ng
:
1
.
Turn your device’s
Blue
t
oo
t
h
fu
n
c
t
io
n
o
n
.
2
.
E
nt
er
Blue
t
oo
t
h
source
b
y press
i
ng t
h
e
Blue-
tooth
source
b
utton
f
rom t
h
e remote or
p
ress
t
he
Bluetooth
button on the SurroundBar.
3
.
Af
ter a s
h
ort
d
e
l
a
y
, t
h
e two
d
ev
i
ces w
ill
auto
-
m
at
i
ca
lly
connect,
y
ou w
ill
h
ear a s
h
ort tone,
a
n
d
th
e
B
l
ue
t
oo
t
h
source LED will now
be steady blue.
No
t
e
:B
y
default, the last connected
Bluetooth
d
evice will automaticall
y
connect if available.
Pair and/or connect to a device when in
B
l
ue
t
oo
t
h
s
ource
,
b
ut
di
sconnecte
d:
1
.
E
ngage t
h
e
B
l
ue
t
oo
t
h
function on your
B
luetooth source device. See
y
our device’s
m
anua
l
f
or
i
nstruct
i
ons
.
a
.The SurroundBar will be dis
p
la
y
ed on
y
our source device as available to
p
ai
r
and connect. Select the “
p
olk soundbar”
on your
d
ev
i
ce to
i
n
i
t
i
ate t
h
e pa
i
r
i
ng an
d
connection
p
rocess.
A
fter a short dela
y
, the two devices should now
b
e
p
aired and connected. You should hear a short
t
one and the Bluetooth source s
y
mbol will now
b
e stead
y
blue
.
How to disconnect:
N
ote:
A
n
y
time The SurroundBar exits SLEEP
m
o
d
e an
d
i
s
i
n
Bl
uetoot
h
source
,
the SurroundBa
r
will
automat
i
ca
lly
connect to t
h
e
l
ast connecte
d
Bluetooth
device if the
p
aired device’s
Bluetooth
fea
t
u
r
e
is
o
n
.
10 Polk Customer Service 800-377-7655 (Outside USA & Canada: 410-358-3600)
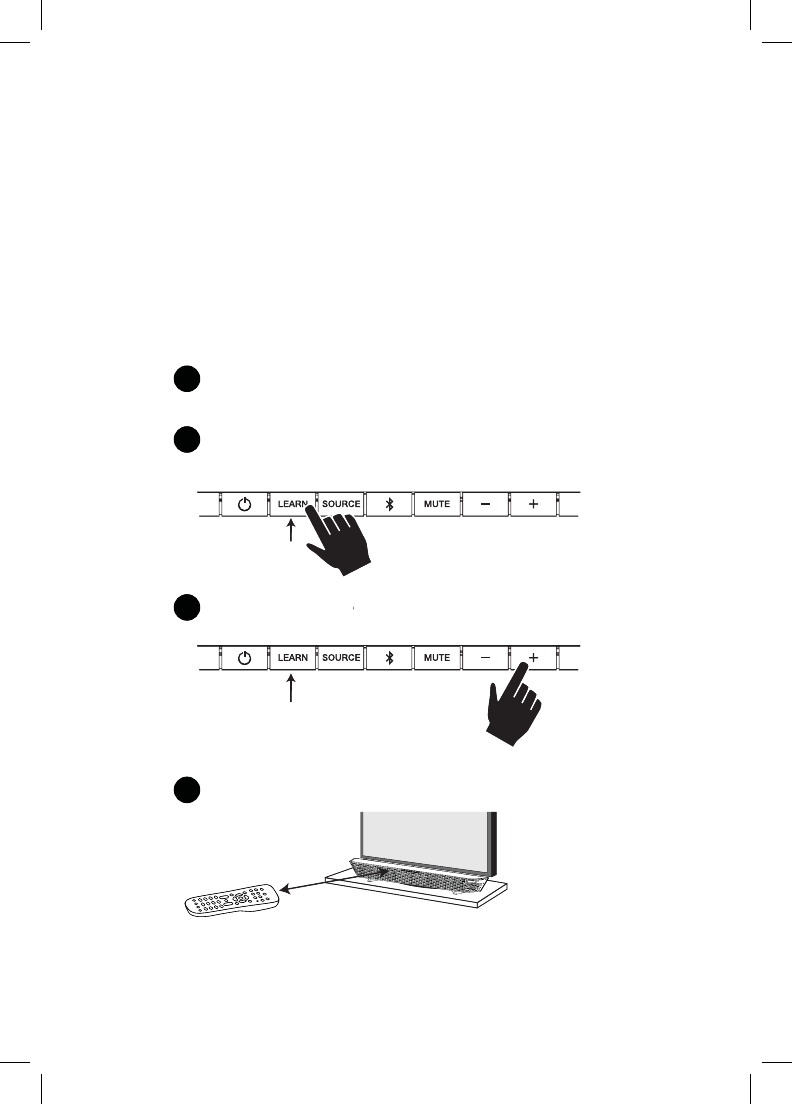
How To Set Up A Remote Control
For Your SurroundBar
SmartBar™ Programming Note:
For your SurroundBar to respond to your remote
control, you MUST FIRST program the bar to
respond to your television’s original IR (Infra-Red)
remote. An RF (Radio Frequency) remote will
not work. Other remotes (cable, satellite) will
work only after you have programmed the bar
to respond to the TV’s IR remote.
Programming Instructions:
Your SurroundBar is currently programmed to
respond to the remote control that is included with
the product. However, we strongly recommend
programming the SurroundBar to also respond
to your existing remote control using the steps
illustrated below. This will enable you to oper-
ate all of your components using a single remote
control. While programming the SurroundBar,
ignore anything that may be displayed on the
TV screen.
Example: To teach your bar the “Volume Up”
command of your remote control:
2
3
4
LED
Press and hold “LEARN” for 2 seconds, or until LED
blinks blue, then release the “LEARN” button.
1
The SurroundBar is turned on and the LED is solid green.
And you have sound coming from the bar.
Hold TV remote 1' - 2' from SurroundBar.
Press and release Volume Up “
+ ”
LED turns solid blue.
Solid blue
LED
Blinks blue
1' - 2'
10
Polk
C
ustomer
S
ervice 800-377-7655 (
O
utside U
S
A &
C
anada: 410-358-3600
)
How To Set U
p
A Remote Control
For Your
S
urroundBa
r
S
martBar™ Programming Note:
For
y
our
S
urroundBar to res
p
ond to
y
our remote
c
ontrol, you MU
S
T FIR
S
T program the bar to
r
espond to your television’s original IR
(
Infra-Red
)
r
emote. An RF
(
Radio Frequency
)
remote will
no
t w
o
rk.
O
ther remotes
(
cable, satellite
)
will
work onl
y
a
ft
er
you have programmed the bar
r
to res
p
ond to the TV’s IR remote
.
P
rogramm
i
ng
I
nstruct
i
ons:
Y
our
S
urroundBar is currently programmed to
r
espon
d
to t
h
e remote contro
l
t
h
at
i
s
i
nc
l
u
d
e
d
w
i
t
h
th
e pro
d
uct.
H
owever, we strong
l
y recommen
d
p
rogramming the
S
urroundBar to also respond
t
o your ex
i
st
i
ng remote contro
l
us
i
ng t
h
e steps
ill
ustrate
d
b
e
l
ow.
Thi
s w
ill
ena
bl
e you to oper-
a
te a
ll
o
f
your components us
i
ng a s
i
ng
l
e remote
c
ontro
l
.
W
hile pro
g
rammin
g
the
S
urroundBar,
i
gnore anyt
hi
ng t
h
at may
b
e
di
sp
l
aye
d
on t
h
e
TV
screen.
Example:
To teach your bar the “Volume Up”
c
omman
d
o
f
y
our remote contro
l
:
2
3
4
LED
Press and hold “LEARN” for 2 seconds, or until LED
blinks blue
,
then
r
e
l
ease t
h
e
“LEARN”
b
utton
.
1
Th
e
Su
r
r
ou
n
d
B
a
r i
s
t
ur
ned on and the LED is solid
gr
ee
n
.
And you have sound coming f
r
o
m the bar
.
H
o
ld
TV
r
e
mote 1
'
- 2
'
fr
om
S
urroun
dB
a
r
.
P
ress and
r
elease
V
olume Up “
V
V
+
”
L
ED t
ur
n
s
so
li
d
b
l
ue.
So
li
d
b
l
ue
LED
Bli
n
ks
blue
1'
-
2'
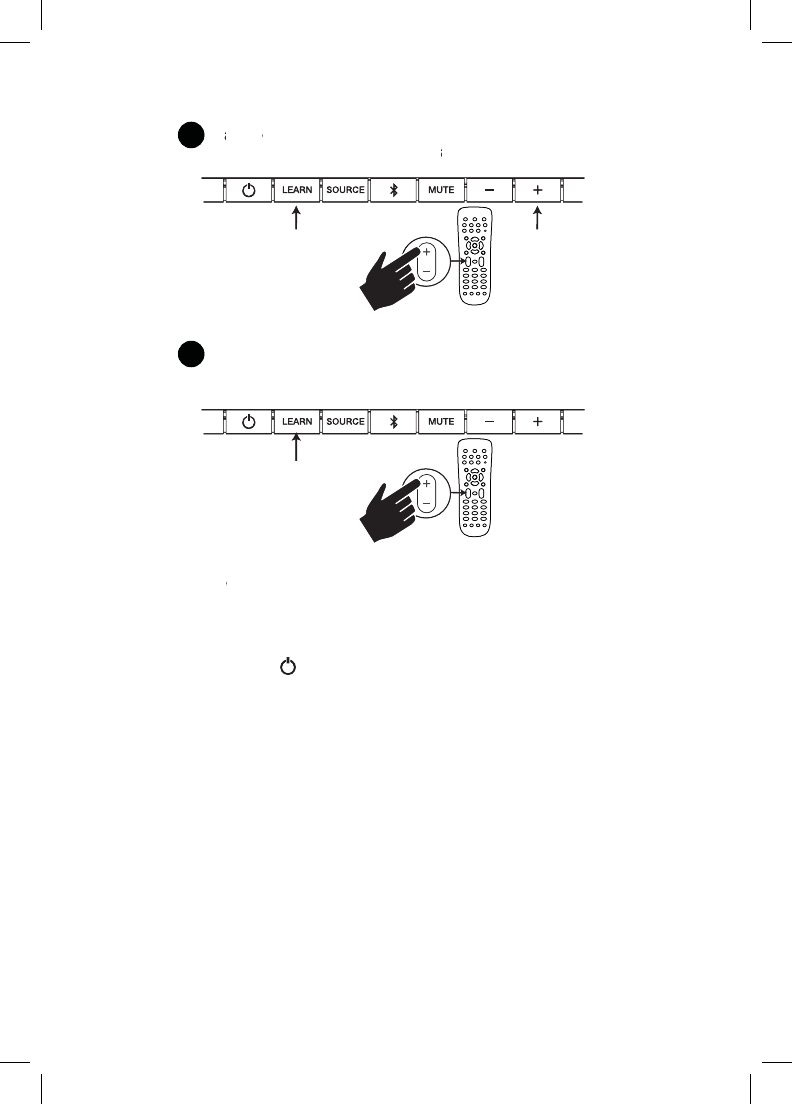
11
Customer Service Hours of Operation: Monday-Friday, 9am-5:30pm est polkcs@polkaudio.com
Repeat steps 1-6 to program “Volume Down” ( – ),
Source, Mute and Power button ( ).
Note: If your bar fails to learn certain IR remote
codes, the power LED will blink red. Try erasing
any previously programmed codes (see below)
and carefully repeat steps 1-6 above.
Code Erasing Procedure: If you have pro-
grammed your SurroundBar to respond to
a remote control and you no longer want it to do
so, erase the codes by pressing the LEARN key
for about two seconds while the unit is in standby
mode (power LED is red). You’ll know that previ-
ously learned codes have been successfully
erased when the LEARN LED blinks red twice.
Note: This procedure removes ALL of your bar’s
remote control programming. If you only need
to change the programming for some of the bar
buttons, follow the six steps in the sequence previ-
ously described to redo any previous programming.
The SurroundBar will continue to respond to the
provided credit card remote control.
5
VOL
LED
LEARN LED blinks with
each button press
LED
Volume Up button
LED blinks blue
LED
LED blinks blue
Tap “Volume Up” button on your TV’s remote control
4 - 8 times, once per second. Tap, do not hold.
6When the LEARN LED and the button (command)
both blink blue, the command has been learned.
Verify command works.
VOL
11
C
ustomer
S
ervice Hours of
O
peration: Monday-Friday, 9am-5:30pm est polkcs
@
polkaudio.co
m
R
epeat steps 1-6 to pro
g
ram “Volume Down” ( – ),
).
N
ote
:
If
your
b
ar
f
a
il
s to
l
earn certa
i
n
IR
remote
co
d
es, t
h
e power
LED
w
ill
bli
n
k
re
d
.
T
ry eras
i
n
g
any previously pro
g
rammed codes (see below)
an
d
care
f
u
ll
y repeat steps 1-6 a
b
ove
.
C
ode Erasing Procedure
:
If
y
ou
h
ave
p
ro-
grammed your
S
urroundBar to respond to
a remote contro
l
an
d
you no
l
onger want
i
t to
d
o
so, erase t
h
e co
d
es
b
y press
i
ng t
h
e
LEARN
k
ey
f
or a
b
out two secon
d
s w
hil
e t
h
e un
i
t
i
s
i
n stan
dby
mode
(p
ower LED is red
)
. You’ll know that
p
revi-
o
usl
y
learned codes have been successfull
y
e
r
ased
wh
e
n th
e
LEARN LED
b
link
s
r
ed
twi
ce
.
N
ote
:
Thi
s proce
d
ure removes
ALL
o
f
your
b
ar
’
s
remote control pro
g
rammin
g
. If you only need
to c
h
an
g
e t
h
e pro
g
ramm
i
n
g
f
or some o
f
t
h
e
b
a
r
b
uttons,
f
o
ll
ow t
h
e s
i
x steps
i
n t
h
e sequence prev
i-
o
us
l
y
d
escr
ib
e
d
to re
d
o any prev
i
ous pro
g
ramm
i
n
g.
T
he
S
urroundBar will continue to res
p
ond to the
p
rovided credit card remote control
.
5
VO
L
LED
LEARN
LED
bli
n
ks
w
i
t
h
e
ac
h
b
utton pr
es
s
LED
Vo
l
ume
U
p
b
utt
o
n
LED blinks blue
LED
LED
bli
n
ks
blue
T
ap “V
T
T
olume Up” button on your TV’
V
V
s
r
e
m
o
t
e
co
nt
r
o
l
4 - 8 times, once per second. T
ap, do not hold
T
T
.
6
When the LEARN LED and the button
(
command
)
b
oth blink blue, the command has been lea
r
ne
d.
V
erify command works.
V
V
VO
L
Source, Mute and Power button (

12 Polk Customer Service 800-377-7655 (Outside USA & Canada: 410-358-3600)
Troubleshooting
The bar does not power on.
tEnsure you have plugged the power supply
into a live wall outlet.
tEnsure that all components of the power
supply are connected properly.
tEnsure the power supply is properly
connected to the bar power input.
No sound from the bar.
tCheck that the TV or cable box is providing
a signal.
tIf necessary, check using an alternate source.
tCheck that the bar is receiving power
and is turned on.
tTurn up the volume of the bar.
tCheck the input cables to make sure
they are connected securely.
tTurn up the volume of your television
or cable box.
tCheck mute status: Is the bar status
light slowly blinking green? If so, press
the Mute button on the bar.
The sound coming from the bar is distorted.
tTry turning down the volume of your audio
source, if possible.
tAudio processing (see FAQ’s on pages
10-11)—there may be audio processing
occurring prior to reaching the bar.
Disable this processing.
The included remote control won’t work.
tEnsure the battery’s protective plastic
tab has been removed.
tReplace the battery (CR2025).
The bar won’t learn my remote
control commands.
tCarefully follow the programming instructions
on the previous page of this manual.
tHold the remote steady and 1-2 feet
from the front of the bar.
tQuickly “tap” the button on your existing
remote until the status LED blinks green.
Note: The bar learns almost all IR commands,
but some IR protocols cannot be programmed.
The volume of my television speakers gets
louder than my N1 SurroundBar system
over time.
tTurn off your TV speakers per the
instructions on page 7 of this manual.
tWhen the remote control volume button
is held down, your television may change
volume levels faster than the bar. Use the
buttons on the bar to adjust the volume
of the bar to the correct balance with
the TV speakers.
FAQ’s (Frequently Asked Questions)
My TV does not have an optical output.
How do I connect my audio?
You have several options for connecting
your audio:
t Use the optical output of your source unit
(cable/satellite box, DVD player, etc.) and
connect directly to the SurroundBar using
the supplied optical cable.
tUse the 1/8" (3.5mm) analog/headphone
output of your TV (if available) and
connect directly to the N1 SurroundBar
using 1/8" (3.5mm) to 1/8” (3.5mm)
analog cable.
tUse the RCA audio outputs (white/red pair)
on your TV (if available) and connect
directly to the N1 SurroundBar using
1/8" (3.5mm) to 1/8” (3.5mm) analog
cable and 1/8" (3.5mm) to RCA adapter.
12
Polk
C
ustomer
S
ervice 800-377-7655 (
O
utside U
S
A &
C
anada: 410-358-3600
)
T
rou
bl
es
h
oot
i
ng
The bar does not
p
ower on
.
t
E
nsure you have plu
gg
ed the power supply
int
o
a
liv
e
w
a
ll
ou
tl
e
t
.
t
E
nsure t
h
at a
ll
com
p
onents o
f
t
h
e
p
owe
r
su
pply
are connecte
d
p
ro
p
er
ly
.
t
E
nsure the
p
ower su
pp
l
y
is
p
ro
p
erl
y
connected to the bar
p
ower in
p
ut.
N
o soun
d
f
rom t
h
e
b
ar
.
tCheck that the TV or cable box is providin
g
a si
g
nal.
t
If
necessary, c
h
ec
k
us
i
n
g
an a
l
ternate source.
t
C
heck that the bar is receiving powe
r
and is turned on
.
t
T
urn u
p
t
h
e vo
l
ume o
f
t
h
e
b
ar.
t
Check the in
p
ut cables to make sure
t
h
e
y
are connecte
d
secure
ly.
t
T
urn u
p
t
h
e vo
l
ume o
f
y
our te
l
ev
i
s
i
on
or cable box.
tCheck mute status: Is the bar status
li
g
ht slowly blinkin
g
g
reen? If so, press
the Mute button on the bar
.
Th
e soun
d
com
i
ng
f
rom t
h
e
b
ar
i
s
di
storte
d.
t
T
ry turn
i
ng
d
own t
h
e vo
l
ume o
f
your au
di
o
source,
if
poss
ibl
e.
t
A
udio processing
(
see FA
Q
’s on pages
10-11
)
—there may be audio processing
occurr
i
ng pr
i
or to reac
hi
ng t
h
e
b
ar.
Di
sa
bl
e t
hi
s process
i
ng
.
Th
e
i
nc
l
u
d
e
d
remote contro
l
won
’
t wor
k.
t
E
nsure t
h
e
b
atter
y’
s
p
rotect
i
ve
pl
ast
i
c
ta
b
h
as
b
een remove
d.
t
R
e
p
lace the batter
y
(
CR2025
).
Th
e
b
ar won
’
t
l
earn m
y
remote
contro
l
comman
d
s.
tCarefully follow the pro
g
rammin
g
instructions
on the previous page of this manual.
tHold the remote stead
y
and 1-2 feet
from the front of the bar
.
t
Quickly “tap” the button on your existing
remote unt
il
t
h
e status
LED
bli
n
k
s green
.
Note:
The bar learns almost all IR commands,
b
ut some
IR
protoco
l
s cannot
b
e programme
d.
Th
e vo
l
ume o
f
m
y
te
l
ev
i
s
i
on spea
k
ers
g
ets
l
ouder than m
y
N1
S
urroundBar s
y
stem
o
ver time.
t
Turn off your TV speakers per the
instructions on pa
g
e 7 of this manual
.
t
When the remote control volume button
is held down, your television may chan
g
e
v
o
l
u
m
e
l
e
v
e
l
s
f
as
t
e
r th
a
n th
e
ba
r.
Use
th
e
b
uttons on t
h
e
b
ar to a
dj
ust t
h
e vo
l
ume
o
f th
e
ba
r t
o
th
e
co
rr
ec
t
ba
l
a
n
ce
with
the TV s
p
eakers
.
F
AQ’s (Frequentl
y
Asked Questions
)
M
y
TV
d
oes not
h
ave an opt
i
ca
l
output.
H
ow do I connect my audio
?
You have several options for connecting
y
our au
di
o:
t Use the optical output of your source unit
(cable/satellite box, DVD player, etc.) and
connect directly to the SurroundBar usin
g
t
he supplied optical cable
.
t
U
se the 1/8" (3.5mm) analo
g
/headphone
output of your TV (if available) and
connect directly to the N1 SurroundBar
using 1/8" (3.5mm) to 1/8” (3.5mm)
analog cable.
t
U
se the R
C
A audio out
p
uts
(
white
/
red
p
air
)
on your TV
(
if available
)
and connect
directly to the N1 SurroundBar using
1/8" (3.5mm) to 1/8” (3.5mm) analog
cable and 1
/
8"
(
3.5mm
)
to R
C
A ada
p
ter.

13
Customer Service Hours of Operation: Monday-Friday, 9am-5:30pm est polkcs@polkaudio.com
What if my provided optical cable is too short?
tWe did our best to provide a cable of
adequate length; however, there might
be a few setup instances in which the
cable may be too short. If that is your
situation, your local electronics store
will have cables that meet your
required length.
My audio sounds strange and distorted.
tYour N1 SurroundBar requires a clean,
unaltered stereo signal for proper audio
performance. If the sound from your
N1 SurroundBar is strange or distorted,
then check the audio menus of whatever
source(s) are connected to your SurroundBar
and make sure any audio processing
is turned off.
Why can’t I successfully program
the N1 SurroundBar to respond
to my remote control?
tThere are many remote control formats,
and we have done our best to make the
N1 SurroundBar compatible with the
most popular brands. However, there
are likely some cases in which the bar
will not be able to learn your remote codes.
tIn this case, please use the remote control
provided with the N1 SurroundBar product
or try a different universal remote control.
Note: RF only remotes will not work
with this system.
How do I control the N1 SurroundBar?
There are three ways to control your
N1 SurroundBar:
tUse the buttons on the front of the bar.
tUse the provided remote control.
tProgram the N1 SurroundBar to
respond to your existing remote
(see included instructions).
My N1 SurroundBar was responding to com-
mands, but now it isn’t. What should I do?
tIn this rare event, simply turn off the power
(switch located on the back of the bar), wait
a few seconds, and then turn the power back
on. This should restore control.
How do I erase previously learned remote
control commands?
t If you have programmed your SurroundBar
to respond to a remote control and you no
longer want it to do so, then you can erase
the codes by pressing the LEARN key for
about two seconds while the unit is in standby
mode (power LED is red). The N1 Surround-
Bar will continue to respond to the provided
credit card remote control.
To contact Customer Service/
Technical Support:
tIf you have a question or comment, please
feel free to call us or email us. In North
America and Canada, call Polk Customer
Service: 800-377-7655 (M-F 9-5:30 EST)
or via email polkcs@polkaudio.com.
Outside the US, call 410-358-3600.
Polk is a DEI Holdings, Inc. Company. Polk, SDA Surround and
SurroundBar are registered trademarks of Polk Audio, Inc. N1
SurroundBar and SmartBar are trademarks of Polk Audio, Inc.
All other trademarks are the property of their respective owners.
© 2013 Microsoft Corporation. All Rights Reserved. Microsoft, 343
Industries, the 343 Industries logo, Halo, the Halo logo, Turn 10, the
Turn 10 logo, Forza Motorsport, the Forza Motorsport logo, Xbox, Xbox
360, Xbox One, and the Xbox logos, are trademarks of the Microsoft
group of companies.
Products that have earned the Energy Star® are designed to protect
the environment through superior energy effi ciency.
Manufactured under licence from Dolby Laboratories. Dolby and the
double-D symbol are registered trademarks of Dolby Laboratories.
The Bluetooth® word mark and logos are registered trademarks
owned by Bluetooth SIG, Inc. and any use of such marks by Polk
is under license. Other trademarks and trade names are those
of their respective owners.
The “aptX® software is copyright CSR plc or its group companies.
All rights reserved. The aptX® mark and the aptX logo are trademarks
of CSR plc or one of its group companies and may be registered
in one or more jurisdictions.”
is a trademark of SRS Labs, Inc. TruSurround HD
technology is incorporated under license form SRS Labs, Inc.
13
C
ustomer
S
ervice Hours of
O
peration: Monday-Friday, 9am-5:30pm est polkcs
@
polkaudio.co
m
What if my provided optical cable is too short
?
tWe did our best to
p
rovide a cable o
f
a
d
equate
l
engt
h
;
h
owever, t
h
ere m
i
g
h
t
be a few setu
p
instances in which the
cable ma
y
be too short. If that is
y
ou
r
situation,
y
our local electronics store
will have cables that meet
y
ou
r
requ
i
re
d
l
engt
h.
M
y au
di
o soun
d
s strange an
d
di
storte
d.
t
Y
our N1
S
urroundBar requires a clean,
una
l
tere
d
stereo s
i
gna
l
f
or proper au
di
o
p
er
f
ormance.
If
t
h
e soun
d
f
rom
y
ou
r
N1
S
urroundBar is strange or distorted,
then check the audio menus of whateve
r
source
(
s
)
are connected to
y
our SurroundBa
r
an
d
ma
k
e sure any au
di
o process
i
ng
is turned off.
Wh
y
can’t I successfull
y
pro
g
ram
the N1 SurroundBar to res
p
ond
to m
y
remote control
?
t
Th
ere are man
y
remote contro
l
f
ormats,
and we have done our best to make the
N1
S
urroundBar com
p
atible with the
most popular brands. However, there
are likel
y
some cases in which the ba
r
will not be able to learn
y
our remote codes.
tIn this case,
p
lease use the remote control
p
rovided with the N1 SurroundBar
p
roduct
or tr
y
a different universal remote control
.
N
o
t
e:
RF onl
y
remotes will not wor
k
with this s
y
stem
.
How do I control the N1
S
urroundBar
?
There are three wa
y
s to control
y
ou
r
N1
Su
rr
ou
n
d
B
a
r:
t
U
se t
h
e
b
uttons on t
h
e
f
ront o
f
t
h
e
b
ar
.
tUse the
p
rovided remote control.
t
Program the N1
S
urroundBar to
respon
d
to your ex
i
st
i
ng remote
(
see included instructions
).
My N1
S
urroundBar was responding to com
-
mands, but now it isn’t. What should I do
?
t
I
n this rare event, sim
p
l
y
turn off the
p
owe
r
(
switch located on the back of the bar
)
, wait
a few seconds, and then turn the
p
ower bac
k
on. This should restore control
.
H
ow
d
o
I
erase prev
i
ous
l
y
l
earne
d
remote
control commands
?
t
If you have programmed your
S
urroundBa
r
to respon
d
to a remote contro
l
an
d
you no
l
onger want
i
t to
d
o so, t
h
en you can erase
t
h
e co
d
es
b
y press
i
ng t
h
e
LEARN
k
ey
f
o
r
ab
out two secon
d
s w
hil
e t
h
e un
i
t
i
s
i
n stan
dby
mode
(p
ower LED is red
)
. The N1 Surround
-
B
ar w
ill
cont
i
nue to res
p
on
d
to t
h
e
p
rov
id
e
d
credit card remote control
.
To contact
C
ustomer
S
ervice
/
Technical Su
pp
ort
:
t
If
y
ou
h
ave a
q
uest
i
on or comment,
pl
ease
feel free to call us or email us. In North
America and
C
anada, call Polk
C
ustome
r
Service: 800-377-7655
(
M-F 9-5:30 EST
)
or via email polkcs@polkaudio.com.
O
utside the U
S
, call 410-358-3600
.
Polk is a DEI Holdings, Inc.
C
ompany. Polk,
S
DA
S
urround and
SurroundBar are re
g
istered trademarks of Polk Audio, Inc. N1
S
urroundBar and
S
martBar are trademarks of Polk Audio, Inc
.
All
ot
h
er tra
d
emar
k
s are t
h
e property o
f
t
h
e
i
r respect
i
ve owners
.
©
2013 Microsoft
C
orporation. All Rights Reserved. Microsoft, 343
Industries, the 343 Industries logo, Halo, the Halo logo, Turn 10, the
Turn 10 logo, Forza Motorsport, the Forza Motorsport logo, Xbox, Xbox
360, Xbox One, and the Xbox lo
g
os, are trademarks of the Microsoft
group o
f
compan
i
es
.
Products that have earned the Energy
S
ta
r
®
are designed to protect
t
h
e env
i
ronment t
h
roug
h
super
i
or energy e
ffi
c
i
ency.
Manufactured under licence from Dolb
y
Laboratories. Dolb
y
and the
double-D symbol are re
g
istered trademarks of Dolby Laboratories.
The Bluetooth
®
word mark and logos are registered trademarks
owned by Bluetooth SIG, Inc. and any use of such marks by Pol
k
is under license. Other trademarks and trade names are those
o
f
t
h
e
i
r res
p
ect
i
ve owners.
Th
e
“
apt
X
®
software is copyright CSR plc or its group companies.
All ri
g
hts reserved. The apt
X
®
mark and the aptX lo
g
o are trademarks
of CSR plc or one of its group companies and may be registered
in one or more
j
urisdictions.
”
is a trademark of SRS Labs, Inc. TruSurround HD
technology is incorporated under license form SRS Labs, Inc
.

14 Polk Customer Service 800-377-7655 (Outside USA & Canada: 410-358-3600)
Limited Warranty
Polk Audio, Inc., warrants to the original retail purchaser
only. This warranty will terminate automatically prior to
its stated expiration if the original retail purchaser sells
or transfers the Product to any other party. Polk Au-
dio, Inc., warrants, to the original retail purchaser only,
that the LOUDSPEAKER(S), PASSIVE CROSSOVER
COMPONENT(S) and ENCLOSURE on this Polk Audio
Loudspeaker Product will be free from defects in material
and workmanship for a period of three (3) years from the
date of original retail purchase from a Polk Audio Authorized
Dealer. Furthermore, Polk Audio, Inc., warrants, to the origi-
nal retail purchaser only, that any AMPLIFIER OR OTHER
ELECTRONIC COMPONENT that may be included in this
Polk Audio Loudspeaker Product will be free from defects
in material and workmanship for a period of one (1) year
from the date of original retail purchase from a Polk Audio
Authorized Dealer. To allow Polk Audio to offer the best
possible warranty service, please fi ll out the Product Reg-
istration Card(s) and send it to the Factory at the address
provided on the Product Registration Card(s) within ten (10)
days of the date of original purchase. Defective Products
must be shipped, together with proof of purchase, prepaid
insured to the Polk Audio Authorized Dealer from whom
you purchased the Product, or to the Factory at 1 Viper
Way, Vista, California 92081. Products must be shipped in
the original shipping container or its equivalent; in any case
the risk of loss or damage in transit is to be borne by you.
If upon examination at the Factory or Polk Audio Autho-
rized Dealer it is determined that the unit was defective in
materials or workmanship at any time during this Warranty
period, Polk Audio or the Polk Audio Authorized Dealer will,
at its option, repair or replace this Product at no additional
charge, except as set forth below. All replaced parts and
Products become the property of Polk Audio. Products
replaced or repaired under this warranty will be returned to
you, within a reasonable time, freight prepaid. This warranty
does not include service or parts to repair damage caused
by accident, disaster, misuse, abuse, negligence, inad-
equate packing or shipping procedures, commercial use,
voltage inputs in excess of the rated maximum of the unit,
cosmetic appearance of cabinetry not directly attributable to
defect in materials or workmanship, or service, repair,
or modifi cation of the Product which has not been
authorized or approved by Polk Audio. This warranty shall
terminate if the serial number on the Product has been
removed, tampered with or defaced.
This warranty is in lieu of all other expressed Warranties.
If this Product is defective in materials or workmanship
as warranted above, your sole remedy shall be repair or
replacement as provided above. In no event will Polk Audio,
Inc. be liable to you for any incidental or consequential
damages arising out of the use or inability to use the
Product, even if Polk Audio, Inc., or a Polk Audio Authorized
Dealer, has been advised of the possibility of such dam-
ages, or for any claim by any other party. Some states do
not allow the exclusion or limitation of consequential dam-
ages, so the above limitation and exclusion may not apply
to you. All implied warranties on this Product are limited to
the duration of this expressed Warranty. Some states do not
allow limitation on how long an implied Warranty lasts, so
the above limitations may not apply to you. This Warranty
gives you specifi c legal rights, and you also may have other
rights which vary from state to state.
This Warranty applies only to Products purchased in
the United States of America, its possessions, and U.S.
and NATO armed forces exchanges and audio clubs.
The Warranty terms and conditions applicable to Products
purchased in other countries are available from the Polk
Audio Authorized Distributors in such countries.
Customer Service
Thank you for your Polk Audio purchase. If you have
a question or comment, please feel free to call us or
email us. In North America and Canada, call Polk Audio
Customer Service 800-377-7655 (M-F, 9-5:30 EST)
or via email polkcs@polkaudio.com. Outside the US,
call 410-358-3600.
14
Polk
C
ustomer
S
ervice 800-377-7655 (
O
utside U
S
A &
C
anada: 410-358-3600
)
Li
m
i
te
d
W
arrant
y
P
o
lk
A
u
di
o,
I
nc., warrants to t
h
e or
i
g
i
na
l
reta
il
purc
h
aser
onl
y
. This warrant
y
will terminate automaticall
y
p
rior to
its stated expiration if the original retail purchaser sells
or transfers the Product to any other party. Polk Au-
dio, Inc., warrants, to the ori
g
inal retail purchaser only,
that the LOUDSPEAKER(S), PASSIVE CROSSOVER
COMPONENT
(
S
)
and ENCLOSURE on this Polk Audio
L
ouds
p
eaker Product will be free from defects in material
and workmanship for a period of three
(
3
)
years from the
date of ori
g
inal retail purchase from a Polk Audio Authorized
D
ealer. Furthermore, Polk Audio, Inc., warrants, to the ori
g
i
-
nal retail purchaser only, that any AMPLIFIER OR OTHER
E
LECTRONIC COMPONENT that may be included in this
P
olk Audio Louds
p
eaker Product will be free from defects
in material and workmanshi
p
for a
p
eriod of one
(
1
)
y
ea
r
from the date of ori
g
inal retail purchase from a Polk Audio
A
u
th
o
riz
ed
D
ea
l
e
r. T
o
a
ll
o
w P
o
lk A
ud
i
o
t
o
o
ff
e
r th
e
bes
t
poss
ibl
e warranty serv
i
ce, p
l
ease
fi
ll
out t
h
e
P
ro
d
uct
R
eg
-
istration Card
(
s
)
and send it to the Factor
y
at the address
provided on the Product Registration
C
ard
(
s
)
within ten
(
10
)
d
ays o
f
t
h
e
d
ate o
f
or
i
g
i
na
l
purc
h
ase.
D
e
f
ect
i
ve
P
ro
d
ucts
must be shipped, to
g
ether with proof of purchase, prepaid
i
nsure
d
to t
h
e
P
o
lk
A
u
di
o
A
ut
h
or
i
ze
d
D
ea
l
er
f
rom w
h
om
y
ou
p
urchased the Product, or to the Factor
y
at 1 Vi
p
e
r
Wa
y
, Vista, California 92081. Products must be shi
pp
ed in
the ori
g
inal shippin
g
container or its equivalent; in any case
t
h
e r
i
s
k
o
f
l
oss or
d
amage
i
n trans
i
t
i
s to
b
e
b
orne
b
y you.
If
upon exam
i
nat
i
on at t
h
e
F
actory or
P
o
lk
A
u
di
o
A
ut
h
o
-
riz
ed
D
ea
l
e
r it i
s
de
t
e
rmin
ed
th
a
t th
e
u
nit w
as
de
f
ec
tiv
e
in
materials or workmanship at any time during this Warranty
p
eriod, Polk Audio or the Polk Audio Authorized Dealer will,
at its option, repair or replace this Product at no additional
char
g
e, except as set forth below. All replaced parts and
P
ro
d
ucts
b
ecome t
h
e property o
f
P
o
lk
A
u
di
o.
P
ro
d
ucts
rep
l
ace
d
or repa
i
re
d
un
d
er t
hi
s warranty w
ill
b
e returne
d
to
you, w
i
t
hi
n a reasona
bl
e t
i
me,
f
re
i
g
h
t prepa
id
.
Thi
s warranty
d
oes not
i
nc
l
u
d
e serv
i
ce or parts to repa
i
r
d
amage cause
d
by accident, disaster, misuse, abuse, negligence, inad
-
equate packing or shipping procedures, commercial use,
voltage inputs in excess of the rated maximum of the unit,
cosmetic a
pp
earance of cabinetr
y
not directl
y
attributable to
defect in materials or workmanshi
p
, or service, re
p
air,
o
r m
od
ifi
ca
ti
o
n
o
f th
e
Pr
oduc
t whi
c
h h
as
n
o
t
bee
n
authorized or a
pp
roved b
y
Polk Audio. This warrant
y
shall
terminate if the serial number on the Product has been
removed, tam
p
ered with or defaced
.
Thi
s warranty
i
s
i
n
li
eu o
f
a
ll
ot
h
er expresse
d
W
arrant
i
es.
If
t
hi
s
P
ro
d
uct
i
s
d
e
f
ect
i
ve
i
n mater
i
a
l
s or wor
k
mans
hi
p
as warranted above,
y
our sole remed
y
shall be re
p
air o
r
rep
l
acement as prov
id
e
d
a
b
ove.
I
n no event w
ill
P
o
lk
A
u
di
o,
Inc. be liable to you for any incidental or consequential
dama
g
es arisin
g
out of the use or inability to use the
Product
,
even if Polk Audio
,
Inc.
,
or a Polk Audio Authorized
Dealer, has been advised of the
p
ossibilit
y
of such dam
-
a
g
es, or for any claim by any other party. Some states do
not a
ll
ow t
h
e exc
l
us
i
on or
li
m
i
tat
i
on o
f
consequent
i
a
l
d
am
-
ages, so t
h
e a
b
ove
li
m
i
tat
i
on an
d
exc
l
us
i
on may not app
l
y
to
y
ou. All im
p
lied warranties on this Product are limited to
the duration of this expressed Warranty.
S
ome states do not
allow limitation on how long an implied Warranty lasts, so
the above limitations ma
y
not a
pp
l
y
to
y
ou. This Warrant
y
g
ives you specifi c le
g
al ri
g
hts, and you also may have othe
r
ri
g
hts which vary from state to state
.
Thi
s
W
arranty app
li
es on
l
y to
P
ro
d
ucts purc
h
ase
d
i
n
the United
S
tates of America, its possessions, and U.
S
.
and NATO armed forces exchan
g
es and audio clubs.
Th
e
W
arranty terms an
d
con
di
t
i
ons app
li
ca
bl
e to
P
ro
d
ucts
purchased in other countries are available from the Pol
k
Audio Authorized Distributors in such countries.
C
ustomer
S
ervic
e
Thank
y
ou for
y
our Polk Audio
p
urchase. If
y
ou have
a quest
i
on or comment, p
l
ease
f
ee
l
f
ree to ca
ll
us or
email us. In North America and Canada
,
call Polk Audio
Customer Service 800-377-7655
(
M-F, 9-5:30 EST
)
or via email polkcs
@
polkaudio.com.
O
utside the U
S
,
ca
ll 41
0
-
358
-
3600
.

15
Customer Service Hours of Operation: Monday-Friday, 9am-5:30pm est polkcs@polkaudio.com
Consignes de Sécurité Importantes
Ce produit a été conçu et fabriqué pour répondre à de
strictes normes de qualité et de sécurité. Veuillez cependant
porter attention aux consignes de sécurité suivantes
se rapportant à son installation et à son utilisation.
1. Lisez toutes les consignes de sécurité et d’utilisation
avant d’utiliser cet appareil.
2. Conservez les instructions de sécurité et d’opération
pour référence future.
3. Observez les consignes contenues dans ce manuel
et affi chées sur le produit.
4. Suivez toutes les instructions d’opération et d’utilisation.
5. Nettoyage. Débranchez l’appareil avant de le nettoyer.
N’utilisez jamais de nettoyant liquide ou en aérosol.
Utilisez un chiffon humide.
6. Accessoires. N’utilisez jamais d’accessoires non
recommandés par le fabricant. Ils pourraient provoquer
un danger.
7. Eau et humidité. N’utilisez jamais cet appareil près d’une
source d’eau ou d’humidité—par exemple près d’une
baignoire, d’un évier, d’un lavabo ou dans un sous-sol
humide ou près d’une piscine ou autre source d’eau.
8. Accessoires. Ne placez jamais ce produit audio-visuel sur
un charriot, socle, meuble ou support instable. Le produit
pourrait tomber, s’endommager et/ou blesser grièvement
un enfant ou un adulte. Utilisez uniquement un charriot,
socle, meuble ou support spécifi é par le fabricant ou
vendu avec le produit. Toute installation du produit doit
se faire selon les directives du fabricant et en utilisant
des accessoires recommandés par le fabricant.
9. Aération. Les ouvertures et les fentes situées sur le boîtier
préviennent la surchauffe et assurent la fi abilité du produit
et ne doivent jamais être couvertes ou obstruées. Elles
ne doivent jamais être obstruées en plaçant le produit
sur un lit, un sofa, un tapis ou autre surface similaire.
Ce produit ne doit jamais être installé sur ou à proximité
d’un radiateur ou d’un registre de chaleur. Ce produit ne
doit pas être installé dans un meuble, une bibliothèque
ou un bâti à moins d’assurer une aération adéquate ou
d’observer les directives du fabricant.
10. Alimentation CA. Ce produit ne doit être utilisé qu’avec le
type d’alimentation CA spécifi é sur l’étiquette apposée au
produit. Si vous ne connaissez pas le type d’alimentation
utilisé dans votre région, communiquez avec le revendeur
du produit ou avec votre fournisseur local d’électricité.
11. Mise à la terre et polarisation. Ce produit est muni d’une
fi che d’alimentation CA polarisée (une des deux broches
étant plus large que l’autre). Cette fi che ne peut être in
sérée dans la prise de courant que d’une seule façon.
C’est un dispositif de sécurité. Si vous ne parvenez pas
à bien insérer la fi che dans la prise de courant, ren-
versezla. Si vous ne parvenez toujours pas à insérer la
fi che dans la prise de courant, faites remplacer la prise
obsolète par un électricien. Ne contournez jamais le dis-
positif de sécurité de mise à la terre de la fi che polarisée.
12. Protection du cordon d’alimentation CA. Les cordons
d’alimentation CA doivent être disposés hors des zones
passantes où ils risquent d’être écrasés, pincés ou en-
dommagées, particulièrement à proximité des prises de
courant, des blocs multiprises et à la sortie de l’appareil.
13. Foudre et surtension. Pour assurer la protection de ce
produit contre la foudre ou la surtension lorsqu’il n’est
pas utilisé pour de longues périodes, débranchez son
cordon d’alimentation de la prise de courant CA et
déconnectez le système de câble ou d’antenne.
14. Lignes électriques. Une antenne extérieure ne doit pas
être installée à proximité de lignes électriques aériennes
ou autres dispositifs électriques ou d’éclairage sur
lesquels elle pourrait tomber. Lors de l’installation d’une
antenne extérieure, il est impératif de vousassurer que
cette dernière ne pourra jamais entrer en contact avec
de tels disposi tifs ou lignes électriques. Il pourrait y avoir
danger de mort.
15. Surcharge. Ne surchargez jamais les prises de courant,
les rallonges ou les blocs multiprises; cela pourrait
constituer un risque d’incendie ou de choc électrique.
16. Objets et liquides. N’insérez jamais d’objets dans les
ouvertures de ce produit. Ils pourraient entrer en contact
avec des points de voltage dangereux ou provoquer
des courts-circuits; cela pourrait provoquer un risque
d’incendie ou de choc électrique. Ne renversez jamais
deliquides sur le produit.
17. Service. Ne tentez jamais de réparer ce produit
vousmême car ouvrir son boîtier ou en retirer le
couvercle pourrait vous exposer à des voltages
dangereux ou à d’autres dangers. Confi ez tout
service à un technicien qualifi é.
18. Dommages et service. Débranchez l’appareil de la prise
CA et contactez un réparateur qualifi é lorsque:
a. Le cordon d’alimentation a été endommagé.
b. Un objet ou du liquide s’est introduit dans le produit.
c. Le produit a été exposé à la pluie ou à de l’eau.
d. Le produit ne fonctionne pas normalement selon
les instructions du fabricant. Réglez uniquement les
contrôles spécifi és dans le manuel de l’utilisateur car le
réglage inapproprié de certains autres contrôles pour-
rait endommager le produit et requérir l’intervention
d’un réparateur qualifi é pour le remettre en ordree.
e. Le produit a subi une chute ou son boîtier
a été endommagé.
f. Le produit ne semble pas fonctionner normalement—
ce qui indique la nécessité de service.
Français
15
C
ustomer
S
ervice Hours of
O
peration: Monday-Friday, 9am-5:30pm est polkcs
@
polkaudio.co
m
C
onsignes de
Sé
curit
é
Importante
s
C
e produit a été con
ç
u et fabriqué pour répondre à de
s
trictes normes de qualit
é
et de s
é
curit
é
. Veuillez cependant
p
orter attention aux consignes de s
é
curit
é
suivantes
s
e ra
pp
ortant
à
son installation et
à
son utilisation
.
1. Lisez toutes les consi
g
nes de sécurité et d’utilisation
a
vant
d’
ut
ili
ser cet a
pp
are
il.
2. Conservez les instructions de sécurité et d’o
p
ération
p
our r
é
f
é
rence future
.
3.
O
bservez les consignes contenues dans ce manuel
e
t affi ch
é
es sur le
p
roduit
.
4.
S
uivez toutes les instructions d’o
pé
ration et d’utilisation
.
5. Nettoya
g
e. Débranchez l’appareil avant de le nettoyer.
N
’utilisez
j
amais de netto
y
ant li
q
uide ou en aérosol.
U
t
ili
sez un c
hiff
on
h
um
id
e
.
6.
A
ccesso
i
res.
N’
ut
ili
sez
j
ama
i
s
d’
accesso
i
res non
recommand
é
s
p
ar le fabricant. Ils
p
ourraient
p
rovo
q
ue
r
un
d
an
g
er
.
7. Eau et humidité. N’utilisez jamais cet appareil près d’une
s
ource d’eau ou d’humidité—
p
ar exem
p
le
p
rès d’une
bai
g
noire, d’un évier, d’un lavabo ou dans un sous-sol
humide ou
p
r
è
s d’une
p
iscine ou autre source d’eau
.
8.
A
ccesso
i
res.
N
e
pl
acez
j
ama
i
s ce
p
ro
d
u
i
t au
di
o-v
i
sue
l
su
r
un c
h
arr
i
ot, soc
l
e, meu
bl
e ou su
pp
ort
i
nsta
bl
e.
L
e
p
ro
d
u
i
t
pourrait tomber, s’endommager et
/
ou blesser gri
è
vement
un enfant ou un adulte. Utilisez uni
q
uement un charriot,
s
ocle, meuble ou su
pp
ort s
p
écifi é
p
ar le fabricant ou
ven
d
u avec
l
e
p
ro
d
u
i
t.
T
oute
i
nsta
ll
at
i
on
d
u
p
ro
d
u
i
t
d
o
i
t
s
e
f
a
i
re se
l
on
l
es
di
rect
i
ves
d
u
f
a
b
r
i
cant et en ut
ili
sant
d
es accessoires recommandés
p
ar le fabricant
.
9
. A
é
r
a
ti
o
n. L
es
ou
v
e
rt
u
r
es
e
t l
es
f
e
nt
es
s
it
uées
su
r l
e
bo
îti
er
p
réviennent la surchauffe et assurent la fi abilité du
p
roduit
e
t ne doivent
j
amais être couvertes ou obstruées. Elles
ne doivent jamais
ê
tre obstru
é
es en plaçant le produit
s
ur un
li
t, un so
f
a, un ta
pi
s ou autre sur
f
ace s
i
m
il
a
i
re.
C
e
p
roduit ne doit
j
amais être installé sur ou à
p
roximité
d
’un radiateur ou d’un registre de chaleur.
C
e produit ne
d
oit
p
as
ê
tre install
é
dans un meuble, une biblioth
èq
ue
o
u un bâti à moins d’assurer une aération adé
q
uate ou
d’
o
b
server
l
es
di
rect
i
ves
d
u
f
a
b
r
i
cant
.
10. Alimentation
C
A.
C
e produit ne doit
ê
tre utilis
é
qu’avec le
type d’alimentation
C
A sp
é
cifi
é
sur l’
é
tiquette appos
é
e au
p
roduit.
S
i vous ne connaissez
p
as le t
yp
e d’alimentation
utilisé dans votre ré
g
ion, communiquez avec le revendeu
r
d
u
p
roduit ou avec votre fournisseur local d’
é
lectricit
é.
11. Mise
à
la terre et polarisation.
C
e produit est muni d’une
fi
che d’alimentation
C
A polaris
é
e
(
une des deux broches
é
tant plus large que l’autre). Cette fi che ne peut être in
sé
r
é
e dans la prise de courant que d’une seule façon.
C
’est un dis
p
ositif de s
é
curit
é
.
S
i vous ne
p
arvenez
p
as
à
bien ins
é
rer la fi che dans la prise de courant, ren
-
v
ersezla.
S
i vous ne
p
arvenez tou
j
ours
p
as
à
ins
é
rer la
fi
c
h
e
d
ans
l
a
p
r
i
se
d
e courant,
f
a
i
tes rem
pl
acer
l
a
p
r
i
se
o
bsol
è
te
p
ar un
é
lectricien. Ne contournez
j
amais le dis
-
p
ositif de sécurité de mise à la terre de la fi che
p
olarisée
.
12. Pr
o
t
ec
ti
o
n
du
co
r
do
n
d
’
a
lim
e
nt
a
ti
o
n
C
A. L
es
co
r
do
n
s
d
’alimentation CA doivent être dis
p
osés hors des zones
p
assantes o
ù
ils ris
q
uent d’
ê
tre
é
cras
é
s,
p
inc
é
s ou en
-
d
omma
g
ées, particulièrement à proximité des prises de
c
ourant, des blocs multi
p
rises et
à
la sortie de l’a
pp
areil
.
13.
F
ou
d
re et surtens
i
on.
P
our assurer
l
a
p
rotect
i
on
d
e ce
p
roduit contre la foudre ou la surtension lors
q
u’il n’est
pas utilis
é
pour de longues p
é
riodes, d
é
branchez son
c
ordon d’alimentation de la
p
rise de courant
C
A et
dé
connectez le s
y
st
è
me de c
â
ble ou d’antenne.
14. Lignes électriques. Une antenne extérieure ne doit pas
ê
tre install
é
e
à
proximit
é
de lignes
é
lectriques a
é
riennes
o
u autres dispositifs
é
lectriques ou d’
é
clairage su
r
l
es
q
uels elle
p
ourrait tomber. Lors de l’installation d’une
a
ntenne ext
é
rieure, il est im
pé
ratif de vousassurer
q
ue
c
ette dernière ne
p
ourra
j
amais entrer en contact avec
d
e tels disposi tifs ou lignes
é
lectriques. Il pourrait y avoi
r
d
anger
d
e mort
.
15.
S
urcharge. Ne surchargez jamais les prises de courant,
l
es ra
ll
onges ou
l
es
bl
ocs mu
l
t
i
pr
i
ses; ce
l
a pourra
i
t
c
onstituer un risque d’incendie ou de choc
é
lectrique.
16. Ob
j
ets et li
q
uides. N’insérez
j
amais d’ob
j
ets dans les
o
uvertures de ce
p
roduit. Ils
p
ourraient entrer en contact
a
vec
d
es po
i
nts
d
e vo
l
tage
d
angereux ou provoque
r
d
es courts-c
i
rcu
i
ts; ce
l
a
p
ourra
i
t
p
rovo
q
uer un r
i
s
q
ue
d
’incendie ou de choc
é
lectrique. Ne renversez jamais
d
e
li
qu
id
es sur
l
e pro
d
u
i
t.
17. Service. Ne tentez
j
amais de ré
p
arer ce
p
roduit
vousmême car ouvrir son boîtier ou en retirer le
c
ouvercle pourrait vous exposer
à
des voltages
d
angereux ou
à
d’autres dangers.
C
onfi ez tout
s
ervice à un technicien
q
ualifi é
.
18. Dommages et service. Débranchez l’appareil de la prise
CA et contactez un réparateur qualifi é lorsque:
a. Le cordon d’alimentation a
é
t
é
endommag
é.
b
.
U
n o
bj
et ou
d
u
liq
u
id
e s
’
est
i
ntro
d
u
i
t
d
ans
l
e
p
ro
d
u
i
t
.
c. Le
p
roduit a
é
t
é
ex
p
os
é
à
la
p
luie ou
à
de l’eau
.
d
.
L
e
p
ro
d
u
i
t ne
f
onct
i
onne
p
as norma
l
ement se
l
on
les instructions du fabricant. Ré
g
lez uniquement les
c
ontr
ô
les sp
é
cifi
é
s dans le manuel de l’utilisateur car le
réglage inapproprié de certains autres contrôles pour
-
rait endommager le produit et requ
é
rir l’intervention
d’un r
ép
arateur
q
ualifi
é
p
our le remettre en ordree.
e. Le produit a subi une chute ou son boîtier
a été endommagé.
f
.
L
e pro
d
u
i
t ne sem
bl
e pas
f
onct
i
onner norma
l
ement
—
c
e
q
ui indi
q
ue la n
é
cessit
é
de service
.
F
ran
ç
ai
s
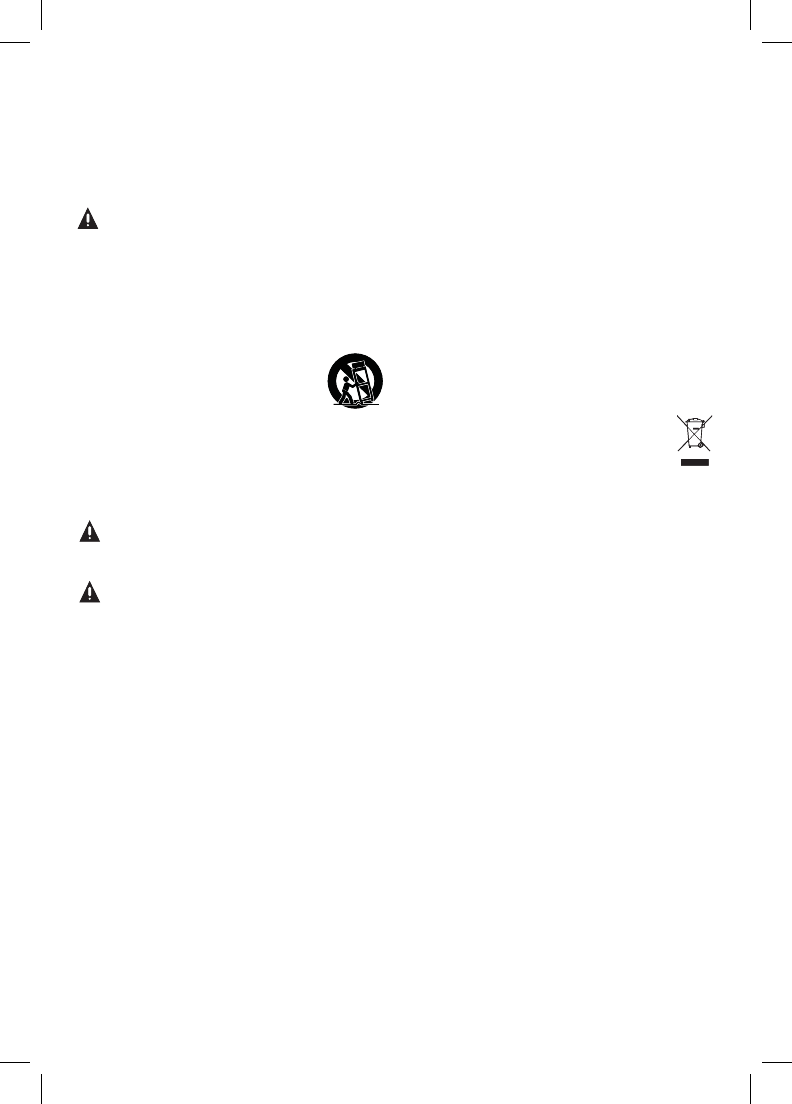
16 Polk Customer Service 800-377-7655 (Outside USA & Canada: 410-358-3600)
19. Pièces de rechange—Lorsque des pièces de rechange
sont requises, assurez-vous que le technicien de service
utilise des pièces de rechange spécifi ées par le fabricant
ou des pièces ayant les mêmes caractéristiques que
les pièces d’origine. Des substitutions non autoriséesris-
quent de provoquer un incendie, des chocs électriques
ou d’autres dangers.
AVERTISSEMENT: Danger d’explosion si la batterie
est inexactement substituée. Remplacez seulement
par la même chose ou le type équivalent. (CR2025)
AVERTISSEMENT: N’exposez pas les piles ou le
paquet de piles à la chaleur excessive telle que le soleil,
le feu ou une autre source de chaleur semblable.
20. Contrôle de sécurité—Après chaque contrôle technique
ou réparation de cet appareil, demandez au technicien
d’effectuer un contrôle pour assurer que l’appareil est en
bon état de fonctionnement.
21. Chariots et socles. Les appareils doivent être
utilisés uniquement avec des chariots ou des
socles recommandés par le fabricant. Un
appareil sur chariot doit être déplacé avec
soin. Des arrêts soudains, une poussée excessive ou
une surface négale pourraient provoquer le renversement
du chariot avec risque de plessures.
22. Ce produit n’est pas conçu pour utilisation extérieur.
Les AVERTISSEMENTS ci-dessous sont situés à l’arrière
de votre système d’enceintes SurroundBar®
AVERTISSEMENT: Tpour prévenir les chocs élec-
triques, insérez la fi che bien à fond en vous assurant
que la lame large de la fi che s’insère dans
la fente large de la prise CA.
AVERTISSEMENT: aucune source de fl amme, comme
une chandelle, ne doit être placée sur l’appareil.
23. N’installez pas ce dispositif dans un endroit confi né, comme
une bibliothèque. Assurez une ventilation adéquate et veillez
à ce que des objets comme des journaux, des nappes ou
des rideaux ne nuisent pas à sa ventilation.
24. AVERTISSEMENT : Pour réduire le risque d’incendie
ou de choc électrique, n’exposez pas ce dispositif à
la pluie ou à l’humidité. Ce dispositif ne doit pas être
exposé à des éclaboussures ou à des égouttures d’eau.
Ne déposez aucun objet contenant du liquide sur le
dispositif (comme un vase ou un verre).
25. AVERTISSEMENT : La fi che électrique du bloc
d’alimentation est utilisée comme dispositif de dé-
branchement et doit rester facilement accessible.
Mise en garde: Le fabricant n’ est pas responsable des
interférences radio ou télévision causées par des modifi ca-
tions non autorisées de cet appareil. De telles modifi cations
pourraient annuler l’autorisation d’utiliser l’appareil.
Déclaration sur l’exposition aux irradiations: Cet équipe-
ment est conforme aux limites de radiation établies par la
FCC comme indiquées dans le cadre d’un environnement
d’accès libre et est conforme à la section 15 des réglementa-
tions de la FCC. Cet équipement doit être installé et utilisé
à une distance minimale de 20 cm entre la source
d’irradiations et votre corps.
Limites des émissions de classe B
Cet appareil numérique de la classe B respecte toutes
les exigences du Règlement sur le matériel brouilleur
du Canada.
Fonctionnement
Cet appareil est conforme à la section 15 des règlements
de la FCC et à la norme RSS-210 d’Industrie Canada. Son
fonctionnement est soumis aux deux conditions suivantes:
1) Ce dispositif pourrait ne pas causer d’interférence.
2) Ce dispositif est susceptible à toute interférence,
incluant de l’interférence qui pourrait provoquer
le fonctionnement fautif du dispositif.
Le dispositif rencontre l’exemption des limites courantes
d’évaluation dans la section 2.5 de RSS 102 et la confor-
mité à l’exposition de RSS-102 RF, utilisateurs peut obtenir
l’information canadienne sur l’exposition et la conformité
de RF.
Récupération Du Produit
Certaines lois ou certains règlements internationaux,
nationaux et/ou régionaux pourraient s’appliquer à la
récupération de ce produit. Pour plus d’information,
communiquez avec le revendeur de ce produit ou
avec l’importateur/distributeur de ce produit dans votre
pays. Vous trouverez la liste des importateurs/distributeurs
des produits Polk sur le site www.polkaudio.com ou en
communiquant avec Polk: 5601 Metro Drive, Baltimore,
Maryland 21215, USA—Tél.: +1 410 358-3600.
NOTE:
Ce dispositif a été testé et déclaré conforme au chapitre
15 des règlements de la FCC en ce qui attrait aux limites
d’interférences générées par un appareil numérique de
classe B. Ces limites ont été établies pour assurer une
protection raisonnable contre les interférences nuisibles dans
une installation résidentielle. Ce dispositif génère, utilise et
peut irradier des radiofréquences et, s’il n’est pas installé
et utilisé conformément aux instructions, pourrait causer de
l’interférence nuisible aux radiocommunications. Toutefois,
il n’y a aucune garantie que de l’interférence ne sera pas
présente en certains types d’installation. Si ce dispositif
génère de l’interférence nuisible à la réception radio ou télévi-
sion—ce qui peut être déterminé en allumant et éteignant le
dispositif—l’utilisateur peut essayer d’éliminer l’interférence
par un ou plusieurs des moyens suivants: réorienter ou
déplacer l’antenne de réception; accroître la distance entre
le dispositif et le récepteur; brancher le dispositif à une prise
de courant reliée à un circuit distinct de celui sur lequel est
branché le récepteur; consulter le détaillant ou un technicien
radio/TV qualifi é pour obtenir de l’aide.
16
Polk
C
ustomer
S
ervice 800-377-7655 (
O
utside U
S
A &
C
anada: 410-358-3600
)
19. Pièces de rechan
g
e—Lorsque des pièces de rechan
g
e
s
ont requ
i
ses, assurez-vous que
l
e tec
h
n
i
c
i
en
d
e serv
i
ce
utilise des pièces de rechan
g
e spécifi ées par le fabricant
o
u des
p
ièces a
y
ant les mêmes caractéristi
q
ues
q
ue
l
es pièces d’ori
g
ine. Des substitutions non autoriséesris
-
q
uent de
p
rovo
q
uer un incendie, des chocs
é
lectri
q
ues
o
u
d’
autres
d
angers
.
A
VERTI
SS
EMENT:
D
anger
d’
exp
l
os
i
on s
i
l
a
b
atter
i
e
e
st inexactement substituée. Rem
p
lacez seulement
p
ar la même chose ou le type équivalent. (CR2025
)
A
VERTI
SS
EMENT
:
N’ex
p
osez
p
as les
p
iles ou le
p
a
q
uet de
p
iles
à
la chaleur excessive telle
q
ue le soleil,
l
e
f
eu ou une autre source
d
e c
h
a
l
eur sem
bl
a
bl
e
.
20. Contrôle de sécurité—A
p
rès cha
q
ue contrôle techni
q
ue
o
u ré
p
aration de cet a
pp
areil, demandez au technicien
d
’effectuer un contrôle
p
our assurer
q
ue l’a
pp
areil est en
bon
é
tat de fonctionnement
.
21.
C
hariots et socles. Les a
pp
areils doivent
ê
tre
utilisés uniquement avec des chariots ou des
s
ocles recommandés
p
ar le fabricant. Un
app
areil sur chariot doit être dé
p
lacé avec
s
oin. Des arr
ê
ts soudains, une
p
ouss
é
e excessive ou
une surface né
g
ale pourraient provoquer le renversement
d
u chariot avec ris
q
ue de
p
lessures
.
22.
C
e produit n’est pas conçu pour utilisation ext
é
rieur.
L
es
A
VERTI
SS
EMENT
S
ci-dessous sont situ
é
s
à
l’arri
è
re
d
e votre s
y
st
è
me d’enceintes
S
urroundBa
r
®
AVERTISSEMENT:
T
p
our
p
r
é
venir les chocs
é
lec
-
tri
q
ues, insérez la fi che bien à fond en vous assurant
que la lame large de la fi che s’ins
è
re dans
l
a fente large de la prise CA
.
A
VERTI
SS
EMENT
:
aucune source
d
e
fl
amme, comme
une chandelle, ne doit
ê
tre
p
lac
é
e sur l’a
pp
areil
.
2
3
.
N
’installez pas ce dispositif dans un endroit confi n
é
, comme
une biblioth
è
que. Assurez une ventilation ad
é
quate et veillez
à
ce que des objets comme des journaux, des nappes ou
des rideaux ne nuisent pas
à
sa ventilation.
24.
A
VERTISSEMENT : Pour réduire le ris
q
ue d’incendie
ou de choc
é
lectrique, n’exposez pas ce dispositif
à
l
a pluie ou
à
l’humidit
é
.
C
e dispositif ne doit pas
ê
tre
e
xposé à des éclaboussures ou à des é
g
outtures d’eau.
N
e d
é
posez aucun ob
j
et contenant du liquide sur le
d
ispositif
(
comme un vase ou un verre
)
.
2
5.
A
VERTI
SS
EMENT : La fi che
é
lectrique du bloc
d
’alimentation est utilisée comme dis
p
ositif de dé-
b
ranc
h
ement et
d
o
i
t rester
f
ac
il
ement access
ibl
e.
Mi
se en gar
d
e
:
L
e
f
a
b
r
i
cant n
’
est
p
as res
p
onsa
bl
e
d
es
interférences radio ou télévision causées
p
ar des modifi ca
-
t
ions non autorisées de cet a
pp
areil. De telles modifi cations
p
ourraient annuler l’autorisation d’utiliser l’a
pp
areil
.
D
é
claration sur l’ex
p
osition aux irradiations:
C
et
éq
ui
p
e
-
m
ent est conforme aux limites de radiation établies
p
ar la
FCC comme indiquées dans le cadre d’un environnement
d
’acc
è
s libre et est conforme
à
la section 15 des r
ég
lementa
-
t
ions de la F
CC
.
C
et
éq
ui
p
ement doit
ê
tre install
é
et utilis
é
à
une distance minimale de 20 cm entre la source
d
’irradiations et votre cor
p
s
.
Limites des
é
missions de classe
B
C
et appareil num
é
rique de la classe B respecte toutes
les exi
g
ences du Rè
g
lement sur le matériel brouilleu
r
du Canada.
F
onct
i
onnemen
t
C
et appareil est conforme
à
la section 15 des r
è
glements
de
l
a
F
CC
e
t
à
l
a
n
o
rm
e
R
SS
-21
0
d
’In
dus
tri
e
Ca
n
ada
.
So
n
fo
n
c
t
io
nn
e
m
e
nt
es
t
sou
m
is
au
x
deu
x
co
n
di
t
io
n
s
sui
v
a
nt
es:
1) Ce dispositif pourrait ne pas causer d’interférence
.
2
)
Ce dis
p
ositif est susce
p
tible à toute interférence,
incluant de l’interf
é
rence
q
ui
p
ourrait
p
rovo
q
ue
r
l
e
f
onct
i
onnement
f
aut
if
d
u
di
spos
i
t
if.
Le dis
p
ositif rencontre l’exem
p
tion des limites courantes
d
’
é
valuation dans la section 2.5 de R
SS
102 et la confor
-
mité à l’ex
p
osition de RSS-102 RF, utilisateurs
p
eut obteni
r
l’information canadienne sur l’ex
p
osition et la conformit
é
d
e
RF
.
Récu
p
ération Du Produi
t
C
ertaines lois ou certains r
è
glements internationaux,
nationaux et/ou ré
g
ionaux pourraient s’appliquer à la
récu
p
ération de ce
p
roduit. Pour
p
lus d’information,
commun
i
quez avec
l
e reven
d
eur
d
e ce pro
d
u
i
t ou
avec l’importateur
/
distributeur de ce produit dans votre
pays. Vous trouverez la liste des importateurs
/
distributeurs
d
es
p
ro
d
u
i
ts
P
o
lk
sur
l
e s
i
te www.
p
o
lk
au
di
o.com ou en
commun
iq
uant avec
P
o
lk
: 5601
M
etro
D
r
i
ve,
B
a
l
t
i
more,
Maryland 21215, USA—Tél.: +1 410 358-3600.
N
O
TE
:
C
e dis
p
ositif a
é
t
é
test
é
et d
é
clar
é
conforme au cha
p
itre
15 des rè
g
lements de la FCC en ce qui attrait aux limites
d
’interférences
g
énérées par un appareil numérique de
classe B.
C
es limites ont
é
t
é
é
tablies pour assurer une
protection raisonnable contre les interf
é
rences nuisibles dans
une installation r
é
sidentielle.
C
e dispositif g
é
n
è
re, utilise et
p
eut irradier des radiofr
éq
uences et, s’il n’est
p
as install
é
et utilis
é
conform
é
ment aux instructions,
p
ourrait causer de
l’interférence nuisible aux radiocommunications. Toutefois,
il n’y a aucune garantie que de l’interf
é
rence ne sera pas
pr
é
sente en certains types d’installation.
S
i ce dispositi
f
g
é
n
è
re de l’interf
é
rence nuisible
à
la r
é
ception radio ou t
é
l
é
vi
-
sion—ce qui peut être déterminé en allumant et étei
g
nant le
d
is
p
ositif—l’utilisateur
p
eut essa
y
er d’
é
liminer l’interf
é
rence
p
ar un ou
p
lusieurs des mo
y
ens suivants: réorienter ou
d
é
p
lacer l’antenne de réce
p
tion; accroître la distance entre
le dis
p
ositif et le r
é
ce
p
teur; brancher le dis
p
ositif
à
une
p
rise
d
e courant reli
é
e
à
un circuit distinct de celui sur le
q
uel est
branch
é
le r
é
ce
p
teur; consulter le d
é
taillant ou un technicien
radio/TV
q
ualifi é
p
our obtenir de l’aide
.
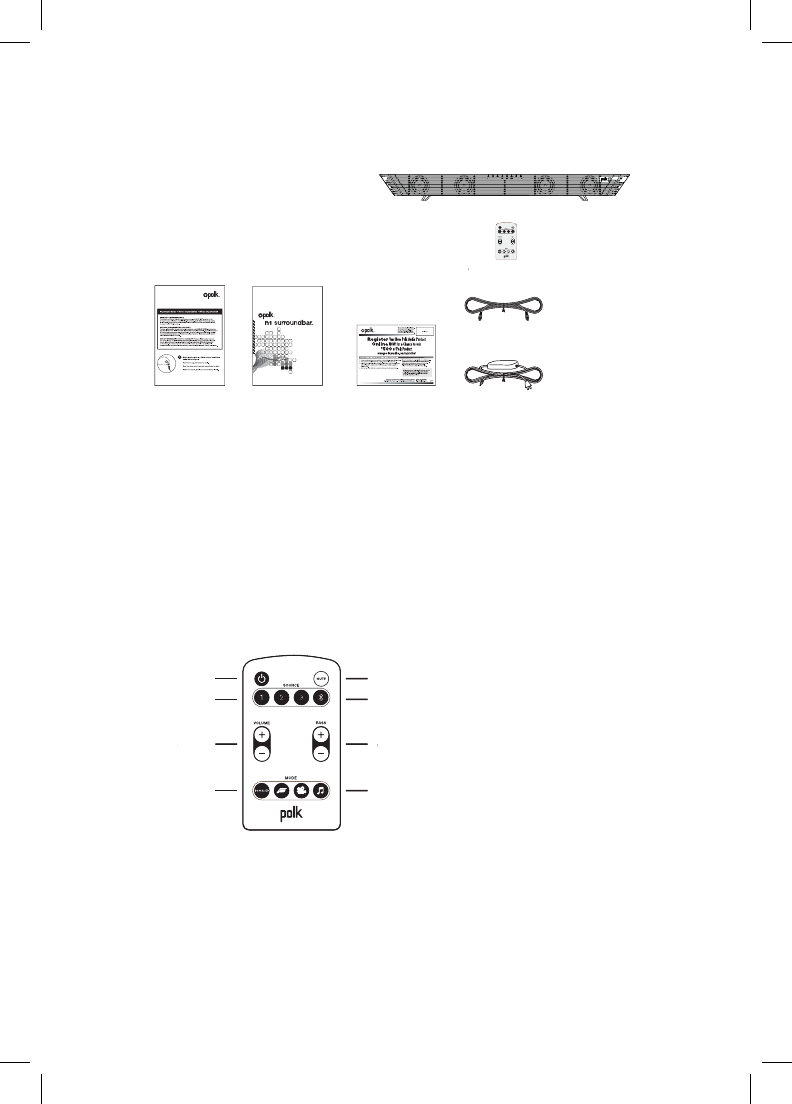
17
Customer Service Hours of Operation: Monday-Friday, 9am-5:30pm est polkcs@polkaudio.com
Contenu de la boîte de
la SurroundBarMC N1
Note importante: S’il manque des pièces,
si vous découvrez des avaries ou si votre
SurroundBar N1 Polk ne fonctionne pas,
contactez immédiatement votre revendeur.
Conservez la boîte et l’emballage—ils
assureront la protection du produit en
cas de transit éventuel.
Spécifi cations
Dimensions 4" H x 39 1/4" W x 4 1/2" D
(10,2 cm x 99,7 cm x 11,4 cm)
Poids 9 lbs 10 oz (4,35 kg)
Alimentation 20 V, 3 A
Modèle N1 SurroundBar
Pile de
télécommande
CR2025
Télécommande
Modes d’immersion
Quatre modes d’immersion audio (Warrior, Racer,
Cinéma et Musique) vous permettent de régler la
N1 pour assurer une performance maximale et une
expérience sonore plus excitante et immersive.
SurroundBar
Câble numérique
(optique) 1,82 m
Télécommande
(pile comprise)
Bloc d’alimentationManuel
d’utilisation
Guide de
démarrage rapide
Carte
d’enregistrement
en ligne
Source
1, 2 et 3
Interrupteur Mute
Source
Bluetooth
Volume des graves
Volume
Modes d’immersion
Jeux: Warrior et Racer
Modes d’immersion
Cinéma et Musique
17
C
ustomer
S
ervice Hours of
O
peration: Monday-Friday, 9am-5:30pm est polkcs
@
polkaudio.co
m
C
ontenu de la bo
î
te de
la
S
urroundBa
r
M
C
N1
N
ote
i
mportante
:
S
’il manque des pi
è
ces,
s
i vous d
é
couvrez des avaries ou si votre
S
urroundBar N1 Polk ne fonctionne pas,
c
ontactez imm
é
diatement votre revendeur.
C
onservez la bo
î
te et l’emballage—ils
a
ssureront
l
a protect
i
on
d
u pro
d
u
i
t en
c
as de transit
é
ventuel.
S
p
é
cifi cation
s
Dimension
s
4" H x 39 1
/
4" W x 4 1
/
2" D
(
10,2 cm x 99,7 cm x 11,4 cm
)
Poid
s
9 lbs 10 oz
(
4,35 kg
)
A
lim
e
nt
a
ti
on
2
0 V
,
3 A
M
odè
l
e
N1
S
urroundBa
r
Pil
e
de
té
l
éco
mm
a
n
de
C
R202
5
S
urroundBa
r
Câ
ble num
é
ri
q
u
e
(
o
p
ti
q
ue
)
1,82
m
T
élécommande
T
T
(pile comprise
)
Bloc
d’ali
m
e
nt
a
t
ion
Ma
n
uel
d’u
t
ilisa
t
ion
G
uide d
e
dé
marrage rapid
e
C
art
e
d’e
nreg
i
st
r
e
m
e
n
t
en li
g
n
e
T
élécommand
e
M
o
d
es
d’i
mmers
i
on
Q
uatre modes d’immersion audio
(
Warrior, Racer,
C
inéma et Musique) vous permettent de régler la
N
1 pour assurer une per
f
ormance max
i
ma
l
e et une
e
x
p
érience sonore
p
lus excitante et immersive.
Sou
r
ce
1, 2 et
3
I
nterrupteu
r
M
ut
e
S
our
ce
Bl
ue
t
oo
t
h
V
olume des graves
VV
V
olume
V
V
M
o
d
es
d’i
mmers
i
o
n
J
eux: Warr
i
or et
R
ac
e
r
M
o
d
es
d’i
mmers
i
on
C
in
é
ma et Musiqu
e
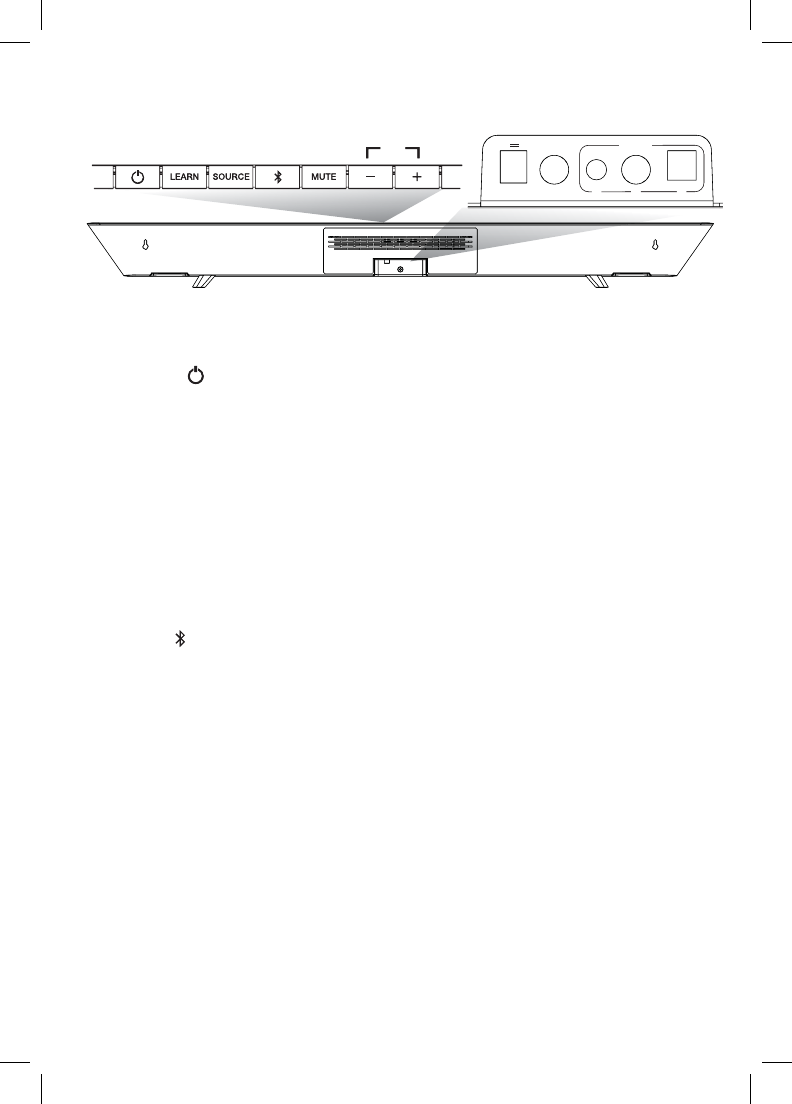
18 Polk Customer Service 800-377-7655 (Outside USA & Canada: 410-358-3600)
Contrôles
1. Interrupteur ( )—Allume/éteint
la barre ou la met en mode veille.
DEL—Bleue, verte ou rouge selon
l’état d’activité.
2. Learn—Met la barre en mode d’apprentissage
pour vous permettre de la programmer pour
répondre à la télécommande IR de votre télé.
3. Source—Détermine la source d’entrée audio.
Source 1: Optique (DEL bleue pour PCM
ou verte pour Dolby Digital)
Source 2: Coaxiale (DEL bleue pour PCM
ou verte pour Dolby Digital)
Source 3: Analogique
4. Bluetooth ( ): Le voyant bleu indique que
la source Bluetooth a été sélectionnée.
5. Mute—Met la SurroundBar N1
en mode sourdine.
6. Volume ( – / + )—Règle le volume de la
SurroundBar N1.
7. 24V—Branchez le bloc d’alimentation
de la barre ici.
8. SUB Out—Sortie pour le subwoofer optionnel.
9. Entrées audio (Source 1, 2, ou 3)—Pour
connecter votre télé (ou autre source) à la
SurroundBar N1, utilisez le câble 6' optique
fourni (Source1), un câble audio coaxial
numérique (Source2) (non fourni), ou un
câble 1/8" analogique(Source3) (non fourni).
DEL interrupteur
Mode normal:
Vert ou bleu continu—Barre sous tension;
source1 connectée.
Rouge continu—Barre en mode veille.
Mode d’apprentissage:
Clignotement rouge—La barre n’a pas réussi
à acquérir un code de la télécommande.
Clignotements rapides bleus—Les codes
IR acquis ont été effacés avec succès.
DEL Learn
Mode d’apprentissage:
Clignotement bleu—La barre est en
mode d’apprentissage.
Bleu continu— La barre est en
mode d’apprentissage et un bouton
a été sélectionné.
DEL du bouton de la barre—Clignotement
bleu. Lorsque la barre a acquis les codes avec
succès, la DEL LEARN de même que la DEL
du bouton sélectionné clignotent bleu.
1
78 9
2345 6 3A
20V
13 2
SOURCE
SUB OUT60W
18
Polk
C
ustomer
S
ervice 800-377-7655 (
O
utside U
S
A &
C
anada: 410-358-3600
)
Contrôles
1
.
Interrupteur
( )—Allume/éteint
r
la
ba
rr
e
ou
l
a
m
e
t
e
n m
ode
v
e
ill
e
.
DEL
—
Bleue, verte ou rou
g
e selon
l
’
é
t
a
t
d
’
ac
tivit
é
.
2. L
ea
rn—
M
et
l
a
b
arre en mo
d
e
d’
apprent
i
ssa
g
e
p
our vous permettre
d
e
l
a pro
g
rammer pou
r
r
é
p
ondre à la télécommande IR de votre télé.
3.
S
ource—
D
étermine la source d’entrée audio.
S
ource 1:
Op
ti
q
ue
(
DEL bleue
p
our PCM
o
u verte pour Dolby Di
g
ital
)
S
ource 2:
C
oaxiale
(
DEL bleue
p
our PCM
o
u verte pour Dolby Di
g
ital
)
S
ource 3:
A
na
l
og
i
qu
e
4. Bluetooth ( ):
Le voyant bleu indique que
l
a source Bluetoot
h
a
é
t
é
s
é
lectionn
é
e.
5.
M
ute—Met la
S
urroundBar N1
e
n mode sourdine
.
6. Volume
(
–
/
+
)
—Rè
g
le le volume de la
S
urroundBar N1
.
7. 24V—Branchez le bloc d’alimentation
d
e la barre ici
.
8.
SU
B
O
ut
—S
ortie
p
our le subwoofer o
p
tionnel.
9
.
E
ntrées audio
(S
ource 1, 2, ou 3
)
—Pou
r
c
onnecter votre t
é
l
é
(
ou autre source
)
à
la
S
urroundBar N1, utilisez le c
â
ble 6' o
p
ti
q
ue
f
ourni
(S
ource1
)
, un c
â
ble audio coaxial
n
um
é
ri
q
ue
(S
ource2
)
(
non fourni
)
, ou un
câ
ble 1
/
8" analogique
(S
ource3
)
(
non fourni
).
D
EL interru
p
teur
Mode
n
o
rm
a
l
:
Ve
rt
ou
b
l
eu
co
ntin
u
—
B
arre sous tens
i
on;
sou
r
ce
1
co
nn
ec
t
ée
.
Rouge continu
—Barre en mode veille.
M
o
d
e
d’
apprent
i
ssa
g
e
:
C
li
g
notement rou
ge
—
La barre n’a
p
as réussi
à
ac
q
uérir un code de la télécommande
.
C
li
g
notements rapides bleu
s
—Les codes
IR acquis ont été effacés avec succès.
D
EL Lear
n
Mode d’apprentissa
g
e:
Cli
g
notement ble
u
—L
a
ba
rr
e
es
t
e
n
mode d’apprentissa
g
e
.
Bleu
co
nt
i
n
u
— La barre est en
mode d’apprentissage et un bouton
a
é
t
é
sé
l
ec
ti
o
nn
é.
DEL
du
bou
t
o
n
de
l
a
ba
rr
e
—
C
lignotement
bleu. Lorsque la barre a acquis les codes avec
s
ucc
è
s, la DEL LEARN de m
ê
me que la DE
L
d
u bouton s
é
lectionn
é
clignotent bleu
.
1
7
8
9
23
4
5
6
3A
2
0
V
1
3
2
SOURCE
SU
B
OUT
60
W

19
Customer Service Hours of Operation: Monday-Friday, 9am-5:30pm est polkcs@polkaudio.com
Où installer votre barre pour
maximiser sa performance
Note: Les pieds de caoutchouc sont détachables
et peuvent être retirés (pour installation murale)
ou repositionnés le long de la surface inférieure
de la barre selon vos besoins d’installation.
Dimensions hors tout
1. 4" H (10,2 cm)
2. 39 1/4" W (99,7 cm)
Distance entre les fentes en trou de serrure
3. 32" W (81,28 cm)
Distance du dessus de la barre
aux fentes en trou de serrure
4. 1 1/16" (2,67 cm)
Note: Si vous installez votre Surroundbar au
mur, assurez-vous que les chevilles d’ancrage
sont bien fi xées au mur et qu’elles peuvent
supporter le poids de la SurroundBar.
1
2
3
4
Sur une tablette Au mur
19
C
ustomer
S
ervice Hours of
O
peration: Monday-Friday, 9am-5:30pm est polkcs
@
polkaudio.co
m
Où installer votre barre pou
r
max
i
m
i
ser sa per
f
ormanc
e
Note
:
Les
p
ieds de caoutchouc sont détachables
et
p
euvent être retirés
(p
our installation murale
)
ou repositionnés le lon
g
de la surface inférieure
de
l
a
ba
rr
e
se
l
o
n v
os
beso
in
s
d
’in
s
t
a
ll
a
ti
o
n.
Dim
e
n
s
i
o
n
s
h
o
r
s
t
out
1
.4" H
(
10,2 cm
)
2.
39 1
/
4" W
(
99,7 cm
)
Dis
t
a
n
ce
e
ntr
e
les
fe
nt
es
e
n tr
ou
de
se
rr
u
r
e
3
. 32" W
(
81,28 cm
)
Di
s
t
a
n
ce
du
dessus
de
l
a
ba
rr
e
au
x f
e
nt
es
e
n tr
ou
de
se
rr
u
r
e
4
. 1 1
/
16"
(
2,67 cm
)
N
o
t
e:
S
i vous installez votre
S
urroundbar au
mur, assurez-vous que
l
es c
h
ev
ill
es
d’
ancra
g
e
sont bien fi x
é
es au mur et qu’elles peuvent
supporter le poids de la
S
urroundBar
.
1
2
3
4
S
ur une tablett
e
Au mu
r

20 Polk Customer Service 800-377-7655 (Outside USA & Canada: 410-358-3600)
Connexion de votre SurroundBar
Comment optimiser le son quand les
haut-parleurs de la télé sont actifs
Vous devriez entendre du son de la barre; sinon
montez le volume à l’aide de ses touches de
volume (– / +).
Si votre barre est connectée à la télé, les haut-
parleurs de la télé sont probablement actifs. Il est
impossible d’offrir des instructions spécifi ques pour
désactiver les h.-p. de toutes les télés mais voici
comment désactiver les h.-p. de la plupart télés:
1. Sélectionnez «menu» ou «setup»
sur la télécommande de la télé.
2. Appuyez sur ce bouton. Vous devriez
voir un menu à l’écran.
3. Sélectionnez le réglage des fonctions audio.
Le réglage qui permet de désactiver les haut-
parleurs de la télé devrait s’y trouver.
Même si vous ne n’arrivez pas à désactiver les
haut-parleurs de votre télé, votre SurroundBar N1
améliorera considérablement le son de votre télé.
Mais la barre devra jouer plus fort que votre télé.
Suivez les étapes suivantes pour ajuster l’équilibre
entre le volume de votre télé et celui de la barre.
1. Si nécessaire, programmez votre barre pour
qu’elle réponde au contrôle de volume de
la télécommande de votre télé. (Voyez
«Comment programmer une télécommande
pour contrôler votre SurroundBar» aux
pages22-23.)
2. Réglez le volume de votre télé au minimum
utilisant le contrôle de volume de votre télé.
3. Utilisant les touches de volume (– / +) de votre
barre, réglez le volume à un niveau d’écoute
normal (n’utilisez pas la télécommande).
Suite à ces réglages, votre SurroundBar N1 devrait
toujours jouer plus fort que votre télé. Utilisez
ensuite la télécommande de votre télé pour
ajuster le volume comme d’habitude.
3A
20V
13 2
SOURCE
SUB OUT60W
SURROUNDBAR
XBOX CONSOLE
DIGITAL OPTICAL
AUDIO OUTPUT
Note: Retirez les capuchons
de protection avant d’insérer
le câble.
20
Polk
C
ustomer
S
ervice 800-377-7655 (
O
utside U
S
A &
C
anada: 410-358-3600
)
C
onnexion de votre
S
urroundBa
r
Comment optimiser le son quand les
haut-parleurs de la t
é
l
é
sont actifs
V
ous
d
evr
i
ez enten
d
re
d
u son
d
e
l
a
b
arre; s
i
non
montez le volume à l’aide de ses touches de
volume
(
– / +
)
.
S
i votre barre est connect
é
e
à
la t
é
l
é
, les haut-
parleurs de la t
é
l
é
sont probablement actifs. Il est
impossible d’offrir des instructions sp
é
cifi ques pou
r
d
é
sactiver les h.-p. de toutes les t
é
l
é
s mais voici
comment d
é
sactiver les h.-p. de la plupart t
é
l
é
s:
1
.
Sé
lectionnez «menu» ou «setu
p
»
su
r l
a
t
é
l
éco
mm
a
n
de
de
l
a
t
é
l
é
.
2.
App
u
y
ez sur ce bouton. Vous devriez
voir un menu à l’écran.
3
. Sélectionnez le ré
g
la
g
e des fonctions audio.
Le r
é
glage qui permet de d
é
sactiver les haut
-
p
arleurs de la t
é
l
é
devrait s’
y
trouver
.
M
ême si vous ne n’arrivez
p
as à désactiver les
haut-
p
arleurs de votre télé, votre SurroundBar N1
am
é
liorera consid
é
rablement le son de votre t
é
l
é
.
M
ais la barre devra
j
ouer
p
lus fort
q
ue votre télé.
Suivez les éta
p
es suivantes
p
our a
j
uster l’é
q
uilibre
entre le volume de votre t
é
l
é
et celui de la barre.
1.
Si nécessaire, pro
g
rammez votre barre pou
r
q
u’elle ré
p
onde au contrôle de volume de
la télécommande de votre télé. (Voyez
«
C
omment programmer une t
é
l
é
commande
pour contrôler votre SurroundBar»
aux
pages22-23.
)
2
.
Ré
g
lez le volume de votre télé au minimum
utilisant le contrôle de volume de votre télé
.
3
.Utilisant les touches de volume
(
–
/
+
)
de votre
barre, ré
g
lez le volume à un niveau d’écoute
normal
(
n’utilisez pas la t
é
l
é
commande
)
.
Suite à ces réglages, votre SurroundBar N1 devrait
tou
j
ours
j
ouer
p
lus fort
q
ue votre t
é
l
é
. Utilisez
ensuite la t
é
l
é
commande de votre t
é
l
é
pou
r
a
j
uster le volume comme d’habitude
.
3A
20
V
1
3
2
SOUR
C
E
SUB OU
T
60W
SU
RR
OU
NDBA
R
XB
O
X
CO
N
SO
L
E
DIGIT
AL OPTICA
T
T
L
A
UDI
O
O
UTP
U
T
Note:
R
et
i
rez
l
es capuc
h
ons
de protection avant d’insére
r
le câble.
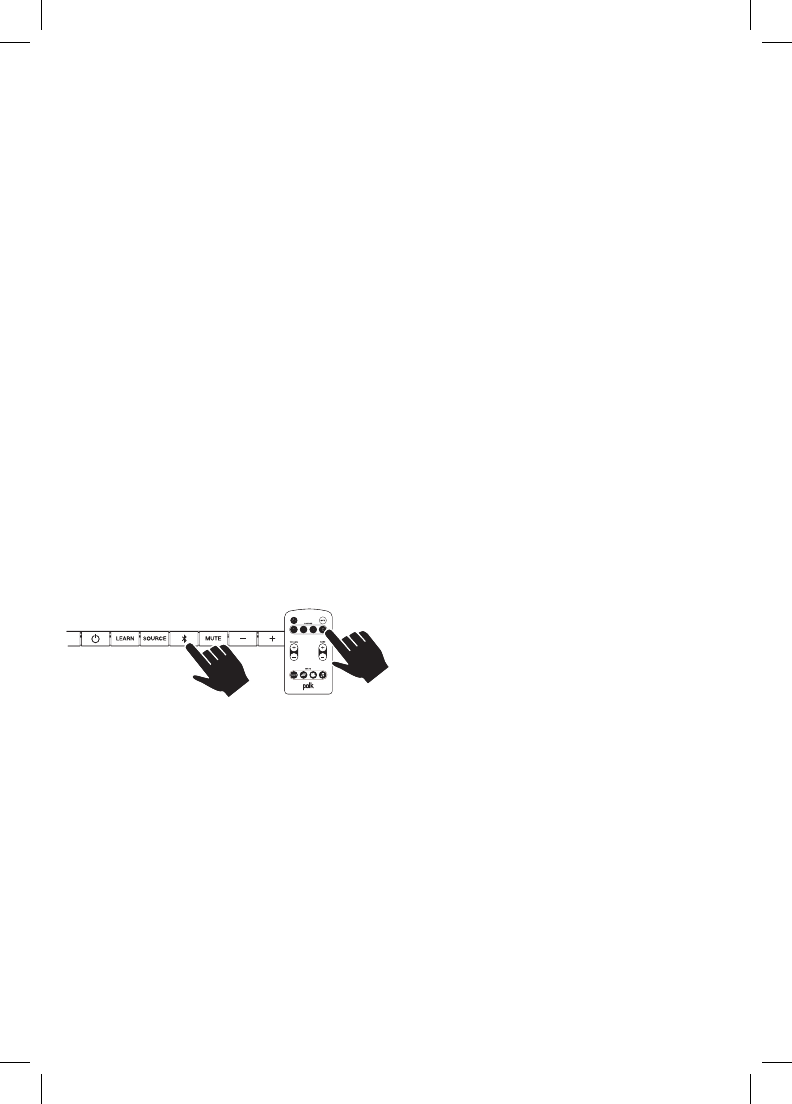
21
Customer Service Hours of Operation: Monday-Friday, 9am-5:30pm est polkcs@polkaudio.com
Technologie sans fi l Bluetooth®
Pour utiliser un dispositif sans fi l à technologie
Bluetooth avec la SurroundBar, vous devez
d’abord apparier le dispositif et la SurroundBar.
L’appariement permet au dispositif Bluetooth
de se connecter sans fi l à la SurroundBar et
d’échanger des données.
Vous n’aurez à apparier la SurroundBar à votre
dispositif Bluetooth qu’une seule fois. Par la suite,
vous n’aurez qu’à sélectionner«polk soundbar»
depuis le menu de votre dispositif pour établir sa
connexion avec la SurroundBar. La SurroundBar
peut conserver jusqu’à huit dispositifs Bluetooth
en mémoire. Si plusieurs autres dispositifs sont
appariés, le vôtre pourrait disparaitre de la liste.
Appariement et connexion de votre dispositif
Bluetooth à la SurroundBar:
1. Assurez-vous que votre dispositif Bluetooth
et la SurroundBarsont allumés.
2. Activez la fonction Bluetooth de votre
dispositif. Consultez le manuel du
dispositif pour des instructions.
3. Appuyez sur le bouton Bluetooth de la
télécommande de la SurroundBar.
Le symbole Bluetooth luira, puis clignotera
durant sa recherche du dispositif apparié.
4. Votre SurroundBar apparaitra maintenant
sur le menu de votre dispositif et sera prête
à s’apparier et à se connecter. Sélectionnez
«polk soundbar» pour lancer la connexion.
5. En quelques secondes (5), les deux appareils
devraient s’être connectés. Vous entendrez
une brève tonalité et la DEL Bluetooth luira
bleu continu.
6. Faites jouer la musique de votre dispositif!
Note: Si votre appareil requiert un code pour
s’apparier à la SurroundBar, entrez «0000.»
Déconnexion d’un dispositif Bluetooth:
1. Enfoncez et relâchez le bouton Bluetooth
de la télécommande; ou
2. Enfoncez et relâchez le bouton de source
Bluetooth de la barre; ou
3. Éteignez ou déconnectez la fonction
Bluetooth de votre dispositif.
La SurroundBar émettra une brève tonalité et
le symbole Bluetooth clignotera lentement
suite à la déconnexion.
Connexion automatique:
Lorsque vous désirez connecter le dernier
appareil apparié à la SurroundBar, suivez
les instructions suivantes:
1. Activez la fonction Bluetooth
de votre dispositif.
2. Appuyez sur le bouton Bluetooth de la
télécommande ou sur le bouton Bluetooth
de la Surroundbar.
3. En quelques secondes, les deux appareils
se connecteront automatiquement; vous
entendrez une brève tonalité et le symbole
Bluetooth luira bleu continu.
Note: Le dernier appareil Bluetooth connecté
se connectera automatiquement par défaut.
Appariement ou connexion d’un dispositif lorsque
la barre est en mode source Bluetooth, mais
n’a pas établi de connexion:
1. Lancez la fonction Bluetooth de votre
dispositif. Consultez le manuel de votre
dispositif pour des instructions.
a. Votre SurroundBar sera affi chée sur
le menu de votre dispositif et prête
à s’apparier ou à se connecter.
Sélectionnez «polk soundbar» pour
lancer l’appariement et la connexion.
En quelques secondes, les deux appareils seront
appariés et connectés; vous entendrez une brève
tonalité et le symbole Bluetooth luira bleu continu.
Déconnexion
Note: Lorsque la SurroundBar quitte le mode
veille (SLEEP) et entre en mode source Bluetooth,
elle se connecte automatiquement au dernier
dispositif Bluetooth apparié si la fonction Bluetooth
de ce dispositif est active.
21
C
ustomer
S
ervice Hours of
O
peration: Monday-Friday, 9am-5:30pm est polkcs
@
polkaudio.co
m
Technolo
g
ie sans fi l
B
l
ue
t
oo
th
®
P
our utiliser un dispositif sans fi l à technolo
g
ie
Bluetoot
h
avec la SurroundBar, vous devez
d’abord a
pp
arier le dis
p
ositif et la SurroundBar.
L
’a
pp
ariement
p
ermet au dis
p
ositi
f
B
luetoot
h
de
se
co
nn
ec
t
e
r
sa
n
s
fi l
à
l
a
Su
rr
ou
n
d
B
a
r
e
t
d’échan
g
er des données
.
Vous n’aurez à a
pp
arier la SurroundBar à votre
dis
p
ositi
f
B
l
ue
t
oo
th
q
u’une seule fois. Par la suite,
vous n’aurez
q
u’à sélectionner«
p
olk soundbar»
de
p
uis le menu de votre dis
p
ositif
p
our établir sa
co
nn
e
xi
o
n
a
v
ec
l
a
Su
rr
ou
n
d
B
a
r. L
a
Su
rr
ou
n
d
B
ar
p
eut conserver
j
us
q
u’à huit dis
p
ositifs Bl
ue
t
oo
t
h
en mémoire. Si
p
lusieurs autres dis
p
ositifs sont
a
pp
ariés, le vôtre
p
ourrait dis
p
araitre de la liste.
A
pp
ariement et connexion de votre dis
p
ositi
f
Bl
ue
t
oo
t
h
à
l
a
Su
rr
ou
n
d
B
a
r
:
1
.
A
ssurez-vous
q
ue votre
di
s
p
os
i
t
if
B
l
ue
t
oo
t
h
e
t l
a
Su
rr
ou
n
d
B
a
r
so
nt
a
ll
u
m
és.
2
. A
c
tiv
e
z l
a
f
o
n
c
ti
o
nBl
ue
t
oo
t
h
de
v
o
tr
e
dis
p
ositif. Consultez le manuel du
di
s
p
os
i
t
if
p
our
d
es
i
nstruct
i
ons
.
3
.
App
u
y
ez sur
l
e
b
outon Bl
ue
t
oo
t
h
de
l
a
t
é
l
éco
mm
a
n
de
de
l
a
Su
rr
ou
n
d
B
a
r.
L
e symbole
Bl
uetoot
h
l
u
i
ra, pu
i
s c
lig
notera
durant sa recherche du dispositif appari
é
.
4
. Votre
S
urroundBar apparaitra maintenant
sur le menu de votre dispositif et sera pr
ê
te
à
s’apparier et
à
se connecter.
Sé
lectionnez
«polk soundbar» pour lancer la connexion
.
5. En
q
uel
q
ues secondes
(
5
)
, les deux a
pp
areils
devraient s’être connectés. Vous entendrez
une brève tonalité et la DE
L
Bluetoot
h
luira
bleu continu
.
6
.
F
a
i
tes
j
ouer
l
a mus
i
que
d
e votre
di
spos
i
t
if!
N
ote
:
S
i votre appareil requiert un code pou
r
s’apparier
à
la
S
urroundBar, entrez «0000.»
D
éconnexion d’un dis
p
ositi
f
B
luetoot
h
:
1.
E
nf
o
n
ce
z
e
t r
e
l
âc
h
e
z l
e
bou
t
o
n
Bluetooth
d
e la t
é
l
é
commande
;
ou
2
.
E
nf
o
n
ce
z
e
t r
e
l
âc
h
e
z l
e
bou
t
o
n
de
sou
r
ce
Bluetooth
de la barre; ou
3.
Éteignez ou déconnectez la fonction
Bluetooth
de votre dis
p
ositif
.
L
a
S
urroundBar
é
mettra une br
è
ve tonalit
é
et
l
e s
y
mbole
Blue
t
oo
t
h
c
li
gnotera
l
entement
su
it
e
à
l
a
déco
nn
e
xi
o
n
.
C
onnexion automati
q
ue
:
L
ors
q
ue vous désirez connecter le dernie
r
appareil apparié à la SurroundBar, suivez
l
es
i
nstruct
i
ons su
i
vantes
:
1
.
Activez la fonction
Bl
ue
t
oo
t
h
d
e votre dis
p
ositif
.
2
.
App
u
y
ez sur le bouton
Blue
t
oo
t
h
de
la
t
é
l
éco
mm
a
n
de
ou
su
r l
e
bou
t
o
n
Bluetooth
de la Surroundbar.
3
.
E
n
q
uel
q
ues secondes, les deux a
pp
areils
s
e connecteront automati
q
uement; vous
e
ntendrez une brève tonalité et le s
y
mbole
Bluetooth
luira bleu continu.
N
ote: Le dernier a
pp
areil
Blue
t
oo
t
h
co
nn
ec
t
é
s
e connectera automati
q
uement
p
ar défaut.
App
ariement ou connexion d’un dis
p
ositif lors
q
ue
l
a barre est en mode source Bluetoot
h
,
ma
i
s
n
’a
p
as établi de connexion
:
1
.
Lancez la fonction
B
l
ue
t
oo
t
h
de votre
d
is
p
ositif.
C
onsultez le manuel de votre
di
s
p
os
i
t
if
p
our
d
es
i
nstruct
i
ons
.
a
.Votre SurroundBar sera affi chée sur
le menu de votre dispositif et prête
à
s’a
pp
arier ou
à
se connecter.
Sélectionnez «polk soundbar» pour
l
ancer
l’
a
pp
ar
i
ement et
l
a connex
i
on
.
E
n
q
uel
q
ues secondes, les deux a
pp
areils seront
app
ariés et connectés; vous entendrez une brève
t
onalité et le s
y
mbole Bl
ue
t
oo
t
h
l
u
ir
a
b
l
eu
co
ntin
u.
D
éconnexio
n
N
ote:
Lorsque la SurroundBar quitte le mode
v
eille
(S
LEEP
)
et entre en mode source
Blue
t
oo
t
h
,
ell
e se connecte automat
iq
uement au
d
ern
i
er
di
s
p
os
i
t
if
Bl
uetoot
h
a
pp
ari
é
si la fonction
Bl
uetoot
h
d
e ce
di
s
p
os
i
t
if
est act
i
ve
.
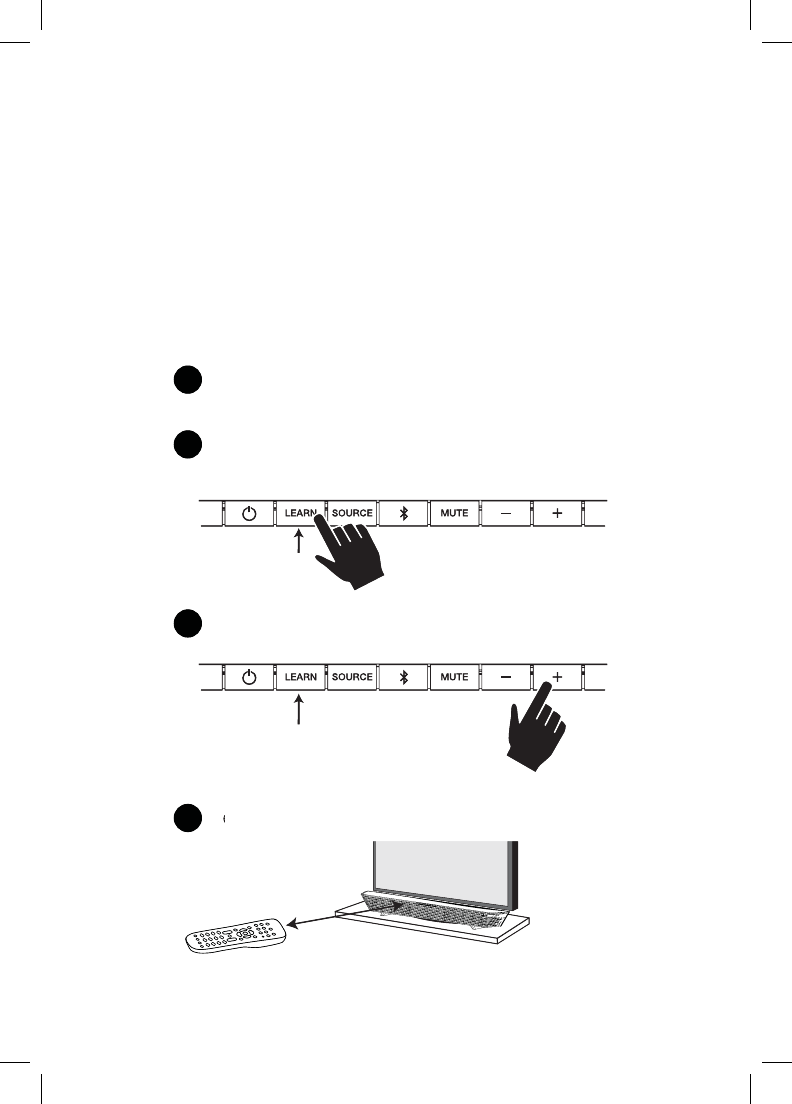
22 Polk Customer Service 800-377-7655 (Outside USA & Canada: 410-358-3600)
Comment programmer une télécom-
mande pour contrôler votre SurroundBar
Note sur la programmation SmartBarMC:
Pour que la barre réponde à votre télécommande,
VOUS DEVEZ D’ABORD la programmer pour
qu’elle réponde à la télécommande IR (infrarouge)
originale de votre télé. Les télécommandes RF
(radiofréquences) ne sont pas compatibles.
Les autres télécommandes IR (câble, satellite)
ne fonctionneront que lorsque vous aurez
programmé la barre pour qu’elle réponde
à la télécommande IR de votre télé.
Instructions pour la programmation:
La SurroundBar N1 est programmée à l’usine pour
répondre à la télécommande fournie. Mais il est
fortement recommandé de programmer la Sur-
roundBar pour qu’elle réponde également à votre
télécommande actuelle. En suivant les étapes illus-
trées ci-dessous, vous pourrez contrôler tous vos
composants en utilisant une seule télécommande.
Au cours de la programmation de la Surround-
Bar, ignorez tout ce qui pourrait apparaître
à l’écran de votre télé.
Exemple: Pour programmer la barre à répondre
au contrôle «volume +» de votre télécommande:
2
3
4
DEL
Appuyez sur la touche LEARN pour deux secondes–
ou jusqu’à ce que la DEL clignote bleu–puis relâchez
la touche LEARN.
1
La SurroundBar est allumée, la DEL luit vert continu
et du son provient de la barre.
Tenez la télécommande de la télé à 30-60 cm
de la SurroundBar.
Appuyez brièvement sur la touche «volume +.»
La DEL luit bleu continu.
bleu continu
DEL
clignote bleu
1' - 2'
22
Polk
C
ustomer
S
ervice 800-377-7655 (
O
utside U
S
A &
C
anada: 410-358-3600
)
C
omment pro
g
rammer une t
é
l
é
com
-
mande
p
our contr
ô
ler votre
S
urroundBa
r
Note sur la programmation
S
martBa
r
MC
:
Pour
q
ue la barre r
ép
onde
à
votre t
é
l
é
commande,
VO
U
S
DEVEZ D’AB
O
RD la programmer pou
r
q
u’elle r
é
ponde
à
la t
é
l
é
commande IR
(
infrarouge
)
o
riginale de votre t
é
l
é
. L
es
t
é
l
éco
mm
a
n
des
RF
(
radiofré
q
uences
)
ne sont
p
as com
p
atibles.
Les autres t
é
l
é
commandes IR
(
c
â
ble, satellite
)
n
e fonctionneront
q
ue lors
q
u
e
v
o
u
s
a
ur
e
z
p
rogramm
é
la barre pour qu’elle r
é
ponde
à
la t
é
l
é
commande IR de votre t
é
l
é.
I
nstruct
i
ons pour
l
a programmat
i
on:
L
a
S
urroundBar N1 est programm
é
e
à
l’usine pour
ré
pondre
à
la t
é
l
é
commande fournie. Mais il est
f
ortement recommand
é
de programmer la
S
ur
-
r
oundBar pour qu’elle r
é
ponde
é
galement
à
votre
té
l
é
commande actuelle. En suivant les
é
tapes illus
-
t
r
é
es ci-dessous, vous pourrez contr
ô
ler tous vos
c
omposants en utilisant une seule t
é
l
é
commande.
A
u cours de la pro
g
rammation de la
S
urround
-
B
ar, ignorez tout ce qui pourrait appara
î
tre
à
l’
é
cran de votre t
é
l
é
.
Exemple:
Pour programmer la barre à répondre
a
u contrôle «volume +» de votre télécommande
:
2
3
4
D
E
L
A
ppuyez sur
l
a touc
h
e
LEARN
pour
d
eux secon
d
es
–
ou jusqu’
à
ce que la DEL cli
g
note bleu–puis
r
e
l
âc
h
e
z
l
a
t
ouc
h
e
LEARN
.
1
L
a
Su
r
r
o
undBar est allumée
,
la DEL luit vert continu
et
d
u son p
r
o
v
ie
nt
de
la
ba
r
r
e.
T
enez la télécommande de la télé à 30-60 cm
TT
de
l
a
Su
rr
ou
n
d
B
ar
.
A
ppuyez brièvement sur la touche «volume +.
»
L
a
DEL
l
u
i
t
bl
eu cont
i
nu
.
bl
eu cont
i
nu
D
E
L
clignote bleu
1
'-
2'
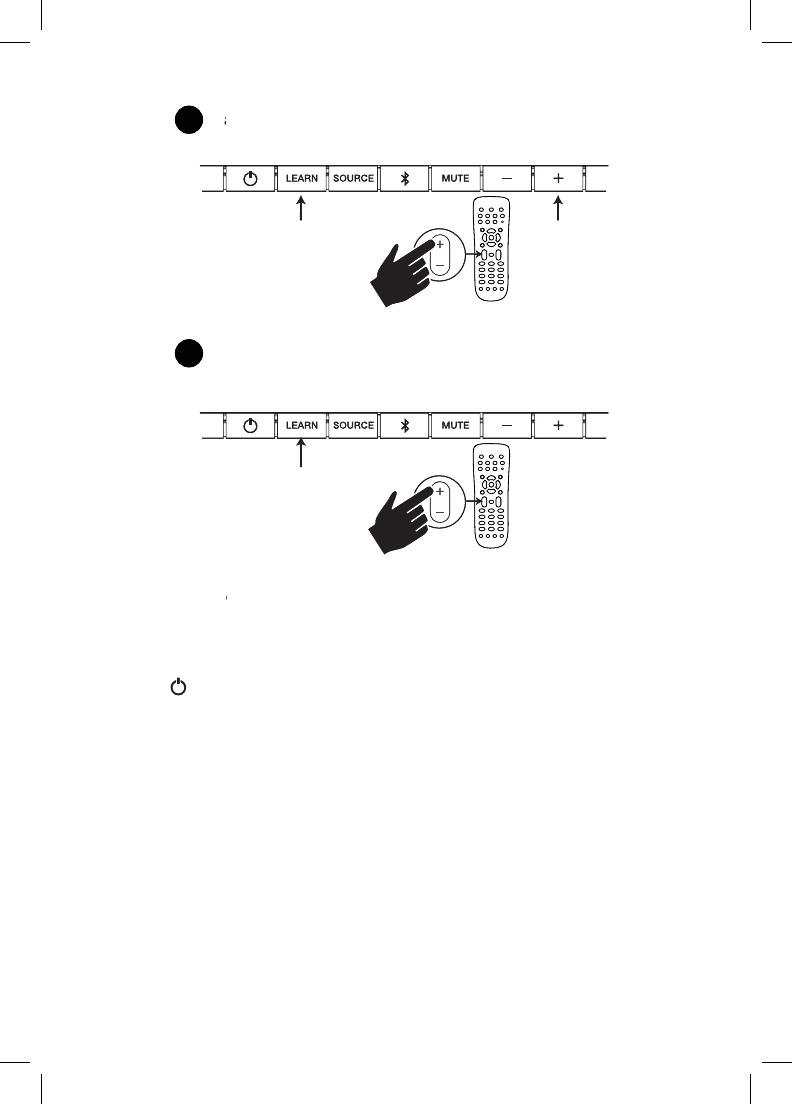
23
Customer Service Hours of Operation: Monday-Friday, 9am-5:30pm est polkcs@polkaudio.com
Répétez les étapes 1 à 6 pour programmer
les touches de «volume -», source, Mute
et interrupteur ( ).
Note: si votre barre ne réussit pas à acquérir
certains codes IR de la télécommande, la DEL
de l’interrupteur clignotera rouge. Effacez les
codes précédemment programmés (voir ci-
dessous) et répétez les étapes 1 à 6.
Procédure pour effacer les codes: Si vous
avez programmé votre SurroundBar pour qu’elle
réponde à une télécommande et que vous désirez
supprimer cette programmation, appuyez sur
la touche LEARN pour environ deux secondes
lorsque la SurroundBar est en mode veille
(la DEL interrupteur luit rouge continu). Vous
saurez que les codes précédemment programmés
ont été effacés lorsque la DEL LEARN clignote
rouge deux fois.
Note: Cette procédure efface TOUTE la program-
mation de votre télécommande pour la Surround-
bar. Si vous désirez modifi er la programmation
pour seulement certaines des fonctions de la
barre, répétez les six étapes de programmation
en séquence pour reprogrammer la barre selon
vos besoins. La barre répondra toujours à la petite
télécommande fournie.
5
VOL
DEL
La DEL LEARN clignote
à chaque pression du bouton
DEL
Bouton «volume +»
DEL clignote bleu
DEL
Del clignote bleu
Tapotez le bouton «volume +» de la télécommande
de votre télé de 4 à 8 fois en autant de secondes.
6Lorsque la DEL LEARN de même que la DEL du
bouton sélectionné clignotent bleu, la commande
a été programmée.
Vérifiez si la commande fonctionne.
VOL
23
C
ustomer
S
ervice Hours of
O
peration: Monday-Friday, 9am-5:30pm est polkcs
@
polkaudio.co
m
R
épétez les étapes 1 à 6 pour pro
g
rammer
l
es touc
h
es
d
e «vo
l
ume -»
,
source
,
M
ute
et interrupteur ( ).
Note
:
si votre barre ne r
é
ussit pas
à
acqu
é
ri
r
certains codes IR de la t
é
l
é
commande
,
la DE
L
d
e
l’i
nterrupteur c
lig
notera rou
g
e.
Eff
acez
l
es
codes précédemment pro
g
rammés (voir ci
-
dessous
)
et r
épé
tez les
é
ta
p
es 1
à
6
.
Proc
é
dure
p
our effacer les codes
:
S
i vous
avez programm
é
votre
S
urroundBar pour qu’elle
r
ép
onde
à
une t
é
l
é
commande et
q
ue vous d
é
sirez
suppr
i
mer cette programmat
i
on, appuyez su
r
l
a touc
h
e
LEARN
pour env
i
ron
d
eux secon
d
es
l
ors
q
ue la SurroundBar est en mode veille
(la DEL interrupteur luit rou
g
e continu). Vous
s
aurez que les codes précédemment pro
g
rammés
o
nt été effacés lorsque la DEL LEARN cli
g
note
rou
g
e deux fois.
N
ote
:
Cette procédure efface TOUTE la pro
g
ram
-
mation de votre t
é
l
é
commande pour la
S
urround
-
bar. Si vous désirez modifi er la pro
g
rammation
p
our seu
l
ement certa
i
nes
d
es
f
onct
i
ons
d
e
l
a
barre, répétez les six étapes de pro
g
rammation
e
n séquence pour repro
g
rammer la barre selon
v
os besoins. La barre r
ép
ondra tou
j
ours
à
la
p
etite
t
é
l
é
commande fournie.
5
VO
L
DE
L
L
a DEL LEARN cligno
t
e
à cha
q
ue
pr
e
ssion du bouto
n
DE
L
B
outon «vo
l
ume +
»
DEL clignote bleu
DE
L
D
e
l
c
lig
note
bl
e
u
T
apotez le bouton «volume +» de la télécommande
TT
de
v
o
t
r
e
t
é
l
é
de
4
à
8
f
o
i
s
e
n
au
t
a
nt
de
seco
n
des
.
6
L
orsque la DEL LEARN de même que la DEL d
u
b
outon sélectionné cli
g
notent bleu, la commande
a
é
t
é
p
r
ogramm
é
e.
V
érifiez si la commande fonctionne.
VV
VO
L

24 Polk Customer Service 800-377-7655 (Outside USA & Canada: 410-358-3600)
Guide de dépannage
La barre ne s’allume pas.
tAssurez-vous que le bloc d’alimentation est
branché dans une prise de courant active.
tAssurez-vous que tous les composants
du bloc d’alimentation sont bien connectés.
tAssurez-vous que le bloc d’alimentation est
bien branché à l’entrée 24V de la barre.
Pas de son de la barre.
t Assurez-vous qu’il y a un signal provenant
de la télé ou du récepteur câble/sat.
tEssayez une autre source audio si nécessaire.
t Assurez-vous que la barre est bien branchée
et allumée.
tMontez le volume de la barre.
tVérifi ez la connexion des câbles d’entrée.
t Montez le volume de la télé ou du récepteur-
câble/sat.
t Vérifi ez l’état du mode MUTE: la DEL clignote-
t-elle vert lentement? Si oui, appuyez sur la
touche MUTE de la barre.
Le son provenant de la barre est distortionné.
t Baissez le volume de la source audio
(si possible).
t Traitement audio (voir FAQ aux pages24-25)
Il y a peut-être un traitement audio actif entre
la source et la barre. Désactivez-le.
La télécommande fournie ne fonctionne pas.
t Assurez-vous que la languette de plastique
qui protège la pile a été retirée.
tRemplacez la pile (CR2025).
La barre n’acquiert pas les codes
de ma télécommande.
t Suivez attentivement les instructions
de programmation à la page précédente
de ce manuel.
t Tenez fermement la télécommande
à 30-60cm de l’avant de la SurroundBar.
t Tapotez le bouton de votre propre
télécommande jusqu’à ce que la DEL
d’état d’activité clignote vert.
Note: La barre peut acquérir les codes de presque
toutes les commandes IR mais certains protocoles
IR ne peuvent pas être programmés.
Le volume des haut-parleurs de ma télé
devient graduellement plus fort que celui
de ma SurroundBar N1.
t Désactivez les haut-parleurs de votre télé en sui-
vant les instructions à la page22 de ce manuel.
t Lorsque vous appuyez sur le bouton de volu-
mede la télécommande, il se peut que le volume
de votre télé change plus rapidement que celui
de la barre. Utilisez les touches situées sur
la barre pour équilibrer le volume de la barre
avec celui de la télé.
FAQ (Foire aux questions)
Ma télé n’est pas munie d’une sortie optique.
Comment connecter mon audio?
Il y a plusieurs options de connexion audio:
t Connectez la sortie optique de votre composant
de source (récepteur câble/sat, DVD, etc.)
directement à la SurroundBar en utilisant
le câble optique fourni.
t Connectez la sortie 1/8" (3,5mm) écouteurs/
analogique/(si disponible) de votre télé directe-
ment à la barre en utilisant un câble analogique
1/8" à 1/8" (3,5mm).
t Connectez les sorties audio RCA (prises
rouge/blanc) de votre télé (si disponibles)
directement à la SurroundBar en utilisant
un câble analogique avec fi che 1/8"
(3,5mm) à fi ches RCA.
24
Polk
C
ustomer
S
ervice 800-377-7655 (
O
utside U
S
A &
C
anada: 410-358-3600
)
G
uide de d
é
pannage
La barre ne s’allume
p
as
.
t
A
ssurez-vous
q
ue le bloc d’alimentation est
b
ranché dans une
p
rise de courant active
.
t
A
ssurez-vous
q
ue tous
l
es com
p
osants
du bloc d’alimentation sont bien connect
é
s
.
t
A
ssurez-vous
q
ue le bloc d’alimentation est
b
ien branché à l’entrée 24V de la barre.
P
as
d
e son
d
e
l
a
b
arre.
t
A
ssurez-vous qu’il y a un si
g
nal provenant
de la télé ou du réce
p
teur câble/sat.
t
E
ssayez une autre source audio si n
é
cessaire
.
t
A
ssurez-vous
q
ue la barre est bien branchée
et allum
é
e
.
tM
o
nt
e
z l
e
v
o
l
u
m
e
de
l
a
ba
rr
e.
t
Vé
rifi ez la connexion des c
â
bles d’entr
é
e
.
tMontez le volume de la télé ou du réce
p
teur
-
c
â
ble
/
sat
.
t
V
érifi ez l’état du mode MUTE: la DEL cli
g
note
-
t-elle vert lentement? Si oui, a
pp
u
y
ez sur la
touche MUTE de la barre
.
Le son
p
rovenant de la barre est distortionné
.
t
B
a
i
ssez
l
e vo
l
ume
d
e
l
a source au
di
o
(
si possible
).
t
T
raitement audio
(
voir FA
Q
aux pages24-25
)
I
l y a peut-
ê
tre un traitement audio actif entre
la source et la barre. D
é
sactivez-le.
La t
é
l
é
commande fournie ne fonctionne pas
.
t
A
ssurez-vous que la lan
g
uette de plastique
qui protè
g
e la pile a été retirée
.
t
R
emplacez la pile
(C
R2025
).
L
a
b
arre n
’
acqu
i
ert pas
l
es co
d
es
de ma t
é
l
é
commande.
t
Su
iv
e
z
a
tt
e
ntiv
e
m
e
nt l
es
in
s
tr
uc
ti
o
n
s
de pro
g
rammation à la pa
g
e précédente
de
ce
m
a
n
ue
l
.
t
T
enez fermement la télécommande
à
30
-
60
c
m
de
l’
a
v
a
nt
de
l
a
Su
rr
ou
n
d
B
a
r.
t
T
a
p
otez le bouton de votre
p
ro
p
re
télécommande jusqu’à ce que la DEL
d’
é
tat d’activit
é
clignote vert
.
Note:
La barre peut acqu
é
rir les codes de presque
t
outes
l
es comman
d
es
IR
ma
i
s certa
i
ns protoco
l
es
I
R ne peuvent pas être pro
g
rammés
.
L
e volume des haut-parleurs de ma t
é
l
é
d
ev
i
ent gra
d
ue
ll
ement p
l
us
f
ort que ce
l
u
i
de ma
S
urroundBar N1
.
t D
é
sactivez les haut-parleurs de votre t
é
l
é
en sui
-
vant les instructions à la pa
g
e22 de ce manuel
.
t
L
ors
q
ue vous a
pp
u
y
ez sur
l
e
b
outon
d
e vo
l
u
-
mede la t
é
l
é
commande, il se
p
eut
q
ue le volume
de votre t
é
l
é
change plus rapidement que celui
de la barre. Utilisez les touches situ
é
es su
r
l
a barre
p
our
éq
uilibrer le volume de la barre
avec celui de la télé.
F
AQ (Foire aux questions
)
M
a t
é
l
é
n’est pas munie d’une sortie optique.
C
omment connecter mon audio
?
I
l y a plusieurs options de connexion audio:
t
C
onnectez la sortie optique de votre composant
de source
(
r
é
cepteur c
â
ble
/
sat, DVD, etc.
)
directement
à
la
S
urroundBar en utilisant
l
e c
â
ble optique fourni
.
t
C
onnectez la sortie 1
/
8"
(
3,5mm
)
é
couteurs
/
a
nalo
g
ique/(si disponible) de votre télé directe
-
ment à la barre en utilisant un câble analo
g
ique
1
/
8"
à
1
/
8"
(
3,5mm
)
.
t
Connectez les sorties audio RCA (prises
rouge/blanc) de votre télé (si disponibles)
directement à la SurroundBar en utilisant
un câble analogique avec fi che 1/8"
(
3,5mm
)
à
fi ches R
C
A
.

25
Customer Service Hours of Operation: Monday-Friday, 9am-5:30pm est polkcs@polkaudio.com
Que faire si le câble optique fourni
est trop court?
t Le câble fourni devrait normalement être
assez long, mais en certains cas il pour-
rait s’avérer trop court. Les magasins
d’électronique pourront vous en fournir
un plus long.
Le son semble étrange et distortionné.
t Votre SurroundBar N1 requiert une source
stéréo intégrale pour atteindre sa perfor-
mance optimale. Si le son semble étrange
ou distortionné, vérifi ez les menus audio des
composants qui sont connectés à votre barre
et assurez-vous que tout traitement audio
est désactivé.
Je n’arrive pas à programmer la SurroundBar
N1 pour qu’elle réponde à ma télécommande.
t Il existe plusieurs types de télécommandes
et nous nous sommes efforcés d’assurer la
compatibilité de la SurroundBar N1 avec la
plupart des marques populaires. Il se peut
toutefois que la barre ne soit pas compatible
avec certaines télécommandes.
t Dans ce cas, utilisez la télécommande fournie
avec la SurroundBar N1 ou essayez une autre
télécommande universelle.
Note: Les télécommandes uniquement à RF
ne sont pas compatibles avec ce système.
Comment contrôler la SurroundBar N1?
Il y a trois façons de contrôler votre SurroundBar:
tUtilisez les touches situées à l’avant
de la barre.
tUtilisez la télécommande fournie.
t Programmez la SurroundBar N1 à répondre
à votre télécommande actuelle (voir les
instructions incluses).
Ma SurroundBar répondait aux commandes
mais ne répond plus. Que faire?
t Dans cette rare éventualité, éteignez la
barre (interrupteur situé à l’arrière), attendez
quelques instants puis rallumez-la. Cela
devrait rétablir la communication.
Comment effacer une programmation
antécédente de ma télécommande?
t Si vous avez programmé votre SurroundBar
pour qu’elle réponde à une télécommande et
que vous désirez supprimer cette program-
mation, appuyez sur la touche LEARN pour
environ deux secondes lorsque la Surround-
Bar est en mode veille (la DEL interrupteur luit
rouge). La SurroundBar N1 répondra toujours
à la petite télécommande fournie.
Service à la Clientèle:
t Si vous avez des questions ou des com-
mentaires, n’hésitez pas à communiquer avec
nous à polkcs@polkaudio.com–ou par télé-
phone au 800-377-7655 (L-V, 9h-17:30h HE,
Canada et É.-U. seul.); à l’extérieur des É.-U.
et du Canada, composez le 410-358-3600.
Polk est une compagnie de la DEI Holdings, Inc.. Polk, SDA Surround
et SurroundBar sont des marques de commerce déposées de Polk
Audio, Inc. N1 Surroundbar et SmartBar sont des marques de com-
merce de Polk Audio.
Les autres marques de commerce et appellations commerciales ap-
partiennent aux sociétés qui en sont respectivement détentrices.
© 2013 Microsoft Corporation. Tous droits réservés. Microsoft, 343
Industries, le logo 343 Industries, Halo, le logo Halo, Turn 10, le logo
Turn 10, Forza Motorsport, le logo Forza Motorsport, Xbox, Xbox 360,
Xbox One, et les logos Xbox, sont des marques de commerce du
groupe de compagies Microsoft.
Fabriqué sous licence de Dolby Laboratories. Dolby et le
symbole Double-D sont des marques de commerce déposées
de Dolby Laboratories.
La marque de mot Bluetooth® et ses logos sont des marques de
commerce déposées détenues par Bluetooth SIG, Inc. et tout usage
de ces marques par Polk Audio est sous licence. Les autres marques
de commerce et appellations commerciales appartiennent aux sociétés
qui en sont respectivement détentrices.
Le logiciel aptX® est protégé par les droits d’auteur de la CSR plc ou
d’une de son groupe d’entreprises. Tous droits réservés. La marque
aptX® et le logo aptX sont des marques de commerce de la CSR plc
ou d’une de son groupe d’entreprises et pourraient être enregistrées
dans un ou plusieurs pays.
est une marque de commerce deSRS Labs, Inc. La tech-
nologie TruSurround HD est incorporée sous license de SRS Labs, Inc.
2
5
C
ustomer
S
ervice Hours of
O
peration: Monday-Friday, 9am-5:30pm est polkcs
@
polkaudio.co
m
Que faire si le câble o
p
ti
q
ue fourni
est tro
p
court?
t Le c
â
ble fourni devrait normalement
ê
tre
assez
l
on
g
, ma
i
s en certa
i
ns cas
il
pour
-
rait s’avérer trop court. Les magasins
d’électroni
q
ue
p
ourront vous en fourni
r
un p
l
us
l
ong
.
Le son semble
é
trange et distortionn
é.
t Votre
S
urroundBar N1 requiert une source
st
é
r
é
o int
é
grale pour atteindre sa perfor-
mance optimale.
S
i le son semble
é
trange
ou distortionn
é
, v
é
rifi ez les menus audio des
com
p
osants
q
ui sont connectés à votre barre
et assurez-vous
q
ue tout tra
i
tement au
di
o
est d
é
sactiv
é.
Je n’arrive pas
à
pro
g
rammer la
S
urroundBar
N1
p
our
q
u’elle ré
p
onde à ma télécommande
.
t
Il existe
p
lusieurs t
yp
es de télécommandes
et nous nous sommes efforc
é
s d’assurer la
com
p
atibilité de la SurroundBar N1 avec la
pl
u
p
art
d
es mar
q
ues
p
o
p
u
l
a
i
res.
Il
se
p
eut
toute
f
o
i
s
q
ue
l
a
b
arre ne so
i
t
p
as com
p
at
ibl
e
avec certaines t
é
l
é
commandes.
t Dans ce cas, utilisez la t
é
l
é
commande fournie
avec la SurroundBar N1 ou essa
y
ez une autre
t
é
l
é
commande universelle
.
N
o
t
e:
Les télécommandes uni
q
uement à RF
ne sont
p
as com
p
atibles avec ce s
y
stème
.
C
omment contrôler la
S
urroundBar N1
?
Il y a trois fa
ç
ons de contrôler votre SurroundBar:
t
Utilisez les touches situ
é
es
à
l’avant
de la barre
.
t
U
tili
se
z l
a
t
é
l
éco
mm
a
n
de
f
ou
rni
e
.
t Programmez la
S
urroundBar N1
à
r
é
pondre
à
votre t
é
l
é
commande actuelle
(
voir les
instructions incluses
).
Ma
S
urroundBar r
é
pondait aux commandes
mais ne r
é
pond plus.
Q
ue faire
?
t Dans cette rare éventualité, étei
g
nez la
barre
(
interru
p
teur situ
é
à
l’arri
è
re
)
, attendez
q
uel
q
ues instants
p
uis rallumez-la. Cela
de
vr
a
it r
é
t
ab
lir l
a
co
mm
u
ni
ca
ti
o
n.
C
omment effacer une programmation
a
nt
écéde
nt
e
de
m
a
t
é
l
éco
mm
a
n
de?
t
Si vous avez pro
g
rammé votre SurroundBa
r
p
our
q
u’elle ré
p
onde à une télécommande et
que vous désirez supprimer cette pro
g
ram
-
mat
i
on, a
pp
u
y
ez sur
l
a touc
h
e
LEARN
p
ou
r
environ deux secondes lorsque la
S
urround-
B
ar est en mode veille
(
la DEL interrupteur luit
rou
g
e). La SurroundBar N1 répondra toujours
à
la
p
etite télécommande fournie
.
S
ervice à la
C
lientèle
:
t
Si vous avez des
q
uestions ou des com
-
mentaires, n’hésitez
p
as à communi
q
uer avec
nous à
p
olkcs@
p
olkaudio.com–ou
p
ar télé
-
p
hone au 800-377-7655
(
L-V, 9h-17:30h HE,
Canada et É.-U. seul.
)
; à l’extérieur des É.-U.
et du Canada, com
p
osez le 410-358-3600
.
Polk est une compagnie de la DEI Holdings, Inc.. Polk,
S
DA
S
urround
et
S
urroundBar sont des marques de commerce d
é
pos
é
es de Pol
k
Audio, Inc. N1
S
urroundbar et
S
martBar sont des marques de com
-
merce
d
e
P
o
lk
A
u
di
o
.
L
es autres marques
d
e commerce et appe
ll
at
i
ons commerc
i
a
l
es ap
-
partiennent aux sociétés qui en sont respectivement détentrices
.
© 2013 Microsoft Corporation. Tous droits réservés. Microsoft, 343
Industries, le lo
g
o 343 Industries, Halo, le lo
g
o Halo, Turn 10, le lo
g
o
Turn 10, Forza Motorsport, le logo Forza Motorsport, Xbox, Xbox 360,
Xbox One, et les logos Xbox, sont des marques de commerce du
g
roupe de compa
g
ies Microsoft
.
Fabriqué sous licence de Dolby Laboratories. Dolby et le
symbole Double-D sont des marques de commerce déposées
d
e
D
o
lb
y
L
a
b
orator
i
es
.
L
a marque
d
e mot
Bl
uetoot
h
®
et ses
l
ogos sont
d
es marques
d
e
commerce d
é
pos
é
es d
é
tenues par Bluetooth
S
I
G
, Inc. et tout usage
d
e ces marques par
P
o
lk
A
u
di
o est sous
li
cence.
L
es autres marques
de commerce et appellations commerciales appartiennent aux sociétés
qui en sont respectivement détentrices.
Le lo
g
iciel aptX
®
est proté
g
é par les droits d’auteur de la CSR plc ou
d’une de son
g
roupe d’entreprises. Tous droits réservés. La marque
a
p
t
X
®
et le lo
g
o aptX sont des marques de commerce de la CSR plc
ou d’une de son groupe d’entreprises et pourraient être enregistrées
dans un ou plusieurs pays.
est une marque de commerce deSRS Labs, Inc. La tech-
nologie TruSurround HD est incorporée sous license de SRS Labs, Inc
.

26 Polk Customer Service 800-377-7655 (Outside USA & Canada: 410-358-3600)
Garantie limitée
La garantie de Polk Audio, Inc., n’est valide que pour
l’acheteur au détail original. La garantie sera automa-
tiquement annulée avant sa date d’expiration spécifi ée si
l’acheteur original vend ou transfère le produit à tout autre
parti. Polk Audio, Inc., garantit—à l’acheteur au détail
original seulement—que le ou les HAUT-PARLEUR(S),
COMPOSANTE(S) DE FILTRE PASSIF et CAISSON(S)
de ce produit Polk Audio seront exempts de tout défaut
attribuable aux pièces d’origine et à la main d’oeuvre pour
une période de Trois (3) ans à partir de la date de l’achat
au détail original chez un revendeur agréé Polk Audio. En
outre, Polk Audio, Inc., garantit—à l’acheteur au détail
original seulement—que TOUT AMPLIFICATEUR OU TOUT
AUTRE COMPOSANTE ÉLECTRONIQUE qui pourrait faire
partie ce produit Polk Audio sera exempt de tout défaut
attribuable aux pièces d’origine et à la main d’oeuvre pour
une période de un (1) ans à partir de la date de l’achat au
détail original chez un revendeur agréé Polk Audio. Pour
permettre à Polk Audio de vous offrir le meilleur service
de garantie possible, veuillez enregistrer votre nouveau
produit en ligne à l’adresse web: www.polkaudio.com/
registration ou contactez le Service à la Clientèle de Polk
au 800-377-7655 aux États-Unis et au Canada (à l’extérieur
des. U.: 410-358-3600) dans les dix (10) jours suivant la
date de l’achat original. Assurez-vous de conserver votre
reçu d’achat original. Les produits défectueux doivent être
expédiés, avec une preuve d’achat, francs de port et dû-
ment assurés, au revendeur agréé Polk Audio de qui vous
avez acheté le produit, ou à l’usine Polk Audio, à l’adresse:
1 Viper Way, Vista, California 92081. Les produits doivent
être expédiés dans leur carton d’expédition original ou dans
un contenant équivalent. En tout cas le propriétaire doit
assumer tout risque de perte ou de dommage en transit.
Si, suite à l’examen du produit à l’usine Polk ou chez le
marchand agréé Polk Audio, il est déterminé que la défec-
tuosité est imputable aux matériaux d’origine ou à la main
d’oeuvre au cours de la période de la garantie spécifi ée,
Polk Audio ou le revendeur Polk Audio, à sa guise, réparera
ou remplacera le produit sans frais additionnels et selon
les conditions décrites ci-dessous. Toute pièce ou produit
remplacé devient la propriété de Polk Audio. Les produits
réparés ou remplacés sous la garantie vous seront expédiés
francs de port dans un délai raisonnable. Cette garantie
n’inclut pas le service ou les pièces nécessaires à la répara-
tion des dommages provoqués par accident, désastre,
abus, négligence, mode d’expédition ou emballage
inadéquat, utilisation commerciale, tensions supérieures
au maximum prescrit pour l’unité, aspect visuel du meuble
non directement attribuable à un défaut de pièces d’origine
ou de main d’oeuvre, ou par le service, la réparation,
ou toute modifi cation du produit qui n’a pas été autorisé
ou approuvé par Polk Audio.
Cette garantie sera annulée si le numéro de série sur
le produit a été enlevé, altéré ou falsifi é. Cette garantie
prend préséance sur toutes autres garanties énoncées.
Si la défectuosité de ce produit est imputable aux pièces
d’origine ou à la main d’oeuvre selon les conditions de la
garantie exprimées ci-dessus, votre seul recourt sera la
réparation ou le remplacement selon les conditions décrites
ci-dessus. Dans aucun cas Polk Audio, Inc. pourra-t-elle
être tenue responsable pour tout dommage accessoire ou
indirect causé par l’utilisation ou par l’incapacité d’utilisation
du produit, même si Polk Audio, Inc. ou un revendeur agréé
Polk Audio, a été avisé de la possibilité de tel dommage, ou
pour toute réclamation par tout autre parti. Certains états ne
permettant pas l’exclusion ou la limitation des dommages
indirects, les limitations et exclusions exprimées ci-dessus
pourraient ne pas s’appliquer dans votre cas. Toutes les
garanties tacites sur ce produit sont limitées à la durée de
la garantie énoncée. Certains états ne permettant pas la
limitation de la durée d’une garantie tacite, les limitations
ci-dessus pourraient ne pas s’appliquer dans votre cas.
Cette garantie vous accorde des droits légaux spécifi ques;
vous pourriez également avoir d’autres droits qui pourraient
varier d’état en état.
Cette garantie s’applique seulement aux produits achetés
au Canada, aux États-Unis d’Amérique et ses possessions,
et dans les clubs audio et d’échange des forces armées
des É.U. et de l’OTAN. Les modalités et les conditions de
garantie applicables aux produits achetés dans d’autres
pays sont disponibles chez les distributeurs agréés Polk
Audio établis dans ces pays.
Service à la Clientèle
Merci d’avoir choisi Polk Audio. Si vous avez des questions
ou des commentaires, n’hésitez pas à communiquer avec
nous par courriel à l’adresse polkcs@polkaudio.com—
ou par téléphone au 800-377-7655 (L-V 9h-17h30 HE,
Canada et É.U. seul.); à l’extérieur des É.-U. et du Canada,
composez le (410)-358-3600).
26
Polk
C
ustomer
S
ervice 800-377-7655 (
O
utside U
S
A &
C
anada: 410-358-3600
)
G
arantie limit
ée
L
a garant
i
e
d
e
P
o
lk
A
u
di
o,
I
nc., n
’
est va
lid
e que pou
r
l’acheteur au détail ori
g
inal. La
g
arantie sera automa
-
tiquement annul
é
e avant sa date d’expiration sp
é
cifi
é
e si
l’acheteur original vend ou transfère le produit à tout autre
parti. Polk Audio, Inc.,
g
arantit—à l’acheteur au détail
ori
g
inal seulement—que le ou les HAUT-PARLEUR(S),
COMPOSANTE
(
S
)
DE FILTRE PASSIF et CAISSON
(
S
)
de ce
p
roduit Polk Audio seront exem
p
ts de tout défaut
attribuable aux pi
è
ces d’origine et
à
la main d’oeuvre pou
r
une p
é
riode de Trois
(
3
)
ans
à
partir de la date de l’achat
au détail ori
g
inal chez un revendeur a
g
réé Polk Audio. En
outre, Polk Audio, Inc., garantit—à l’acheteur au détail
ori
g
inal seulement—que TOUT AMPLIFICATEUR OU TOU
T
AUTRE COMPOSANTE ÉLECTRONIQUE
q
ui
p
ourrait faire
p
artie ce
p
roduit Polk Audio sera exem
p
t de tout défaut
attribuable aux pièces d’ori
g
ine et à la main d’oeuvre pou
r
une
p
ériode de un
(
1
)
ans à
p
artir de la date de l’achat au
d
é
tail original chez un revendeur agr
éé
Polk Audio. Pou
r
p
ermettre à Polk Audio de vous offrir le meilleur service
d
e garant
i
e poss
ibl
e, veu
ill
ez enreg
i
strer votre nouveau
produit en ligne
à
l’adresse web: www.polkaudio.com
/
re
g
istration ou contactez le Service à la Clientèle de Pol
k
au 800-377-7655 aux États-Unis et au Canada (à l’extérieu
r
des. U.: 410-358-3600
)
dans les dix
(
10
)
j
ours suivant la
date de l’achat ori
g
inal. Assurez-vous de conserver votre
re
ç
u d’achat ori
g
inal. Les produits défectueux doivent être
exp
é
di
é
s, avec une preuve d’achat, francs de port et d
û-
ment assurés, au revendeur a
g
réé Polk Audio de qui vous
avez achet
é
le produit, ou
à
l’usine Polk Audio,
à
l’adresse:
1 Viper Way, Vista,
C
alifornia 92081. Les produits doivent
être expédiés dans leur carton d’expédition original ou dans
un contenant é
q
uivalent. En tout cas le
p
ro
p
riétaire doit
assumer tout risque de perte ou de domma
g
e en transit.
S
i, suite
à
l’examen du produit
à
l’usine Polk ou chez le
marchand agr
éé
Polk Audio, il est d
é
termin
é
que la d
é
fec
-
tuosit
é
est imputable aux mat
é
riaux d’origine ou
à
la main
d’oeuvre au cours de la p
é
riode de la garantie sp
é
cifi
é
e,
Polk Audio ou le revendeur Polk Audio, à sa guise, réparera
ou remplacera le produit sans frais additionnels et selon
les conditions décrites ci-dessous. Toute pièce ou produit
rem
p
lacé devient la
p
ro
p
riété de Polk Audio. Les
p
roduits
réparés ou remplacés sous la
g
arantie vous seront expédiés
francs de port dans un délai raisonnable. Cette
g
arantie
n’inclut pas le service ou les pièces nécessaires à la répara
-
tion des domma
g
es provoqués par accident, désastre,
abus, né
g
li
g
ence, mode d’expédition ou emballa
g
e
i
nadéquat, utilisation commerciale, tensions supérieures
a
u maximum
p
rescrit
p
our l’unité, as
p
ect visuel du meuble
n
on directement attribuable à un défaut de pièces d’origine
ou de main d’oeuvre, ou
p
ar le service, la ré
p
aration,
ou toute modifi cation du
p
roduit
q
ui n’a
p
as été autorisé
ou approuv
é
par Polk Audio.
C
ette
g
arantie sera annulée si le numéro de série sur
l
e produit a
é
t
é
enlev
é
, alt
é
r
é
ou falsifi
é
.
C
ette garantie
prend préséance sur toutes autres garanties énoncées.
Si la défectuosité de ce
p
roduit est im
p
utable aux
p
ièces
d
’ori
g
ine ou à la main d’oeuvre selon les conditions de la
g
arantie exprimées ci-dessus, votre seul recourt sera la
ré
p
aration ou le rem
p
lacement selon les conditions décrites
c
i
-
d
essus.
D
ans aucun cas
P
o
lk
A
u
di
o,
I
nc. pourra-t-e
ll
e
ê
tre tenue responsable pour tout dommage accessoire ou
i
ndirect causé
p
ar l’utilisation ou
p
ar l’inca
p
acité d’utilisation
d
u produit, m
ê
me si Polk Audio, Inc. ou un revendeur agr
éé
P
olk Audio, a
é
t
é
avis
é
de la possibilit
é
de tel dommage, ou
p
our toute réclamation
p
ar tout autre
p
arti. Certains états ne
permettant pas l’exclusion ou la limitation des domma
g
es
i
ndirects, les limitations et exclusions ex
p
rimées ci-dessus
p
ourraient ne
p
as s’a
pp
li
q
uer dans votre cas. Toutes les
garanties tacites sur ce produit sont limit
é
es
à
la dur
é
e de
l
a
g
arantie énoncée. Certains états ne permettant pas la
l
imitation de la durée d’une
g
arantie tacite, les limitations
c
i
-
d
essus pourra
i
ent ne pas s
’
app
li
quer
d
ans votre cas.
C
ette
g
arantie vous accorde des droits lé
g
aux spécifi ques;
vous pourriez é
g
alement avoir d’autres droits qui pourraient
varier d’état en état
.
C
ette
g
arantie s’applique seulement aux produits achetés
a
u Canada, aux
É
tats-Unis d’Amérique et ses possessions,
et dans les clubs audio et d’échan
g
e des forces armées
d
es É.U. et de l’OTAN. Les modalités et les conditions de
g
arantie applicables aux produits achetés dans d’autres
pays sont disponibles chez les distributeurs a
g
réés Pol
k
A
udio établis dans ces
p
a
y
s
.
S
ervice à la
C
lientèl
e
Merci d’avoir choisi Polk Audio. Si vous avez des
q
uestions
ou des commentaires, n’hésitez
p
as à communi
q
uer avec
n
ous par courriel à l’adresse polkcs@polkaudio.com
—
ou
p
ar télé
p
hone au 800-377-7655
(
L-V 9h-17h30 HE,
C
anada et É.U. seul.
)
; à l’extérieur des É.-U. et du Canada,
com
p
osez le
(
410
)
-358-3600
).