DENSO TEN FT0071A WIRELESS SPEAKER SYSTEM User Manual TD M1 EN indd
Fujitsu Ten Limited WIRELESS SPEAKER SYSTEM TD M1 EN indd
Contents
- 1. Users Manual
- 2. Users Manual regulatory statements
- 3. Quick Guide
Users Manual

1
Contents
Features ……………………………… 2
Included items ……………………… 2
Terminals ……………………………… 3
Preparing the speakers …………… 4
Adjusting the speaker angle ……………… 4
Attaching the grills ………………………… 4
Connecting the power ……………………… 4
Connecting supported devices …… 5
AirPlay ………………………………… 6
Wi-Fi mode (recommended) ……………… 6
Direct mode ………………………………… 6
Using the TD-M1 …………………… 7
Indicator (center) display ……………………7
Switching the power on or off ……………… 7
Auto-standby function ………………………7
Adjusting the volume ……………………… 7
Switching the source ……………………… 7
Switching AirPlay connection modes ………7
Connecting via AirPlay ……………… 8
Connecting using Direct mode ………… 8
Connecting using Wi-Fi mode …………… 8
Playing music ………………………… 9
Listening via AirPlay ………………………… 9
iOS device ………………………………… 9
iTunes ……………………………………… 9
Listening via USB connection (Type A) … 10
Listening via USB connection (Type B) … 10
Mac ………………………………………… 10
Windows PC ……………………………… 11
Windows 7, Windows 8 ………………… 11
Windows XP ……………………………… 12
Listening via AUX connection …………… 12
TD-M1 Network Audio Device
Settings screen …………………… 13
Using Safari on a Mac ……………………13
Using Network on Windows 7,
Windows 8 ……………………………… 13
Using My Network Places on
Windows XP ……………………………… 14
Using an iOS device ………………………14
Configuring the network settings ……… 15
Device Details screen …………………… 15
Network Settings Screen ………………… 16
Updating software ……………………… 17
Resetting the TD-M1 ……………… 18
Maintenance ……………………… 18
Troubleshooting …………………… 18
Trademark ………………………… 18
Notice for WEEE directive ……… 18
Specifications ……………………… 19
TD-M1 ……………………………………… 19
AC adapter ………………………………… 19
Audio etiquette
•Depending on the location, even enjoyable music can be bothersome. Enjoy music at an appropriate volume so as not to disturb
the people around you.
•At night in particular, music can travel far to surrounding areas even at a low volume. Be mindful of others and maintain a
pleasant living environment.
2
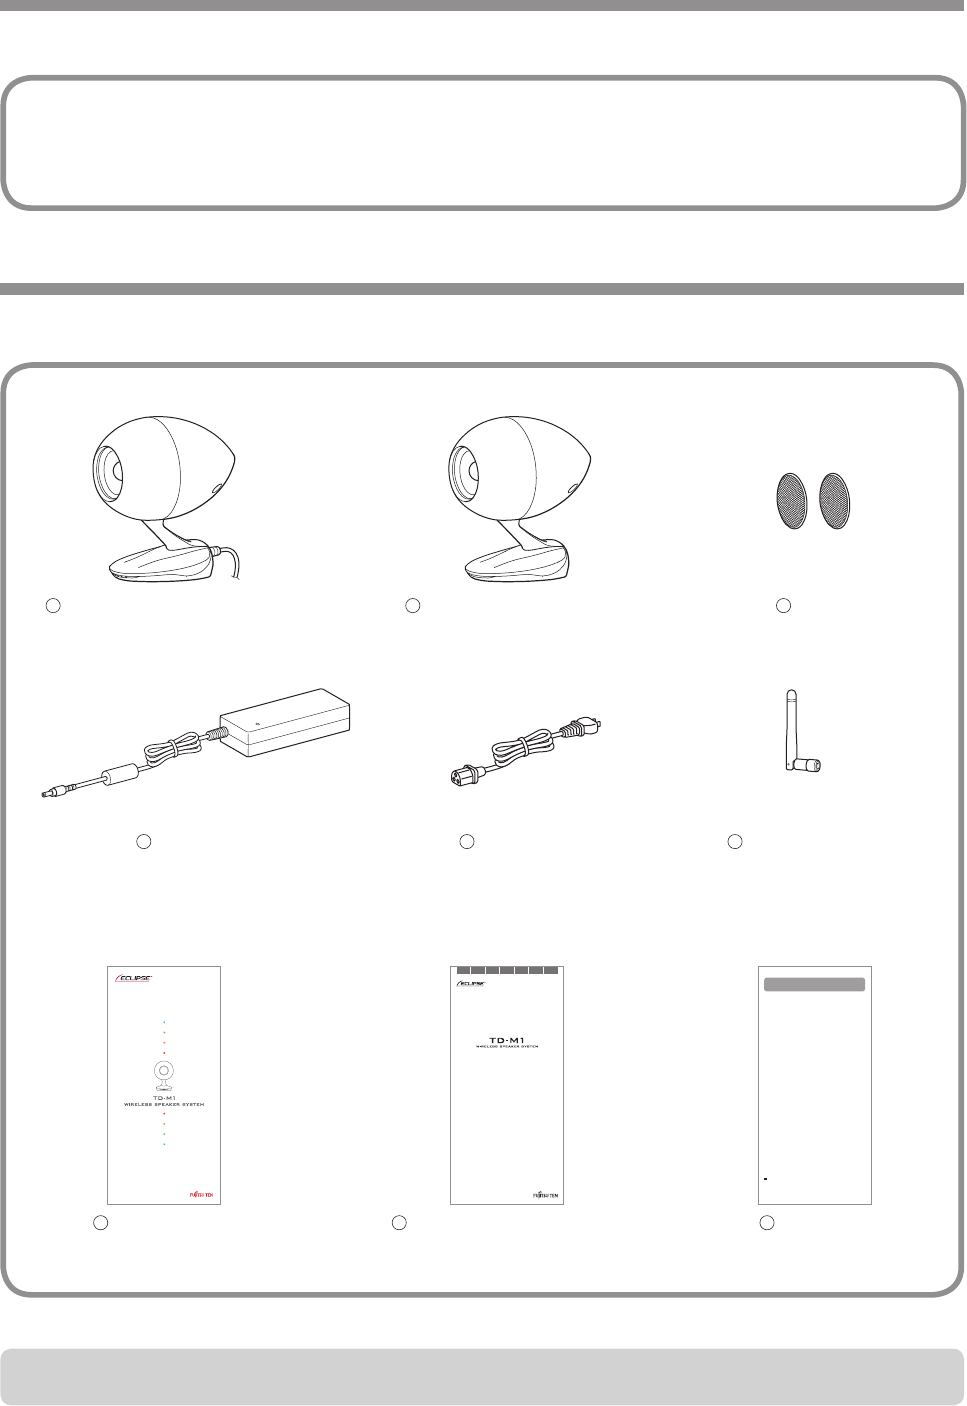
Included items
* When two types of cables are included, use one with the suitable plug for your outlet.
1 Right speaker (right channel) 12 Left speaker (left channel) 13 Grill 2
6 Wi-Fi® antenna 1
If any items are damaged or missing, contact the place of purchase.
7 Quick guide 1
JP EN DE FR IT ES PT
安全上のご注意とアフターサービスについて
Important Safety Instructions and After-Sales Service
Wichtige Hinweise zur Sicherheit und Kundendienst
Importantes instructions de sécurité et service après-vente
Importanti istruzioni di sicurezza e assistenza post-vendita
Instrucciones importantes de seguridad y servicio de posventa
Instruções de Segurança Importantes e Serviço Pós-Venda
FUJITSU TEN LIMITED One (1) Year Limited Warranty
Terms and Conditions of warranty
(Two (2) Years limited warranty only in the countries of European Union (EU))
1. When warranty becomes effective
This warranty becomes effective from the date at which the product was originally purchased.
2. What warranty covers
We will repair the product (“Product”) manufactured by FUJITSU TEN LIMITED to which this warranty
relates, if it is agreed there are any defects in material or in manufacturing, at no charge (“Warranty
Repair”) based upon the period and the conditions stated herein. We will repair the Product as a
Warranty Repair. Any removed defective parts will become the property of FUJITSU TEN LIMITED.
3. Warranty Period
The One (1) year, (Two (2) years in EU) limited warranty, commences on the date the Product was
purchased with a valid receipt.
4. How to obtain a Warranty Repair
In the first instance you should contact your original retailer of the Product who may be able to assist
in resolving your issue. If the issue was not resolved, please contact FUJITSU TEN LIMITED as listed
in the owner’s manual or on our Web support page (http://www.eclipse-td.net/), along with the receipt,
for Warranty Repair.
5. What is NOT covered by this warranty
We will make a charge, even if the Product is within the Warranty Period, for any repair under the
following circumstances:
a. No original proof of purchase is available.
b. No indication herein of purchase date, name of customer or name of shop.
c. Replacement of consumables (e.g. batteries)
d. Any evidence of modification and/or tampering with the original serial number.
e. Any damage caused by:
· Misuse outside of the handling methods indicated in the owner’s manual, poor maintenance
or service by the customer, cosmetic damage or any modification of the Product.
· Malfunction of another manufacturers product when in use with our Product.
· External factors such as fire, pollution, chemical cleaner, abnormal voltage, use of a power
supply providing non-rated voltage or frequency, earthquake, thunder, lightning, wind or flood
damage, or other such natural disasters.
f. Any other use that could reasonably be considered how the Product was not originally intended
to be used.
· Shipping cost to FUJITSU TEN LIMITED including postage, packaging materials and handling.
· Any damage during shipping.
· Unauthorized repair or modification performed by non-authorized FUJITSU TEN LIMITED
repair facility.
6. WHERE THIS WARRANTY IS VALID
This warranty is applicable in the country of original purchase.
7. WARRANTY DISCLAIMER AND LIMITATION
THIS WARRANTY STATEMENT FOR THE PRODUCT AND THE SOFTWARE IS IN LIEU OF ALL
WARRANTIES, EXPRESS, IMPLIED OR STATUTORY INCLUDING BUT NOT LIMITED TO ANY IMPLIED
WARRANTIES OF MERCHANTABILITY OR FITNESS FOR A PARTICULAR PURPOSE ON THE PRODUCT.
ALL IMPLIED OR STATUTORY WARRANTIES, TO THE EXTENT THAT THEY CANNOT BE EXCLUDED,
ARE LIMITED TO THE EFFECTIVE PERIOD OF THE EXPRESS WARRANTY SET FORTH HEREIN. IF THE
PRODUCT IS DEFECTIVE IN MATERIALS OR WORKMANSHIP, YOUR SOLE AND EXCLUSIVE REMEDY
SHALL BE REPAIR OR REPLACEMENT AS PROVIDED ABOVE. HOWEVER IF THAT REMEDY FAILS
OF ITS ESSENTIAL PURPOSE, WE RESERVE THE RIGHT TO REFUND THE PURCHASE PRICE OF THE
PRODUCT TO THE PURCHASER IN EXCHANGE FOR THE RETURN OF THE PRODUCT. WE SHALL NOT
BE LIABLE FOR ANY DAMAGES INCLUDING, BUT NOT LIMITED TO, DIRECT, INDIRECT, INCIDENTAL
OR CONSEQUENTIAL DAMAGES, LOSS OF USE OR DATA, LOSS OF PROFITS OR INTERRUPTION
OF BUSINESS, WHETHER SUCH ALLEGED DAMAGES ARE BASED IN WARRANTY, TORT (INCLUDING
NEGLIGENCE AND STRICT LIABILITY, BUT EXCLUDING PERSONAL INJURY), CONTRACT, OR
INDEMNITY.
8. Other Rights
If your country or state does not allow any limitation or exclusion by its law, above terms may not
apply to you.
9. Others
· Please keep your proof of purchase safe for future reference.
· FUJITSU TEN LIMITED is not liable for transportation and installation charges.
· The maximum liability of FUJITSU TEN LIMITED will not exceed the retail price actually paid.
See the owner’s manual for further information on repairs after the Warranty Period or the storage period
of spare parts.
FUJITSU TEN LIMITED.
2-28, Gosho-dori 1-chome, Hyogo-ku, Kobe,
Hyogo, Japan 652-8510
+81-78-671-5081
8 Important Safety Instructions and
After-Sales Service 1
9 Warranty 1
4 AC adapter 15 Power cable 1*
This product is a speaker system that has been designed based on Time Domain theory.
Time Domain theory
Theory with the goal of reproducing accurately the audio waveforms carefully created by artists and engineers. This conveys the
delicate expressions that musicians have included in their music and creates a space that feels alive.
Features
Make sure that the following items are included in the packaging before using this product.
3
Terminals
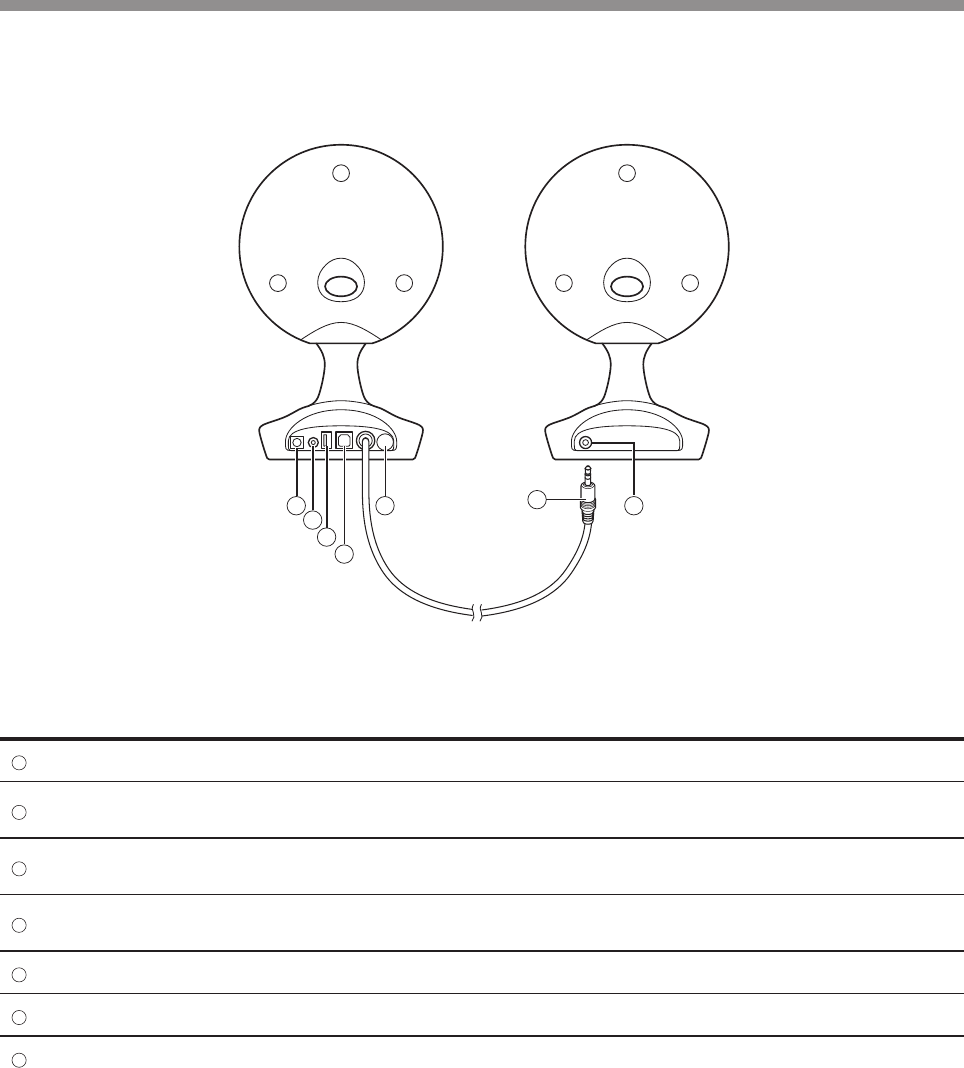
No. Terminal Use
1Power-input terminal Connect the included AC adapter.
2AUX IN terminal (3.5 mm stereo jack) Connect a TV set, CD player or other external device. Use a
commercially available audio cable with a 3.5 mm stereo plug.
3USB terminal (Type A) Connect an iPhone, iPod or iPad. Use the Lightning to USB or 30-pin
to USB cable included with your device.
4USB terminal (Type B) Connect a Mac or Windows PC. Use a commercially available USB
A-B cable (USB printer cable).
5Left-channel speaker output terminal Connect to the left-channel speaker input terminal.
6Antenna input terminal Connect the included Wi-Fi antenna.
7Left-channel speaker input terminal Connect to the left-channel speaker output terminal.
Right channel speaker Left channel speaker
12
3
4
5
6 7
4
Preparing the speakers
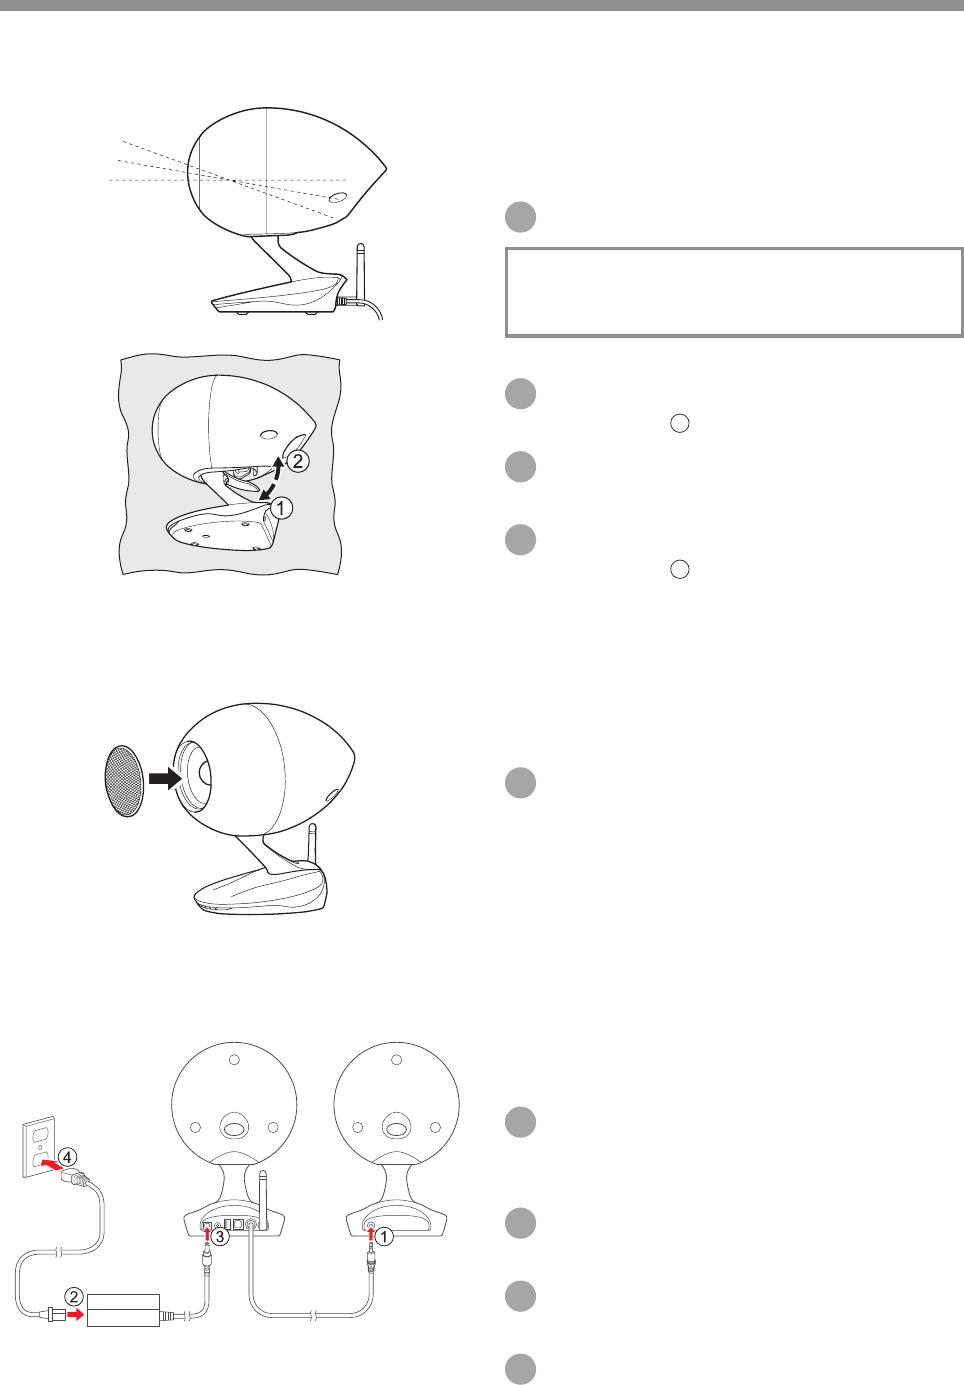
Adjusting the speaker angle
+10°
+20°
You can adjust the speaker to an angle of your choosing from 0°
(horizontal), 10°, and 20°.
1 Place the speaker on its side.
When placing the speaker on its side, use a soft cloth or
similar item to prevent scratches.
2 Move the lever in the direction shown in
the diagram 1 to release the lock.
3 Adjust the speaker to an angle of your
choosing.
4 Move the lever in the direction shown in
the diagram 2 to set the lock.
Attaching the grills
Attach the grills, for example, when the speaker will not be used
or if you would like it attached.
1 Attach the grills as shown in the diagram.
Connecting the power
To connect the power of the TD-M1, perform the following
procedure.
1 Connect the left-channel speaker output
terminal to the left-channel speaker input
terminal.
2 Connect the included power plug and AC
adapter.
3 Connect the included AC adapter to the
power input terminal of the TD-M1.
4 Connect the power plug to an outlet in your
home.

5
Connecting supported devices
The following table shows the devices that can be connected to the TD-M1 and their connection methods.
Connections Connectable devices
Listening via AirPlay Supports audio playback from an iPhone, iPod touch, iPad (iOS 4.3.3 and later), or
iTunes 10.2.2 and later (on a Mac or Windows PC).
Listening via USB connection (Type A) Supports audio playback from an iPhone, iPod, or iPad and charging of an iPhone or
iPod.
Listening via USB connection (Type B)
Supports audio playback from a Mac or Windows PC (XP/7/8).
If you will use a Windows PC, first install the dedicated driver.
(See page 11 “Windows PC”)
Listening via an AUX connection Supports playback of analog audio.
Connection requires a commercially available cable with a 3.5 mm stereo plug.
* The functions of the TD-M1 were developed and tested based on the iPhone, iPod touch, iPad, and iTunes software versions listed on the Eclipse web site. If other
versions of iPhone, iPod touch, iPad, or iTunes software are used, some functions may not be compatible.
6
AirPlay
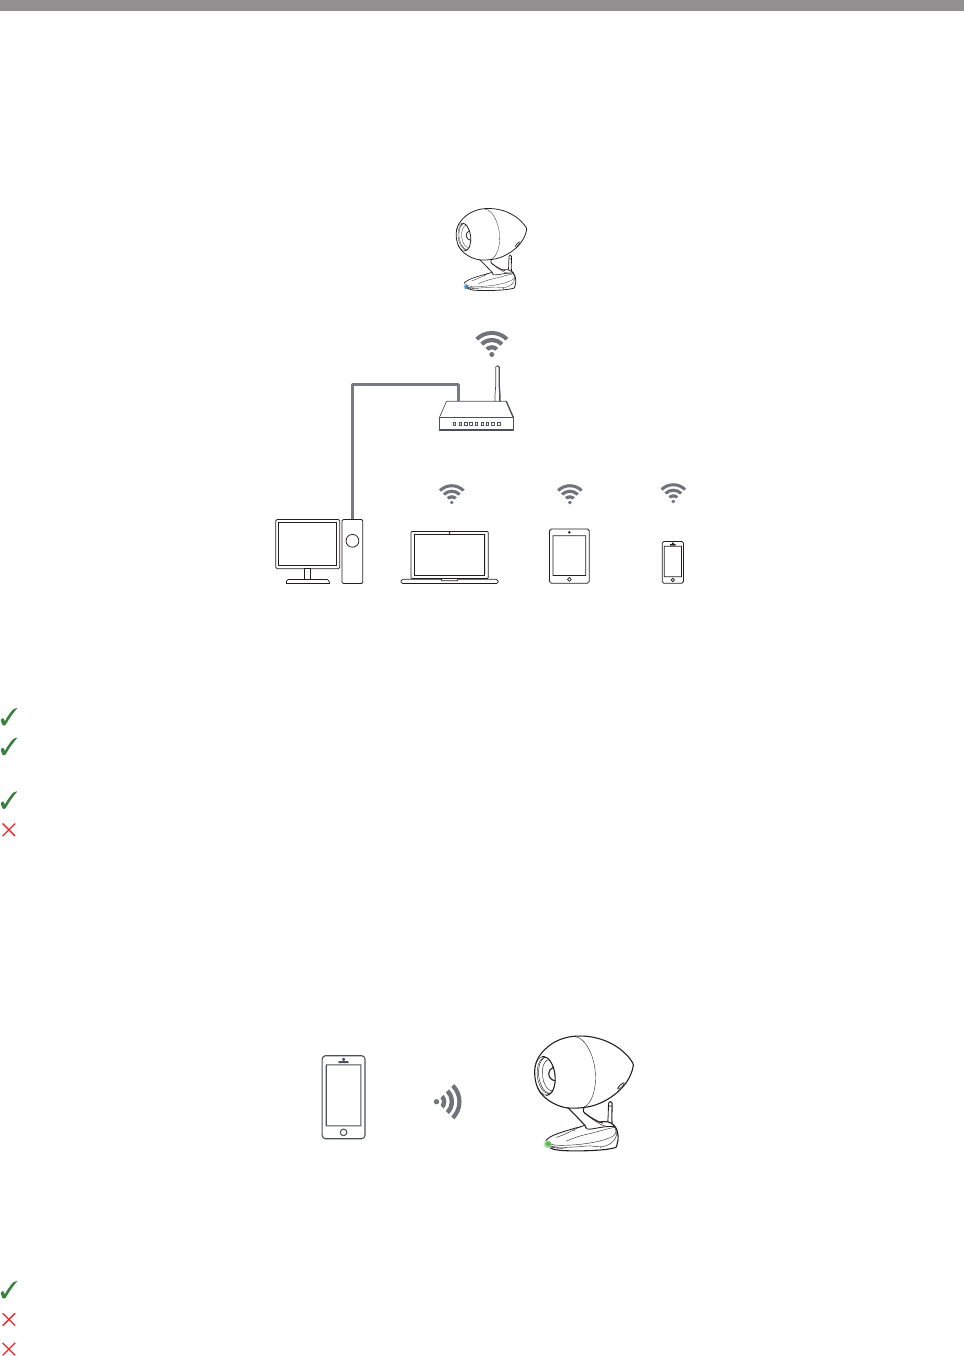
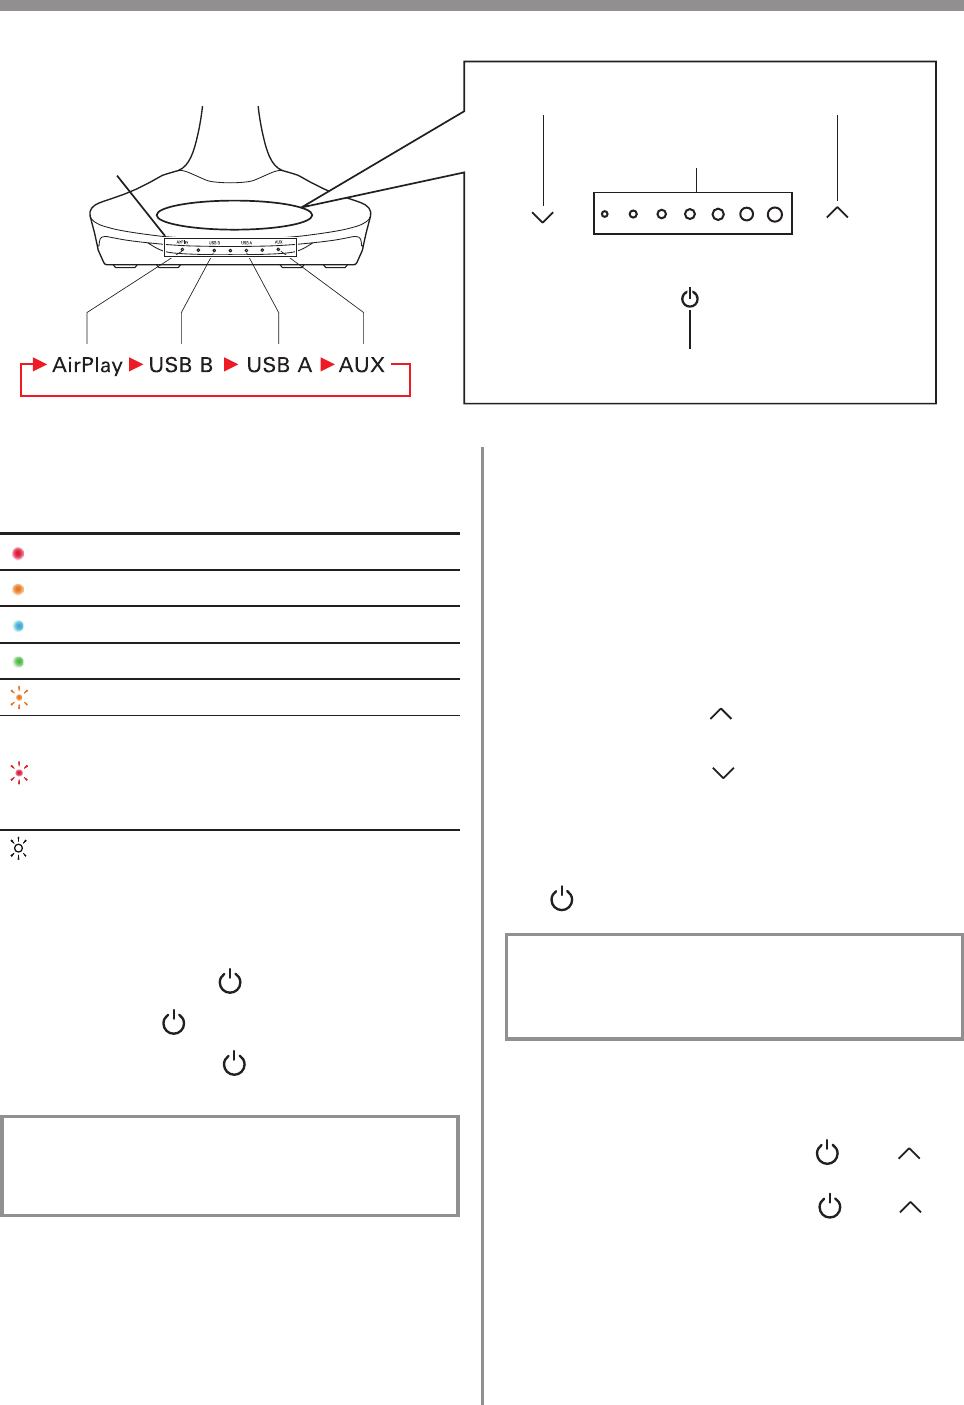
The TD-M1 can play music sent wirelessly from a supported device via AirPlay.
There are two operation modes, as shown below. However, we recommend connecting in Wi-Fi mode when a Wi-Fi environment is
available.
Wi-Fi mode (recommended)
Direct mode
•Connect the TD-M1 and supported devices via a Wi-Fi router.
You can connect from all devices connected to the same local area network (LAN) to the TD-M1.
After configuring the default settings (page 8 “Connecting using Wi-Fi mode”), you can connect to the TD-M1 by simply connecting
the playback device to the Wi-Fi router.
You can connect to the Internet via the Wi-Fi router even while communicating with the TD-M1.
A Wi-Fi router must be prepared separately.
*A wireless LAN router that supports one of the following standards can be used: IEEE802.11b/g.
•Connect the TD-M1 and compatible device directly without using a Wi-Fi router.
A Wi-Fi router is not necessary.
While the device is communicating with the TD-M1, you cannot connect to the Internet from the device.
In Direct mode, communication is not protected by encryption.
If a third party connects without permission and attempts an audio playback operation from a wireless device, the TD-M1 may perform
the operation.
TD-M1
LAN cable
Wi-Fi router
Windows PC Mac iPad iPhone
iPod touch
TD-M1
iPhone or other
compatible device
7
Using the TD-M1
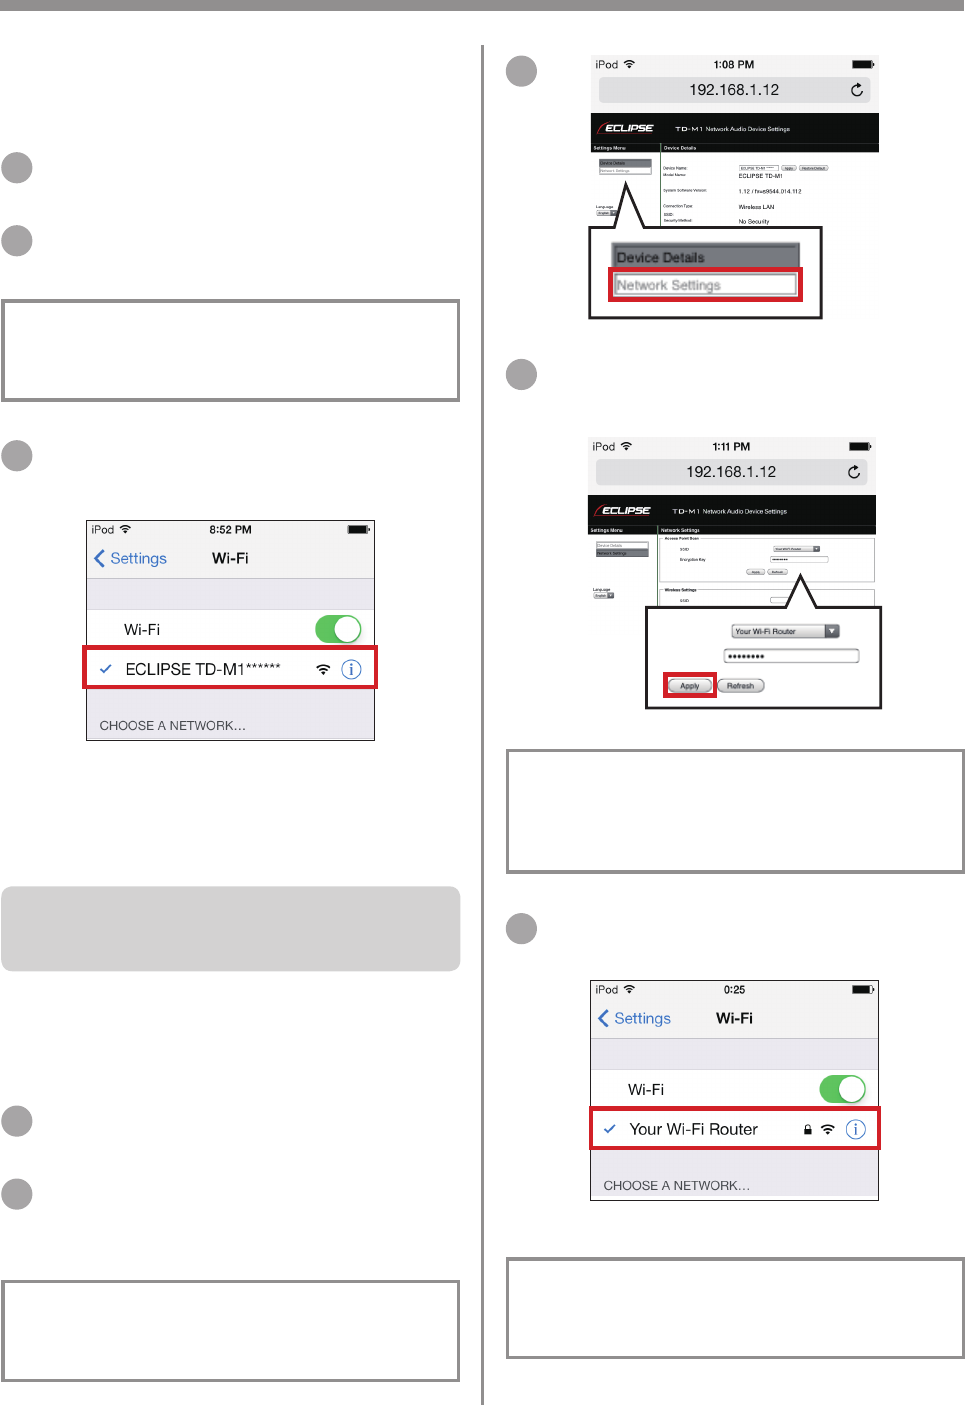
Indicator (center) display
Indicators Meaning
Red Standby
Orange Network standby
Blue Power on (Wi-Fi mode)
Green Power on (Direct mode)
Orange (flashing) Attempting Wi-Fi connection
Red (flashing)
Wi-Fi connection error
(Perform the Wi-Fi mode
connecting procedure on page 8
“Connecting via AirPlay”.)
White (flashing) Software update in progress
Switching the power on or off
To switch the power on, touch
To enter standby, touch for 3 seconds.
To enter network standby, touch for 1 second.
During network standby, Wi-Fi communication is available.
If playback is started via AirPlay, the power is switched on
automatically.
Auto-standby function
The auto-standby function is on by default. If there is no operation
and audio input for 30 minutes, the device enters network
standby automatically.
The settings for the auto-standby function can be changed by
using the dedicated iOS application.
Adjusting the volume
To raise the volume, touch . Alternatively, slide the volume
slider to the right.
To lower the volume, touch . Alternatively, slide the volume
slider to the left.
Switching the source
Touch .
· The source can be switched in the following order: AirPlay,
USB B, USB A, and AUX.
· The selected source is shown by the indicators.
Switching AirPlay connection
modes
To switch to Wi-Fi mode, while touching , touch for 1
second. The indicator changes to blue after flashing orange.
To switch to Direct mode, while touching , touch for 1
second. The indicator changes to green after flashing orange.
Indicators Volume slider
Power switch
Volume-down switch Volume-up switch
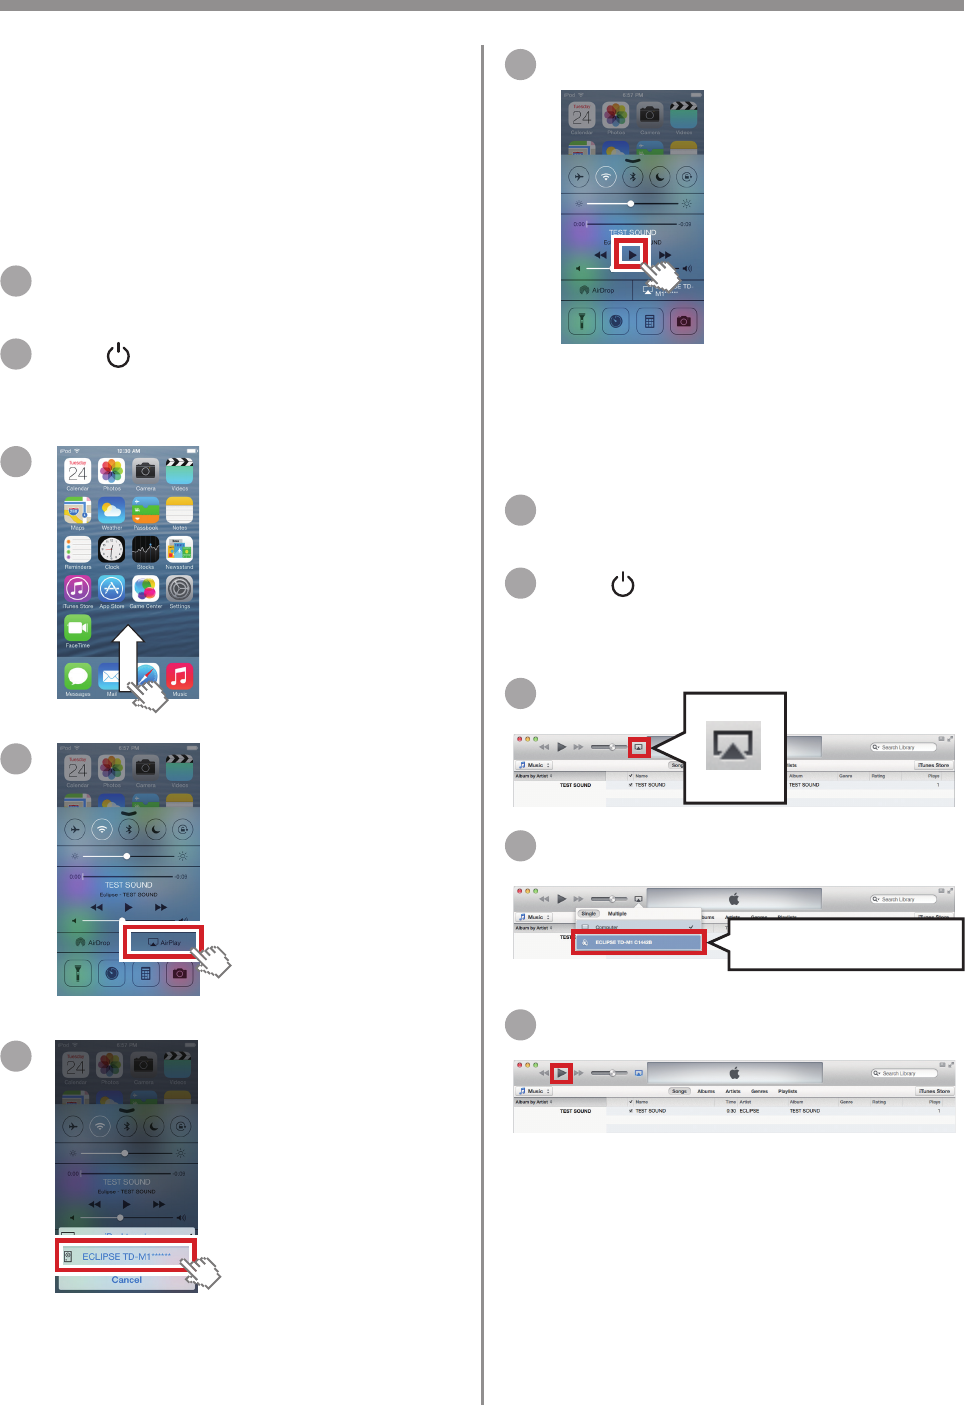
To play music wirelessly using AirPlay, connect your device and
the TD-M1 via Wi-Fi. To connect, perform the following procedure.
Connecting using Direct mode
1 Make sure that the power of the TD-M1 is
on.
2 Make sure that the indicator is on and
green.
When it is powered on blue or flashing in red, switch
to Direct mode. (See page 7 “Switching AirPlay
connection modes”)
3 From the Wi-Fi settings screen of your
device, connect to “ECLIPSE TD-M1******.”
* “******” is the ID number of the product. Your ID
number can be recognized by the last 6 digits of the MAC
ID on the bottom label.
*The above example is the iOS screen.
While the device is connected in Direct mode, you cannot
connect to the Internet from your device.
Connecting using Wi-Fi mode
If a Wi-Fi router is available, we recommend connecting in Wi-Fi
mode. To connect, perform the following procedure.
1 First connect your device and the TD-M1 in
Direct mode.
2 Open your web browser, and access the
following address to open the settings
screen: http://192.168.1.12.
If you are using a Mac or Windows PC, you can also open the
settings screen using the procedure shown on page 13
“TD-M1 Network Audio Device Settings screen”.
3
4 Select a SSID for your Wi-Fi router, and
then enter the password.
If the connection is completed, the indicator switches on
blue. If the connection was not successful, the indicator
flashes red. After confirming that the SSID and password are
correct, perform the procedure again starting from Step 1.
5 Connect your device to the Wi-Fi router in
your home.
The procedure to configure Wi-Fi mode is necessary for
the initial connection only. Thereafter you can connect by
performing Step 5 only.
8
Connecting via AirPlay
9
Playing music
Listening via AirPlay
To play music via AirPlay, connect your device and the TD-M1
via Wi-Fi, and then perform the following procedure. (Page 8
“Connecting via AirPlay”)
iOS device
1 Make sure that the power of the TD-M1 is
on.
2 Touch on the TD-M1 to switch the input
source to AirPlay. (Page 7 “Switching
the source”)
3
4
5
* “******” is the ID number of the product.
6 Operate the iOS device to play music.
*The screen display depends on the iOS version.
iTunes
1 Make sure that the power of the TD-M1 is
on.
2 Touch on the TD-M1 to switch the input
source to AirPlay. (Page 7 “Switching
the source”)
3
4
ECLIPSE TD-M1
5 Operate the iTunes to play music.
10
Listening via USB connection
(Type B)
To play music via USB (Type B), you must configure the Mac/
Windows PC. In addition, if you will use a Windows PC, you must
first install the dedicated USB audio driver before connecting the
USB terminal.
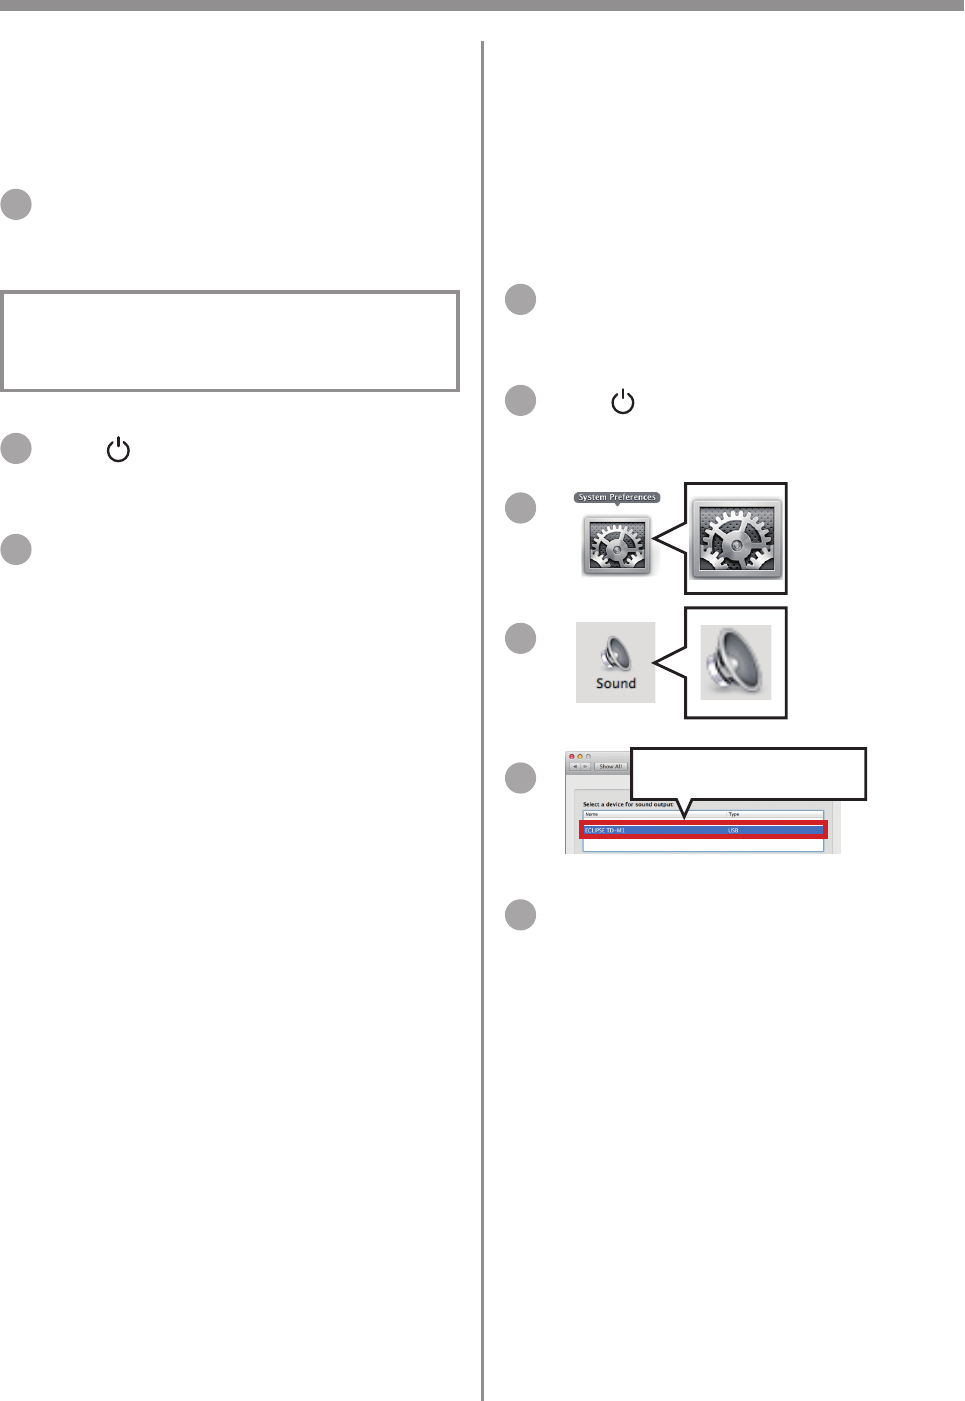
Mac
1 Make sure that the power of the TD-M1 is
on, and then connect the Mac to the USB
terminal (Type B).
2 Touch on the TD-M1 to switch the input
source to USB B. (Page 7 “Switching
the source”)
3
4
5ECLIPSE TD-M1
6 Operate music playback software (such as
iTunes) to play music.
Listening via USB connection
(Type A)
To play music via USB (Type A), perform the following procedure.
1 Make sure that the power of the TD-M1 is
on, and then connect the iPhone/iPod/iPad
to the USB terminal (Type A).
If an iPhone/iPod/iPad is connected to the USB terminal
(Type A) during network standby, the power switches on
automatically.
2 Touch on the TD-M1 to switch the input
source to USB A. (Page 7 “Switching
the source”)
3 Operate the iPhone/iPod/iPad to play music.
11
Next, check the operating system you are using, and then
configure the settings.
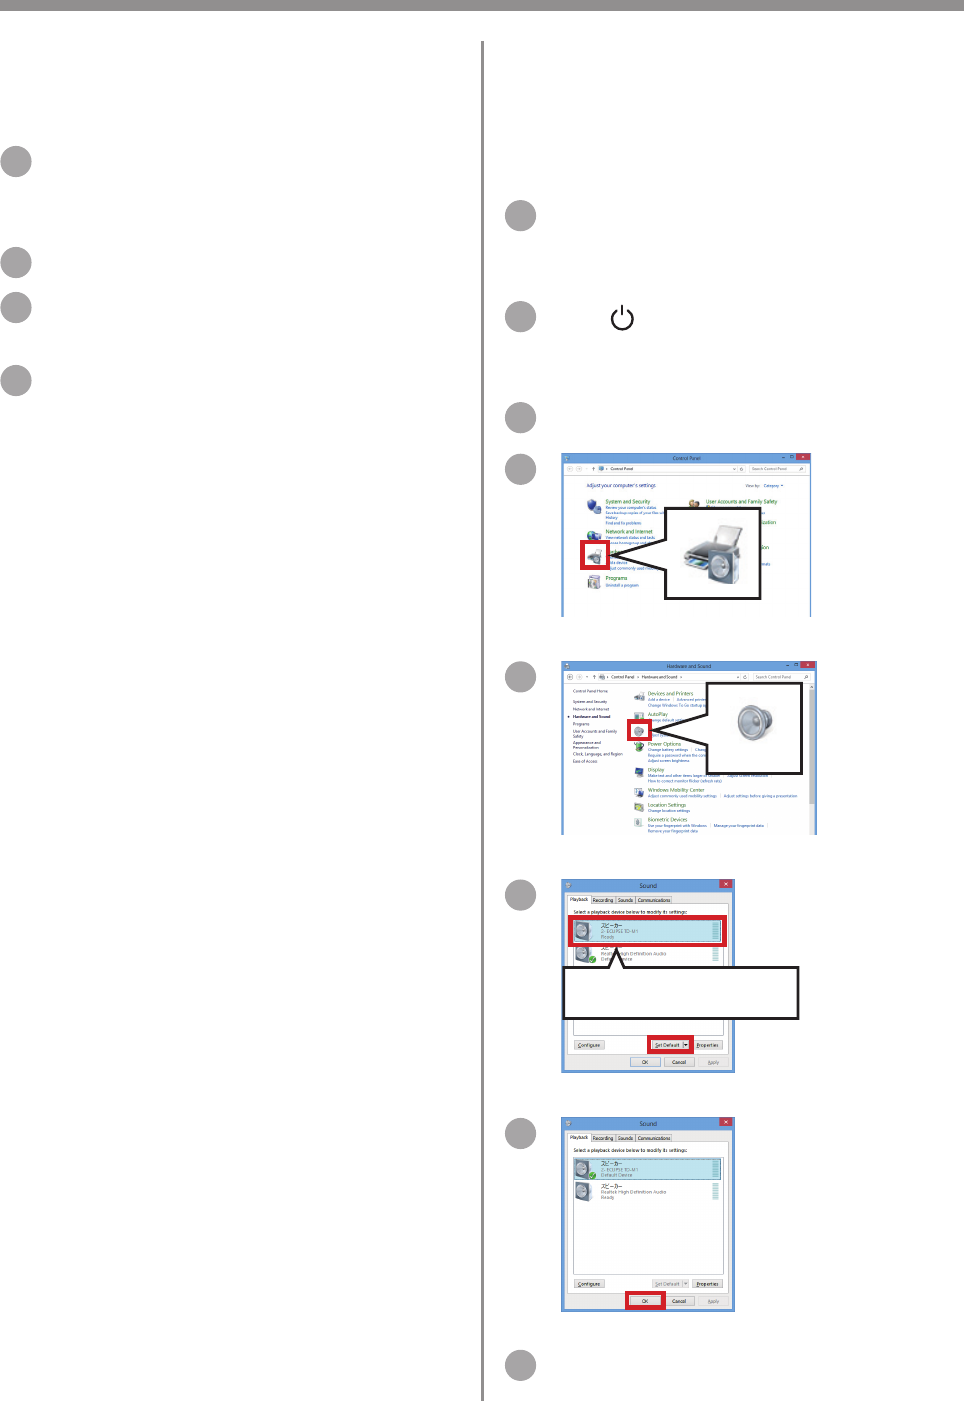
Windows 7, Windows 8
*The below examples are the Windows 8 screens.
1 Make sure that the power of the TD-M1 is
on, and then connect the Windows PC to
the USB terminal (Type B).
2 Touch on the TD-M1 to switch the input
source to USB B. (Page 7 “Switching the
source”)
3 Open Control Panel.
4
5
6
ECLIPSE TD-M1
7
8 Operate music playback software (such as
Windows Media Player) to play music.
Windows PC
If you are using a Windows PC, first browse to the Eclipse web
site, and then download the USB audio driver.
1 Access http://www.eclipse-td.net, browse
to the “Support” page, and then download
the USB audio driver.
2 Uncompress the downloaded file.
3 Open the uncompressed folder, and then
run the file “Setup.exe.”
4 Follow the instructions on the screen to
install the driver.
12
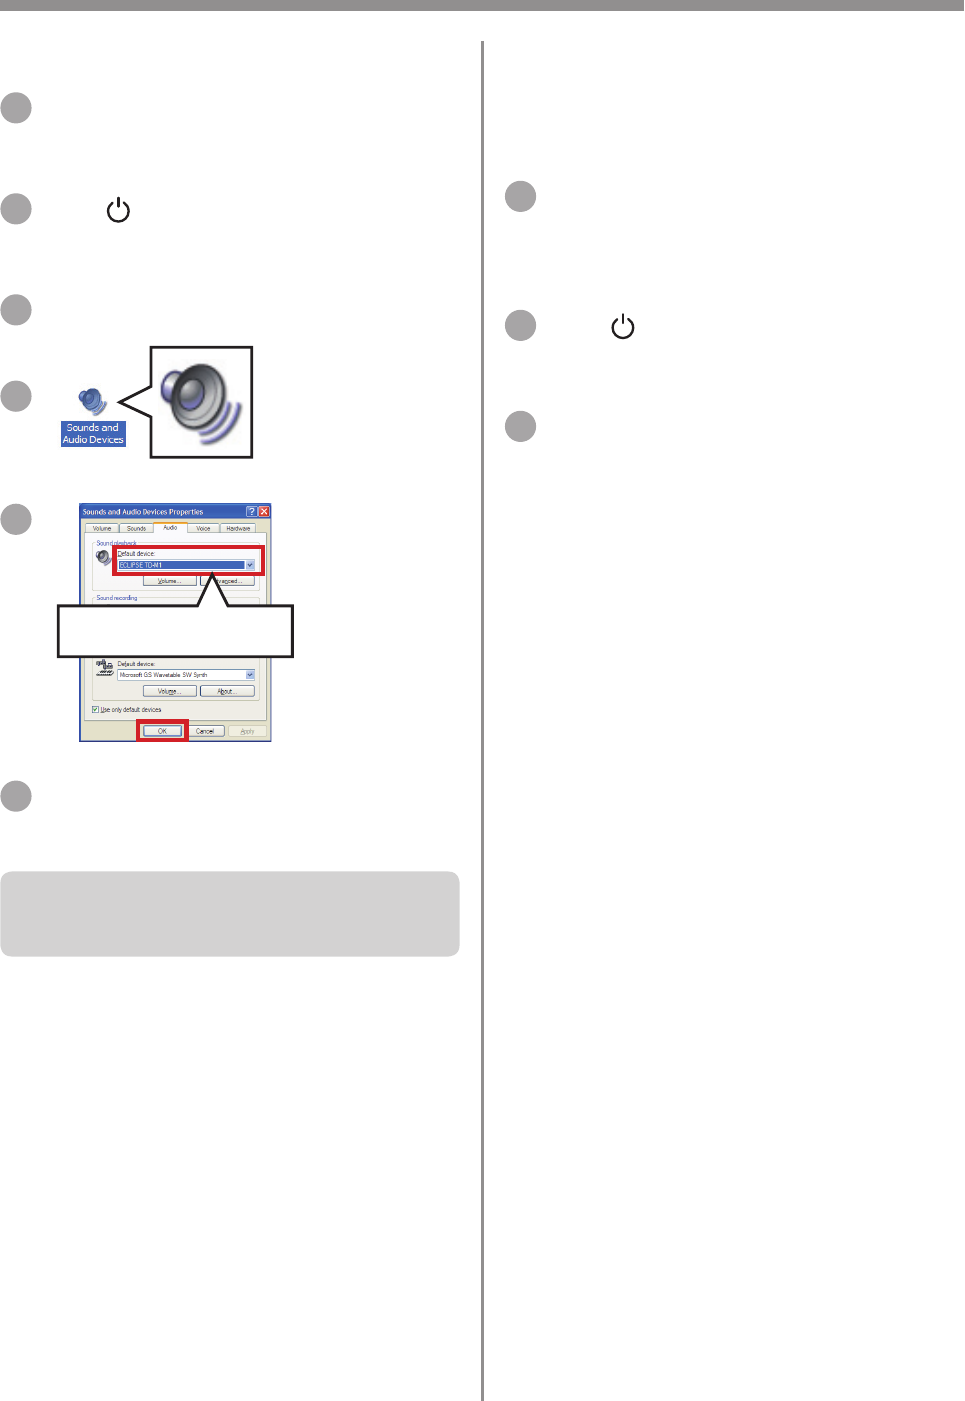
Windows XP
1 Make sure that the power of the TD-M1 is
on, and then connect the Windows PC to
the USB terminal (Type B).
2 Touch on the TD-M1 to switch the input
source to USB B. (Page 7 “Switching
the source”)
3 Open Control Panel.
4
5
ECLIPSE TD-M1
6 Operate music playback software (such as
Windows Media Player) to play music.
When changing USB ports on the PC, you must reinstall the
driver first.
Listening via AUX connection
To play music via AUX connection, perform the following
procedure.
1 Make sure that the power of the TD-M1 is
on, and then connect to the audio output
cable of the external device to the AUX IN
terminal.
2 Touch on the TD-M1 to switch the input
source to AUX. (Page 7 “Switching the
source”)
3 Operate the external device to play music.
13
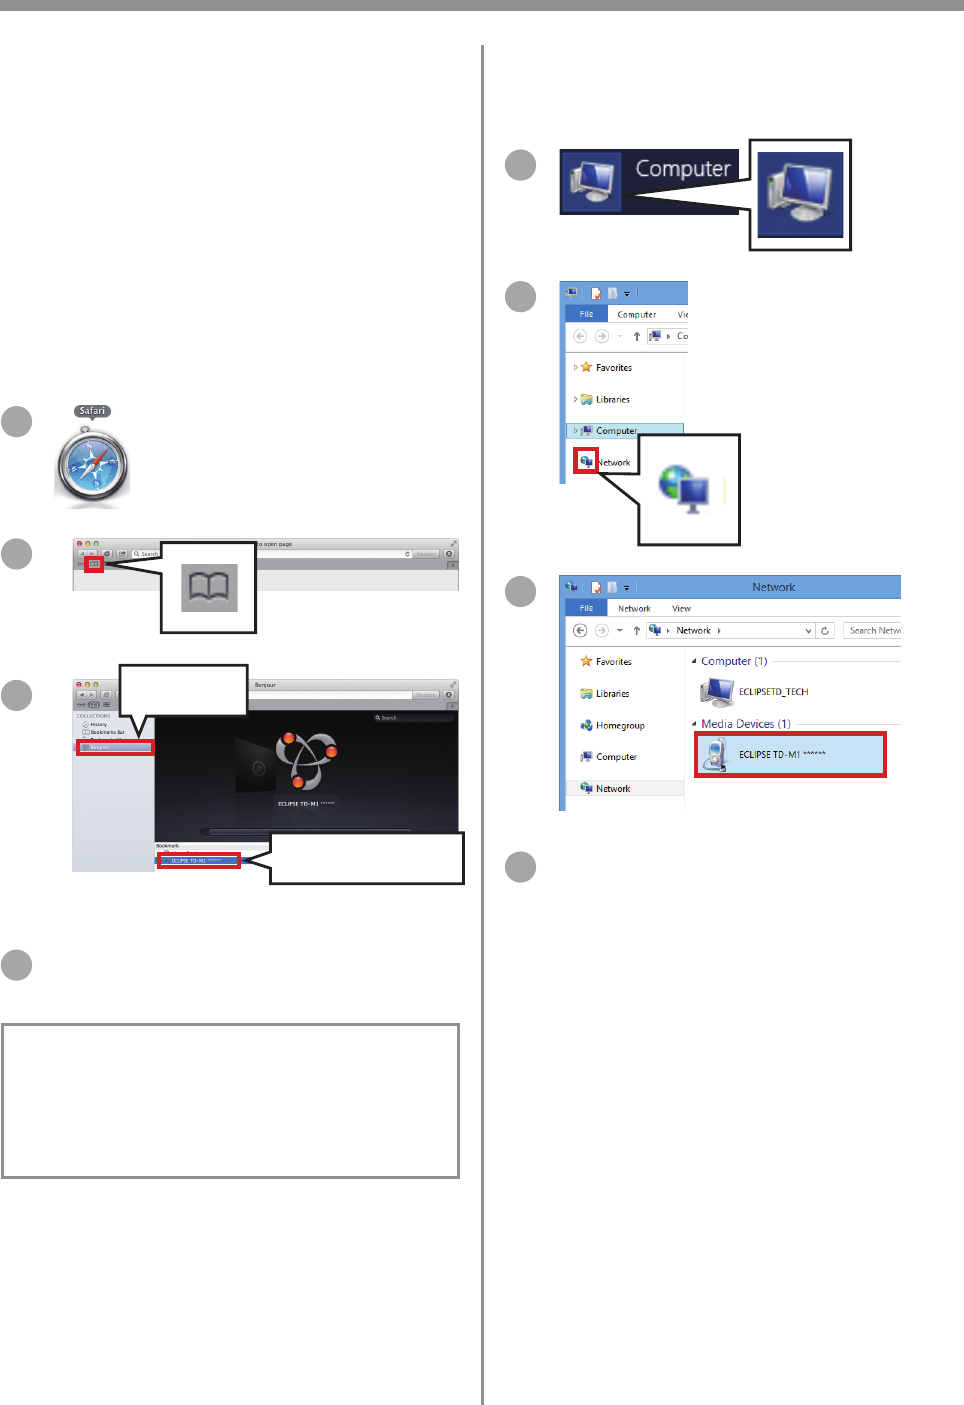
TD-M1 Network Audio Device Settings screen
Using Network on Windows 7, Windows 8
*The below examples are the Windows 8 screens.
1
2
3
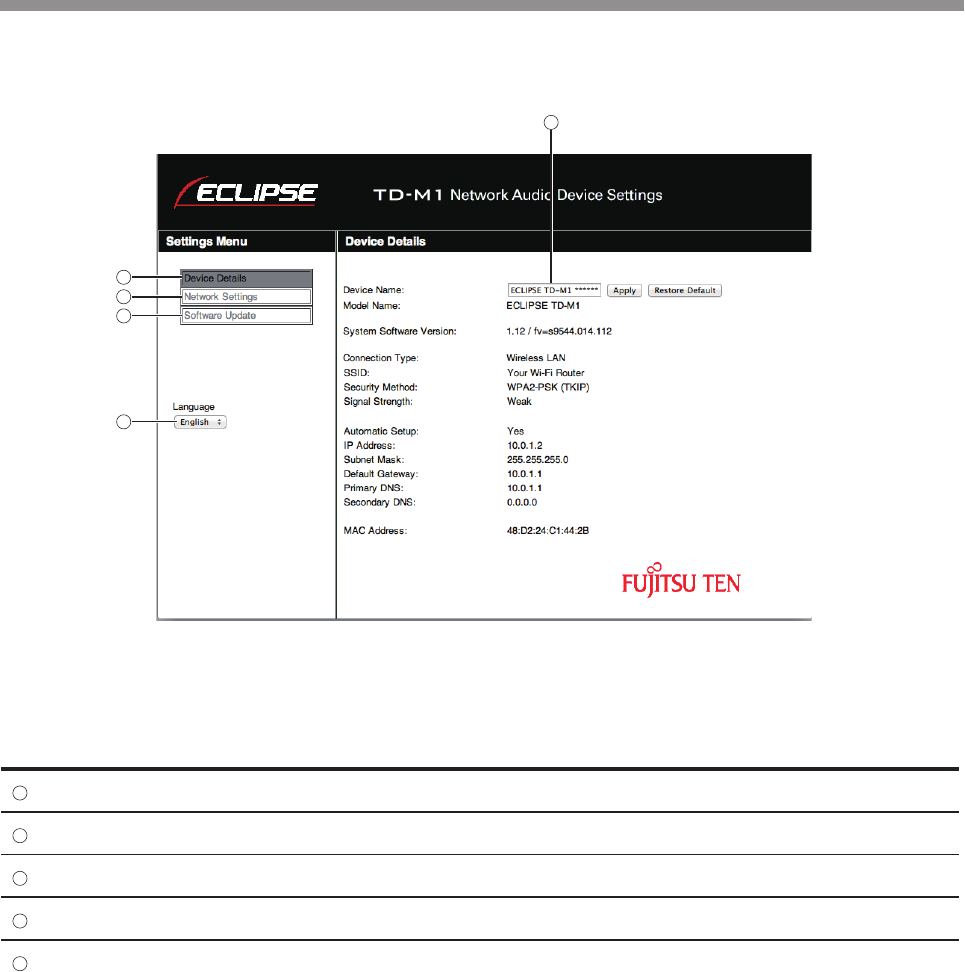
4 The TD-M1 Network Audio Device Settings
screen appears.
To perform the following operations, configure the settings from
the TD-M1 Network Audio Device Settings screen.
· Change the name displayed on the network for the TD-M1
· Configure advanced network settings
· Update software (a Mac or Windows PC is required)
Before opening the settings screen, connect your device and the
TD-M1 via Wi-Fi. (Page 8 “Connecting via AirPlay”)
Using Safari on a Mac
1
2
3Bonjour
ECLIPSE TD-M1
* “******” is the ID number of the product.
4 The TD-M1 Network Audio Device Settings
screen appears.
If “Bonjour” is not found in the bookmarks, select “Safari”
and “Preferences” from the menu.
Select “Advanced” and tick “Include Bonjour in the Favorites
bar”.
Bonjour is added to the Favorites bar.
14
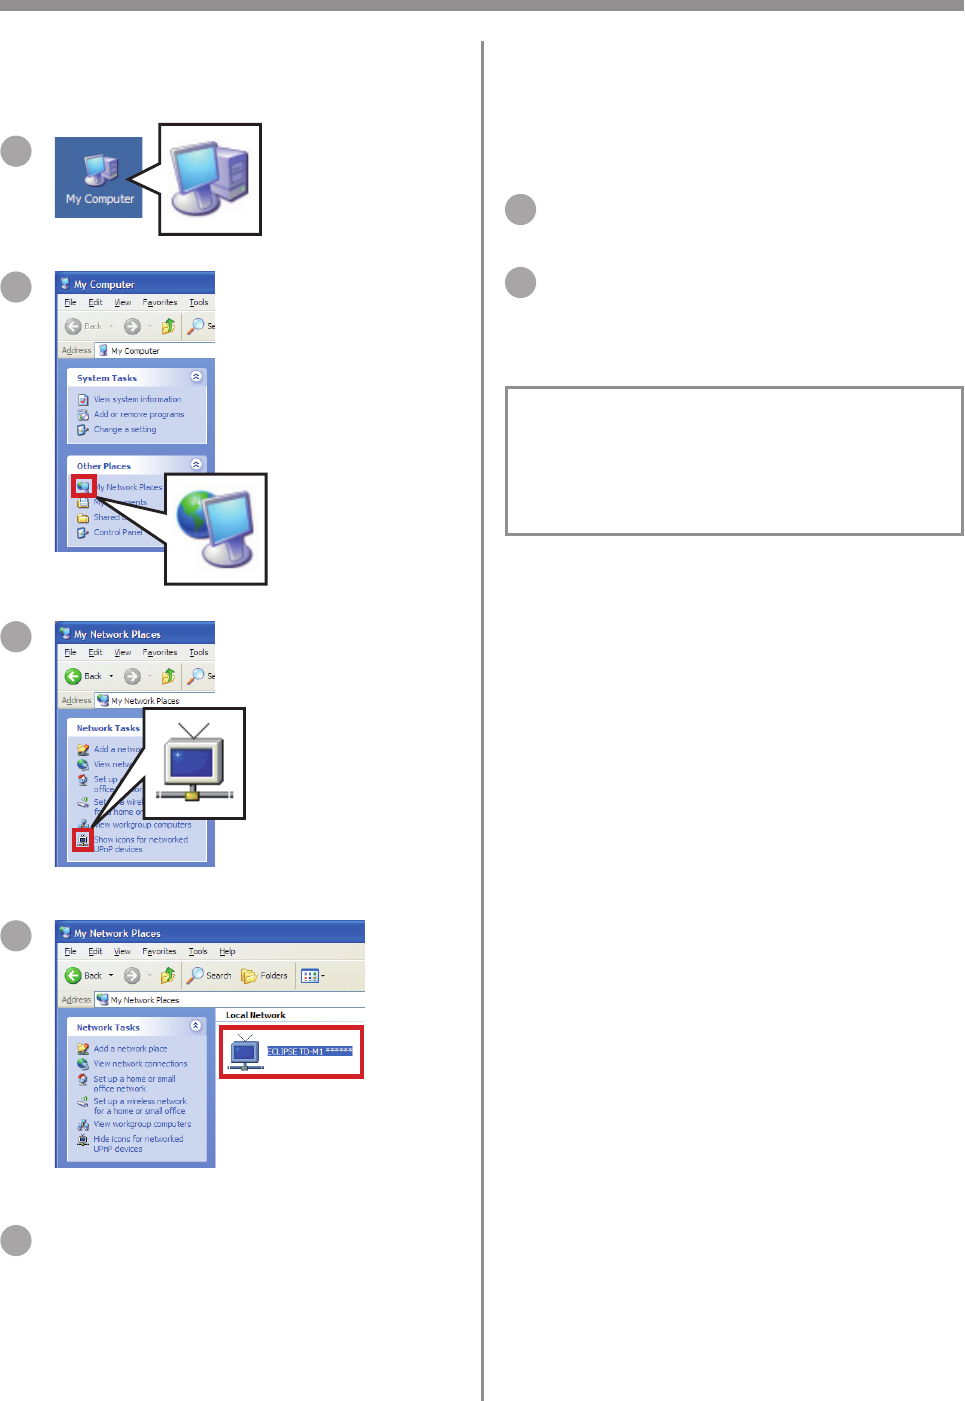
Using My Network Places on Windows XP
1
2
3
4
5 The TD-M1 Network Audio Device Settings
screen appears.
Using an iOS device
When an iOS device is connected in Wi-Fi mode, the settings
screen cannot be opened from the iOS device. Connect in Direct
mode, and then perform the following operations. (Page 8
“Connecting via AirPlay”)
1 Connect your device and the TD-M1 in
Direct mode.
2 Open your web browser, and access the
following address to open the settings
screen: http://192.168.1.12.
If the settings screen has been opened on an iOS device,
software cannot be updated.
To update software, connect the TD-M1 in Wi-Fi mode (Page
8) “Connecting via AirPlay”), and then use a Mac or
Windows PC.
15
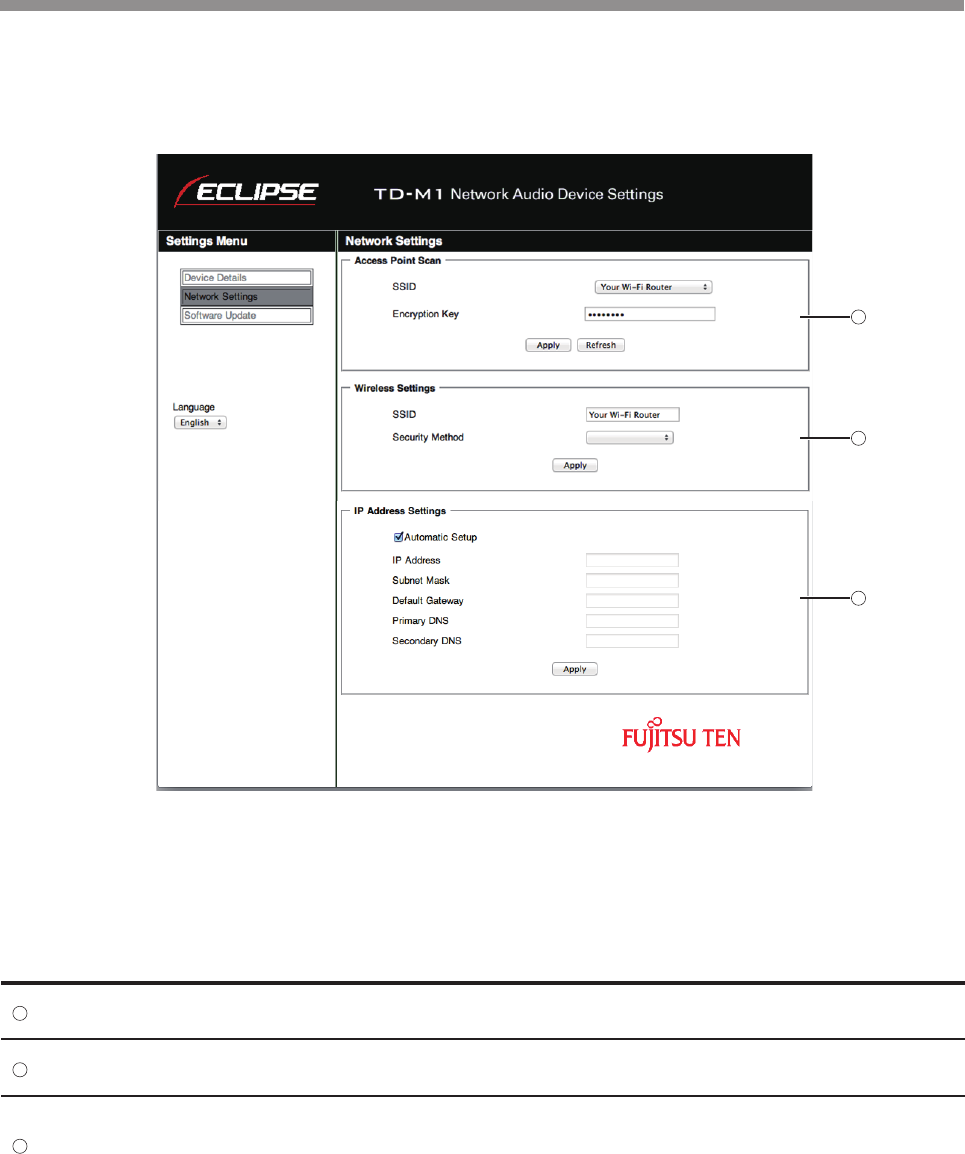
No. Item Details
1Device Details You can check advanced information about the TD-M1.
2Network Settings You can change network settings.
3Software Update You can update software. *
4Language You can select the language.
5Device Name You can change the name displayed on the network for the TD-M1.
* Displayed only in Wi-Fi mode.
Configuring the network settings
Device Details screen
1
2
3
4
5
16
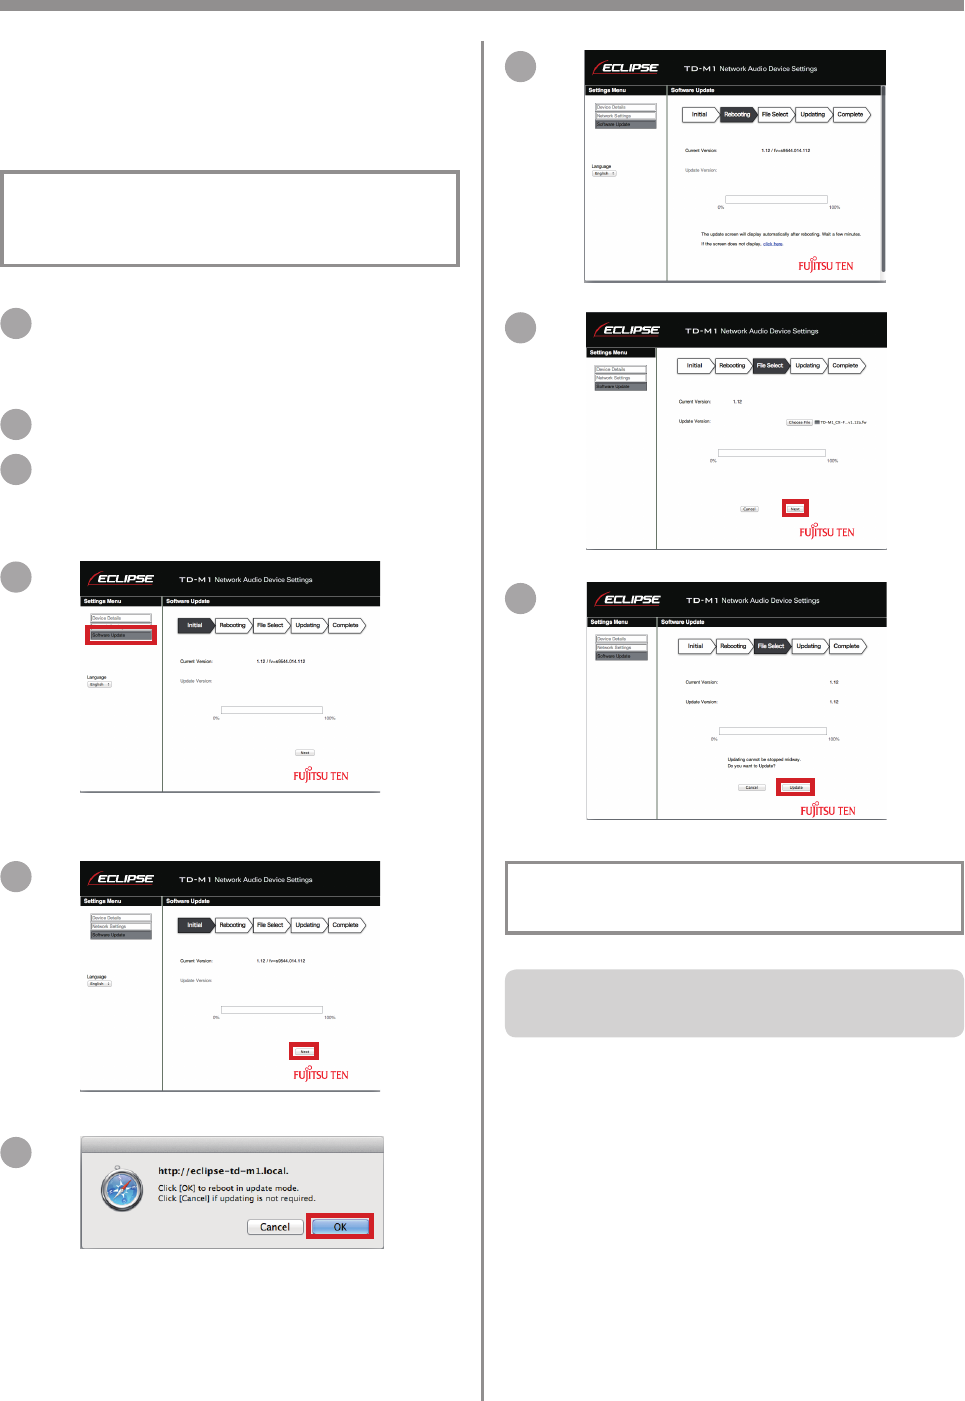
No. Item Details
1Access Point Scan Available access points are found automatically. Select an SSID, and then enter the
encryption key.
2Wireless Settings You can select the SSID and security method manually. Use these settings when the
Wi-Fi router is set to stealth mode.
3IP Address Settings
You can configure the IP address settings manually. In most situations, select the
“Automatic Setup” check box. To use a static IP address, clear the “Automatic Setup”
check box, and then enter the appropriate items. After changing the settings, click
“Apply”.
Network Settings Screen
1
2
3
17
Updating software
The software of the TD-MI may be updated on an irregular basis.
To update software, first browse to the Eclipse web site, and then
download the update file.
To update software, connect the TD-M1 in Wi-Fi mode
(Page 8 “Connecting via AirPlay”), and then use a Mac
or Windows PC.
1 Browse to http://www.eclipse-td.net, and
then download the update file from the
“Support” page.
2 Uncompress the downloaded file.
3 Open the TD-M1 Network Audio Deveice
Settings screen. (See page 13 “TD-M1
Network Audio Device Settings screen”)
4
*Not displayed in Direct mode.
5
6
7
8
9
The update starts. When the update is completed, the TD-M1
enters standby automatically.
During an update, do not switch off the power of the TD-M1.

18
Resetting the TD-M1
If the TD-M1 is reset, all settings are cleared.
1 Make sure that the power is on.
2 While touching , touch and at the same time for 3 seconds.
After resetting, the TD-M1 enters standby.
Maintenance
Before cleaning, be sure to turn off the power supply for all connected equipment and disconnect the power cords from the electrical
outlets. Remove any dirt from the unit by lightly wiping with a soft dry cloth.
If required moisten the cloth to remove surface dirt, then dry with a soft cloth.
Do not use gasoline or thinners, etc. on this unit as it may damage the cabinet.
Troubleshooting
When you have any troubles including system malfunction with the product, browse to the Eclipse web site (http://www.eclipse-td.net)
and refer to the “Support” page.
Trademark
AirPlay, Bonjour, iPad, iPhone, iPod, iPod touch, iTunes, Mac and Mac OS are trademarks of Apple Inc., registered in the U.S. and other
countries.
Windows and Windows Media are either registered trademarks or trademarks of Microsoft Corporation in the United States and/or other
countries.
Wi-Fi® is a registered trademark of Wi-Fi Alliance.
Notice for WEEE directive
In accordance with the European Directive 2002/96/EC (for Waste Electric and Electronic Equipment=WEEE),
this product, which is labeled with crossed-out wheeled bin, may not be disposed of with household waste in
member states of the EU.
WEEE : Waste Electrical and Electronic Equipment
When disposing of this product in an EU member state, dispose properly in accordance with the laws of that
state, for example by returning it to the distributor. WEEE has the potential effects on the environment and human
health as a result of the presence of hazardous substances. You can contribute to eliminate these effects and to
enhance reuse/recycle/ other forms of recovery by your cooperation.

19
Specifications
Be aware that the specifications and exterior may change without notice for improvements.
TD-M1
Speaker unit ................................................... Full range speaker with 8-cm cone
Method .......................................................... Bass reflex box
Playback frequency ........................................ 70Hz to 30kHz
Rated output .................................................. 20 W (T.H.D: 1%) *When one channel is operating
Maximum output ........................................... 25 W (T.H.D: 10%) *When one channel is operating
Harmonic distortion ....................................... 0.08% (at 10 W output, 1 kHz)
S/N ratio ......................................................... 90 dB or higher
Resolution ...................................................... 60 dB or higher
Input .............................................................. Wi-Fi, USB B (for PC/Mac), USB A (for iPhone/iPod/iPad), and analog
(3.5 mm stereo mini)
Input sensitivity ............................................. 950 mVrms (at 20 W output)
Input impedance ............................................ 10kΩ
Power consumption ....................................... 10W
Standby power (during network standby) ...... 2.7W
Standby power (during standby) .................... 0.5 W or less
Outer dimensions (mm) *Single speaker ...... W155D219H242
Weight (pair) .................................................. About 5.3 kg
AC adapter
Input voltage .................................................. 100V to 240V (50Hz/60Hz)
Output voltage ............................................... 20V
Output current ............................................... 3.6A
Outer dimensions (mm) ................................. W132D54H31
Weight ........................................................... About 0.4 kg
MANUAL No.: 090002-36270700 (EN)
1401(0)