DEVELOPMENT A-IDC881011XX DOCKING STATION User Manual 88101x xx ES IDC Pg 1 07 06 09
INTERNATIONAL DEVELOPMENT CORP. DOCKING STATION 88101x xx ES IDC Pg 1 07 06 09
Manual-REV1.0
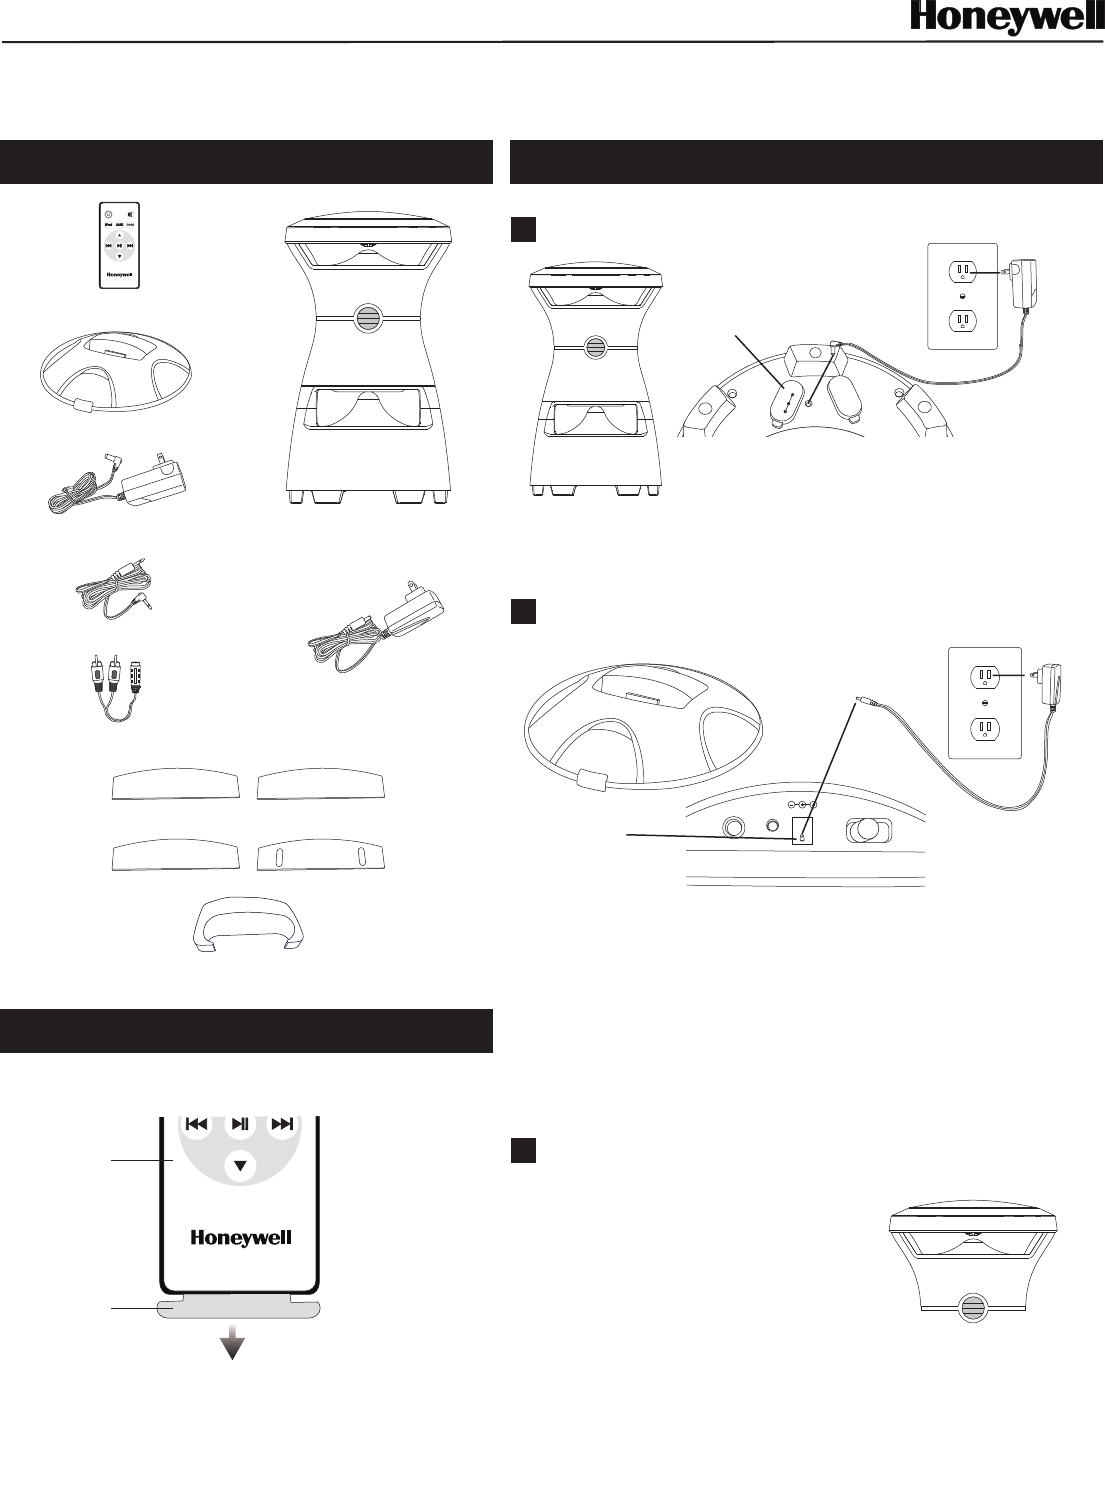
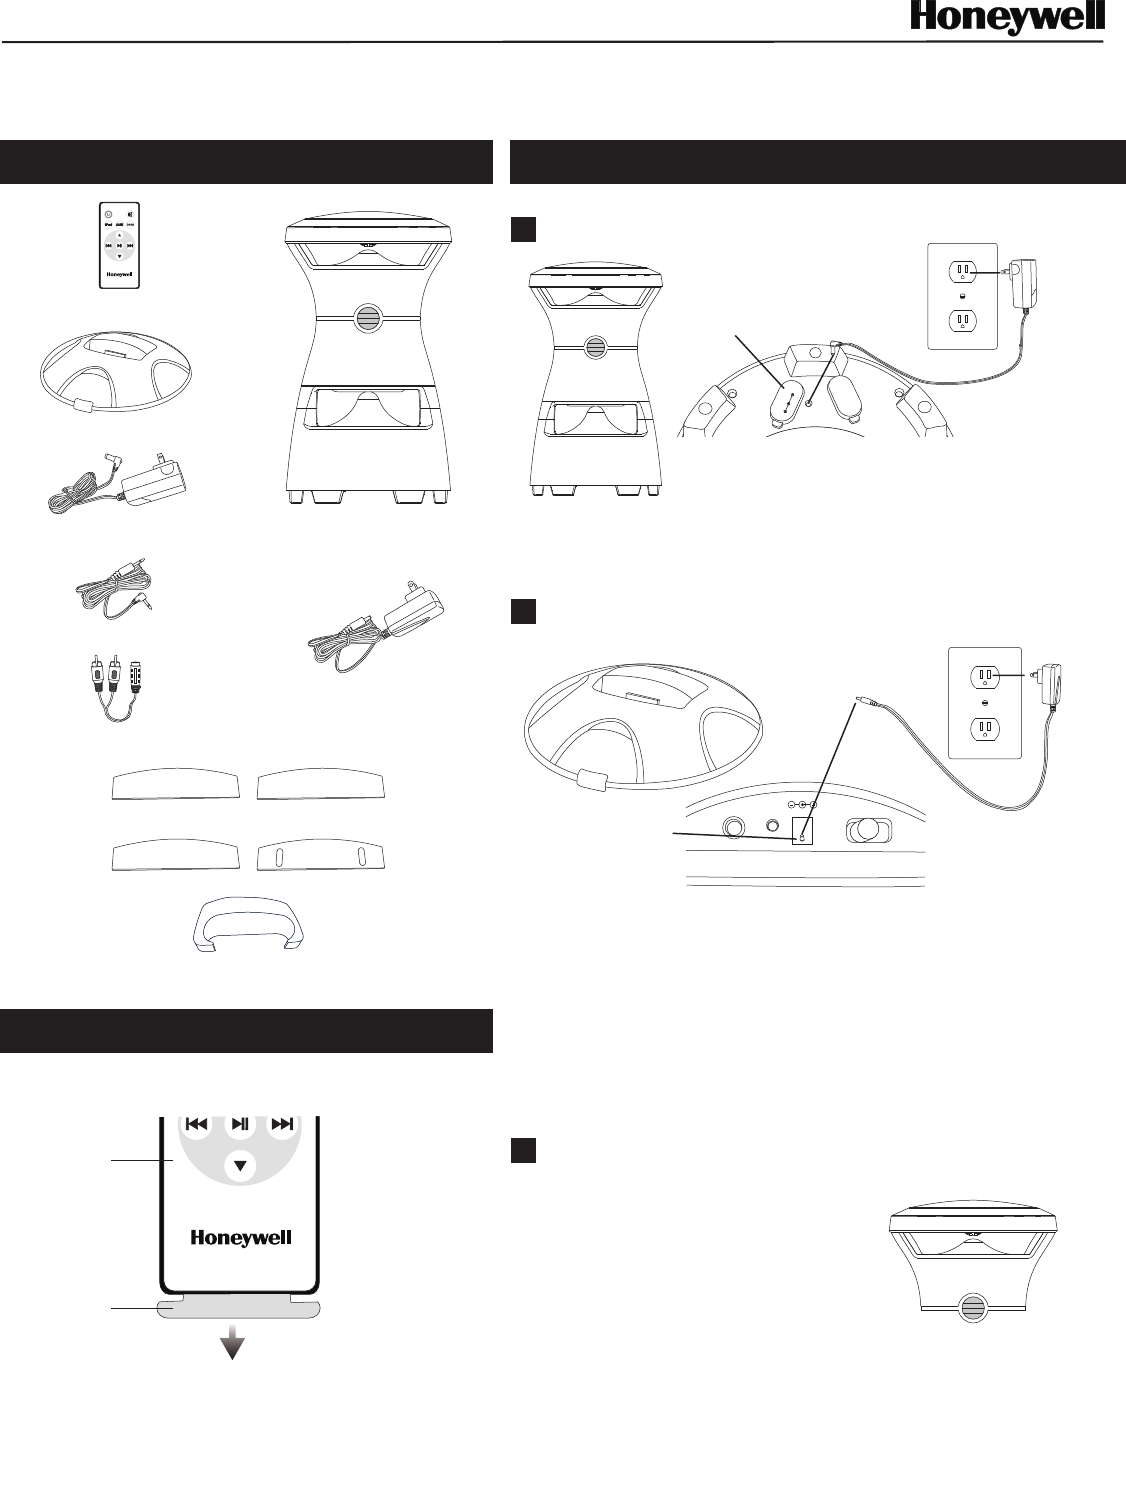
Charging the solar speaker with your AC/DC adaptor.
Charging The Solar Speaker Using The Sun.
Place the solar speaker in direct sunlight for 15 hours to
ensure a complete charge.
PULL TAB
Item # 88101x-xx
Owners Manual
REMOTE
CONTROL
O
F
F
1
2
3
Channel
MP3/
AUX IN
DC13.5V
SOLAR SPEAKER
DOCKING
STATION AC ADAPTOR
SOLAR SPEAKER AC ADAPTOR
DOCKING STATION
DOCKING STATION ADAPTORS
AUXILIARY CABLE
AUDIO CABLE
REMOTE CONTROL
POWER PORT
POWER PORT
DC 6.8V
OFF 123
Solar panel may have protective film. THIS MUST BE REMOVED PRIOR TO USE.
BOTTOM OF SOLAR SPEAKER
BACK OF DOCKING STATION
Charging the docking station with your AC/DC adaptor.
A
B
C
30GB/60GB
TOUCH 8,16,32GB10GB/20GB
NANO
MINI
STEP 1
STEP 2
For first time use, remove pull tab from between the battery and its connector.
(See remote control instructions for battery replacement)
Charging your devices out of the box
* For first time use allow both the speaker and the docking station to charge
for 4 full hours to ensure a complete charge.
Solar Speaker Parts
Plug the docking station AC cable into the wall outlet. Plug the opposite end into the DC portal on
the back of the docking station. When plugged into an AC outlet, the docking station will charge
a docked iPod.
Plug the solar speaker AC adaptor into the wall outlet. Plug the opposite end into the DC portal
on the bottom of the solar speaker. When AC adapter is plugged in, red LED on speaker
bottom lights up.
IDC
899 Henrietta Creek Rd. Roanoke, TX 76262 - 1-888-377-5377
The Honeywell trademark is used under license from Honeywell International Inc.
Honeywell International Inc. makes no representations or warranties with respect to this product or service
12/18/09
Revised 02/03/10
E
O
F
F
1
2
3
Channel
MP3/
AUX IN
DC12V
O
F
F
1
2
3
Channel
There might be a slight delay in sound from your speaker once play is pressed, continue to press the volume key on your remote to make sure the volume is at a audible level.
The iPod can be controlled using the keys on your remote or on the iPod itself. On a full charge the docking station and solar speaker can be expected to run approximately
3-10 hours (depending on volume setting) before recharging is required
DOCKING STATION ADAPTOR
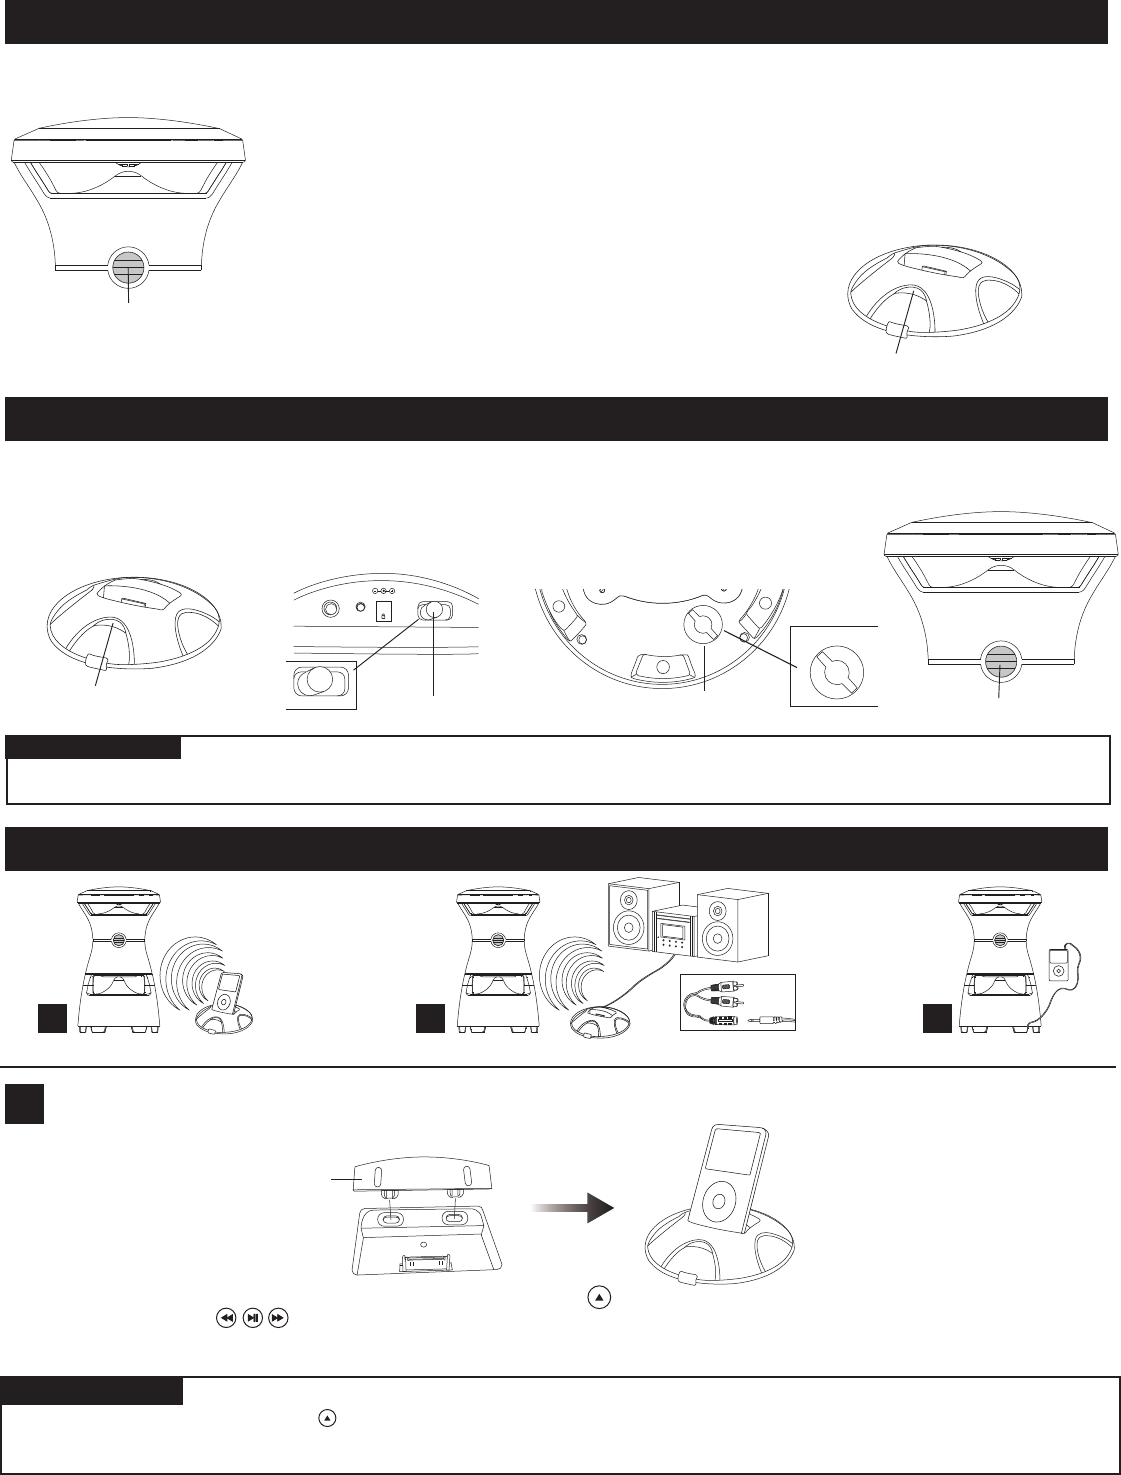
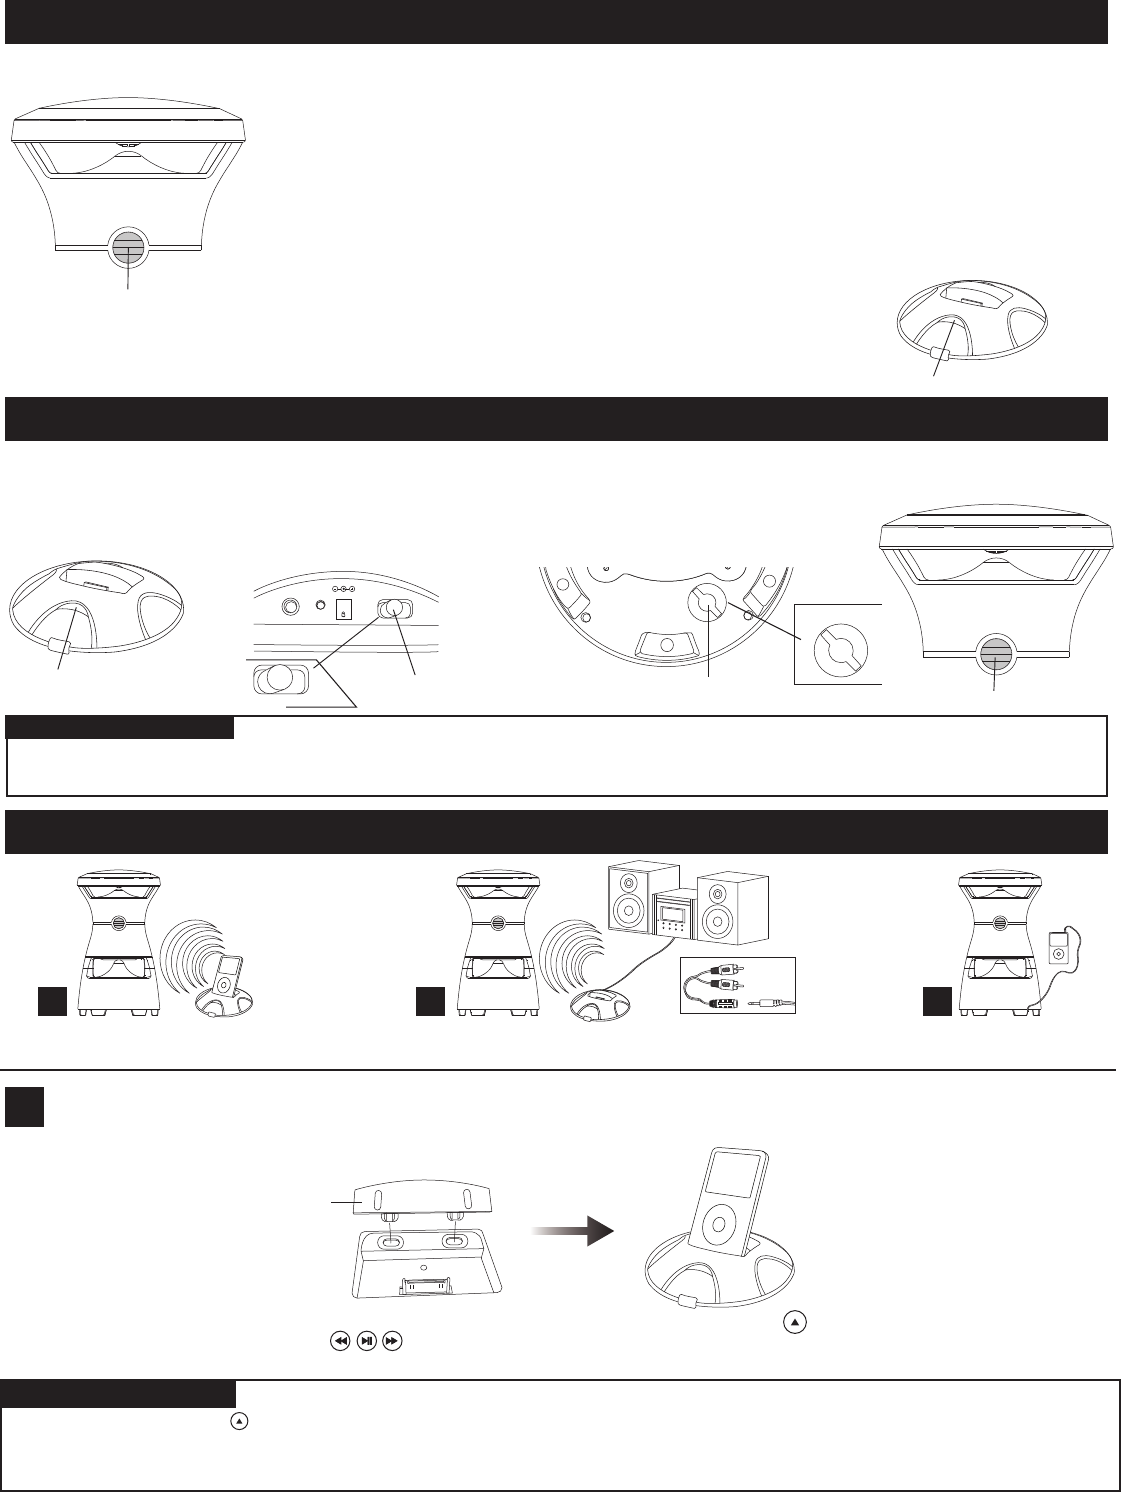
To get started playing music you will need to first move the channel switch from the off position to one of the three available channels on both the solar speaker as well as your docking station.
Please note that both the speaker and the docking station must be on the same channel. You will know that both units are powered on by the indicator light, which is located on the front
of the speaker as well as the docking station.
ON/OFF/CHANNELS SWITCH
DC 6.8V
OFF 123
OFF 123
BACK OF DOCKING STATION
ON/OFF/CHANNELS SWITCH
BOTTOM OF SOLAR SPEAKER
Deciding How To Listen To Your Music
Powering Your New Solar Speaker And Docking Station
Item # 88101x-xx
A
MP3 or home audio wireless connection through docking station auxiliary port and audio input port iPod/MP3 Direct solar speaker connection
TROUBLESHOOTING
HIBERNATION MODE
STEP 3
STEP 4
iPod wireless connection through docking station
A B C
NOTE: The front LCD lights will change
color to show the charge progress.
BATTERY STATUS INDICATOR - SPEAKER:
• Green light indicates a battery capacity of 80%-100%.
• Yellow light indicates a battery capacity of 20%-80%
• Red light indicates a battery capacity of less than 20%
• Flashing red light indicates that the battery capacity is exhausted. After
one hour speaker turns off automatically.
• Flashing green light indicates that the speaker is in hibernation mode.
Blue lights on speaker will light up at night.
BATTERY STATUS INDICATOR - DOCKING STATION:
• Red light indicates a battery capacity of less than 20%.
• Yellow light indicates a battery capacity of 20%-80%.
• Green light indicates a battery capacity of 80%-100%.
STEP 2 Contd. page 2
(1) If no sound is heard, first reconnect the docking station and speaker to the wall outlets to charge for 4 hours. Also make sure your iPod is set at an appropriate
volume, as well as on your docking station using the volume key on your remote. (2) Ensure the docking station is within 100 feet of the solar speaker and has a clear line of sight.(3) If there
is interference when the docking station is playing, choose a different audible channel on both the docking station and solar speaker. (Note: The same channel must be selected on both)
For optimal sound and range performance, elevate speaker and docking station at least 24" off the ground.
Depending on your iPod (nano, mini, 30GB, etc) select the correct docking station adaptor. ( See parts Included ) and snap in to place. Gently press your iPod down
onto
the docking pin until flush. Set your iPod to an appropriate volume, and press play. (For optimal sound elevate speaker and docking station 24” or more off the ground)
INDICATOR LIGHT
INDICATOR LIGHT
INDICATOR LIGHT
INDICATOR LIGHT
After 10 minutes of inactivity, the docking station will enter hibernation mode. After one minute without signal from the docking station, the speaker will enter hibernation
mode, indicated by a flashing light. After 30 minutes in hibernation, the speaker will automatically shut off. To awake the docking station or speaker from hibernation mode, turn the switch / channel
selector off and back on.
FOR FIRST TIME USE, REMOVE PULL TAB FROM BETWEEN THE BATTERY AND ITS CONNECTOR.
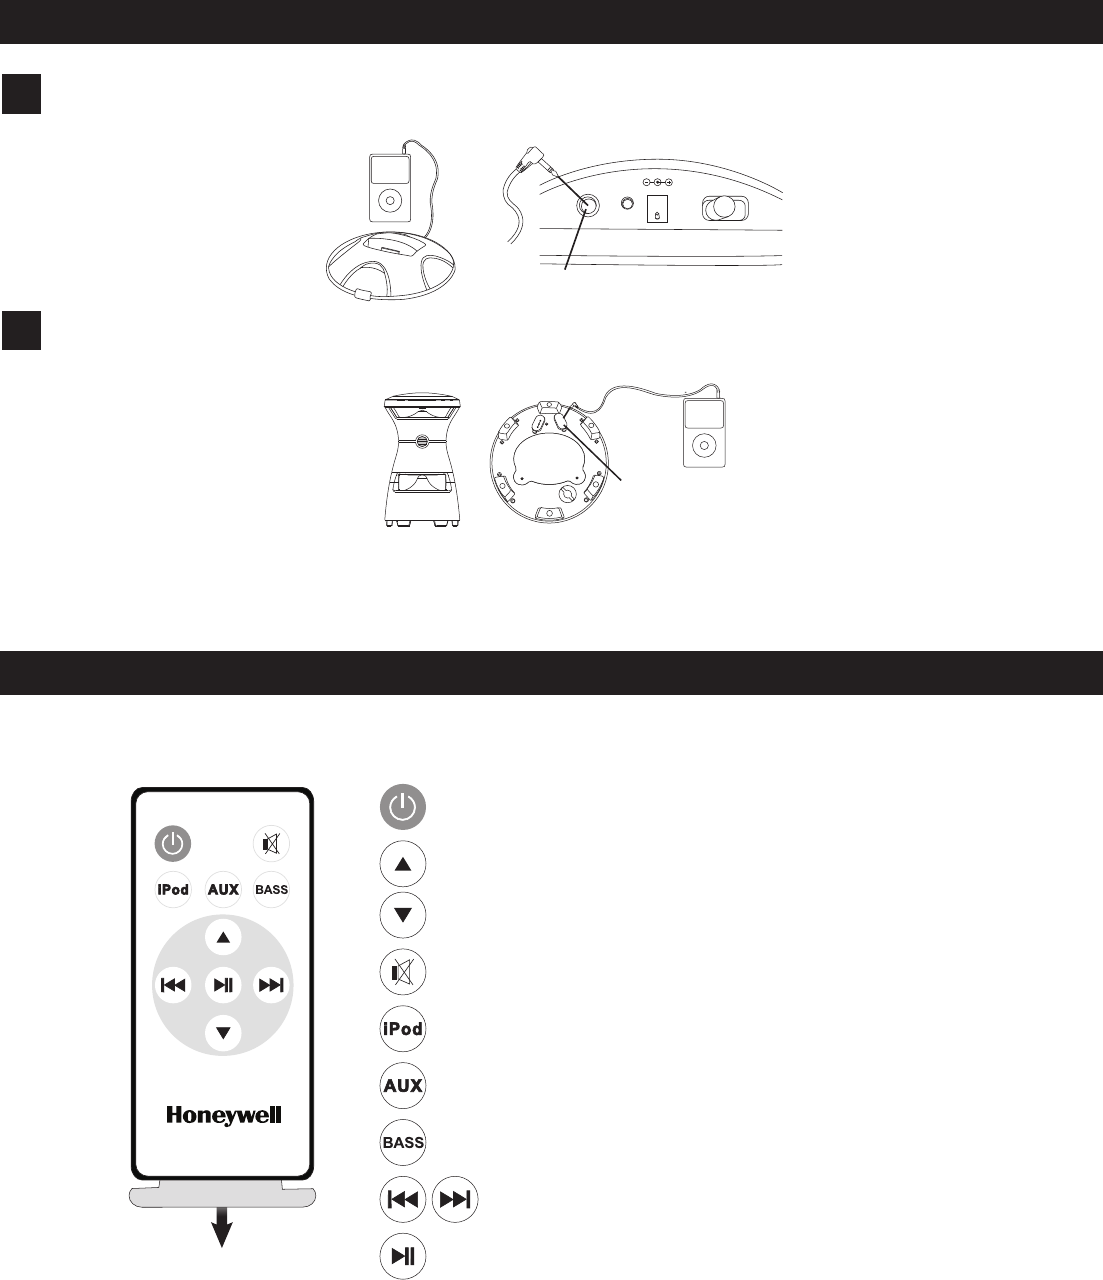
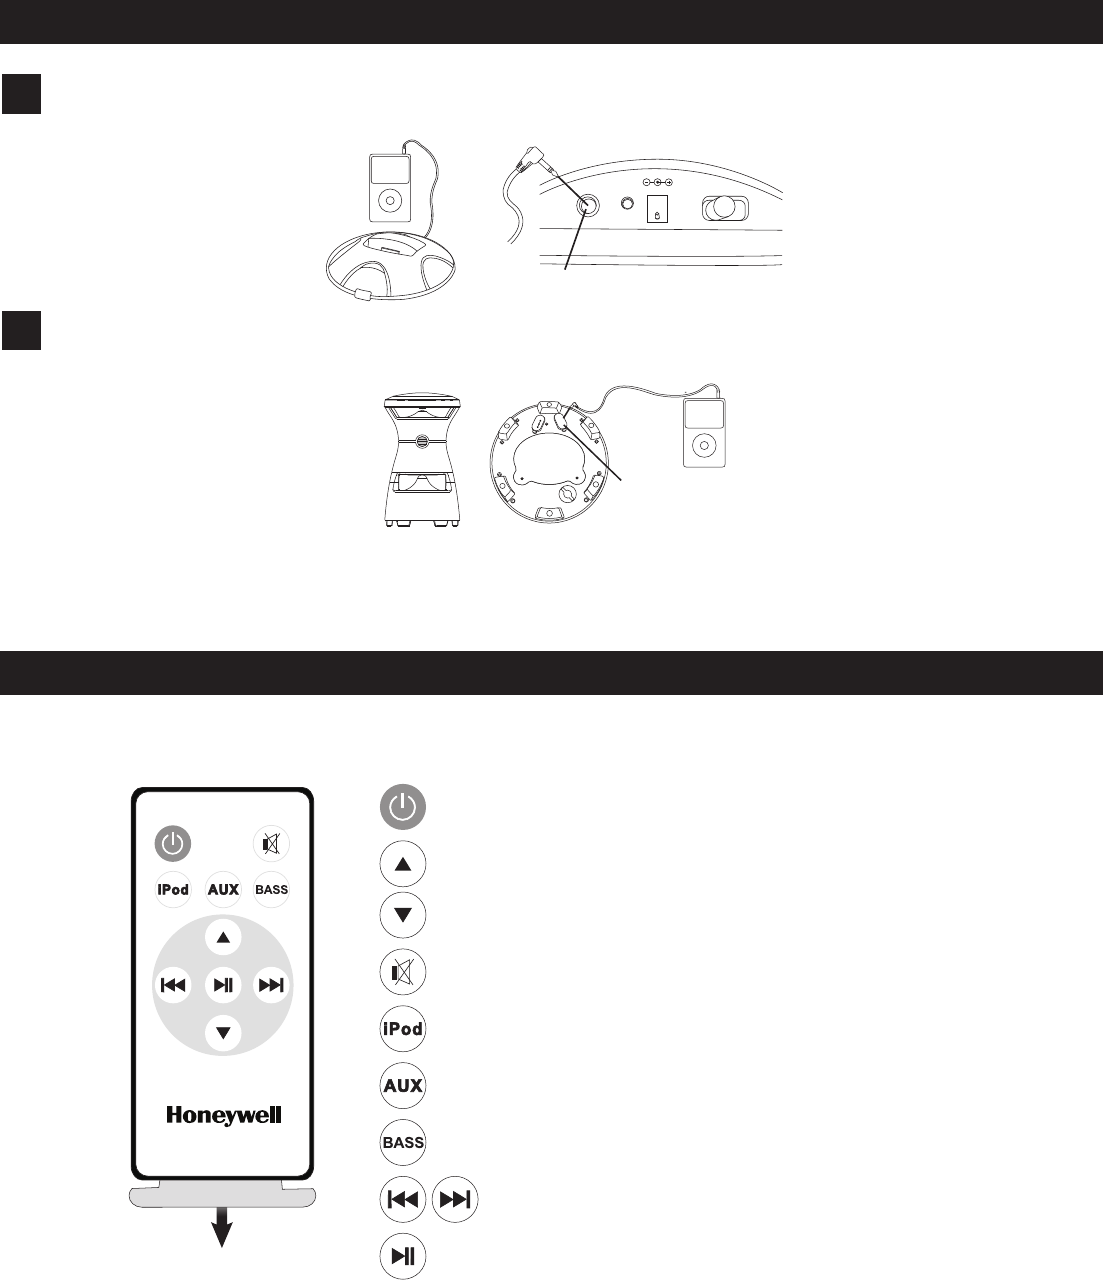
Using your solar speaker remote
Press the ON/OFF button once to turn the speaker ON or OFF.
Press the volume buttons to control the volume levels.
Press the BASS button to control the bass levels.
Press the play/pause button to toggle between play and pause.
Press the track selection buttons to change the track being played.
Press the mute button to turn the sound off completely.
Press the iPod button to indicate the use of an iPod.
Press the AUX button to indicate the use of an auxiliary device.
PULL TAB
STEP 4 Contd. page 3
O
F
F
1
2
3
Channel
AUXILIARY PORTAL
AUXILIARY PORTAL
DC 6.8V
OFF 123
BOTTOM OF SOLAR SPEAKER
B
C
Plug the straight end into the headphone jack on the iPod. Plug the angled end into the MP3/AUX port on the bottom of the solar speaker. Turn your iPod, or MP3 player on and
set the volume to maximum for best performance. Now press play. Do not use auxiliary cable to connect docking station directly to the solar speaker.
Item # 88101x-xx
Using the auxiliary cable provided, plug the straight end into the microphone jack of your iPod shuffle, MP3 player, or home audio system. Then plug the angled end of the auxiliary
cable
directly into the AUX port on the back of the docking station. Now turn on your iPod or MP3 player or home audio system. Turn the volume to an appropriate level for best
performance.
Now press play.
Item # 88101x-xx
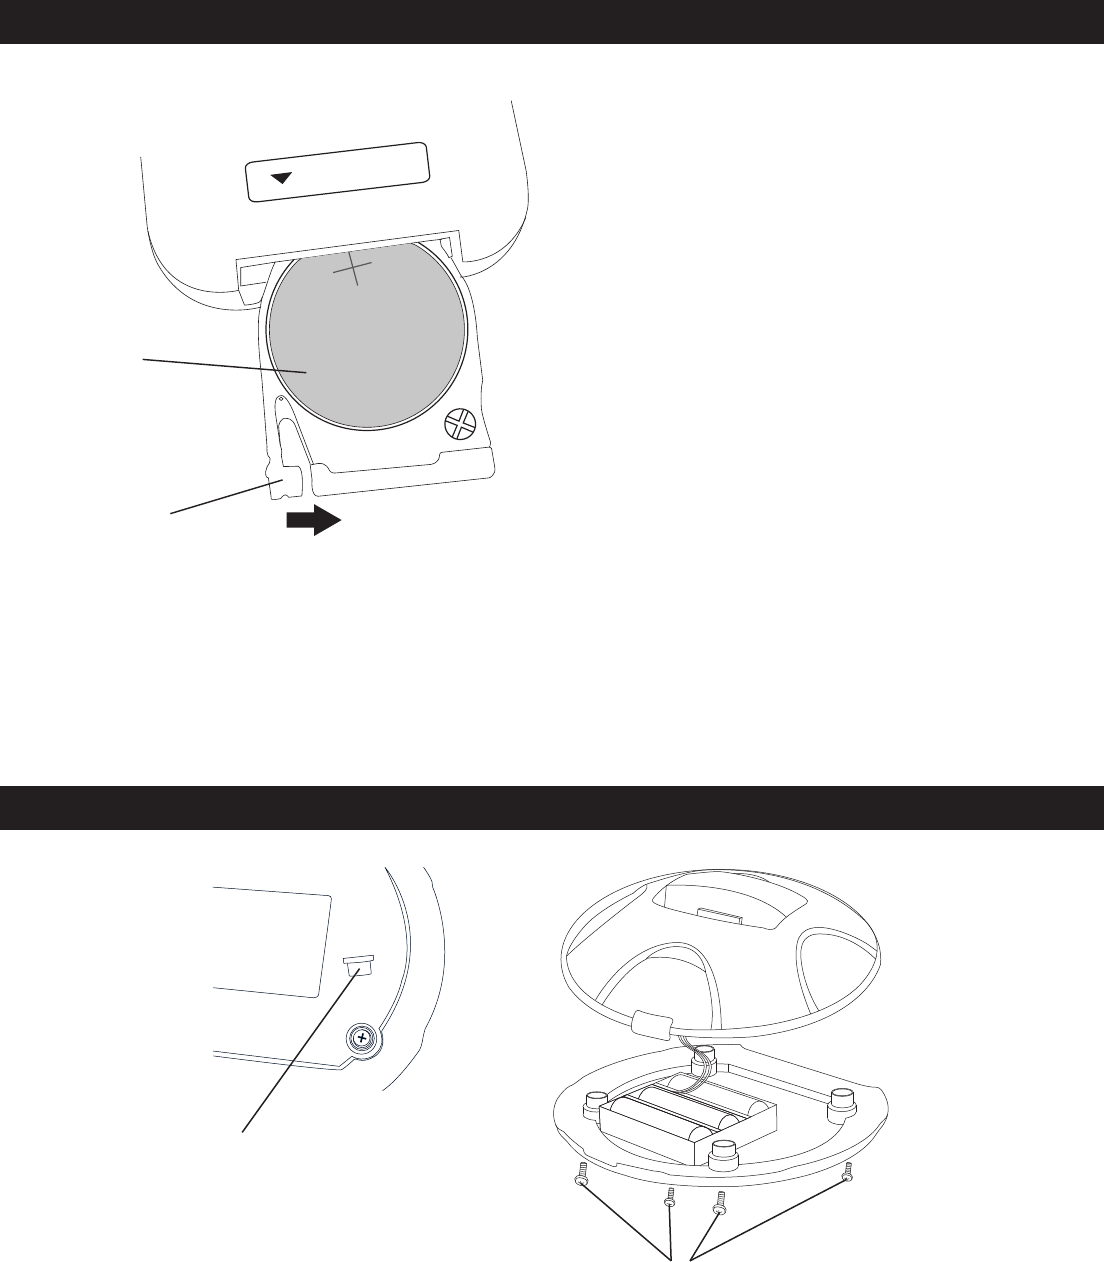
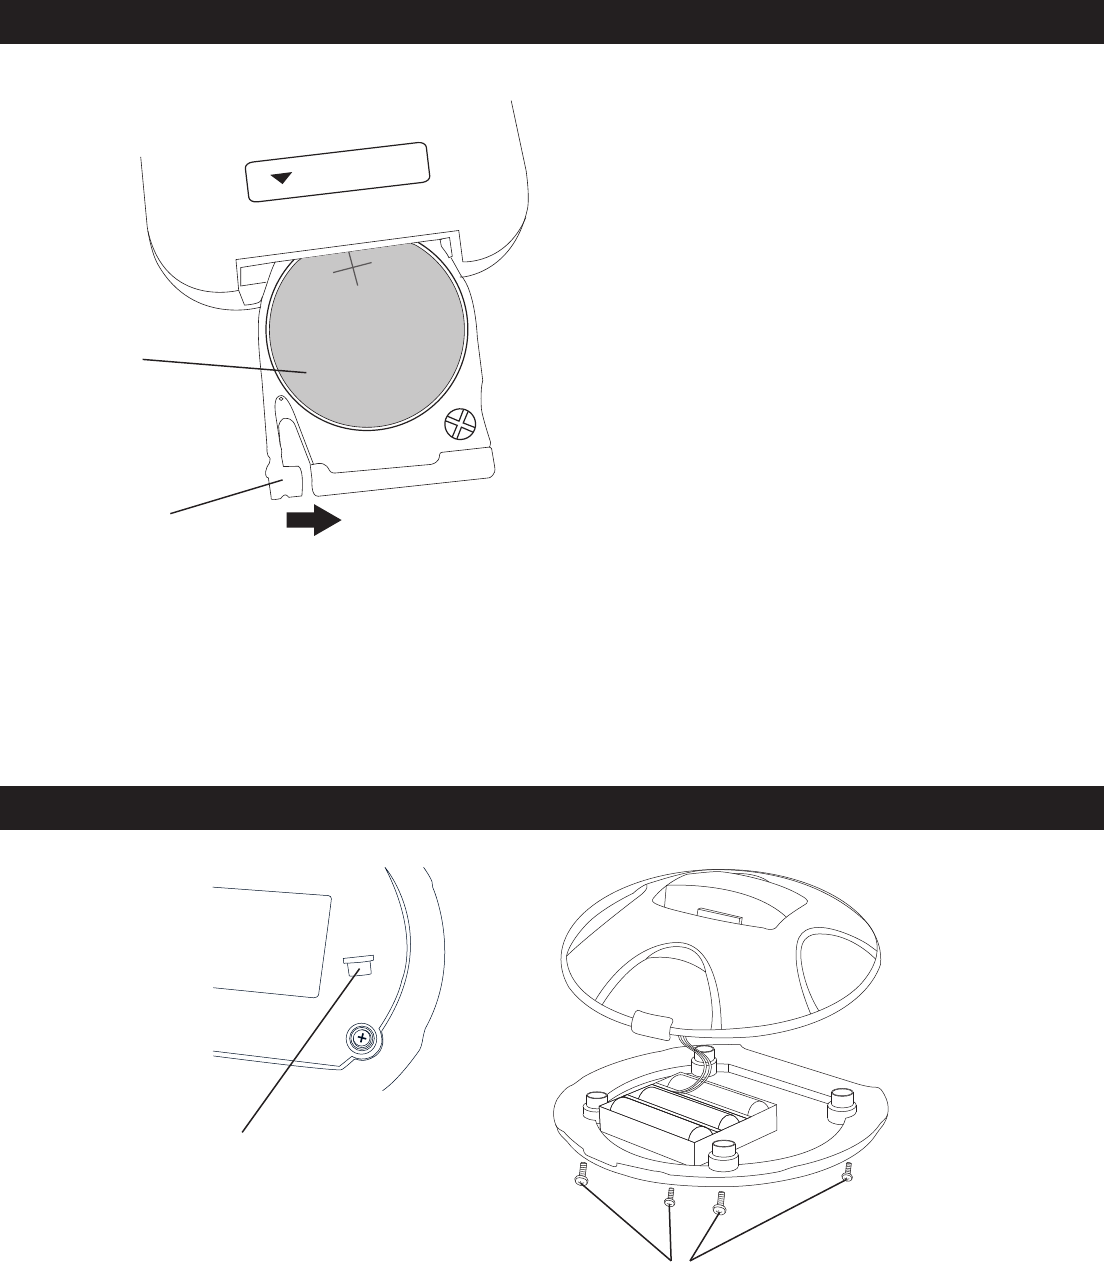
Replacing the batteries in your docking station.
SCREWS
SCREW COVERS
Replacing the battery on your remote
LITHIUM BATTERY
RELEASE
CR 2025
3 V
CHN
RELEASE TAB
BATTERY
BACK OF REMOTE CONTROL
Gently pull in the release tab towards the battery tray as you
pull the battery tray out. Remove the old battery and replace
with a new CR2025 lithium battery (sold separately). Replace battery cover.
NOTE: This equipment has been tested and found to comply with the limits for a Class B digital device. This device complies with Part 15 of the FCC Rules. These limits are designed to provide reasonable protection
against harmful interference in a residential installation. Operation is subject to the following two conditions: (1) This device may not cause harmful interference, and (2) this device must accept any interference
received, including interference that may cause undesired operation. This equipment generates, uses and can radiate radio frequency energy and, if not installed and used in accordance with the instructions, may
cause harmful interference to radio communications. However, there is no guarantee that interference will not occur in a particular installation. If this equipment does cause harmful interference to radio or television
reception, which can be determined by turning the equipment off and on, the user is encouraged to try to correct the interference by one or more of the following measures: -- Reorient or relocate the receiving antenna.
-- Increase the separation between the equipment and receiver. -- Connect the equipment into an outlet on a circuit different from that to which the receiver is connected. -- Consult the dealer or an experienced radio/TV
technician for help.
page 4
Turn the ON/OFF switch to "OFF." First remove the four screw covers from the bottom of the docking station, next use a phillips head screwdriver to remove the four
screws holding the bottom in place. NOTE: Do not remove any of the connecting wires. Finally remove the old batteries and replace with new Ni-Mh 1000 mAh AA
rechargeable batteries (sold separately). Replace bottom cover by aligning it properly and then inserting each screw into one of the four holes and turning the screws
clockwise until secure, make sure to replace and tighten all four screws. Replace all four screw covers.
Item # 88101x-xx
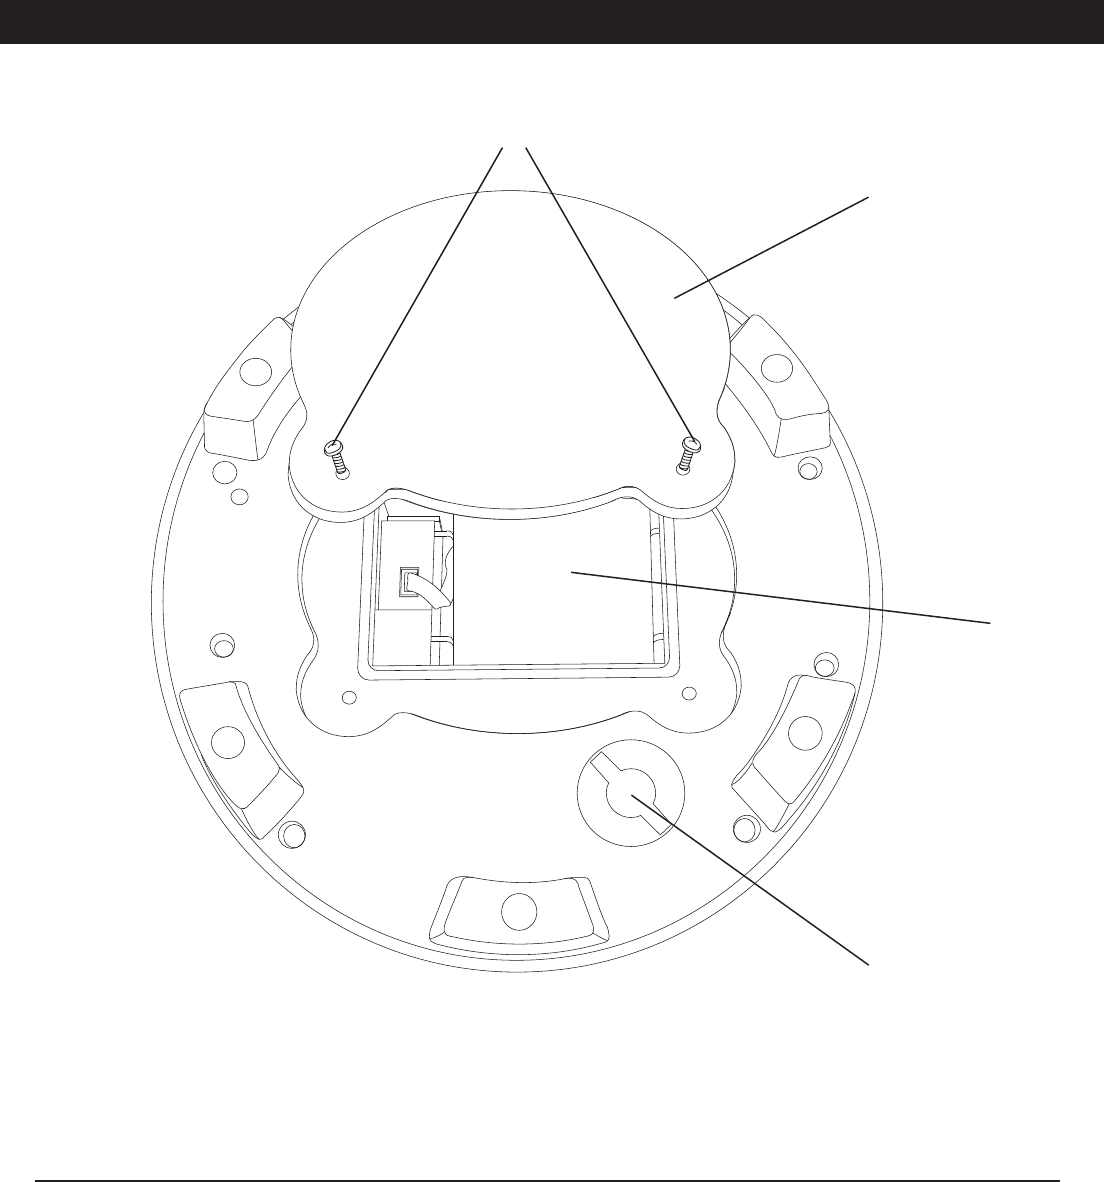
Replacing the batteries in your solar speaker
O
F
F
1
2
3
Channel
MP3/
AUX IN
DC12V
SCREWS
BATTERY COVER
BATTERY PACK
ON/OFF SWITCH
page 5
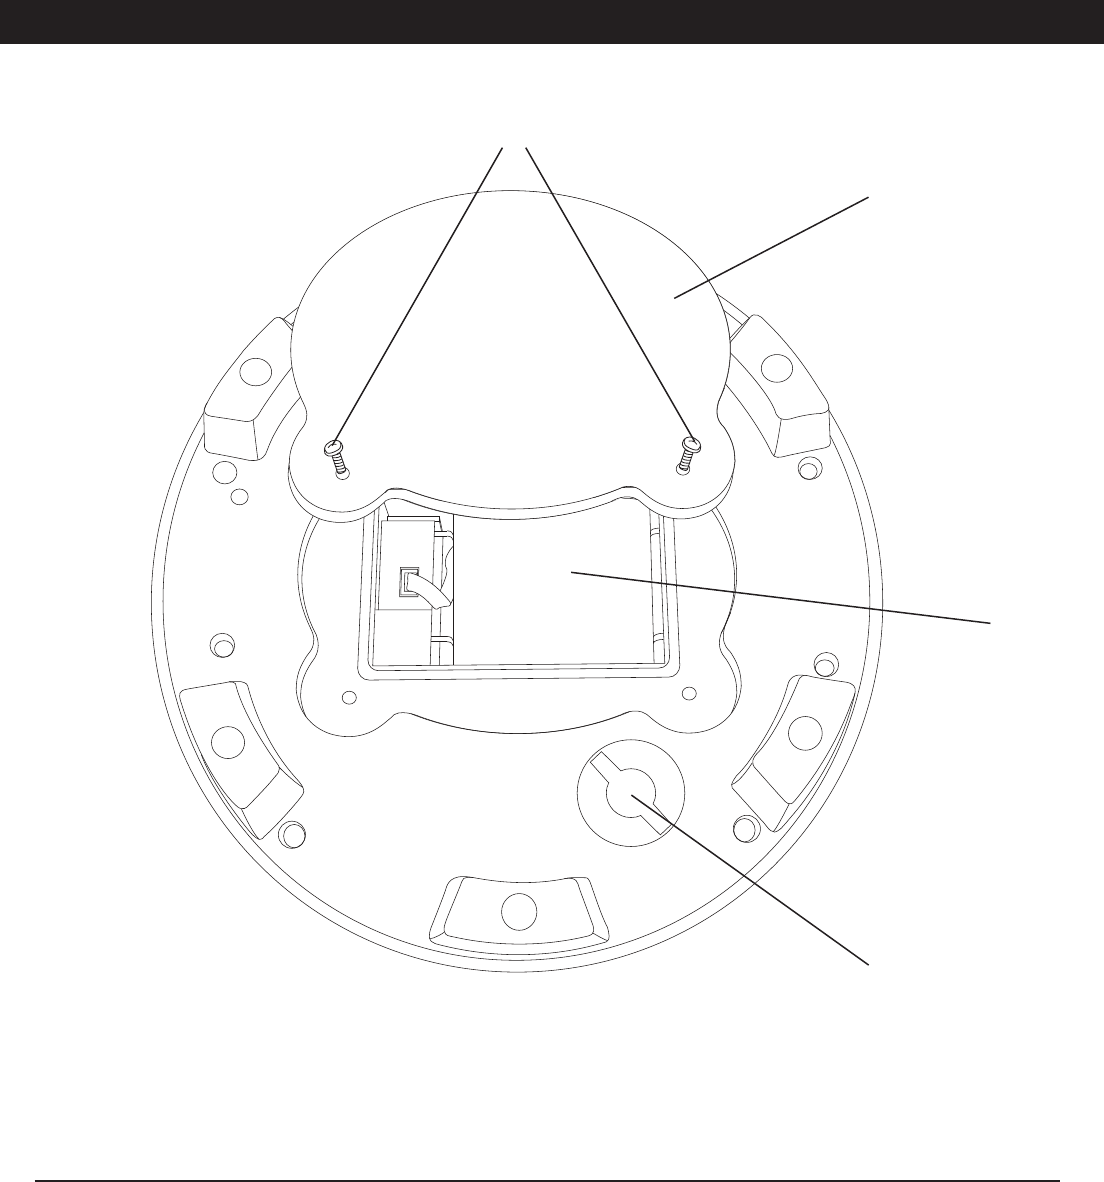
Turn the ON/OFF switch to "OFF." Use a flat head screwdriver to remove the two screws holding the battery cover in place. Remove the old battery pack by carefully
unplugging it from the bottom of the solar speaker. Replace with one new Ni-Mh 2000 mAh AA rechargeable battery pack (sold separately). Replace bottom cover by
aligning it properly and then inserting each screw into one of the two holes and turning the screws clockwise until secure.
WARNING: Do not dispose of Ni-Mh batteries in the regular trash, municipal waste stream or by fire as batteries may leak or explode. Do not open, short circuit, or
mutilate batteries as injury may occur. Preserve our environment by recycling Ni-Mh batteries or disposing of them in accordance with Local, State, and Federal
regulations. Do not mix old and new batteries. Do not mix alkaline, standard (Carbon-Zinc), or rechargeable (Nickel Cadmium) batteries.

Item#88101x‐xx
Note page 6
Changes or modifications not expressly approved by the manufacturer could void the user's authority to operate the
equipment.
This equipment has been tested and found to comply with the limits for a Class B digital device, pursuant to Part 15 of
the FCC Rules. These limits are designed to provide reasonable protection against harmful interference in a residential
installation. This equipment generates, uses and can radiate radio frequency energy and, if not installed and used in
accordance with the instructions, may cause harmful interference to radio communications. However, there is no
guarantee that interference will not occur in a particular installation. If this equipment does cause harmful interference to
radio or television reception, which can be determined by turning the equipment off and on, the user is encouraged to try
to correct the interference by one or more of the following measures:
-- Reorient or relocate the receiving antenna.
-- Increase the separation between the equipment and receiver.
-- Connect the equipment into an outlet on a circuit different from that to which the receiver is connected.
-- Consult the dealer or an experienced radio/TV technician for help
Cómo cargar el altavoz solar con su adaptador de CA/CD.
Cómo Cargar El Altavoz Solar Usando El Sol
LENGÜETA
Modelo No. 88101x-xx
Manual del propietario
O
F
F
1
2
3
Channel
MP3/
AUX IN
DC13.5V
ALTAVOZ SOLAR
ADAPTADOR CA DEL ALTAVOZ SOLAR
ESTACIÓN DE ACOPLAMIENTO
ADAPTADORES DE LA ESTACIÓN DE ACOPLAMIENTO
CABLE AUXILIAR
CABLE DE AUDIO
CONTROL REMOTO
CONEXIÓN DE ENERGÍA
CONEXIÓN DE ENERGÍA
DC 6.8V
OFF 123
PARTE INFERIOR DEL ALTAVOZ SOLAR
PARTE POSTERIOR DE LA ESTACIÓN DE ACOPLAMIENTO
Cómo cargar la estación de acoplamiento con su adaptador de CA/CD.
A
B
C
30GB/60GB
TOUCH 8,16,32GB10GB/20GB
NANO
MINI
PRIMER PASO
SEGUNDA PASO Cómo cargar su dispositivo por primera vez
Partes del altavoz solar
Enchufe el adaptador de CA del altavoz solar en la pared. Conecte el extremo opuesto en la
toma de CD de la parte inferior del altavoz solar. Cuando el adaptador de CA está conectado,
el LED rojo de la parte inferior del altavoz se ilumina.
IDC
899 Henrietta Creek Rd. Roanoke, TX 76262 - 1-888-377-5377
La marca Honeywell se usa con licencia de Honeywell International Inc.
Honeywell International Inc. no ofrece ninguna declaración o garantía respecto a este producto o servicio.
Enchufe el cable de CA de la estación de acoplamiento en la pared. Conecte el extremo opuesto
en la toma de CD en la parte trasera de la estación de acoplamiento. Al conectarla a una toma de
CA, la estación de acoplamiento carga la iPod que tenga acoplada.
*Cuando los use por primera vez, permita que el altavoz y la estación de
acoplamiento se carguen durante 4 horas para asegurar una carga
completa.
Coloque el altavoz solar bajo la luz directa del sol durante
15 horas para asegurarse de que la carga esté completa.
Es posible que el panel solar tenga una película protectora. RETÍRELA ANTES DE USARLO.
ADAPTADOR DE LA ESTACIÓN DE
ACOPLAMIENTO
Para usarlo por primera vez, extraiga la pestaña que se encuentra entre la batería
y su conector (consulte las instrucciones del control remoto para reemplazar la
batería).
CONTROL
REMOTO
12/18/09
Revised 02/03/10
E
O
F
F
1
2
3
Channel
MP3/
AUX IN
DC12V
O
F
F
1
2
3
Channel
INTERRUPTOR DE
ENCENDIDO/APAGADO/CANALES
INTERRUPTOR DE
ENCENDIDO/APAGADO/CANALES
DC 6.8V
OFF 123
OFF 123
PARTE INFERIOR DEL ALTAVOZ SOLAR
PARTE POSTERIOR DE LA
ESTACIÓN DE ACOPLAMIENTO
Cómo escuchar su música
Cómo Encender Su Nuevo Panel Solar Y Estación De Acoplamiento
Modelo No. 88101x-xx
A
LOCALIZACIÓN DE AVERÍAS
MODO DE HIBERNACIÓN
TERCER PASO
CUARTO PASO
A B C
NOTA: Las luces LCD frontales cambian
de color para mostrar el progreso de
carga.
INDICADOR DEL ESTADO DE LA BATERÍA DEL ALTAVOZ:
• La luz verde indica que la capacidad de la batería está entre 80% y 100%.
• La luz amarilla indica que la capacidad de la batería está entre 20% y
80%.
• La luz roja indica que la capacidad de la batería está por debajo de 20%.
• La luz roja parpadeante indica que la capacidad de la batería está
agotada. Después de una hora, el altavoz se apagará automáticamente.
• La luz verde parpadeante indica que el altavoz se encuentra en modo de
hibernación.
Las luces azules del altavoz se encienden por la noche.
INDICADOR DE CARGA DE LA BATERÍA DE LA
ESTACIÓN DE ACOPLAMIENTO:
• La luz roja indica que la capacidad de la batería está por
debajo del 20%.
• La luz amarilla indica que la capacidad de la batería
está entre 20% y 80%.
• La luz verde indica que la capacidad de la batería está
entre 80% y 100%.
PASO 2 Cont. página 2
1) Si no escucha ningún sonido, conecte de nuevo la estación de acoplamiento y el altavoz a los enchufes de la pared para cargarlos durante 4 horas.
Además, utilice la tecla de volumen de su control remoto para asegurarse de que su iPod y su estación de acoplamiento tengan el volumen adecuado. (2) Asegúrese de que la estación
de acoplamiento se encuentre a menos de 150 pies (50 m) del altavoz solar y que la línea de visión entre ambos no tenga obstáculos. (3) Si hay interferencia cuando la estación de
acoplamiento esté funcionando, seleccione un canal audible diferente en ambos. (Nota: el mismo canal debe estar seleccionado en ambos dispositivos.) Para obtener un sonido y alcance
óptimos, eleve el altavoz y la estación de acoplamiento al menos a 24 pulg. del suelo.
Para comenzar a reproducir música, es necesario que primero mueva el interruptor de canales de la posición de apagado a uno de los tres canales disponibles en el altavoz solar, así como
en su estación de acoplamiento. Observe que tanto el altavoz como la estación de acoplamiento deben estar en el mismo canal. La luz indicadora señala que ambas unidades están encendi-
das; ésta se ubica al frente del altavoz y de la estación de acoplamiento.
Seleccione el adaptador correcto para la estación de acoplamiento según su tipo de iPod (nano, mini, 30 GB, etc.) (vea las piezas que se incluyen) y colóquelo en
su sitio a presión. Empuje suavemente su iPod hacia abajo sobre la clavija de acoplamiento hasta que quede al ras. Coloque su iPod en un volumen adecuado y
oprima “Play” (para lograr un sonido óptimo, eleve los altavoces y la estación de acoplamiento a 24 pulg. o más del piso).
Conexión directa de la iPod o MP3 al
altavoz solar
Conexión alámbrica al MP3 o al audio de su casa por medio de la conexión auxiliar y de entrada de
audio de la estación de acoplamiento
ADAPTADOR DE LA ESTACIÓN
DE ACOPLAMIENTO
Conexión inalámbrica a la iPod por medio de la
estación de acoplamiento
Es posible que haya un ligero retraso en el sonido de su altavoz una vez que oprima “Play”; continúe oprimiendo la tecla de volumen de su control remoto para asegurarse de que
pueda escuchar. Puede controlar la iPod con las teclas de su control remoto o directamente en la misma iPod. Con una carga completa, puede esperar que la estación de
acoplamiento y el altavoz solar funcionen aproximadamente de 3 a 10 horas (dependiendo del volumen) antes de que tenga que cargarlos de nuevo.
INDICATOR LIGHT
INDICATOR LIGHT
INDICATOR LIGHT
Después de 10 minutos de inactividad, la estación de acoplamiento entrará en modo de hibernación. Después de un minuto sin recibir señal de la estación de
acoplamiento, el altavoz entrará en modo de hibernación; esto se indica por medio de una luz parpadeante. Después de 30 minutos de hibernación, el altavoz se apaga automáticamente. Para reactivar
la estación de acoplamiento o el altavoz si están en modo de hibernación, apague el selector de encendido / canal y vuélvalo a encender.
INDICATOR LIGHT
PARA USARLO POR PRIMERA VEZ, EXTRAIGA LA PESTAÑA QUE SE ENCUENTRA ENTRE LA BATERÍA Y SU CONECTOR.
Cómo usar el control remoto de su altavoz solar
Oprima el botón “ON/OFF” una vez para encender o apagar el altavoz.
Oprima los botones de volumen para controlar su nivel.
Oprima el botón BASS para controlar el nivel de bajos.
Oprima el botón de reproducción/pausa para reproducir o detener la reproducción.
Oprima el botón “mute” para apagar por completo el sonido.
Oprima el botón iPod para indicar el uso de una iPod.
Oprima el botón AUX para indicar el uso de un dispositivo auxiliar.
LENGÜETA
PASO 4 Cont. página 3
O
F
F
1
2
3
Channel
CONEXIÓN AUXILIAR
CONEXIÓN AUXILIAR
DC 6.8V
OFF 123
PARTE INFERIOR DEL ALTAVOZ SOLAR
B
C
Modelo No. 88101x-xx
Utilice el cable auxiliar que se incluye para conectar el extremo recto en el enchufe para el audífono de su iPod Shuffle, MP3 o sistema de audio de su hogar. Después, conecte el
extremo con ángulo del cable auxiliar directamente en la conexión AUX de la parte posterior de la estación de acoplamiento. Ahora, encienda su iPod, MP3 o el sistema de audio de
su hogar. Coloque el volumen en un nivel adecuado para mejor funcionamiento. Ahora oprima “Play”.
Conecte el extremo recto en el enchufe para el audífono de la iPod. Conecte el extremo con ángulo en la conexión MP3/AUX de la parte inferior del altavoz solar. Encienda su
iPod o reproductor de MP3 y coloque el volumen al máximo para un mejor funcionamiento. Ahora oprima “Play”. No utilice un cable auxiliar para conectar la estación de
acoplamiento directamente al altavoz solar.
Oprima los botones de selección de pistas para cambiar la pista
que se está reproduciendo.
Modelo No. 88101x-xx
Cómo reemplazar las baterías de su estación de acoplamiento.
TORNILLOS
CUBIERTAS DE
LOS TORNILLOS
Cómo reemplazar la batería de su control remoto
LITHIUM BATTERY
ABRIR
CR 2025
3 V
CHN
SEGURO
BATTERY
PARTE POSTERIOR DEL CONTROL REMOTO
página 4
Coloque el interruptor de encendido/apagado en la posición “OFF”. Primero retire las cuatro cubiertas de los tornillos de la parte inferior de la estación de acoplamiento; a continuación,
use un destornillador Phillips para extraer los cuatro tornillos que sujetan la parte inferior en su sitio. NOTA: No desconecte ninguno de los alambres. Por último, extraiga las baterías
agotadas y reemplácelas con baterías recargables nuevas tipo AA de níquel metal hidruro (Ni-Mh) de 1000 mAh (se venden por separado). Coloque de nuevo la cubierta inferior
alineándola apropiadamente; inserte los tornillos en los cuatro orificios y apriételos en sentido de las manecillas del reloj. Asegúrese de colocar y apretar bien los cuatro tornillos. Coloque
de nuevo las cuatro cubiertas de los tornillos.
Jale suavemente la pestaña de liberación hacia la bandeja
de la batería mientras la extrae. Extraiga la batería agotada
y reemplácela con una batería nueva de litio CR2025 (se
vende por separado). Reinstale la cubierta de la batería.
NOTA: Este equipo ha sido probado y se ha determinado que cumple con los límites establecidos para dispositivos Clase B. Este dispositivo cumple con la Parte 15 de los reglamentos de la FCC. Estos límites se
diseñaron para proporcionar una protección razonable contra la interferencia dañina al instalarse en una casa. Su operación está sujeta a las siguientes dos condiciones: (1) este dispositivo no debe causar
interferencia dañina y (2) este dispositivo debe aceptar cualquier interferencia que reciba, incluida la interferencia que pueda causar un funcionamiento indeseable. Este equipo genera, utiliza y puede irradiar energía
de radiofrecuencia y, si no se instala y utiliza apegándose al instructivo, puede causar interferencia dañina en las radiocomunicaciones. Sin embargo, no se garantiza que la interferencia no ocurra en una instalación
en particular. Si este equipo causa interferencias dañinas en la recepción de las señales de radio o televisión, que podrán determinarse al encender y apagar el equipo, se insta al usuario a tratar de corregir las
interferencias por medio de una o más de las siguientes medidas: -- Reoriente o reubique la antena receptora. -- Incremente la separación entre el equipo y el receptor. -- Conecte el equipo en un tomacorriente de un
circuito diferente al que se use para conectar el receptor. -- Consulte al distribuidor o a un técnico experimentado en radio y televisión.
Modelo No. 88101x-xx
Cómo reemplazar las baterías de su altavoz solar
O
F
F
1
2
3
Channel
MP3/
AUX IN
DC12V
TORNILLOS
CUBIERTA DE BATERÍA
BLOQUE DE BATERÍAS
INTERRUPTOR DE
ENCENDIDO/APAGADO
página 5
Coloque el interruptor de encendido/apagado en la posición “OFF”. Use un destornillador plano para extraer los dos tornillos que sostienen la cubierta de la batería en su lugar.
Extraiga el bloque de baterías y desconéctelo cuidadosamente de la parte inferior del altavoz solar. Reemplácelo con un bloque nuevo de baterías recargables tipo AA de níquel metal
hidruro (Ni-Mh) de 2000 mAh (se vende por separado). Coloque de nuevo la cubierta inferior alineándola correctamente; inserte cada tornillo en uno de los dos orificios y apriételos en
sentido de las manecillas del reloj.
CUIDADO: No deseche las baterías de Ni-Mh en la basura habitual, en el sistema de procesamiento de desechos municipales o en un incinerador, ya que pueden
filtrarse o explotar. No abra, ni provoque un corto circuito, ni mutile las baterías, ya que podría lesionarse. Conserve nuestro medio ambiente reciclando las baterías de
Ni-Mh o desechándolas según las normas municipales, estatales y federales. No mezcle las baterías agotadas con las nuevas. No mezcle las baterías alcalinas,
estándar (carbono-zinc) ni recargables (níquel-cadmio).