DGL Group WHT SMART LED LIGHT User Manual Tapp ComboManual 20140825 ai
DGL Group LTD. SMART LED LIGHT Tapp ComboManual 20140825 ai
Users Manual
Smart Connected Home
Setup Guide
Smart Connected Home
Setup Guide
Revolutionizing
the
Revolutionizing
the
w
a
y
you
way you
co
co
y
o
ur
your
h
h
ome
l
i
gh
ome ligh
n
n
n
n
g
g
g
g
ntro
l
ntrol
h
h
t
i
ng
ti
ng
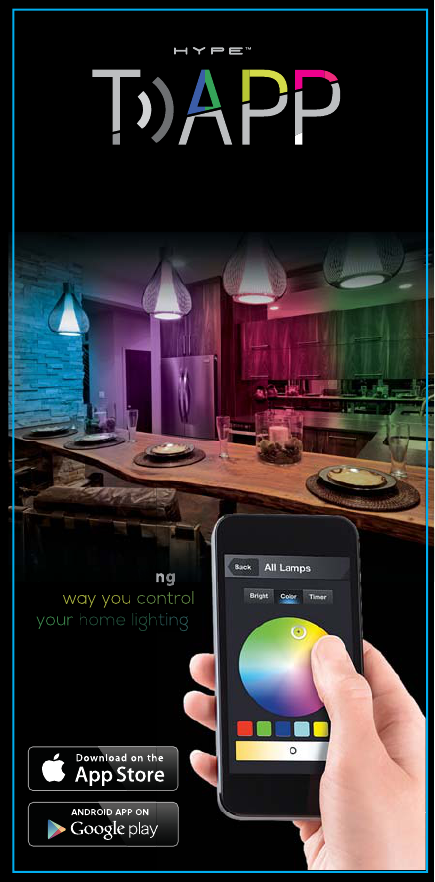
APP Controlled
Supports iOS/Android
Use up to 4 devices
simultaneously
Multi Color
Customize up to
16 million colors with
RGB bulbs & starter kit
Timer
Automate your settings
to conveniently fit
your schedule
Brightness
Control dimming
functions from your
devices
Standard Socket
Fits most standard
light sockets
Wi-Fi Controlled
Allows flexible remote
access from anywhere
Contrast Control
Create the perfect
mood & ambiance with
white bulbs & starter kit
Eco-friendly
Helps conserve and
reduce energy usage
Anti-Theft
Safe guard your
home while away
Energy Saving
Lifetime electricity
savings up to $250.00
over incandescent bulbs
Features
For more information,
please visit our website:
www.mytapplife.com
1
Table of Contents
2
..................................... 3
................................................................................. 3
......................................... 4
............................................................................ 4
......................... 4
................................................................... 4
...................................................... 5
................................................................ 5
.................................................... 6
................................................................ 6
.................................................................................... 8
................................................................................. 9
.......................................................................... 11
.......................................................................... 12
................................................................ 14
Package Contents
Setup
Bulb Installation
Pairing
Download & Connect
Bulb Intro
Finding Bulbs
All Control
Naming Bulbs
Brightness
Color
Timer
Groups
Scenes
Warranty
Thank you for choosing the HYPE TAPP lifestyle
product. All HYPE TAPP products are designed and
manufactured according to the highest standards
of quality.
Updates to product, packaging, manual and
contents may happen without written notice at the
manufacturer’s discretion. We do this in order to
resolve bugs and to provide you with the most
updated product at the best quality that we can.
Our most updated manuals and Apps can be found
on our website. Feel free to visit us at any time on
the App Store or at www.mytapplife.com.
1
2
3
4
5
6
7
8
9
10
11
12
13
14
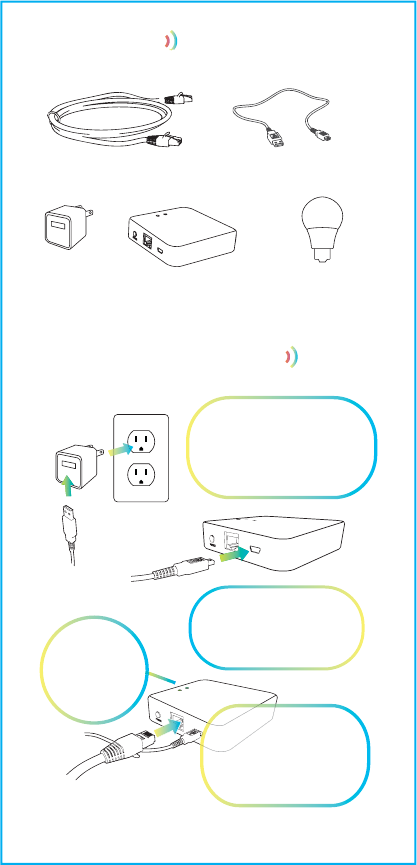
Ethernet cable USB power cable
TAPP
Adapter TAPP
Gateway TAPP
Light bulbs
Plug adapter
into wall outlet and
USB cable into adapter
Connect other end
of USB cable
to TAPP Gateway
The light on
the gateway
will turn on
1 Package Contents
3
2 Setup
Connect TAPP
Gateway to Wi-Fi
router via
ethernet cable
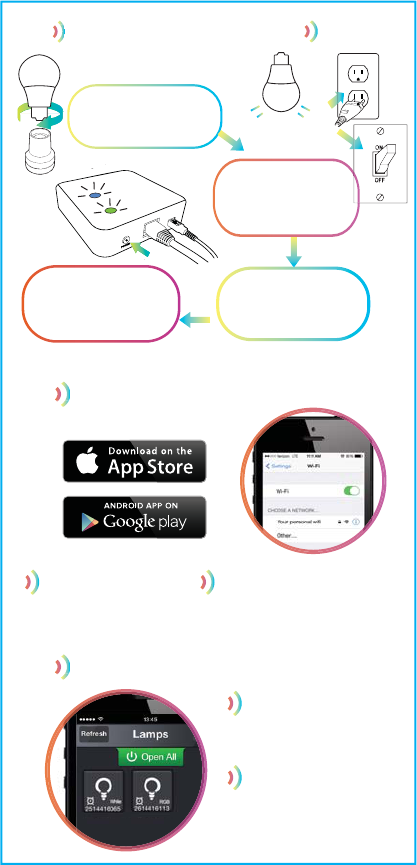
The light on the
gateway will remain
on when paired
Note: Hold “Pair” button for 8 seconds to reset TAPP gateway.
Download free app
HYPE TAPP
from App Store
Connect to your
personal home network
and open TAPP app
on your device
3 Bulb Installation
5 Download + Connect
4 Pairing
6 Bulb Introduction
Serial #s of each
bulb appear under
each bulb icon
Identify which
bulbs are
RGB color bulbs &
which are white bulbs
Ensure TAPP light
bulbs are screwed into
lamp or ceiling socket
Press “Pair” button
on TAPP gateway to
pair with bulbs
4
Plug in your lamp
and turn on the power
to the lamp or to your
ceiling light.
7 Finding Bulbs
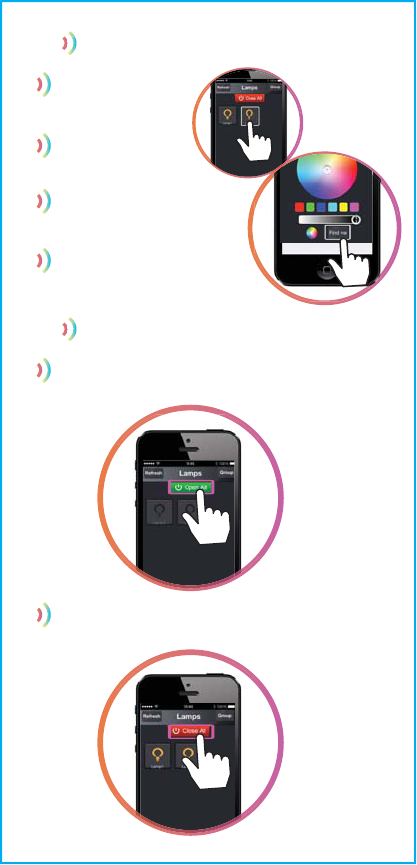
8 All Control
Click on a bulb to
enter the bulb’s
control menu
To switch on all bulbs, simply press “Open All”
from the home screen.
Click “Find Me.”
The bulb will
begin to flash.
Once located,
click “Find Me”
again and the bulb
will stop flashing.
Proceed to change
bulb settings.
To switch off all bulbs, simply press “Close All”
from the home screen.
5
6
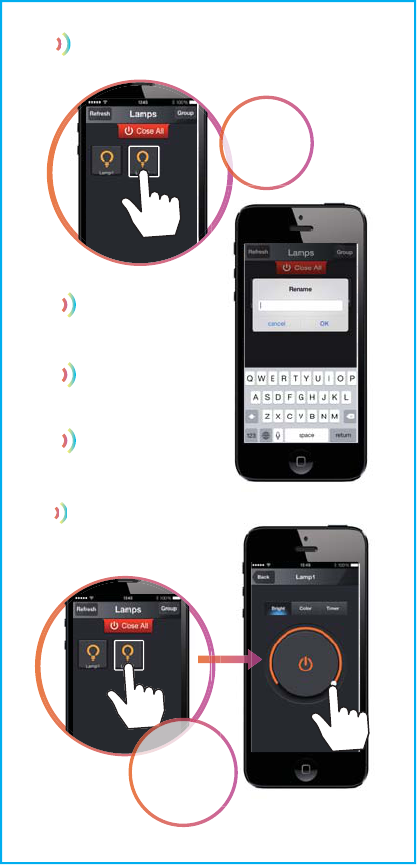
9 Naming Bulbs
Press &
hold bulb
icon to
name.
Enter desired name
for bulb and press
“OK” to save.
A pop-up window
and keyboard
will appear.
Repeat for other
bulbs you wish to
name or rename.
10 Brightness
Select
a TAPP
light bulb
to adjust
brightness
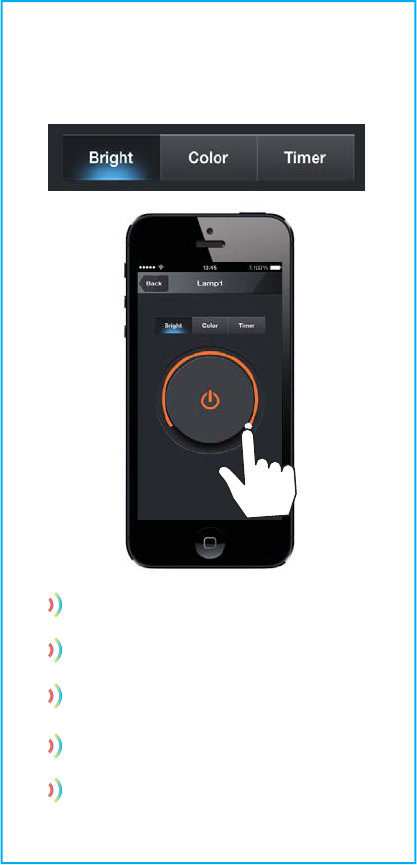
7
Slide your finger clockwise along the wheel
to brighten bulb.
Slide your finger counter-clockwise
along the wheel to dim bulb.
The center power button lets you
easily turn your bulb on/off as desired.
If you have selected a white bulb to adjust
brightness, the wheel slider will be white.
If you have selected an RGB color bulb to
adjust brightness, the wheel slider will
reflect the color you have chosen for that bulb.
lid fi l k i l th h
The “Brightness” menu is the first menu that appears
at the top of the bulb control menu.
It is available for both RGB and white bulbs.
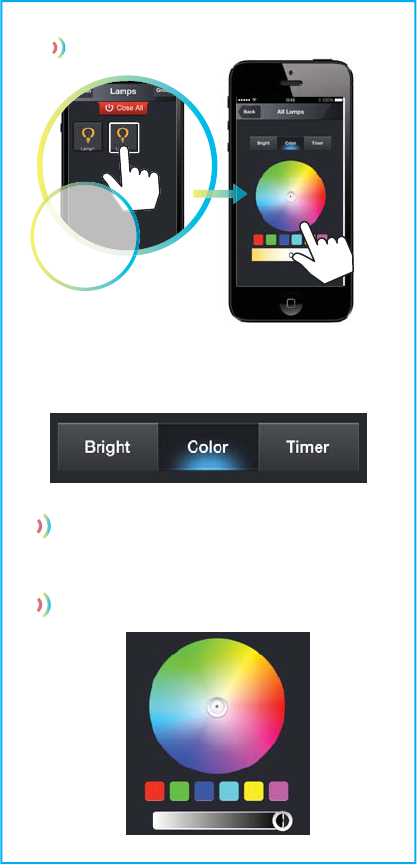
Bulb color can be chosen from the color wheel provided,
or by one of the preset options in the color blocks below.
Color saturation of a bulb can be adjusted by sliding the
grey bar from dark to light on the bottom.
11 Color
The “Color” menu is the second menu that appears at the
top of the bulb control menu.
It is only available for RGB color bulbs.
Select
a TAPP
light bulb
to adjust
color
8
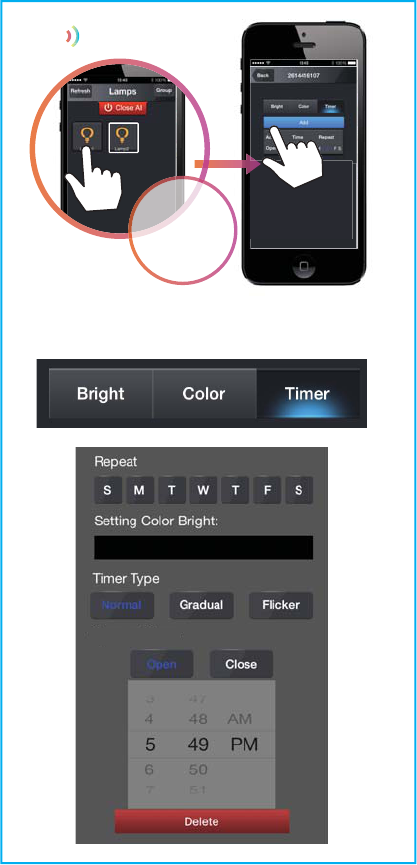
12 Timer
The “Timer” menu is the third menu that appears at the
top of the bulb control menu.
It is available for both RGB and white bulbs.
menu that
appe
ars
at the
Select
a TAPP
light bulb to
set/adjust
timer
9
Action
10
Choose a day of the week you would like the bulb
to repeat the action you are setting on the timer.
If you would not like it to repeat, do not select a day.
Select a color you would like your RGB bulb to
set itself to when the timer goes off.
Please note, if you are setting a timer with
white bulbs, you can set bulb brightness only.
Select a timer type:
Normal - turns bulb on/off
Gradual - slowly fades bulb on/off
Flicker - bulb flickers
Select action type:
Open - turns bulb on
Close - turns bulb off
Set the time of your timer.
Press “Save” at top right to save your timer.
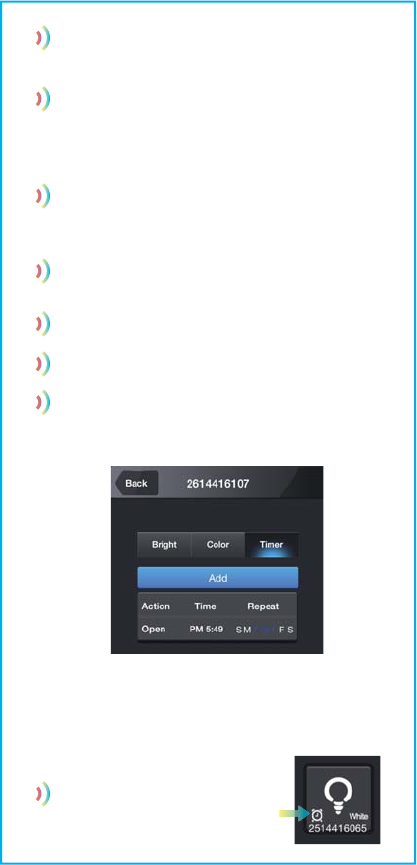
If you are editing a timer on an existing bulb,
you can edit any of the mentioned action types,
times, repeat settings, etc. To delete your timer,
press “Delete” at the bottom of the page.
Your “Timer” menu will show you the summary
of the timer you have set.
You can set more than one timer for each bulb.
Press the “Back” button to return to your Lamp page.
On your Lamp page, a small alarm
clock icon will appear next to
bulbs that have timers.
11
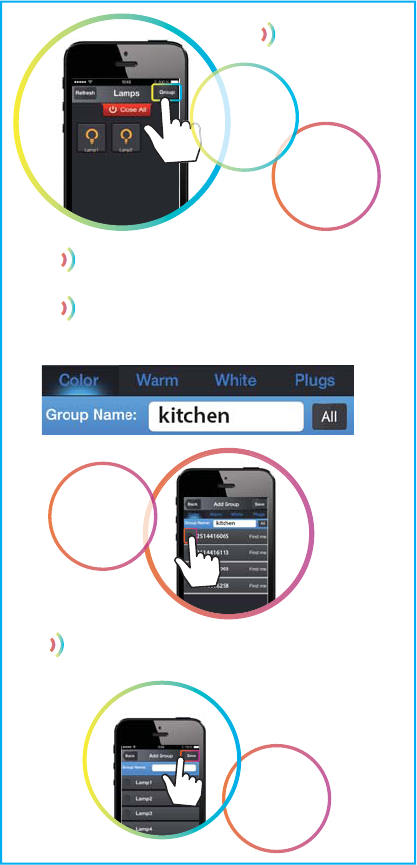
13 Groups
Select
bulbs. Find
them easily
& add to
group.
Select
[+] to
add group
Rename
& Save
group.
Select
GROUP
to create
lighting
groups
Select bulb type from top menu in
order to group bulbs together.
If you have not renamed your bulbs,
they will appear by their serial number.
Color bulbs, warm bulbs, white bulbs,
& plugs will automatically be
separated for easy grouping.
12
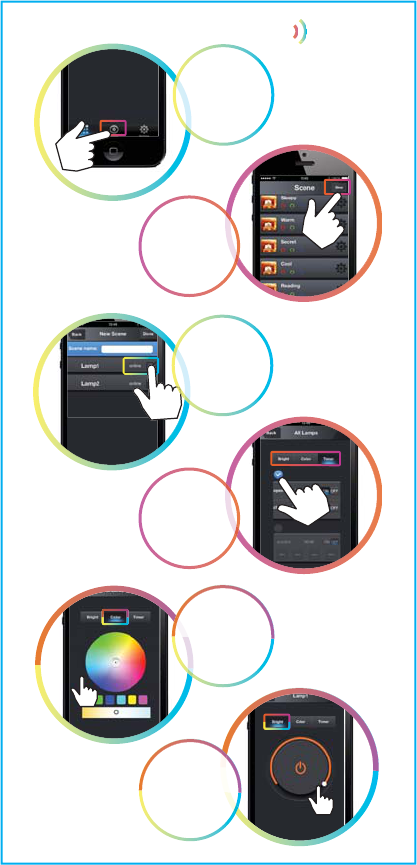
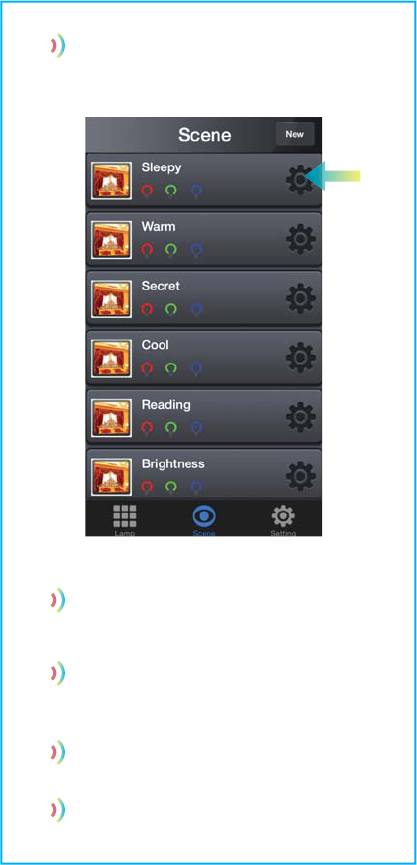
14 Scenes
Select
SCENES
to create
lighting
scenes
Select
NEW to
add
custom
scene
Adjust
timer, color,
brightness
Select
Color
Select
Brightness
Select a
bulb or
group.
13
Preset or custom Scenes can be
adjusted by pressing the setting gear
to the right of each scene.
After making desired adjustments
to a preset scene or a custom-made
scene, make sure you save.
As you select a scene, the bulbs
chosen for the scene will automatically
change to the preset or custom scene.
Adjust color, brightness and timer
as desired.
Save when complete.

14
Thank you for choosing the HYPE TAPP
lifestyle product. All HYPE TAPP products are
designed and manufactured according to the
highest standards of quality.
3 Year
limited warranty
For a period of three years from the date of purchase
HYPE guarantees that your products will remain free of
manufacturing faults in relation to materials or
workmanship, as long as the products are used for its
intended purpose.
The condition of this warranty and our responsibilities
under this warranty are as follows:
Supplier’s warranty is non-transferable and is limited to
the original purchaser only.
* You must be able to prove the date of original
purchase of the unit with a dated receipt.
* The warranty is not applicable if the product has been
subject to physical abuse, improper installation,
modification or repair by unauthorized third party.
* The responsibility of supplier’s products shall be limited
to the repair of replacement of the product at its sole
discretion.
* Specifically exempt from any warranty are limited-life
consumable components subject to normal wear and
tear such as batteries, decorations and other accessories.
* A supplier will not take any responsibility if the failure of
the unit has resulted from accident, abuse, misuse, or any
unauthorized repair, modification or disassemble.
* Modification and repair of the unit should be done by
authorized and qualified service personnel, service center
or returned to the manufacturer.
* This warranty gives you specific legal rights, and you may
also have other rights which vary under local laws.
The following conditions comprise the requirements and
scope of our warranty conditions and do not affect our
legal and contractual warranty obligations. We offer a
warranty on our products in accordance with the
following conditions:

15
1) Hype™ products are covered by a 12 month warranty. We
will resolve damages or defects on Hype™ products free of
charge within 12 months of the purchase date under the
following warranty conditions.
For any damage or defect
determined later than 12 months after the purchase date,
proof of a manufacturing fault must be submitted for repair
under warranty.
2) The warranty does not cover batteries and other parts,
which are considered consumables, parts that break easily
such as glass or plastic or defects based on normal wear
and tear. There is no warranty obligation in the event of
marginal differences compared to the target appearance
and workmanship provided these have a negligible effect on
the product’s fitness for use, in the event of damage caused
by chemical or electrochemical effects, by water or generally
from abnormal conditions.
3) The warranty will be performed in such a way that we
shall decide whether to repair the defective parts or to
replace them with working parts free of charge. Hype™
reserves the right to exchange the product for a replace-
ment product of equal value if the product sent in cannot be
repaired within a reasonable time or at a reasonable cost.
Requests cannot be made for repairs to be carried out on
site. Parts that have been replaced or exchanged become
our property.
4) The warranty claim does not apply if repairs or other
work is carried out by unauthorized persons or if our
products are equipped with additional parts or accesso-
ries that are not approved for our product.
5) Warranties that have been activated do not cause the
warranty period to be extended, nor do they trigger a new
warranty period. The warranty period for any replacement
parts installed ends with the warranty period for the entire
product.
6) Any other further claims are excluded, especially those
for replacement due to damage caused to the outside of
the product, provided there is no obligatory legal liability.
We therefore accept no liability for accidental, indirect or
other consequential damage of any kind, which leads to
usage restrictions, data loss, and loss of earnings or
interruption to business.
Asserting a warranty claim:
1) To make use of the warranty service for hardware
issues, you must contact the Hype™ Service Center by
email at support@dglusa.com

16
2) Hype™ will try to diagnose and solve your problem. If it is
determined that a warranty claim exists, you will be given an
RMA number (Return Material Authorization) and will be
asked to send the product to Hype™.
IMPORTANT: Hype™ will only accept parcels that have an RMA
number.
Please observe the following when sending the product:
1) Send the product suitably packaged with carriage and
insurance paid. Do not enclose any accessories with the
product (cables, chargers, manuals, etc.) unless the Hype™
Service Center specifies otherwise.
2) Mark the RMA number on the outside of the package in such
a way that it is visible and clearly legible.
3) You must enclose a copy of the sales slip as proof of
purchase.
4) Once Hype™ has received the product, it will meet its
warranty obligations in accordance with the warranty
conditions and will return the product to the sender with
carriage and insurance paid.
Service outside of warranty
Hype™ can refuse any service claim made that is not covered
by the warranty.
If Hype™ agrees to provide a service outside the warranty, the
customer will be invoiced for all repair and transport costs.
Hype™ will not accept any packages that have not first been
approved by Hype™ by means of an RMA (Return Material
Authorization).
For more information or technical support, please visit our
website
www.mytapplife.com or contact
our customer service department at:
support@mytapplife.com
1. This device complies with Part 15 of the FCC rules . Operation is subject to the following two
conditions:
(1) This device may not cause harmful interference; and (2) this device must accept any
interference received, including interference that may cause undesired operation.
Caution the user that changes or modifications not expressly approved by the party responsible
for compliance could void the user’s authority to operate the equipment.
FCC NOTICE
FCC STATEMENT
FCC CAUTION
This equipment has been tested and found to comply with the limits for a Class B digital device,
pursuant to part 15 of the FCC Rules.
These limits are designed to provide reasonable protection against harmful interference in a
residential installation. This equipment generates, uses and can radiate radio frequency energy and, if
not installed and used in accordance with the instructions, may cause harmful interference to radio
communications. However, there is no guarantee that interference will not occur in a particular
installation. If this equipment does cause harmful interference to radio or television reception, which
can be determined by turning the equipment off and
on, the user is encouraged to try to correct the interference by one or more of the following
measures:
—Reorient or relocate the receiving antenna.
—Increase the separation between the equipment and receiver.
—Connect the equipment into an outlet on a circuit different from that to which the receiver is
connected.
—Consult the dealer or an experienced radio/TV technician for help.
This equipment complies with FCC radiation exposure limits set forth for an uncontrolled environment.
This equipment should be installed and operated with minimum distance 20cm between the radiator
& your body.
Pair with additional
TAPP lifestyle products
For more information,
please visit our website:
www.mytapplife.com
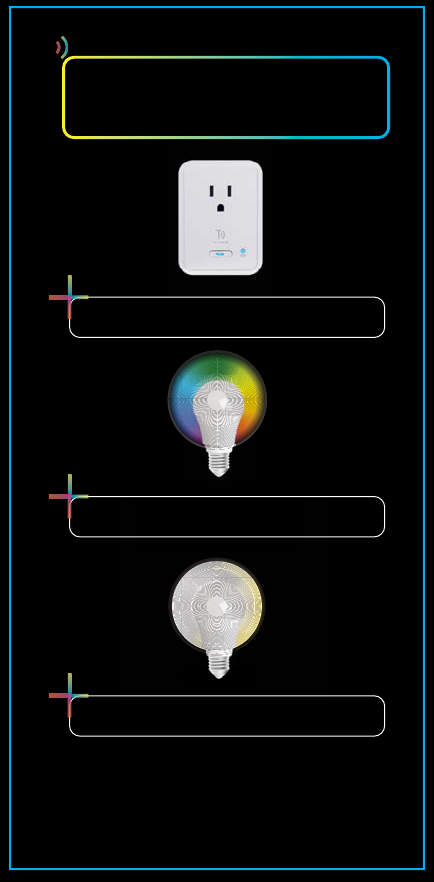
Smart APP Connected TAPP Outlet
Control home electronics
from anywhere.
Colored LED TAPP Bulb
Creates white and colored smart lighting
.
White LED TAPP Bulb
Creates white smart lighting
.