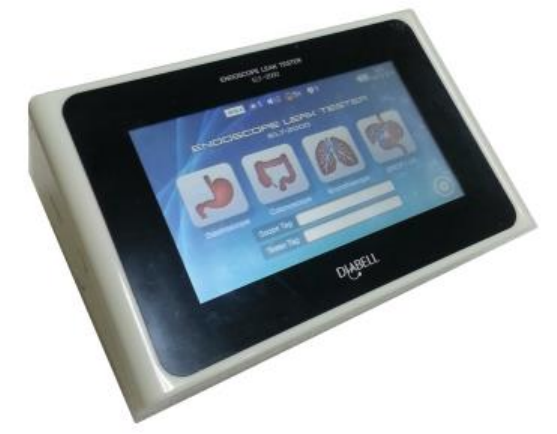
DIABELL ELT-2000 Endoscope leak tester User Manual
DIABELL COMPANY LIMITED Endoscope leak tester
DIABELL >
User Manual
Instruction Manual
Automatic Inspection Device
for Detecting Leak in an Endoscope
ELT-2000
(ENDOSCOPE AUTO LEAK TESTER)
Diabell Endomaster
< Index >
1.
Precautions before use ∙∙∙∙∙∙∙∙∙∙∙∙∙∙∙∙∙∙∙∙∙∙∙∙∙∙∙∙∙∙∙∙∙∙∙∙∙∙∙∙∙∙∙∙∙∙∙∙∙∙∙∙∙∙∙∙∙∙∙∙∙∙∙∙∙∙∙∙∙∙∙∙∙∙∙∙∙∙∙∙∙∙∙∙∙∙∙∙∙∙∙∙∙∙∙∙∙∙∙∙∙∙∙∙∙∙∙∙∙∙∙∙∙∙∙
4
1–1. (Warning) for the power adapter ∙∙∙∙∙∙∙∙∙∙∙∙∙∙∙∙∙∙∙∙∙∙∙∙∙∙∙∙∙∙∙∙∙∙∙∙∙∙∙∙∙∙∙∙∙∙∙∙∙∙∙∙∙∙∙∙∙∙∙∙∙∙∙∙∙∙∙∙∙∙∙∙∙∙∙∙∙∙∙∙∙∙∙∙∙∙∙∙∙∙∙∙∙
4
1–2. (Warning) for handling the inner battery ∙∙∙∙∙∙∙∙∙∙∙∙∙∙∙∙∙∙∙∙∙∙∙∙∙∙∙∙∙∙∙∙∙∙∙∙∙∙∙∙∙∙∙∙∙∙∙∙∙∙∙∙∙∙∙∙∙∙∙∙∙∙∙∙∙∙∙∙∙∙∙∙∙∙∙∙∙∙∙∙∙
4
1–3. (Warning) Preventing moisture aborption ∙∙∙∙∙∙∙∙∙∙∙∙∙∙∙∙∙∙∙∙∙∙∙∙∙∙∙∙∙∙∙∙∙∙∙∙∙∙∙∙∙∙∙∙∙∙∙∙∙∙∙∙∙∙∙∙∙∙∙∙∙∙∙∙∙∙∙∙∙∙∙∙∙∙∙∙∙∙∙∙
4
1–4. (Caution) for the data management of the internal memory ∙∙∙∙∙∙∙∙∙∙∙∙∙∙∙∙∙∙∙∙∙∙∙∙∙∙∙∙∙∙∙∙∙∙∙∙∙∙∙∙∙∙∙∙∙∙∙∙∙∙∙∙∙
4
1–5. (Caution) for general use ∙∙∙∙∙∙∙∙∙∙∙∙∙∙∙∙∙∙∙∙∙∙∙∙∙∙∙∙∙∙∙∙∙∙∙∙∙∙∙∙∙∙∙∙∙∙∙∙∙∙∙∙∙∙∙∙∙∙∙∙∙∙∙∙∙∙∙∙∙∙∙∙∙∙∙∙∙∙∙∙∙∙∙∙∙∙∙∙∙∙∙∙∙∙∙∙∙∙∙∙∙∙∙∙
5
2.
Description of components ∙∙∙∙∙∙∙∙∙∙∙∙∙∙∙∙∙∙∙∙∙∙∙∙∙∙∙∙∙∙∙∙∙∙∙∙∙∙∙∙∙∙∙∙∙∙∙∙∙∙∙∙∙∙∙∙∙∙∙∙∙∙∙∙∙∙∙∙∙∙∙∙∙∙∙∙∙∙∙∙∙∙∙∙∙∙∙∙∙∙∙∙∙∙∙∙∙∙∙∙∙∙∙∙∙∙∙∙∙
5
3.
The name of each part ∙∙∙∙∙∙∙∙∙∙∙∙∙∙∙∙∙∙∙∙∙∙∙∙∙∙∙∙∙∙∙∙∙∙∙∙∙∙∙∙∙∙∙∙∙∙∙∙∙∙∙∙∙∙∙∙∙∙∙∙∙∙∙∙∙∙∙∙∙∙∙∙∙∙∙∙∙∙∙∙∙∙∙∙∙∙∙∙∙∙∙∙∙∙∙∙∙∙∙∙∙∙∙∙∙∙∙∙∙∙∙∙∙∙∙
5
3–1. The names of exterior parts ∙∙∙∙∙∙∙∙∙∙∙∙∙∙∙∙∙∙∙∙∙∙∙∙∙∙∙∙∙∙∙∙∙∙∙∙∙∙∙∙∙∙∙∙∙∙∙∙∙∙∙∙∙∙∙∙∙∙∙∙∙∙∙∙∙∙∙∙∙∙∙∙∙∙∙∙∙∙∙∙∙∙∙∙∙∙∙∙∙∙∙∙∙∙∙∙∙∙∙
5
3–2. The names of display parts ∙∙∙∙∙∙∙∙∙∙∙∙∙∙∙∙∙∙∙∙∙∙∙∙∙∙∙∙∙∙∙∙∙∙∙∙∙∙∙∙∙∙∙∙∙∙∙∙∙∙∙∙∙∙∙∙∙∙∙∙∙∙∙∙∙∙∙∙∙∙∙∙∙∙∙∙∙∙∙∙∙∙∙∙∙∙∙∙∙∙∙∙∙∙∙∙∙∙
6
4.
Preparation for use ∙∙∙∙∙∙∙∙∙∙∙∙∙∙∙∙∙∙∙∙∙∙∙∙∙∙∙∙∙∙∙∙∙∙∙∙∙∙∙∙∙∙∙∙∙∙∙∙∙∙∙∙∙∙∙∙∙∙∙∙∙∙∙∙∙∙∙∙∙∙∙∙∙∙∙∙∙∙∙∙∙∙∙∙∙∙∙∙∙∙∙∙∙∙∙∙∙∙∙∙∙∙∙∙∙∙∙∙∙∙∙∙∙∙∙∙∙∙∙∙
6
4–1. Preparation of the power supply ∙∙∙∙∙∙∙∙∙∙∙∙∙∙∙∙∙∙∙∙∙∙∙∙∙∙∙∙∙∙∙∙∙∙∙∙∙∙∙∙∙∙∙∙∙∙∙∙∙∙∙∙∙∙∙∙∙∙∙∙∙∙∙∙∙∙∙∙∙∙∙∙∙∙∙∙∙∙∙∙∙∙∙∙∙∙∙∙∙∙∙∙
6
4–1–1. Reset ∙∙∙∙∙∙∙∙∙∙∙∙∙∙∙∙∙∙∙∙∙∙∙∙∙∙∙∙∙∙∙∙∙∙∙∙∙∙∙∙∙∙∙∙∙∙∙∙∙∙∙∙∙∙∙∙∙∙∙∙∙∙∙∙∙∙∙∙∙∙∙∙∙∙∙∙∙∙∙∙∙∙∙∙∙∙∙∙∙∙∙∙∙∙∙∙∙∙∙∙∙∙∙∙∙∙∙∙∙∙∙∙∙∙∙∙∙∙∙∙∙∙
6
4–1–2. Power on ∙∙∙∙∙∙∙∙∙∙∙∙∙∙∙∙∙∙∙∙∙∙∙∙∙∙∙∙∙∙∙∙∙∙∙∙∙∙∙∙∙∙∙∙∙∙∙∙∙∙∙∙∙∙∙∙∙∙∙∙∙∙∙∙∙∙∙∙∙∙∙∙∙∙∙∙∙∙∙∙∙∙∙∙∙∙∙∙∙∙∙∙∙∙∙∙∙∙∙∙∙∙∙∙∙∙∙∙∙∙∙∙∙∙∙∙
6
4–1–3. Power off ∙∙∙∙∙∙∙∙∙∙∙∙∙∙∙∙∙∙∙∙∙∙∙∙∙∙∙∙∙∙∙∙∙∙∙∙∙∙∙∙∙∙∙∙∙∙∙∙∙∙∙∙∙∙∙∙∙∙∙∙∙∙∙∙∙∙∙∙∙∙∙∙∙∙∙∙∙∙∙∙∙∙∙∙∙∙∙∙∙∙∙∙∙∙∙∙∙∙∙∙∙∙∙∙∙∙∙∙∙∙∙∙∙∙∙∙
6
4–2. Connection of coil hose ∙∙∙∙∙∙∙∙∙∙∙∙∙∙∙∙∙∙∙∙∙∙∙∙∙∙∙∙∙∙∙∙∙∙∙∙∙∙∙∙∙∙∙∙∙∙∙∙∙∙∙∙∙∙∙∙∙∙∙∙∙∙∙∙∙∙∙∙∙∙∙∙∙∙∙∙∙∙∙∙∙∙∙∙∙∙∙∙∙∙∙∙∙∙∙∙∙∙∙∙∙∙∙∙
6
5.
Inspection methods ∙∙∙∙∙∙∙∙∙∙∙∙∙∙∙∙∙∙∙∙∙∙∙∙∙∙∙∙∙∙∙∙∙∙∙∙∙∙∙∙∙∙∙∙∙∙∙∙∙∙∙∙∙∙∙∙∙∙∙∙∙∙∙∙∙∙∙∙∙∙∙∙∙∙∙∙∙∙∙∙∙∙∙∙∙∙∙∙∙∙∙∙∙∙∙∙∙∙∙∙∙∙∙∙∙∙∙∙∙∙∙∙∙∙∙∙∙∙∙
7
5–1. A mode of the RFID ∙∙∙∙∙∙∙∙∙∙∙∙∙∙∙∙∙∙∙∙∙∙∙∙∙∙∙∙∙∙∙∙∙∙∙∙∙∙∙∙∙∙∙∙∙∙∙∙∙∙∙∙∙∙∙∙∙∙∙∙∙∙∙∙∙∙∙∙∙∙∙∙∙∙∙∙∙∙∙∙∙∙∙∙∙∙∙∙∙∙∙∙∙∙∙∙∙∙∙∙∙∙∙∙∙∙∙∙∙∙
7
5–1–1. Inspection way to use the <RFID tag for Scope> and <RFID tag for Inspector> ∙∙∙∙∙∙∙∙∙∙∙∙∙∙∙∙
7
5–1–2. How to enter tags on the <inspection screen> and inspect leaks ∙∙∙∙∙∙∙∙∙∙∙∙∙∙∙∙∙∙∙∙∙∙∙∙∙∙∙∙∙∙∙∙∙∙∙∙
8
5–1–3. Inspection methods by using the auto button ∙∙∙∙∙∙∙∙∙∙∙∙∙∙∙∙∙∙∙∙∙∙∙∙∙∙∙∙∙∙∙∙∙∙∙∙∙∙∙∙∙∙∙∙∙∙∙∙∙∙∙∙∙∙∙∙∙∙∙∙∙∙∙∙
8
5–1–4. Manual inspection by using the manual button ∙∙∙∙∙∙∙∙∙∙∙∙∙∙∙∙∙∙∙∙∙∙∙∙∙∙∙∙∙∙∙∙∙∙∙∙∙∙∙∙∙∙∙∙∙∙∙∙∙∙∙∙∙∙∙∙∙∙∙∙∙∙
8
5–2. B mode of the RFID ∙∙∙∙∙∙∙∙∙∙∙∙∙∙∙∙∙∙∙∙∙∙∙∙∙∙∙∙∙∙∙∙∙∙∙∙∙∙∙∙∙∙∙∙∙∙∙∙∙∙∙∙∙∙∙∙∙∙∙∙∙∙∙∙∙∙∙∙∙∙∙∙∙∙∙∙∙∙∙∙∙∙∙∙∙∙∙∙∙∙∙∙∙∙∙∙∙∙∙∙∙∙∙∙∙∙∙∙∙∙
8
5–2–1. Inspection methods by only using the <RFID tag for Scope> ∙∙∙∙∙∙∙∙∙∙∙∙∙∙∙∙∙∙∙∙∙∙∙∙∙∙∙∙∙∙∙∙∙∙∙∙∙∙∙∙∙∙
9
5–2–2. How to enter the tag on the <inspection screen> and inspecting leaks ∙∙∙∙∙∙∙∙∙∙∙∙∙∙∙∙∙∙∙∙∙∙∙∙∙∙∙∙
9
5–2–3. Inspection methods by using the auto button ∙∙∙∙∙∙∙∙∙∙∙∙∙∙∙∙∙∙∙∙∙∙∙∙∙∙∙∙∙∙∙∙∙∙∙∙∙∙∙∙∙∙∙∙∙∙∙∙∙∙∙∙∙∙∙∙∙∙∙∙∙∙∙∙∙
9
5–2–4. Manual inspection by using the manual button ∙∙∙∙∙∙∙∙∙∙∙∙∙∙∙∙∙∙∙∙∙∙∙∙∙∙∙∙∙∙∙∙∙∙∙∙∙∙∙∙∙∙∙∙∙∙∙∙∙∙∙∙∙∙∙∙∙∙∙∙∙∙∙
10
5–3. Normal modes ∙∙∙∙∙∙∙∙∙∙∙∙∙∙∙∙∙∙∙∙∙∙∙∙∙∙∙∙∙∙∙∙∙∙∙∙∙∙∙∙∙∙∙∙∙∙∙∙∙∙∙∙∙∙∙∙∙∙∙∙∙∙∙∙∙∙∙∙∙∙∙∙∙∙∙∙∙∙∙∙∙∙∙∙∙∙∙∙∙∙∙∙∙∙∙∙∙∙∙∙∙∙∙∙∙∙∙∙∙∙∙∙∙∙∙∙∙
10
5–3–1. Inspection methods by using the auto button ∙∙∙∙∙∙∙∙∙∙∙∙∙∙∙∙∙∙∙∙∙∙∙∙∙∙∙∙∙∙∙∙∙∙∙∙∙∙∙∙∙∙∙∙∙∙∙∙∙∙∙∙∙∙∙∙∙∙∙∙∙∙∙∙∙
10
5–3–2. Manual inspection by using the manual button ∙∙∙∙∙∙∙∙∙∙∙∙∙∙∙∙∙∙∙∙∙∙∙∙∙∙∙∙∙∙∙∙∙∙∙∙∙∙∙∙∙∙∙∙∙∙∙∙∙∙∙∙∙∙∙∙∙∙∙∙∙∙∙
10
6.
Confirmation of the test record on the inspection screen ∙∙∙∙∙∙∙∙∙∙∙∙∙∙∙∙∙∙∙∙∙∙∙∙∙∙∙∙∙∙∙∙∙∙∙∙∙∙∙∙∙∙∙∙∙∙∙∙∙∙∙∙∙∙∙∙∙∙∙∙∙∙∙∙
10
7.
Configuration (Setting) ∙∙∙∙∙∙∙∙∙∙∙∙∙∙∙∙∙∙∙∙∙∙∙∙∙∙∙∙∙∙∙∙∙∙∙∙∙∙∙∙∙∙∙∙∙∙∙∙∙∙∙∙∙∙∙∙∙∙∙∙∙∙∙∙∙∙∙∙∙∙∙∙∙∙∙∙∙∙∙∙∙∙∙∙∙∙∙∙∙∙∙∙∙∙∙∙∙∙∙∙∙∙∙∙∙∙∙∙∙∙∙∙
11
7–1.The setting data and time ∙∙∙∙∙∙∙∙∙∙∙∙∙∙∙∙∙∙∙∙∙∙∙∙∙∙∙∙∙∙∙∙∙∙∙∙∙∙∙∙∙∙∙∙∙∙∙∙∙∙∙∙∙∙∙∙∙∙∙∙∙∙∙∙∙∙∙∙∙∙∙∙∙∙∙∙∙∙∙∙∙∙∙∙∙∙∙∙∙∙∙∙∙∙∙∙∙∙∙∙
11
7–2. How to set automatic off time ∙∙∙∙∙∙∙∙∙∙∙∙∙∙∙∙∙∙∙∙∙∙∙∙∙∙∙∙∙∙∙∙∙∙∙∙∙∙∙∙∙∙∙∙∙∙∙∙∙∙∙∙∙∙∙∙∙∙∙∙∙∙∙∙∙∙∙∙∙∙∙∙∙∙∙∙∙∙∙∙∙∙∙∙∙∙∙∙∙∙∙∙∙∙∙
11
7–2–1. How to set the time when using the internal battery. ∙∙∙∙∙∙∙∙∙∙∙∙∙∙∙∙∙∙∙∙∙∙∙∙∙∙∙∙∙∙∙∙∙∙∙∙∙∙∙∙∙∙∙∙∙∙∙∙∙∙∙∙∙∙∙
11
7–2–2. How to set the time when using the power adaptor ∙∙∙∙∙∙∙∙∙∙∙∙∙∙∙∙∙∙∙∙∙∙∙∙∙∙∙∙∙∙∙∙∙∙∙∙∙∙∙∙∙∙∙∙∙∙∙∙∙∙∙∙∙∙∙∙
11
7–3. How to select the test mode ∙∙∙∙∙∙∙∙∙∙∙∙∙∙∙∙∙∙∙∙∙∙∙∙∙∙∙∙∙∙∙∙∙∙∙∙∙∙∙∙∙∙∙∙∙∙∙∙∙∙∙∙∙∙∙∙∙∙∙∙∙∙∙∙∙∙∙∙∙∙∙∙∙∙∙∙∙∙∙∙∙∙∙∙∙∙∙∙∙∙∙∙∙∙∙∙∙
11
7–3–1. Selection method for the A mode of RFID ∙∙∙∙∙∙∙∙∙∙∙∙∙∙∙∙∙∙∙∙∙∙∙∙∙∙∙∙∙∙∙∙∙∙∙∙∙∙∙∙∙∙∙∙∙∙∙∙∙∙∙∙∙∙∙∙∙∙∙∙∙∙∙∙∙∙∙∙∙∙∙
11
7–3–2. Selection method for the B mode of RFID ∙∙∙∙∙∙∙∙∙∙∙∙∙∙∙∙∙∙∙∙∙∙∙∙∙∙∙∙∙∙∙∙∙∙∙∙∙∙∙∙∙∙∙∙∙∙∙∙∙∙∙∙∙∙∙∙∙∙∙∙∙∙∙∙∙∙∙∙∙∙∙∙
12
7–3–3. Selection method for the normal modes ∙∙∙∙∙∙∙∙∙∙∙∙∙∙∙∙∙∙∙∙∙∙∙∙∙∙∙∙∙∙∙∙∙∙∙∙∙∙∙∙∙∙∙∙∙∙∙∙∙∙∙∙∙∙∙∙∙∙∙∙∙∙∙∙∙∙∙∙∙∙∙∙∙∙
12
7–4. Setting the speaker ∙∙∙∙∙∙∙∙∙∙∙∙∙∙∙∙∙∙∙∙∙∙∙∙∙∙∙∙∙∙∙∙∙∙∙∙∙∙∙∙∙∙∙∙∙∙∙∙∙∙∙∙∙∙∙∙∙∙∙∙∙∙∙∙∙∙∙∙∙∙∙∙∙∙∙∙∙∙∙∙∙∙∙∙∙∙∙∙∙∙∙∙∙∙∙∙∙∙∙∙∙∙∙∙∙∙∙∙∙∙∙
12
7–5. Registration and management of tags ∙∙∙∙∙∙∙∙∙∙∙∙∙∙∙∙∙∙∙∙∙∙∙∙∙∙∙∙∙∙∙∙∙∙∙∙∙∙∙∙∙∙∙∙∙∙∙∙∙∙∙∙∙∙∙∙∙∙∙∙∙∙∙∙∙∙∙∙∙∙∙∙∙∙∙∙∙∙∙∙∙∙∙∙
12
7–5–1. How to register and correct the name of hospital and department, and management number
∙∙∙∙∙∙∙∙∙∙∙∙∙∙∙∙∙∙∙∙∙∙∙∙∙∙∙∙∙∙∙∙∙∙∙∙∙∙∙∙∙∙∙∙∙∙∙∙∙∙∙∙∙∙∙∙∙∙∙∙∙∙∙∙∙∙∙∙∙∙∙∙∙∙∙∙∙∙∙∙∙∙∙∙∙∙∙∙∙∙∙∙∙∙∙∙∙∙∙∙∙∙∙∙∙∙∙∙∙∙∙∙∙∙∙∙∙∙∙∙∙∙∙∙∙∙∙∙
12
7–5–2. How to register the <RFID tag for the inspector> ∙∙∙∙∙∙∙∙∙∙∙∙∙∙∙∙∙∙∙∙∙∙∙∙∙∙∙∙∙∙∙∙∙∙∙∙∙∙∙∙∙∙∙∙∙∙∙∙∙∙∙∙∙∙∙∙∙∙∙∙∙
13
7–5–3. How to correct the <RFID tag for the inspector> ∙∙∙∙∙∙∙∙∙∙∙∙∙∙∙∙∙∙∙∙∙∙∙∙∙∙∙∙∙∙∙∙∙∙∙∙∙∙∙∙∙∙∙∙∙∙∙∙∙∙∙∙∙∙∙∙∙∙∙∙∙
14
7–5–4. How to register the <RFID tag for the scope> ∙∙∙∙∙∙∙∙∙∙∙∙∙∙∙∙∙∙∙∙∙∙∙∙∙∙∙∙∙∙∙∙∙∙∙∙∙∙∙∙∙∙∙∙∙∙∙∙∙∙∙∙∙∙∙∙∙∙∙∙∙∙∙∙∙
15
7–5–5. How to correct the <RFID tag for the scope> ∙∙∙∙∙∙∙∙∙∙∙∙∙∙∙∙∙∙∙∙∙∙∙∙∙∙∙∙∙∙∙∙∙∙∙∙∙∙∙∙∙∙∙∙∙∙∙∙∙∙∙∙∙∙∙∙∙∙∙∙∙∙∙∙∙∙
16
7–5–6. How to delete the saved tags to the internal memory of the device ∙∙∙∙∙∙∙∙∙∙∙∙∙∙∙∙∙∙∙∙∙∙∙∙∙∙∙∙∙∙∙∙∙∙
17
7–5–7. How to copy to the SD card from the registered contents of tags to the internal memory
17
7–6. Data management ∙∙∙∙∙∙∙∙∙∙∙∙∙∙∙∙∙∙∙∙∙∙∙∙∙∙∙∙∙∙∙∙∙∙∙∙∙∙∙∙∙∙∙∙∙∙∙∙∙∙∙∙∙∙∙∙∙∙∙∙∙∙∙∙∙∙∙∙∙∙∙∙∙∙∙∙∙∙∙∙∙∙∙∙∙∙∙∙∙∙∙∙∙∙∙∙∙∙∙∙∙∙∙∙∙∙∙∙∙∙∙∙
18
7–6–1. Searching measured data on the data management ∙∙∙∙∙∙∙∙∙∙∙∙∙∙∙∙∙∙∙∙∙∙∙∙∙∙∙∙∙∙∙∙∙∙∙∙∙∙∙∙∙∙∙∙∙∙∙∙∙∙∙∙∙∙∙∙∙
18
7–6–2. Deleting measured data of the manager mode ∙∙∙∙∙∙∙∙∙∙∙∙∙∙∙∙∙∙∙∙∙∙∙∙∙∙∙∙∙∙∙∙∙∙∙∙∙∙∙∙∙∙∙∙∙∙∙∙∙∙∙∙∙∙∙∙∙∙∙∙∙∙∙∙
18
7–6–3. Copy of searched data on the SD card ∙∙∙∙∙∙∙∙∙∙∙∙∙∙∙∙∙∙∙∙∙∙∙∙∙∙∙∙∙∙∙∙∙∙∙∙∙∙∙∙∙∙∙∙∙∙∙∙∙∙∙∙∙∙∙∙∙∙∙∙∙∙∙∙∙∙∙∙∙∙∙∙∙∙∙∙
18
7–6–4. Copy of all measured data of the selected month on the SD card ∙∙∙∙∙∙∙∙∙∙∙∙∙∙∙∙∙∙∙∙∙∙∙∙∙∙∙∙∙∙∙∙∙∙∙∙∙
19
7–6–5. Automatic copy the data over 12 months on SD card ∙∙∙∙∙∙∙∙∙∙∙∙∙∙∙∙∙∙∙∙∙∙∙∙∙∙∙∙∙∙∙∙∙∙∙∙∙∙∙∙∙∙∙∙∙∙∙∙∙∙∙∙∙∙
19
7–6–6. Confirmation of saved data on the SD card ∙∙∙∙∙∙∙∙∙∙∙∙∙∙∙∙∙∙∙∙∙∙∙∙∙∙∙∙∙∙∙∙∙∙∙∙∙∙∙∙∙∙∙∙∙∙∙∙∙∙∙∙∙∙∙∙∙∙∙∙∙∙∙∙∙∙∙∙∙
19
7–7. Scope options ∙∙∙∙∙∙∙∙∙∙∙∙∙∙∙∙∙∙∙∙∙∙∙∙∙∙∙∙∙∙∙∙∙∙∙∙∙∙∙∙∙∙∙∙∙∙∙∙∙∙∙∙∙∙∙∙∙∙∙∙∙∙∙∙∙∙∙∙∙∙∙∙∙∙∙∙∙∙∙∙∙∙∙∙∙∙∙∙∙∙∙∙∙∙∙∙∙∙∙∙∙∙∙∙∙∙∙∙∙∙∙∙∙∙∙∙∙∙
22
7–8. Setting and changing the password ∙∙∙∙∙∙∙∙∙∙∙∙∙∙∙∙∙∙∙∙∙∙∙∙∙∙∙∙∙∙∙∙∙∙∙∙∙∙∙∙∙∙∙∙∙∙∙∙∙∙∙∙∙∙∙∙∙∙∙∙∙∙∙∙∙∙∙∙∙∙∙∙∙∙∙∙∙∙∙∙∙∙∙∙∙∙∙
22
7–9. Setting the brightness of the LCD ∙∙∙∙∙∙∙∙∙∙∙∙∙∙∙∙∙∙∙∙∙∙∙∙∙∙∙∙∙∙∙∙∙∙∙∙∙∙∙∙∙∙∙∙∙∙∙∙∙∙∙∙∙∙∙∙∙∙∙∙∙∙∙∙∙∙∙∙∙∙∙∙∙∙∙∙∙∙∙∙∙∙∙∙∙∙∙∙∙∙
23
8.
Updating software ∙∙∙∙∙∙∙∙∙∙∙∙∙∙∙∙∙∙∙∙∙∙∙∙∙∙∙∙∙∙∙∙∙∙∙∙∙∙∙∙∙∙∙∙∙∙∙∙∙∙∙∙∙∙∙∙∙∙∙∙∙∙∙∙∙∙∙∙∙∙∙∙∙∙∙∙∙∙∙∙∙∙∙∙∙∙∙∙∙∙∙∙∙∙∙∙∙∙∙∙∙∙∙∙∙∙∙∙∙∙∙∙∙∙∙∙∙∙∙∙
23
9.
Cleaning and storage ∙∙∙∙∙∙∙∙∙∙∙∙∙∙∙∙∙∙∙∙∙∙∙∙∙∙∙∙∙∙∙∙∙∙∙∙∙∙∙∙∙∙∙∙∙∙∙∙∙∙∙∙∙∙∙∙∙∙∙∙∙∙∙∙∙∙∙∙∙∙∙∙∙∙∙∙∙∙∙∙∙∙∙∙∙∙∙∙∙∙∙∙∙∙∙∙∙∙∙∙∙∙∙∙∙∙∙∙∙∙∙∙∙∙∙∙
23
10.
Possible errors ∙∙∙∙∙∙∙∙∙∙∙∙∙∙∙∙∙∙∙∙∙∙∙∙∙∙∙∙∙∙∙∙∙∙∙∙∙∙∙∙∙∙∙∙∙∙∙∙∙∙∙∙∙∙∙∙∙∙∙∙∙∙∙∙∙∙∙∙∙∙∙∙∙∙∙∙∙∙∙∙∙∙∙∙∙∙∙∙∙∙∙∙∙∙∙∙∙∙∙∙∙∙∙∙∙∙∙∙∙∙∙∙∙∙∙∙∙∙∙∙∙∙∙∙∙∙
24
11.
Troubleshooting ∙∙∙∙∙∙∙∙∙∙∙∙∙∙∙∙∙∙∙∙∙∙∙∙∙∙∙∙∙∙∙∙∙∙∙∙∙∙∙∙∙∙∙∙∙∙∙∙∙∙∙∙∙∙∙∙∙∙∙∙∙∙∙∙∙∙∙∙∙∙∙∙∙∙∙∙∙∙∙∙∙∙∙∙∙∙∙∙∙∙∙∙∙∙∙∙∙∙∙∙∙∙∙∙∙∙∙∙∙∙∙∙∙∙∙∙∙∙∙∙∙∙∙
24
12.
Product specification ∙∙∙∙∙∙∙∙∙∙∙∙∙∙∙∙∙∙∙∙∙∙∙∙∙∙∙∙∙∙∙∙∙∙∙∙∙∙∙∙∙∙∙∙∙∙∙∙∙∙∙∙∙∙∙∙∙∙∙∙∙∙∙∙∙∙∙∙∙∙∙∙∙∙∙∙∙∙∙∙∙∙∙∙∙∙∙∙∙∙∙∙∙∙∙∙∙∙∙∙∙∙∙∙∙∙∙∙∙∙∙∙∙∙∙∙∙
25
Quality Assurance ∙∙∙∙∙∙∙∙∙∙∙∙∙∙∙∙∙∙∙∙∙∙∙∙∙∙∙∙∙∙∙∙∙∙∙∙∙∙∙∙∙∙∙∙∙∙∙∙∙∙∙∙∙∙∙∙∙∙∙∙∙∙∙∙∙∙∙∙∙∙∙∙∙∙∙∙∙∙∙∙∙∙∙∙∙∙∙∙∙∙∙∙∙∙∙∙∙∙∙∙∙∙∙∙∙∙∙∙∙∙∙∙∙∙∙∙∙∙∙∙∙∙∙∙∙∙∙∙∙
26
: This device complies with part 15 of the FCC Rules. Operation is subject to the following two conditions:
(1) This device may not cause harmful interference, and
(2) This device must accept any interference received, including interference that may cause undesired operation.
Caution: Any changes or modifications to the equipment not expressly approved by the party responsible for
compliance could void user’s authority to operate the equipment.
This appliance and its antenna must not be co-located or operation in conjunction with any other antenna or
transmitter.
A minimum separation distance of 20 ㎝ must be maintained between the antenna and the person for this
appliance to satisfy the RF exposure requirements.
1. Precautions before use
▶ Thank you for purchasing the product of Diabell.
▶ Place this instruction near you and refer to it.
▶ For using it safely and correctly, please read this precautions before use.
- Warning: If mishandled, it contains to specify that people can be killed or injured.
- Caution: If mishandled, it contains to specify that people can be injured or material damages can be
occurred.
☞ Material damages mean the loss including houses, properties, livestock, and pets.
1–1. (Warning) for the power adapter
▶ Please use the proprietary power adapter!
▶ Do not touch it with wet hands!
▶Do not bend too much and damage the power connection.
1–2. (Warning) for handling the inner battery
▶ Prohibitions for prevention of shocks, fires, explosions.
- Do not drop or impact the product containing the internal battery!
- Do not place the product on a hot surface
- Inspect the product every three months
- Lifetime of the fully charged battery depends on the operation environment, number of charges and hours
of use.
- Assure the internal battery is discharged while not in use.
- The internal battery is consumable, so inspect the product when the lifetime of the battery is reduced by
more than half.
1–3. (Warning) Preventing moisture aborption
▶ Use in a dry environment!
▶ Do not use in an environment where water drops are likely!
▶ Please, use the waterproof sheet where there is water!
(If required, use the provided waterproof sheet)
1–4. (Caution) for the data management of the internal memory
▶ This product does not guarantee that measured data will be saved to the internal memory and on the SD
card.
- According to the data management methods in article of 7–6, you must back up the data daily or monthly.
▶ According to the current time, before passing 12 months, back up the measured data.
- The data passing 12 months will be saved to the SD card, and will be deleted to the internal memory.
However, it does not guarantee to save the measured data.
▶ Before changing the current time at the configurations, back up the measured data!
- If you change the current time, the data passing 12 months to the internal memory will be saved to the SD
card, and delete the data to the internal memory.
However, this product does not guarantee to save the measured data to the internal memory and the SD
card.
1–5. (Caution) for general use
▶ Please, use this product after fully understanding these instructions!
▶ It is dangerous to repair the product! Follow the instruction of the manufacturer!
▶ Do not use it for any other purpose, excepting for inspecting leakage!
▶ Do not use any other hose or connector, excepting the proprietary ones!
▶ Do not dismantle or remodel the body or coil hoses of the product!
▶ Do not bent the coil hose too much!
▶ Do not press it when the hose is not fully connected!
▶ Do not drop it or impact its body!
▶ Please, repeat the test 2 ~ 3 times to increase the accuracy of results.
2. Description of components
1. A body of the leak tester (Device, Leak tester) 2. A SD card
3. A SD card reader 4. Two RFID tags for the inspector
5. Three RFID tags for the scope 6. A power adapter (AD/DC adapter, +5V, 2000 mA)
7. A coil hose 8. Three waterproof sheets
9. Instruction manual (including the original booklets and the quality assurance)
☞ If required, components are available to purchase separately.
※ Coil hoses are available to purchase according to manufacturers (O, E, P, and F).
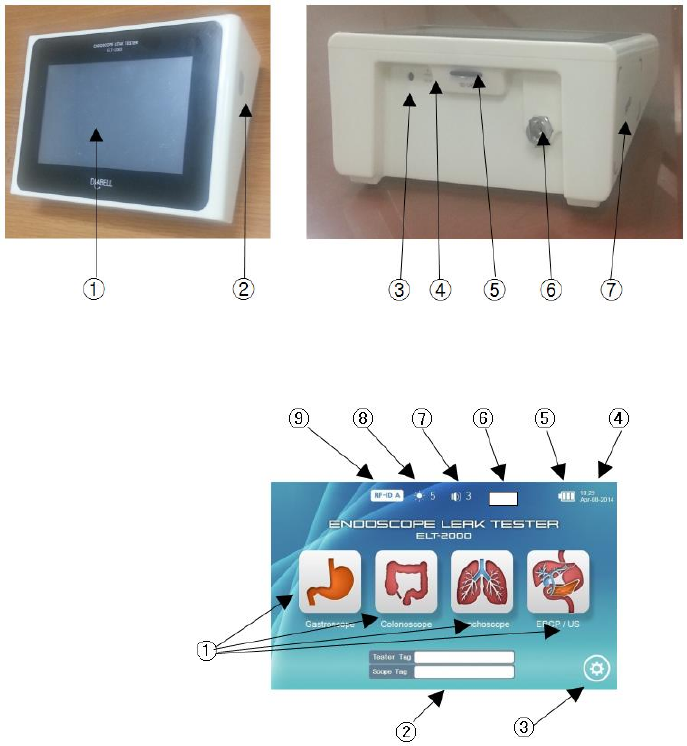
3. The name of each part
3–1. The names of exterior parts
① LCD & touch screen
② Power button
③ DC connector
④ Hole for reset
⑤ SD card
⑥ Air connector
⑦ RFID reader
3–2. The names of display parts
① Icon for selecting the scope
② Tag information
③ Configurations
④ Current date
⑤ Remaining battery indicator
⑥ Power supply (internal
battery/ DC IN)
⑦ Volume
⑧ Brightness of the LCD
⑨ Inspection mode
(RFID A/ RFID B/ Normal)
4. Preparation for use
▶ Make sure that the place where the product is putted is flat.
※ If not, the product can be dropped.
▶ Check the temperature difference between the device and its environment.
※ If there is severe difference of temperature, its results would not be accurate due to contraction and
expansion.
4–1. Preparation of the power supply
▶ Connect the power adapter to the power connector (DC IN) that is behind of the body.
▶ When remove battery indicator shows only one block, connect the power adaptor.
- If you connect the power adaptor, the internal battery will be automatically charged.
- If the indicator shows more than one block, it is available to inspect only with the internal battery.

4–1–1. Reset
▶ If you push the reset switch that is behind of the body, the tester will be formatted.
- Using a tool for reset (clip or pin), push the reset switch inside the hole.
- If the function is operated, the tester will automatically turn off.
4–1–2. Power on
▶ If you keep pressing the power button for 2 seconds, the screen will turn on.
※ If there is no change while pushing the button over 3 seconds, or if the device is switched off after
displaying the logo, connect the power adapter. It might be needed to charge the battery.
※ If there is same situation after connecting the adapter, request the service inspection!
4–1–3. Power off
▶ If you keep pressing the power for 2 seconds when the device turned on, the screen displays a message of
“Good Bye”, then the power will be turn off.
※ If the device doesn’t turn off while pushing the button over 2 seconds, the tester should be formatted
by using the reset hole that is behind of the body (see: 4–1–1. Reset).
4–2. Connection of coil hose
▶ Connect one of two coil hoses to the air connecter that is behind of the body, and connect the other one to
the air connector of the scope of the endoscope.
- The coil hose can be differed by the manufacturers of coil scopes (O, E, P, and F)
(O: Olympus, E: EndoChoice, P: Pentax, F: Fuhinon, and etc.)
- If it does not connect, request the inspection service.
5. Inspection methods
There are three modes such as RFID A, RFID B, and normal mode, and the mode is able to be choose at the
checking option on the setting screen.
(See the article of 7–3. How to select the test mode)
5–1. A mode of the RFID
▶ It is a way to inspect with <RFID tags for the scope> and < RFID tags for inspectors>.
Main (initial) page The screen under inspection

5–1–1. Inspection way to use the <RFID tag for the Scope> and <RFID tag for the Inspector>
(Inputting tags)
① Touch the <RIFD tags for the scope> to the RFID reader on the side of the tester.
- If the reader is successful, it generates a feep sound.
- Make sure that information of the touched tag is displayed on the display.
② Touch the <RIFD tags for inspectors> to the RFID reader on the side of the tester.
- If the reader is successful, it generates a feep sound.
- Make sure that information of the touched tag is displayed on the indicator of the tester.
※ If there is no change to touch the <RFID tag for the scope> and <RFID tag for inspectors> at the
<RFID reader> on the side of the tester, the state has no registration information. Hence, you must
register it. (See: 7–5. 7–5. Registration and management of tags)
※ The <RFID tag for the scope> and <RFID tag for inspectors> that have already been registered in other
testers are automatically registered its device ID, inspector ID, and scope ID without any other
registration process.
(Inspection)
③ If the tester recognizes both the <RFID tag for the scope> and <RFID tag for inspectors>, it moves
automatically to the test screen, then starts to inspect.
④ If you want to stop the inspection while putting pressure, touch the auto button, then it will stop to put
pressure, exhausting the internal air automatically.
⑤ After stopping to put pressure and entering a test step, it starts to inspect the endoscope, moving the
handle for the scope along the test screen.
(Completion of the inspection)
⑥ If the inspection is completed, display of test results and related information will save to the internal
memory, while internal air is automatically exhausted.
(The inspection date/ management number of the tester, model and management number of the scope,
inspectors’ management number/ test results/ measured value of leak/ the number of inspection times
depending on the type of scope (See: 7–6–4))
(Reinspection)
▶ If the value of resultant leaks is between the level of leaks and of repressured leaks, inspect automatically
one more time, then it displays the result.
<ex. If the level of leaks is (-3), and the level of repressured leaks is (-5), inspect one more time when the
resultant value is between -3 and -5 mmHg.>
5–1–2. How to enter tags on the <inspection screen> and inspect leaks
▶ Repeat the process, from ① to ⑥, of the article of 5–1–1.
5–1–3. Inspection methods by using the auto button
(Selecting the type of the scope)
▶ Among icons of the scope such as , touch the icon button to inspect.
- It will be switched to test screen
(Inspection)
▶ On the test screen, touch the auto button.
- It starts to inspect. (See the article of 5–1–1.)
※ The results obtained by the auto button do not saved to the internal memory.
5–1–4. Manual inspection by using the manual button
(Inspection)
▶ On the test screen, touch the manual button.
- It automatically starts to put pressure.
※ The level of putting pressure is able to control on the configuration.
- If you want to stop to put pressure, touch the manual button, then it will stop to do, exhausting the internal
air automatically.
- When it stops to put pressure, check the place where the bubbles is created.
(Completion of the inspection)
▶ If the inspection is completed, stop the operation by touching the manual button
▶ If the operation is stopped, internal air is automatically exhausted.
5–2. B mode of the RFID
▶ It is a way of using only the <RFID tags for the scope>.
Main page The screen under inspection
5–2–1. Inspection methods by only using the <RFID tag for Scope>
(Inputting tags)
① Touch the <RIFD tags for the scope> to the RFID reader on the side of the tester.
- If the reader is successful, it generates a feep sound.
- Make sure that information of the touched tag is displayed on the display.
※ If there is no change to touch the <RFID tag for the scope> at the RFID reader on the side of the tester,
the state has no registration information. Hence, you must register it. (See: 7–5. Registration and
Displaying with
the inspector

management of tags)
※ The <RFID tag for the scope> that have already been registered in other testers are automatically
registered its device ID and scope ID without any other registration process.
(Inspection)
② If the tester recognizes the <RFID tag for the scope>, it moves automatically to the test screen, then starts
to inspect. (The tester is displayed as a guest.)
③ If you want to stop the inspection while putting pressure, touch the auto button, then it will stop to put
pressure, exhausting the internal air automatically.
④ After stopping to put pressure and entering a test step, it starts to inspect the endoscope, moving the
handle for the scope along the test screen.
(Completion of the inspection)
⑤ If the inspection is completed, display of test results, and related information will save to the internal
memory, while internal air is automatically exhausted.
(The inspection date/ management number of the tester, model and management number of the scope,
inspectors’ management number (being displayed as a guest)/ test results/ measured value of leak/ the
number of inspection times depending on the type of scope (See: 7–6–4))
(Reinspection)
▶ If the value of resultant leaks is between the level of leaks and of repressured leaks, inspect automatically
one more time, then it displays the result.
<ex. If the level of leaks is (-3), and the level of repressured leaks is (-5), inspect one more time when the
resultant value is between -3 and -5 mmHg.>
5–2–2. How to inspect using tags on the <inspection screen> and inspecting leaks
▶ Repeat the process, from ① to ⑤, of the article of 5–2–1.
5–2–3. Inspection methods by using the auto button
▶ The inspection method is same to the article of 5–1–3.
5–2–4. Manual inspection by using the manual button
▶ The inspection method is same to the article of 5–1–4.
5–3. Normal modes
▶ The inspection method is to inspect the endoscope without the <RFID tags for the scope>
Main page The screen under inspection
Delete
5–3–1. Inspection methods by using the auto button
▶ The inspection method is same to the article of 5–1–3.
5–3–2. Manual inspection by using the manual button
▶ The inspection method is same to the article of 5–1–4.
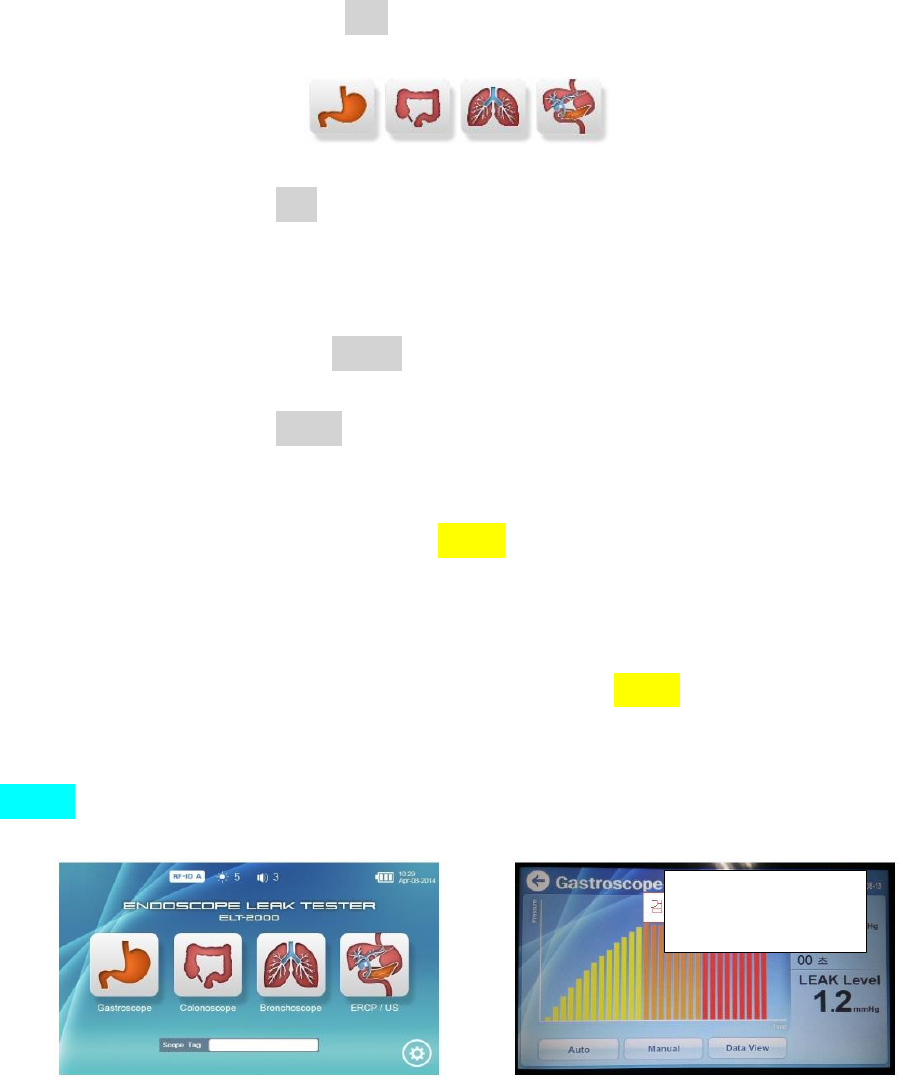
6. Confirmation of the test record on the inspection screen
▶ If the inspections of this leak tester is completed, the results are automatically saved to the internal memory,
and all data are saved and managed monthly for a period of 12 months
After passing 12 months, it will automatically delete the data that were saved in the first month.
Ex) If the device was saved the data from October 2014, after 12 months, November 2015, it deletes the
data of October 2014, then save the data of October 2015.
※ For the data management after passing 12 months, the user should manage to back up the data
monthly or daily.
The screen under inspection The screen of data view
▶ On the test screen, touch the data view button.
- it displays the screen of the data view.
- it displays the recent data of the inspection.
▶ Using the Gastro▼ scope button, select the scope what you want to search.
- It displays the inspection data for the type of the selected endoscope.
▶ If completing the operation, move to the test screen using the button.
▶ To delete the data and copy them on the SD card, see <7–7 Data management>.
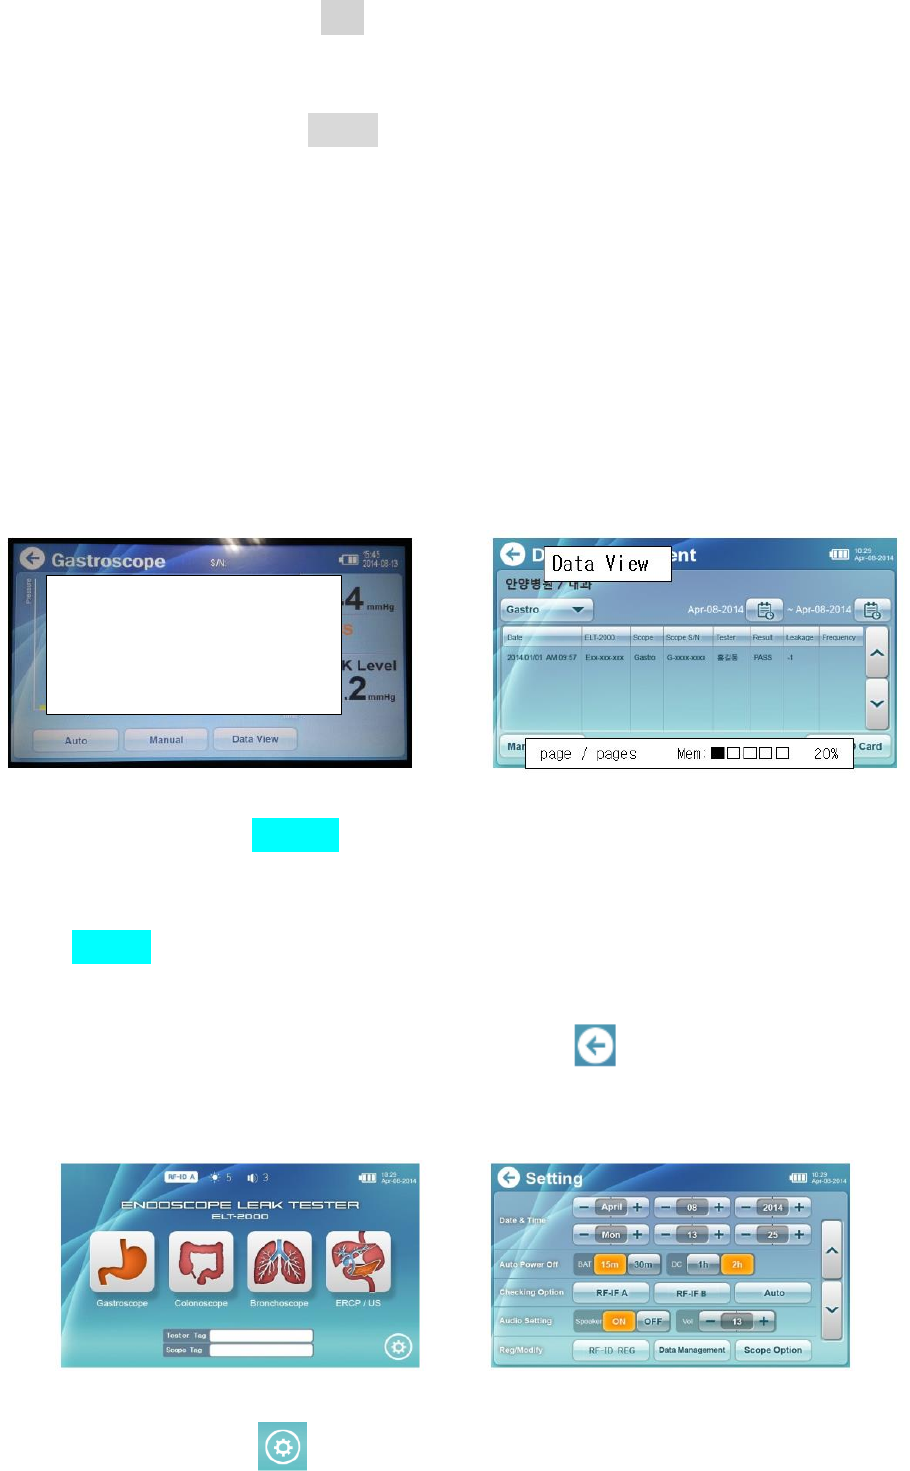
7. Configuration (Setting)
Main page The screen for setting
Graph: Correction
Marking the scale
On the window of messages, the result
of leaks
Displaying the rotating shape of a handle
▶ One the main page, touch the button.
- It moves to the screen for setting.
7–1. The setting date and time Date & Time
▶ The buttons of the month, date, year, hour, minute, and second.
- The setting values are increased/decreased.
7–2. How to set the automatic off time Auto Power Off
7–2–1. How to set the time when using the internal battery
▶ Click the 15 m button
- For using only the internal battery, when it is not in use, the device automatically turns off after 15 minutes.
▶ Click the 30 m button
- For using only the internal battery, when it is not in use, the device automatically turns off after 30 minutes.
7–2–2. How to set the time when using the power adaptor
▶ Click the 1 h button
- For using the power adaptor, when it is not in use, the device automatically turns off after 1 hour
▶ Click the 2 h button
- For using the power adaptor, when it is not in use, the device automatically turns off after 2 hours.
7–3. How to select the test mode Checking Option
7–3–1. Selection method for the A mode of RFID
▶ It is a way to inspect leaks with <RFID tags for the scope> and < RFID tags for inspectors>.
- It will save the data of the inspection data, <RFID tags for the scope>, and <RFID tags for inspectors>.
- According to the process of 5–1, inspect leaks.
7–3–2. Selection method for the B mode of RFID
▶ It is a way of using only the <RFID tags for the scope>.
- It will save the data of the inspection data and <RFID tags for the scope>.
- According to the process of 5–2, inspect leaks.
7–3–3. Selection method for the normal modes
▶ It is a method to inspect leaks without the <RFID tags for the scope>
- It will not save the data.
- According to the process of 5–3, inspect leaks.
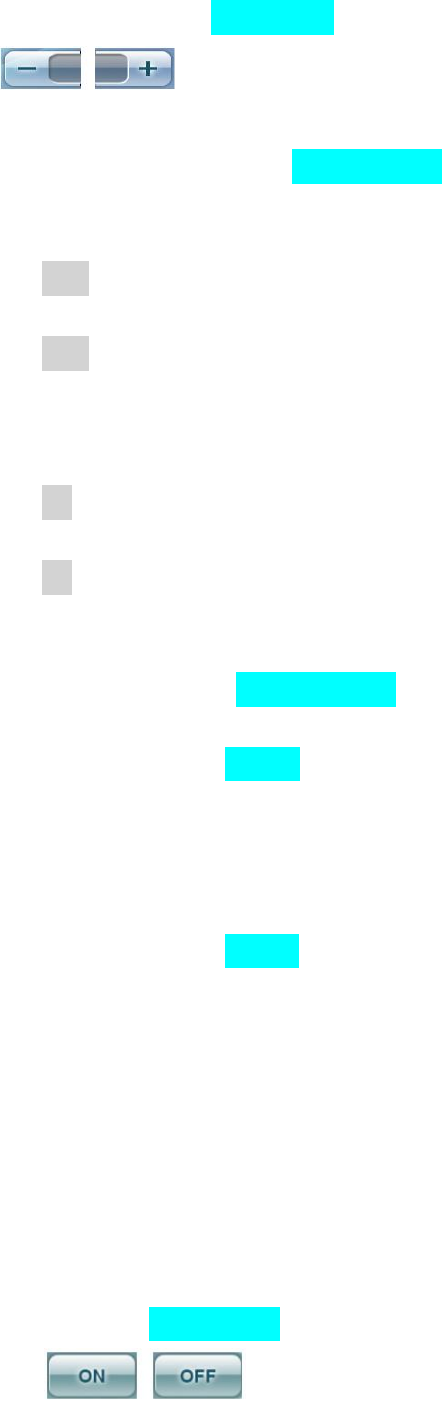
7–4. Setting the speaker Audio Setting
▶Using the buttons, change the function of the speaker to state of ON/OFF.
▶ Using the buttons, control the volume of the audio system.
7–5. Registration and management of tags
▶ It manages the data information of the <RFID tags for the scope> and < RFID tags for inspectors>.
- Input the information of hospitals.
- Register and correct the <RFID tags for inspectors>
- Register and correct the <RFID tags for the scope>
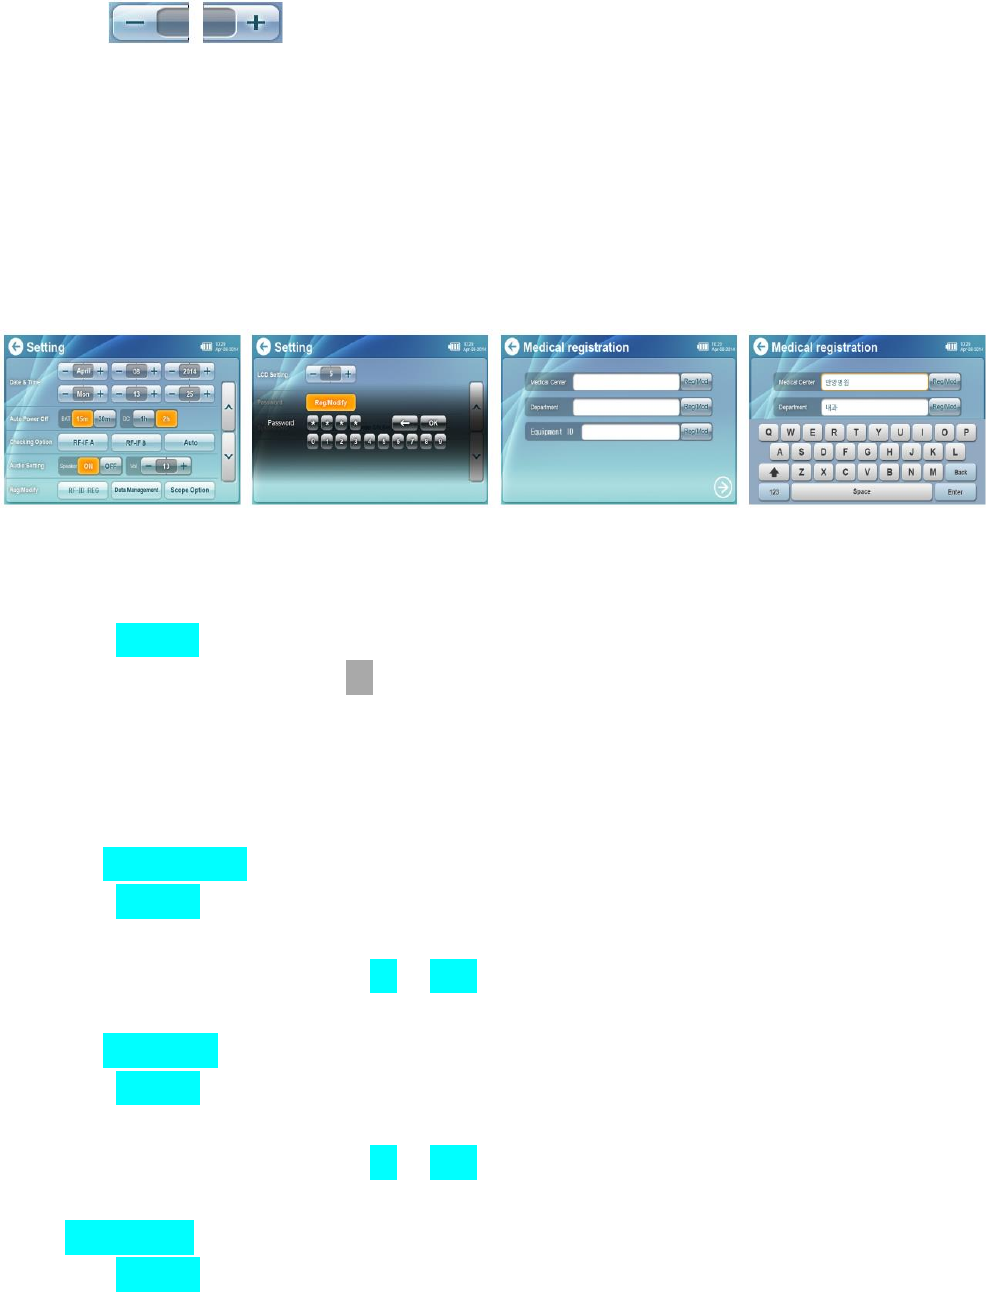
7–5–1. How to register and correct the name of hospital and department, and management number
The screen for setting Inputting the password The screen for register hospitals The keyboard screen
Inputting the <password>
① Touch the RFID Reg button on the setting screen.
② If it generates input box, touch the OK button after entering the password of four digits.
※ The default password is 0000.
After installing the tester, use it after changing the password to manage the data.
③ If the password is confirmed, it moves to the screen to register the device ID.
Inputting the Medical Center
④ Touch the Reg/Mod button of the medical center.
⑤ Enter the name of the hospital, up to 16 characters including letter and number.
⑥ If you complete entering it, touch the OK or Enter button.
Inputting the Department
⑦ Touch the Reg/Mod button of the department.
⑧ Enter the name of the department, up to 16 characters including letter and number.
⑨ If you complete entering it, touch the OK or Enter button.
Inputting the Device ID
⑩ Touch the Reg/Mod button of the device ID.
⑪ Enter the name of the device ID, up to 4 characters including letter and number, which is not to duplicate
the ID of other body.
※ If the management number is same to other one, the tester is not able to be discriminated from the
leak data.
⑫ If you complete entering it, touch the OK or Enter button.
⑬ Touch the button, and move to the next step.
※ If there are no names of hospital and department, and device ID, it will not be proceed to the next step.
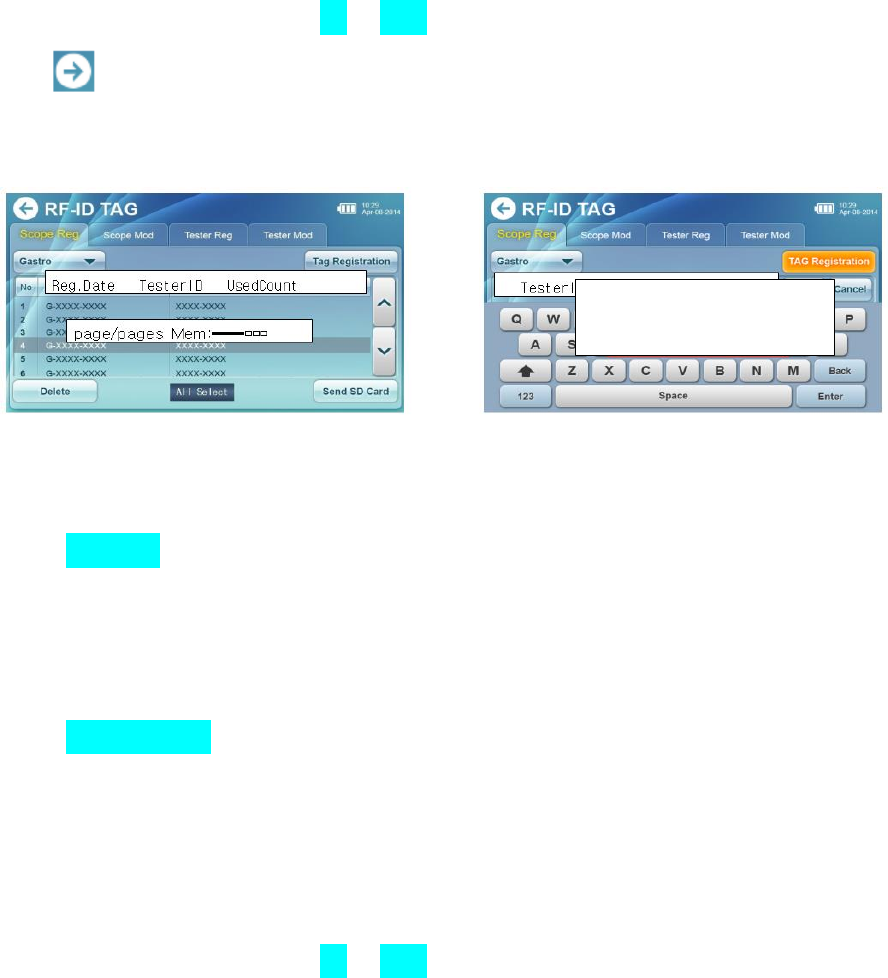
7–5–2. How to register the <RFID tag for the inspector>
The registration screen for inspectors’ tags The keyboard screen
Select the registration page of the <RFID tags for inspectors>
① Touch the Tester Reg button.
- Registered tags of the inspector which is one of the most recent data to the internal memory are displayed
on the screen.
<Inputting the tester ID>
② Touch the Tag Registration button.
③ Input the tester ID you want to register.
- Input the ID up to 13 characters including letter and numbers, which is different to other one.
※ If the tester ID is same to other one, the inspector is not able to be identified from the leak data.
<Registration of tags>
④ If you complete entering it, touch the OK or Enter button.
⑤ If it generates the <Contact Tester to the RFID Reader> window, Touch the <RFID tag for the inspector> to
the RFID reader on the side of the tester.
※ If two tags are neighbored, it might be occured errors. Therefore, touch one of them.
- If the registration is completed, device ID and tester ID will be saved to the RFID tag of the inspector and
the memory of the tester.
- If the registration is completed, it generates a feep sound.
- If the registration is failed, it generates two feep sounds (feep feep).
7–5–3. How to correct the <RFID tag for the inspector>
Input data
: With conspicuous color
The screen of the list to correct the inspectors’ tags The keyboard screen
<Selecting the page to correct the inspectors’ tag>
▶ Touch the page button of Tester Mod.
- The screen will display registered contents of the latest inspector who inspected leaks with the device
among the registered information that is saved to the internal memory.
<Reading Tags >
② Touch the Tag Registration button.
③ If it generates the <Contact Tester to the RFID Reader> window, touch the tag for the inspector that you
want to change to the RFID reader on the side of the tester.
※ If two tags are neighbored, it might be occured errors. Therefore, touch one of them.
- If the reader is successful, it generates a feep sound.
- Make sure that information of the touched tag is displayed on the indicator of the tester ID.
<Change of the tester ID>
④ Change the tester ID that is not same to other ID, up to 13 characters including letter and number.
※ If the tester ID is same to other one, the tester is not able to be discriminated from the leak data.
<Registration of tags>
⑤ If you complete changing it, touch the OK or Enter button.
⑥ If it generates the <Contact Tester to the RFID Reader> window, touch the tag for the inspector that you
want to register to the RFID reader on the side of the tester.
※ If two tags are neighbored, it might be occured errors. Therefore, touch one of them.
- If you complete the registration, changed device ID and scope ID will be saved to the RFID tags for
inspectors and the memory of tester.
- If the registration is completed, it generates a feep sound.
- If the registration is failed, it generates two feep sounds (feep feep).
7–5–4. How to register the <RFID tag for the scope>
Input data
: With conspicuous color
The screen to register the tag for the scope The screen to enter and register the tag ID for the scope
<Selecting the page to register the tags for the scope>
① Touch the Scope Reg button.
- The screen will display the latest registered contents of tags among the registered information that is saved
to the internal memory.
<Selecting the type of scopes>
② Using the Gastro▼ scope button, select the scope what you want to search.
<Inputting the scope ID>
③ Touch the Tag Registration button.
④ Enter the scope ID to register.
- Enter the scope ID that is not same to other ID, up to 13 characters including letter and number.
※ If the scope ID is same to other one, the scope is not able to be discriminated from the leak data.
<Registration of tags>
⑤ Touch the OK or Enter button.
⑥ If it generates the <Contact Tester to the RFID reader> window, touch the tag for the scope to register to
the RFID reader on the side of the tester.
※ If two tags are neighbored, errors may occur. Therefore, touch one of them.
- If you complete the registration, changed device ID and scope ID will be saved to the RFID tags for the
scope and the memory of tester.
- If the registration is completed, it generates a feep sound.
- If the registration is failed, it generates two feep sounds (feep feep).
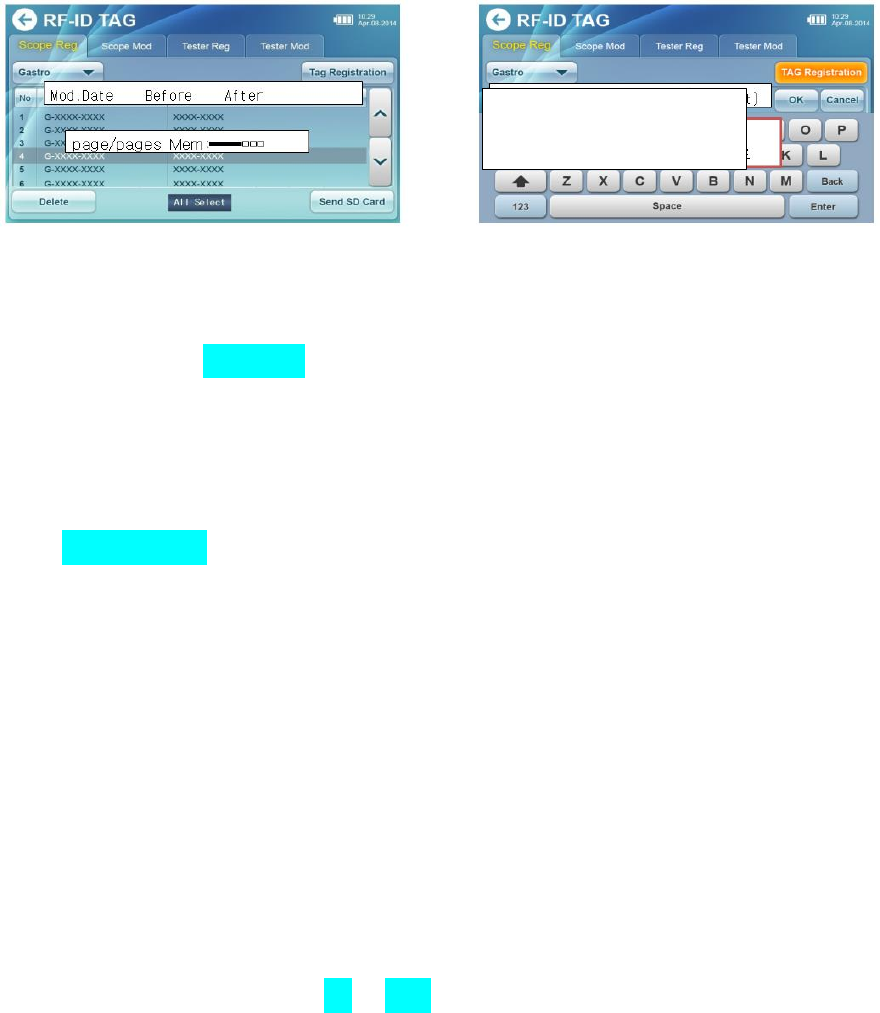
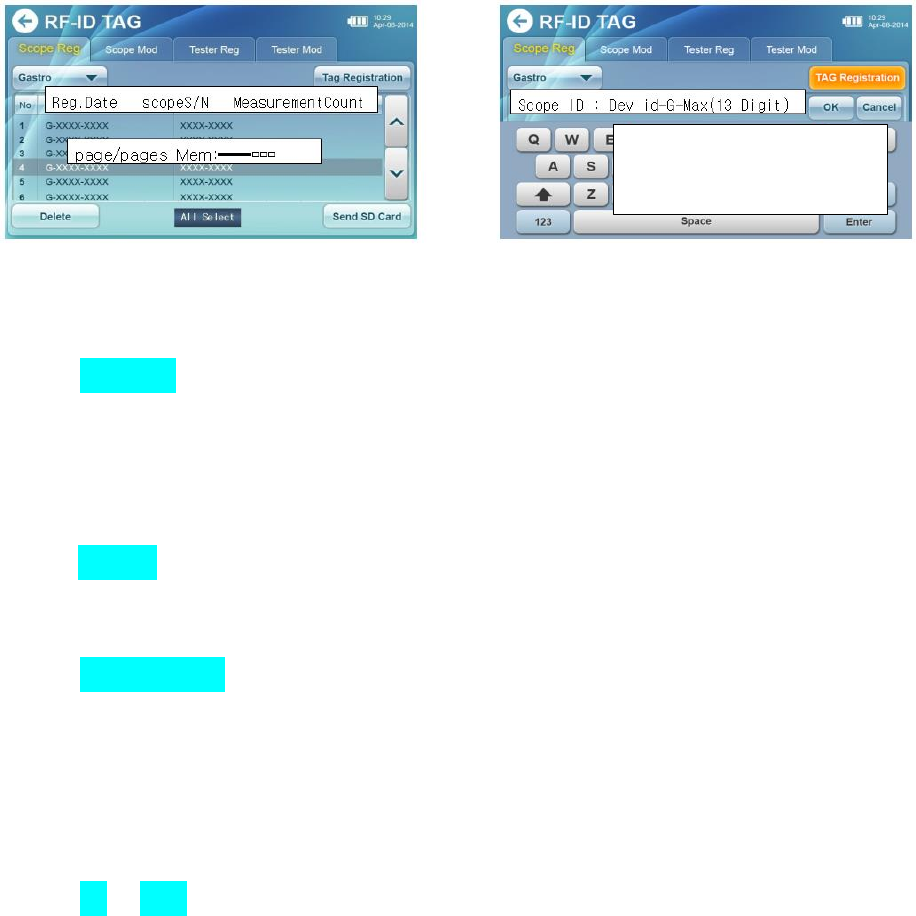
7–5–5. How to correct the <RFID tag for the scope>
Input data
: With conspicuous color
The screen of the list to correct the tags for the scope The keyboard screen
Select the correction page of the <RFID tags for the scope>.
① Touch the Scope Reg button.
- The screen will display the latest registered contents of tags among the registered information that is saved
to the internal memory.
<Reading tags>
② Touch the Tag Registration button.
③ If it generates the <Contact Tester to the RFID Reader> window, touch the tag for the scope to register to
the RFID reader on the side of the tester.
※ If two tags are neighbored, errors may occur. Therefore, touch one of them.
- If the reader is successful, it generates a feep sound.
- Make sure that information of the touched tag is displayed on the indicator of the scope ID.
<Change of the scope ID>
④ Enter the scope ID that is not same to other ID, up to 13 characters including letter and number.
※ If the scope ID is same to other one, the scope is not able to be discriminated from the leak data.
<Registration of tags>
⑤ If the change is completed, touch the OK or Enter button.
⑥ If it generates the <Contact Tester to the RFID Reader> window, touch the tag for the scope to register to
the RFID reader on the side of the tester.
- If you complete the registration, changed device ID and scope ID will be saved to the RFID tags for the
scope and the memory of tester.
- If the registration is completed, it generates a feep sound.
- If the registration is failed, it generates two feep sounds (feep feep).
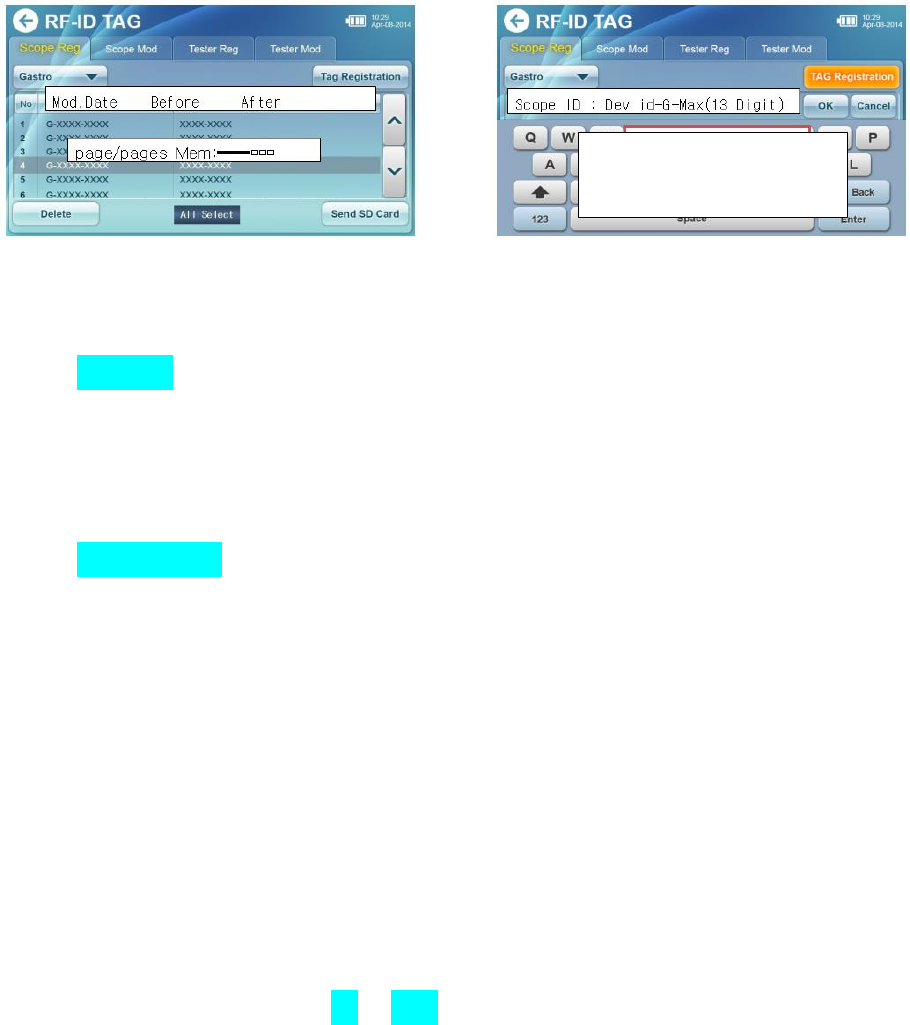
7–5–6. How to delete the saved tags to the internal memory of the device
Input data
: With conspicuous color
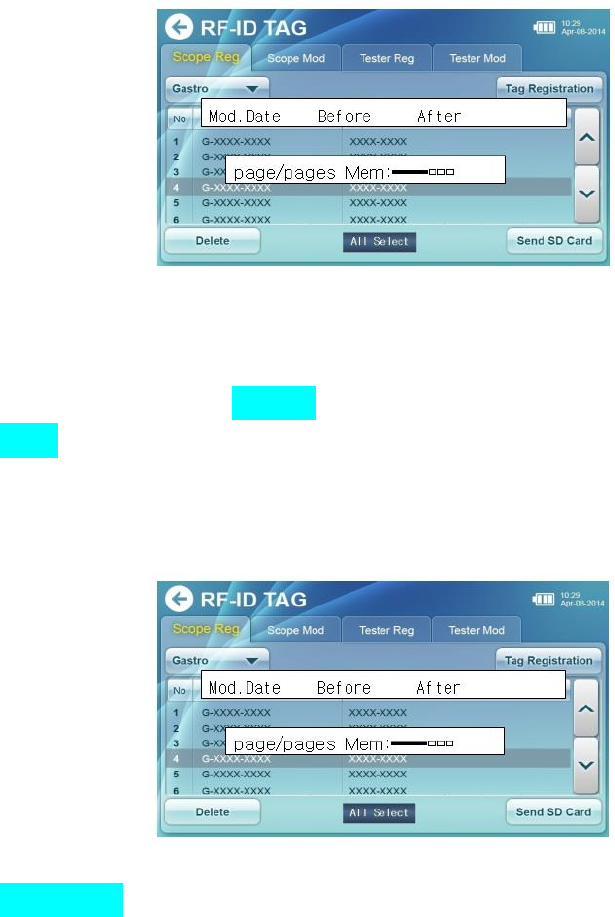
The screen to register tags
▶ Touch the page button of the tag having contents to delete.
▶ Touch the contents to select.
- If you want to select all, touch the All Select button.
▶ Touch the Delete button.
- Touch the <OK> button, if it generates a browser of confirmation for data deletion.
7–5–7. How to copy to the SD card from the registered contents of tags to the internal memory
The screen to register tags
▶ Touch the Save SD Card button.
- Copy all saved information of tags to the internal memory to the SD card.
- You can confirm the data at the “Text editor (memo pad)” of the PC.
File Name : Tag.txt
Type : Text
Data Format : See the example
<Example of Tag.txt>
※ Data format can be changed for the quality improvement without notice. (Refer to homepage)
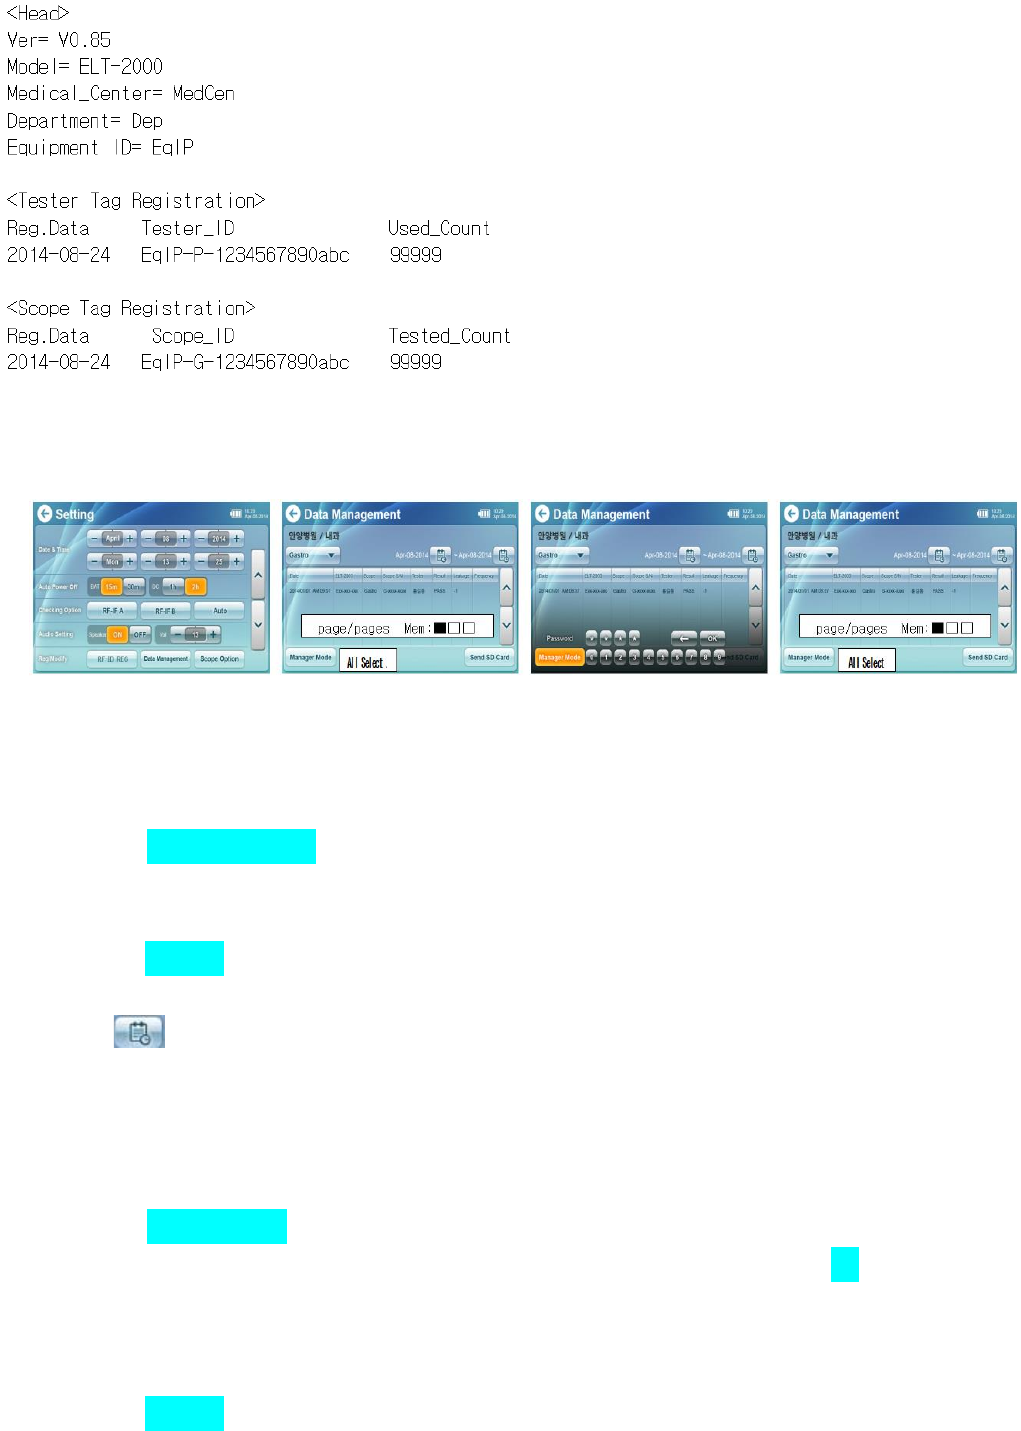
7–6. Data management ※※※ The fourth picture should be changed
Setting screen The screen of data management The screen to input the Password Manager Mode
Search, delete, or copy the saved data on internal memory to the SD Card
7–6–1. Searching measured data on the data management
① Touch the Data Management button on the setting screen.
- Move to the screen of data management.
- The screen will display the latest saved data among the registered one that is saved to the internal memory.
② Using the Gastro▼ scope button, select the scope what you want to search.
- The screen will display the latest saved data among the registered one that is saved to the internal memory.
③ Touch to select searching period.
- It displays the found data on the screen.
※ Caution: Searching is only possible within selected one month.
7–6–2. Deleting measured data of the manager mode
① Touch the Manager Mode button on the screen of data management.
② If it generate the input box window for password, enter 4 digits password and touch OK button.
- If the password is correct, it moves to the <Manager Mode>.
- If the password is incorrect, enter it again.
- The screen will display the latest data among the saved one to the internal memory.
② Using the Gastro▼ scope button, select the scope that you want to search.
③ Select the date to search by touching the button.
③ Touch contents to select.
- If you want to select the period of whole one month, touch the All Select button.
④ If you want to delete data, touch the Delete button.
- Touch the (OK) button once the window for confirming data deletion is generated.
7–6–3. Copy of searched data on the SD card
▶ Touch the Save SD Card button.
- Copy the searched measurement data to the SD card, using the method in 7-6-1.
※ Caution: Saving search result is only possible within one month.
7–6–4. Copy of all measured data of the selected month on the SD card
▶ Select the month you want to search by touching button.
▶ Touch button.
- The whole period of month will be selected.
- The whole type of scopes will be selected.
▶ Touch the Save SD Card button.
- Copy selected measurement data to the SD card.
※ Caution: Saving search result is only possible within one month.
7–6–5. Automatic copy the data over 12 months on SD card
- The measured data that had passed 12 months from current time will be on the SD cad.
7–6–6. Confirmation of saved data on the SD card
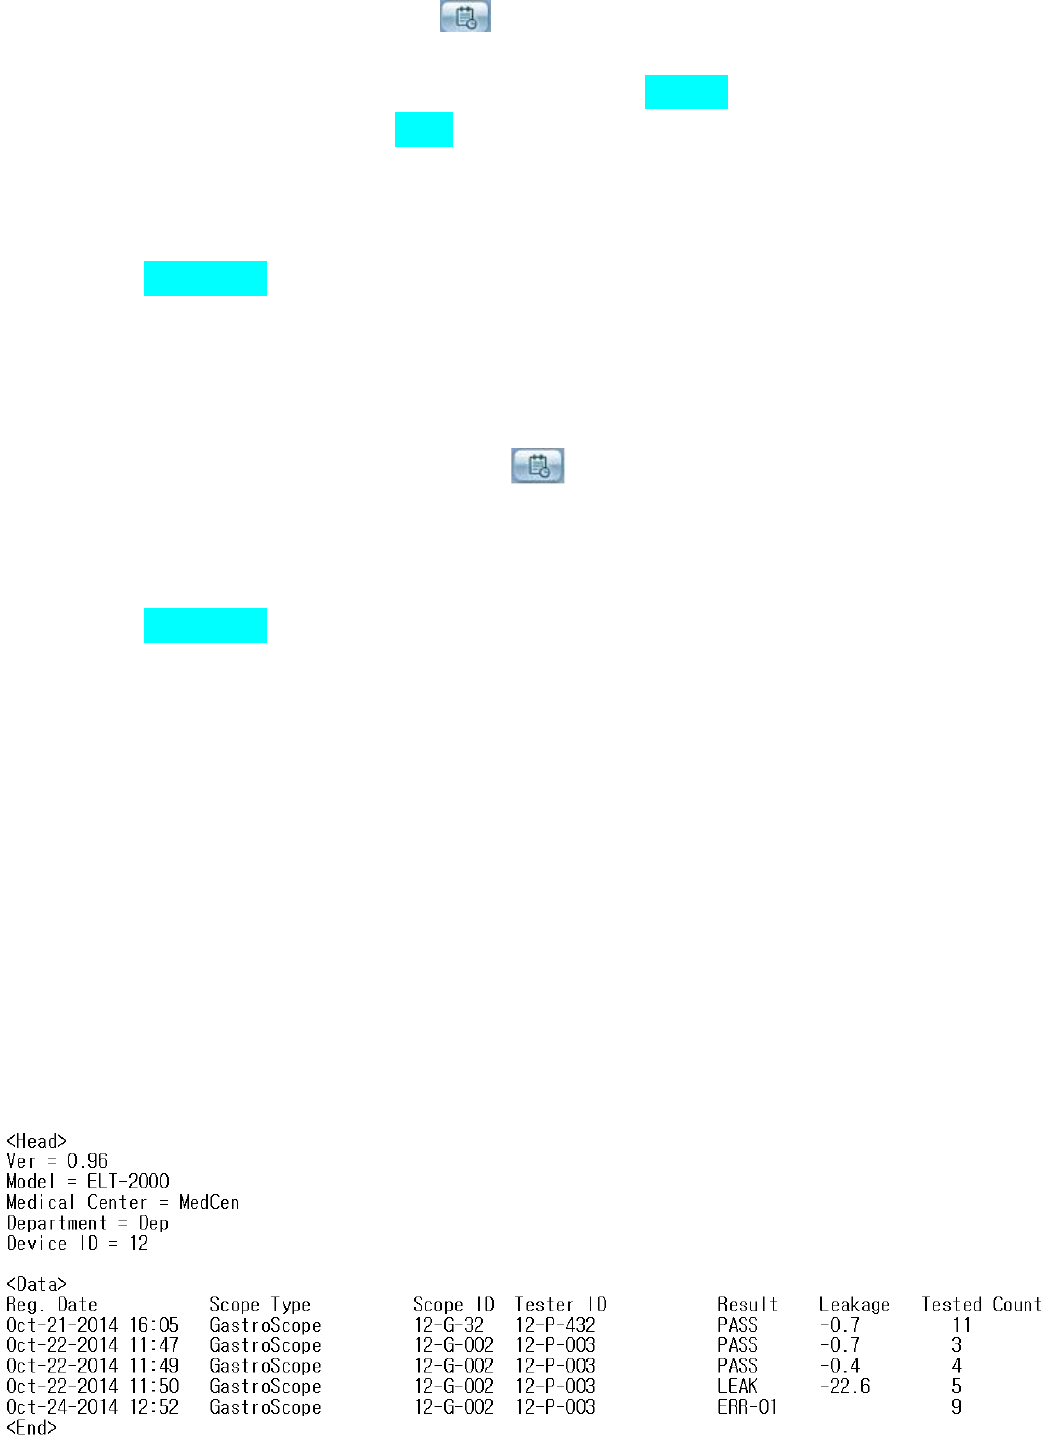
- You can confirm the data from the “MS Excel” or “text editor (memo pad)” of the PC
File Name : YYYYMMDD.TXT or YYYYMM.TXT
(YYYY:Year, MM:Month, DD:Day)
Type : Text
Data Format : Refer to example
<Example of YYYYMMDD.TXT>
※ Caution: Data format can be changed for the quality improvement without notice. (Refer to homepage)
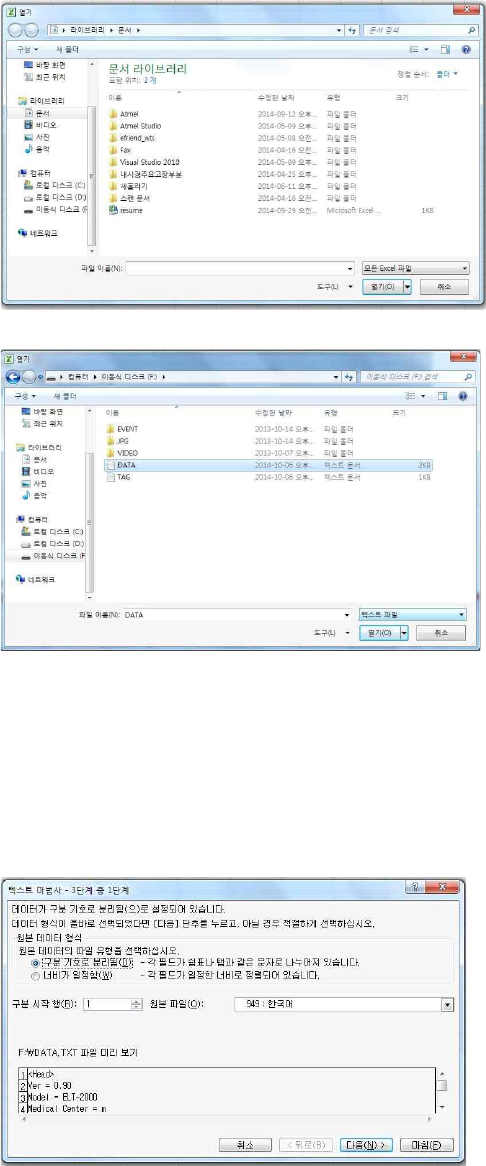
<Review with the MS Excel>
1. Run the ‘open file’ of the MS Excel.
2. Select the file of YYYMM.TXT
① Select the type of text file.
② Select the flash disk (SD card).
③ Select the file of Data.txt.
④ Click the ‘open’ button.
3. 1 step to open
Select the “Delimited” and the “Next” button.
4. 2 step to open
Select the “Tab (T)” and click the “Next” button.
5. 3 step to open
Select the “General” and click the “Finish” button.
6. View data
You can control the width of the cell when it has different size, then check the data.
7–7. Scope options
In order to inspect leaks, set the stabilizing time, checking time, leak level, and pressure by the type of
endoscope.
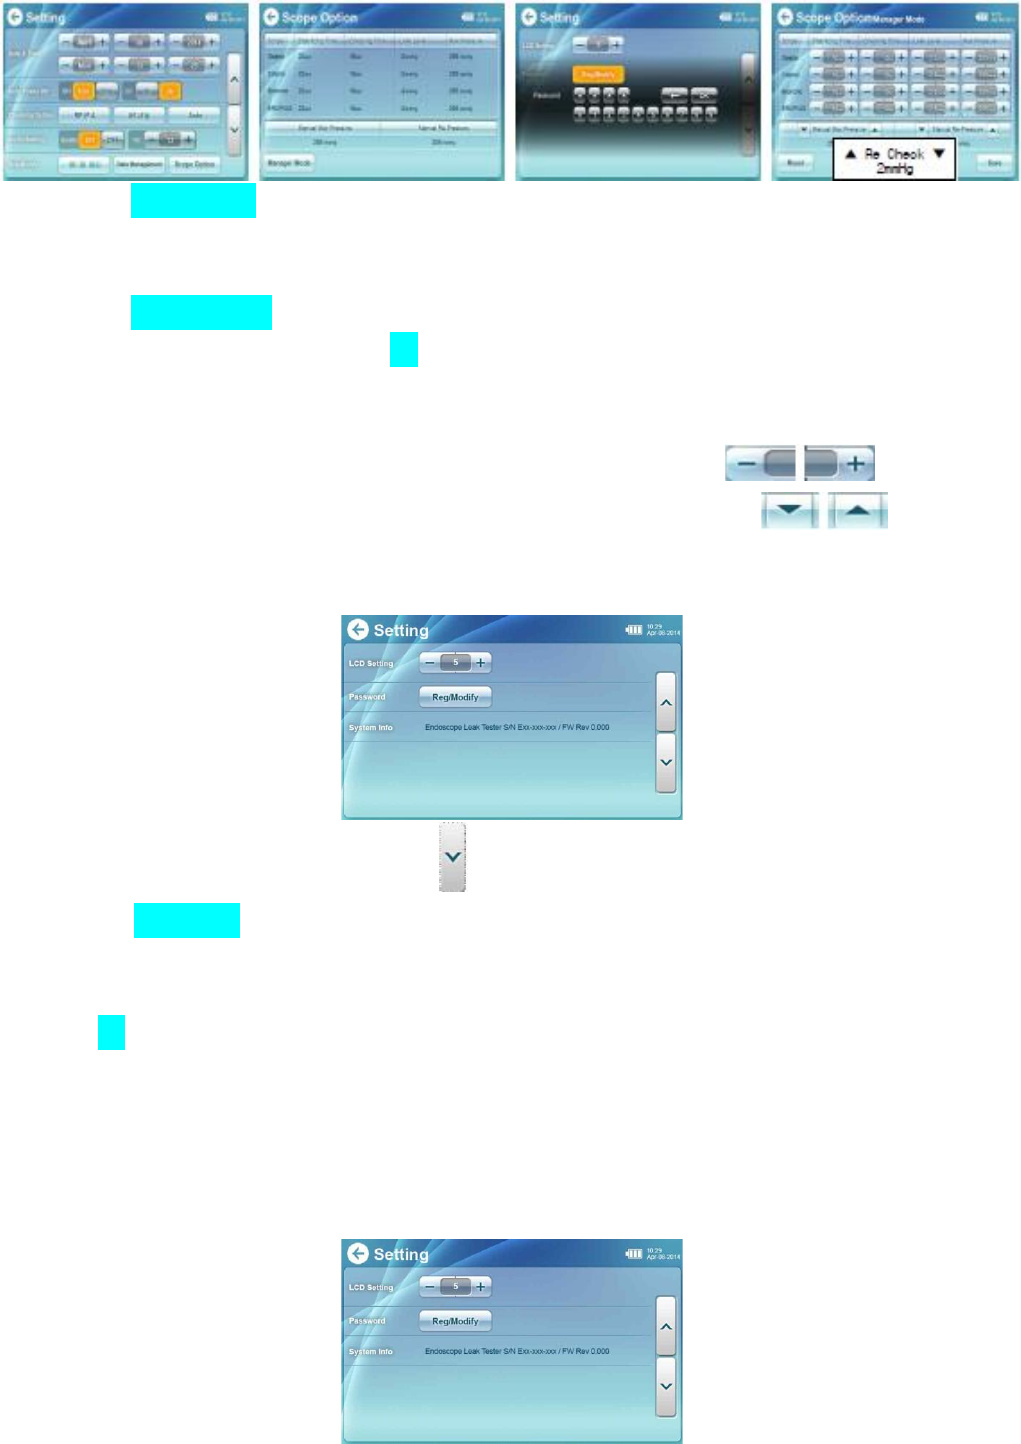
▶ Touch the Scope Option button.
- It will display the screen of scope option.
- The screen will display setting data of the scope option.
▶ Touch the Manager Mode button.
▶ Enter 4 digits password and touch the OK button.
- If the password is correct, it moves to the screen of <Manager Mode>.
- If the password is incorrect, enter it again.
▶Set the scope type, stabilizing time, checking time, and max pressure using button.
▶ Set the manual max pressure, recheck level, and manual repressure level using button.
7–8. Setting and changing the password
① Move to page 2 of the configuration using button.
② Touch the Reg/Modify button.
③ Enter current password once the window to enter password is appeared.
※ Default password is 0000.
④ Touch OK button after entering new password.
※ Remember new password because it is appeared only on time above the star shaped button.
※ In order to confirm the new password, you can check it by going back to the <Scope Option> in the
initial <Setting> window.
7–9. Setting the brightness of the LCD

① Move to page 2 of the configuration using button.
② Control the brightness of the LCD using button.
8. Updating software (Homepage: www.diabell.com)
▶ Please progress following upgrade procedures after downloading and unzip the version up file.
1. Copy SPHOST.BRN to SD card.
2. Turn on after insertion of copied SPHOST.BRN on the SD card.
3. If the upgrade is automatically done when the screen is turned on, and if it is finished, the power will be
turned off automatically.
4. Turn on the power again, you can find new version in the system info. by clicking lowing button on setting
screen.
5. Proceed the inspection after returning to the main page.
9. Cleaning and storage
▶ Please keep the main body clean.
▶ Please clean contaminants on main body with dry cloth.
▶ If the level of contaminant is serious, clean it with a neutral detergent or water coated cloth. And then rub
it with the dry cloth.
- Be careful to prevent absorbing water to internal main body.
(Caution)
▶ Do not use alcohol, benzene and thinner when removing contaminants.
(Caution for storage)
Please do not store in following locations.
▶ Nearby water contents
▶ Location that can be affected by air such as high temperature, moisture, dust, and salty.
▶ Places that have impact, vibration, and slope.
▶ The places that store chemicals or generate corrosive gas.
10. Possible errors
LCO display
Problems
Matters of management
ERROR-1
No reach to normal pressure
even in increasing pressure.
Check connection part of Air tube.
ERROR-2
Reach to optimal pressure within
2 seconds after operating
switch.
Check connection between waterproof and
connector.
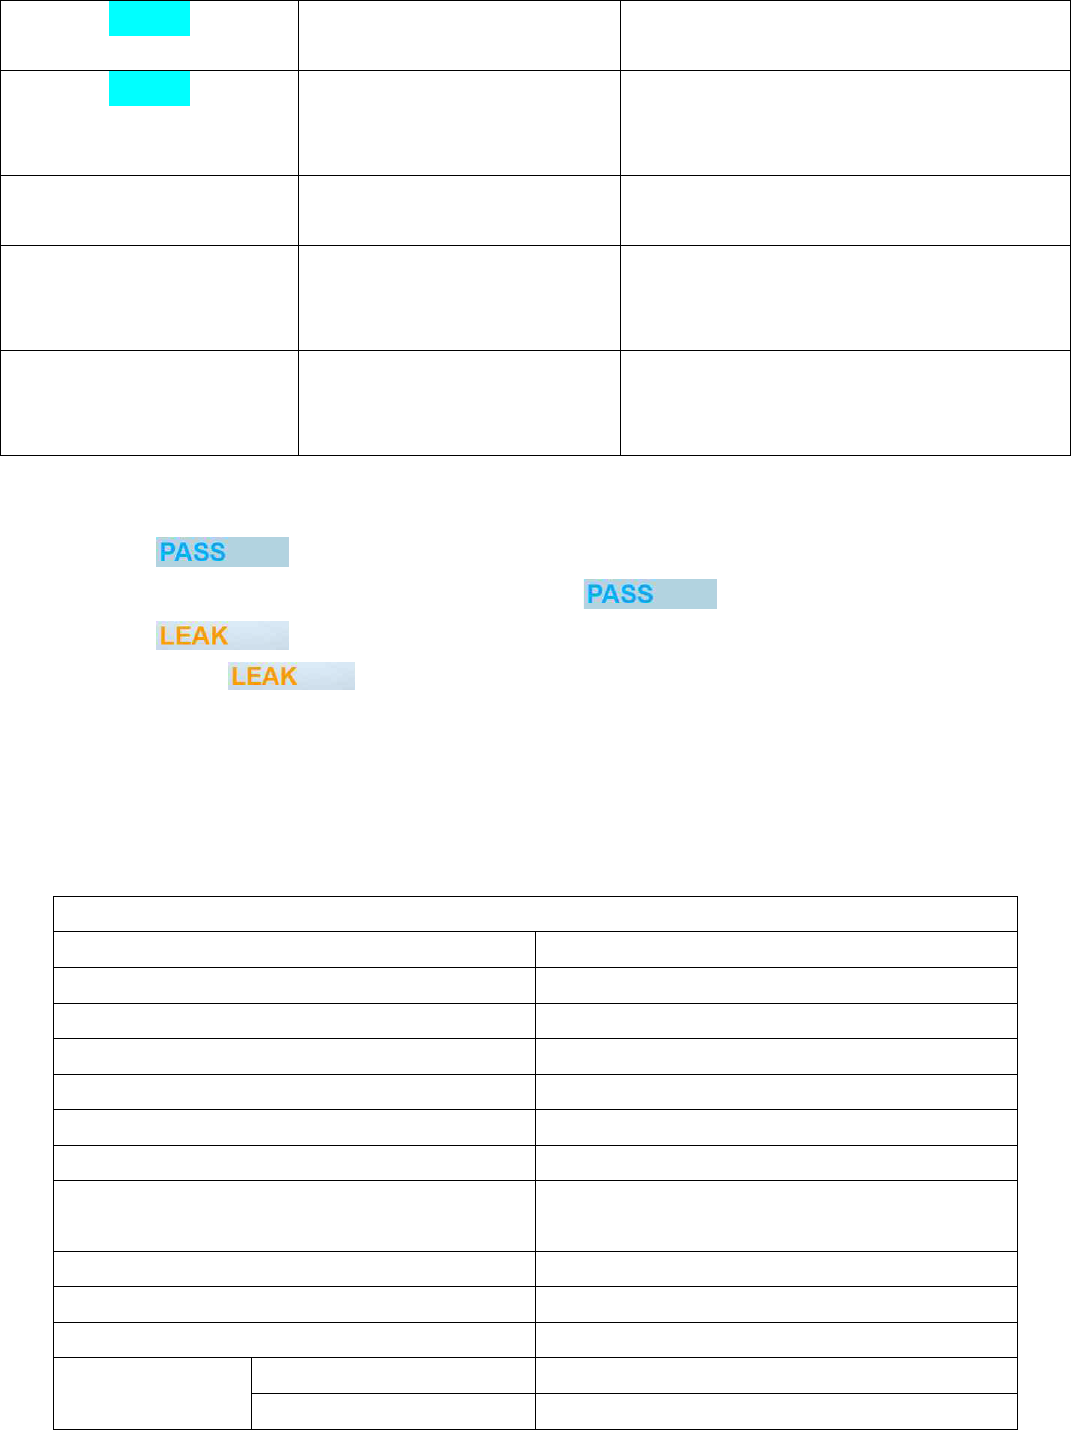
ERROR-3
Measuring pressure inaccurately
Please ask to production company if the Error
signal is still remained after turning on power.
ERROR-4
Detected leak in stabilization of
air
Check whether or not the Air way is opened.
(It should be completely opened for
inspection of leak).
No more than one square of
remained battery charging
Low charging capacity in
internal battery
Use it by connecting with adapter.
No signal after turning on
power
Completely discharged in
battery
Please operate it after connecting adapter for
30 min. If the problem is still existed, request
After Service.
No change in operation on
display
No operating in touch key of
pressure
Push RESET switch on backside of product
using tool. . If the problem is still existed,
request After Service.
11. Troubleshooting
▶ In case of sign
- There is possibility that can include minute leak even in signal.
▶ In case of sign
- If there a sign of , request A/S to company after checking Leak part and changing to manual
mode.
※ The value of reexamination of leak can be slightly different because of temperature, moisture,
expansion coefficient and force of restitution.
12. Product specification
Product specification
Items
Contents
Name of product
ENDOSCOPE LEAK TESTER
Model name
ELT-2000
Display
Digital graphic 7 “Color TFT LCD
Method of measurement
Pressure sensor type
Range of evaluation leak
5~300 mmHg
Storing capacity of measurement data
0~ -99.9 mmHg
Pressure
Data capacity for 12 months (Maximum 5000 per
a month)
Exhaust
The type of pressure setting
Temperature and humidity in usage environment
The type of auto- quick exhaust
Temperature and humidity in storage environment
+10~+50℃, 15~85%RH
RF ID
Range of frequency
-20~+60℃, 10~90%RH
Modulation system
13.5603 MHz
The number of channel
ASK
Form of radio wave
1 Channel
Output
< 47.544 mW/m at 10 meter distance
Weight
920 g
Outer dimension (W × H × D)
223 x 90 x 160 mm
Component
Adapter, SD card, RFID tag, coil horse, one SD
card reader, manual (including guarantee)
Name of equipment (Model name): Wireless machine for RFID/USN (13.56
MHz range) (ELT-2000)
Confirmation number: MSIP-CRS-DBX-ELT-2000
Certificated company name
Date of production
Producer/production nation
In generally speaking, this equipment is not allowed to working within 20 cm
from human, thus it is considered as a no SAR tool and the SAR test is not
performed.
Quality Assurance
1. Quality assurance
∙ If you use this product properly by following the manual and instruction within one year, we can provide free
repairing service.
∙ After passing the period of free repairing, we provide fixing at a cost.
∙ If the problems in product made by mistakes of user, we provide repairing service at a cost.
2. Free repairing
Consumer damage type
Repairing contents
∙ In normal condition, when troubles are occurred within 10 days so
it is required to repair.
Refund / Exchange
∙ In normal condition, when troubles are occurred within 1 month so
it is required to repair.
Exchange / Repairing
∙ In normal condition, when troubles are occurred within 1 year so it
is required to repair.
Free repairing
3. Repairing at a cost
Types of consumer’s damages
Repairing content
∙ Even in period of free repairing, if the damage come from the following
reasons, it is applied to cost repairing case.
- The reasons of damage or trouble come from malfunction of power
(voltage and frequency) except for fire, earthquake, flood, thunderbolt,
natural disaster, environmental pollution and abnormal voltage.
- The cause of disorder is not related to product.
Repairing at a cost
∙ The troubles in operation are made by user’s mistake or unreasonable
repairing and remodeling.
Repairing at a cost
∙ Please read manual carefully because it will charge price to you if you
request service to product in no trouble.
Charging price
4. Customer counseling
Phone number: 031-732-4602 (www.diabell.com)
Product warranty
Product name
ENDOSCOPE
Model name
ELT-2000
Number of product
Date of purchase
Assembler
Period of warranty
1 year
Name of customer
Contact information of customer