DIRT DEVIL Vacuum, Upright Manual L0606617
User Manual: DIRT DIRT DEVIL Vacuum, Upright Manual DIRT DEVIL Vacuum, Upright Owner's Manual, DIRT DEVIL Vacuum, Upright installation guides
Open the PDF directly: View PDF ![]() .
.
Page Count: 5
OWNER'SMANUAL
Operatingand Servicing
instructions
Please read these
instructions carefully before
using your Upright.
Let us help you put your
vacuum together or answer
any questions, call:
1-800=321=1134
(USA& Canada)
www.dirtdevil.com
WARNING:
Cleaner assembly may
include small parts. Small
parts can present achoking
hazard.
Forquickreference,pleaserecordyour
vacuuminformationbelow.
Model #:
Mfg. Code:
(Mfg.codelocatedon the lower backsideof cleaner)
Espafiol-p#gina E1 ©2004 All rightsreserved #1-113810-000
1/06
THiS CLEANER iS iNTENDED FOR HOUSEHOLDUSE ONLY.
iMPORTANTSAFETYiNSTRUCTiONS
When you use an appliance, basic precautions should always be followed,
including the following:
*READ ALL INSTRUCTIONS BEFOREUSING THE APPLIANCE.
* ALWAYSFOLLOWTHESE SAFETY INSTRUCTIONS.
*BRING CLEANERTO UPRIGHT POSiTiON WHEN USING THE HOSEAND
ATTACHMENTS.
* DO NOT LEAVECLEANERUNATTENDEDWHEN PLUGGEDiN.
*REGULARLYCHECKTHE FILTERTO CLEAN OR REPLACE.
*WARNING: DO NOTUSE SHARP OBJECTS TO CLEANOUT THE HOSE
SINCE THEY COULDCAUSE DAMAGE.
*OCCASIONALLY REMOVE BRUSH AND CLEAN DEBRIS FROM END CAPS TO
KEEP BRUSH ROTATINGSMOOTHLY.
* WARNING:THE CORDS,WIRES, AND/OR CABLESSUPPLIEDWITH THiS
PRODUCTCONTAINSCHEMICALS,iNCLUDINGLEAD OR LEAD COMPOUNDS,
KNOWN TO THE STATEOF CALIFORNIATO CAUSECANCERAND BIRTH
DEFECTSOR OTHERREPRODUCTIVEHARM. WASH HANDS AFTER USING.
READALLiNSTRUCTiONSBEFOREUSINGTHEAPPLIANCE.
WARNING:TOREDUCETHERiSKOFFIRE,
ELECTRICSHOCKORiNJURY:
o Do not leave appliance when plugged in. Unplug from outlet when not in use
and before servicing.
,Do not use outdoors or on wet surfaces. Electrical shock could occur.
*Do not allow to be used as a toy. Close attention is necessary when used by or
near children.
*Use only as described in this manual. Use only manufacturer's recommended
attach ments.
,Do not use with damaged cord or plug. if appliance is not working as it should, has
been dropped, damaged, left outdoors, or dropped into water, return it to a service
center for inspection.Call 1-800-321-1134 for the nearest service center.
*Do not puff or carry by cord, use cord as handle, close a door on cord, or puil cord
around sharp edges or corners. Do not run appliance over cord. Keep cord away
from heated surfaces.
,Do not unplug by puffing on cord. To unplug, grasp the plug, not the cord.
,Do not handle plug or appliance with wet hands.
*Do not put any objects into openings. Do not use with any opening blocked; keep
free of dust, lint, hair, and anything that may reduce air flow.
*Keep hair, looseclothing, fingers, and all parts of body away from openings and
moving parts.
*Do not pick up anything that is burning or smoking, such as cigarettes, matches,
or hot ashes.
, Do not use without dust bag or filter in place.
, Turn off all controls before unplugging.
, Use extra care when cleaning on stairs.
, Do not use to pick up flammable or combustible liquids, such as gasoline, or use
in areas where they may be present.
, Keep the vacuum cleaner on the floor. Only the hand-held vacuum cleaners may
be set on furniture.
, Cleaner must be in the upright position to lift the rotating brush off the carpet
when doing above floor cleaning.
, Do not use an extension cord with this vacuum cleaner.
, Storethe vacuum cleaner indoors.Put the vacuum cleaneraway after use to prevent
tripping accidents.
, Using improper voltage may result in damage to the motor and possible injury to
the user. Proper voltage is listed on the cleaner plate.
, Unplug before connecting *Power Brush Tool.
*NOT,4VAI!.ABLEONALL MODELS
SAVETHESEiNSTRUCTiONS
WARNING:
Toreducethe risk of electricshock,thisappliancehasa polarizedplug(onebladeis wider
than the other). Thisplugwill fit in a polarizedoutletonlyoneway. If the plugdoesnot fit
fully in the outlet,reversethe plug. If it still doesnot fit, contacta qualifiedelectricianto
installthe properoutlet. Donot changethe plugin anyway.
CONGRATULATIONS
Youare now the proudownerof the Dirt Devil®.Wetrust your new
purchasewill bring you manyyears of satisfaction.
Our company has designed and developed this productwith you
in mind.
We are very proudof our productsand hopethat you are equally
satisfied with their quali_ and performance.
Thankyou for yoursupportof Dirt Devil_products.
Visit our website at www.dirtdevil.com
TABLE OFCONTENTS
Safety Instructions................................. Page2, 3
Features......................................... Page5
Body and HandleAssembly .......................... Page6
ToolCaddy,Hose,and ToolAssembly ................... Page6, 7
HowTo Operate ................................... Page7
PaperBag: Removal& Replacement ................... Page8
Filter PadCleaning Instructions....................... Page8
Belt or Brushrolh Removal& Replacement............... Page9
GeneralMaintenance............................... Page9
Lightbulb: Removal& Replacement .................... Page 10
TroubleshootingGuide .............................. Page 10
UMiTEDWARRANTY
Tothe consumer,RoyalAppliance Mfg. Co.warrants this vacuum cleanerto befree of defects in material or
workmanshipcommencing uponthe date of the original purchase. Refer to your vacuum cleaner carton for
the length ofwarranty and saveyour originalsales receiptto validatestart of warranty period.
If the vacuumcleanershouldbecomedefectivewithin the warranty period,we will repairor replaceany defective
parts free of charge. The complete machine must be delivered_ to any ROYAL®Authorized Sales&
WarrantyServiceStation. Pleaseincludecompletedescriptionof the problem,dayof purchase,copy of original
salesreceipt and your name,address and telephonenumber. If you are not near a WarrantyStation,call the
factory for assistanceat USA& Canada:1-800-321-1134. Useonly genuine Royal®replacement parts.
The warranty doesnot includeunusualwear, damageresultingfrom accidentor unreasonableuse of the vacuum
cleaner. Thiswarranty doesnot coverbrushes,bags,flat belts,filters and bulbs.Thiswarranty doesnot cover
unauthorizedrepairs.Thiswarrantygivesyouspecificlegalrightsandyoumayalsohaveotherrights(Otherrights
mayvaryfromstateto statein the USA).
iMPORTANT:USE ONLYGENUINEROYAL® REPLACEMENT PARTS.
NOTE:TO REGISTERYOURPRODUCT,RETURNYOURWARRANTYCARDOR REGISTER
ONLINEATWWW.DIRTDEVILCOM.
3 4

FRONTVIEW BACK VIEW
20
19
12
18
17
14 -14
FRONTViEW BACK VIEW
1. Handle Grip
2. FrontPanel ReleaseHandle
3. FrontPanel
4. Headlight
5. Bumper
6. Clear Dirt Window
7. Hose
8. UpperHeseWrap
9. CordGuide
10. Dust Brush
11. ToolCaddy
12. ExtensionWand
13. ExtensionWand Holder/Hose Clip
14. Wheels
15. Handle ReleasePedal
16. On/Off Pedal
17. Lower Cord Wrap
18. Power Cord
19. CreviceTool
20. UpperCord Wrap with Quick Cord
Release
TOOLREQUIRED:PHILLIPSSCREWDRIVER
BODY ASSEMBLY
WARNING: BEFORE
ASSEMBLINGTHEBODY
OF THE CLEANER TO
BASE, MAKE SURE
POWERCORDIS DOWN
AND OUT OF THE WAY
TO AVOID PINCHING
CORD.
Place front panel on
by putting its bottom
tab in the slot on the
vacuum (inset).Close
until it snaps into
place(Diagram3).
Placethebodyofthecleanerontobase(Diagram2).
Pushtogetherfirmly.Insertlongerscrew intothe
frontofbodyof cleanerto secure(Diagram2a).
HANDLEASSEMBLY
Slide handle down
onto the body of the
cleaner.
TOOLCABBY,HOSE,ANDTOOLASSEMBLY
Inserttab on tool caddy into
slot above screw holes on
back of handle,
Bring tool caddy down to fit against
handle.Inserttwo (2)screwsto secure
caddy and handle sections. Tighten
screws to secure.
HOSEASSEMBLY
Holdlower cord wrap'
place while insertim
one (1) screw. Tighten
until secure.
BACKVIEW
HoldExtensionWandHolder/HoseClip in
place while inserting one (1) screw.
Tightenuntil secure.
Push curved end of hose
onto the back of unit.
6
Wrap hose around storage
hookas shown.

TOOLSTOBAGE NOTE:Unplugcleaner before changingpaper bag. Cleanermust havepaper bag in place at all times.
Pushbackdirtwindowflap.Aligntabs Place the hose into the ATTACHTOOLS:(A) - Slide the dust
oncleardirt passagewindowwith the two side hoseclips, brush onto the post on the tool caddy
slots onthe lower hosecuff. Pushand with bristles facing out. Push down to
turn to lock into place (inset). secure.(B)- Slidethe extensionwand into
the roundslot on the right, (C)- Slidethe
crevicetool intothe roundslot on the left.
WARNING:FULLYASSEMBLECLEANERBEFOREOPERATING.
NOTE:Paperbag must be properly installedbefore operating.
QUICKCORDRELEASE CORDGUIDE ON/OFFSWITCH
TOREMOVE
Take front panel off by
squeezingfront panelrelease
levertowards you.
TOiNSTALL
Graspcardboardcollar of paper bag
with both hands andpull pastraised
locking tabs on the dirt tube.
Disposeof old paper bag.
IMPORTANT:EXTENDBAG AWAY
FROMHOLEBEFOREINSTALLING.
Press in opening to clear paper
away from hole.
To releaseyour cord,turn the
top cord hook to the left or
right.
FLOOR/CARPETCLEANING
Keepthe cord out of the way
whileyouvacuumbysnapping
it into the cord guide on the
backof the handle.
Plug cord into electrical outlet.
Steponthe power switch to turn
on the cleaner. Switch is grey
and located on the base of the
unit.
ABOVE FLOOR CLEANING
Pushcardboardcollarpast raisedlocking tabson the dirt tube
with both hands(Diagram1). Thebottomof the bagshouldbe
restingon the postslocated insidethe right and leftof the bag
chamber (Diagramla). Be sure paper bag is fully extended
and tucked in at the top and bottom (Diagram 1b).
Replacefront panel by putting the one bottom
tab in the slot on the vacuura(Diagram2). Close
until it snaps into place (Diagram2a).
WARNING:UNPLUGCLEANERBEFORECHANGINGFILTER.
BAG CHAMBERFILTER(INTERNAL)
Locatedunder the paperbag,
Releasethe handle. With your
foot, depress the handle
releasepedal on the left side
of the base.
Move the handle and adjust it to the
desired position for (A) storing the
upright,(B)operatingthe cleaner,and(C)
low profile for cleaning under furniture.
NOTE:Youwill need to depress handle
releasepedal againfor low profile.
Cleanermust be lockedin the
upright position to lift the
rotating brush off the carpet
whencleaningabovethe floor.
Turn cleaner off BEFORE
attachingor removing hose.
Takefront panel off
by squeezing front
panel release lever
towards you.
Lift up on front edge
and pull towards you to
remove. Brush or
shake filter debris until
dirt stops falling from
the filter. In some
cases, more or less
cleaning of the filter
may be required.
7 8
TOOLREQUIRED:PHILLIPSSCREWDRIVER
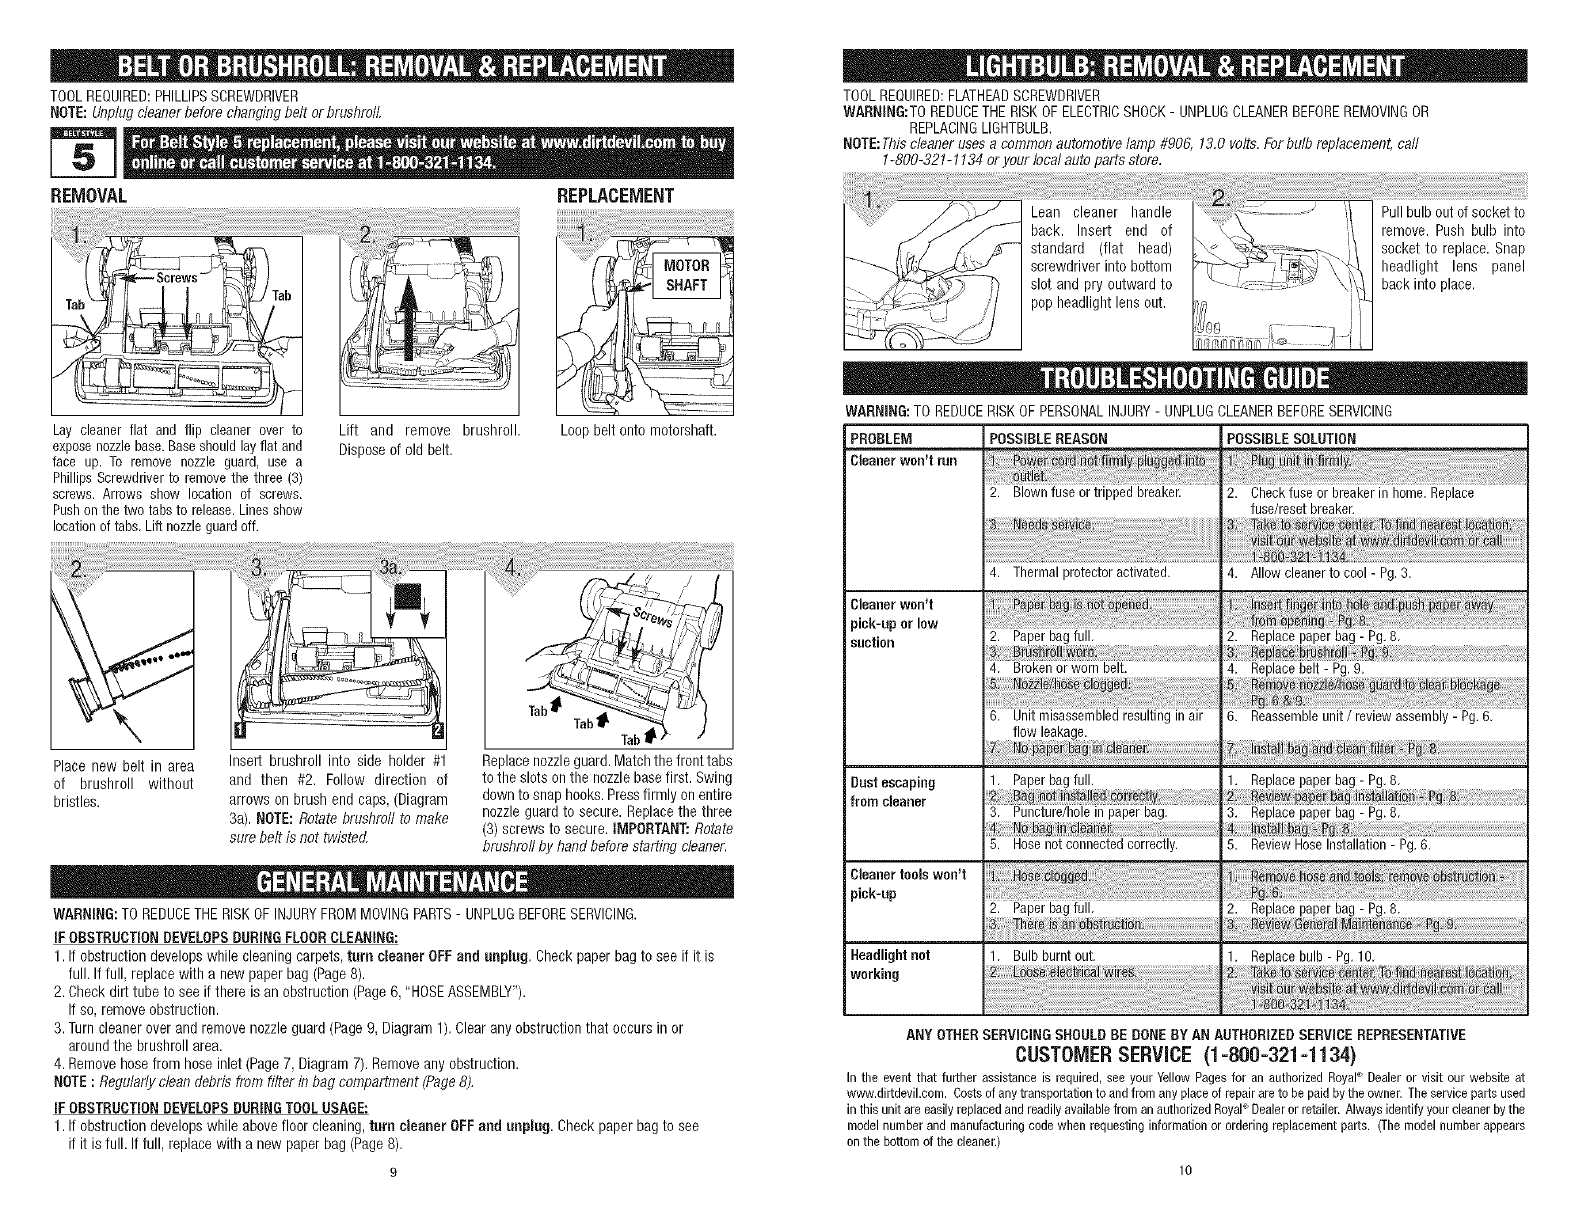
NOTE:Unplugcleanerbefore changingbelt or brushrolL
REMOVAL REPLACEMENT
TOOLREQUIRED:FLATHEADSCREWDRIVER
WARNING:TOREDUCETHERISKOFELECTRICSHOCK- UNPLUGCLEANERBEFOREREMOVINGOR
REPLACINGLIGHTBULB.
NOTE:Thiscleaner uses a common automotivelamp #906, 13.0 volts.Forbulb replacement,call
1-800-321-1134or your local auto parts store.
Lay cleanerflat and flip cleaner over to
exposenozzlebase.Baseshouldlayflat and
face up. To remove nozzle guard, use a
PhillipsScrewdriverto removethe three (3)
screws. Arrows show location of screws.
Pushonthe two tabsto release.Linesshow
locationof tabs,Lift nozzleguardoff.
Lift and remove brushroll.
Disposeof old belt.
Loop belt onto motorshaft.
Place new belt in area Insert brushroll into side holder #1 Replacenozzleguard.Matchthe fronttabs
of brushroll without and then #2. Follow direction of tothe slots on the nozzlebasefirst. Swing
bristles, arrows on brush end caps, (Diagram down to snap hooks.Pressfirmly on entire
3a). NOTE:Rotate brushroti to make nozzleguard to secure. Replacethe three
sure belt is net twisted, (3) screws to secure. IMPORTANT:Rotate
brushroll by hand before starting cleaner.
WARNING:TO REDUCETHERISKOFINJURYFROMMOVINGPARTS- UNPLUGBEFORESERVICING.
IFOBSTRUCTION DEVELOPS DURINGFLOOR CLEANING:
1. If obstructiondevelopswhile cleaning carpets,turn cleaner OFFand unplug. Checkpaper bag to see if it is
full. If full, replacewith a new paper bag (Page8).
2. Check dirt tube to see if there is an obstruction(Page6, "HOSEASSEMBLY").
If so,removeobstruction.
3. Turncleaner overand removenozzleguard (Page9, Diagram1). Clearany obstructionthat occurs in or
aroundthe brushroll area.
4. Removehosefrom hoseinlet (Page7, Diagram7). Removeanyobstruction.
NOTE:Regularlyclean debris from filter in bag compartment (Page8).
IFOBSTRUCTION DEVELOPS DURINGTOOL USAGE:
1. If obstructiondevelopswhile abovefloor cleaning,turn cleaner OFFand unplug. Checkpaper bag to see
if it is full. If full, replace with a new paperbag (Page8).
WARNING: TO REDUCE RISK OF PERSONAL INJURY - UNPLUG CLEANER BEFORESERVICING
PROBLEM POSSIBLE REASON POSSIBLE SOLUTION
Cleaner won't run
2. Blown fuse or tripped breaker. 2. Check fuse or breaker in home. Replace
fuse/reset breaker.
Cleaner Won_t
pick-upor low
suction
Dust escaping
from cleaner
Cleaner tools won't
pick-up
4. Thermal protector activated. 4. Allow cleaner to cool - Pg. 3.
2. Paper bag full, 2. Replace paper bag - Pg. 8,
4. Brokenorworn belt.
6. Unitmisassembledresultinginair
flow leakage.
1. Paperbagfull.
3, Puncture/holein paperbag.
4. Replace belt - Pg. 9.
6. Reassemble unit /review assembly - Pg. 6.
1. Replacepaperbag - Pg.8.
_sf_
3. Replacepaperbag- Pg.8,
5. Hose not connected correctly.
Headlightnot
working
2. Paper bag full.
1. Bulb burnt out.
5. ReviewHoseInstallation- Pg.6.
2. Replacepaperbag- Pg.8.
1. Replacebulb- Pg.10.
n_ To _#_ _ Bat
: i 6 i
ANY OTHER SERVICINGSHOULD BE DONE BY AN AUTHORIZEDSERVICEREPRESENTATIVE
CUSTOMER SERVICE (1 =800-321 q 134)
In the eventthat further assistance is required,see yourYellowPages for an authorizedRoyaP Dealeror visitour webeite at
www.dirtdevil.com.Costsofany transportationtoand fromanyplace of repairare to be paid bythe owner.Theservice partsused
inthis unitare easilyreplacedand readilyavailablefroman authorizedRoyal Dealeror retailer.Alwaysidentifyyourcleanerbythe
modelnumberand manufacturingcede whenrequestinginformationor orderingreplacementparts. (Themodelnumberappears
on the bottomof the cleaner.)
