DISH Technologies 1018 BT + ZIGBEE and WLAN DTS/UNII a/b/g/n MIMO Satellite Set Top Box User Manual User Guide ID082
Echostar Technologies LLC BT + ZIGBEE and WLAN DTS/UNII a/b/g/n MIMO Satellite Set Top Box User Guide ID082
User Guide ID082
I
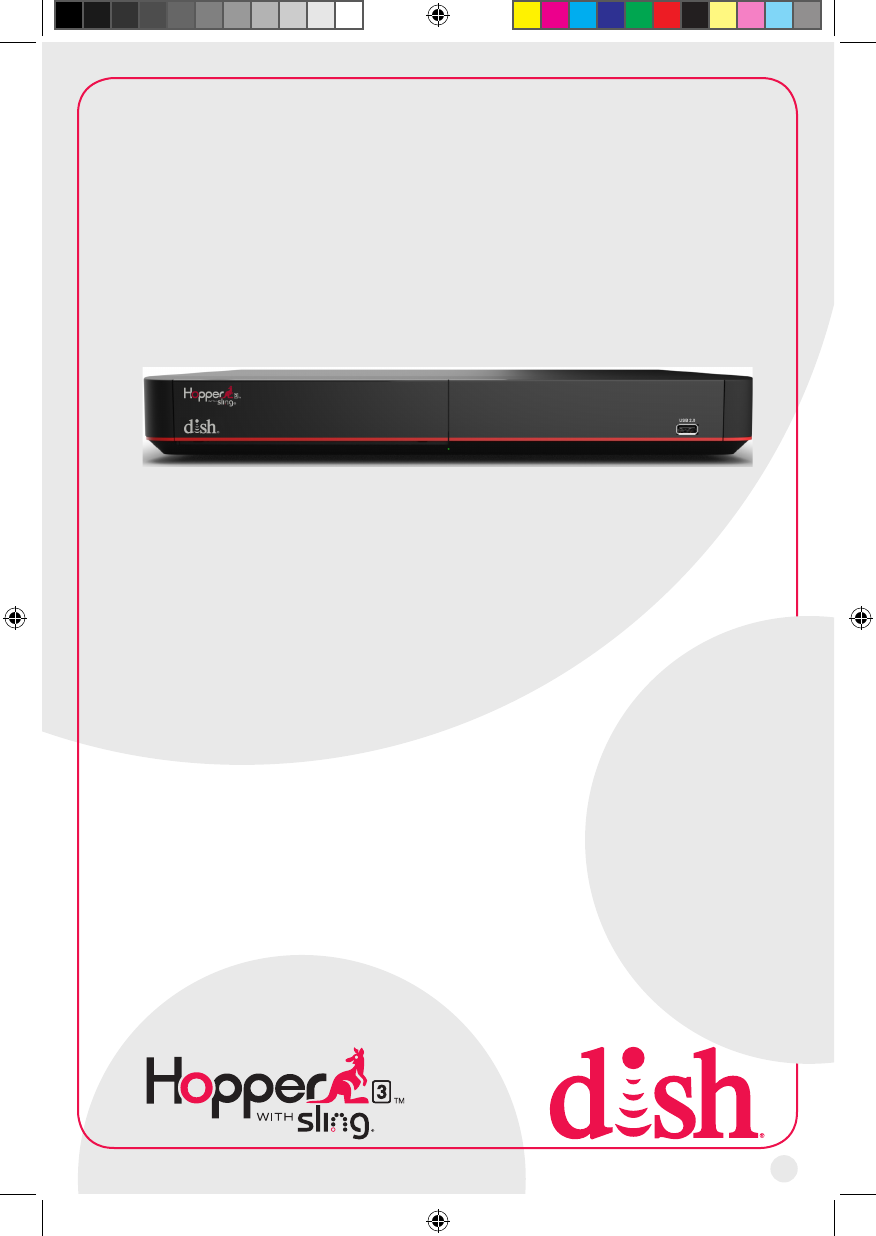
HOPPER 3
USER GUIDE
Hopper_3_UserGuide.indd 1 8/17/2015 1:05:30 PM
II
Warning and Attention Symbols
You must be aware of safety when you install and use this system. This document
provides various procedures. If you do some of these procedures carelessly, you could
injure or kill yourself or damage equipment or property. Some other procedures require
special attention.
Thelightningashwitharrowheadsymbol,withinanequilateraltriangle,is
intended to alert the user to the presence of uninsulated “dangerous voltage”
withintheproduct’senclosurethatmaybeofsufcientmagnitudetoconstitutea
risk of electric shock to persons.
The exclamation point within an equilateral triangle is intended to alert the user
to the presence of important operating and maintenance (servicing) instructions
in the literature accompanying the appliance.
For Your Safety
Warning: Do not try to open the case of the Hopper® 3 receiver. There is risk
of electrical shock, which may cause damage to the Hopper 3 and/or personal
injury or death to you. There are no user-serviceable parts inside the Hopper 3
receiver. Opening the receiver’s case or making unauthorized changes will void
the warranty.
Warning:Toreducetheriskofreorelectricshock,donotexposethis
appliance to rain or moisture.
Important Software Notice
As with all software controlled products, unexpected behavior could arise if the user
tries to perform operations in a non-routine manner. This product, like almost any other
high tech product, is subject to bugs and hence EchoStar CANNOT AND DOES NOT
GUARANTEE OR WARRANT THAT ALL FEATURES, SUCH AS PARENTAL CONTROLS,
WILL WORK AS INTENDED UNDER ALL CIRCUMSTANCES. EchoStar endeavors to
improve such conditions and will periodically download improvements.
Equipment and Software Covered by this Getting Started Guide
This Hopper 3 User Guide covers the Hopper 3 receiver and software models Hopper 3.
This document may cover other devices not listed here.
Publishing Information
Copyright © 2015. EchoStar Technologies L.L.C., Englewood, Colorado 80112. All rights
reserved.
The information in this document may change without notice. Revisions may be issued to
tell you about such changes.
Hopper_3_UserGuide.indd 2 8/17/2015 1:05:30 PM
III
Send comments or questions about this document to
techpubs@echostar.com or
Technical Publications, EchoStar Technologies L.L.C,
90 Inverness Circle East, Englewood, Colorado 80112.
Part Number: 207601
Printed in
DISH is a registered trademark of DISH Network L.L.C.
All product names, trade names, or corporate names mentioned in this document are
acknowledged to be the proprietary property of the registered owners.
Manufactured under license from Dolby Laboratories. Dolby and the double-D symbol are
trademarks of Dolby Laboratories.
®HDMI,theHDMIlogoandHigh-DenitionMultimediaInterfaceare
trademarks or registered trademarks of HDMI Licensing LLC.
This equipment may incorporate copyright protection technology that is protected by U.S.
patents, patent applications, and/or other intellectual property rights. Use of such copyright
protection technology is intended for home and other limited pay-per-view uses only
unless otherwise authorized. Reverse engineering or disassembly is prohibited.
Hopper_3_UserGuide.indd 3 8/17/2015 1:05:30 PM

IV
Important Safety Instructions
1 Read these instructions.
2 Keep these instructions.
3 Heed all warnings.
4 Follow all instructions.
5 Do not use the apparatus near water.
6 Clean only with a dry cloth.
7 Do not block any ventilation openings. Install in accordance with the manufacturer’s
instructions.
8 Do not install near any heat sources such as radiators, heat registers, stoves, or other
apparatus(includingampliers)thatproduceheat.
9 Do not defeat the safety purpose of the polarized or grounding-type plug. A polarized
plug has two blades with one wider than the other. A grounding-type plug has two
blades and a third grounding prong. The wide blade or the third prong are provided for
yoursafety.Iftheprovidedplugdoesnottintoyouroutlet,consultanelectricianfor
replacement of the obsolete outlet.
10 Protect the power cord from being walked on or pinched, particularly at plugs,
convenience receptacles, and the point where they exit from the apparatus.
11 Onlyuseattachments/accessoriesspeciedbythemanufacturer.
12 Unplug the apparatus during lightning storms or when unused for long periods of time.
13 Referallservicingtoqualiedservicepersonnel.Servicingisrequiredwhenthe
apparatus has been damaged in any way, such as the power supply cord or plug is
damaged, liquid has been spilled or objects have fallen into it, the apparatus has been
exposed to rain or moisture, does not operate normally, or has been dropped.
14 The power plug must be readily accessible so that the apparatus can be easily
disconnected from the AC power.
15 The receiver is still connected to the AC power whenever it is plugged into a live
power outlet, even if it is turned off using the remote control or front panel buttons.
16 Noamesources,suchaslitcandles,shouldbeplacedontheequipment.
17 Theapparatusshallnotbeexposedtodrippingorsplashing,andnoobjectslledwith
liquids, such as vases, shall be placed on the top of it.
18 Use only the power supply provided with the receiver. Unplug the receiver’s power
cord by gripping the power plug, not the cord.
19 Donotoverloadwalloutletsorextensioncords;thiscanresultinariskofreor
electrical shock.
20 Never insert objects of any kind into the receiver through openings, as the objects
maytouchdangerousvoltagepointsorshortoutparts.Thiscouldcausereor
electrical shock.
21 Do not locate the antenna near overhead light or power circuits, or where it can fall
into such power lines or circuits. When installing the antenna, take extreme care to
avoid touching such power lines or circuits, as contact with them can be fatal.
Hopper_3_UserGuide.indd 4 8/17/2015 1:05:30 PM

V
22 Do not attempt to service the receiver yourself, as opening or removing covers
may expose you to dangerous voltage and will void the Limited Warranty. Refer all
servicing to authorized service personnel.
23 Unplug the receiver from the AC power outlet before cleaning.
24 Do not place the receiver in an enclosure such as a cabinet without proper ventilation.
25 Do not install the receiver in any area where the temperature can be less than 40°F or
more than 113°F. If the receiver is cold to the touch, do not plug it in immediately. Let
it sit unplugged at room temperature for at least 45 minutes before plugging it in.
26 Use an outlet that contains surge suppression or ground fault protection. During an
electrical storm or when the receiver is left unattended and unused for long periods
of time, unplug the power cord from the wall outlet, disconnect the lines between the
receiver and the antenna, and disconnect the telephone line. These actions provide
additional protection against damage caused by lightning or power line surges.
27 Tighten all of the coaxial cable connections only by hand. If you use a wrench, you
may overtighten the connections and damage your equipment.
Hopper_3_UserGuide.indd 5 8/17/2015 1:05:30 PM
VI
Important Safety Instructions,
Cont’d
Proper Care of Your Equipment
• Always handle the receiver carefully. Excessive shock and vibration can damage it.
• If the equipment is turned on and needs to be moved, unplug the equipment and let it
sit for at least 30 seconds before moving it.
• The use of accessories or attachments not recommended by the receiver
manufacturer will void the Limited Warranty.
• Do not stack the receiver on top of or below other electronic devices as this can
cause heat build-up and vibration.
• OnsomeTVs,thepresenceofxedimagesforextendedperiodsoftimemay
cause them to be permanently imprinted on the screen. Consult your TV user guide
for information on whether this is a problem for your TV, what operating/viewing
restrictions apply to avoid this problem, and associated TV warranty coverage.
If this equipment does cause harmful interference to radio or television reception,
which can be determined by turning the equipment off and on, the user is
encouraged to try to correct the interference by one or more of the following
measures:
• Reorient or relocate the antenna assembly.
• Increase the separation between the equipment.
• Connect the equipment into an outlet on a circuit different from that to which
the apparatus is connected.
• Consult the dealer or an experienced radio/TV technician for help.
Note to Antenna Installer: This reminder is provided to call the antenna
installer’s attention to the National Electrical Code® (NEC) which provides
guidelines for proper bonding and grounding of antennas and their associated
cabling.
Hopper_3_UserGuide.indd 6 8/17/2015 1:05:30 PM

1
Hopper 3 Receiver
Your new Hopper® 3 receiver is a Whole-Home HD DVR that offers full digital video
recording functionality, including pausing live TV, to every TV in your house that is
part of your Whole-Home DVR system. The Hopper 3 receiver is the hub for all things
entertainment. It is an HD DVR that provides the equivalent of 16 tuners, allowing you to
record multiple HD channels at once and at any time and play them back in any room in
your home. Using the PrimeTime Anytime® feature, you can record up to six HD channels
simultaneously (with your local ABC, CBS, FOX and NBC channels provided in HD,
which may not be available in all markets). It is one HD DVR that works independently
on as many as four different TVs at the same time, so everyone can be in different room
watching their favorite TV programming.
Joey® receivers (Joey®, SuperJoey®, Wireless Joey®, 4K Joey™) connect to other TVs
in your home and link to the Hopper 3 system, creating a Whole-Home DVR network. It
supports all of the features of the Hopper 3 (with the exception of Picture-In-Picture) and
offers an identical user interface as the Hopper 3. You can connect a Joey receiver to a
high-denitionorstandard-denitionTV.
The remote uses radio frequency (RF) signals to control the Hopper 3 receiver and IR
signals to control any other equipment you have programmed. RF signals travel relatively
long distances and can go through walls and other solid objects. IR signals, used in TV,
DVD, and AUX device modes, travel up to 40 feet in a straight line-of-sight and cannot go
through walls or other solid objects. Point the remote directly at the equipment you want to
control without any objects blocking the signal path.
Note: The term “Hopper” in this document represents both the original Hopper® receiver,
the Hopper® with Sling® receiver, and the Hopper® 3 receiver.
Hopper_3_UserGuide.indd 1 8/17/2015 1:05:30 PM
2
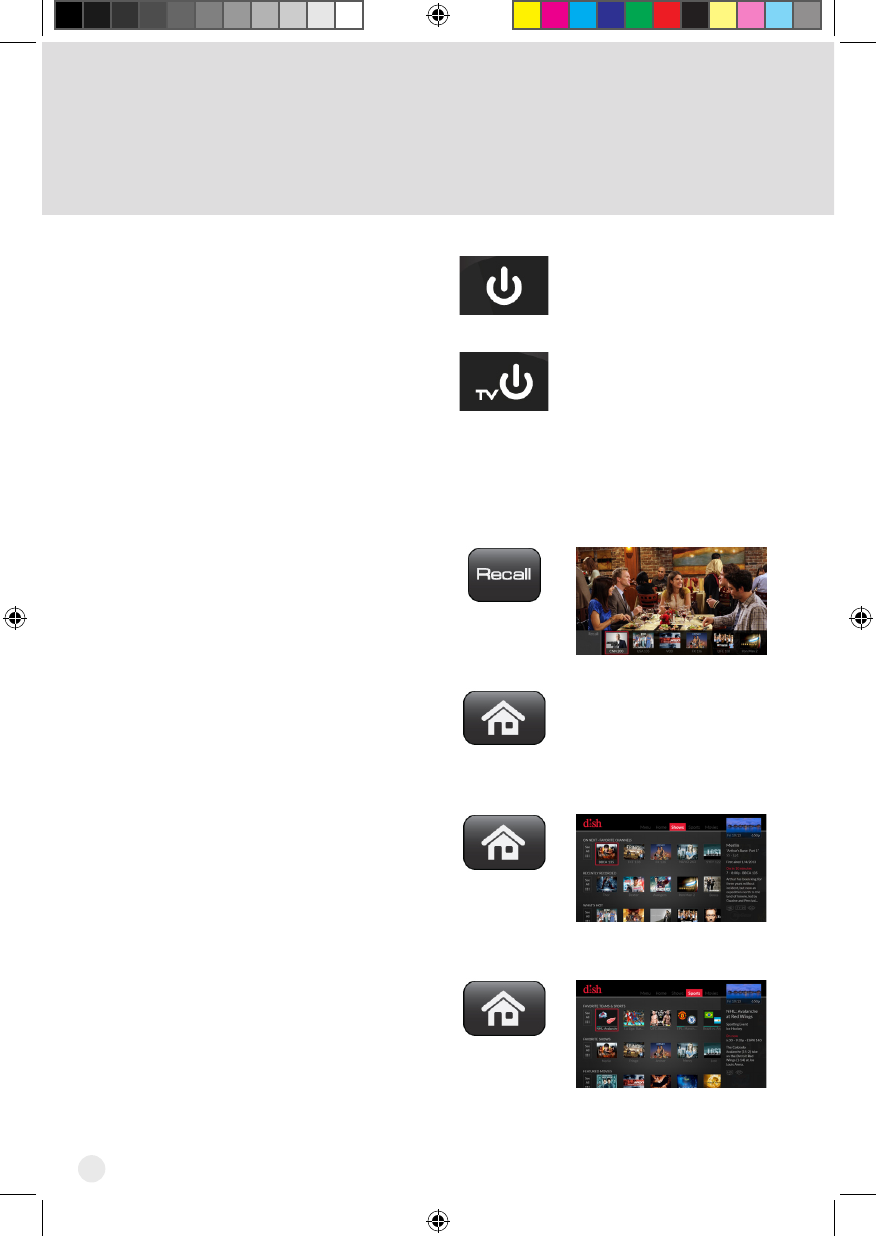
Watching TV
Press the POWER button on
your DISH remote.
Press the TV POWER button
on your DISH remote. Live TV
displays.
Other ways to nd programs
to watch
Press the RECALL button
to display previously viewed
channels.
Press the HOME button to
display programs On Now,
On Later, and a list of your
recordings.
Highlight Shows on the menu
at the top of the screen and
click the touchpad to display
top shows picks.
Highlight Sports on the menu
at the top of the screen and
click the touchpad to display
games that your team are
playing, Games on Today, and
most anticipated match-ups.
1
2
Hopper_3_UserGuide.indd 2 8/17/2015 1:05:31 PM
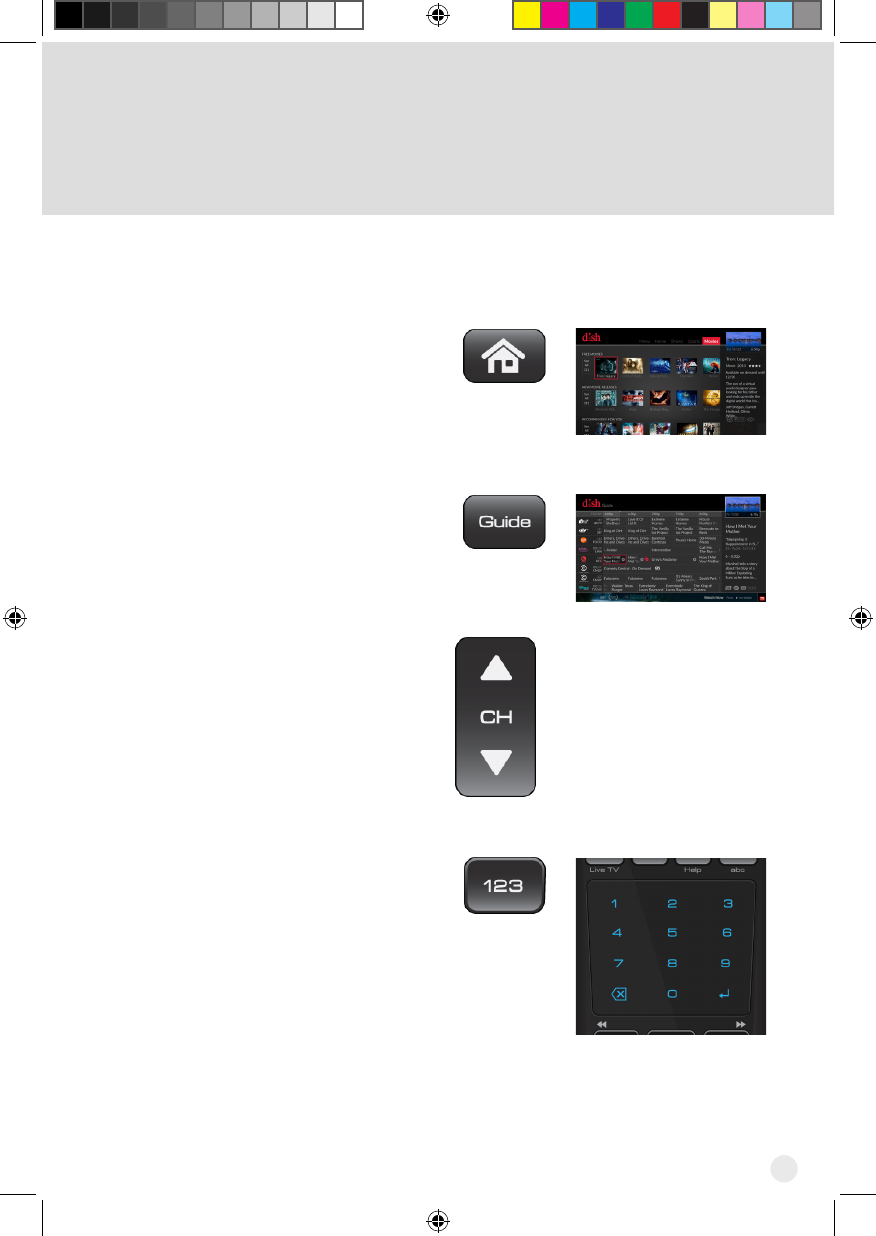
3
Other ways to nd programs
to watch, continued
Highlight Movies on the menu
at the top of the screen and click
the touchpad to display movies
available from DISH, movies in
theaters, and movies coming
soon.
Press the GUIDE button to view
the program guide.
Press the Channel UP or DOWN
button on your DISH remote.
Press the 123 button on your
DISH remote. The number pad
displays within the touchpad
area of the remote. Enter the
channel that you want.
Hopper_3_UserGuide.indd 3 8/17/2015 1:05:31 PM
4
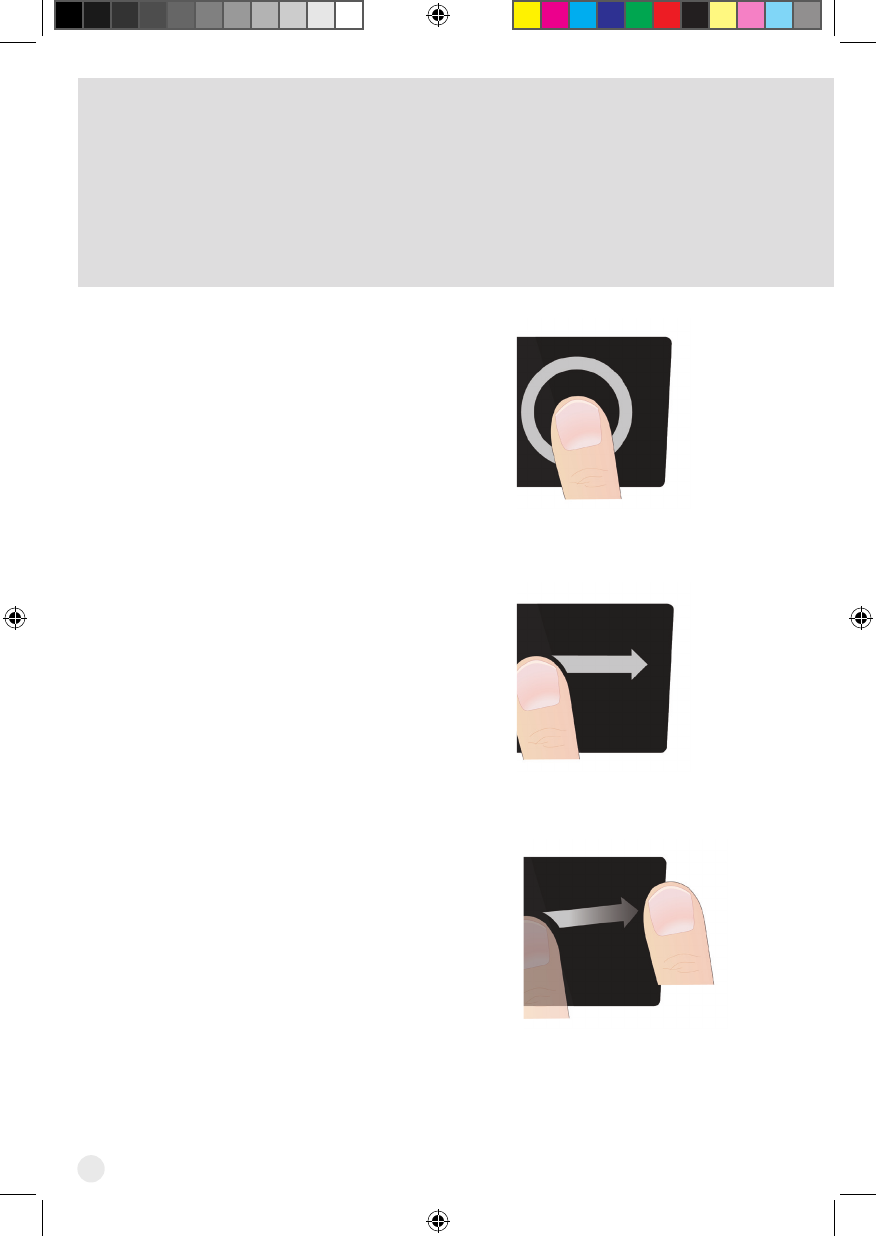
Using the Touchpad
Click the touchpad to make a
selection.
Dragangeracrossthe
touchpad to move the highlight
to where you want it.
Swipe to navigate more quickly
through large groups of content
such as the program guide or
to open additional options while
viewing TV. To swipe, drag and
thenliftyourngerattheend.
a
b
c
Hopper_3_UserGuide.indd 4 8/17/2015 1:05:32 PM
5
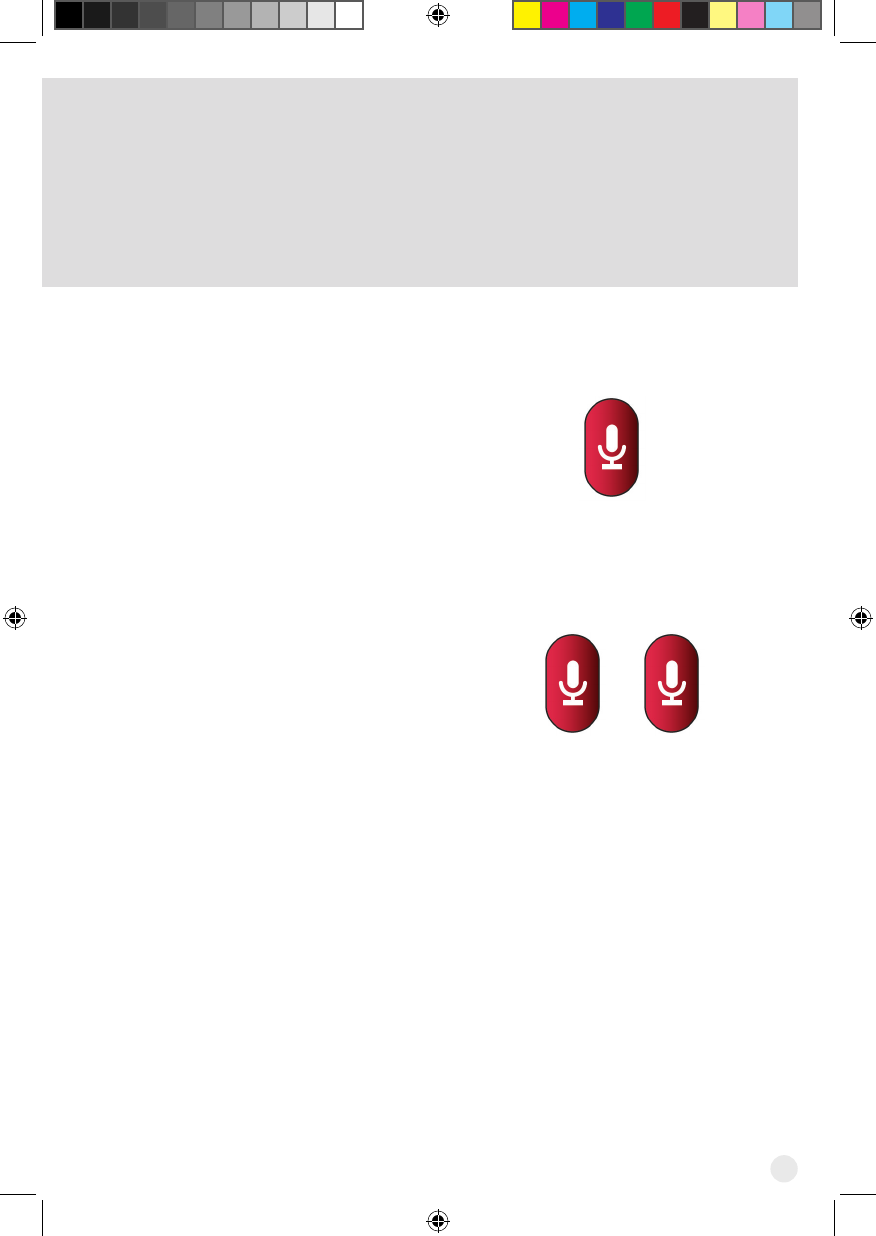
Using the Microphone
To go directly into voice
control, press and hold the
MICROPHONE button.
To create a text search, press
the MICROPHONE button twice.
Note: This remote is only in listening mode when the MICROPHONE
button is pressed and held. It is not a listening device.
a
b
Hopper_3_UserGuide.indd 5 8/17/2015 1:05:32 PM
6
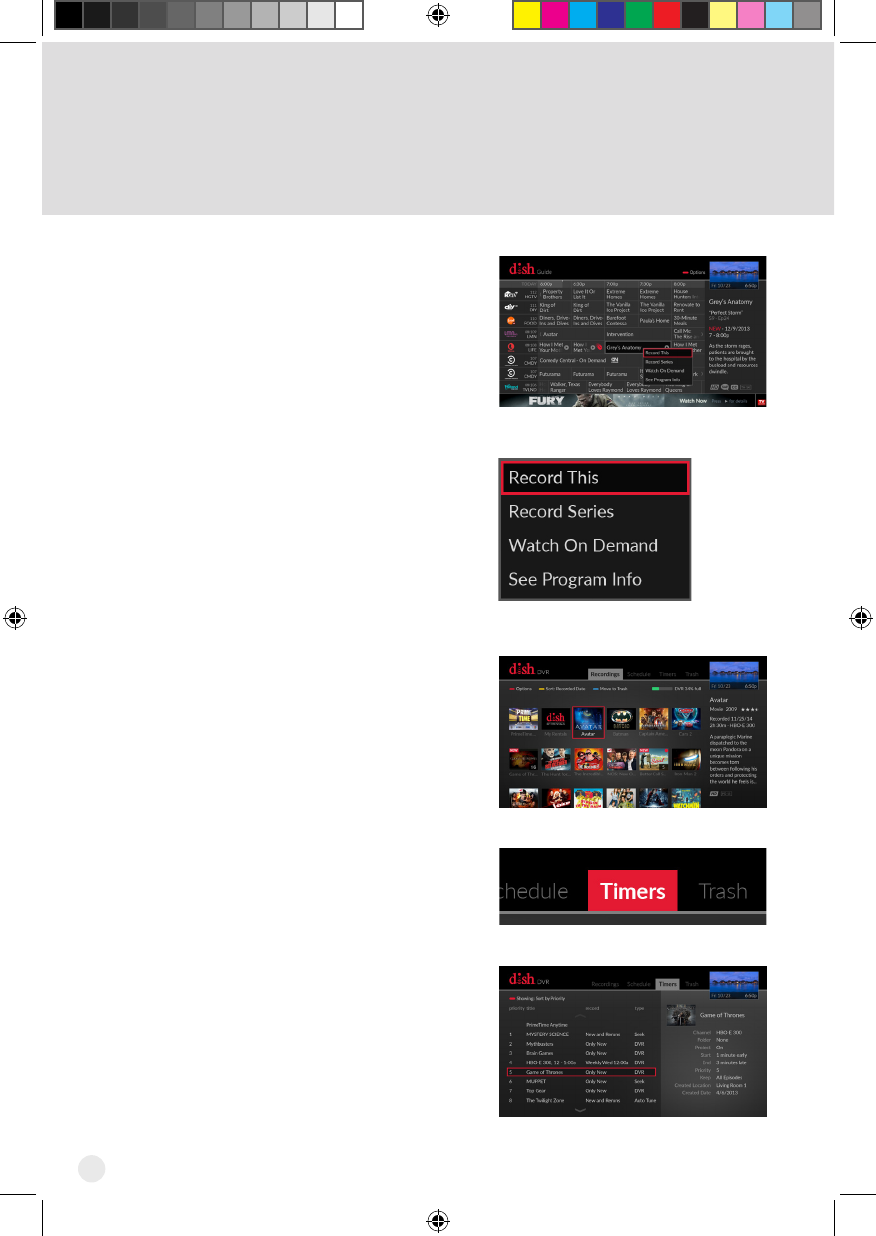
Recording Shows
Using one of the methods listed
in Watching TV, click on the
show that you want to record. A
menu appears, giving you the
option to Record This show,
Record Series (if appropriate),
Watch On Demand, or to See
Program Information.
Highlight your preference and
click the touchpad.
Viewing Timers for Shows to
Record
To view the timers, press the
DVR button on your DISH
remote.
Highlight Timers in the menu at
the top of the screen and click
the touchpad to select it. Timer
information displays.
1
2
1
2
Hopper_3_UserGuide.indd 6 8/17/2015 1:05:33 PM
7
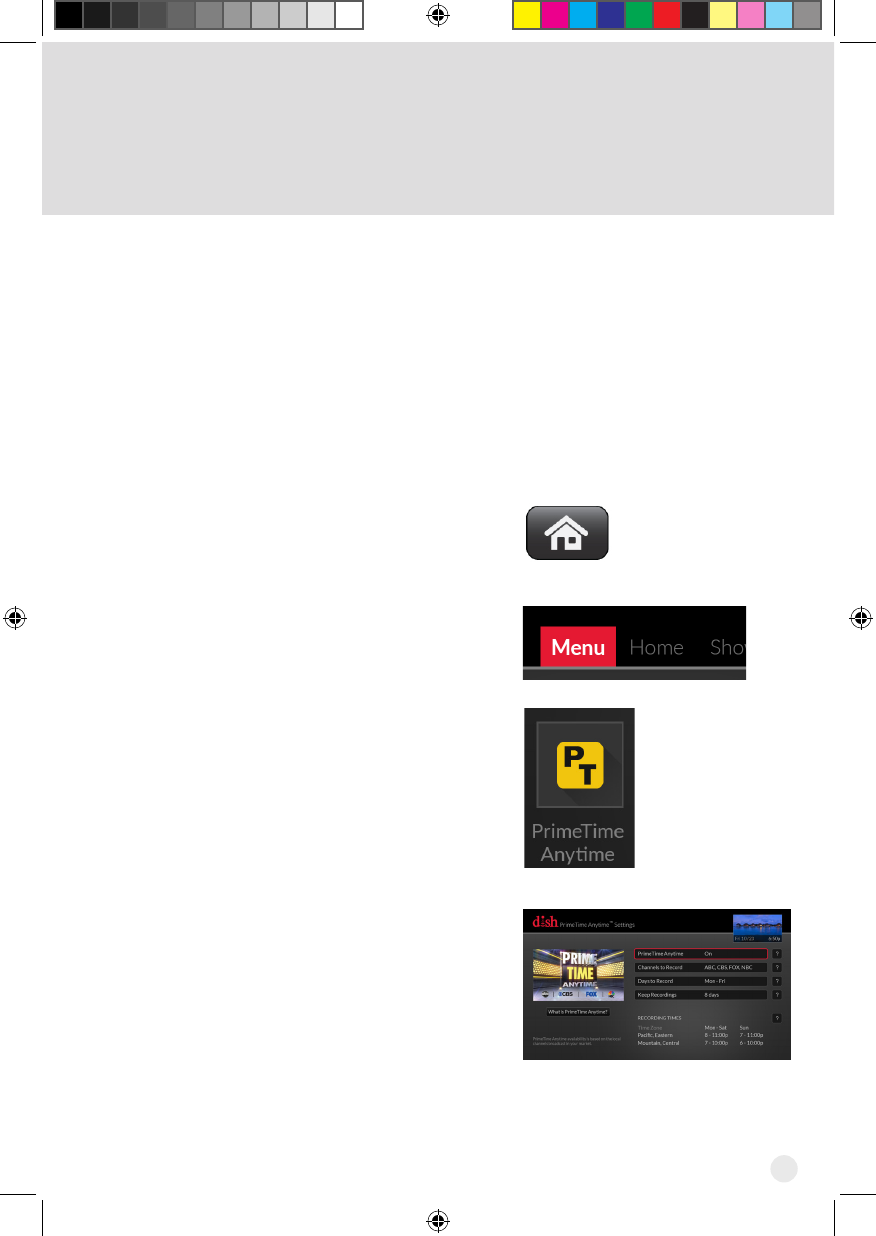
Setting PrimeTime Anytime
When enabled, the PrimeTime Anytime® feature provides instant access to
yourfavoriteshowsonABC,CBS,FOX,andNBCinhigh-denition.Programs
airing during primetime hours, 8-11 p.m. ET/PT Monday through Saturday and
7-11 p.m. ET/PT Sunday, are recorded and accessible for eight days from their
initial air dates. You can save these recordings to your DVR library to watch
them at any time.
Note: If any of your local HD channels are not available in your market, these
shows cannot be recorded automatically.
Press the HOME button on your
DISH remote.
Highlight Menu at the top of the
screen and click the touchpad.
Highlight the PrimeTime Anytime
tile and click the touchpad to
select it.
Highlight the PrimeTime
Anytime option and click the
touchpad. The PrimeTime
Anytime option is now On.
You can customize your
PrimeTime Anytime options by
highlighting and selecting the
options.
1
2
3
4
Hopper_3_UserGuide.indd 7 8/17/2015 1:05:33 PM
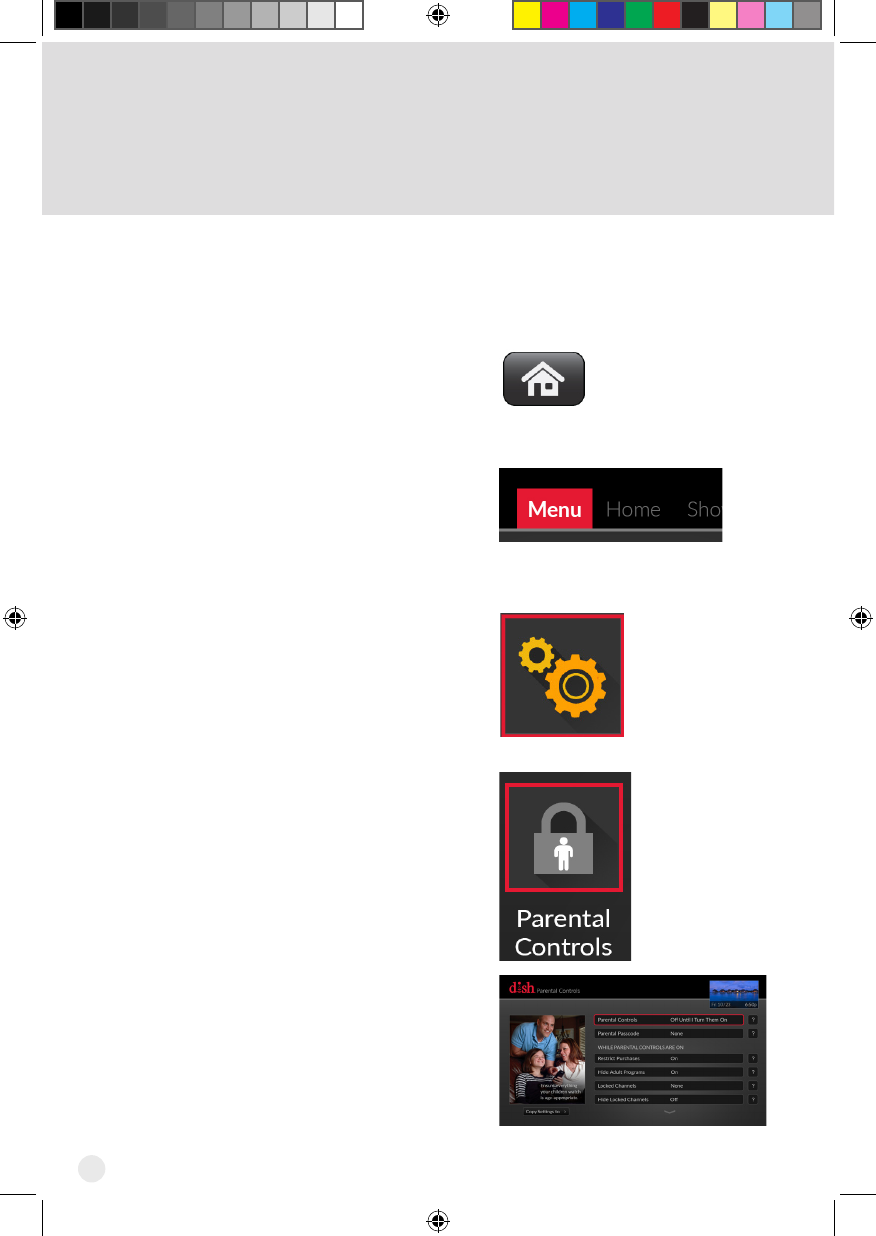
8
Press the HOME button
on your DISH remote.
Highlight the Menu
option on the top of the
screen and click on the
touchpad to select it.
Select the Settings tile.
Select the Parental
Controls tile.
The Parental Controls
screen appears.
To place parental controls on the programming coming to the TV connected to
this receiver, you can set parental controls.
1
2
3
Setting Parental Controls
4
Hopper_3_UserGuide.indd 8 8/17/2015 1:05:33 PM
9
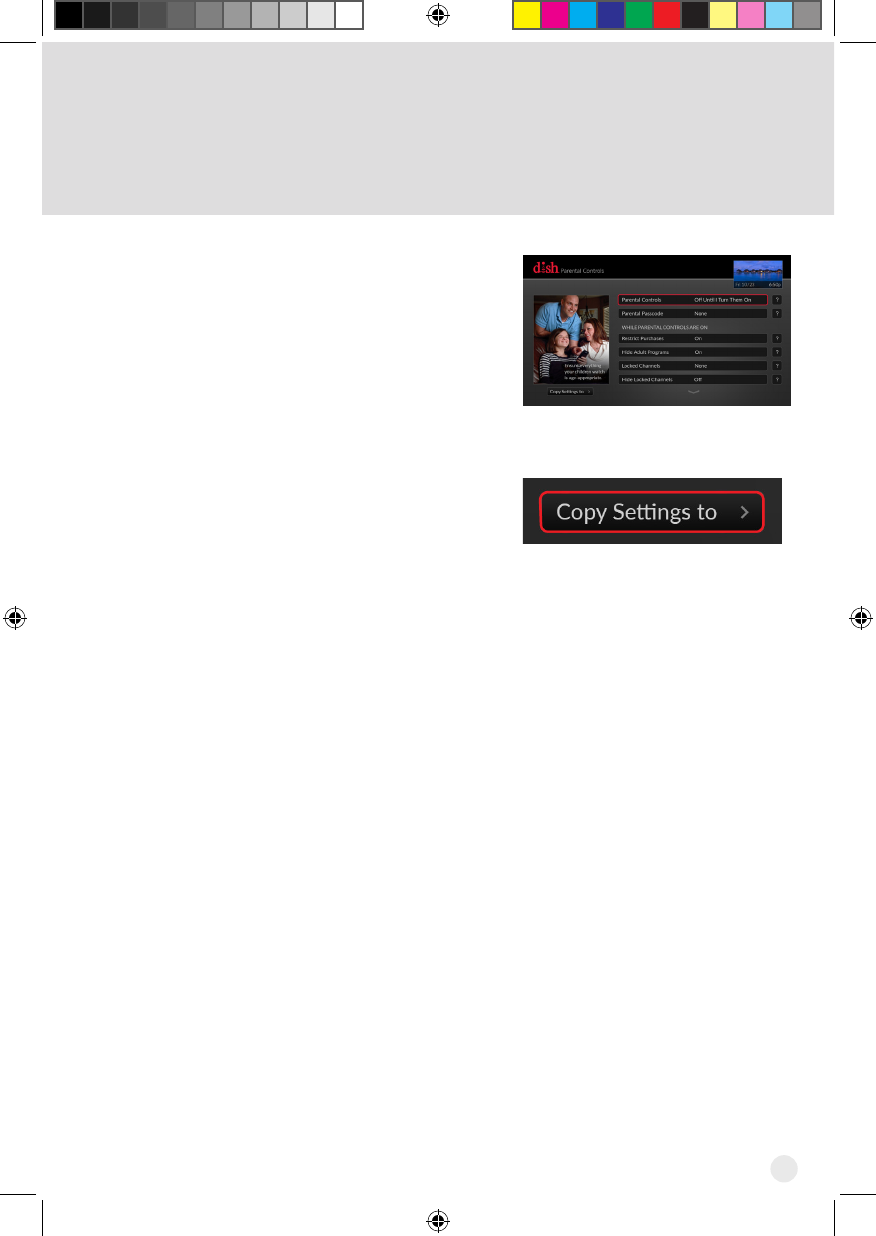
5Set your preferences by
highlighting an option and
clicking the touchpad.
The Hopper 3 saves each
option as you select your
preference.
If you want to copy your
settings to another receiver
such as a Joey, highlight
the Copy Settings to
button and click the
touchpad.
6
Hopper_3_UserGuide.indd 9 8/17/2015 1:05:34 PM
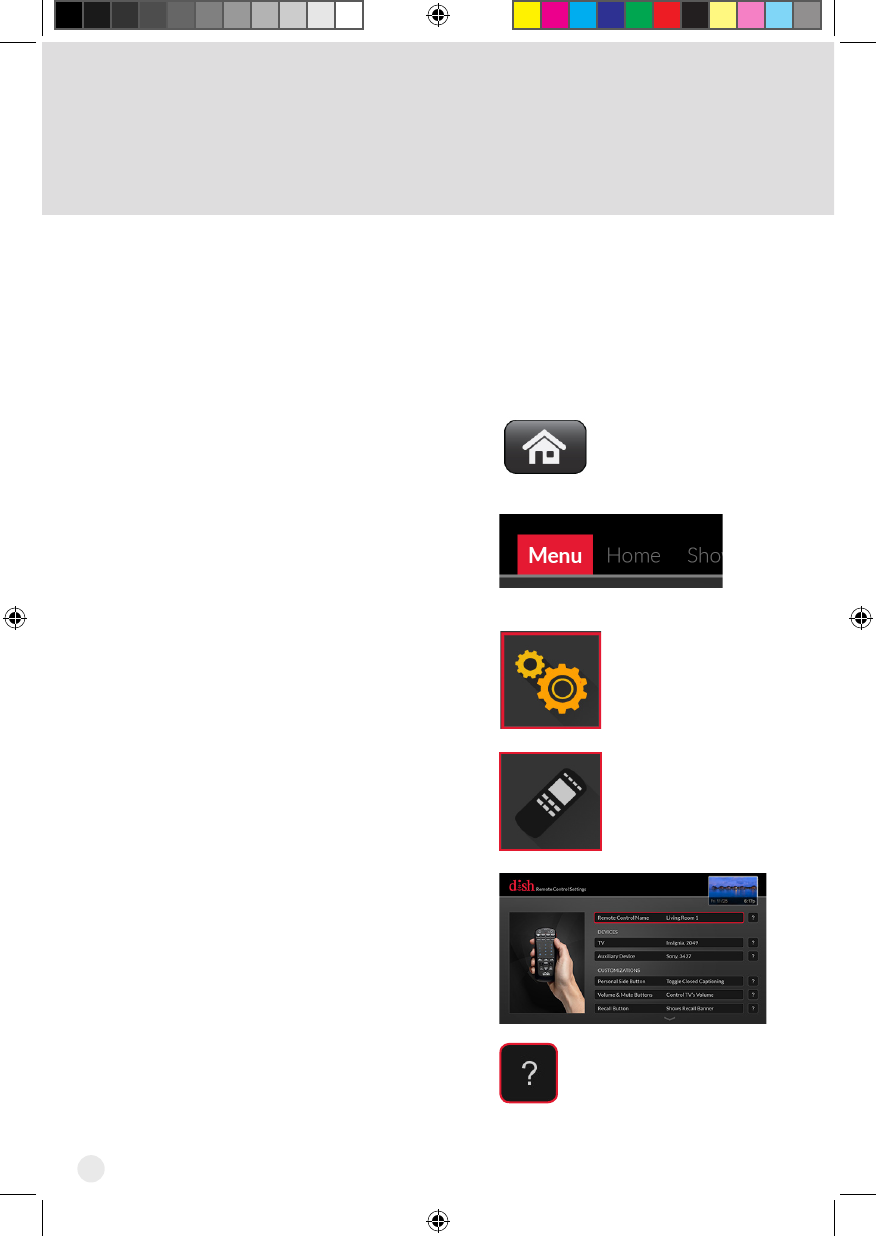
10
Press the HOME button.
Use the touchpad to access
the tabs. Move the tab
selection to Menu and click
the touchpad to select.
Select Settings.
Select Remote Control.
Select the Devices,
Customizations, or
Advanced Features that you
would like to program.
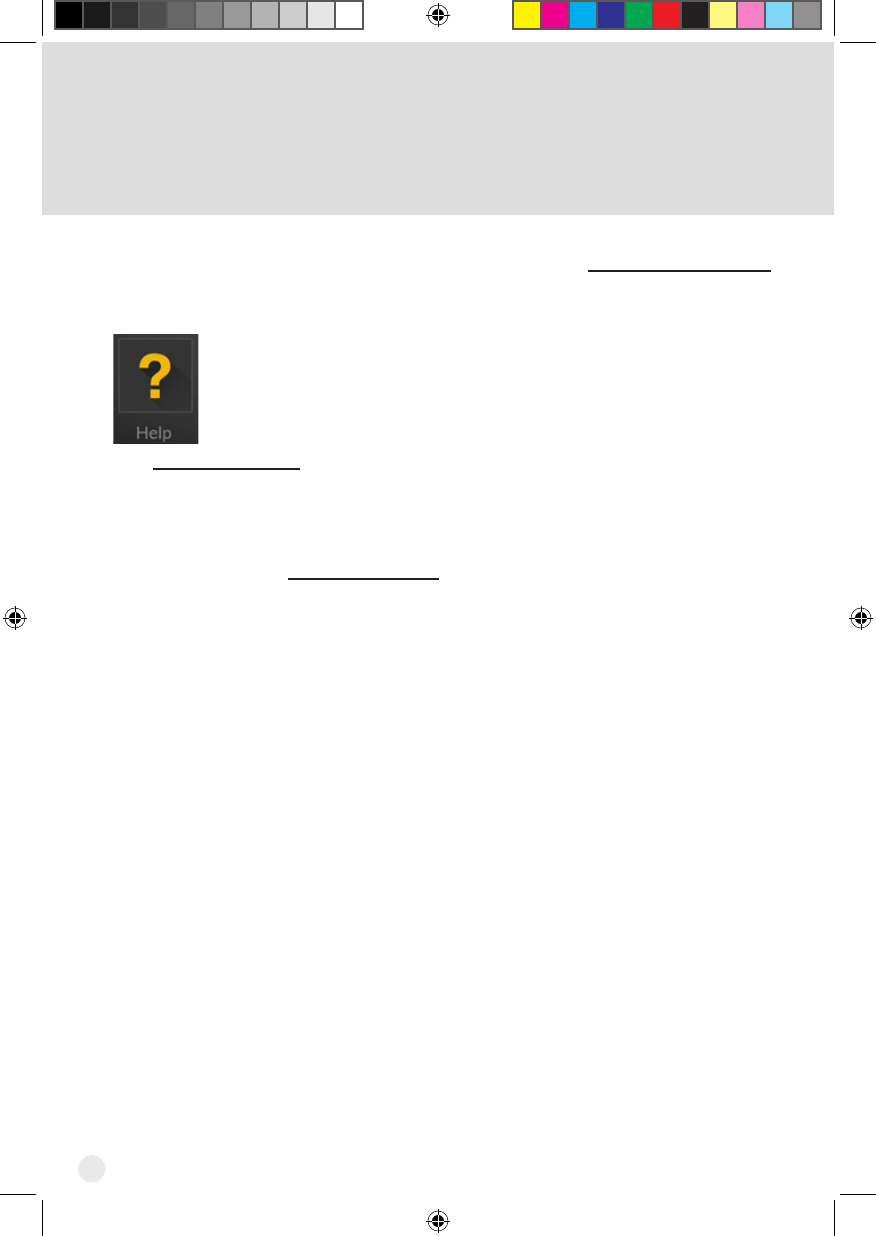
If you need additional
information, use the ?
button.
Remote Settings
1
2
3
If you would like the VOLUME and MUTE buttons on
your DISH remote to work with your TV or other devices,
go to the Remote Control Settings menu to program
your DISH remote.
4
5
6
Hopper_3_UserGuide.indd 10 8/17/2015 1:05:34 PM
11
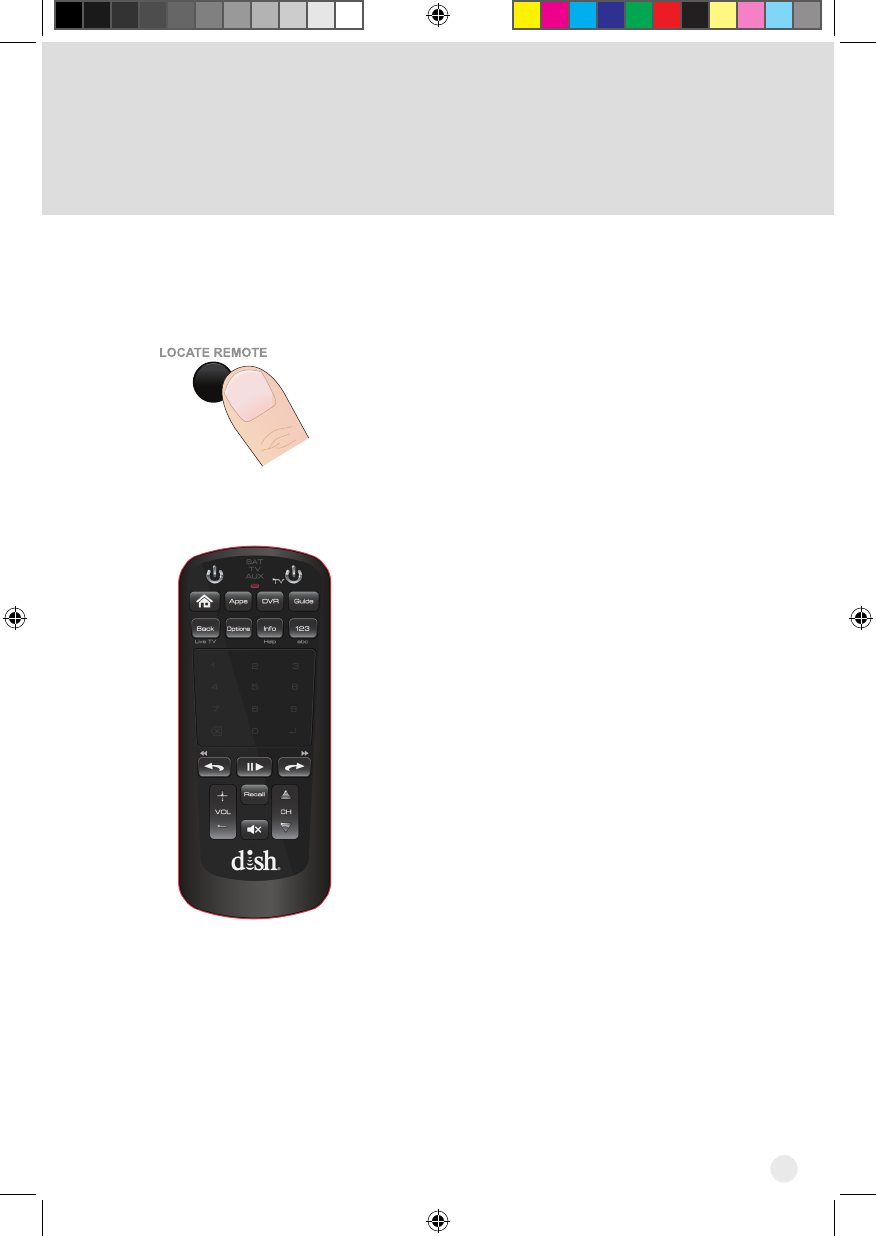
Locating the Remote
Press LOCATE REMOTE on the front
panel of the Hopper 3 receiver.
If the missing remote control is paired to
this Hopper 3 receiver and within radio
frequency (RF) range, there should be a
seriesoftonesyouheartohelpndthe
location of the remote. It may take up to 30
seconds after touching LOCATE REMOTE
before you hear the tones. Press any
button on the remote to turn off the Locate
tonesafterndingtheremote.
If you do not hear any tones after pressing
LOCATE REMOTE, press the SYSTEM
INFO button on the front panel. The
System Info screen lists the paired
remote(s). If the remote control you want
tondisnotlistedoritisnotpairedto
the Hopper 3 receiver, using LOCATE
REMOTE is not an option.
Iftheremotecontrolyouwanttondisout
of RF range, LOCATE REMOTE is not an
option.
When you are looking for the remote, try the LOCATE REMOTE feature on the
front panel of the Hopper receiver.
1
2
Hopper_3_UserGuide.indd 11 8/17/2015 1:05:34 PM
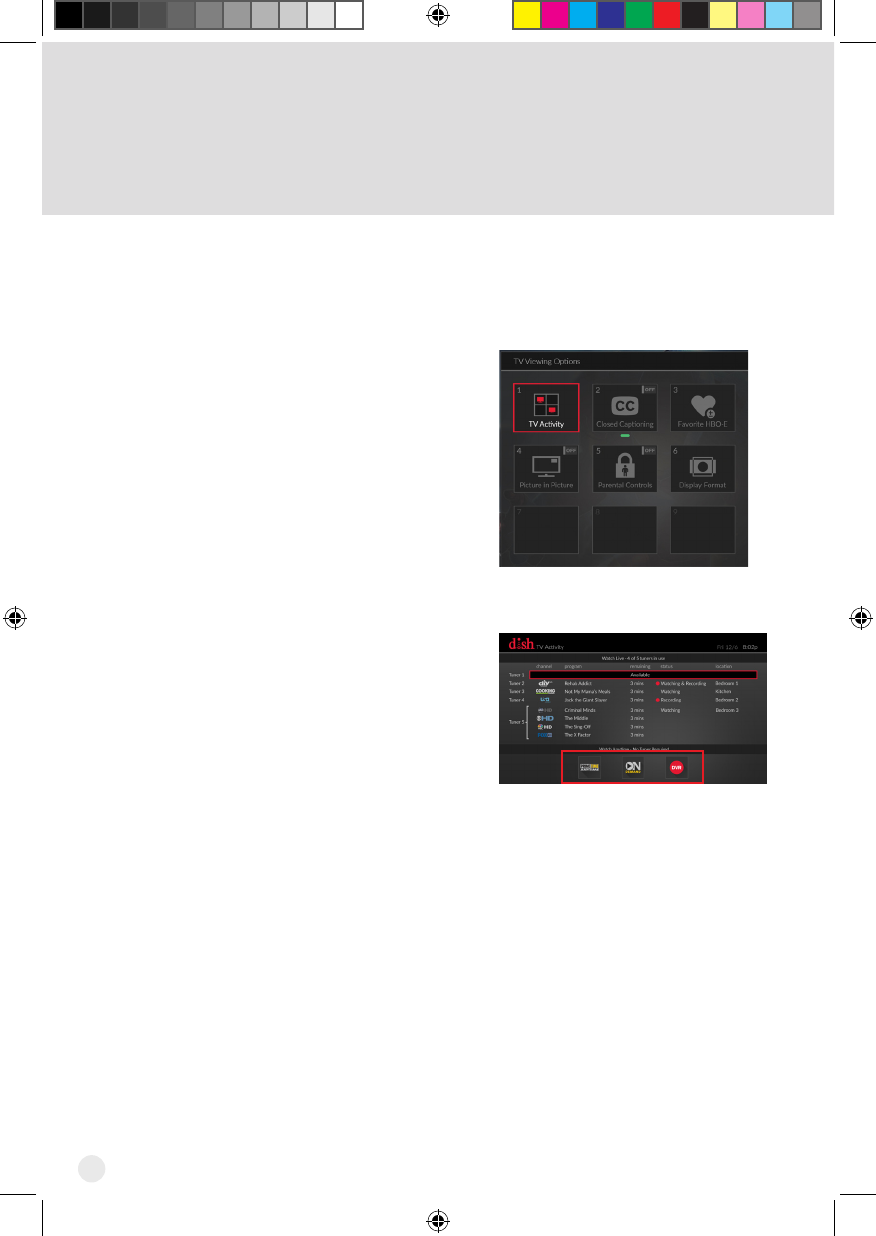
12
Sharing Content
If all tuners are in use, you may either join one of the events or watch a program
found under PrimeTime Anytime®, On Demand, or recorded on the DVR.
Press the OPTIONS button on your
DISH remote. The TV Viewing
Options screen appears.
With the TV Activity tile
highlighted, click on the touchpad.
The TV Activity screen displays.
1
2
Hopper_3_UserGuide.indd 12 8/17/2015 1:05:36 PM
13
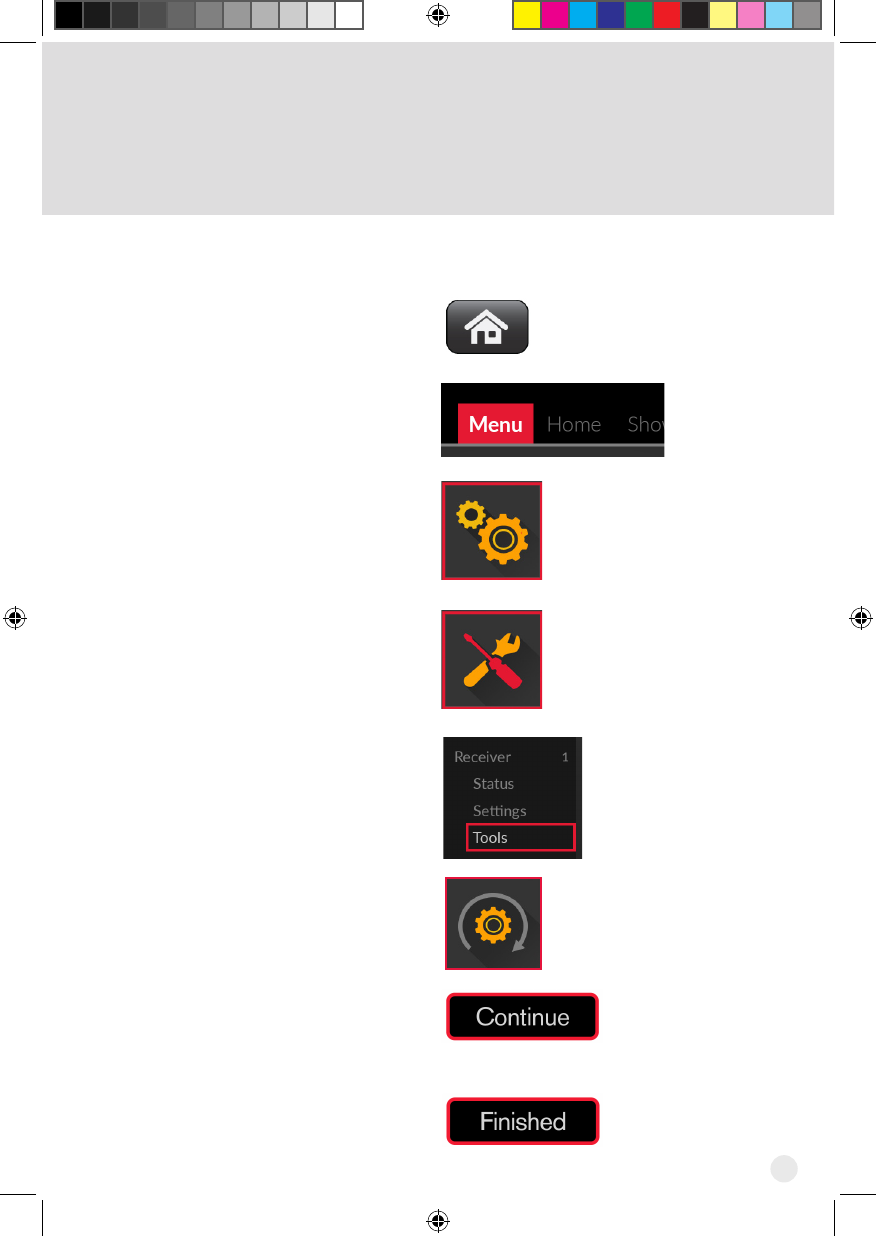
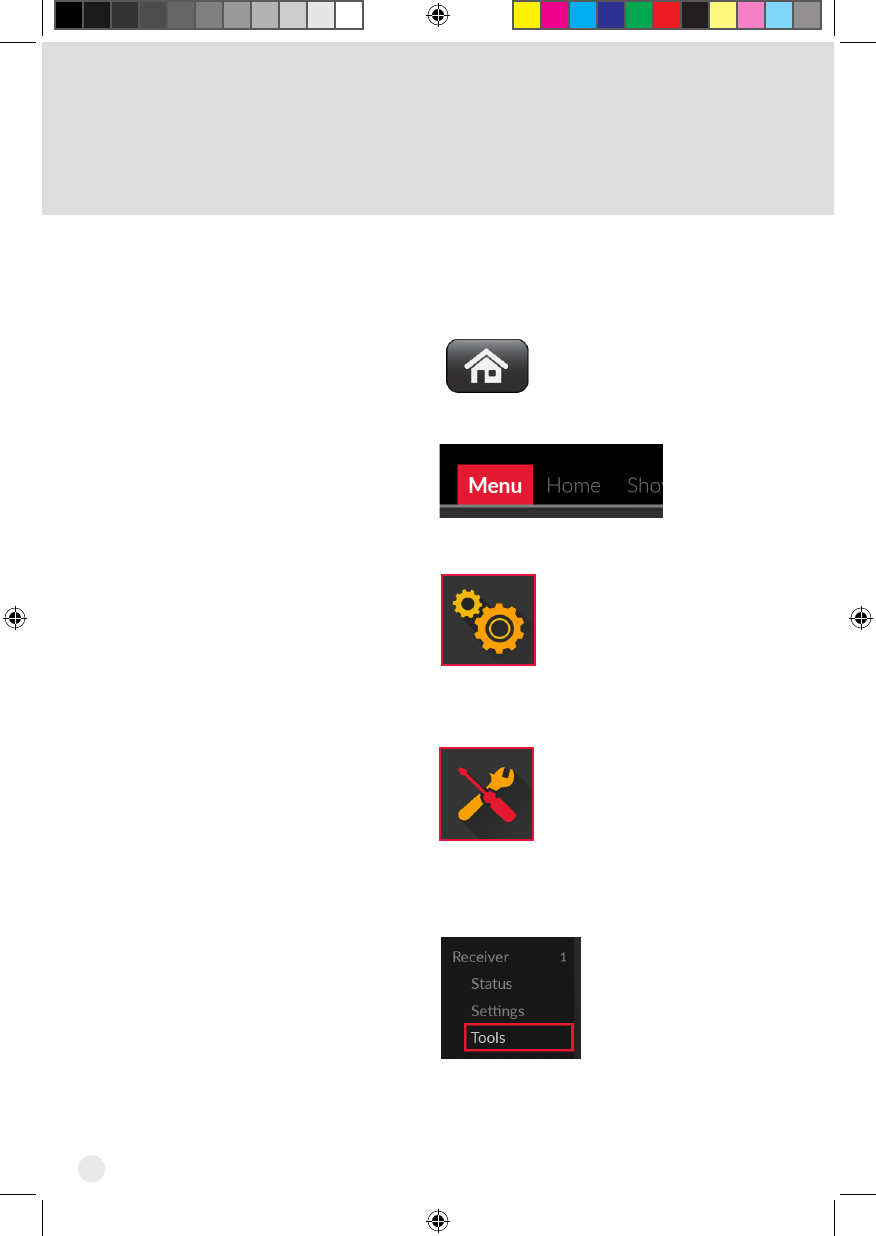
Backing-up Your Remote
Settings
Press the HOME button.
Use the touchpad to access
the tabs. Move the tab
selection to Menu and click
the touchpad to select.
Select Settings.
Select Diagnostics.
Select Tools under
Receiver.
Select Back Up Settings.
Select Continue.
Note: Do not move your
DISH remote or receiver
during this process.
Select Finished when the
backup is completed.
1
2
3
4
5
6
7
8
After changing your remote settings, it is recommended
that you back-up these settings.
Hopper_3_UserGuide.indd 13 8/17/2015 1:05:36 PM
14
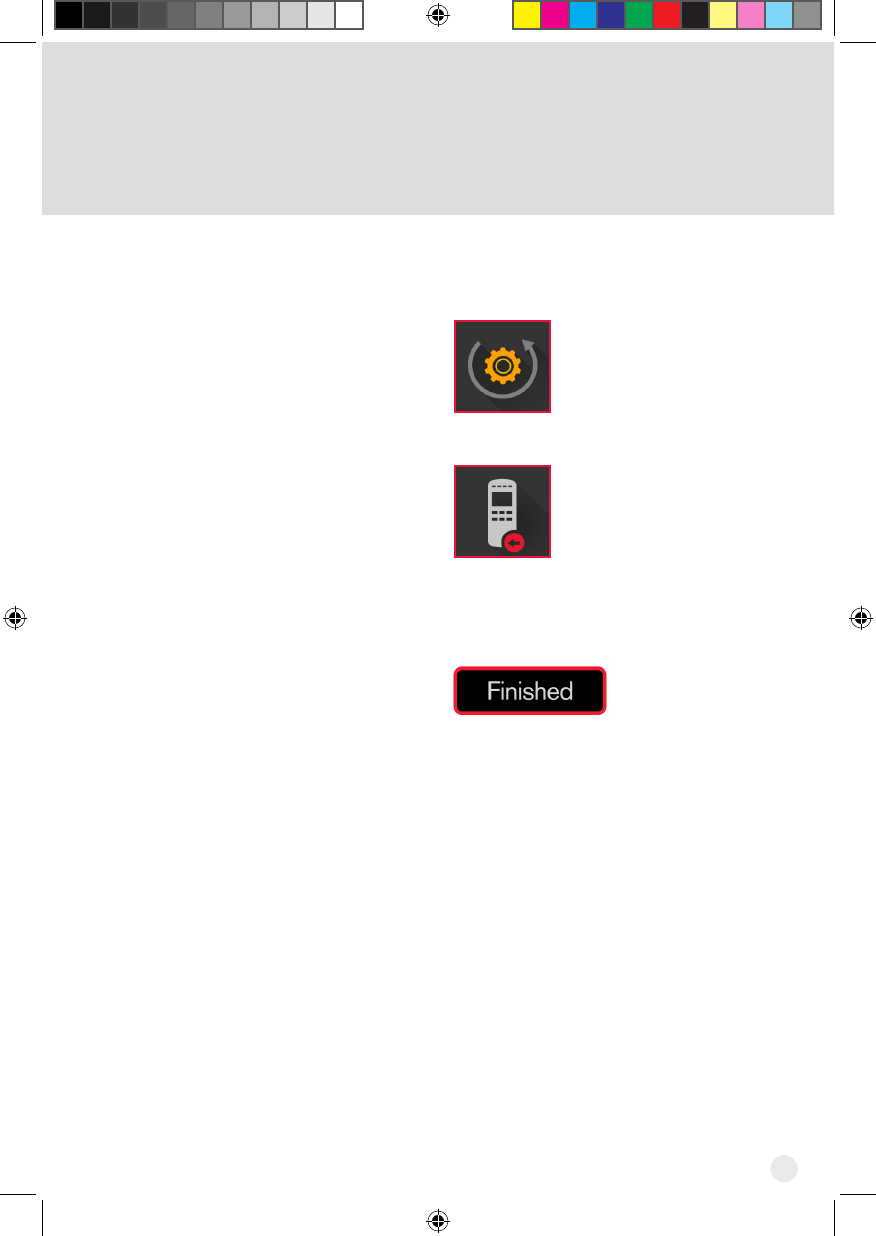
Restoring Remote Settings
Press the HOME button.
Use the touchpad to access
the tabs. Move the tab
selection to Menu and click
the touchpad to select.
Select Settings.
Select Diagnostics.
Select Tools under
Receiver.
1
2
3
4
5
After your remote is paired, restore your remote settings
to update the remote with settings that were previously
backed-up.
Hopper_3_UserGuide.indd 14 8/17/2015 1:05:36 PM
15
Select Restore Settings.
Select Restore to Remote
Control to update your
remote with previously
backed-up settings.
Note: Do not move the
remote or disturb the
receiver during this process.
Select Finished when the
remote settings have been
restored.
6
7
8
Hopper_3_UserGuide.indd 15 8/17/2015 1:05:36 PM
16
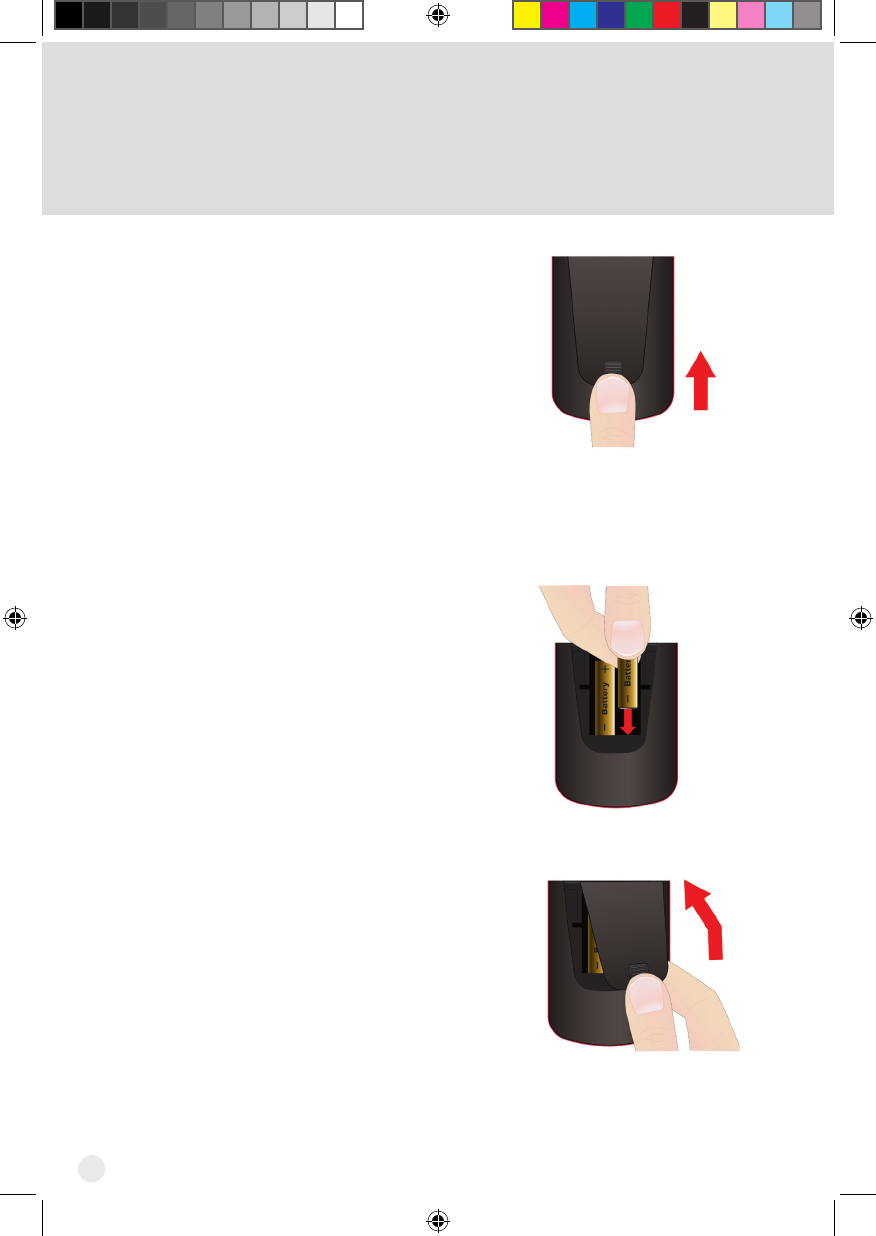
Inserting the Batteries
1
2
3
Push the tab toward the top
of the remote to release the
battery door latch and lift
the battery door from the
remote.
Insert 2 AA batteries, putting
thenegativeendrst.
Match the plus (+) ends with
the plus markings inside the
battery case.
Slide the top of the remote
battery cover back into place
and push the bottom of the
cover until it clicks closed.
Hopper_3_UserGuide.indd 16 8/17/2015 1:05:37 PM
17
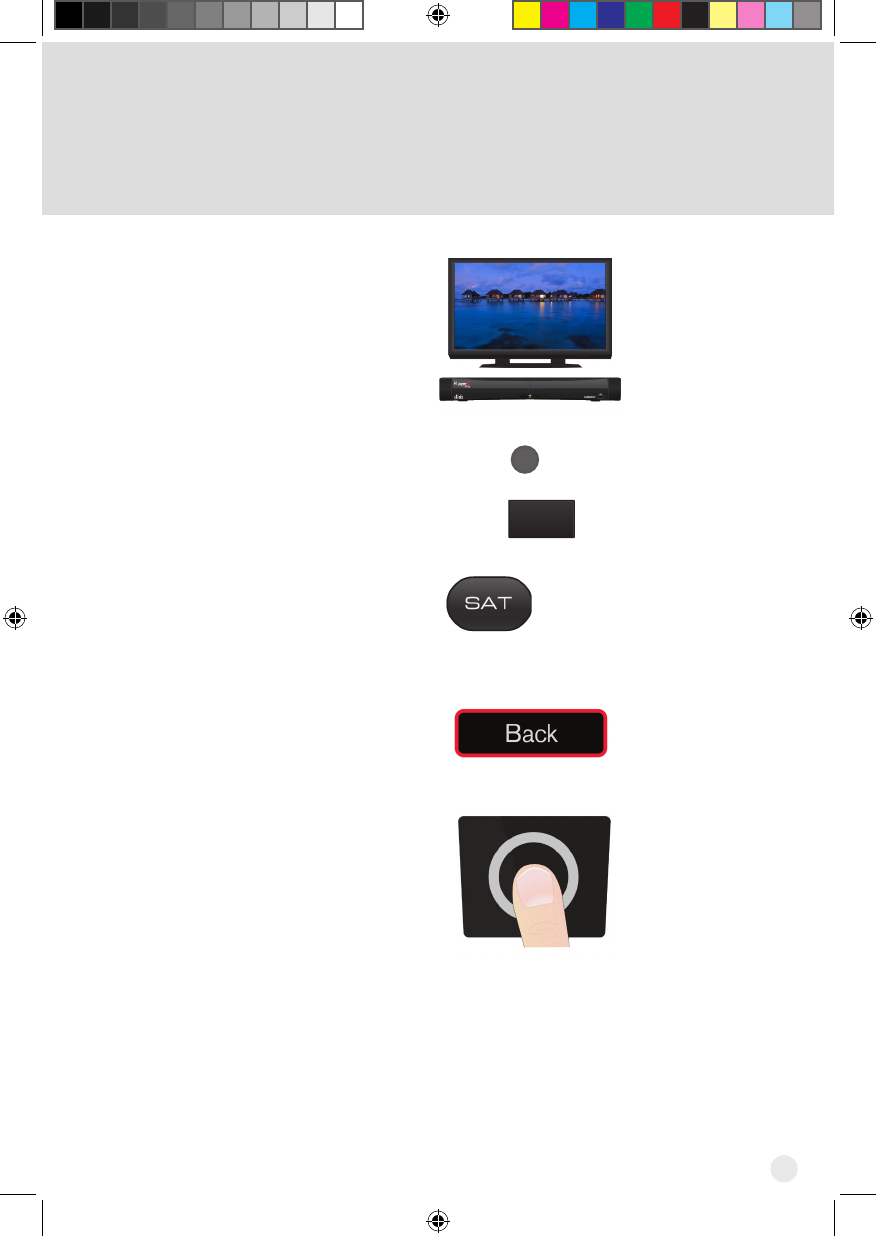
Pairing the Remote
Turn your receiver and TV
on.
Press SYSTEM INFO on the
front panel.
Press the SAT button on
your remote. When the
remote is paired, it gives a
series of ascending tones.
Highlight the BACK button.
Click the touchpad to return
to live TV.
2
1
SYSTEM
INFO
SYS INFO
Joey:
OR
Hopper 3:
3
4
5
Hopper_3_UserGuide.indd 17 8/17/2015 1:05:38 PM

18
SAT Mode
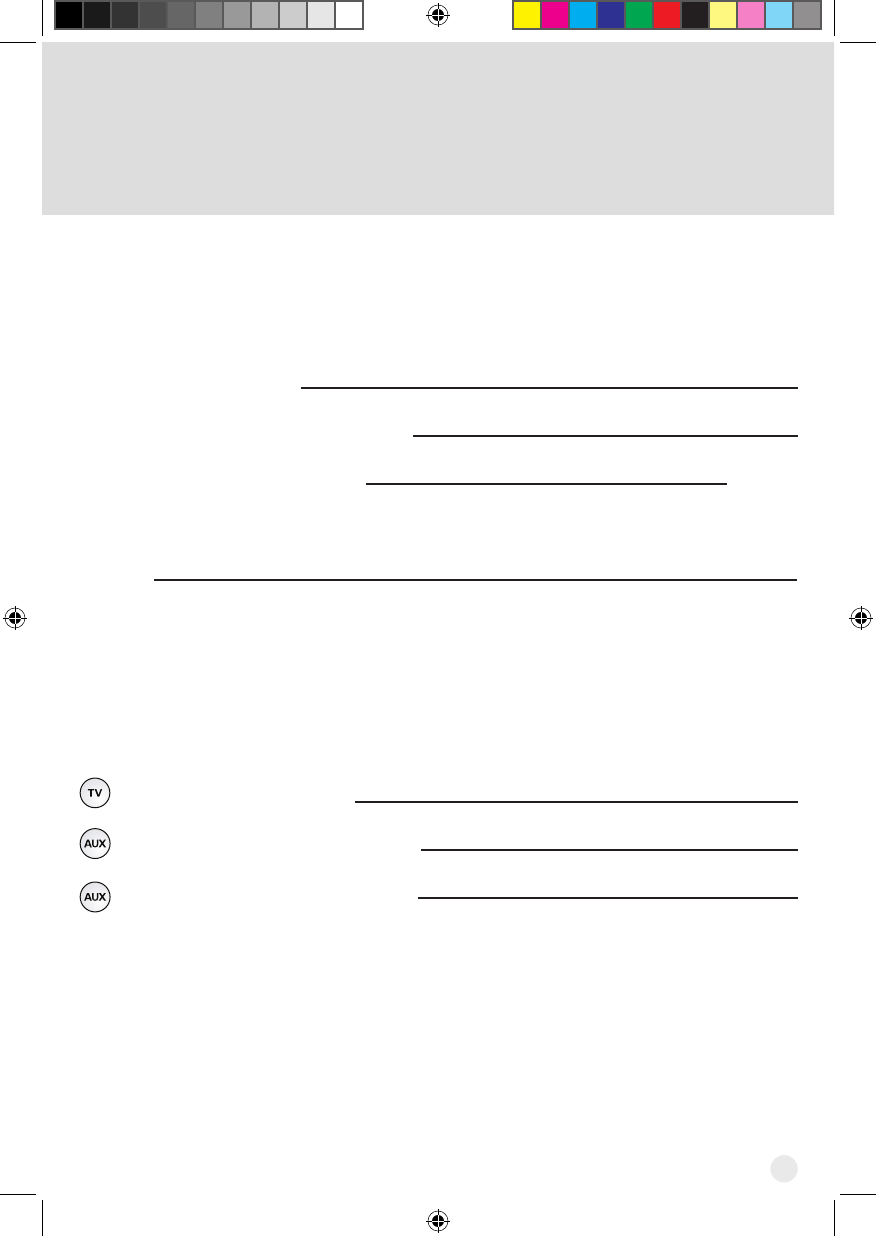
To use the features described in this section, make sure you are in SAT mode by pressing
the SAT Mode button. Use SAT Mode to control the Hopper 3 receiver.
Note: Some features may not be available.
SAT/TV/AUX
Mode indicator lights
up when in that
mode
CH
Channels up/down
Navigates one full page
in menus
Skip Forward/Forward
Press to skip forward 30
seconds in a program
Press and hold to
forward through the
program
Skip Back/Back
Press to skip back
10 seconds in a
program. Press and
hold to reverse the
program
Back/Live TV
Returns to previous
screen. Press and
hold to return to
viewing live TV
Pause/Play
Pauses or plays a live or
recorded program
Vol and Mute
Buttons
Controls TV volume
Programming required Recall
Returns to previously
viewed channel(s)
Home
Displays Home
menu
Options
Opens Options
menu
Apps
Displays the Apps
menu
DVR
Displays recorded
programs
Info/Help
Retrieves program
info. Press and hold
for help
Guide
Displays the Guide
123/abc
Displays the
number pad in the
touchpad
Press and hold
to display the
on-screen alpha
keypad
Microphone
Receives voice
commands when
microphone button
is pushed and held
Power
Turns the receiver
on/off
Touchpad
Navigates you
through your
Hopper experience
Hopper_3_UserGuide.indd 18 8/17/2015 1:05:38 PM
19
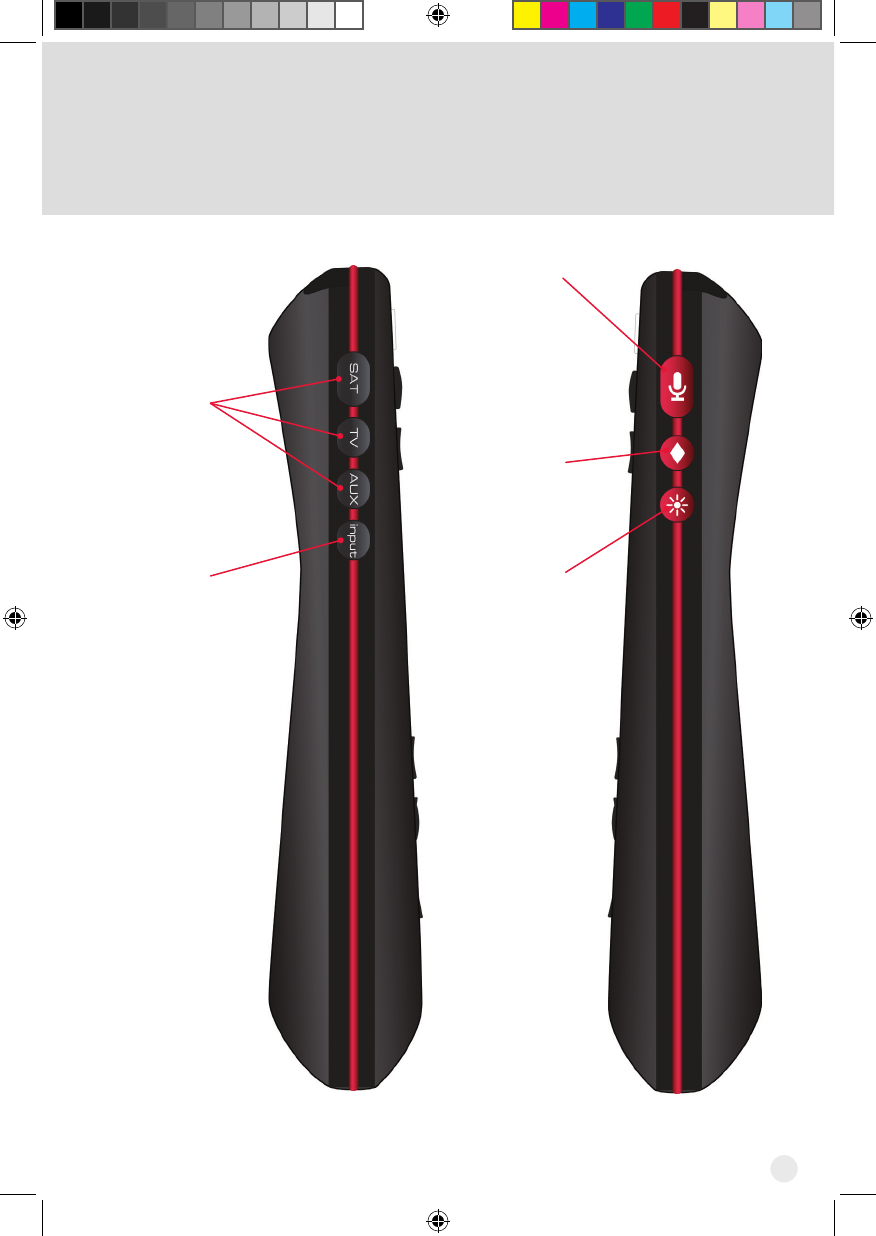
Input
Swaps the
tuner
SAT/TV/AUX
Mode
Changes
which device
the remote
controls
Microphone
Press and
hold to
use voice
commands
or initiate
voice or
text search
Backlight
Backlights
the remote
buttons
Hot Key/
Shortcut
Button
Creates a
shortcut
Hopper_3_UserGuide.indd 19 8/17/2015 1:05:39 PM
20
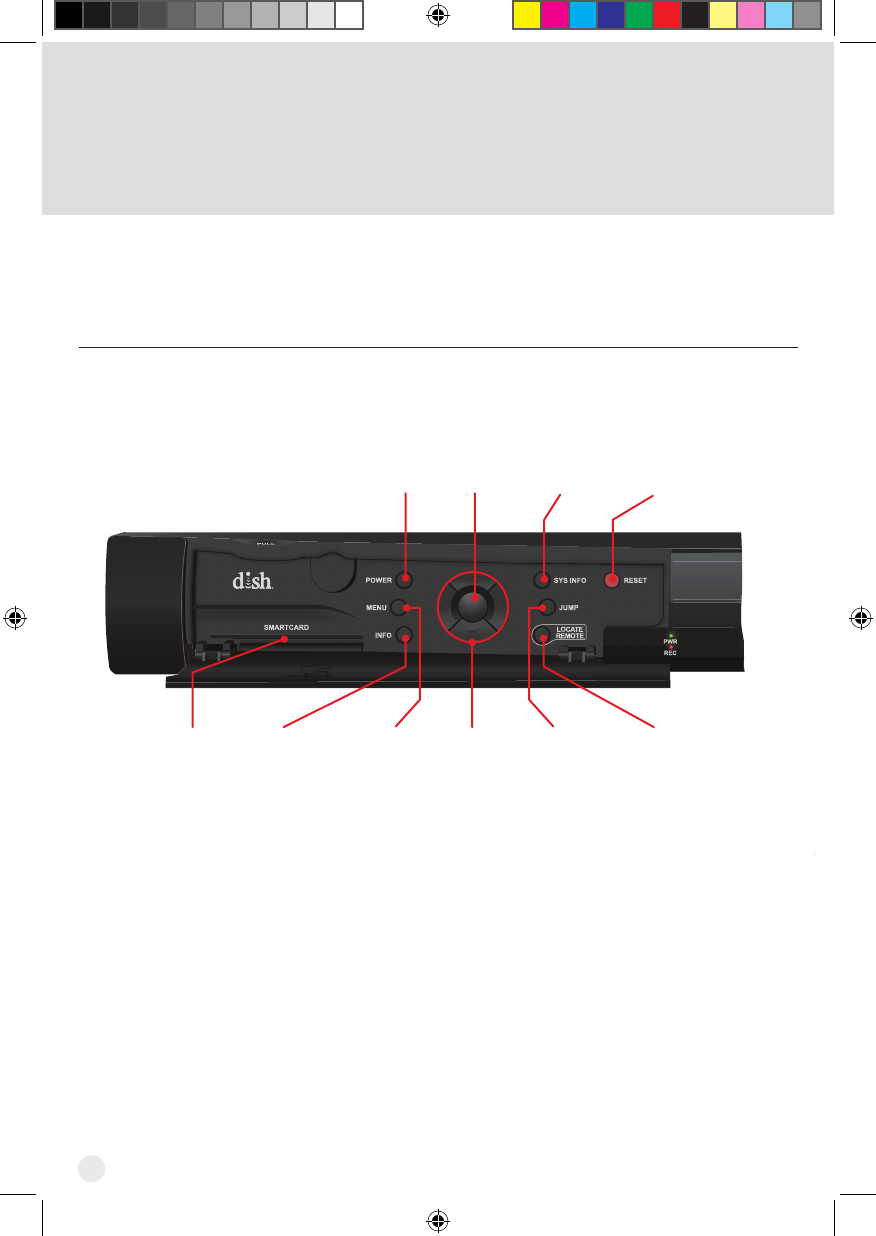
Front and Rear Panels of the
Hopper 3 Receiver
The front panel of the Hopper 3 receiver is provided below.
Front Panel Controls
POWER
MENU
INFO
SMARTCARD
SYS INFO
JUMP
LOCATE
REMOTE
RESET
SELECT
PWR
REC
Reset
Resets the
Hopper
with Sling 3
Power
Turns
receiver
power
on/off
Select
Selects
menu
items or
events
Sys Info
Displays
information
on system
Options
Moves to
another
selection
Locate
Remote
Triggers the
remote to emit
tones, making
it easier to
find (may be a
delay in
tones)
Up/Down
Arrows
Navigates
through
menus or
channels
Menu
Displays
the Main
Menu
screen
Info
Displays
program
information
Smart
Card
Slot for
smart card
Hopper_3_UserGuide.indd 20 8/17/2015 1:05:41 PM
21
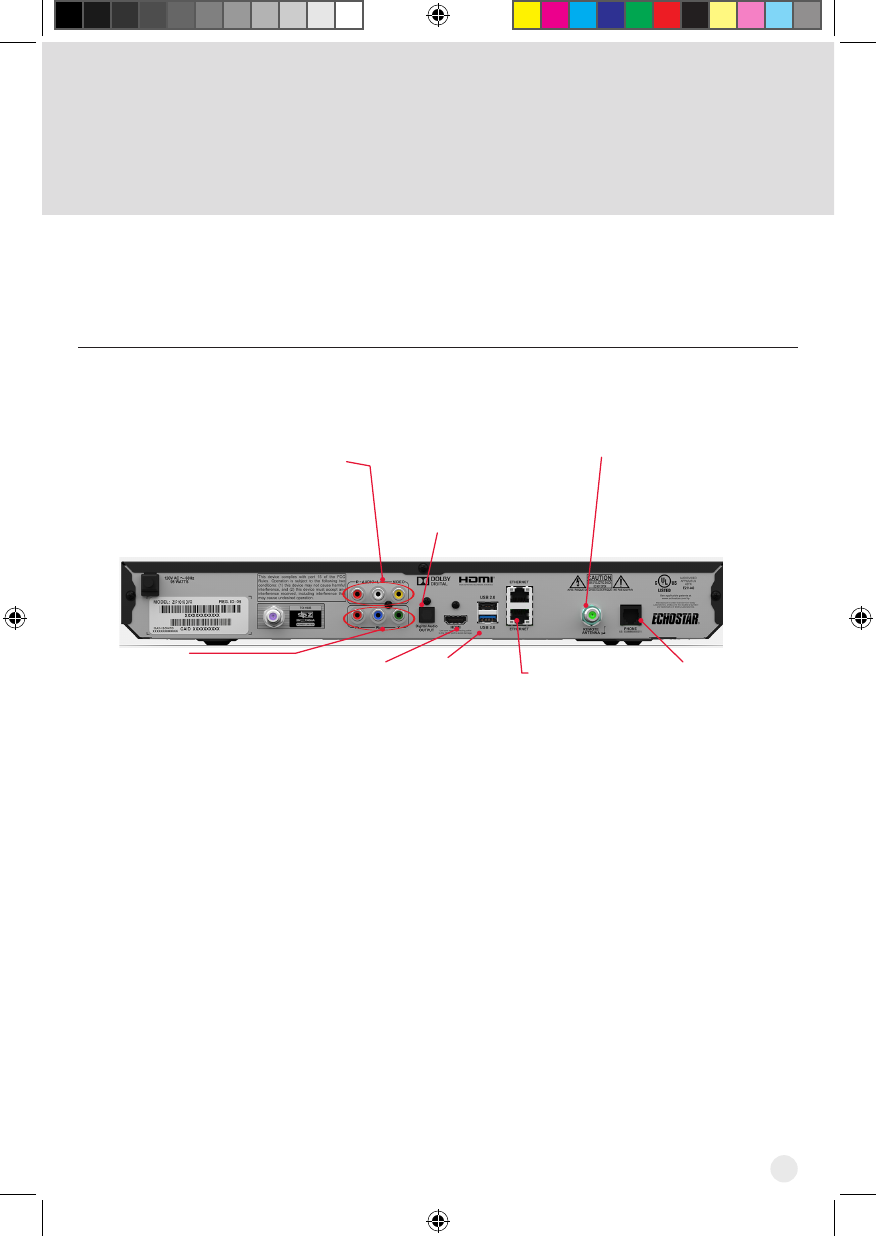
Rear Panel Connections
Remote
Antenna
Connects to a UHF-2G
remote control antenna
Phone Jack
Connects to a
telephone line
USB Ports
Connects to
multimedia
devices, such as
an external hard
drive
HDMI® Output
Provides high-
denitiondigitalaudio
and video to the TV
Ethernet
Connects to a
broadband home
network
Audio/Video Output
High-qualitystandard-denition
connection to the TV audio and
video input
Digital Audio
Optical connection
to a high-quality
digital sound
decoding system
YPbPr/
Component
Output
Optional
connection to your
high-denitionTV
video input
The back panel of the Hopper 3 receiver is provided below.
Hopper_3_UserGuide.indd 21 8/17/2015 1:05:41 PM

22
Troubleshooting
Use this information if you have a problem using the Hopper 3 receiver. To solve a
particular problem, do the following:
• Inthefollowingsection,ndtheinformationthatrelatestotheproblemyouare
experiencing. Try the suggested solution for that problem.
• Make sure your remote control has fresh batteries. If you see the Remote Battery
Low warning on your TV screen, change the batteries.
• Visit mydish.com/support.
The Hopper 3 receiver does not turn on.
What to do: If the green power LED on the Hopper 3 receiver does not light after
applying power, verify that
• the power connector is properly inserted into the Hopper 3.
• the power cord hasn’t been damaged or pinched.
• there is power to the outlet.
How do I nd something to watch?
What to do: Press the HOME button on your remote for suggested programs to watch.
Press the GUIDE button for a complete listing of available programs.
Why are some of the channels red in the Program Guide?
What to do: The channels that are red in the Program Guide are those which are not
currently included with your DISH package. If you’d like to watch those channels, call
1-800-333-DISH (3474) or visit www.mydish.com.
I’m looking at program information in a guide I bought at the grocery store, but
nothing matches what’s on my Hopper 3; is something wrong?
What to do: No,nothing’swrong.DISHprogrammingdatamayvaryformwhatyou’llnd
in a local TV publication. For best results, use the Program Guide on your system, or you
can order DISH Entertainment Magazine [contact DISH at 1-800-333-DISH (3474) or visit
www.mydish.com].
I am trying to watch a program, but the TV Activity displays instead.
What to do: All tuners on the receivers are currently in use, either by other TVs, the
DVR(s) recording a program(s), the receivers taking a software download, and/or a remote
viewing session occurring. You can wait until a tuner becomes available, watch the same
programming that is displaying on another TV, stop a recording, or select PrimeTime
Anytime®, On Demand, or DVR.
Hopper_3_UserGuide.indd 22 8/17/2015 1:05:41 PM

23
Continued on next page
My PIP (Picture-In-Picture) button isn’t working.
What to do: The PIP feature is available only on the Hopper 3 receiver.
When can I use the Picture-In-Picture (PIP) feature on the Hopper 3?
What to do: When any two of the tuners on your Hopper 3 receiver are available, you
can use the PIP functions on the TV that is connected to your Hopper 3 receiver. The
TV(s) connected to your linked Joey receiver(s) do not support the PIP feature.
Why isn’t PIP working?
What to do: If the PIP feature is not working on your Hopper 3 receiver, there must not be
two available tuners. Check TV Activity to view tuner use (see Sharing Content).
Can I watch and use the DVR functions on the same program on all of the TVs in my
house?
What to do: Yes. Go to the room with a linked Joey receiver connected to a TV, and the
remote control for that Joey receiver operates the same DVR features and functions as
the Hopper 3 receiver.
Why does my receiver change channels or display menus at random?
What to do: A close neighbor may have a DISH remote control set on the same address.
Ifthereissignicantradio-frequencyinterferencewithremote-controlsignals,thenyou
may have to install a UHF attenuator.
Why are some of my channels missing?
What to do: Parental controls may be set to lock or hide the channels. See Setting
Parental Controls to view the current settings. Your Program Guide may be displaying
the wrong list of channels. Press the GUIDE button on your DISH remote to access the
Program Guide and display the default Favorites List.
How can I order an event for all receivers in my whole-home DVR system?
What to do: Order the event with the remote control while your Hopper 3 receiver
is attached to an active phone line or broadband Internet connection. For each Joey
receiver, you want to play the event, ensure that it is linked to the correct Hopper 3.
Order the event over the phone at 1-877-DISH-PPV (347-4778). Fees may apply.
Order the event online at www.mydish.com/ppv website.
Hopper_3_UserGuide.indd 23 8/17/2015 1:05:42 PM

24
Troubleshooting, cont’d
Why are some Pay-per-View programs blacked out?
What to do: Sporting events and other programs are sometimes blacked out because of
local broadcast restrictions. Note that the provider of such programming determines these
restrictions, not DISH.
Why did my All-Day Pay-Per-View program shut off while I was watching it?
What to do: The all-day events run from 3 AM to 3 AM Mountain Time. You should
ensurethatyoucannishwatchinganeventthatyouhaveorderedbythistime.
Why are channels missing from the Program Guide?
What to do: You might have a Favorites List that does not contain those channels.
The channels may be locked and hidden by parental controls. For more information about
locks, see Setting Parental Controls.
Why are my Favorites Lists missing?
What to do: When a receiver is in a Whole-Home DVR system, the Favorites Lists
created by users of a different receiver in the home are not available on your TV.
Why don’t the locks I set for a remote TV work?
What to do: If the receiver is in a Whole-Home DVR system, then any locks you have
setonotherTVsarenotavailable.LocksandrestrictionsarespecictoeachHopper3
and Joey receiver in your system. However, you can copy all the same parental-control
settings you have made on your Hopper 3 receiver to one or more linked Joey receivers
in your whole-home DVR system. See Setting Parental Controls to copy settings from the
Hopper 3 to the linked Joey receivers. Note that you cannot copy settings made on a Joey
receiver to any other Joey receivers (or back to a Hopper 3 receiver) in your whole-home
system.
What do I do if I forget my password?
What to do: If you ever forget your password, then you need to contact a DISH Customer
Service Representative.
Hopper_3_UserGuide.indd 24 8/17/2015 1:05:42 PM
25
How can I fast-forward through commercials?
What to do: If you are watching a pre-recorded program, or have delayed a live program,
press the SKIP FWD or FWD button on your remote control. However, you cannot skip/
forward while watching live TV.
Why did the receiver delete a program that I recorded?
What to do: Ifyourrecordingwasunprotectedandthereceiver’shard-diskdrivellsup,
your DVR deletes the oldest unprotected recording.
Your picture is snowy (or black or blue).
What to do: Make sure your TV is tuned to the correct channel. Make sure the cables are
completely and correctly connected from the Hopper 3 receiver to the TV.
Your remote control does not work well when controlling the Hopper 3 receiver.
What to do: Verify that your remote has fresh batteries. There is a Battery Level indicator
on the System Info screen that displays three levels: Green (good), Yellow (low), and Red
(critical). If this indicator is at Yellow or Red, replace the batteries with new batteries of the
same type and kind.
Verify that your remote is paired. This information is provided on the System Info screen.
If it is not paired, pair the remote.
Verify or adjust the remote-control antenna connection.
Other devices, such as wireless routers, Bluetooth®, 2G phones, and microwave ovens,
could create interference and affect the performance of your remote. Move your receiver
away from other electronic devices that could potentially cause interference.
My remote doesn’t control my Hopper 3 receiver or other components. What do I
do?
What to do: Make sure the remote control is in the correct device mode (SAT, TV, AUX).
Check that the batteries are working and installed correctly.
If the remote isn’t controlling the Hopper 3, verify or adjust the remote-control antenna
connection.
Continued on next page
Hopper_3_UserGuide.indd 25 8/17/2015 1:05:42 PM

26
Troubleshooting, cont’d
While performing a remote control procedure, the remote control stops working.
What to do: Start over again. If you don’t press a button for
20 seconds in a programming sequence, the remote shuts off its programming function.
My remote is not working.
What to do: Verify the batteries are installed according to the diagram inside the remote
control’s battery compartment.
Check the Battery Level indicator located in the System Info screen. This indicator
displays three levels: Green (good), Yellow (low), and Red (critical). If this indicator is at
Yellow or Red, replace the batteries with batteries of the same type and size.
Conrmtheremoteisinthecorrectmodeforthedeviceyouwanttocontrol.Forexample,
to control the Hopper 3 receiver, press SAT on the remote before the function you want
performed.
Make sure you are using the correct remote control provided for your Hopper 3 receiver by
pressing the Locate Remote button on the front panel of the Hopper 3 (see Locating the
Remote on page 11).
The remote uses radio frequency (RF) signals to operate your Hopper 3 receiver. Other
equipment is usually controlled using infrared (IR) light signals. If you have programmed
the remote to control your equipment in other device modes, then the remote control must
have a clear line-of-sight to the front of these other devices.
Check that all cable connections to the Hopper 3 receiver and TV are secure.
Press the Reset button on the front panel of the Hopper 3 to reset the system. After the
system comes back up, try the remote to see if it is now working.
If your remote is showing that it is paired but isn’t working, select Un-Pair on the System
Infoscreenandlistenfortheconrmationtone.PressPAIRtopairtheremoteagain.If
you do not hear the tone, continue with the next suggestion.
Hopper_3_UserGuide.indd 26 8/17/2015 1:05:42 PM

27
If your remote is not listed or cannot be un-paired on the System Info screen, then
complete the following steps:
1 Press and hold SAT until the Mode Indicator lights and then release. If the Mode
Indicator does not light up, the remote isn’t paired. Use the Locate Remote button
onthefrontpaneloftheHopper3receivertondapairedremote(seeLocating the
Remote on page 11).
2 Press and hold the HOME and GUIDE buttons simultaneously until the remote beeps.
The remote is now unpaired.
When I press a button on the remote, Mode LED indicator lights.
What to do:Whenbatteriesarerstinsertedintotheremote,theremotegoesthrough
an initializing process. This process takes about ten seconds, and pressing a key while
theremoteisbootingupcausestheSAT,TV,andAUXmodebuttonstoash.Ifaremote
stays in this state for longer than two minutes, replace the batteries (see page 4).
Hopper_3_UserGuide.indd 27 8/17/2015 1:05:42 PM
28
Limited Warranty
This Limited Warranty is a legal document. Keep it in a safe place. Remember
to retain your Bill of Sale for warranty service! Any items returned without a
copy of the Proof of Purchase will be considered out of warranty.
What the Warranty Covers
This warranty extends only to the original user of the equipment and is limited to the
purchasepriceofeachpart.DISHNetworkL.L.C.anditsafliatedcompanies(“DISH”)
warrant this system against defects in materials or workmanship as follows:
Labor: For a period of one (1) year from the original date of purchase, if DISH determines
that the equipment is defective subject to the limitations of this warranty, it will be replaced
at no charge for labor. DISH warrants any such work done against defects in materials or
workmanship for the remaining portion of the original warranty period.
Parts: For a period of one (1) year from the original date of purchase, DISH will supply,
at no charge, new or re-manufactured parts in exchange for parts determined to be
defective subject to the limitations of this warranty. DISH warrants any such replacement
parts against defects in materials or workmanship for the remaining part of the original
warranty period. Note: “Parts” means items included in this package, which may include
the satellite dish assembly, receiver, LNBF, remote control, power supply, or dish mounting
hardware. It does not include other parts purchased separately.
What the Warranty Does Not Cover
This warranty does not cover installation of the system. If applicable, such installation will
be warranted under a separate installation agreement.
This warranty does not cover consumer instruction, physical setup or adjustment of any
consumer electronic devices, remote control batteries, signal reception problems, loss of
use of the system, or unused programming charges due to system malfunction.
This warranty does not cover cosmetic damage, damage due to lightning, electrical
ortelephonelinesurges,batteryleakage,re,ood,orotheractsofNature,accident,
misuse, abuse, repair or alteration by other than authorized factory service, use of
accessories not recommended by the receiver manufacturer, negligence, commercial or
institutional use, or improper or neglected maintenance.
This warranty does not cover equipment sold AS IS or WITH ALL FAULTS, shipping and
handling, removal or reinstallation, shipping damage if the equipment was not packed
and shipped in the manner prescribed, nor equipment purchased, serviced, or operated
outside the continental United States of America.
Legal Limitations
REPLACEMENT AS PROVIDED UNDER THIS WARRANTY IS YOUR EXCLUSIVE
REMEDY. DISH SHALL NOT BE HELD LIABLE FOR ANY INCIDENTAL OR
CONSEQUENTIAL DAMAGES FOR BREACH OF ANY EXPRESSED OR IMPLIED
Hopper_3_UserGuide.indd 28 8/17/2015 1:05:42 PM

29
WARRANTY ON THIS SYSTEM, NOR FOR ANY INCIDENTAL OR CONSEQUENTIAL
DAMAGES RESULTING FROM THE USE OF, OR INABILITY TO USE, THIS SYSTEM.
SOME STATES MAY LIMIT OR EXCLUDE THE FOREGOING LIMITATION, SO THE
ABOVE EXCLUSION OR LIMITATION MAY NOT APPLY TO YOU. EXCEPT TO THE
EXTENT PROHIBITED BY APPLICATION LAW, UNDER NO CIRCUMSTANCES SHALL
DISH’S LIABILITY, IF ANY, EXCEED THE PURCHASE PRICE PAID FOR THIS SYSTEM.
ANY IMPLIED WARRANTY OF MERCHANTABILITY OR FITNESS FOR A PARTICULAR
PURPOSE ON THIS SYSTEM IS LIMITED IN DURATION TO THE PERIOD OF THIS
WARRANTY. SOME STATES DO NOT ALLOW LIMITATIONS ON HOW LONG A
STATUTORY OR IMPLIED WARRANTY LASTS, SO THE ABOVE LIMITATION MAY
NOT APPLY TO YOU. DISH RESERVES THE RIGHT TO REFUSE TO HONOR THIS
WARRANTY IF DISH DETERMINES ANY OF THE ABOVE EXCEPTIONS TO HAVE
CAUSED THIS SYSTEM NOT TO HAVE PERFORMED PROPERLY. THIS WARRANTY
SHALL BE VOID IF ANY FACTORY-APPLIED IDENTIFICATION MARK, INCLUDING
BUT NOT LIMITED TO SERIAL OR CONDITIONAL ACCESS NUMBERS, HAS BEEN
ALTERED OR REMOVED. THIS WARRANTY SHALL ALSO BE VOID IF THE RECEIVER
HAS BEEN OPENED BY AN UNAUTHORIZED PERSON.
If You Need Assistance
Call the Customer Service Center at 1-800-333-DISH (3474). Have the date of purchase
and either your customer account number, the receiver conditional access number, or the
receivermodelnumberready.DisplaytheSystemInfoscreentondthesenumbers.
A Customer Service Representative will assist you.
If the Representative determines you should return any equipment, you will be directed
to call a Return Authorization representative. Before shipping any equipment, you must
talk to a Return Authorization representative and must obtain a Return Authorization (RA)
number.
You will be given the appropriate address for which to return your equipment. Whether
under warranty or not, you will be responsible for the cost of shipping back the defective
equipment. For faster service, see the Advance Exchange Program below.
Returned equipment must be packaged properly, using either the original shipping
materials or the packaging in which the replacement equipment is shipped. Include a
copy of the Bill of Sale. Any items returned without a copy of the Proof of Purchase will be
considered out of warranty. Follow the instructions given to you by the Customer Service
Representative.
Write the RA number in large, clearly visible characters on the outside of the shipping
box that you use to return the equipment. To avoid confusion and misunderstandings,
shipments without an RA number clearly visible on the outside of the box will be returned
to you at your expense.
Hopper_3_UserGuide.indd 29 8/17/2015 1:05:42 PM
42
FCC Compliance
FCC Compliance
The following text is extracted from Federal Communications Commission (FCC)
regulations, as of the publication date of this User’s Guide. Contact the FCC
(see following) or your library for the complete text of the regulations.
This device complies with Part 15 of FCC Rules. Operation is subject to the following two
conditions:
1. This device may not cause harmful interference
and
2. This device must accept any interference received, including interference that may
cause undesired operation.
This equipment has been tested and found to comply with the limits for a Class B digital
device, pursuant to Part 15 of the FCC Rules. These limits are designed to provide
protection against harmful interference in a residential installation. This equipment
generates, uses, and can radiate radio frequency energy and, if not installed and
used in accordance with the instructions, may cause harmful interference to radio
communications. However, there is no guarantee that interference will not occur in a
particular installation. If this equipment does cause harmful interference to radio or
television reception, which can be determined by turning the equipment off and on, the
user is encouraged to try to correct the interference by following one or more of the
following measures:
• Reorient or relocate the receiving antenna.
• Increase the separation between the equipment and receiver.
• Connect the equipment into an outlet on a circuit different from that to which the
receiver is connected.
• Consult the dealer or an experienced radio/TV technician for help.
If none of these remedies stops the radio interference, you should contact a licensed
radio/television technician, your satellite dealer, or call the Customer Service Center at
1-800-333-DISH (3474), for assistance.
Donotmakechangesormodicationstothisequipment.Thiscouldvoidtheuser’s
authority to operate the equipment.
Product must be installed at least 20 cm (~8 inches) from typical person locations per FCC
RF exposure regulations.
Operation of Wi-Fi on channels within 5150-5250 MHz is restricted to indoor use only.
Hopper_3_UserGuide.indd 42 8/17/2015 1:05:43 PM

43
Agreement on Internet Usage via
Hopper 3 Receiver
The software contained in the receiver may reference, display, link to, and provide users
access to web services, sites, and information located worldwide through the Internet.
Because EchoStar Technologies L.L.C. and DISH Network L.L.C. have no control over
such sites and information, we make no representations, warranties or guarantees as to
such sites and information, including but not limited to:
(a) the accuracy, availability, sequence, completeness, timeliness, copyright compliance,
legality, content, validity, or quality of any such sites or information, or
(b) whether using the software may result in locating unintended, inappropriate, or
objectionable content.
Because some of the content on the Internet consists of material that is adult-oriented,
restricted to viewers at least 18 years of age or the age of majority where you live, or
otherwise objectionable to some people or viewers, under the age of 18, the results of
using the software may automatically and unintentionally result in the generation or display
of sites, links, or references to such objectionable and/or adult-oriented material.
By using the software, you acknowledge that neither EchoStar Technologies L.L.C. nor
DISH Network L.L.C. makes any representations, or warranties, or guarantees with
regard to any sites or information displayed by or accessed by in connection with use
of the software. EchoStar Technologies L.L.C., DISH Network L.L.C., their respective
directandindirectsubsidiariesandparents,andtheofcers,directors,andshareholders
of any of the foregoing companies shall not, directly or indirectly, be liable in any way to
you or to any other person or entity for the content you receive using the software or for
any inaccuracies, errors in, or omissions from the content. EchoStar Technologies L.L.C.,
DISHNetworkL.L.C.,andtheirrespectiveafliatesandlicensorsreservetherightto
change, suspend, remove, or disable access to any services at any time without notice.
In no event will EchoStar Technologies L.L.C., DISH Network L.L.C., their respective
directandindirectsubsidiariesandparents,ortheofcers,directors,andshareholdersof
any of the foregoing companies be liable for the removal of or disabling of access to any
such services. EchoStar Technologies L.L.C., DISH Network L.L.C., and their respective
afliatesandlicensorsmayalsoimposelimitsontheuseoforaccesstocertainservices,
in any case, and without notice or liability.
Hopper_3_UserGuide.indd 43 8/17/2015 1:05:43 PM
44
If You Need Help
If You Need Help
1. Review the Hopper 3 and Joey receiver guides available at mydish.com/manuals.
2. See Troubleshooting on page 22.
3. On your receiver, select the Help tile
from the Menu tab.
4. Visit mydish.com/chat for 24/7 support.
5. Call the Customer Service Center at 1-800-333-DISH (3474).
For additional information, refer to the Residential Customer Agreement included with your
Hopper 3 and available at mydish.com/legal.
Hopper_3_UserGuide.indd 44 8/17/2015 1:05:43 PM
45
Hopper 3 Receiver Information
Purchase Location Name:
Purchase Location Telephone Number:
Hopper 3 Receiver CAID Number: R
Hopper 3 Receiver Smart Card
Number: S
Remote Control Settings
Television Code (TV Mode):
Auxiliary Device Code (AUX Mode):
Auxiliary Device Type (AUX Mode):
You may need to provide this information if you call the Customer Service Center.
Note: Some of the items listed below may not be used at this time.
Hopper_3_UserGuide.indd 45 8/17/2015 1:05:43 PM

46
207601
For all your customer needs,
go to mydish.com/chat or call
the Customer Service Center
at 1-800-333-DISH (3474)
Hopper_3_UserGuide.indd 46 8/17/2015 1:05:43 PM