DISH Technologies WWT RF4CE Zigbee Radio User Manual User Guide ID072
Echostar Technologies LLC RF4CE Zigbee Radio User Guide ID072
User Guide ID072.pdf
Wireless Joey
GETTING
STARTED GUIDE
Warning and Attention Symbols
You must be aware of safety when you install and use this system. This Wireless
Joey Getting Started Guide provides various procedures. If you do some of these
procedures carelessly, you could injure or kill yourself or damage equipment or
property. Some other procedures require special attention.
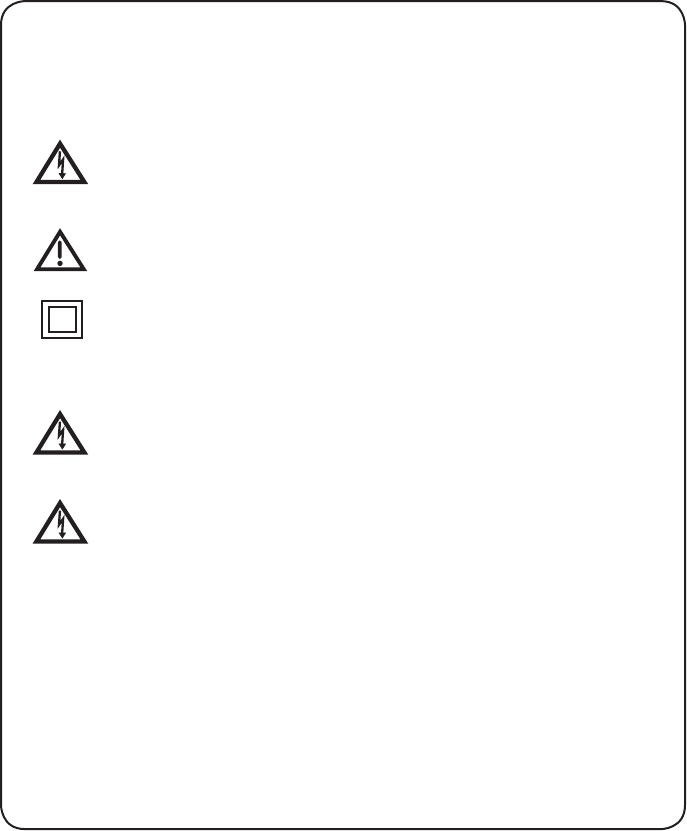
The lightning ash with arrowhead symbol, within an equilateral triangle,
is intended to alert the user to the presence of uninsulated “dangerous
voltage” within the product’s enclosure that may be of sufcient magnitude
to constitute a risk of electric shock to persons.
The exclamation point within an equilateral triangle is intended to alert the
user to the presence of important operating and maintenance (servicing)
instructions in the literature accompanying the appliance.
The Class II equipment symbol means the equipment has additional
insulation and does not need to be grounded.
For Your Safety
Warning: Do not try to open the case of the Wireless Joey™ receiver.
There is risk of electrical shock, which may cause damage to the Wireless
Joey and/or personal injury or death to you. There are no user-serviceable
parts inside the Wireless Joey receiver. Opening the receiver’s case or
making unauthorized changes will void the warranty.
Warning: To reduce the risk of re or electric shock, do not expose this
appliance to rain or moisture.
Important Software Notice
As with all software controlled products, unexpected behavior could arise if
the user tries to perform operations in a non-routine manner. This product, like
almost any other high tech product, is subject to bugs and hence EchoStar
CANNOT AND DOES NOT GUARANTEE OR WARRANT THAT ALL FEATURES,
SUCH AS PARENTAL CONTROLS, WILL WORK AS INTENDED UNDER ALL
CIRCUMSTANCES. EchoStar endeavors to improve such conditions and will
periodically download improvements.
i
Equipment and Software Covered by this User Guide
This Wireless Joey Getting Started Guide covers the Wireless Joey™ receiver
and software models Wireless Joey. This Wireless Joey Getting Started Guide
may cover other devices not listed here.
Publishing Information
Copyright © 2014. EchoStar Technologies L.L.C., Englewood, Colorado 80112.
All rights reserved.
The information in this Wireless Joey Getting Started Guide may change without
notice. Revisions may be issued to tell you about such changes.
Send comments or questions about this Wireless Joey Getting Started Guide to
techpubs@echostar.com or
Technical Publications, EchoStar Technologies L.L.C,
90 Inverness Drive Circle East, Englewood, Colorado 80112.
DISH is a registered trademark of DISH Network L.L.C.
All product names, trade names, or corporate names mentioned in this Wireless
Joey Getting Started Guide are acknowledged to be the proprietary property of
the registered owners.
Manufactured under license from Dolby Laboratories. Dolby and the double-D
symbol are trademarks of Dolby Laboratories.
®HDMI, the HDMI logo and High-Denition Multimedia
Interface are trademarks or registered trademarks of
HDMI Licensing LLC.
This equipment may incorporate copyright protection technology that is
protected by U.S. patents, patent applications, and/or other intellectual property
rights. Use of such copyright protection technology is intended for home and
other limited pay-per-view uses only unless otherwise authorized. Reverse
engineering or disassembly is prohibited.

ii
1 Read these instructions.
2 Keep these instructions.
3 Heed all warnings.
4 Follow all instructions.
5 Do not use the apparatus near water.
6 Clean only with a dry cloth.
7 Do not block any ventilation openings. Install in accordance with the
manufacturer’s instructions.
8 Do not install near any heat sources such as radiators, heat registers, stoves, or
other apparatus (including ampliers) that produce heat.
9 Do not defeat the safety purpose of the polarized or grounding-type plug. A
polarized plug has two blades with one wider than the other. A grounding-type plug
has two blades and a third grounding prong. The wide blade or the third prong are
provided for your safety. If the provided plug does not t into your outlet, consult an
electrician for replacement of the obsolete outlet.
10 Protect the power cord from being walked on or pinched, particularly at plugs,
convenience receptacles, and the point where they exit from the apparatus.
11 Only use attachments/accessories specied by the manufacturer.
12 Unplug the apparatus during lightning storms or when unused for long periods of
time.
13 Refer all servicing to qualied service personnel. Servicing is required when the
apparatus has been damaged in any way, such as the power supply cord or plug
is damaged, liquid has been spilled or objects have fallen into it, the apparatus
has been exposed to rain or moisture, does not operate normally, or has been
dropped.
14 The power plug must be readily accessible so that the apparatus can be easily
disconnected from the AC power.
15 The Wireless Joey™ receiver is still connected to the AC power whenever it is
plugged into a live power outlet, even if it is turned off using the remote control or
front panel buttons.
16 No ame sources, such as lit candles, should be placed on the equipment.
17 The apparatus shall not be exposed to dripping or splashing, and no objects lled
with liquids, such as vases, shall be placed on the top of it.
18 Use only the power supply provided with the receiver. Unplug the receiver’s power
cord by gripping the power plug, not the cord.
19 Do not overload wall outlets or extension cords; this can result in a risk of re or
electrical shock.
Important Safety Instructions

iii
Important Safety Instructions, continued
20 Never insert objects of any kind into the receiver through openings, as the objects
may touch dangerous voltage points or short out parts. This could cause re or
electrical shock.
21 Do not locate the antenna near overhead light or power circuits, or where it can fall
into such power lines or circuits. When installing the antenna, take extreme care to
avoid touching such power lines or circuits, as contact with them can be fatal.
22 Do not attempt to service the receiver yourself, as opening or removing covers
may expose you to dangerous voltage and will void the Limited Warranty. Refer all
servicing to authorized service personnel.
23 Unplug the receiver from the AC power outlet before cleaning.
24 Do not place the receiver in an enclosure such as a cabinet without proper
ventilation.
25 Do not install the receiver in any area where the temperature can be less than 40°F
or more than 113°F. If the receiver is cold to the touch, do not plug it in immediately.
Let it sit unplugged at room temperature for at least 45 minutes before plugging it in.
26 Use an outlet that contains surge suppression or ground fault protection. During an
electrical storm or when the receiver is left unattended and unused for long periods
of time, unplug the power cord from the wall outlet, disconnect the lines between the
receiver and the antenna, and disconnect the telephone line. These actions provide
additional protection against damage caused by lightning or power line surges.
27 Tighten all of the coaxial cable connections only by hand. If you use a wrench, you
may overtighten the connections and damage your equipment.
Proper Care of Your Equipment
• Always handle the receiver carefully. Excessive shock and vibration can damage it.
• If the equipment is turned on and needs to be moved, unplug the equipment and let
it sit for at least 30 seconds before moving it.
• The use of accessories or attachments not recommended by the receiver
manufacturer and voids the Limited Warranty.
• Do not stack the receiver on top of or below other electronic devices as this can
cause heat build-up and vibration.
• On some TVs, the presence of xed images for extended periods of time may
cause them to be permanently imprinted on the screen. Consult your TV user
guide for information on whether this a problem for your TV, what operating/viewing
restrictions apply to avoid this problem, and associated TV warranty coverage.
iv
If this equipment does cause harmful interference to radio or television reception,
which can be determined by turning the equipment off and on, the user is
encouraged to try to correct the interference by one or more of the following
measures:
• Reorient or relocate the antenna assembly.
• Increase the separation between the equipment.
• Connect the equipment into an outlet on a circuit different from that to which
the receiver is connected.
• Consult the dealer or an experienced radio/TV technician for help.
Important Safety Instructions, continued
Note to Antenna Installer: This reminder is provided to call the antenna
installer’s attention to the National Electrical Code® (NEC) which provides
guidelines for proper bonding and grounding of antennas and their
associated cabling.

1
Wireless Joey Receiver
With the Wireless Joey™ receiver, watch and record up to 6 channels
of high-denition (HD) and standard-denition (SD) programming, while
having the next-generation of TV content delivered, including multimedia
services over IP-based networks. The Wireless Joey receiver uses WiFi
signals to connect to the Wireless Joey Access Point™, which uses
ethernet to connect to the host receiver, a Hopper® or a Hopper® with
Sling, and delivers HD programming and recorded programs from that
receiver to the Wireless Joey receiver. Content includes live, paid, and
DVR programming in HD, SD, and 3D. Like a Joey® box, the Wireless
Joey receiver can display prerecorded content from the DVR or IP-
delivered content.
A Hopper or Hopper with Sling receiver supports up to two Wireless
Joey receivers and one Wireless Joey Access Point.
The remote uses radio frequency (RF) signals to control the Wireless
Joey receiver and IR signals to control any other equipment you have
programmed. RF signals travel relatively long distances and can go
through walls and other solid objects. IR signals, used in TV, DVD, and
AUX device modes, travel up to 40 feet in a straight line-of-sight and
cannot go through walls or other solid objects. Point the remote directly
at the equipment you want to control without any objects blocking the
signal path.
2
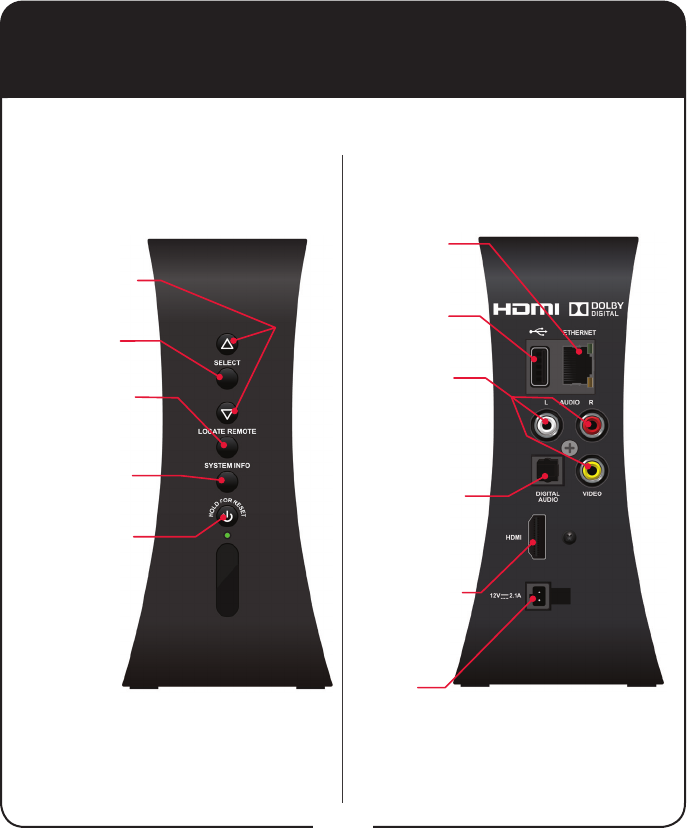
Wireless Joey Receiver, continued
Power
Turn the Wireless
Joey receiver on
and off or hold to
reset it
Rear Panel Connections
System Info
Displays the System
Info screen
Locate Remote
Triggers the remote
to emit tones, making
it easier to nd
Up/Down Arrows
Navigate through
menus or channels USB Port
Connects to
multimedia devices
HDMI® Output
Provides high-
denition digital
audio and video
to the TV
Ethernet
Connects to the
broadband home
network
Audio/Video
Output
High-quality
standard-denition
connection to the
TV audio and video
input
Digital Audio
Optical connection
to a high-quality
digital sound
decoding system
Power
Provides power
to the Wireless
Joey receiver
The front and back panels of the Wireless Joey receiver are provided below.
Front Panel Controls
Select
Select menu
items and events
3
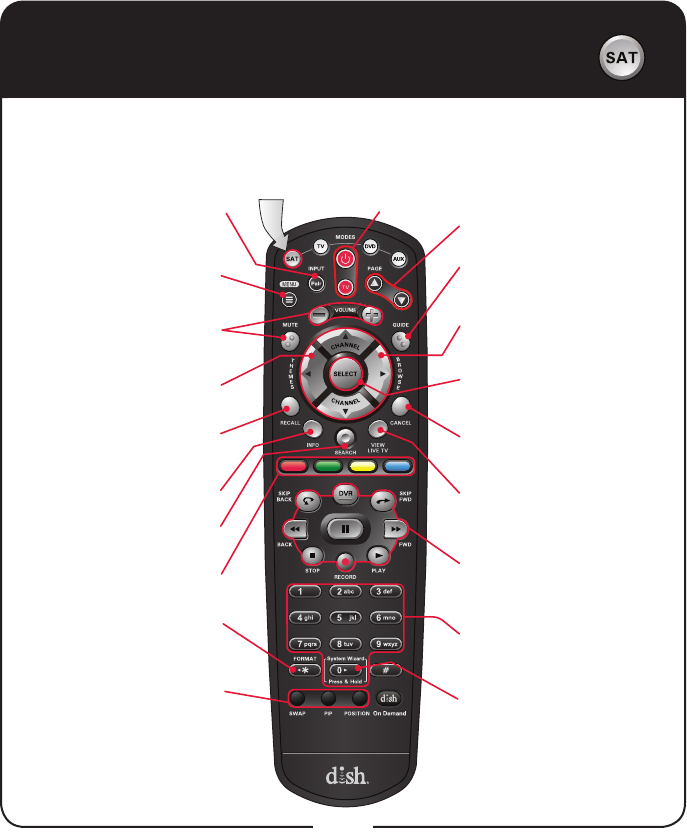
To use the features described in this section, make sure you are in SAT mode by
pressing the SAT Mode button. Use SAT Mode to control the Wireless Joey receiver.
Note: Some features may not be available.
SAT Mode
Power & TV Power
Top button turns the Wireless Joey receiver on/off
Bottom button turns the TV on/off
Volume and Mute Buttons
Control TV volume
Programming required
Recall
Return to last
TV channel viewed
PIP (Picture-In-Picture)
Buttons
Not available at this time.
Number Buttons
Enter a channel number or
navigate the program guide
Menu
Access receiver
features and settings
Themes
Search for programs
using Themes
Info
Retrieve info on programs
Search
Search for a program
Shortcut Keys
Access frequently
used features
Digital Video Recorder
(DVR) Buttons
Pause live TV and
play or record programming
Format
Format the picture to the
desired width to match the
program you are viewing
System Wizard
Press and hold to backup and
restore receiver and remote
settings
Arrow/Select Buttons
Channel up/down, navigate
through menus, and select a
desired option
View Satellite
Programming
Exit out of any menu/guide and
return to viewing live TV
Cancel
Return to previous menu or
return to watching a program
Browse
See what is on other channels
while watching TV
Program Guide
Display current and future
satellite program listings
Page Buttons
Page up/down in Program
Guide and event content
Press this button
for SAT Mode
Pair/Input
Pair remote to a
Wireless Joey receiver
4
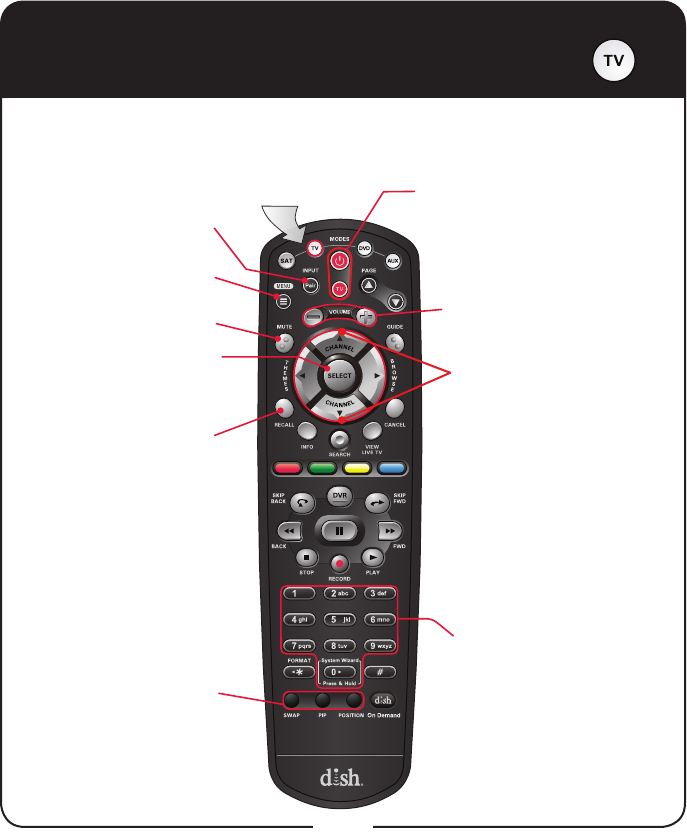
TV Mode
To use the features described in this section, make sure you are in TV mode by
pressing the TV Mode button. Remote programming is required.
Note: Some features may not be available depending on your model.
Note: Remote operation is different
on DISH TVs.
See your DISH TV User’s Guide for
proper operation.
Power & TV Power
Top button turns the TV on/off
Bottom button turns the TV on/off
Press this button
for TV Mode
Mute
Turn TV volume on or off
Recall
Return to last TV channel
viewed
PIP (Picture-In-Picture)
Buttons
Not available at this time.
Number Buttons
Enter a channel number
TV Menu
Access menu features
available on some TVs
Pair/Input
Switch between TV inputs
(available only for certain
makes and models of TVs)
Up/Down Arrow Button
Channel up/down on the TV
Volume
Control TV volume (available
depending on your TV model)
Select Button
Select a program or menu
Power & TV Power
Top button turns the DVD/VCR/BD on/off
Bottom button turns the TV on/off
5
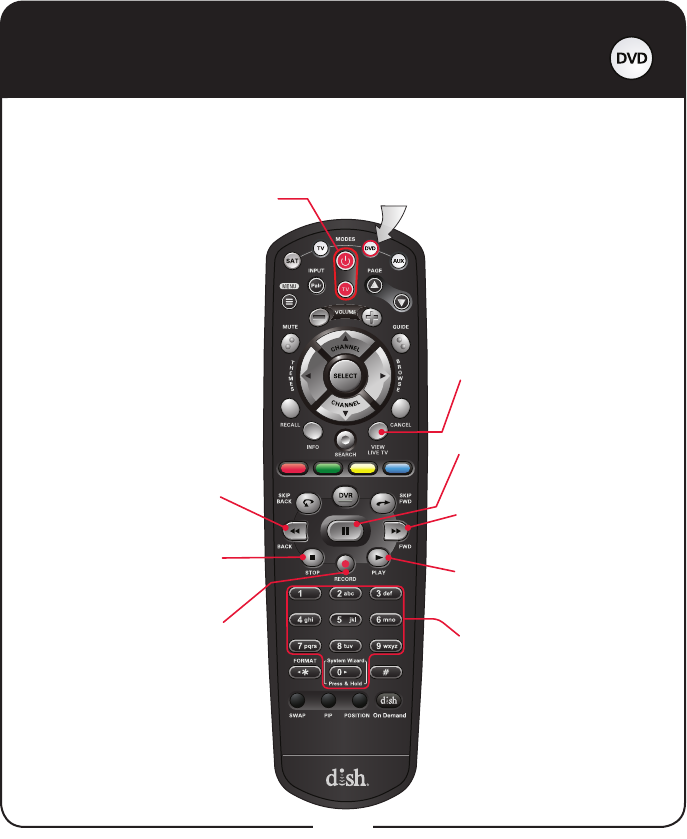
DVD Mode
To use the features described in this section, make sure you are in DVD mode by
pressing the DVD Mode button. In addition to operating a DVD player, you can also
use this mode to operate a VCR or Blu-ray Disc™ (BD) player. Remote programming is
required. Note: Some features may not be available depending on your device model.
Power & TV Power
Top button turns the DVD/VCR/BD on/off
Bottom button turns the TV on/off
Number Buttons
Use to get to specic chapters
on the DVD; the function
of remote number buttons
depends on the device
View Satellite
Programming
Exit out of any menu/guide and
return to viewing live TV
Press this button
for DVD Mode
FWD
Forward a
videotape or DVD/BD
Play
Play a videotape or
DVD/BD
Pause
Pause a videotape or
DVD
Back
Rewind a videotape
or reverse a DVD/BD
Stop
Stop playing a DVD/BD,
stop playing or
recording a videotape
Record
Record on a videotape
6
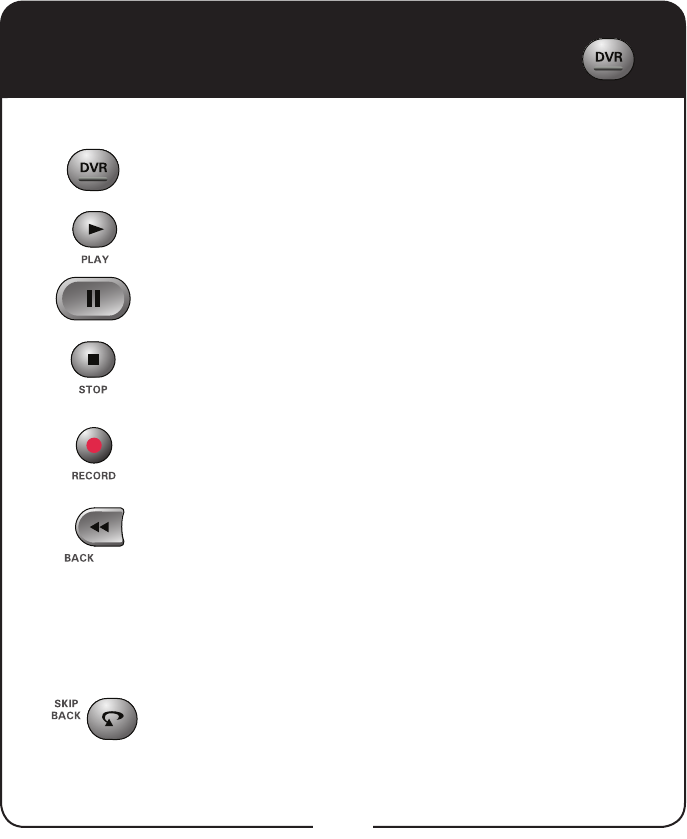
DVR Functions
• Displays a list of recorded programs.
• Plays a live or recorded program.
• Pauses a live or recorded program.
• Stops recording a program or playing a recorded
program.
• Records a program.
• Press BACK once to reverse the program four times as
fast as normal play. Press BACK twice to reverse at 15
times normal speed, three times to reverse at 60 times
normal speed, and four times to reverse at 300 times
normal speed. The on-screen bar shows how far you’ve
gone. For a live program, you can only reverse back to
the last channel change or back one hour, whichever
occurs rst.
• Press SKIP BACK to skip back about 10 seconds in a
program.
7
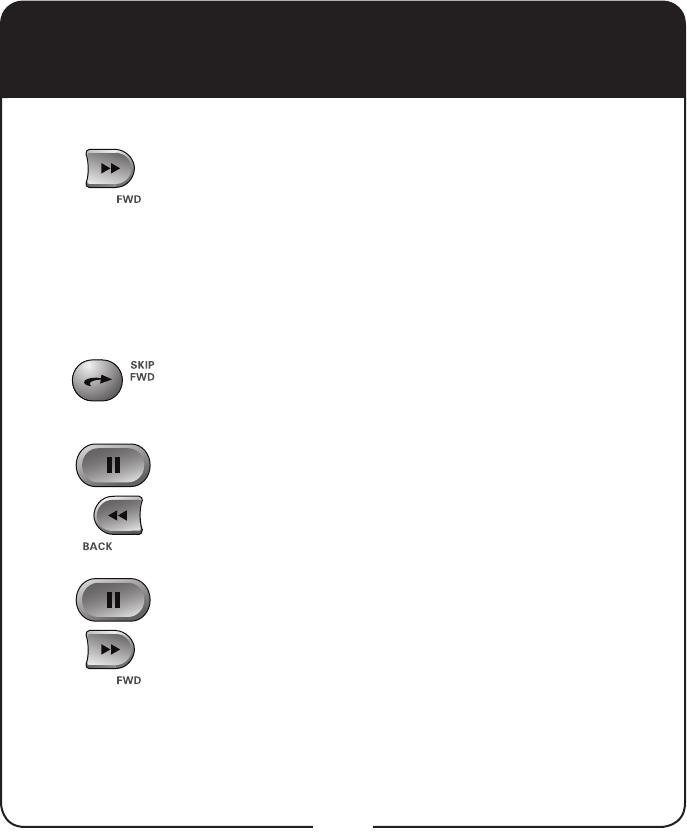
• Press FWD (Forward) once to fast-forward through
the program four times normal speed. Press FWD
twice to forward at 15 times normal speed, three
times to forward at 60 times normal speed, and four
times to forward at 300 times normal speed. The on-
screen bar shows how far you have gone. Of course,
you cannot forward into the part of a live program that
has not been broadcast yet.
• Press SKIP FWD to skip ahead about 30 seconds in
the program.
• Press PAUSE and then press BACK to reverse the
program in slow motion at 1/4 the speed of normal
play. Press BACK again to reverse at normal speed.
• Press PAUSE and then press FWD to forward
the program in slow motion at 1/15 the speed of
normal play. Press FWD twice to forward at 1/4 as
fast as normal play. Press FWD three times to play
the program. Of course, you cannot forward a live
program that has not been broadcast yet.
DVR Functions, continued
8
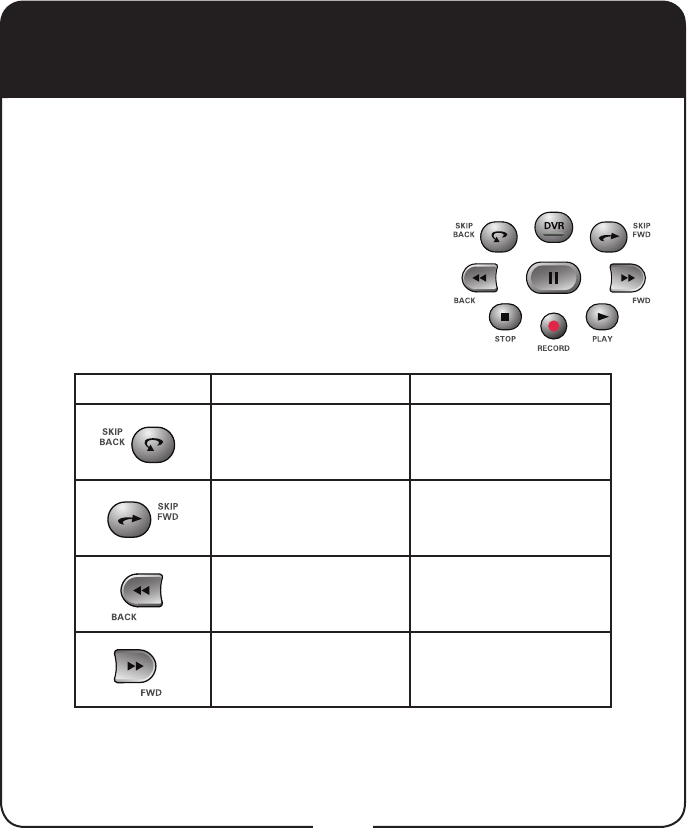
Using Remote Button Shortcuts
Buttons In Guide Display Scroll in Lists
Move 3 hours back By 1 screen upward
Move 3 hours ahead By 1 screen downward
24 hours back To beginning of list
24 hours ahead To end of list
In addition to their normal functions, some buttons on your remote control
have special shortcut functions. These shortcuts are enabled while
navigating the on-screen Electronic Program Guide (EPG) or viewing the
scrollable list of events.
DVR Buttons
The following table lists some of these shortcuts
for the gray set of buttons that normally control
your DVR functions.
Note: Scheduled updates to your receiver
software may add to or modify these shortcuts.
9
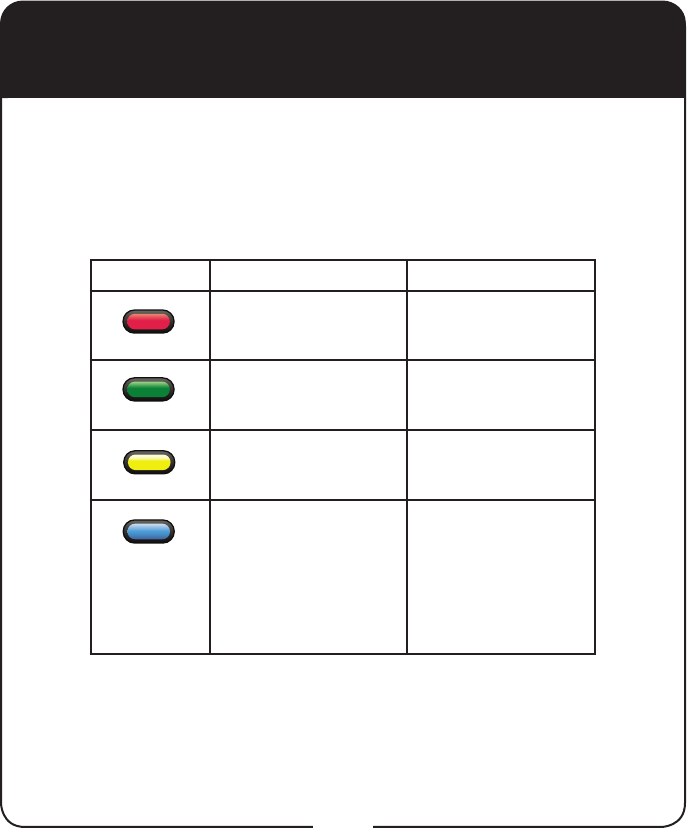
Buttons From Live TV Elsewhere
Access TV Viewing Status
Jumps to menu bar and
displays the red button
menu option
Access Quick Clicks list
Jumps to menu bar
and displays the green
button menu option
Access Settings screen
Jumps to menu bar
and displays the yellow
button menu option
Access Network Settings Jumps to menu bar and
displays the blue button
menu option.
From the EPG, expands
or collapses select
channel ranges
Colored Buttons
The following table lists some of the shortcuts for the colored set of
buttons on your remote control.
Note: Scheduled updates to your receiver software may add to or modify
these shortcuts.
Using Remote Button Shortcuts,
continued
10
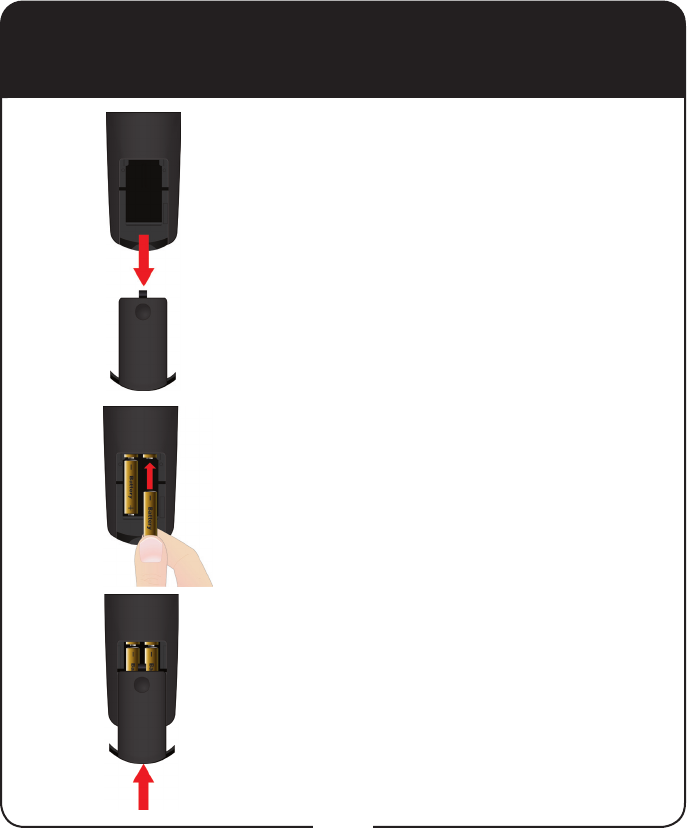
Inserting the Batteries
Pull the remote battery cover off.
Insert 4 AAA batteries of the same type
and kind, making sure to match the plus
(+) ends with the plus markings on the
battery case.
Replace the remote battery cover.
1
2
3
11
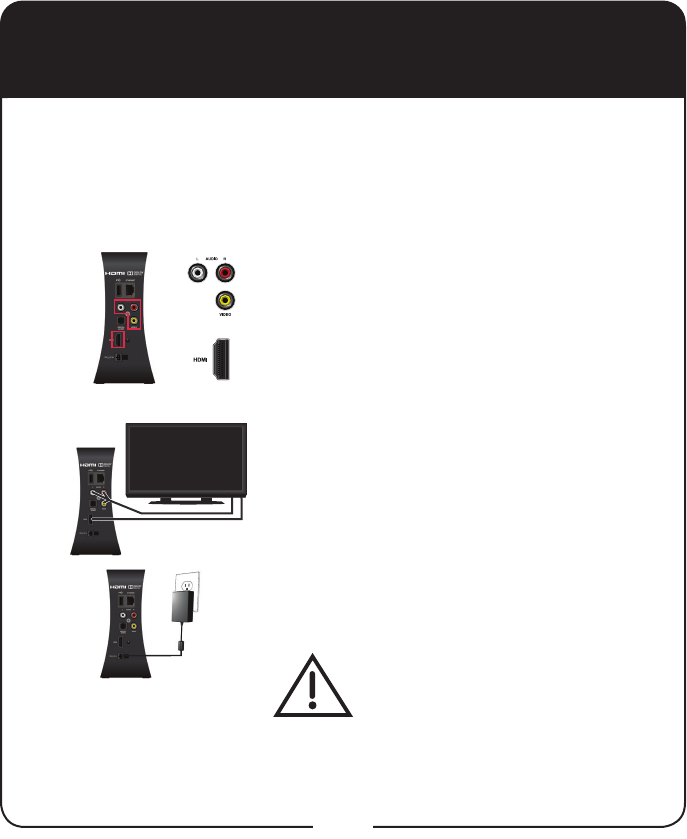
Connecting to Home Network
Connect cable(s) to the appropriate connection
on the back of the Wireless Joey receiver. This
receiver supports HDMI technology or RCA-
type connections.
Connect the other end of the cable to the
appropriate input of your TV or monitor.
Conrm that both your TV and the Wireless
Joey receiver are connected to a power outlet.
Note: In most cases, connecting the HDMI
cable provides plug-and-play control of the
TV’s display resolution and other settings.
However, your TV may require selecting a
different format to display from the Wireless
Joey receiver during setup.
Do not cover the vents or stack
anything on the Wireless Joey
receiver. Covering the vents or
stacking anything on the Wireless
Joey receiver can cause heat
build-up, which voids the Limited
Warranty.
1
2
The Wireless Joey receiver uses Wi-Fi to connect to a Wireless Joey
Access Point, which uses an Ethernet connection to connect to your
Home Network, making it possible to share programming and recorded
content.
Note: Using the Wireless Joey Access Point Installation Instructions, set
up your Wireless Joey Access Point rst before starting this procedure.
Continued on the next page

12
4
Connecting to Home Network, continued
Turn on the Wireless Joey receiver
and TV. Change your TV to the
correct input or source using the
remote that came with the TV.
Consult your TV user’s guide for
assistance.
Turn up the volume on your TV
and conrm you have sound.
If you don’t have sound, your
system may require you to connect
audio (red and white) RCA-type
cables between the Wireless Joey
receiver’s Audio Outputs and the
TV’s audio input connections.
3
Continued on the next page
13
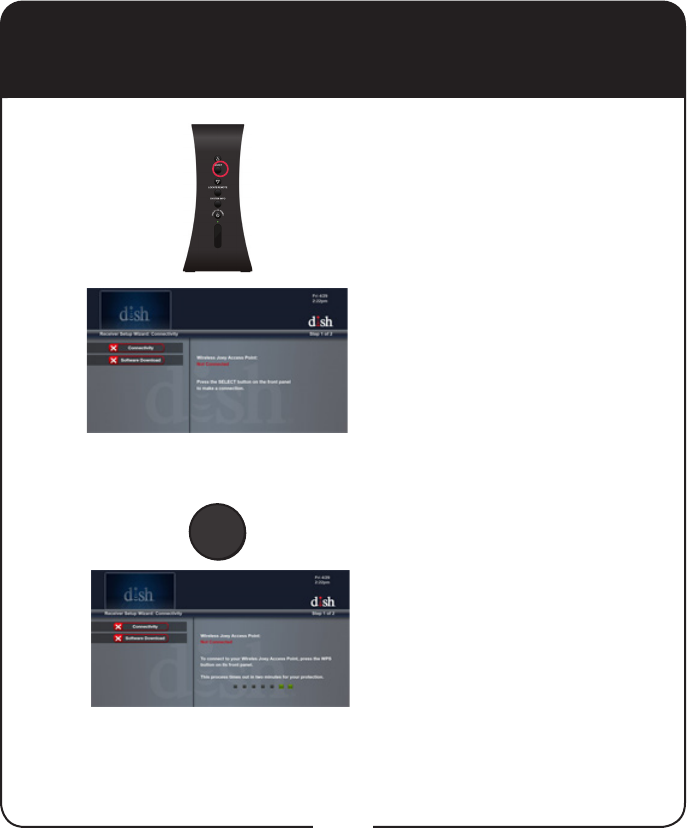
6
5
Connecting to Home Network, continued
Press SELECT on the front panel
of the Wireless Joey to begin the
Wireless Joey Installation Wizard.
Press the WPS button on the front
panel of the Wireless Joey Access
Point to begin the Wireless Joey
Installation Wizard and to connect
the Wireless Joey to the Wireless
Joey Access Point.
WPS
Continued on the next page

14
When the Wireless Joey connects
to the Wireless Joey Access
Point, it then connects to a
Hopper receiver.
The Starting Up screen appears.
The cursor appears on the
screen.
After a few minutes, the Receiver
Setup Wizard screen appears.
Connecting to Home Network, continued
Continued on the next page
7
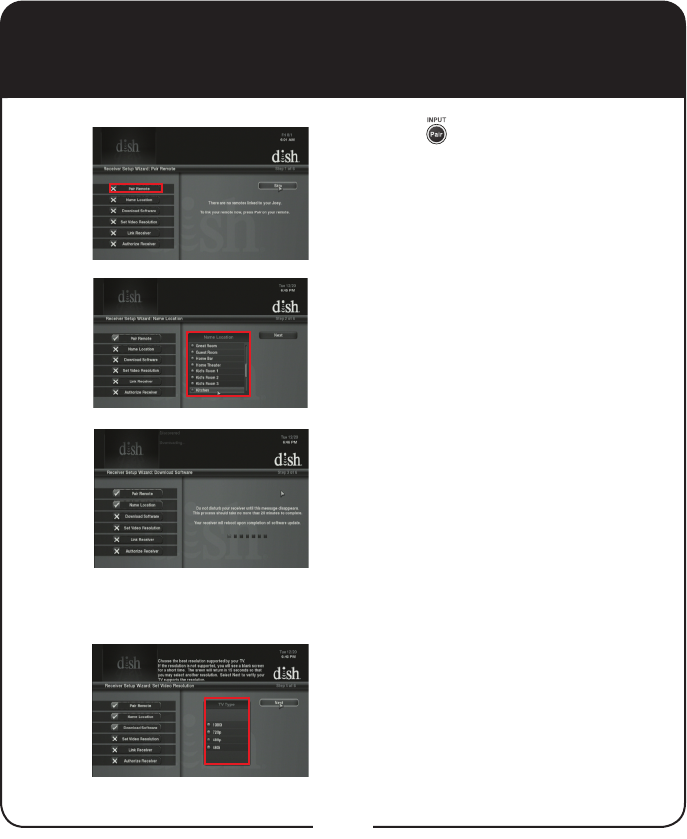
15
8Press PAIR on your remote.
The Pair Remote option becomes
highlighted.
Select a Location Name for the
Wireless Joey and select Next. The
system updates the software and
reboots; this process takes several
minutes.
If your connection is recognized, the
video resolution is correctly selected;
select Next. If you change the format
for the HDTV setup, select the video
resolution for your HDTV under TV
Type and select Next.
9
Continued on the next page
Connecting to Home Network, continued
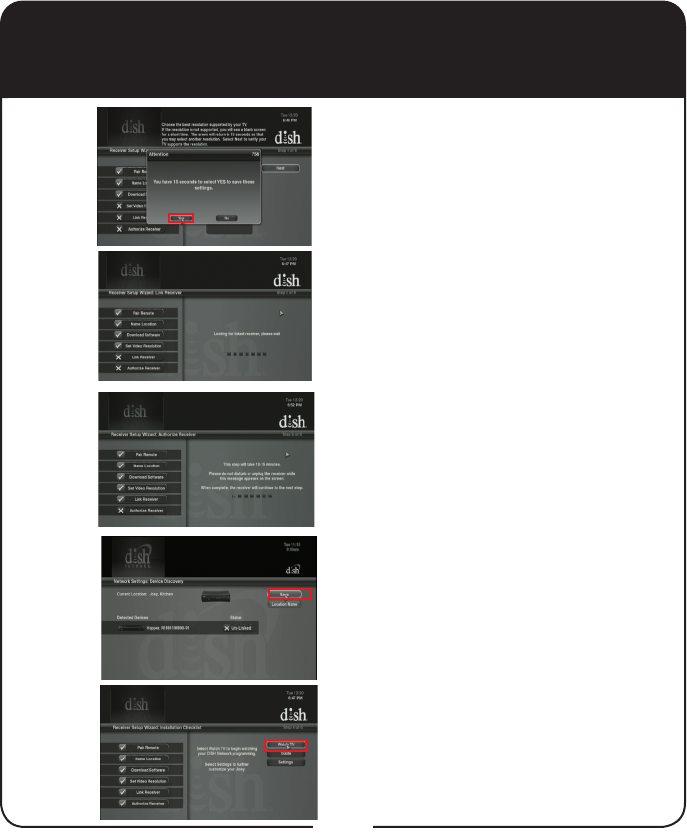
13
12
10
11
16
Select Yes to save the settings.
The system looks for an available
host receiver. If the Wireless Joey
nds more than one Hopper, select
the Hopper to which you want to link
the Wireless Joey.
To link the Wireless Joey to the
Hopper receiver, press Select.
Select Save. This step takes several
minutes to complete.
Select Watch TV to watch your
DISH programming. Select Guide
to display the program guide. Select
Settings to display the Settings
Menu.
Connecting to Home Network, continued
Lookup Code
17
You can program your DISH remote to control another device, such as
a TV, DVD, Blu-ray Disc™ player, VCR, audio receiver, or ampliier.
The receiver scans the database of codes for the particular device and
tries each code. When you nd one that works, you save that code.
Typically, the TV mode button is programmed to a TV; the DVD mode
button is programmed to a DVD, Blu-ray Disc™ player, or VCR; and
the AUX button to a DVD, Blu-ray Disc™ player, VCR, audio receiver,
or amplier. However, each of the Mode buttons are programmable to
whatever device you select.
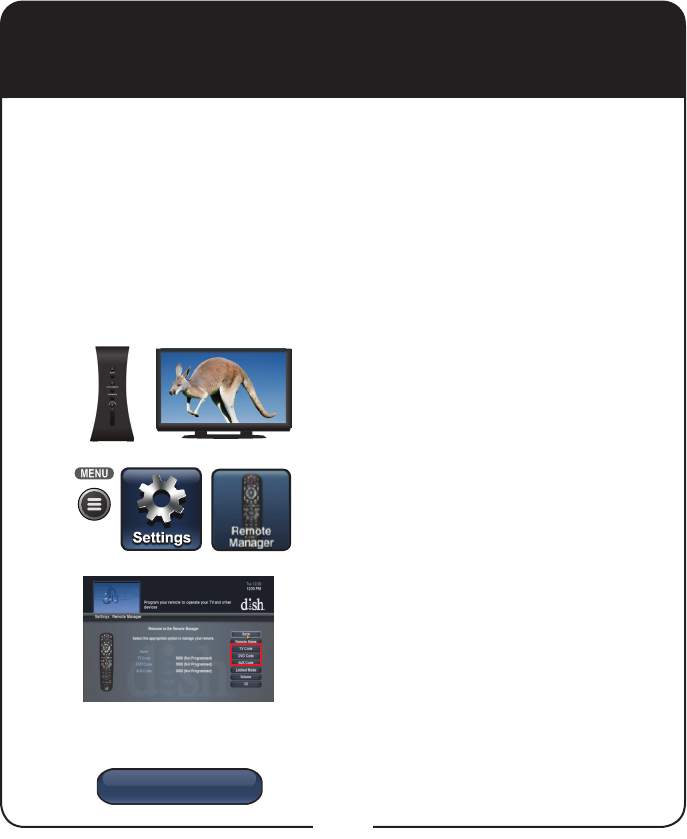
Turn the device and receiver on.
Press MENU and select Settings. From
the Settings screen, select Remote
Manager.
Select the TV Code, DVD Code, or AUX
Code option on the Remote Manager
screen. If programming in TV or DVD
Code, continue to step 4. If programming
in AUX Code, continue with this step.
For programming in AUX Mode only:
Scroll the Aux Device list to select and
highlight your device type. Select Next.
Select the Lookup Code option.
2
1
3
Programming Remote to Control
Another Device
4
Yes
No
18
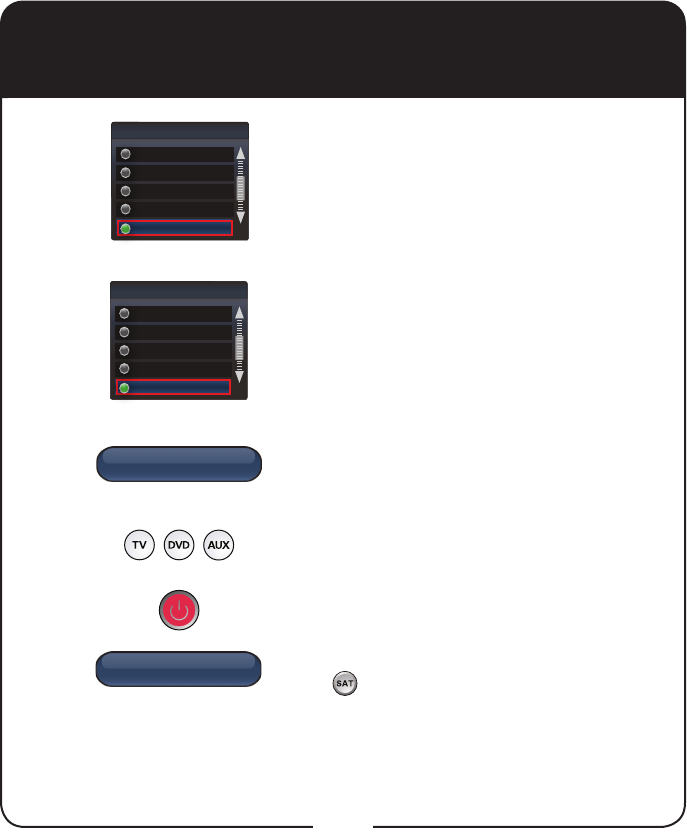
Scroll the Sort By (or Aux Device) list to
position the selected option within the blue
highlight bar.
Highlight the device’s name in the Brand list
and select Next.
Select Yes to test the remote with the
device.
Press the Mode button for the device you
are setting up. Release.
Press POWER to turn off your device. If
device turns off, continue with step 10.
If it does not turn off, press and release
SAT to switch modes. Select No and
return to step 6 for the next code.
5
6
7
8
9
Programming Remote to Control
Another Device, continued
K-L
Sort by
I-J
M-N
O-Q
R-S
RCS
Brand
RadioShack
Realistic
Reoc
RevolutionHD
Yes
OR
No
Save
19
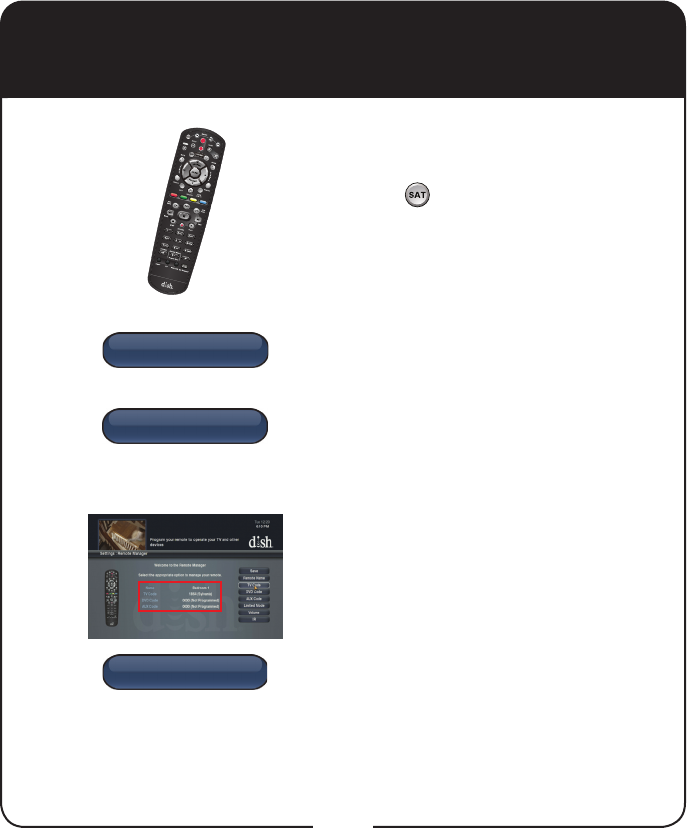
Using the remote, turn the device on and
try some other remote buttons to make
sure they work. When nished, press and
release SAT to switch modes.
If the code worked for other buttons, select
Yes and continue to step 11. If the code did
not work, select No and return to step 6 for
the next code for the brand of your device.
On the Remote Manager screen,
conrm that the device’s brand name is in
parentheses after a four-digit code. Select
Save.
Programming Remote to Control
Another Device, continued
10
11
20
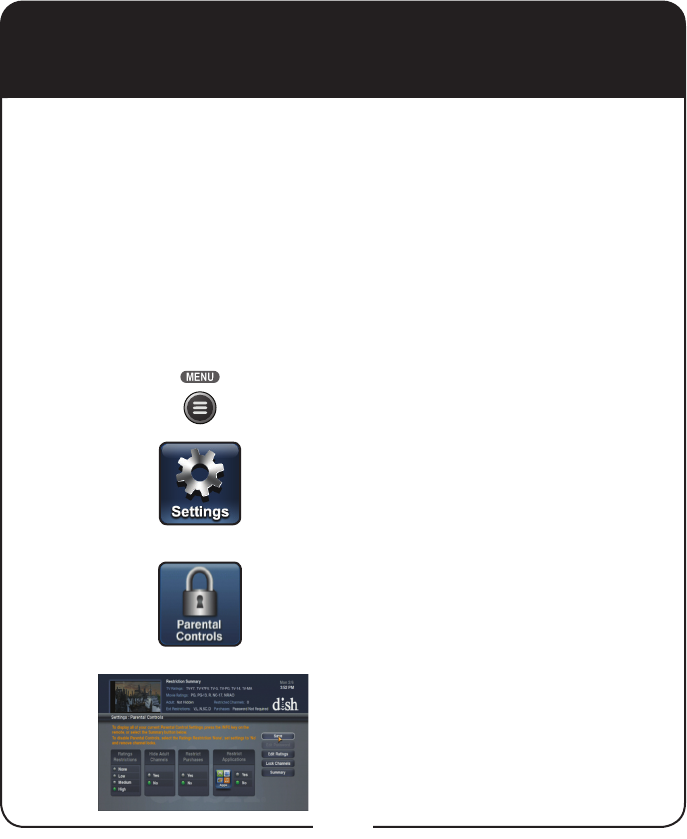
Setting Parental Controls
Press MENU.
Select Settings.
Select Parental Controls.
The Parental Controls screen
appears.
To place parental controls on the programming coming to the TV
connected to this Wireless Joey receiver, you can either copy the
settings from the Hopper or Hopper with Sling receiver, or you can
set different parental controls for your Wireless Joey receiver. To
copy the parental controls that have been set for the Hopper or
Hopper with Sling receiver, go to your Hopper or Hopper with Sling
receiver, press MENU, select Settings, select Parental Controls,
and select Copy Settings. Select your Wireless Joey receiver to
have the same settings as the Hopper or Hopper with Sling.
To set parental controls on the Wireless Joey receiver, follow the
procedure provided below.
1
2
3
continued on next page
Save
Hide Adult
Channels
Yes
No
Restrict
Purchases
Yes
No
Ratings
Restrictions
Medium
High
None
Low
Restrict
Applications
Yes
No
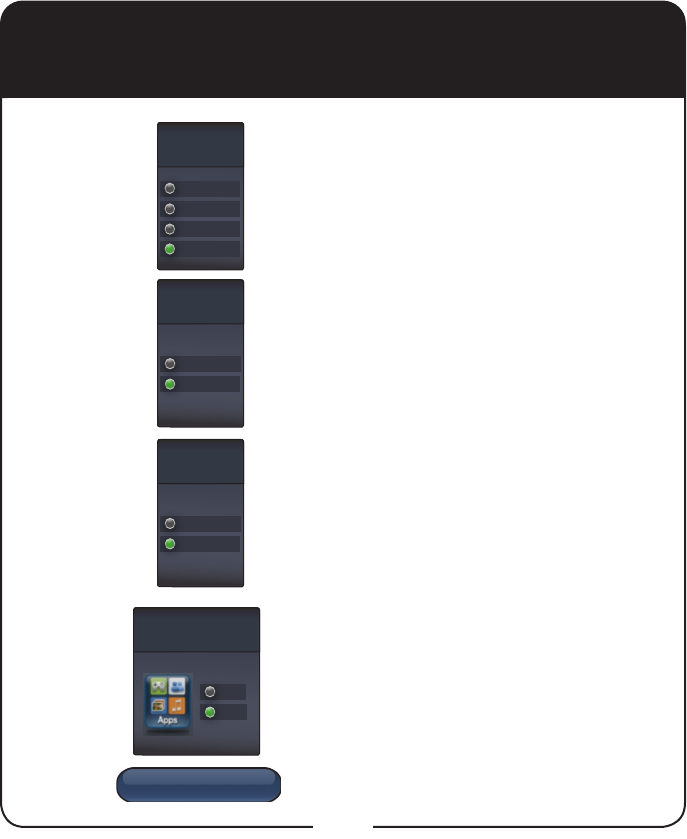
21
4Select one of the following from
Ratings Restrictions:
• None
• Low
• Medium
• High
Select Yes to hide adult channels or
leave No selected.
Select Yes to restrict purchases or
leave No selected.
Select Yes to restrict applications or
leave No selected.
Select Save. Conrm Password.
6
7
Setting Parental Controls, continued
5
8
22
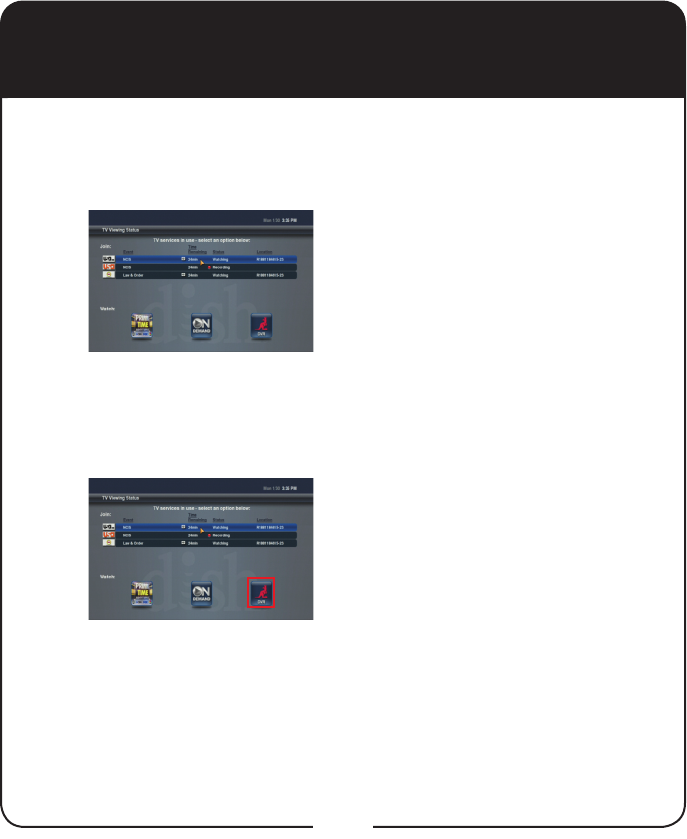
Sharing Content
If all tuners are in use, you may either join one of the events or watch
a program found under PrimeTime Anytime™, On Demand, or
recorded on the DVR.
Press the red button to display
the TV Viewing Status screen.
You may join a program that
is being displayed on another
TV on your home network or
watch PrimeTime Anytime, On
Demand, or a program recorded
on the DVR. If the event is grayed
out, you are unable to join it.
Select an event under Join or
a tile under Watch by using the
Arrow keys on the remote to
highlight your option and pressing
SELECT.
1
2
Back
Backup
23
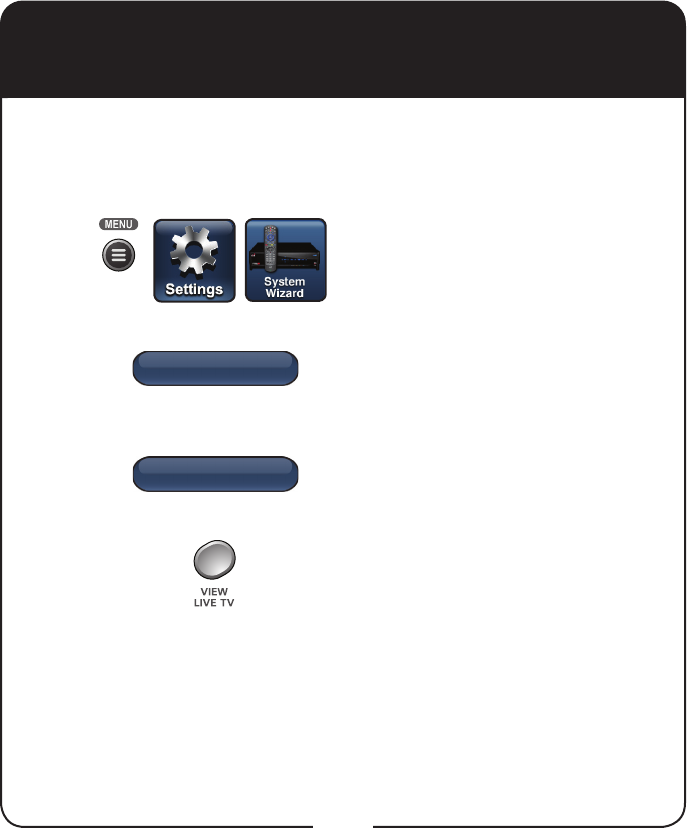
Backing Up Settings
After setting up the remote and the Wireless Joey receiver, you
can back up your settings. If you back up your settings, you can
easily restore your settings.
Press MENU, select Settings,
and then select System Wizard.
If you have nished setting up a
new remote and receiver, select
Backup. Backup saves your
receiver and remote settings.
When Backup is complete,
select Back to return to System
Wizard.
Press VIEW LIVE TV to return to
your satellite programming.
1
2
3
4
Back
Restore
24
Restoring Settings
If you should lose settings that have been backed up (see Backing
Up Settings on page 23), you can restore the remote and receiver
settings.
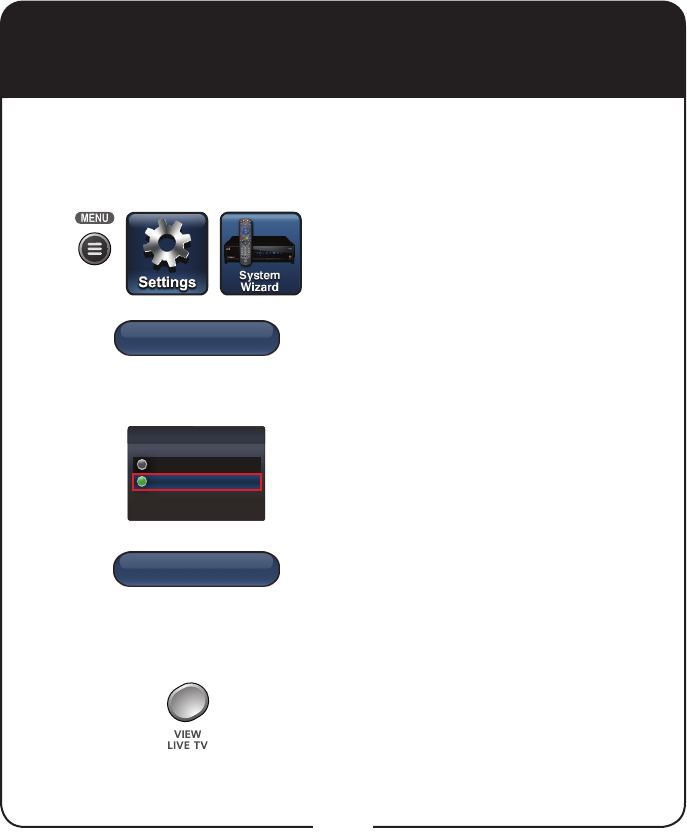
Press MENU, select Settings, and
then select System Wizard.
If you are setting up a new remote
and used Backup with the previous
remote, click on Restore to restore
the settings.
Select either Receiver or Remote
settings to restore from the Device
List.
When Restore is nished, select Back
to return to System Wizard. Repeat
step 3 to restore settings for either
Receiver or Remote, depending on
which one was selected earlier.
Press VIEW LIVE TV to return to your
DISH programming.
5
4
3
2
1
Device
Remote
Receiver
LOCATE
REMOTE
25
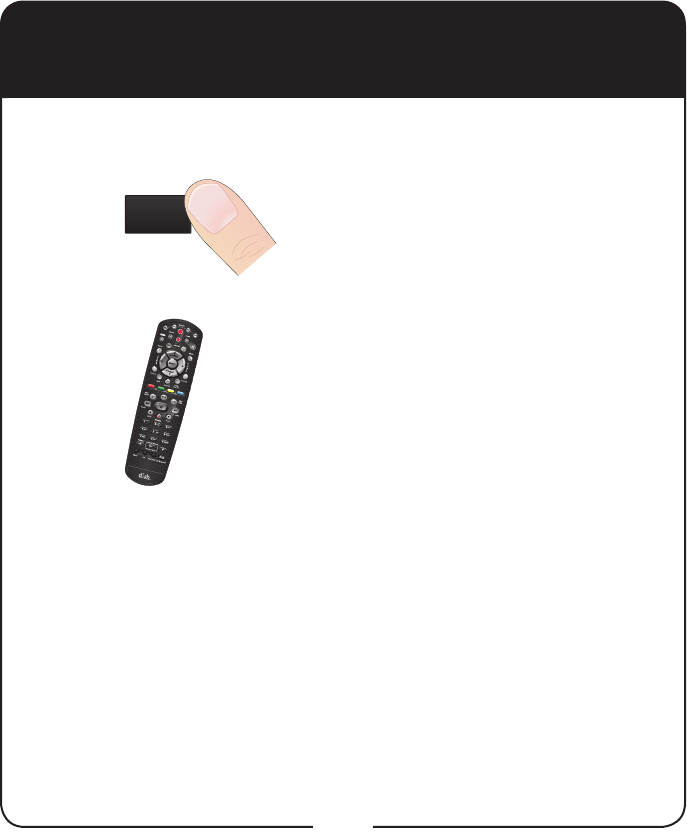
Locating the Remote
Press LOCATE REMOTE on the front panel
of the Wireless Joey receiver.
If the missing remote control is paired to
this Wireless Joey receiver and within radio
frequency (RF) range, there should be a
series of tones you hear to help nd the
location of the remote. It may take up to 30
seconds after touching LOCATE REMOTE
before you hear the tones. Press any button
on the remote to turn off the Locate tones
after nding the remote.
If you do not hear any tones after pressing
LOCATE REMOTE, press the SYSTEM
INFO button on the front panel. The
System Info screen lists the paired
remote(s). If the remote control you want
to nd is not listed or it is not paired to the
Wireless Joey receiver, using LOCATE
REMOTE is not an option.
If the remote control you want to nd is out
of RF range, LOCATE REMOTE is not an
option.
When you are looking for the remote, try the LOCATE REMOTE feature
on the front panel of the Wireless Joey receiver.
1
2

26
Troubleshooting
There is no picture on the TV after connecting it to the Wireless Joey
receiver.
What to do: Check that all connections are hand-tightened. Verify that
DISH programming is displaying on the Hopper or the Hopper with Sling
receiver. If all connections are good and the Hopper and/or Hopper with
Sling receiver is working as expected, try connecting the Wireless Joey
receiver to the TV using an RCA-type connection. If using an RCA-type
connection, set the correct input for this connection on the TV and change
the settings for the TV on the Wireless Joey receiver to match your TV’s
settings.
Your remote control does not work well when controlling the receivers.
What to do: Verify that your remote has fresh batteries. There is a Battery
Level indicator on the System Info screen that displays three levels: Green
(good), Yellow (low), and Red (critical). If this indicator is at Yellow or Red,
replace the batteries with new batteries of the same type and kind.
Verify that your remote is paired. This information is provided on the
System Info screen. If it is not paired, pair the remote.
Other devices, such as wireless routers, Bluetooth®, 2G phones, and
microwave ovens, could create interference and affect the performance of
your remote. Move your Wireless Joey receiver away from other electronic
devices that could potentially cause interference.
Use this information if you have a problem using the Wireless Joey
receiver. To solve a particular problem, do the following:
• In the following section, nd the information that relates to the problem
you are experiencing. Try the suggested solution for that problem.
• Make sure your remote control has fresh batteries. If you see the
Remote Battery Low warning on your TV screen, it is time to change
the batteries.
• Visit mydish.com/support.

27
Troubleshooting, continued
Your picture is snowy (or black or blue).
What to do: Make sure your TV is tuned to the correct channel. Make
sure the cables are completely and correctly connected from the
Wireless Joey receiver to the TV and from the Wireless Joey receiver
to the home network.
While performing a remote control procedure, the remote control
stops working.
What to do: Start over again. If you don’t press a button for
20 seconds in a programming sequence, the remote shuts off its
programming function.
My remote is not working.
What to do: Verify the batteries are installed according to the diagram
inside the remote control’s battery compartment.
Check the Battery Level indicator located in the System Info screen.
This indicator displays three levels: Green (good), Yellow (low),
and Red (critical). If this indicator is at Yellow or Red, replace the
batteries with batteries of the same type and size.
Conrm the remote is in the correct mode for the device you want to
control. For example, to control the Wireless Joey receiver, press SAT on
the remote before the function you want performed.
Make sure you are using the correct remote control provided for your
Wireless Joey receiver. The remote uses radio frequency (RF) signals
to operate your Wireless Joey receiver. Other equipment is usually
controlled using infrared (IR) light signals. If you have programmed the
remote to control your equipment in other device modes, then the remote
control must have a clear line-of-sight to the front of these other devices.
Check that all cable connections to the home network are hand-
tightened.

28
Troubleshooting, continued
If your remote is showing that it is paired but isn’t working, select Un-Pair
on the System Info screen and listen for the conrmation tone. Press PAIR
to pair the remote again. If you do not hear the tone, continue with the next
suggestion.
If your remote is not listed or cannot be un-paired on the System Info
screen, then complete the following steps:
1 Press and hold SAT until all the Mode buttons light up and release.
2 Press RECALL and 0 (the number zero) at the same time and release
(SAT lights up).
3 Press SEARCH and release (SAT lights up).
4 Press VOL+ and release (SAT lights up).
5 Press STOP and release (un-pair tone is heard).
6 Press SYSTEM INFO on the front panel.
7 Press INPUT/PAIR and release to pair the remote again.
When I press a button on the remote, all the Mode LEDs ash.
What to do: When batteries are rst inserted into the remote, the remote
goes through an initializing process. This process takes about ten seconds,
and pressing a key while the remote is booting up causes the SAT, TV, and
AUX mode buttons to ash. If a remote stays in this state for longer than
two minutes, replace the batteries (see page 10).
My PIP (Picture-In-Picture) button isn’t working.
What to do: The PIP feature is available only with the Hopper or the
Hopper with Sling receivers.
I am trying to watch a program, but the TV Viewing Status displays
instead.
What to do: All tuners on the receivers are currently in use, either by other
TVs; the DVR is recording a program; the receivers are taking a software
download; and/or a remote viewing session is occurring. You can wait until
a tuner becomes available, watch the same programming that is displaying
on another TV, or select PrimeTime Anytime™, On Demand, or DVR.
29
Limited Warranty
This Limited Warranty is a legal document. Keep it in a safe place. Remember
to retain your Bill of Sale for warranty service! Any items returned without a copy
of the Proof of Purchase will be considered out of warranty.
What the Warranty Covers
This warranty extends only to the original user of the equipment and is limited to the
purchase price of each part. DISH Network L.L.C. and its afliated companies (“DISH”)
warrant this system against defects in materials or workmanship as follows:
Labor: For a period of one (1) year from the original date of purchase, if DISH
determines that the equipment is defective subject to the limitations of this warranty,
it will be replaced at no charge for labor. DISH warrants any such work done against
defects in materials or workmanship for the remaining portion of the original warranty
period.
Parts: For a period of one (1) year from the original date of purchase, DISH will supply,
at no charge, new or re-manufactured parts in exchange for parts determined to be
defective subject to the limitations of this warranty. DISH warrants any such replacement
parts against defects in materials or workmanship for the remaining part of the original
warranty period. Note: “Parts” means items included in this package, which may include
the satellite dish assembly, receiver, LNBF, remote control, power supply, or dish
mounting hardware. It does not include other parts purchased separately.
What the Warranty Does Not Cover
This warranty does not cover installation of the system. If applicable, such installation will
be warranted under a separate installation agreement.
This warranty does not cover consumer instruction, physical setup or adjustment of any
consumer electronic devices, remote control batteries, signal reception problems, loss of
use of the system, or unused programming charges due to system malfunction.
This warranty does not cover cosmetic damage, damage due to lightning, electrical
or telephone line surges, battery leakage, re, ood, or other acts of Nature, accident,
misuse, abuse, repair or alteration by other than authorized factory service, use of
accessories not recommended by the receiver manufacturer, negligence, commercial or
institutional use, or improper or neglected maintenance.
This warranty does not cover equipment sold AS IS or WITH ALL FAULTS, shipping and
handling, removal or reinstallation, shipping damage if the equipment was not packed
and shipped in the manner prescribed, nor equipment purchased, serviced, or operated
outside the continental United States of America.

30
Limited Warranty, continued
Legal Limitations
REPLACEMENT AS PROVIDED UNDER THIS WARRANTY IS YOUR EXCLUSIVE
REMEDY. DISH SHALL NOT BE HELD LIABLE FOR ANY INCIDENTAL OR
CONSEQUENTIAL DAMAGES FOR BREACH OF ANY EXPRESSED OR IMPLIED
WARRANTY ON THIS SYSTEM, NOR FOR ANY INCIDENTAL OR CONSEQUENTIAL
DAMAGES RESULTING FROM THE USE OF, OR INABILITY TO USE, THIS SYSTEM.
SOME STATES MAY LIMIT OR EXCLUDE THE FOREGOING LIMITATION, SO THE
ABOVE EXCLUSION OR LIMITATION MAY NOT APPLY TO YOU. EXCEPT TO THE
EXTENT PROHIBITED BY APPLICATION LAW, UNDER NO CIRCUMSTANCES SHALL
DISH’S LIABILITY, IF ANY, EXCEED THE PURCHASE PRICE PAID FOR THIS SYSTEM.
ANY IMPLIED WARRANTY OF MERCHANTABILITY OR FITNESS FOR A PARTICULAR
PURPOSE ON THIS SYSTEM IS LIMITED IN DURATION TO THE PERIOD OF THIS
THIS WARRANTY. SOME STATES DO NOT ALLOW LIMITATIONS ON HOW LONG
A STATUTORY OR IMPLIED WARRANTY LASTS, SO THE ABOVE LIMITATION MAY
NOT APPLY TO YOU. DISH RESERVES THE RIGHT TO REFUSE TO HONOR THIS
WARRANTY IF DISH DETERMINES ANY OF THE ABOVE EXCEPTIONS TO HAVE
CAUSED THIS SYSTEM NOT TO HAVE PERFORMED PROPERLY. THIS WARRANTY
SHALL BE VOID IF ANY FACTORY-APPLIED IDENTIFICATION MARK, INCLUDING
BUT NOT LIMITED TO SERIAL OR CONDITIONAL ACCESS NUMBERS, HAS BEEN
ALTERED OR REMOVED. THIS WARRANTY SHALL ALSO BE VOID IF THE RECEIVER
HAS BEEN OPENED BY AN UNAUTHORIZED PERSON.
If You Need Assistance
Call the Customer Service Center at 1-800-333-DISH (3474). Have the date of purchase and either
your customer account number, the receiver conditional access number, or the receiver model number
ready. Display the System Info screen to nd these numbers.
A Customer Service Representative will assist you.
If the Representative determines you should return any equipment, you will be directed to call a Return
Authorization representative. Before shipping any equipment, you must talk to a Return Authorization
representative and must obtain a Return Authorization (RA) number.
You will be given the appropriate address for which to return your equipment. Whether under warranty
or not, you will be responsible for the cost of shipping back the defective equipment. For faster service,
see the Advance Exchange Program below.
Returned equipment must be packaged properly, using either the original shipping materials or the
packaging in which the replacement equipment is shipped. Include a copy of the Bill of Sale. Any
items returned without a copy of the Proof of Purchase will be considered out of warranty. Follow the
instructions given to you by the Customer Service Representative.
Write the RA number in large, clearly visible characters on the outside of the shipping box that you use
to return the equipment. To avoid confusion and misunderstandings, shipments without an RA number
clearly visible on the outside of the box will be returned to you at your expense.

31
DISH Exchange Program
DISH offers two options if you need to replace your satellite receiver equipment or its
accessories.
Advance Exchange Program
The Advance Exchange Program allows you to have replacement equipment shipped
immediately to you (depending upon where you live, it could take three to ve business days).
Along with replacement equipment, you will receive a prepaid shipping label and instructions
on how to return the defective equipment. The shipping charge, for receiving replacement
equipment and returning the defective equipment, is a one-time fee based on DISH’s
competitive bulk shipping rates (additional charges may apply outside of the continental US).
This fee will be charged to your billing account or your valid credit card. If you do not ship
the defective equipment to DISH within ten days after receiving the replacement, your billing
account or credit card will be charged the market price of the replacement. If you return the
defective equipment after ten days, you will receive a full refund less an administrative fee.
If your equipment is out of warranty and can be repaired your billing account or credit card will
be charged the standard repair fee for the replacement. If damage to the defective equipment
is found, which DISH in its sole discretion determines has voided the warranty, or makes the
equipment unrepairable, billing account or credit card will be charged the market price of the
replacement.
Post Receipt Exchange Program
You may choose to ship the equipment to us at your cost. To provide faster service, upon
receipt of your equipment you will be shipped a replacement. Your original equipment will not
be available for return.
If the defective equipment is covered under this warranty, a replacement will be shipped back
to you at no additional cost (additional charges may apply outside the continental US).
If your equipment is not covered under warranty and can be repaired your billing account
or credit card will be charged the standard repair fee for the replacement. If damage to the
defective equipment is found, which DISH in its sole discretion determines has voided the
warranty, or makes the equipment unrepairable, your billing account or credit card will be
charged the market price of the replacement.
An accessory is any DISH branded equipment, displaying the DISH logo, excluding the
receiver, cables and hookups, and non-mechanical components. A one-year warranty becomes
effective upon the activation of the DISH system or date of purchase, if bought separately.
A proof of purchase is required to verify the purchase date. If an accessory has an expired
warranty, no exchange will be issued. You may purchase replacement accessories from DISH
or your local retailer.
Accessory Warranty
32
FCC Compliance
The following text is extracted from Federal Communications Commission
(FCC) regulations, as of the publication date of this User’s Guide. Contact
the FCC (see following) or your library for the complete text of the
regulations.
This device complies with Part 15 of FCC Rules. Operation is subject to the following
two conditions:
1. This device may not cause harmful interference
and
2. This device must accept any interference received, including interference that
may cause undesired operation.
This equipment has been tested and found to comply with the limits for a Class
B digital device, pursuant to Part 15 of the FCC Rules. These limits are designed
to provide protection against harmful interference in a residential installation. This
equipment generates, uses, and can radiate radio frequency energy and, if not
installed and used in accordance with the instructions, may cause harmful interference
to radio communications. However, there is no guarantee that interference will not
occur in a particular installation. If this equipment does cause harmful interference to
radio or television reception, which can be determined by turning the equipment off and
on, the user is encouraged to try to correct the interference by following one or more of
the following measures:
• Reorient or relocate the receiving antenna.
• Increase the separation between the equipment and receiver.
• Connect the equipment into an outlet on a circuit different from that to which the
receiver is connected.
• Consult the dealer or an experienced radio/TV technician for help.
Do not make changes or modications to this equipment. This could void the user’s
authority to operate the equipment.
Product must be installed at least 20 cm (~8 inches) from typical person locations per
FCC RF exposure regulations.
Operation of Wi-Fi on channels within 5150-5250 MHz is restricted to indoor use only.
If none of these remedies stops the radio interference, you should contact a licensed
radio/television technician, your satellite dealer, or call the Customer Service Center at
1-800-333-DISH (3474), for assistance.

33
Agreement on Internet Usage
via Wireless Joey Receiver
The software contained in the receiver may reference, display, link to, and provide
users access to web services, sites, and information located worldwide through the
Internet. Because EchoStar Corporation and DISH Network have no control over such
sites and information, we make no representations, warranties or guarantees as to
such sites and information, including but not limited to:
(a) the accuracy, availability, sequence, completeness, timeliness, copyright
compliance, legality, content, validity, or quality of any such sites or information, or
(b) whether using the software may result in locating unintended, inappropriate, or
objectionable content.
Because some of the content on the Internet consists of material that is adult-oriented,
restricted to viewers at least 18 years of age or the age of majority where you live, or
otherwise objectionable to some people or viewers, under the age of 18, the results
of using the software may automatically and unintentionally result in the generation
or display of sites, links, or references to such objectionable and/or adult-oriented
material.
By using the software, you acknowledge that neither EchoStar Technologies L.L.C.
nor DISH Network L.L.C. makes any representations, or warranties, or guarantees
with regard to any sites or information displayed by or accessed by in connection
with use of the software. EchoStar Technologies L.L.C., DISH Network L.L.C., their
respective direct and indirect subsidiaries and parents, and the ofcers, directors,
and shareholders of any of the foregoing companies shall not, directly or indirectly,
be liable in any way to you or to any other person or entity for the content you receive
using the software or for any inaccuracies, errors in, or omissions from the content.
EchoStar Technologies L.L.C., DISH Network L.L.C., and their respective afliates
and licensors reserve the right to change, suspend, remove, or disable access to any
services at any time without notice. In no event will EchoStar Technologies L.L.C.,
DISH Network L.L.C., their respective direct and indirect subsidiaries and parents, or
the ofcers, directors, and shareholders of any of the foregoing companies be liable
for the removal of or disabling of access to any such services. EchoStar Technologies
L.L.C., DISH Network L.L.C., and their respective afliates and licensors may also
impose limits on the use of or access to certain services, in any case, and without
notice or liability.

34
If You Need Help
1. Review the Hopper, Hopper with Sling, and Wireless
Joey receiver guides available at mydish.com/
manuals.
2. See Troubleshooting on page 26.
3. On your receiver, select the Help tile from the Main
Menu.
4. Visit mydish.com/chat for 24/7 support.
5. Call the Customer Service Center at
1-800-333-DISH (3474).
For additional information, refer to the Residential
Customer Agreement included with your Hopper and
available at mydish.com/legal.

35
Index
B
Back up Settings 23
C
Connect Wireless Joey Receiver
to Home Video Network 11
D
DVD mode 5
DVR buttons
Back 6
DVR 6
Forward 7
Pause 6
Play 6
Record 6
Skip Back 6
Skip Forward 7
Stop 6
E
Exchange Program 31
F
FCC 32
Front Panel Controls 2
I
Insert Batteries 10
Internet Usage Agreement 33
L
Limited Warranty 29
Locate Remote 25
P
Parental Controls 20
Program Remote to Control
Another Device 17
R
Rear Panel Connections 2
Remote Button
Shortcuts 8
Restore Settings 24
S
SAT mode 3
Set up Wireless Joey Receiver 11
Share Content 22
T
Troubleshooting 26
TV mode 4
W
Warranty 29
36
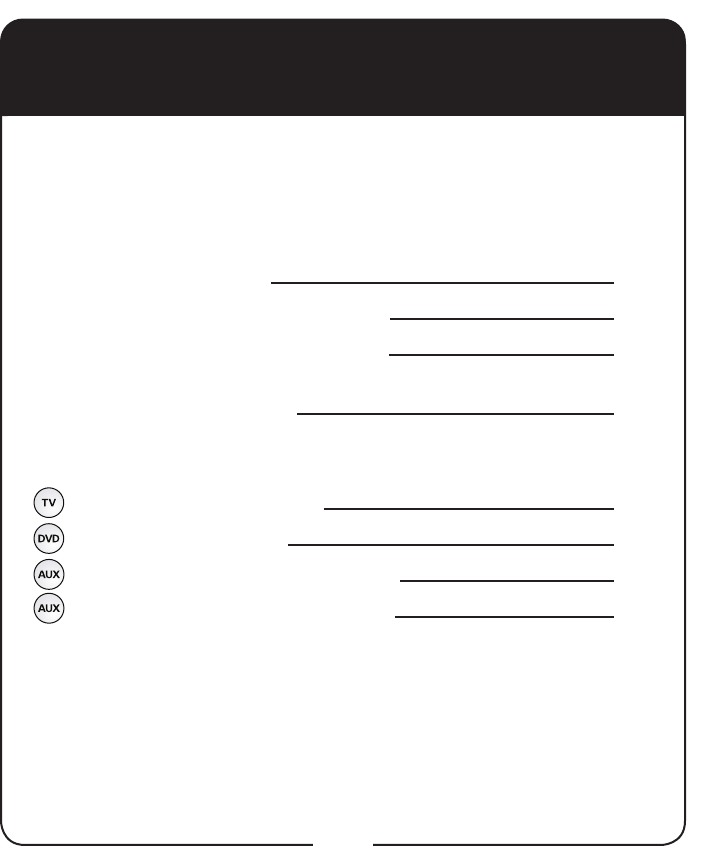
Wireless Joey Receiver Information
Purchase Location Name:
Purchase Location Telephone Number:
Wireless Joey Receiver Serial Number:
Wireless Joey Receiver Smart Card
Conditional Access Number:
Remote Control Settings
Television Code (TV Mode):
DVD Code (DVD Mode):
Auxilliary Device Code (AUX Mode):
Auxilliary Device Type (AUX Mode):
You may need to provide this information if you call the Customer Service
Center.
Note: Some of the items listed below may not be used at this time.

For all your customer needs,
go to www.mydish.com/chat or call
the Customer Service Center
at 1-800-333-DISH (3474)