DIT SECURITY and SURVEILLANCE TECHNOLOGY N7514JV IPC User Manual
SHENZHEN DIT SECURITY&SURVEILLANCE; TECHNOLOGY CO.LTD IPC
User Manual
1
User Manual
(Ver.8.D.12.08)
2
Content
1. INSTALLATION
1.1. SOFTWARE INSTALLATION
2. GETTING STARTED
2.1. VIEW CAMERA IN THE LOCAL NETWORK (LAN)
2.2. SET WIFI CONNECTION
2.3. VIEW THE CAMERA ON THE INTERNET (WAN)
2.4. REGISTER A NEW ACCOUNT AND ADD DEVICES
2.5. MAIN MENU
3. VIDEO SURVEILLANCE
4. GENERAL SYSTEM SETTINGS
4.1. CAMERA SETTINGS IN LAN MODE
4.2. CAMERA SETTINGS IN WAN MODE
5. FREQUENTLY ASKED QUESTIONS – FAQ
3
1 Installation
1.1 Software installation
Window’s requirement:
Windows XP, Windows Vista, Windows 7 and Windows 8
Basic hardware requirement:
1GB RAM and 2 Core CPU for 1 camera at 1 time
2GB RAM and i3 or updated processor for 4 cameras at 1 time
Remarks: No matter how many cameras you’d like to connect, this software has no requirement for GPU
(Graphic Processing Unit)
Caution: This manual is for SYSM Monitor V8.D.12.08, the software is improving, and we are sorry for no
offering more information if it is improved.
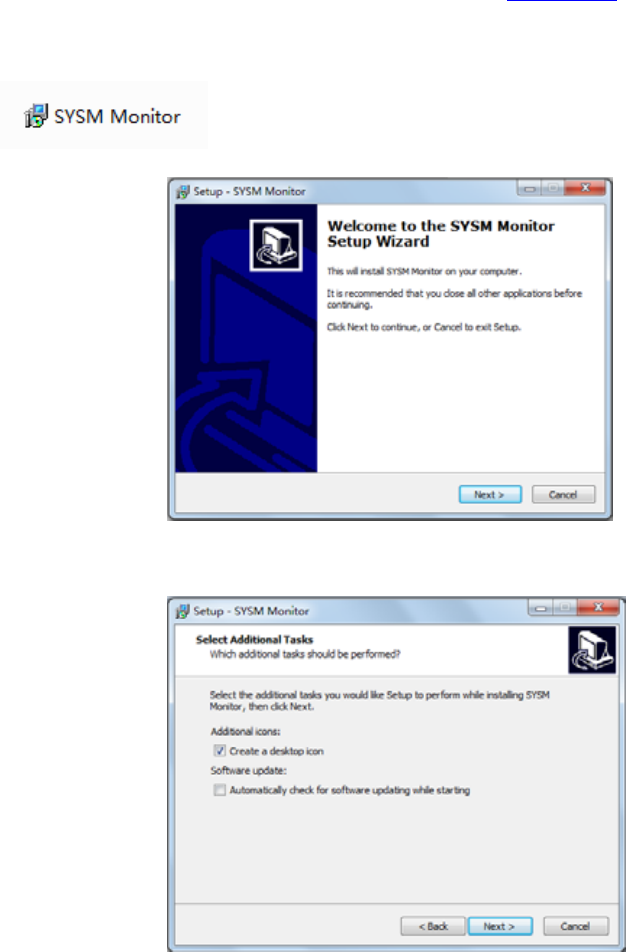
Installation steps:
1. Insert the software CD into the PC drive.( or download the software on www.scc21.net )
2. Opening the CD and start the program "SYSM Monitor.exe"
3. Continue click “Next “until the following steps were finished.
4
Installation steps
4. After installation finished, please click below icon “SYSM Monitor” to run the software as shown.
2 Getting Started
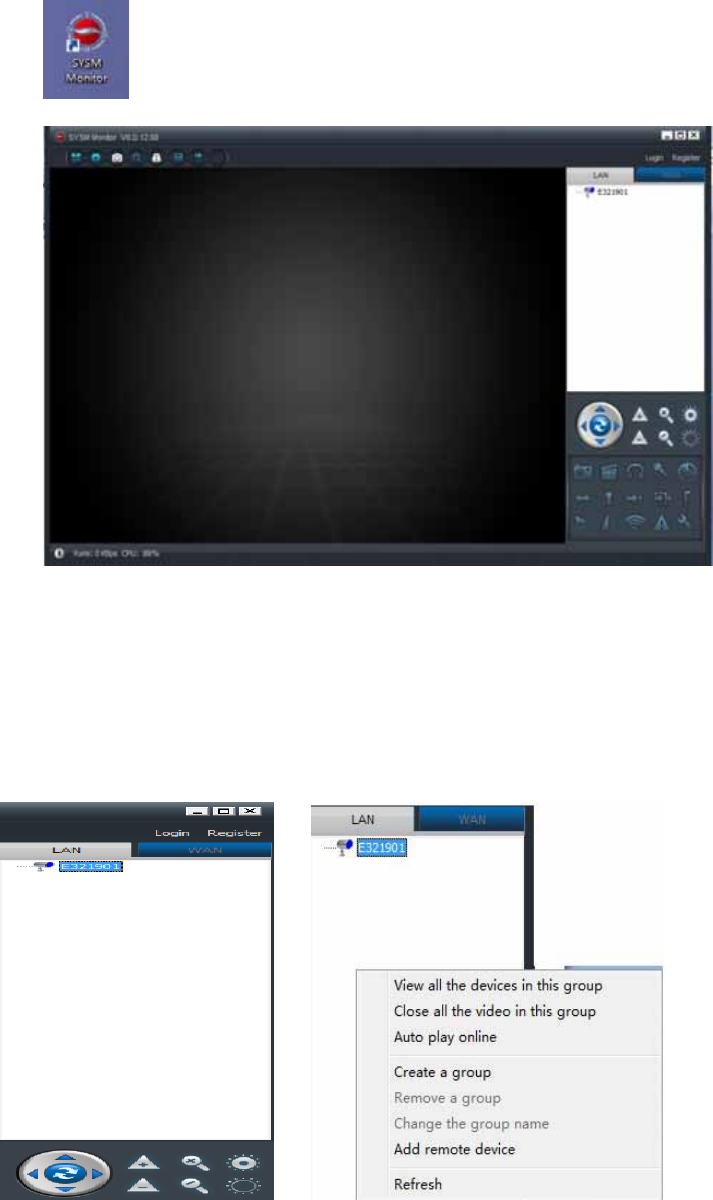
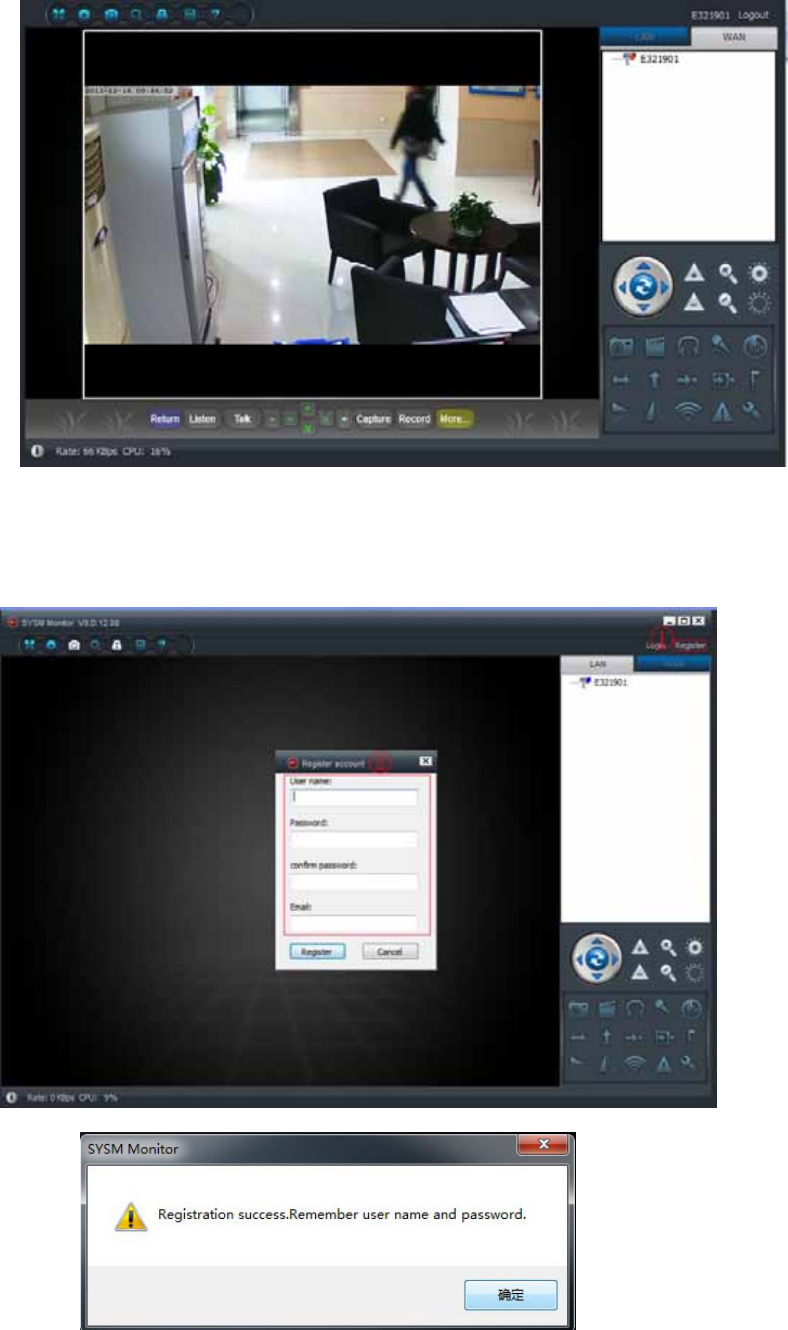
2.1 View camera in the local network (LAN)
Please make sure the IP camera was plugged in adaptor and connected with router via LAN cable first.
Run SYSM monitor and click “LAN” on the right list area, then right-click the blank area, a menu pops out similar to
Figure, select "Refresh" to get the camera list in the LAN. If there is a camera, double-click the camera ID to view
the live video. If popped out a prompt like “request camera video failure!",check FAQ for help.
5
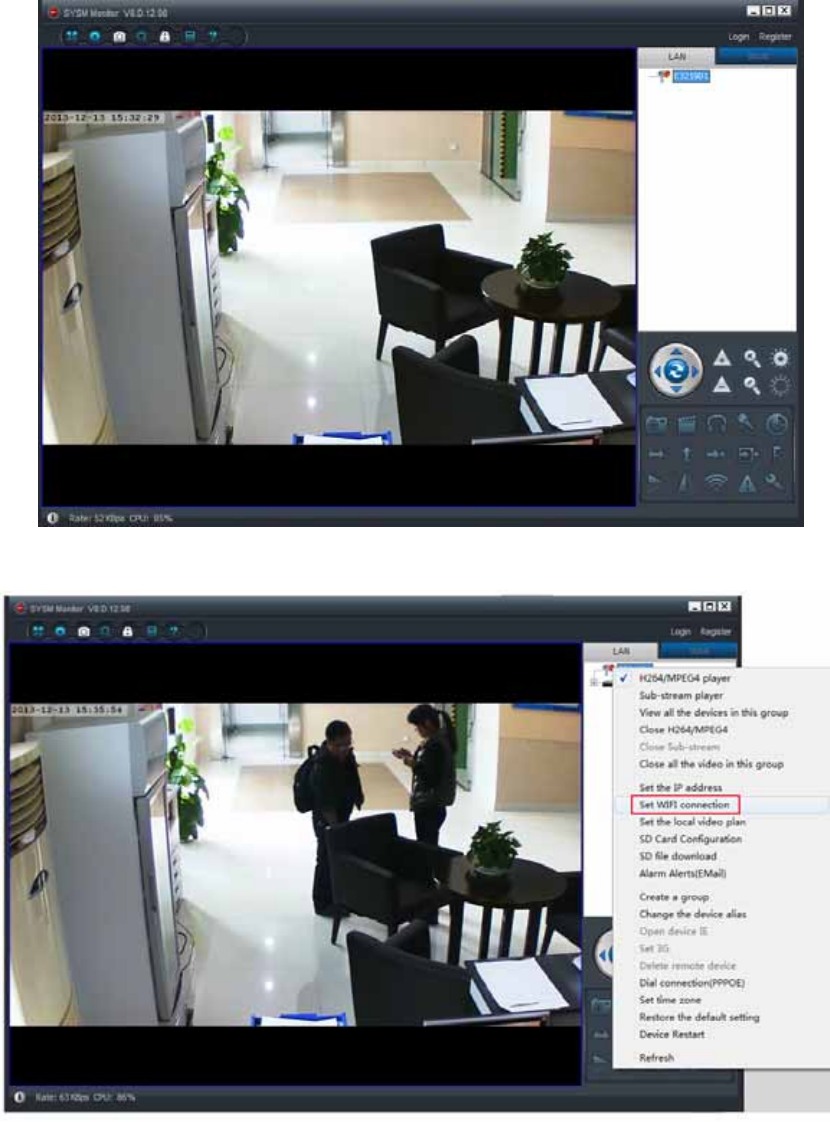
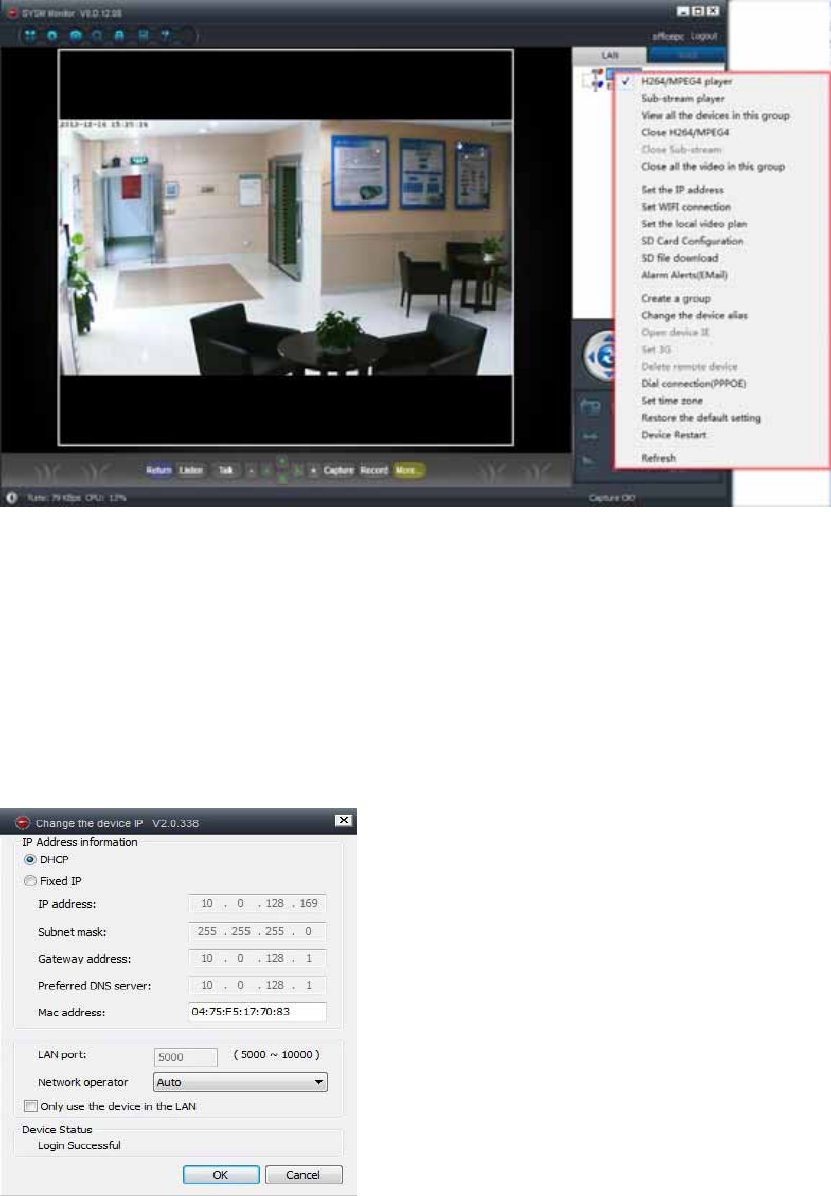
2.2 Set WIFI connection
a. Right-click the device ID, then select “Set WIFI connection” on the menu popped out.
b. Set SSID(Wireless router name) /Password
6
(1)Enable “Start WiFi setting”.
(2)Click “Scan” to choose the WIFI connection “Network name (SSID)” (it is your Wireless router name);
(3)Choose which “Wireless security type” you want to connect to WIFI;(Usually the software will auto select it,
needn’t change it .)
(4)Select the corresponding “Data encryption”; (Usually the software will auto select it, needn’t change it.)
(5)Input the WIFI connection “Password” and click “OK” to save.
Note:
After save WIFI setting , the camera will auto restart, you can take off the LAN cable after the camera boots up
success in 1-2 minutes.
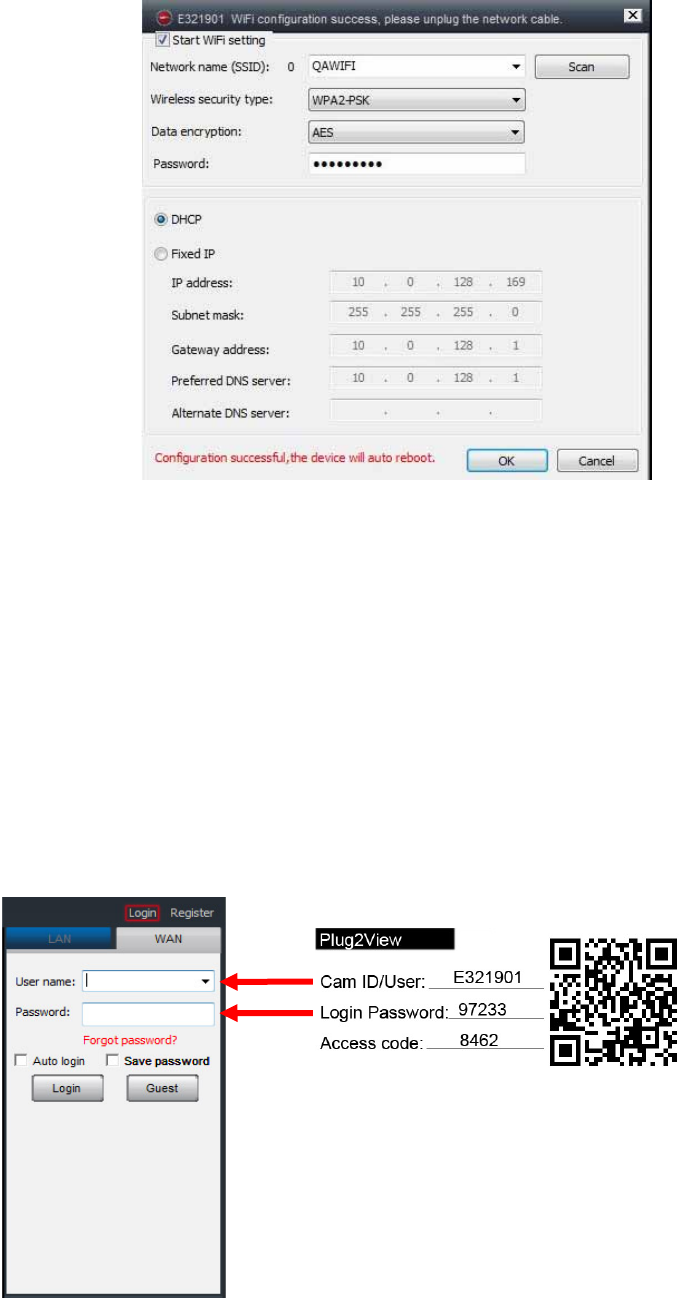
2.3 View the camera on the Internet (WAN)
Click "Login" in the area of the main list on the right, input "User Name" and "password" and click "Login" button.
The user name and password is on the label of the camera.
User name : Cam ID/User
Password: Login password
7
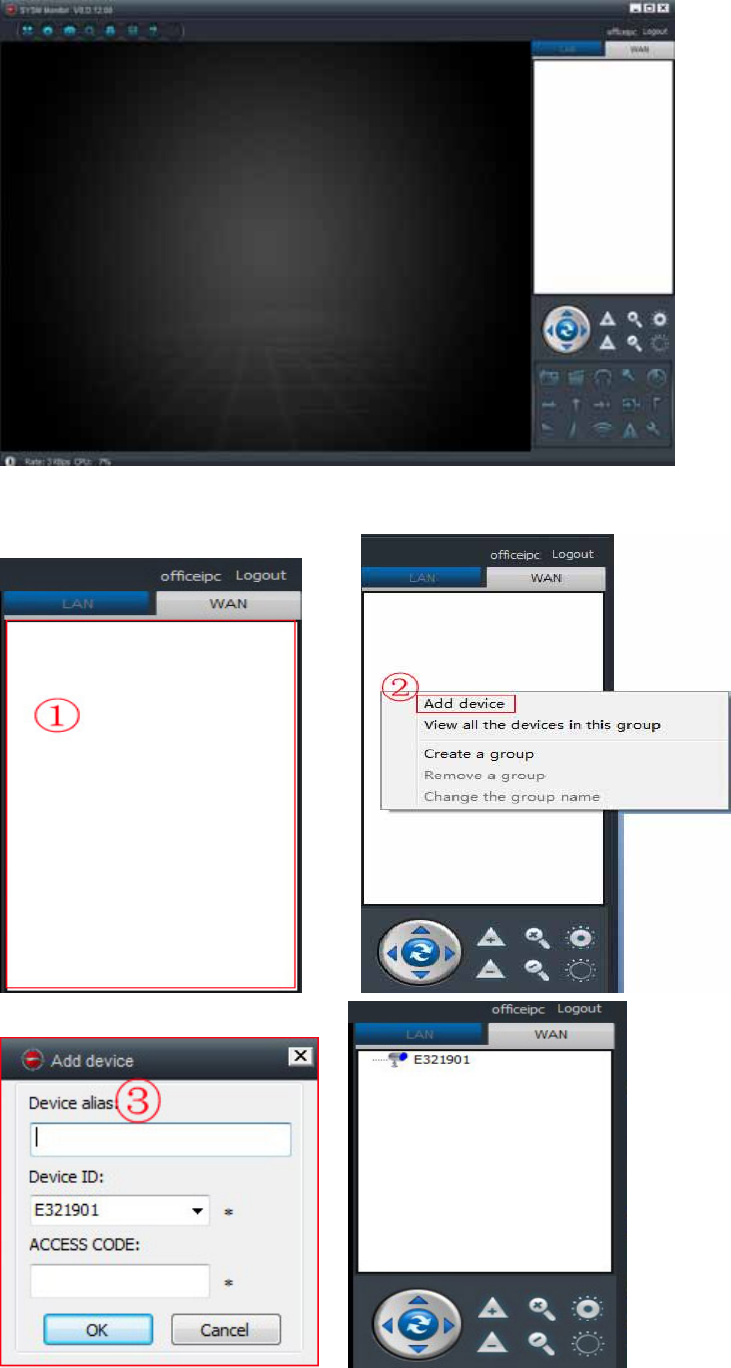
2.4 Register a new account and add devices
If you have many cameras, you also can register a new account, and add all cameras in the same account.
1) Click “ Register” and input user name / password /Email.
2) Login in via the new account.
8
3) Right click on the blank area, select “ Add device” on the pop up window and input IP camera alias /Camera ID
/Access password(it is on the label of the camera)
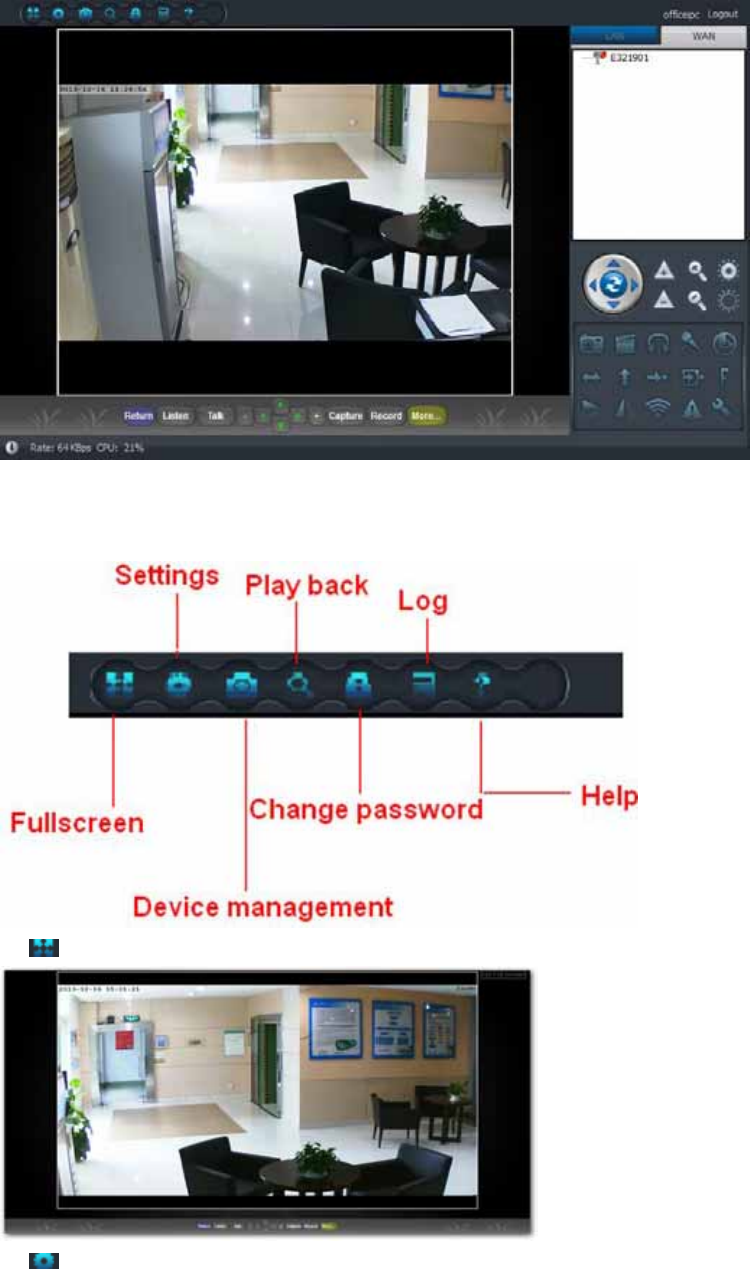
9
4) Double click the camera name to view video
2.5 Main menu
There are 7 menu icons on the top let of the SYSM monitor.
1) Full screen: view video in full screen.
2) Settings: set System/Video/Local alarm alerts/Net.

10
a) System: set program language/set 3D option/Notifications/Update.
b) Video: set the folder of video recording and take picture/alarm view time
c) Local alarm alerts: set local alarm record time / capture time/alarm music.
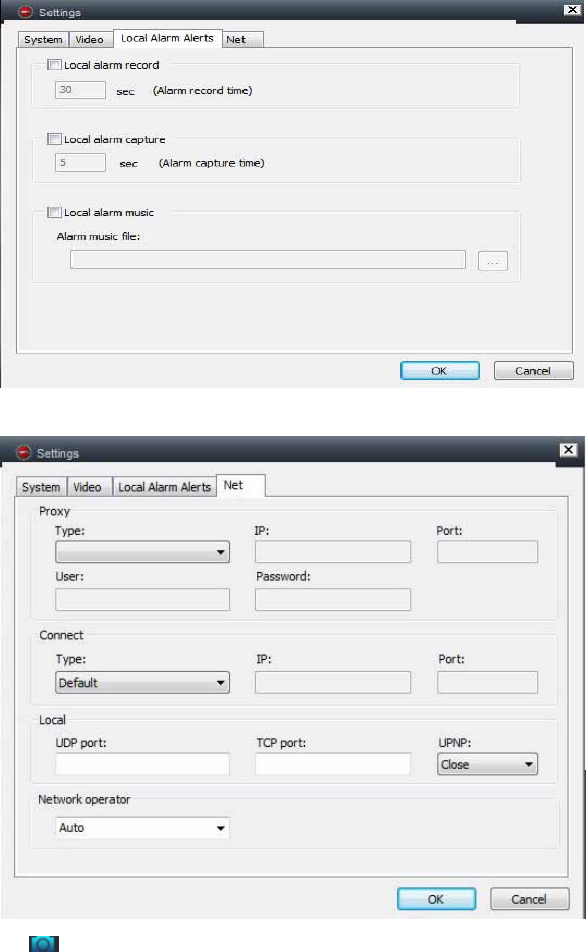
11
d) Net: Usually this is for development to test. Don’t change anything.
3) Device management: add device / change password /set permission
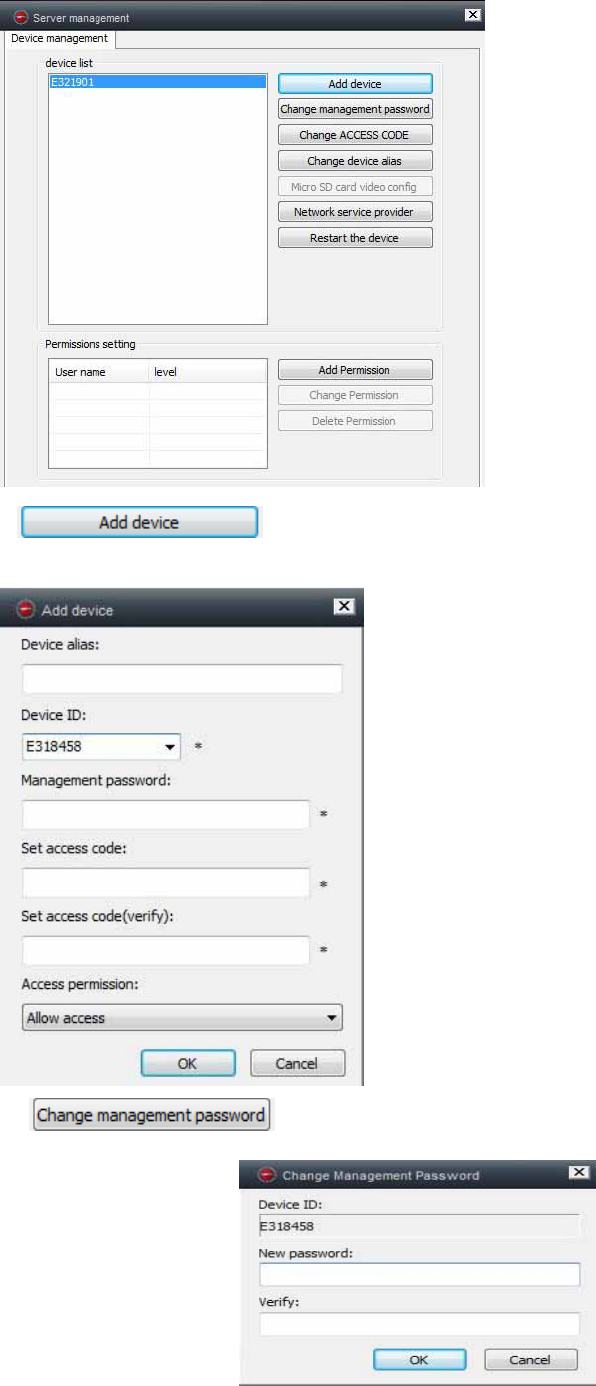
12
a) : add other camera to this account, this account will get the
management authority.
b) :change the device management password
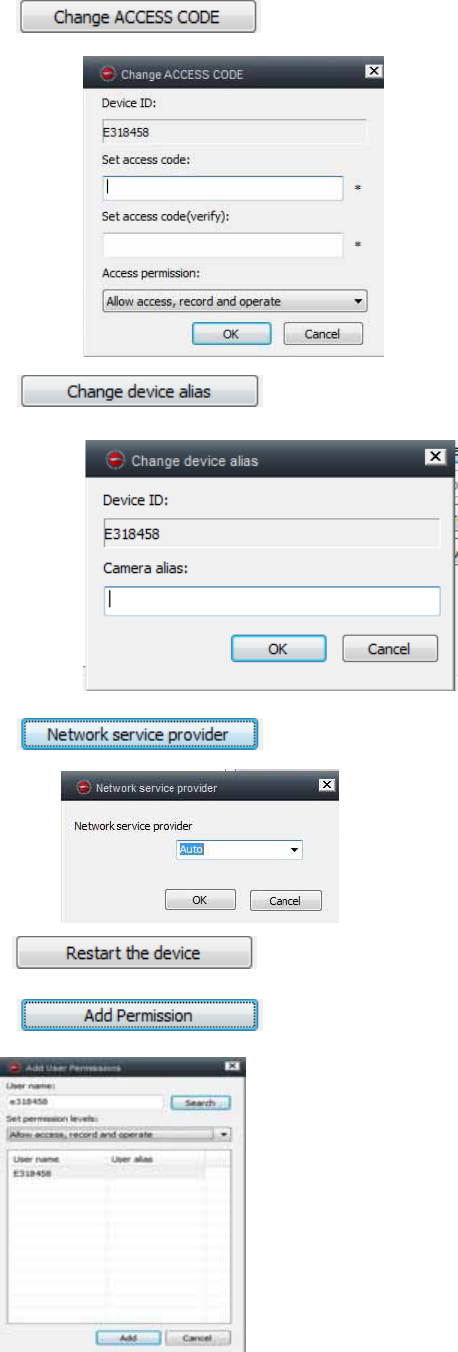
13
c) : change the device access code (watch password).
d) : change device name.
e) : select network server, usually use “auto”.
f) : restart the device remotely.
g) : set permission.
14
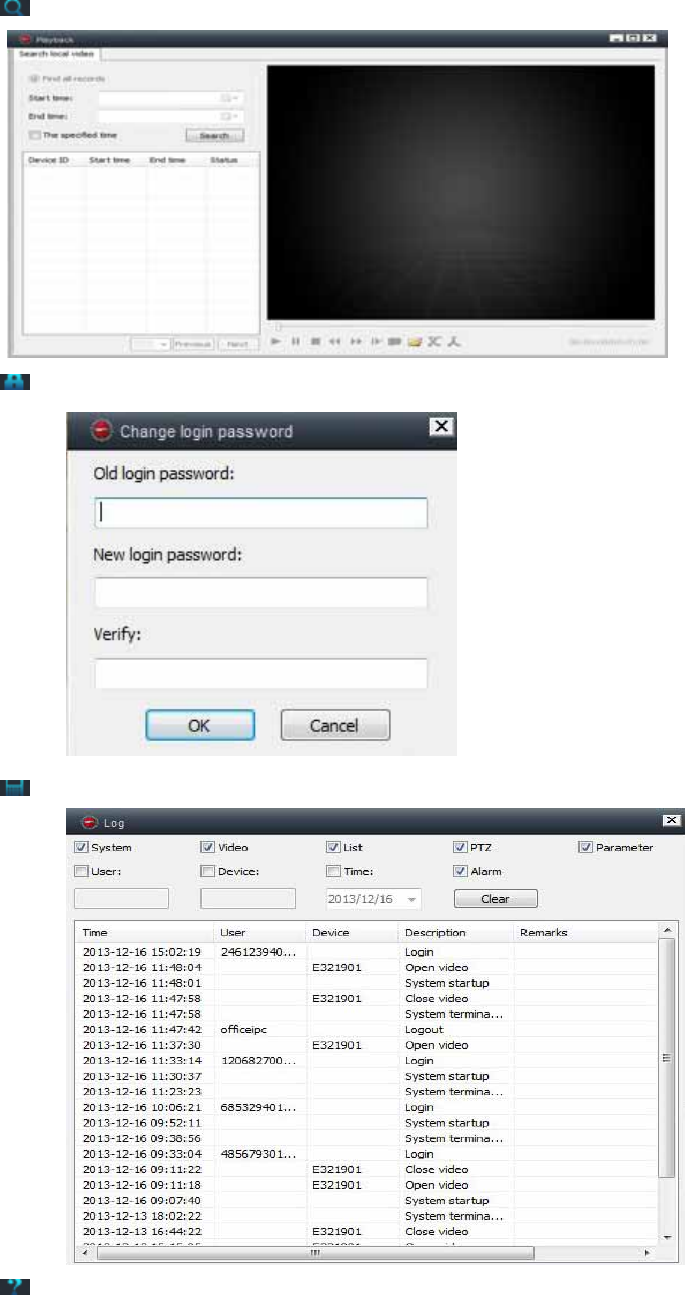
4) Playback: playback video on computer
5) Change password: change login password
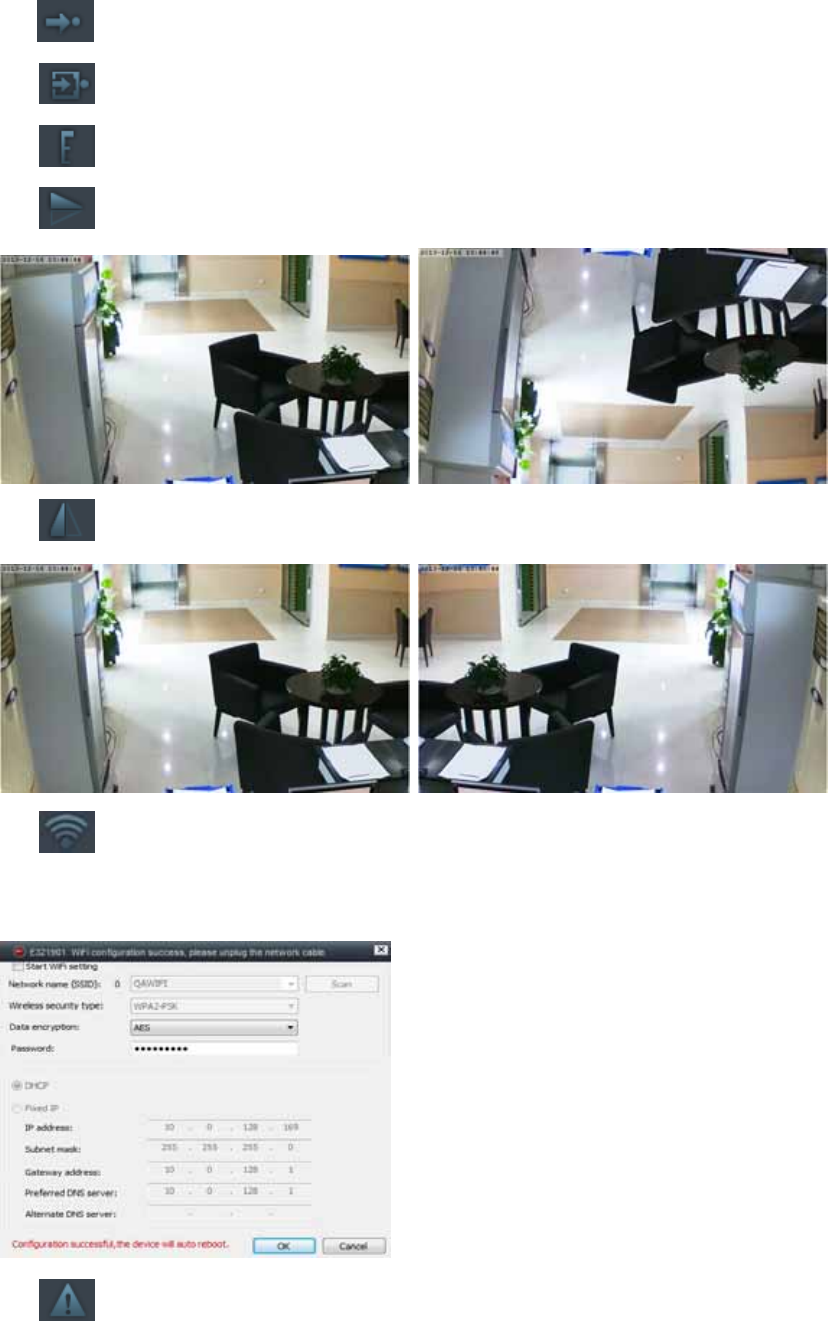
6) Log: check system log
7) Help: Software question and answer
3. Video Surveillance
15
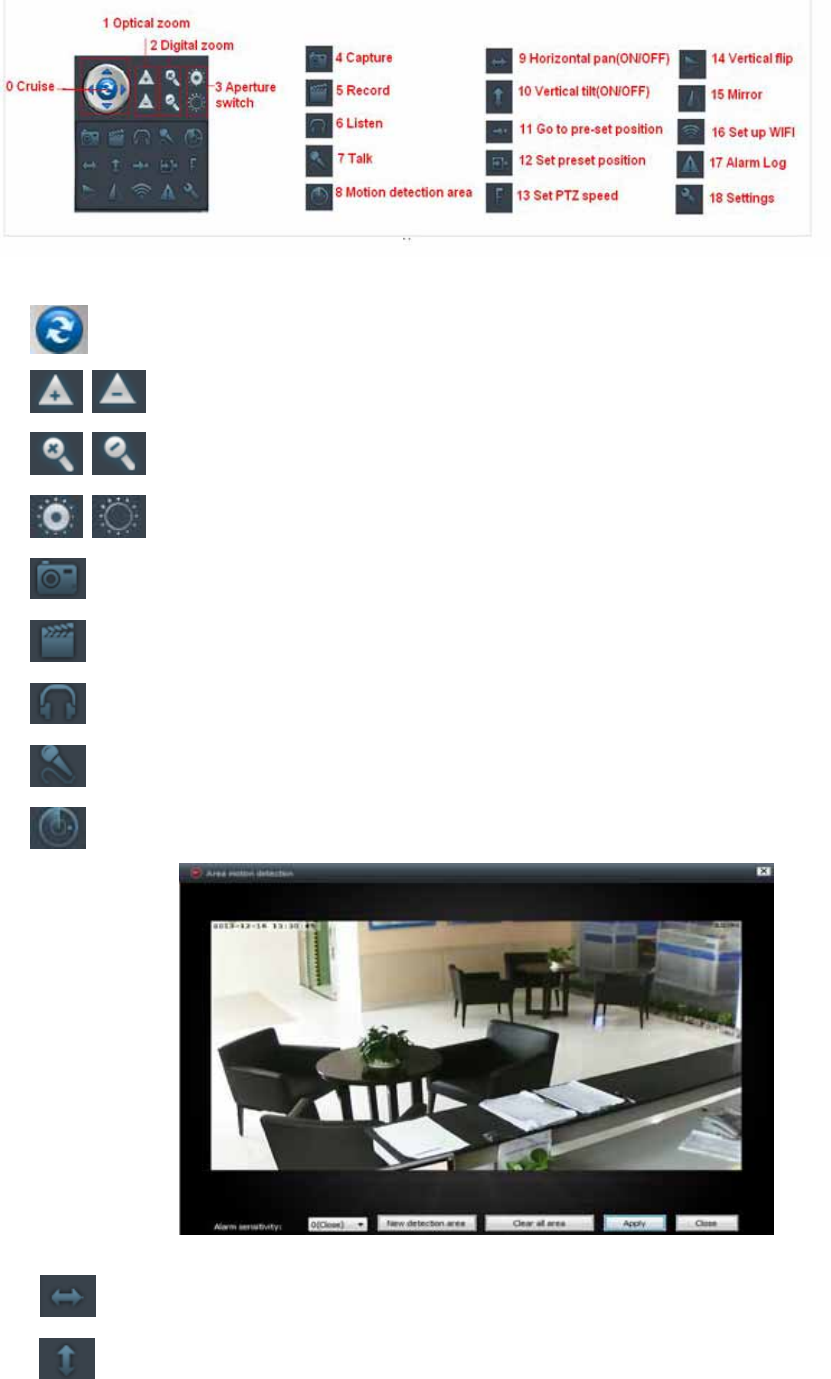
Caution: some function is only for special camera
(0) Cruise (ON/OFF): Set cruise on, the camera will auto move rotate.
(1) Optical zoom: control camera optical zoom +/-, only for the camera has optical zoom lens.
(2) Digital Zoom: software support 4x digital zoom
(3) Aperture switch: set camera aperture big or small
(4) Capture : snap picture
(5) Record: Record video on computer
(6) Listen: listen to the camera audio on computer
(7) Talk: talk with camera on computer
(8) Set motion detection area: set the motion area (only for the camera which supports motion area.
Set alarm sensitivity and set area (press left button and move to set area)
(9) Horizontal pan (ON/OFF): set camera auto rotate horizontally
(10) Vertical tilt(ON/OFF0 : set camera auto rotate vertically
16
(11) Go to pre-set position: call the camera preset(1-8)
(12) Set preset position: set camera preset.(1-8)
(13) Set PTZ speed : set camera rotate speed (1-10, 10 is fastest)
(14) Vertical flip
(15) Mirror
(16) Set up wireless
Enable “ Start WIFI setting” , then click scan to search wireless router signal , and select the right wireless router
name , input password . After set WIFI, the camera will auto restart in 1-2 minutes.
(17) Alarm log: the camera alarm log
17
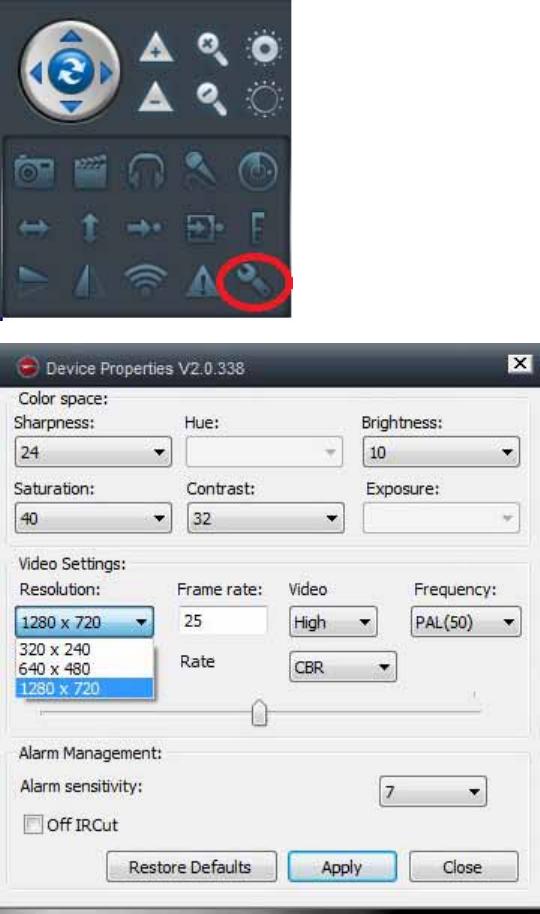
(18) Setting: set device properties
4 General system settings
4.1 Camera Settings in LAN Mode
Run the SYSM monitor, all the cameras will display in the LAN device list, double click the camera name to view
the camera video.
Right-click the device to set the camera parameter.
18
H.264/MPEG4 player (Better image quality)
Sub-Stream Player (Normal image quality)
View all the devices in this group
Close H.264/MPEG4
Close Sub Stream
Close all the video in this group
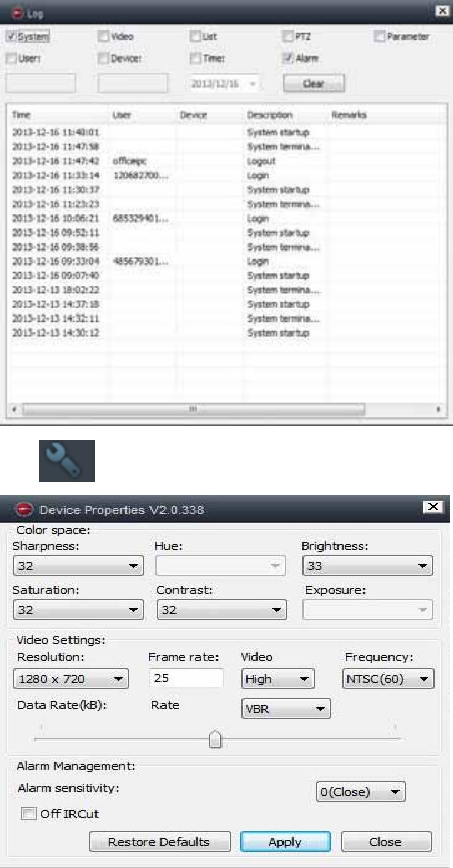
4.1.1 Set the IP Address
The default setting is camera use DHCP. Camera auto gets IP address from network router. It is a easy way for
normal customer who don’t know how to set IP address manually.
4.1.2 Set WIFI connection
Please refer to 2.2 WIFI connection.
19
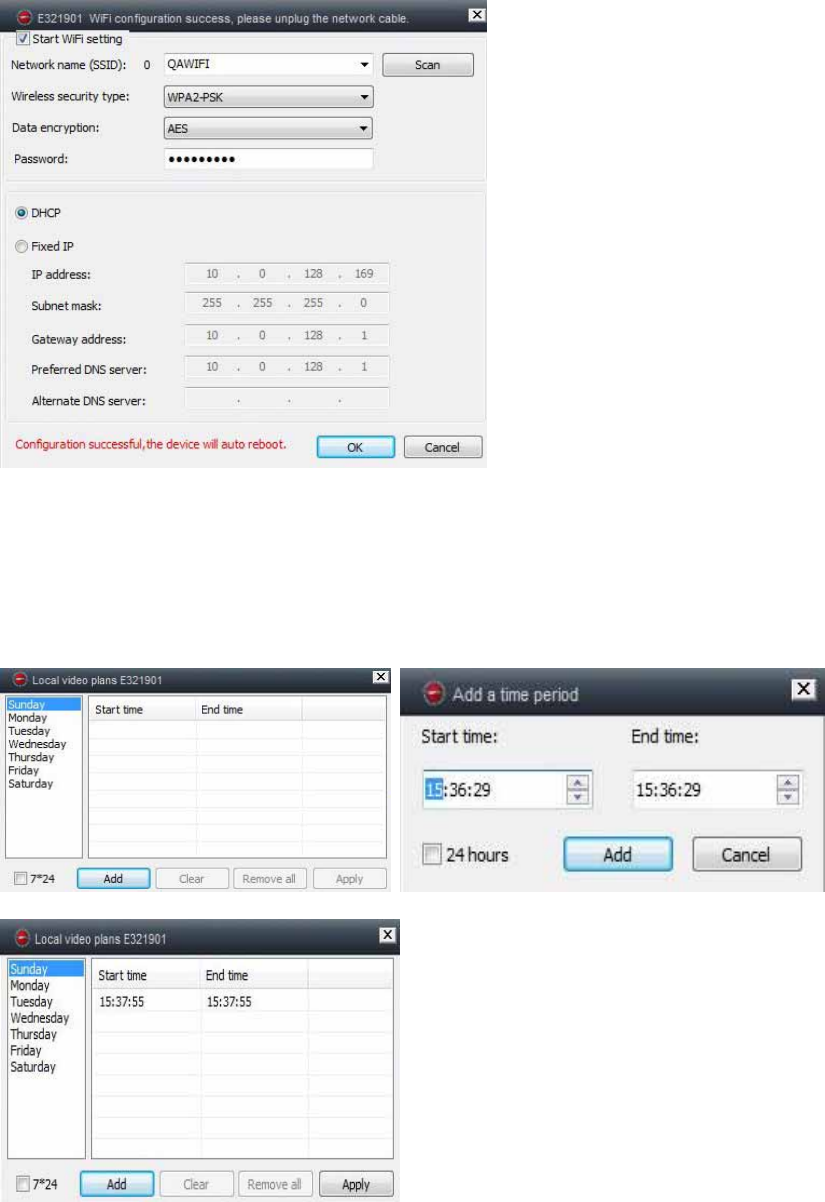
4.1.3 Set the local video plan
Set local video record plan, the software will auto record the camera schedule on the computer after the SYSM
monitor is running, as shown below:
Enable “7*24” to record all the time from Sunday to Monday
Click “Add” to select the day it and set the start and End time for video recording
Click “Apply” to save the current video equipment plan settings.
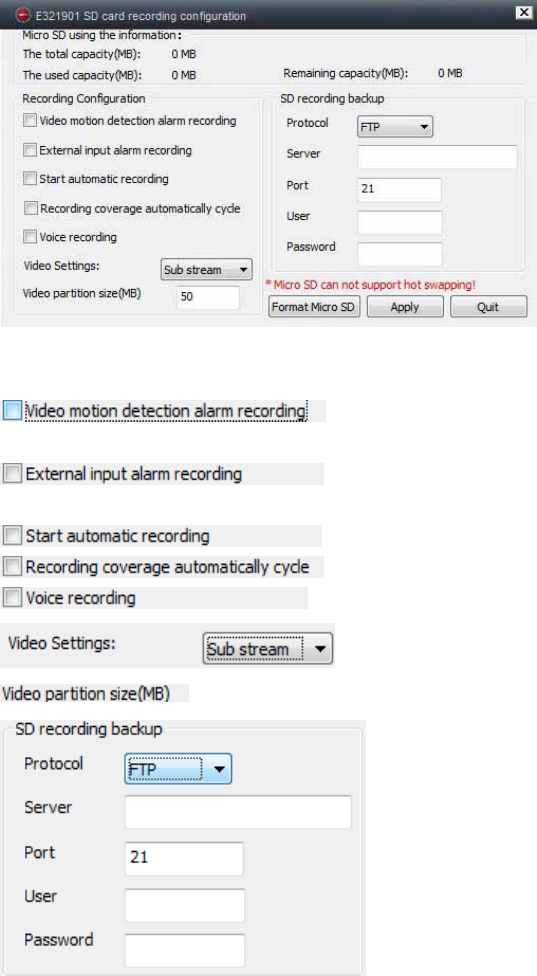
4.1.4 SD Card Configuration / SD file download
20
1) SD Card Configuration
Turn off the camera, then insert the TF card, and turn on the camera , after boot up . First format the TF card. It
also doesn’t support hot swapping.
: The camera auto records video to the TF card when there is motion
alarm.
:The camera auto records video to the TF card when the camera
external sensor gets alarm.
:The camera auto continue records after the camera boots up.
:The camera auto coverage the old video file when the TF card is full.
: The camera record audio to the TF card.
: Select the record video stream
:Set the video file size.
: Set video uploading to FTP server.FTP server can be only
useful when TF card has been plugged in.
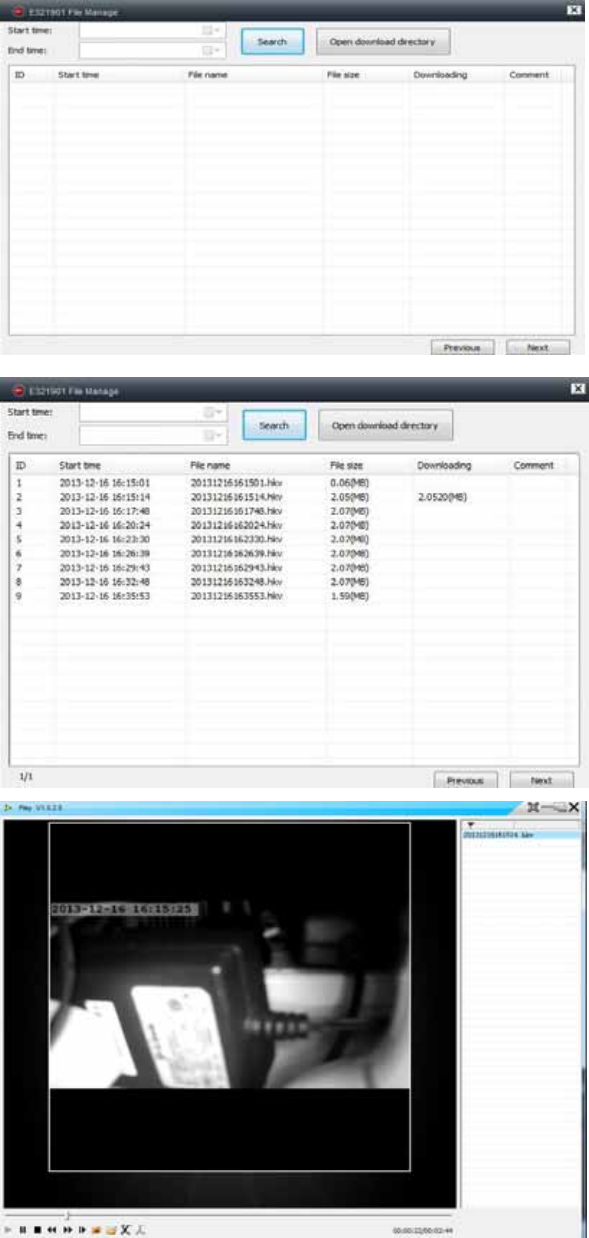
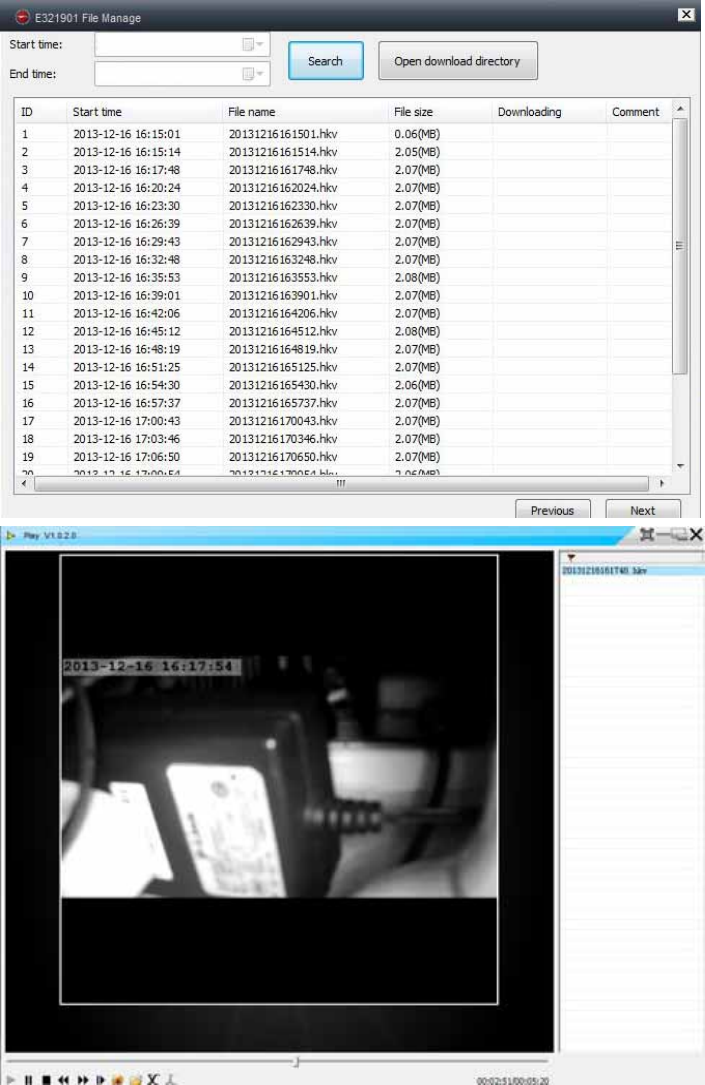
2) SD file download
Click “Search” to search the video file on the TF card. Double click the file to download, double click the file to
playback after downloaded.
21
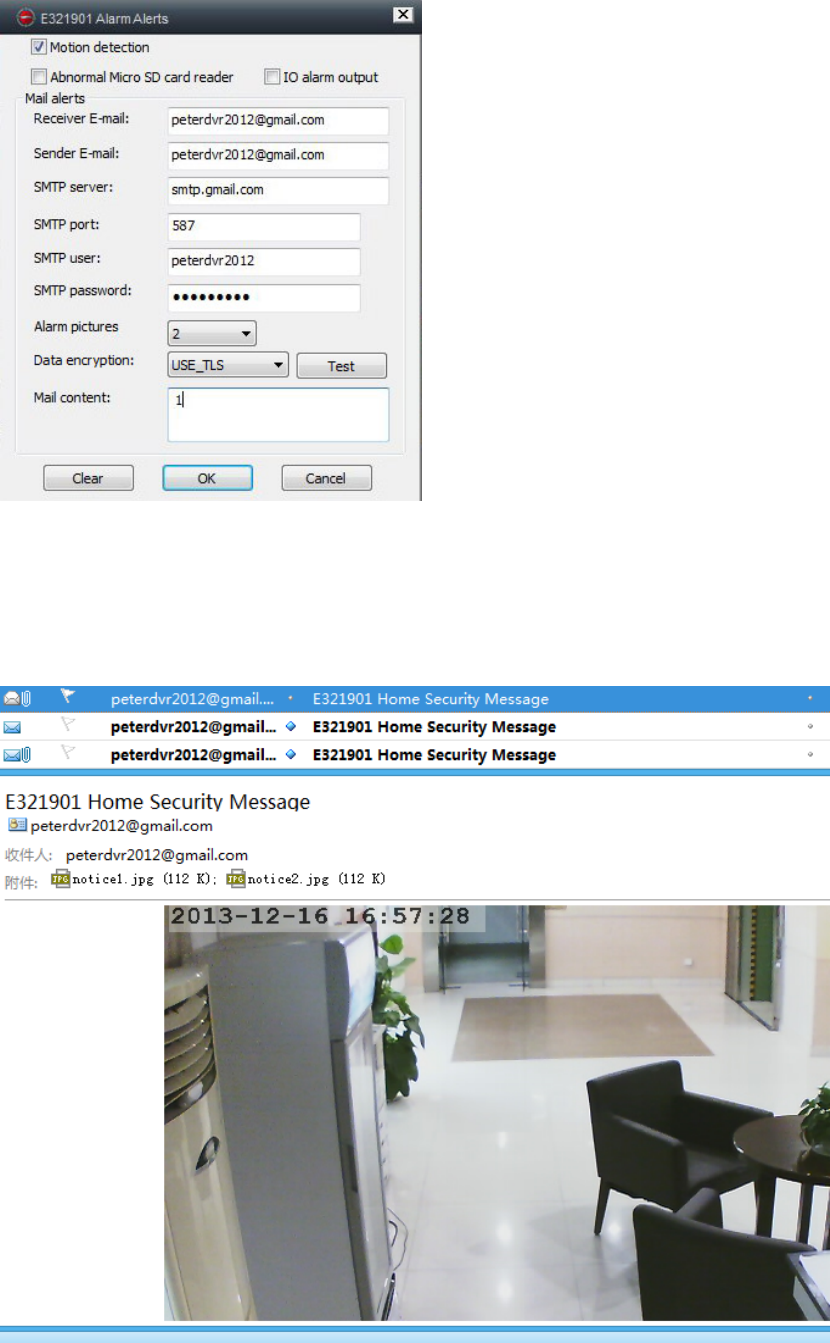
4.1.5 Alarm alerts (Email)
Please first enable the camera motion alarm function before setting the alarm alerts by email
22
Fill in the blanks of below pop-up window, click “OK”. The device will automatically take photos and sent them to
the email you set. (For example: the SMTP port for Gmail is 587; Yahoo use 465)
Alarm pictures: the picture number you want to the camera to snap.
Data encryption: To set the data encryption format depend on the email box supplier.(Gmail use TLS; Yahoo use
SSL)
23
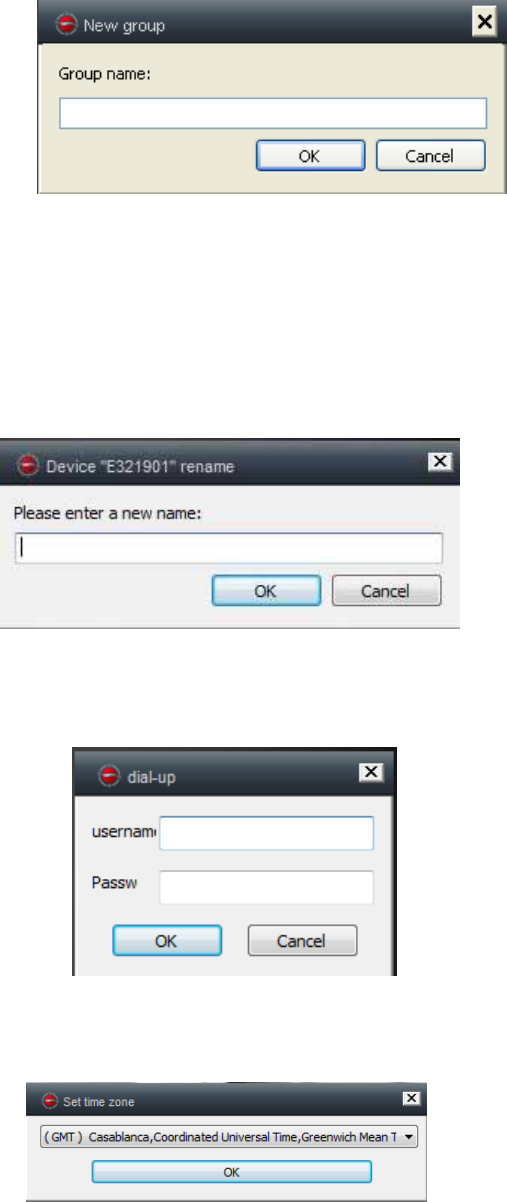
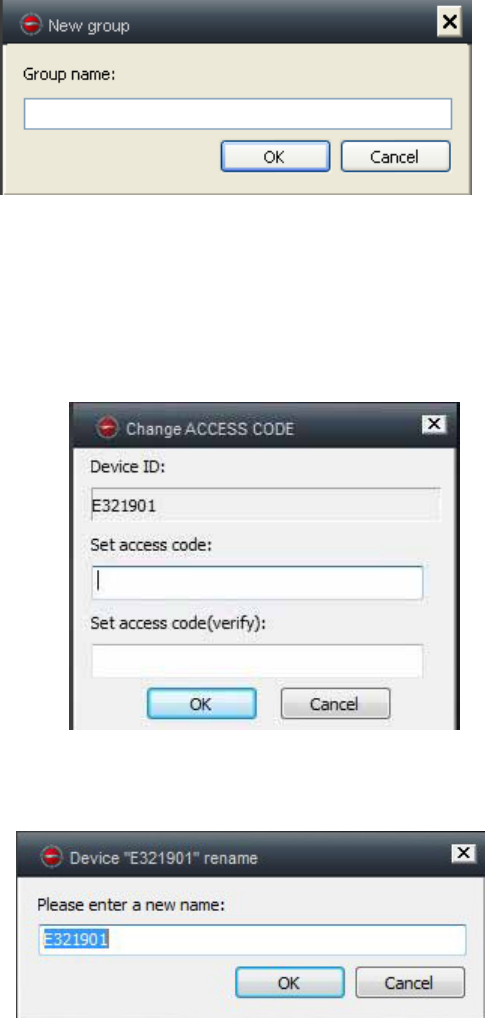
4.1.6 Create a Group
1) Create a group: Right click the camera ID and select “Create a group”, enter a name for the group in the
pop-up interface.
2) Delete a group: If you want to delete the group you can right-click the group name and click "Delete group" to
display the pop-up box.
3) To add the camera to the appropriate group: select the camera ID, hold down the left button to drag the camera
to the group, and then release the left mouse button.
4.1.7 Change the camera alias
Change the camera alias: Set a name that easy to remember for LAN camera. Right-click the camera ID and
select “Change the device alias” to set a new name for the camera. As shown below:
4.1.8 Dial connection (PPPOE)
Right click the camera ID and select “Dial connection (PPPOE)”:
Input user name and password of internet, and click “OK” to save.
4.1.9 Set time zone
Right click the camera ID and select “Set time zone”:
From below pop-up interface, select the time zone you are in, click “OK” to finish time zone setting.
Remark: The time of the camera displayed will be the same with your PC time.
4.1.10 Restore the default setting
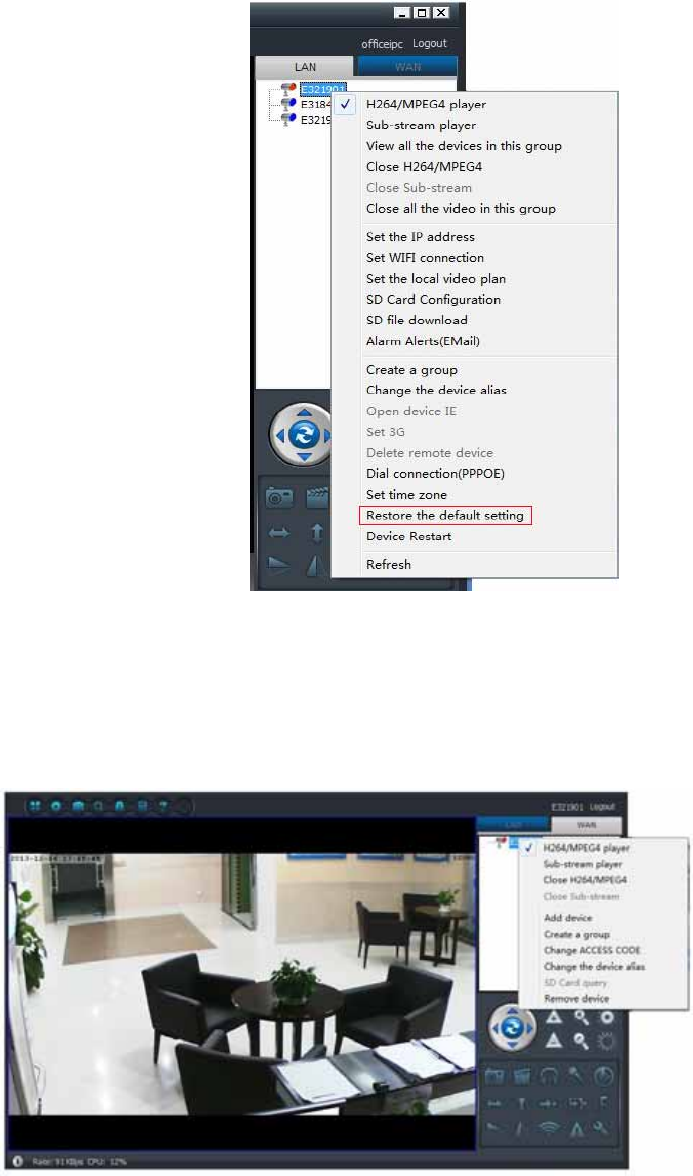
24
Right click the camera ID and select “Restore the default setting”, as shown below:
Remarks:
Login password, watch password, and the parameters of the device like camera system, language, video
parameter, will be restored to the factory setting. All those settings previously saved will be lost.
The manager for the device will not be changed back to the default manager.
4.2 Camera Settings in LAN Mode
Login in the SYSM monitor via the camera ID(or new registered account) and password.
H.264/MPEG4 player (better image quality)
Sub-Stream Player (Normal image quality)
Close H.264/MPEG4
Close Sub Stream
4.2.1 Creating a group
25
1) Create a group: Right click the camera ID and select “Create a group”, enter a name for the group in the
pop-up interface.
2) Delete a group: If you want to delete the group you can right-click the group name and click "Delete group" to
display the pop-up box.
3) To add the camera to the appropriate group: select the camera ID, hold down the left button to drag the camera
to the group, and then release the left mouse button.
4.2.2 Change Access password
After successfully login in, right-click camera ID, select “Change access code”, as shown below:
4.2.3 Change the device alias
Modify the camera alias: Set a name that easy to remember for LAN camera. Right-click the camera ID and select
“Change the device alias” to set a new name for the camera. As shown below:
4.2.4 SD Card query
Right-click the camera ID, select the “SD Card query”.
Click “Search” to obtain the file directory of the SD card
Double-click the file to download. Maximum 3 files are supported to be downloaded at the same time.
26
5 Frequently Asked Questions – FAQ
5.1 Video delay problem
There are three factors which will cause video delay: upload speed, PC download speed, and image resolution. If
the issue happens on the PC client, generally, you can click “Settings” as below to adjust the resolution to QVGA
(320 x 240). If it also does not work, please check the other two factors.
27
5.2 LAN cable should not be too long
If network cable is too long, the signal will be weakened and cause disconnection. Any network fault on PC client
or IP camera will cause video disconnection.
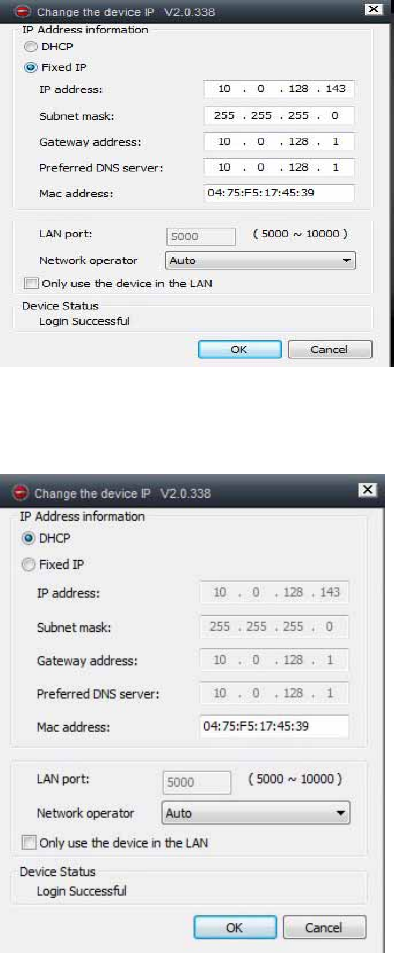
5.3 Cannot visit the IP camera in LAN?
1. Please check whether the network cable is connected ok .
2. Right-click the device on LAN, and select “Set the IP address” as below. Normally the device will automatically
get an IP address, if not, please manually set a same subnet IP address for device.
28
5.4 User can visit the IP camera via LAN, but cannot visit it on WAN?
When camera can be viewed on LAN, but cannot be viewed via WAN, usually because the device gets wrong IP
address. Try to set DHCP for the device
5.5 Image quality is not good enough?
All of the camera parameters keep default value of factory, but not all the parameters are proper for special
occasions.
The default setting is based on factory testing environment. Users can adjust parameters according to his
environment to get a good video.
You can adjust the parameters like resolution to get better quality images according to your requirements.
29
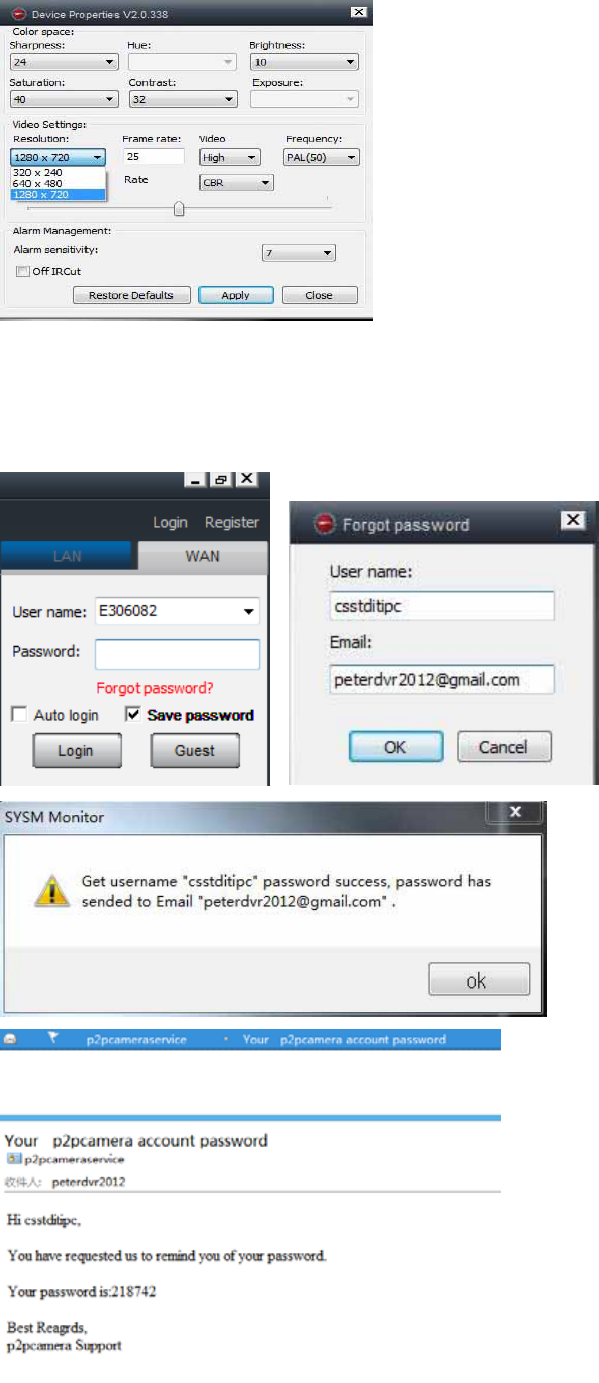
5.6 Forgot your password?
If you have forgotten your own login password which registered by yourself, click “Forgot Password”. Input your
username and your registered email address. The server will send a password your mail box. Then use the new
password to login in .
30
5.7 How to restore to default setting?
a. Press the reset button of the camera about 1 minutes.
b. Right-click camera ID on LAN, click “Restore to default setting”.
5.8 How to remote reboot equipment?
User can reboot equipment whatever he/she is in local network or Internet.
If the user is in LAN, right-click the device and select “Device restart”.
If the user is in WAN, click “Device management” and click the “Device restart”.
FCC Certification Requirements
Caution: Any changes or modifications in construction of this device which are not
expressly approved by the party responsible for compliance could void the user's authority
to operate the equipment.
This device complies with part 15 of the FCC Rules. Operation is subject to the following
two conditions: (1) This device may not cause harmful interference, and
(2) This device must accept any interference received, including interference that may
cause undesired operation.
The manufacturer is not responsible for any radio or TV interference caused by
unauthorized modifications to this equipment. Such modifications could void the user’s
authority to operate the equipment.
This equipment has been tested and found to comply with the limits for a Class B digital
device, pursuant to Part 15 of the FCC Rules. These limits are designed to provide
reasonable protection against harmful interference in a residential installation. This
equipment generates, uses and can radiate radio frequency energy and, if not installed
and used in accordance with the instructions, may cause harmful interference to radio
communications. However, there is no guarantee that interference will not occur in a
particular installation. If this equipment does cause harmful interference to radio or
television reception, which can be determined by turning the equipment off and on, the
user is encouraged to try to correct the interference by one or more of the following
measures:
-- Reorient or relocate the receiving antenna.
-- Increase the separation between the equipment and receiver.
-- Connect the equipment into an outlet on a circuit different from that to which the receiver
is connected.
Consult the dealer or an experienced radio/TV technician for help.
The antenna(s) used for this transmitter must be installed to provide a separation distance of at least 20 cm from
All persons and must not be co-located or operating in conjunction with any other antenna or transmitter.