DJP C07760 RADAR DETECTOR WITH BLUETOOTH User Manual AR9970BT Manual 1229
DJP CO. RADAR DETECTOR WITH BLUETOOTH AR9970BT Manual 1229
DJP >
User Manual
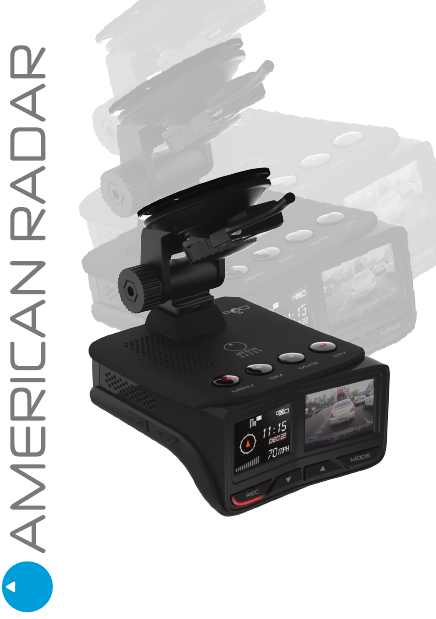
AR9970BT User Manual
www. american-radar.com

What’s included
1 x AR9970BT
1 x USB Data Cable
1 x 12V Vehicle Power Adapter
1 x 12V Hardwire Cable
1 x Windshield Bracket
1 x Micro SD Card
1 x User Guide
2

3
2
6
7
9
10
3
1
5
8
12
11
4
13
1. Windshield Bracket - detachable bracket with suction cup
2. MENU - radar/laser detector user settings
3. DIM – three selectable display brightness modes
4. MUTE – during an alert, press to mute the audio
5. CITY - switch between four sensitivity modes
6. Micro SD Card Slot - supports up to 64 GB
7. 1.25” Multi-Colored OLED Display for radar/laser detector
8. 1.5” LCD Display for dash camera
9. REC - start or stop dash camera video recording
(long press to enter into settings menu)
10. Down Arrow – toggles microphone on and o
(in menu setting, use to scroll down)
11. Up Arrow – toggles dash camera display on and o
(in menu setting, use to scroll up)
12. MODE - long press to access the video les and photos
13. USB Power Port – connect the 12V vehicle power adapter
Product overview

1. High-delity speaker
2. Windshield bracket mounting slot
3. Built-in laser detector
4. Built-in radar detector
5. 170 degree wide-angle lens for the dash camera
6. On/O and Volume Control - push the thumbwheel to turn device
on and o; rotate the dial to control the volume
7. Micro USB Port (covered) - use when updating the software for the
dash camera (do not use to power the device)
8. Mini HDMI Port (covered) - playback video directly from the device
to an external HDMI TV or monitor
9.
Mini USB Port - use the provided data cable when updating the speed
trap database and radar-detector’s software.
10. Built-in Ambarella A7L HD video processor
4
8
7
6
10
9
1
2
3
4
5

Installation
Attach the suction cup mount to the unit by sliding it into the windshield
bracket slot on the top of the unit. Afterwards, mount the unit where it
has an unobstructed view of the road and has a clear view of the sky.
Once you have chosen a suitable location, press the suction cup bracket
rmly to the windshield with the lever in the unlock position. Then turn
the lever 90 degrees to lock position to seal the suction cup to the
windshield. Finally, loosen the nut slightly and adjust the bracket so that
the unit is horizontal to the road.
Attach the power cable to the 12V mini USB port located on the lever of
the windshield bracket. Insert the other end into an appropriate
cigarette lighter receptacle.
To hardwire your unit for a neater installation look, please contact an
automobile electrician or your local car dealer.
Use the supplied 12V auxiliary power cord or the 12V hardwire to power
the unit. Other third-party USB cables may not provide sucient power
to the unit.
Safety Warnings
Do not allow the unit to obstruct the driver’s view.
Do not place the unit in front of the air bags such that it would interfere
with the ination of the air bag.
Do not place the unit unsecured on the dashboard or elsewhere, as it
could be propelled inside the vehicle, causing injury to occupants.
Some state laws prohibit mounts or restrict mounting to specic areas
of the windshield. Please check your local laws for restrictions.
5
WARNING:
To guard against injury, basic safety precautions should be observed:

Radar/Laser Detector and Dash Camera Operation
AR9970BT combines a high performance GPS, radar, laser, speed trap
detector, and Super HD dash camera in one unit.
Radar/Laser Detector Buttons
[MENU] On/O and Menu Access
A long press on the MENU button will power the unit on or o.
A short press to the MENU button will open the settings menu.
See the “Radar/Laser Settings Menu” section for a detailed explanation of
the menu options.
[DIM] Brightness Control
Press to change the brightness of the display. There are three settings
to
choose from: Bright, dim and dark. The factory setting is set to bright.
[MUTE] Mute Incoming Audio Alerts
Press MUTE to instantly silence the audio alert during a radar or laser encounter.
Once your device has passed the radar or laser source location and the
alert ceases, the mute will be lifted, and the device will be ready to provide
audio alerts for future encounters.
[CITY] Highway/City Mode
The unit is equipped with four dierent sensitivity modes that the user
can select from for an optimal driving experience. Choose between these
sensitivity modes in order to reduce the number of false alerts caused by
non-police radar sources (i.e. automatic doors, microwave towers, blind
spot monitoring systems, trac-ow radar, etc).
Along with audio alerts, the unit provides a visual alert displaying the band
detected and a bar graph showing the signal strength ranging from
1 to
6. Press the CITY button to select between dierent sensitivity modes:
CITY1 – X-band and K-band alerts will be suppressed until they reach a
signal strength level of 3. All other laser/radar signals will sound alerts at
every sensitivity level.
CITY2 – X-band and K-band alerts will be suppressed until they reach signal
6

strength level 4. Ka-band alerts will be suppressed until they reach signal strength
level 3. All other laser/radar signals will sound alerts at every sensitivity level.
HIGHWAY
–
All laser/radar signals will sound alerts at every sensitivity level.
Radar/Laser Settings Menu
Menu – Changing the Settings
To access the user settings, press the MENU button.
Navigating inside the menu:
1) Press the DIM or MUTE button to scroll left or right in the menu list.
2) Press the CITY button to change the selected value.
a) If there are more than two options, use DIM and MUTE buttons to scroll
through the options, and then press MENU to conrm your selection and to
return to the top menu.
3)To exit the menu, press MENU.
Safety Warning
WARNING
: Do not attempt to access or change the settings while driving.
If you need to change any of the settings, please ask a fellow passenger, or
wait until you are safely parked.
Radar/Laser Settings Menu Options
[Quick Start]
At startup, the current settings are briey displayed for several seconds.
When the Quick Start menu item selected, this startup sequence will be skipped.
[OLED Display Themes]
Choose from three dierent screen themes:
Orange, Blue, and All Color.
[Voice]
Enable or disable voice alerts.
[Auto Mute]
When Auto-mute is on, the device will automatically reduce the
audio volume of all alerts after 3 seconds. When Auto-mute is o, the alerts will
sound at full volume for as long as the signal is detected.
[Speed limit]
It will alert if the driver exceed their self-selected driving speed
limit. Disable option also available.
7
UTC
The unit automatically adjusts the time zone based on the location. The
user can also manually set the device’s current time zone. The standard
time zones are dened in terms of hourly osets from UTC. The following
table lists the time zone osets relevant to the US.
United States time zones
24-hour time / 12-hour time
Choose between 12 hour and 24 hour clock formats
Speed unit - KMH/MPH
Select between MPH (miles per hour) and KMH (kilometers per hour).
Factory reset
Select to reset the device to factory settings.
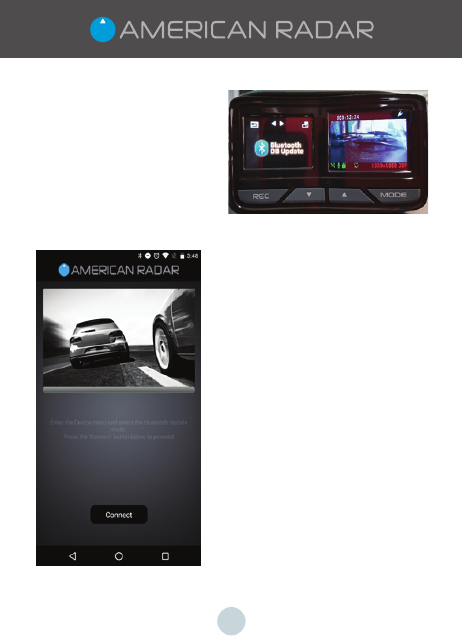
Bluetooth DB Update
The unit is preinstalled with the latest rmware and a database of “points
of interest” (i.e. red light camera locations, speed camera locations,
dangerous intersections, etc.). American Radar will provide free updates to
the rmware and the “points of interest” database for the lifetime of the unit.
To update the device via a Bluetooth connection:
8
Time Zone Standard Time Daylight Time
Hawaii–Aleutian
Time Zone
Alaska Time Zone
Pacic Time Zone
Mountain Time Zone
Central Time Zone
Eastern Time Zone
HADT (-9)
Aleutian Islands only
AKDT (-8)
PDT (-7)
MDT (-6)
CDT (-5)
EDT (-4)
HAST (−10 )
AKST (−9)
PST (-8)
MST (-7)
CST (-6)
EST (-5)
9
1) Enter the AR-9970BT GPS detector
menu and select the Bluetooth DB
update.
2)
Download the AmericanRadar
BT App on Google Play or Apple
App Store.
3)
Run the application “American
Radar DB Updater” on your
mobile device.
4) Press the ‘Connect’ button
5) Select the device name ‘AR BT’ from the
“Device List”
6)
Select the checkbox next to the corresponding
country database (i.e. USA)
and click “OK”
7)
Press Download to begin updating the
data to your unit.
8) Close the mobile app when nished.
Update Mode
In addition to updating the unit over Bluetooth,
users can directly connect the unit to a PC
via a USB cable, and perform software updates
and “points of interest” databases updates.
For more information on how to perform
updates over a USB cable, please visit our
website at www.american-radar.com for
download links and more installation
instructions.
Software Ver.
View the software version installed on the unit.

10
Dash Camera Settings Menu
To access the dash camera user settings, long press the REC button.
Navigating inside the menu:
1) Press the down arrow button▼or the up arrow button ▲to scroll
through the menu list.
2) Press the REC button to select individual options.
a) If there are more than two options, use ▼ and ▲ to scroll through the sub-list
3) Press the REC button to conrm selection and return to top menu.
4) From the top menu, long press the REC button to close the menu.
Dash Camera Settings Menu Options
[Resolution]
This setting allows the user to choose from six available video recording
resolutions. The available resolutions are as follows:
tYGQT
tYGQT
tYGQTXJUI)%3
[Video Quality]
Change the video capture quality. The available options are as follows:
t4VQFS'JOFt'JOFt/PSNBM
[Record Loop Time]
The looping video recording function captures video continuously and
automatically manages space on the SD card by overwriting the oldest
footage when the card lls up. By default, the unit creates consecutive
video les that are 3 minutes in length, and removes the oldest les rst.
This setting allows the video le length to be changed to 1, 2, 3, or 5
minutes.
[Motion Detection]
When this setting is enabled, recording will start when motion is
detected. This feature is particularly useful if the device is hardwired to
tYGQT
tYGQT
tYGQT

11
[MIC]
Use this feature to switch the microphone on or o during video
recording.
[Time Lapse]
As an alternative to continuous loop recording, this setting allows the user
to select time-lapse style photographs, where a series of photographs are
taken over a several second interval. Choose between the following time-
lapse interval options:
tTFD
tTFD
[Language]
Select the language option. Please note that this will only change the
language within the dash camera settings and will not change the language
used in the radar/laser detector interface.
[TV Type]
Set which color encoding format to use: NTSC or PAL. NTSC is the default.
[Format (Erase the SD Card)]
Format the microSD card. All video recordings and photographs previously
saved on the SD card will be deleted during the format process.
[Stamp]
Add an informational speed, GPS coordinate, or timestamp overlay onto
the bottom of your video recordings.
Available options are as follows:
t4QFFE(14%BUFUJNF
t4QFFE(14
t(14%BUFUJNF
t4QFFE%BUFUJNF
tTFD
t0ò
t4QFFE
t(14
t%BUFUJNF
t"NFSJDBO3BEBSoi"NFSJDBO3BEBSwUFYU
power, and the vehicle is left unattended (for example, parked overnight
and street parked).

[Car Number Set]
Add a custom text overlay (embedded text into the recorded video), of
up to 9 alphanumeric characters in length. Press the ▼and ▲ arrows to
select a character and press the MODE button to conrm the selection
and move the cursor to the right.
[Auto LCD Off]
Sets the dash camera’s LCD to automatically turn o after a specic
duration of time. Choose between the following:
t0òTFMFDUBOEUIF-$%XJMMTUBZPOQFSNBOFOUMZ
tTFDTUIF-$%XJMMTXJUDIPòBGUFSTFDPOET
tTFDTUIF-$%XJMMTXJUDIPòBGUFSTFDPOET
tNJOTUIF-$%XJMMUVSOPòBGUFSNJOVUFT
tNJOTUIF-$%XJMMUVSOPòBGUFSNJOVUFT
[Default setting]
Select to return all dash camera settings back to their original factory
default settings.
[Flicker – adjust Hz rate]
Adjust the refresh rate of the recorded videos. The following options are
available:
t)[
t)[
tBVUPEFGBVMU
[Contrast]
Set the display contrast of the recorded videos:
t4UBOEBSEEFGBVMU
t)BSE
t4PGU
12

[Sharpness]
Set the sharpness of the recorded videos
t4UBOEBSEEFGBVMU
t)BSE
t4PGU
[White Balance]
Set the white balance for the recorded videos
t"VUPEFGBVMU
t4VOOZ
t$MPVEZ
t'MVPSFTDFOU
t*ODBOEFTDFOU
[G-Sensor Set]
When enabled, the 3-axis accelerometer senses sudden movement or
impacts and automatically protects video footage surrounding the
incident. Choose from 4 impact sensitivity options:
t0ò
t-PXEFGBVMU
t.FEJVN
t)JHI
[GMT (UTC) Setup]
Set the dash camera’s current time zone. The standard time zones are
dened in terms of hourly osets from UTC. The following table lists the
time zone osets relevant to the US.
13
WDR – Wide Dynamic Range
The advanced image processor can handle a wide range of lighting conditions:
it awlessly resolves both dark and bright areas in a scene, and delivers clear
videos in low-light situations. Enable this feature to record greater scene
details, from shadows to highlights.
LCD Contrast
This setting sets the contrast of the dash cam LCD display on a range from 1
(low) to 7 (high). 4 is the default.
Lane Departure Warning System (LDWS) Detect
When the LDWS is enabled, it will notify the driver when the unit detects the
vehicle drifting out of the lane.
t0òEFGBVMUt0O
Forward Collision Warning System (FCWS) Detect
When FCWS is enabled, the unit will alert the driver if they are fast approaching
a vehicle ahead.
t0òEFGBVMUt0O
Low Light Detect (LLWS)
Enable this feature to receive alerts when there is not enough light (i.e. if the
car’s headlights are o.)
14
Time Zone Standard Time Daylight Time
Hawaii–Aleutian
Time Zone
Alaska Time Zone
Pacic Time Zone
Mountain Time Zone
Central Time Zone
Eastern Time Zone
HADT (-9)
Aleutian Islands only
AKDT (-8)
PDT (-7)
MDT (-6)
CDT (-5)
EDT (-4)
HAST (−10 )
AKST (−9)
PST (-8)
MST (-7)
CST (-6)
EST (-5)
United States time zones
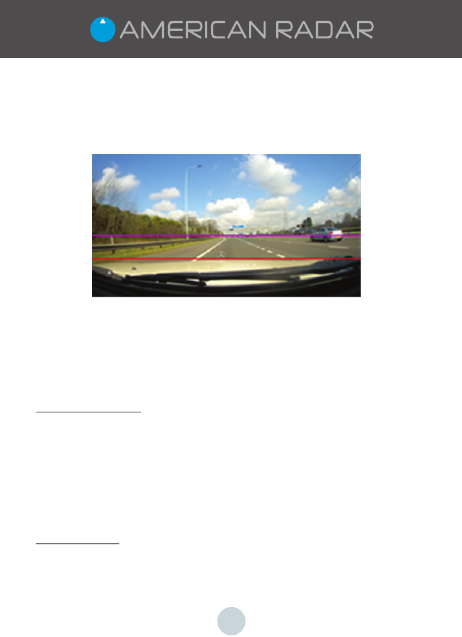
FCWS/LDWS Calibration
For the LDWS and FCWS functions to operate correctly, the user must
calibrate the unit when the car is parked on a at surface with a clear
view of the horizon. Please see the image below:
Press the MODE button to select between the red and purple lines needed
for adjustment. Use the ▼ and ▲ arrow to adjust the lines. Align the red
line so that is parallel to the front edge of the hood. Align the purple line
so that it is parallel to the horizon on the road.
Video Playback
Playback on Device
To playback video or still photos on the device, long press the MODE
button to enter the playback menu.
Use the ▼ and ▲ to select the folder to review. Press REC to conrm the
selected folder.
Use the ▼ and ▲ to navigate through the les. Press REC to view the le.
Press REC to play the le. Use the ▼ and ▲ to rewind or fast forward
through the footage.
Playback on TV
To view the recorded videos and photos, connect your device to an
HDMI-capable TV via a mini HDMI cable (not supplied). See the “Playback
on Device” section for information on how to navigate and play content.
15
Playback via American Radar DVR Player
Please visit our website, www.american-radar.com to download the
American Radar DVR Player. Install the media player following the
installation instructions onscreen.
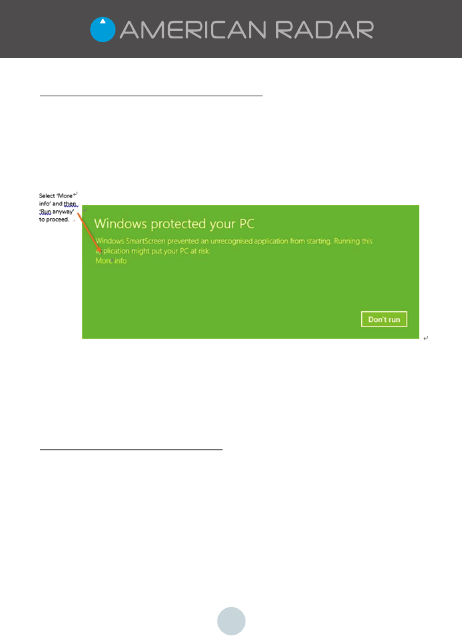
Depending on your version of Windows, you may see the following
message:
Select ‘More info’ and then ‘Run anyway’ to continue the installation.
Follow the on-screen instructions to install the video software. Once
complete, you should see American Radar DVR Player icon on your
computer’s desktop.
Using American Radar DVR Player
1) Launch the player by double-clicking on the downloaded app.
2) Remove the microSD card from the unit and insert in to your PC using
a suitable SD card reader.
3) When prompted with the message, ‘SD card detected. Do you want to
load the DVR recordings?’, press ‘OK’ to proceed.
Note: If the computer or American Radar DVR Player does not
automatically recognize the SD card, open the le from the File
menu and retrieve your media les.
16
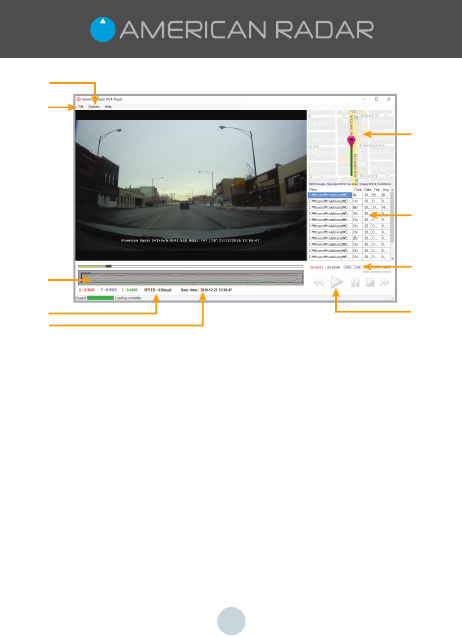
1. Go to File and open the video le to review
2. Click the options menu to switch between MPH and KMH, and KM to Miles.
3. GPS map of the journey that corresponds to the video footage being
played.
4. Displays le name, time, date, and tip information of the displayed les.
5 and 6. Playback navigation and controls.
7. Date and time stamp of video.
8. Displays the speed of the traveling vehicle.
9. G-Sensor data.
Please note we do not support the Apple OS at this time. If you have a
Mac, please use QuickTime media software or similar to review the video
footage recorded on the device.
17
1
2
3
9
8
7
4
5
6
Appendix A: Factory Default Settings or the unit
For optimal performance, your unit comes in the following default setting
for your radar/laser detector and red light and speed camera alerts.
Appendix B: Electrical and Electronic Conditions and Specifications
Standard Test Environmental:
- Temperature: +25 C +/-5 C
- Humidity: 20% to 60%
- Operating Voltage: 13.6V +/-1.0V
Electrical Specications:
- Operating Voltage Range: 16V~12.5V
- Max DC Current
- Standby: 330 mA
- Alert: 500 mA (Full audio volume, full brightness on display for X SS6
alert)
18
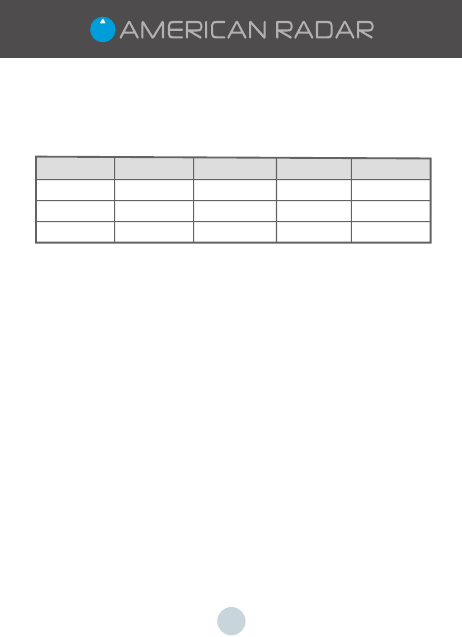
User Setting Factory Default
X-Band
K-Band
Ka-Band
Laser
Red Light
Speed Camera
High Risk Zone
Dangerous Intersection
Speed Trap
City Mode
On
On
On
On
On
On
On
On
On
Setting #1
Microwave Radar Specification
Detectable Bands
The following microwave-frequency guns, transmitters, and Radar
Detector Detectors (RDDs) are to be detected:
Undetectable Bands
VG-2 Swept 11.500 +/-0.250 GHz
Spectre1 Swept 13.300 +/-0.200 GHz
Spectre I/Elite Stepped 12.650 +/-0.025 GHz
13.150 +/-0.025 GHz
Radar/Laser Sensitivity
10.525 GHz : -90 (+/-3) dBm
24.150 GHz : -115 (+/-2) dBm
33.800 GHz : -115 (+/-2) dBm
34.300 GHz : -115 (+/-2) dBm
Super HD Dash camera Specifications
- 170 degree ultra-wide angle lens / Ambarella A7L video processor
- Super HD high quality resolution
- Advanced H.264 video compression technology
- 3 mega pixels / 1.5 inch high resolution LCD
- Support HDMI high quality video transmission
- 30 frames per second for smooth video ow
- WDR function - optimizes brightness in dark or overcast conditions
- G-Sensor - Auto sense event and lock video le.
- Seamless continuous video recording
- Automatic video recording function
- Includes 8GB Micro SD card. Supports up to 64GB Micro SD card.
19
Band Modulation Center Freq Min. Dev Units
X none 10.525 +/-0.050 GHz
K none 24.125 +/-0.125 GHz
Ka none 34.700 +/-1.300 GHz
34.700 GHz : -115 (+/-2) dBm
34.940 GHz : -115 (+/-2) dBm
35.500 GHz : -120 (+/-2) dBm
Laser : -128 dBJ/cm2

LIMITED WARRANTY
American Radar, Inc. (“American Radar” or “we”) warrants your product against
defects
in materials and workmanship for a period of one year from the date
of the original
purchase (“Warranty Period”). Except where prohibited by
applicable law, this
warranty
is nontransferable and is limited to the original
purchaser.
American Radar does not warrant that the operation of the product will be
uninterrupted
or error-free. American Radar is not responsible for damage
arising from failure to follow instructions relating to the product’s use.
Remedies
If the product is determined to be materially defective during the Warranty
Period, American Radar will provide the following remedy (at its option) to:
(1) Use new or refurbished parts to repair or
(2) Replace the product with the same or similar valued item.
Any replacement product will be warranted for the remainder of the original
warranty period or thirty (30) days, whichever is longer.
This warranty does not cover damage resulting from (1) improper operation
or maintenance; (2) unauthorized repair or modication; (3) if the serial
number or housing of the product has been removed; or (4) other causes
that are not defects in material and workmanship except where such
restriction is prohibited by applicable
law. Additionally, this warranty does not
cover products marked as “sample” or sold “As Is”.
How to get Warranty Support
Before submitting a warranty claim, we recommend you visit our website at
https:// www.american-radar.com for current mailing address and customer
service contact
information. The product must be returned, insured and
shipping prepaid, to American
Radar in its original packaging or a similar
protective box, along with a written description of the problem, and a copy
of the original purchase receipt.
20

Limitation of Liability
We strive to provide great products to our customers and we hope that you
will enjoy your purchase. But there are certain things that we do not promise
about our device(s).
OTHER THAN AS EXPRESSLY SET OUT IN THESE TERMS, AMERICAN RADAR
MAKES NO WARRANTIES, EXPRESSED OR IMPLIED; INCLUDING WARRANTIES
OF MERCHANTABILITY AND FITNESS FOR ANY PARTICULAR PURPOSES
WHATSOEVER, AND NO OTHER REMEDY SHALL BE AVAILABLE (INCLUDING
WITHOUT LIMITATION, INCIDENTAL OR CONSEQUENTIAL DAMAGES). ANY
RECOVERY IS LIMITED TO REPAIR OR REPLACEMENT AS DESCRIBED ABOVE.
SOME JURISDICTIONS DO NOT ALLOW THE EXCLUSION OR LIMITATION OF
INCIDENTAL OR CONSEQUENTIAL DAMAGES OF HOW LONG AN IMPLIED
WARRANTY LASTS, SO THE ABOVE LIMITATIONS OR EXCLUSIONS MAY NOT
APPLY TO YOU. IF IT TURNS OUT THAT A PARTICULAR TERM IS NOT
ENFORECEABLE, THIS WILL NOT AFFECT ANY OTHER TERMS.
Customer Assistance
For Assistance in the United States
Monday through Friday (except holidays)
9:00 am to 5:00 pm CST
Toll free: 855.694.7873
support@american-radar.com
For Assistance Outside the United States
Contact your local dealer
For product registration, FAQ, and other information, please visit our
website at www.american-radar.com.
21

COMPLIANCE & ADVISORY STATEMENT
This device complies with part 15 of Federal Communications Commission
Rules. Operation is subject to the following two conditions : (1) This device
may not cause harmful interference, and (2) this device must accept any
interference received including interference that may cause undesired operation.
Note : Modications not expressly approved by the manufacturer could
void the user’s FCC granted authority to operate the equipment.
Note :
This equipment has been tested and found to comply with the limits
for a Class B digital device, pursuant to part 15 of the FCC Rules.
These limits are designed to provide reasonable protection against harmful
interference in a residential installation. This equipment generates uses
and can radiate radio frequency energy and, if not installed and used in
accordance with the instructions, may cause harmful interference to radio
communications. However, there is no guarantee that interference will
not occur in a particular installation.
If this equipment does cause harmful interference to radio or television
reception, which can be determined by turning the equipment o and
on,
the user is encouraged to try to correct the interference by one or more
of
the following measures:
- Reorient or relocate the receiving antenna.
- Increase the separation between the equipment and receiver.
- Connect the equipment into an outlet on a circuit dierent from that to
which the receiver is connected.
- Consult the dealer or an experienced radio/TV technician for help.
22
Federal
Communications
Commission
Disposal of Old Electrical & Electronic Equipment
This product may contain hazardous substances that could impact health and
the environment if not disposed of properly.
For further information about recycling please contact your local civic oce
or recycling center.
If you see this symbol on any product or packaging it should be
handed over to an applicable collection point for the recycling of
electrical equipment. By ensuring that this product is disposed of
correctly you will help prevent a potentially negative impact on
the environment. In addition the recycling of materials will help
to conserve natural resources.
23

www. american-radar.com