DOD Technology CHIMERA Dash cam User Manual Chimera
Shenzhen DOD Technology Co.,Ltd. Dash cam Chimera
User manual

Chimera
User Manual
1
Table of Contents
Product Features ............................................................................................................... 2
Safety Precautions ............................................................................................................ 5
Package Contents ............................................................................................................. 6
Optional Accessories ....................................................................................................... 7
Camera Controls ............................................................................................................... 8
Getting Started ................................................................................................................ 11
Installing Your Camera ................................................................................................... 13
Basic Camera Operation................................................................................................. 15
Mobile viewer \ DOD Dash Cam Application ................................................................. 16
Camera Settings .............................................................................................................. 25
Playback on PC \ DOD Video Player .............................................................................. 28
Transferring Files ............................................................................................................ 29
Firmware Update ............................................................................................................. 30
RC500S 1-CH Specifications ................................................................. 错误!未定义书签。
RC500S Specifications ................................................................................................... 31

2
Product Features
New SONY STARVIS Sensor- ISO Sensitivity up to ISO 12800
Features a new SONY STARVIS CMOS sensor with improved sensitivity not only
under normal lighting but also in low light and near infrared light condition.
Dual Channel 1080P FULL HD
The front and rear view of your vehicle are recorded in 1080p high definition
quality; moreover, the image captured at a 145º angle of view at front and 140º in
the rear for optimal coverage and clarity.
*Optional rear camera available for 1CH package.
Integrated 10 Hz GPS processor
Integrated with the fast 10 Hz GPS processor, that updates GPS data 10 times per
second, accurately recording your speed and location. Date and time Automatically
synchronizes with the atomic clock.
Advanced WDR Technology - Stunning Videos in Any Light
WDR technology, well-balanced exposure for any condition. It makes night shots
brighter and prevents overexposure to create the clearest image.
Traffic Camera Alert
Remind you of approaching fixed speed camera locations and mobile speed
camera “hot-spots” well in advance so you can slow down in time. Stay away from
traps and always stay in control.
*Currently supported: US, CA, UK, NO, PL, NL, BE, AU.
*Traffic Camera Alert act as references and is for reference only, which does not
act as an active radar detector. Please follow all traffic rules and drive safely.

3
Parking Surveillance
Ensure your peace of mind by recording continually even when you have parked
and left your car. Record and lock a file if unusual shock or motion is detected.
*DOD hardwiring kit required
Support to 128GB Micro SDXC Memory Card
4X storage compatibility compared to predecessor models, supports up to 128GB
with more than 18 hours of recording.
*Suggest to use 64GB/128GB for 2-CH models.
DOD GPS Player
The DOD GPS Player generates 1080p video recordings with real-time driving data
such as speed and location clearly at a glance.
Wi-Fi Connectivity – View Remotely with The Free DOD APP
No need to wait any longer whenever you would like to replay the exciting
moments. Simply transfer or visualize files from the dash cam’s memory right from
your smartphone/tablet via the dedicated DOD APP (iOS and Android compatible).
145º Wide Angle of View
Wide angle, wide view, without distortion. The brand-new-designed optical lens
captures images with ultra wide fields of view, covering up to 145 degrees, without
pincushion or distortion.
f/1.6 Large Aperture Glass Lens - Super Low Light Performance
Equipped with f/1.6 large aperture, capturing better night shots than conventional
f/2.0, and records clearly sophisticated details such as the license plate and others.

4
6G Sharp Glass Lens
6-Element sharp lens, made of 6 layers of glass, provides stunning clear and
non-deformed images.
G-Sensor Automatic Trigger for File Protection
When an impact, emergency brake occurs or the car tilts, the device will lock the
current video files automatically. Important files will not be overwritten by loop
recording.
Loop Recording
When the storage space is full, it can automatically overwrite the unprotected
files.
Adjustable Circular Polarizing Filter
Adjustable filter reduces windshield glare and enhances saturation at the same
time.

5
Safety Precautions
Product
Do not disassemble, repair, modify your camera or power related accessories. For warranty
service, please contact DOD Tech Support.
Do not adjust or operate camera while driving.
Avoid exposing your camera to extended periods of humidity and/or heat.
Prolonged exposure may reduce the product’s lifespan.
Do not spray water or cleaning agents directly onto the camera.
Fluids may cause fire, electric shocks, or malfunctions.
Avoid installing camera where it may obstruct the driver’s view or airbag deployment.
Car Power Adaptor
Use ONLY the DOD power adapter supplied with your unit.
Other power adapters may create a safety hazard or damage the unit.
Do not use damaged power adapters or cords. If damaged, please disconnect the power adapter
and contact DOD Tech Support for assistance.
Do not pull, insert, or bend the power cable using excessive force.
Do not operate or handle power cable with wet hands.
In specified cars, the power may be constantly supplied to the device even the engine is turned
off. This may drain the vehicle battery. The optional DOD DP4 kit equipped with low-voltage
protection is designed to prevent battery drain and jump starting.
Battery
Keep the device away from heaters or other hot objects.
Store the camera at lower temperatures to reduce the rate of self-discharge and preserves the
initial energy stored in the battery. The battery in the device self-discharges over a period of time
naturally whether the battery is used or not.
Charge the Dash Camera for 5 minutes with the supplied DOD power cord if you are unable to
turn on the camera.
6
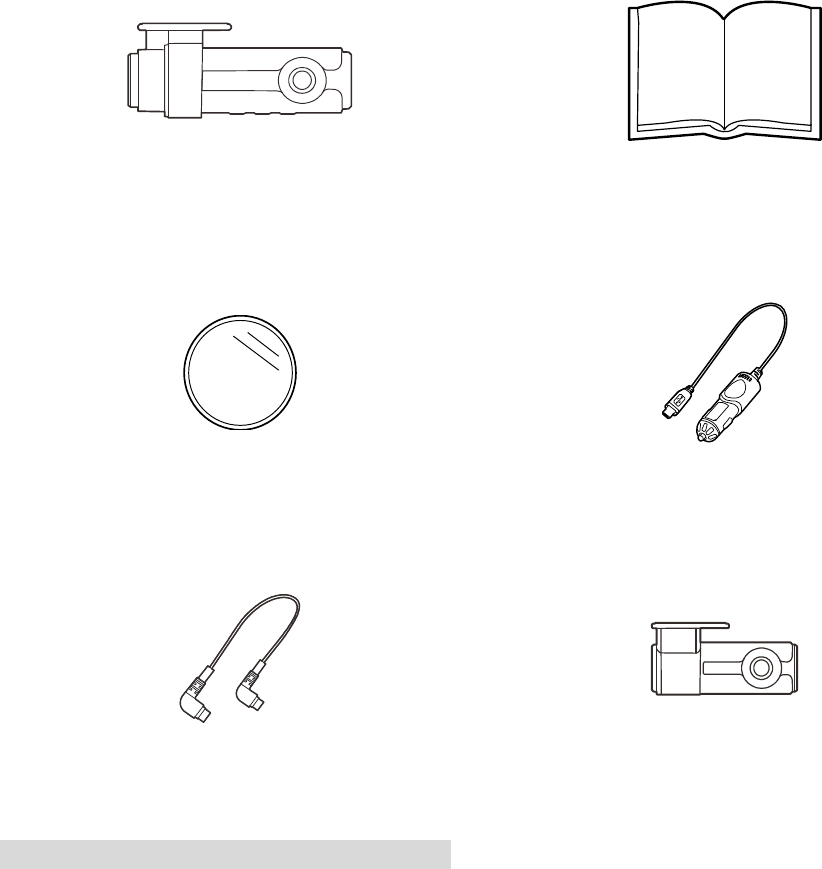
Package Contents
Dash Cam
User Guide
CPL
Car Power Adaptor
Rear Cam Connection Cable
*Optional for 1CH model Rear Dash Cam
*Optional for 1CH model
Note: Supplied accessories may vary by region.
7
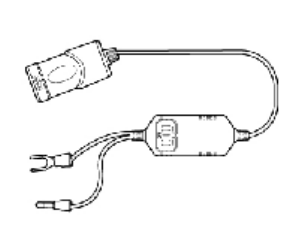
Optional Accessories
DP4
DP4 hardwiring kit offers constant
source and prevent battery drain with
low-voltage protection.
8
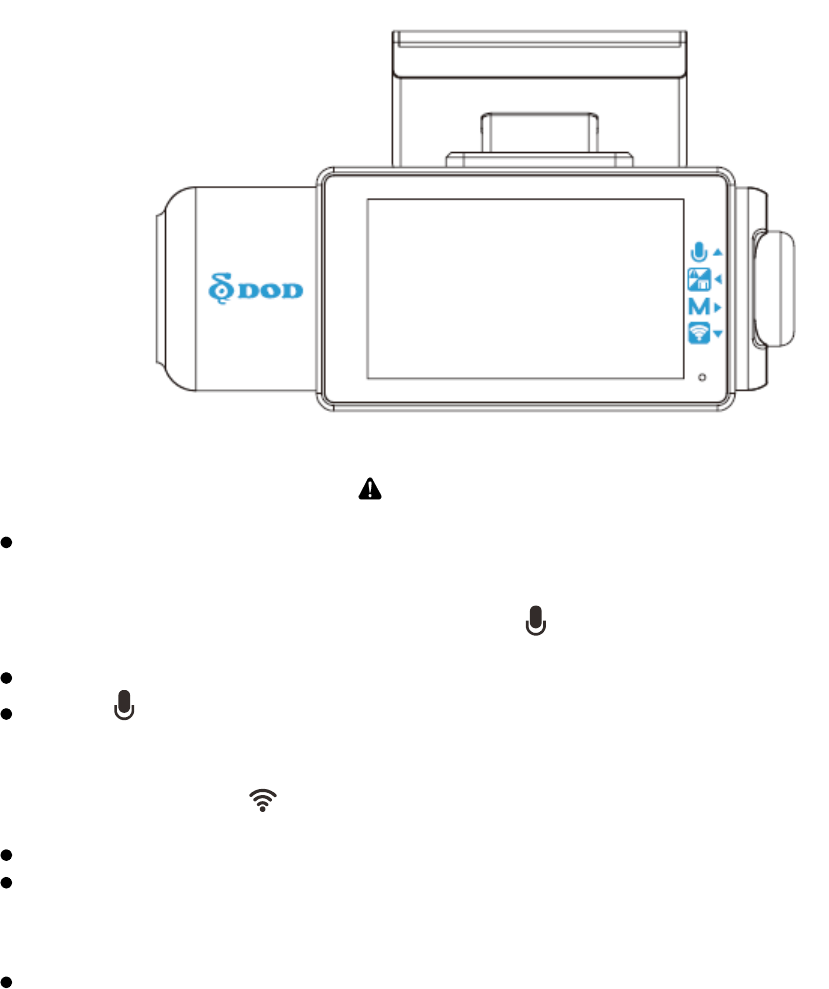
Camera Controls
●1 SOS Emergency File Lock【 】
While recording, press this button to lock current recording file from being over written.
●2 Audio Recording Function / Display OFF【 】
During standby / recording mode:
Press 【 】button once to turn voice recording ON/OFF.
●3Wi-Fi Connection【 】
Press once to turn on/off Wi-Fi for smart device connection.
Press once to exit parking surveillance mode (if enable), then press again to turn on W-Fi.
●4Reset Button
Press to force the device to reboot.
9
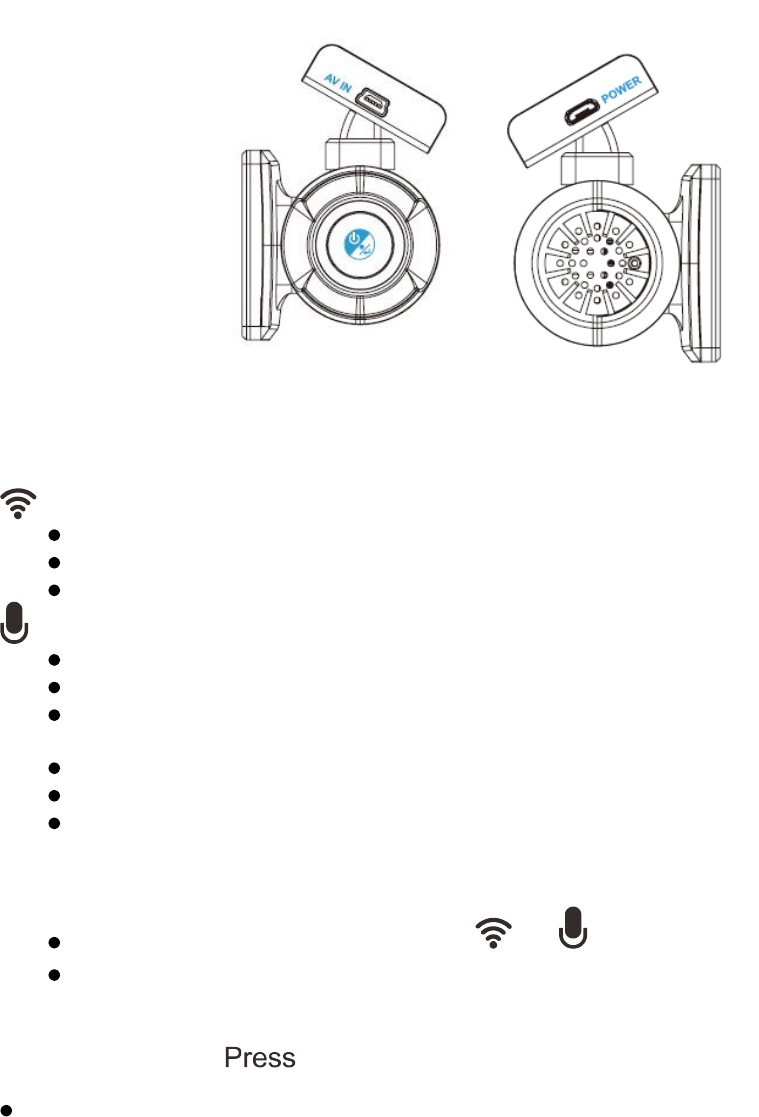
Camera Controls
●5Operation Status LED
ON – Wi-Fi connected to smart device.
OFF – Wi-Fi disabled.
Flashing white LED– Connecting / Wi-Fi stand by.
ON – Audio recording (+GPS signal locked on).
OFF – Audio recording off (+GPS signal locked on).
Green LED Flashing – GPS locating whether audio disabled or enabled.
REC
ON – Red LED solid - Stand by.
OFF – Red LED off - Dash cam off / not recording.
Red LED Flashing – Recording video.
Parking Surveillance Mode:
Stand by – Light up in order and loop, à à REC
Recording – All 3 lights flash together.
●6Holder Release【 】
Press release lock mechanism to adjust angle or slide dash camera out of mounting
bracket.
●7Speaker

10
Camera Controls
●8Micro USB Port【 】
For use with the supplied DOD Car Power Adaptor or USB data cable.
●9MicroSD Slot
Requires a micro SDHC/SDXC card, class 10 or above. Supports up to 128GB.
●10 Rear Cam Connection Port【AV IN】
11
Getting Started
Setting Up Your Camera
Set up your camera inside your vehicle to ensure easy access to power.
1. Start With SD Card.
To use with SD card, please format the microSD card in the camera menu to ensure correct
format before initial use. Memory card must be in FAT32 format to function properly.
Card slot is directional and may be damaged if SD card is inserted incorrectly.
To save recorded videos stably, DOD Tech recommends formatting your SD card every two
weeks within the camera
Note: After formatting the SD card, all data will be deleted. Be sure that you have backed up the
important files.
Estimated Video Recording Length (Dual 1080p Full HD form)
Storage/Quality Recording length
16GB 120 minutes (2 hours)
32GB 250 minutes (4.2 hours)
64GB 505 minutes (8.4 hours)
128GB 995 minutes (16.6 hours)
*Video recording length may vary depending on environmental conditions.
12
Getting Started
2. Connect the Power Adapter.
Plug the DOD power adapter into your vehicle’s power/accessory outlet.
Then carefully insert the micro USB plug into the USB port.
3. Turn on Your Vehicle.
Powering from your vehicle through the accessory socket will automatically turn on your
camera and starts recording, and your camera will stop recording and shuts off
automatically when power is turned off.
Note: In specified cars, the power may be constantly supplied to the device even when the
engine is turned off. This may drain the vehicle battery. The optional DOD DP4 kit equipped
with low-voltage protection and is designed to prevent battery drainage.
4. Connecting the Camera Wi-Fi to Your Smart Device.
l Download the DOD APP from APP Store on your smart device.
l Press the Wi-Fi connection button on the camera to activate. The white LED will flash.
l Camera connection, settings and viewing files can now be done within the APP, see
instruction in Page 16-27.
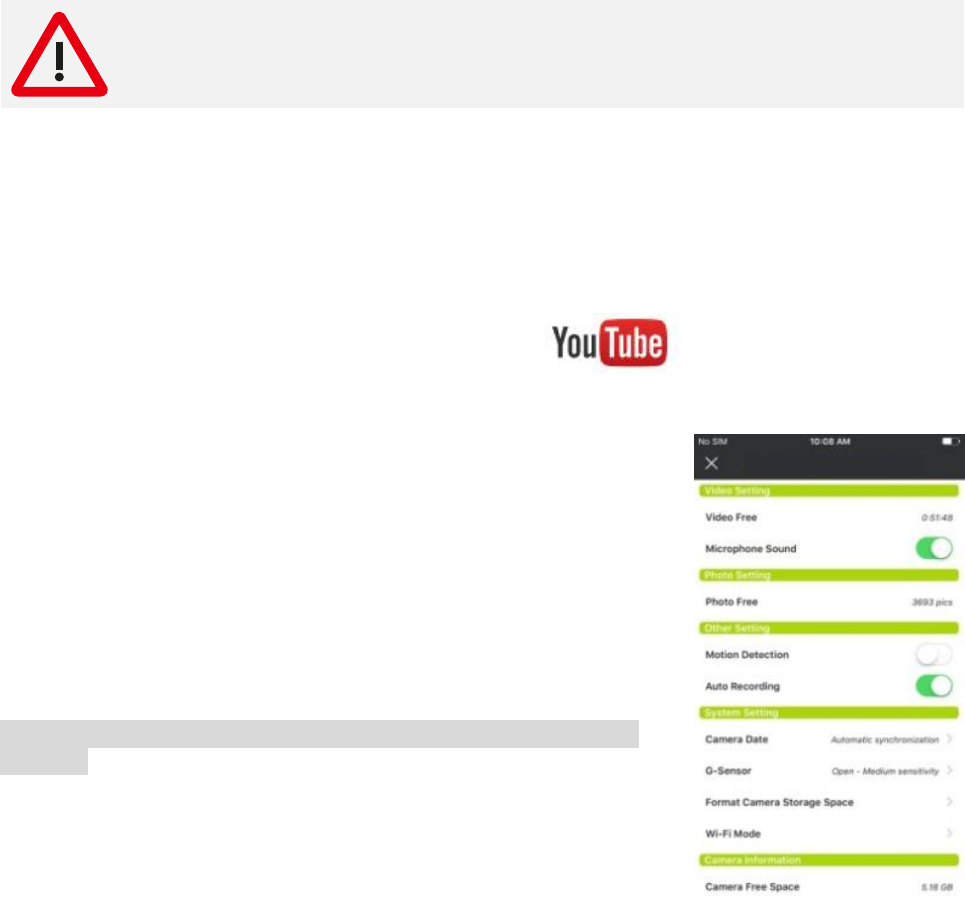
l Click following icon for online instruction video.
5. Access to Settings
l Upon powering up the camera for the first time or after
upgrading the firmware on the device, you can access to the
setting menu via DOD APP and change the settings to your
personal references rather than default.
l Your camera will automatically sync via GPS with the time
and date to the atomic clock once the time zone (GMT) is
correctly set.
Note: The time zone must be manually adjusted for daylight
savings.
13
Installing Your Camera

14
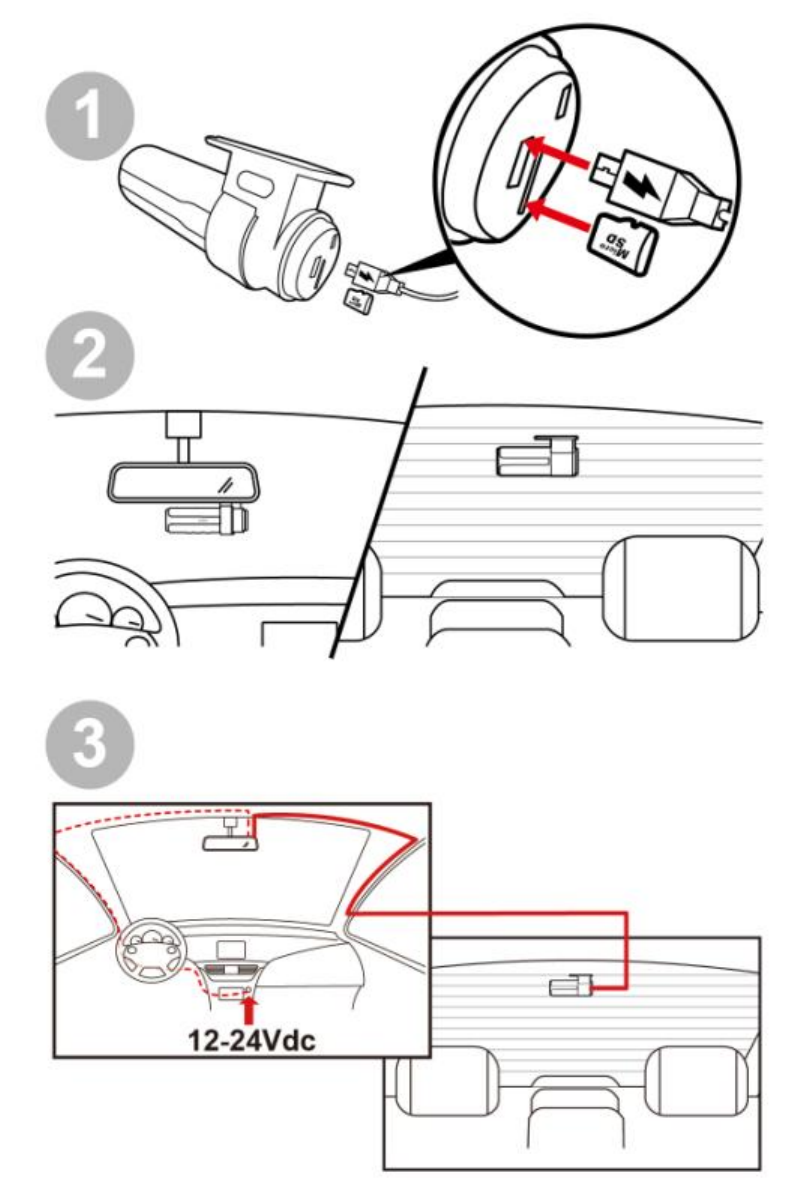
Installing Your Camera
1. Clean Windshield
Wipe down both the interior and exterior glass for the best image quality.
2. Prepare the Camera for Installation
Peel off the protective mount cover.
Find a location which does not obstruct your view when driving.
It is recommended to place the camera behind the rearview mirror without blocking either
lenses or camera functions.
DOD Tech recommends to place the rear cam at the top center of your rear glass for best
images and shortest hanging wires after installation.
3. Adjust the Angle
The camera is adjustable via twist motion, which can be loosened by press and hold the
release button on the mount.
Point your camera slightly below the horizon line to minimize glare.
4. Install the Car Power Adapter
If you have not done so previously, plug the micro USB into the port of the camera, and
insert the power adapter into the cigarette lighter socket of your car.
The wiring can be hidden in the headliner, seams and rubber strips around the perimeter
of the windshield.
5. Remove the Lens Protector Film
Your camera is now installed and ready for daily use.
Note:
Always use the supplied DOD car power adaptor to avoid the unexpected damage.
If grease, fingerprints, or blots are found on the external/internal windshield of the car,
please wipe it clean or replace the windshield. Blots may affect the recording quality or
may cause the bracket to be unstable.
Due to various road condition in different countries, DOD Tech recommends setting the
G-Sensor sensitivity accordingly to suit driving environments in your country.

15
Basic Camera Operation
Everyday Operation
Dash cam will automatically turn on and start recording when it starts receiving power. By
default, the camera will record over the oldest videos when the memory card is full (loop
recording). The protect files can take up to 30% of full SD card space, and not be over
written by normal recording files. When reaching 30% limit, files in RO (Read Only) folder
will be overwritten by newest protected file, starting with the oldest.
Continuously Powered Electrical Outlet
The camera will not automatically shut down when your vehicle is turned off If your vehicle
provides continuously power to the accessory outlet. To turn off your camera manually,
simply unplug the USB cable.
Continuously powered electrical outlet allows the camera to capture videos while you are
away but it will result in vehicle battery drainage and may eventually prevent your car
from starting. DOD Tech recommend to use DP4 power kit for needs of parking
surveillance.
Video Directory:
Videos will be saved on the memory card and or in internal storage. Normal driving videos
are in the root directory and the protected files will be saved in the “RO” (Read Only) file.
File-naming for front camera: 2017_0125_180946_001F
File-naming for rear camera: 2017_0125_180946_002R
Blue number sequence in example above indicates year/month/day,
Green number sequence indicates time in 24H format including seconds,
Orange letters indicates file recorded from front or rear camera.
The number in front of F/R means sequence of the video recorded.

16
Mobile viewer \ DOD Dash Cam Application
The DOD Dash Cam Application is designed to be compatible with all DOD Tech products
equipped with Wi-Fi function. Control your camera, download recorded videos and photos,
and monitor real-time live view through your smart device.
Download
Please download and install the DOD Dash Cam Application from Google Play or App Store
on your smart device.
Note: DOD Dashcam application requires Android 4.5 / iOS 7 (or newer).
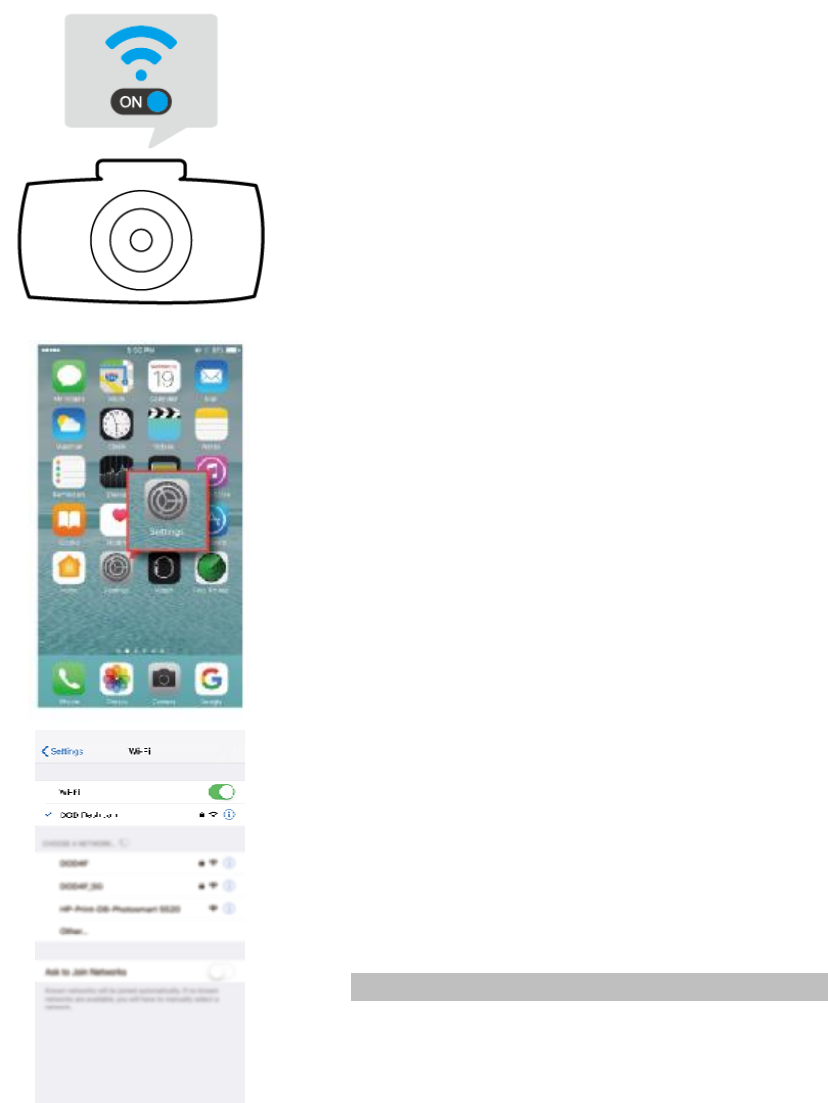
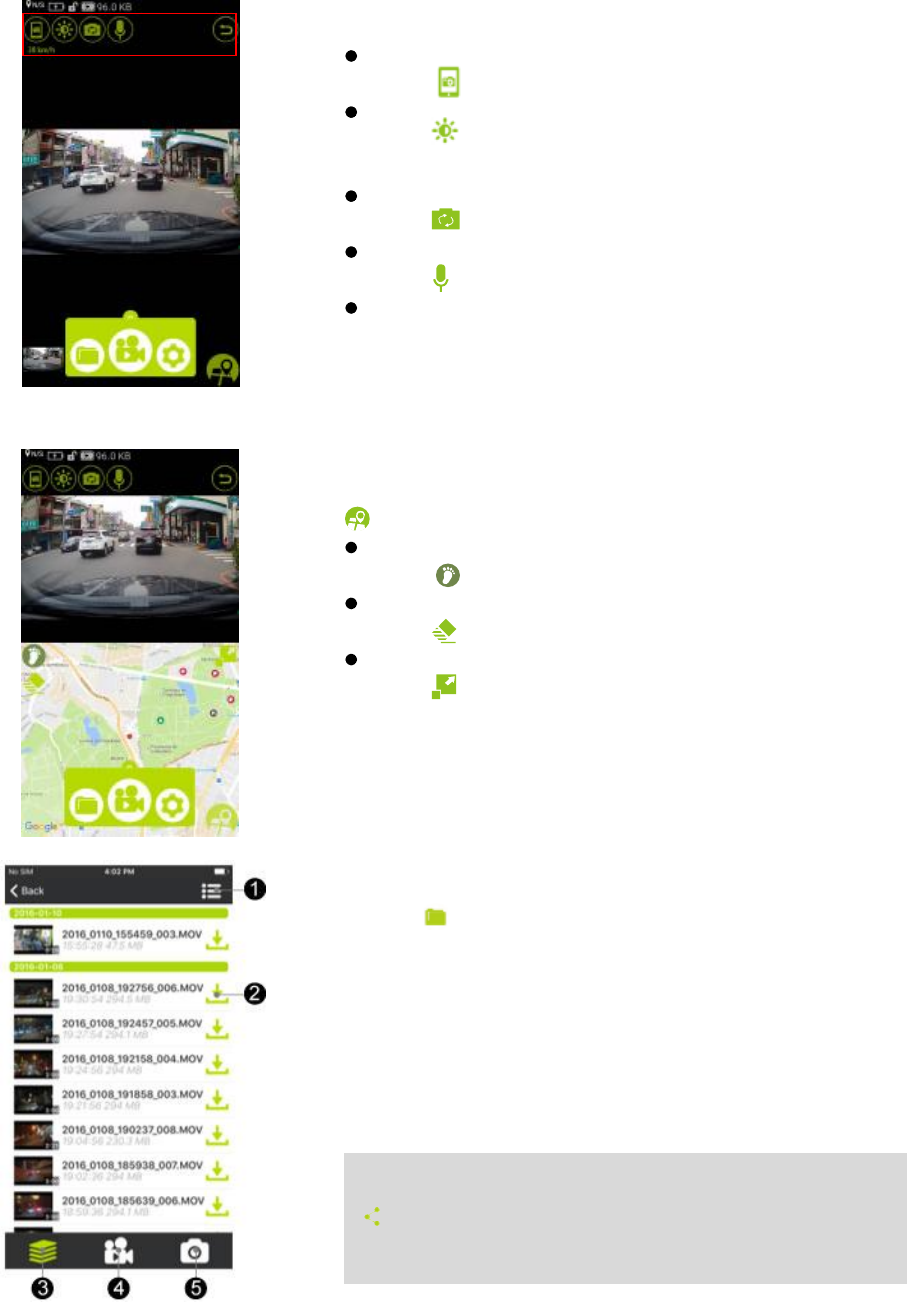
Connect Wi-Fi
1. Enable the camera to AP mode (Access Point Mode) by pressing button. The white
LED light will flash while sending out the Wi-Fi signal.
2. Open the Wi-Fi setting page on your smart device and choose your DOD dashcam
network to connect. Default key 12345678 can be changed once access to DOD Dash Cam
in setting menu within DOD APP on your smart device.
3. Your smart device and camera are now connected.
Note:
•The Wi-Fi password is only required once during set up.
•Wi-Fi range between the camera and your smart device is limited to approximately 10 meters (32
feet)
Click the Player icon below to view instruction video
Please ensure internet access before viewing instruction video
17
Mobile viewer \ DOD Dash Cam Application
Functions of DOD Dash Cam APP (iOS)
Please make sure:
1.Dash Cam is on.
2.Wi-Fi function is enabled by pressing the Wi-Fi
button. White LED light will be flashing.
For iOS Platform:
To connect the smart device, firstly access to
“Settings” folder on your iOS device.
Select your DOD Dash Cam model and enter the
default password to connect.
*Password: 12345678
Note: Password can be changed in dash cam settings

18
Once the Wi-Fi connection is complete, open the
DOD Dash Cam APP.
1.
Browse through the instruction pages by touching
the left/right arrow or swipe across the screen.
2.
Touch the green “GO” icon to continue.
When no dash cam is connected, this page is shown.
●
1To access to connection page.
●
2To review connection instruction.
●
3Access to files directory (smart device storage).
●
4Access to setting options.
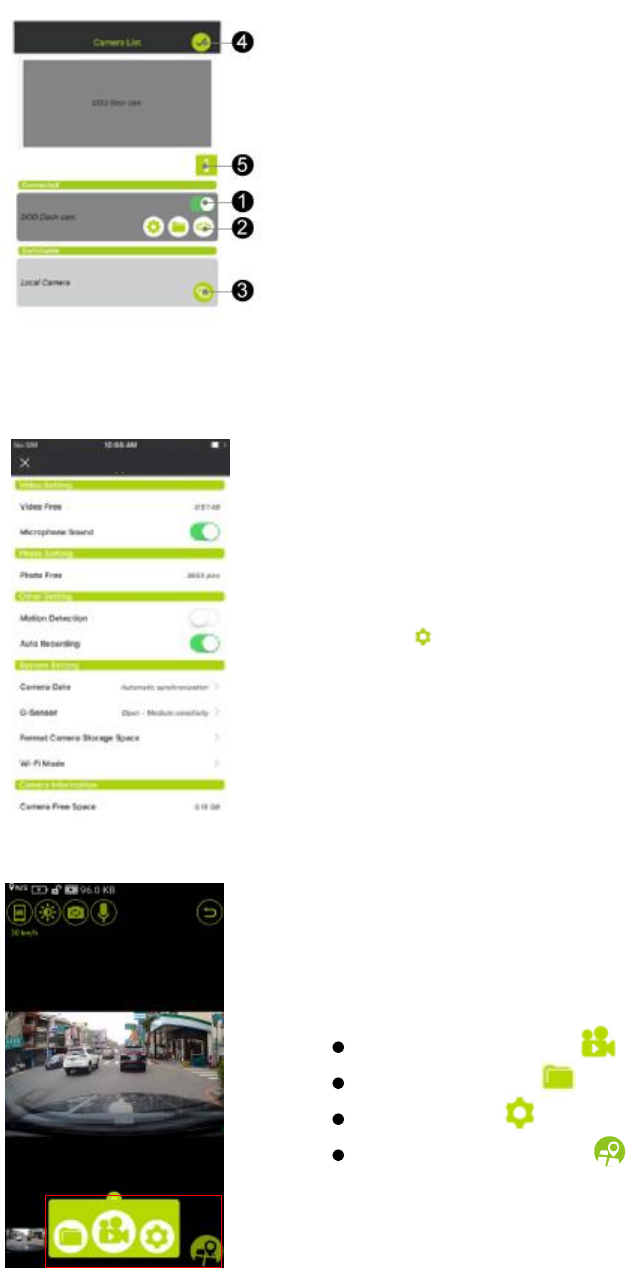
19
●
1When dash cam is connected, please make sure to
switch on then hit check mark to confirm.
●
2Break camera connection.
●
3Connect to switchable camera.
●
4Confirm and return to previous page.
●
5View connection instruction.
Settings
Press [ ] to enter the menu setting. Settings can
only be changed when recording has stopped.
The camera defaults to video recording when the
camera is first turned on.
Recording Mode: Press【 】to start/stop recording.
File Directory: Press【 】to access recorded files directory.
Settings: Press【 】to access camera setting page.
Display or hide map, tap 【 】to change display style.
20
You can access to three different functions; details as
follow:
Snap Shot
Press【 】to take a snap shot of current camera view.
Screen Brightness.
Press【 】to dim the display of your smart device or press it
again to resume.
PIP Display
Press【 】to change picture in picture display style.
Audio On/Off
Press【】to turn audio recording on or off.
Speed Display
Tap on speed display to switch between digital or
speedometer.
Map View:
Track Path
Press【】to track travel path.
Screen Brightness.
Press【 】to erase past path.
PIP Display
Press【 】to change map display mode.
Playback and Download
Press [ ] to enter the files of recorded videos and
photos.
●1File View Mode
●
2Download File to Your Smart Device*
●
3All Files
●
4Display Video Files Only
●
5Display Photo Files Only
*NOTE: After downloaded to local storage on your smart device,
[] will appear, indicating the file can be share via various social
network such as Facebook, Instagram, etc.
21
Mobile viewer \ DOD Dash Cam Application
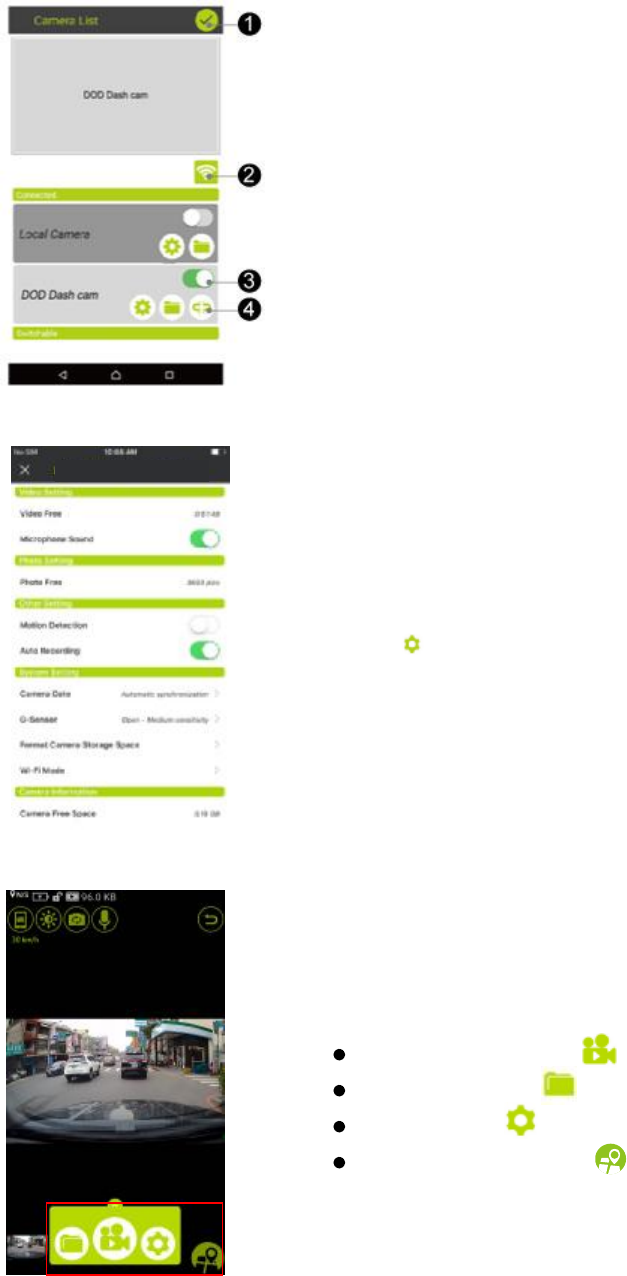
Functions of DOD Dash Cam APP (Android)
Please make sure:
1.Dash Cam is on.
2.Wi-Fi function is enabled by pressing the Wi-Fi
button. White LED light will be flashing.
To connect the smart device, firstly access to
“Settings” folder on your Android device.
Select your DOD Dash Cam model and enter the
default password to connect.
*Password: 12345678
Note: Password can be changed in dash cam settings

22
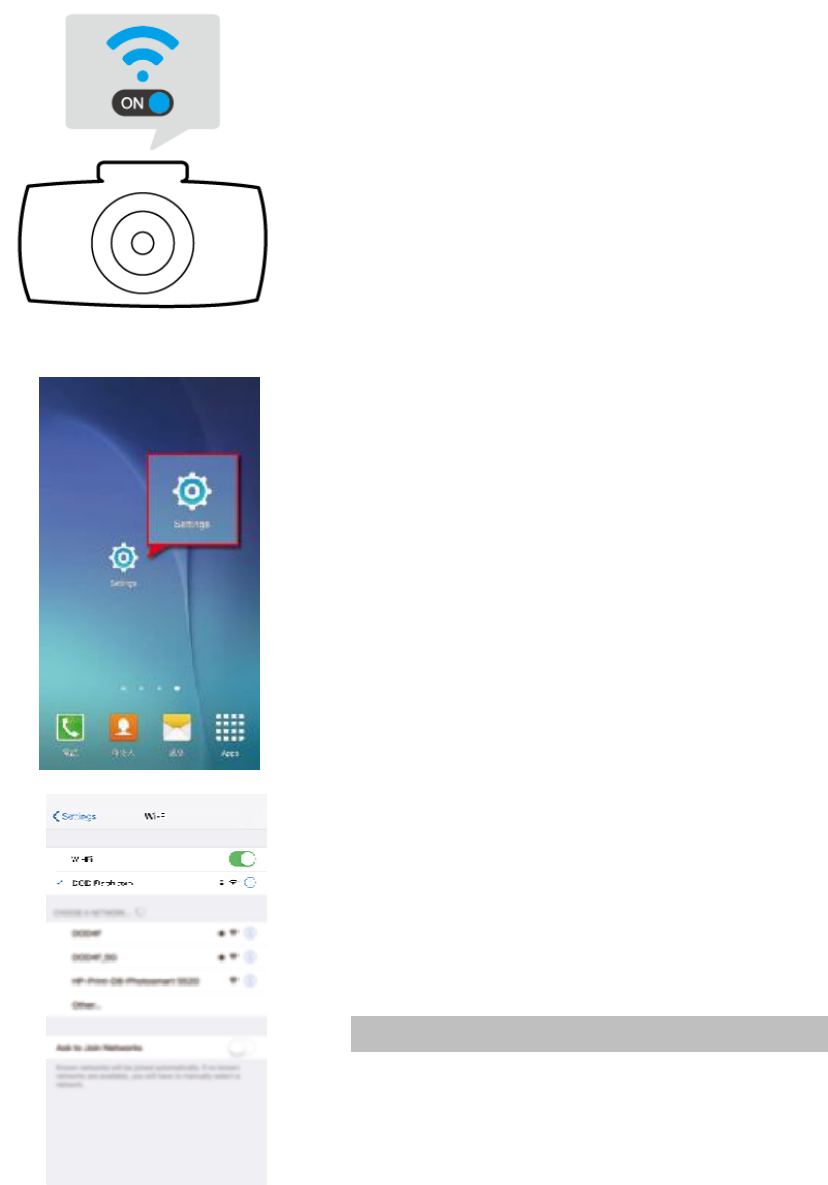
For Android Platform:
To connect your smart device, firstly access
"Settings" folder on your Android devices.
When no dash cam is connected, this page is shown:
●
1To access to connection page.
●
2To review connection instruction.
●
3Access to files directory (smart device storage)
●
4Access to setting options.
●
1Confirm.
●
2Quick access to Wi-Fi settings on your smart device.
●
3Camera switch.
●
4Camera quick settings. Files directory.
●
5Link to switchable DOD dash cams.
23
●
1Confirm connection and return to previous page.
●
2Quick access to Wi-Fi settings on your smart device.
●
3Camera switch.
●
4Camera quick settings. Files directory.
●
5Disconnect from current camera.
Settings
Press [ ] to enter the menu setting. Settings can
only be changed when recording has stopped.
The camera defaults to video recording when the
camera is first turned on.
Recording Mode: Press【 】to start/stop recording.
File Directory: Press【 】to access recorded files directory.
Settings: Press【 】to access camera setting page.
Display or hide map, tap 【 】to change display style.

24
You can access to three different functions; details as
follow:
Snap Shot
Press【 】to take a snap shot of current camera view.
Screen Brightness.
Press【 】to dim the display of your smart device or press it
again to resume.
PIP Display
Press【 】to change picture in picture display style.
Audio On/Off
Press【】to turn audio recording on or off.
Speed Display
Tap on speed display to switch between digital or
speedometer.
Map View:
Track Path
Press【】to track travel path.
Screen Brightness.
Press【 】to erase past path.
PIP Display
Press【 】to change map display mode.
Playback and Download
Press [ ] to enter the files of recorded videos and
photos.
●1File View Mode
●
2Download File to Your Smart Device*
●
3All Files
●
4Display Video Files Only
●
5Display Photo Files Only
*NOTE: After downloaded to local storage on your smart device,
[] will appear, indicating the file can be share via various social
network such as Facebook, Instagram, etc.

25
Camera Settings
All settings are changed via the DOD Dash Cam APP; all changes made will be
automatically saved. Settings can only be changed once the recording is stopped. For
details of each function please see the description below.
Display Mode
Live view screen display is default to be large front and small rear, can be changed to front
view only, rear view only, or large rear with small front.
Video Stamp
Imprints the time, date, vehicle speed and GPS coordinates onto the recorded video file.
Loop Recording
Can be set to 1, 3, 5 or 10 minute per video section saved in memory card. When the
memory card is full, the oldest files will be overwritten, excluding locked clips. Turing off
loop recording will result in 30 minutes per video until the memory card is full, and will not
continue recording after. For downloading files onto a smart device, 1 minute files are
faster.
Camera time
Choice of Synchronizing with GPS or set manually.
Volume Setting
Choice of High / Mid / Low / OFF, if the volume setting is off, all voice notifications and alerts
will be muted.
Set Time Zone
Sets the current time zone for GPS time and date auto calibration. Note the time zone must
be manually adjusted for daylight savings
Traffic Camera Warning
Warning sound to remind you of approaching traffic camera such as fixed speed camera,
red-light camera or hot-spots for mobile police camera. Speed camera warning will not be
activated below 20km/h or 12mph.
Note: Currently supported: US, CA, UK, NO, PL, NL, BE, AU.
**Please make sure "Volume" is turned on in setting menu
*Traffic Camera Alert act as a reference and is for reference only, which does not act as an
active radar detector. Please follow all traffic rules and drive safely.
26
G-Sensor
Measures G-forces. The sensitivity settings can be set off/low/mid/high, If excessive force
is detected, the current recording video will be locked and the file will be saved in the “RO”
directory. However, Setting G-Sensor to OFF may result in faulty function in Parking
Surveillance Mode.
Recommended setting: low. Inappropriate setting per environment or road condition will
result in frequently file lock.
Record Audio
Switches the microphone recording on/off.
Can be changed during recording by pressing button【 】.
See Page 9 for LED indication.
Parking Surveillance (Default: Off)
When function is enabled, unit will automatically switch to Parking Surveillance Mode if
vehicle is stationary for over 10 minutes.
1. Automatically records videos (both front and rear) when motion is detected within view
range of front or rear camera.
2. Automatically records and locks recording videos (both front and rear) when excessive
force of impact is detected by G-sensor.
3. Camera only records when motion or impact is detected.
4. Unit will return to normal recording mode if vehicle moves continuously for 3 seconds or
longer.
Note:
Parking Surveillance requires consistent power supply via vehicle battery. (It is
recommended to use optional DOD hardwire kit equipped with low-voltage protection
design to prevent battery drainage.
Please ensure to enable G-sensor function in setting menu before switch to Parking
Surveillance. (G-sensor sensitivity Default: Medium)
Parking Surveillance will automatically shut down GPS locating, and will resume when
switched to normal recording mode.
Enabling Parking Surveillance will automatically shut down Time-Lapse function if
previously turned on.
Back lighting will automatically dim when entering Parking Surveillance, and will resume
when exit.
Image Rotation (Front / Rear)
Rotates the recorded image 180º when dash cam is mounted upside down.

27
Exposure Value (Front / Rear)
Sets the brightness /darkness of the video of each camera.
Video too bright? Set between -1 to -3.
Video too dark? +1 to +3.
Recommended setting: 0
ISO Stamp
Imprints ISO value (light sensitivity value) on the video file.
Format Memory Card
Completely deletes all files including locked footage from the SD card and optimizes the
card for recording. DOD Tech suggest formatting via the menu every two weeks to ensure
proper SD card functionality.
Factory Reset
Reverts all settings back to the original factory default.
Camera Wi-Fi Settings
Shows the name on Wi-Fi network and its password, password can be changed to prevent
access by others. Password should be 8 or more alphanumerical only.
APP Version
Shows current APP version.
APP Name
This APP by DOD Tech is called DOD CAM.
Maps
Choice of maps varies from smart device platforms.
iOS has choice of APPLE maps or Baidu maps.
Android includes GOOGLE maps or Gaode maps.
Offline Maps
Offline maps can be downloaded to use when data access is not available on your smart
devices. Offline maps may require large storage space on your smart devices.
Speed Units
Select metric or imperial units.
File Sorting
Choice of file sorting mode, newest to oldest, or reverse.
Auto Connect
If enable, APP will automatically connect known dashcam without connecting manually.
Clear Cache
Delete cache can free up RAM space for smoother APP operation.

28
Playback on PC \ DOD Video Player
Please transfer the video files to your electronic device for smooth viewing and or storage.
The DOD Video Player is a user-friendly program to playback videos and to visualize your
position and speed on your PC or Mac.
Installing the DOD Video Player
Download the software from DOD Tech’s website and follow instructions for installation.
Suggested System Requirements:
Windows XP or higher (i3 or better, with at least 2GB Ram)
Mac OSX 10.6.4 or higher
Launching the DOD Video Player
Once launched, the player will appear on your screen.
*Sub display is only available when connected to the rear cam.
Click the Player icon below to view instruction video
Please ensure internet access before viewing instruction video
Learn more about DOD GPS PLAYER V2.0
Video Display
(Main)
Preview
Video Display
(Sub*)
Add/Remove
or Export
Direction of Travel
G
-
Force
Value
Speed

29
Open Video Files
Add your file to the list of videos:
Click “File”, click “Open”, and navigate to the location of your files.
Press the “ADD” button located below the list of videos.
Video Player Features
Once the video is playing, your position, speed and G-Force will be displayed at the
bottom of the player window.
Pressing the “Location Map” button will show your position on Google Maps.
PIP Function (Picture in Picture)
This function allows you to watch both front and rear videos simultaneously.
Make sure to turn on PIP function from top menu before playback for dual cam models.
Click on main or secondary display to exchange display location.
Transferring Files
Video files can be transferred to your electronic device for viewing and storage.
USB Cable
1. Connect a USB cable from the camera’s USB port to computer.
2. Your computer should now detect a new device. The memory card and videos can be
accessed similar to a USB flash drive.
Card Reader/MicroSD Slot
Use a SD card adaptor (purchase separately) or a compatible electronic device with a
MicroSD slot (ex: tablet). Follow the manufacturer’s instructions.
Note:
PIP function must be turned on prior to dual video playback.
30
Firmware Update
See the support section on DOD Tech’s website for any available firmware updates and
instructions.
About SD Card
Test the Micro SD memory card regularly as the memory card is a consumable item, and needs to
be replaced periodically.
Reformat the memory card in the camera menu every two weeks to extend usable lifetime. This
should only be done AFTER desired files have been saved elsewhere, such as portable hard drive.
Formatting the memory card will clear all files, including RO files.
DOD is NOT responsible for any malfunctions caused from the use of disingenuous, modified, or
unauthorized parts and accessories.
DOD does NOT guarantee the recording of accidents which may produce excessive force of
impact causing the device to malfunction and fault.
The working temperature of this product is -20°C~65°C(-4°F~149°F). Please ensure the device is
stored within the temperature range; or the device may be damaged and or malfunction, which
these circumstances are not covered by warranty.
DOD is NOT responsible for the loss of any recorded video during operation due to unexpected
factors or force majeure when driving.
The video recordings filmed by this Dash Cam are intended for personal use ONLY.
DOD Tech recommend NOT to use Sandisk branded memory cards.
Note:
Please ensure stable power during firmware update, otherwise may result in update
failure or malfunction.
When update completes, system will show option to format SD card. Please ensure
to format SD card by computer / dashcam to prevent update repeatedly.
Note:
64GB or greater capacity cards will show
“
SD Card Error
”
when first insert into
dash cam. Please use formatting function in system menu to format SD card prior to
usage to ensure proper functionalities.
When formatting via computer, 64GB or greater requires formation program to
transform original exFAT format to FAT32 to properly function in dash cam.

31
Chimera Specifications
Video Resolution F: 1920x1080@30fps
R: 1920x1080@30fps
Sensor
SONY STARVIS CMOS sensor
Wide-Angle Lens F: 145°
R: 140°
Aperture
f/1.6 both front and rear
ISO Sensitivity
up to ISO 12800
Display
N/A
Video Format
H.264 MP4
Recording Media
micro SDHC/SDXC Card (Up to 128GB)
Audio
Mic and Speaker(Mono)Equipped
Battery
Supercapacitor
Power Input
5V 1.5A
Size F: 112.6 (L) x 61.5(W) x 33.4 (H)mm
R: 75.2(L)x 26(W)x 38.8(H)mm
Weight F: 120g
R: 41g
Operating Temperature
-20°C ~65°C
All Specifications Are Subject to Change without Notice.

32
Caution:
This equipment has been tested and found to comply with the limits for a Class B
digital device, pursuant to part 15 of the FCC rules. These limits are designed to
provide reasonable protection against harmful interference in a residential
installation. This equipment generates uses and can radiate radio frequency energy
and, if not installed and used in accordance with the instructions, may cause harmful
interference to radio communications. However, there is no guarantee that
interference will not occur in a particular installation. If this equipment does cause
harmful interference to radio or television reception, which can be determined by
turning the equipment off and on, the user is encouraged to try to correct the
interference by one or more of the following measures:
-Reorient or relocate the receiving antenna.
-Increase the separation between the equipment and receiver.
-Connect the equipment into an outlet on a circuit different from that to which the
receiver is connected.
-Consult the dealer or an experienced radio/TV technician for help.
This device complies with part 15 of the FCC rules. Operation is subject to the
following two conditions: (1) This device may not cause harmful interference, and (2)
this device must accept any interference received, including interference that may
cause undesired operation.
Any Changes or modifications not expressly approved by the party responsible for
compliance could void the user's authority to operate the equipment.
RF Exposure
The equipment complies with FCC radiation exposure limits set forth for an
uncontrolled environment. This device should be installed and operated with
minimum distance 20cm between the radiator & your body.

33
Copyright ©2017 DOD Tech
All Rights Reserved
Under the copyright laws, this manual may not be copied,
in any way, shape, or form, without the written consent of DOD Tech.