DOD Technology RC500S Dashcam User Manual
Shenzhen DOD Technology Co.,Ltd. Dashcam
Contents
- 1. User Manual
- 2. User manual
User Manual

RC400S / RC500S
User Manual
1
Table of Contents
Product Features ................................................................................... 2
Safety Precautions ................................................................................ 5
Package Contents ................................................................................. 7
Optional Accessories ............................................................................ 8
Camera Controls .................................................................................... 9
Getting Started ..................................................................................... 12
Installing Your Camera ....................................................................... 14
Basic Camera Operation ..................................................................... 16
Mobile viewer \ DOD Dash Cam Application ..................................... 17
Functions of DOD Dash Cam APP (iOS) ........................................... 18
Functions of DOD Dash Cam APP (Android) .................................... 22
Camera Settings .................................................................................. 26
Camera Modes ..................................................................................... 29
Playback on PC \ DOD Video Player .................................................. 30
Transferring Files ................................................................................ 32
Video Output ........................................................................................ 32
Firmware Update ................................................................................. 32
RC400S Specifications ........................................................................ 33
RC500S Specifications ........................................................................ 33

2
Product Features
NewSONYSTARVISSensor‐ISOSensitivityUptoISO12800
NewSONYSTARVISCMOSsensorwithimprovedsensitivitynotonlyunder
normallightingbutalsoinlowlightandnearinfraredlightcondition.
DualChannel
Thefrontandrearviewofyourvehiclearerecordedin1080phighdefinition
quality;moreover,theimagecapturedata145ºviewangleatfrontand140ºin
therearforoptimalcoverageandclarity.
Integrated10HzGPSprocessor
Integratedthefastest10HzGPSprocessor,updatesGPSdata10timesper
second,recordingyourdrivingconditionsaccurately.Automaticallysynchronizes
thetime/datewiththeatomicclock.
AdvancedWDRTechnology‐StunningVideosinAnyLight
WDRtechnology,well‐balancedexposureforanycondition.Itmakesnightshots
brighter;preventoverexposureandtocreatetheclearestimage.
SpeedCameraAlert
Remindyouofapproachingfixedspeedcameralocationswellinadvancesoyou
canslowdownintime.Stayawayfromtrapsandalwaysstayincontrol.
*Thisfunctionisonlysupportedinsomespecificregions.
Parkingsurveillance
Ensureyourpeaceofmindbyrecordingcontinuallyevenwhenyouhaveparked
andleftyourcar.Recordandlockafileifunusualshockormovementis
detected.*DODDP4hardwiringkitrequired

3
Supportto128GBMicroSDXCMemoryCard
4Xstoragecompatibilitycomparedtopredecessormodel,supportsupto128GB
withmorethan18hoursofrecording.
DODGPSPlayer
TheDODGPSPlayergenerates1080pvideorecordingswithreal‐timedriving
dataclearlyataglance.
Wi‐FiConnectivity–ViewRemotelywithTheFreeAPP
Noneedtowaitanylongerwheneveryouwouldliketoreplaytheexciting
moments.Simplytransferorvisualizefilesfromthedashcam’smemoryright
fromyoursmartphone/tabletviatheDODAPP..
f/1.6LargeApertureGlassLens‐SuperLowLightPerformance
Equippedwithf/1.6largeaperture,capturingbetternightshotsthan
conventionalf/2.0,andrecordsclearlysophisticateddetailssuchasthelicense
plateandothers.
6GSharpGlassLens
6‐Elementsharplens,madeof6layersofglass,providesstunningclearand
non‐deformedimages.
G‐SensorAutomaticTriggerforFileProtection
Whenanimpact,emergencybrakeoccurredorthecartilted,thedevicewill
lockthecurrentvideofilesautomatically.Importantfileswillnotbeoverwritten
bylooprecording.

4
LoopRecording
Whenthestoragespaceisfull,itcanautomaticallyoverwritetheunprotected
files.
AdjustableCircularPolarizingFilter
Adjustablefilterreduceswindshieldglareandenhancessaturationatthesame
time.

5
Safety Precautions
Product
Donotdisassemble,repair,modifyyourcameraorpowerrelatedaccessories.Forwarranty
service,pleasecontactDODTechSupport.
Donotadjustcamerawhiledriving.
Avoidexposingyourcameratoextendedperiodsofhumidityand/orheat.
Prolongedexposuremayreducetheproduct’slifespan.
Donotspraywaterorcleaningagentsdirectlyontothecamera.
Fluidsmaycausefire,electricshocks,ormalfunctions.
Avoidinstallingcamerawhereitmayobstructthedriver’svieworairbagdeployment.
Car Power Adaptor
UseONLYthepoweradaptersuppliedwithyourunit.
Otherpoweradaptersmaycreateasafetyhazardordamagetheunit.
Donotusedamagedpoweradaptersorcords.Ifdamaged,pleasedisconnectthepoweradapter
andcontactDODTechSupportforassistance.
Donotpull,insert,orbendthepowercableusingexcessiveforce.
Donotoperateorhandlepowercablewithwethands.
Inspecifiedcars,thepowermaybeconstantlysuppliedtothedeviceeventheengineisturned
off.Thismayrunoutthevehiclebattery.TheoptionalDODDP4kitequippedwithlow‐voltage
protectiondesigntopreventbatterydrain.
Battery
Keepthedeviceawayfromheatersorotherhotobjects.
Storethecameraatlowertemperaturestoreducetherateofself‐dischargeandpreservesthe
initialenergystoredinthebattery.Thebatteryinthedeviceself‐dischargesoveraperiodoftime
naturallywhetherthebatteryisusedornot.
Chargethedashcamerafor5minutesifyouareunabletoturnonthecamera.

6
Others
TesttheMicroSDmemorycardregularlyasthememorycardisaconsumableitem,andneedsto
bereplacedperiodically.
Reformatthememorycardeverytwoweekstoprolongitslifetime.Youshouldonlydothis
AFTERyou’vedownloadanyfilesfromthecardthatyouwouldliketokeep,sinceformattingthe
memorycardwillclearallfiles.
DODdoesNOTresponsibleforanymalfunctionsoccurredfromtheuseofdisingenuous,
modified,orunauthorizedpartsandaccessories.
DODdoesNOTguaranteetherecordingofaccidentswhichmaycausethedevicemalfunction
andfaulty.
Theworkingtemperatureofthisproductis0~40°C.Pleaseensurethedeviceisstoredwithinthe
temperaturerange;orthedevicemaybedamagedbytheheatandworkincorrectly,whichwill
notbecoveredbywarranty.
DODisNOTresponsibleforthelossofanyrecordedvideoduringoperationduetounexpected
factorsorforcemajeurewhendriving.
ThevideorecordingsmadebythisDashcamareintendedforpersonaluseONLY.
7
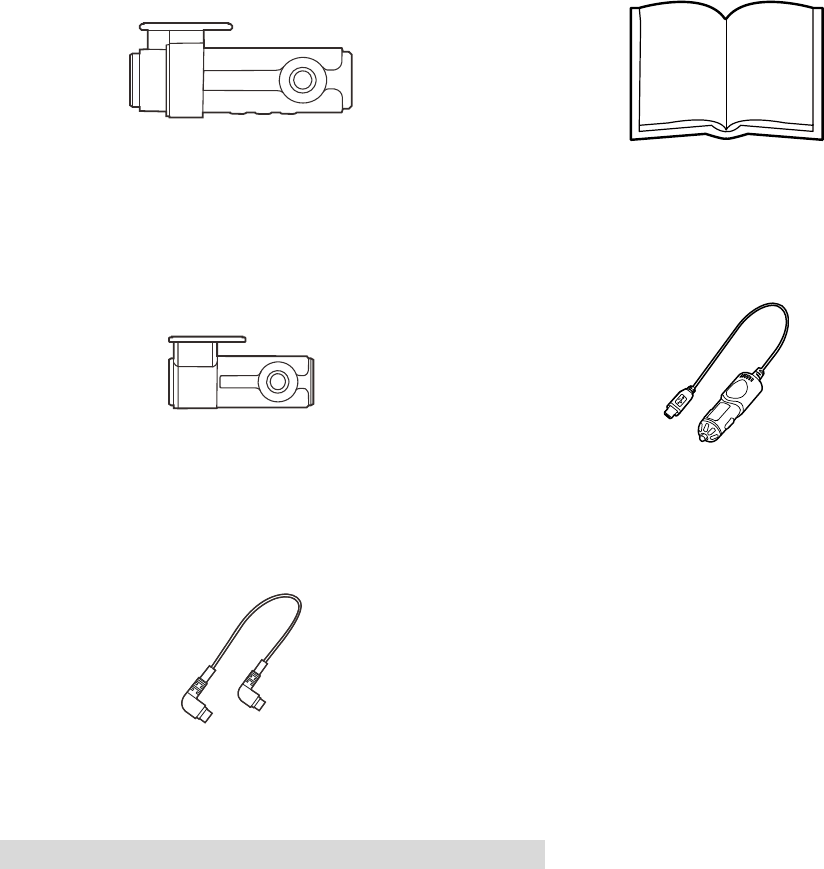
Package Contents
DashCam
UserGuide
RearDashCam
CarPowerAdaptor
RearCamConnectionCable
Note:Suppliedaccessoriesmayvarybyregionormodel.
8
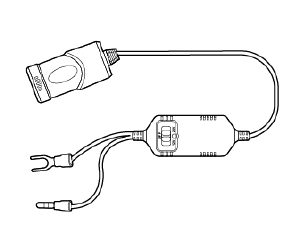
Optional Accessories
DP4
DP4hardwiringkitoffersconstant
sourceandpreventbatterydrainwith
low‐voltageprotection.
9
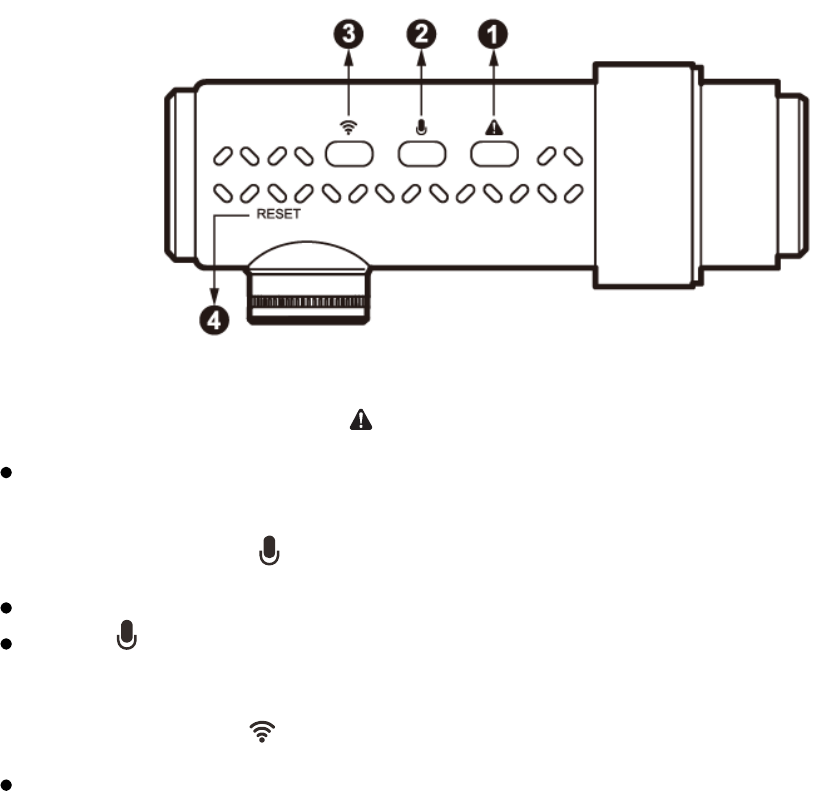
Camera Controls
●1SOS Emergency File Lock【】
While recording, press this button to lock current recording file from being over written.
●2MIC / Display OFF【】
During standby / recording mode:
Press 【】once to turn ON/OFF voice recording.
●3Wi-Fi Connection【】
To turn on Wi-Fi for smart device connection.
●4Reset Button
Reset to factory settings.
Press to force the device to reboot.
Use a small pin to press the button.
10
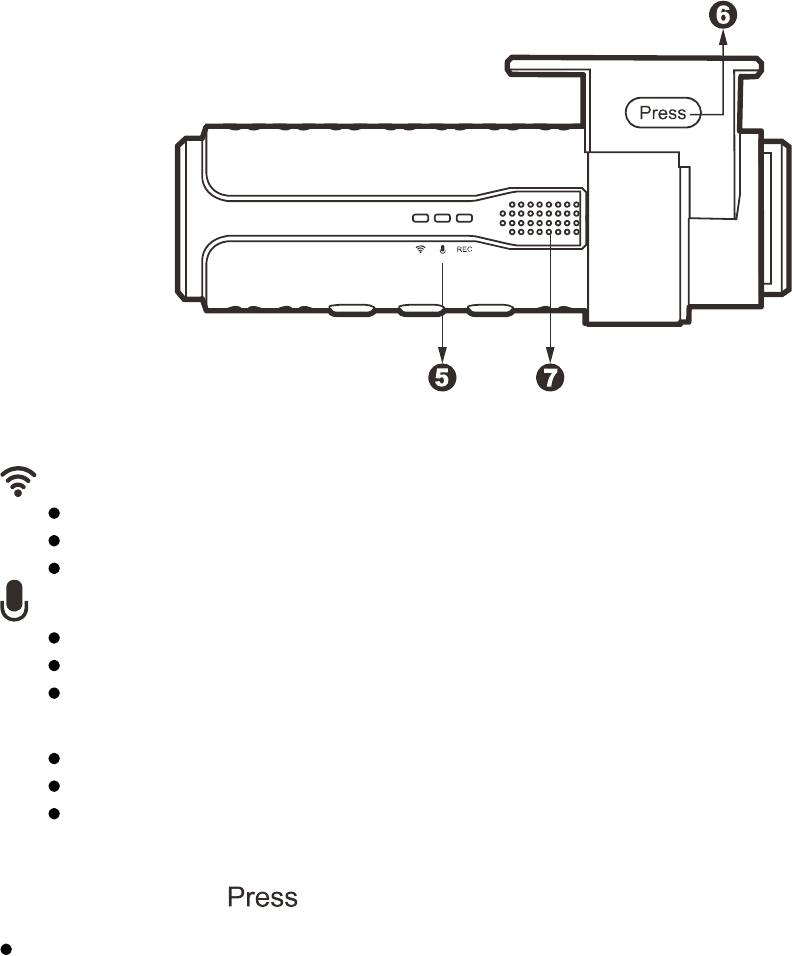
Camera Controls
●5Operation Status LED
OFF– Wi-Fi Disabled
ON – Wi-Fi Connected
Flashing – Connecting / Wi-Fi Stand by
OFF – Microphone mute (GPS signal confirmed)
ON – Microphone recording (GPS signal confirmed)
Flashing – GPS Locating
REC
OFF – Dash cam off / malfunction
ON – Stand by
Flashing – Recording
●6Holder Release【】
Press release lock mechanism for cam removal.
●7Speaker

11
Camera Controls
●8Micro USB Port【】
For use with the supplied Car Power Adaptor or USB data cable.
●9MicroSD Slot
Required a microSDHC/SDXC card, class10 or above. Supports up to 128GB.
●10 AV-IN Connection Port【】
Rear cam connection port.
12
Getting Started
Setting Up Your Camera
Set up your camera inside your vehicle to ensure easy access to power.
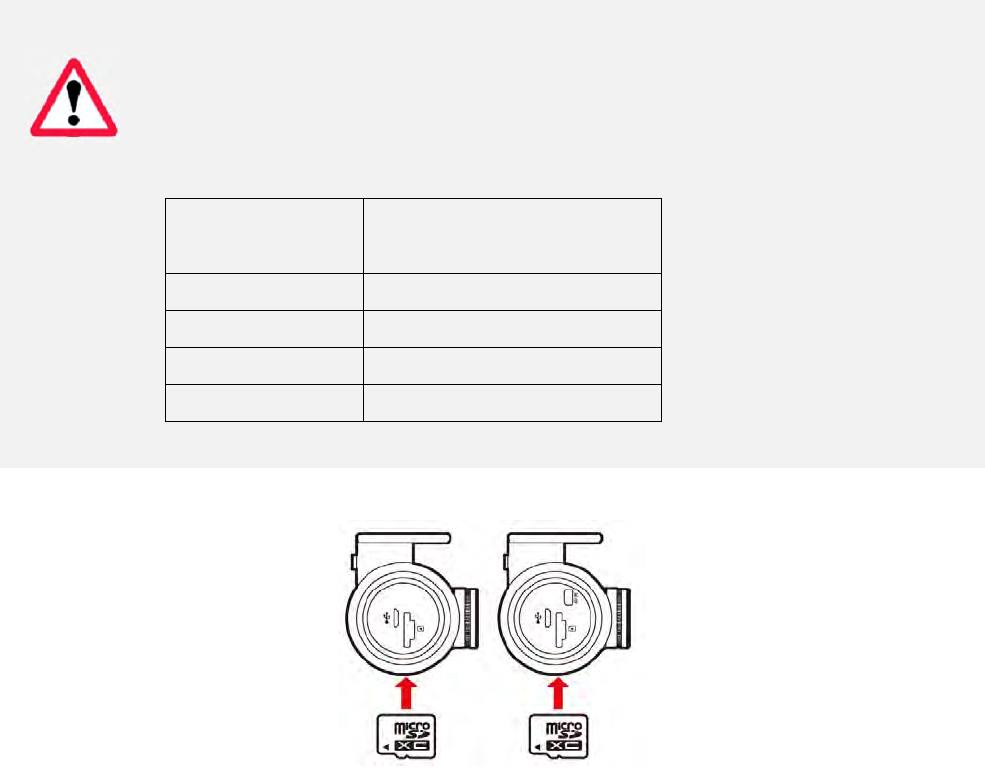
1. Start With or Without SD Card.
To use without SD card, please skip to step 2.
To use with SD card, please formattheMicroSD cardbeforeinitial use.
To save recorded videos stably, DOD Tech recommends formattingyourSD cardevery two
weeks.
Note: Requires the MicroSD card Class 10 or above, supports up to 128GB
Note: After formatting the SD card, all of your data will be lost. Be sure that you have backed
up the important files.
Video Recording Length
*Video recording length may vary depending on environmental conditions.
Storage/Quality 1080p Recording length
16GB 110minutes (1.8 hours)
32GB 200 minutes (3.2hours)
64GB 380 minutes (6.3 hours)
128GB 780 minutes (12.8 hours)
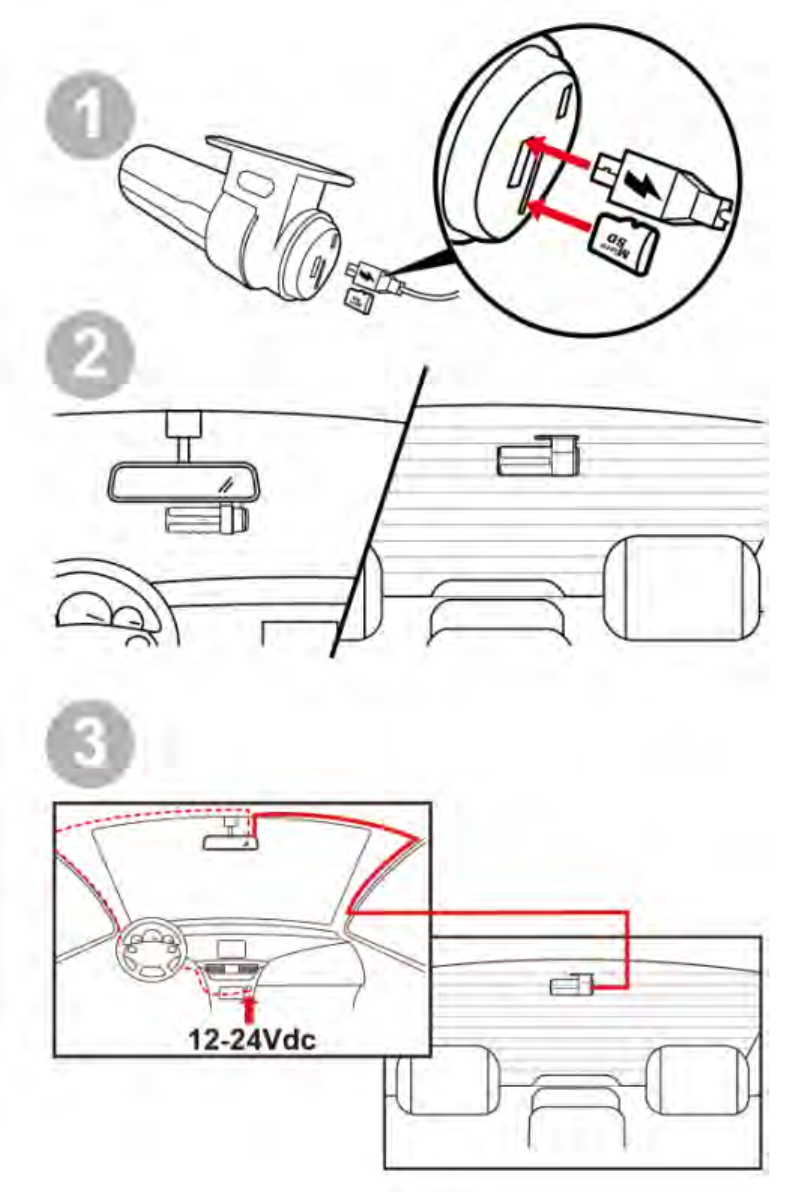
2. Connect the Power Adapter.
Plug the DOD power adapter into your vehicle’s power outlet.
Insert the USB plug into the USB port.
13
Getting Started
3. Turn on Your Vehicle.
Power from your vehicle through the outlet will automatically turn on your camera and when
power is turned off your camera will shut off automatically. The camera automatically begins
recording every time it is turned on and stops recording when it is turned off.
Note: In specified cars, the power may be constantly supplied to the device even the
engine is turned off. This may run out the vehicle battery. The optional DOD DP4 kit
equipped with low-voltage protection design to prevent battery drainage.
4. Turn on/off Your Camera.
The dashcam will turn on and off automatically with the power supply from your vehicle.
5. Connecting Wi-Fi to Your Smart Device.
Press the Wi-Fi connection button to activate.
Open DOD Dash Cam APP from your smart device.
Follow the instructions within the APPor see page.23.
6. Access to Settings
Upon powering upthe camera for the first time or after upgrading the firmware on the device,
you can access to the setting menu via DOD APP and change the settings to your personal
references rather than default.
Your camera will automatically sync with the time and date to the atomic clock once
thetime zone is correctly set.
Note: The time zone must be manually adjusted for daylight savings.
14
Installing Your Camera
15
Installing Your Camera
1. Clean Windshield
Wipe down both the interior and exterior glass for the best image quality.
Keep the mount secured to the windshield.
2. Attach the Mount to Your Camera
Keep the mount secured to the camera.
Please insert MicroSD card to the unit.
3. Camera Installation
Peel off the adhesive mount cover.
Find a location which does not obstruct your view when driving.
It is recommended to place the camera behind the rear view mirror without obstructing
either lenses or camera functions.
Press the mount firmly against the glass.
4. Install the Car Power Adaptor
If you have not done so previously, plug the car power adaptor into your vehicle's power
outlet.
Insert the micro USB plug into the port of the camera, and insert the power adapter into
the cigarette lighter socket of your car.
The wiring can be hidden in the headliner, seams and rubber strips around the perimeter
of the windshield.
5. Adjust the Angle
The camera is adjustable via twist motion, which can be loosen by press and hold the
release button on the mount.
Angle your camera slightly below the horizon line to minimize glare.
6. Remove the Lens Protector Film
Your camera is now installed and ready for daily use.
Note:
Always use the supplied car power adaptor to avoid the unexpected damage.
If grease, fingerprints, or blots are found on the external/internal windshield of the car,
please wipe it clean or install the unit on an unaffected area. Blots may worsen
therecordingqualityor may cause the bracket to be unstable.
Do not turn on Motion Detection unless your vehicle is parked. If Motion Detection is
enabled while driving, the camera may not continuously record.
DOD Tech recommends setting the G-Sensor to low.

16
Basic Camera Operation
Everyday Operation
Your dash camera will automatically turn on and start recording when it starts receiving
power. By default, the camera will record over the oldest videos when the memory card is
full (loop recording).
Continuously Powered Electrical Outlet
If your camera is continuously powered, the camera will not automatically shut down when
your vehicle is turned off. To turn off your dash cam while the vehicle remains running,
simply unplug the micro USB power cable.
The camera may be left on while parked to capture video while you are away.
“Continuously-Powered-Electrical-Outlet” operation will slowly drain your vehicle’s battery
and may eventually prevent your car from starting.
Video Directory
Videos will be saved in the memory card and or in internal storage, normal videos are in the
root directory and the protected files will be saved in the “RO” (Read Only) file.
File-naming format: 2016_0725_180946_002
Year/month/day, time, sequence of the video recorded at the same day.
“F” folder indicates videos from front camera, and “R” refers to videos recorded from rear
camera.
17
Mobile viewer \ DOD Dash Cam Application
TheDOD Dash CamApplicationis designed to be compatible with all DOD Tech products
equipped with Wi-Fi function. Control your camera, download recorded videos and photos,
and monitor real-time live view through your smartphone.
Download
Please download and install the DOD Dash Cam Application from Google Play or App
Store on your smartphone.
Note: DOD Dashcam Application requires Android 4.0 / iOS 7 (or newer).
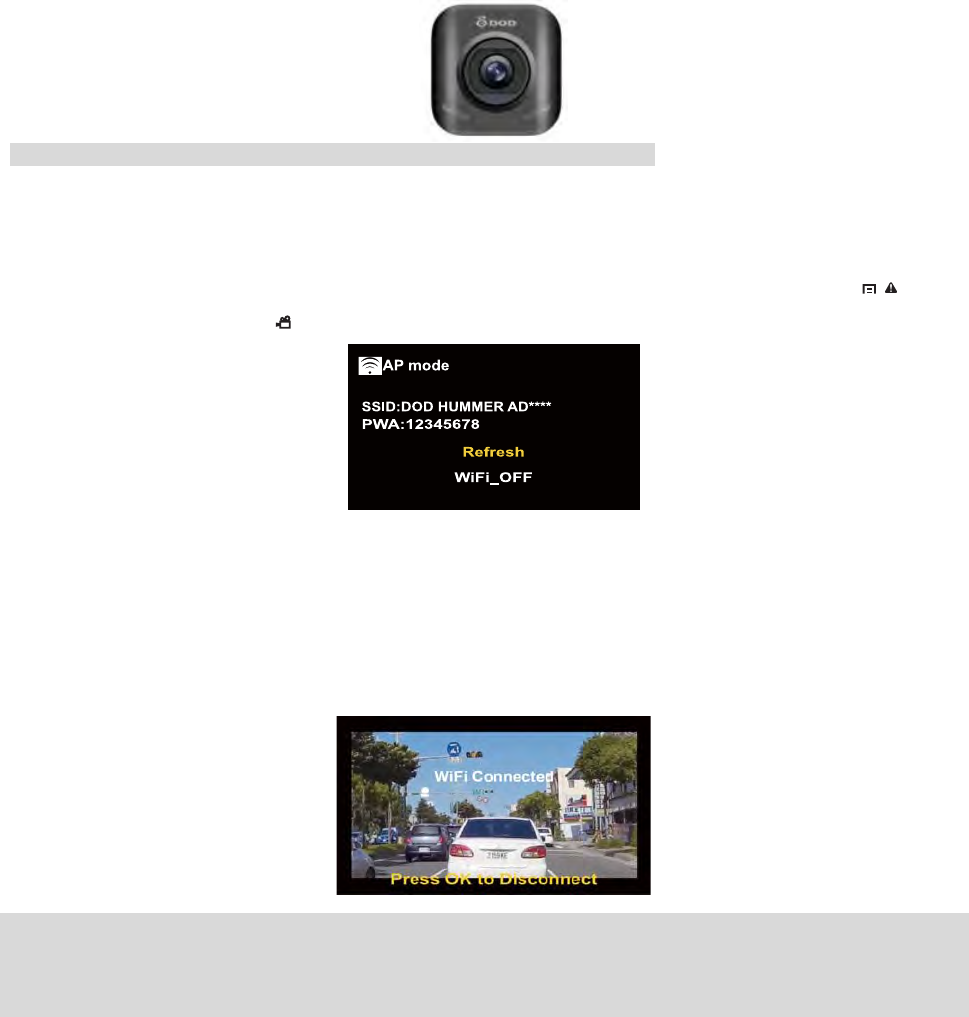
Connect Wi-Fi
1. Turn on the Wi-Fi connection to enable the camera to AP mode (Access Point Mode) by
pressing [▼]to turn on the Wi-Fi during Standby mode, or access it by pressing [ / ]twice,
select [Wi-Fi] and press [ /OK].
2. Follow APP User Guide to connect your smart device to Hummer. Or open the DOD
Dash Cam APP on your smartphone, then follow the instruction arrows on the bottom half
of the screen.
3. Your smartphone and camera are now connected.
Note:
The Wi-Fi password is only required once during set up.
Wi-Fi range between the camera and your smartphone is limited to approximately 10 meters (32
feet)
18
Mobile viewer \ DOD Dash Cam Application
Functions of DOD Dash Cam APP (iOS)
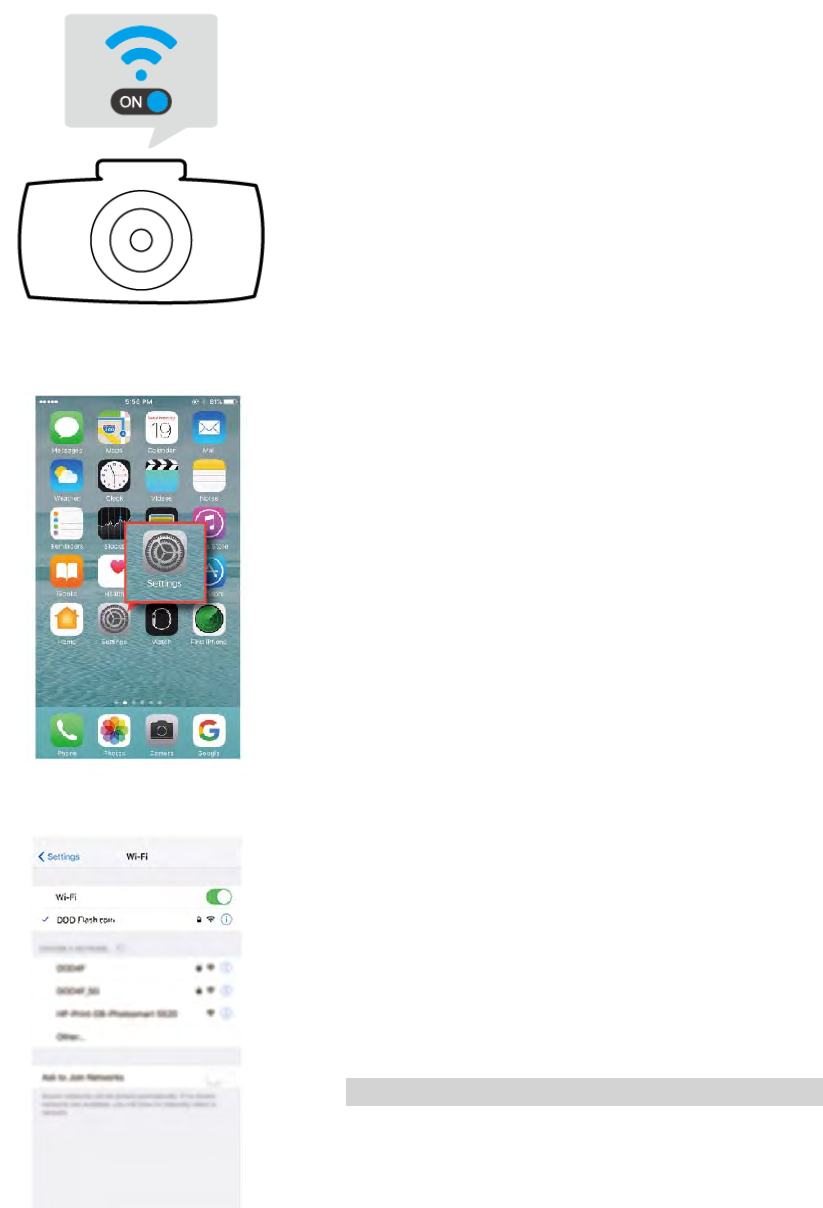
Please make sure:
1.Dash Cam is on
2.Wi-Fi function is enabled
For iOS Platform:
To connect the smart device, firstly access to
“Settings” on your iOS device
Select your DOD Dash Cam model and enter the
default password to connect.
*Password: 12345678
Note: Password can be changed in dash cam settings

19
Once completeWi-Fi connection, open DOD Dash
Cam APP
1
. Browse through theinstruction pages by touching
the left/right arrow or swipe across the screen.
2
. Touch the green “GO” icon to continue.
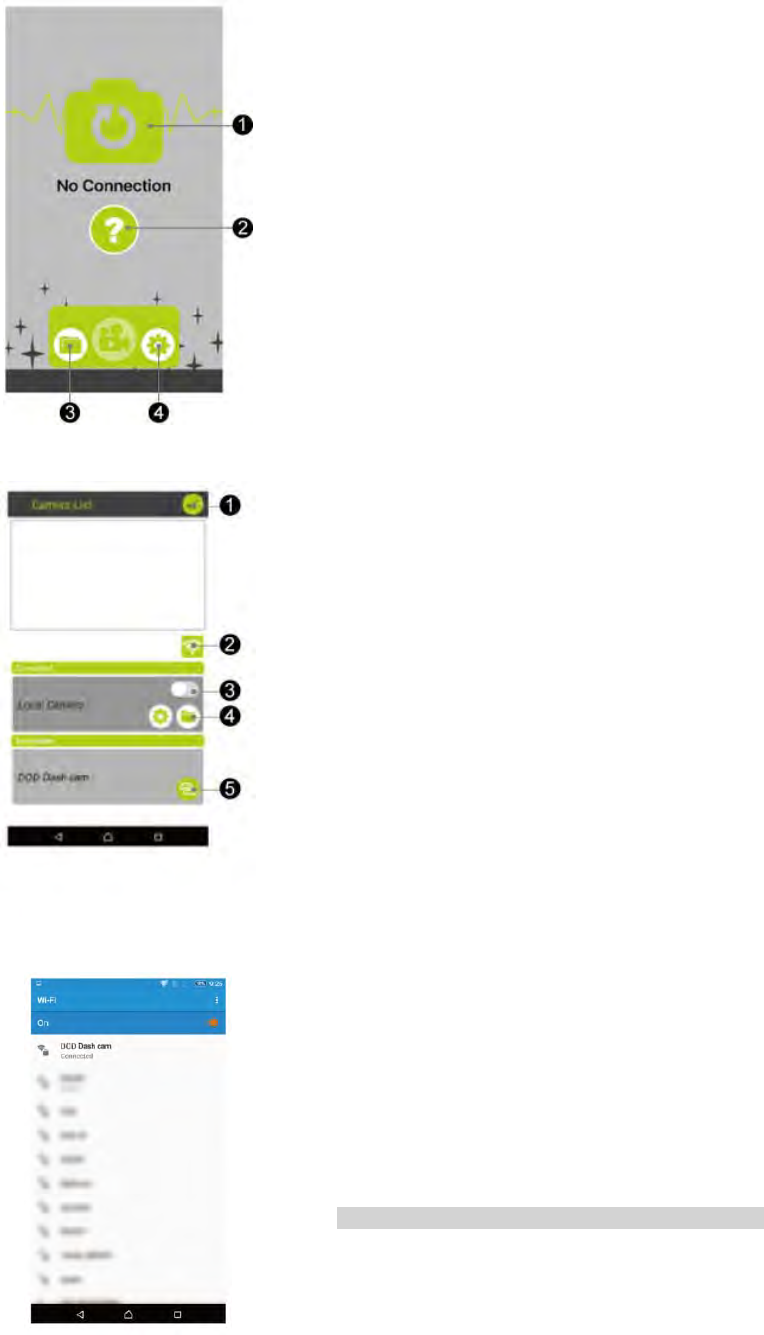
When no dash cam is connected, this page is shown.
●
1Toaccesstoconnectionpage.
●
2Toreviewconnectioninstruction.
●
3Accesstofilesdirectory(smartdevicestorage)
●
4Accesstosettingoptions.
20
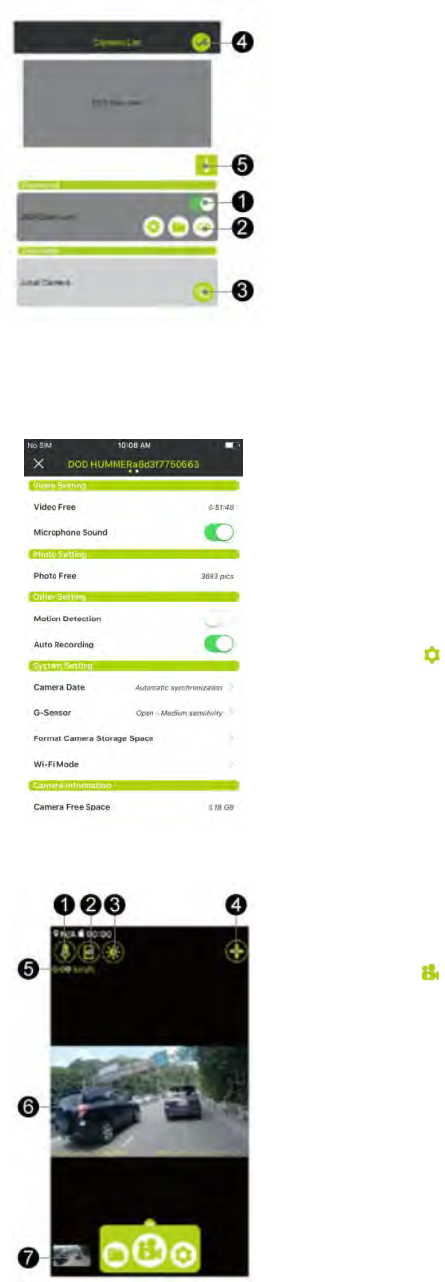
●
1Whendashcamisconnected,pleasemakesureto
switchonthenhitcheckmarktoconfirm.
●
2Breakcameraconnection.
●
3Connecttoswitchablecamera.
●
4Confirmandreturntopreviouspage.
●
5Viewconnectioninstruction.
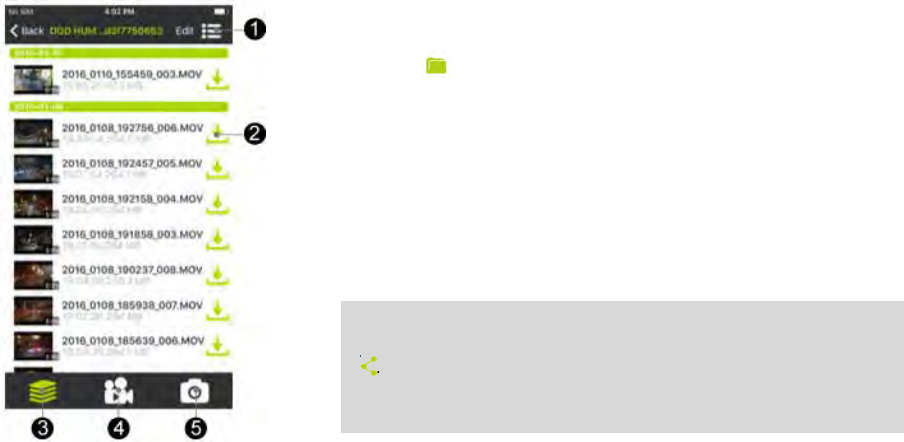
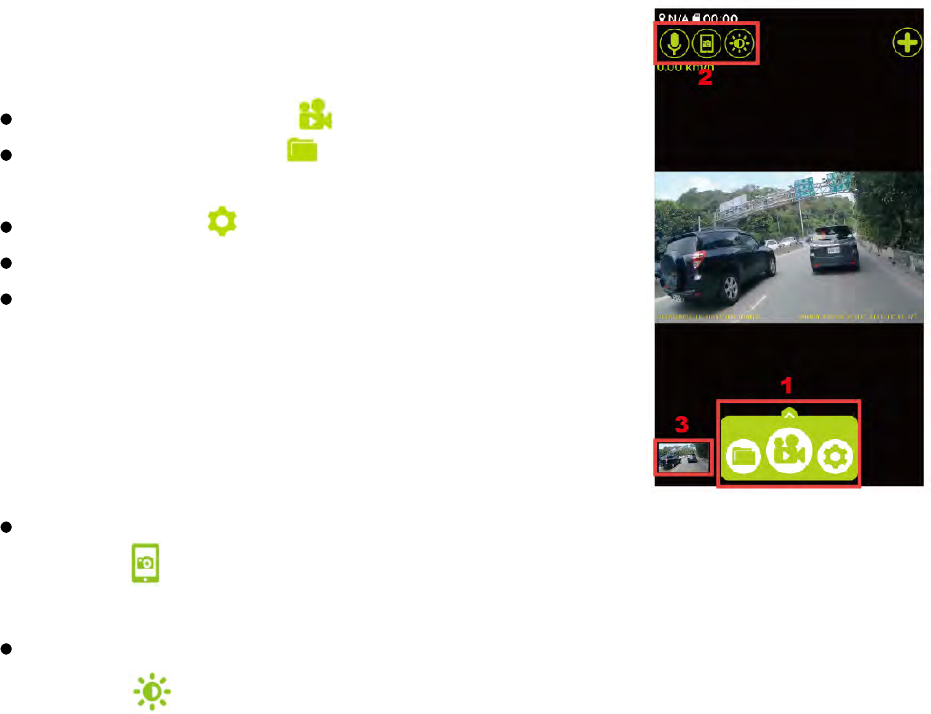
Settings
Press [ ] to enter the menu setting
Video Recording
Press [ ] to enable the real time recording.
●
1MicrophoneRecord/Mute
●
2SnapShot
●
3DimDisplay/Wakeup
●
4DashCamConnectionControlPanel
●
5SpeedIndicator
●
6Real‐TimeStreamingfromDashCam
●
7ThumbnailofLastVideoFile/Snapshot

21
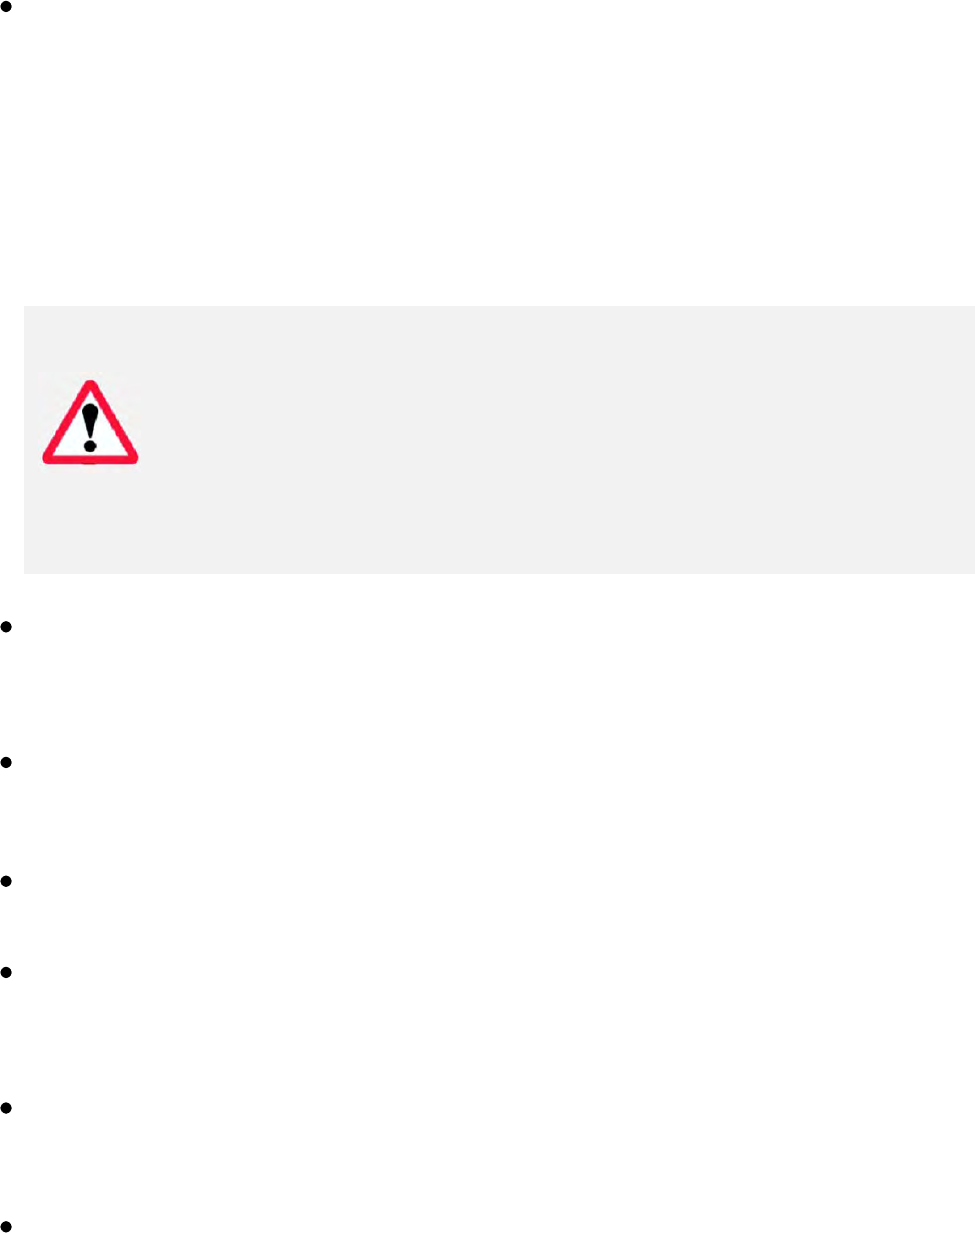
Playback and Download
Press [ ] to enter the files of recorded videos and
photos.
●1FileViewMode
●
2DownloadFiletoYourSmartDevice*
●
3AllFiles
●
4DisplayVideoFilesOnly
●
5DisplayPhotoFilesOnly
*NOTE:Afterdownloadedtolocalstorageonyoursmartdevice,
[]willappear,indicatingthefilecanbeshareviavarioussocial
networksuchasfacebook,instagram,etc.
22
Mobile viewer \ DOD Dash Cam Application
Functions of DOD Dash Cam APP (Android)
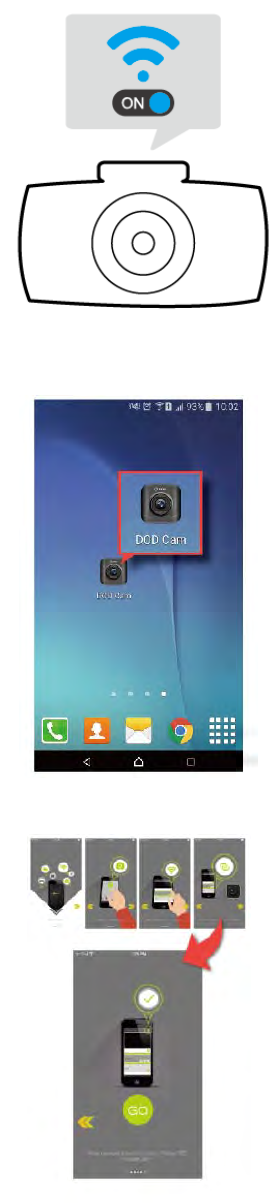
Please make sure:
1.Dash Cam is on
2.Wi-Fi function is enabled
For Android Platform:
Open DOD Dash Cam APP
1.Browsethroughtheinstructionpagesbytouchingthe
left/rightarrow.
2.Touchthegreen“GO”icontocontinue.
23
Whennodashcamisconnected,thispageisshown.
●
1Toaccesstoconnectionpage.
●
2Toreviewconnectioninstruction.
●
3Accesstofilesdirectory(smartdevicestorage)
●
4Accesstosettingoptions.
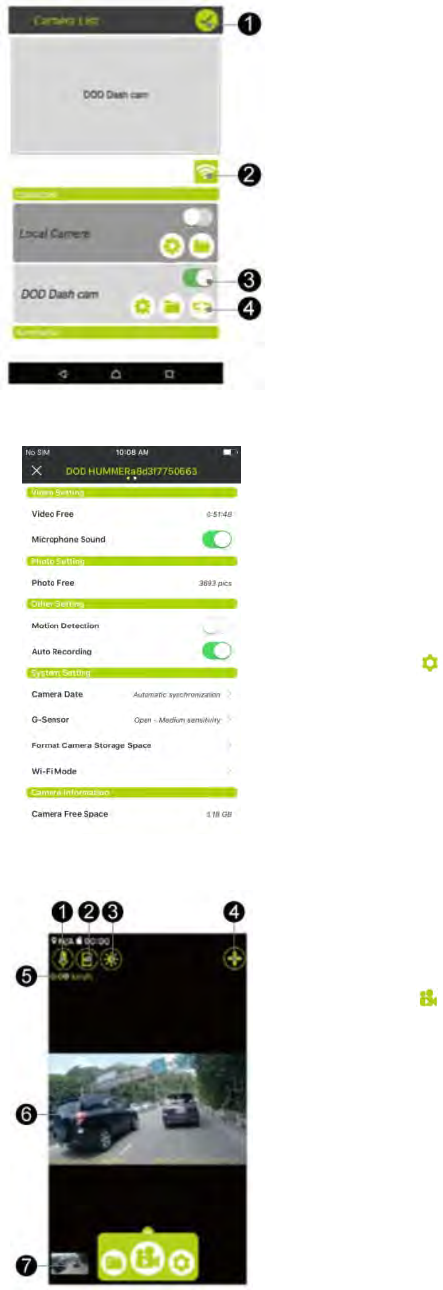
●
1Confirm.
●
2QuickaccesstoWi‐Fisettingsonyoursmartdevice.
●
3Cameraswitch.
●
4Cameraquicksettings.
Filesdirectory.
●
5LinktoswitchableDODdashcams.
Select your DOD dash cam model and enter the
default password to connect.
*Password:12345678
Note:Passwordcanbechangedindashcamsettings
24
●
1Confirmconnectionandreturntopreviouspage.
●
2QuickaccesstoWi‐Fisettingsonyoursmartdevice.
●
3Cameraswitch.
●
4Cameraquicksettings.
Filesdirectory.
●
5Disconnectfromcurrentcamera.
Settings
Press [ ] to enter the menu setting
Video Recording
Press [ ] to enable the real time recording.
●
1MicrophoneRecord/Mute
●
2SnapShot
●
3DimDisplay/Wakeup
●
4DashCamConnectionControlPanel
●
5SpeedIndicator
●
6Real‐TimeStreamingfromDashCam
●
7ThumbnailofLastVideoFile/Snapshot
25
Playback and Download
Press [ ] to enter the files of recorded videos and
photos.
●1FileViewMode
●
2DownloadFiletoYourSmartDevice*
●
3AllFiles
●
4DisplayVideoFilesOnly
●
5DisplayPhotoFilesOnly
*NOTE:Afterdownloadedtolocalstorageonyoursmartdevice,
[]willappear,indicatingthefilecanbeshareviavarioussocial
networksuchasfacebook,instagram,etc.

26
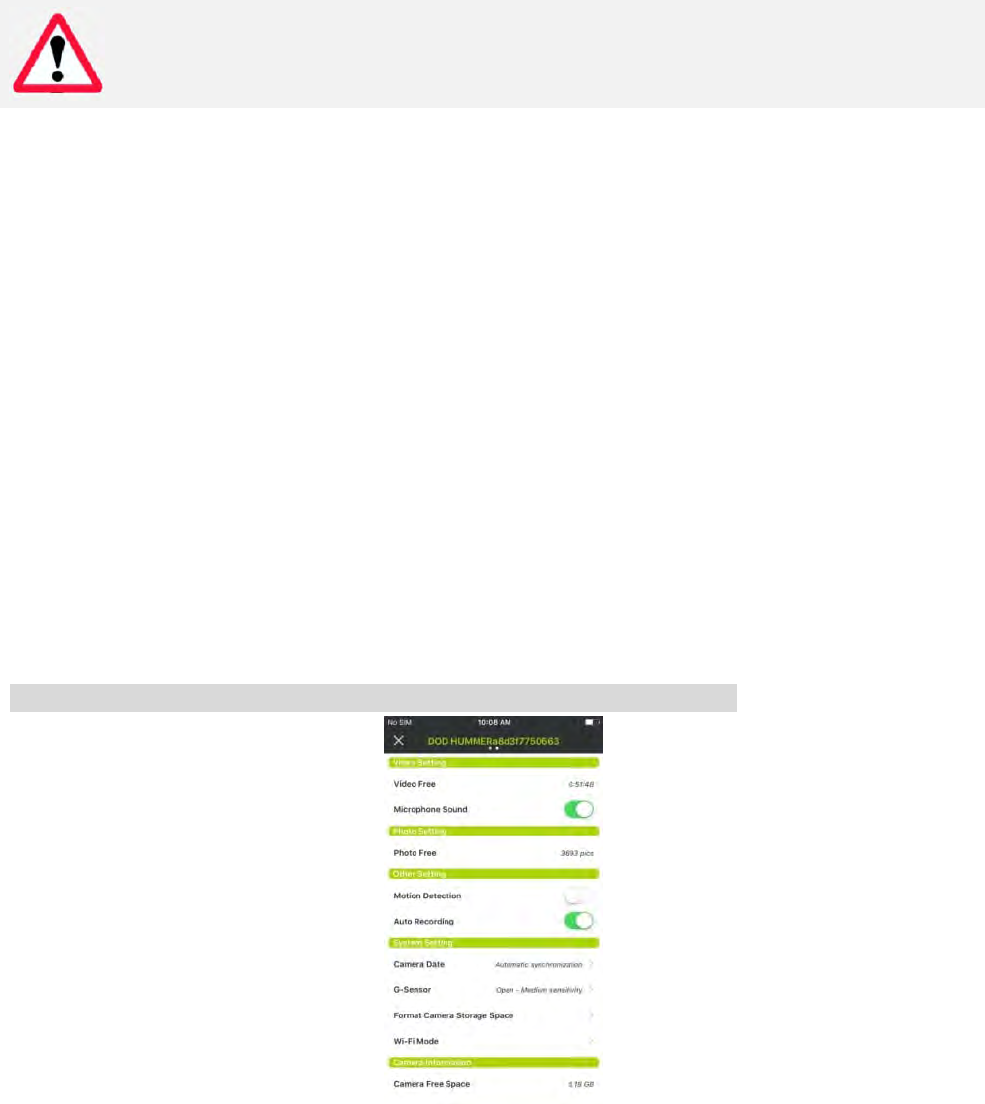
Camera Settings
All settings are via DOD Dash Cam APP; all changes made will be automatically saved. For
details of each function please see the description below.
Resolution
Changes the video resolution. Lower the resolution for smaller file sizes but this reduces
video quality.
Recommended setting: 1080p FHD.
Loop Recording
Can be set to 2, 3 or 5 minutes. Video recordings of the selected length will be recorded
onto the memory card. When the memory card is full, the oldest files will be overwritten,
excluding locked clips. Turing off loop recording will prevent the camera from writing new
files when the memory card is filled.
Exposure Value
Sets the brightness /darkness of the video.
Video too bright?Set between -1 to -3.
Video too dark? +1 to +3.
Recommended setting: 0
Record Audio
Switches the microphone on/off.
Can be used during recording by pressing button【】.
Date Stamp
Imprints the time and date on the recorded video.
G -Sensor
Measures shock forces. The settings from “low to high” determine the amount of force
needed to lock the file from being overwritten. Once the function is triggered, the current
recording video will be locked and the file will be saved in the “RO” directory.
Recommended setting: low.
Image Rotation
Rotates the recorded image 180ºwhendash cam is mounted on the dashboard instead of
windshield.
27
Parking Surveillance (Default: Off)
When function is enabled, dashboard camera will automatically switch to Parking
Surveillance if vehicle is stationary for over 10 minutes.
1. Automatically records video when motion detected within view range of camera.
2. Automatically records and locks video when excessive force of impact is detected by
G-sensor.
3. Unit will return to normal recording mode if vehicle moves continuously for 3 seconds or
longer.
Note:
Parking Surveillance requires consistent power supply via vehicle battery. (It is
recommended to use optional DOD DP4 kit equipped with low-voltage protection design to
prevent battery drainage.
Please ensure to enable G-sensor function in setting menu before switch to Parking
Surveillance. (G-sensor sensitivity Default: Medium)
Parking Surveillance will automatically shut down GPS locating, and will resume when
switched to normal recordingmode.
ISO Stamp
On/Off
Default: On.
Set Time Zone
Sets the current time zone for GPS time and date calibration. The time zone must be
manually adjusted for daylight savings
Speed Units
Select metric or imperial units.
GPS Logging
On/Off.
Default: On.
Time-Lapse
The time-lapse function is used to create a sped-up video. When set, the camera will record
one frame every 200ms (milliseconds)/500ms/1 second/5 seconds.
Plate Stamp
Imprints a customized set of 8 digits to the recorded video. Add license plates or other
identifying features to watermark your video.

28
Password Settings
Set a password lock which will prevent files from being deleted or the settings changed on
the device.
Note: This does not prevent other users from extracting the memory card or changing the files.
Speed Camera Warning
A beeping sound and on-screen icon to remind you of approaching fixed speed camera
locations.First warning at 400 meters (1/4 mile) and final warning at 200 meters (1/8 mile).
*This function is only supported in some specific regions.
Flicker Reduction
Adjusts the camera's frequency setting to minimize flickering and banding in the recorded
video.
Format Memory Card
Completely deletes all files including locked footage from the SD card and optimizes the
card for recording.
Factory Reset
Sets all settings back to the original settings.
Firmware Version
Shows the model name and current firmware version.
29
Camera Modes
When the camera is connected to your smart device, please refer to the following diagram.
1. Main Control
The camera defaults to video recording when the camera is
first turned on.
Recording Mode: Press【】to start/stop recording.
File Directory: Press【】to access recorded files
directory.
Settings: Press【】to access camera setting page.
Recording Mode.
Photo Mode.
2.Quick Functions
You can access to three different functions; details as
follow:
Snap Shot
Press【】totake a snap shot of current camera view.
Screen Brightness.
Press【】to dim the display of your smart device or press it again to resume.
3. Thumbnail
This shows the last photo or video file your camera took.
Press to access to this particular file without finding it from file directory.

30
Playback on PC \ DOD Video Player
Before using the DOD video player, please transfer all the video files to your electronic
device for viewing and storage.
USB Cable
1. Connect a USB cable from the camera’s USB port to computer.
2. Turn on your camera. A black screen should appear showing “Mass Storage”.
3. Press the “Record/Select” button. A blue screen should appear labeled“Mass Storage”.
4. Your computer should now detect a new device. The memory card and videos can be
accessed similar to a USB flash drive.
Card Reader/Micro SD Slot
Use a memory card reader (separately purchased) or a compatible electronic device with a
Micro SD slot (ex: tablet).
The DOD Video Player is a user-friendly program to playback videos and to visualize your
position and speed on your PC or Mac.
Installing the DOD Video Player
Insert and launch the installer from the CD included or download the software from the
support section on DOD Tech’s website.
Launching the DOD Video Player
Once launched, the player will appear on your screen.
Suggested System Requirements:
Windows XP or higher (i3 or better, with at least 2GB Ram)
Mac OSX 10.6.4 or higher
The DOD Video Player is a user-friendly program to playback videos and to visualize your
position and speed on your PC or Mac. Please see the “Transferring Files” section to find
out how to view or transfer your video files.
Installing the DOD Video Player
Insert and launch the installer from the CD included or download the software from the
support section on DOD Tech’s website.
31
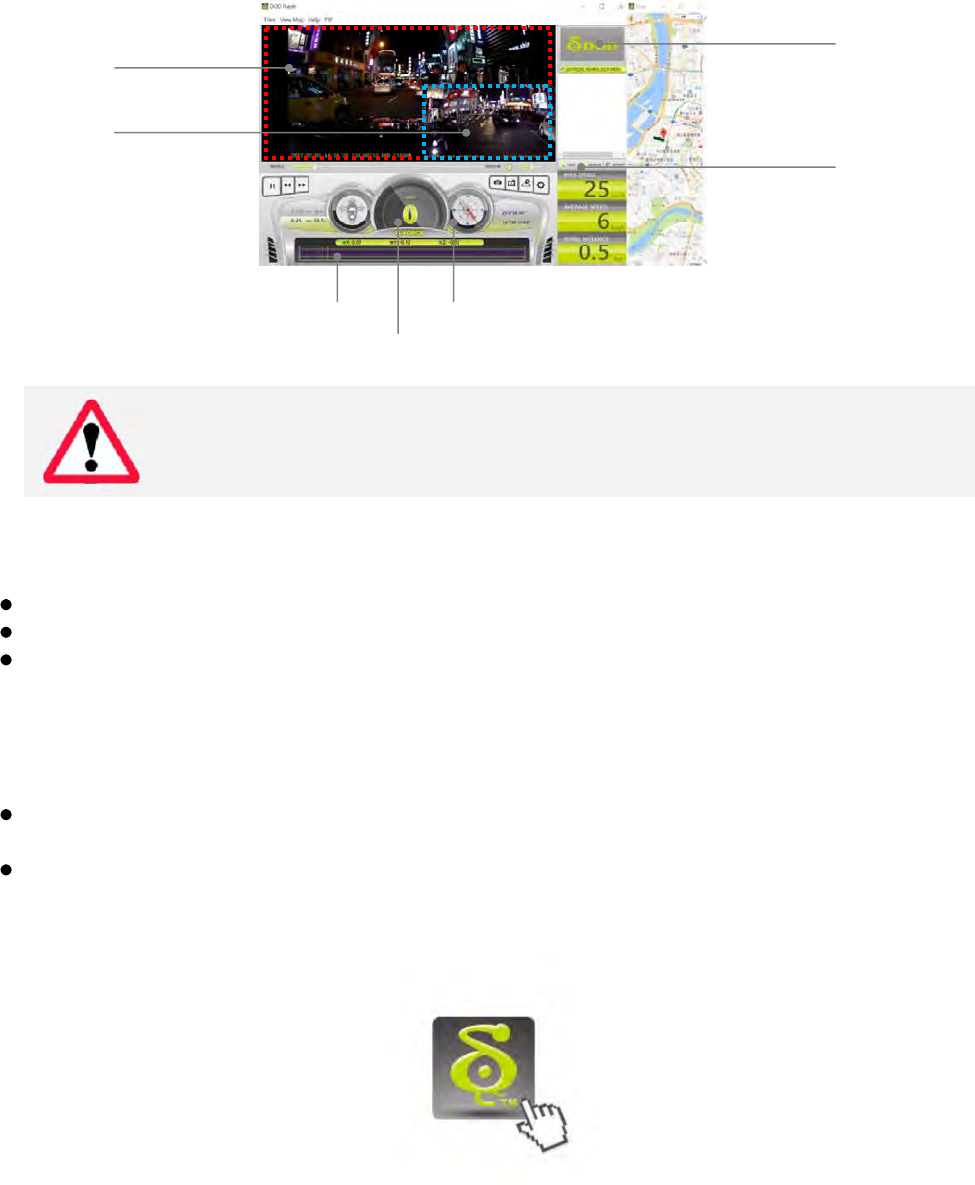
Launching the DOD Video Player
Once launched, the player will appear on your screen.
Make sure to turn on PIP function from top menu before playback for dual cam models.
Click on Main or sub display to switch.
Double click on display to enter full screen display.
To Play a Video
Add your file to the list of videos. To do this, there are two options:
Click “File”, click “Open”, and navigate to the location of your files.
Press the “ADD” button located below the list of videos.
Drag and drop the desired file into the DOD Player window, the video file will automatically
start.
Double click on the video you wish to play. The video will then load into the Player.
Video Player Features
Once the video is playing, your position, speed and G-Force will be displayed at the
bottom of the player window.
Pressing the “Location Map” button will show your position on Google Map.
Click the Player icon below to view instruction video
Learn more about DOD GPS PLAYER V2.0
MainVideoDisplay
(Clicktoswitch)
S
p
eed
DirectionofTravel
Preview
G‐ForceGraph
Add/Remove,
orExport
PIPDisplay
(Clicktoswitch)
32
Transferring Files
Video files can be transferred to your electronic device for viewing and storage.
USB Cable
1. Connect a USB cable from the camera’s USB port to computer.
2. Turn on your camera. A black screen should appear showing “Mass Storage”.
3. Press the【REC】button. A blue screen should appear labeled “Mass Storage”.
4. Your computer should now detect a new device. The memory card and videos can be
accessed similar to a USB flash drive.
Card Reader/MicroSD Slot
Use a memory card reader (purchase separately) or a compatible electronic device with a
MicroSD slot (ex: tablet). Follow the manufacturer’sinstructions.
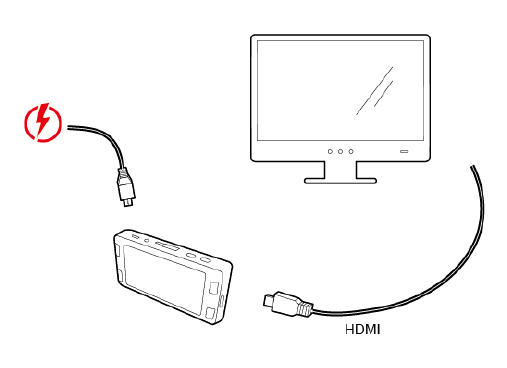
Video Output
Choose one of the methodsbelow to install the output connection.
HDMI (TV)
Connecting a mini-HDMI to HDMI from your camera to a compatible television/monitor will
automatically output the camera’s screen. Recording functions are disabled while
streaming video.
Firmware Update
See the support section on DOD Tech’s website for any available firmware updates and
instructions.

33
RC400S Specifications
VideoResolution1920x1080@60fps
SensorSONYSTARVISCMOSsensor
Wide‐AngleLens145°
Aperturef/1.6
ISOSensitivityuptoISO12800
DisplayN/A
VideoFormatH.264MOV
RecordingMediamicroSDHC/SDXCCard(Upto128GB)
AudioMicandSpeaker(Mono)Equipped
BatterySupercapacitor
PowerInput5V1.5A
Size112.6(L)x61.5(W)x33.4(H)mm
Weight120g
OperatingTemperature0°C~40°C
RC500S Specifications
VideoResolutionF:1920x1080@30fps
R:1920x1080@30fps
SensorSONYSTARVISCMOSsensor
Wide‐AngleLensF:145°
R:140°
Aperturef/1.6
ISOSensitivityuptoISO12800
DisplayN/A
VideoFormatH.264MOV
RecordingMediamicroSDHC/SDXCCard(Upto128GB)
AudioMicandSpeaker(Mono)Equipped
BatterySupercapacitor
PowerInput5V1.5A
SizeF:112.6(L)x61.5(W)x33.4(H)mm
R:75.2(L)x26(W)x38.8(H)mm
WeightF:120g
R:41g
OperatingTemperature0°C~40°C
AllSpecificationsAreSubjecttoChangeWithoutNotice.
34
Notice:Thechangesormodificationsnotexpresslyapprovedbythepartyresponsible
forcompliancecouldvoidtheuser’sauthoritytooperatetheequipment.
FCCRadiationExposureStatement:
ThisequipmentcomplieswithFCCradiationexposurelimitssetforthforanuncontrolled
environment.Thisequipmentshouldbeinstalledandoperatedwithminimumdistance20cm
betweentheradiator&yourbody.
FederalCommunicationCommissionInterferenceStatement
ThisequipmenthasbeentestedandfoundtocomplywiththelimitsforaClassBdigitaldevice,pursuanttoPart15of
theFCCRules.Theselimitsaredesignedtoprovidereasonableprotectionagainstharmfulinterferenceinaresidential
installation.Thisequipmentgenerates,usesandcanradiateradiofrequencyenergyand,ifnotinstalledandusedin
accordancewiththeinstructions,maycauseharmfulinterferencetoradiocommunications.However,thereisno
guaranteethatinterferencewillnotoccurinaparticularinstallation.Ifthisequipmentdoescauseharmful
interferencetoradioortelevisionreception,whichcanbedeterminedbyturningtheequipmentoffandon,theuseris
encouragedtotrytocorrecttheinterferencebyoneofthefollowingmeasures:
● Reorientorrelocatethereceivingantenna.
● Increasetheseparationbetweentheequipmentandreceiver.
● Connecttheequipmentintoanoutletonacircuitdifferentfromthattowhichthereceiverisconnected.
● Consultthedealeroranexperiencedradio/TVtechnicianforhelp.
ThisdevicecomplieswithPart15oftheFCCRules.Operationissubjecttothefollowingtwoconditions:(1)Thisdevice
maynotcauseharmfulinterference,and(2)thisdevicemustacceptanyinterferencereceived,includinginterference
thatmaycauseundesiredoperation.
ForproductavailableintheUSA/Canadamarket,onlychannel1~11canbeoperated.Selectionofotherchannelsis
notpossible.
ThisdevicecomplieswithPart15oftheFCCRules.Operationissubjecttothefollowingtwo
conditions:(1)thisdevicemaynotcauseharmfulinterference,and(2)thisdevicemustacceptany
interferencereceived,includinginterferencethatmaycauseundesiredoperation.

35
Copyright ©2017 DOD Tech
All Rights Reserved
Under the copyright laws, this manual may not be copied,
in any way, shape, or form, without the written consent of DOD Tech.