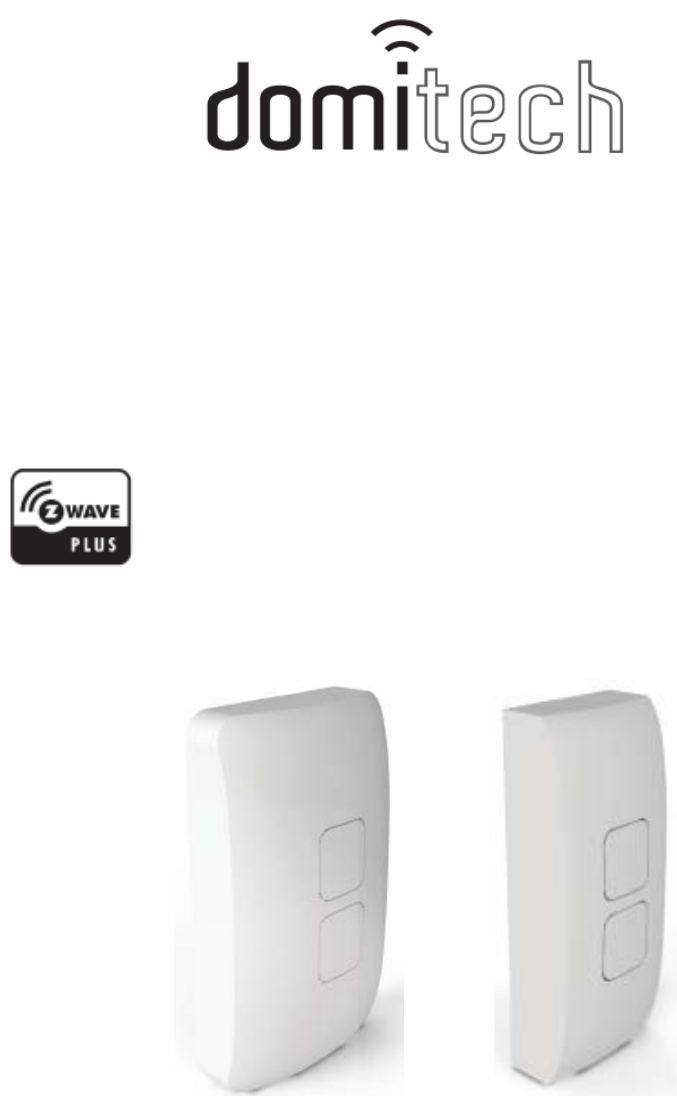
DOMITECH ZSC Z-Wave Wall Switch User Manual Switch Cover Manual 20150814
DOMITECH PRODUCTS, LLC Z-Wave Wall Switch Switch Cover Manual 20150814
DOMITECH >
User manual

ModelZSC
WirelessControlDevice
Z‐waveSwitchCoverZSC
ThisproductspeakswithotherZ‐Wavecertifieddevices
INTRODUCTION
domitechSwitchCoverZSCisamemberoftheZ‐Wave®familyandcommunicateswith
otherZ‐Wave®certifieddevicesinacontrolnetwork.ZSCisdesignedtofitovertheexisting
wallswitchinthehome,ensurethatthesmartLEDbulbstaysonlineallthetime,andallow
youtocontrolthelightsmanually.TheZSCcancontroltheZ‐waveSmartLEDBulbaswellas
otherZ‐Wavelightcontroldevices.DifferenttypesandbrandsofZ‐Wavedevicescanbe
associatedwithdomitechZSCinyoursystemandtheywillworktogethertooptimizeand
enhancethecomfortandconvenienceofyourautomatedhomelighting.
FEATURES
• Built‐inZ‐Waveradio‐cancontrolZ‐WaveLightBulbandswitches/dimmersremotely
andwirelessly
• Plugandplay,simplesetup.Fitsoveranexistingwallswitch.
• Manuallyturnon,off,dimyourlightswhilekeepingthesmartlightbulbalways
onlineinyourhomenetwork
• NoneedtohireanelectriciantoinstallanewIn‐Wallswitch
• WorkswithdifferenttypesandbrandsofZ‐WaveLEDLightcontroldevices
• Over‐The‐Airfirmwareupgradeavailablewithcompatiblegateway,Z‐Wave®static
controller,PCandsoftware
• PoweredbyZ‐Wave®500Seriesmoduleinside
• Manualresetcapability
• Poweredby2piecesofstandardCR2032LithiumCoinCellwithlongbatterylife
!WARNING!
RISKOFFIRE,ELECTRICALSHOCK&BURNS
NOTFOREMERGENCYLIGHTING
DONOTUSEWITHMEDICALANDLIFESUPPORTINSTRUMENT
Nouserserviceablepartsareinthismodule
1.INSTALLATION
TheZSCcanbeinstalledwithoutanyscrewsbyusingtheincludeddoublesidedtape.In
somecases,mountingscrewscanbeusedtosecuretheZSCoveranexistingwallswitch.
MakesuretoinsertthetwoCR2032lithiumcoincellbatteryintothebatterycompartment
intheZSCmainunit.
Oncethebatteriesareinstalled,selecttheproperfaceplatetobeusedforZSC.Usethe
widerincludedfaceplatetocoverasinglegangwallswitch.Usethenarrowerfaceplate
whenusedonamulti‐gangwallswitch.Snap‐inthefaceplateontheZSCsothatthetwo
buttonsareflushwiththesurfaceofthefaceplate.
Installationwithdoublesidedtape
YoucaninstalltheZSCbytheincludeddoublesidedtapesasfollows.

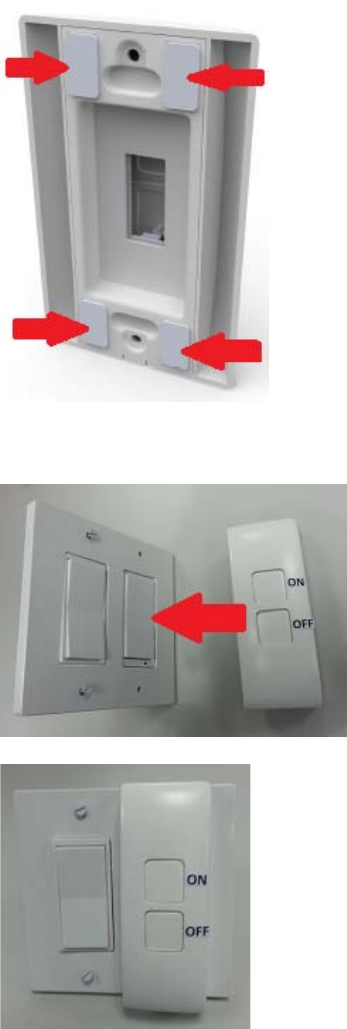
Step1,placethedoublesidedtapesinthe4cornersonthebacksideofZSCmainunitas
shown.
Step2,sticktheZSContopofyourexistingwallplate.PositiontheZSCproperlyoverthe
switch(thebatterycompartmentshouldbeonthebottomsideandexistingwallswitch
shouldbeinONposition).Makesurethesurfaceiscleananddrybeforesecuring.
Step3,securetheZSCtightlybypressingfirmlyontheexistingwallplate
Installationbymountingscrews
Ifyourexistinglightswitchisadecorativetypeortoggleswitchwithscrewholesthatlineup
withZSC,youmaysecureZSCusingscrews.

(A)Installonasinglegangswitch
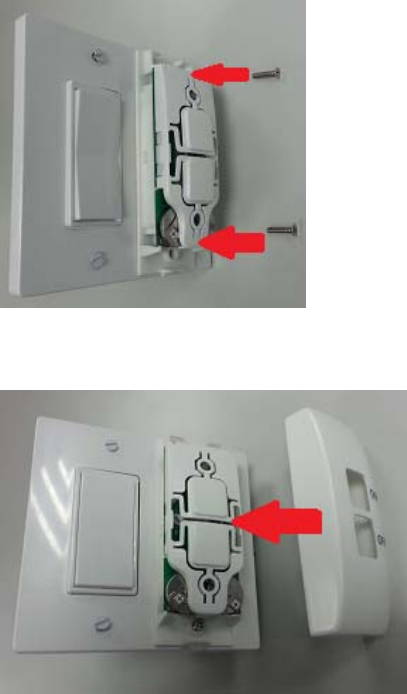
Step1,removethemountingscrewsontheexistingwallplate
Step2,removetheexistingwallplatefromtheIn‐wallSwitch.
Step3,placethebottomcaseofZSCtotheIn‐wallswitch.Makesuretheexistingswitchis
inONposition.
Step4,tightenthemountingscrewsandsecurethebottomcaseofZSC

Step5,placethewiderfaceplateontheZSCmainunit.
(B)Installonamulti‐gangswitch
Step1,removethemountingscrewsontheexistingwallplatethatyouwishtocover(do
NOTremovethescrewsonotherswitchnorthewallplate).
Step2,placethebottomcaseofZSCmainunitontopoftheexistingfaceplate.Makesure
theexistingswitchisinONposition.
Step3,SecuretheZSCmainunittotheexistingwallplateusingtheincludedlonger
mountingscrews.

Step4,Snap‐inthenarrowerfaceplateontheZSC.Makesurethetwobuttonsareflush
withthesurfaceofthefaceplate.
2.INCLUSION
Step1,placeyournetworkcontrollerintoInclusionmodebyfollowingthecontroller
manufacturer’sinstructions.
Step2,pressanybuttonontheZSC.
Step3,agreenLEDwillflashtwicetoindicatethatZSCInclusionissuccessful.
NOTE:
Iftheinclusionwasafail,aredLEDwillflashonZSC.Repeattheprocedure.
Beforerepeatingtheabovesteps,trymovingtheZSCinthesameroomasyourhome
gatewayincasethepreferredswitchlocationisoutofrangeinitially.Repeatstep1‐3until
theZSCisaddedtoyournetwork.OncetheZSChasbeensuccessfullyaddedtoyourhome
network,youcanmoveittothepreferredlocationinthehome.
Note:IfInclusionstillfailsafterthe2ndattempt,youneedtofirstmanuallyRESETtheZSC
beforerepeatingtheabovesteps.
ManualReset–PresstheTopbutton3timesandthenBottombutton3timesveryquicklywithin2
seconds.LEDwillflash7timesifRESETissuccessful.RepeatprocedureuntilyouseetheLEDflash
7times.
3.ActivationofCentralScene
Z‐waveplusintroducesanewprocessforsceneactivation–“TheCentralSceneControl”.

Pressandreleasethebutton,itwillsendacertaincommandtothecentralcontrollerusing
thelifelineassociationgroup.Thisallowstoreactbothbuttonpressandbuttonrelease.This
modeimplementscommunicationpatterns6butrequiresgatewaysupportingZ‐wavePlus.
ParameterNo:1
Length:1Byte
ValidValue=0–99(Default0)
ValidValue01 … 99
ButtonTopBottomTop Bottom …TopBottom
SceneNumber123 4 … 199200
4.ASSOCIATION(TurnON/OFFandDimUP/DOWN)
TheZSCeithercontrolotherdevicesortheyissuevarioussceneactivationcommandstoa
centralcontroller.Fordirectdevicecontrolare.
Step1,includeyourSmartBulbintothenetworkbyfollowingthecontrollerandSmartBulb
instructions.
Step2,placeyourcontrollerinASSOCIATIONmodewithGroup2orGroup3,andsettheZSC
asDESTINATION.DependingontheControllersoftware,Associationmaybereferredtoas
SmartApps,“If,Then”typeconditions,etc.
Step3,switchOFFandthenONtheSmartBulbforsettingtheSmartBulbasaDESTINATION.
Step4,pressanybuttonforsettingtheZSCasaSOURCE.
Step5,theLEDwillflashtwicewhenitissuccessful.
TurnON
Pressandreleasethetopbutton,SmartBulbsinGroup2willbeturnedON.
Pressandreleasethetopbuttontwice(doubleclick),SmartBulbsinGroup3willbeturned
ON.
TurnOFF
Pressandreleasethebottombutton.SmartBulbsinGroup2willbeturnedOFF.
Pressandreleasethebottombuttontwice(doubleclick).SmartBulbsinGroup3willbe
turnedOFF.
DimUP
Pressandholdthetopbutton.SmartBulbsinGroup2willdimup.
Pressthetopbuttontwicewhileholdingdownthebuttonin2ndpress.SmartBulbsinGroup
3willdimup.
DimDOWN
Pressandholdthebottombutton.SmartBulbsinGroup2willdimdown.
Pressthebottombuttontwicewhileholdingdownthebuttonin2ndpress.SmartBulbsin
Group3willdimdown.
Note:
YoucansetthesmartbulbsintoGroup2orGroup3.Maximumof5SmartBulbscanbe
addedineachgroup.
5.CONTROLMODE
YoucansettheZSCtocontrolotherdevicesortheyissuevarioussceneactivation
commandstoacentralcontroller.
ParameterNo:2
Length:1Byte
ValidValues=0,1,2(Default0)
Value=0:ZSCcanactivatetheScenewhichispre‐setbyGateway,andthencontrolthe
associatedSmartBulbsineitherGroup2orGroup3.
Value=1:ZSCcanonlyactivatetheScenewhichispre‐setbyGateway.
Value=2:ZSCcanonlycontrolSmartBulbsinAssociationGroup2andGroup3.
6.REVERSEBUTTON
IftheZSCisinstalledupsidedown,youcansetthebelow
ParameterNo:4
Length:1Byte
ValidValue=0or1(Default0)
7.EXCLUSION
Step1,placeyournetworkcontrollerintoExcludemodebyfollowingthecontroller
manufacturer’sinstructions.
Step2,pressanybuttonontheZSC.
Step3,theLEDwillflashtwiceandZSCexclusionissuccessful.
8.FACTORYRESET
PresstheTopbutton3timesandthenBottombutton3timesveryquicklywithin2seconds.
LEDwillflash7timesifRESETissuccessful.RepeatprocedureuntiltheLEDflashes7times.
IMPORTANTNOTE:
PleasenotethatitisextremelyimportanttofollowtheaboveproceduretohaveZSCoperate
properlywithyourhomegateway.InstallationofZSCensuresthatthepowertothesmart
lightbulbalwaysremainsON.WithouttheelectricalpowertotheSmartBulb,theSmart
BulbcannotbeturnedONremotelynorfunctionasasignalrepeatertomaintainproperZ‐
Wavenetwork.
AbouttheZ‐Wave500SeriesModulewithZ‐WavePlusfeatures:
YoucanuseaZ‐WavecertifiedportableorstaticcontrollertocommunicatewithyourZ‐
Wavedevices.Dependingonthecapabilityofyourcontrollerorgatewaysoftware,the
followingsimpletoadvancedoperationsmaybeperformed.Pleaserefertothecontrolleror
gatewaymanualfordetails.
1. Add(Include)orDelete(Exclude)theSmartBulbto/fromyournetwork
2. TurnOnorOfftheSmartBulbremotely
3. Dimup/downindividualAssociationGrouporturnontheScenewhichispre‐setby

gateway.
4. Over‐the‐Airfirmwareupdatebyyourgatewayorstaticcontroller
5. Lifelinefunctionwhichautomaticallynotifiestheassociatedmodulesandthe
networkthatamanuallyresetdeviceisnolongerinthenetwork,thus,the
correspondingassociationbecomesinvalid
SPECIFICATIONS
Model:ZSC
Power:2piecesCR2032LithiumCell
Radiofrequency:908.4MHz/916MHz
Wirelessrange:upto132feetlineofsightbetweenthecontrollerandtheotheravailable
nodes.
Normaloperatingtemperature:77°F(25°C)
FORINDOORUSEONLY
InteroperabilitywithZ‐Wave®devices
AZ‐Wave®networkcanintegratedevicesfromvariousclassesofproducts,andthesedevices
canbemadebydifferentmanufacturers.Thedomitech®productintroducedinthis
instructionsmanualhasaZ‐WavePluscertificationwhichguaranteessuchan
interoperability.
FCCID:xxxxxxxxxxxx
TheFederalCommunicationCommissionRadioFrequencyInterferenceStatementincludes
thefollowingparagraph:
TheequipmenthasbeentestedandfoundtocomplywiththelimitsforaClassBDigital
Device,pursuanttopart15oftheFCCRules.Theselimitsaredesignedtoprovidereasonable
protectionagainstharmfulinterferenceinaresidentialinstallation.Thisequipmentuses,
generatesandcanradiateradiofrequencyenergyand,ifnotinstalledandusedin
accordancewiththeinstruction,maycauseharmfulinterferencetoradiocommunication.
However,thereisnoguaranteethatinterferencewillnotoccurinaparticularinstallation.If
thisequipmentdoescauseharmfulinterferencetoradioortelevisionreception,whichcan
bedeterminedbyturningtheequipmentoffandon,theuserisencouragedtotrytocorrect
theinterferencebyoneormoreofthefollowingmeasures:
− Reorientorrelocatethereceivingantenna
− Increasetheseparationbetweentheequipmentandreceiver
− Connecttheequipmentintoanoutletonacircuitdifferentfromthattowhichthe
receiverisconnected
− Consultthedealeroranexperiencedradio/TVtechnicianforhelp
Operationissubjecttothefollowingtwoconditions:
− Thisdevicemaynotcauseinterference
− Thisdevicemustacceptanyinterference,includinginterferencethatmaycause
undesiredoperationofthedevice.
ImportantNote:TocomplywiththeFCCRFexposurecompliancerequirements,nochange
totheantennaorthedeviceispermitted.Anychangetotheantennaorthedevicecould
resultinthedeviceexceedingtheRFexposurerequirementsandvoiduser’sauthorityto
operatethedevice.

IC:xxxxxxxxxxxx
ThisdevicecomplieswithIndustryCanadalicense‐exemptRSSstandard(s).Operationis
subjecttothefollowingtwoconditions:
(1) Thisdevicemaynotcauseinterference,and
(2) Thisdevicemustacceptanyinterference,includinginterferencethatmaycause
undesiredoperationofthedevice.
Z‐WaveisaregisteredtrademarkofSigmaDesigns
WARRANTY
DomitechProductswarrantstotheoriginalpurchaserofthisproductthatforthewarranty
period,thisproductwillbefreefrommaterialdefectsinmaterialsandworkmanship.The
foregoingwarrantyissubjecttotheproperinstallation,operationandmaintenanceofthe
productinaccordancewithinstallationinstructionsandtheoperatingmanualsuppliedto
customer.Warrantyclaimsmustbemadebycustomerinwritingwithin30daysofthe
manifestationofaproblem.Domitech’ssoleobligationundertheforegoingwarrantyisto
repair,replaceorcorrectanysuchdefectthatwaspresentatthetimeofdelivery,orto
removetheproductandtorefundthepurchasepricetocustomer.Thewarrantydoesnot
extendtoconsequentialorincidentaldamagetootherproductsthatmaybeusedwiththis
product.Forinquiryandcustomerservice,emailtosupport@domitechproducts.com
Warrantyperiod:limited1yearfromdateofpurchase
DomitechProducts,LLC
2140E.SouthlakeBlvd.SuiteL‐312
Southlake,Texas76092
SwitchCover_ZSC_07082015_En_v1.0