DORAN 3602 TIRE PRESSURE MONITORING SYSTEM User Manual USERS MANUAL
DORAN MANUFACTURING, LLC. TIRE PRESSURE MONITORING SYSTEM USERS MANUAL
DORAN >
USERS MANUAL
User Manual
DORAN360RV is a full-time direct tire pressure monitoring system which includes
one wireless Monitor. User can choose 2 to 36 Transmitters to install on their vehicles
as needed.
The Transmitter can be screwed onto the tire instead of the cap of the valve and then
senses the pressure inside the tire all the time and transmits the pressure information
data to the Booster by RF technology. The Booster then signifies the signal and
transmits it to the Monitor. The Monitor can receive and deal with the data, then
display the pressure on the screen. The Monitor can issue different alarms if the tire
pressure is at an improper level based on the standard pressure.
DORAN360RV can sense and display the tire pressure all the time and can issue an
alarm when the tire pressure is improper, so as to notify the driver to treat the problem
and avoid tire busting or tire damage.
Through TPMS, the driver can keep the tire running under a proper pressure so as to
avoid excess gasoline consumption and keep the vehicle in an easily controlled state.
Transmitter and the Security Lock
Installation of the Transmitter
Before installing the Transmitter, the Monitor must be powered on
and then it will be under the “waiting” mode (waiting for receiving
the ID information). At this time, if the Transmitter is installed, its
ID information will be received and recorded by the Monitor.
However, the Monitor can only record one Transmitter’s ID
information each time. So before another Transmitter is installed,
the ID information of the previous installed Transmitter must be received and
recorded by the Monitor.
The Installation steps of the Transmitter are as
follows:
1. Inflate the tire to the standard pressure recommended
by the manufacturer.
2. Take out a Transmitter and check whether the rubber
seal is placed smoothly and suitably inside the copper
stem of the valve.
3. Screw off the current cap of the valve on the tire.
Note: IMPORTANT. DORAN360RV provides a Lock for each Transmitter to prevent
the Transmitter from falling off. Whether use the Lock or not won’t influence the
work of the Transmitter. If you want to install the Security Lock, Please follow the
Installation steps of the Transmitter Lock below. The Lock must be installed onto the
valve before the installation of the Transmitter.
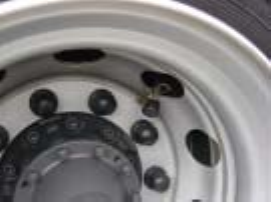
4. Screw the Transmitter onto the valve of the tire.
5. Check the connection of Transmitter and valve with the soap solution to confirm
whether the Transmitter is firmly screwed onto the valve or not, check whether there
is air leakage caused by the installation or the seal of the Transmitters or not.
6. Once screwed onto the tire, Transmitter can sense the pressure inside the tire and
transmit the data to the Monitor, and the information will appear on the screen within
6 minutes.
Note
1. Before installing the Transmitter, please program the standard pressure on the
Monitor. The default standard pressure is set to 100psi in factory.
2. If one of the Transmitters is broken or fails to work, the others can still function
well. Only the broken one or the lost one needs to be changed.

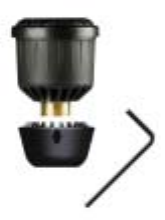
DORAN360RV has a Security Lock and a special tool for the lock
for each Transmitter to prevent the Transmitter from loosing or
falling off.
The Security Lock has three sockets on it and each socket has a
bolt in it, as shown in the above figure. The function of the lock is
to connect the Transmitter and the Lock by connecting the meshing
part of them, and then fasten the lock to the valve by the three bolts. Thus the Lock
together with the Transmitter can be firmly fixed onto the valve and will not be easily
removed or be screwed off by a sudden force while running.
The customer can choose to use the locker or not. Installing the lock or not will not
influence the functions of the Transmitter.
Note: If the customer chooses to use the Lock, the following installing steps should be
inserted follow the Transmitter Installing Term 4.
Installation step of the Security Lock
1. Connect the meshing part of the Transmitter and the Lock
First connect the meshing parts of the Lock and the Transmitter to
make them to be integrated, then screw the Transmitter together
with the Locker firmly onto the valve, as shown in the figure on the
left.
2. Lock the Transmitter
Use the special tool to screw the three bolts inside the sockets on the
lock, let the Lock together with the Transmitter screw firmly onto
the valve, as shown in the figure on the left. Then the Transmitter
can not be screwed off unless you screw off the Lock with the
special tool.
How to inflate the tire with a locked Transmitter
BEFORE inflating the tire, please
1) Use the special tool to loose the three bolts inside the sockets on the Lock.
2) Screw off the Transmitter.
3) Remove the Transmitter together with the Security Lock from the Valve
Note: 1.The Security Lock will not influence the Transmitter’s work, you can choose
using the Lock or not while you install the Transmitter.
2. The tires need to be re-balanced after installing the Transmitter or the
Transmitter with the Lock.
FCC Caution
This device complies with Part 15 of the FCC Rules. Operation is subject to the
following two conditions:
(1) this device may not cause harmful interference, and (2) this device must accept
any interference received, including interference that may cause undesired operation.
FCC Notes:
The manufacturer is not responsible for and radio or TV interference caused by
unauthorized modifications to this equipment. Such modifications could void the
user's authority to operate the equipment.