DORRY ELECTRONICS TB650 2G PHONE TABLET PC User Manual
DORRY ELECTRONICS INTERNATIONAL CO.,LTD 2G PHONE TABLET PC
User Manual

2G Phone Tablet PC User Guider
TB-650
Please read the documentation
1. Before using the equipment, please read these instructions carefully to ensure safe and
proper use.
2. The description is based on the factory setting.
3. Images and screen shots used in this manual may be different from the actual product
appearance.
4. Available features and additional services may be changed by device, software, or
service provider.
5. We’re not liable on the problems caused by a third-party applications.
DORRY ELECTRONICS INTERNATIONAL CO.,LTD
Power button Long press:turn on/shutt down,restart to confirm
Short press: turn off and to lock the screen,and let the phones
sleeping ; to press the button again to restart the screen
Volume button To adjust the volume of the device
Home key To press it, the device will return to standby screen
RESET Reset
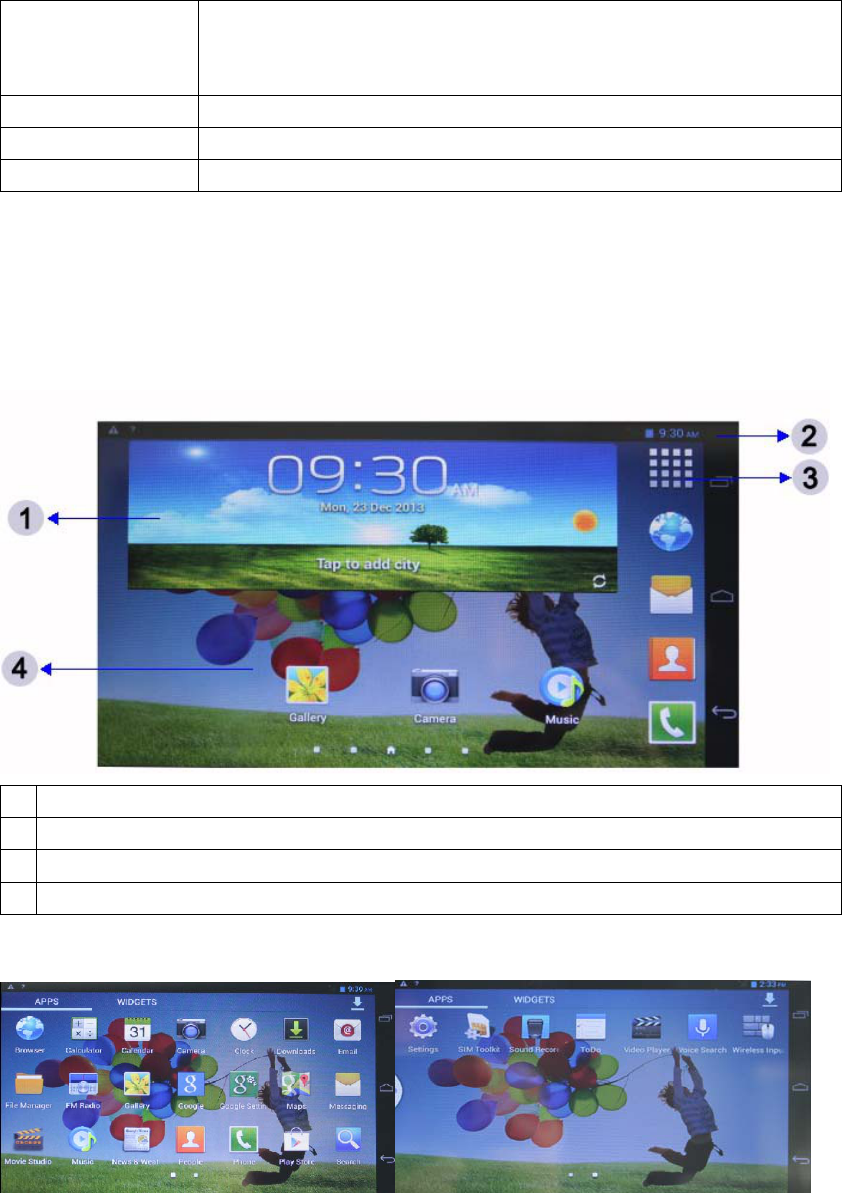
Main Screen
The main screen can be viewed after unlocked. you can see the indicator, widgets,
application shortcuts and other items. The main screen extends to beyond the width of
screen, you can switch to a different page by sliding your finger around on the desktop.
1 Open the search widget to search
2 System notification bar
3 Open the application list and widget list
4 Slide left and right to switch to a different page
Customized the Home Screen
In the upper right corner of the main screen, the interface of application icons can be entered.
The required application or small component can be clicked by sliding left and right on the main
screen, until it’s shown on the main screen and drag to the special address required, then released.
If you want to delete one item, please tap, hold and drag it into the position marked “the fork”.
System Bar
At the top of screen, there are some regular main buttons another side, such as
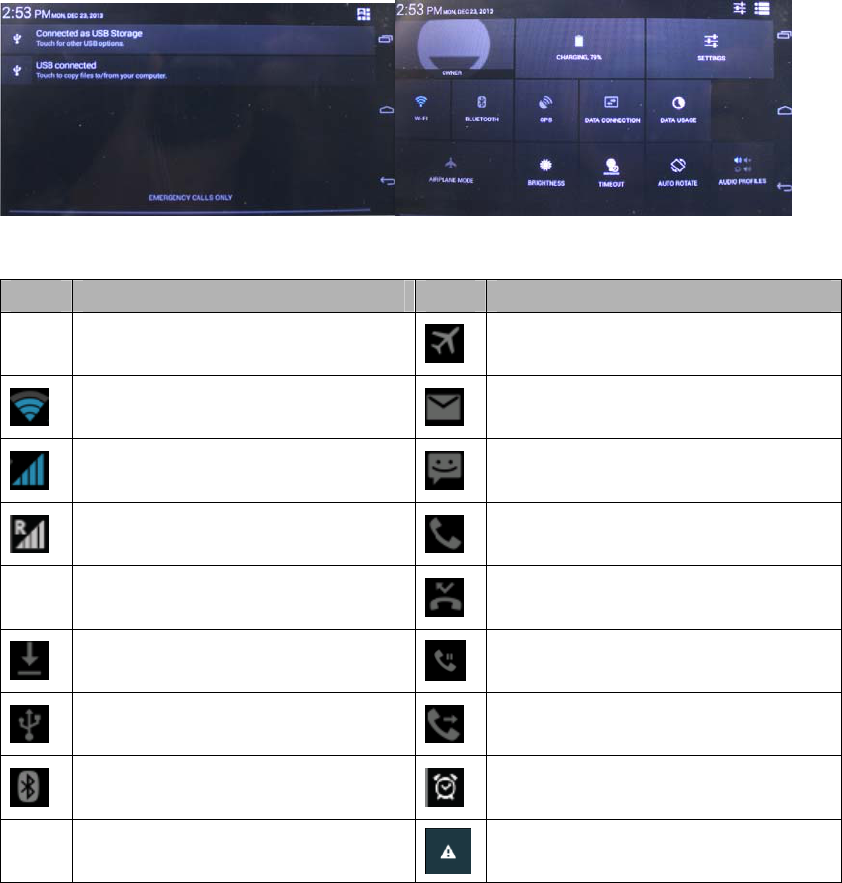
“return”,”HOME”,”menu”,ect. To touch anyone to perform itself function well. The battery
level, network signal, time and other icons are showing on the right side. You can view the
notification by touching every one.
Tips and Status Icons
icon definition icon definition
Wi-Fi available around here Flight mode is activated
Wi-Fi connected New mail
The strength of signal New SMS or MMS
Roaming On the phone
Uploading data Missed call
Downloading data Connected
Connected to the computer Call forwarding is activated
Bluetooth function is activated Alarm clock has started
Battery charge SIM card is not inserted
Rotating touch screen
The device has been built-in motion sensors and rotary device. the interface will automatically
rotate based on device orientation. If you need the interface remains the same direction, Please
touch the right of system tray to turn off the automatically rotate setting.
Unlock or lock the touch screen
Tap and hold the screen lock screen icon, then drag it to the unlocked position to unlock the screen;
If you have to lock the screen by hand, Please press the power button.
Input text
You can use the onscreen keyboard to write. Please tap the input area to open the on-screen
keyboard , tap the “close” on the taskbar to turn it off ; If you need to switch the input method,
please tap the key point intraday; You can copy and paste to input text quickly.
Customized Equipment
To select settings from the application list or the notifications panel, you can modify all settings as
needed.
Management Applications
To select settings from application list Æenter to applications
1. if you want to uninstall the applications downloaded, you can click the “download”, select the
desired application, and then click "Uninstall."
2. To pause the application, change the settings, or manage other options, select "All" or
"running." Click a program, and then select the desired operation.
Security Setting
You can adopt a variety of ways to protect your equipment and information, such as the lock
screen, encryption tablet computers.
1. Lock screen
Select “settings” in the application list -> Security -> Screen lock:
a. No: Never lock the screen
b. Slide: no pattern, PIN or password to unlock the screen;
c. Voice unlock: Set voice commands. Then set up a backup unlock
d. PIN code: require digital PIN code to unlock the screen. After set up, when requiring the PIN
code, enter it to unlock the screen.
e. Pattern: require pattern to unlock. According to the mention on the screen to draw the same
pattern you set, it will be unlock after successfully drawn
f. Password: Need a password to unlock the screen. When the device asking password,Please
enter the password you set to unlock
Encrypt Tablet PC
You can encrypt your accounts, settings, applications downloaded and the data, media and other
files. After done, you will have to enter numeric PIN or password every time to decrypt the device.
Reset Tablet PC
To select “settings ” in the application list -> Backup and Reset -> Restore factory settings, you
can restore the tablet to factory setting state and erase all data stored in the device.
WARNING: This operation will delete all applications and files downloaded, and all personal
information. Once these are deleted, they can not be restored.
Communication
Dial
To tap the icon of dial in the application
Call
Several methods to do the call
1. dialing: input the phone number and tap the button of dial
2. call records: tap the number recorded in the mid-list
3. contact: Tap a contact to call the contact number
Answer the call
Press the circle button and slide it to the green position to answer the call.

Reject or cut a call
Press the circle button and slide it to the red position to reject an incoming call; To touch the
midpoint to hang up.
Use other functions.
Tap the menu button on the right corner and select the “setting” to use the following functions:
1. fixed dialing: after set up the fixed dialing function, only the numbers fixed in the list can be
dialed, others not.
2. quick reply: after set it up, when it’s not convenient to answer the phone, the quick reply
phrases can be sent to the caller soon.
3. voicemail service: select or set up your service provider.
4. voice messages: Set the voice message service number.
5. Call forwarder: You can set incoming calls to another number.
6. Call waiting: set the remind of incoming calling, when you’re on the phone.
Contact
In the application list, tap the contact icon to enter.
Groups: Lists all contacts by grouping;
All: Lists all contacts;
collections: lists all collections and frequent contacts
Create a contact
1 into contact;
2 Touch ;
3 input contact information;
4 Tap "Done."
edit contacts
1 go to the All tab pages, select the contact you want to modify, touch the Menu button on the
right corner;
2 Tap the "Edit";
3 input contact information;
4 Tap "Done."
Input/output contacts (Import/export contacts)
Tap the Menu button on the top right corner, then select "Import / Export":
1 Import from SIM: After selected the page, tap the Menu button on the upper-right corner, select
"Import All" to all the contacts in the SIM card into the contact list.
2 imported from the storage device: You can import contact file (vcf format) from the memory
card to the device.
3 Export to a storage device: Export contacts to the memory card.
4 Share visible contacts: contacts can be sent out by mail or Bluetooth .
Look for contacts
1 Tap the title bar button , input the keyword of the contact to do fast index.

2 In the upper left corner of the main screen, tap the icon of search and input contact’s name to
search quickly. The contact-related information will be appeared on the screen immediately.
SMS
In the application list, tap SMS icon to enter.
According to the contact information, all SMS received and sent out has been categorized,
including SMS and MMS in the mail box.
Check SMS
1 In the application list screen, tap the icon to enter the message;
2 Touch the message to read.
Send SMS
1 enter SMS interface;
2 Touch the "new message";
3 In the "recipient" subject line, input the contact number, several numbers separated by a comma
in English mode;
4 Tap and select the input text area, input the words;
5 Tap the Menu button and select "Send."
Send MMS
MMS support multimedia features, including text, images, sound, data and other multimedia
messages.
Equipment pictures have been stored on the memory card. The pictures can be copied from other
device and can also be taken by camera. before taking pictures, please insert the memory card in
advance.
1 Enter the new information interface;
2 Tap the additional icon in the title ;
3 Tap one of the following options:
Photo: add existing photos;
Photograph: take a new photo and insert;
Video: Add existing video;
shooting video: shoot a new video and insert;
Audio: Adding existing audio files;
Recording: record sounds and and insert;
Slide: You can add mult iple pictures, video, sound and text.
4 In the "recipient" subject line, input a contact number or email address, multiple numbers or
addresses separated by commas in English mode;
5 Tap the text input field, write words;
6 Tap the Menu button and select "Send."
E-mail
In the application list, tap the email icon to enter.

This function supports accounts via POP3, IMAP and Exchange agreement. Multiple e-mail
accounts can be set up simultaneously. You can view and send e-mail after setting success.
Set up an email account
1 Touch "e-mail" to enter;
2. Input the appropriate information in the setup wizard page popped-up, and tap "Next" until
completion.
3 If you need to add more email accounts, tap the Menu button in the upper right corner and select
"Settings", then select "Add Account", follow up the screen prompts
After the completion of the e-mail account settings, e-mail messages will be downloaded
automatically. If you create two or more e-mail accounts, it can switch between email accounts.
Delete mailbox account
1 After entering the mailbox, tap the menu button on the top right corner and select "Settings"
2 Select the account you want to delete;
3 Tap "Delete account";
4 Tap "OK."
Send e-mail
1 Enter email interface;
2 Touch ;
3 in the recipient's address bar, enter your email address, multiple addresses separated by commas
in English mode;
4 Tap Cc, enter Cc / dense anyone to e-mail address, multiple addresses separated by commas in
English mode;
5 Enter the subject;
6 Enter the body of the email;
7 Tap the title bar of the send button.
Network
Browser
In the application list, tap the Browser icon to enter
Visit website
1 enter the browser function, the main page will be accessed;
2. If you need to access other pages, tap "Enter the URL bar", enter the URL, tap the “go” button
in the keyboard;
3 browsing the Web, tap and hold the screen with two fingers, then the fingers apart to zoom in the
web pages; two fingers close slowly to zoom out the Web page;
open multiple pages
You can open multiple pages and switch between different pages.
1 Tap the title bar button to open a new tab;
2. Tap the title in the window to view different pages;

3 Touch the close button to close the current page.
On the main screen, touch the "Applications"; touch "browser."
Set Home
1 After entering the browser, tap the Menu button on the upper right corner;
2 Select "Settings";
3 Select the "General";
4 Tap "Set Home";
5 Select or enter the desired URL OK.
Set bookmarks
Browsing a web page, select the button to add bookmarks for this web page to facilitate future
browsing.
view bookmarks and history
Tap the title bar button to view the bookmark set, you can click it to open the corresponding web
page quickly; choose "History" to view web pages visited recently.
Customized browser
Tap the Menu button on the top right corner, select "Settings" to customize the browser, such as
setting the font size, the browser mode.
Play Store
Tap the icon of “play store” in the application to enter the store.
Massive applications can be downloaded quickly and easily to the device from play store (when
logging in the play store at first time, you will have to set up a Google account)
After successfully set up, enter the main interface of play store:
1 look for the desired application to enter;
2 Click "Install";
3 Read the instructions permission carefully;
4 After confirmed, select "Accept and Download" to start downloading. After program
downloaded successfully, it will install automatically.
Note:
All software supported by "Play Store" have been provided by third-party developers. The
developers of information can be get in each software detail.
All problem caused by a third-party application shall not be liable.
Entertainment
Video Player
Touch video player icon in the application list to enter.
You can browse and open folders to view pictures or play video files. you can also edit the picture,
send, set wallpaper, set the contact photo and other operations.
Note: If storing large files, it may take some time to load.
Supported file formats
Type format
pict JPEG、 GIF、BMP、PNG and so on
ures
Vide
o AVI、RM、RMVB、MOV、FLV、3GP、MP4,ect
Note: Depending on the file encoded format, some files maybe not played properly.
browse pictures
1 Select the picture folder to enter, click on the picture you want to view, swipe left or right to
browse previous / next picture;
2 two-finger tap and hold the screen, slide your finger to zoom out the picture, close two fingers
slowly to shrink the picture. It can be double-clicked on the screen.
3 To automatically play pictures, tap the title bar . During playback, click on the screen to
pause;
4 To view file details, click the Menu button on the top right corner of the title bar - Details>;
5 Tap the title bar , you can send files via MMS, email or Bluetooth.
6 to set an image as wallpaper, click the upper right corner of the Menu button -> set the photo ->
Wallpaper -> move the trimmer to the region -> Crop.
7 set the image into caller picture, click the Menu button on the upper right corner -> set the photo
-> contact photo -> Contacts -> select the desired contact or to add new contacts -> done -> move
the trimmer to the region -> Crop.
Edit pictures
1 Tap the menu button on the top right corner -> trim, adjust the size of the image;
If you want to move the trimmer to other areas, please tap and hold the inside of the cropper,
then drag your finger to the desired location.
To adjust the size of trimmer, tap and hold an edge of trimmer tool. After the arrow of trimmer
appeared, slide your finger from the center to inward or outward to resize. When resizing, if you
want to keep the ratio of trimmer, please tap and hold any of the four corners.
Touch "Save
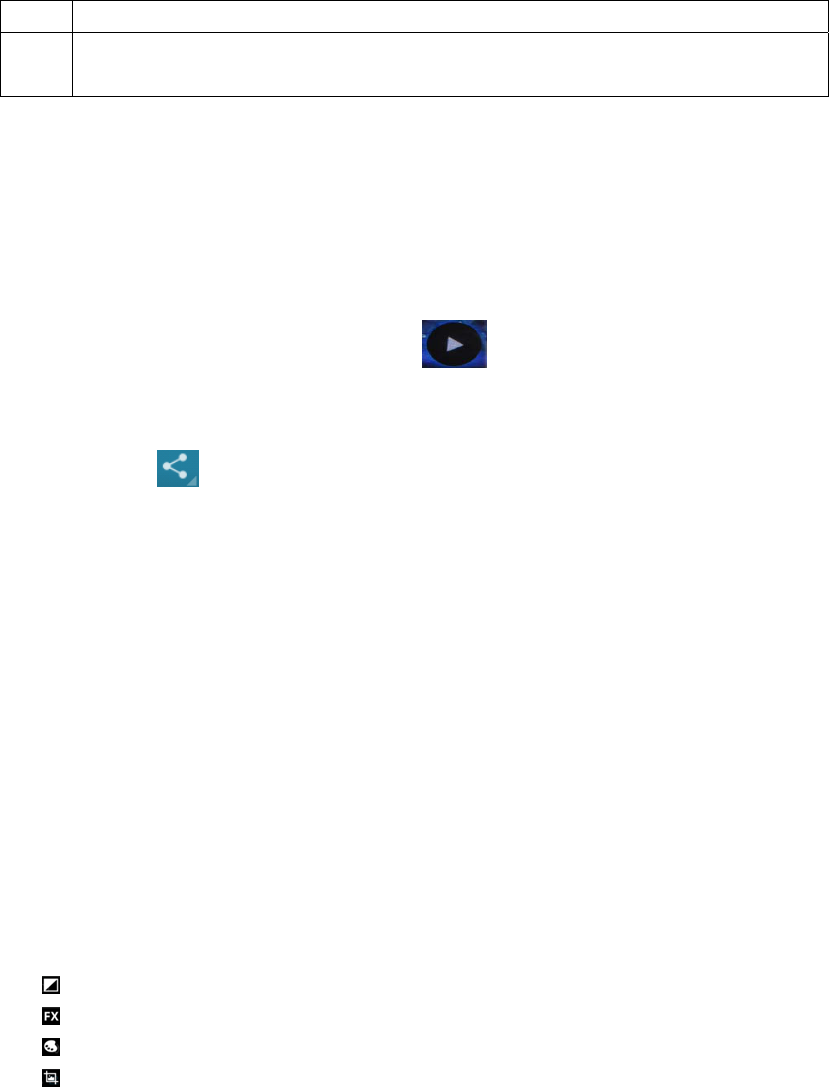
2 Tap the Menu button of the top right corner -> Edit, you can apply various effects to the picture:
:adjust the brightness of the picture;
: apply a different filter effects;
: apply different color effects;
: trim, straighten, rotate, flip images.
Music
In the application list, tap the Music icon to enter.
The music player supports the following formats: MP3, AAC, APE, WMA, OGG, WAV, M4A
formats, ext.
Note: Depending on the file encoding format, some files maybe not played properly.
add music files to your device
First, copy the files to your device or memory card.
play music
1 Click to play music;
2 Use the on-screen buttons to control playback.
: enable play random;
: Repeat all songs;
z :Local Search
z :you could choose random playing / delating/ ringtone making / sound mixing
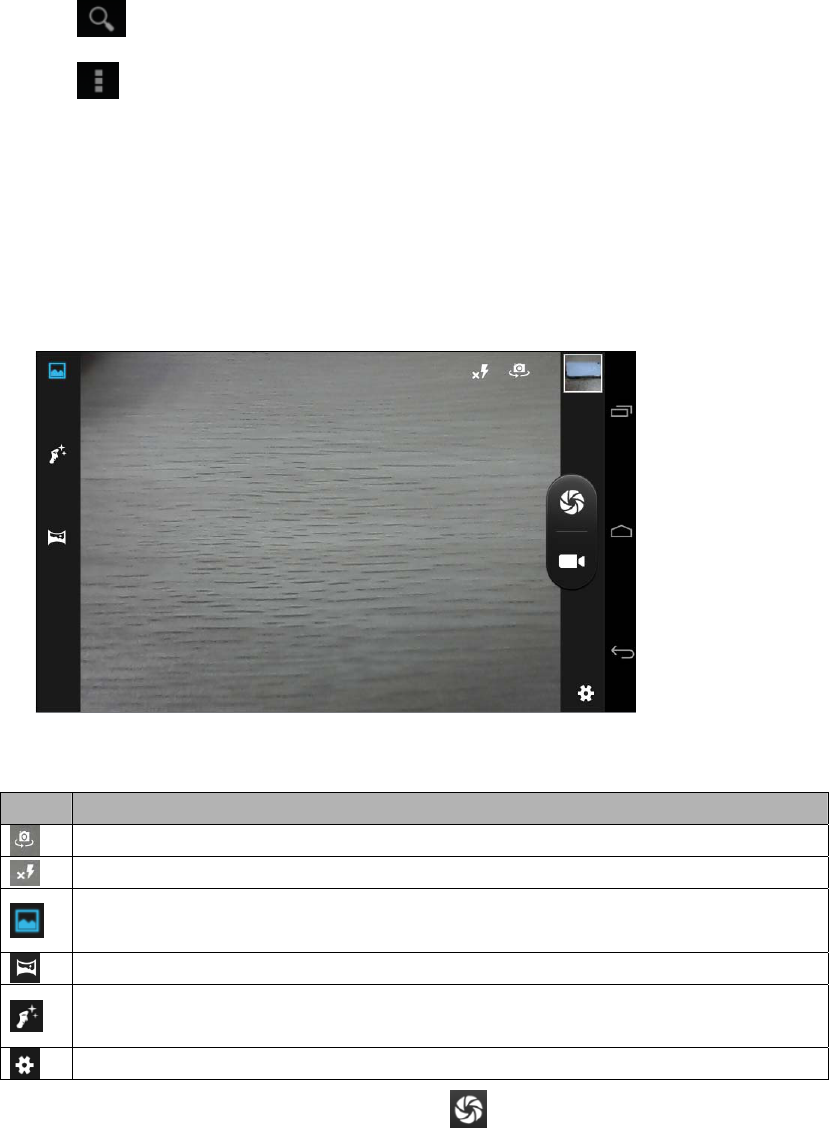
Camera
Press the camera icon to access the program in the application list
Taking photos
1. Before taking photos,you need to adjust the settings first
Icon Definition
Switching front and rear cameras
Flashlight on/off
Original camera mode
panoramic camera mode
human face patterns
Camera setting: adjust the size 、effects and restore default settings
1. Focus the Camera lens to the target and press . The photos will be saved in root
directory file DCIM automatically
2. You could press the icon on the right corner to check the photos you take
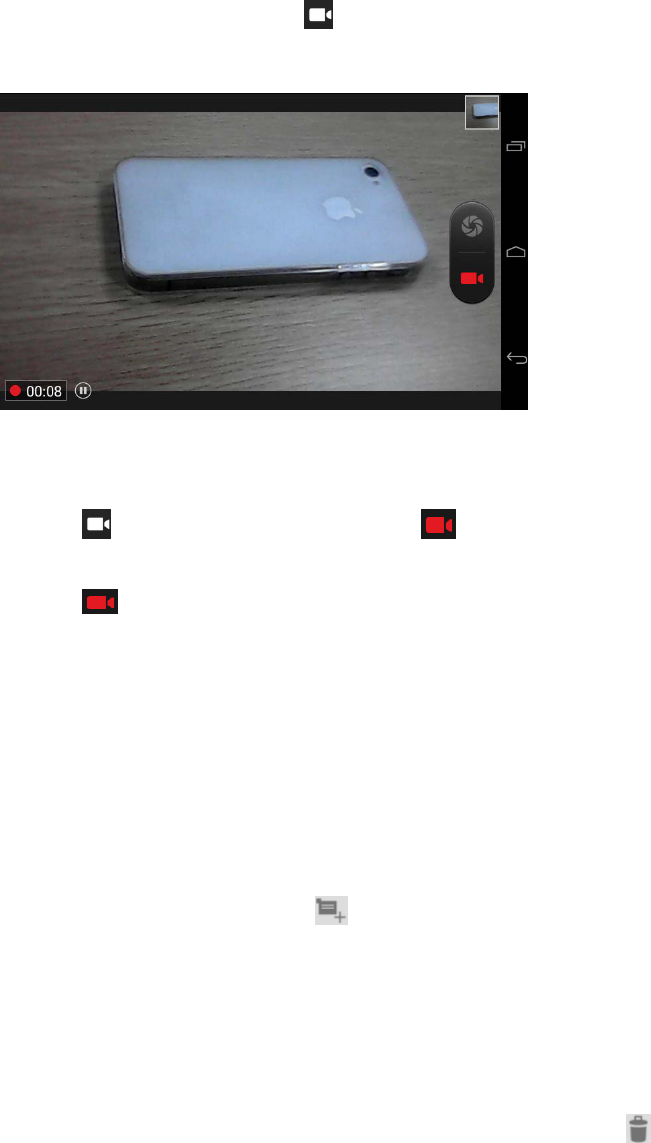
3. Video Recording
1, Enter the camera and the press to video recording mode,before recording video you
need to adjust the video settings
2, Click to video.and the icon will become . The video duration depends on the
storage space
3, Click you can stop video recording, the video will be saved in the root directory file
DCIM automatically
4. You could press the icon on the right corner to check the videos you take
Tools
Calendar
Press the calendar icon to access the program in the application list.
Use calendar to manage you personal events every day every week and every month,
1, To set up an event ,please press or click on the blank area in the interface of days of
week ,day ,and month
z Input the schedule ,you can set the type of alert according to your own need ,date and
time
z Press “OK” after inputting all the information 。
2. You could check the agenda by day ,week or month
3. To delete the agenda just press the one you do not want and then press
Clock
Press the clock icon to access the program in the list of the applications
Press “Alarm Options”
1. Press “new alarm”;
2. select“start the alarm”;
3, Set the alarm time, repetition period, alarm ringtone according to your needs, and press
OK button after the settings .
4, Press “cancel” to shut off the alarm and press “ pause” then the alarm will ring again
after few minutes
5, To stop the alarm , you need to cancel the check mark in the check box
6, To delete the alarm , long press the one you do not want and choose “delete”
File Manager
In the application list, click the file manager to enter.
Files and folders can be stored and managed in the device. You can open, create, copy,
rename, and search files or folders. You can transfer files to the device from a compatible
computer, downloaded files while browsing the web, or receive files through e-mail
attachments.
Note:
1 Some file formats can’t be supported, while, it’s depending on the device's software;
2 According to the way of document encoding, some files maybe not opened properly.
Recorder
Tap the recorder in the application to enter
1 Click “ ” to start recording, click “ ” to stop recording, and then click "done" to save
the recording file
2 Click “ ” to play audio files.
Calculators
Tap the calculator In the application list to enter.
Touch virtual buttons on the screen to perform basic or scientific computing.
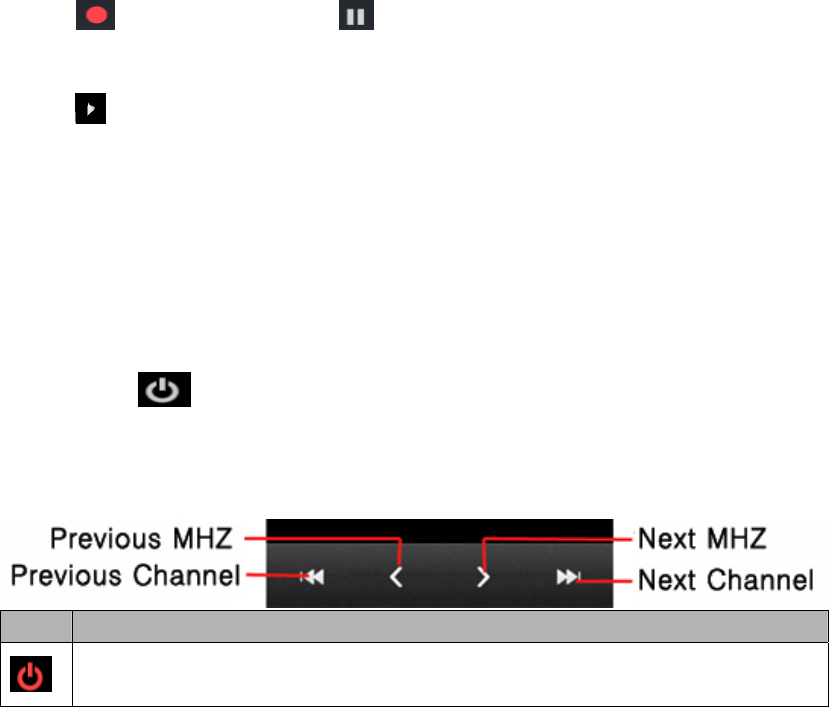
Radio
Note: This flat is no built-in antenna, if you want to listen to the radio, insert the headset. In
addition, you can adjust the volume by the side buttons.
3. channel list, you can view all the channels, and select a channel.
4. Play / Pause : Start / Stop FM.
5. Previous/Next Channel: press the button to switch the channel.
6. Previous/Next MHZ: press it to switch the MHZ.
7. Speaker: Select headset features or loud speaker function.
Icon Definitions
Channel is playbacking

Enter to search, speaker and recording
Channel list
Favorite Channels
Connection
USB connection
You can connect the device with computer as a mass storage device and access the file directory
1 Insert the memory card into the device;
2. Connect the device with computer with a USB cable ;
3 Tap the task bar to open the Notifications panel, select "USB connected";
4 Click "Turn on USB storage";
5 Turn on the "My Computer" from the end of computer, touch "Removable Disk" to enter, you
can copy files between the memory card and computer.
Bluetooth
It can be created a free wireless connection between 10 meters away, when using Bluetooth.
After a successful connection, you can use Bluetooth for the following purposes: Bluetooth call,
listen music via Bluetooth stereo, send and receive data.
Activate the Bluetooth function
1 Open the application list and select Settings -> Wireless & networks;
2 Turn on the Bluetooth switch.
Look for other Bluetooth devices and pair with it
1 Turn on the Bluetooth switch and Select "Search";
2 Select the device searched;
3 Input the PIN code of the Bluetooth, select "OK", the device paired must be input the PIN code,
if paired successfully, the device will search the available services automatically.
Note: Some devices, especially headsets, may have a fixed Bluetooth password (eg 0000), you
must enter the password before being paired.
Send data by Bluetooth
1 Select the file you want to send from the appropriate application;
2 Select it to send via Bluetooth mode;
3 search-enabled Bluetooth device and pair, after paired completed, the data can be sent
automatically.
Receive data via Bluetooth
1 Open the application list and select Settings -> Wireless & networks -> Bluetooth, the option is
set to "allow all nearby Bluetooth devices can be detected";
2 If prompted, input the PIN, click "OK";
3 choose on the system tray , and then select "accept" to start receiving the document.
Wi-Fi
Can connect to internet by join wi-fi or wireless hotspots.

◆ Use Wi-Fi function
1. Open application and select setting, wireless and internet;
2. Wi-Fi switch.
◆ Scanning and use Wi-Fi function
1. Turn on Wi-Fi switch, the device can search available Wi-Fi;
2. Select which one you need;
3. If needed, insert the password to connect Wi-Fi.
Safety Knowledge
Please be cautious to use your device under circumstance as follow:
◆ Airplane
Forbidden using on the plane, please power off before get on board, please follow the rules
under airplane company about the wireless device as well.
◆ Vehicle security
Please do not use the device when driving. Please keep the device in safe place; do not leave
the device on the seat or some place that device can move when braking.
◆ Electronic device
Most electronic device use Radio frequency signal, your device may affect others sometime.
◆ Place that may cause explore
We suggest that keep your device powered off in the place where may cause explore, please
follow the tip around you. Because it may cause explore by some special spark, that may lead
to large human hurt and property loss.
◆ Pacemaker and other medicine device
The manufacturer of pacemaker should suggest keep over 20 cm distance between mobile
device and pacemaker, avoid potential bad influence.
Any operation of the wireless device can affect medicine device which havenot protected well. Ift
there’s something unclear about the medicine device, please ask help from doctor or manufacturer.
Please keep your phone powered off in any hospital or place which ruled.
◆ Operating environment
When connecting the device with others, please read users’ manual first and follow the instruction,
do not connect any device that can not match.
Do not leave the leave the phone at anywhere that airbag can reach in the car, avoid hurt when
airbag open.
Same as any other wireless device, for making safe of the device and user, we advice the device
can just operated by correct way.
Must powered off your device in anywhere electronic products forbidden.
◆ Place where marked
Must powered off your device in anywhere needed.

Proper care and use of equipment
◆ Only use accessories come from original manufacturer, other ones may affect the device,
shorten the lifetime of device;
◆ Keep the device dry, far from water to protect the device and accessories;
◆ Do not use or keep the device in any place where full of dust or dirty;
◆ Keep the device away from magnetic field;
◆ Keep the device away from metal things such as coin、key;
◆ Avoid the device from repressing or falling down from higher place.
To operate the phone function:
Step 1: Make sure your tablet is fully charged
Step 2: Turn the tablet off
Step3: Insert the sim card
Step4: Turn on the tablet
Federal Communications Commission (FCC) Statement
This device complies with part 15 of the FCC Rules. Operation is subject to the following two
conditions: (1) This device may not cause harmful interference, and (2) this device must accept
any interference received, including interference that may cause undesired operation.
Note: This equipment has been tested and found to comply with the limits for a Class B digital
device, pursuant to part 15 of the FCC Rules. These limits are designed to provide reasonable
protection against harmful interference in a residential installation. This equipment generates, uses
and can radiate radio frequency energy and, if not installed and used in accordance with the
instructions, may cause harmful interference to radio communications. However, there is no
guarantee that interference will not occur in a particular installation. If this equipment does cause
harmful interference to radio or television reception, which can be determined by turning the
equipment off and on, the user is encouraged to try to correct the interference by one or more of
the following measures:
z Reorient or relocate the receiving antenna.
z Increase the separation between the equipment and receiver.
z Connect the equipment into an outlet on a circuit different from that to which the receiver is
connected.
z Consult the dealer or an experienced radio/TV technician for help.
Warning: Changes or modifications made to this device not expressly approved by DORRY
ELECTRONICS INTERNATIONAL CO.,LTD may void the FCC authorization to operate this
device.
Note: The manufacturer is not responsible for any radio or tv interference caused by unauthorized
modifications to this equipment. Such modifications could void the user’s authority to operate the
equipment.
Certification Information (SAR)
This device meets guidelines for exposure to radio waves. Your device is a low-power radio
transmitter and receiver. As recommended by international guidelines, the device is designed not
to exceed the limits for exposure to radio waves. These guidelines were developed by the
independent scientific organization International Commission on Non-Ionizing Radiation
Protection (ICNIRP) and include safety measures designed to ensure safety for all users,
regardless of age and health.
The Specific Absorption Rate (SAR) is the unit of measurement for the amount of radio frequency
energy absorbed by the body when using a device. The SAR value is determined at the highest
certified power level in laboratory conditions, but the actual SAR level of the device when being
operated can be well below the value. This is because the device is designed to use the minimum
power required to reach the network.
The SAR limit adopted by USA and Canada is 1.6 watts/kilogram (W/kg) averaged over one gram
of tissue. The Highest SAR value reported to the FCC for this device type when properly worn
on body is 0.777 W/kg..