DREAMUS AK120 Portable Music Player User Manual Manual
IRIVER LIMITED Portable Music Player Manual
UserManual.wiki
>
DREAMUS
>
AK120 User Manual
>
Manual
Contents
1.
Manual
2.
Addendum
Manual
Navigation menu
Upload a User Manual
Namespaces
Wiki Guide
HTML
PDF
Info
Views
User Manual
Discussion / Help
Navigation

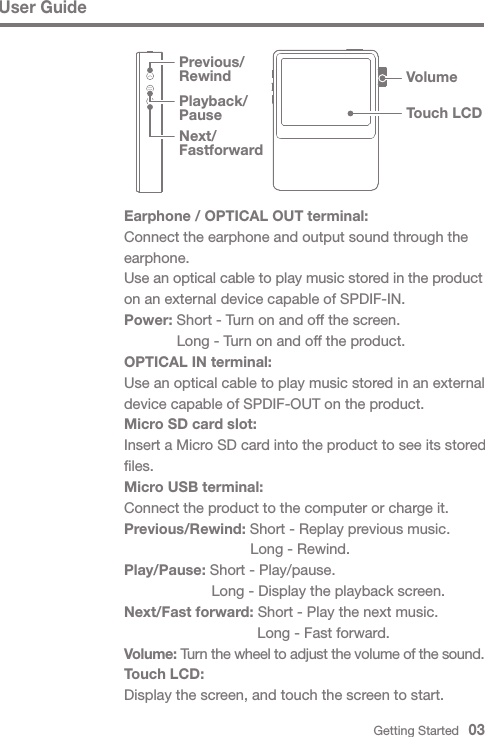
![User GuideThis product has the automatic power saving function to prevent battery consumption. If there is no key operation within the prescribed period [ - Power Settings - Automatic Turn Off], the iriver device will be automati-cally turned offf. (See page 18)This product has the automatic screen off function to prevent battery consumption. According to the [ - Power Settings - Turn Off the Screen] setting, the screen will be automatically turned off if there is no key operation within the prescribed period. (See page 18)When using the reset function, the current time and memory data will not be deleted. Do not use the reset function while the product is in use. Doing so may seriously damage the memory.Turn on/off the screen1. When on standby, press and hold the [ ] key to turn off.2. Press the [ ] key once briefly to turn on the screen.Using the reset function1. If the product should stop unexpectedly during operation and the keys no longer function normally, press the [ ] key and [ ] key simultaneously more than 7 seconds to reset the product.Turn on/off1. Press and hold the [ ] key to turn on.2. When on standby, Press and hold the [ ] key to turn off.Power source manage-mentGetting Started 04](https://usermanual.wiki/DREAMUS/AK120.Manual/User-Guide-1962655-Page-5.png)
![User GuideDisconnecting from a computer1. Click the icon displayed in the task bar of the computer screen to safely remove it.2. Click [OK] to ensure the iriver device can be safely removed.An icon may be hidden in the task bar depending on the operating system like Windows XP. Click the icon to display it on the screen.When using application programs like Windows Explorer or Windows Media Player, it may be unsafe to remove the iriver device.Safely remove it after exiting all application programs. Only remove the iriver device after exiting all application programs. Failure to do so may result in loss of stored data.Connect the computer and the iriver device when all functions are stopped.Use only the Micro USB cable provided with the product to ensure safe operation. Connect the computer and the Micro USB cable only after all functions have been stopped. Check that it is connected to a high-power USB 2.0 port. Connecting to a keyboard or a USB hub without its own power supply may prevent normal operation. Only FAT32 file system is supported so format the iriver device accordingly.Getting Started 06 - Connect a removable disk: It can transmit data while connected to a computer.](https://usermanual.wiki/DREAMUS/AK120.Manual/User-Guide-1962655-Page-7.png)
![Getting Started 07Please connect the Micro USB cable correctly.Use caution when copying or moving files. If the computer or product is turned off or the Micro USB cable is removed while the file/folder is being copied or moved, the data may be lost or seriously damaged.Transmission speed may vary depending on the computer and OS environment.Save media files through iriver plus 4. If the files were saved in the removable disk through file copy, re-generate the DB in [ - Advanced – Auto Library Scan]. (See page 18)Delete the files (folders) of the product1. Select the file/folder to delete, right-click the mouse, and select [Delete].2. Click [Yes] in the [check file/folder/deletion] window to delete the selected file/folder.User GuideCopy files (folder) to the product1. To copy a file/folder from the computer, select it and drag&drop it to the drive added by the product.](https://usermanual.wiki/DREAMUS/AK120.Manual/User-Guide-1962655-Page-8.png)
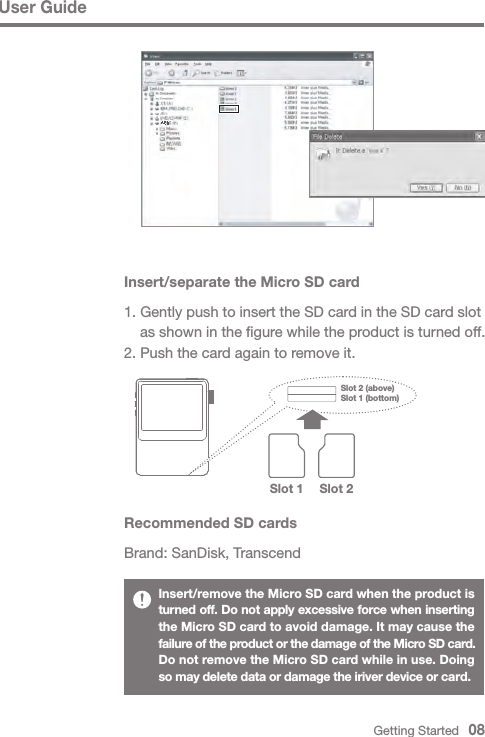

![Extracting media from the CDGetting Started 11Initializing the disk1. Use the Micro USB cable to connect the iriver device to the computer’s Micro USB terminal and run iriver plus 4.2. Select [Device - Initialize disk], and when the window displayed asks whether you want to continue, click [Start].3. When initialization is completed, the completion window will be displayed and the computer will be disconnected.Once files in the iriver device are deleted, they cannot be recovered. Back up all files before initializing the disk.Sending media to the product1. Use the Micro USB cable to connect the iriver device to the computer’s Micro USB terminal and run iriver plus 4.2. Select the file’s check box to send from the computer to the iriver device, click the [Send] button, or drag&drop the file to the device icon or device window at the bottom. Check the file transmission progress in the [File transmission] tab.3. When transmission is completed, check that the selected music has been added to the iriver device’s library.User Guide1. Insert a music CD in the CD drive, and run iriver plus 4.2. Select the check box for the music to extract from the [CD] tab of iriver plus 4, and click [CD ripping] at the bottom of the window.3. When music extraction is completed, select [All music] to check that the extracted music has been added to the library.Slot 1 is supported when an external memory card is used.](https://usermanual.wiki/DREAMUS/AK120.Manual/User-Guide-1962655-Page-12.png)
![User GuideIf the battery runs low, firmware update may not be completed. Do not disconnect the iriver device from the computer while the firmware update file is being downloaded.Disconnect the Micro USB cable after download is completed.When the firmware of the iriver device is up-to-date, the latest version information window will be displayed.If the firmware needs to be updated when the iriver device is connected to the computer, the information window will be displayed automatically.Getting Started 12Upgrading the firmware1. Use the Micro USB cable to connect the iriver device to the Micro USB terminal of the Internet-connected computer, and run iriver plus 4.2. Select [Device - Update firmware], and update the firmware according to the information window.](https://usermanual.wiki/DREAMUS/AK120.Manual/User-Guide-1962655-Page-13.png)
![Using 13Basic operationsUsing the touch LCDListening to music1. This iriver device has a touch LCD system that operates by touching the screen. Simply touch the desired icon on the screen to execute it.Moving up/down in the list1. Change the list order by dragging the list screen [down up] / [up down].Selecting music1. Select Music Search Method on the home screen to display the music list.2. Press the desired song on the list to play it.Using a sharp object or applying excessive force when touching the screen may damage it.Search music by folder in [Folder].Continuous play time: about ?? hours (MUSIC: FLAC, 16bit, 44KHZ, Volume 37, EQ off, LCD Off)Supported file formats: FLAC, WAV, WMA, MP3, OGG, APE FLAC, WAV[8~192KHz (8/16/24bit)], MP3 (8~320Kbps), WMA (8~320Kbps), APE (supported compression level: Normal, Fast, Hight). Use iriver plus4 to manage the play list.User Guide](https://usermanual.wiki/DREAMUS/AK120.Manual/User-Guide-1962655-Page-14.png)
![User GuideMusic play screenListening to music- Turn the [Volume wheel] to adjust the volume.- Press [ ] during playback to pause, press [ ] to restart. + Press the iriver device’s [ ] key to pause/restart.- Press [ / ] during playback to play the previous /next music. + Alternatively, press the iriver device’s [ / ] key to play the previous/next music.- Press and hold the [ / ] key during playback to rewind/fast forward. + Alternatively, press the iriver device’s [ / ] key to rewind/fast forward.- Press [ ] to display the previous screen.- Press [ ] to display the home screen.- Press [ ] to display the play list.- The status bar may be moved to the desired section during playback.- To display lyrics, press [LYRIC] during playback, press [CONTROL], to discontinue lyrics.Present timeAlbum art FilenameMicro SD card 1/2 inserting statusLyricsProgress time of musicOptionBatteryBluetooth connection statusPrevious/RewindPrevious screenStatus barTrack list Play/Pause Artist nameNext/Fast forwardHome screenTotal playtime of musicUsing 14](https://usermanual.wiki/DREAMUS/AK120.Manual/User-Guide-1962655-Page-15.png)
![Using 15Music option1. Press [ ] in the waiting screen or during playback to display the list of options.2. Select the desired menu and set it up.3. Press [ ] to display the previous screen and press [ ] to display the music play screen. - Equalizer: Set up the equalizer as desired. + Set up the equalizer by adjusting its height. - Playlist: Add currently playing music to the Playlist. + Press [ ] to add a Playlist. - Music information: Display information on the currently playing music. - Repeat mode: Change the repeat mode. + : Repeat-play the entire list of currently playing music. + : Repeat-play the currently playing music. + : Release the repeat play mode. - Play mode: Change the play mode. + : Play the music saved in memory in sequence. + : Play the music saved in memory in random sequence.1Using BluetoothUse Bluetooth-supported devices to enjoy music wirelessly.Connecting Bluetooth1. Select [ - Bluetooth Setting] from the home screen.2. Set Bluetooth to [ON] to display the list of Bluetooth- supported devices.3. Select the desired device from the list of devices to connect it to the product.4. Turn on the product and enjoy music wirelessly.User Guide](https://usermanual.wiki/DREAMUS/AK120.Manual/User-Guide-1962655-Page-16.png)
![User GuideUsing 16Making/Taking calls during bluetooth connectionTaking calls: Information on incoming calls is displayed on the device and the device connection is automatically disabled when call is requested.Making calls: The connection to the device will be automatically disabled when call is requested.Disconnecting Bluetooth1. Press the connected device to disconnect it.Bluebooth support specifications- Profile: HFP, A2DP- Operation of the device may slow when high audio quality music files are played. (48KHz or less recommended)- EQ will not be applied.Do not turn off the iriver device while connected to Bluetooth.If Bluetooth malfunctions, turn off the Bluetooth device and turn it back on.As registration methods may vary for different Bluetooth devices, please read the user manual for each device before connecting it.When you connect the iriver device to a Bluetooth device, the distance must be within 20cm.If the distance between the iriver device and the Bluetooth device is extended, sound quality will deteriorate and beyond 3m, the devices will disconnect. (Distance may vary depending on use environment and Bluetooth device type.)Crosstalk may occur while Bluetooth is in use.When using multi-point supported audio equipment, please connect the device and then enjoy the music.Deleting Bluetooth1. Select Bluetooth from the Bluetooth list and drag it to the left to display the menu list.2. Press [ ] to delete Bluetooth from the list and press [ ] to make the menu list disappear.](https://usermanual.wiki/DREAMUS/AK120.Manual/User-Guide-1962655-Page-17.png)
![Using 17Settings Users can set up their own product environment.The structure of the settings menu may vary depending on the version of the firmware.Setup1. Select [ ] from the home screen.2. Select the desired item and set it up.3. Press [ ] to display the previous screen and press [ ] to display the music play screen.Date and time- Set up the present date and time.User GuideConnection to car audio devices is not supported.Malfunction or noise may occur depending on the use environment and charging state.- When the user is wearing a Bluetooth device while holding the iriver device or holding the device in one hand and a cell phone in the other- When part of the body touches the radio sender and receiver of the iriver device or Bluetooth headset- When the received power is changed by obstacles like walls, corners and partitions- When there is radio interference from devices using the same frequency band like medical devices, microwave ovens and wireless LAN-In areas with a great deal of interference like inside elevators and basements](https://usermanual.wiki/DREAMUS/AK120.Manual/User-Guide-1962655-Page-18.png)
![User GuideUsing 18Other- System information: The iriver device’s system information will be displayed.- Auto Library Scan: The DB of the file will be re-generated.- Album art screen settings: Configures the display method of album art on the screen.- Tutorial: View simple instructions on system use.- Bluetooth device name: Change the Bluetooth device name.- Lock Settings: To lock and unlock the producte.- Rest All Settings: Reset to default settings.Bluetooth setting- Use Bluetooth-supported devices to enjoy music wirelessly. (For details on setup, see [Connecting Bluetooth] on page 15.)Display- Adjust the screen brightness.Power- Auto Power Off: Once a certain amount of time passes without operating the iriver device or buttons, power will be automatically turned off.- Backlight Off: Once the specified time passes when the device is not working, the screen will be turned off.Languages- Select the desired language.](https://usermanual.wiki/DREAMUS/AK120.Manual/User-Guide-1962655-Page-19.png)
![Other information 21+ The screen turns off repeatedly. - To reduce power consumption during file playback, the screen will be turned off after a certain period of time. Set up time in [ - Power setting - Turn Off the Screen].+ The screen does not look normal. - Check for any foreign material on the screen.+ There is no sound or there is static. - Check that the volume is set to [0]. - Check that the earphone terminal is well connected and remove foreign material from the terminal. - Check the music file.+ I cannot connect it to the computer. - Connect the iriver device to the USB port on the back of the computer.Connect the iriver device to the USB port on the back of the computer. Differences may occur in the output voltage of USB ports.+ The file is not played back, or the iriver device is unstable when a certain file is used. - The following may occur depending on the file, quality and damage. Playback may not be smooth or may be difficult. The product may not work normally. It may look different than on the PC. There may be differences in performance like playback speed. There may be differences in the playable specifications. - Convert the file or use another file.Copyright iriver has the patent, trademark right, copyright and other intellectual property rights related to this instruction book so no contents may be copied or duplicated in any format or by any means without the prior approval of iriver.User Guide](https://usermanual.wiki/DREAMUS/AK120.Manual/User-Guide-1962655-Page-22.png)