DREAMUS DPF11 Network Audio Player User Manual 1of 2
IRIVER LIMITED Network Audio Player Users Manual 1of 2
UserManual.wiki
>
DREAMUS
>
DPF11 User Manual
>
Users Manual - 1of 2
Contents
1.
Users Manual - 1of 2
2.
Users Manual - 2 of 2
Users Manual - 1of 2
Navigation menu
Upload a User Manual
Namespaces
Wiki Guide
HTML
PDF
Info
Views
User Manual
Discussion / Help
Navigation

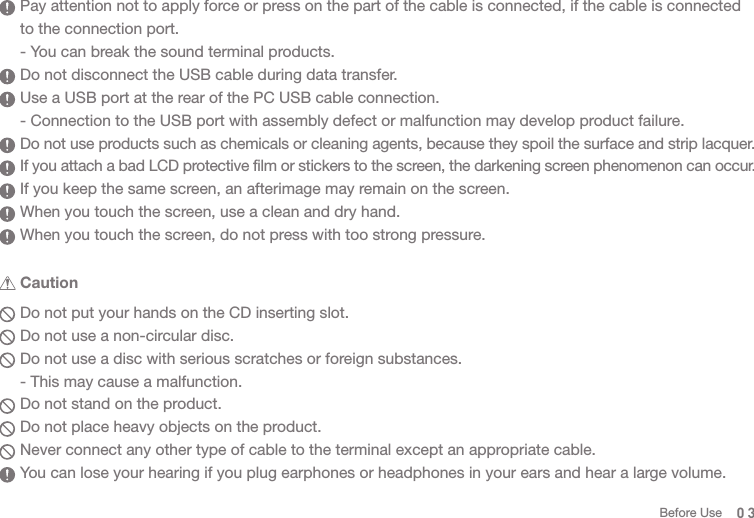
![SAFTEY PRECAU-TIONSPlease check [Safety Instructions] before using the device for a safety use. Warning indicates a serious danger. Caution indicates a hazard. Users should not decompose, repair or change the product randomly. - iriver does not take responsibility for any problems caused by a random decomposition, change or repair. Do not place the metal (coins, hairpins, etc.) or inflammable foreign object inside the product. When lightning do not touch the power cord. - You can cause fire or electric shock. Stop using the product immediately, if the operation is not smooth or a failure occurs. If water or foreign object get inside the product, disconnect the power plug from the outlet immediately, quickly wipe with a dry cloth, and get the AS through the near iriver zone. Repair for the damage due to inundation may cost, or even not possible, regardless of the quality assurance period. Descriptions : Instructions are divided into “Warning” and “Caution”, and the meanings are explained in the following. Indicates “Forbidden” or “Prohibited matters”. Indicates “Required Action” or “Perform as instructed”.Explanations of SymbolsUse Warning02Before Use](https://usermanual.wiki/DREAMUS/DPF11.Users-Manual-1of-2/User-Guide-2451750-Page-3.png)
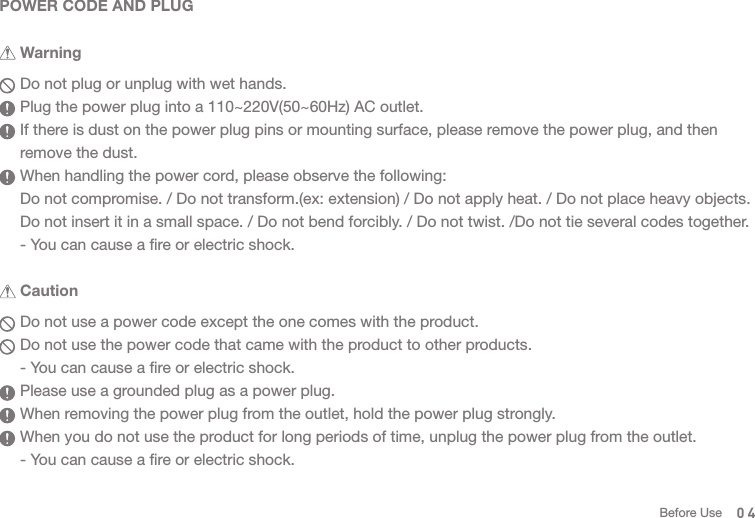

![11Product specifica-tionBefore UseDisplayDACStorageDigital _Out _InputAnalog _Fixed & Variable OutFixed output levelVariable output levelChannel SeparationFrequency ResponseTHD(Total Harmonic Distortion)SNR(Signal to Noise Ratio)Audio File SupportedAudio Sample RateUSB SupportedUSB DAC SupportedNetwork SupportedCD Ripping audio formatBatteryDimension / Weight7”WVGA(1280x800) Touch DisplayCirrus Logic CS4398 x2 (Dual DAC)SSD 1TB (Max 4TB, RAID 0,5)AES/EBUx1, BNCx1, Coaxialx1, Opticalx1AES/EBUx1, BNCx1, Coaxialx1, Opticalx1Balanced (L/R) x2, RCA (L/R) x23V(RCA, Balanced)7.5V(RCA) / 10V(Balanced)>135dB / 1Khz± 0.02dB / 20Hz ~ 20Khz, ± 0.4dB / 10Hz ~ 70Khz< 0.0008% / 1Khz / 10v, <0.001% / 10Hz ~ 20kHz / 10v118dB/10vWAV, FLAC, WMA, MP3, OGG, APE, AAC, ALAC, AIFF, DFF, DSF8kHz ~ 384kHz (8/16/24bits per sample)DSD Native : DSD64(1bit/2.8MHz) / DSD128(1bit/5.6MHz)Type A(Host) x2, Type B(Device) x1UAC(USB Audio Class) 2.0 / DSD64, DSD128, PCMWi-Fi 802.11b/g/n(2.4GHz) & Ethernet 10/100/1000, DLNA(DMS,DMC,DMR)WAV, FLACCapacity : 10.4A / Voltage : 7.4V(Normally) / Type : Li-Ion214[W] x 238[H] x 243[D](mm) / 11.4kgSpecifications and appearance can be changed without previous notice. The Auto Spec has been measured by the Balanced of the Analog Out.](https://usermanual.wiki/DREAMUS/DPF11.Users-Manual-1of-2/User-Guide-2451750-Page-9.png)
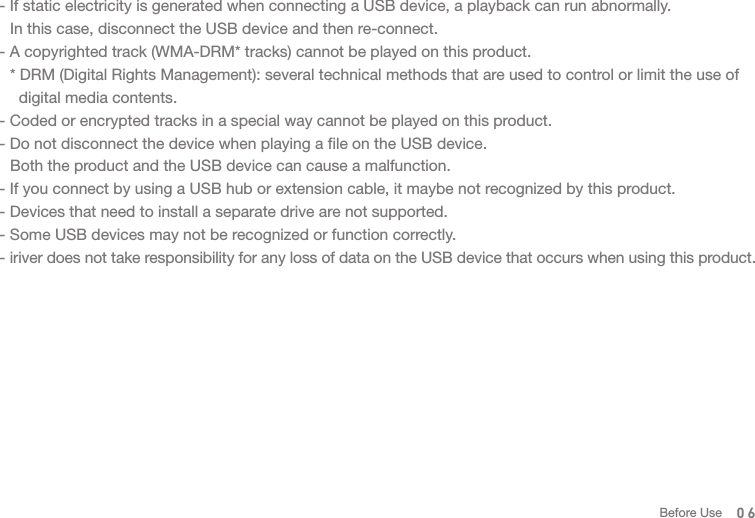
![12Package contentsComponents may be changed without notice to improve product performance and quality. DPF11Power Code & Adapter: Connect with the product to recharge the product. Adapter Protective Case: Protects the adapter from external shocks. You can bind the adapter protective case to the supplied adapter. USB Cable for data transfer: Connects the product to the computer and sends data. Antenna: It is an antenna for wireless network connection. Please tighten it on the [ANT] terminal of the back of the product. T Wrench: Use when combine or spate the body and stand of DPF11.Quick Start Guide: A manual of basic methods of using the product. Product Warranty: Please keep the Product Warranty well, because it is necessary when you apply for AS.Protective Film: You can use for LCD protection. User Manual: You can download User Manual from [http://www.astellnkern.com > Support > Download] or check from [Settings-Help] of the product. AdapterPower codeAdapter Protective Case T wrenchUSB cable for data transferProtective FilmQuick Start Guide & Warranty CardAntennaBefore Use](https://usermanual.wiki/DREAMUS/DPF11.Users-Manual-1of-2/User-Guide-2451750-Page-10.png)
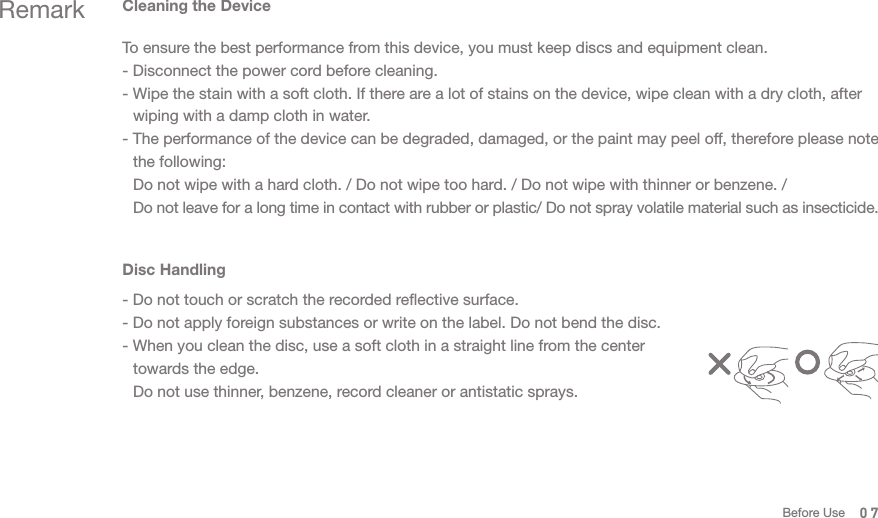
![5 6 721 431234567Fixed RCA PortFixed Balanced PortVariable Balanced PortVariable RCA PortEthernet PortUSB PortUSB-HOST PortFixedAnalog OutVariable Analog Out System 단자Connect RCA cable to the port to output to digital.Connect Balanced cable to the port to output to analog.Connect Balanced cable to the port to output to analog.Connect RCA cable to the port to output to analog. Connect a wired LAN cable to the port. Connect USB B type cable to the port and the computer.You can connect a USB storage device to play music files on a USB storage device. Digital In/Out and Analog Out can be set in a notification bar or the [Settings-Sound-Sound In/Out]. You cannot adjust the volume on the product if you selected Fixed Analog Out.15Before Use](https://usermanual.wiki/DREAMUS/DPF11.Users-Manual-1of-2/User-Guide-2451750-Page-13.png)
![Managing powerConnecting the Power1. Connect the adapter and the power cord. 2. Connect the adapter cable to the [Power] on the rear panel, and turn the mounting ring to tighten.3. Connect the power cord and then press the [Power] button on the product for 2-3 seconds. 4. [ ] logo appears on the screen while the product is booted.Connect the power cord to a wall outlet after completing the connection of the product, an adapter, and the power cord. Use only the power cord and the adapter supplied in order to prevent malfunction or damage of the device. Keep unplug the power cord from the outlet when you go out or you are not using the product for a long time.16Before Use](https://usermanual.wiki/DREAMUS/DPF11.Users-Manual-1of-2/User-Guide-2451750-Page-14.png)
![Earphones/Headphones- Connect earphones or headphones to the [BAL], [PHONES] port of the side of the product. - Connect earphones or headphones that support the balance cable to [BAL] port on the side of the product.- You can use various earphones/headphones that fit 2.5Φ, 3.5Φ, 6.5Φ. Do not raise the volume to loud when connecting earphones or headphones. You can lose your hearing if you plug the earphones or headphones on your ears and listen to the large volume. Connec-tions17Before Use](https://usermanual.wiki/DREAMUS/DPF11.Users-Manual-1of-2/User-Guide-2451750-Page-15.png)
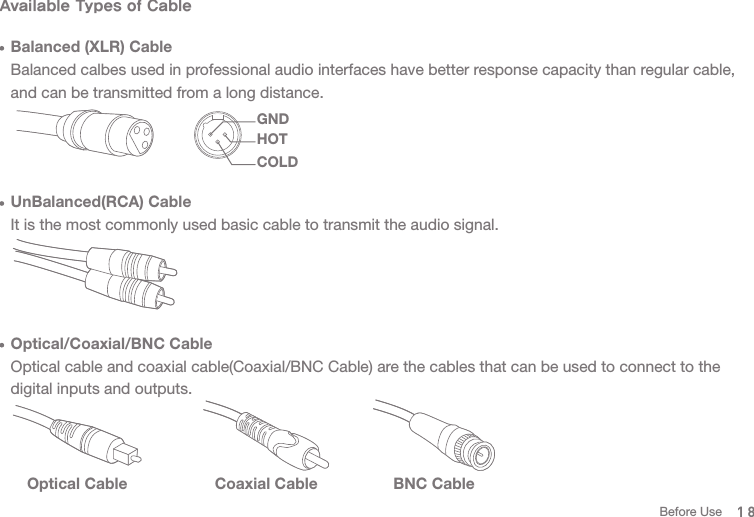
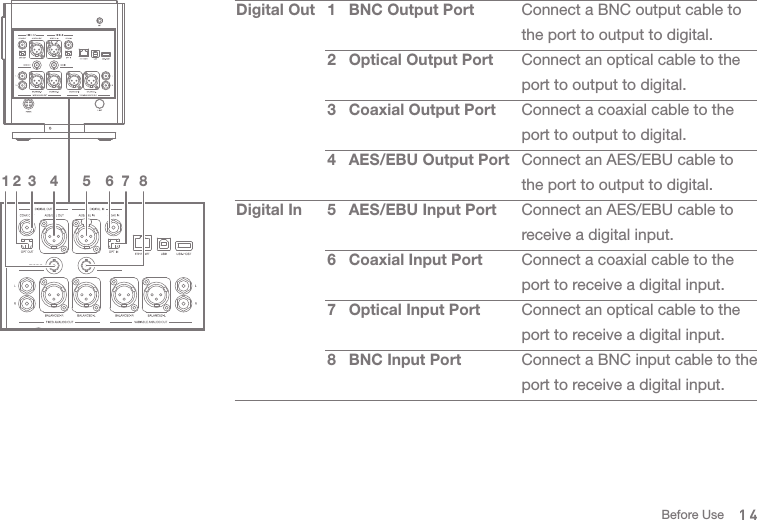
![Connecting DIGTAL OUT1. You can connect the product to an external amplifier device by using AES/EBU, Optical, Coaxial, BNC cables to [AES/EBU OUT], [OPT OUT], [COAX OUT], [BNC OUT] port of the rear panel. BNC CableCoaxialCableAES/EBU CableOpticalCableConnecting DIGITAL IN1. You can connect the product to an external source device by using AES/EBU, Optical, Coaxial, BNC cables to the [AES/EBU IN], [OPT IN], [COAX IN] port of the rear panel. BNC CableCoaxial CableAES/EBU CableOptical CableCD Player19Before Use](https://usermanual.wiki/DREAMUS/DPF11.Users-Manual-1of-2/User-Guide-2451750-Page-17.png)
![RCA Cable L/RBalanced Cable L/RConnecting Fixed Analog Out1. You can connect ‘Blacned’ and ‘RCA cable’ to an external amplifier device from [FIXED ANALOG OUT] of the back the product. Connecting Variable Analog out1. You can connect ‘Balanced’ and ‘RCA cable’ to an external amplifier device from [VAIRABLE ALALOG OUT] of the back of the product. RCA Cable L/RBalancedCable L/R This product supports both ‘Fixed Analog Out’ and ‘Variable Analog Out’. If it is set to ‘Fixed Analaog Out’, you can not adjust the volumen in this product. Please check the interface port before using a cable.When connecting a cable, do not force strongly, and connect it by pushing it gently. Do not shake too strongly when it is connected to a cable. 20Before Use](https://usermanual.wiki/DREAMUS/DPF11.Users-Manual-1of-2/User-Guide-2451750-Page-18.png)
![Inserting/Removing CD1. Refer to the CD label and gently insert into the CD slot.2. If you select [Remove CD] from the notification bar on the home screen, the CD will be realised. This product does not suport the CD Play function. When you insert the CD, the CD-Ripping fuction will be activated. Cautions for CD insertion- Do not put excessive force when inserting a CD. This can cause malfuction and CD breakage. - If the CD is inserted incorrectly, the product can be damaged or the CD can not be separated. - A damaged CD or a CD with foreign substances can generate a problem. Cautions for CD Separation- Do not remove the CD during operation, it can cause a malfuction and a breakage of the CD. 21Before Use](https://usermanual.wiki/DREAMUS/DPF11.Users-Manual-1of-2/User-Guide-2451750-Page-19.png)
![Recommended MicroSD cardBrand: SanDisk, TranscentInserting/Removing the MicroSD Card1. Place the microSD card in the slot like the figure and press gently.2. If you choose [Safely Remove SD Card] from the notification bar on the home screen, the microSD card will be removed safely. 3. If you press the microSD card one more time, the card will be separated. Cautions for inserting the MicroSD cardDo not force the SD card. This may cause a malfuction of the product and damage to the microSD card.Please do not repeatedly insert/remove the microSD card. If the microSD card is not positioned properly, the product may mulfuction or the card may become un-removable. Cautions for removing microSD card - Please remove the microSD card through ‘Safe Removal’. If not, the memory or the system of the product can be damanged. - Do not remove the microSD card while using the microSC card.It can cause a deletion of data, a malfuction of the product, and damage to the microSD card.Other Cuations for using microSD card- If microSD card is not recognized or has malfuctioned, please reformat the card to the FAT32 system which is recommended. -If you use other cards rather than recommended microSD card, a malfuction can occur. - MicroSD card is not included in the compenent. You can purchase separately. 22Before Use](https://usermanual.wiki/DREAMUS/DPF11.Users-Manual-1of-2/User-Guide-2451750-Page-20.png)
![Connecting USB Storage1. Connect the USB storage device to the [USB] port on the side of the product. 1. Connect the USB storage device to the [USB-HOST] port on the back of the product by using a USB cable.Some products that require a separate driver installation or multiple drive generation(multi-card reader), etc. may not be supported. Some products that require a separate power source(external HDD, etc.) may not be supported. The USB host cable is optional. 23Before Use](https://usermanual.wiki/DREAMUS/DPF11.Users-Manual-1of-2/User-Guide-2451750-Page-21.png)
![Connecting to a Wireless Network Antenna1. Connect the antenna for the wireless network to [ANT] port of the product. Connecting to the Network1. Connect the internet connections(ADSL, VDSL, cable model and wired/wireless router, etc.) to the [ETHERNET] port on the back of the product, or connect to an AP that provides WI-Fi.2. Check the notification bar and the setting menu if network is connected or not.24Before Use](https://usermanual.wiki/DREAMUS/DPF11.Users-Manual-1of-2/User-Guide-2451750-Page-22.png)
![Separating with the Computer1. Check if there is a work in process between the product and the computer before disconnecting the USB cable for data transfer.Connecting to a Computer1. Connect the [USB] port and a computer by using the supplied USB cable for data transfer. Native DSD plays to PCM while connected to a PC as MTP. If it is connected to MTP via a USB cable while playing Native DSD, Native DSD will be terminated automatically. If you are a MAC user, please download a MTP program from [Support > Download of http://www.astellnkern.com] and install to use. Do not use a cable other than the USB cable supplied for data transfer. This cay cause a malfuction. Please connect at the state all the features stopped, for a smooth connection of the computer and a USB cable for data transfer. Please connect to a high-power USB 2.0 port. The connection with a computer can be not good, if you connect a keyboard or a self-powered USB hub, etc. If you are a Windows XP user, you need Service Pack 2 or more, Windows Media Player 10 or newer version installation to recognize and use the USB disk. You can download the Service Pack and Media Player from [http://www.microsoft.com]. If you disconnect the USB cable for data transfer during a work in process, it may cause fatal errors on the product. 25Before Use](https://usermanual.wiki/DREAMUS/DPF11.Users-Manual-1of-2/User-Guide-2451750-Page-23.png)
![Deleting a File(Folder) of the Product1. Select files/folders to delete and click the right mouse key, then select [Delete].2. If you click [Yes] in the [File/Folder Delete Confirmation] window, the selected file/folder will be deleted. Copying a File(Folder) to the Product1. If you select the files/folders to copy from a computer, drag and drop(Drop&Drop) to the drive added by the product, the selected files/folders will be copied. Please connect the USB cable for data transfer correctly. If you copy files/folders, or the computer is off or the USB cable for data transfer is disconnected while moving it, it may cause serious damage on memory. The transmission speed can be slow depending on the computer and OS environment that you use. If you copy or move a file during PCM to DSP playback, the sound may be distorted or break up.26Before Use](https://usermanual.wiki/DREAMUS/DPF11.Users-Manual-1of-2/User-Guide-2451750-Page-24.png)
![Upgrading the Firmware of the Product1. Connect the product to a wired or wireless network. 2. When the new firmware is verified, the firmware update instruction appears.3. Select [Update], and select the item you want to update. 4. Follow the prompts on the screen to proceed the firmware upgrade.Upgrading the firmwareRefer to page 56 for a network connection method. If you move to another screen while downloading upgrade files, the download will be stopped. Please do not turn off the network connection while downloading upgrade files.It can cause serious damage to the system, because the upgrade file cannot be downloaded properly. If an error occurs or notification bar is gone while downloading upgrade files, you can re-download the firmware via [Settings-Update-System Update]. 27Before Use](https://usermanual.wiki/DREAMUS/DPF11.Users-Manual-1of-2/User-Guide-2451750-Page-25.png)
![Using the Touch LCD1. The product is equipped with a touch screen LCD system that operates by a direct touch. If you touch the desired icon on the screen, the selected function will be operated. Basic operationBasic Setting1. Set the language to be used in the language setting screen that is displayed when you turn on the power for the first time after purchasing the product, and then click [Next]. 2. Set the time to use from the world time settings, and then click [Next]. 3. The default setting will be completed if you click [Start], and the Feature Guide for using DPF11. 4. You can use the product, if you click [Start] after the function guide is finished. Do not use a sharp object or excessive force to prevent damage to the screen.28Using the Device](https://usermanual.wiki/DREAMUS/DPF11.Users-Manual-1of-2/User-Guide-2451750-Page-26.png)
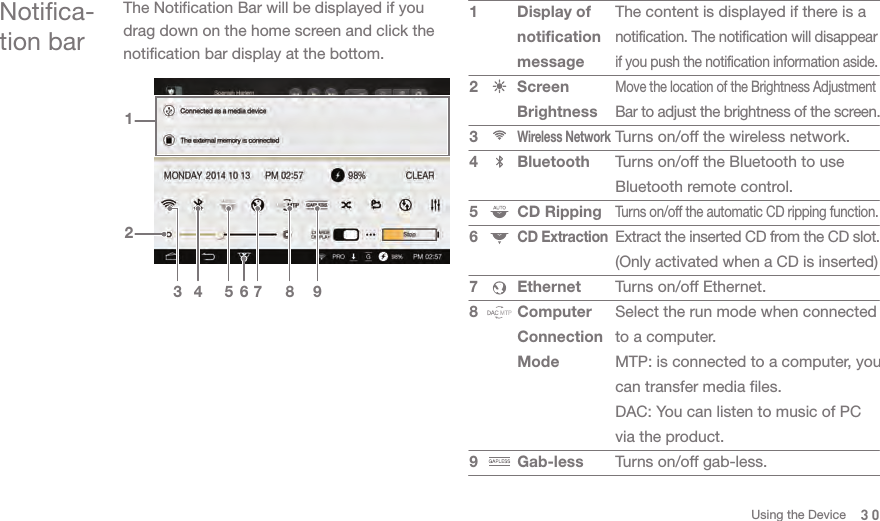
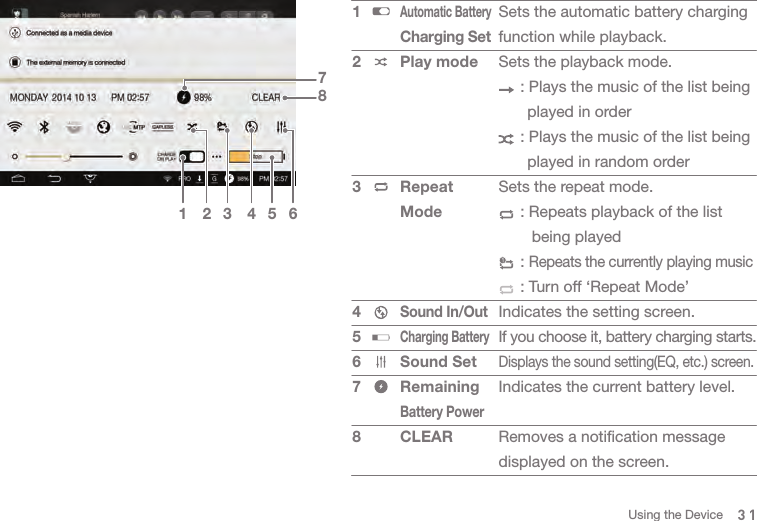
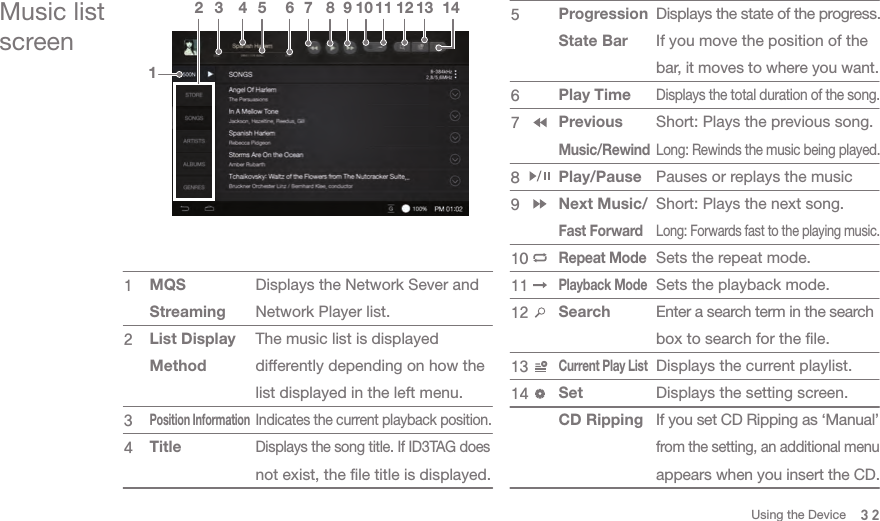
![Moving to the Previous Screen1. Click [ ] while using the product to move to the previous page. Moving Up/Down from the List1. Drag the screen [down to the top]/[top to the down] from the display list to move the list. Setting Sound In/Out1. You can set in the notification bar screen or [Settings-Sound-Sound In/Out].If ‘Sound In/Out’ is connected to ‘Digital In(Coax, OPT, AES/EBU, BNC), you can not output the sound with ‘Digital Out’. If you choose ‘Digital In’ from the ‘Sound In/Out’ selection screen, ‘Digital Out’ is not available. While ‘Sound In/Out’ is connected to ‘Digital In(Coax, OPT, AES/EBU, BNC), the connection will be canceled and [CLOSE] menu will be activated, if you re-click the connected port icon.If you attempt to connect to the USB DAC when connected to ‘Digital In(Coax, OPT, AES/EBU, BNC), ‘Sound In/Out’ will be automatically changed as the internal storage. The volume adjustment is only available if [BAL] and [PHONES] of the side and ‘Variable Analog Out’ from the ‘Sound In/Out’ selection screen. 29Using the Device](https://usermanual.wiki/DREAMUS/DPF11.Users-Manual-1of-2/User-Guide-2451750-Page-27.png)