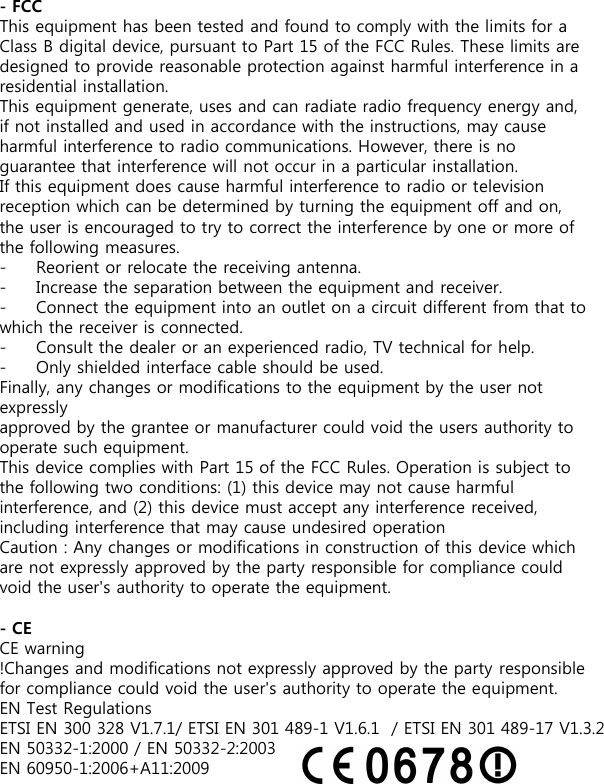
DREAMUS EB05 E-BOOK User Manual 01
IRIVER LIMITED E-BOOK 01
UserManual.wiki
>
DREAMUS
>
EB05 User Manual
Users Manual
Navigation menu
Upload a User Manual
Namespaces
Wiki Guide
HTML
PDF
Info
Views
User Manual
Discussion / Help
Navigation

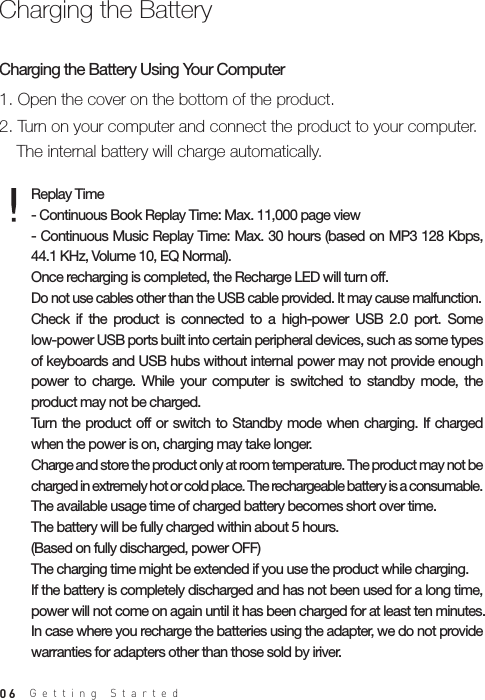
![051. Press and hold the [ ] and the power comes on.2. If you press and hold the [ ] when the product is turned on, then the power will be turned off. This model supports an automatic power-saving feature to minimize battery consumption. Depending on the power-saving mode settings, the product will be automatically turned off if keys are not operated for a given time. (refer to page 32)Turning on/offPower Management1. If you press the [ ] key briefly when the product is on, you can switch to standby mode.2. If you press the [ ] key briefly again, standby mode is terminated.Switching to Standby Mode1. If the product does not respond to key presses, reset it by pressing the [ ] + [ ] keys for more than six seconds.Using the Reset FunctionEven if you use reset function, current time and memory data will be preserved.Don't use reset function while the product is playing. It may cause severe damage to its memory. Getting Started](https://usermanual.wiki/DREAMUS/EB05/User-Guide-1368274-Page-7.png)
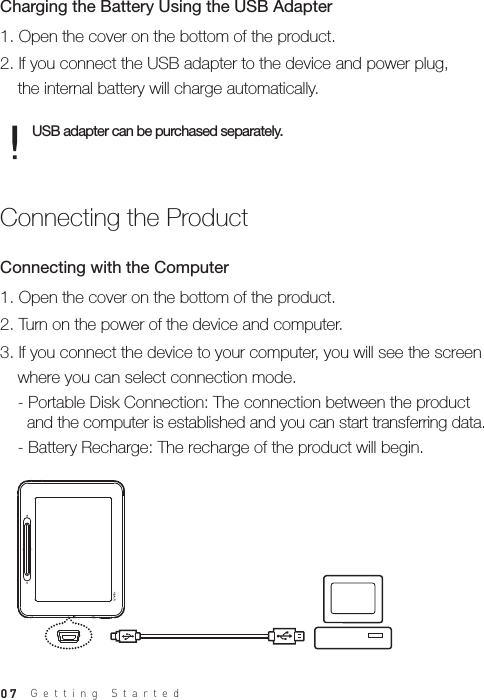
![081. After selecting files/folders to copy from your computer, the selected file/folder will be copied if you drag and drop it to the added drive.2. Files (or folders) will be transferred to folders below according to their content type. - E-Book: book - Comic Book: comic - Music: musicCopying Files (Folders) to the Product1. Safely disconnect the product from your computer by clicking the icon on the taskbar of the computer screen.2. Confirm the device disconnection by clicking [Confirm].Depending on the operating system for example Windows XP, the icon may be hidden from the taskbar. Hidden icons can be displayed by clicking indicator.Safe disconnection may not be performed if application programs such as Windows Explorer or Windows Media Player Windows are being used.Make sure that the product is safely disconnected after all the active application programs are closed. If safe disconnection fails, try again later. Failure to safely disconnect may cause data loss.Disconnecting from your computerDo not use cables other than the USB cable provided. It may cause malfunction. For successful connection between your computer and the USB cable, make sure that all the functions are disabled before connection. Check if the product is connected to a high-power USB 2.0 port. If connected to a keyboard or a USB hub without a power supply of its own, connection with the computer may not be troublefree.Getting Started](https://usermanual.wiki/DREAMUS/EB05/User-Guide-1368274-Page-10.png)
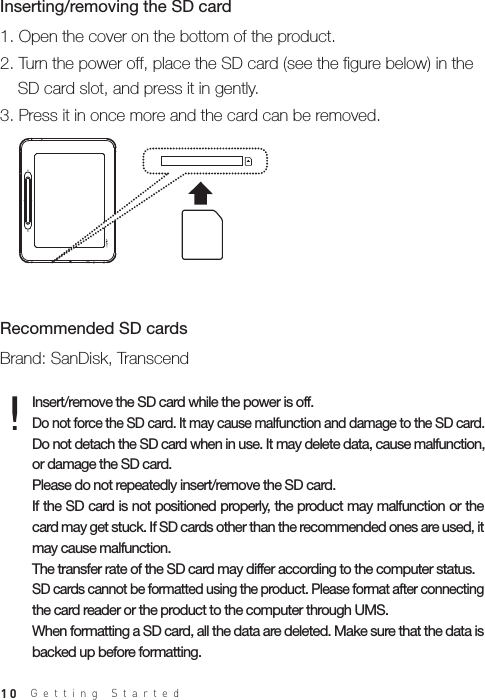
![091. Select the files/folders to be deleted, right-click on them and select [Delete].2. Click [Yes] if the [Confirm File/Folder Deletion] window pops up, and the selected files/folders will be deleted.Deleting Files (Folders) from the ProductPlease connect the USB cable in the proper manner. If the power of the computer or product is turned off or the USB cable is disconnected while copying or moving files/folders, it may cause serious damage to the memory.Transfer rate may differ depending on the computer or OS environment available for your region.Getting Started](https://usermanual.wiki/DREAMUS/EB05/User-Guide-1368274-Page-11.png)
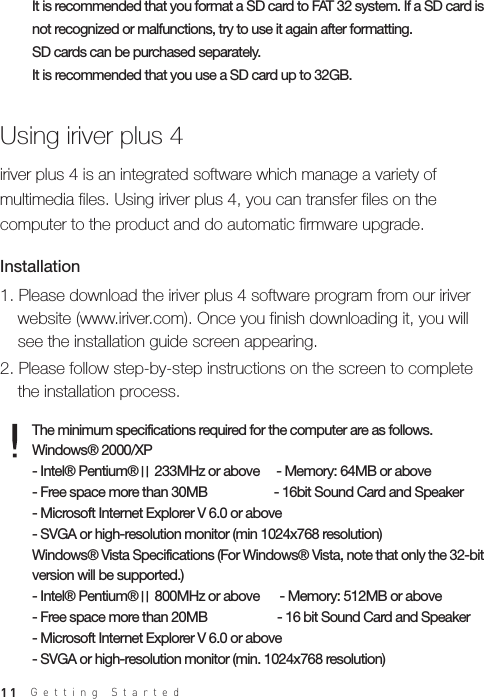
![12Windows® 7 Specifications (For Windows® 7, note that only 32-bit version will be supported.)- 1GHz or above, 32-bit processor - Memory: 1GB or above- Free space more than 16GB - DirectX 9 Graphic Device with WDDM 1.0 higher Drive- SVGA or high-resolution monitor (min. 1024x768 resolution)1. When iriver plus 4 is first run, the Add Media Wizard will be executed.2. According to the screen instructions, you can add to the library media files such as music, and e-books stored in the computer.Adding Media to the Library1. Insert a music CD into the CD drive and execute iriver plus 4.2. Select the music checkboxes you want to extract from [CD] tab in iriver plus 4 and click [CD Ripping] at the bottom left.3. When the music extraction is complete and [All Music] is selected, you will see the extracted music files added to the library.Extracting Media from a CD 1. Connect the product to your computer’s USB port and then execute iriver plus 4.Transferring Media to the ProductGetting Started](https://usermanual.wiki/DREAMUS/EB05/User-Guide-1368274-Page-14.png)
![132. Select the file checkboxes you want to transfer from your computer to the product and then click [Transfer] button or drag & drop the file to Device icon at the bottom or Device window. You will see the file transfer status in the [File Transfer] tab.3. When the file transfer is complete, you will see the selected music files added to the device library. 1. Connect the device to your computer’s USB port and then execute iriver plus 4.2. Select [Device > Initialize Disc]. When the window pops up asking whether to proceed with initializing the disc, click [Start].3. When the initialization process is finished, the Complete window will be displayed and the device can be disconnected from your computer.Initializing the Disc 1. Connect the device to your computer’s USB port while connected to the Internet and then execute iriver plus 4.2. Select [Device > Firmware Upgrade], and the Upgrade window will be displayed. Complete the firmware upgrade by following the instruction window.Upgrading the Firmware File recovery will not be possible if files have been deleted from the device. Please make sure to perform backup before initializing the disc.Getting Started](https://usermanual.wiki/DREAMUS/EB05/User-Guide-1368274-Page-15.png)
![14If there is not enough battery, a firmware upgrade may not be initiated.Never disconnect the device from your computer while a firmware upgrade file is being downloaded. After the download is finished, the upgrade will be initiated when the device is disconnected from your computer.If the device firmware is the latest version, a pop-up window will be displayed to indicate that it is the latest version.If there is newer firmware version, notification window will be displayed automatically when the device is connected to the computer.1. After you execute the Adobe Digital Editions program, please begin the [Library-Computer Authentication] process.Authenticating the Computer and the Product Using Adobe Digital Editions1. Please download Adobe Digital Editions from the Adobe website. Once you finish downloading it, you will see the installation guide screen appearing.2. Please complete the installation process by following the step-by- step instructions.Installation You can transfer copyrighted e-book files onto the portable device easily by using Adobe Digital Editions.Getting Started](https://usermanual.wiki/DREAMUS/EB05/User-Guide-1368274-Page-16.png)
![15Getting Started1. Select [Setup] on the main screen.2. On menu, select [System Management-Adobe Activation]. 3. On the Adobe Activation window, enter Adobe ID and password and press [Authentication]. Then you will see the AP list, which will show that you can connect.4. If you select an AP that you want, you can complete the Adobe Activation process. - Depending on AP, you may have to enter the key index and network key.Activating Adobe 1. Execute the Adobe Digital Editions program.2. Please select content to be saved on to the device and drag & drop the file.Transferring Files to the Device 2. Once you type in your ID and password on the computer's authentication window, press the authentication button. You can obtain the Adobe ID from the Adobe website.3. After authentication is completed, the device installation helper window will appear if you connect the device to your computer.4. Press the device authentication button.](https://usermanual.wiki/DREAMUS/EB05/User-Guide-1368274-Page-17.png)
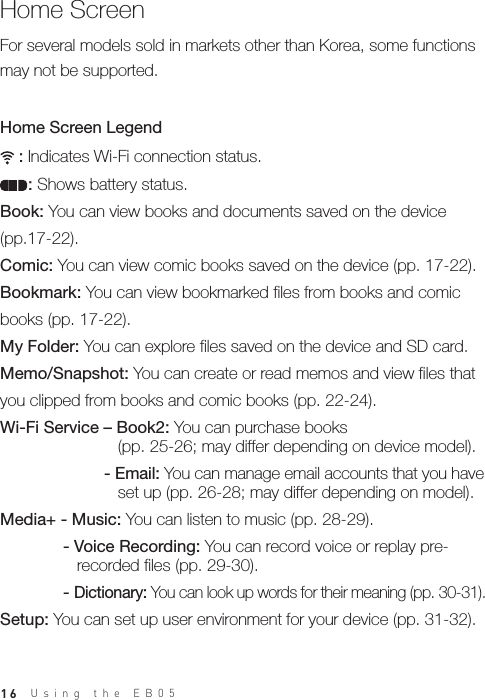
![171. Once you turn on the power, you will see the home screen. - If you press the [ ] in the middle of using the device, you will also see the home screen.2. If you touch the function button on the screen, you can enjoy the function.3. If you press the [ ] during function operation, the previous screen will appear.Selecting OptionsPlease use the stylus pen when using the touch screen. When touching the screen, please do so gently; if you touch it hard with a sharp object, the screen may be damaged.When parking the stylus pen, keep inserting it into the groove until it clicks.1. Once you select [Book/Comic/Bookmark/My Folder] on the Home screen, you will see the file list.2. On the file list, select the tab on the left side. - Book: View All Books / Books You Are Reading / Bookmarked - Comic Book: Cover Story / SD Card - Bookmark: Book / Comic Book - My Folder: Cover Story / SD Card3. If you select a file of your choice, you can open the file for viewing.Selecting FilesSelecting FilesFiles saved on the SD card can be viewed by searching in My Folder. Book Formats Supported: Comic Book Formats Supported: DF, EPUB, TXT, DOC, PPT, XLS, HWP, DJVU, and FB2 Using the EB05](https://usermanual.wiki/DREAMUS/EB05/User-Guide-1368274-Page-19.png)
![- If you press the [ / ] on the file list or push the [ / ] button on the bottom-right side of the screen, you can move to the previous/next page.- If you push the [ / ] and hold it for a few seconds, you can continuously move to the previous/next page.18Progress Bar on File Name: Indicates how much of the file is read.Format: Specifies the file’s format. : Designates the files registered as favorites.File List Screen Legend1. On the file list, if you press the [ ] on the top right of the screen, you can search for files by typing in search words.Searching FilesViewing Previous/Next List Page 1. If you press the [ ] on the top right of the screen, you can activate the [ ] icon right next to the file name.2. If you press the [ ] icon next to the file, you can register the file as your favorite.Registering a File as a Favorite Compressed File Formats Supported: JPG, BMP, PNG, GIF, and Zip compressed file formats for all the above formats. It may take longer for progressive JPEG files to open or to turn pages.Using the EB05](https://usermanual.wiki/DREAMUS/EB05/User-Guide-1368274-Page-20.png)
![191. On the file list, if you press the [ ] on the top right of the screen, you can delete all bookmarks.Deleting All Bookmarks 1. On the file list, if you press the [ ], you will see the menu list coming on.2. You can select menu and set up items.- Change Cover/Title List: Sets up the sorting types of the book list.- Change Alignment Type: Sets up the alignment types of the book list.Book/Comic List MenuALLALL1. On the file list, if you press the [ ] on the top right of the screen, you can activate [ ] icon next to the bookmark.2. If you press the [ ] icon next to the bookmark, you can delete the bookmark.Deleting Bookmarks1. On the file list, if you push the [ ] button on the top right of the screen, you can activate [ ] icon next to the file name.2. If you press the [ ] icon next to the file, you can delete the file.Deleting Files Using the EB05](https://usermanual.wiki/DREAMUS/EB05/User-Guide-1368274-Page-21.png)
![20SAaIf you press the screen while viewing, you will see a toolbar window. : Uses the simple function in [Music] mode (Book/Comic). 1-2/20 : Indicates the page you are viewing and the total number of pages (Book/Comic). : Opens a simple memo window while viewing and enables you to create drawings (Book/Comic). : Enables you to take the snapshot of the page you are viewing (Book/Comic). (Snapshot files are saved in the Snapshot folder under the [Memo/Snapshot] mode.) : Bookmarks the page you are viewing (Book/Comic). : Looks up the dictionary while viewing (Book). : While viewing a PDF file, you can enlarge the text size with this if the reflow function is on. You can cut the outer margins of the file if the reflow function is off (Book). How to Use Toolbar - If you slide the [ / ] or press the left/right on the screen while viewing, you will see the previous/next page.- If you slide the [ / ] while viewing, you will see the page status bar. Having moved to a page you want after pressing the [ / ], you can view the page if you press the [ ]. (If you want to cancel continuous moving, press the [ ].)- If you press and hold a search word while viewing, you will see a window with dictionary lookup results. (This function may not be supported depending on file format.) - If you press the [ ] while viewing, you will see the previous screen.File Viewing Viewing FilesUsing the EB05](https://usermanual.wiki/DREAMUS/EB05/User-Guide-1368274-Page-22.png)
![21 : Resizes the screen size according to the size of the file (Comic). : Sets up the auto page turner function (Comic). : Creates drawings on the page you are viewing (Book/Comic). : Deletes drawings on the page you are viewing (Book/Comic). : (Book/Comic) If you choose: Sets up the thickness of the pen. If you choose: Sets up the thickness of the eraser or deletes all drawings you have entered.Auto1. While reading books, press [ ] to view the list of menu.2. You can select a menu and set up items.- Page Moving: Enables you to move to the page you entered.- Rotate: Rotates the screen.- Table of Contents: If there is a table of contents in the file, you can view it with this function. If you select a table of contents you can move to the page that you select. This function supports PDF/EPUB files only. - Main Text Search: If you type in a keyword, you can find sentences in the main text containing the word. - Link Search: If there is a link in a PDF and EPUB document, it will enable you to move to the linked location. If you select the Main Text Link Search function, you can move to the linked location in the main text.- Dithering On/Off: If the color scheme used in the original file is impossible to reproduce, it will be replaced by one most similar to the original. - Reflow On/Off: If the page is too crowded with text, which may make it hard for you to read, this function will simplify the page and thereby improve readability. Book Viewing MenuUsing the EB05](https://usermanual.wiki/DREAMUS/EB05/User-Guide-1368274-Page-23.png)
![22Depending on file format, you may not be able to see the menu. Once you view a file, you will see the same status of the file (e.g., zoom in, landscape viewing) on your next viewing.1. Once you choose [Memo/Snapshot] on the Home screen, you will see the Memo/Snapshot list. - On the Memo/Snapshot list, press the tab on the left side of the screen to select a Memo/Snapshot. 2. If you select a Memo/ Snapshot file you will see the Memo/Snapshot.Selecting Memo/Snapshot File Memo/Snapshot 1. While reading comic books, press [ ] to view the list of menu.2. You can select a menu and set up items.- Page Moving: Enables you to move to the page you entered.- Change Viewing Order: Changes the viewing order of the comic book you are reading (left to right and right to left). - Dithering On/Off: If the color scheme used in the original file is impossible to reproduce, it will be replaced by one most similar to the original. - Setup to Standby Screen: Sets up the page you are viewing now as the standby screen.Comic Viewing MenuUsing the EB05](https://usermanual.wiki/DREAMUS/EB05/User-Guide-1368274-Page-24.png)
![1. On the Memo/Snapshot list, press the tab on the left side and select Drawing.2. If you press [ ] on the top right of the screen, you will see a memo window. : Creates a drawing. : Switches to the eraser mode. If you choose: Sets up the thickness of the pen. If you choose: Sets up the thickness of the eraser or deletes all you have entered : Sets up background memo pad.3. Once you enter a drawing and press the [ ] on the screen, you can save the drawing.23If you select a memo on the list, you can see the memo that you chose and toolbar. : Sends an email with the memo as an attachment. : Revises the drawing. : Deletes the drawing. / : Indicates the previous/next memo.Viewing Drawings 1. If you press the [ ] on the top right of the screen on Memo/ Snapshot list, you can activate the [ ] icon next to Memo/Snapshot.2. If you press the [ ] icon next to the Memo/Snapshot file to delete, you can delete the Memo/Snapshot.Deleting Memo/Snapshot File Creating DrawingsUsing the EB05](https://usermanual.wiki/DREAMUS/EB05/User-Guide-1368274-Page-25.png)
![24On the Snapshot list, if you select Snapshot, you will see a Snapshot and toolbar. : Sends an email with the memo as an attachment. : Deletes the snapshot file. / : Indicates the previous/next memo.Viewing SnapshotsTIf you select a memo on the list, you can see the memo that you chose and toolbar. : Sends an email with the memo as an attachment. : Revises the text memo. : Deletes the text memo. / : Indicates the previous/next memo.Viewing Text Memos 1. On Memo/Snapshot list, press the tab on the left of the screen and select a Text memo.2. If you press the [ ] button on the top right of the screen, you can see a memo window. 3. Once you enter a memo using the virtual keyboard and press the [ ] on the screen, you can save the memo you typed.Creating Text Memos TUsing the EB05](https://usermanual.wiki/DREAMUS/EB05/User-Guide-1368274-Page-26.png)
![25Using the EB05 Wi-Fi ServiceThe Wi-Fi service function may not be available for some models. This function allows you to connect to the wireless Internet and buy books online and send and receive emails. For several models sold in markets other than Korea, some functions may not be supported.For how to connect to the wireless Internet, refer to the following page (pp. 25-26). For how to activate Adobe, refer to the following page (pp. 14-15). 1. On the Home screen, select [Wi-Fi Service-Book2] and you will see the Book2 site. - Please enter your ID and password on the Adobe activation window.2. Log in by typing in your ID and password. - You must be a member of the online service.3. After selecting [Buy Now] at the bottom of the book to buy and fill out the payment form.4. If you press [Download], you will see the book you bought begin downloading.How to Buy Books Online1. Select [Setup] on the Home screen.2. Select [System Management – Wi-Fi Setup] on Menu.3. If you press the [Search Wireless LAN] tab, you will see the AP list that you can access nearby.Connecting to Wireless Internet](https://usermanual.wiki/DREAMUS/EB05/User-Guide-1368274-Page-27.png)
![26Using the EB05 If you select a menu requiring wireless network connecting, you will see the AP list window appearing.1. If you select [Wi-Fi Service-Email] on the Home screen, you will see the email account list.2. If you press the [ ] on the top right of the screen on the email account list, you will see the email management window appearing.3. If you press the [ + ] on the top of the screen, you will see the add email window appearing. (Please refer to the example below when you add email accounts.) - Account ID: iriver - Email Address: iriver.story@gmail.com - Account Password: 12345 - Incoming Mail Server: imap.gmail.com - Outgoing Mail Server: smtp.gmail.com - Incoming Server Port: 993 - Outgoing Server Port: 4654. If you press the [Confirm] after finishing filling out the form, you are all set to adding email accounts.Adding Email AccountsFor some information you enter when adding accounts, please visit your email service provider’s website. - If you press the [Search Again] button below the [Search Wireless LAN] tab, you will see the AP list searched again.4. Once you select the AP to connect and press [Connect], you will see the wireless network connecting. - Depending on AP, you may have to enter the key index and network key.](https://usermanual.wiki/DREAMUS/EB05/User-Guide-1368274-Page-28.png)
![27Using the EB05 1. If you select an email account you want on the email account list, you will see the email list.2. You can activate functions by pressing icons on the top right of the screen. : Allows you to compose new mail messages and send them. : Refreshes the screen and shows you new mail messages. : Enables you to activate the delete window and delete mail messages of your choice. : Manages email address book. Send: Activates selected windows and sends mail messages to selected addresses. If you press [Save] after composing a mail message, the composed message will be saved on the temporary folder. Add: Adds new addresses. Delete: Activates the Delete window and deletes addresses you want. Revise: Activates the Revise window and revises addresses you want.3. If you select the mailbox by pressing the tab on the left of the screen, you will see the mail list.4. If you select a mail message of your choice, you will see the message. - If you press the [ + ] key next to the sender’s email address in the inbox, you can add the address to your address book. - If there is any attachment, you can see the attachment list by pressing the attached file. Viewing Email Account 1. Once you press the [ ] on the top right of the email management window, you can delete [ ] next to the account. 2. If you press the [ ] icon next to the account to be removed, you can delete it.Deleting Email Accounts](https://usermanual.wiki/DREAMUS/EB05/User-Guide-1368274-Page-29.png)
![28Using the EB05 If you press and hold the [ / ] button on music list, you can move to the previous/next page continuously. If you press the [ / ] button or [ / ] on the bottom right of the screen on music list, you can move to the previous/next page.If you press the [ ] button on the bottom left of the screen on music list, you can move to the upper-level folder. Supported file formats: MP3, WMA, OGG1. If you select [Media – Music] on the Home screen, you will see the music list.2. If you select a music file you want, you can replay it. - You can select a memory you want by pressing the tab on the left of the screen on file list.Selecting Music Music - If you press the [Reply] on the bottom of the inbox screen, you can reply to the message you received. - If you press the [Forward] on the bottom of the inbox screen, you can forward the message you received.While viewing mail messages, if you press the [ / ] or the [ / ] on the bottom right of the screen, you can move to the previous/next page.- While playing, press the [ / ] to control volume.- While playing, press the [ / ] to stop/replay.Listening to music](https://usermanual.wiki/DREAMUS/EB05/User-Guide-1368274-Page-30.png)
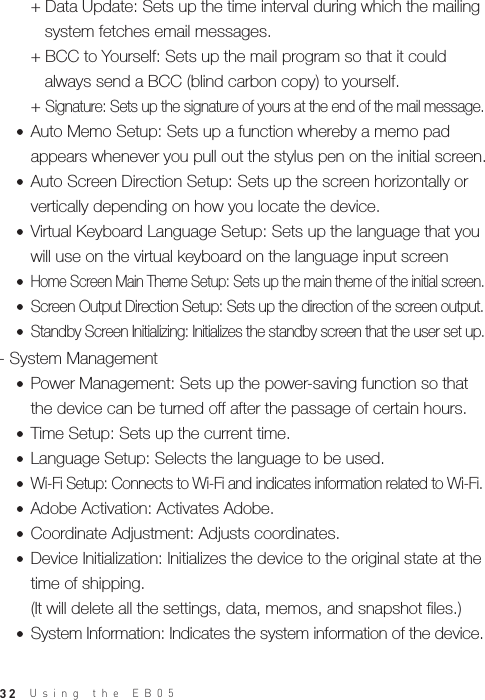
![29Using the EB05 - While playing, press the [ / ] to play the previous/next music.- While playing, touch the location of the progress bar while replaying, you can move to a location you want.- If you press the [EQ] on the screen, you can change the EQ.- If you press the [Replay Mode] on the screen, you can change the replay mode.1. Once you choose [Media/Recording] on the Home screen, the standby screen will be displayed.2. Once you press the [ ], recording starts. If you press [ ] in the middle of recording, recording terminates.- If you press the [LOW/MEDIUM/HIGH] on the top right of the screen, you can change the quality of the recording.RecordingRecording1. If you press the [ ] on music list or while replaying, you can see the menu list.2. You can select menu and set up items.- Change the sorting type: Sets the sorting type for the music list.- Delete file: Deletes selected music.Music Listening Menu You cannot control volume while recording.If the remaining memory space or power is insufficient, recording will be automatically stopped.](https://usermanual.wiki/DREAMUS/EB05/User-Guide-1368274-Page-31.png)
![30Using the EB05 The recorded file will be saved in the following format. VOICEYYMMDD-XXX.mp3 (YY:Year, MM:Month, DD:Day, XXX: saved number) The size for recorded files per minute according to recording quality is as below.low: Approx. 240KB / medium: Approx. 380KB / high: Approx. 720KB Recording can be done for up to 5 hours. 1. From the recording standby window, press the [Replay] key on the left of the screen to view the list of recorded files.2. If you select a file you want, you can see the file replayed. - While playing, press the [ / ] to control the volume. - While playing, press the [ / ] to stop/replay. - While playing, press the [ / ] to play the previous/next file. - While playing, touch the location of the progress bar while replaying, you can move to a location you want.Listening to recorded files Dictionary1. If you select [Media-Dictionary] on the Home screen, you will see the keyword input window.2. Select a dictionary for a lookup by pressing the [ / ] button on the screen.3. Pressing [Enter] after typing in a search word will produce the dictionary lookup results.Looking up Dictionary](https://usermanual.wiki/DREAMUS/EB05/User-Guide-1368274-Page-32.png)
![31Using the EB05 1. If you press the [ / ] on the lookup results screen, you can move to the previous/next entry page.1. Please select [Setup] on the Home screen.2. If you select items you want by clicking the tab, you will see the setup list.3. Please select the setup you want.- Personal Information Management Set up My Name: Sets up the name to appear on the main screen. Personal Information: Sets up my own name and phone number.- Other Management Mail Setup: Sets up items related to your email account.Settings Setup You may set up your own user environment. The pre-installed menu structure may differ depending on the firmware version.Moving to Previous/Next Entry 1. If you press the [ / ] on the lookup results screen, you can move to the previous/next page.Moving to Previous/Next Page](https://usermanual.wiki/DREAMUS/EB05/User-Guide-1368274-Page-33.png)

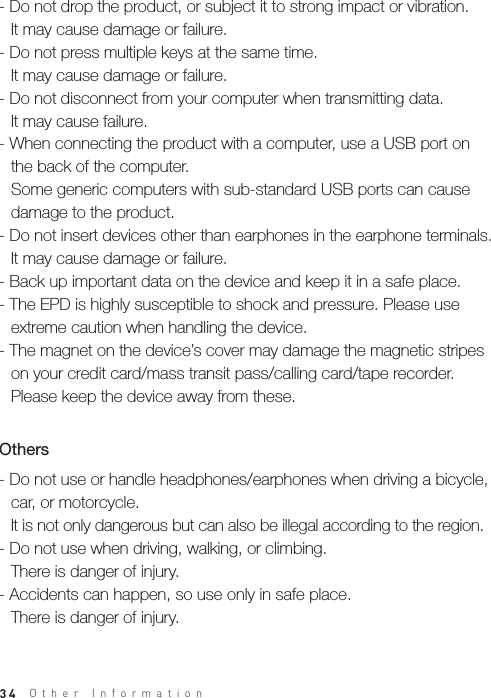
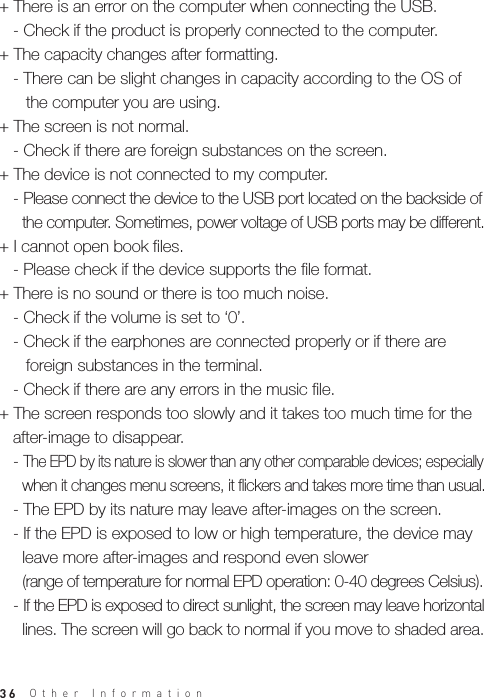
![35- When using while on the move, check if there are any dangerous obstacles. There is danger of injury.- There is a risk of electric shock during electrical storms, so do not use if possible. There is danger of injury.- If you experience tinnitus, reduce the volume or stop use. There is danger of injury.- Do not use for long periods at high volume. There is danger of injury.- Do not use headphones/earphones at high volume. There is danger of injury.- Be careful that headphones/earphones do not get caught or snagged in other objects. There is danger of injury.- Do not sleep with earphones on, or use them for a long period of time. There is danger of injury.+ The power does not come on. - Check if there is battery power left. Charge and turn the power on. - Reset the device by pressing the [ ] + [ ] keys for more than six seconds.+ There is an error on the computer when charging battery. - Check if the product is properly connected to the computer.Check!TroubleshootingOther Information](https://usermanual.wiki/DREAMUS/EB05/User-Guide-1368274-Page-37.png)