DREAMUS EB12 E-BOOK User Manual EB12 Manual 1119 2
IRIVER LIMITED E-BOOK EB12 Manual 1119 2
DREAMUS >
user manual

USER GUID E
CONTENTS
01
02
03
Gatting Started Troubleshooting and
Other Resources
Basics
0 3 Gatting Started
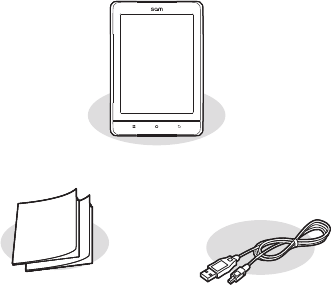
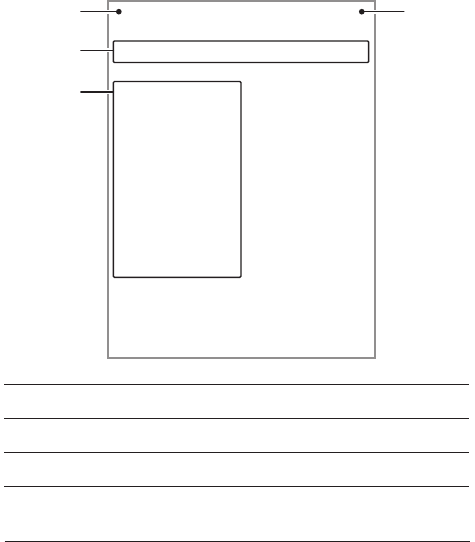
What’s in the Box?
Components may be changed without notice to improve the
performance or quality of the product.
Main Body
Quick start guide &
warranty information USB cable
Quick Start Guide: Basic guide to using the EB12.
Product Warranty: Please keep this warranty in a safe place in
the event your EB12 needs servicing.
USB Cable: Connect the USB cable to a PC to charge the
product.
0 4
1
2
3
4
5
6
7
Touch EPD
Simply touch the screen to start.
Press the menu button to display the menu window.
Press the home button to display the home screen.
Click here to display the previous screen.
5 6 7
1
4
3
2
Gatting Started
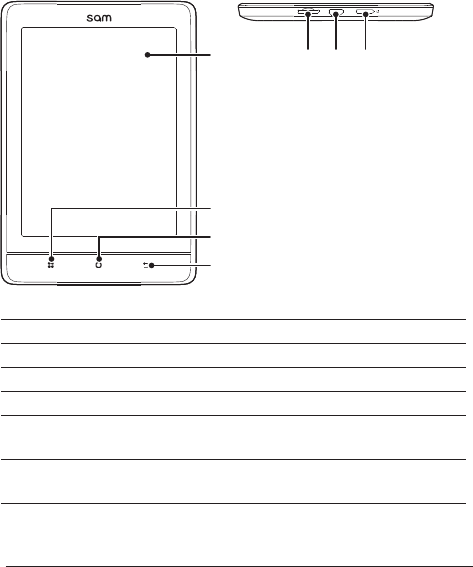
EB12 at a Glance
Product appearance, printed and engraved information
may vary depending on the model.
Menu Button
Home Button
Previous Button
Micro SD
Card Slot
USB Jack
Power
Insert a Micro SD card into the device to view
the stored files.
Connect a USB cable to link with a computer
or recharge the device.
Press and hold the power button to turn the
device on/off. Press and hold briefly for
power-saving mode.

0 5 Gatting Started
Powering Up & Charging
Power on/off
1. Press and hold the [ ] power on/off key to power on.
2. During stand-by mode, Press and hold the [ ] power on/off
key to power off.
This product has an automatic power saving function to
prevent excessive battery consumption. If there is no key
operation within the prescribed period [Settings - automati-
cally turn off], the device will be automatically powered off.
(See page 25)
Turning to standby mode
Using the reset function
1. Manually switch to standby mode by pressing the [ ] key
briefly when the power is on.
2. Return to normal mode by pressing the [ ] key briefly.
1. Should the product stop unexpectedly during operation and keys
are no longer responsive, press and hold the [ ] key for 10
seconds to reset the product.
When using the reset function, the current time and memory
data will not be deleted. Do not use the reset function while
the product is in use. Doing so may seriously damage the
memory.

0 6
Screen refresh
Screen setup
Recharging by connecting with the computer
Gatting Started
1. Refresh the screen by pressing and holding the [ ] key for
more than 2 seconds.
Optimize the screen for reading by:
1. Press the [ ] key will brings up a window for environment setup.
2. Set up the desired line spacing, margins, and font.
1. To recharge the device’s battery, simply turn on the computer and
connect the device.
When an eBook is viewed continuously: up to ?? page views
On Standby: Approximately ?? weeks after full recharge
Use only the USB cable provided with the device. Unauthorized cables
may cause device malfunction.
Connect the provided cable to the high-power USB 2.0 port.
Connecting the cable to a low-power USB port (keyboard or USB hub
without power supply) may not recharge the device. Charging may be
interrupted when the computer switches to standby mode.
Recharge the device at room temperature. Recharging in excessively
hot or cold environments may adversely affect charging rate or
capacity. Battery life will gradually shorten after frequent recharges.
Recharge time will take ? hours and ?? minutes (when battery is fully
discharged and the power is off). Recharging while the device is in use
will increase the time necessary to achieve a full charge.
Recharge at least 10 minutes before turning the power on when the
battery is completely discharged and then reset the device by
pressing the [ ] key more than 10 seconds.
0 7
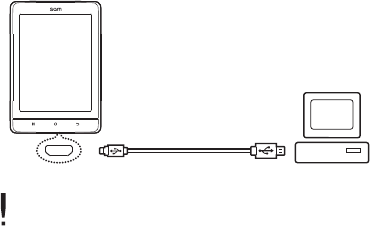
Connecting & Syncing
Connecting to a computer
1. Turn on the power of the device and the computer, and then
connect the device to the computer.
Use only the USB cable provided with the EB12 to ensure safe
operation.
Connect the computer and the USB cable only after all
functions of the EB12 have been stopped.
Check that the EB12 is connected to a high-power USB 2.0
port. Connecting to a keyboard or a USB hub without its own
power supply may prevent normal operation.
Disconnecting from a computer
1. Click the icon displayed in the task bar or desktop of the
computer to safely disconnect the EB12.
2. Click [Ok] to ensure the EB12 can be safely removed.
Gatting Started

0 8
The icon may be hidden in the task bar depending on the
operating system. For example: For Windows XP, click the
expand icon to display it on the screen.
When using application programs like Windows Explorer or
Windows Media Player, it may be unsafe to disconnect the
device while using the program.
Remove the EB12 only after exiting all applications and
programs. Failure to do so may result in the loss of stored
data.
Copy files & folders to the EB12
Delete files & folders in the EB12
1. To copy a file/folder from the computer, select the file and use
the drag & drop method to add the files to the device.
Please connect the USB cable properly and use caution
when copying or moving files. If the
computer or product is powered off or the USB cable is
removed while the file/folder is being copied or moved, data
may be lost or become seriously damaged.
Transmission speed may vary depending on the computer
and the OS environment.
1. Select the file/folder to delete, right-click, and select [Delete].
2. Click [Yes] in the [check file/folder/deletion] window to delete the
selected file/folder.
Gatting Started
0 9
Brand : SanDisk, Transcend
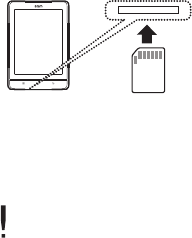
Insert/remove the SD Card
Recommended SD Cards
1. Gently insert and push the Micro SD card in the card slot as
shown in the figure below while the product is powered off.
2. Gently press the SD card again to remove it.
Insert/remove the SD card when the product is powered off.
To avoid damage, do not apply excessive force when
inserting the SD card.
Do not remove the SD card while in use. Doing so may delete
data, damage the EB12 or cause damage to the SD card.
Do not repeatedly insert/remove the SD card.
Improper handling of the SD card may cause damage to the
EB12 or to the SD card.
Use of an unauthorized SD card may result in a malfunction
of the EB12.
Transfer speed of the SD card may vary depending on the PC
status.
Formatting the SD card deletes all data. Please back up the
card before formatting it.
Please format the SD card as FAT 32 system and format any
SD card that is not recognized or may cause damage to the
EB12 or to the SD card.
SD cards up to 32 GB are supported by the EB12.
Gatting Started

1 0
To Purchase eBooks from Kyobo Book
Make eBook purchases from Kyobo Book wherever Wi-Fi is
available.
How to buy eBooks
1. Connect to a wireless network.
2. Visit Kyobo Book website (www.kyobobook.co.kr) to sign up for a
membership.
3. Press the [ ] key at the home page and select [Kyobo login].
- You may use the shortcut to [Kyobo Book – Buy a Book Store] on
the home page.
4. Use the keypad to type in the ID and password on your Kyobo
Book account.
5. Select [Login].
6. Once logged in, you will see the Kyobo Book website.
7. Enter the title or author to search for the desired eBook.
8. Once you select an eBook, detailed information on the book will
be displayed.
9. Select [Buy an eBook Now] and enter your credit card informa
-tion to complete the transaction.
10. Once you select [Download] on the purchased books list, you will
see the eBook downloaded in your library.
Gatting Started
To connect to Kyobo Book, you must have access to a Wi-Fi
network. For how to connect to Wi-Fi networks, please refer
to the next page (p. ??).
1 1
14
1
2
3
4
2
3
Home Page Screen
Home Page Legend
User Name
List Category
eBook List
Recently Views
eBooks
Shows the user name
Shows list of eBook
Shows eBook list
Shows recently read eBooks
Basics

1 2
5
6
7
8
9
10
5
6
7
8
9
10
Search eBooks
List Page Information
Membership Service
Wireless Network
Battery
Time and Date
Search eBooks by entering book titles.
Shows eBook list’s page information
Shows how to use membership service
Shows the status of wireless network
connection
Indicates battery charge status
Indicates current time and date
Basics
Shows how to use membership service
1 3
11
12
Connecting to Kyobo Book website
11
12
Connecting to
Kyobo Book
Shows whether the micro SD card is
inserted
Micro SD Card
Basics
Press the [ ] key while using the device to see the home
page screen.

1 4 Basics
Viewing eBook
Selecting an eBook
1. Once you select the category tab on the home page screen, you
will see lists of eBooks in different formats.
- Downloaded: Shows eBooks in the order of being downloaded
- Member Library: ??/ One-volume eBook library: Shows the list of one-volume eBooks
- Recently Read: Shows the list of recently read eBooks
- By Title: Shows the list of eBooks’ title’s in Korean alphabetical order
- By Author: Shows the list of eBooks’ author’s name in Korean alphabetical order
- Fully Read: Shows the list of fully read eBooks
- Purchased Date: Shows the list of eBooks by purchase date
- ePUB Only: Shows ePUB files only
- PDF Only: Shows PDF files only
2. Select the desired eBook from the list to display its contents.
Searching eBook
1. Press the [ ] key on home page screen.
2. Press [Search] after typing in a book title and you will see an
eBook list that contains the keyword.
3. Select the desired eBook from the list to display its contents.
How to read eBook
- Move to the previous/next page by pressing the left/right side of
the screen.
- Display the tool bar window by pressing the [ ] key or pressing
the center part of the screen while reading.

1 5
+ Touch the status bar in the tool bar window to move to the desired
page.
+ Display the search window by pressing the [ ] key in the tool bar
window. Press [ ] after typing a search word to display sentences in
the book containing the search word.
+ Bookmark the current page by pressing [ ] in the tool bar window.
+ While reading, press and hold a finger against the screen to display
options--memo, highlighter, dictionary lookup, and share.
+ Memo
+ Highlighter
+ Dictionary Lookup
+ Share
+ Not supported on Comic Viewer and Office View.
+ While reading, press the [ ] key to display the previous screen.
eBook Formats Supported by the Device: PDF, ePUB, TXT, DOC,
PPT, XLS, HWP, DJVU, FB2
Comic Book Formats Supported by the Device: JPG, BMP, PNG,
GIF, and ZIP compression files for the aforementioned formats
Files in progressive JPEG format may take longer to open
initially and to turn pages.
Option
Press the [ ] key on the home page screen to display the option
list.
- Wireless Internet connect/disconnect
+ Wi-Fi: Use the checkbox to connect/disconnect wireless Internet.
Basics

1 6 Basics
+ Wi-Fi Setup
Network Notification – Displays open-to-public network availability.
Add Wi-Fi Network – Add a Wi-Fi network by entering the network
SSID.
- Library List Update: Update the library list.
- Download All: Download all purchased eBooks.
- Kyobo Login: Log in to the Kyobo Book website by entering your ID
and password.
- Setup: Set up the device’s environment.
Connecting Wireless Internet
1. Select [Wireless Internet Connect/Disconnect] on the option list.
2. Check the [Wi-Fi] item to display the accessible AP list.
3. Select the desired AP to connect to the network.
- It may be necessary to type in a key index and a network key
depending on the AP’s setup.
4. Set up and manage the AP by selecting [Wi-Fi Setup].
When selecting a menu that requires a wireless Internet
connection, an AP list window will be displayed.

1 7 Basics
Users can set up the EB12 according to their preferences. The
structure of the settings menu may vary depending on the version
of the firmware.
1. Press [ ] in the home screen and to see the option list.
2. Press [Settings], to display an environment setup item.
- Wireless Network: Connect/disconnect wireless Internet.
- User Account Information: Check Kyobo Book account informa-
tion/book rental log/reading records.
- Languages: Select the preferred language.
- Auto Power Off: The device automatically turns off after a certain
time has elapsed.
- Auto Standby Mode: The device automatically switches to the
standby mode after a certain time has elapsed.
- Download: Set up the type of the file to download.
- Service Page: Set up the hub page/bookmark/whether to indicate
what page is being read.
- Screen Refresh Interval: Set up the interval for screen refresh.
- Device Information and Update: Update the system/applications or
check information on the device.
- Device Initialization: Initialize the device to the factory settings.
Settings

1 8
Settings
Related to the EB12
- Failure to change the screen image may result in permanent
discoloration.
- Do not put or drop metals or inflammable foreign materials on the
device (coins or hairpins).
- Do not put heavy objects on the device. It may cause malfunction.
- If the EB12 becomes wet (beverages, chemicals, sweat, or
rainwater), DO NOT power on the EB12. Wipe the EB12 dry with a
soft cloth and take it to the nearest iriver service center (problems
resulting from exposure to moisture will be repaired for a fee
regardless of the warranty period, and in some instances, may not
be repairable.)
- Do not expose the device to dusty or moist environments. It may
cause malfunction.
- Do not attempt to disassemble, repair or alter the EB12.
- Avoid exposure to direct sunlight or temperatures outside of 0℃ -
40℃.
- Do not keep the EB12 next to magnets, TVs, monitors or speakers.
- Do not expose the EB12 to chemicals or detergents. Doing so may
damage the surface of the device.
Troubleshooting and Other Resources

1 9 Troubleshooting and Other Resources
- Do not drop the EB12 or expose it to strong impacts or vibrations.
- Do not press two or more keys simultaneously.
- Do not remove the USB cable while transferring data.
- When connecting the USB cable, please use the USB port on the
back of the computer. Some computer's USB ports may be
damaged during assembly.
- Please back up important data stored in the device in a safe place.
- The EPD's panel is thin and may be damaged from impact or
pressure. Utilize caution when using/storing the device.
- Do not operate the device while riding or driving a bicycle,
automobile or motorcycle. It is not only dangerous but is in violation
of the law in some countries.
- Do not use the EB12 while driving, walking, or hiking.
- To avoid accidents, only use the EB12 in a safe place.
- Be aware of the surroundings when using the device.
- Do not use the EB12 during thunderstorms.
Other

2 0 Troubleshooting and Other Resources
Employ the following suggestions if you experience problems with
your EB12.
+ The device does not power on.
- Check the battery power level. Turn on again after recharging.
- Reset the device by pressing the [ ] key for more than 10
seconds.
+ The device is not charging even when it is connected to the
computer.
- Check that the USB cable is properly connected to the computer.
+ An error occurs on the computer when the USB is connected.
- Check that the USB cable is properly connected to the computer.
+ The volume has changed after formatting.
- The volume may vary slightly depending on the operating system
of your computer.
+ The screen does not look normal.
- Check for and remove any foreign material on the screen.
+ The device cannot be connected to the computer.
- Connect the device to the USB port on the back of the computer.
+ No eBook file appears on the screen.
- Check that the eBook is in a format supported by the device.
+ It takes a long time for the screen to change and for the afterim-
age to disappear.
- Normal EPD screen response times may vary.
- It is a natural property of EPD to have afterimages.
- EPDs may leave afterimages or take longer to change screen
images when used in excessively hot or cold places (range of
temperature for normal operation: 0℃ - 40℃).
- When the EPD is used under direct sunlight, it may leave
horizontal lines on the screen (these will disappear when used in
the shade).
Troubleshooting

2 1
Copyright
iriver has the patent, trademark right, copyright and other
intellectual property rights related to this instruction book so no
contents may be copied or duplicated in any format or by any means
without the prior approval of iriver. Unauthorized use of all or part
of this document may result in legal action. Copyrighted contents
like software, sound sources and video are protected by relevant
laws like the Copyright Act. The user accepts full legal responsibili-
ty for the use of this product to copy or
distribute copyrighted contents without permission. The names of
companies, institutions, products persons and incidents in this
manual are fictional. iriver has no intention to be associated with
any company, institution, product, person or incident through this
instruction book, and no such inference should be made. The user
is responsible for complying with the Copyright Act.
©1999~2012 iriver Limited. All rights reserved.
Certification
KC / FCC
Class B device (broadcasting and communication equipment for
homes):
This device is EMC equipment for homes (class B). It can be used in
all regions.
Troubleshooting and Other Resources
FCC ID: QDMEB12
changes or modifications not expressly approved by the party
responsible for compliance could void the user’s authority to
perate the equipment.
2 2 Troubleshooting and Other Resources
This equipment has been tested and found to comply with the
limits for a Class B digital device, pursuant to Part 15 of the
FCC Rules. These limits are designed to provide reasonable
protection against harmful interference in a residential
installation. This equipment generates, uses and can radiate
radio frequency energy and, if not installed and used in
accordance with the instructions, may cause harmful
interference to radio communications. However, there is no
guarantee that interference will not occur in a particular
installation.
If this equipment does cause harmful interference to radio or
television reception, which can be determined by turning the
equipment off and on, the user is encouraged to try to correct
the interference by one or more of the following measures:
- Reorient or relocate the receiving antenna.
- Increase the separation between the equipment and receiver.
- Connect the equipment into an outlet on a circuit different
from that to which the receiver is connected.
- Consult the dealer or an experienced radio/TV technician for help.
This equipment complies with FCC radiation exposure limits
set forth for an uncontrolled environment. End user must
follow the specific operating instructions for satisfying RF
exposure compliance. This transmitter must not be co-located
or operating in conjunction with any other antenna or
transmitter.
The portable device is designed to meet the requirements for
exposure to radio waves established by the Federal Communi-
cations Commission (USA). These requirements set a SAR
limit of 1.6 W/kg averaged over one gram of tissue.
The highest SAR value reported under this standard during
product certification for use when properly worn on the body
is 1.39 W/kg

2 3
Registered Trademark
Windows 2000, Windows XP, Windows Vista, Windows 7, and
Windows 8 are registered trademarks of Microsoft Corp.
Addendum
The manufacturer, importer, and agent will not be responsible for
contingent damage including injury or other damage due to
improper use and operation of this iriver device. The information
contained in this instruction book is based on the current iriver
device specifications. Specifications are subject to change without
any prior notice to the user. There is no warranty against data loss
due to the use of this device.
The EPD panel used in the device may have a technically
inevitable defect during the manufacturing process that makes
0.0012 percent of pixels of the screen dimmer or brighter.
This DOES NOT AFFECT the device’s performance.
Troubleshooting and Other Resources

2 4
How to Receive Warranty Service
When visiting iriver zone in person
When using home delivery service
- Visit any one of the iriver zones across the country to receive quick
service from professional service technicians.
- For phone numbers and directions of iriver zones, please visit
www.iriver.co.kr.
- Register the device at www.iriver.co.kr before applying for
warranty service.
- Select the official home delivery service designated by iriver when
requesting warranty service for fastest service.
- There is a risk of damage from impact during shipment so pack
the device carefully to prevent damage.
- Include your name, contact information, and description of the
trouble.
- If the service is requested within the warranty period, the delivery
cost will be paid for by us (when using the official home delivery
services).
- For more information on warranty service rules, please visit
www.iriver.co.kr
Before requesting warranty service
iriver is not responsible for data loss during repair so back up
data in a safe place.
For product inquiry or customer complaints: Call 1577-5557.
Troubleshooting and Other Resources