DREAMUS PPE11 Portable Music Player User Manual
IRIVER LIMITED Portable Music Player Users Manual
UserManual.wiki
>
DREAMUS
>
PPE11 User Manual
Users Manual
Navigation menu
Upload a User Manual
Namespaces
Wiki Guide
HTML
PDF
Info
Views
User Manual
Discussion / Help
Navigation
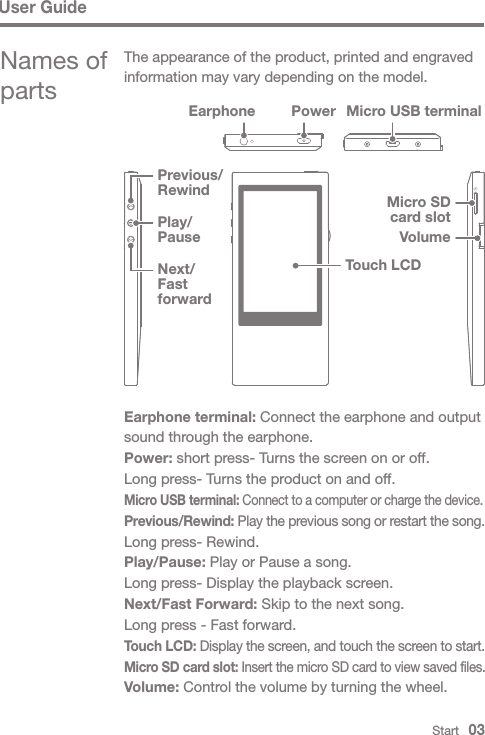
![User GuideAK JrQuick Start Guide& Warranty CardMicro SD Card Slot CoverProtective film: It protects the appearance of the product.Micro USB cable: You can connect the product to the computer and charge it.Quick start guide: It describes the basic method of using the product.Warranty Card: Please keep the product warranty card in a safe place for use in the event your product needs service.Micro SD Card Slot Cover: When there is no micro SD card, this cover protects the slot.It is installed in the product by default.User guide: Download the user guide from [Support > download in http://www.astellnkern. com/].Components may be changed without prior notice to improve the performance or quality of the product.Components2 sheets of protective filmStart 02Micro USB cable](https://usermanual.wiki/DREAMUS/PPE11/User-Guide-2598846-Page-3.png)
![User GuideThis device has an automatic shutdown feature to reduce battery consumption. The device will turn off after a defined period when there is no user input according to the [ - Power settings - Auto power off]. (See page 20.)This device has an automatic timeout feature to reduce battery consumption. The screen will turn off after a certain period when there is no user input according to the [ - Power settings - Screen Timeout]. (See page 20.)When you use the reset function, the current time and memory data will not be deleted.Do not use the reset function while the product is in use. It may seriously damage the memory.Turn on/off the screen1. When the screen is turned off, press the [ ] key to turn it on.2. If you press the [ ] key again, the screen will be turned on.Using the reset function1. If the product malfunctions or stops while in use, press the [ ] key for more than 10 seconds to turn it off. Then you can turn it back on and use it.Turn on/off1. Long press the [ ] button to turn on the device.2. When the device is turned on, press and hold the [ ] key to turn it off. Start 04Power supply manage-ment](https://usermanual.wiki/DREAMUS/PPE11/User-Guide-2598846-Page-5.png)
![Connect the computer and the product when all functions are stopped.Do not use any Micro USB cable other than the one provided with the product. It may cause malfunction.Please connect it to the high-power USB 2.0 port. If you connect the product to a keyboard or a USB hub without its own power supply, it may not be connected to the computer.Only the FAT 32 file system is supported, and if you format the product, please use the format function of the device (See [System information] on page 20 ).MAC users must use the format function of the device to format it. The device may fail to recognize files at times.User GuideStart 06Connecting to a computer1. Turn on the product and computer.2. When you use a Micro USB cable to connect the product and the computer, the connection mode selection window will be displayed on the screen. Charging and playback: You can play back while charging the product. Connect removable disk: It can transmit data while connected to a computer. Using it as USB DAC: You can listen to music from a PC on the device.](https://usermanual.wiki/DREAMUS/PPE11/User-Guide-2598846-Page-7.png)
![Start 07An icon may be hidden in the task bar depending on the operating system like Windows XP. When you click the hidden icon, it will be displayed.If application programs like Windows Explorer or Windows Media Player are working, you may not be able to safely remove it.Safely remove it after exiting all application programs. If the hardware is not safely removed, safely remove it again a little later. If it is not safely removed, the information in the memory may be lost.User GuideCopy files (folder) to the product1. If you select the file/folder to copy from the computer, and drag&drop it to the drive added by the product, the selected file/folder will be copied.Disconnecting it from the computer1. Click the icon displayed in the task bar of the computer screen to safely remove it.2. Click [OK] to confirm that the device has stopped.](https://usermanual.wiki/DREAMUS/PPE11/User-Guide-2598846-Page-8.png)
![User GuideStart 08Make sure that the Micro-USB cable is securely connected.If the computer or product is turned off or the Micro USB cable is removed while the file/folder is being copied or removed, the memory can be seriously damaged. So please use caution.The transmission speed may slow down depending on the computer and OS environment of the user.If you saved the file using a removable disk, re-generate the DB in [ - Re-generate DB].Delete the files (folders) of the product1. Select the file/folder to delete, right-click the mouse, and select [Delete].2. Select [Yes] in the [Confirm File/Folder Deletion] window to delete the selected files/folders.](https://usermanual.wiki/DREAMUS/PPE11/User-Guide-2598846-Page-9.png)

![User GuideStart 10There must be at least 100MB of free space in the internal memory during a firmware upgrade.If the battery runs low, the firmware update may not be completed.Do not disconnect the product from the computer while the firmware update file is being downloaded. After the firmware file has been copied, be sure to disconnect the USB device safely .Upgrading the firmwareUpgrading the firmware1. Use a computer connected to the Internet to download the latest firmware file from [Support > download in http://www.astellnkern. com/].2. Use the Micro USB to connect the product to the computer.3. Select the UMS (USB Mass Storage) to which the product is connected and copy the downloaded firmware file to it.4. After the copying is done normally, remove the USB safely and disconnect the product and the computer.5. You can check the progress of firmware upgrade in the screen of the product.6. After the firmware upgrade is completed, the product will be rebooted, and you can use it.](https://usermanual.wiki/DREAMUS/PPE11/User-Guide-2598846-Page-11.png)
![Using the Device 11User GuideBasic operationsUsing the touch LCDListening to the music1. This product has a touch LCD system that allows you to perform operations by touching the screen. Touch the desired icon among those on the screen to launch it.Moving up/down in the list1. You can move the list by dragging the list screen [up down] / [down up].Selecting music1. Select the search option from the Home Screen to display a list of music.2. Select a song from the list to begin playback.Do not use a sharp object or excessive force to avoid damaging the screen.Select [Folder] to search music by folder.Continuous play time: about 12 hours (MUSIC: FLAC, 16bit, 44KHz, volume 37, EQ Off, LCD Off)Supported file formats: FLAC, WAV[8~192KHz(8/ 16/24bit)], WMA (8~320Kbps), MP3(8~320Kbps), OGG, APE(Normal, Fast, High), AAC, AIFF[8KHZ~192KHZ (8/16/24BIT PER SAMPLE)], ALAC, DFF, DSF, DSD](https://usermanual.wiki/DREAMUS/PPE11/User-Guide-2598846-Page-12.png)
![Using the Device 12User GuideListening to the music1. Turn the [volume wheel] to adjust the volume.2. Press [ ] during playback to pause and press [ ] to restart. You can also pause/restart when you press the [ ] key.3. During playback, press [ / ] to play the previous /next song. You can also play the previous/next music by pressing the [ / ] key.4. During playback, Long-press [ / ] to rewind/ fast forward. You can also rewind/fast forward by pressing the [ / ] key.5. Gapless: Play the next song without any interruption/silence. ※ Gapless playback is only supported when the currently playing music file and the next music file are saved in the same folder and have the same specifications (sampling rate, bit and channels). Gaplee Supported Format : FLAC, WAV, AIFF, ALAC, AAC 6. Repeat mode: Change the repeat mode. : Release the repeat play mode. : Repeat-play the entire list of music that is now playing. : Repeat the current song.7. Play mode: Change the play mode. : Play the music saved in the memory in sequence. : Play the music saved in the memory in random sequence.8. Press [ ] to return to the previous screen.9. Press the [ ] to go to the Home Screen.10. Press [ ] to display the music play screen.11. Drag the progress bar to the desired location during playback.12. Press [ ] to display the current play list.13. Press [ ] during playback to display the lyrics, and press again to hide them.1](https://usermanual.wiki/DREAMUS/PPE11/User-Guide-2598846-Page-13.png)
![Using the Device 13User GuideMusic play screenGaplessHome screenPresent timeBluetooth connection status BatteryExternal memoryOptionTitle name LyricsCurrent play listPlay/pausePrevious song/rewindAlbum art Now playingPrevious screen Next song/fast forward Played time Play mode settings Total playtime of this song Repeat mode explanationArtist name Sequence of songsPlay modeRepeat mode Line outEQLockGaplessMusic option1. Press [ ] in the waiting screen or during playback to display the option list.2. Select the desired menu and set it up.3. Press [ ] to return to the previous screen. ① Equalizer: Set the equalizer according to the user's preference. (When setting the EQ, the response speed of the device may become slower.) User EQ: Adjust the frequencies according to the user's preferences. Pro EQ: EQ Preset recommended by professionals. When using the equalizer, some product functions may operate more slowly. ② Playlist: Add the music you are playing now to the Playlist. Press [ ] to add a playlist. ③ Music information: Display the information on the music that is now playing.](https://usermanual.wiki/DREAMUS/PPE11/User-Guide-2598846-Page-14.png)
![Using the Device 14User GuideUSB DAC Specifications1. USB DAC functions can be used in the following operating systems. Windows XP, Vista, 7, 8 (32/64Bit), MAC OS X 10.7.5 and up2. USB DAC functions support 16Bit 44.1~192kHz and 24Bit 44.1~96kHz.3. Control the volume with the AK Jr’s volume wheel.USB DAC Installation1. Connect AK Jr to a USB port of the PC and select [Connect to USB DAC].2. Since the device driver has been installed automatically, it is not necessary to install a separate driver or program. If a driver has not been automatically installed, use the device manager to automatically search for and install the desired driver.3. Change the default 'Sound Output' device according to the operating system as seen in the images below.The 64Bit operating system does not support USB DAC functions through the USB 3.0 port. Please use the USB 2.0 port.If the USB is has been used extensively or the PC begins operating slowly, the played sound may be interrupted.There may be issues with audio-to-video synchroni-zation during video playback depending on the sound quality and operating environment.Using USB DACThe USB DAC functions allow the AK Jr to be recognized as a sound card on the computer and the music played on the computer to be heard through the earphone terminal of AK Jr.](https://usermanual.wiki/DREAMUS/PPE11/User-Guide-2598846-Page-15.png)
![XP: Control Panel > Sound and Audio Devices > Audio tab > Change the default audio device under 'Sound playback' to [iriver USB DAC]. Vista/7/8: Control Panel > Hardware and Sound > Manage Audio Devices > Right click [iriver USB DAC] and right-click the mouse- to select [Set as default device].Using the Device 15User Guide< Windows XP >< Windows 7 >](https://usermanual.wiki/DREAMUS/PPE11/User-Guide-2598846-Page-16.png)
![Using the Device 16User GuideFor high-quality playback, in Windows Vista/7/8, it is recommended to double-click [iriver USB DAC] in the Control Panel > Hardware and Sound > Audio Device Control, and change the Advanced – Basic Mode to ‘24bit, 96000Hz’. Macintosh OS X: System Preferences > Sound > Output tab > Select [iriver USB DAC].](https://usermanual.wiki/DREAMUS/PPE11/User-Guide-2598846-Page-17.png)
![Using the Device 17User GuideUsing BluetoothYou can use devices supporting Bluetooth to enjoy music wirelessly.Connecting Bluetooth1. Select [ - Bluetooth settings] in the home screen.2. Set Bluetooth to [ON] to display a list of available devices.3. Select the desired device from this list to connect it to the product.4. Turn on the product and enjoy music wirelessly.Originating/terminating a phone call during Bluetooth connectionTerminating: The music playing when a call is received will be paused, and Bluetooth will be disconnected.Originating: The music playing when a call request is made will be paused, and Bluetooth will be disconnected.Only when using the AK Jr with USB DAC for the first time is it necessary to perform this step. No follow-up measure needs to be taken to select the AK Jr for sound output.Disconnecting Bluetooth1. Select a connected device to disconnect from it.](https://usermanual.wiki/DREAMUS/PPE11/User-Guide-2598846-Page-18.png)
![Using the Device 18User GuideBluetooth Support Specifications- Profile: A2DP, HID (The HID profile can be supported only through iriver’s IAA01 model.)- Device performance may be affected during Hi-Fi playback. (48 kHz or lower is recommended)- EQ is not applied.- Bluetooth will not be supported for sound sources with a sampling rate less than 32kHz. Do not turn off the device while connected to Bluetooth.If Bluetooth malfunctions, turn off the Bluetooth device, and turn it back on.Since registration methods may vary for different Bluetooth devices, please read the user manual for each device before connecting to it.When connecting the product to a Bluetooth device, the distance between the two must be within 20cm.Audio quality will degrade with longer distances, and the pairing may disconnect at a distance in excess of 3m. (Distances may vary depending on the user’s environment and device).Crosstalk may be heard while using Bluetooth.For multipoint devices, make the necessary connec-tions prior to use.Car audio Bluetooth connections are not supported.There may be a malfunction or noise depending on the user’s environment and Bluetooth’s battery charging state.- Signal interference affects data transmission. (i.e. holding the device while wearing a Bluetooth device, holding the device while also holding another electronic device, etc.)- In case part of the body touches the radio sender and receiver of the product or Bluetooth headset- In case the received transmission is affected by obstacles like walls, corners and partitions that block radio waves- In case there is radio interference from devices using the same frequency like medical devices, microwave ovens and wireless LANs- In areas where there are many interfering signals like inside elevators and undergroundDeleting Bluetooth1. Press [ ] in the Bluetooth list to delete it.](https://usermanual.wiki/DREAMUS/PPE11/User-Guide-2598846-Page-19.png)
![Using the Device 19User GuideSettings Users can set up their own product environment. The structure of the settings menu may vary depending on the version of the firmware.Setup1. Select [ ] in the home screen.2. Select the desired item and set it up.3. Press [ ] to display the previous screen, and press [ ] to display the home screen .Date and time settings Set up the current date and time.Language settings Select a language.Brightness settings Adjust screen brightness settings.Power settings Auto power off: Once a certain amount of time passes without any operation of the product and buttons, it will be automatically powered off. Screen off: Once a certain amount of time passes without any operation of the product and buttons, it will be automatically powered off. Sleep timer: Once a certain amount of time passes, it will be automatically powered off.](https://usermanual.wiki/DREAMUS/PPE11/User-Guide-2598846-Page-20.png)
![Using the Device 20User GuideBluetooth settings You can use a device supporting Bluetooth to enjoy music wirelessly. (For more details, please see [Bluetooth connection]on page 17.)Re-generation of DB Update the DB.Line Out If you set line out, you can set line out in the volume screen.Locking If you set the volume lock function, you cannot control the volume with the LCD off.System Information You can check the system information of the product and format the product.Initialization of settings Return all user settings back to their original values.](https://usermanual.wiki/DREAMUS/PPE11/User-Guide-2598846-Page-21.png)
![1. The device won't turn on. Check the battery charge status. Use the Micro USB cable for charging and checking the battery.2. The battery does not charge even when the product is connected to the computer with the Micro-USB cable. Check that the USB cable is connected correctly.3. An error occurs on the PC when the Micro USB is connected. Check that the USB cable is connected correctly.4. The volume is changed after formatting. The volume may vary slightly depending on your PC’s OS. 5. The screen turns off repeatedly. O reduce power consumption during file playback, the screen will be turned off after a certain period. Set up time in [ - Power setting - Turn off the screen].6. The screen does not display images properly. Check the screen for debris.7. There is no sound, or there is static/interference. Check that the volume setting is above [0]. Check the earphone terminal connection and inspect the terminal for foreign material. Check the music file’s status.8. It cannot be connected to the computer. Connect the product to the USB port on the back of the computer. Differences may occur in the output voltage of USB ports.Miscellaneous 23User GuideProblem-solvingPlease check!](https://usermanual.wiki/DREAMUS/PPE11/User-Guide-2598846-Page-24.png)

![Miscellaneous 26User GuideSpecifi-cations AK JrPPE11SilverAluminum3.1inch WQVGA (240x400) / Touch ScreenWAV, FLAC, WMA, MP3, OGG, APE(Normal, High, Fast), AAC, ALAC, AIFF, DFF, DSFFLAC, WAV, ALAC, AIFF: 8kHz ~ 192kHz (8/16/24bits per Sample)DSD : DSD64(1bit 2.8MHz), Stereo (DSD to PCM)Unbalance 1.95VrmsWolfson WM8740 x 1(Single DAC)Support up to 24 bit / 192 kHz Bit-to-Bit DecodingUSB Micro-B input(for charging & data transfer (PC & MAC))/Connection Mode : UMS (USB Mass Storage)PHONES(3.5mm)V4.0 (A2DP, AVRCP)2.08” (52.9mm)[W] x 4.60” (117mm)[H] x 0.35” (8.9mm)[D]3.28oz (93g)-5℃ ~ +45℃ (23℉ ~ 113℉)Firmware upgrade supported (UMS - Firmware File Copy Type) ±0.04dB (Condition: 20Hz~20kHz) Unbalance±0.3dB (Condition: 20Hz~70kHz) Unbalance112dB @ 1kHz, Unbalance120dB @ 1kHz, Unbalance0.005% @ 1kHz, Unbalance0.0006% 800Hz 10kHz2ohm50ps(Typ) 64GB[NAND]microSD(Max. 64GB) x 1 1450mAh 3.7V Li-Polymer Battery Windows XP, Windows 7,8(32/64bit)MAC OS X 10.7. and upGeneral specificationsProduct NameModelBody ColorBody MaterialDisplaySupported Audio FormatsSampling rateOutput LevelDACDecodingInputOutputsBluetoothDimensionsWeightOperating temperatureFeature EnhancementsAudio SpecificationsFrequency ResponseS/NCrosstalkTHD+NIMD SMPTEOutput impedanceClock JitterMemoryBuilt-in MemoryExternal MemoryBatteryCapacitySupported OSSupported OS](https://usermanual.wiki/DREAMUS/PPE11/User-Guide-2598846-Page-27.png)