DREAMUS PPF32 SP1000M User Manual
IRIVER LIMITED SP1000M
UserManual.wiki
>
DREAMUS
>
PPF32 User Manual
User Manual
Navigation menu
Upload a User Manual
Namespaces
Wiki Guide
HTML
PDF
Info
Views
User Manual
Discussion / Help
Navigation

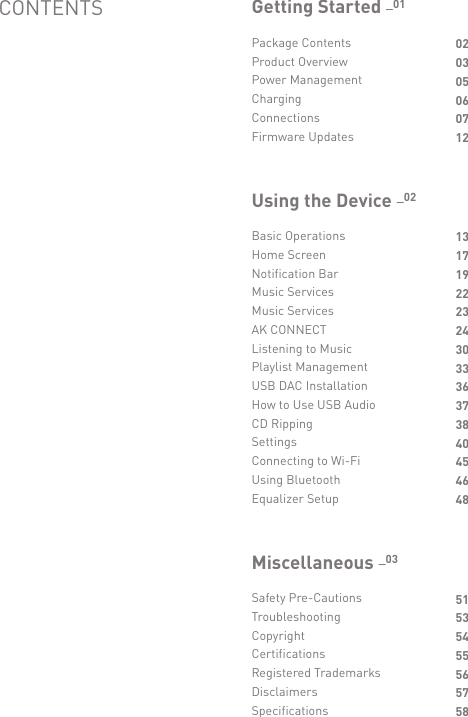
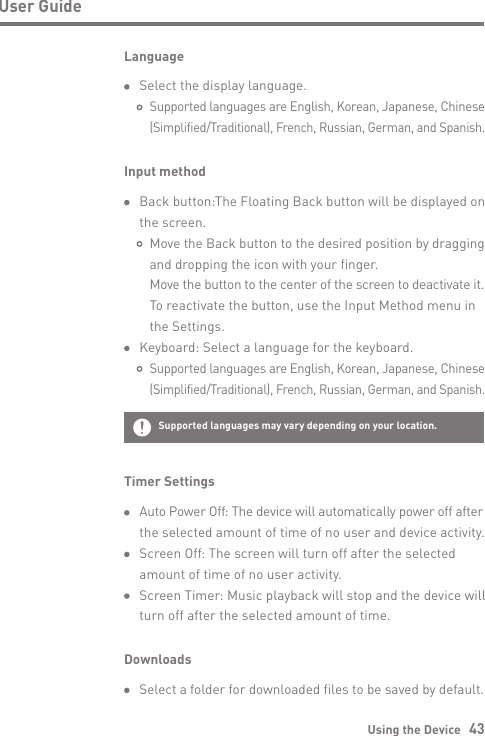
![User GuideContents may be changed without prior notice to improve the performance or quality of the product.Package ContentsGetting Started 02Leather Case & Protective Film: Protect the device and its screen.microSD Card Slot Cover: The cover is used to protect the microSD card slot when not in use. It is installed in the product by default.USB Type-C Cable: For charging and data transfer.Quick Start Guide: Basic overview of device functionality.Warranty Card: Provides warranty details for your device. Maintain a copy of this card since it may be required for future technical support requests. User Guide: The User Guide can be downloaded from the Astell&Kern website.[http://www.astellnkern.com Support > Download]. Quick Start Guide& Warranty CardUSB Type-C CablemicroSD Card Slot CoverLeather Case & Protective FilmSP1000M](https://usermanual.wiki/DREAMUS/PPF32/User-Guide-4006960-Page-3.png)
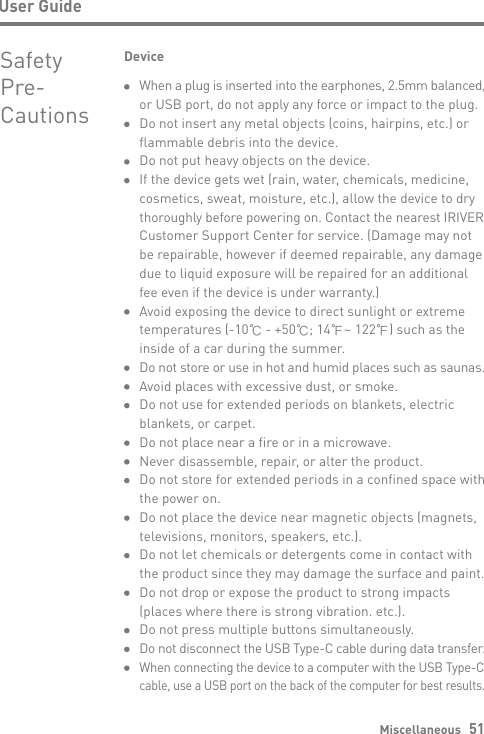
![Getting Started 05User GuideResetting the device will not affect stored data or time settings. Do not use the reset function while the product is in use. Doing so may corrupt the data on the device. This device has an automatic timeout feature to save battery power. The screen will turn off if there is no user input during the period defined in [Menu - Settings - Timer Settings - Screen Off]. (See Page 43)Reset Function1. In case of unexpected device failure or freeze, press and hold [Power ] for 7 seconds to force a shutdown. The device can then be restarted after the shutdown is complete.Turning the Screen On/Off1. While the screen is on, press the [Power ] button to turn off the screen.2. Press [Power ] button again to turn it on.This device has an automatic shutdown feature to save battery power. The device will turn off if there is no user input during the period defined in [Menu - Settings - Timer Settings - Auto Power Off] (See Page 43)Powering the Device On/Off1. Press and hold the [Power ] button to turn on the device.2. While the device is on, press and hold the [Power ] button to shut down the device. A confirmation message will appear.3. Press [OK] to turn off the device.Power Manage- ment](https://usermanual.wiki/DREAMUS/PPF32/User-Guide-4006960-Page-6.png)
![Getting Started 08User GuideConnecting to Computer1. Turn on the device and your computer.2. Use the USB Type-C cable to connect the device to a computer in accordance with settings in [Menu - Settings - USB mode]. [Default] Media Device (USB Drive): Transfer files from a computer to the device. DAC Input: Listen to music on a connected computer through the device. (See Page 37)Mac users need to download and install Android File Transfer from the Astell&Kern website. [http://www.astellnkern.com > Support > Download]For an optimal connection, quit any unnecessary programs before connecting the device to the computer.Do not use cables other than the USB Type-C cable provided with the device. Doing so may cause malfunctions.For both Windows and MAC, the device only works with USB 2.0.Type-C-to-Type-C cable is recommended when connecting with a MAC that supports Type-C port.](https://usermanual.wiki/DREAMUS/PPF32/User-Guide-4006960-Page-9.png)
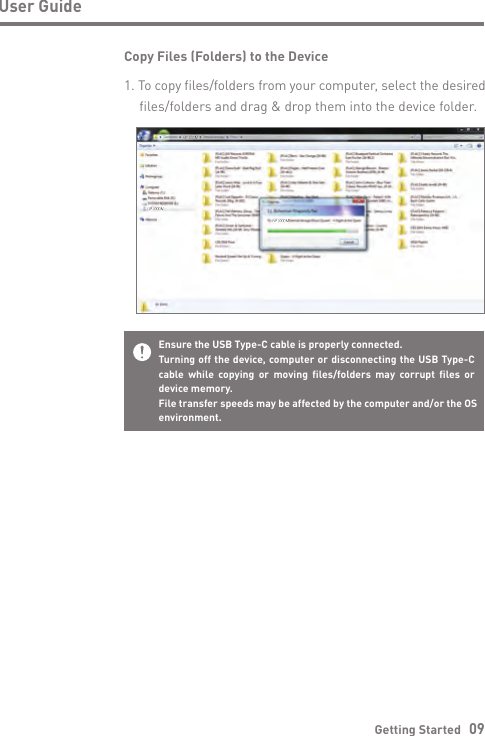
![Getting Started 10User GuideDelete Files (or Folders) from the Device1. Select the file/folder to delete, right-click the mouse, and then select [Delete].2. Select [Yes] in the [Confirm File/Folder Deletion] window to delete the selected files/folders.Disconnecting from the Computer1. Disconnect the USB Type-C cable after the transfer between the device and computer is complete.Disconnecting the device from the computer during a file transfer may corrupt data on the device.](https://usermanual.wiki/DREAMUS/PPF32/User-Guide-4006960-Page-11.png)
![Maximum Capacity: 400GB Notes on Inserting a microSD Card Do not force the microSD card into the slot. Doing so may cause malfunction of the product and damage to the card. Do not repeatedly insert/remove the microSD card. If not inserted properly, the microSD card may cause product malfunctions and may become lodged in the product.Notes on Removing a microSD Card Be sure to safely remove the microSD card from the device. Not following the proper procedure may corrupt data and cause serious damage to the both the card and device. Do not remove the microSD card during use. Doing so may cause malfunction, delete data and damage the microSD card.Getting Started 11User GuideRecommended microSD CardsSanDisk, TranscendInsert/Remove a microSD Card1. Refer to the diagram and gently insert a microSD card into the microSD card slot.2. To safely remove a microSD card, on the Home Screen, select [Safely remove SD card] from the Notification Bar or select [Unmount SD card] from [Menu - Settings - System Information].3. Gently press the microSD card in to unlock and release it from the slot.](https://usermanual.wiki/DREAMUS/PPF32/User-Guide-4006960-Page-12.png)
![Notes on Using a microSD Card If the microSD card is not recognized or functions improperly, format the card, preferably in the FAT32 system. Using cards other than the recommended microSD card types may cause malfunctions. A microSD card is not included in the product package. Please purchase separately.Getting Started 12User GuideFor Wi-Fi connections, see Page 45.The firmware update may not start if the battery level is too low. (A minimum battery level of 20% is required.)Do not disconnect from the wireless network while downloading the update file. Doing so may cause data corruption and/or damage to the system.If an error occurs or the notice in the Notification Bar disappears during an update, download the firmware update again through [Menu - Settings - Update - System].Moving to another screen during a file download will cancel the download.Wi-Fi Update / OTA (Over-the-Air)1. Connect to a wireless network.2. If a new firmware update is available, the screen will display a Firmware Update Guide window.3. Select [Update].4. Follow the on-screen instructions to proceed with the firmware update.FirmwareUpdates](https://usermanual.wiki/DREAMUS/PPF32/User-Guide-4006960-Page-13.png)
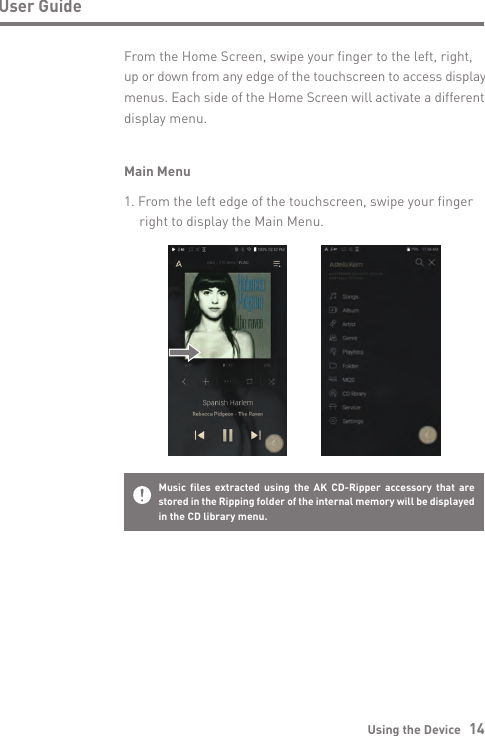
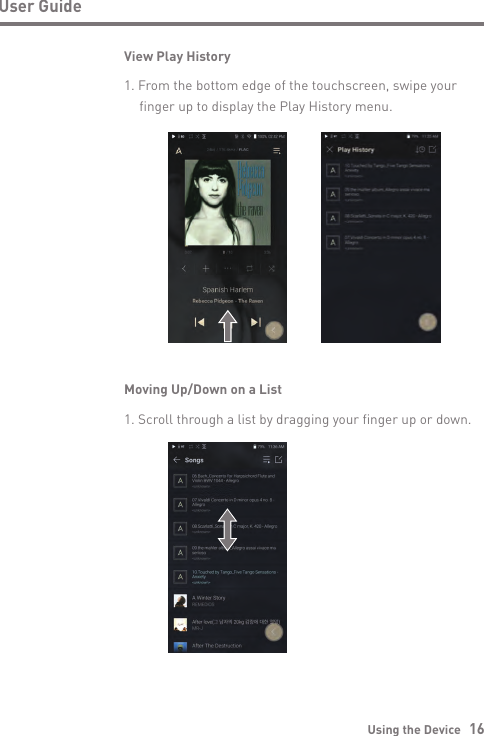
![User GuideUsing the Device 13BasicOperationsLCD Touchscreen1. This device features an LCD touchscreen that allows you to perform operations by touch. Use the touchscreen to access various features on the device.To prevent damage to the screen, do not use a sharp object or excessive force.Return to the Home ScreenHome Screen1. Press [ ] at any time to return to the Home Screen.](https://usermanual.wiki/DREAMUS/PPF32/User-Guide-4006960-Page-14.png)
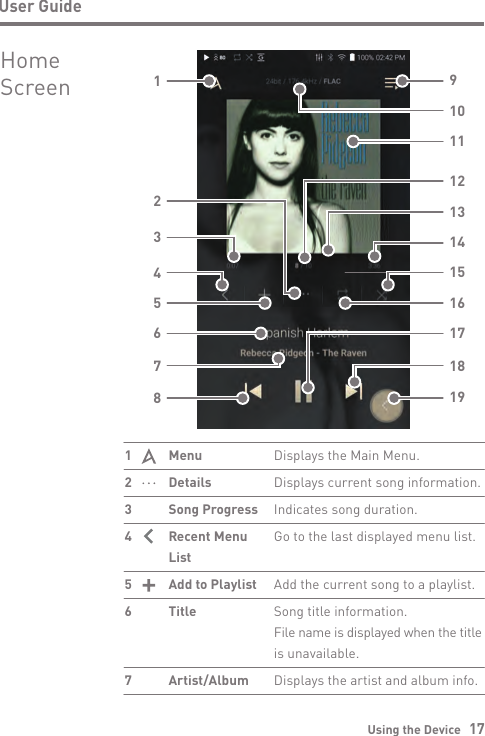
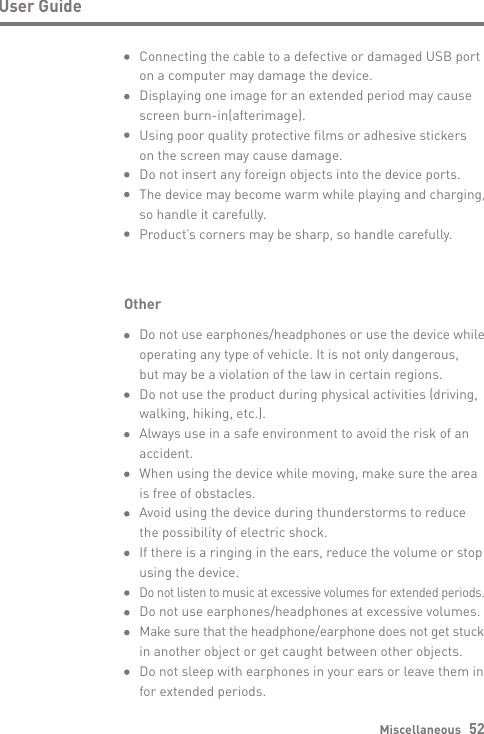
![Using the Device 18User GuideShort press: Play the previous song or restart the current song.Press and hold: Rewind the current song.Display current playlist.Displays the bit rate and sampling frequency data.Displays album cover of current song. Tap image to view the song lyrics. Displays the current song number playing/total number of songs in Now Playing.Shows the current track playback progress. Drag the Playback Progress Bar to move to the desired track time.Indicates the song’s total duration. Press to switch from elapsed time to remaining time.Press [ ] to set track sequence for playback. : Shuffle mode on. : Shuffle mode off.Press [ ] to set the Repeat mode. : Repeat entire playlist. : Repeat current track. : Repeat mode off.Play or pause the current song.Short press: Play the next song. Press and hold: Fast-forward the current song.The Floating Back button will be displayed on the screen.Previous/ RewindPlaylistFormat InformationAlbum CoverNow PlayingSong CountPlayback Progress BarSong DurationShuffle ModeRepeat ModePlay/PauseNext/FFBack button8 9 10 11 12 13 14 1516 17 18 19](https://usermanual.wiki/DREAMUS/PPF32/User-Guide-4006960-Page-19.png)
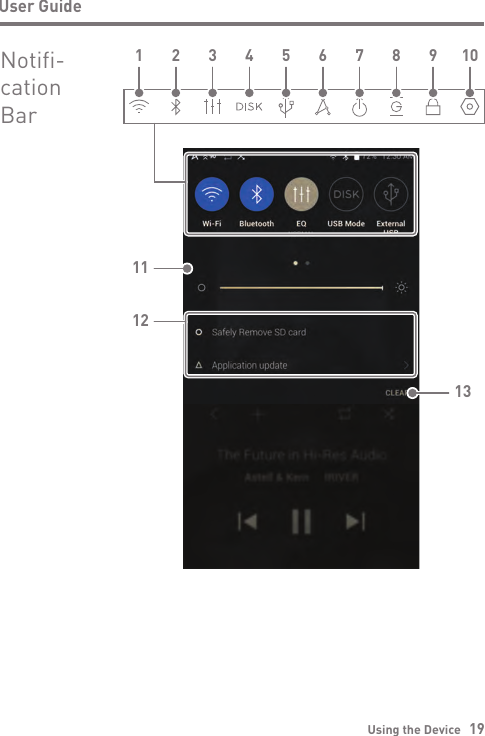
![Using the Device 20User GuidePress [ ] to turn Wi-Fi on/off.Press [ ] to turn Bluetooth on/off.Press [ ] to turn the EQ on/off. The most recent EQ settings are applied by default.Select the mode to use when connected to a computer. : Listen to music on a connected computer through the device.[Default] : Enables transfer of media files.After connecting the device to a portable USB DAC, press [ ] to connect or disconnect the device.Turn CD ripping function on/off.Press [ ] to turn AK Connect on/off.Press [ ] to turn line-out on/off.Press [ ] to turn GaplessPlayback on/off.Press [ ] to turn Wheel lock on/off. The volume wheel is disabled when the screen is locked.Wi-Fi Bluetooth EQ ComputerConnection ModeUSB AudioCD RippingAK CONNECT Line-out Gapless Playback Wheel Lock1 2 3 4 5 6 7 89](https://usermanual.wiki/DREAMUS/PPF32/User-Guide-4006960-Page-21.png)
![Long-press an icon [ / / / / ] to navigate to the corresponding full settings menu screen.Using the Device 21User GuidePress [ ] to display the full settings menu.Use the adjustment bar to control the display brightness.Device notifications are displayed in this area.Clear notifications.Settings BrightnessNotificationsDisplayClear Notifications10 1112 13](https://usermanual.wiki/DREAMUS/PPF32/User-Guide-4006960-Page-22.png)
![Using the Device 22User GuideStreaming or Purchasing Music1. Connect to a wireless network.2. Select [Services] from the menu.3. Select from the the list of service options available.4. Check the user guide or help menu within each Services for detailed information. Select [Menu > User Guide] within the Groovers Services for detailed instructions.Listen to streaming services or purchase music from the Services when connected to a wireless network. (Streaming services and ability to purchase music vary by country. Not all services are available in all countries.)Music ServicesFor Wi-Fi connections, see Page 45.Currently supported services are Groovers and Tidal.ShowMenuUserGuide](https://usermanual.wiki/DREAMUS/PPF32/User-Guide-4006960-Page-23.png)
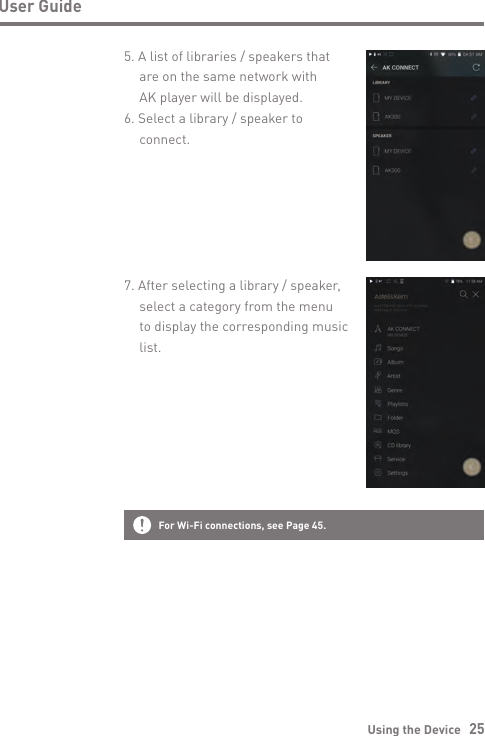
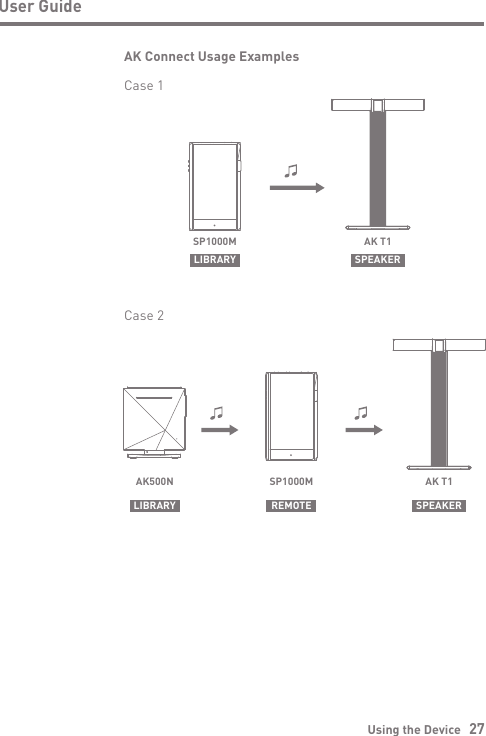
![Using the Device 24User GuideMQS Streaming Server for your Computer1. Visit the Astell&Kern website and download the MQS Streaming Server installer that corresponds to your operating system. [http://www.astellnkern.com > Support > Download].2. Run the downloaded installer and follow the on-screen instructions.3. Check the User Guide within the program for detailed information on using the MQS Streaming Server.Access and play back music files stored on a computer on the same network, as well as output sound through compatible speakers with AK Connect.AK CONNECTPlease refer to the following computer minimum system requirements. Minimum Computer Requirements OS: Windows 7/8/10 (32 & 64-bit) Mac Requirements OS X 10.7 (Lion) or laterUsing AK Connect to Link Music Libraries/Speakers1. Turn on the music library device and/or speaker and AK player. Run the MQS streaming server on your computer.2. Connect all devices to the same Wi-Fi network.3. Turn on the AK CONNECT feature by pressing and holding [ ] in the Notification Bar or selecting [Menu- Settings-AK CONNECT].4. Press [AK CONNECT] on the menu.](https://usermanual.wiki/DREAMUS/PPF32/User-Guide-4006960-Page-25.png)
![Using the Device 26User GuideStreaming Music from Your Library1. Select a category from the library menu to see your list of music.2. Select a song to begin streaming.Downloading Music from Your Library1. Select a category from the library menu to see your list of music.2. Press [ ] button at the upper- right corner of the music list.3. Select the desired music and press [ ] to initiate the download. A message on the Notification Bar will indicate when the download is complete.Depending on network conditions, song loading may be slow and streaming may stutter.Performing other operations on the linked computer may cause slower response time.If you stream and download at the same time, it may slow the device’s response time depending on the speed of the Wi-Fi network or server.To stop a download in progress, tap the notification in the Notification Bar to go to the download screen. Then, select the items to pause or delete.](https://usermanual.wiki/DREAMUS/PPF32/User-Guide-4006960-Page-27.png)


![Using the Device 30User GuideTo search, press [ ] on the menu list and enter the title. The search result will be displayed.At the top of the Play History menu, press [ / ] to sort the music list in order of most recently played/mostplayed.After selecting the [MQS] category, press [ / ] at the top to sort the music list in order of high quality / alphabetical order.In the [MQS] category, the MQS tab shows PCM files of 24 bits or more, and the DSD tab shows DSD files. MQS: PCM[8~384kHz(24/32bit)] DSD: DSD [2.8/5.6/11.2MHz]Select the [Folder] category to check the internal / external memory capacity and number of files / folders, and copy / move music.Press [ ] on the music list to add all music to the current playlist.Listening to MusicSelecting Music1. Select a category from the menu to display the corresponding music list.2. Select a song from the list to begin playback.Listening to MusicSelect [Folder] to search music by folder.Continuous Playing Time: Approx. 10 hours 30 minutes (Music: FLAC,16bit, 44.1kHz, Unbalanced, Volume 80, EQ Off, LCD Off) Supported Formats: PCM [8~384kHz(8/16/24/32bit)]DSD [2.8/5.6/11.2MHz]](https://usermanual.wiki/DREAMUS/PPF32/User-Guide-4006960-Page-31.png)
![Using the Device 31User GuidePress [ ] on top of the music list to view the options: : Select / deselect entire list : Add the selected list at the top / bottom / after the current song of Now Playing : Add selected list to a playlist : Delete selected list : ExitTurn the [Volume] wheel to adjust the volume.Press [ ] during playback to pause and [ ] to resume playback.Press [ / ] during playback for the previous/next track.Press and hold [ / ] to rewind/fast-forward the track.Drag the indicator on the Playback Progress Bar to a desired location of a track during playback. Press the album art on the Home Screen to display the song lyrics.Press the [ ] to go to Home Screen.Press [ ] at the top of the menu list to hide the menu list.After selecting [ALBUM] or [CD LIBRARY] category, press [ / / ] at the top to sort by different viewing options.](https://usermanual.wiki/DREAMUS/PPF32/User-Guide-4006960-Page-32.png)
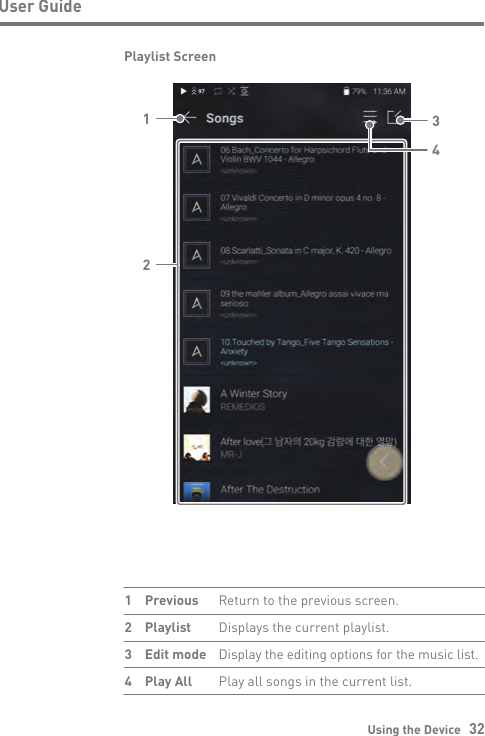
![Using the Device 33User GuidePlaylist Manage-mentCreating a Playlist1. Press [Playlists] on the menu to view the playlists.2. Select [ + ] in the upper right corner of the screen.3. Enter a name for the playlist, and then press [Add] to create a new playlist.Adding a Song to a Playlist1. Press [Playlists] to display the list of playlists.2. Select a playlist and press [+ Add Song] to display a list of songs by album.3. Select a song and press [Add] to add the song to the selected playlist.](https://usermanual.wiki/DREAMUS/PPF32/User-Guide-4006960-Page-34.png)
![Using the Device 34User GuideRemoving a Song from a Playlist1. Press [Playlists] to display the list of playlists.2. Select the playlist to edit.3. Press [ ] at the top, then select the song you want to delete from the playlist.4. Press [ ] on top of the screen.5. Press [DELETE] to remove the song from the selected playlist.Playing a Playlist1. Select the desired playlist for playback.2. Press [ ] at the top right of the screen to play the entire playlist.3. To playback part of the playlist or add it to a current Now Playing playlist, press [ ] at the top of the playlist, select the music you want to play and press [ ] to add the selected list to the top / bottom / after the current song of Now Playing.This action will only remove the song from the selected playlist, not the memory.](https://usermanual.wiki/DREAMUS/PPF32/User-Guide-4006960-Page-35.png)
![Using the Device 35User GuideRenaming a PlaylistDeleting a Playlist1. Press [Playlists] to view the playlists and press [ ].2. Select the playlist to be deleted.3. Press [ ] at the top of the screen.4. Press [DELETE] to delete the selected playlist.1. Press [Playlists] to view the playlists, and press [ ].2. Select a playlist to be renamed.3. Press [RENAME] at the top of the screen to display the RENAME window.4. Enter a name for the playlist and then press [RENAME] to confirm the change.](https://usermanual.wiki/DREAMUS/PPF32/User-Guide-4006960-Page-36.png)
![Using the Device 36User GuidePlayback is unavailable when settings exceed the supported formats. The Previous, Play, and Next buttons are unavailable when connected as a USB DAC.Playback may stutter when computer performance is slow or theUSB connection is experiencing heavy usage.There may be issues with audio-to-video synchronization during video playback depending on the sound quality and operating environment.Volume cannot be adjusted via the Windows volume control. The volume wheel on the device or volume control on the appropriate program must be used to adjust the volume.Install a dedicated driver to use the AK device as a USB DAC.The driver file is located in SP1000M\Internal_Storage\SP1000M_ Contents\Driver. Before installing the driver, set device to USB DAC mode and connect to the computer.USB DACInstallationThe USB DAC function allows the device to be recognized as a sound card on a computer. Music from the computer is played through the device’s headphone port for an enhanced listening experience.USB DAC Specifications Supported OS Windows 7(32bit/64bit) / Windows 8(32bit/64bit) / Windows 10(32/64bit) MAC OS 10.7(Lion) or later USB DAC Support Specifications Supported Formats: PCM [8~384kHz(8/16/24/32bit)] DSD [2.8/5.6/11.2MHz] Control the volume with the AK device’s volume wheel.](https://usermanual.wiki/DREAMUS/PPF32/User-Guide-4006960-Page-37.png)
![Using the Device 37User GuideHow to Use USB AudioConnect the device to a portable amp or DAC using USB Audio Out.How to Connect a Portable USB DAC1. Connect the portable USB DAC to the AK device’s USB Type-C port with a dedicated cable.2. Press [ ] in the Notification Bar.3. Once [ ] is activated, you can enjoy music stored on the device through the connected portable USB DAC.How to Change USB Audio DSD Output TypeYou can change the type of DSD data that is outputted through the USB audio out.1. Select a DSD output type on [Menu - Settings - USB Audio]. PCM : DSD audio is converted into PCM before being outputted through the USB audio out. DoP : DSD audio is converted into DoP before being outputted through the USB audio out.The USB Type-C cable that comes packaged with the device is only to be used for computer data transfer or to charge the device.The type of dedicated cable needed to connect to the portable DAC varies; please refer to USB DAC manufacturer instructions for correct cable type.A USB DAC cable is not included with the device and must be purchased separately. Depending on the OTG cable used, the connection may be unstable.The portable USB DAC must be able to receive digital input through the micro-USB's OTG.Audio output may vary widely depending on the digital input specs of the portable USB DAC used. This is not a defect in the device output and not a reason for exchange or refund.When using DoP as a DSD output type, no sound may be outputted except noise depending on the portable USB DAC.](https://usermanual.wiki/DREAMUS/PPF32/User-Guide-4006960-Page-38.png)
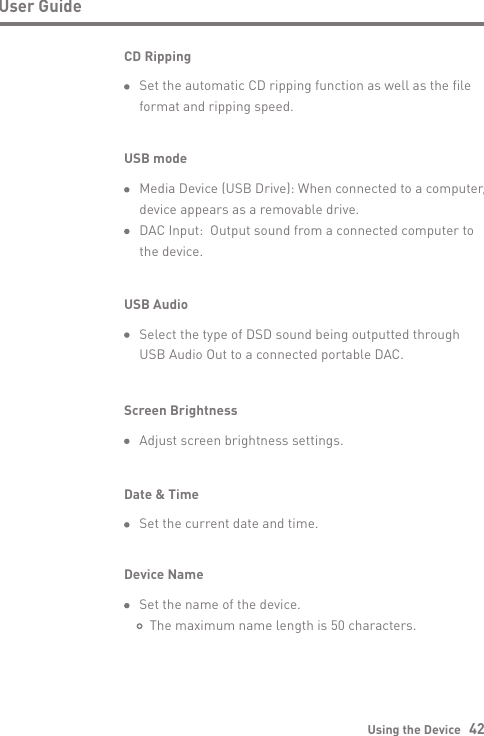
![Using the Device 38User GuideCD RippingCDs can be ripped directly to the device using the AK CD-RIPPER (sold separately).Connecting the AK CD-RIPPER1. Connect the AK CD-RIPPER to USB Type-C port of the device using the proper cable. 2. In the Notification Bar press [ ] to link the devices and activate the CD Ripping Menu.3. When ripping is complete, before disconnecting, press [ ] on the Notification Bar to unlink/disconnect the devices.Automatic CD Ripping1. In [Menu-Settings-CD Ripping], turn on automatic CD ripping function.2. Connect the AK CD-RIPPER to the device and insert a CD.3. Metadata (ID3 tags) for the inserted CD will be retrieved via Gracenote if Wi-Fi is turned on.4. CD ripping will begin automatically after the metadata has been downloaded.5. When finished, press [OK] when prompted to complete the automatic CD ripping process.The USB Type-C cable provided with the device is to be used to connect to the computer or to charge the product.Depending on the CD-Ripper model the dedicated USB Type-C OTG cable may not be provided in the product package.Depending on the OTG cable used, the connection may be unstable.Manual CD Ripping1. In [Menu-Settings-CD Ripping], turn off automatic CD ripping function.](https://usermanual.wiki/DREAMUS/PPF32/User-Guide-4006960-Page-39.png)
![Using the Device 39User GuideCD Ripping Results : Indicates that CD ripping is complete, or that CD ripping was successfully completed after correcting an error via error correction. : Indicates that the song currently being ripped can be canceled by user. : Indicates that CD ripping failed due to an error that can’t be corrected, such as a scratched CD, or that CD ripping was canceled by user.To search the Gracenote database, the device must be connected to Wi-Fi. Database access time may vary depending on the network environment.Please note that metadata for certain CDs may not be available on the Gracenote database.You cannot access the Home Screen while CD ripping is in progress.The AK Connect service will be disabled during CD ripping. The service will automatically restart when CD ripping is completed. Music playback is disabled during ripping.You can set the desired file format and ripping speed from the[Menu - Settings - CD Ripping] menu.Several attempts at correction will be made for data with errors when the feature is enabled under [Menu - Settings - CD Ripping - Error Correction]. Please note that the CD ripping speed will be affected when this feature is enabled.2. Connect AK CD-RIPPER and insert CD to display the [CD Ripping] notification at the bottom of the Notification Bar.3. Press [CD Ripping] and select from the file format options of FLAC or WAV.4. If Wi-Fi is turned on the Gracenote database will be searched for matching CD metadata after the file format is selected.5. When the database search is complete, press [Start] to begin CD ripping.](https://usermanual.wiki/DREAMUS/PPF32/User-Guide-4006960-Page-40.png)
![Using the Device 40User GuideSettings The settings menu allows users to customize the device. The settings menu may vary depending on the firmware version.Setup1. Select [Main Menu - Settings] or select [ ] from the Notification Bar menu.2. Select the feature to view setting options.Wi-Fi Change wireless network settings and turn Wi-Fi on/offBluetooth Connect a Bluetooth device to listen to music wirelessly.See page 45 for more information on connecting to Wi-Fi.See page 46 for more information on using Bluetooth.AK CONNECT Turn AK Connect on/off and set AK Connect options.](https://usermanual.wiki/DREAMUS/PPF32/User-Guide-4006960-Page-41.png)
![Using the Device 41User GuideGapless Playback Plays the next song without any interruption. Gapless playback is only supported between two files with identical bit rates, sample rates, and channels.Line Out Set the voltage value generated when Line Out is activated.Do not use earphones with the Line Out feature enabled. Doing so may cause permanent hearing loss.Supported Formats for EQ: PCM [8 ~ 192kHz(8/16/24bit)]Using the equalizer may negatively affect device performance. See pages 48 - 50 for more information on using the equalizer.Equalizer Set the equalizer according to the user's preferences. USER EQ: Adjust the frequencies according to the user's preferences.Left-Right Balance Adjust the left-right balance for earphones/headphones.Playback Settings Set how to add a song to Now Playing when a song is selected from a music list.](https://usermanual.wiki/DREAMUS/PPF32/User-Guide-4006960-Page-42.png)
![Using the Device 44User GuideSystem Information System Information: View model number, firmware version, MAC address and memory usage information. The microSD card can be mounted/dismounted and data can be deleted. Legal information: Check open source licenses and regulations.Formatting the microSD card will delete all data on the memory card. Be sure to backup any important files before formatting.When formatting the microSD card on a computer, use of the FAT32 system is recommended.System Reset Initialize Media Scan: Resets and rescans the internal database. Database initialization time may vary depending on the number of files stored on the device. Settings Reset: Resets all user settings back to the default settings. Factory Data Reset: Deletes all user data and resets all user settings back to the default setting.Update System Update: Update the device when a new firmware version is available. Application Update: Update the default applications (including the Services) when new versions are available.When using AK Connect to download music, if the [Default folder] is selected in settings, downloading will automatically begin to the pre-set Downloads folder.When [Select Folder] is selected, the user is prompted to choose a download folder each time a file is downloaded.](https://usermanual.wiki/DREAMUS/PPF32/User-Guide-4006960-Page-45.png)
![Using the Device 45User GuideConnecting to Wi-Fi2. Select the desired AP to connect to the wireless network. Additional information such as Wi-Fi password may be required depending on Wi-Fi settings.Connecting to a Wi-Fi Network1. Press and hold [ ] from the Notification Bar or select [Menu - Settings - Wi-Fi] to display a list of available Wi-Fi networks.Networks requiring browser or other additional certifications are not supported.Wi-Fi Channels 1 through 13 are supported (but channels 12 and 13 are not supported by the FCC).](https://usermanual.wiki/DREAMUS/PPF32/User-Guide-4006960-Page-46.png)
![Using the Device 46User GuideUsingBluetoothConnect a Bluetooth device to listen to music wirelessly.Turning Bluetooth On/OffA Bluetooth device must be paired with the device prior to use. Refer to the Bluetooth device's instruction manual for details.1. Select [ ] from the Notification Bar menu or select [On/Off] from [Menu - Settings - Bluetooth].Bluetooth Pairing1. In the Settings Menu, select the appropriate Bluetooth device from the list of available devices.Disconnect a Bluetooth Device1. Press the connected Bluetooth device and confirm the message prompt to disconnect the device.](https://usermanual.wiki/DREAMUS/PPF32/User-Guide-4006960-Page-47.png)
![Using the Device 47User GuideBluetooth Support Specifications Profile: A2DP, AVRCP, aptX™HD Device performance may be affected during Hi-Res playback.Do not turn off the device while connected to Bluetooth.Turn the Bluetooth device off then on in case of issue.Pairing methods may differ for each individual Bluetooth device. Always refer to the respective instruction manual for details.When connecting the product to a Bluetooth device, the distance between the two must be within 20 cm.Audio quality will degrade with longer distances and the pairing may disconnect at a distance of 2 m (6.5 ft.) or more. (Distances may vary depending on device and environment.)Crosstalk may be heard while using Bluetooth.For multipoint devices, make the necessary connections prior to use.Car audio Bluetooth connections may not be fully compatible. Some features may not be supported and quality of playback may vary.Malfunction, noise, and other undesirable effects may occur due to the device's battery level and the environment. If signal interference affects data transmission. (e.g., holding the device while wearing a Bluetooth device, holding the device while holding another electronic device, etc.) If the device or Bluetooth headset's radio transmitters are touching parts of the body. If the transmission strength is affected by walls, corners, partitions, etc. If devices using the same frequencies cause interference. (e.g., medical devices, microwave ovens, Wi-Fi, etc.) Areas with an excessive amount of interference or weak signals. (e.g., elevators, underground, etc.)Removing a Bluetooth Pairing1. Press [ ] to the right of the paired device to go to settings.2. Select [Remove] to complete the process.](https://usermanual.wiki/DREAMUS/PPF32/User-Guide-4006960-Page-48.png)
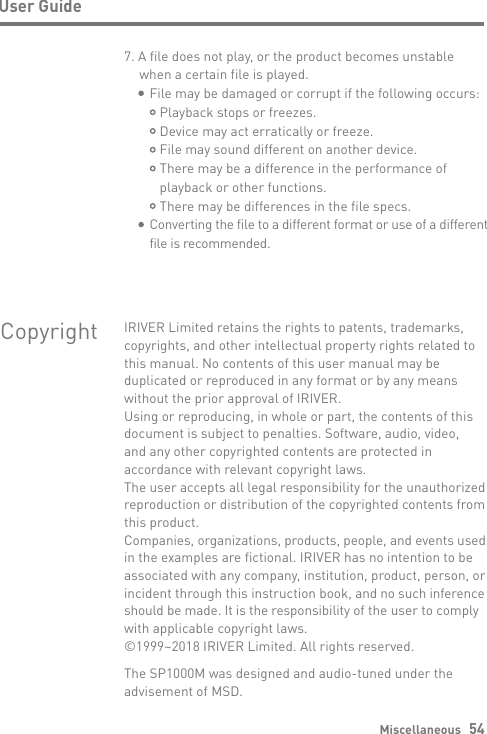
![Using the Device 483. Enter a name for the custom EQ settings and select [SAVE].User GuideEqualizer Setup1. Press and hold [ ] on the Notification Bar or turn on [Menu - Settings - Equalizer].2. Press [PRO EQ] to activate the drop-down menu and select [ + ].EqualizerSetup](https://usermanual.wiki/DREAMUS/PPF32/User-Guide-4006960-Page-49.png)
![Using the Device 494. Adjust the frequencies up and down according to the user's preferences.5. The number values at the lower- left corner of the screen can be adjusted for fine-tuning.User Guide6. Press the [Advanced] tab on the top to display PEQ settings screen. Adjust Freq/Gain/Q.](https://usermanual.wiki/DREAMUS/PPF32/User-Guide-4006960-Page-50.png)
![Using the Device 50User GuideDeleting a Custom Equalizer Setting1. Press on the drop-down menu at the upper-left corner of the screen to display the list of the saved EQ settings.2. Press [ ] next to the EQ name to be deleted.3. Press [OK] to delete the selected EQ setting. Renaming a Custom Equalizer Setting1. Press on the drop-down menu at the upper-left corner of the screen to display the list of the saved EQ settings.2. Press [ ] next to the EQ setting name you wish to change and enter a new name for the selected EQ.3. Press [CHANGE] to save.](https://usermanual.wiki/DREAMUS/PPF32/User-Guide-4006960-Page-51.png)
![Miscellaneous 531. The device won't turn on. The battery may need to be recharged. Charge the device for at least one hour and try again. Reset the device. (See Page 5)2. The device will not charge when connected to a computer via USB cable. Connect to the computer using the provided USB Type-C cable. Charging may not be performed depending on the condition of your PC. (Charging with a PC is not recommended. Use the adapter.) Connect the device to a USB wall adapter using the provided USB Type-C cable to charge directly from a wall outlet.3. The computer won't recognize the device or an error occurs when connected. Use a USB port on the back of the computer. Check if the USB Type-C cable is connected correctly. For Mac, check to ensure the MTP program is installed properly. Check if the device connects properly on a different computer.4. The screen turns off repeatedly. The screen turns off automatically after a defined period to reduce battery consumption. Set the time at [Menu- Settings - Timer Settings - Screen Off].5. The screen does not display images properly. Check the screen for debris.6. There is no sound, or there is static/interference. Check that the volume setting is above [0]. Check that the earphones are plugged in properly and make sure nothing is obstructing the port connection. Verify that the music file is not corrupt. Verify that the audio settings have been set properly. (Balanced out, line out, etc.)User GuideTrouble- shootingSolutions to Common Issues](https://usermanual.wiki/DREAMUS/PPF32/User-Guide-4006960-Page-54.png)
![Miscellaneous 58User GuideSpecifi- cationsSP1000MPPF32Lapis BlueAluminum4.1inch 720x1280 touch displayWAV, FLAC, WMA, MP3, OGG, APE, AAC, ALAC, AIFF, DFF, DSFPCM : 8kHz ~ 384kHz (8/16/24/32bits per Sample)DSD Native: DSD64(1bit 2.8MHz), Stereo/ DSD128(1bit 5.6MHz), Stereo / DSD256(1bit 11.2MHz), StereoUnbalance 2.1Vrms / Balance 4.2Vrms (Condition No Load)AKM4497EQ x2 (Dual DAC)Support up to 32bit / 384kHz Bit to Bit playbackUSB Type-C input (for PC & MAC)PHONES (3.5mm) / Balanced Out (2.5mm, only 4-pole supported)802.11 b/g/n (2.4GHz)V4.1 (A2DP, AVRCP, aptX™ HD)2.67” (67.9mm)[W] x 4.60” (117mm)[H] x 0.66”(16.9mm)[D]7.16oz(203g)Firmware upgrade supported(OTA)±0.062dB (Condition : 20Hz~20kHz) Unbalance / ±0.061dB (Condition : 20Hz~20kHz) Balance,±0.68dB (Condition : 10Hz~70kHz) Unbalance / ±0.67dB (Condition : 10Hz~70kHz) Balance120dB @ 1kHz, Unbalance / 123dB @ 1kHz, Balance138dB @ 1kHz, Unbalance / 144dB @ 1kHz, Balance0.0007% @ 1kHz, Unbalance / 0.0006% @ 1kHz, Balance0.0004% 800Hz 10kHz(4:1) Unbalance / 0.0004% 800Hz 10kHz(4:1) BalanceBalanced out 2.5mm (1ohm) / PHONES 3.5mm (2ohm)25ps(Typ)200 Femto Seconds128GB[NAND]MicroSD(Max. 400GB) x 13,300mAh 3.7V Li-ion BatteryWindows 7,8,10(32/64bit) Mac OS X 1.7 and upGeneral SpecificationsProduct NameModelBody ColorBody MaterialDisplaySupported Audio FormatsSample rateOutput LevelDACDecodingInputOutputsWi-FiBluetoothDimensionsWeightFeature EnhancementsAudio SpecificationsFrequency ResponseS/NCrosstalkTHD+NIMD SMPTEOutput impedanceClock JitterReference Clock JitterMemoryBuilt-in MemoryExternal MemoryBatteryCapacitySupported OSSupported OS](https://usermanual.wiki/DREAMUS/PPF32/User-Guide-4006960-Page-59.png)