DREAMUS PPM21 Portable Music Player User Manual
IRIVER LIMITED Portable Music Player
UserManual.wiki
>
DREAMUS
>
PPM21 User Manual
User Manual
Navigation menu
Upload a User Manual
Namespaces
Wiki Guide
HTML
PDF
Info
Views
User Manual
Discussion / Help
Navigation
![User GuideAK120 IImicroSD Card Slot CoverMicro-USB cableLeather Case & Protective Film : Protect the device and its screen. Warranty for the Leather Case guarantees the quality of the leather. Micro-USB cable : Connect the device to a computer or charge the device.Quick Start Guide : Basic overview of device functionality. Warranty card : The warranty card is required for customer & technical support. Do not misplace the card.User Guide : The User Guide can be downloaded from the Astell&Kern website [http://www.astellnkern.com > Support > Download]. microSD card slot cover : The cover is used to protect the microSD card slot when not in use. It's installed on the device by default.Contents may be changed without prior notice to improve the performance or quality of the product.Package ContentsLeather Case (with warranty)& Protective FilmStart 02Quick Start Guide& Warranty Card](https://usermanual.wiki/DREAMUS/PPM21/User-Guide-2354582-Page-3.png)
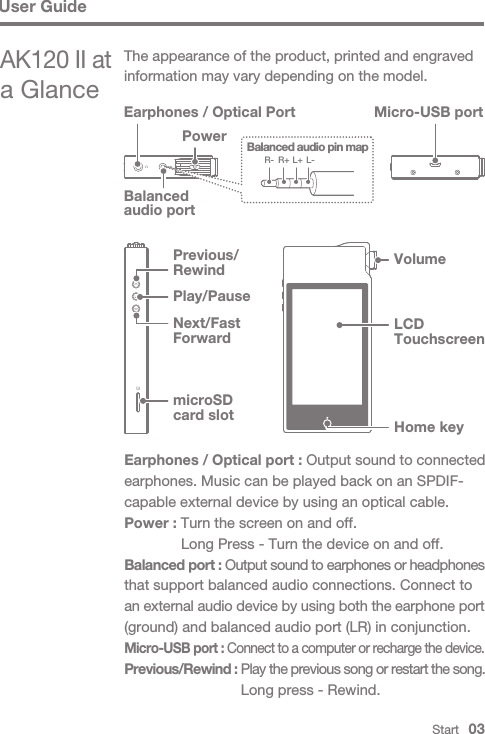
![User GuideThis device has an automatic shutdown feature to reduce battery consumption. The device will turn off after a defined period when there is no user input. [Settings - Power Saving - Automatic Shutdown] (See p. 34)This device has an automatic timeout feature to reduce battery consumption. The screen will turn off after a defined period when there is no user input. [Settings - Power Saving - Screen Timeout] (See p. 34)Turn the Screen On/Off1. Press the [ ] button to turn on the screen.2. Another short press will turn off the screen.Turn On/Off1. Long press the [ ] button to turn on/off the device.2. A long press while the device is on will display a shutdown message.3. Press [Confirm] to turn off the device.Power Manage-mentStart 04Play/Pause : Play or Pause a song.Next/Fast Forward : Skip to the next song. Long press - Fast Forward.microSD card slot : Insert a microSD card and access its files.Volume : Control the volume by turning the wheel.LCD Touchscreen : Display with gesture control.Home button : Show the Home Screen.](https://usermanual.wiki/DREAMUS/PPM21/User-Guide-2354582-Page-5.png)
![Start 05User GuideWhen charging via PC connection, the charge time may change depending on whether the device is On or Off. The maximum charge time with a 5V 2A charging adapter is 4 hours and 30 minutes. (Fully discharged battery, power Off)If the device is On and/or being used while charging, the charge time may be longer or the battery may not fully charge. Charging with the device turned Off is recommended.The device may not charge if the PC or USB connection goes into standby/sleep mode.The device may charge slowly or not charge at all in extreme temperatures. Charging in a room-temperature setting is recommended.The built-in battery will gradually lose capacity over time according to the number of charges/discharges.Be sure to use a high-powered USB 2.0 port. A low- powered USB port (i.e. keyboard or USB hub without a dedicated power supply) will increase the charge time.Do not use a Micro-USB cable other than the one supplied with the device because doing so may cause a malfunction.Charging1. Turn on the computer.2. The device will charge automatically when connected to a computer via the Micro-USB cable.Resetting the device will not affect the stored data or time setting. Do not attempt to reset the device while it's functioning because doing so may corrupt stored data.Reset Function1. In cases of unexpected device failure or freeze, press the [ ] button for 12 seconds to force a shutdown. The device can be restarted normally after a shutdown.](https://usermanual.wiki/DREAMUS/PPM21/User-Guide-2354582-Page-6.png)
![User GuideStart 07Mac users need to download and install the MTP program from the Astell&Kern website. [http://www.astellnkern.com > Support > Download] For an optimal connection, quit all unnecessary programs before connecting the device to the computer.Do not use a Micro-USB cable other than the one supplied with the device because doing so may cause a malfunction.Windows XP users require Service Pack 2 and Windows Media Player 10to be installed for the computer to recognize the USB device. Download necessary Service Packs and Windows Media Player from the Microsoft website. http://www.microsoft.comDSD format is not supported while using Optical Out.Connecting to a Computer1. Turn on the device and the PC.2. Connect the device to a PC as a standard USB device by using the supplied Micro-USB cable. [Settings - Connect USB] USB drive : Transfer files from the PC to the device. DAC input : Listen to music from the PC on the device. (See pp. 29)Optical Out1. Music can be played back on an SPDIF-capable external audio device by using an optical cable.](https://usermanual.wiki/DREAMUS/PPM21/User-Guide-2354582-Page-8.png)
![Start 09User GuideInsert/Remove a microSD Card1. Refer to the diagram and gently insert a microSD card into the microSD card slot.2. To safely remove a microSD card, select [Safely remove SD card] from the Notification Bar or select [Unmount SD card] from [Settings - System Information].3. Gently press the microSD card to release it from the slot.Delete Files/Folders on the Device1. Select the file/folder to delete, right click, and select [Delete].2. Select [Yes] in the [Confirm File/Folder Deletion] window to delete the selected files/folders.](https://usermanual.wiki/DREAMUS/PPM21/User-Guide-2354582-Page-10.png)

![Start 11User GuideRefer to page 37 of the manual for more information on connecting to a wireless network.Firmware Upgrade may not initialize when the battery level is too low (A minimum battery level of 50% is required). Moving to another screen during the file download will cancel the download.Do not disconnect from the wireless network during a Firmware Upgrade. Doing so may cause data corruption and/or damage to the system.If an error occurs or the notice in the Notification Bar disappears during an upgrade, download the Firmware Upgrade again through [Settings - Update - System Update].Wi-Fi Update / OTA (Over-the-Air)1. Connect to a wireless network.2. When a new firmware version is found, a Firmware Update Guide window will display on screen.3. Select [Update] and choose the items for update.4. Follow the on-screen instructions and proceed with the Firmware Upgrade.Firmware Upgrade](https://usermanual.wiki/DREAMUS/PPM21/User-Guide-2354582-Page-12.png)
![Using the Device 12Basic FunctionsLCD Touchscreen1. This device features an LCD Touchscreen. Interact with the device by touching the screen to access a variety of features.Home ScreenHome Screen1. Press the [Home] button at any time to return to the Home Screen.2. Long press the [Home] button to move to the Music Player.Do not use a sharp object or excessive force to prevent damage to the screen.User GuideMoving up/down in the list1. Scroll through a list by dragging [Bottom Top] / [Top Bottom] on the screen.](https://usermanual.wiki/DREAMUS/PPM21/User-Guide-2354582-Page-13.png)
![Using the Device 13User GuideMenu items other than [MQS Streaming/Settings] can be long-pressed and dragged to change their locations.Pull down on the Notification Bar to view its contents. (See pp. 14-16)Currently playing artist/song information. Select a menu button tomove to the corresponding screen.View the list of songs by different search options.Notification Bar Current SongMenu itemsSearch options1 2341234Home Screen](https://usermanual.wiki/DREAMUS/PPM21/User-Guide-2354582-Page-14.png)
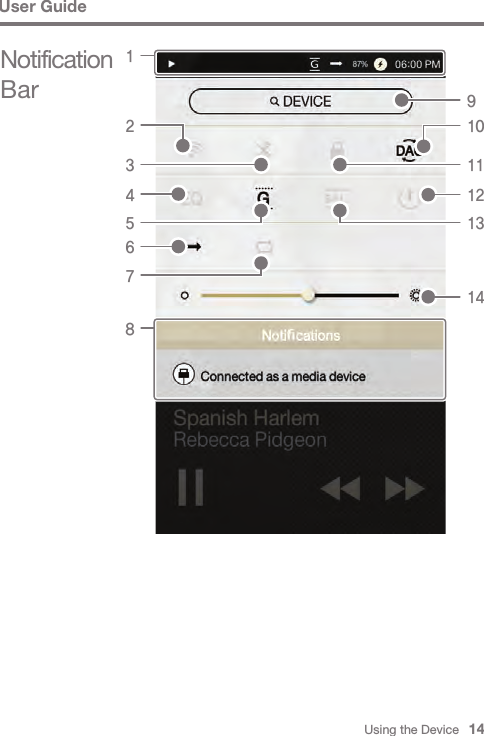
![Press the Notification Bar to close.Press [ ] to turn Wi-Fi on or off.Press [ ] to turn Bluetooth on or off.Press [ ] to turn the EQ on or off. The most recent EQ settings are used by default.Press [ ] to turn Gapless Playback on or off.Press [ ] to cycle through different Play Modes. : Sequential playback. : Shuffle playback.Press [ ] to cycle through different Repeat modes. : Repeat the entire Playlist. : Repeat the current song. : Disable Repeat.Notification contents are displayed in this area.Enter keywords to display a list of items containing the search terms.Using the Device 15User GuideNotification BarWi-Fi Bluetooth Equalizer Gapless PlaybackPlay Mode Repeat Notifications DisplaySearch 1 2 3 4 5 6 7 89](https://usermanual.wiki/DREAMUS/PPM21/User-Guide-2354582-Page-16.png)
![Using the Device 16User GuideComputer Connection Screen Lock Line OutBalanced OutputBrightness1011 1213 14Select the appropriate mode when connected to a computer. :USB drive mode for transferring media files. :Listen to music from the PC through the device.Press [ ] to turn the Screen Lock on or off. The volume wheel will not function when the screen is locked.Turn Line Out on or off.Turn Balanced Output on or off.Use the adjustment bar to control the display brightness.Long press [ / / ] to move to the corresponding screen.](https://usermanual.wiki/DREAMUS/PPM21/User-Guide-2354582-Page-17.png)
![Using the Device 17MQS Streaming Server Installation1. Visit the Astell&Kern website and download the server installer that corresponds to your operating system. [http://www.astellnkern.com > Support > Download]2. Run the downloaded installer and follow the on- screen instructions.3. Check the User Guide within the program for detailed information on using the MQS Streaming Server.The AK120 II can access music files stored on a computer on the same network.MQS StreamingMinimum system requirements. PC- OS : Windows XP, Windows 7, 8 (32 & 64 bit) Mac- Mac OS X Lion (10.7)Running the MQS Streaming Server1. Run the MQS Streaming Server from the computer.2. Connect the AK120 II to the same network as the computer and select [MQS Streaming] from the Home Screen.User Guide](https://usermanual.wiki/DREAMUS/PPM21/User-Guide-2354582-Page-18.png)

![Using the Device 19MQS Streaming and Download1. Select a search option from the server Home Screen to display a list of music.2. Select a song to begin streaming.3. Long press a song to display an option for downloading the song to the device.[Download / Selected Download] Select the appropriate option to download songs. - A message on the Notification Bar will indicate a completed download.User GuideDepending on network conditions, song loading may be slow and streaming may stutter.Server response may be slow when the server computer is under a load.Depending on network conditions and server status, the AK120 II's performance may be affected when streaming and downloading simultaneously.Terminating MQS Streaming or pressing the item being downloaded within the Notification Bar will stop downloads.](https://usermanual.wiki/DREAMUS/PPM21/User-Guide-2354582-Page-20.png)
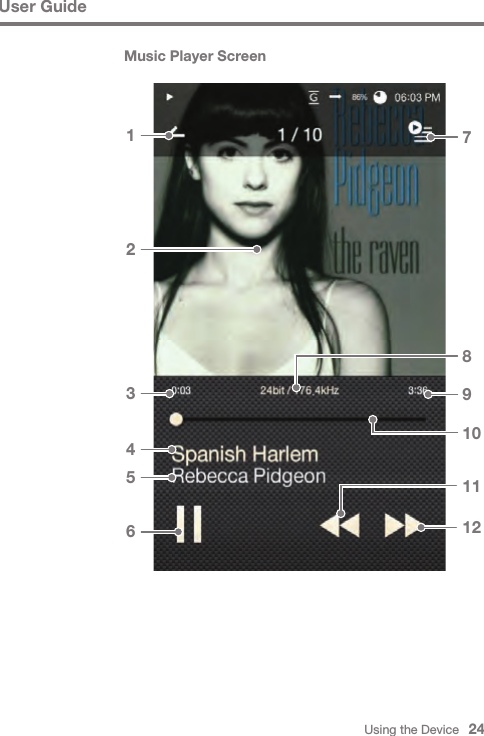
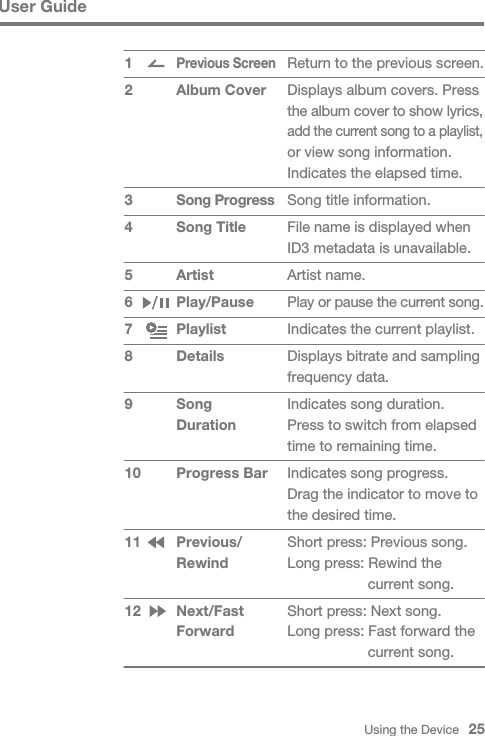
![Using the Device 20User GuideMusic PlayerSelecting Music1. Select a search option from the Home Screen to display a list of music.2. Select a song from the list to begin playback.Select [Folder] to search by folder.Continuous Playback: Approximately 10 hours (Basis: FLAC, 16 bit, 44 kHz, Unbalanced output, Volume 40, EQ Off, LCD Off)Supported file formats: FLAC, WAV (8-192 kHz, 8/16/24 bit), WMA (8-320 kbps), MP3(8-320 kbps), OGG, APE (Normal, Fast, High), AAC, AIFF, ALAC, DFF, DSF- Select an album cover from the Home Screen to begin playback.- Turn the [Volume Wheel] to adjust the volume.- Press [ ] during playback to pause and [ ] to resume playback. + Press the [ ] button on the device to pause/resume playback.- Press [ / ] during playback for the previous/next song. + Press the [ / ] button on the device for the previous /next song.- Long press [ / ] during playback to rewind/fast forward. + Long press the [ / ] button on the device to rewind /fast forward.- Press [ ] to return to the previous screen.Listening to Music](https://usermanual.wiki/DREAMUS/PPM21/User-Guide-2354582-Page-21.png)
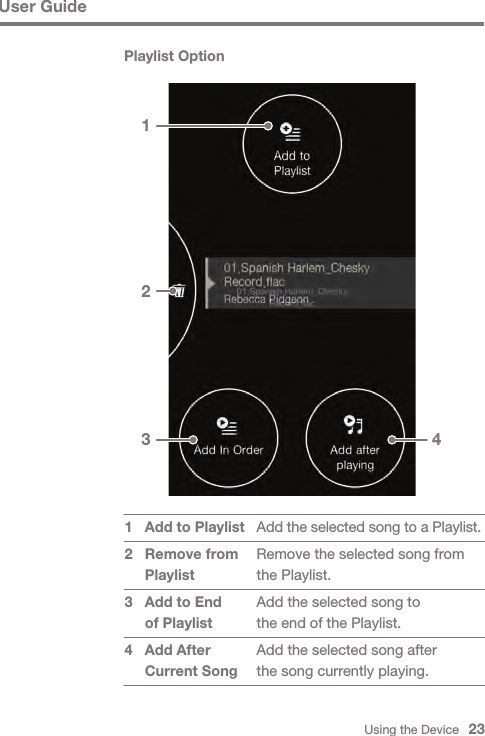
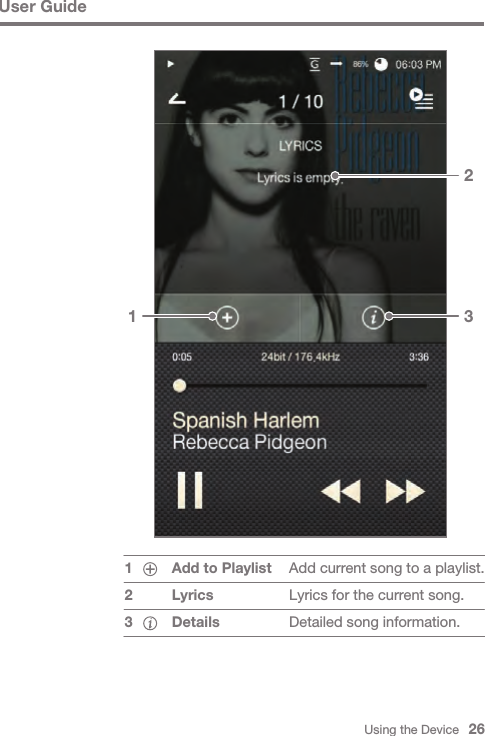
![Using the Device 21User Guide- Press the [Home] button on the device to go to the Home Screen.- Press [ ] to display the current Playlist.- Long press a song on the Playlist for Playlist options. + [Add to Playlist/Remove/Add to end of Playlist/Add after current song] are available from the Playlist.- Drag the progress bar to the desired location during playback.- Press the Album Cover during playback to show lyrics. + : Add current song to Playlist. + : Show song information.](https://usermanual.wiki/DREAMUS/PPM21/User-Guide-2354582-Page-22.png)
![Using the Device 27User GuidePlaylist Manage-mentCreate a Playlist1. Press [Playlists] from the Home screen to display a list of playlists.2. Press [All Playlists], then press [+ Add].3. Enter a name for the playlist and press [Create] to create a new playlist. - Long press to [Delete/ Rename] a playlist.Add a Song to a Playlist1. Press [All Playlists] to display a list of playlists.2. Select a playlist and press [+ Add] to display a list of songs.3. Check the box next to the desired song and press [Add] to add the song to the selected playlist.](https://usermanual.wiki/DREAMUS/PPM21/User-Guide-2354582-Page-28.png)
![Using the Device 28User GuideRemove a Song from a Playlist1. Press [All Playlists] to display a list of playlists.2. Selected the desired playlist and press [- Remove].3. Check the box next to desired song and press [Remove] to remove the song from the selected playlist.Edit the Playlist Order1. Long press [ ] to edit the playlist order.](https://usermanual.wiki/DREAMUS/PPM21/User-Guide-2354582-Page-29.png)
![Using the Device 30User GuideBluetooth Connect a Bluetooth device to listen to music wirelessly.Turn Bluetooth On/OffA Bluetooth device must be paired with the AK120 II prior to use. Refer to the Bluetooth device's User Guide for details.1. Select [ ] from the Home Screen or select [On/Off] from [Settings - Bluetooth].Bluetooth Pairing1. Select the appropriate Bluetooth device from the list of available devices.A Bluetooth device must be paired with the AK120 II prior to use. Refer to the Bluetooth device's instruction manual for details.Terminate Bluetooth Connection1. Press the connected Bluetooth device and confirm the message prompt to disconnect the device.](https://usermanual.wiki/DREAMUS/PPM21/User-Guide-2354582-Page-31.png)
![Using the Device 32User GuideSettings Set up the device according to the user's needs.The settings menu may vary depending on the Firmware version.Setup1. Select [Settings] from the Home Screen.2. Select the desired item.Wi-Fi Change wireless network settings and turn Wi-Fi on or off.Bluetooth Connect a Bluetooth device to listen to music wirelessly.Refer to page 37 of the manual for more information on connecting to a wireless network.Refer to page 30 of the manual for more information on using a Bluetooth connection.Equalizer Set the Equalizer according to the user's preferences. - Pro EQ: EQ Preset recommended by professionals. - User EQ: Adjust the frequencies according to the user's preferences.](https://usermanual.wiki/DREAMUS/PPM21/User-Guide-2354582-Page-33.png)


![Using the Device 37Wi-FiUser Guide2. Select an appropriate AP to connect to the wireless network. - Additional information (encryption key, index, etc.) may be required depending on the network settings.3. Long press the network name and select [Network Settings] to edit specific network settings.Connect to a Wireless Network1. Long press [ ] from the Notification Bar or select [Settings - Wi-Fi] to display a list of Access Points (AP).Networks requiring browser or other additional certifica-tions are supported.](https://usermanual.wiki/DREAMUS/PPM21/User-Guide-2354582-Page-38.png)
![Using the Device 38User Guide2. Press [Pro] from the drop-down list and select [Add New].3. Enter a name for the custom EQ settings and select [Add].Equalizer Equalizer Setup1. Long press [EQ] from the Notification Bar or turn on the feature from [Settings - Equalizer].](https://usermanual.wiki/DREAMUS/PPM21/User-Guide-2354582-Page-39.png)
![Using the Device 39User GuideReset Equalizer1. Select the desired EQ setting and select [Reset] to revert the EQ to its default settings.4. Adjust the frequencies according to the user's preferences.](https://usermanual.wiki/DREAMUS/PPM21/User-Guide-2354582-Page-40.png)
![Using the Device 40User GuideDelete Equalizer1. Select [Delete] and choose the desired EQ setting for deletion.2. Press [Confirm] to complete process.Rename Equalizer1. Select [Rename] and enter a new name for the EQ setting.2. Press [Rename] to complete the process.](https://usermanual.wiki/DREAMUS/PPM21/User-Guide-2354582-Page-41.png)
![Miscellaneous 43User Guide2. The device will not charge when connected to a computer via USB cable. Use a USB port on the back of the computer, and check that the USB port is functioning properly. Check the USB cable connections.3. The computer won't recognize the device or an error occurs when connected. Use a USB port on the back of the computer. Check the USB cable connections. For Windows XP, verify that Service Pack 2 (or higher) and Windows Media Player 10 is installed. Check that the device is connected properly on a different computer.4. The screen turns off. The screen turns off automatically after a defined period to reduce battery consumption. Set the time at [Settings - Power Saving - Screen Timeout].5. The screen is not displaying properly. Check whether debris is on the screen.6. There is no sound or there's static. Verify that the volume isn't set to [0]. Check that the earphones are plugged in properly, and make sure debris isn't in the port or on the plug. Verify that the music file is not corrupted. Verify that the audio settings have been properly set (balanced, line out, etc.)7. File will not playback or a specific file causes instability. The following may occur due to the condition of the file: - Playback is unstable or difficult. - The device may not function properly. - The file may sound different from a computer. - There may be a difference in the performance of playback or other functions. - The file may not be compatible with playback specifications. A file conversion or using a different file is recommended.](https://usermanual.wiki/DREAMUS/PPM21/User-Guide-2354582-Page-44.png)
![Miscellaneous 47User GuideSpecifi-cationsAK120 IIPPM21STONE SILVERAluminum3.31 inch WVGA (480x800) AMOLED Touch ScreenWAV, FLAC, WMA, MP3, OGG, APE (Normal, High, Fast), AAC, ALAC, AIFF, DFF, DSFFLAC, WAV, ALAC, AIFF: 8 kHz - 192 kHz (8/16/24 bits per sample) DSD: DSD64(1 bit 2.8 MHz), DSD128, StereoUnbalanced 2.1 Vrms/ Balanced 2.3 Vrms (Condition No Load) Cirrus Logic CS4398 x 2 (Dual DAC)Support up to 24 bit / 192 kHz Bit-to-Bit DecodingUSB Micro-B input (for charging & data transfer (PC & Mac)) / Connection Mode: MTP (Media Device)PHONES (3.5 mm )/ Optical Out (3.5 mm) / Balanced Out (2.5 mm, only 4-pole supported)802.11 b/g/n (2.4GHz) v4.02.16” (55mm)[W] x 4.64” (118mm)[H] x 0.58” (14.9mm)[D]6.24 oz (177g)Firmware upgrade supported (OTA) ±0.023 dB (Condition: 20 Hz - 20 kHz) Unbalanced & Balanced /±0.3 dB (Condition: 10 Hz - 70k Hz) Unbalanced & Balanced116 dB @ 1 kHz, Unbalanced / 117 dB @ 1 kHz, Balanced130 dB @ 1 kHz, Unbalanced / 135 dB @ 1 kHz, Balanced0.0007% @ 1 kHz, Unbalanced / 0.0005% @ 1 kHz, Balanced0.0004% 800 Hz 10 kHz (4:1) Unbalanced/0.0003% 800 Hz 10 kHz (4:1) BalancedBalanced out 2.5mm (1ohm) / PHONES 3.5mm (2ohm)50 ps (Typ) 128GB(NAND)microSD (Max. 128 GB) x 1 3,250 mAh 3.7V Li-Polymer Battery Windows XP, Windows 7,8 (32 & 64 bit) Mac OS X 10.7General Specifications PRODUCT NAMEModelBody Color Body Material DisplaySupported Audio Formats Sampling rateOutput Level DAC Decoding InputOutputsWi-Fi Bluetooth Dimensions WeightFeature Enhancements Audio SpecificationsFrequency Response S/N Crosstalk THD+NIMD SMPTEOutput impedanceClock JitterMemoryBuilt-in Memory External Memory BatteryCapacitySupported OS Supported OS](https://usermanual.wiki/DREAMUS/PPM21/User-Guide-2354582-Page-48.png)