DREAMUS PPR11 SE100 User Manual Part I
IRIVER LIMITED SE100 Part I
UserManual.wiki
>
DREAMUS
>
PPR11 User Manual
>
User Manual Part I
Contents
1.
User Manual Part I
2.
User Manual Part II
3.
User Manual Part III
User Manual Part I
Navigation menu
Upload a User Manual
Namespaces
Wiki Guide
HTML
PDF
Info
Views
User Manual
Discussion / Help
Navigation
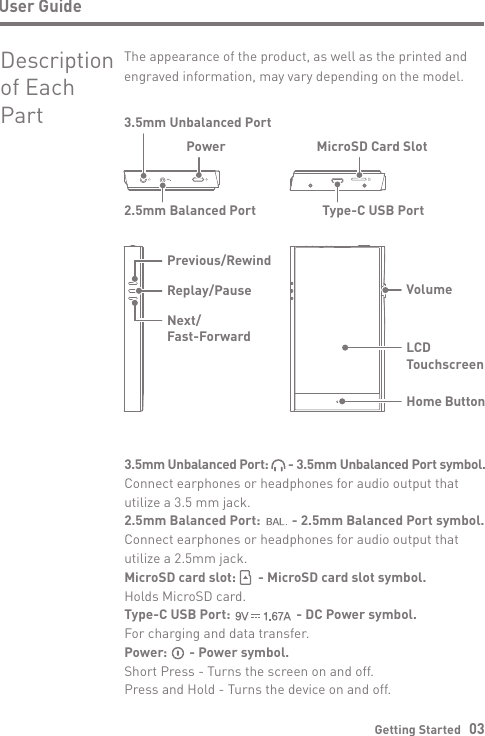
![User GuideProtective Film: Protects the product’s screen.Type-C USB Cable: For charging and data transfer.Quick Start Guide: It describes the basic method of using the product.Warranty Card: The warranty card is required for customer support. Keep the warranty card for technical support. User Guide: The User Guide can be downloaded from the Astell&Kern website.[http://www.astellnkern.com/ > Support > Download]. Contents may be changed without prior notice to improve the performance or quality of the product.Package ContentsGetting Started 02Quick Start Guide& Warranty CardType-C USB CableProtective FilmPPR11](https://usermanual.wiki/DREAMUS/PPR11.User-Manual-Part-I/User-Guide-3829334-Page-3.png)
![Getting Started 05User GuideResetting the device will not affect stored data or time settings. Do not use the reset function while the product is in use. Doing so may corrupt the data on the device. This device has an automatic timeout feature to save battery power. The screen will turn off if there is no user input during the period defined in [Menu - Settings - Power - Screen Timeout]. (See Page 42.)Reset Function1. In case of an unexpected device failure or freeze, press and hold [Power] for 7 seconds to force a shutdown. The device can then be restarted after the shutdown is complete.Turn the Screen On/Off1. While the screen is on, press the [Power button] to turn off the screen.2. Press [Power button] again to turn it on.This device has an automatic shutdown feature to save battery power. The device will turn off if there is no user input during the period defined in [Menu - Settings - Power - Automatic Shutdown] (See Page 42.)Turning on/off Power1. Press and hold the [Power button] to turn on the device.2. While the device is on, press and hold the [Power button] to shut down the device. A confirmation message will appear.3. Press [Confirm] to turn off the device.Power Manage- ment](https://usermanual.wiki/DREAMUS/PPR11.User-Manual-Part-I/User-Guide-3829334-Page-6.png)
![Getting Started 08User GuideConnecting to Computer1. Turn on the device and your computer.2. Connect the device to your computer using USB Type-C cable and select one of the following settings on the device [Menu - Settings - USB mode] Media Device (USB Drive): Transfer files from a computer to the device. DAC Input: Listen to music on a connected computer through the device. (See Page 36.)Mac users need to download and install Android File Transfer from the Astell&Kern website. [http://www.astellnkern.com > Support > Download]For the best connection, close any unnecessary programs before connecting the device to the computer.Do not use cables other than the USB Type-C cable provided with the product.Use USB 2.0 only on Mac.Type-C-to-Type-C cable is recommended when connecting with a MAC that supports Type C portWindows XP users require Service Pack 2 and Windows Media Player 10 to be installed for the computer to recognize the USB device. Download Windows Media Player and required Service Packs from the Microsoft website. http://www.microsoft.com](https://usermanual.wiki/DREAMUS/PPR11.User-Manual-Part-I/User-Guide-3829334-Page-9.png)
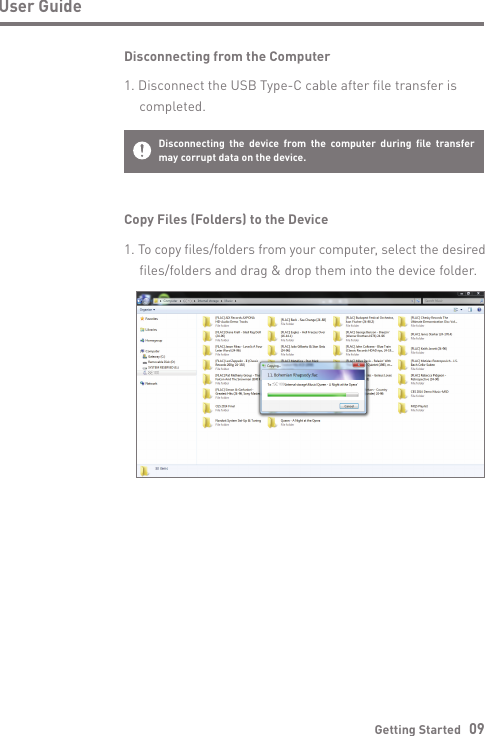
![Getting Started 10User GuideDelete Files (or Folders) from the Device1. Right-click the desired file/folder, and then select [Delete].2. Select [Yes] in the [Confirm File/Folder Deletion] window to delete the selected files/folders.Ensure the USB Type-C cable is properly connected.Turning off the device or disconnecting the USB Type-C cable while copying or moving files/folders may corrupt files or device memory.File transfer speeds may be affected by the computer and/or the OSenvironment.](https://usermanual.wiki/DREAMUS/PPR11.User-Manual-Part-I/User-Guide-3829334-Page-11.png)
![Getting Started 11User GuideMaximum Capacity: 256GBNotes on Inserting MicroSD Card When inserting the MicroSD card, do not use excessive force. This may cause damage to the device and the card. Do not repeatedly insert/remove the MicroSD card. If the card is improperly inserted, it may become stuck or cause damage to the device.Notes on removing a MicroSD card Be sure to safely dismount and remove the MicroSD card from the device. Not dismounting the MicroSD card before removal may corrupt data on the MicroSD card and device. Do not disconnect the MicroSD card during use. Doing so may damage the MicroSD card, corrupt or delete data and cause the device to malfunction.Recommended MicroSD CardsSanDisk, TranscendInsert/Remove a MicroSD Card1. Refer to the diagram and gently insert a MicroSD card into the MicroSD card slot.2. To safely remove a MicroSD card, select [Safely remove SD card] from the Notification Bar or select [Dismount MicroSD card] from [Menu - Settings - System Information].3. Gently press the MicroSD card to release it from the slot.](https://usermanual.wiki/DREAMUS/PPR11.User-Manual-Part-I/User-Guide-3829334-Page-12.png)
![Getting Started 12User GuideFor Wi-Fi connections, see Page 44.The firmware upgrade may not start if the battery level is too low. (A minimum battery level of 20% is required for installation.)Do not disconnect from the wireless network while downloading a firmware update. Doing so may cause data corruption and/or damage to system files.If an error occurs or the notice in the Notification Bar disappears during an upgrade, download the firmware update again by accessing [Menu - Settings - Update - System Update].Wi-Fi Update / OTA (Over-the-Air)1. Connect to a wireless network.2. If a new firmware update is available, the screen will prompt to download the new firmware.3. Select [Update].4. Follow the on-screen instructions to proceed with the firmware upgrade.FirmwareUpgradeNotes on Using MicroSD Cards If the MicroSD card is not recognized or is not functioning properly, format the card, preferably as a FAT32 partition. Using cards other than the recommended MicroSD card may cause issues. A MicroSD card is not included in the product package. MicroSD cards must be purchased separately.](https://usermanual.wiki/DREAMUS/PPR11.User-Manual-Part-I/User-Guide-3829334-Page-13.png)
![User GuideUsing the Device 13BasicOperationsLCD Touchscreen1. This device features an LCD touchscreen that allows you to select options by touching the screen. Use the touchscreen to access various features on the device.To prevent damage to the screen, do not use a sharp object or excessive force.Return to the Home ScreenHome Screen1. Press [ ] to go to the Home Screen.](https://usermanual.wiki/DREAMUS/PPR11.User-Manual-Part-I/User-Guide-3829334-Page-14.png)
![Using the Device 15User GuideView Current Playlist1. Touch and hold, then drag your finger left on the home screen to display the current playlist.View playback history1. Drag [Down / Up] direction on the Home screen to display the playback history.](https://usermanual.wiki/DREAMUS/PPR11.User-Manual-Part-I/User-Guide-3829334-Page-16.png)
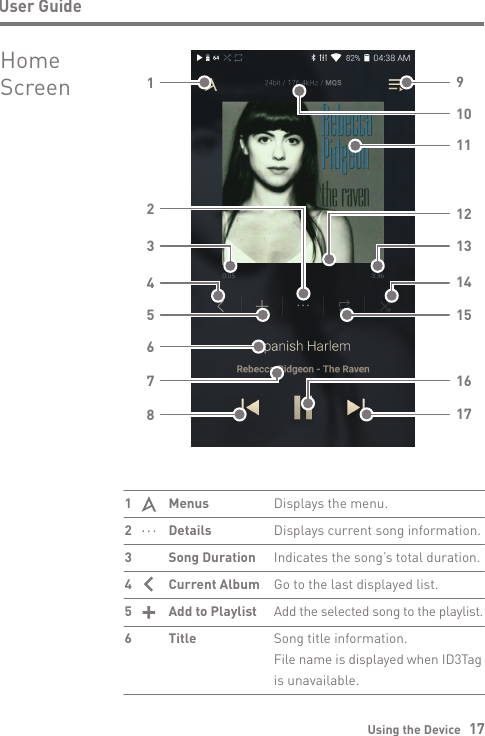
![Using the Device 18User GuideDisplays the artist and album info.Short press: Plays the previous song.Press and hold: Rewinds the current song.Display current playlist.Displays the bit rate and sampling frequency data.Display album covers. Press the album cover to view the lyrics. Shows the playback progress bar. Drag the indicator to move to the desired track time.Indicates the song’s total duration. Press to switch from elapsed time to remaining time.Set the playing sequence by pressing [ ]. :Sets random replaying. :Sets sequential replaying.Press [ ] to set the Repeat mode. : Repeat entire playlist. : Repeat current music. : Undo repeat function.Plays or pauses the current song.Short press: Plays the next song. Press and hold: Fast-forwards the current song.Artist/AlbumPrevious/ RewindPlaylistFormat informationAlbum CoverProgress BarSong DurationPlay ModeRepeat ModePlay/PauseNext/FF7 8 9 10 11 12 13 1415 16 17](https://usermanual.wiki/DREAMUS/PPR11.User-Manual-Part-I/User-Guide-3829334-Page-19.png)
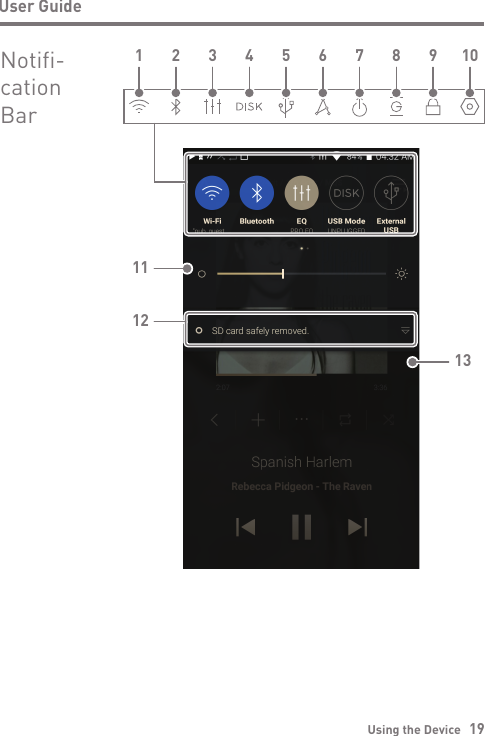
![Using the Device 20User GuidePress [ ] to turn Wi-Fi ON/ OFF.Press [ ] to turn BluetoothPress [ ] to turn the EQ ON/OFF. The most recent EQ settings are applied by default.Select the mode to use when connected to a computer. :Listen to music files on a connected computer through the device. :Enables transfer of media files.After connecting product to the portable USB DAC, press [ ] to connect or disconnect the device.Turn CD ripping function On/Off.Enable AK Connect.Turn line-out ON/OFF. Press [ ] to turn GaplessPlayback ON/OFF.Press [ ] to turn screen lock ON/OFF. The volume wheel and touchscreen are disabled when the screen is locked.Wi-Fi BluetoothEQ ComputerConnection ModeUSB AudioCD RippingAK CONNECTLine-outGapless Playback Screen Lock1 2 3 4 5 67 89](https://usermanual.wiki/DREAMUS/PPR11.User-Manual-Part-I/User-Guide-3829334-Page-21.png)
![Long-press an icon [ / / / / ] to navigate to the corresponding full menu settings screen.Using the Device 21User GuideDisplays a list of settings.Use the adjustment bar to control the display brightness.Device notifications are displayed in this area.Deletes notifications.SettingsBrightnessNotificationsDisplayDelete Notifications101112 13](https://usermanual.wiki/DREAMUS/PPR11.User-Manual-Part-I/User-Guide-3829334-Page-22.png)