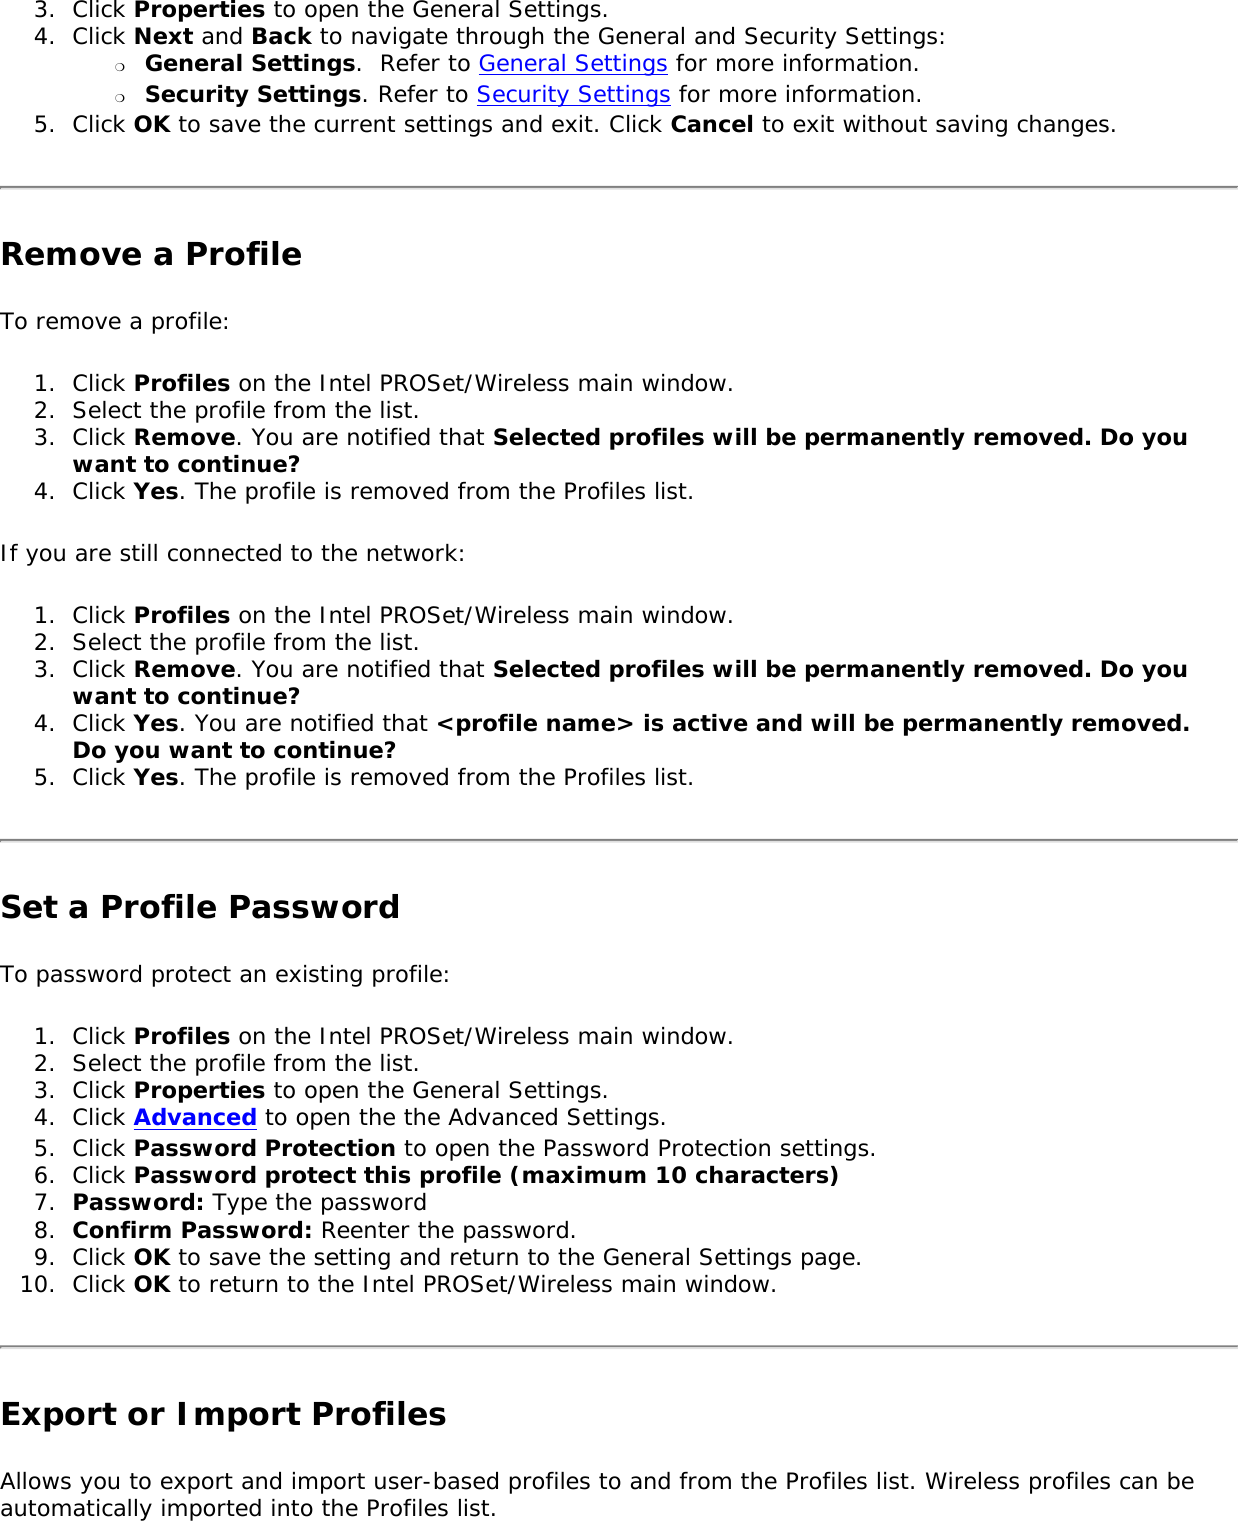
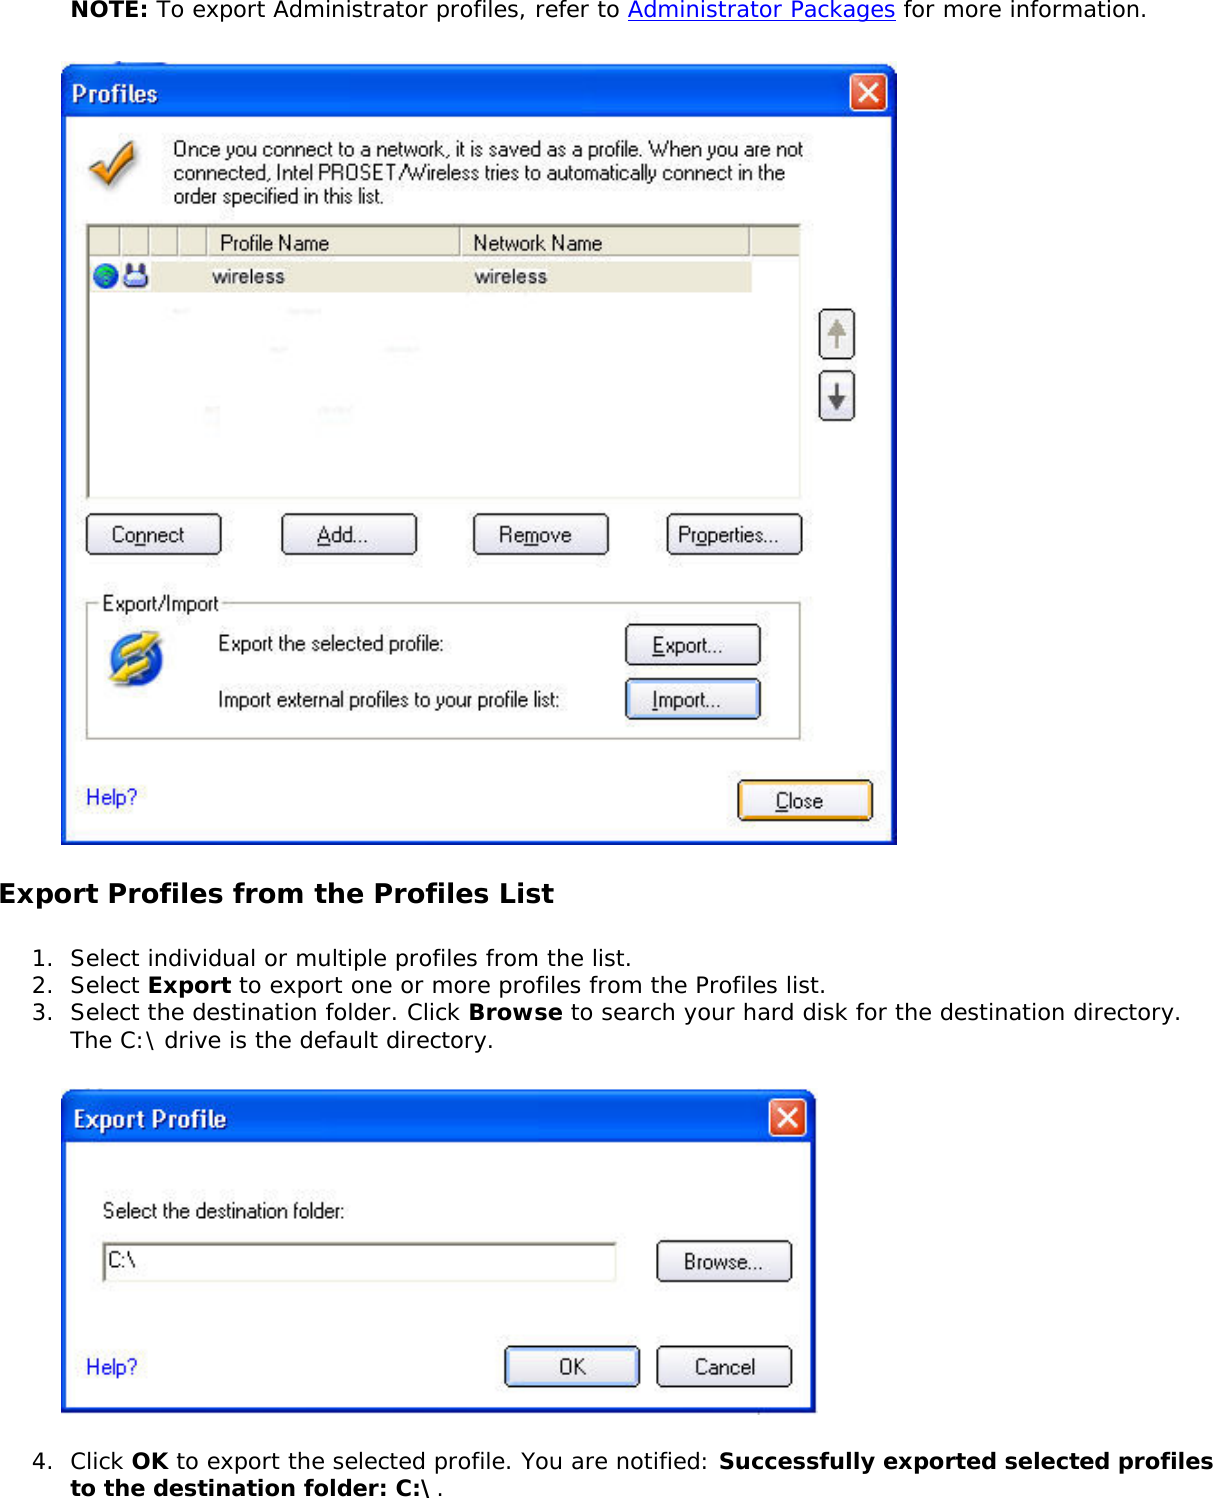
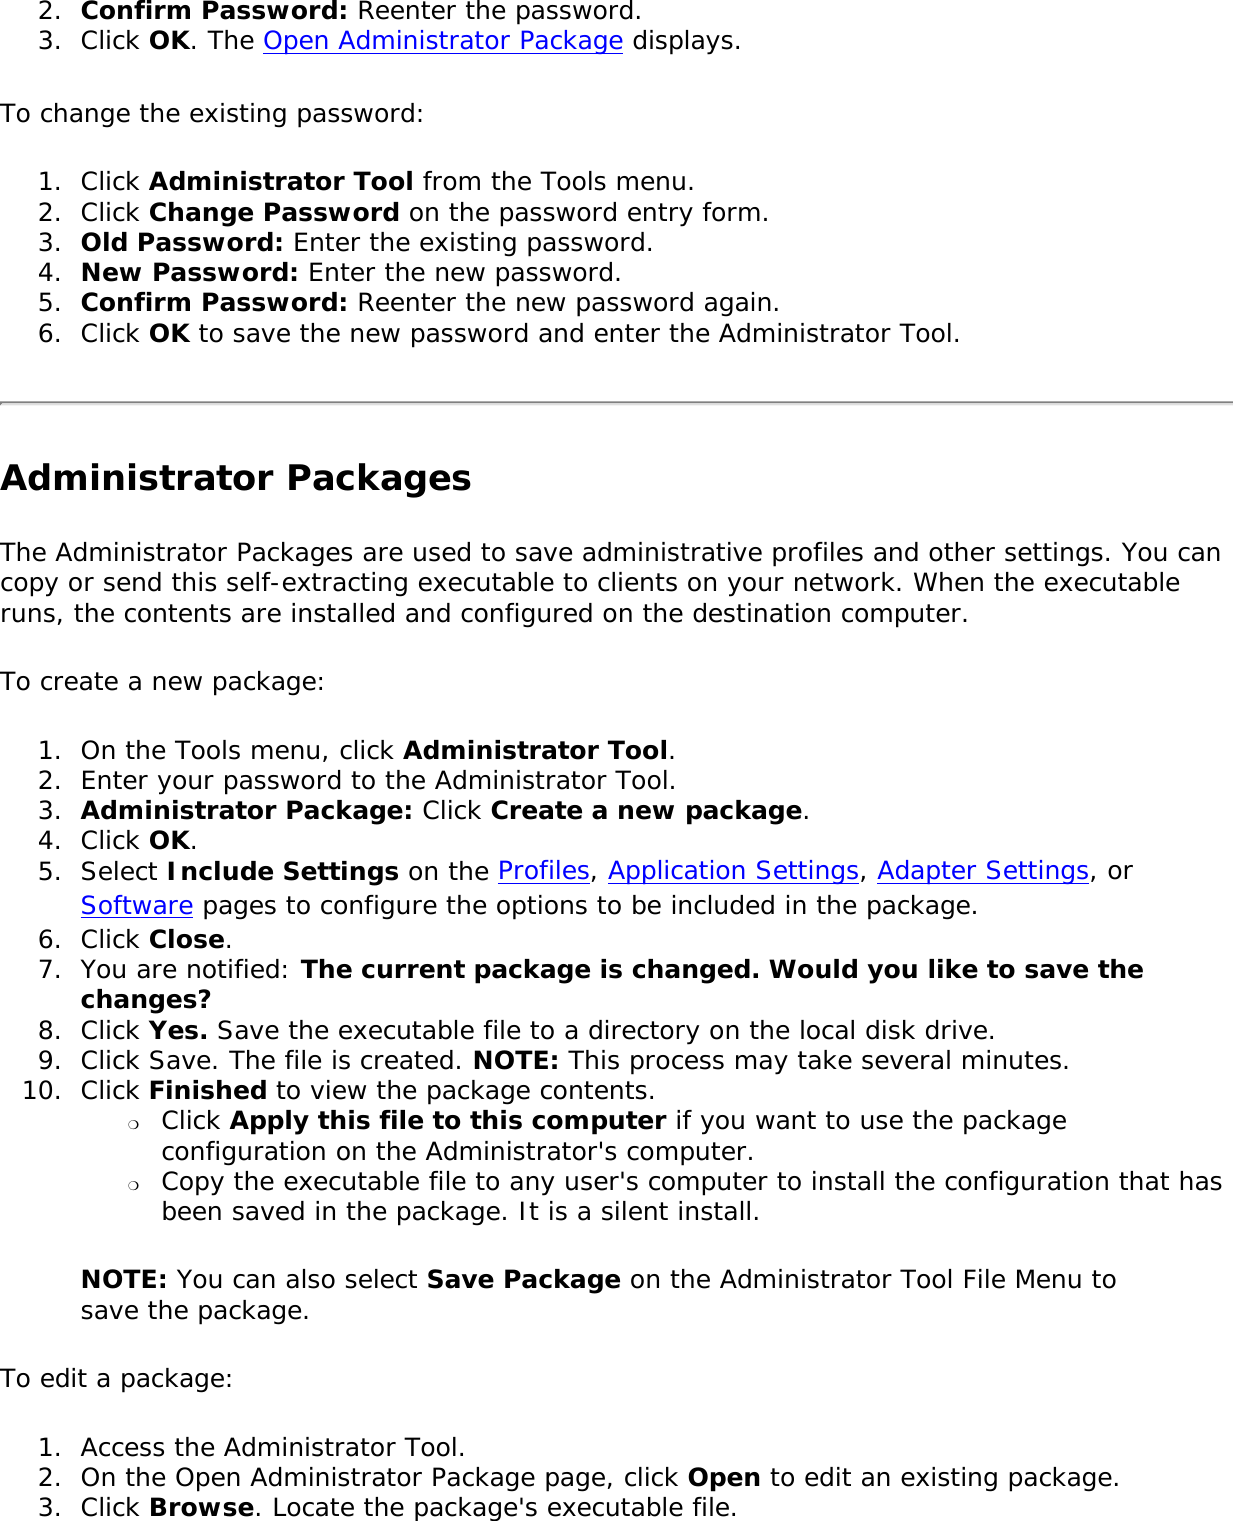
DRS Tactical Systems 980026010 ARMOR X10 TABLET User Manual User Guide
DRS Tactical Systems, Inc. ARMOR X10 TABLET User Guide
UserManual.wiki
>
DRS Tactical Systems
>
980026010 User Manual
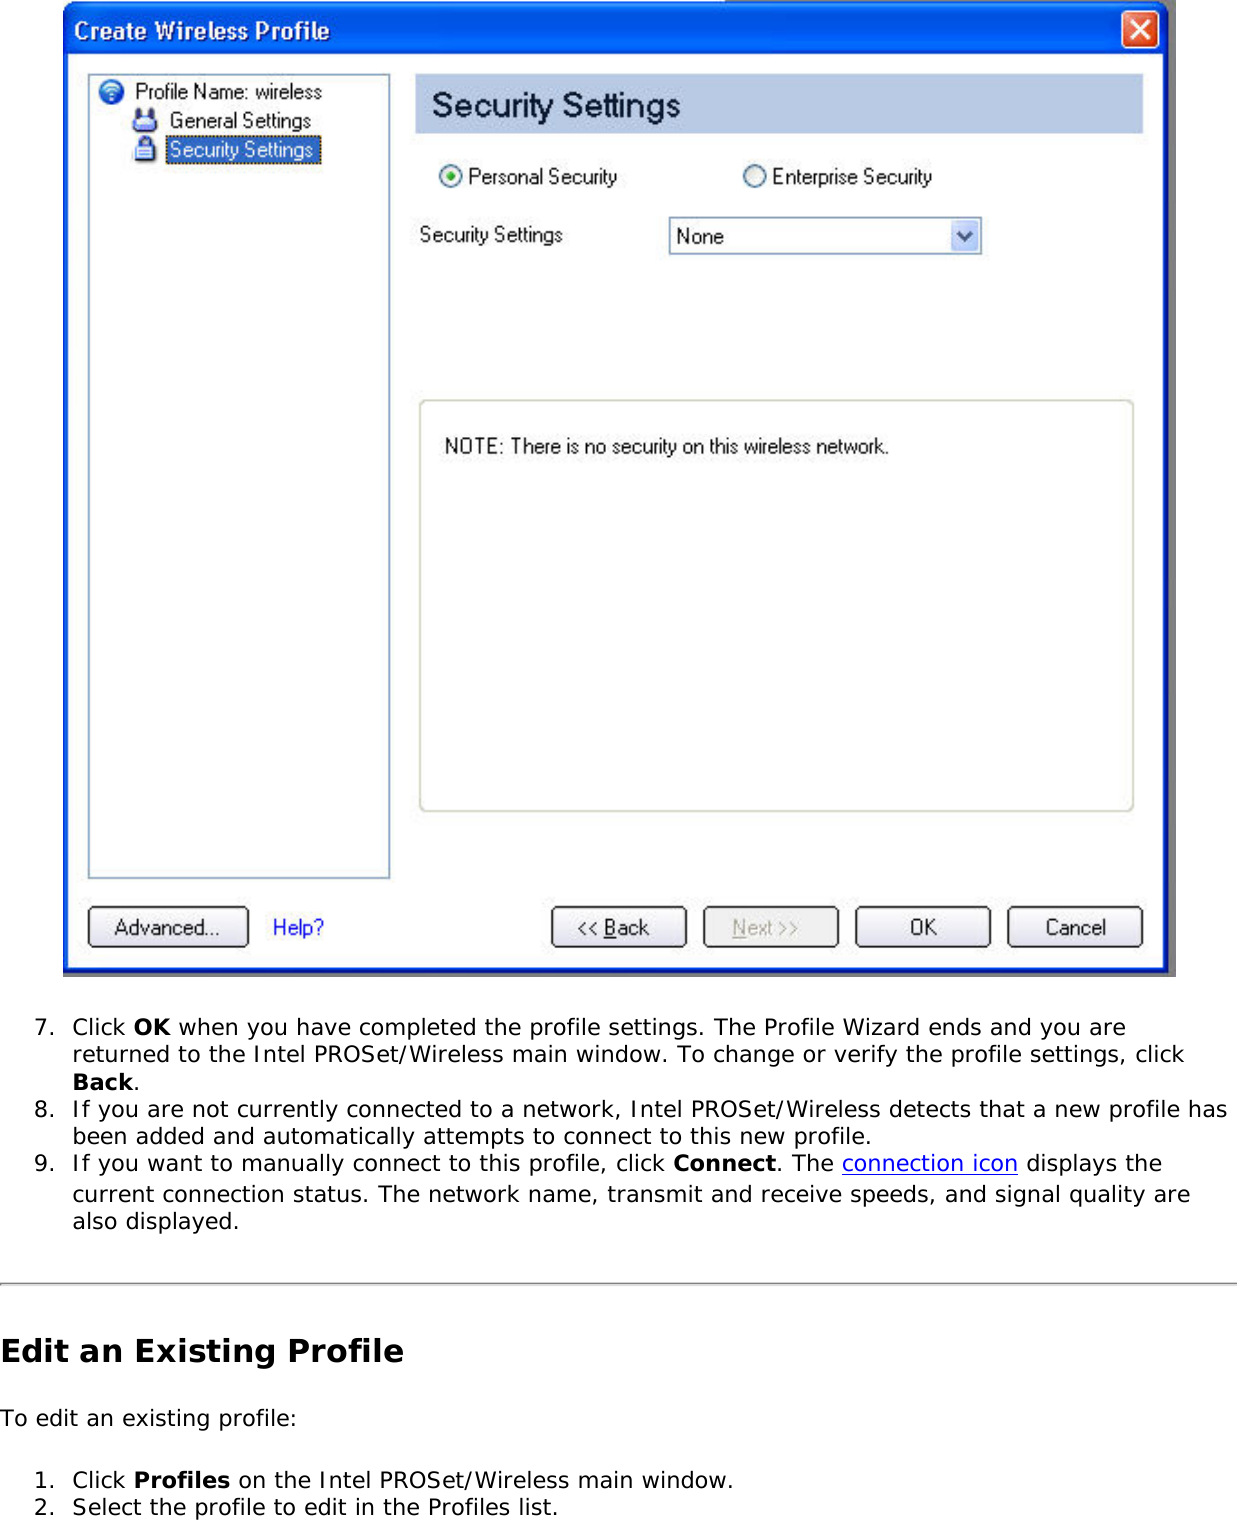
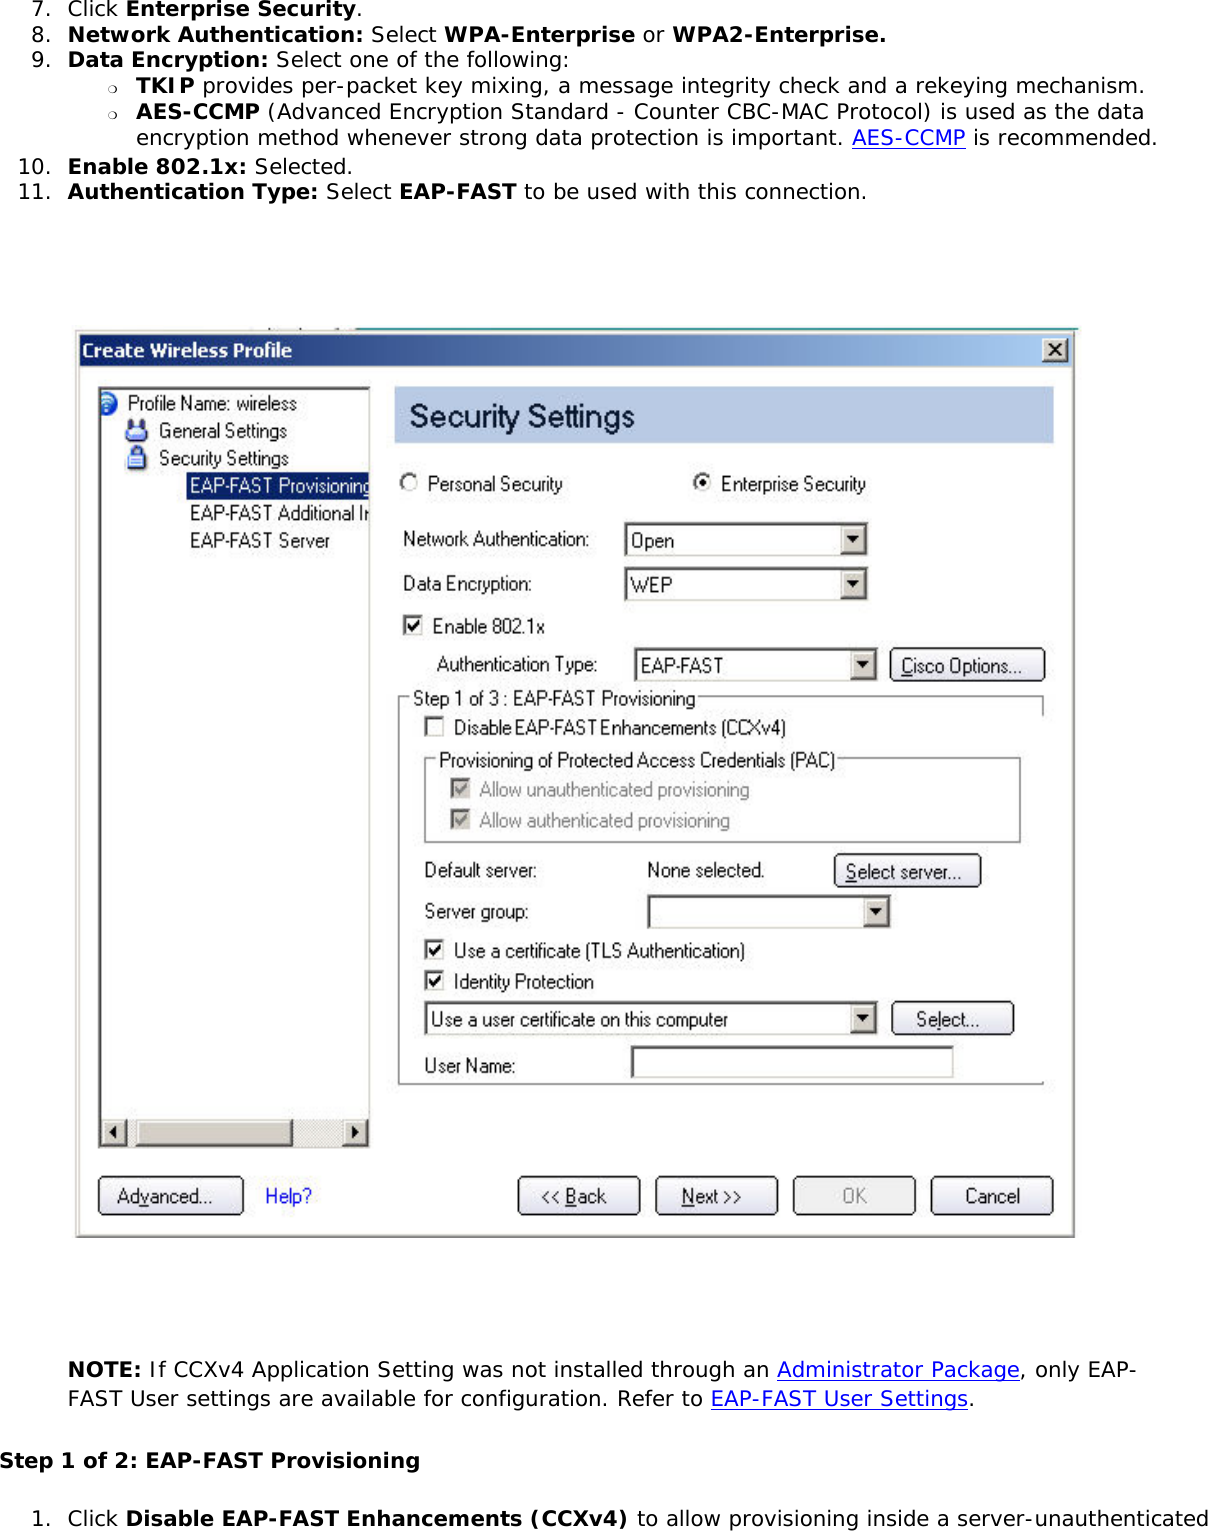
>
User Guide
Contents
1.
User Guide
2.
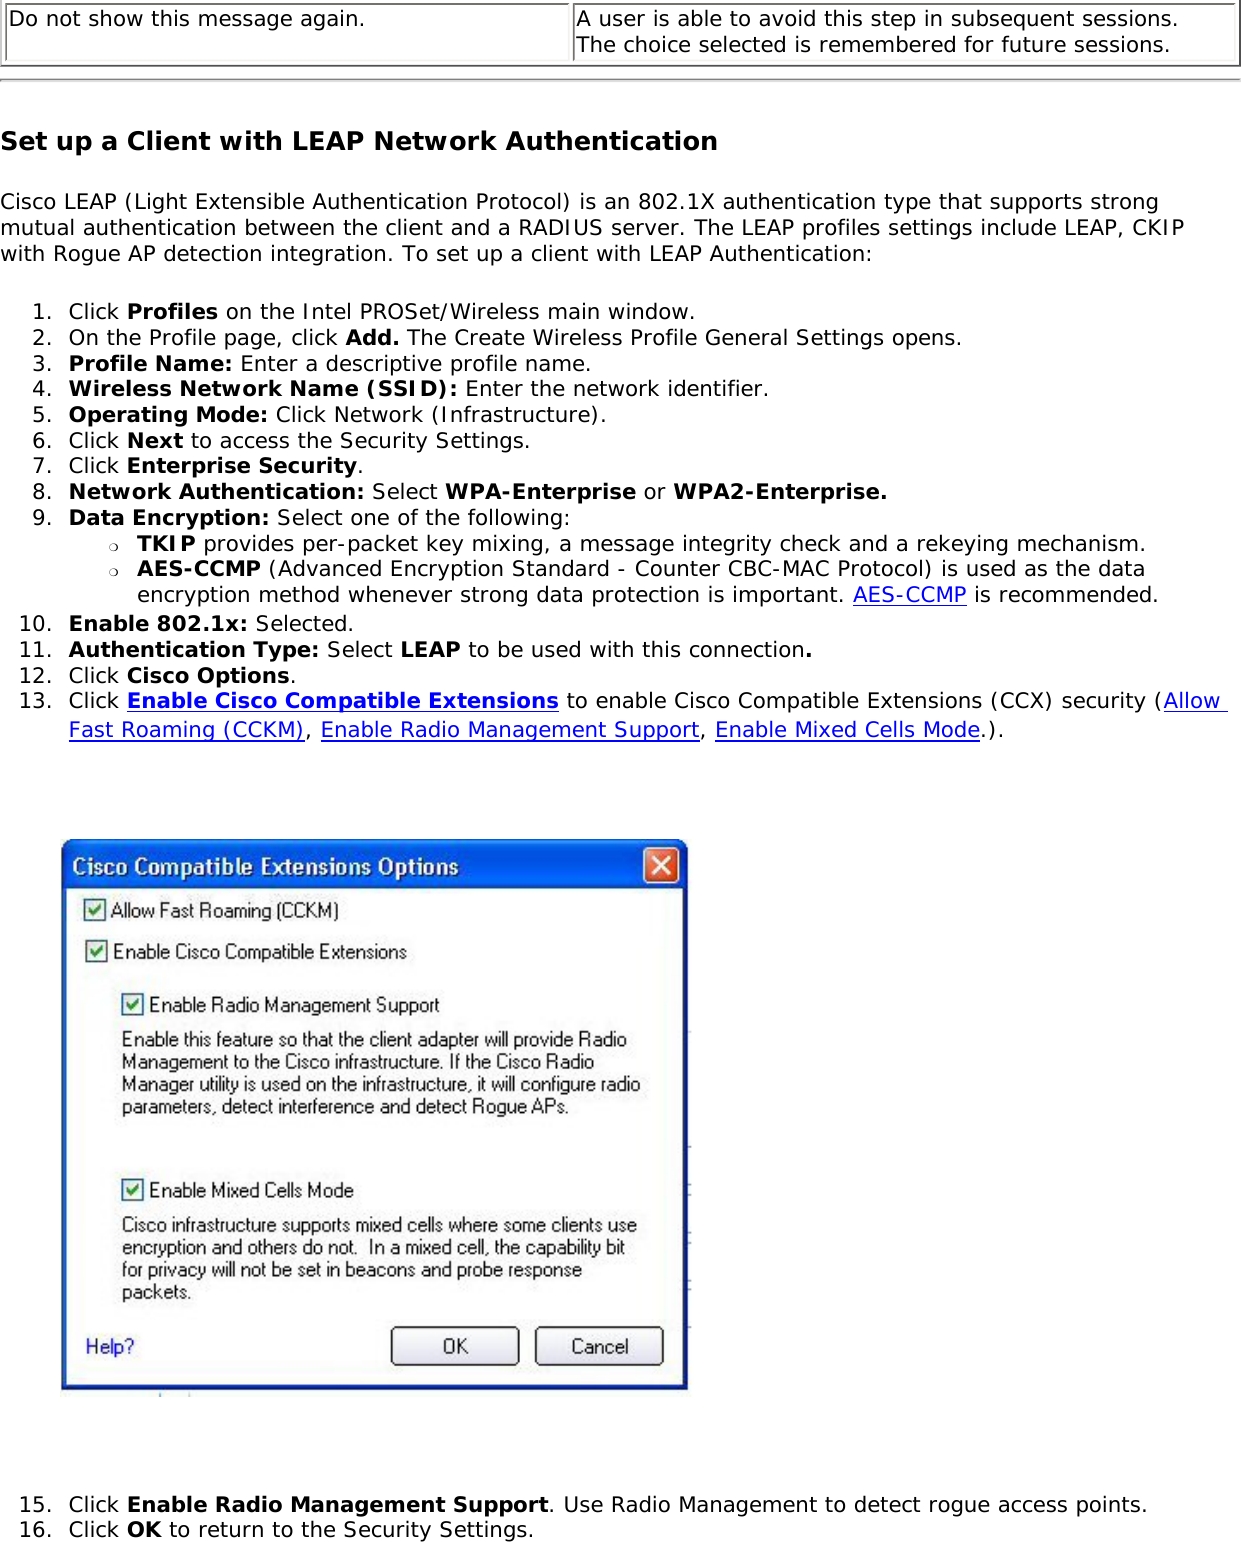
User Guide 2
3.
Users Guide BT
User Guide
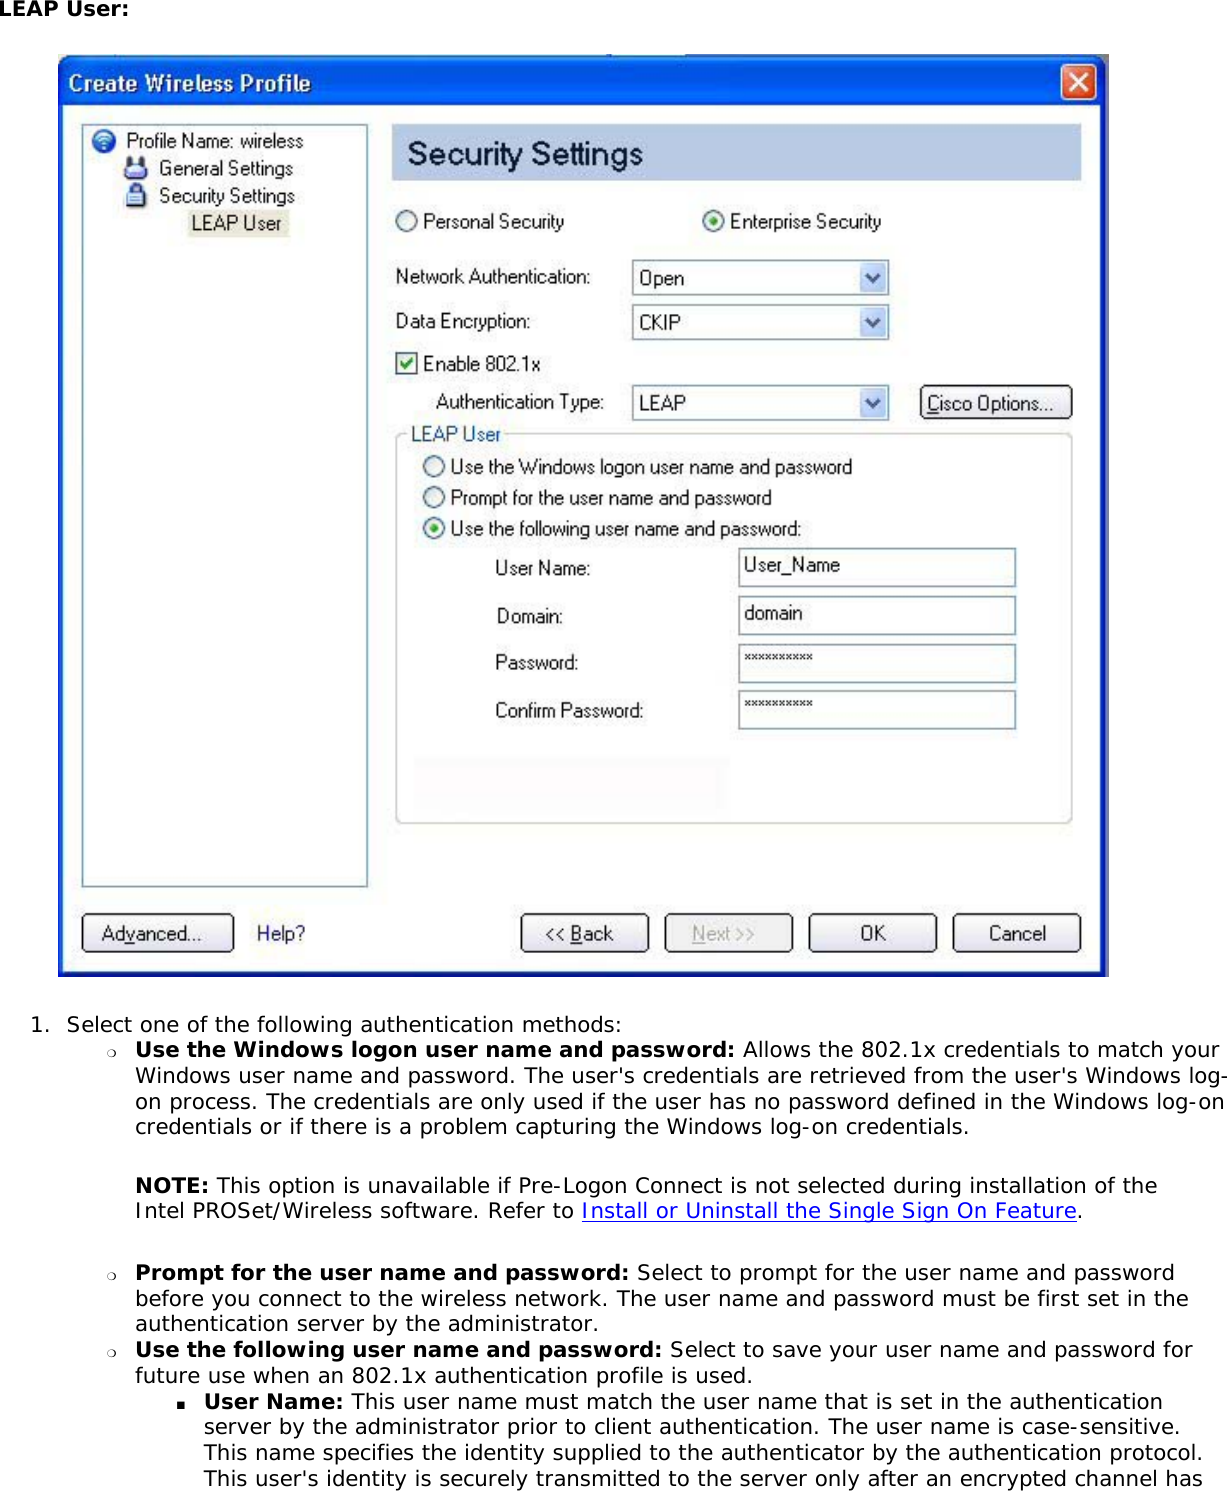
Navigation menu
Upload a User Manual
Namespaces
Wiki Guide
HTML
PDF
Info
Views
User Manual
Discussion / Help
Navigation

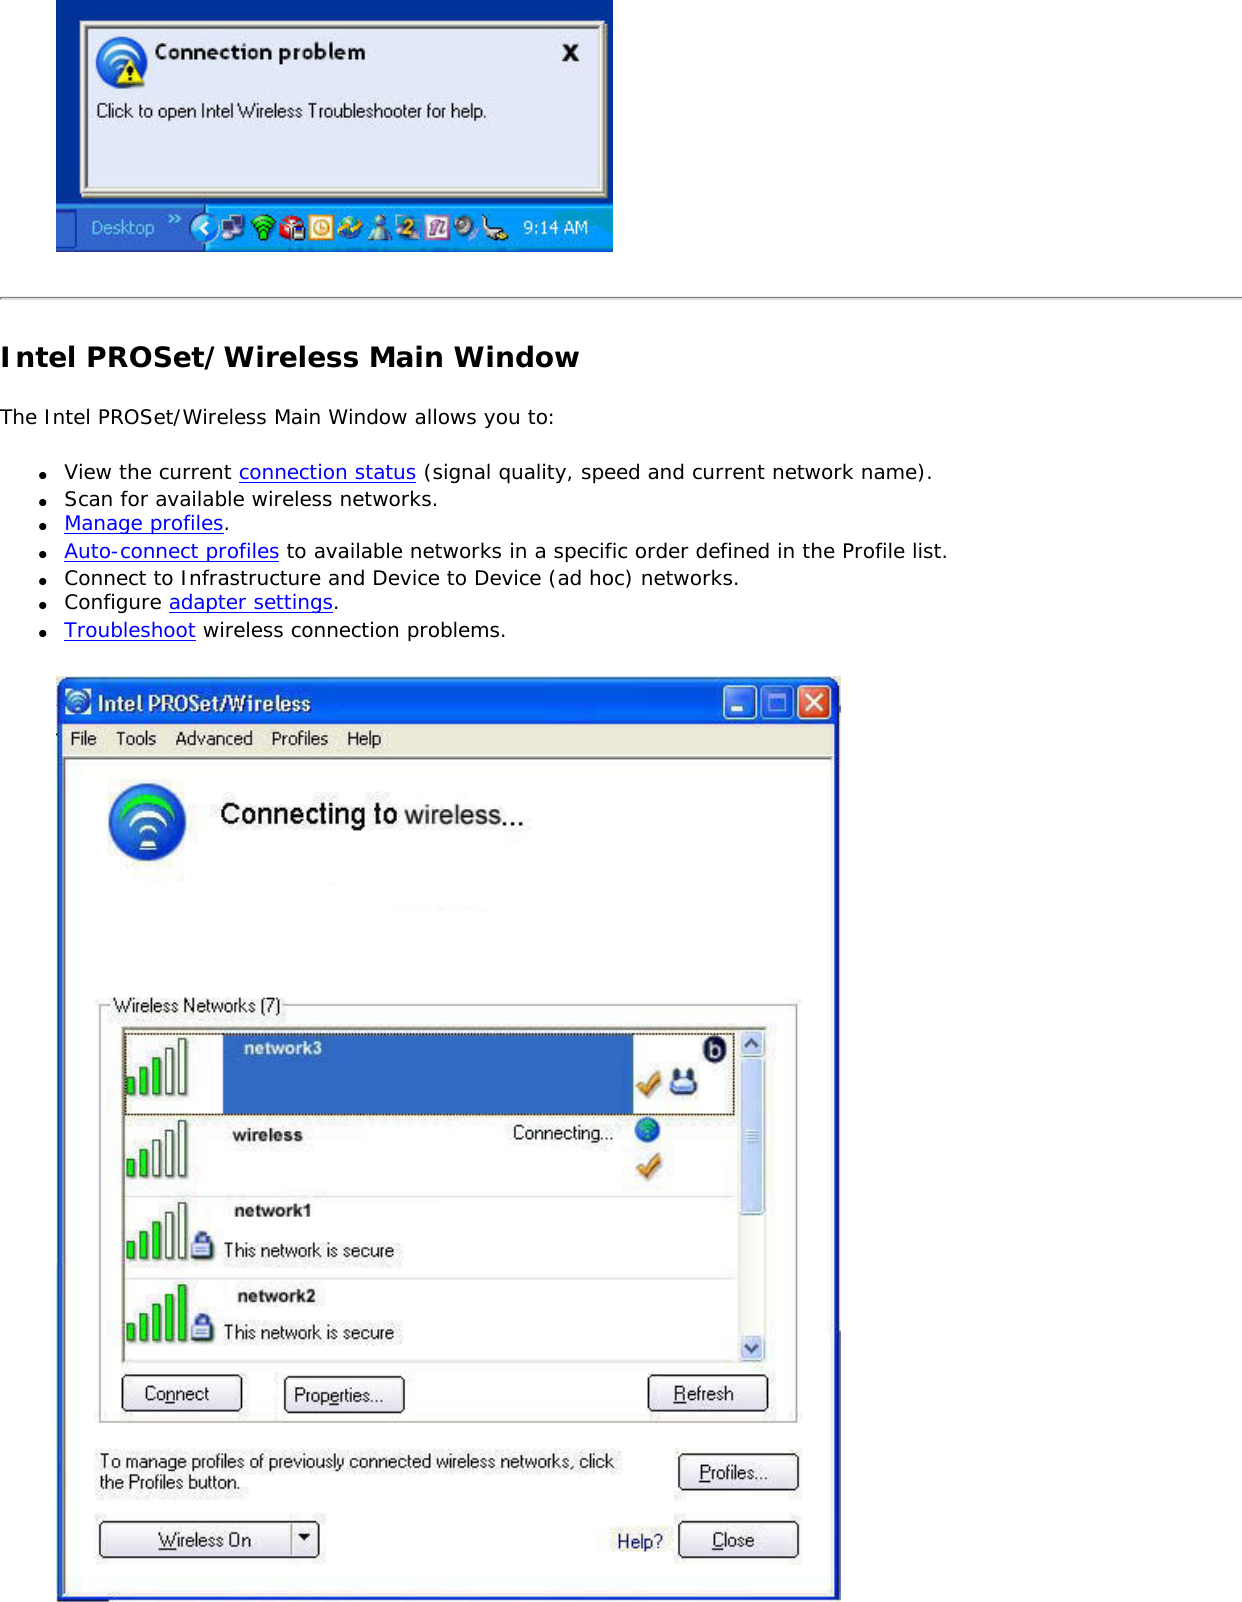
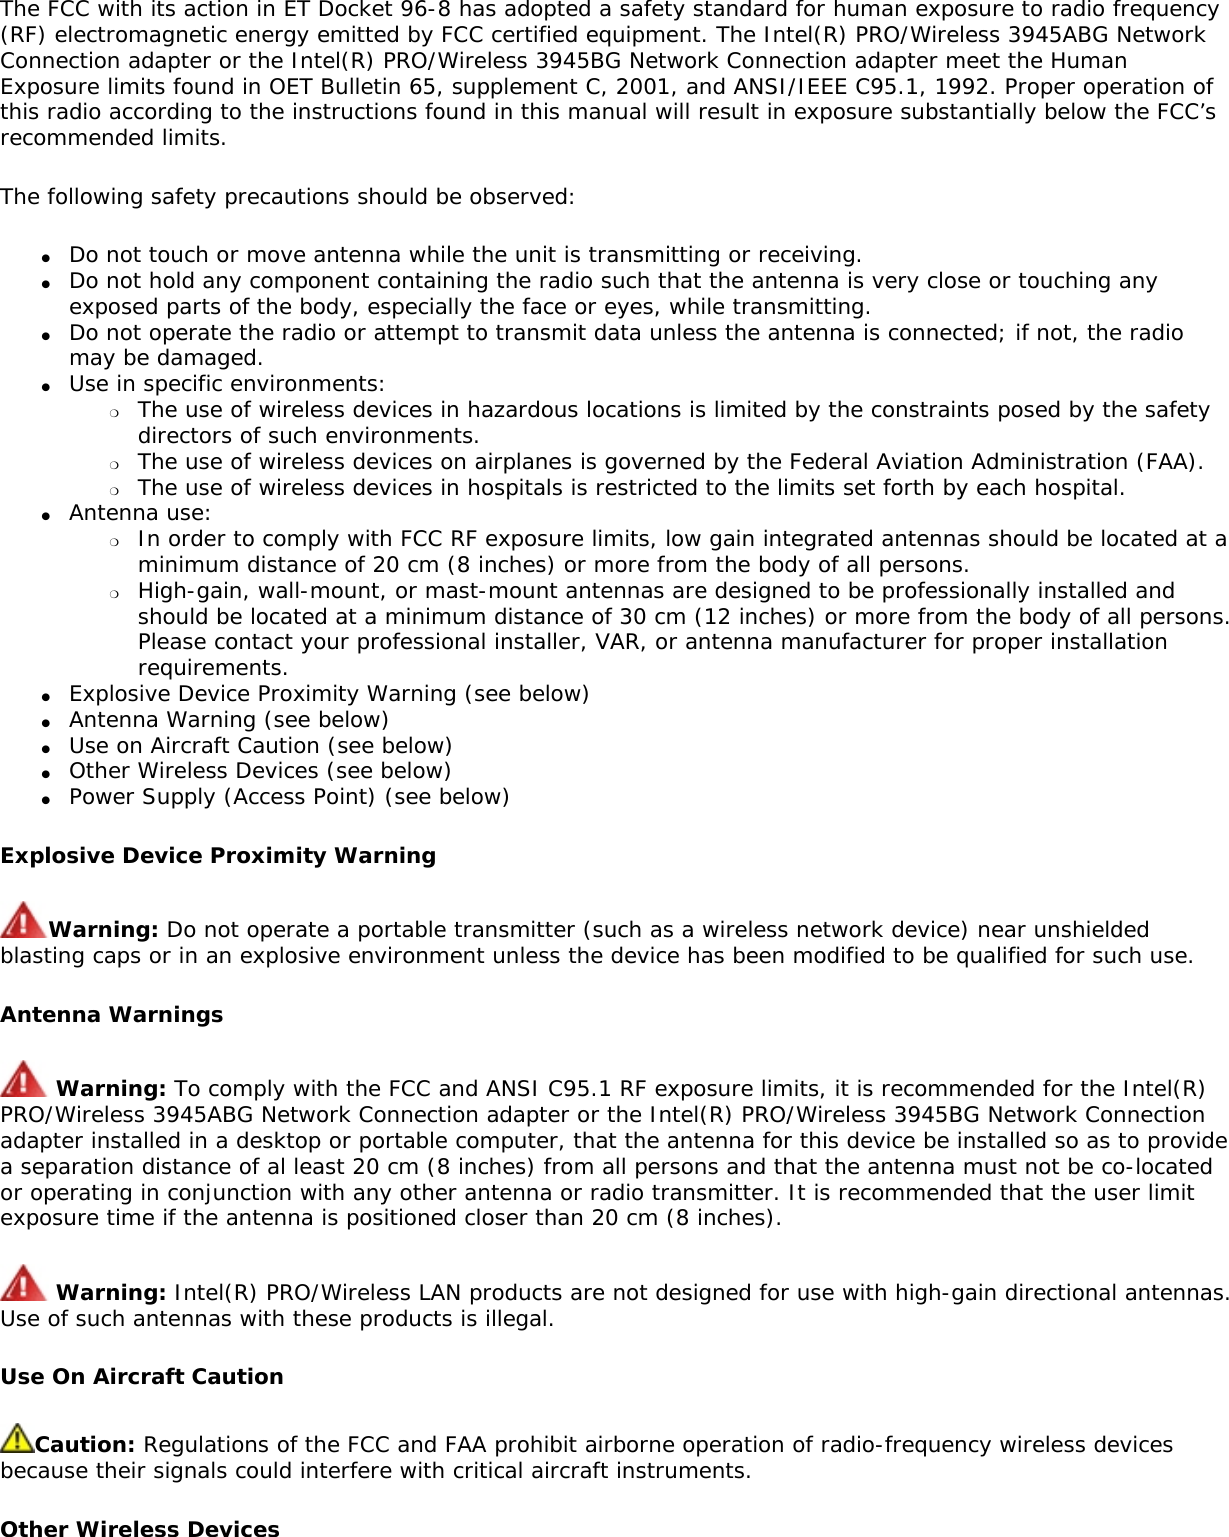
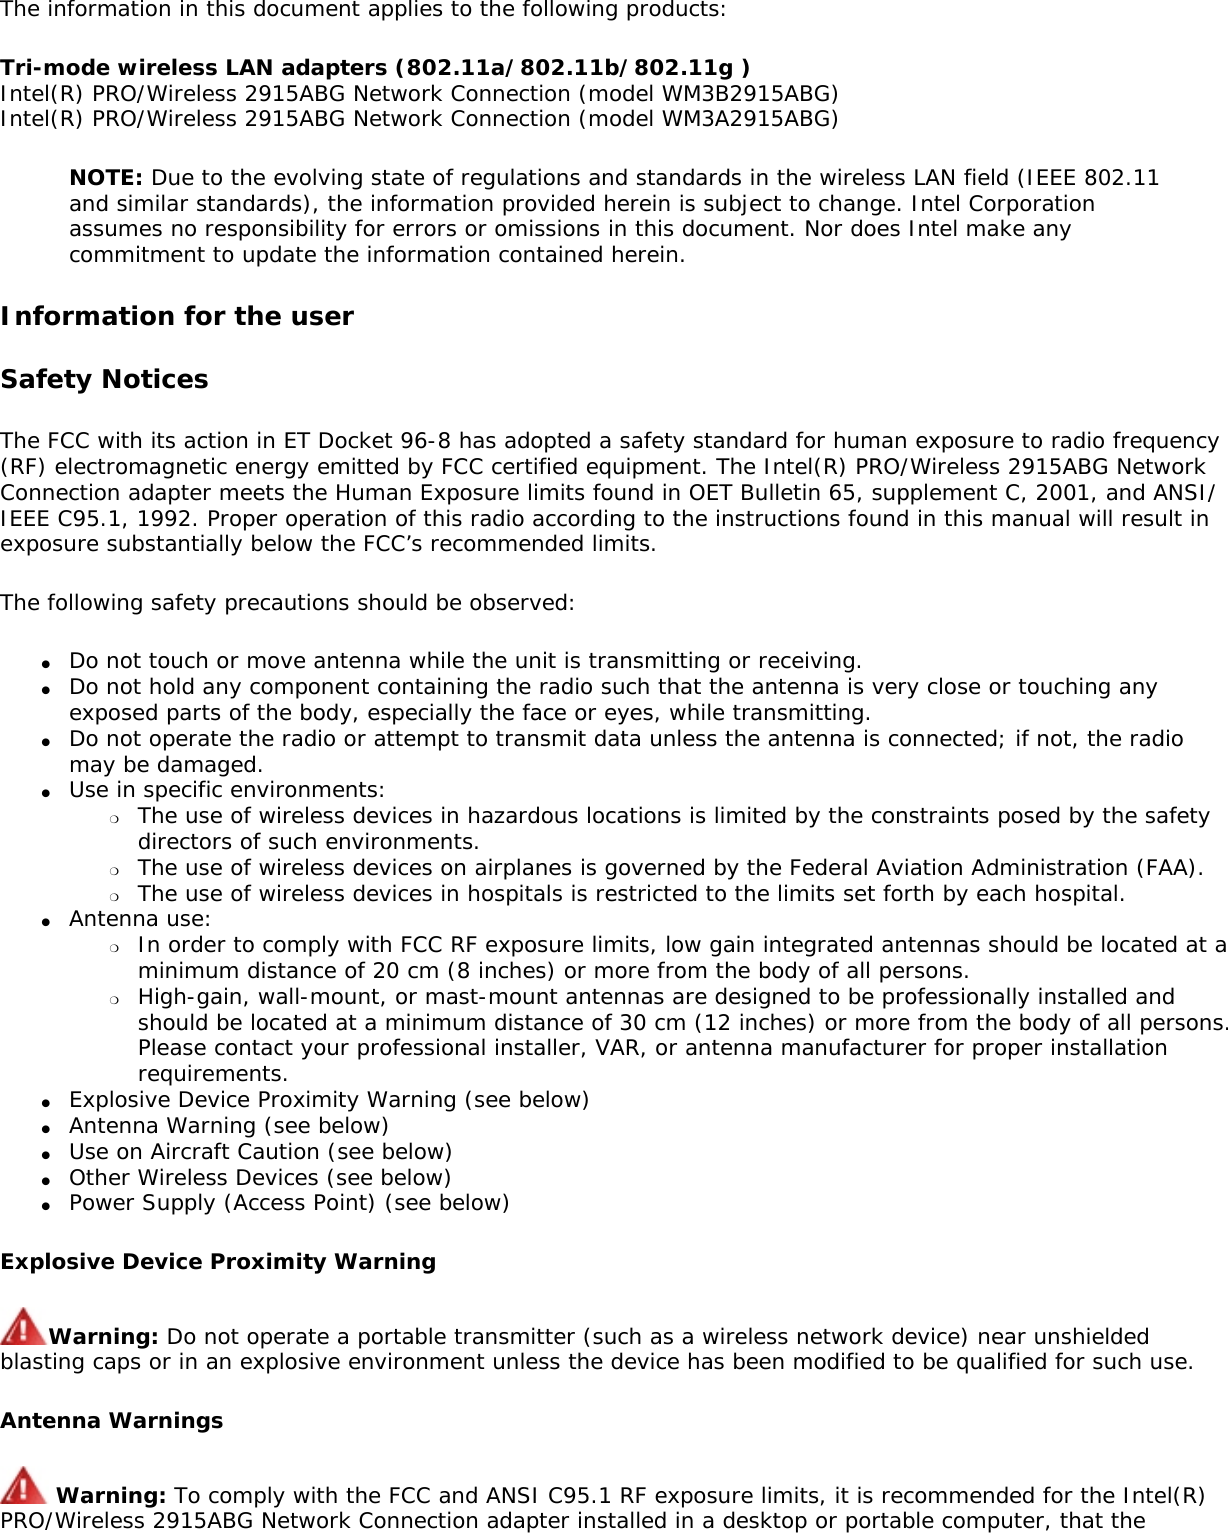
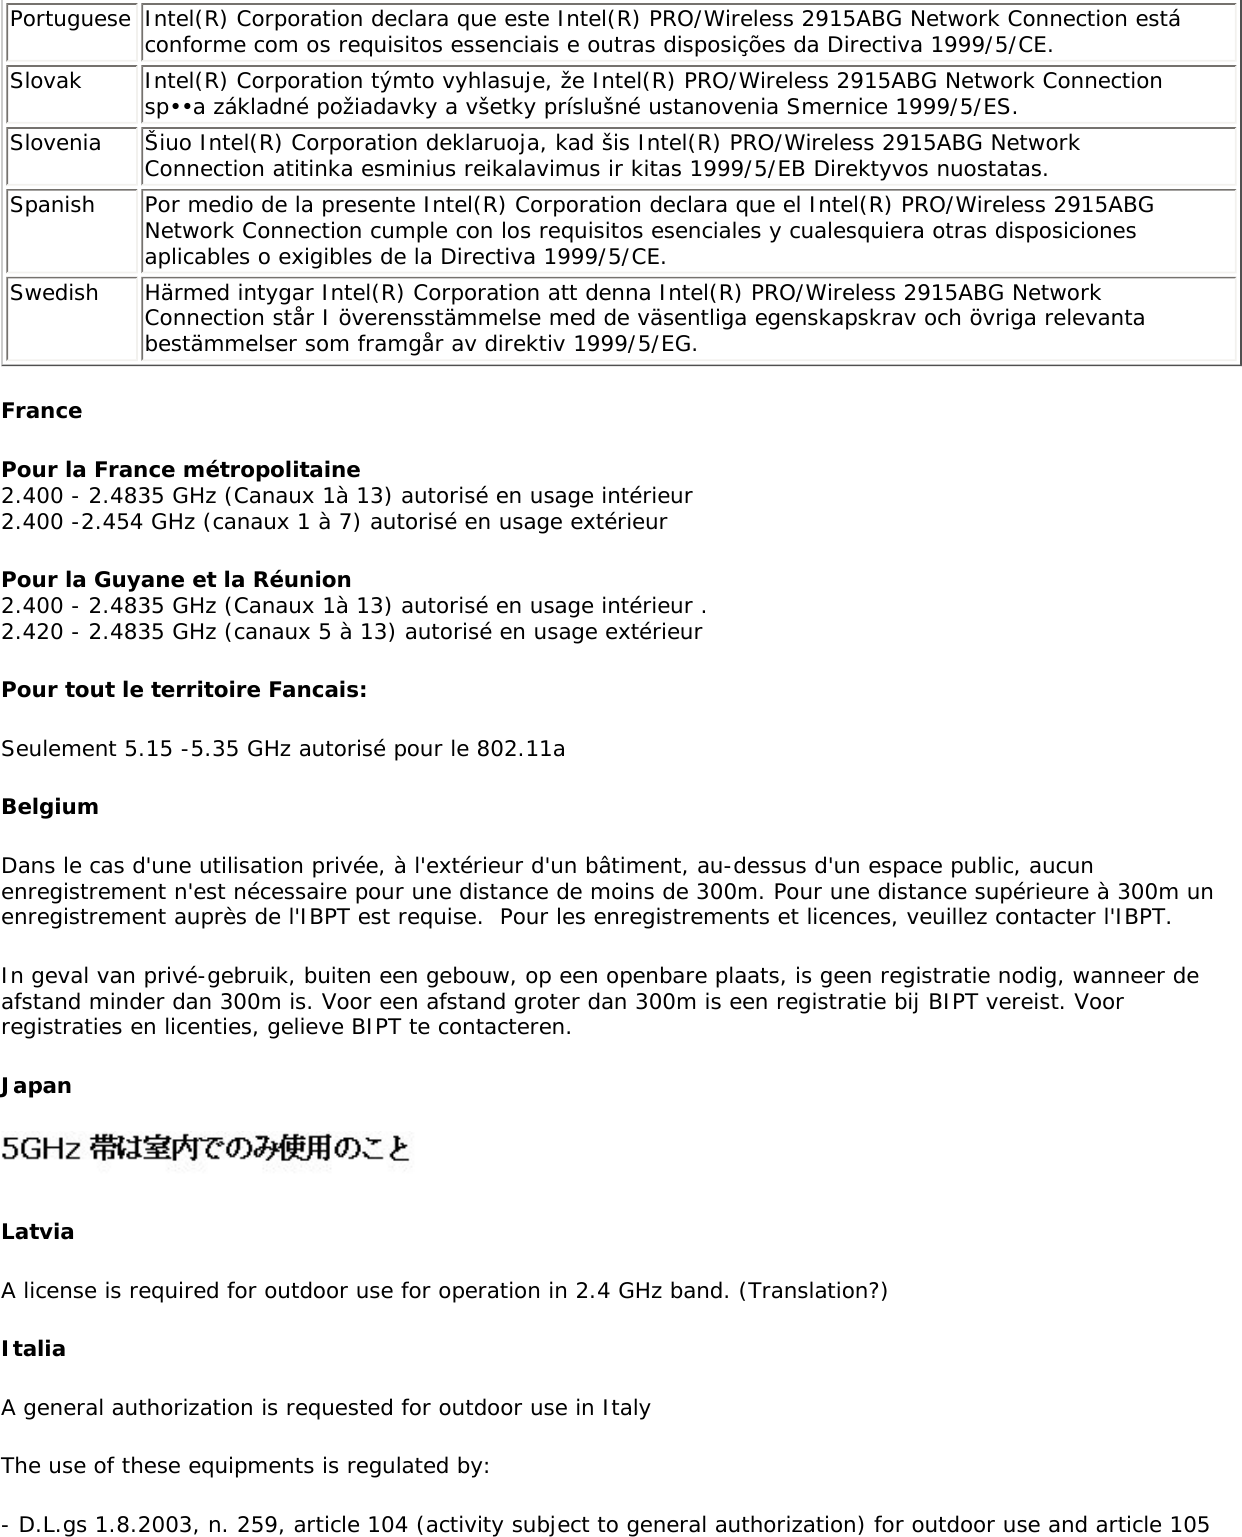
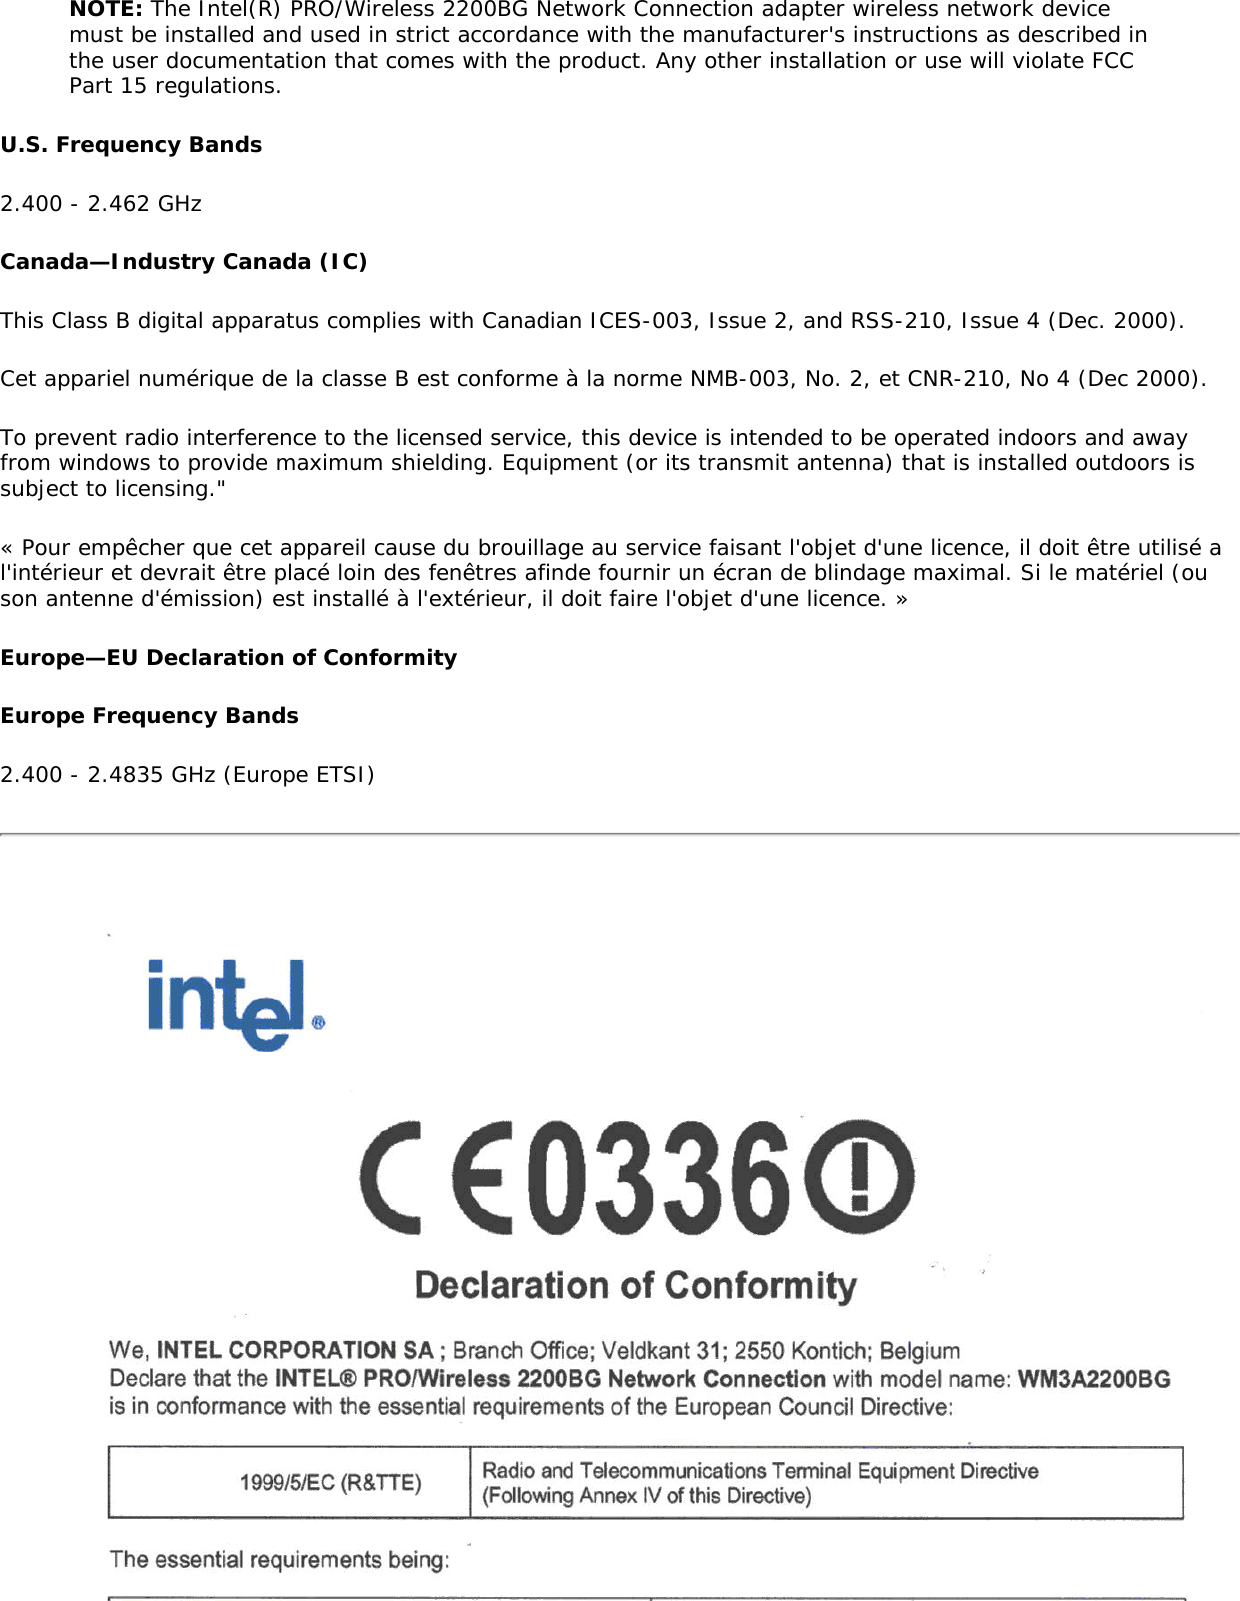
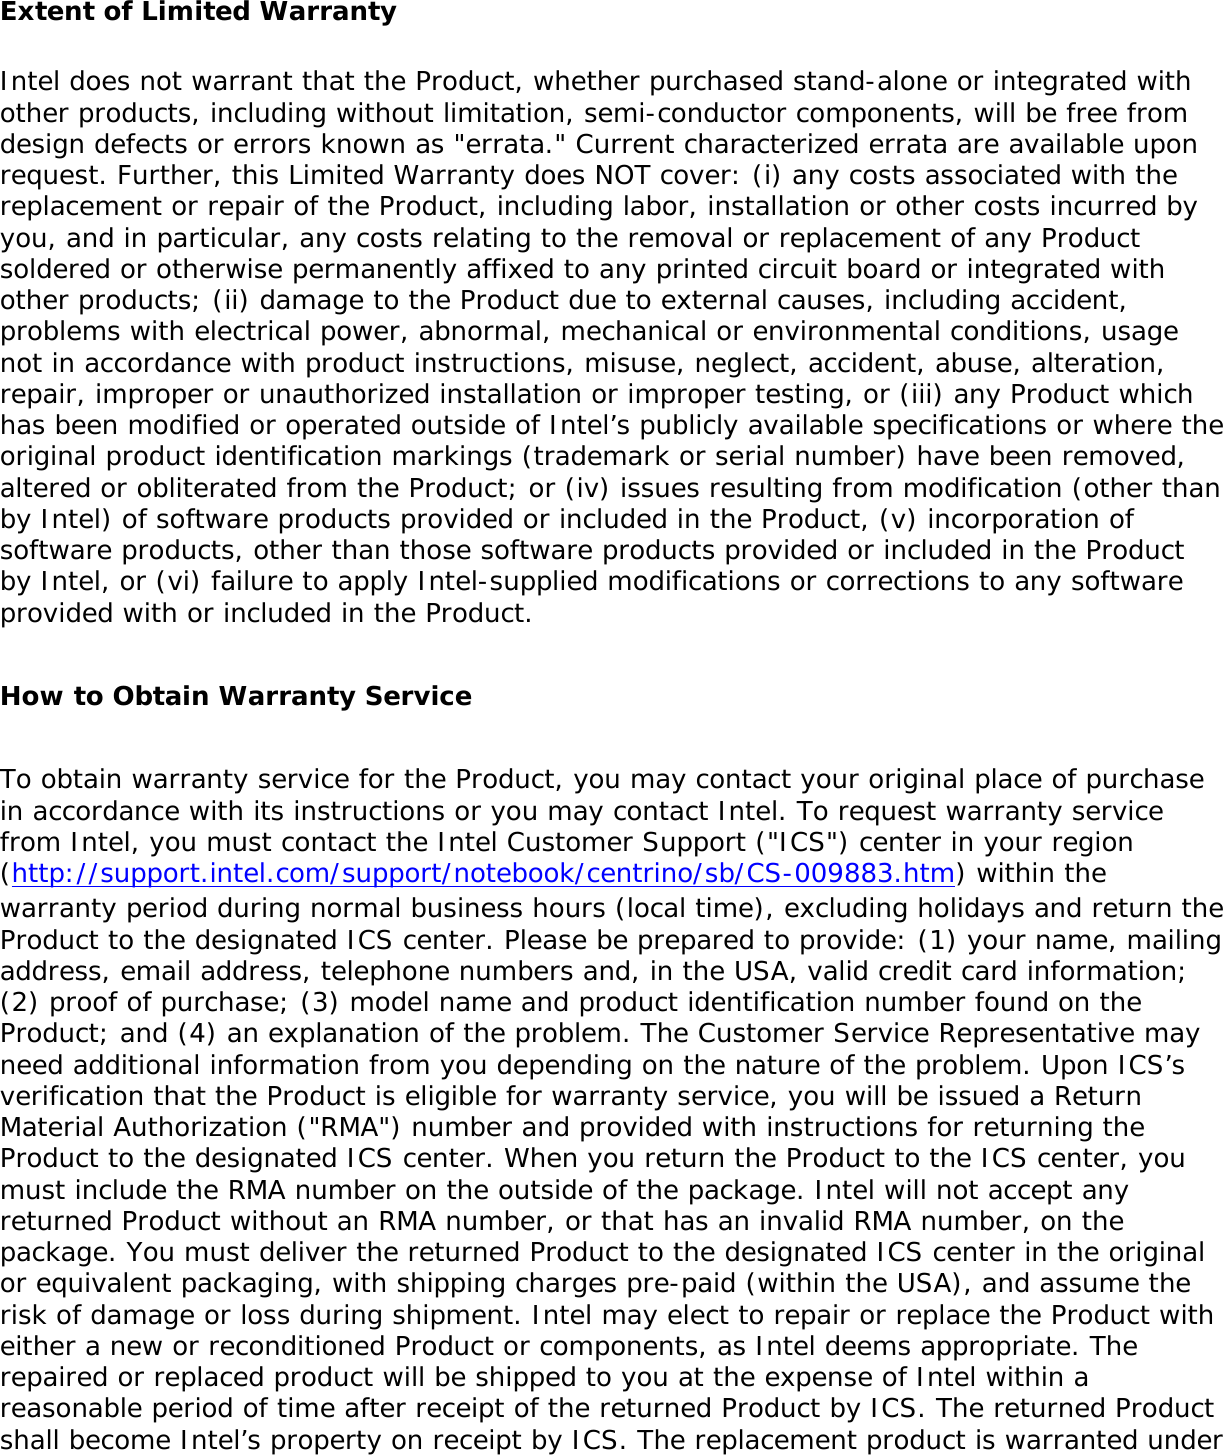
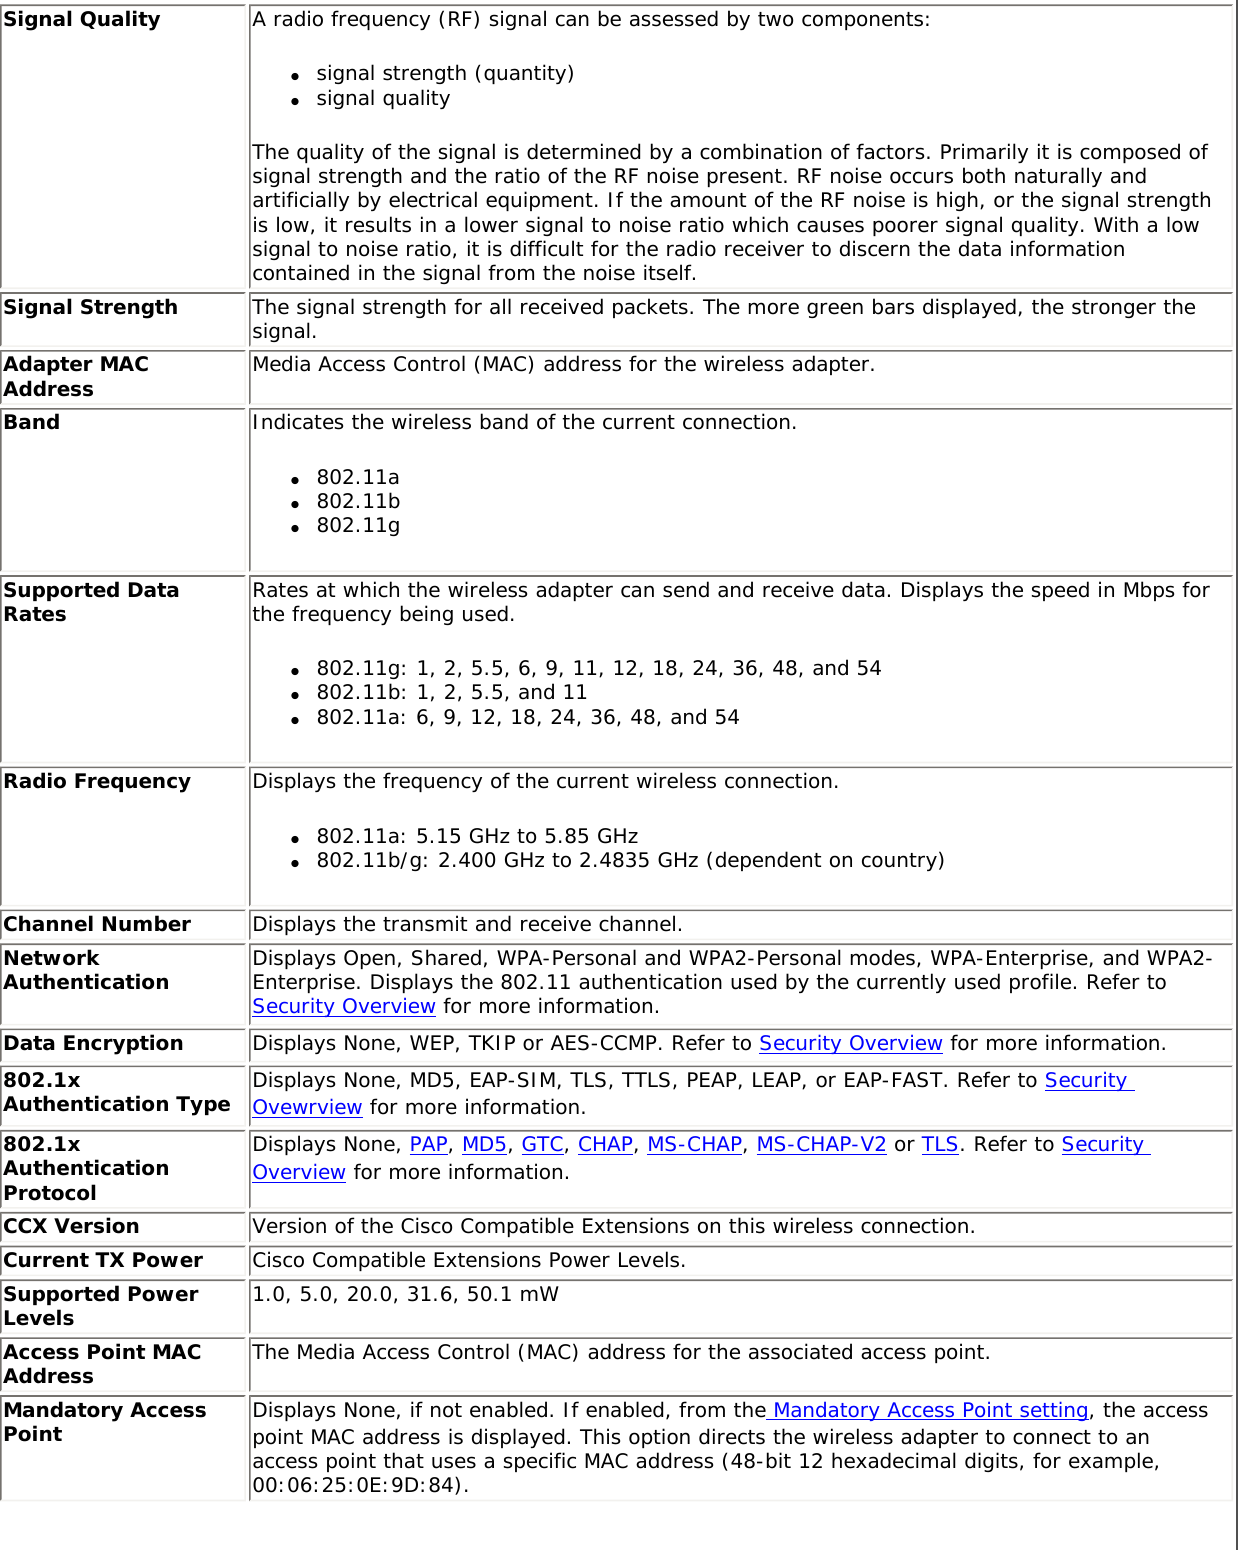
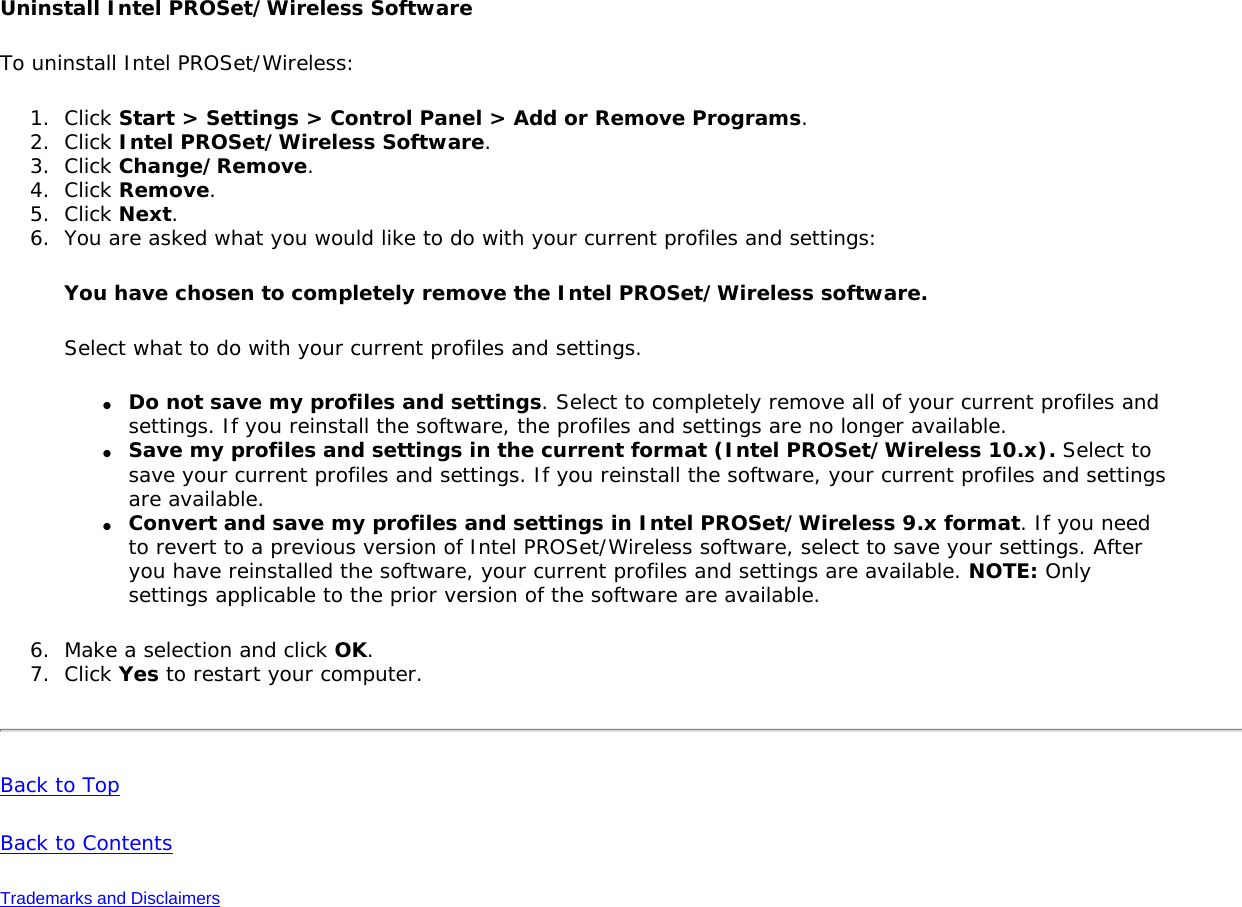
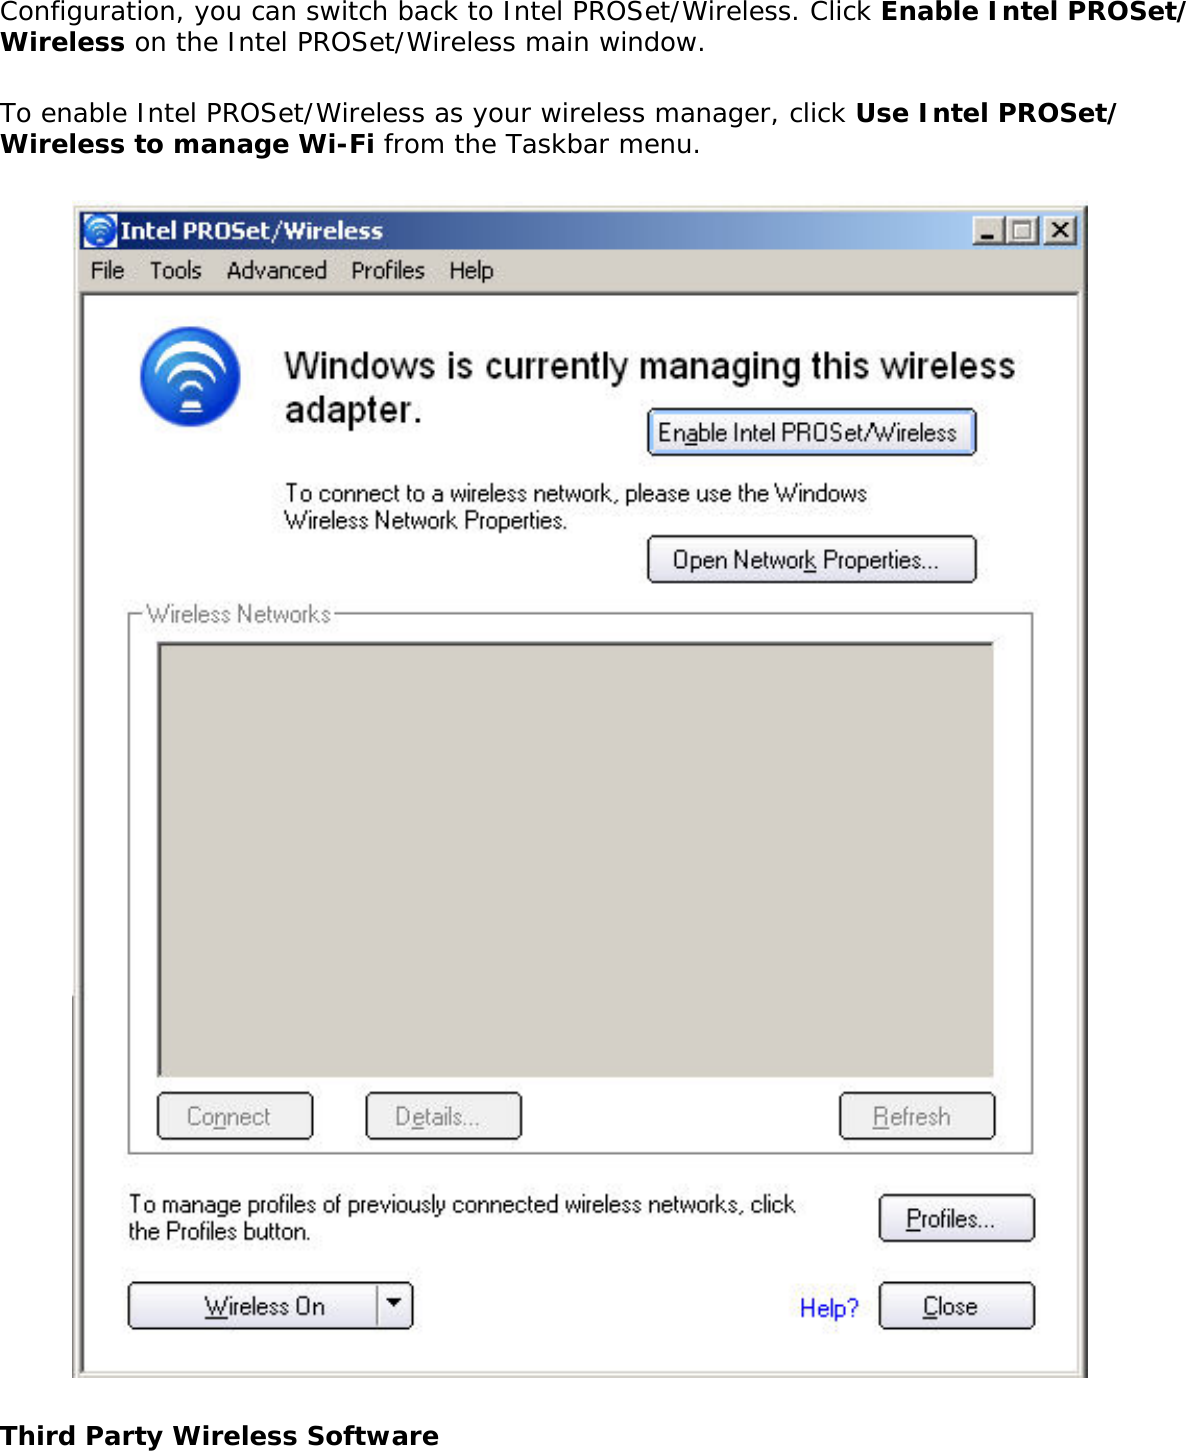
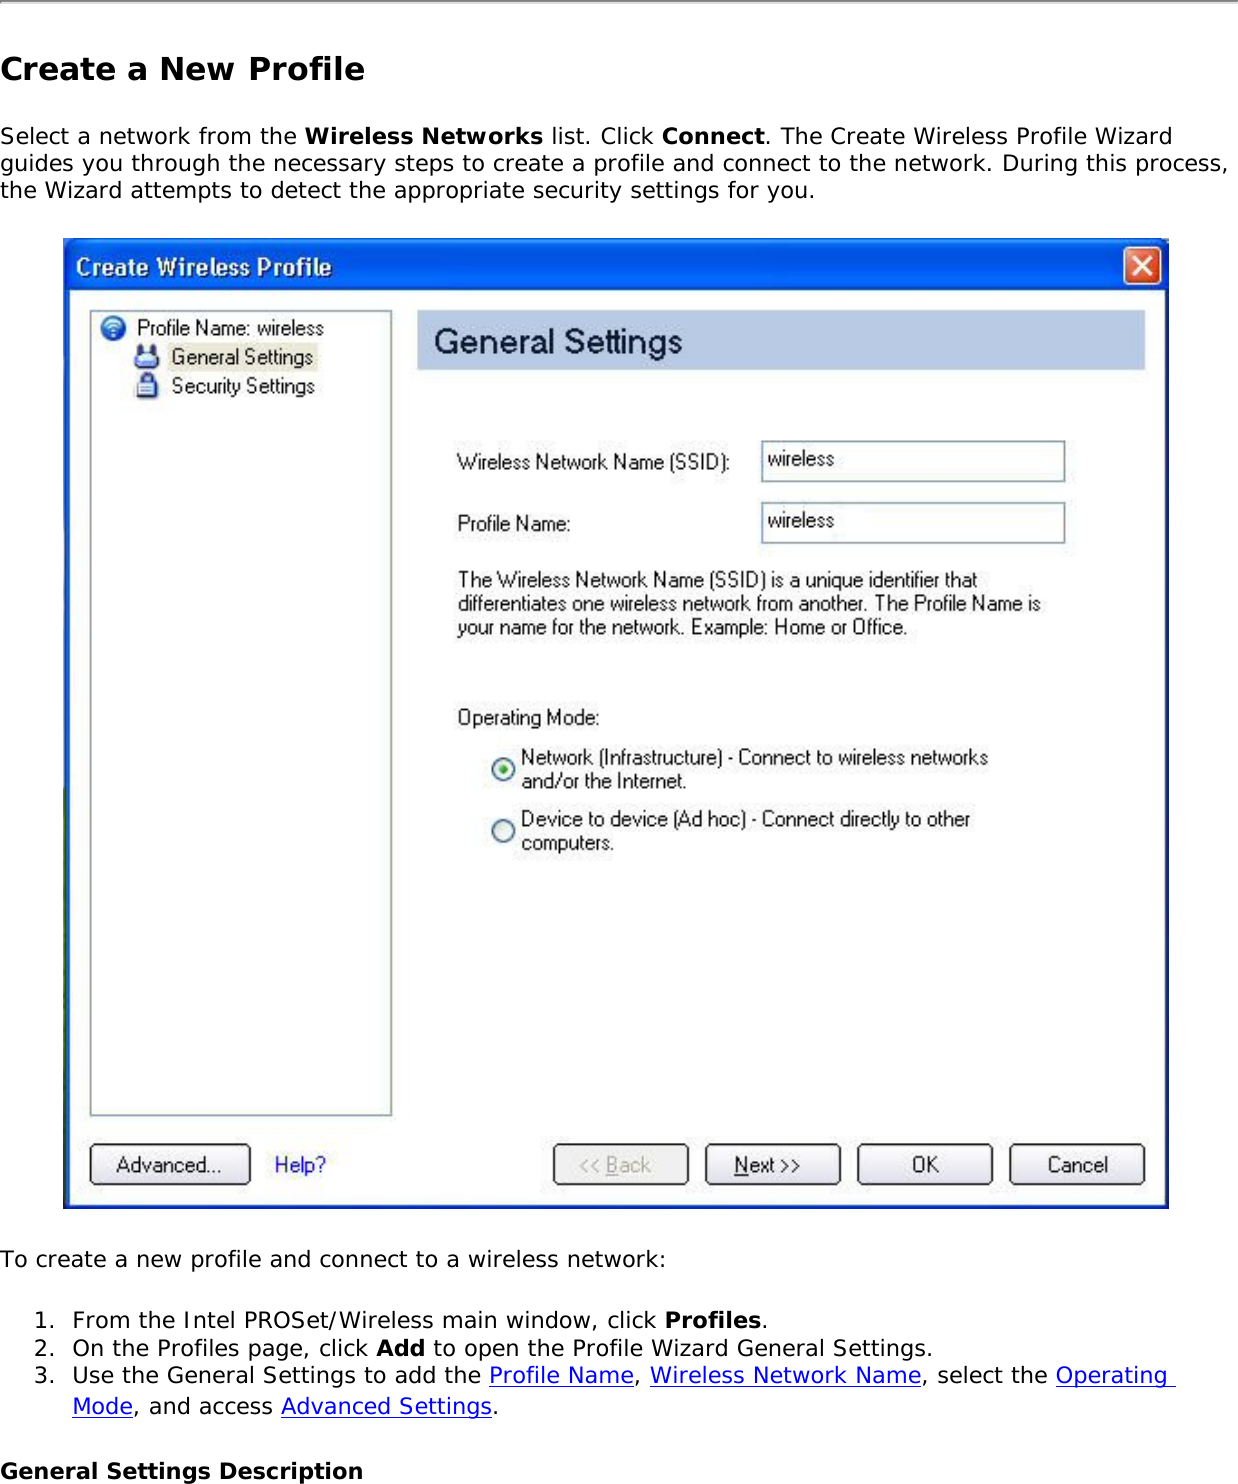
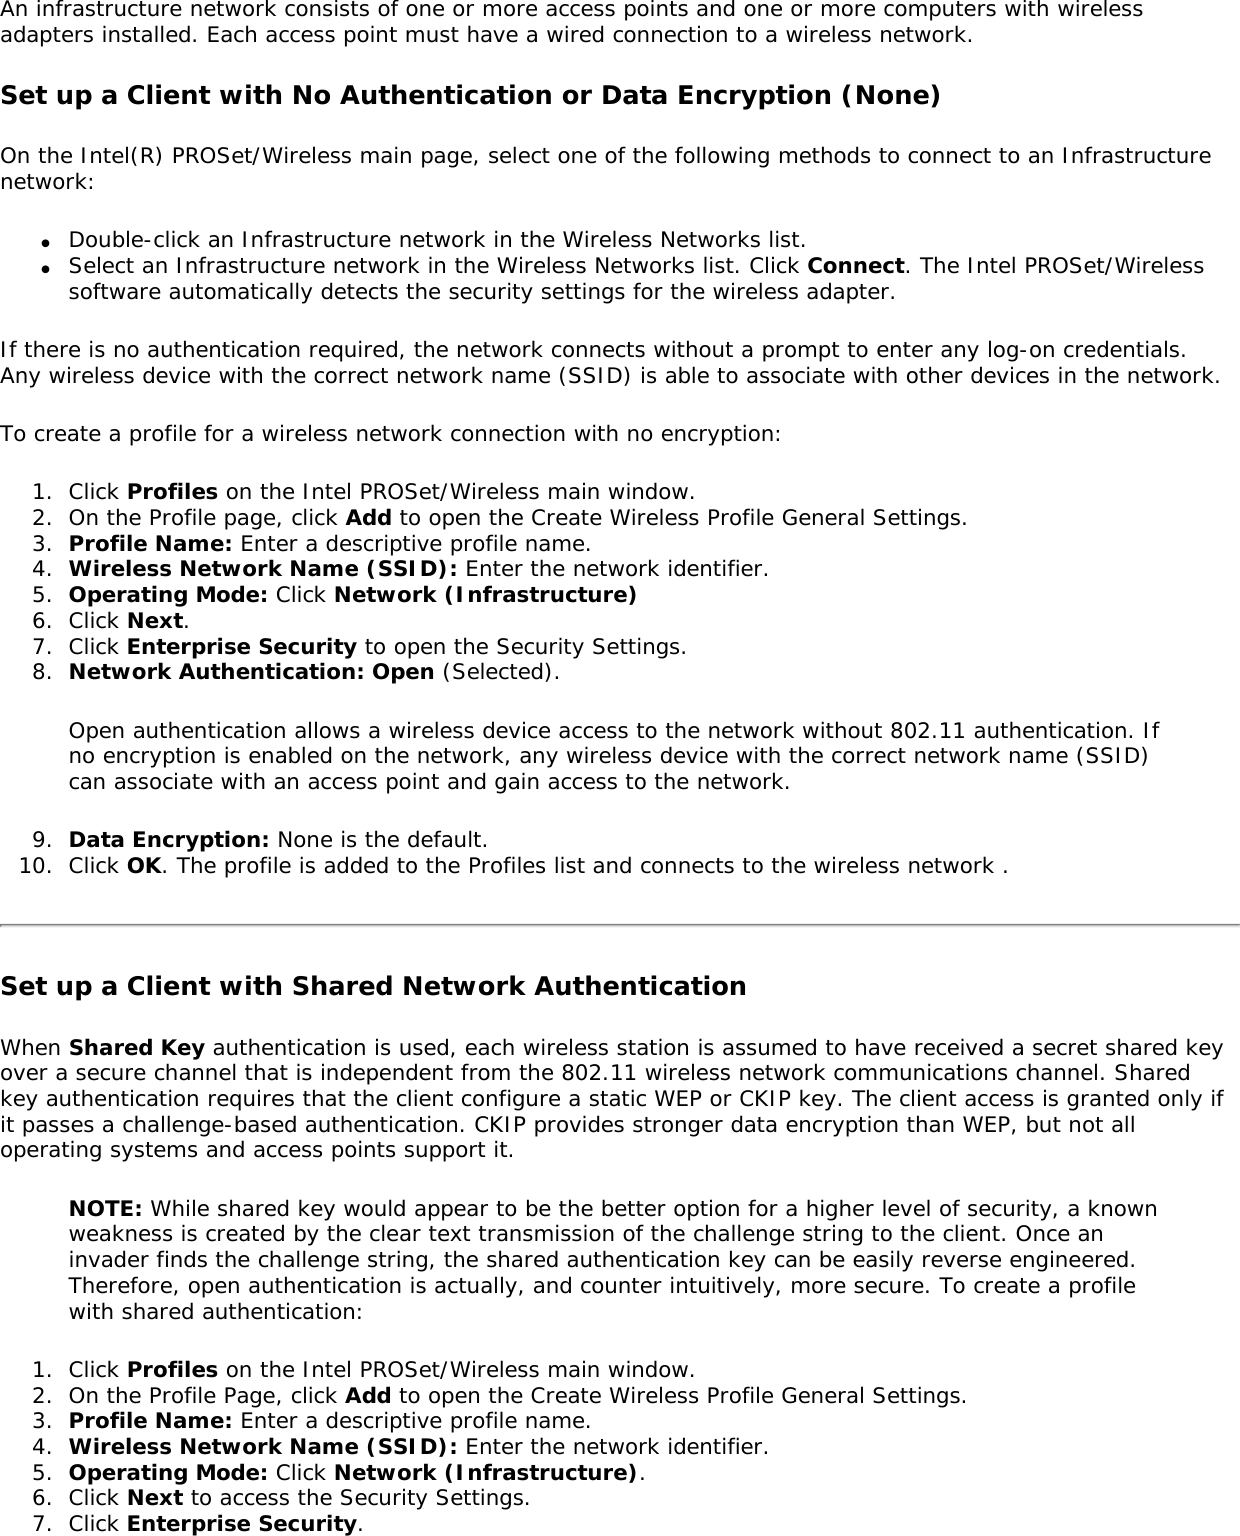
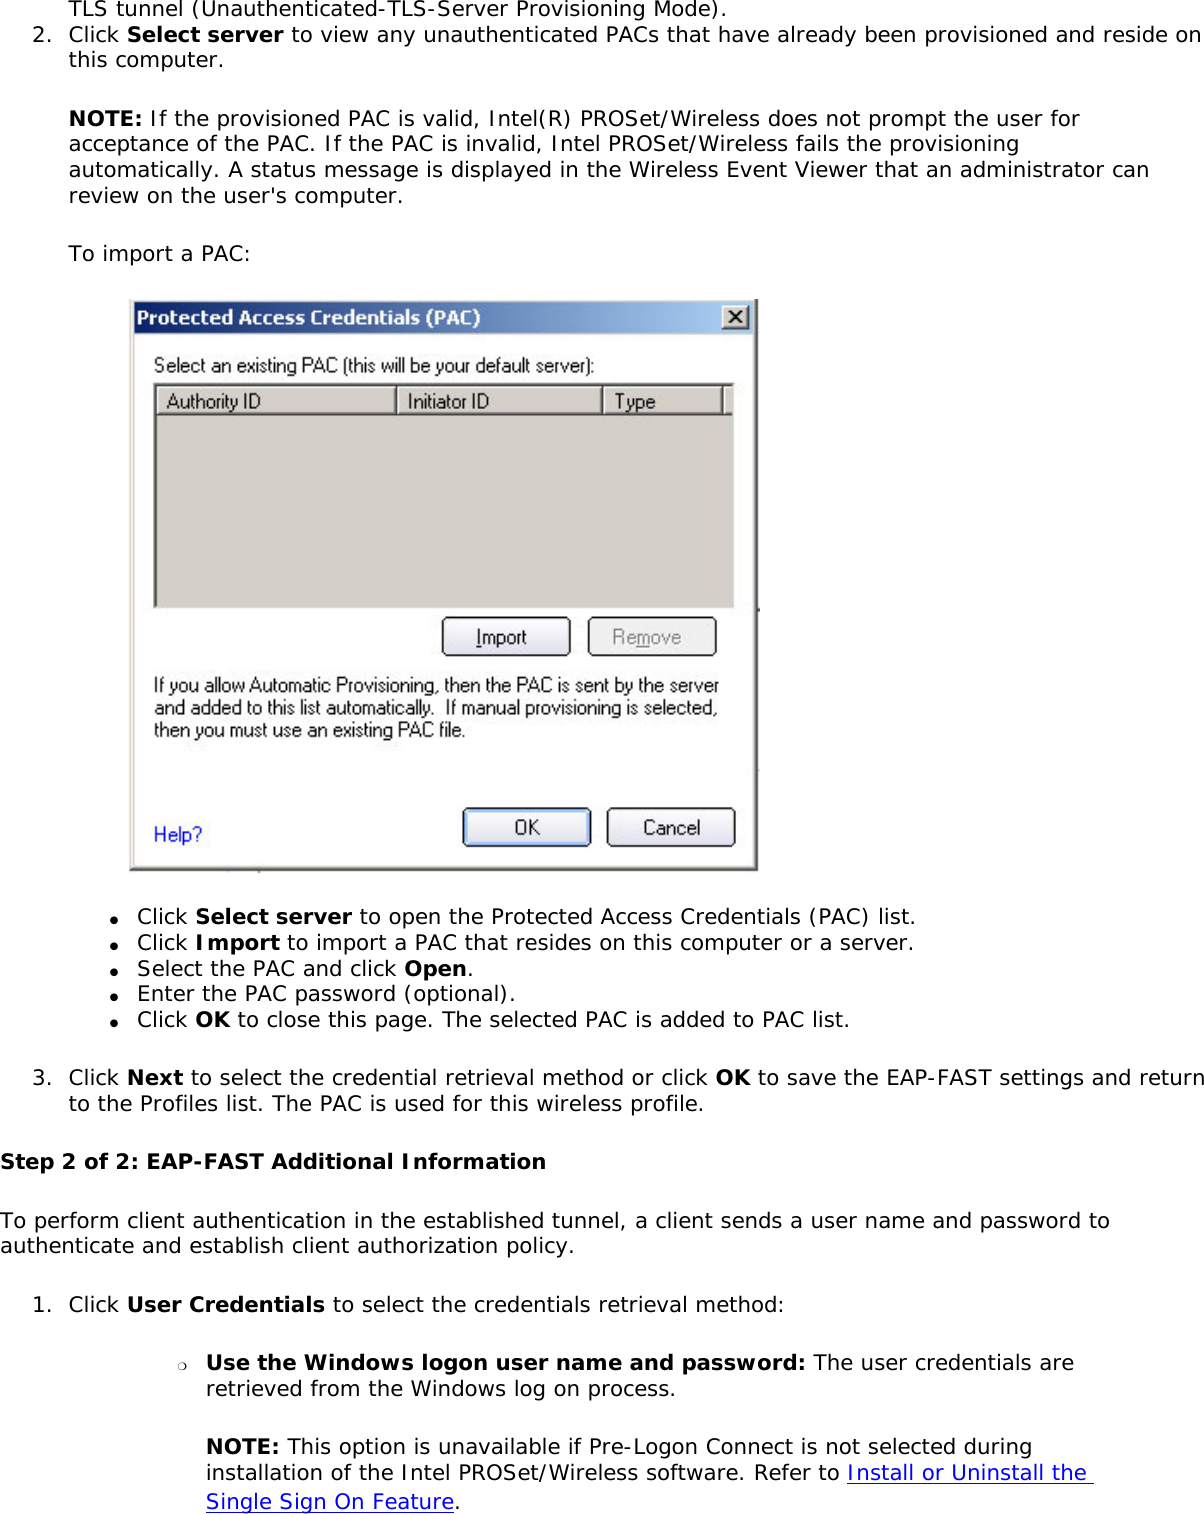
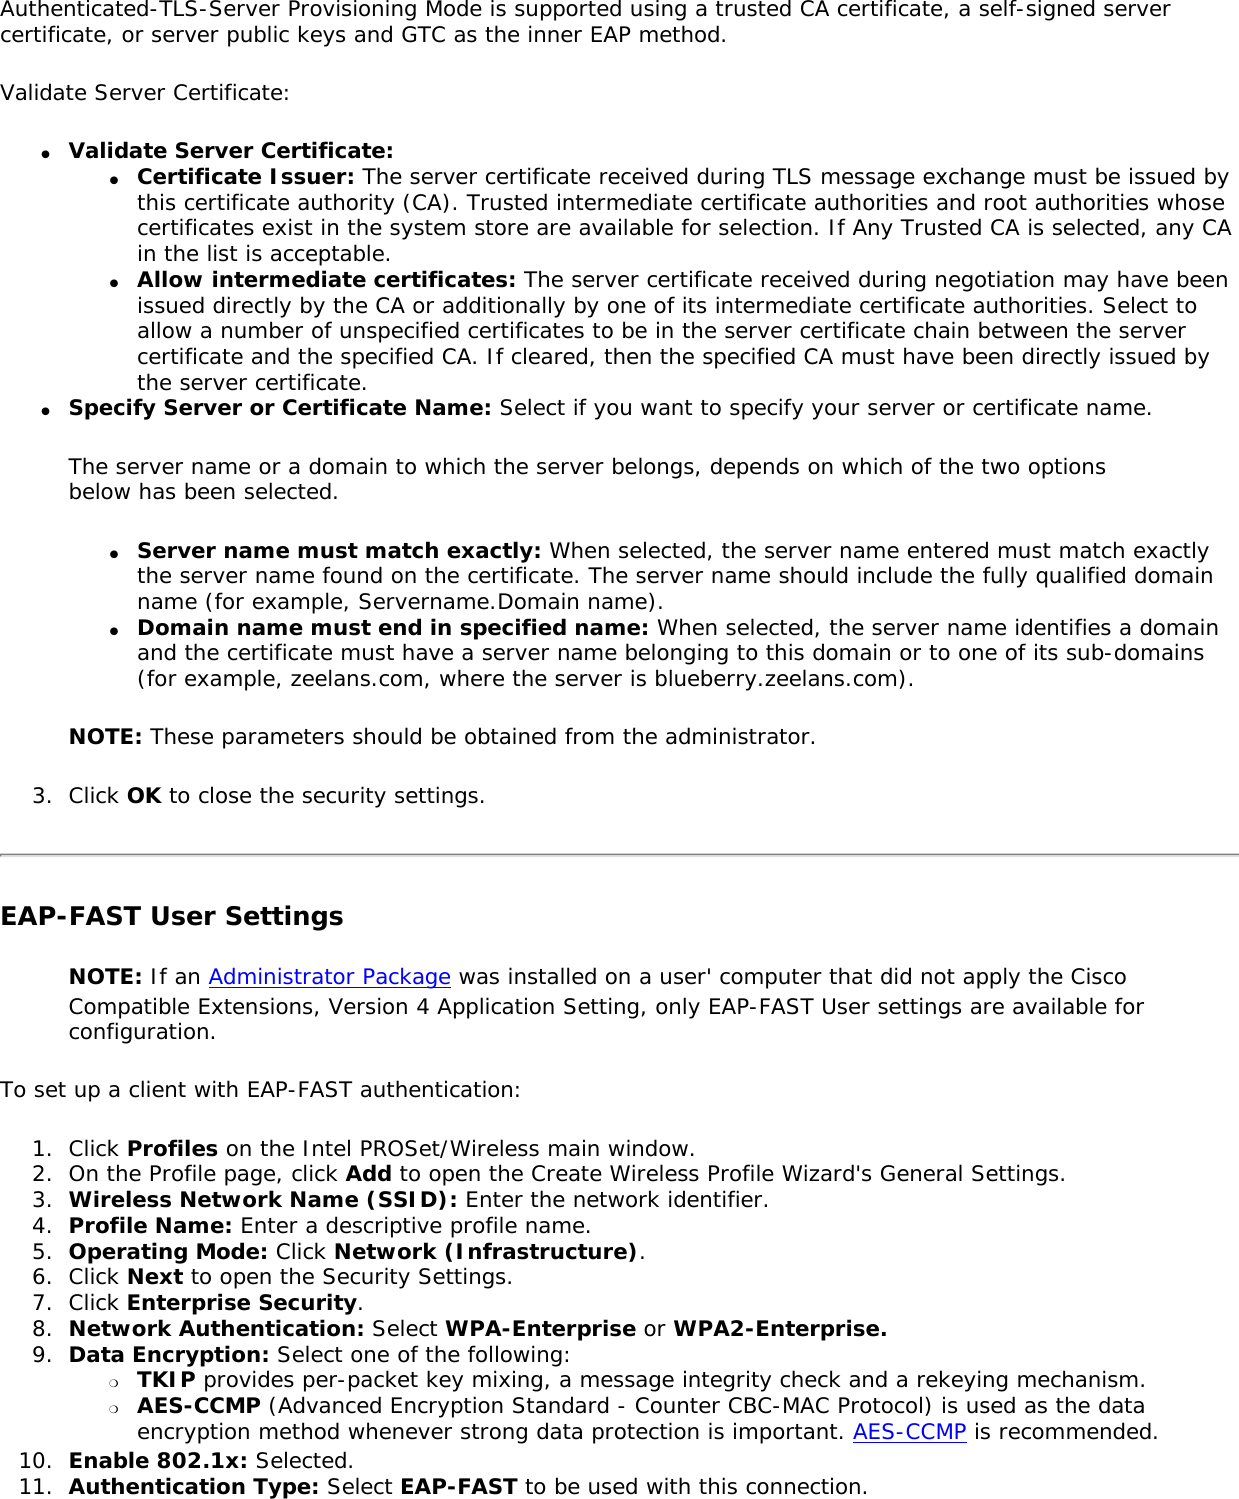
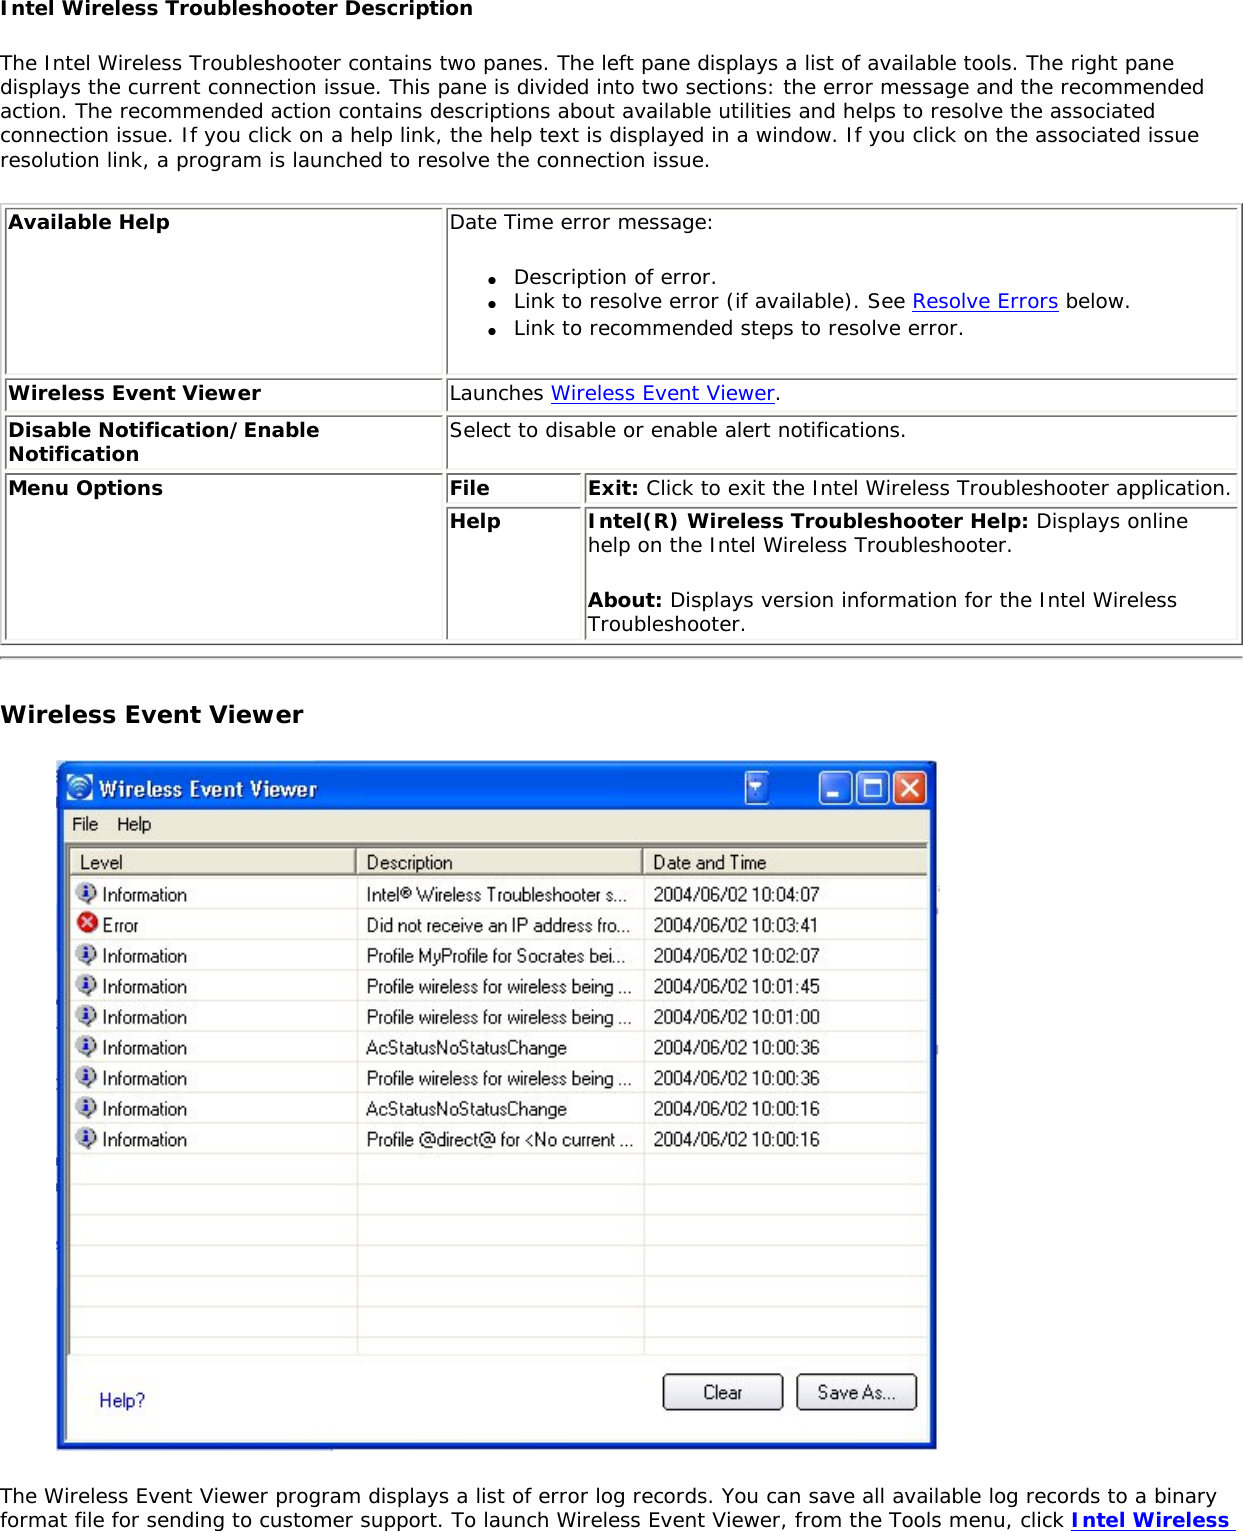
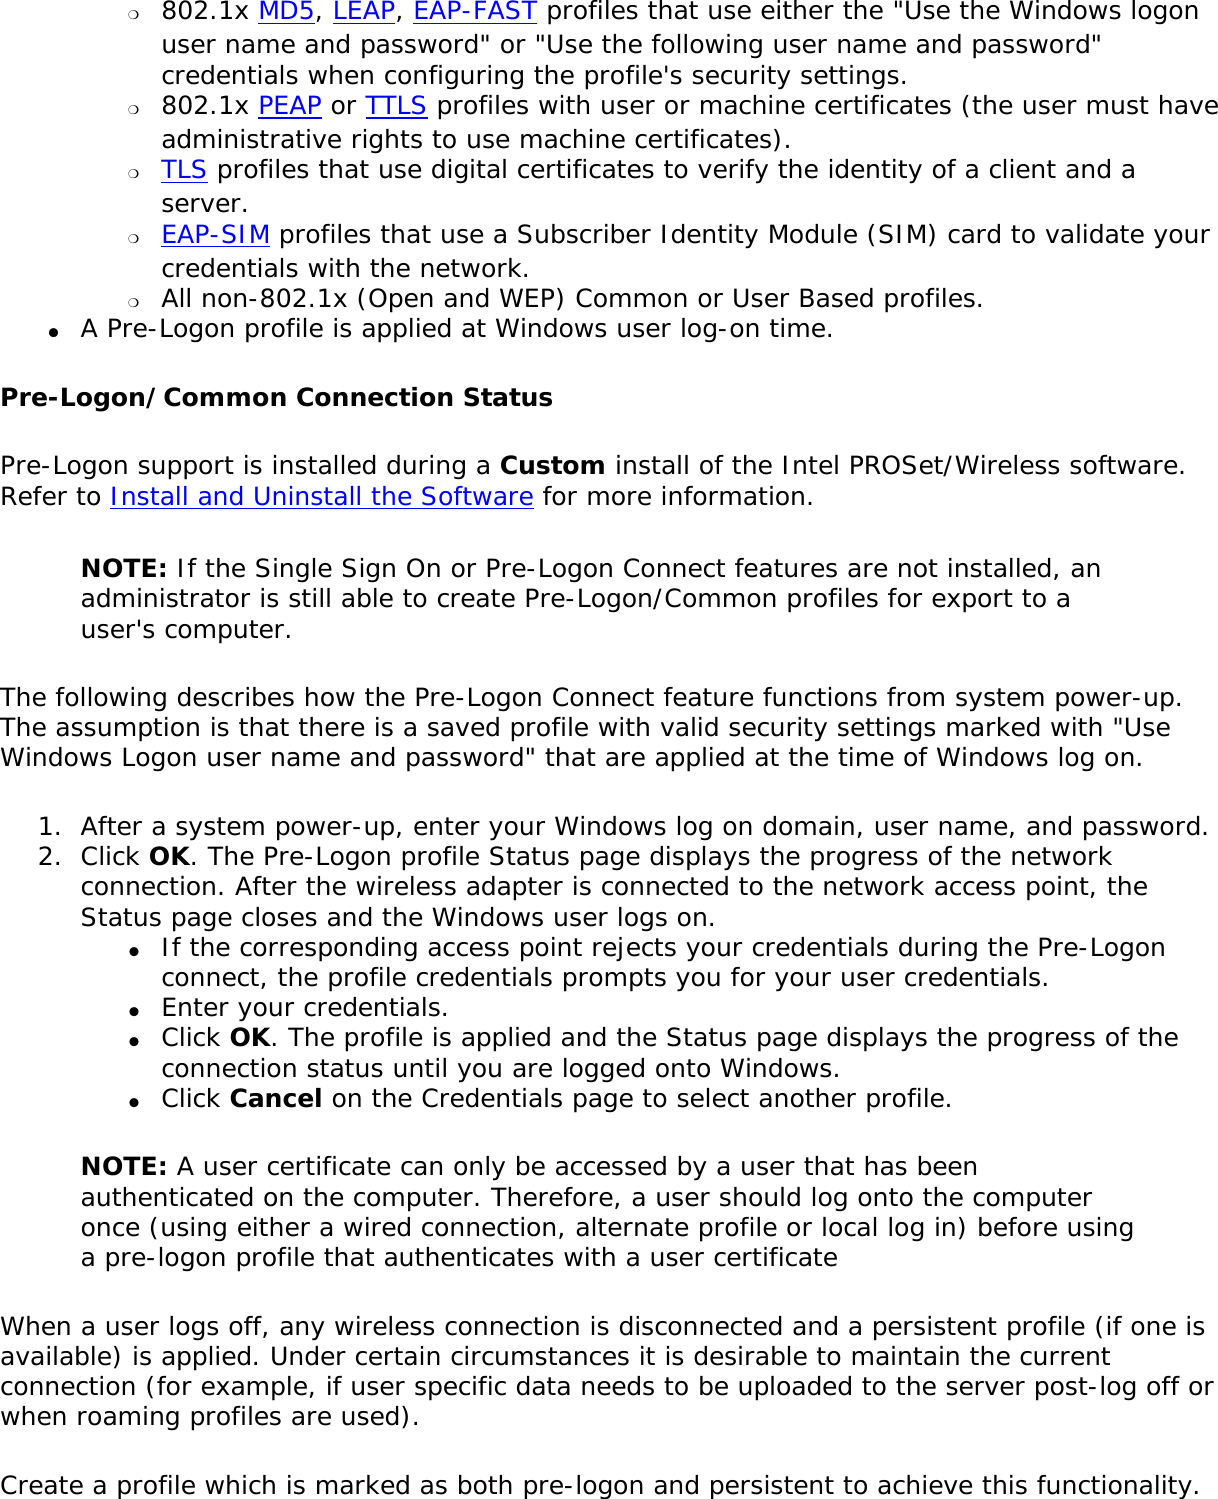
![Signal Quality The signal quality icon bars indicate the quality of the transmit and receive signals between your wireless adapter and the nearest access point or computer in Device to Device (ad hoc) mode. The number of vertical green bars indicates the strength of the transmit and receive signals. The signal quality ranges from excellent to out of range. The following factors affect signal quality: ● Signal quality decreases with distance and is affected by metal and concrete barriers. ● Metal objects can reflect signals and cause interference. ● Other electrical devices can cause interference. Properties Provides adapter connection status information. See Properties Button for information. Wireless On (Off) Switch the radio off and on. Refer to Turn Wireless On or Off for more information.Help? Provides help information for this page. Close Closes the Intel PROSet/Wireless main window.Wireless NetworksThe Wireless Networks list displays a list of wireless networks within range of the adapter. Name Description The signal strength of the wireless network access point or computer (Device to Device [ad hoc] mode). The signal strength icon bars indicate that the wireless network or computer is available for connection but is still not is associated with an access point or computer (Device to Device [ad hoc] mode).Network Name Network Name (SSID): The name of the network that the adapter is connected to. The Network Name SSID must be the same as the SSID of the access point.Status Notification that the adapter is connecting to the wireless network. Once connected, the status is changed to Connected. Profiles: Identifies a network in the Wireless Networks list that is connected and has a profile in the profiles list. The wireless network uses Network (infrastructure) mode. The wireless network uses Device to Device (ad hoc) mode.The wireless network uses Security encryption.The band frequency being used by the wireless network (802.11a, 802.11b, 802.11g).The wireless network is on the exclusion list or the profile is configured for manual connection.Connect (Disconnect) Click to connect to a wireless network. Once connected, the button changes to Disconnect.Properties Provides detailed information about the connected network and its access points. See Network Properties for information. Refresh Refreshes the list of available networks. If any new networks are available within the adapter range, the list is updated to show the new network name. Wireless On (Wireless Off) Switch the radio off and on. Refer to Wireless Off (On) for more information.Close Closes the Intel PROSet/Wireless main window.Help? Provides help information for this page. Network Properties](https://usermanual.wiki/DRS-Tactical-Systems/980026010.User-Guide/User-Guide-1202037-Page-10.png)
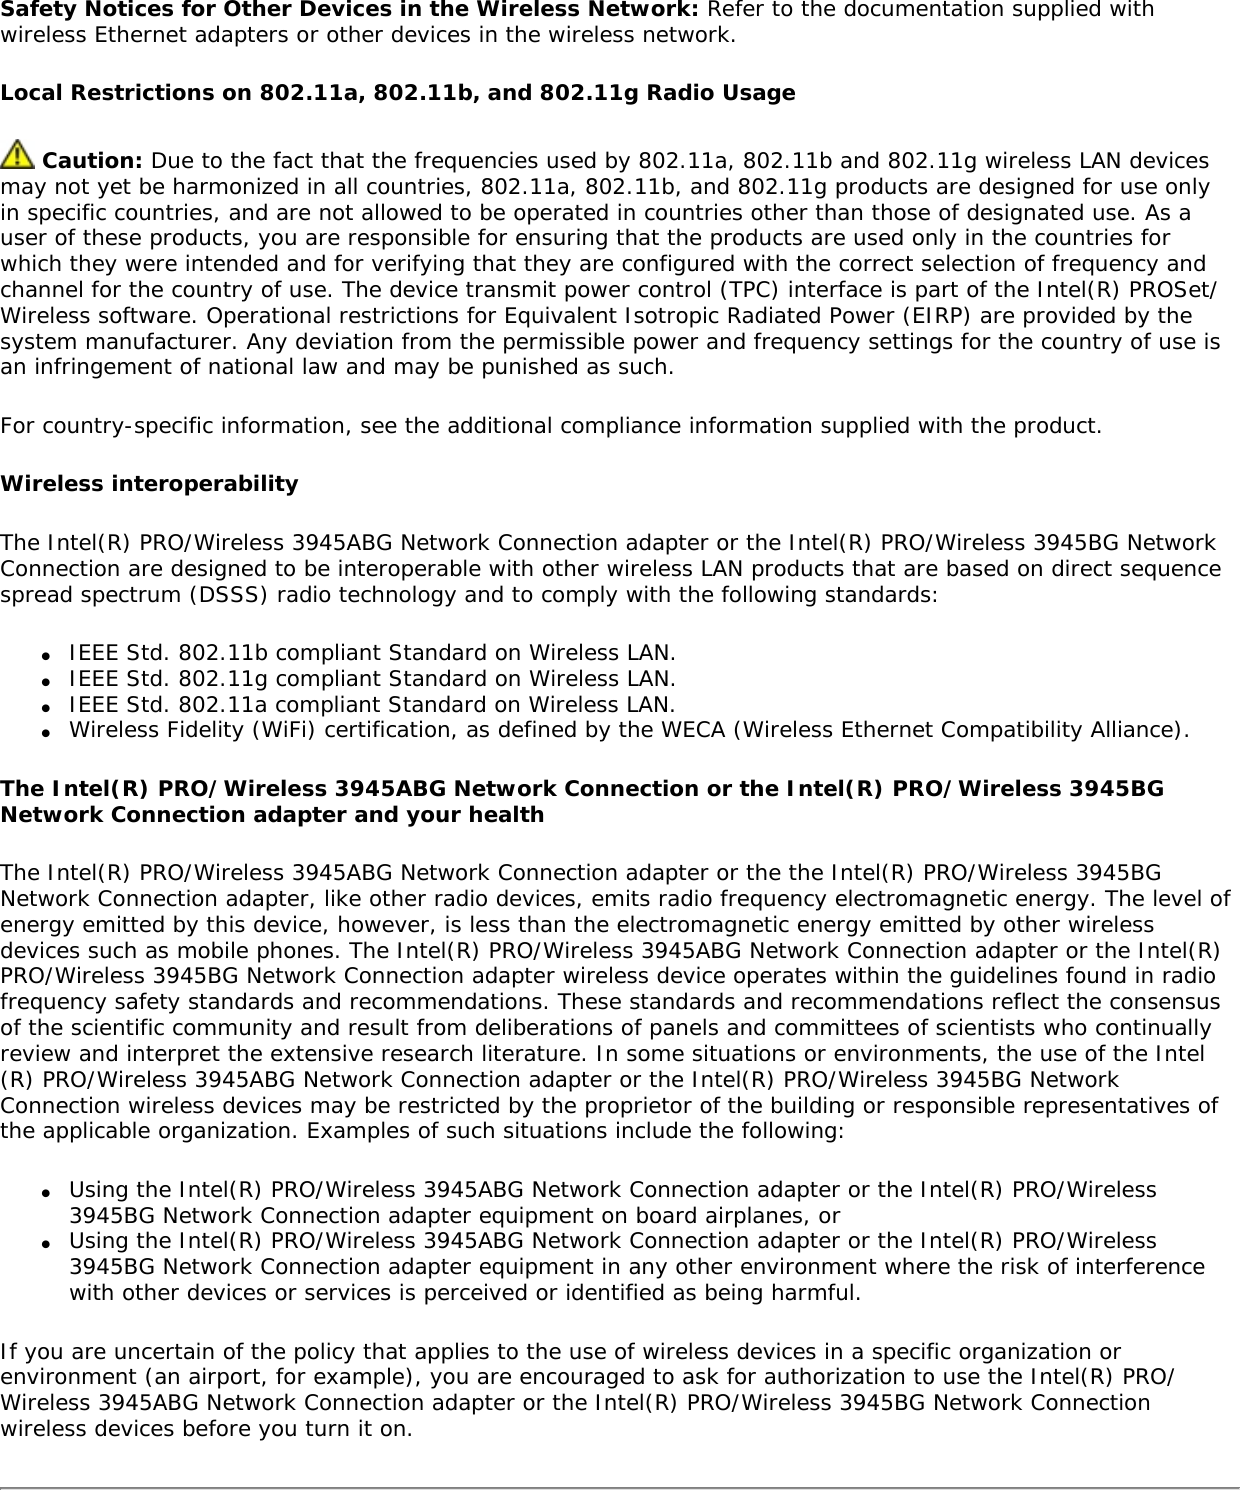
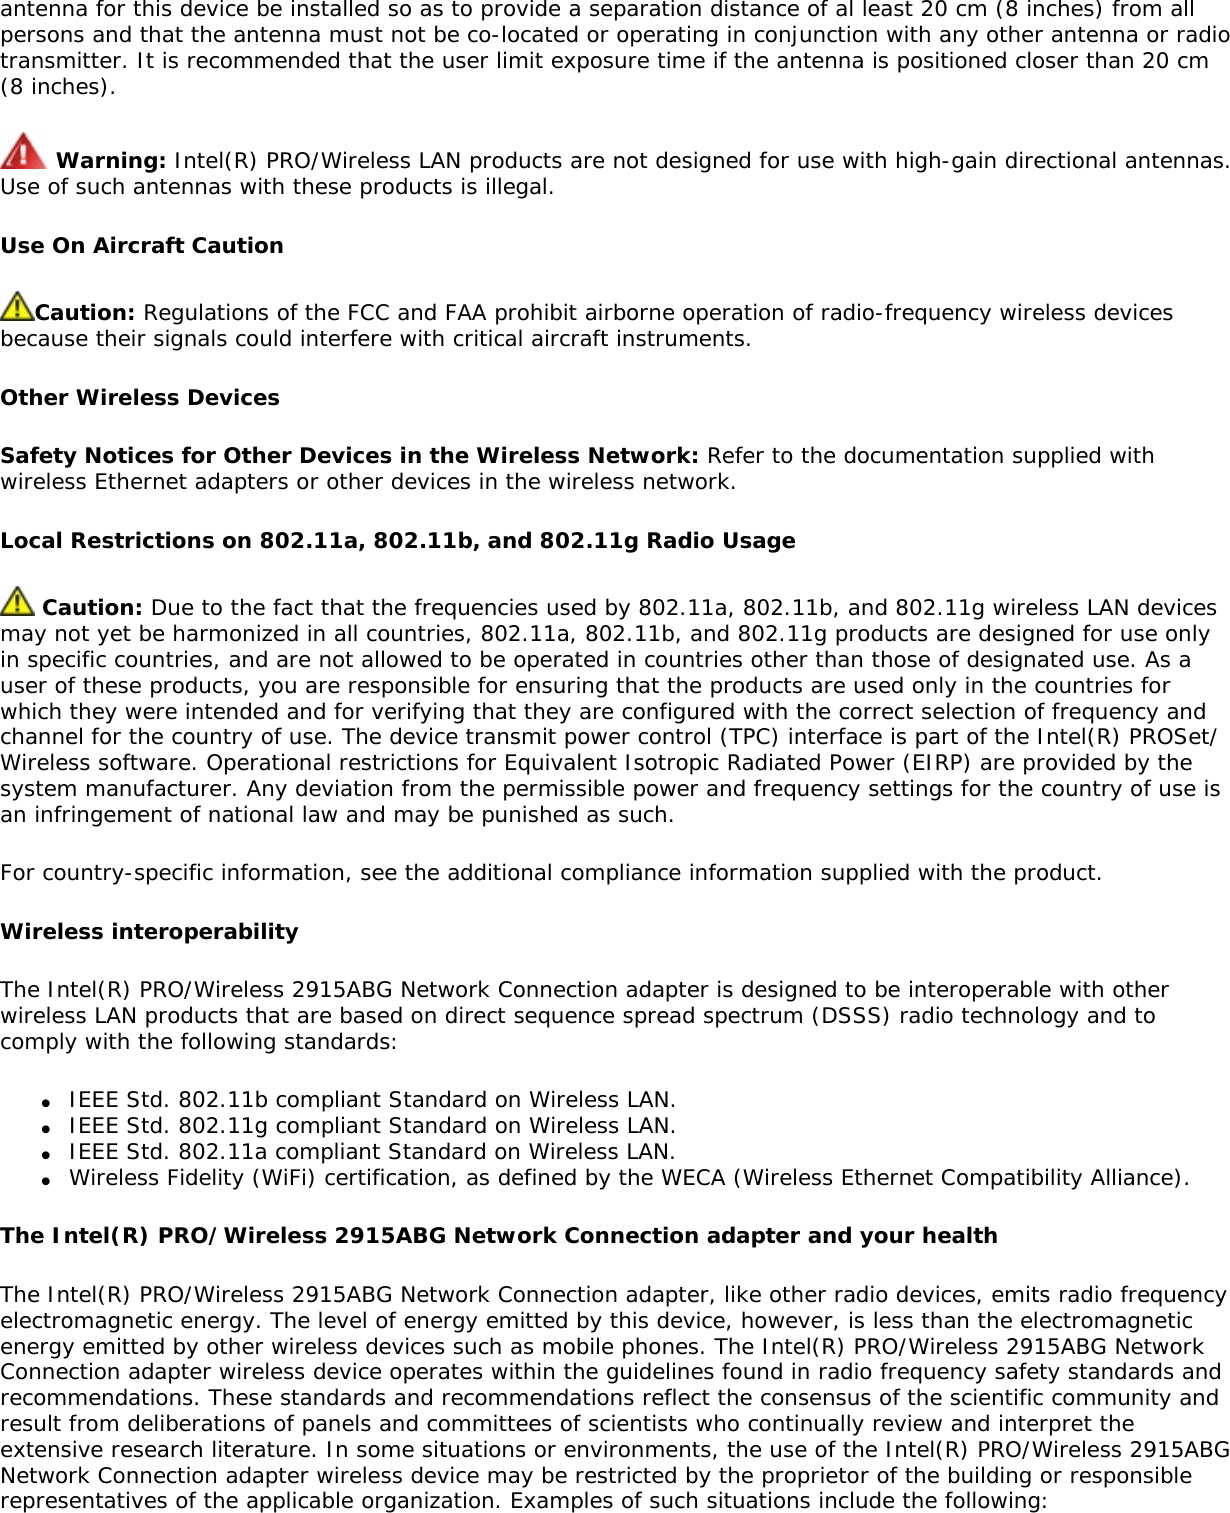
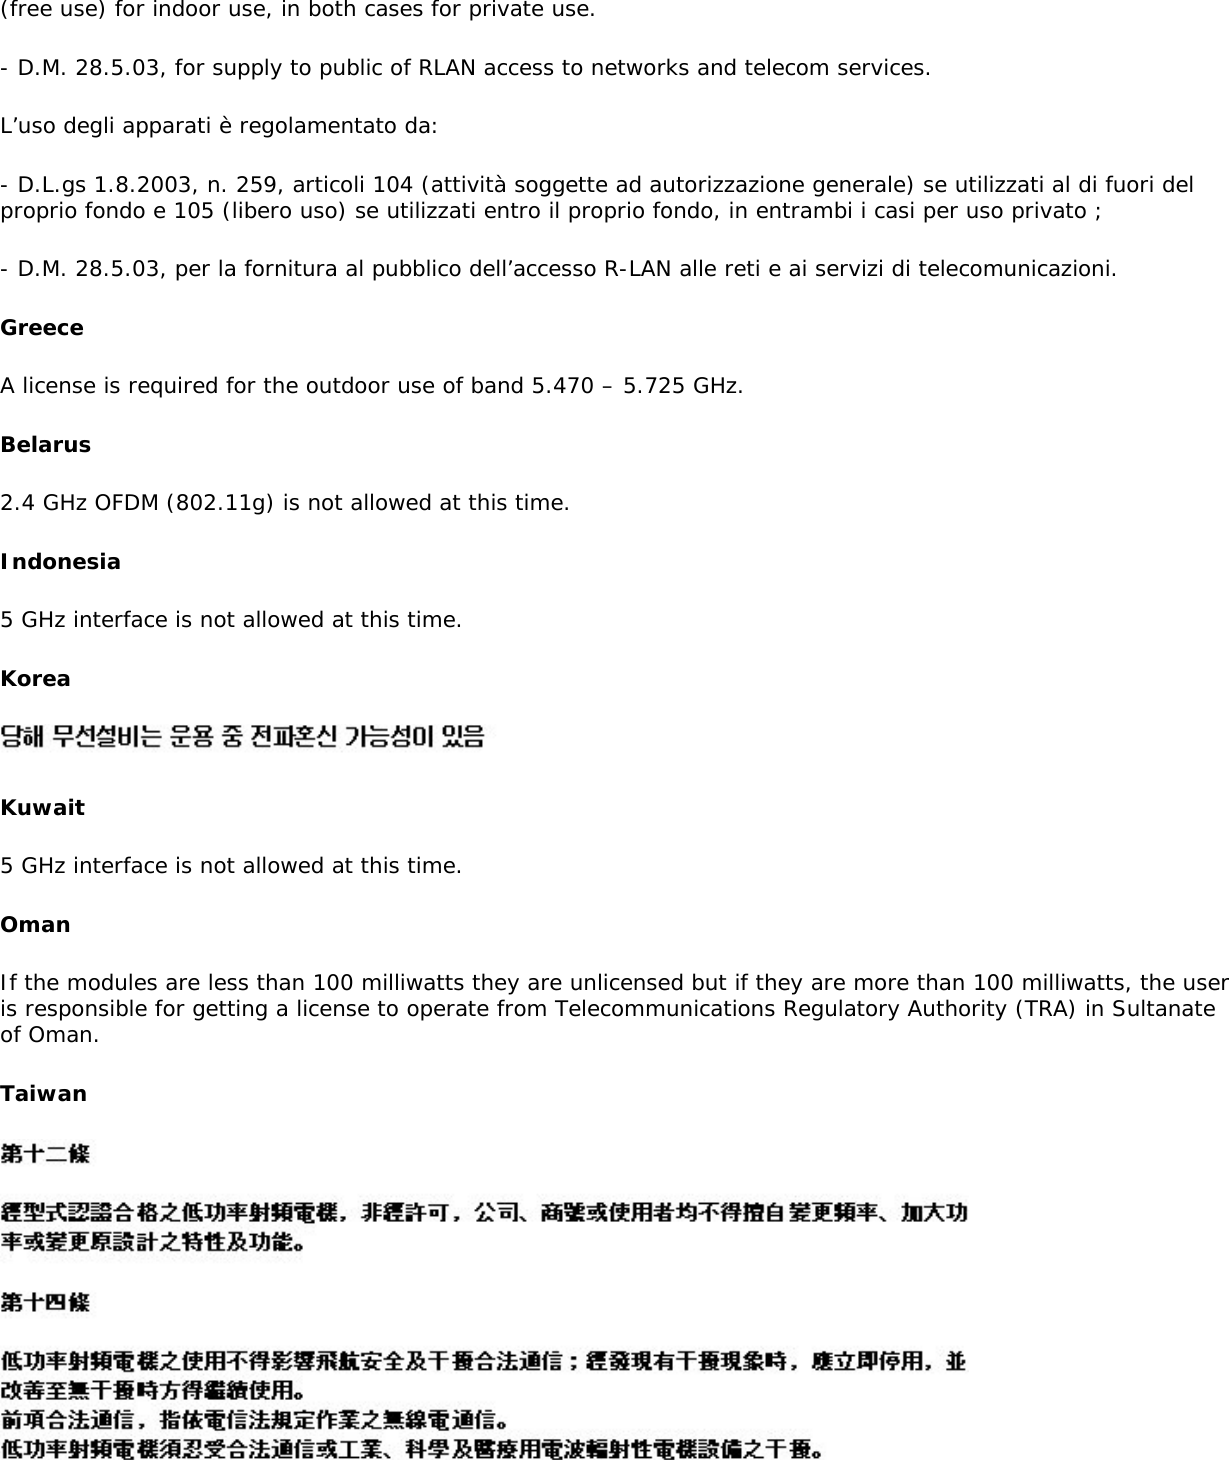
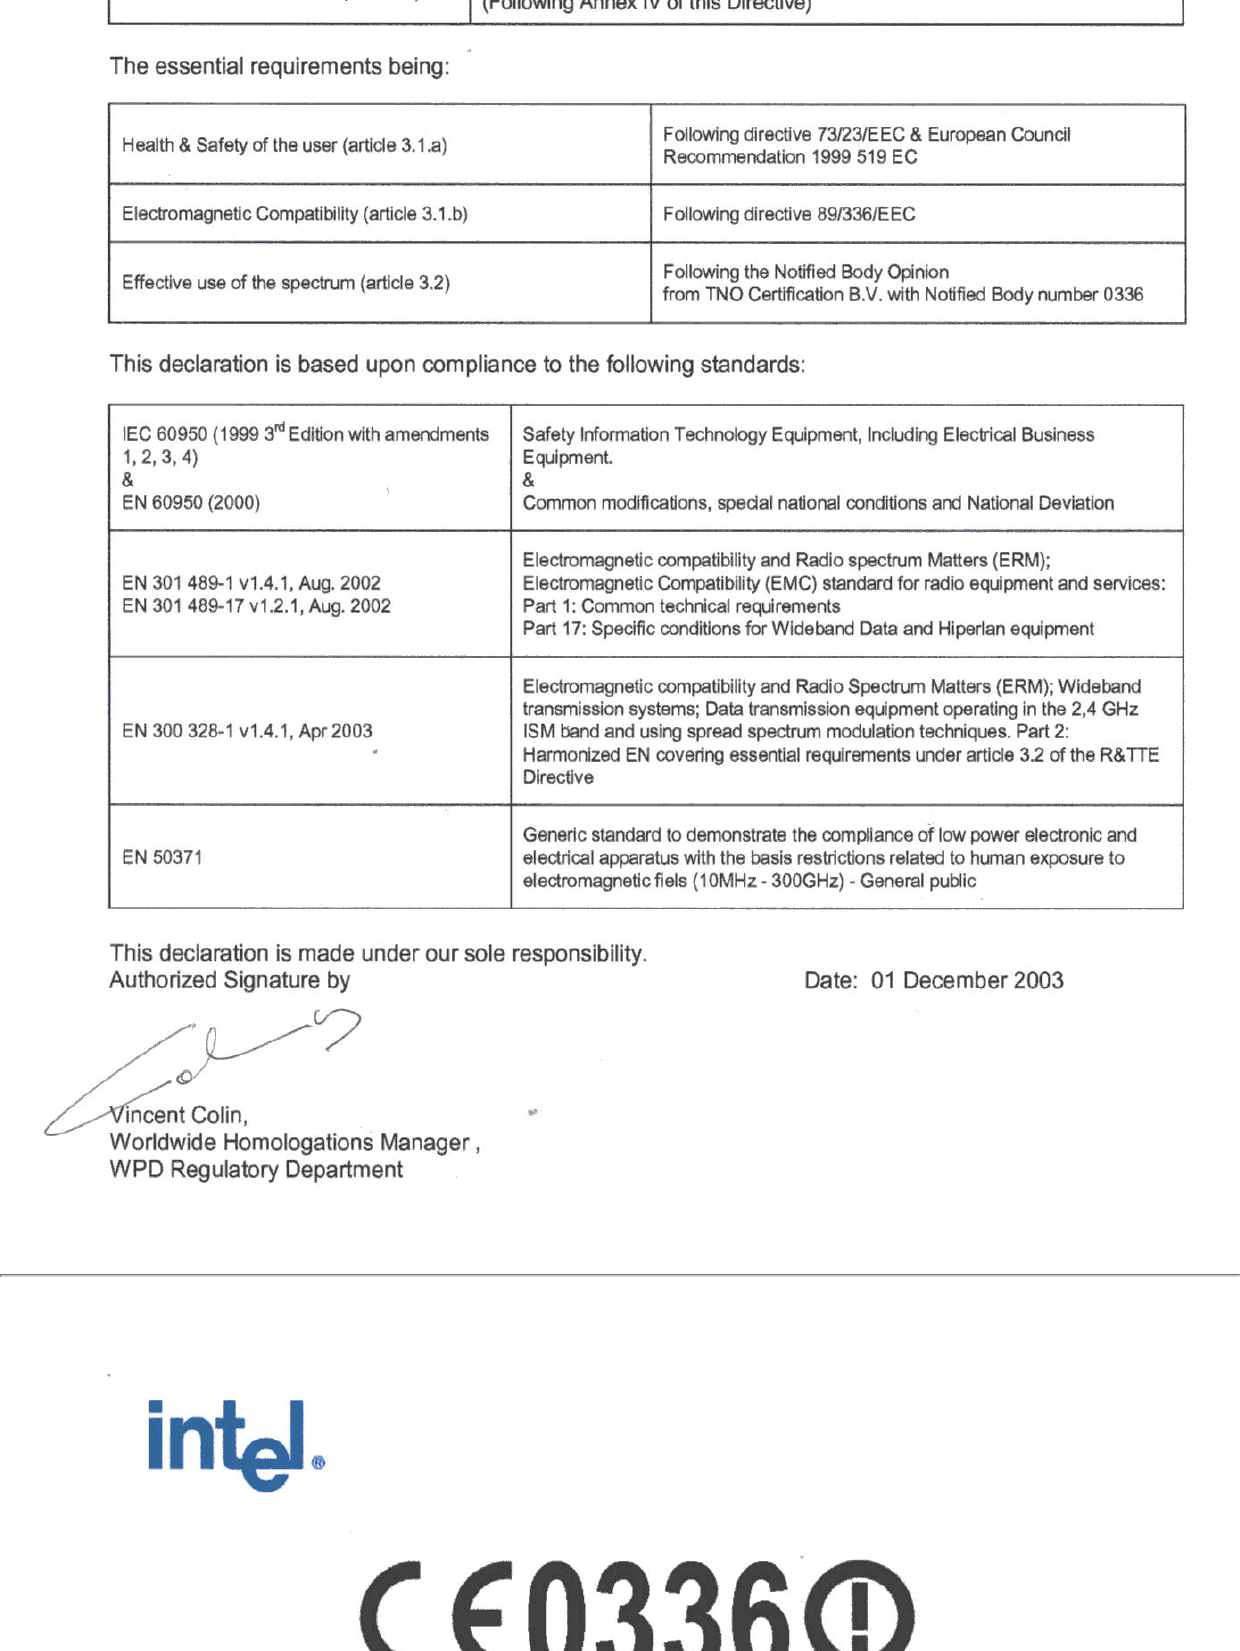
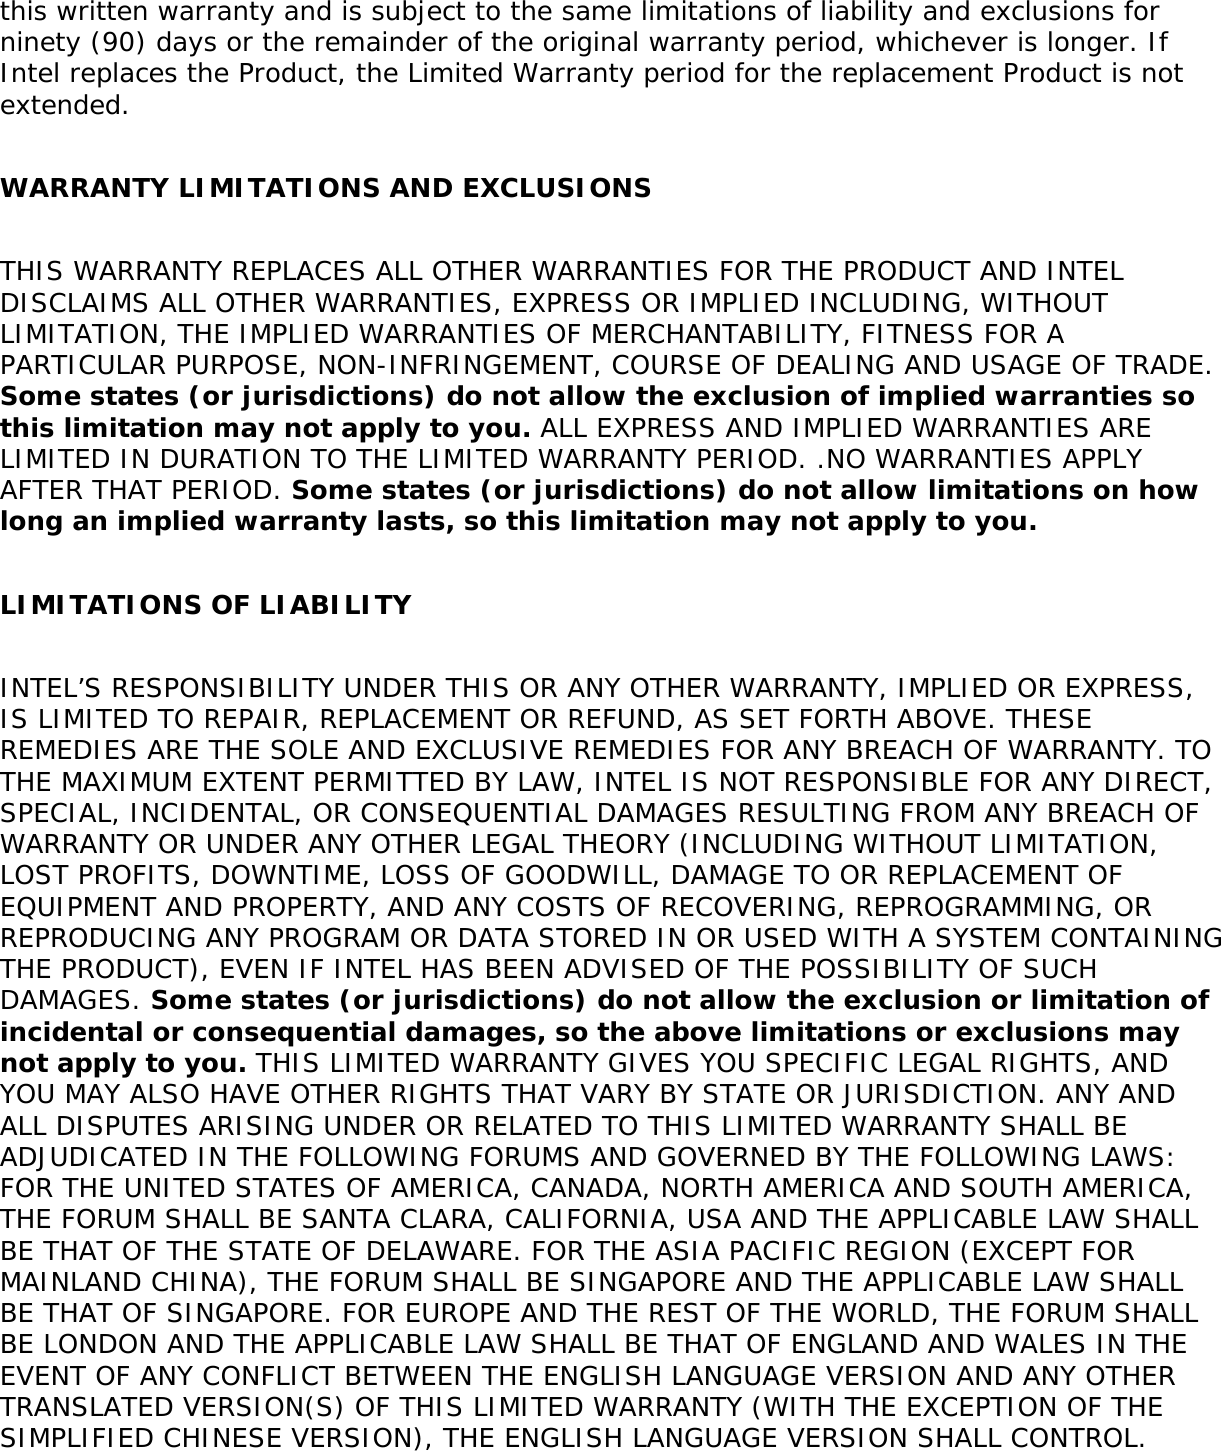
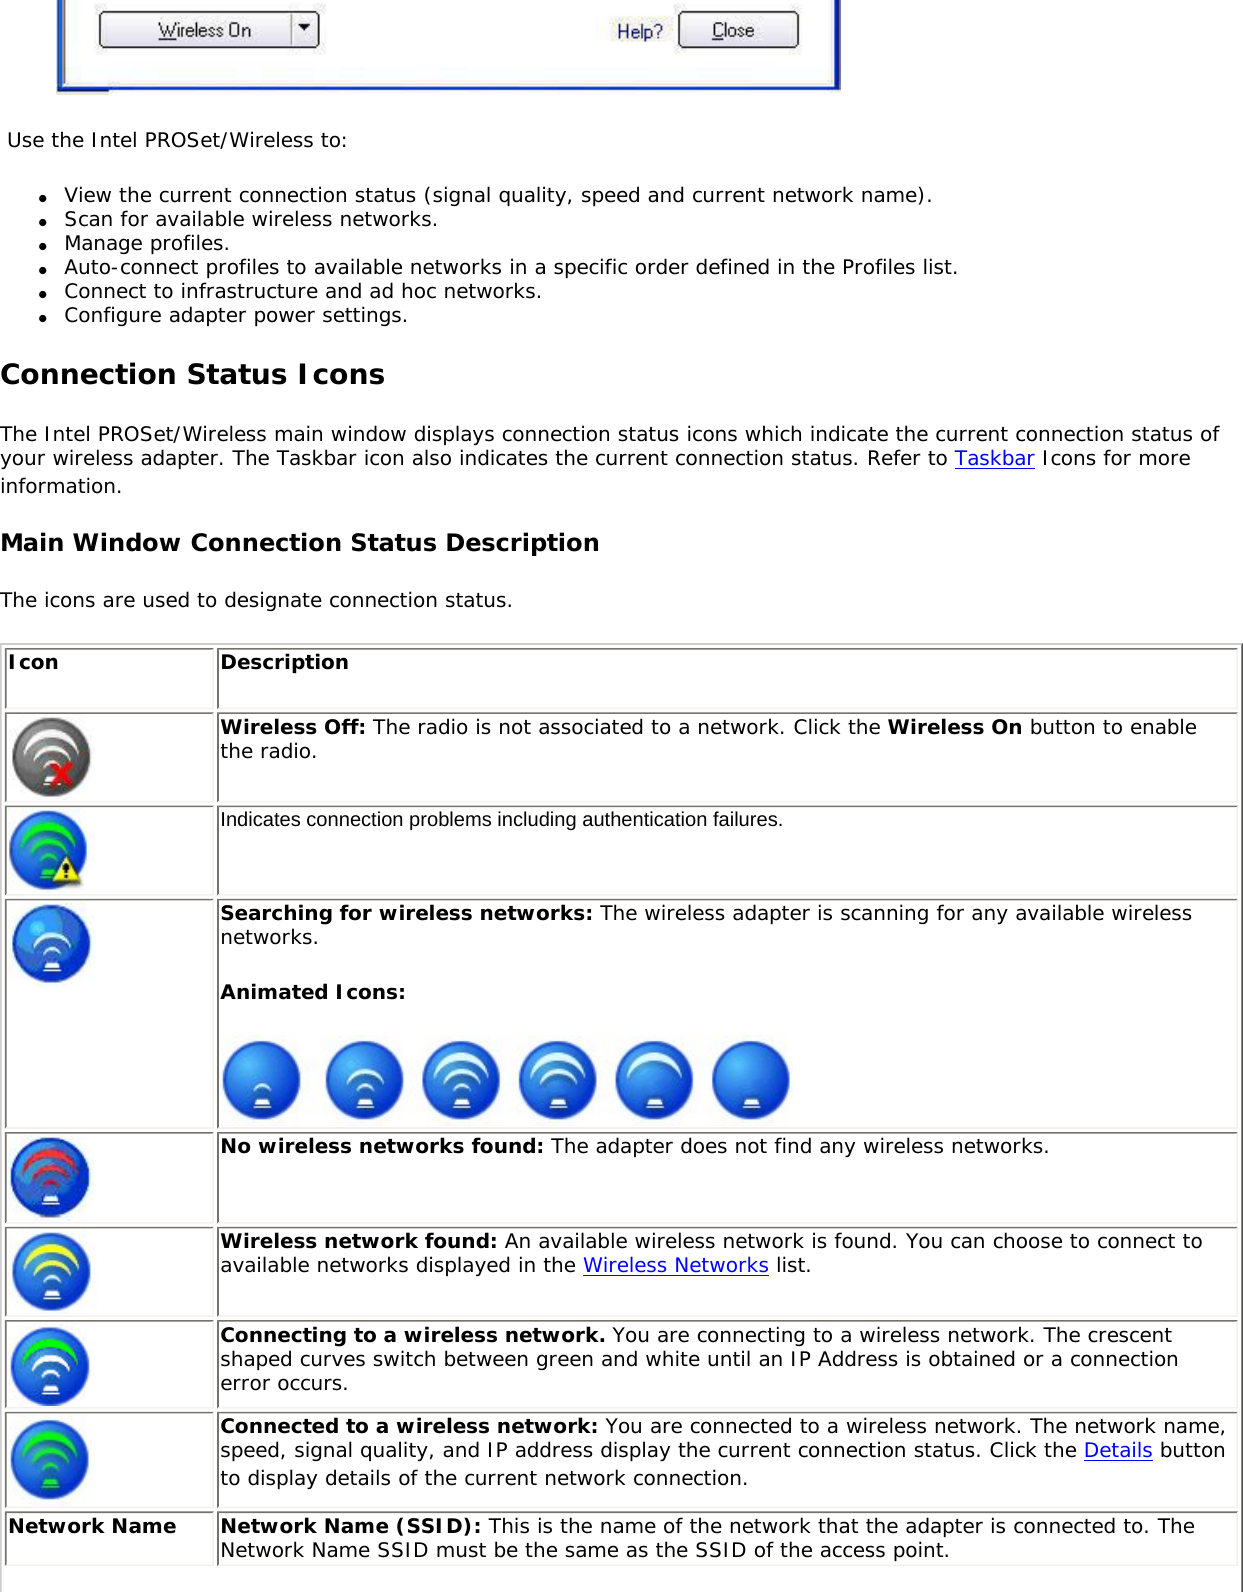
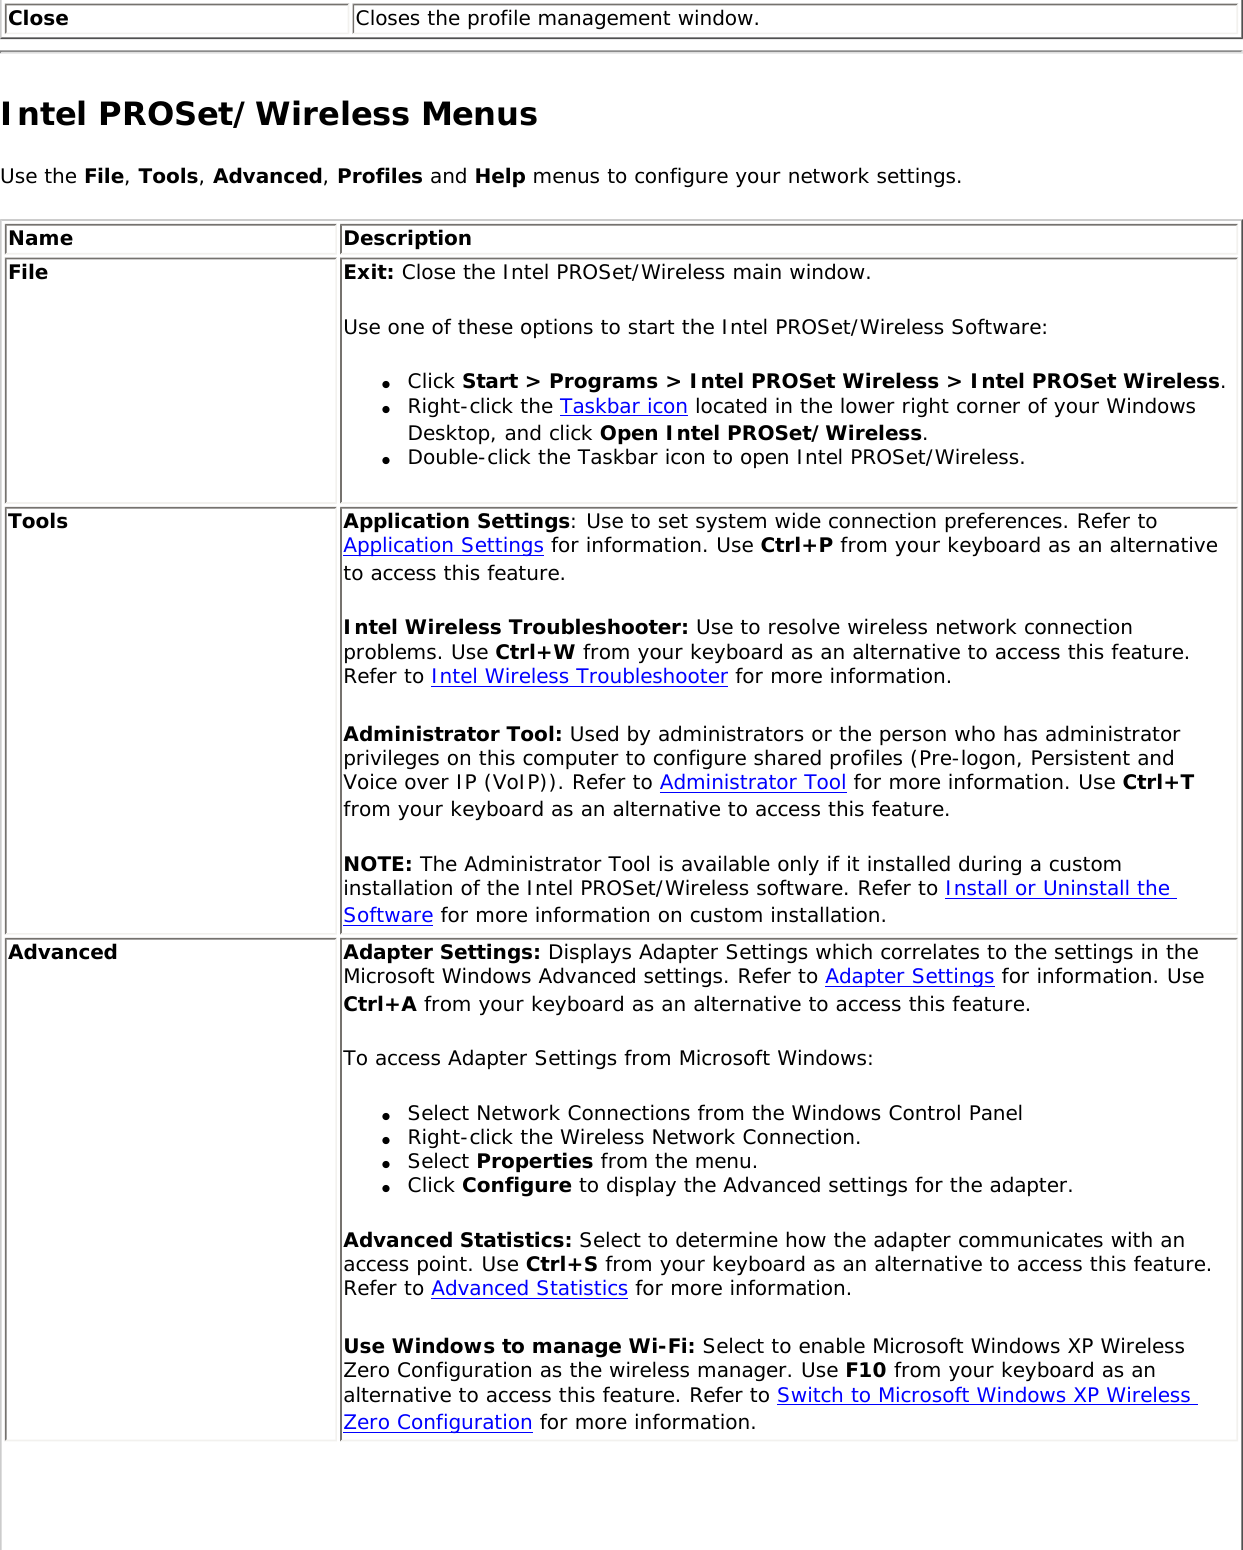
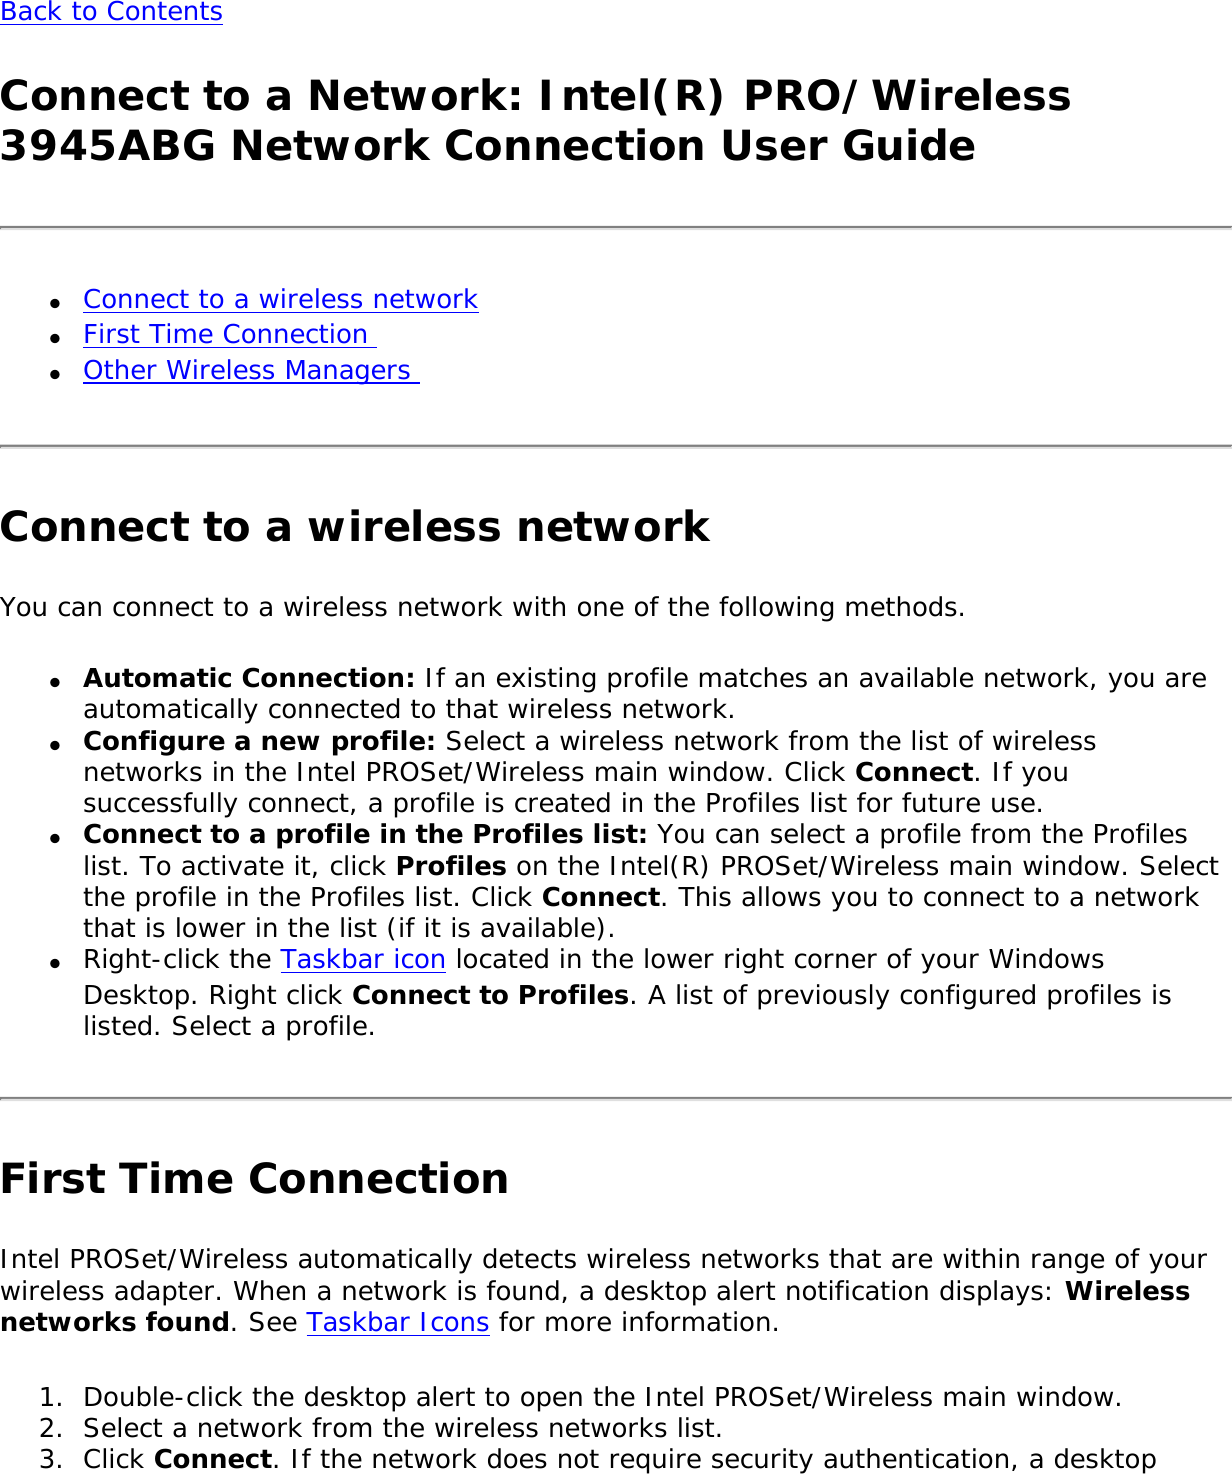
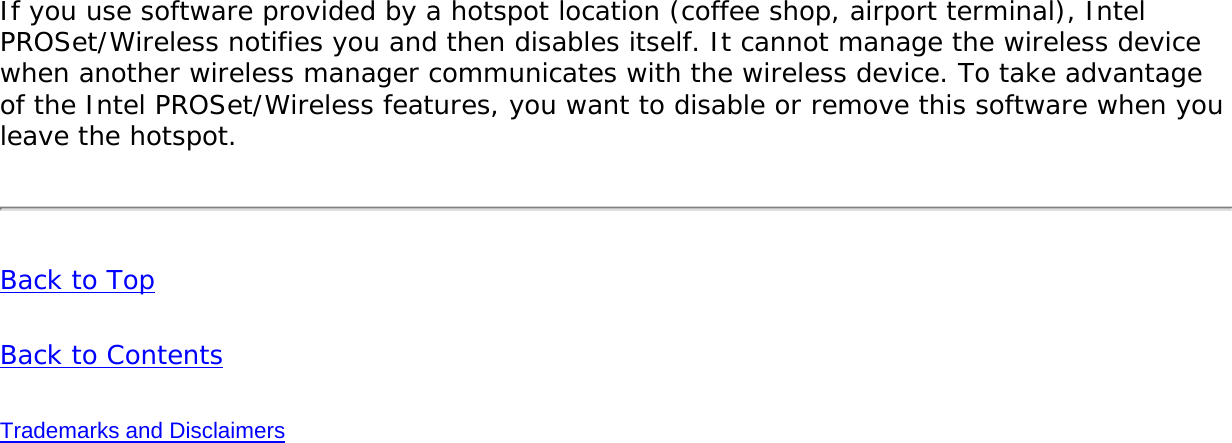
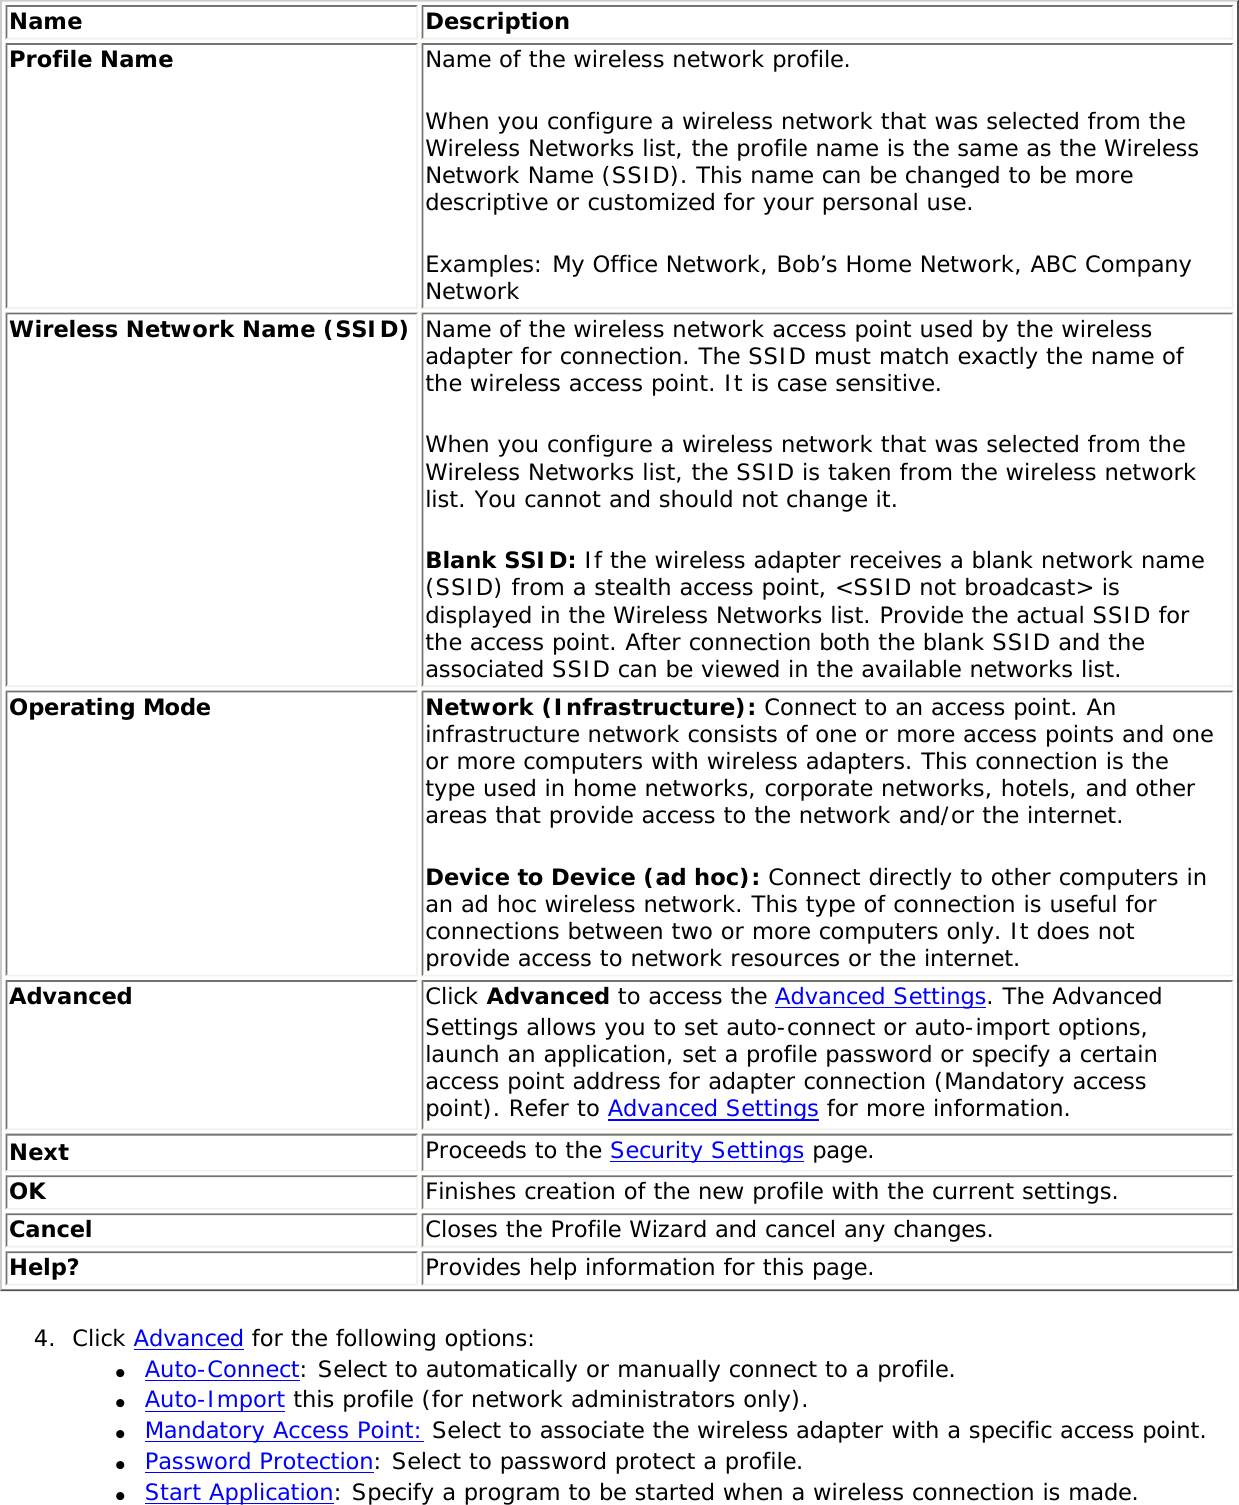
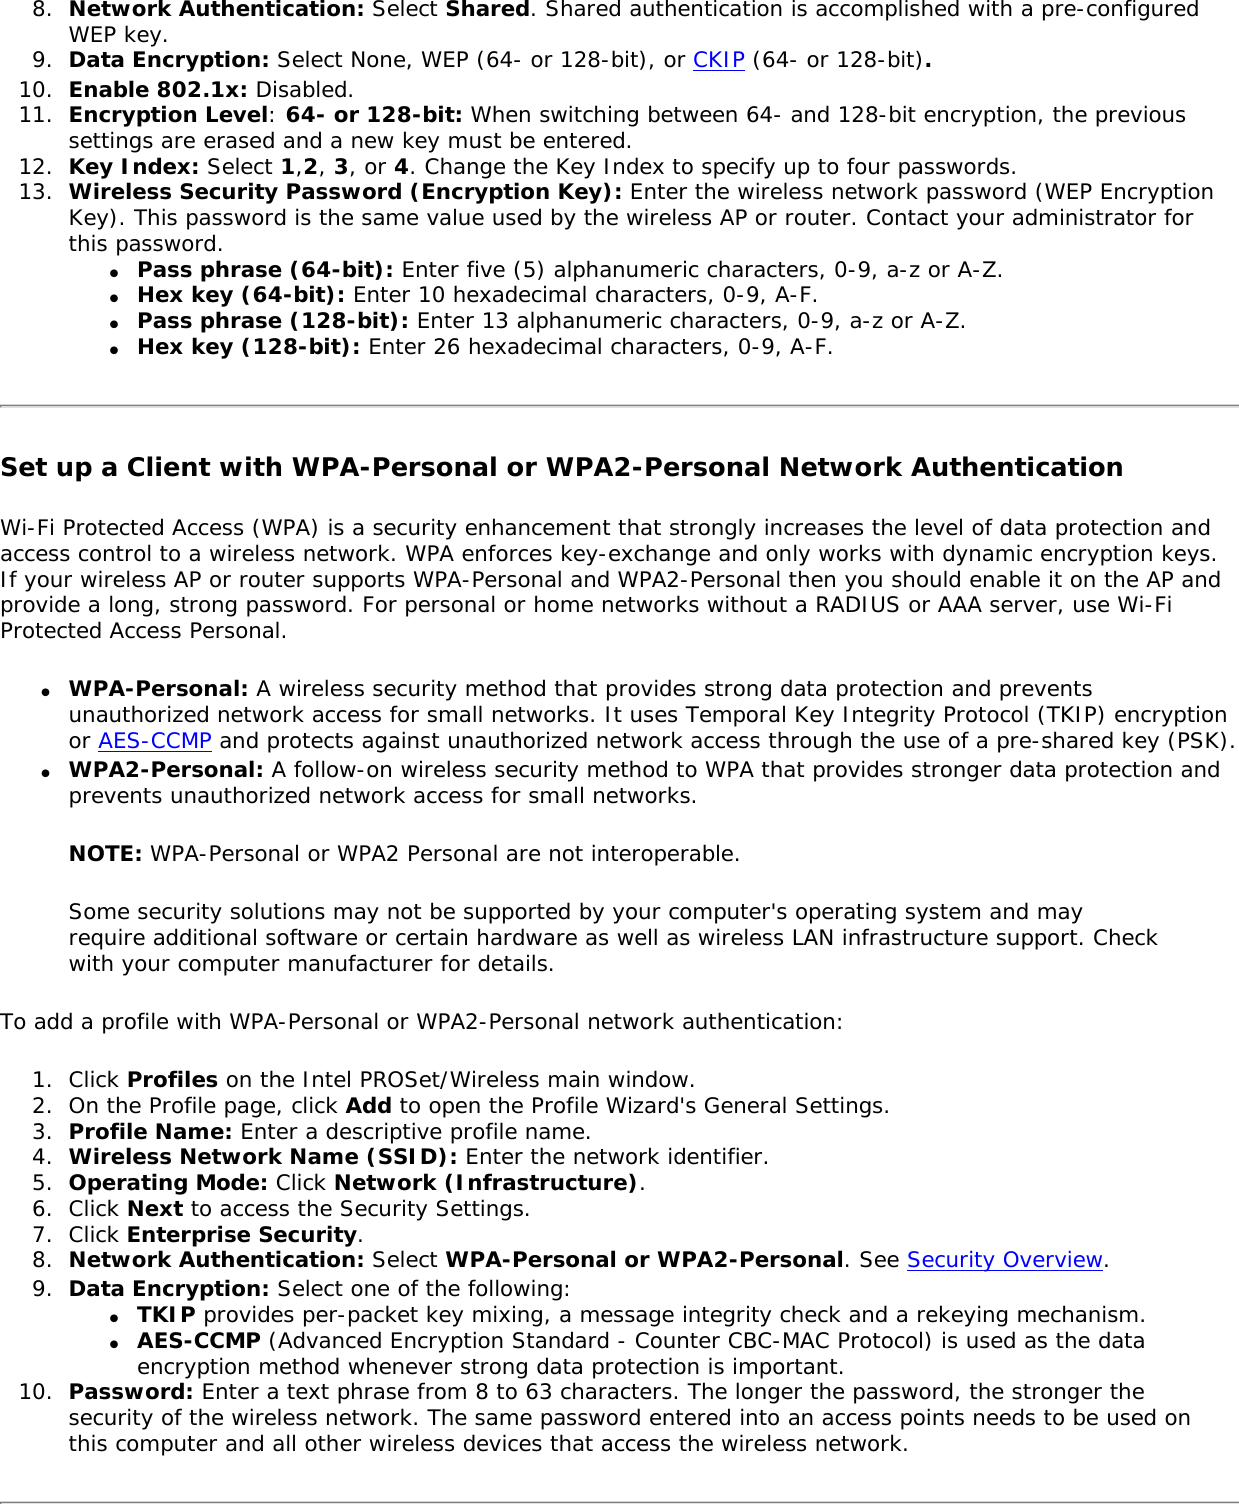
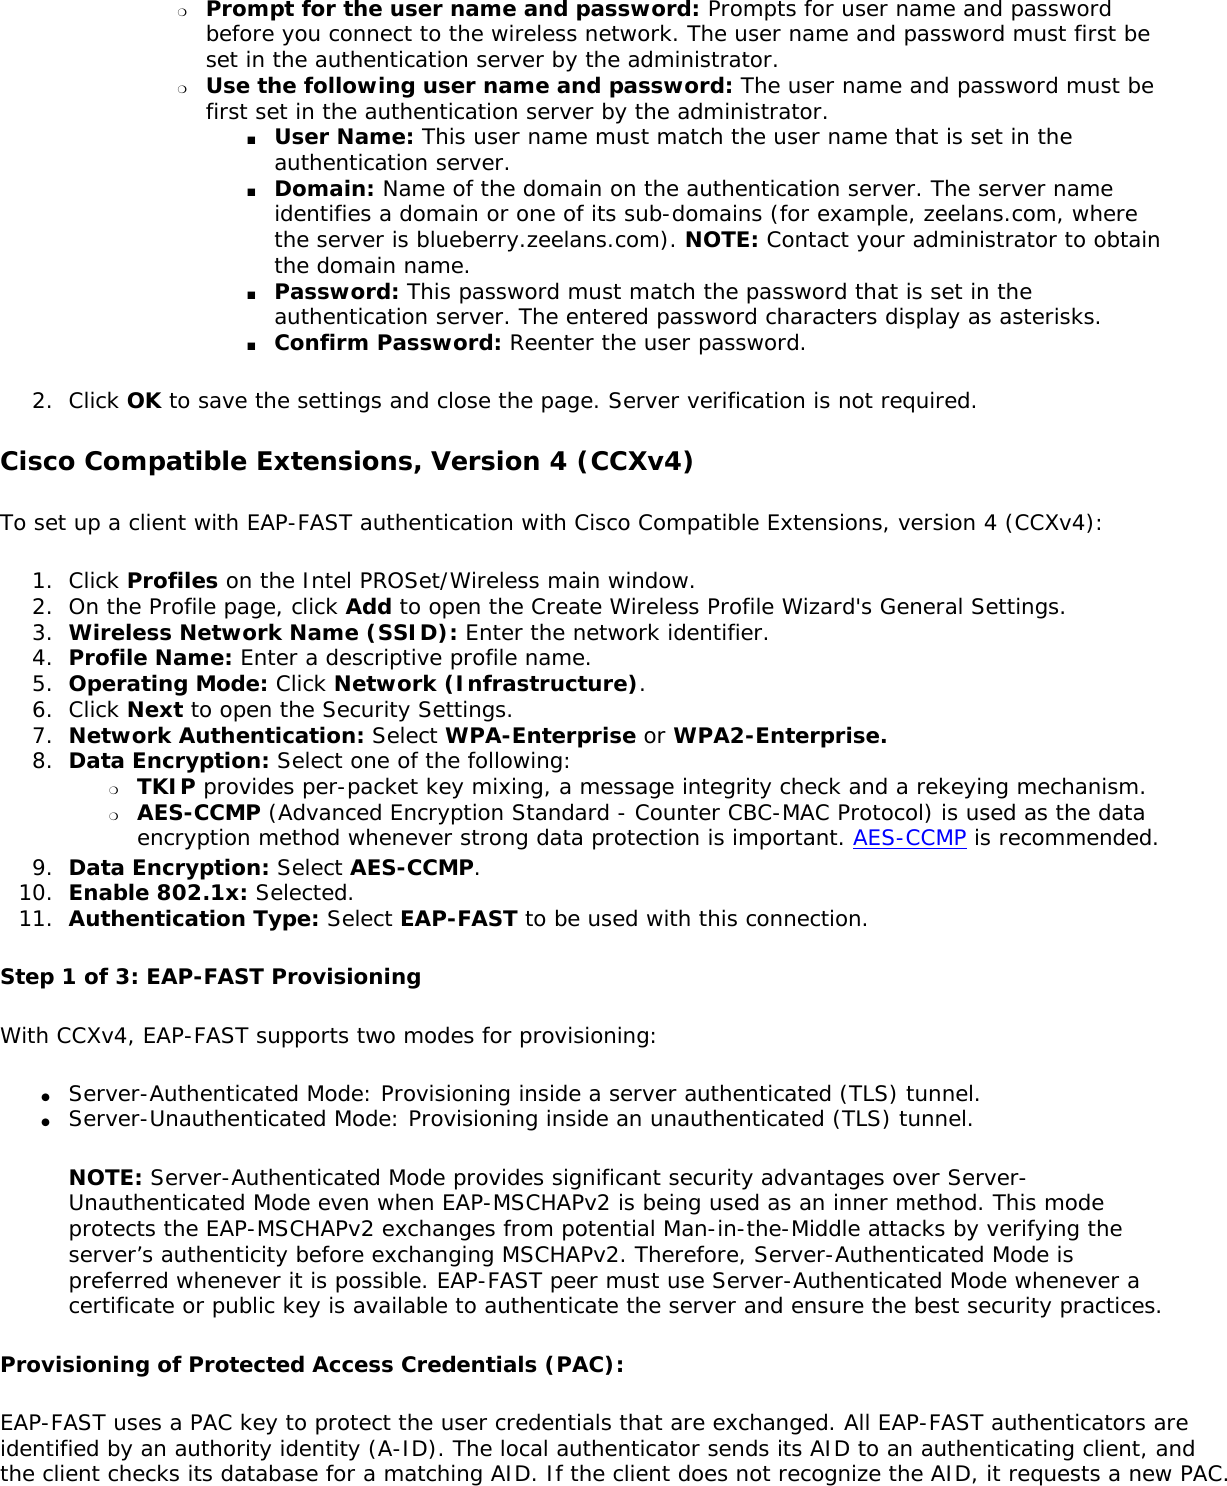
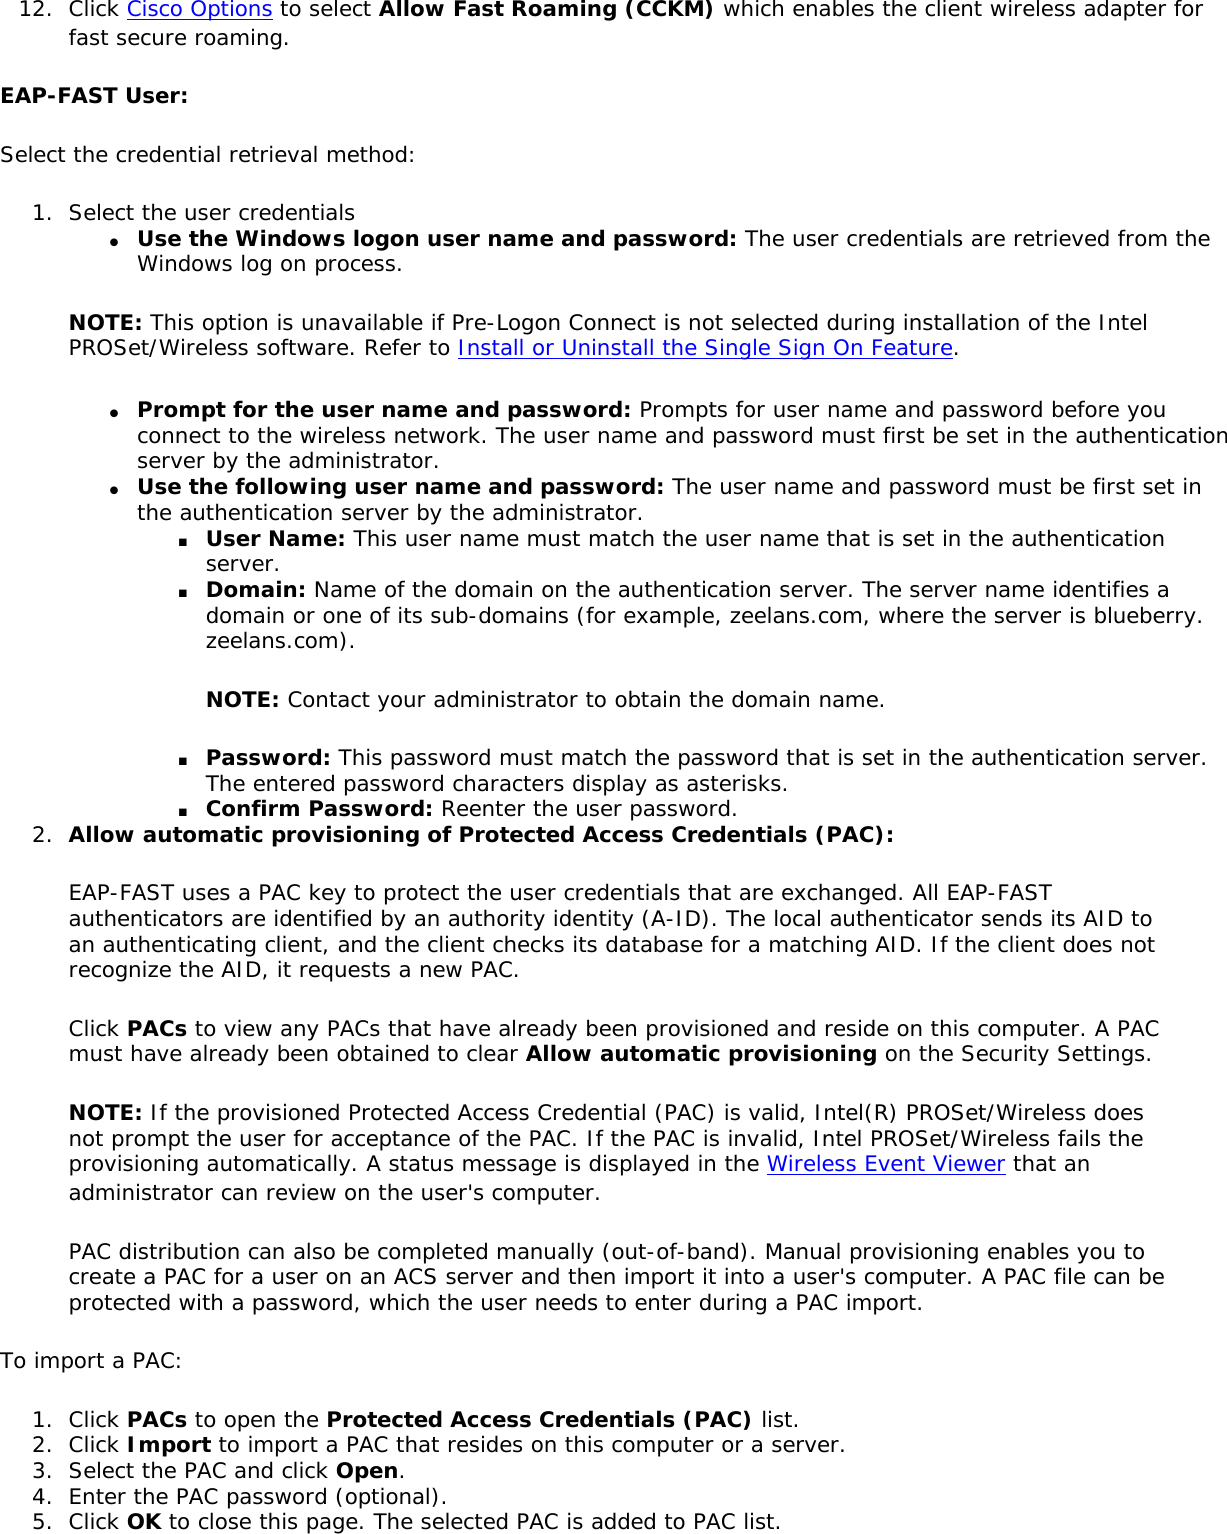
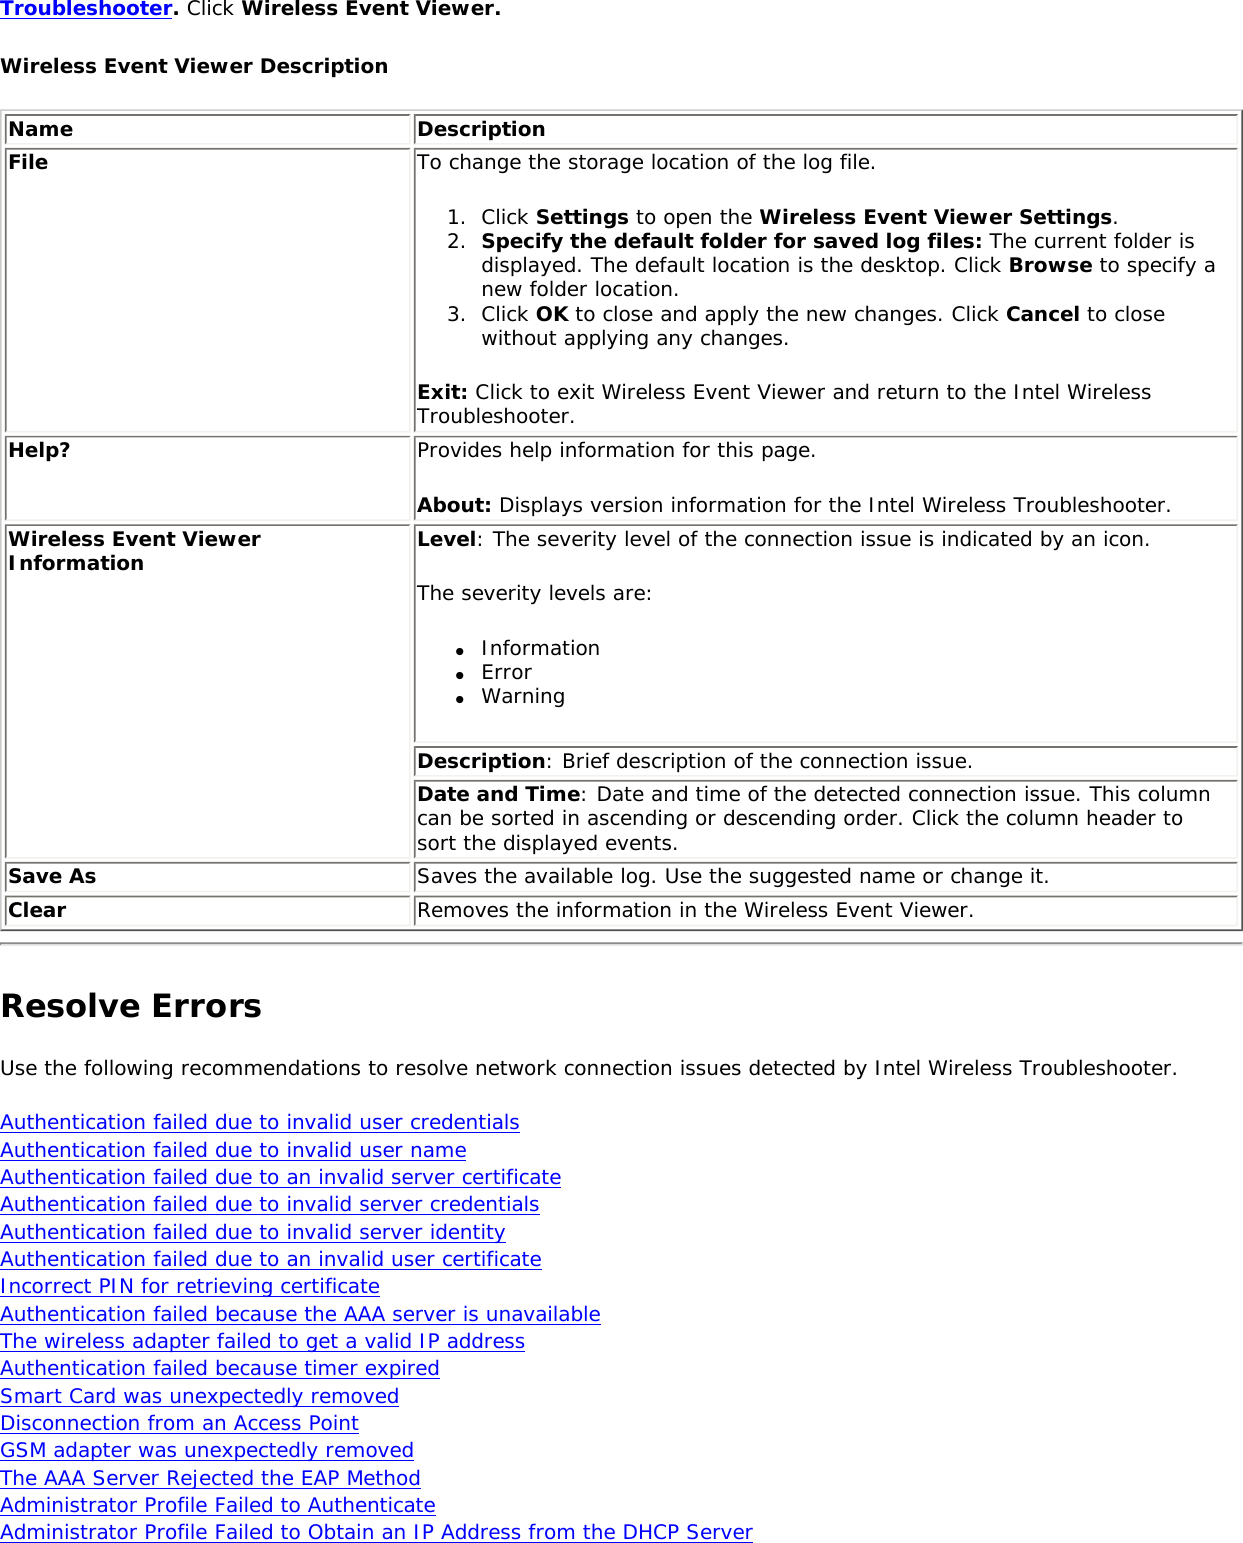
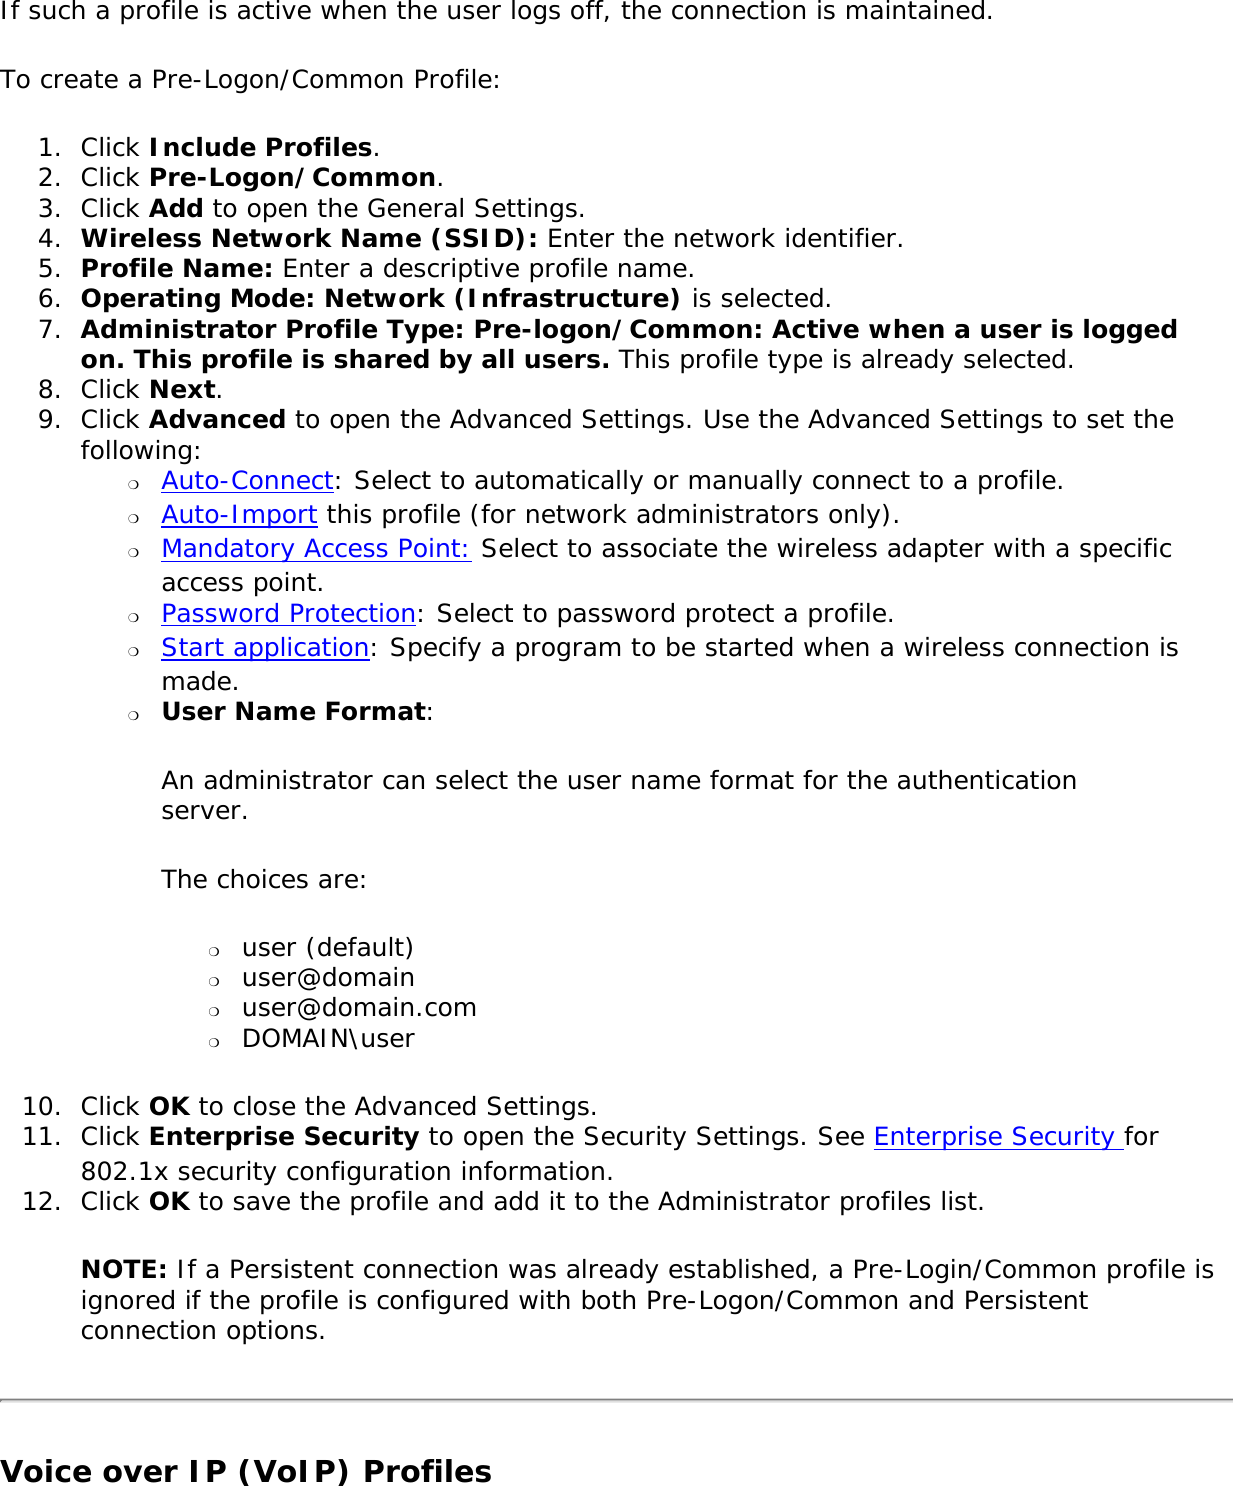
![Repair Renews the IP Address. If you have trouble accessing the network, verify if the IP address is valid. If it is 0.0.0.0 or 169.x.x.x, then it is probably not valid. If your network is setup for automatic network address assignment, then click Repair and request a new IP address.Close Closes the page.Help? Provides help information for this page.Profile Management The Profiles List displays the current user profiles in the order that they are to be applied. Use the up and down arrows to arrange profiles in a specific order to automatically connect to a wireless network. Use the Connect button to connect to a wireless network. Once connected, a profile is created in the Profiles list. You can also add, edit, and remove profiles from the Profiles 'list. Different profiles can be configured for each wireless network. Profile settings can include, the network name (SSID), operating mode, and security settings. See Profile Management for more information. Profiles list Name DescriptionProfile Name Network settings that allow your wireless adapter to connect to a network access point (infrastructure mode) or computer (Device to Device [ad hoc]) mode which does not use an access point. Refer to Set up Profiles for more information.Network Name Name of the wireless network (SSID) or computer.Connection Icons: The network profile status icons indicate the different connection states of the adapter with a wireless network, the type of operating mode being used, and whether network security is being used. Blue circle: The wireless adapter is associated with an access point or computer (Device to Device [ad hoc] mode). If a profile has 802.1x security enabled, this indicates that the wireless adapter is associated and authenticated.Indicates infrastructure mode.Indicates Device to Device (ad hoc) mode.Indicates an Administrator profile. The wireless network uses Security encryption.Arrows Position profiles in a preferred order for auto-connection. ● Up-arrow: Move the position of a selected profile up in the Profiles list. ● Down-arrow: Move the position of a selected profile down in the Profiles list.Connect Connect the selected profile for the wireless network.Add Use the Profile Wizard to create a new profile. Refer to Create a New Profile for more information.Remove Removes a selected profile from the Profile list. Refer to Delete a Profile for more information.Properties Used to edit the contents of an existing profile. You can also double-click a profile in the Profile list to edit the profile. Refer to Edit an Existing Profile for more information.Export/Import: Imports and exports user-based profiles to and from the Profile list. Wireless profiles can be automatically imported into the Profile list. See Import and Export Profiles for more information.](https://usermanual.wiki/DRS-Tactical-Systems/980026010.User-Guide/User-Guide-1202037-Page-14.png)
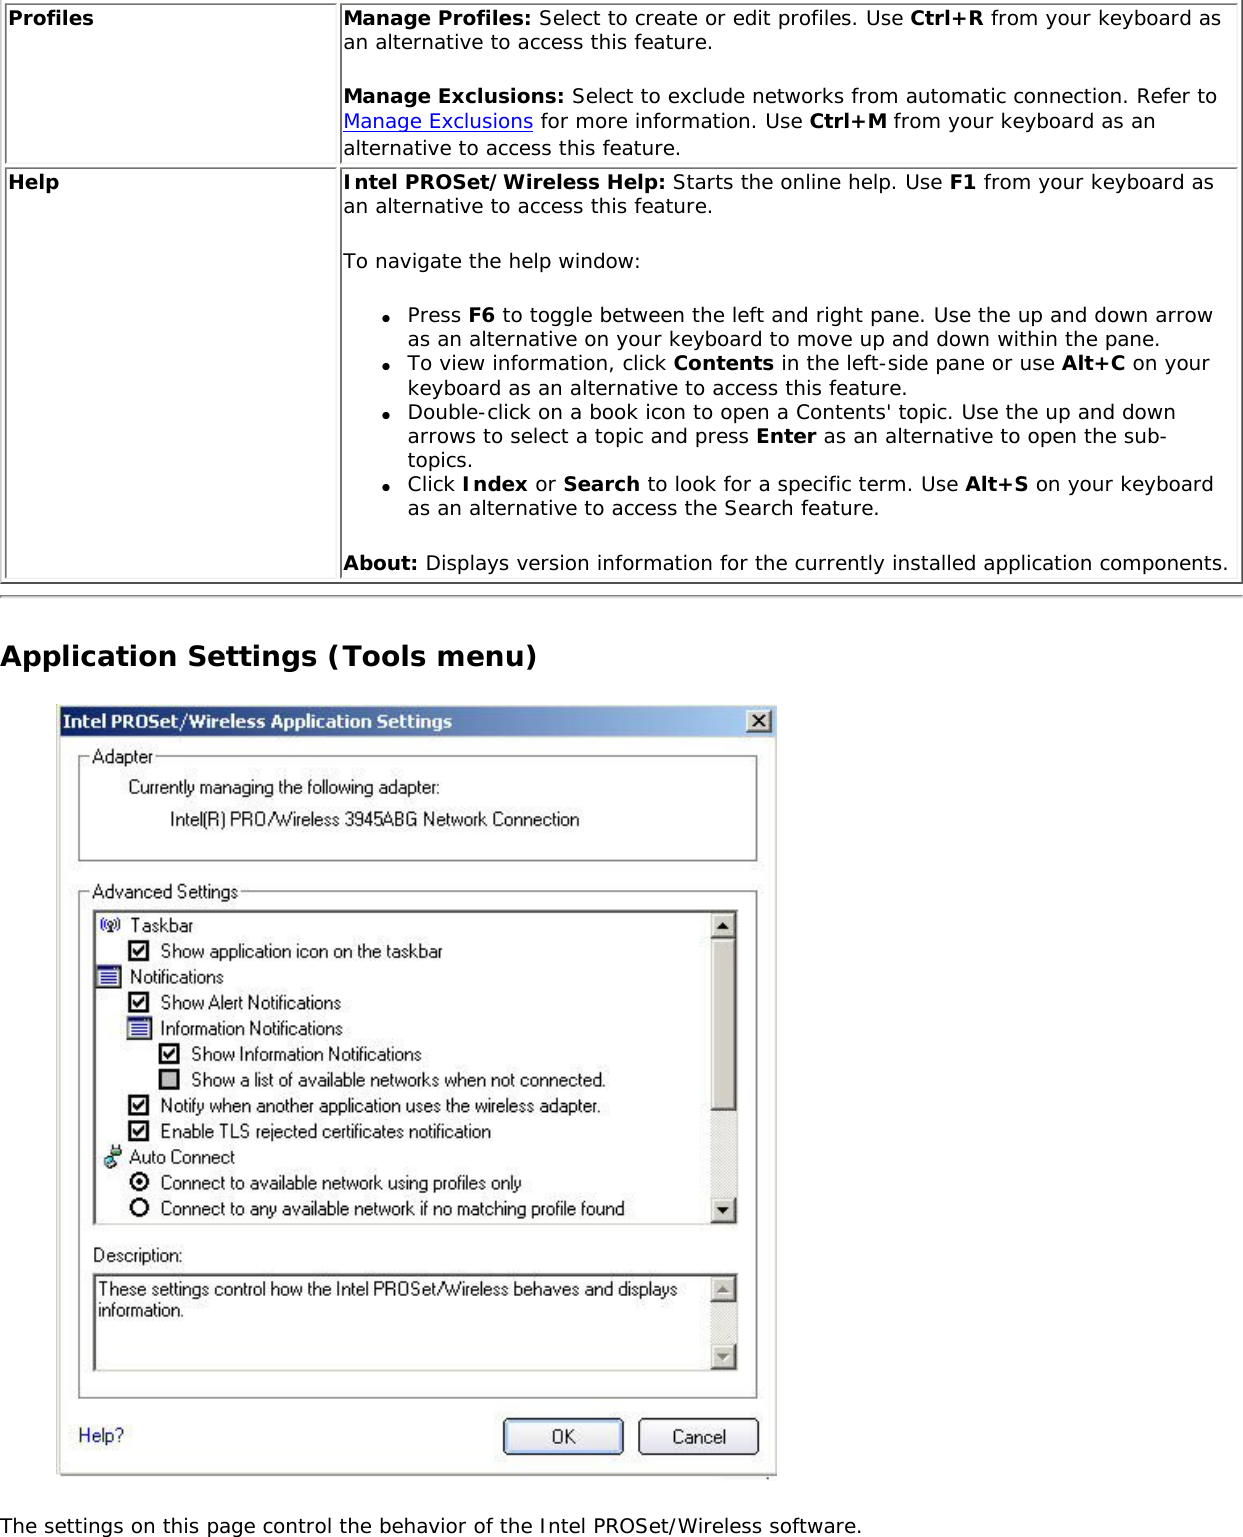
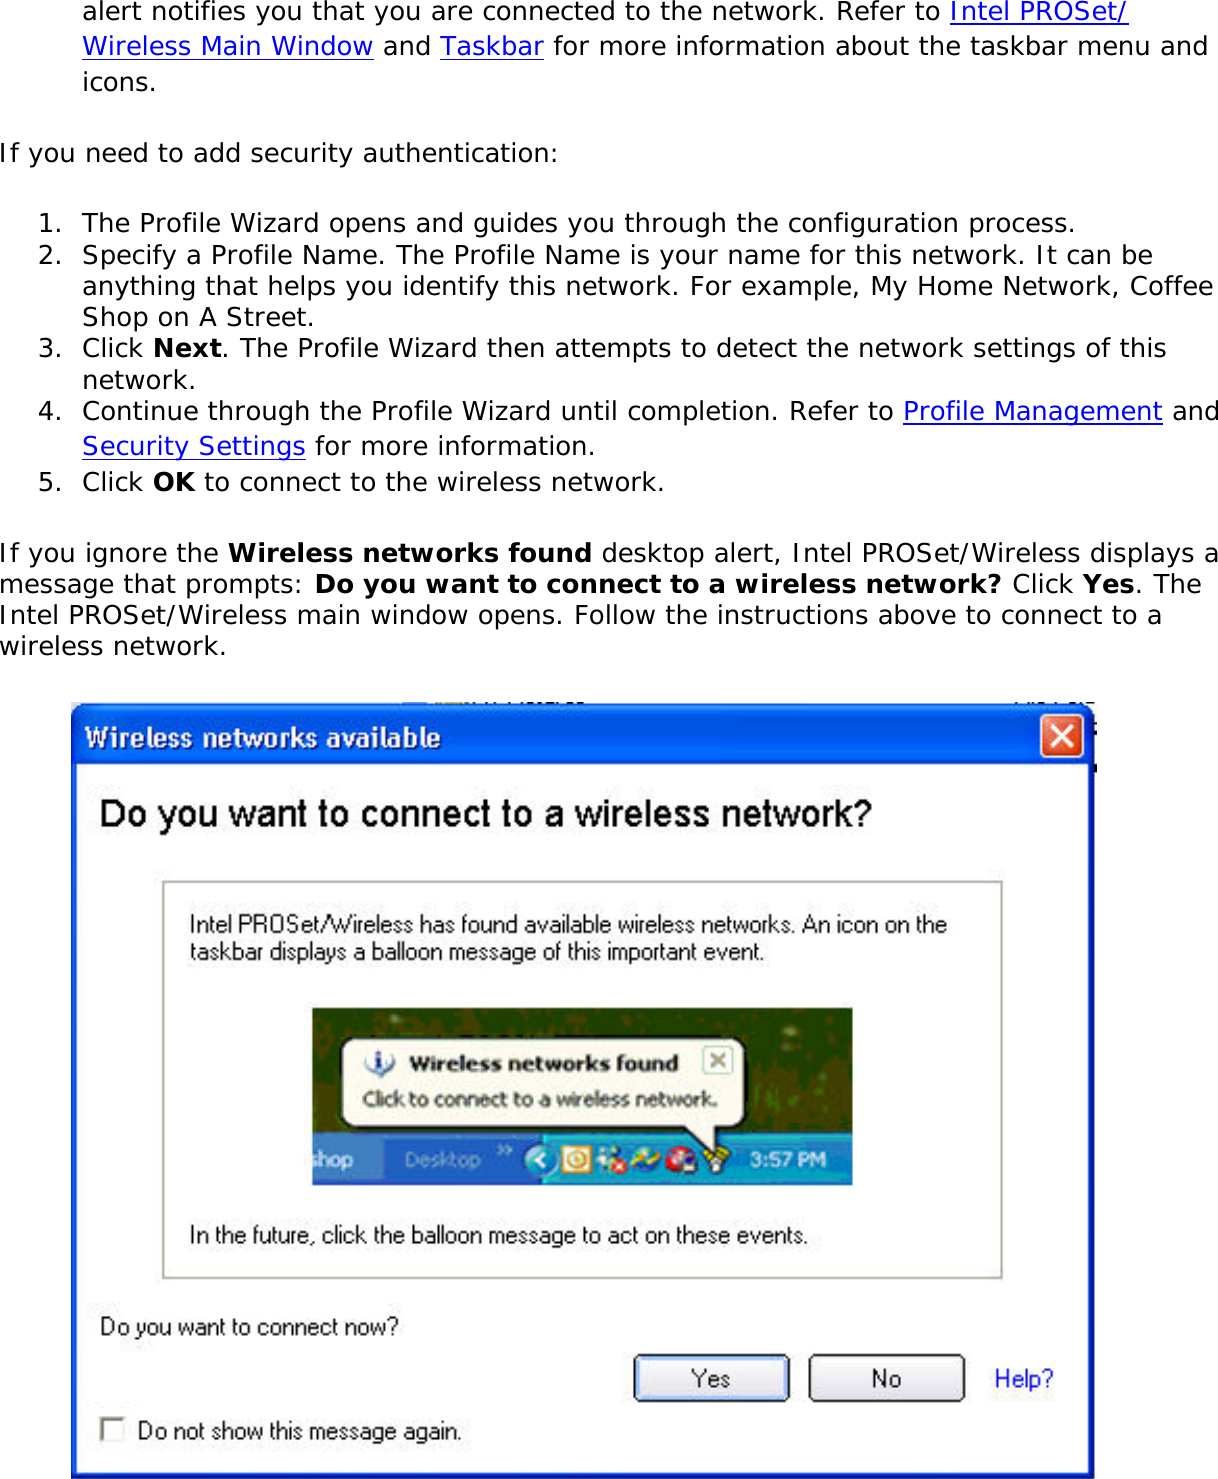
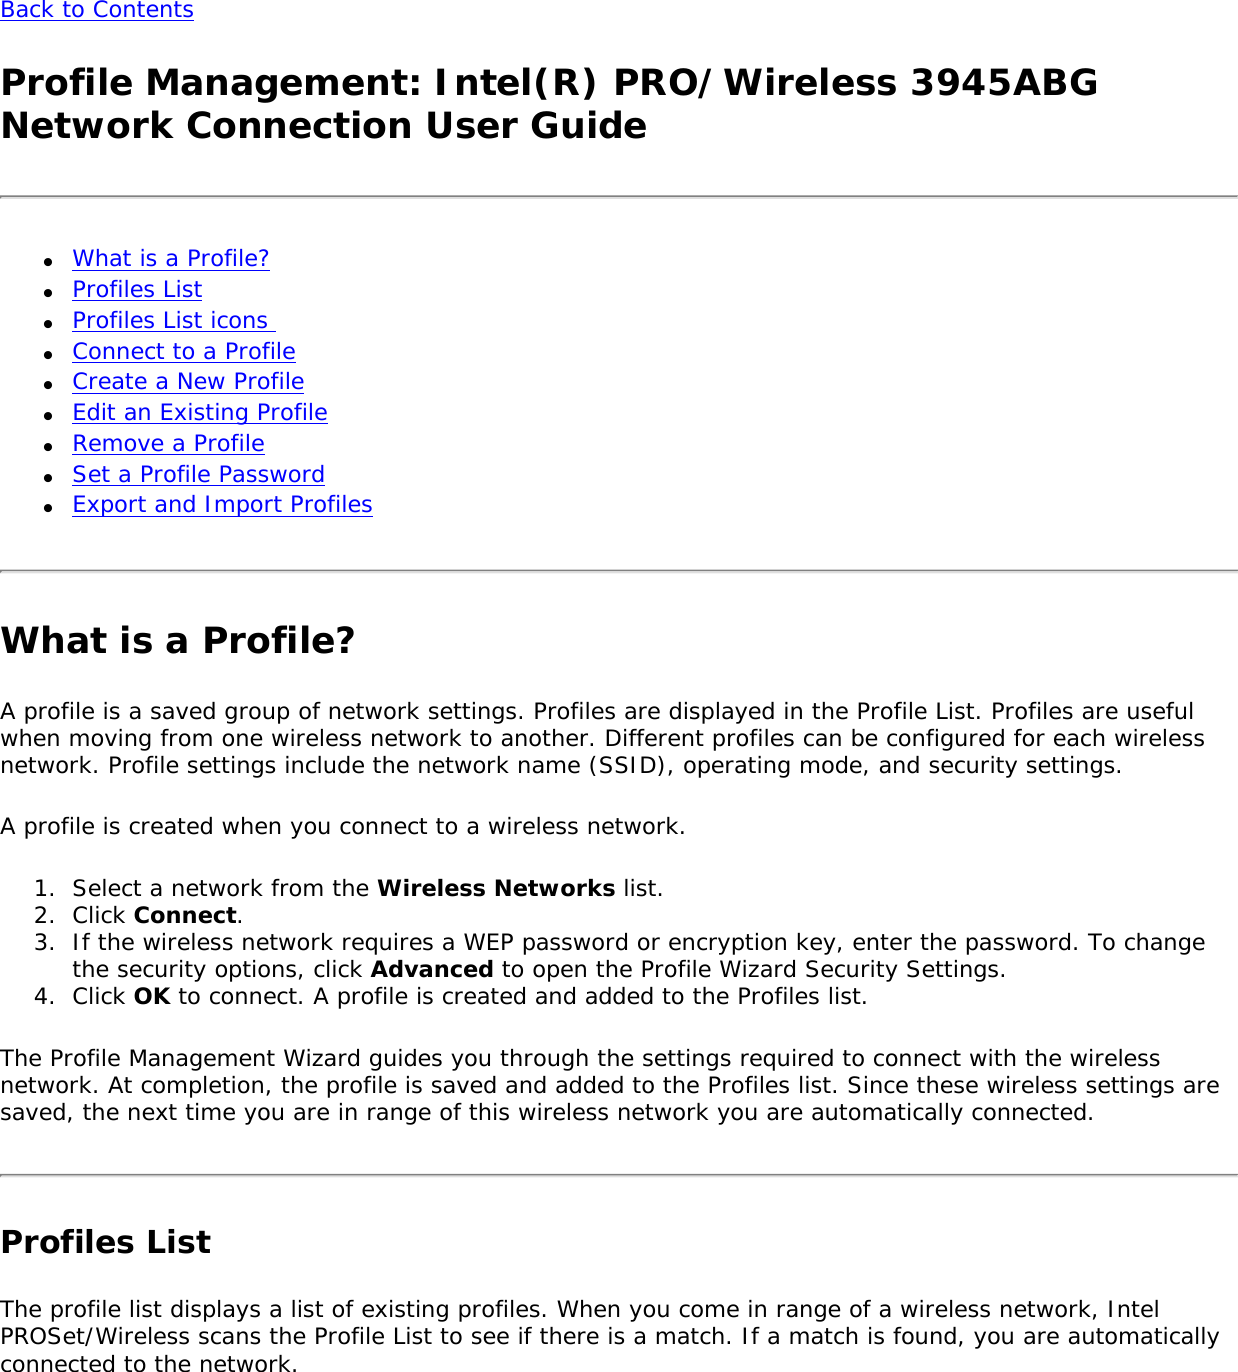
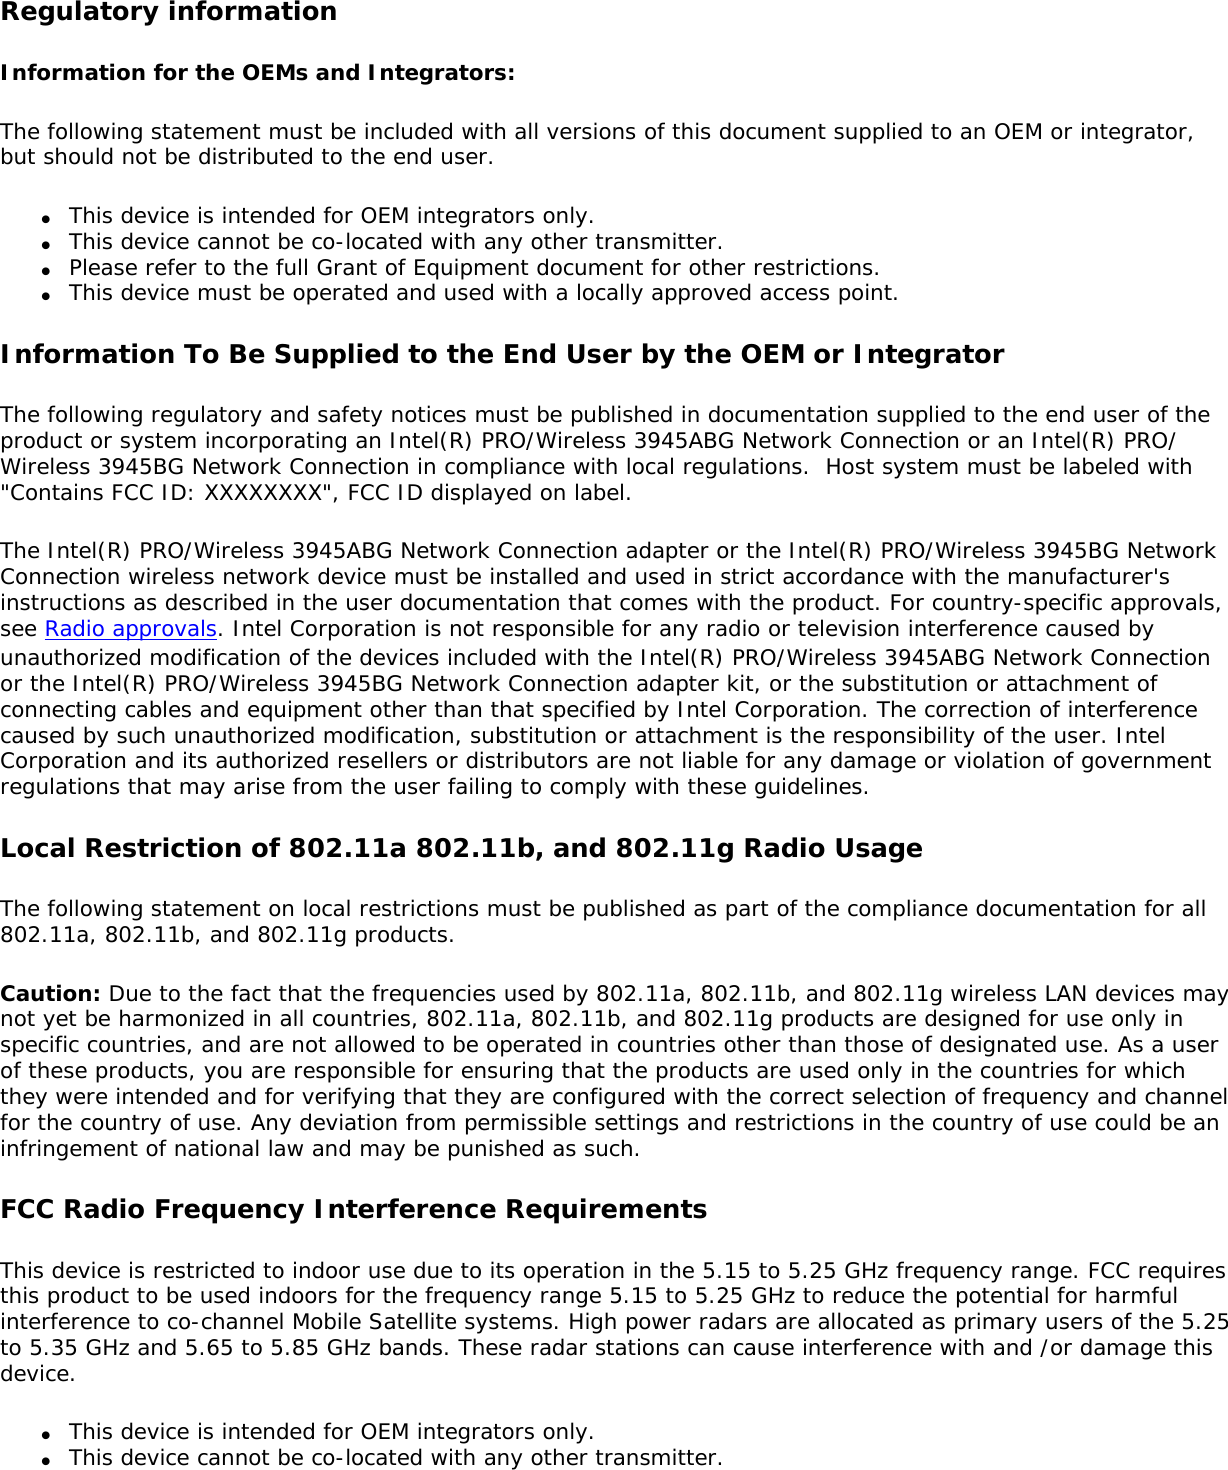
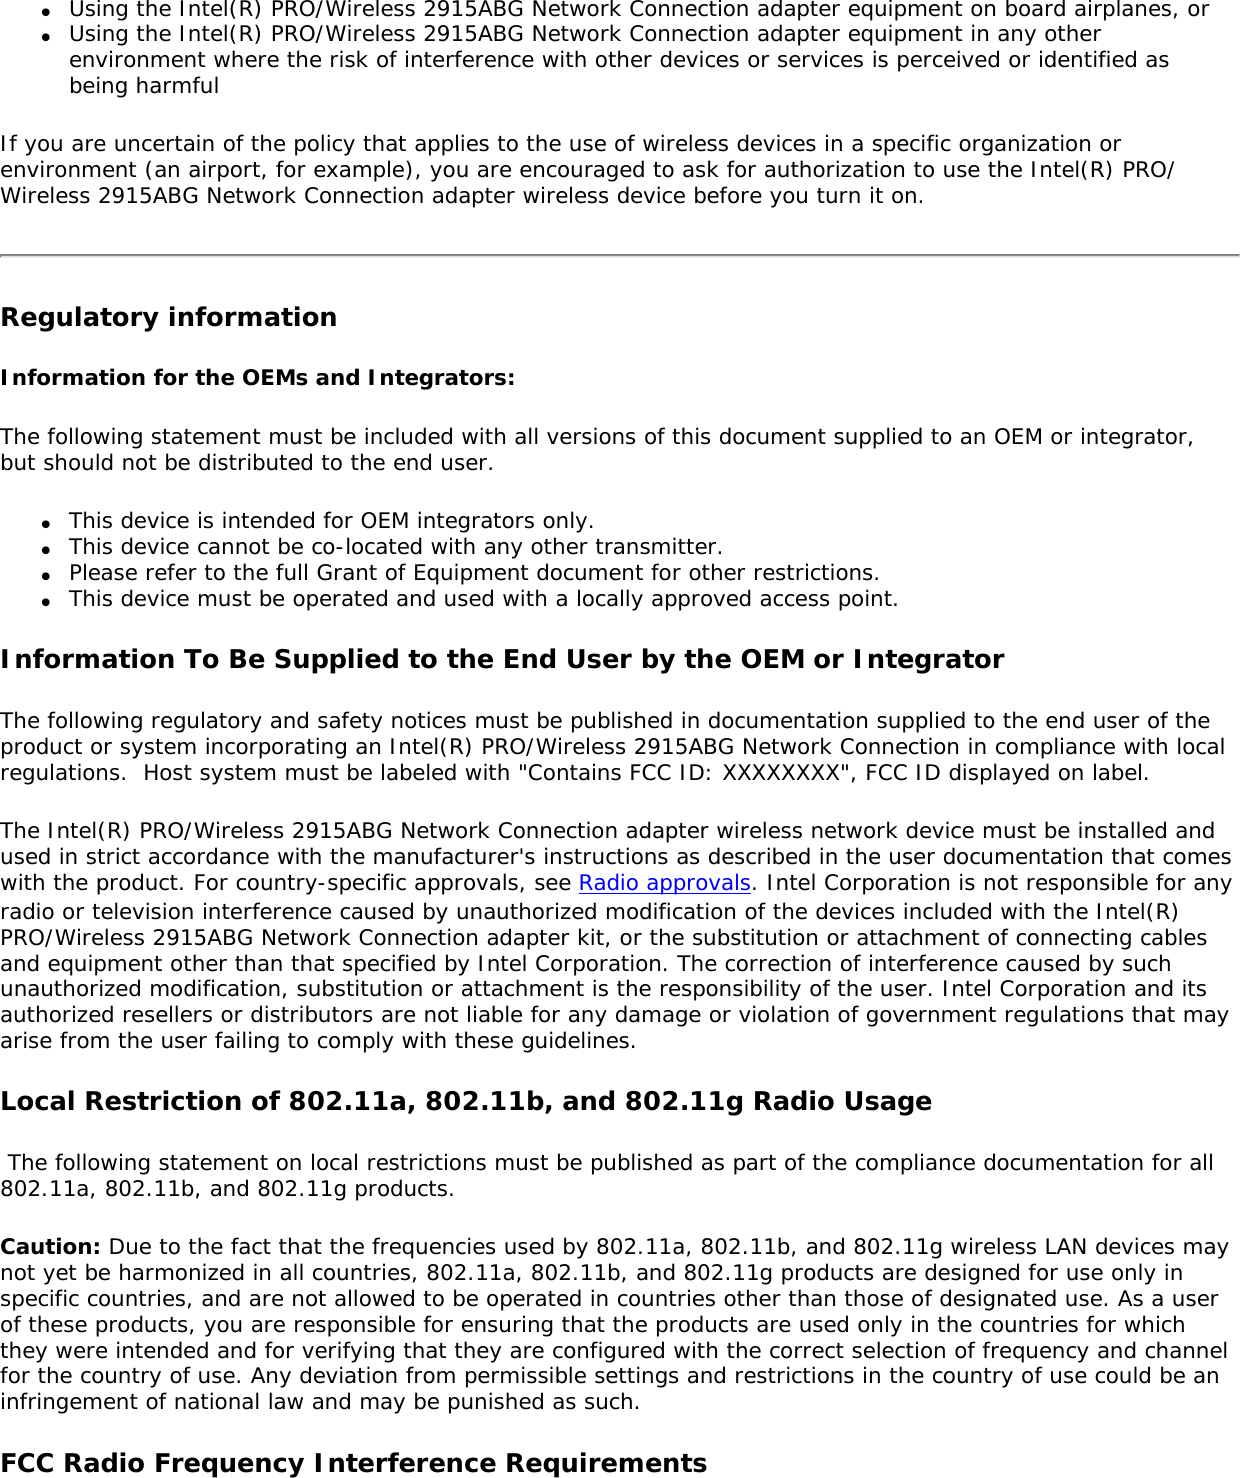
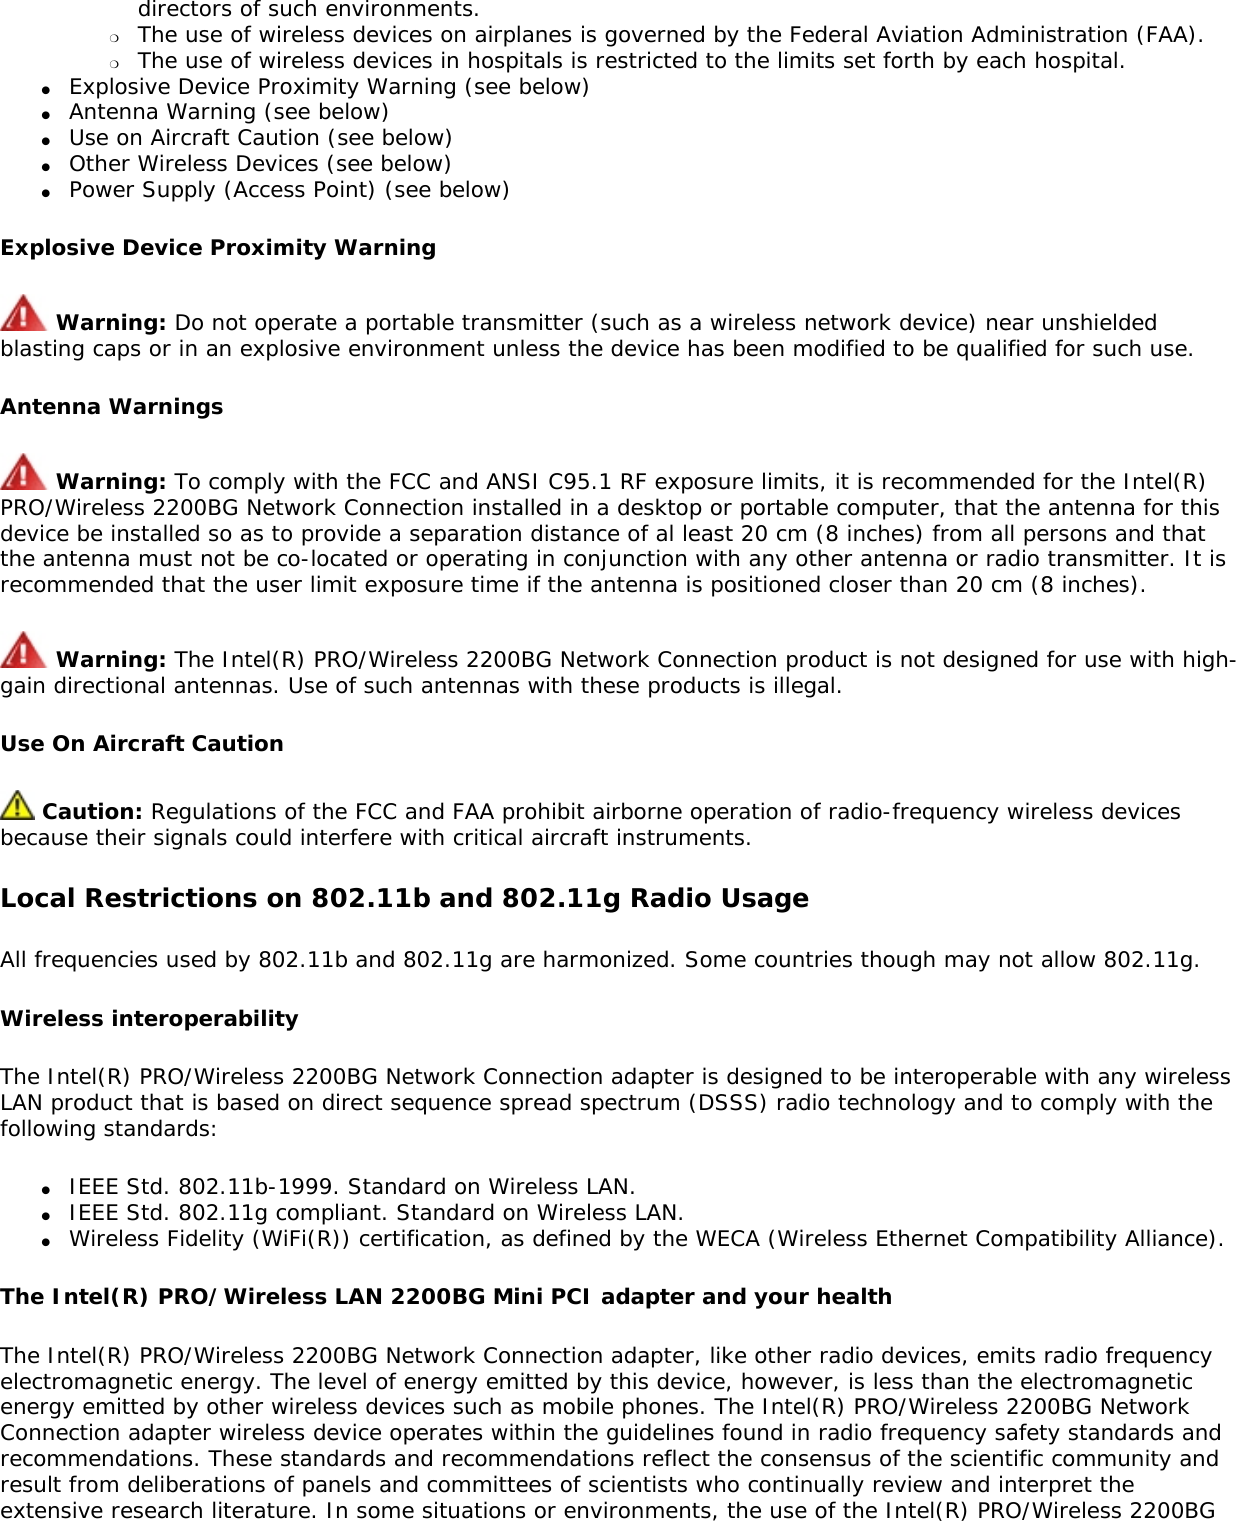
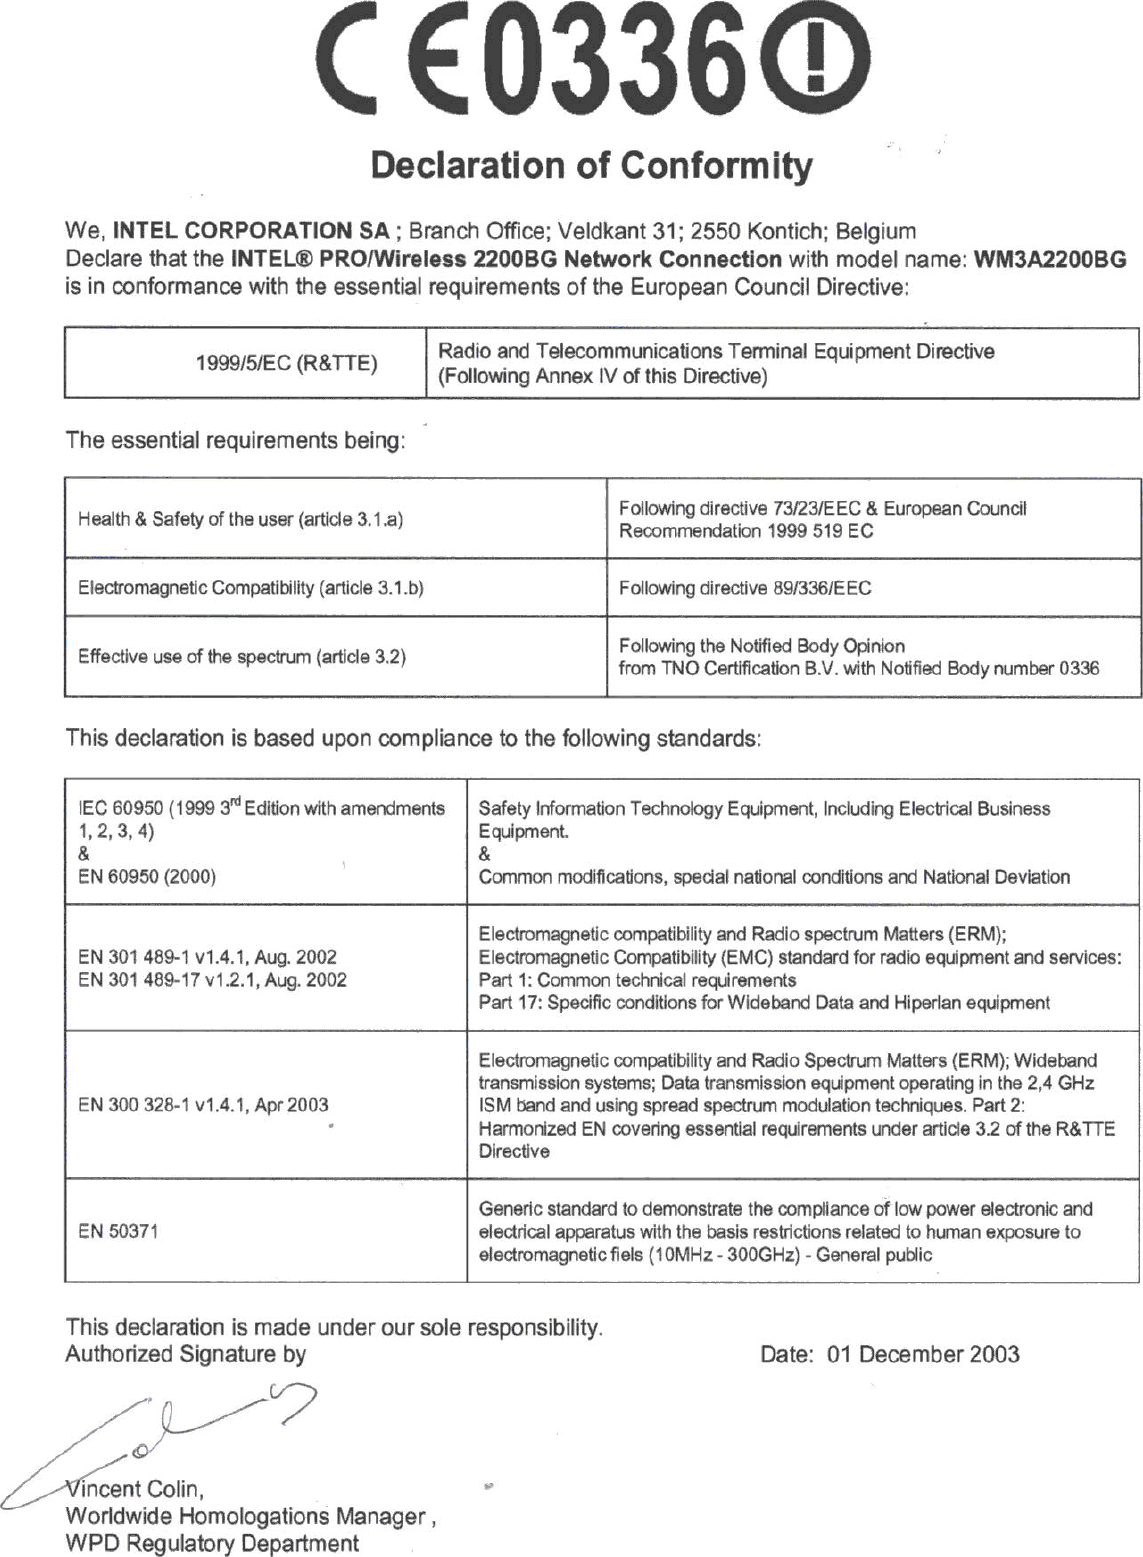
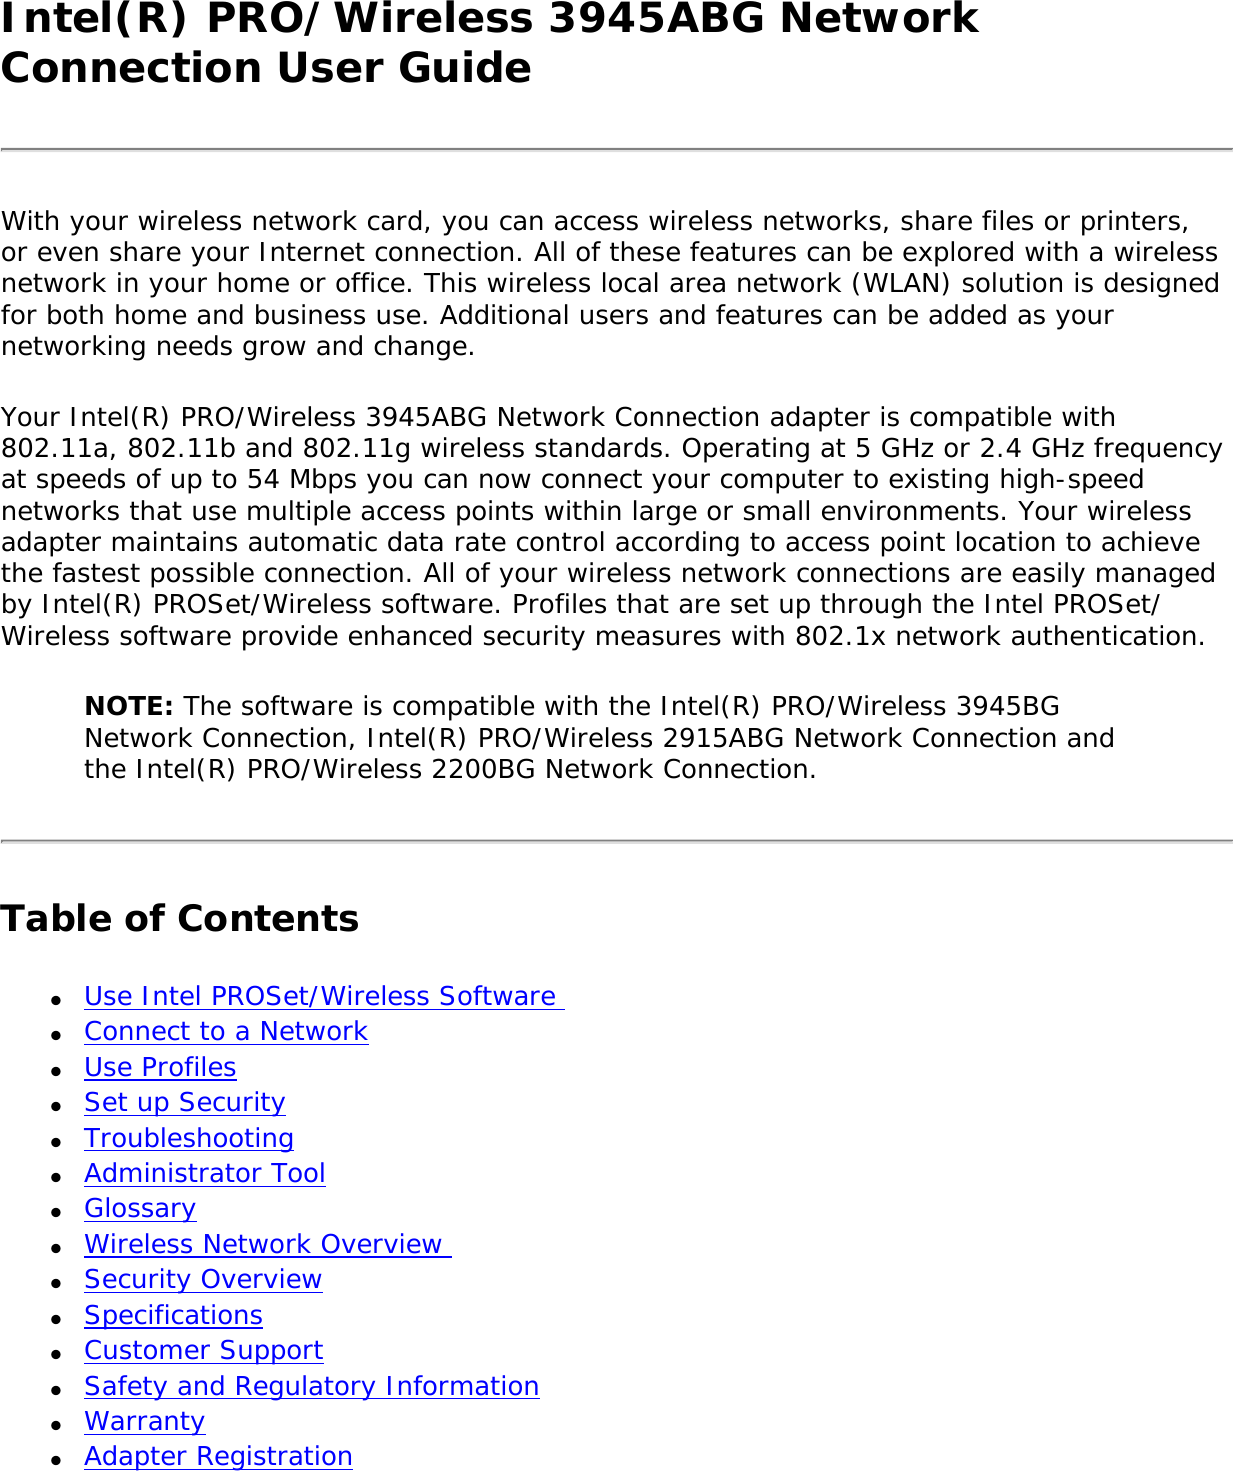
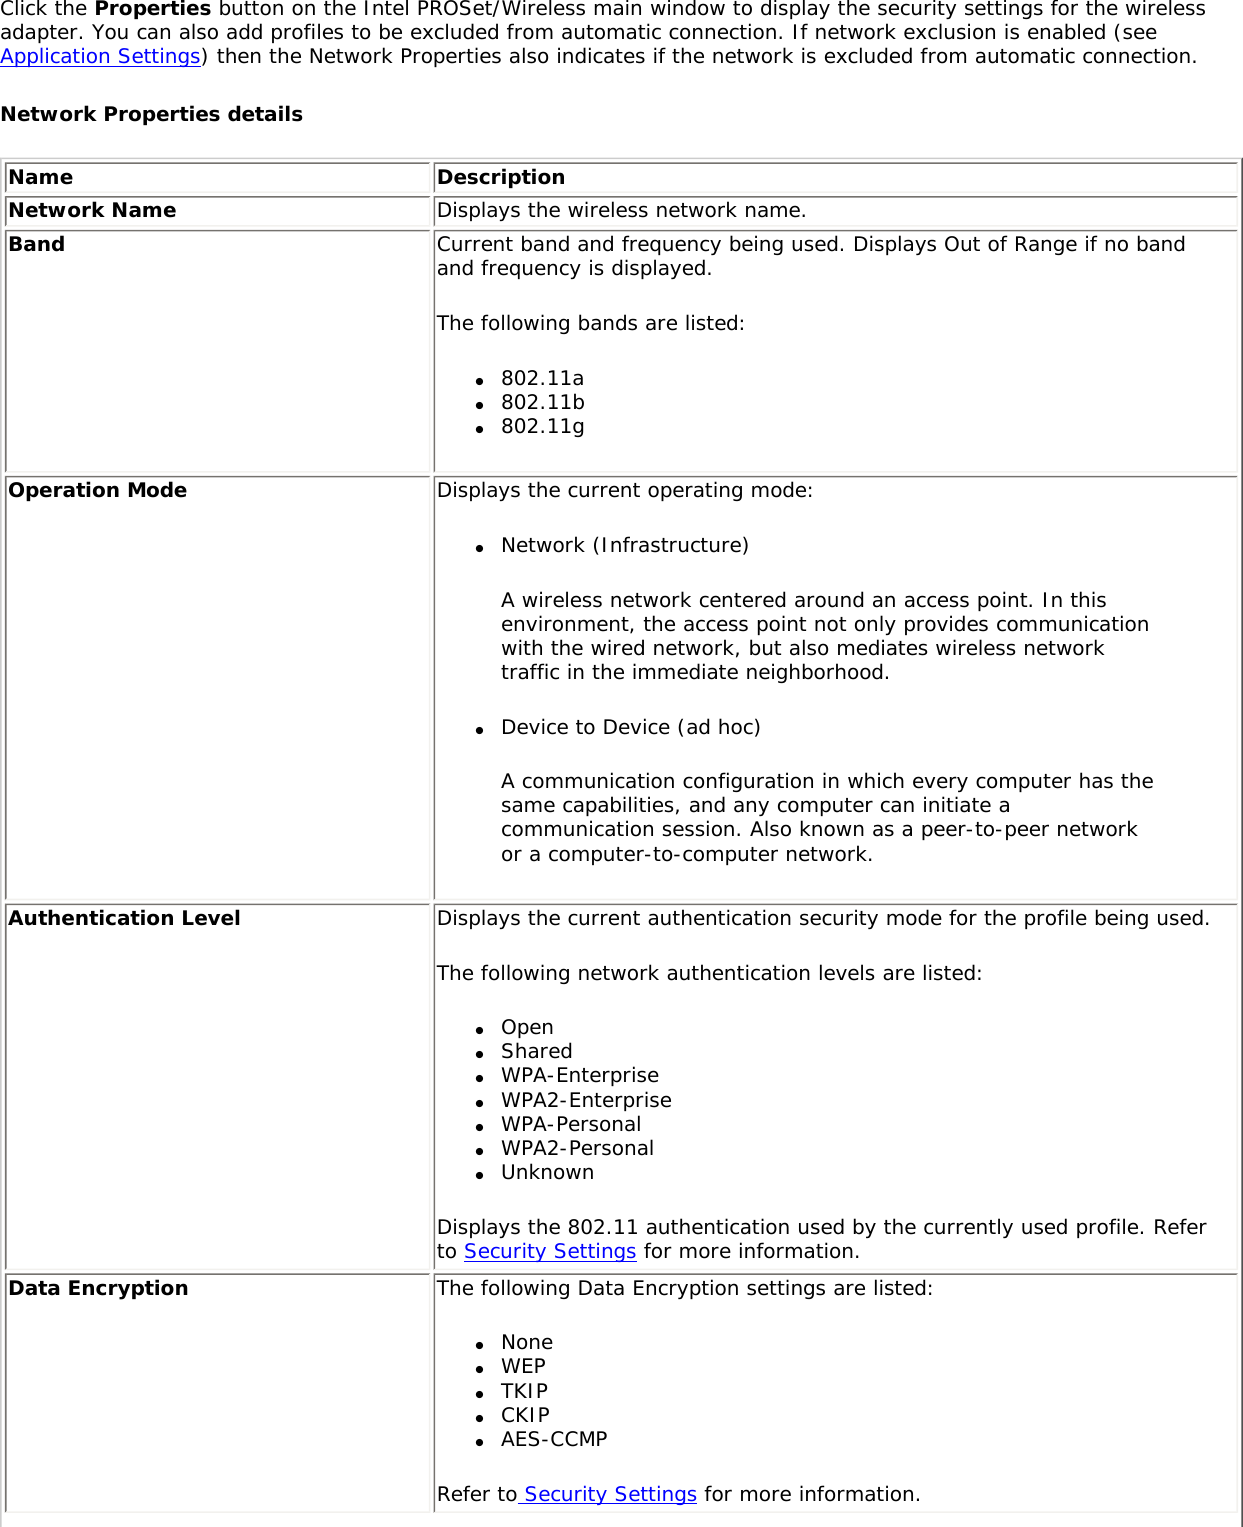
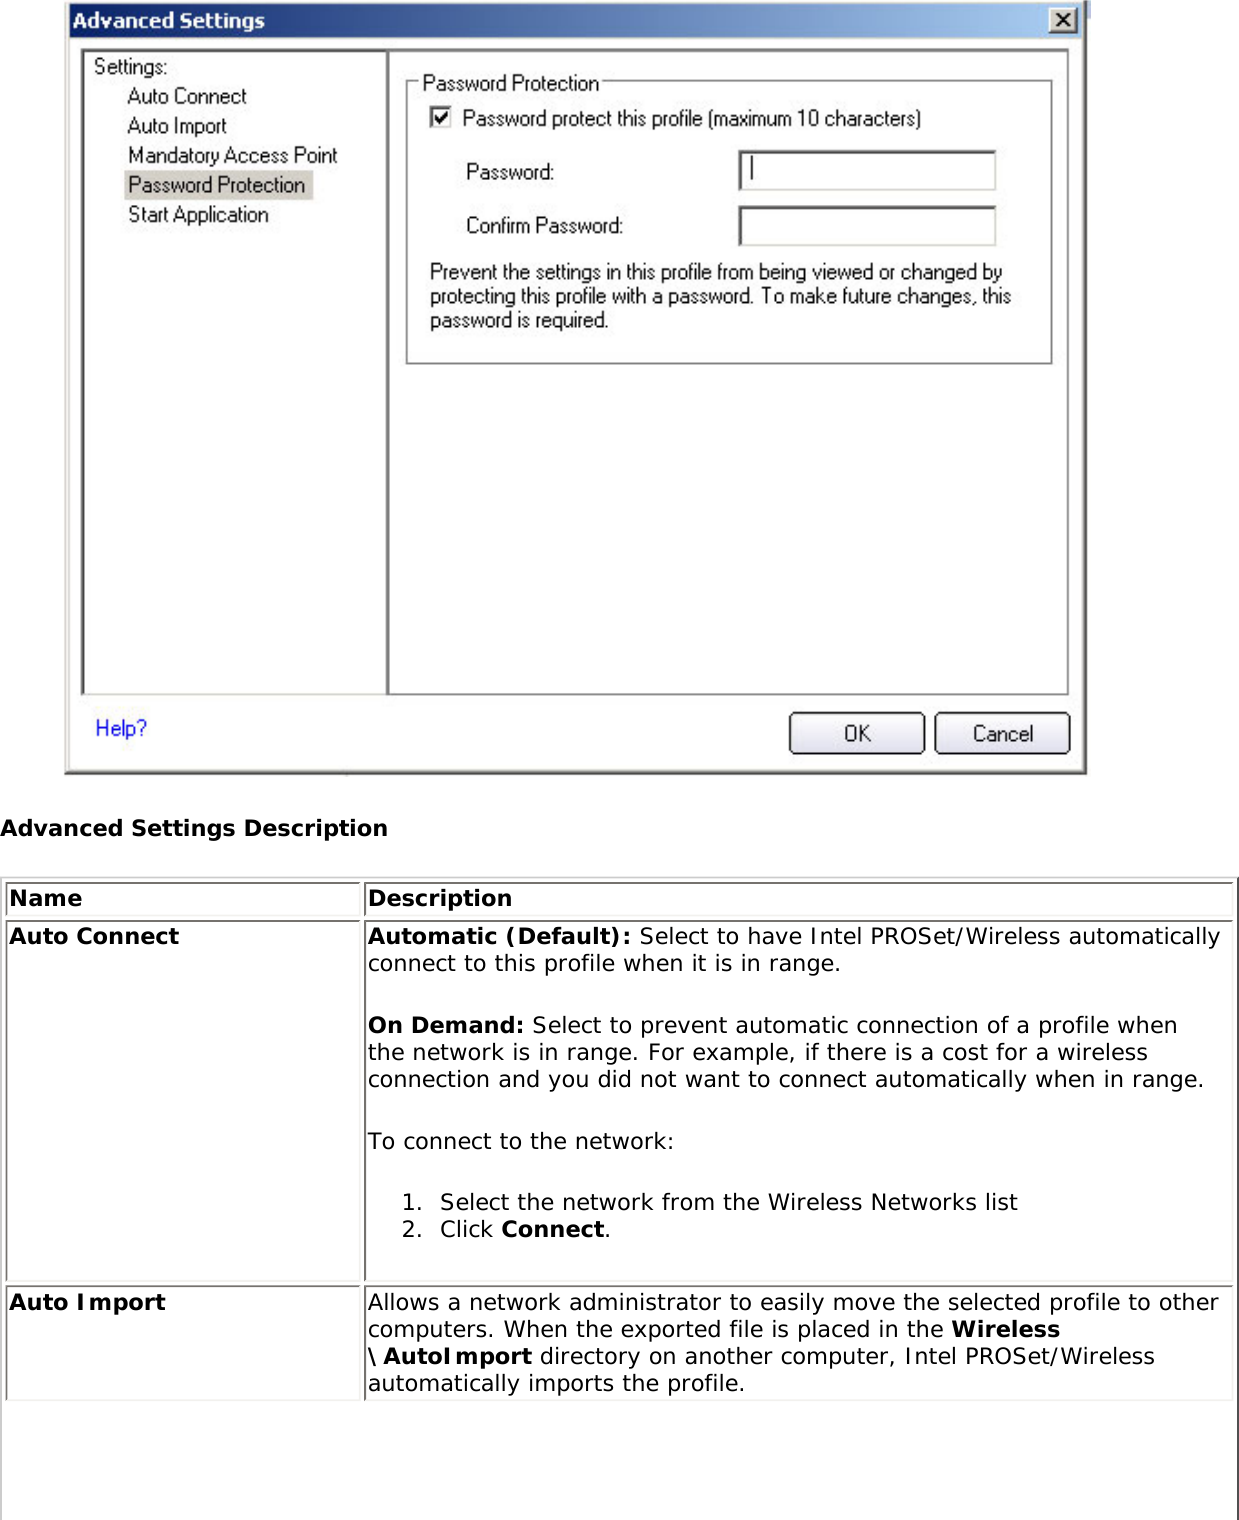
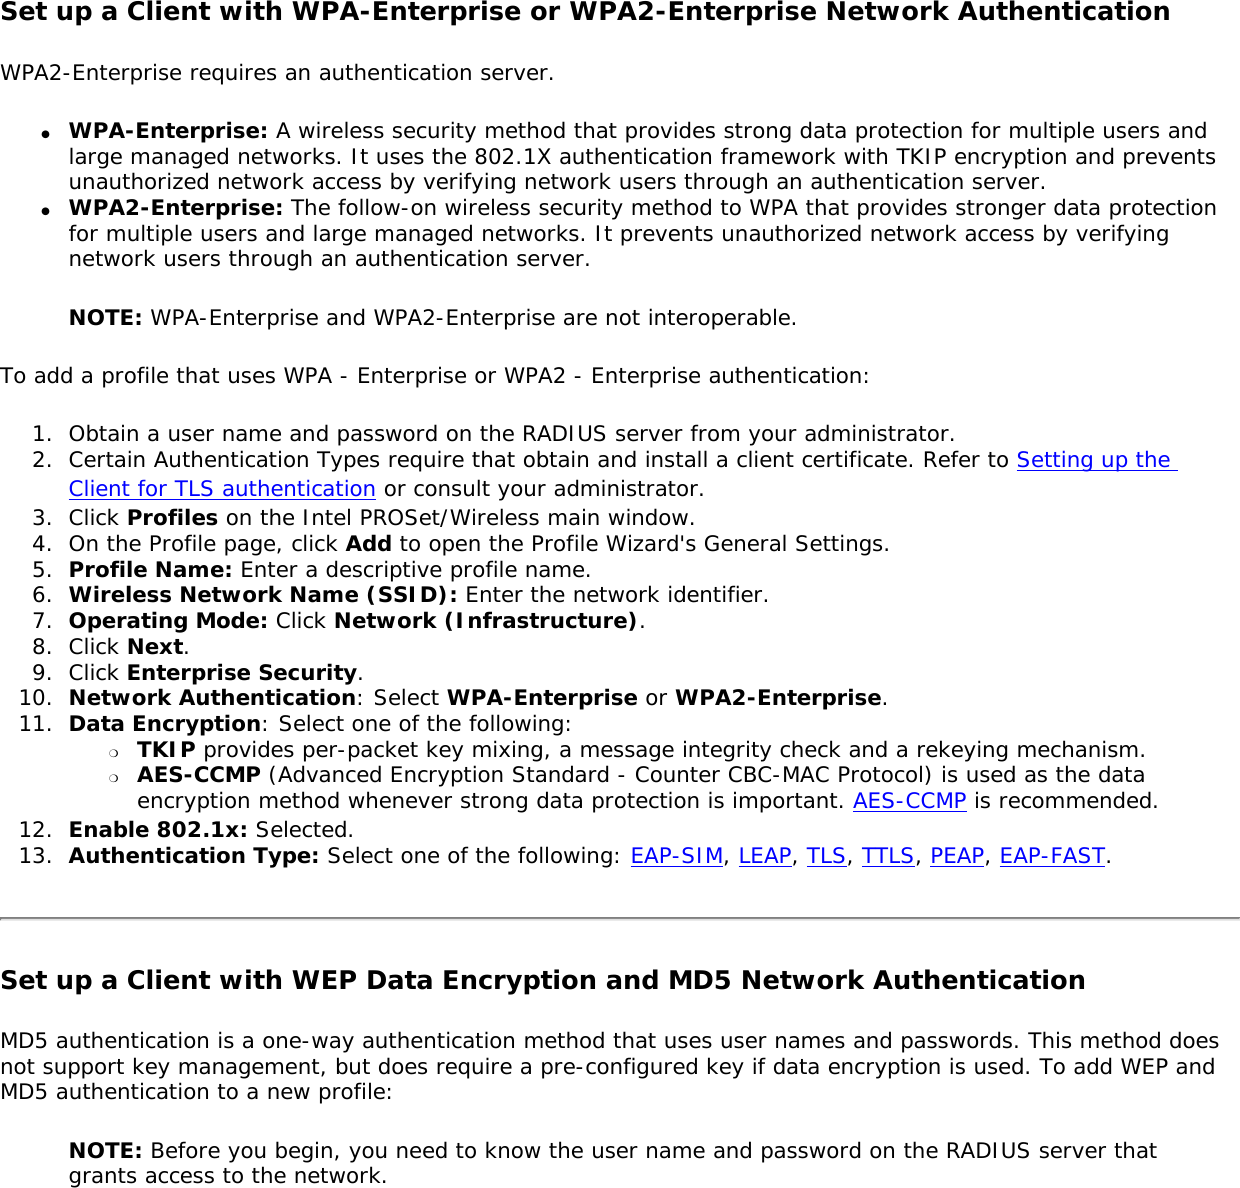
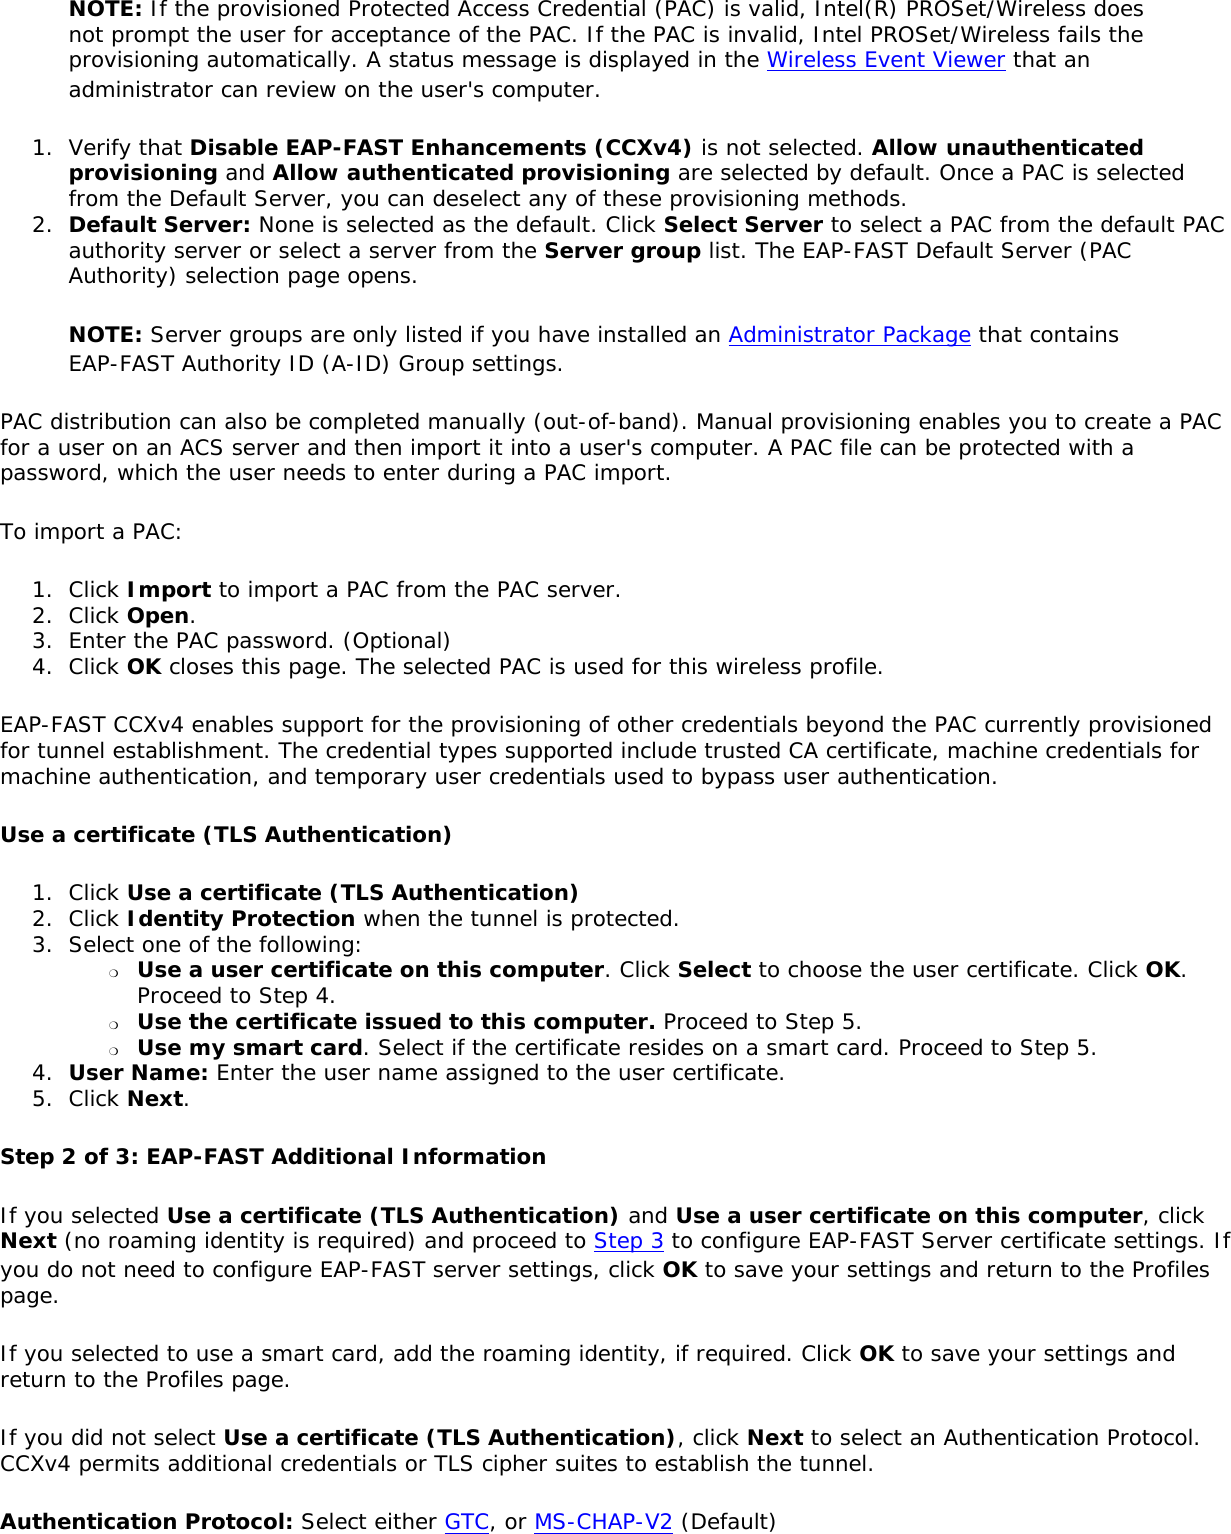
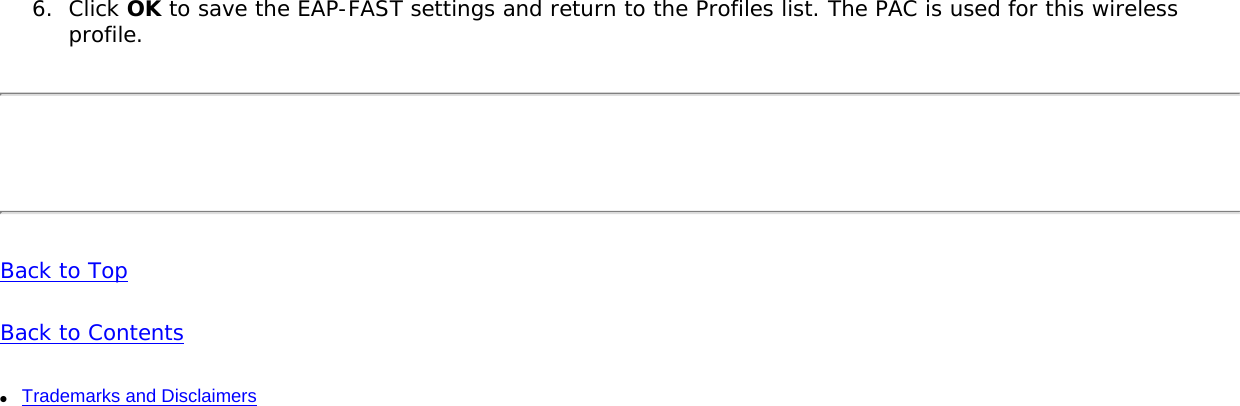
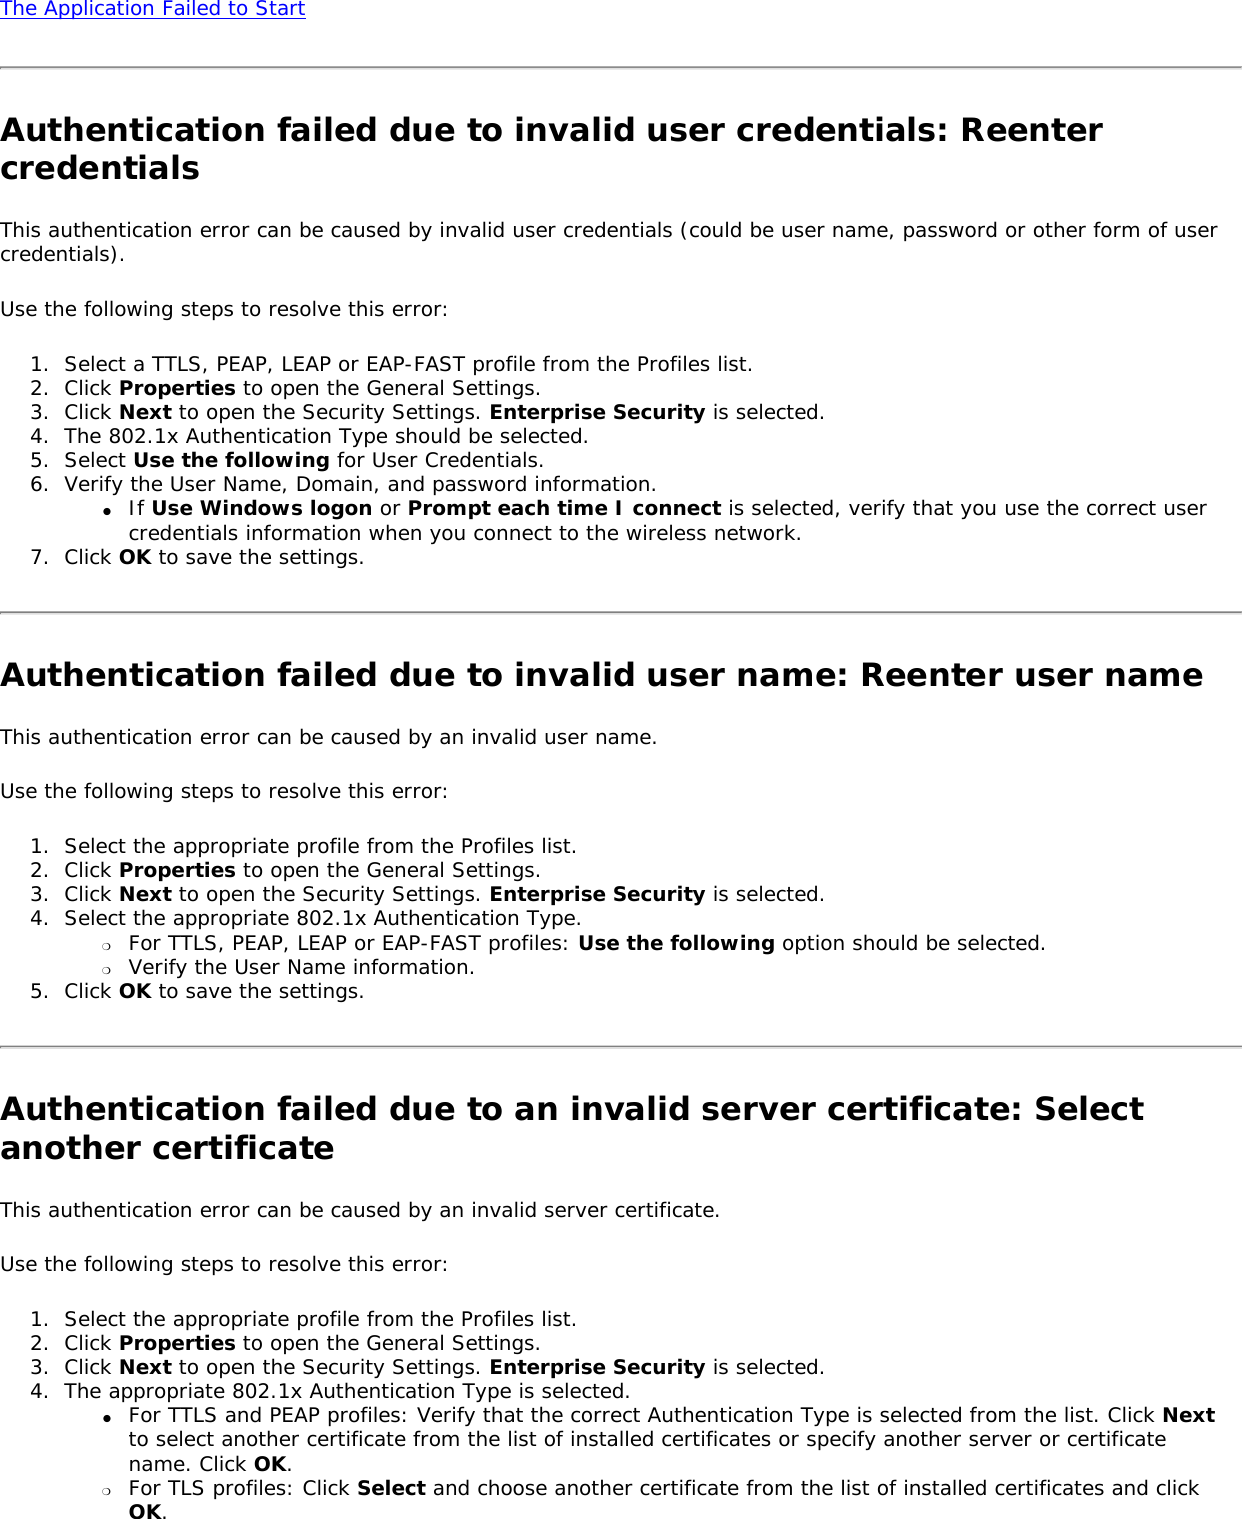
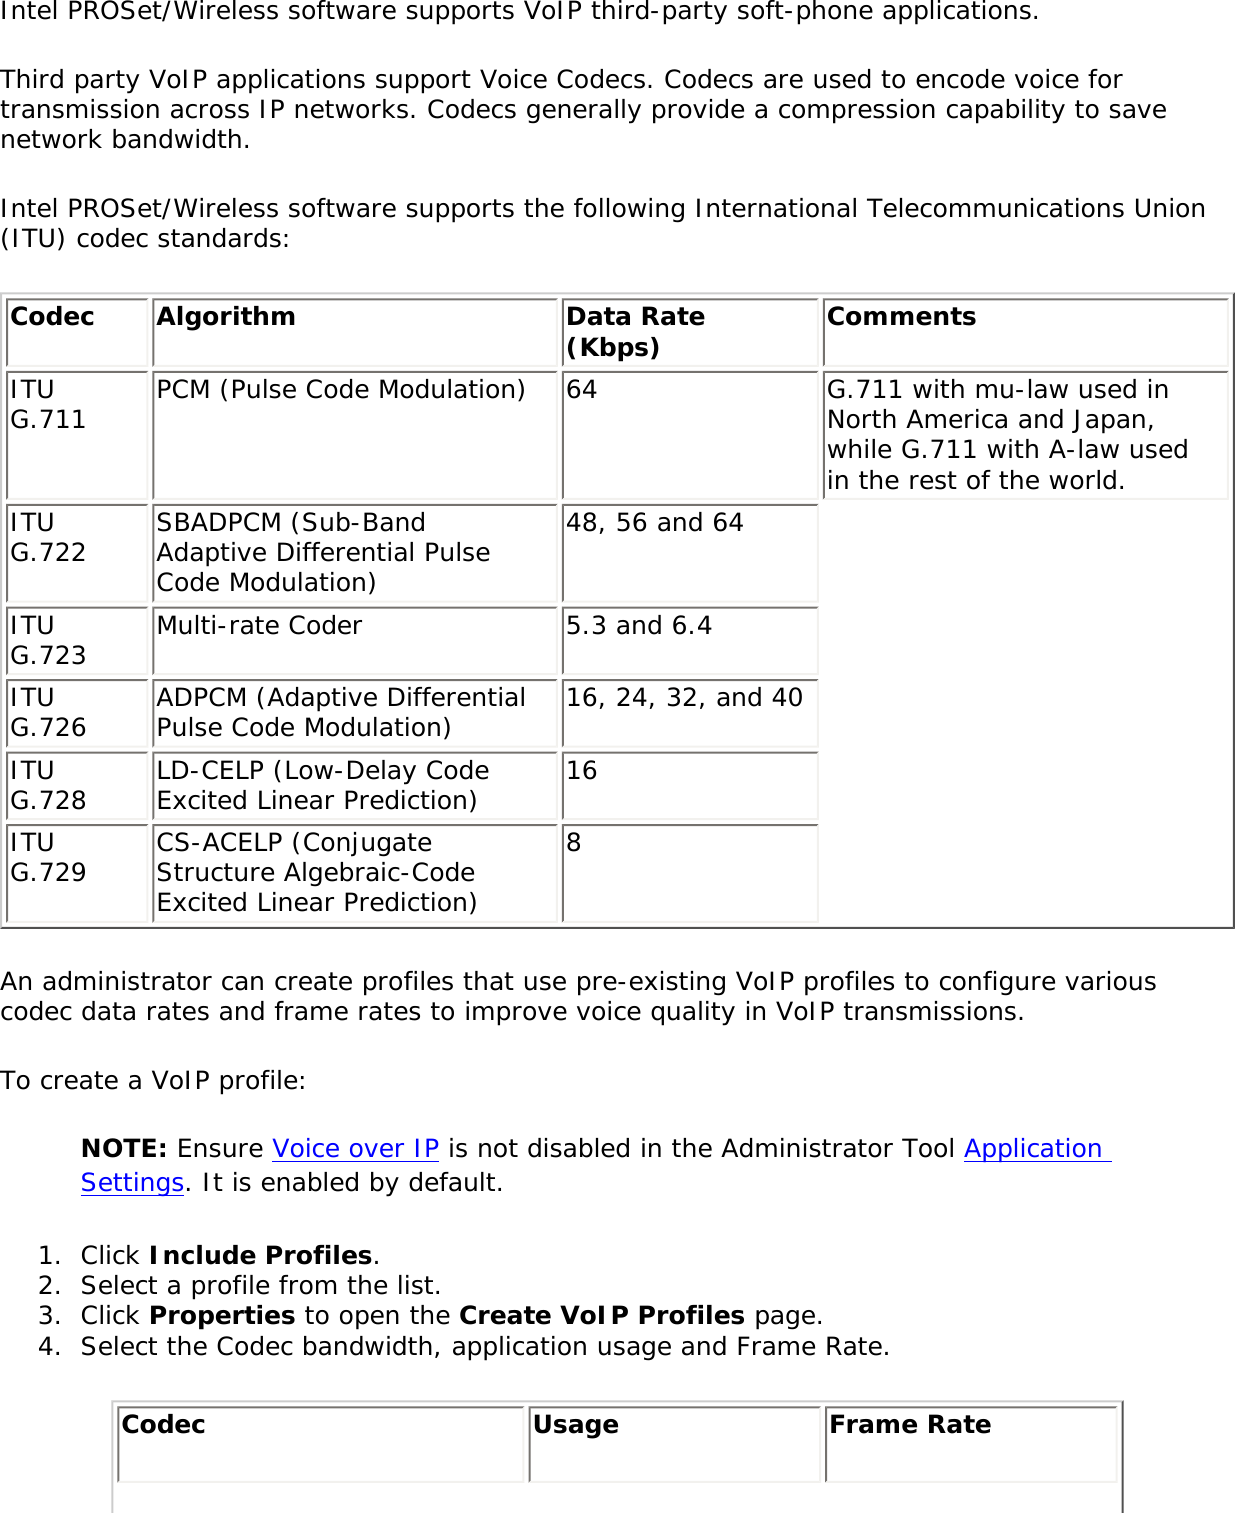
![Profile List Priority Arrows● Use the up-arrow to move the position of a selected profile up in the profiles list.● Use the down-arrow to move the position of a selected profile down in the profiles list.Profiles List Icons The network profile status icons indicate if the adapter is associated with a network, the type of operating mode being used, and if security encryption is enabled. These icons display next to the profile name in the profile list. Name DescriptionProfile Name Profiles are network settings that allow your wireless adapter to connect to a network access point (Infrastructure mode) or computer (device-to-device [Ad hoc] mode) which does not use an access point. Network Name Name of the wireless network (SSID) or computer.Connection Icons - The network profile status icons indicate the different connection states of the adapter with a wireless network, the type of operating mode being used, and if network security is being used.](https://usermanual.wiki/DRS-Tactical-Systems/980026010.User-Guide/User-Guide-1202037-Page-37.png)


![TLS Transport Layer Security. A type of authentication method using the Extensible Authentication Protocol (EAP) and a security protocol called the Transport Layer Security (TLS). EAP-TLS uses certificates which use passwords. EAP-TLS authentication supports dynamic WEP key management. The TLS protocol is intended to secure and authenticate communications across a public network through data encryption. The TLS Handshake Protocol allows the server and client to provide mutual authentication and to negotiate an encryption algorithm and cryptographic keys before data is transmitted.TTLS Tunneled Transport Layer Security. These settings define the protocol and the credentials used to authenticate a user. In TTLS, the client uses EAP-TLS to validate the server and create a TLS-encrypted channel between the client and server. The client can use another authentication protocol, typically password-based protocols, such as MD5 Challenge over this encrypted channel to enable server validation. The challenge and response packets are sent over a non-exposed TLS encrypted channel. TTLS implementations today support all methods defined by EAP, as well as several older methods (CHAP, PAP, MS-CHAP and MS-CHAPv2). TTLS can easily be extended to work with new protocols by defining new attributes to support new protocols.WEP Wired Equivalent Privacy. Wired Equivalent Privacy, 64- and 128-bit (64-bit is sometimes referred to as 40-bit). This is a low-level encryption technique designed to give the user about the same amount of privacy that he would expect from a LAN. WEP is a security protocol for wireless local area networks (WLANs) defined in the 802.11b standard. WEP is designed to provide the same level of security as that of a wired LAN. WEP aims to provide security by data over radio waves so that it is protected as it is transmitted from one end point to another.WEP Key Either a pass phrase or hexadecimal key. The pass phrase must be 5 ASCII characters for 64-bit WEP or 13 ASCII characters for 128-bit WEP. For pass phrases, 0-9, a-z, A-Z, and ~!@#$%^&*()_+|`-={}|[]\:";'<>?,./ are all valid characters. The hex key must be 10 hexadecimal characters (0-9, A-F) for 64-bit WEP or 26 hexadecimal characters (0-9, A-F) for 128-bit WEP.Wi-Fi Wireless Fidelity. Is meant to be used generically when referring of any type to 802.11 network, whether 802.11b, 802.11a, or dual-band.Wireless Router A stand-alone wireless hub that allows any computer that has a wireless network adapter to communicate with another computer and to connect to the Internet. Also known as an access point. WLAN Wireless Local-Area Network. A type of local-area network that uses high-frequency radio waves rather than wires to communicate between nodes.](https://usermanual.wiki/DRS-Tactical-Systems/980026010.User-Guide/User-Guide-1202037-Page-127.png)
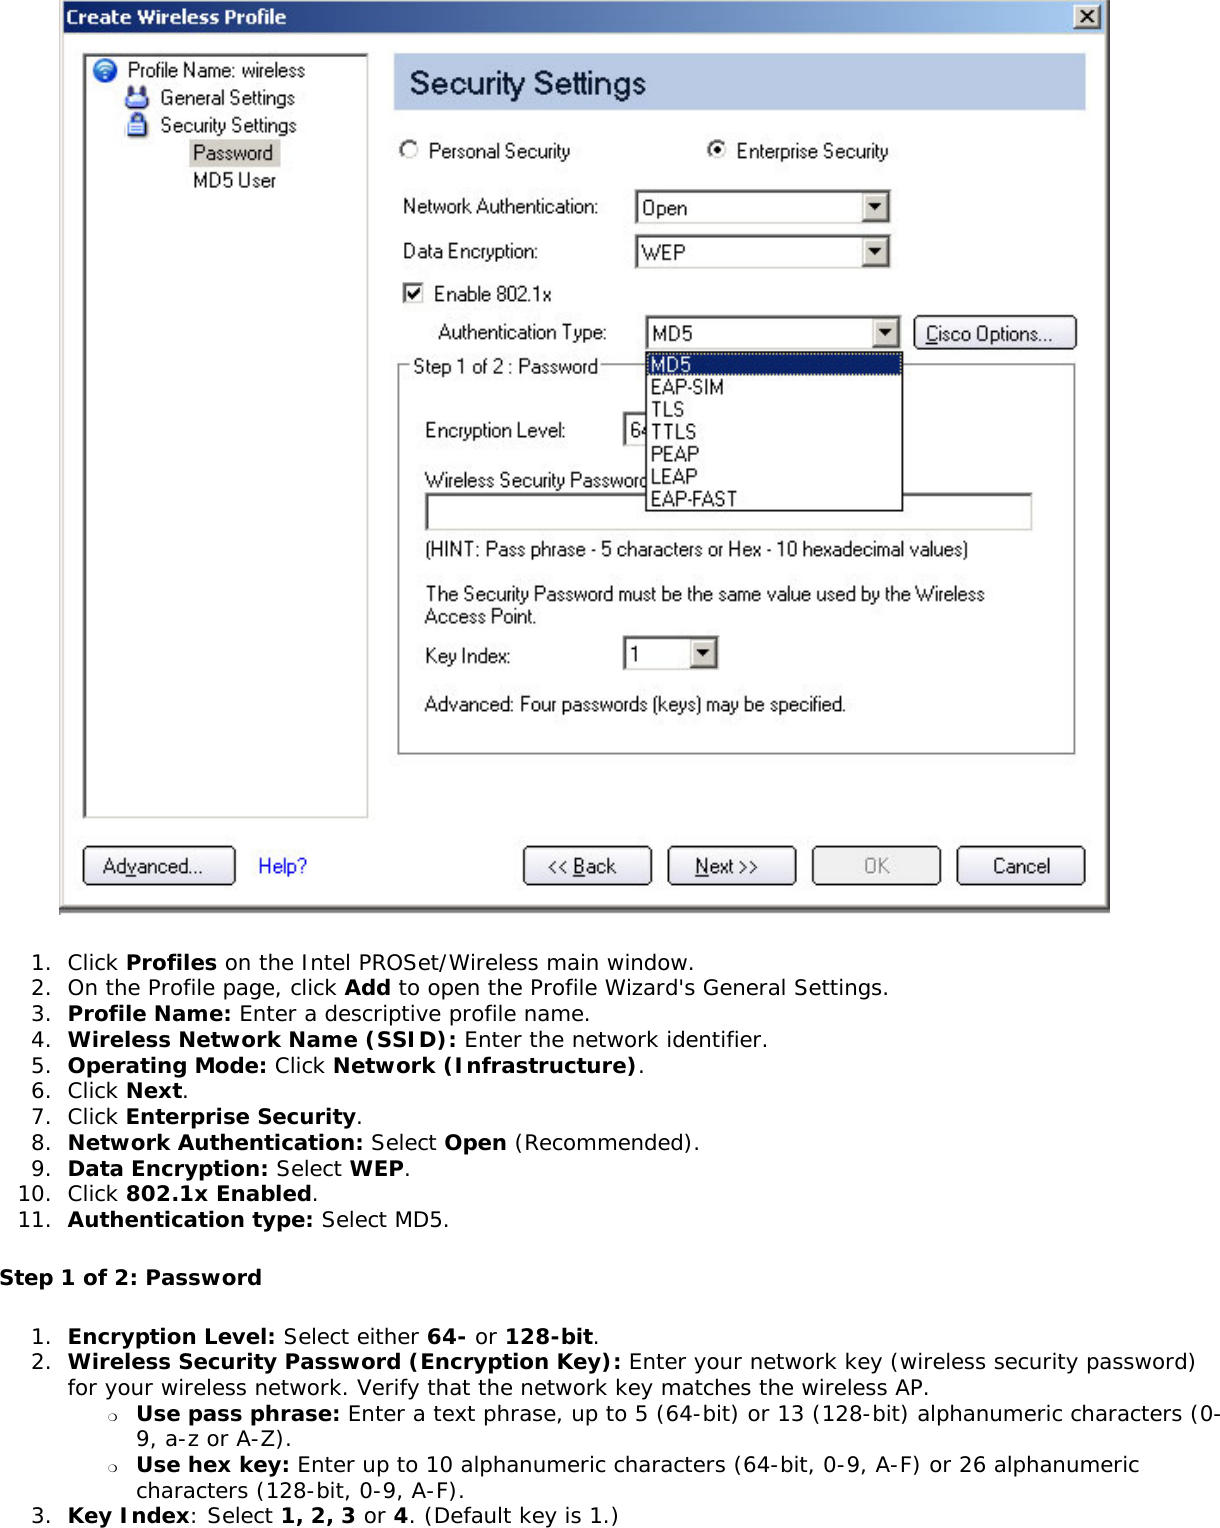
![There are different 802.1x authentication types, each provides a different approach to authentication but all employ the same 802.1x protocol and framework for communication between a client and an access point. In most protocols, upon the completion of the 802.1x authentication process, the supplicant receives a key that it uses for data encryption. Refer to How 802.1x authentication works for more information. With 802.1x authentication, an authentication method is used between the client and a Remote Authentication Dial-In User Service (RADIUS) server connected to the access point. The authentication process uses credentials, such as a user's password that are not transmitted over the wireless network. Most 802.1x types support dynamic per-user, per-session keys to strengthen the static key security. 802.1x benefits from the use of an existing authentication protocol known as the Extensible Authentication Protocol (EAP). 802.1x authentication for wireless LANs has three main components: ● The authenticator (the access point)● The supplicant (the client software)● The authentication server (a Remote Authentication Dial-In User Service server [RADIUS])802.1x authentication security initiates an authorization request from the wireless client to the access point, which authenticates the client to an Extensible Authentication Protocol (EAP) compliant RADIUS server. This RADIUS server may authenticate either the user (via passwords or certificates) or the system (by MAC address). In theory, the wireless client is not allowed to join the networks until the transaction is complete. There are several authentication algorithms used for 802.1x. Some examples are: EAP-TLS, EAP-TTLS, and Protected EAP (PEAP). These are all methods for the wireless client to identify itself to the RADIUS server. With RADIUS authentication, user identities are checked against databases. RADIUS constitutes a set of standards addressing Authentication, Authorization and Accounting (AAA). Radius includes a proxy process to validate clients in a multi-server environment. The IEEE 802.1x standard is for controlling and authenticating access to port-based 802.11 wireless and wired Ethernet networks. Port-based network access control is similar to a switched local area network (LAN) infrastructure that authenticates devices that are attached to a LAN port and prevent access to that port if the authentication process fails. What is RADIUS?RADIUS is the Remote Access Dial-In User Service, an Authorization, Authentication, and Accounting (AAA) client-server protocol, which is used when a AAA dial-up client logs in or out of a Network Access Server. Typically, a RADIUS server is used by Internet Service Providers (ISP) to perform AAA tasks. AAA phases are described as follows: ● Authentication phase: Verifies a user name and password against a local database. After the credentials are verified, the authorization process begins. ● Authorization phase: Determines whether a request is allowed access to a resource.](https://usermanual.wiki/DRS-Tactical-Systems/980026010.User-Guide/User-Guide-1202037-Page-134.png)
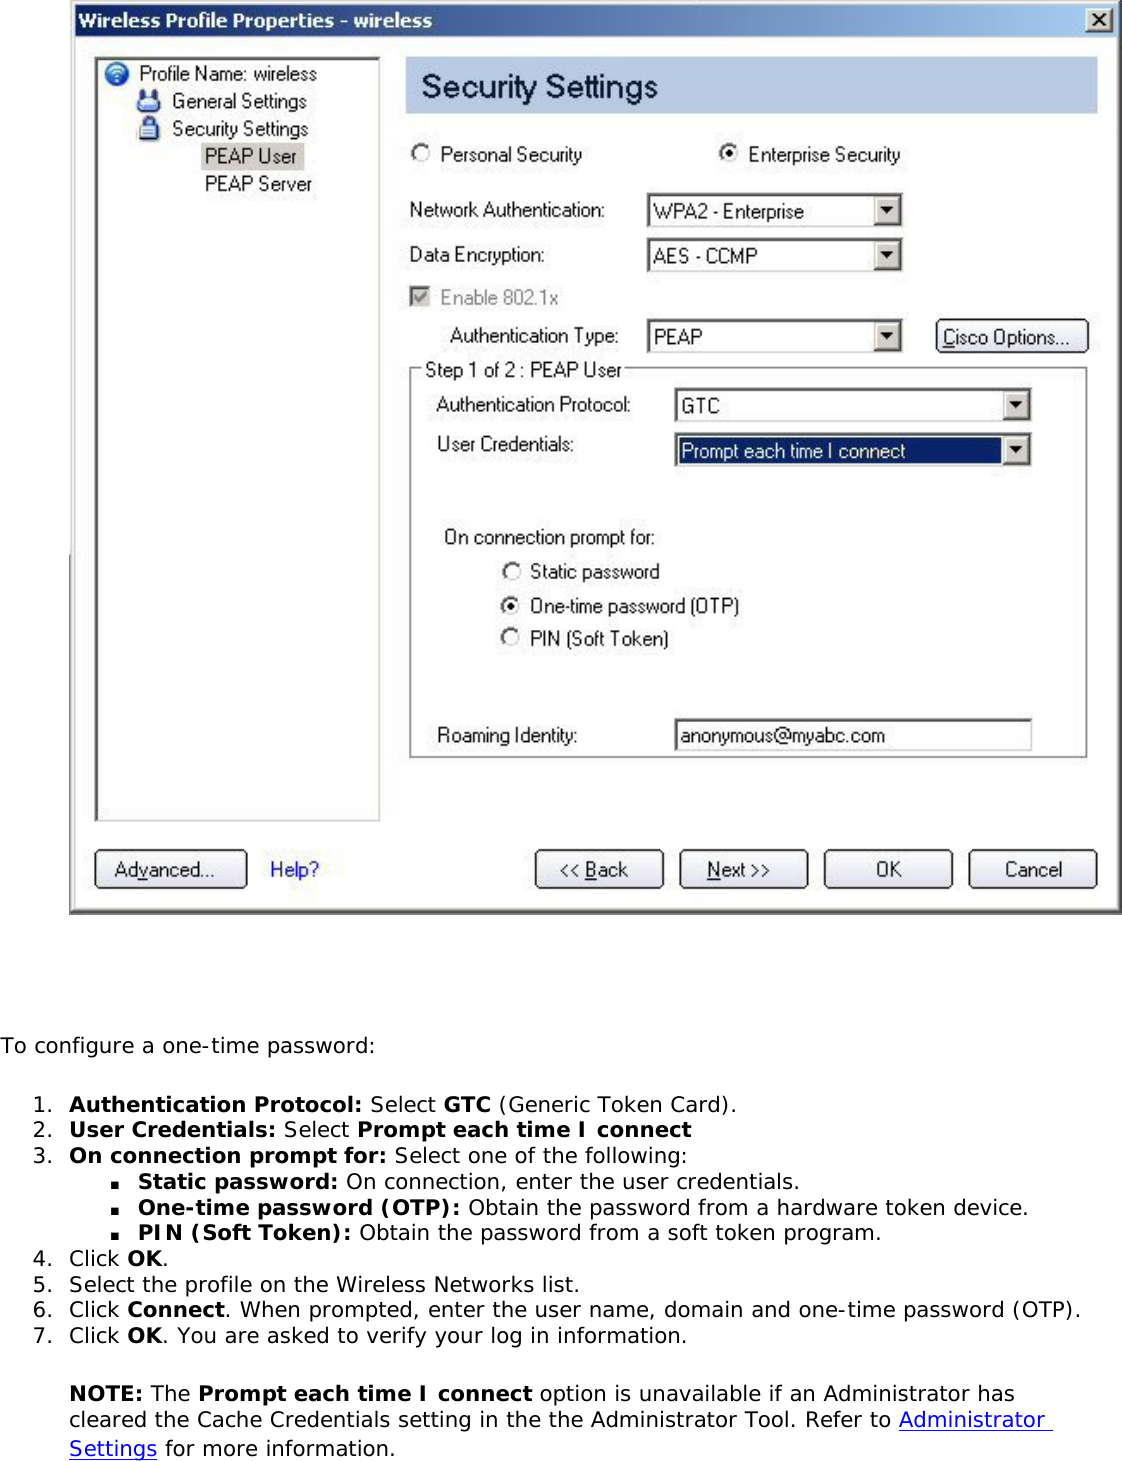
![PEAP is a new Extensible Authentication Protocol (EAP) IEEE 802.1x authentication type designed to take advantage of server-side EAP-Transport Layer Security (EAP-TLS) and to support various authentication methods, including users' passwords and one-time passwords, and Generic Token Cards. Authentication Protocols● Generic Token Card (GTC): Carries user specific token cards for authentication. The main feature in GTC is Digital Certificate/Token Card-based authentication. In addition, GTC includes the ability to hide user name identities until the TLS encrypted tunnel is established, which provides additional confidentiality that user names are not being broadcasted during the authentication phase. ● MS-CHAP-V2: Refer to MS-CHAP-V2 above. ● TLS: The TLS protocol is intended to secure and authenticate communications across a public network through data encryption. The TLS Handshake Protocol allows the server and client to provide mutual authentication and to negotiate an encryption algorithm and cryptographic keys before data is transmitted. Refer to TLS above. Cisco FeaturesCisco LEAP Cisco LEAP (Cisco Light EAP) is a server and client 802.1x authentication through a user-supplied logon password. When a wireless access point communicates with a Cisco LEAP-enabled RADIUS (Cisco Secure Access Control Server [ACS]), Cisco LEAP provides access control through mutual authentication between client wireless adapters and the wireless networks and provides dynamic, individual user encryption keys to help protect the privacy of transmitted data. Cisco Rogue Access Point Security FeatureThe Cisco Rogue Access Point feature provides security protection from an introduction of a rogue access point that could mimic a legitimate access point on a network in order to extract information about user credentials and authentication protocols that could compromise security. This feature only works with Cisco's LEAP authentication. Standard 802.11 technology does not protect a network from the introduction of a rogue access point. Refer to LEAP Authentication for more information. Fast Roaming (CCKM)When a wireless LAN is configured for fast reconnection, a LEAP-enabled client device can roam from one access point to another without involving the main server. Using Cisco](https://usermanual.wiki/DRS-Tactical-Systems/980026010.User-Guide/User-Guide-1202037-Page-138.png)