DVS Korea VXA-2000 Navigation System User Manual ATT E MANUAL
DVS Korea Co., Ltd. Navigation System ATT E MANUAL
UserManual.wiki
>
DVS Korea
>
VXA 2000 User Manual
Users Manual
Navigation menu
Upload a User Manual
Namespaces
Wiki Guide
HTML
PDF
Info
Views
User Manual
Discussion / Help
Navigation
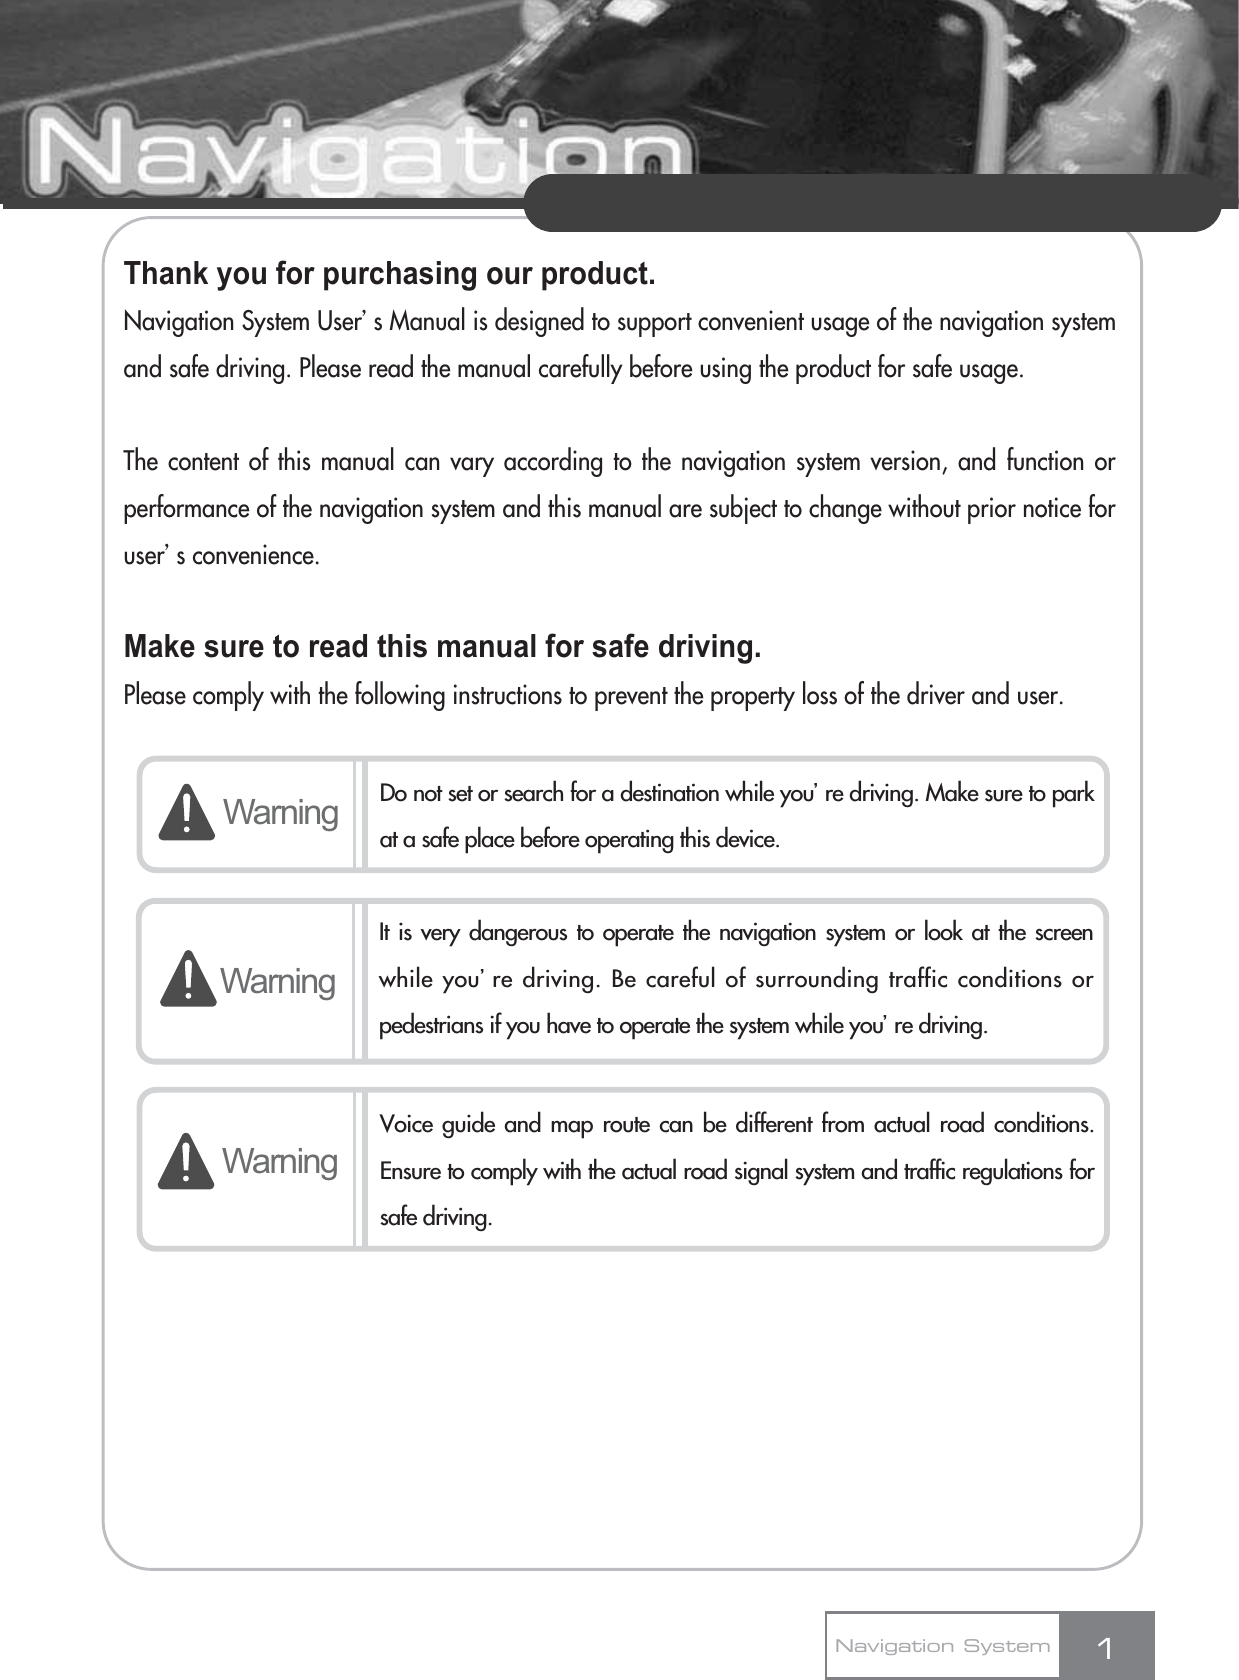
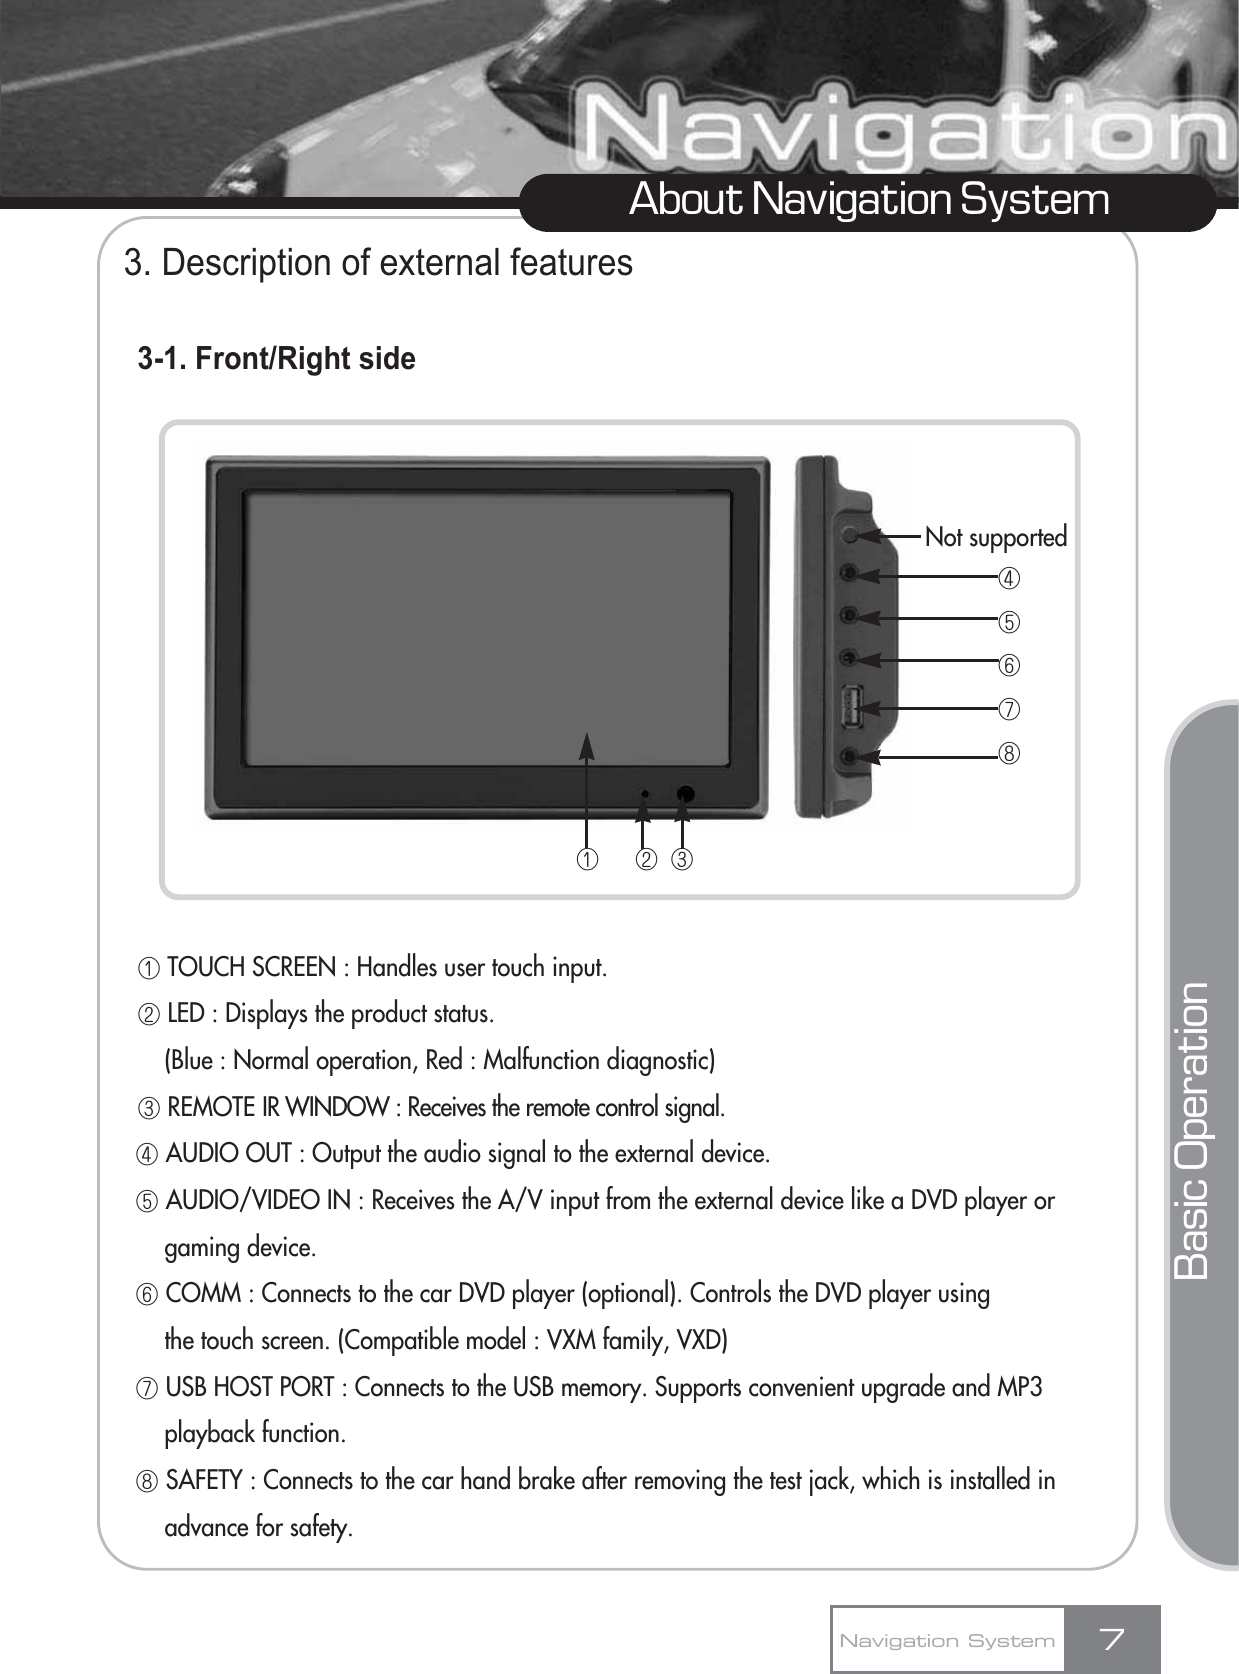
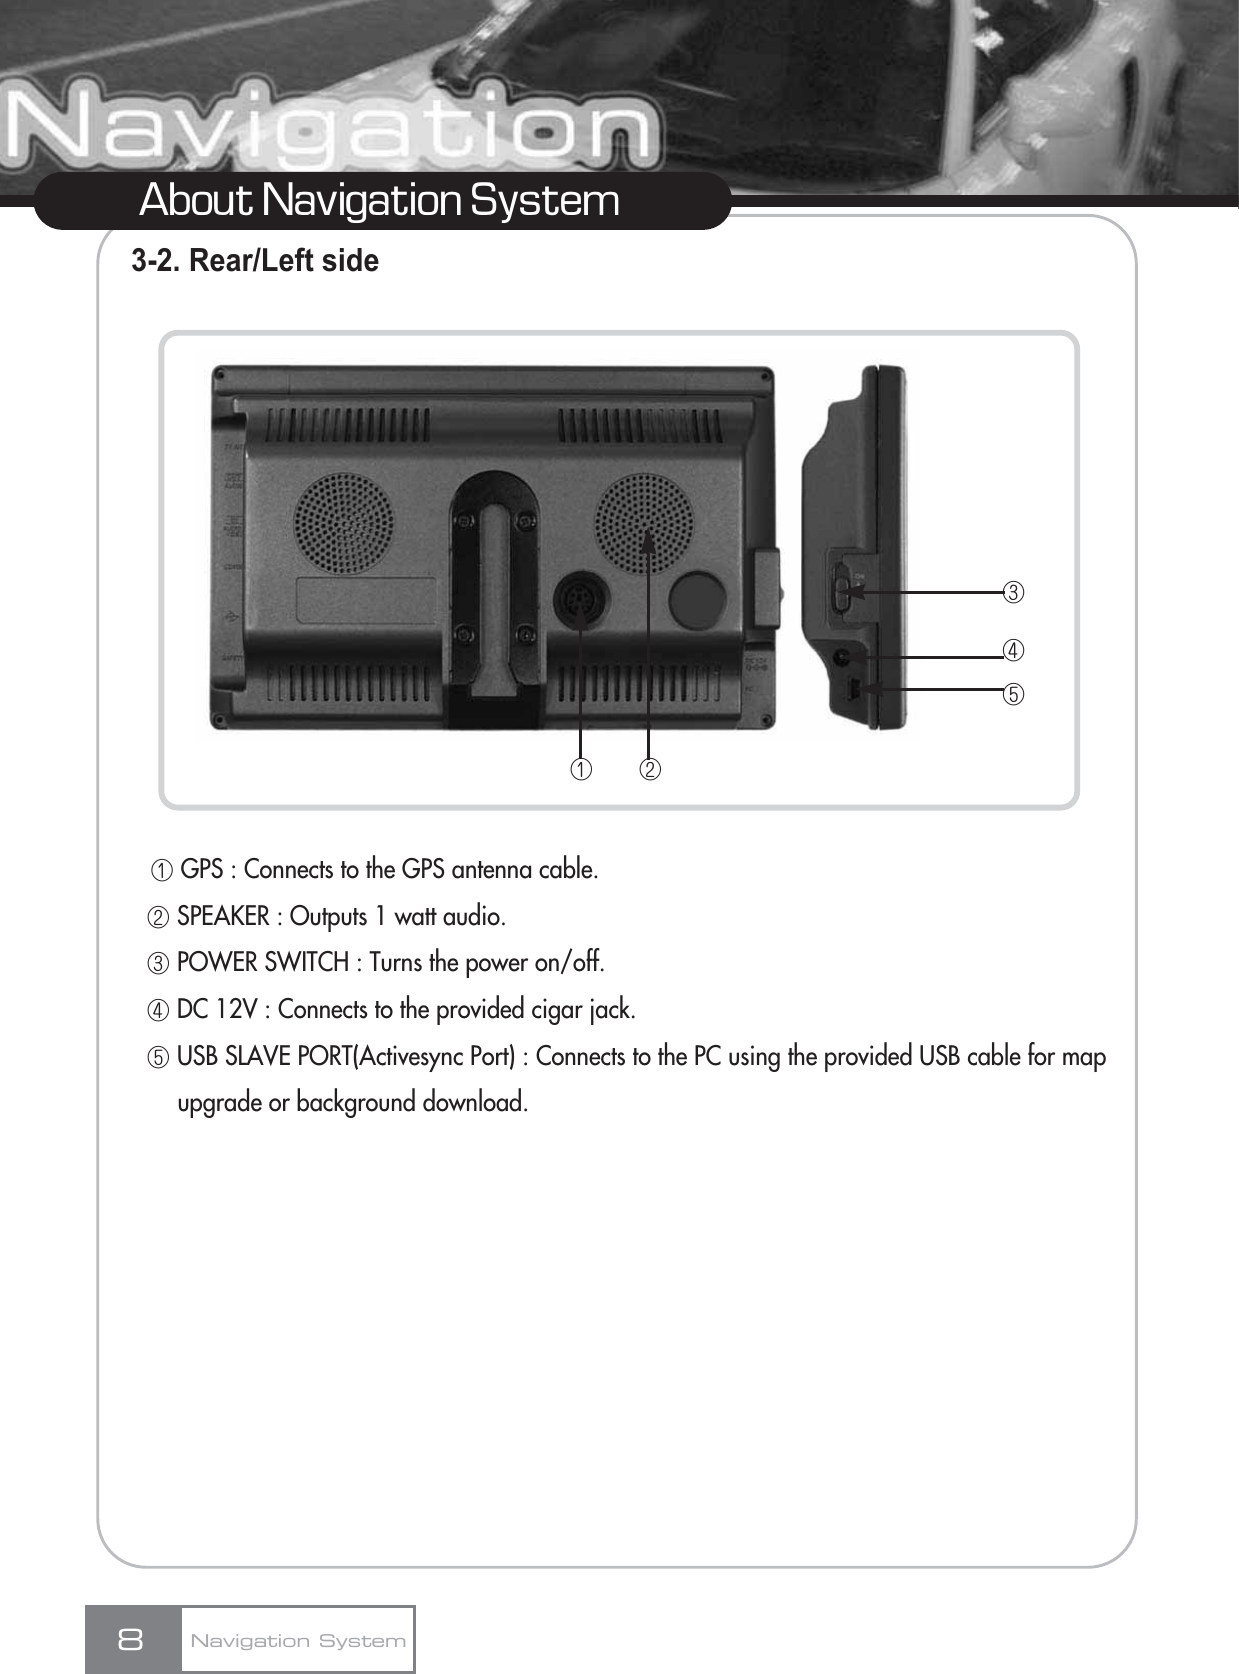
![2Navigation SystemTable of ContentsBasic OperationAbout Navigation System1. Directions before using this product1-1. Usage directions1-2. Installation directions1-3. Upgrade directions1-4. Troubleshooting2. Components3. Description of external features3-1. Front/Right side3-2. Rear/Left side4. Installing productUsing Navigation System1. Basic functions 2. Learning basic remote controller functions[Option]3. Main menu4. Quick Start4-1. Start Screen4-2. Choose a destination4-3. Navigation Screen5. Detailed Description5-1. Choose your Destination5-2. Plan your Route5-3. Settings6. Setup Assistant6-1. Guides6-2. Traffic Message Channel (TMC)7. Frequently Asked Questions8. Audio player8-1. Basic screen8-2. List screen9. Game10. Aux11. Setup11-1. Slide show11-2. Background image11-3. Touch setting11-4. Volume11-5. Dimmer11-6. Upgrade and download using USB11-7. A/V Input11-8. Delete file11-9. Confirm settings11-10. Cancel settings 11-11. Restore default 3333455677891111121414151617191931333737373941424344454649495051525252555757575656565656585960667279797980818181V-Up ProV-Up Pro1. Installing ActiveSync and V-Up ProProgram1-1. Install ActiveSync Program1-2. Install V-Up Pro Program2. Running V-Up Pro Program3. Closing V-Up Pro Program4. System Upgrade5. Music Management6. Bitmap ManagementUpgrading Navigation SystemDownloading Navi or OSWhat is V-Up Pro?SpecificationCustomer Support and ProductEnquiryCustomer Support and ProductEnquiryCustomer Service CenterLimited Warranty](https://usermanual.wiki/DVS-Korea/VXA-2000/User-Guide-661277-Page-5.png)
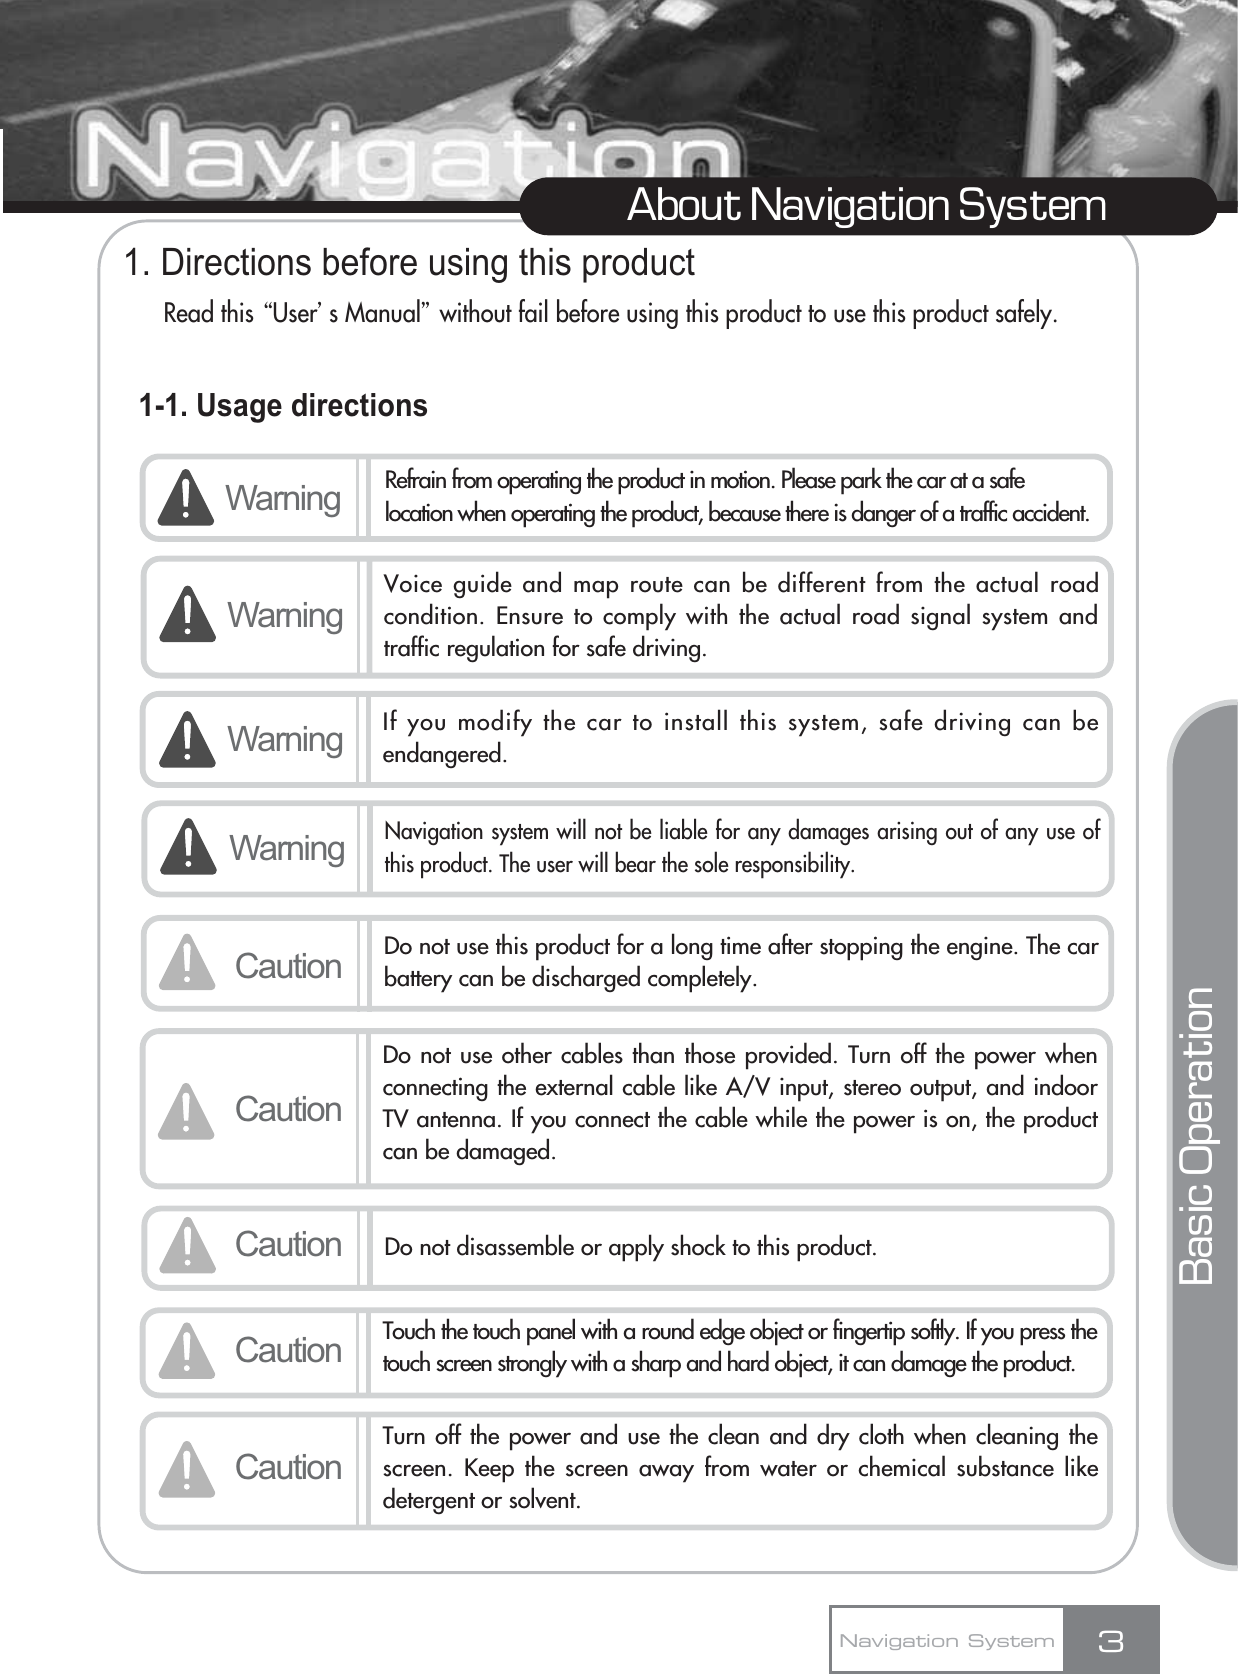
![1-3. Upgrade directions1-4. Troubleshooting1) Touchscreen does not workIf you cannot set up the touchscreen in the Setup menu due to wrong setting, use the remote controller instead.ȘPress the [Initial Screen] button on the remote controller to open the main menu screen.ȘPress the [SUB-T] ō> [ZOOM] ō> [INFORMATION] ō> [REPEAT] button sequentially in the DVD box of the remote controller to open the Touch Setting screen.ȘPress the 5 cross marks using the test jack or touch adjustment rod, according to the instructions displayed on the screen.ȘPress the screen once to close the Touch Setting screen.2) The LED turns on or flashes in red during self-diagnostic:In addition, when the temperature inside the car is too high or low, the red LED flashes. In this case, follow the steps below.ȘTurn the product power off and ventilate the car to get normal temperature.ȘTurn the power on after a little while and observe the LED color.ȘIf the red LED still flashes in normal temperature, contact customer service.5About Navigation SystemȘDo not connect 12V power when connecting ActiveSync.ȘDepending on the USB memory product, the USB sensing time may vary or sensing may fail.ȘOnly the USB memory with FAT32 format is supported.Format the USB memory as FAT32 before using it.Navigation SystemPark the car in a safe place for touchscreen setting.Basic OperationCaution](https://usermanual.wiki/DVS-Korea/VXA-2000/User-Guide-661277-Page-8.png)
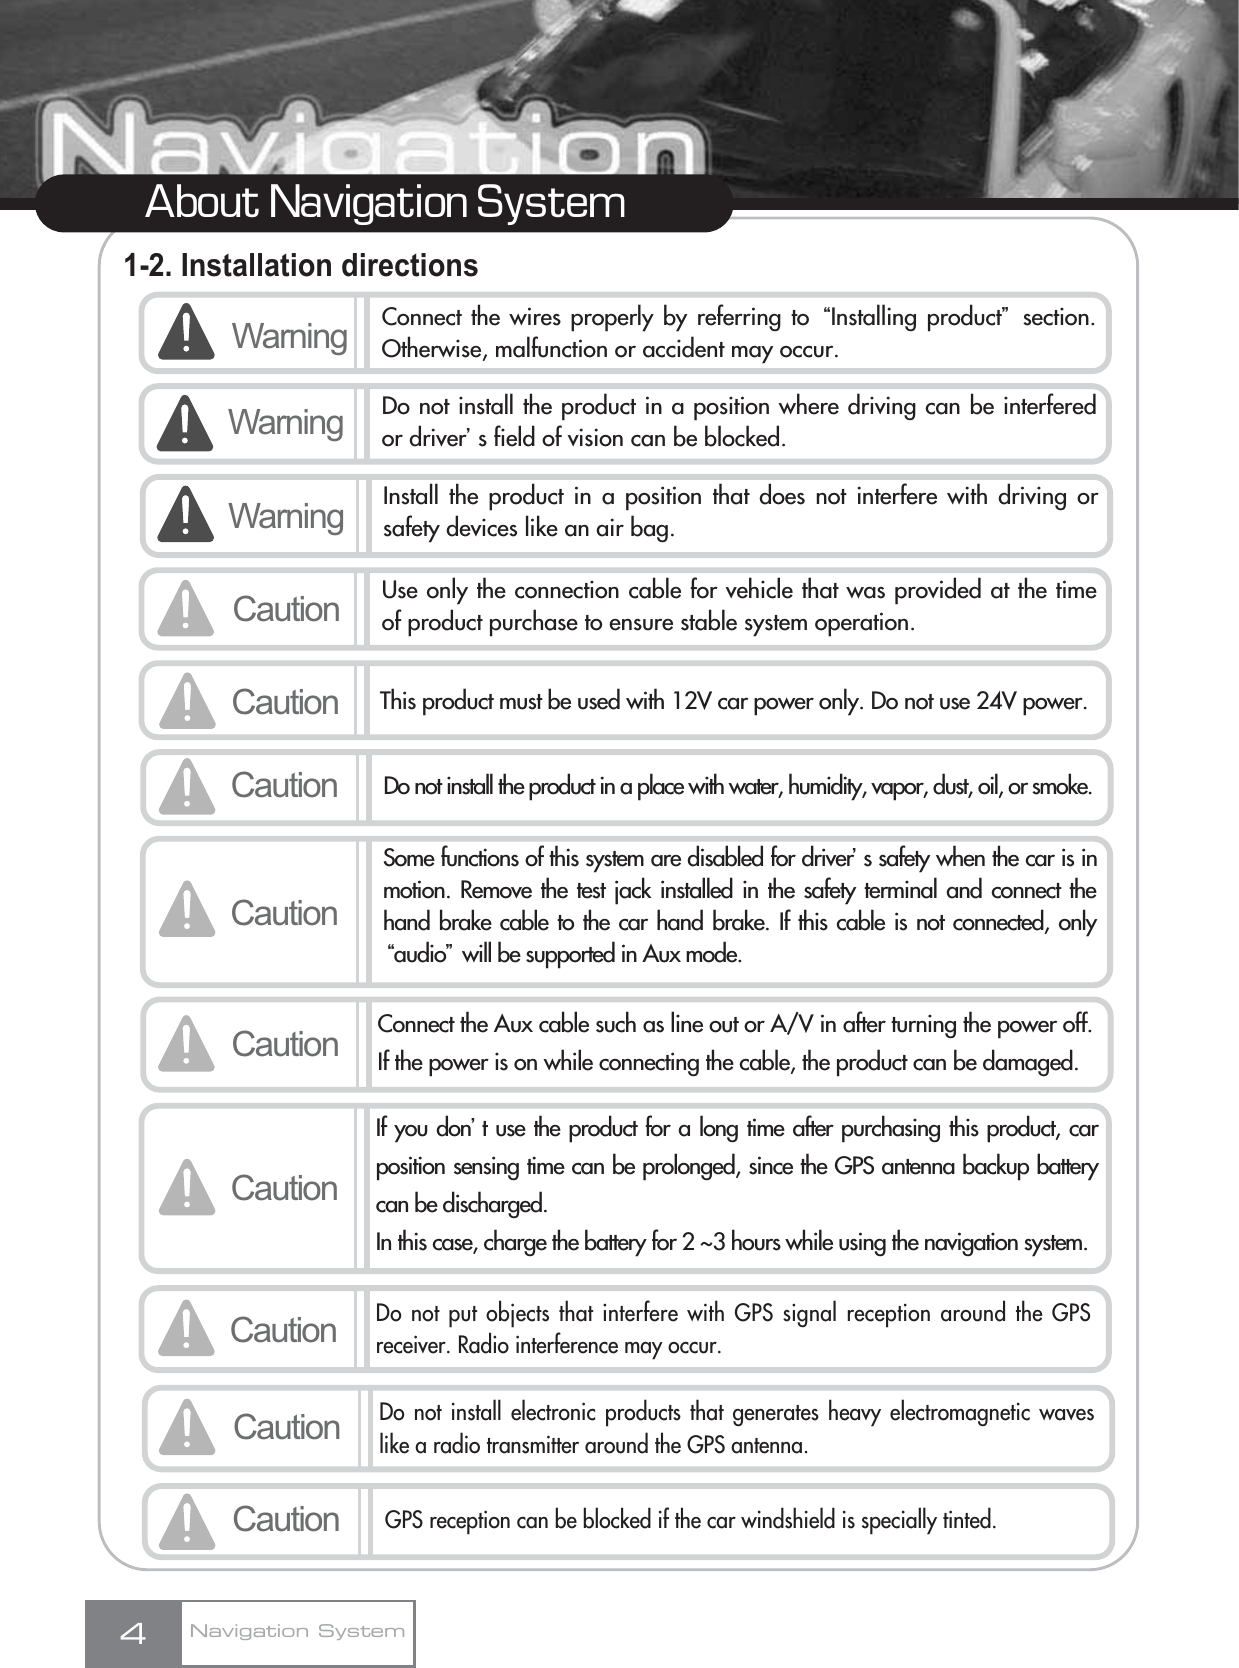
![6About Navigation System2. ComponentsMUTEAUXMAIN FILE LIST DIMMERCH.SCANENTERCHVOLPLAY TYPE ZOOMSUB-T LANGUAGE DISPLAYA-B SETUPTITLESCREENOFFAUDIORemotecontroller[Option]Test jackNavigation System unitStereo output cable[Option] Hand brakeconnection cableUSB cableSuction cap Userœs manualNavigation SystemRed : + : Black-GPS antenna/mount plateAux cable(AV In terminal)[Option] Cigar jack cableDVD-ROMƕSpecifications and design are subject to change without notice. ƕDVD-ROM includes MAP DB, activesync, usb driver, V-Up Pro, and manual file.](https://usermanual.wiki/DVS-Korea/VXA-2000/User-Guide-661277-Page-9.png)
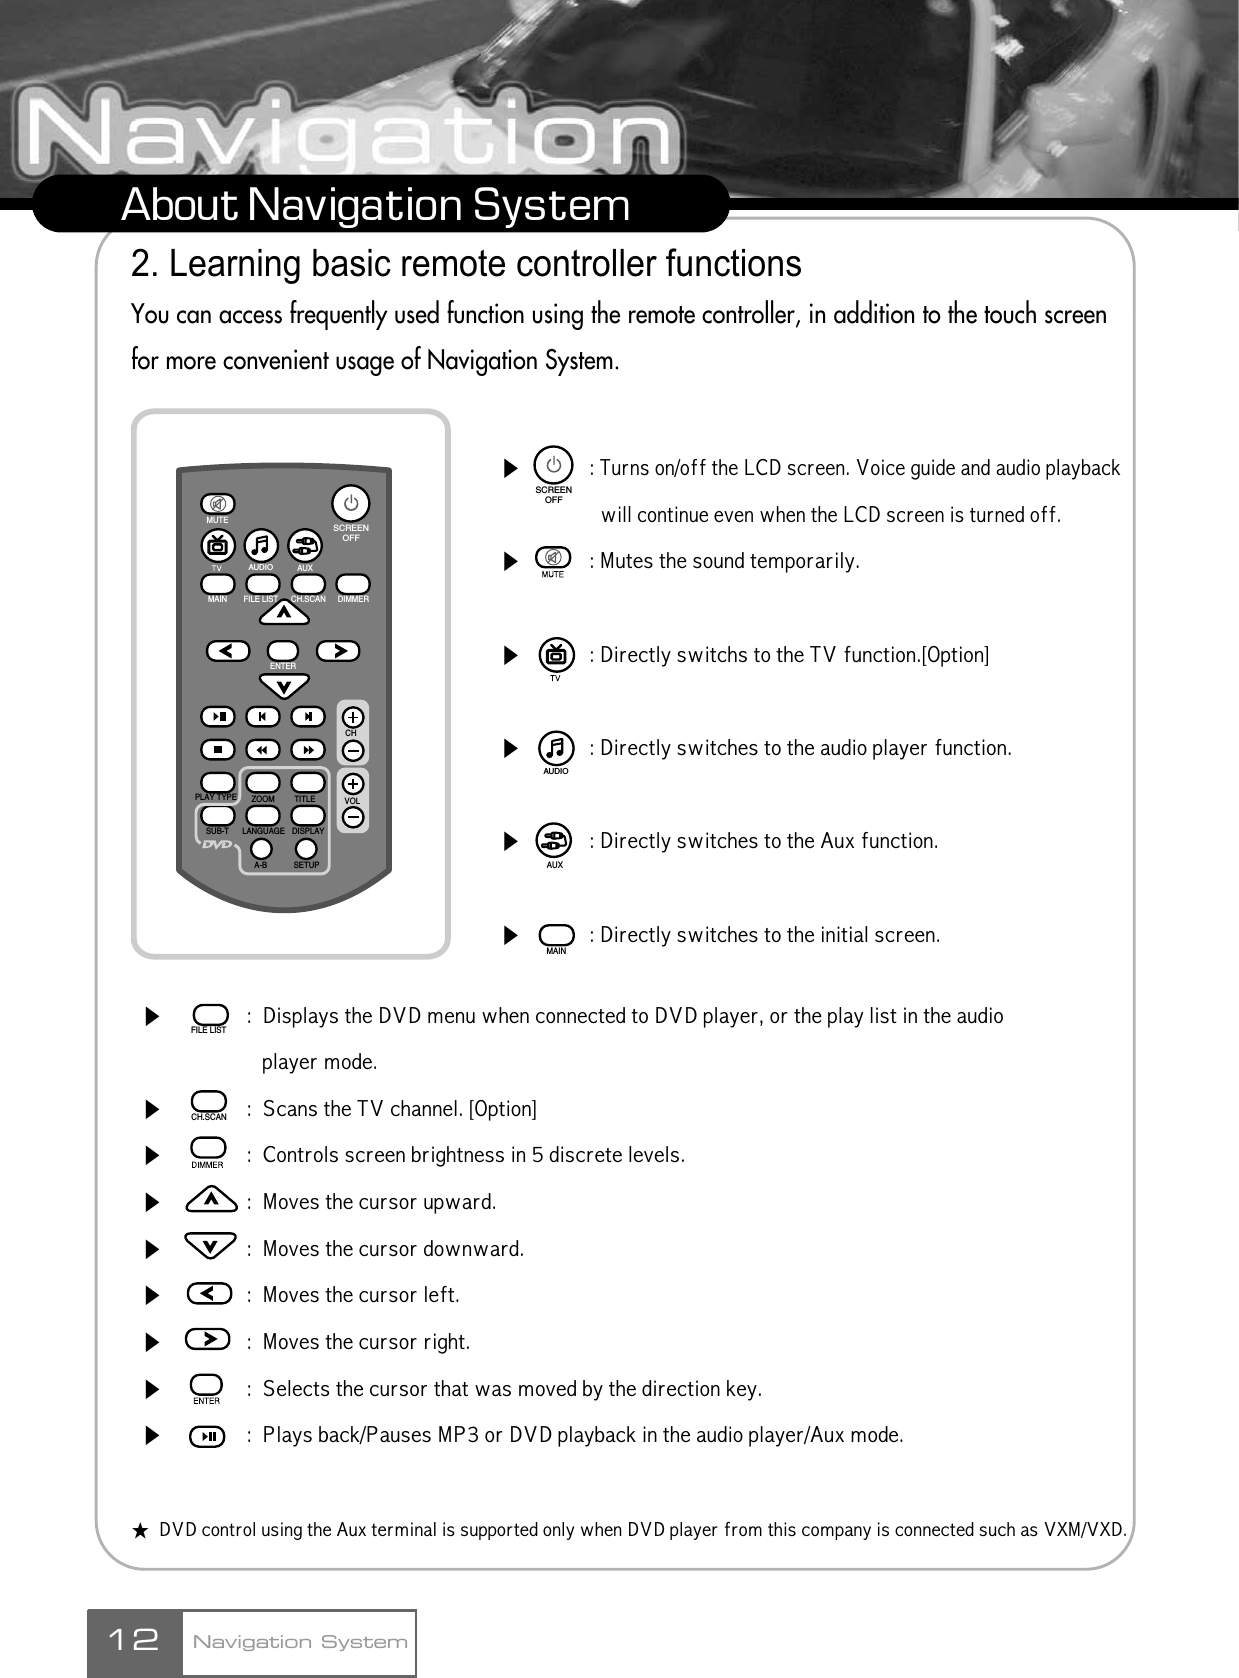
![Ș: Moves MP3 or DVD playback section backward in the audio player/Aux mode.Ș: Moves MP3 or DVD playback section forward in the audio player/Aux mode.Ș: Pauses MP3 or DVD playback in the audio player/Aux mode.Ș: Rewinds MP3 or DVD playback in the audio player/Aux mode.Ș: Fast forwards MP3 or DVD playback in the audio player/Aux mode.Ș: Sets channel up or down in TV mode. [Option] Ș: Sets volume up or down.Ș: Sets Repeat All/Repeat Start when playing back DVD, or Repeat All/Repeat Selected/Random Selection when playing back MP3.[Following functions are enabled only when DVD player from this company is connected.]Ș: Zooms in/out the DVD screen.Ș: Displays the DVD title.Ș: Selects the caption in the DVD.Ș: Selects the sound type provided by the DVD.Ș: Displays DVD player information.Ș: Repeats the section in the DVD.Ș: Displays the configuration screen of VXM/VXD DVD player.13Using Navigation SystemCaution Navigation and game functions are not accessible using the remote controller.Navigation SystemBasic OperationVOLPLAY TYPEZOOMTITLESUB-TLANGUAGEDISPLAYA-BSETUPCH](https://usermanual.wiki/DVS-Korea/VXA-2000/User-Guide-661277-Page-16.png)
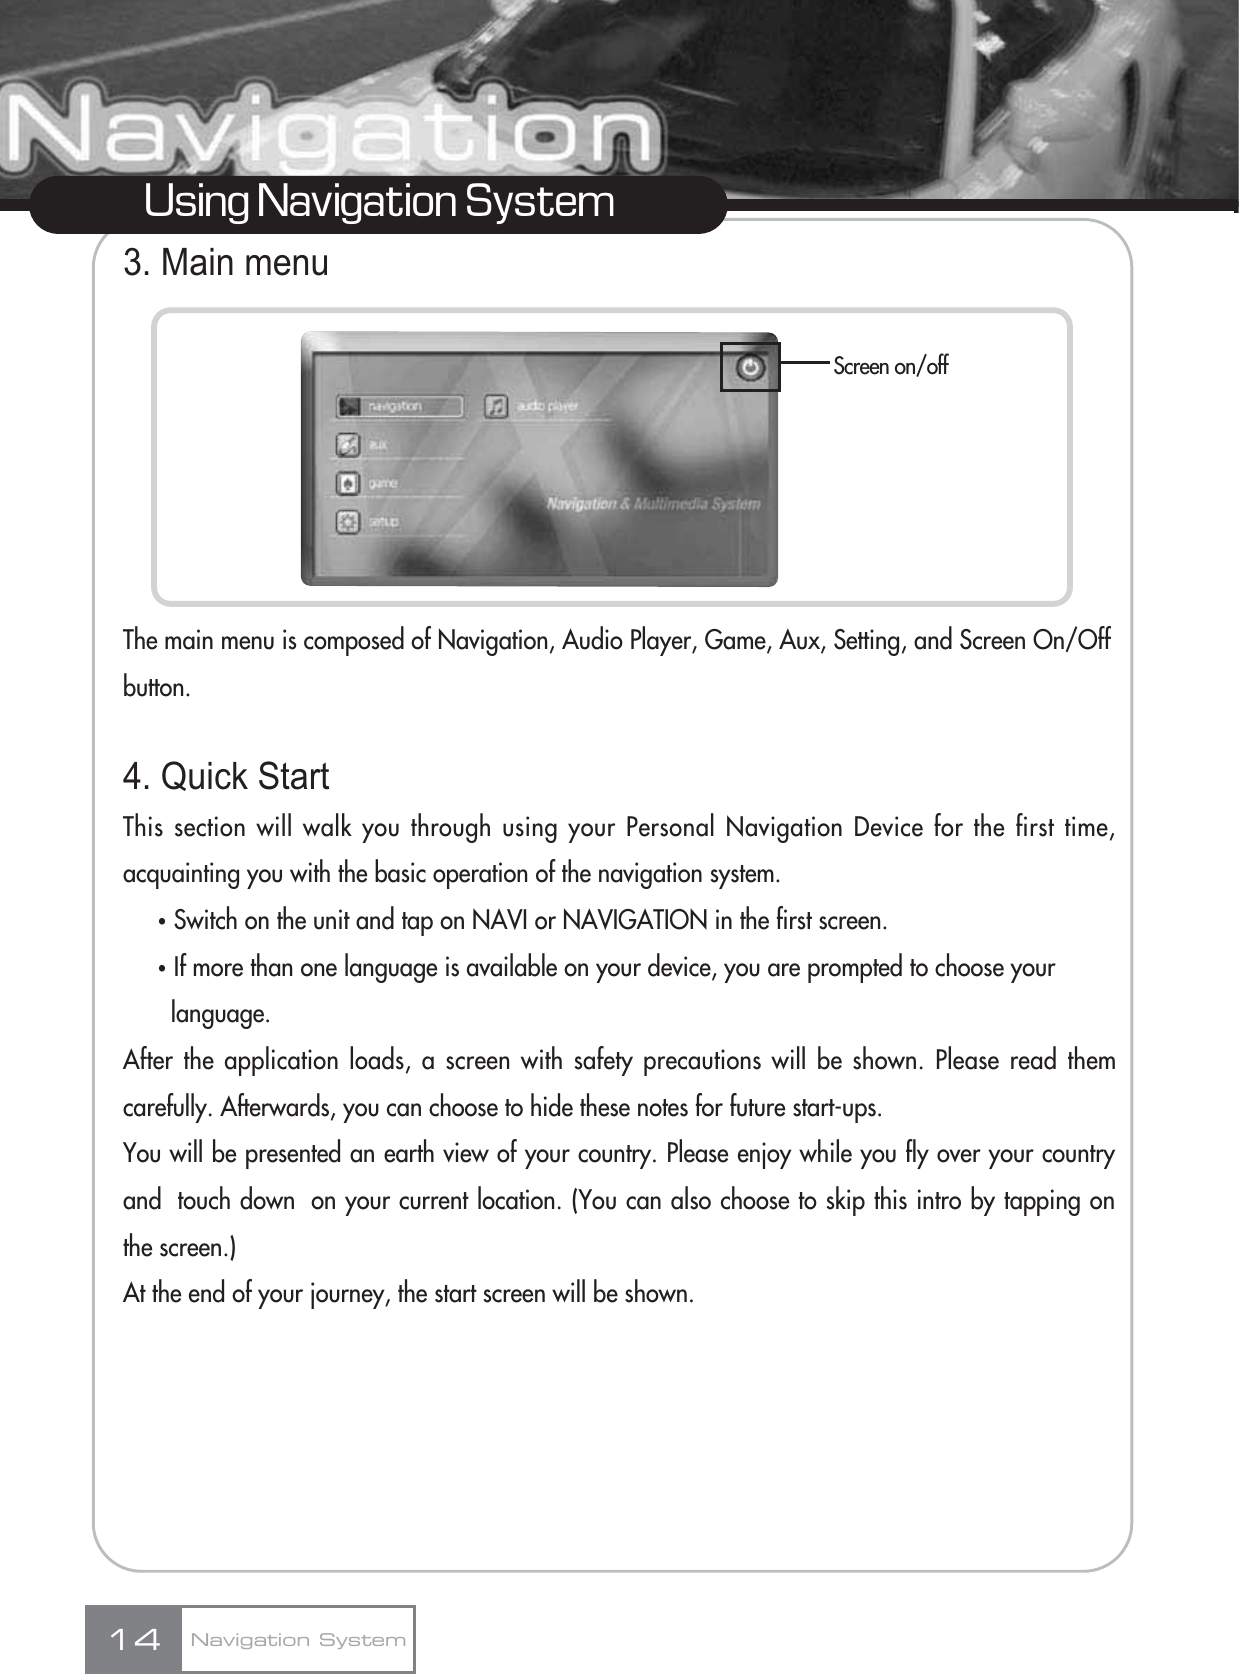


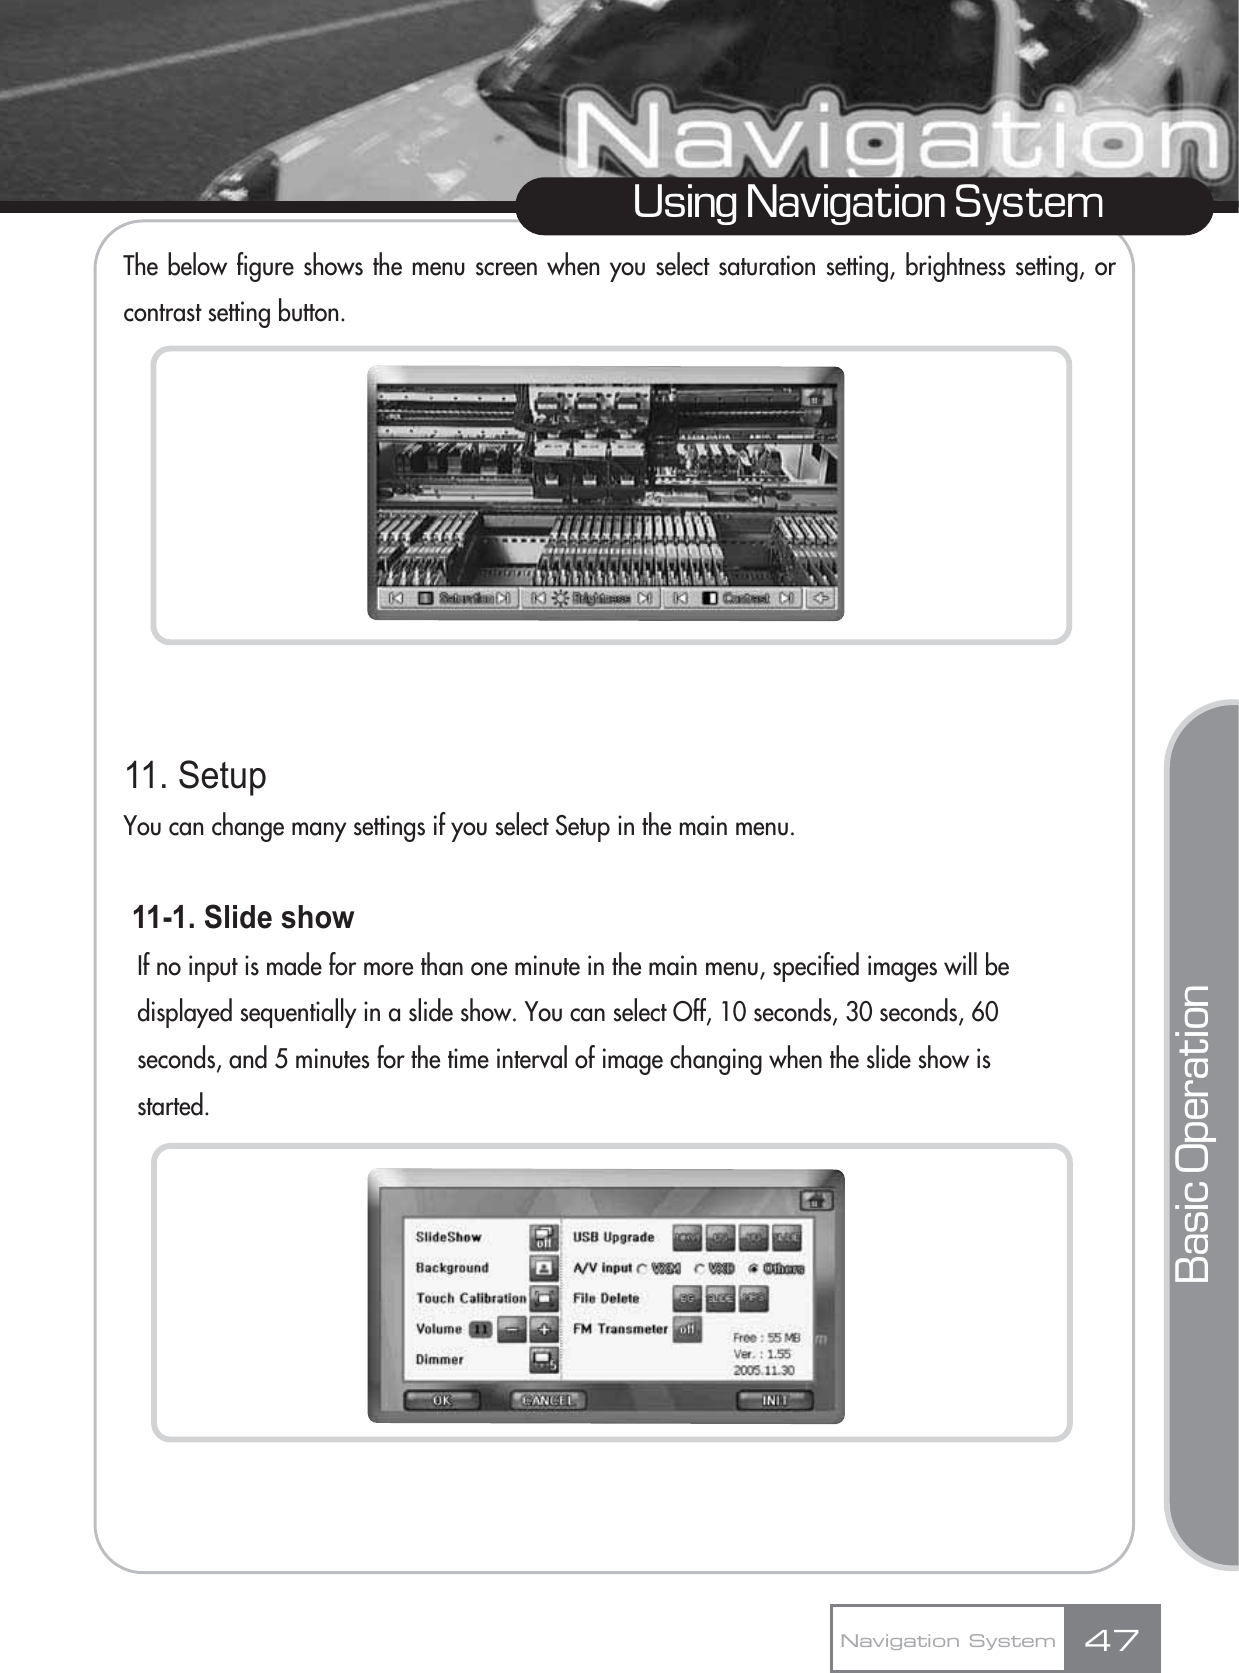
![Using Navigation System10. AuxYou can use the simple Aux function if you set A/V input as ’Others’ in the settings section.As shown by the above figure, only volume control and screen setting are supported in ’Others’mode. DVD player control is not supported.If you press the [Screen Setting] button, the below screen will appear and you can changesaturation, brightness, and contrast.44 Navigation System](https://usermanual.wiki/DVS-Korea/VXA-2000/User-Guide-661277-Page-47.png)
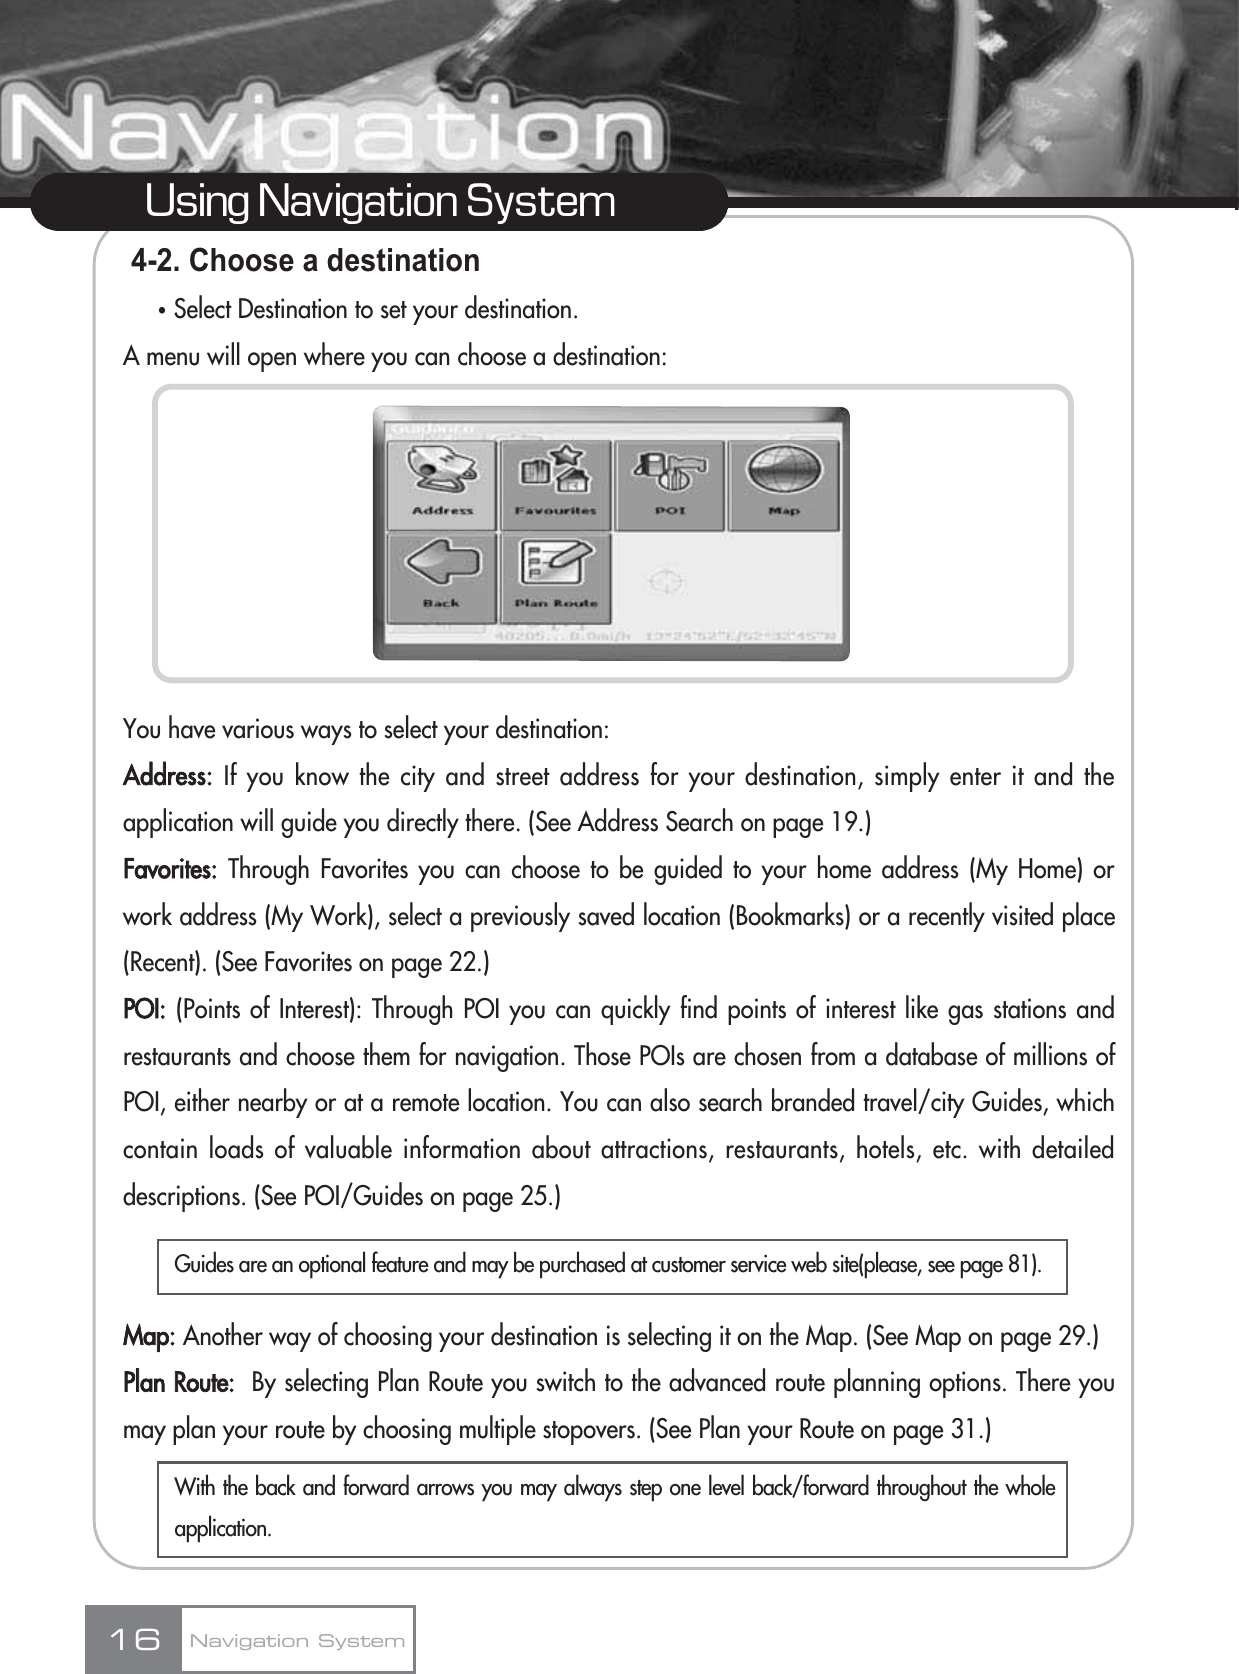
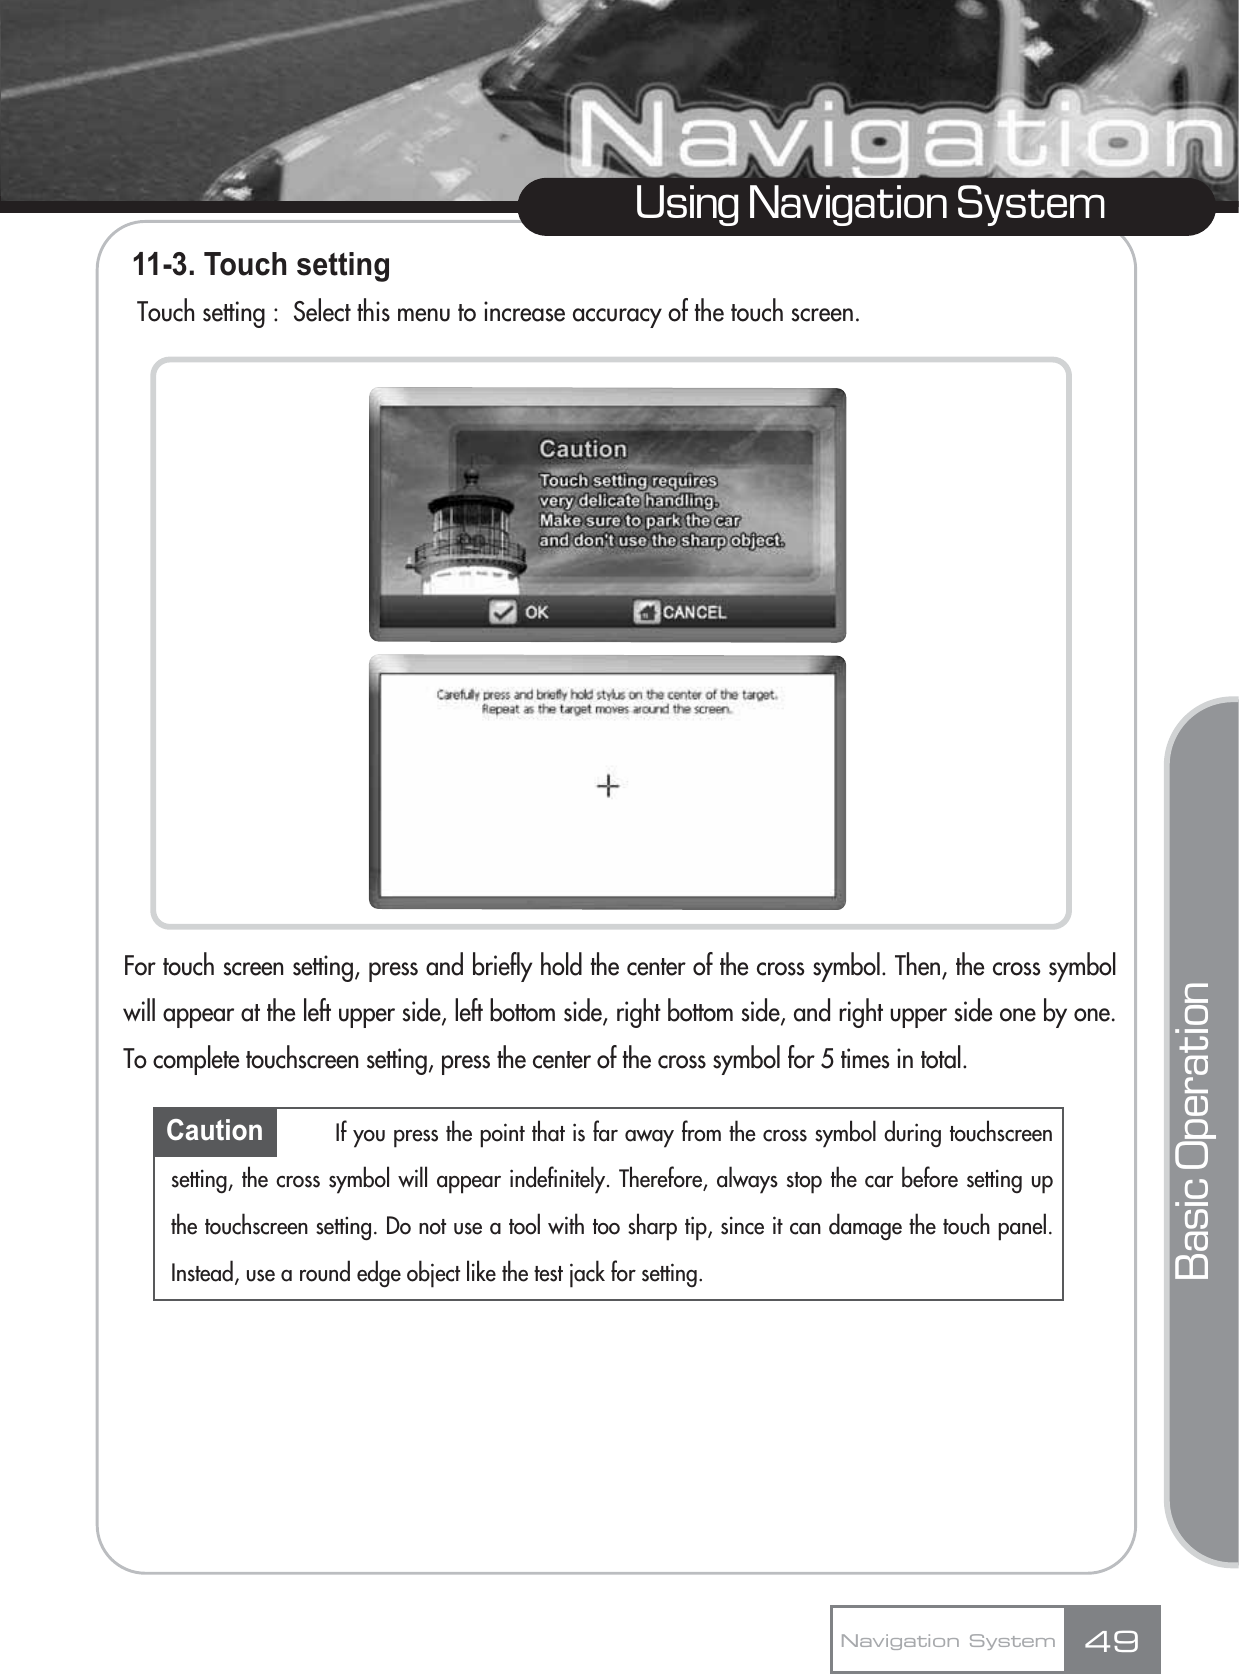
![The following screen will appear if you press the [Setting] button.ڸDVD menu : Switches to the DVD title menu and displays the direction key menu, which makes cursor movement easier in the DVD title.ڹSets saturation, brightness, and contrast.ںDimmer : Controls brightness in 5 discrete levels.ڻReturns to the previous menu.The below figure shows the screen when you press the DVD Setting button. You can move the DVDTitle cursor using the direction key either via the remote control or the touchscreen controls.46Using Navigation SystemNavigation Systemڡڤڢڣ](https://usermanual.wiki/DVS-Korea/VXA-2000/User-Guide-661277-Page-49.png)
![11-2. Background imageYou can select the background image you prefer.1) Select the image to change and press the [SELECT] button.2) If you press the [Previous] button, the background image will not be changed and the set up menu will reappear.48Using Navigation SystemNavigation System](https://usermanual.wiki/DVS-Korea/VXA-2000/User-Guide-661277-Page-51.png)
![11-4. Volume You can select from 16 levels of sound volume.11-5. Dimmer You can select from 5 levels of screen brightness.11-6. Upgrade or download using USB memoryYou could download navigation map database, OS, background images and slide show images to your system by using the USB memory stick. Especially, to change the the navigation map in your system, you have to down another map from DVD-ROM disc provided to USB memory by using V-Up Pro.And so, If you want to upgrade the latest version of navigation map database and OS for your system, these could be downloaded from the customer service web site in page 81 and you have to register at the upgrade web site before upgrading.ȯNavigation upgrade or download1) Download and run V-Up Pro from DVD-ROM disc and select USB as a storage media.2) Save the upgrade or download file in the USB memory.3) Connect the USB memory to the device. When the USB connection icon appears, select Navigation Upgrade.4) Press the [OK] button.5) When upgrade is complete, restart the unit.50Using Navigation SystemNavigation System](https://usermanual.wiki/DVS-Korea/VXA-2000/User-Guide-661277-Page-53.png)
![ȯOS upgrade1) Download and run V-Up Pro from DVD-ROM disc and select USB as a storage media.2) Save the upgrade file in the USB memory.3) Connect the USB memory to the device. When the USB connection icon appears, select OS Upgrade.4) Press the [OK] button.5) When upgrade is complete, restart the unit.ȯBackground download (Only 480 X 234 size BMP file is supported. You can create a background image conveniently using the V-Up Pro program that is provided in the DVD-ROM disc.)1) Create a folder named \upgrade\background\ in the USB memory.2) Save necessary upgrade files in this folder.3) Connect the USB memory to the device. When the USB connection icon appears, select Background Image Upgrade.51Using Navigation SystemNavigation SystemBasic Operation](https://usermanual.wiki/DVS-Korea/VXA-2000/User-Guide-661277-Page-54.png)
![4) Press the [OK] button.ȯSLIDE download(Only 480 X 234 size BMP or JPG file is supported. You can create the slide show file conveniently using the V-Up Pro program that is provided in the DVD-ROM disc.)1) Create a folder named ’\UPGRADE\SLIDESHOW\’ in the USB memory.2) Save necessary upgrade files in this folder.3) Connect the USB memory to the device. When the USB connection icon appears, select Slide Show Upgrade.4) Press the [OK] button.52Using Navigation SystemNavigation System](https://usermanual.wiki/DVS-Korea/VXA-2000/User-Guide-661277-Page-55.png)
![ȯUpgrade will fail if you try to upgrade when the internal memory is not sufficient, or the external USB memory is not available, or no upgrade files are saved in the USB memory.If the internal memory capacity is insufficient, delete some files to secure enough memory space. When upgrading, see if upgrade files are saved in the USB memory, and the USB memory is connected properly.11-7. A/V InputIn Aux mode. You can control the DVD player using this device, when the DVD player is a VXM or VXD series. To connect other manufacturer’s product, set to ’Others’. Default value is ’Others’.11-8. Delete file Using this menu, you can delete the file inside the internal memory.1) Deleting the background image fileȯPress the [Delete] button to delete the selected file only, or press the [Delete All] button to delete all background image files.53Using Navigation SystemNavigation SystemBasic OperationCaution Make sure to fully understand the instructions provided with upgrade files, since failedupgrade may result in product malfunction.](https://usermanual.wiki/DVS-Korea/VXA-2000/User-Guide-661277-Page-56.png)
![2) Deleting the slide show fileȯPress the [Delete] button to delete the selected file only, or press the [Delete All] button to delete all slide show files.3) Deleting the music fileȯPress the [Delete] button to delete the selected file only, or press the [Delete All] button to delete all music files in the album.54Using Navigation SystemNavigation System](https://usermanual.wiki/DVS-Korea/VXA-2000/User-Guide-661277-Page-57.png)
![V-Up Pro V-Up Pro 3. Closing V-Up Pro ProgramA. When you click the [Close] button, the program closing confirmation window will appear as shown in Figure 3-1.B. Click [Yes] to exit from V-Up Pro program.Figure 3-1. V-Up Pro closing confirmation windowNavigation System 59](https://usermanual.wiki/DVS-Korea/VXA-2000/User-Guide-661277-Page-62.png)
![V-Up Pro 4. System UpgradeA. ExecutionA-1) Click the ūSystem UpgradeŬicon in the V-Up Pro main screen.A-2) Then, the screen shown in Figure 4-1 will appear.Figure 4-1. System upgrade running screenڸSelect the upgrade type (radio button)ڹLocal drive and DVD-ROM disc selection combo boxں[Move Previous] buttonڻ[Move Next] buttonڼ[Move to V-Up Pro Main Menu] buttonNavigation System60ڡڢڥڣڤ](https://usermanual.wiki/DVS-Korea/VXA-2000/User-Guide-661277-Page-63.png)
![V-Up Pro V-Up Pro A-3) Select the upgrade type using the radio button shown in Figure 4-1. Transfers upgrade files directly to the navigation set through ActiveSync connection.Saves upgrade files in the local drive specified by the user. (See Figure 4-2 for specifying the local drive.)Reads upgrade files from the user-specified local drive and transfers them to the navigation set. (See Figure 4-2 for specifying the local drive.)Reads upgrade files from the user-specified DVD-ROM disc and transfers them to local drive.(See Figure 4-2 for specifying the local drive and DVD-ROM disc.)Figure 4-2. Specifying local drive and DVD-ROM discA-4) Move to the next step by clicking the [Next] button (Figure 4-1 ڻ) after selecting the upgrade type.Navigation System 61](https://usermanual.wiki/DVS-Korea/VXA-2000/User-Guide-661277-Page-64.png)
![V-Up Pro B. Selecting upgrade itemsƕUpgrade selection window will appear only when ūUpgrade directlyŬor ūDownload upgrade filesŬis selected.B-1) Select the item to upgrade using the ūSelect upgrade itemsŬcheck box (Figure 4-3 ڸ). (Navigation, OS)Figure 4-3. Upgrade items selection windowڸNavigation selection check boxڹOS selection check boxںMap coverage selection check boxڻVoice Language selection check boxڼ[Move Previous] buttonڽ[Move Next] buttonھ[Move to V-Up Pro Main Menu] buttonNavigation System62ڡڣڧڦڤڢڥ](https://usermanual.wiki/DVS-Korea/VXA-2000/User-Guide-661277-Page-65.png)
![V-Up Pro V-Up Pro B-2) To upgrade the navigation, select the navigation selection check box (Figure 4-3 ڸ) and select the target area using the map coverage and voice language check box (Figure 4-3 ں). See Figure 4-4.Figure 4-4. Navigation data selection screenڸCalculate and display checked componentsŪmemory.B-3) To upgrade to the latest OS, select the OS selection check box (Figure 4-5) and click the [Next] button (Figure 4-3 ڽ).Figure 4-5. OS upgrade selection screenNavigation System 63ڡ](https://usermanual.wiki/DVS-Korea/VXA-2000/User-Guide-661277-Page-66.png)
![ƕThe alarm message window appears when navigation upgrade is selected (Figure 4-6). Select the [Yes] button to continue upgrade.Figure 4-6. Navigation upgrade alarm windowC. UpgradeC-1) If the upgrade type and item are properly selected, the upgrade progress screen will appear as shown in Figure 4-7.ƕThe selected upgrade item list will appear at the Figure 4-7 ڹposition.Figure 4-7. Upgrade progress screenڸUpgrade cancellation buttonڹUpgrade list display sectionV-Up Pro Navigation System64ڢڡ](https://usermanual.wiki/DVS-Korea/VXA-2000/User-Guide-661277-Page-67.png)
![C-2) Click the [Cancel] button (Figure 4-7 ڸ) to stop upgrading and return to the previous step.D. Upgrade completionD-1) When upgrade is complete successfully, the Complete message window shown in Figure 4-8 will appear.Figure 4-8. Upgrade complete message windowV-Up Pro V-Up Pro Navigation System 65](https://usermanual.wiki/DVS-Korea/VXA-2000/User-Guide-661277-Page-68.png)
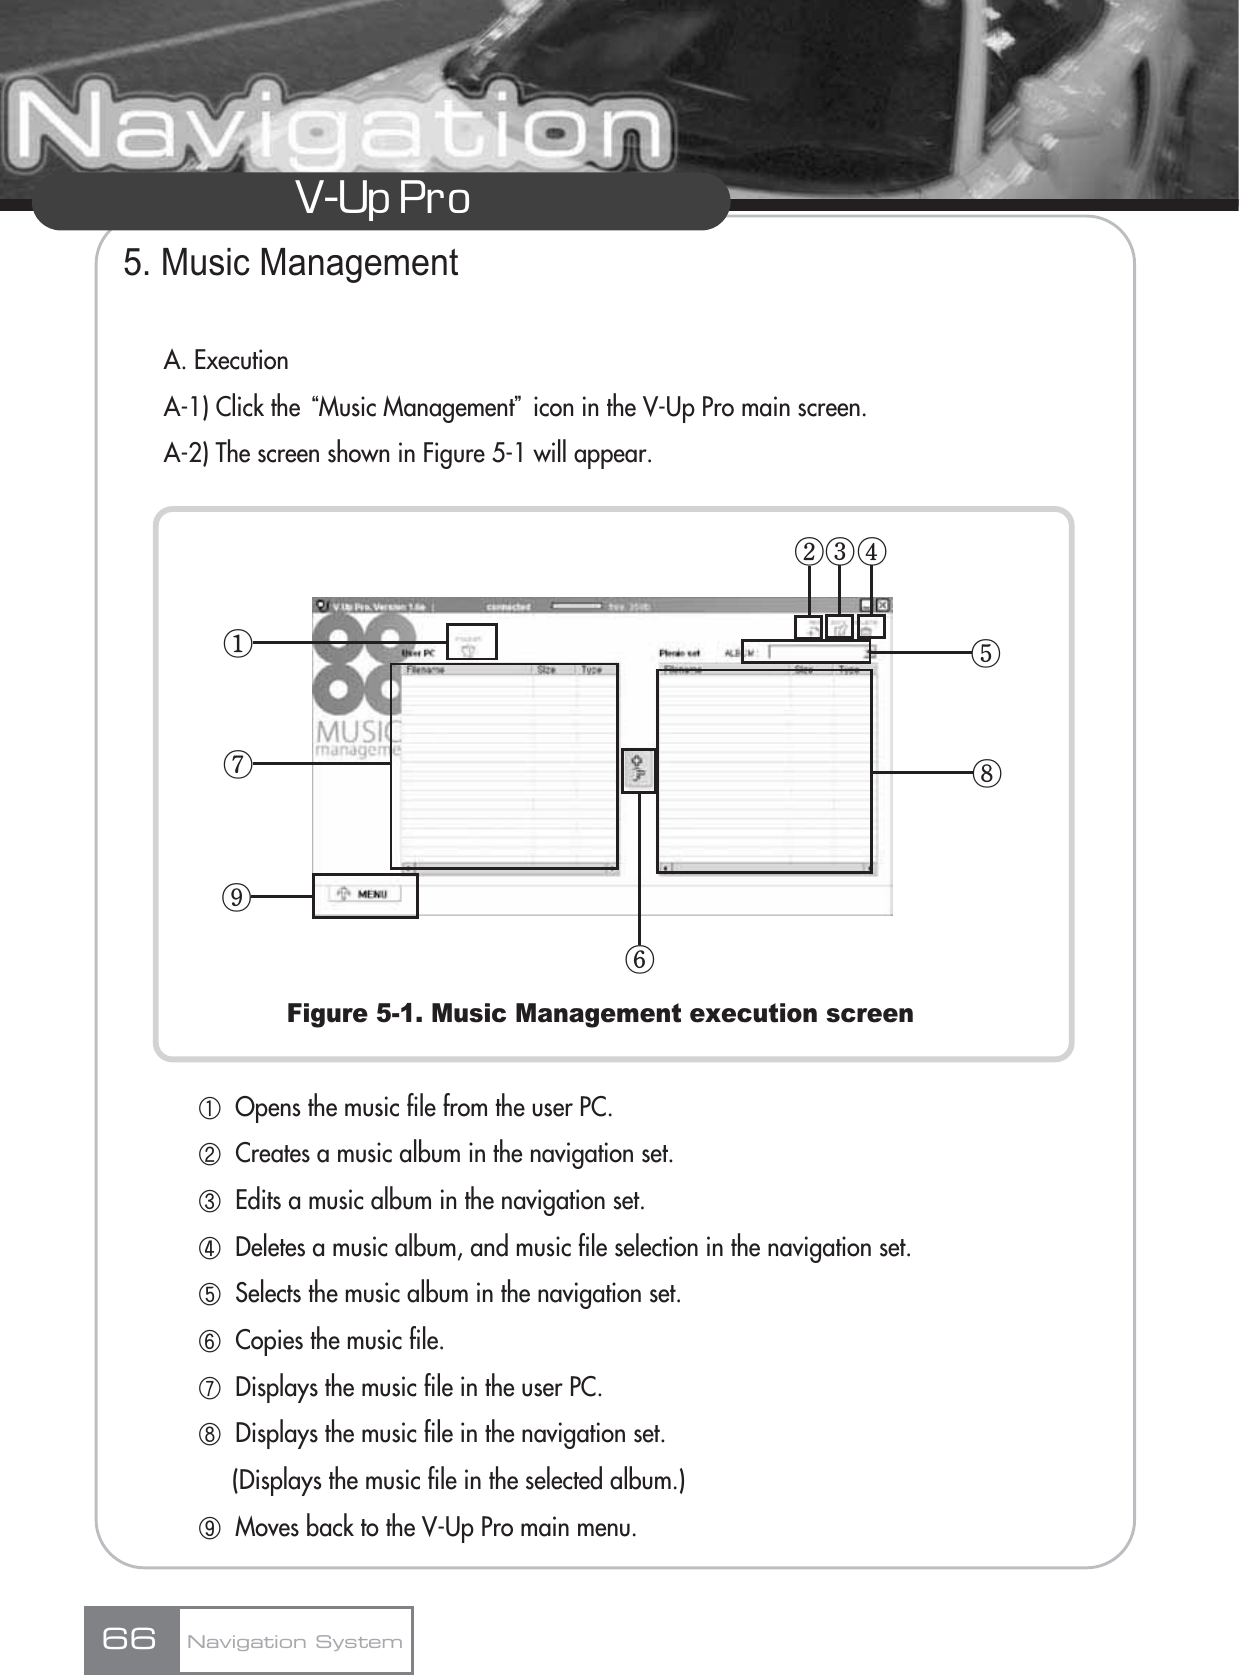
![V-Up Pro C. Creating and selecting music album in the navigation setC-1) Click the ūCreate music albumŬbutton (Figure 5-1 ڹ) and input the name of the album to create in the ūNameŬinput window. (See Figure 5-3.)Figurer 5-3. Music album name input windowC-2) Click [OK] to register the album name in the music album selection input combo box (Figure 5-1 ڼ). See Figure 5-4.Figure 5-4. Music album selection combo boxC-3) Select the album from the music album selection combo box. (If any music file is available in the selected music album, it will be displayed in the music file list window.)Navigation System68](https://usermanual.wiki/DVS-Korea/VXA-2000/User-Guide-661277-Page-71.png)
![V-Up Pro V-Up Pro D. Editing music album in the navigation setD-1) Select the music album to change its name from the music album selection combo box.D-2) Click the ūEdit music albumŬbutton (Figure 5-1 ں) and input the album name to change. See Figure 5-5.Figure 5-5. Music album name edit windowD-3) Click the [OK] button to register the edited album name in the music album selection combo box. See Figure 5-6.Figure 5-6. Edited music albums selection combo boxNavigation System 69](https://usermanual.wiki/DVS-Korea/VXA-2000/User-Guide-661277-Page-72.png)
![V-Up Pro E. Deleting music album from the navigation setE-1) Select the music album to delete from the music album selection combo box.E-2) Click the ūDelete music albumŬbutton (Figure 5-1 ڻ).E-3) If no music file is available in the selected music album, the music album will be deleted.E-4) If any music file is available in the selected music album, the Confirmation window will appear. See Figure 5-7.Figure 5-7. Music album deletion confirmation windowE-5) Click the [Yes] button to delete the selected music album.F. Copying music file to the navigation setF-1) Select the music album to copy from the music album selection combo box. If no music album is available, the new music album must be created in advance.F-2) Open the music file in the user PC. (See ūOpening music file from the user PC.Ŭ)F-3) Select the music file to copy from the ūMusic file in the user PCŬlist window. (Multiple selections are supported. See Figure 5-8.)Navigation System70Note All music files in the selected music album will be removed from the navigation set.](https://usermanual.wiki/DVS-Korea/VXA-2000/User-Guide-661277-Page-73.png)
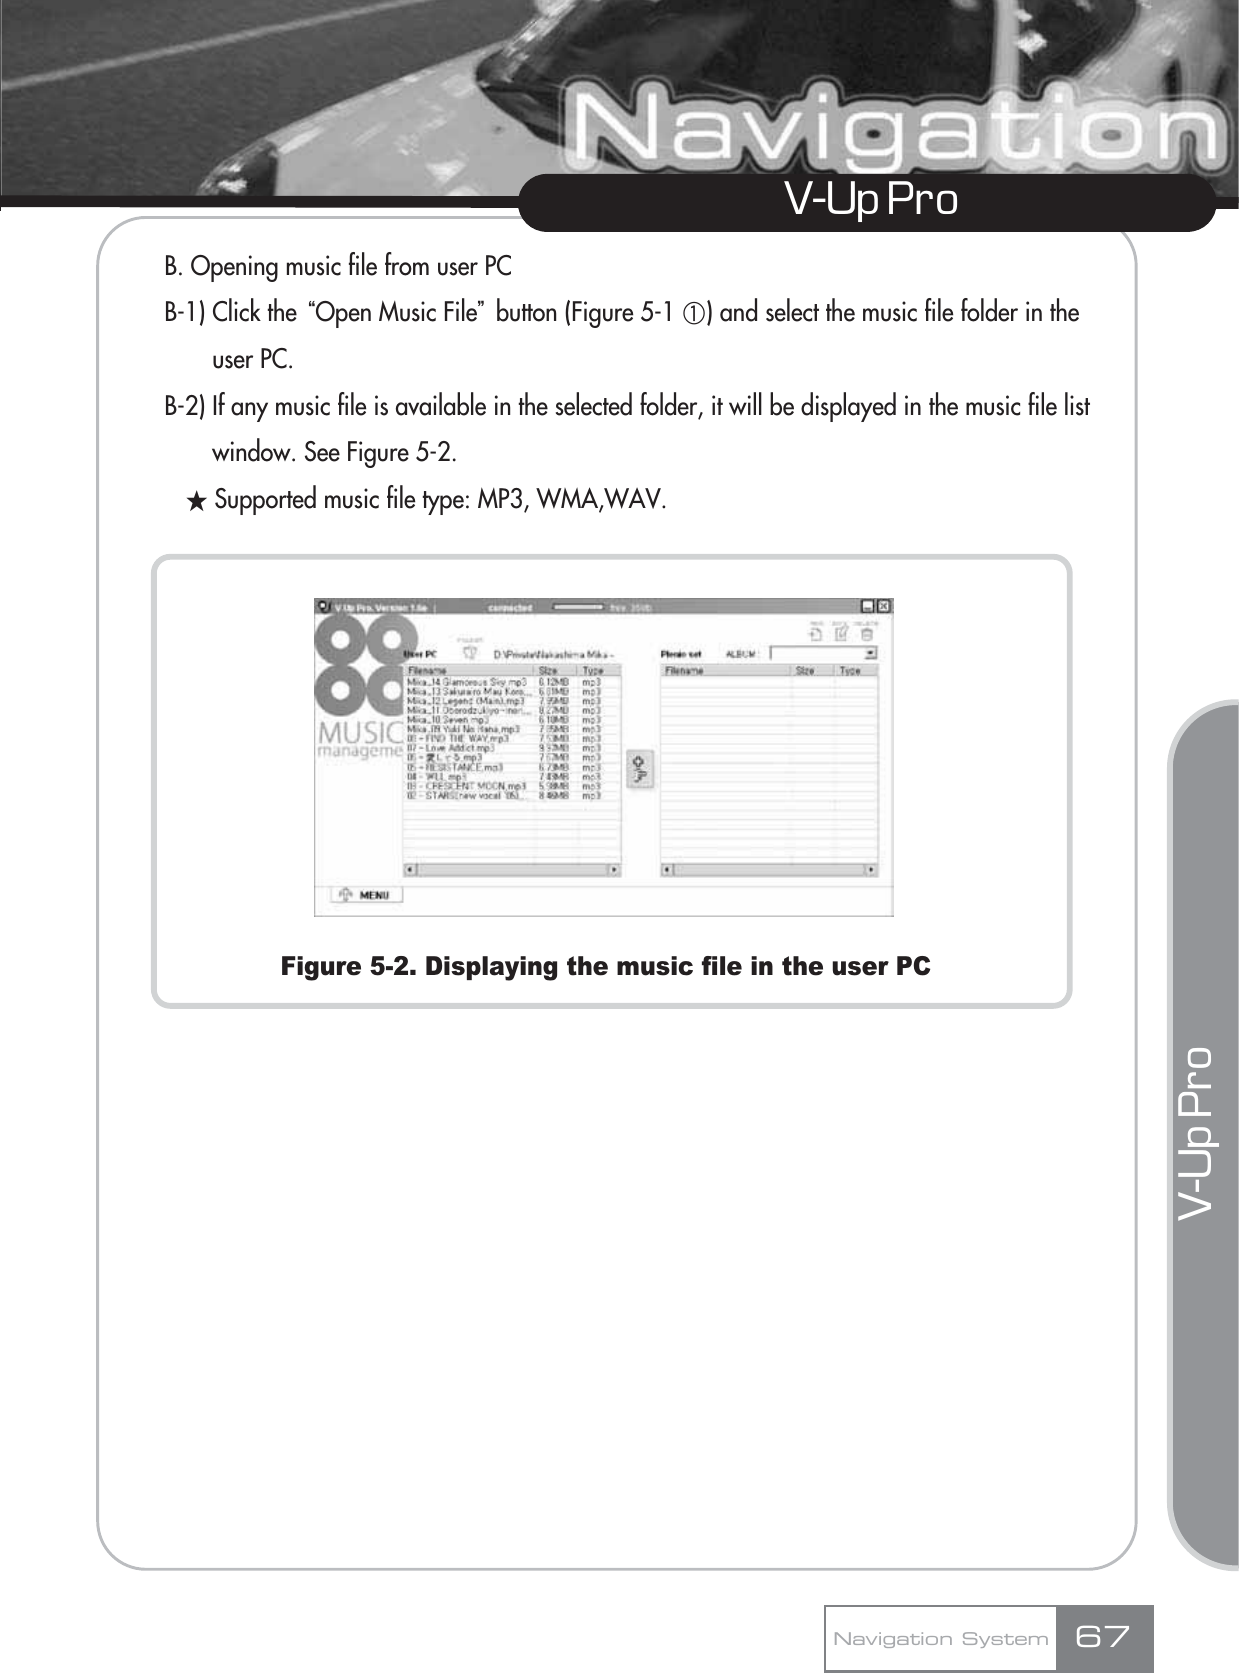
![V-Up Pro V-Up Pro Figure 5-8. Selecting music file in the user PCF-4) Click the ūCopy music fileŬbutton (Figure 5-1 ڽ) button.F-5) While the file(s) is being copied, the file copy progress bar (Figure 5-9 ڸ) will be displayed.F-6) When file copying is complete, the copied music file will be displayed in ūMusic file in the navigation setŬlist window.G. Cancelling music file copyG-1) To stop file copy while in progress, click the [Cancel] button (Figure 5-9 ڹ).Figure 5-9. Music file copyNavigation System 71ڡڢ](https://usermanual.wiki/DVS-Korea/VXA-2000/User-Guide-661277-Page-74.png)


![Customer support and Product EnquiryCustomer support and Product EnquiryCustomer support and Product EnquiryThe product warranty period is calculated from the date of product purchase. Therefore, make sureto write down the purchase data and keep your sales receipt for proper after service.[If the product purchase date cannot be known, the product warranty period will start 3 monthsfrom the manufacturing date or import customs clearance date.]Customer Service CenterCustomer service and complaint reportingYou can make an enquiry or ask advice about the product through a phone call or in the web site.DVS SALES,INC 1180 ASTER AVE, SUNNYVALE, CA 94086TEL : 408 260 3303FAX : 408 260 3304EMAIL : cs.dvs@dvs.co.krHOME PAGE : www.dvssales.comNavigation System 81](https://usermanual.wiki/DVS-Korea/VXA-2000/User-Guide-661277-Page-84.png)