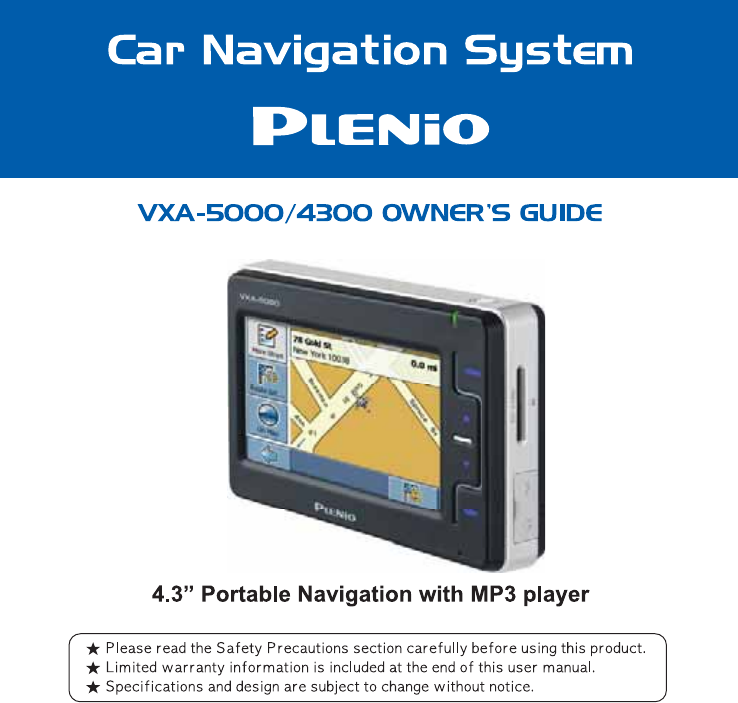
DVS Korea VXA-5000 4.3" Portable Navigation with MP3 Player User Manual 4300 5000 EN 070404 Page 1
DVS Korea Co., Ltd. 4.3" Portable Navigation with MP3 Player 4300 5000 EN 070404 Page 1
Contents
- 1. Manual
- 2. User Manual
User Manual
(4.1 Version)
Thank you for purchasing our product.
This user manual is designed to support convenient usage of the navigation system and safe driving.
Please read the entire manual carefully before using the product.
The contents of this manual may vary depending on the navigation software version.
The user interface, functions and performance of the device and the contents of this manual are subject
to change without prior notice.
Please follow all safety guidelines listed in this manual for your safety.
Please comply with the following important instructions to ensure safe driving.
Warning Do not set or search for a destination while you are driving. Park your car at a safe place
before inputting addresses or searching for a destination.
Warning
Warning Voice guidance and map route can be different from actual road conditions.
Always be sure to comply with actual road signs/signals and local traffic regulations for safe driving.
It is very dangerous to operate the device, or to look at the screen while you are driving.
Always be fully aware of the surrounding traffic conditions and nearby pedestrians when you
are in your car.
1

2
CHOOSING AND FINDING LOCATIONS .............................
NAVIGATING .....................................................................
PLANNING A ROUTE ..........................................................
SETTINGS ............................................................................
EXTRA SERVICES..................................................
FREQUENTLY ASKED QUESTIONS .......................................
MULTIMEDIA MODE...............................................
MULTIMEDIA MODE OVERVIEW ..........................................
AUDIO PLAYER ....................................................................
VIDEO PLAYER ....................................................................
IMAGE VIEWER ...................................................................
GAME MODE ......................................................................
MOBILE PHONE MODE .......................................................
SYSTEM CONFIGURATION..................................
SYSTEM SETTINGS OVERVIEW ............................................
CUSTOMIZING USER PREFERENCES .....................................
SYSTEM MAINTENANCE AND USER SUPPORT......
USING YOUR VXA-5000/4300 SAFELY ...............................
CLEANING THE VXA-5000/4300 ........................................
TROUBLESHOOTING THE VXA-5000/4300 ..........................
FAQS ..................................................................................
CUSTOMER SUPPORT ..........................................................
SYSTEM SPECIFICATIONS...................................
HARDWARE FEATURES ..........................................
GPS SPECIFICATIONS .............................................
SOFTWARE SPECIFICATIONS .................................
DESIGN AND ERGONOMICS .................................
ENVIRONMENTAL SPECIFICATIONS .......................
REGULATORY INFORMATION ................................
Table of Contents
Table of Contents
ABOUT NAVIGATION SYSTEM...................
DIRECTIONS BEFORE USING THIS PRODUCT ....................
COMPONENTS .......................................................
VXA-5000/4300 FEATURE HIGHLIGHTS ...................
FIRST THINGS FIRST..........................
SYSTEM TOUR .........................................................
PERIPHERALS TOUR ..................................................
VXA-5000/4300 SETUP ...........................................
VXA-5000/4300 FUNDAMENTALS..............
HARDWARE INTERFACE ...............................
COMMAND INTERFACE ..........................................
NAVIGATION MODE ..............................................
STARTING THE NAVIGATION APPLICATION ...........
TYPOGRAPHIC CONVENTIONS.................
ICONS............................................................
INTRODUCTION...........................................
KEY FEATURES ........................................................
GETTING STARTED.....................................
CHOOSING A LANGUAGE .....................................
SETTING THE TIME ZONE ........................................
SAFETY PRECAUTIONS ............................................
GPS CONNECTION .................................................
MAIN ELEMENTS.........................................
MAIN MENU ...........................................................
MAP ........................................................................
NAVIGATION SCREEN ............................................
MAIN FEATURES.........................................
3
3
6
7
8
8
12
12
19
19
22
24
25
26
27
28
28
29
29
29
29
30
31
31
32
34
35
35
45
47
50
54
54
55
55
55
60
62
64
65
71
71
72
77
78
78
78
82
84
85
85
86
87
87
89
89
Directions before using this product
Please read through this section for important safety tips before using this product.
Usage directions
3
Warning Refrain from operating the device while the car is in motion. Please park the car at a safe
location before operating the device to minimize the danger of a traffic accident.
Voice guidance and map routes can be different from actual road conditions. Always be sure
to comply with actual road signs/signals and local traffic regulation for safe driving.
Warning Please do not modify the car in any way to install this device. Doing so may negatively affect
the safety devices on your vehicle.
Warning
Warning The manufacturer will not be liable for any accident or damages arising out of the use of this
product. The user will bear sole responsibility.
Warning
The suction cup mount may become dislodged from the windshield due to vibration, sudden
temperature changes, or unexpected shock, resulting in damage to the device or your car.
Please mount the device in a secure location (refer to the installation section for more details).
Caution Do not keep this product powered for a long time after stopping the engine. This can cause
the vehicle battery to drain.
About Navigation System
Directions before using this product
Installation directions
4
Caution
Only use the cables provided with the device. Always make sure that the device power is off
before connecting any external cables. Connecting external cables with the device powered
may cause damage to the device.
Caution Never attemp to disassemble the device yourself. Avoid applying shock to the device.
Caution Operate the touch screen with a round object or your fingertip. Using a sharp hard object may
damage the display.
Caution When cleaning the screen, turn off the power and use a soft clean dry cloth. Never use water
or chemical substance like detergent or solvent.
Caution
Please do not remove the SD card while data is being accessed from it. It will cause the device
to become unstable and freeze. This includes anytime the device is in the Audio player, the
Video player, the Image Viewer, or the navigation application. If the device freezes, turn off
the system and reboot.
Warning Please follow the instructions in the Installing Product section for connecting all wires and cables
to avoid malfunction.
Warning
Do not install the product in a location where driving can be impaired or where the
driver’s view of the road is blocked.
Warning Install the product in a position that does not interfere with the operation of vehicle safety devices
such as air bags.
About Navigation System
Directions before using this product
5
Caution Use only the cables provided with the product to ensure stable system operation.
Caution This product must be used with 5V power only.
Caution Please power down the device before connecting any audio / video cables, otherwise the
product can be damaged.
Caution Do not install the product in a place with water, humidity, vapor, dust, oil, or smoke.
Caution
For the first time the device is taken out of the box, and any time the device hasn’t been used
for a long time, or after a cross country flight, it may take 5~10 minutes to obtain GPS
position.
Caution
Do not put any objects that may interfere with the GPS signal reception near the device. Most
problematic are any metallic objects that are located near the GPS antenna.
Caution
Do not install other electronic devices that generate heavy electromagnetic waves (such as radio
transmitters) near the GPS antenna.
Caution
GPS reception can be blocked if the car windshield is specially tinted.
About Navigation System
Directions before using this product
Components
6
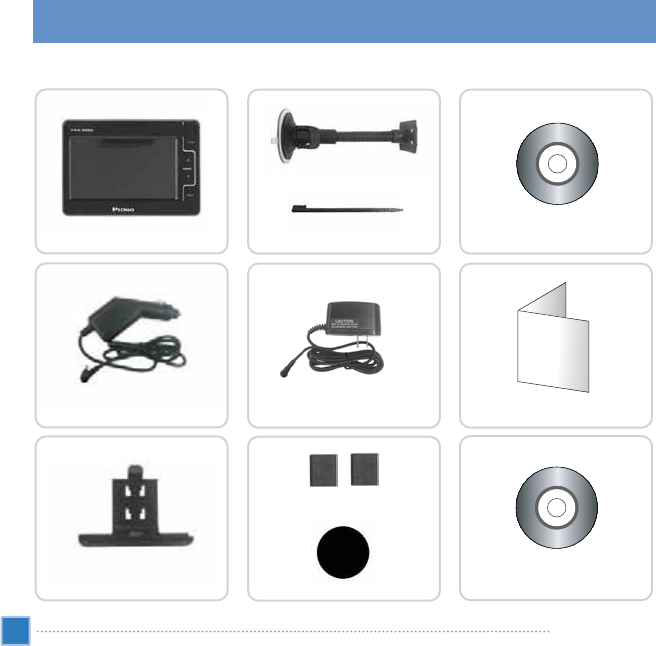
Navigation System unit Installation DiscStylus Pen
Cradle Dashboard disc
Cigar Jack Quick Start GuideAC Adapter
About Navigation System
Components
žSpecifications and design and contents are subject to change without notice.
Suction Cup Mount
Quick Start Guide
Owner’s Guide Disc
Spacer Monitor

VXA-5000/4300 feature highlights
Powerful system
•Microsoft Windows CE .NET 4.2 operating system
•Samsung S3C2410 266 MHz application processor
•SiRF Star III GPS
•High-density rechargeable 2200 mAh Lithium Ion battery
Wide and accurate GPS coverage
•TeleAtlas digital map database
•Integrated patch antenna for optimum satellite pick up at every angle
Mobile design
•Compact and lightweight body makes it easy for users to carry it anywhere while driving or hiking
•Car mount kit for multi-vehicle usage (windshield or dashboard mounting)
•On-the-road recharging options via the car charger
Ergonomic features
•4.3-inch 200-nit QVGA TMR LCD touch-sensitive screen
•Accessible control hot keys with backlight illumination
•Simple, easy-to-use user interface with large icons and command buttons
•Multi-language support for user interface
•Advanced power-saving options
Entertainment programs
•Audio player for musical entertainment
•Video player for moving pictures
•Image viewer for digital pictures
•Enjoyable game
Serviceable program
•Mobile phone mode using Bluetooth (valid in VXA-5000 only)
7
About Navigation System
VXA-5000/4300 feature highlights
This chapter describes the hardware interface of the VXA-5000/4300 and its peripherals. Instructions for setting up
the device and some basic system operations are also discussed.
System tour
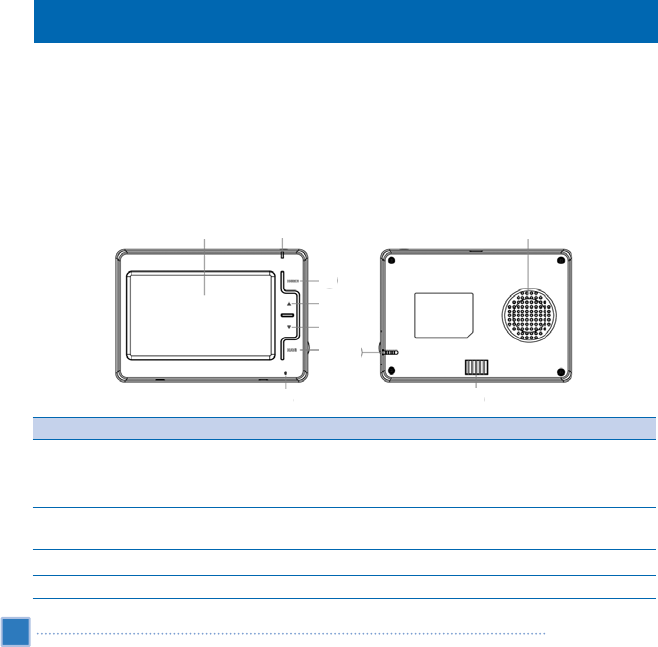
This section describes operation of the device hardware interface.
Rear and front panels
8
First things first
No.
1
2
3
4
Component
Power status LED indicator
Touch screen
Main Menu hot key
Volume up hot key
Description
Indicates the battery power status.
•Green — The device is running on battery power and battery charged.
•Orange — Battery charging
Displays the applications, data, and map images available on your
device. It is touch-sensitive and responds to finger taps.
Displays the Main Menu panel; also called the Home panel.
Press to increase volume.
System tour
ڡڢ
ڣ
ک
ڨ
ڧ
ڦ
ڥ
ڤ
ڪ
Right and left panels
No.
5
6
7
8
9
10
Component
Volume down hot key
Navigation hot key
Microphone
Speaker
Stylus pen
Cradle interface
Description
Press to decrease volume.
Displays the Navigation panel.
Receives user’s sounds (valid in VXA-5000 only).
Emits system sounds.
Stylus pen for touch screen.
Connection pins for cradle.
9
First things first
System tour
ګ
ڭ
ڬ
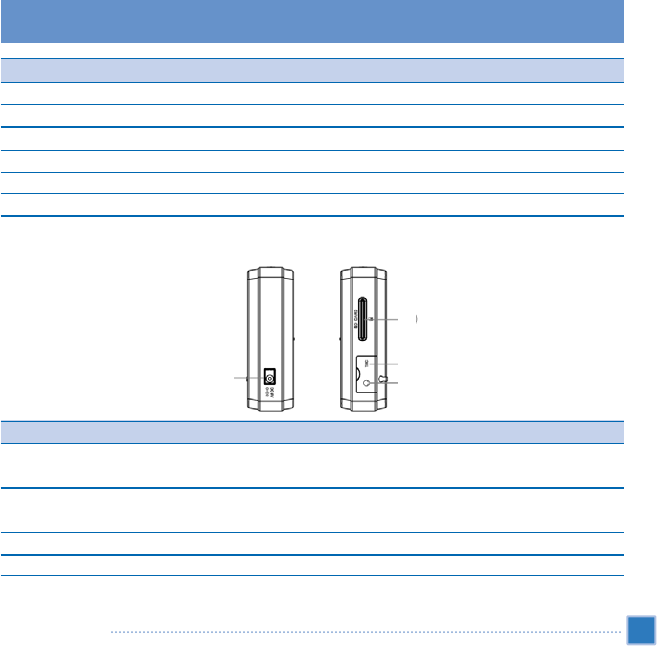
No.
11
12
13
14
Component
Power connector
SD slot
TMC
Earphone jack
Description
Connects the device to an AC power outlet.
(This connect must be used with 5V power only)
Accepts SD storage cards. (All application data are read from SD card,
including map.)
Reserved for future use.
Connects to audio line-out devices (earphones/headphones).
ڮ
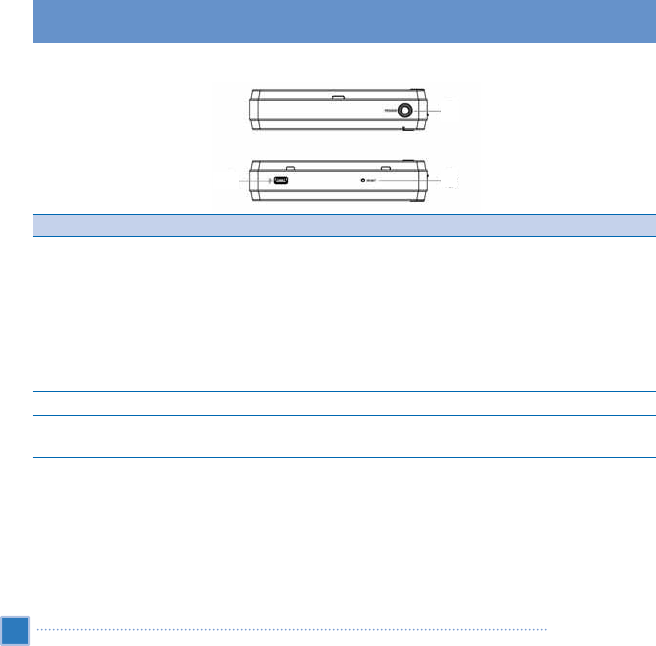
Top and bottom views
10
No.
15
16
17
Component
Power button/
backlight control
USB slave port
Reset
Description
As a power button:
•If the device is off, press the button to turn it on. The power LED indicator on the
front panel lights up green.
•If the device is on, press the button to turn it off. The power LED indicator also
turns off.
As a backlight control:
•Press and hold to activate or deactivate the screen backlight.
Not in use. (Only used at service center for repairs)
Press to perform a soft reset if the device freezes (i.e., device no longer responds to
the buttons on the screen).
First things first
System tour
ױ
گ
װ
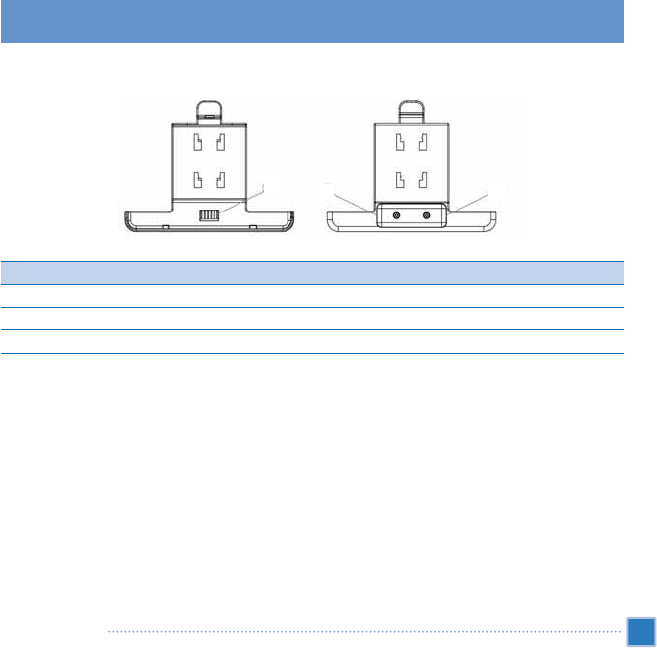
Read and front cradles - Cradle only use in the car.
11
First things first
System tour
No.
18
19
20
Component
System interface
External antenna
Power connector
Description
Interface for system unit connection.
Interface for an external GPS aerial interface. (Is not use)
Connects to an AC adaptor.(This connector must be used with 5V power only)
ײ׳״
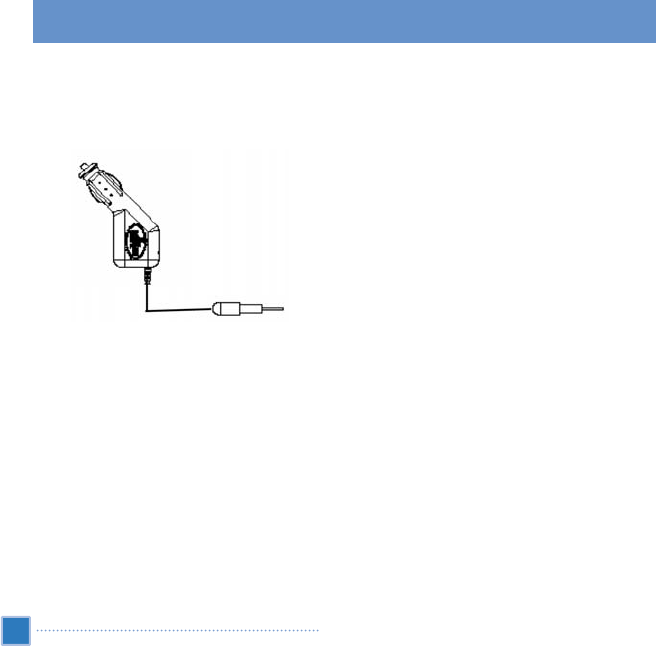
Peripherals tour/VXA-5000/4300 setup
Peripherals tour
This section describes the peripherals bundled with the VXA-5000/4300.
Car charger
VXA-5000/4300 setup
Using the new VXA-5000/4300 is a snap. Unpack, mount, turn on, and it’s ready to go. Perform the following easy
installation tasks to start using the device straight out of the box:
1. Unpack the device.
2. Set up the device on a vehicle.
3. Insert provided SD card.
Turn on and configure the device.
Setup the VXA-5000/4300 on a vehicle
The VXA-5000/4300 comes with a car mount kit and a car charger which you can set up the device on a vehicle.
Choose a location for the car mount kit on the windshield using the suction cup, or on the dashboard using the self-
adhesive disc plate (adhesive to dashboard and smooth surface to suction cup).
12
First things first

Some countries prohibit mounting of any electronic device on the vehicle dashboard. Be sure to check your
local laws for acceptable mounting areas before installing the car mount bracket.
Some newer vehicle models may have a heat reflective shield embedded in the windshield. This may in some
cases obstruct the GPS signal reception. If you encounter this problem in your vehicle, you need to purchase
an external GPS antenna.
Car mount installation reminders
Install the car mount on the surface of a vehicle:
•That is smooth, flat and free of dirt and oil
•Where the driver can easily view/reach it without taking his/her eyes off the road
•Where the device will not obscure vehicle operation nor restrict driver's view of the road
•Far from the air bag deployment area
To set up the device on a vehicle:
This section shows how to install the car mount kit in a vehicle’s windshield using the suction cup. For dashboard
installation procedure using the self-adhesive power disc connector, refer to the VXA-5000/4300 Portable Navigator
Starter Guide.
1. Clean the mounting surface with a glass cleaner and a clean cotton cloth.
2. If the ambient temperature is below +15°C (60°F) warm the mounting area and the suction cup (e.g. with a hair
dryer) to ensure a strong suction bond.
3. Install the car mount on the selected area.
a. Mount the suction cup to the selected area with the locking lever away from the mounting surface.
b. Flip the locking lever towards mounting surface to create a vacuum between the suction cup and the mounting surface.
13
First things first
VXA-5000/4300 setup
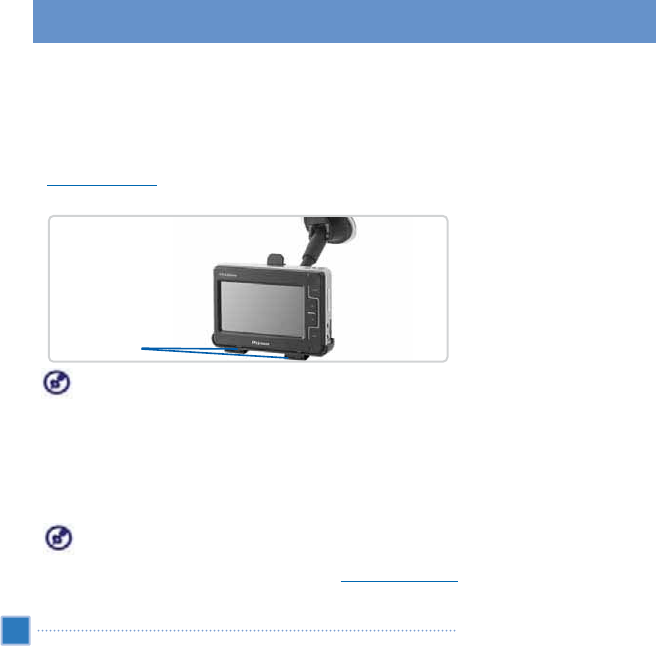
c. Make sure that the suction bond is strong enough before proceeding to the next step.
d. Insert the pegs into holes in back of cradle and then move the cradle downwards while holding mounting arm
firmly until both parts are locked in place.
4. Dock the device on the cradle.
5.
Adjust the car mount
for the best viewing angle.
6. After setting up the device on the car mount, connect the car charger.
If the car engine is turned off, you may need to switch the vehicle ignition back into the Accessories position.
Consult your vehicle owner’s manual.
7. Connect the car charger to the power connector on the cradle.
8. Plug the other end of the car charger to your vehicle’s cigarette lighter.
9. The power LED indicator lights up orange during charging. The hot keys backlight is also lit up.
The device comes with the battery pre-charged to at least 30% capacity. You can start using it once it is
mounted in your vehicle and connected to the cigarette lighter. However, for maximum usage time you need
to charge your device to full capacity. Go to the “
Recharging the device
”section for instructions.
14
First things first
VXA-5000/4300 setup
Spacer Monitor
Start up the VXA-5000/4300
After mounting the VXA-5000/4300 on a vehicle it is ready to be used.
Power Up
Turn on the device by pressing the
POWER
button on the top right panel of the device. The Main Menu panel
displays. This is also referred to as the Home panel.
Calibrate touch screen:
Before using the device, calibrate the touch screen. Touch screen calibration option is under SYS INFO. as
Calibration.
To calibrate touch screen, follow the instruction displayed after selecting “
Calibration
”. For detailed procedure, see
“
System Maintenance and User Support section
”.
After screen calibration, proceed to system settings configuration
15
First things first
VXA-5000 VXA-4300
VXA-5000/4300 setup
To configure system settings:
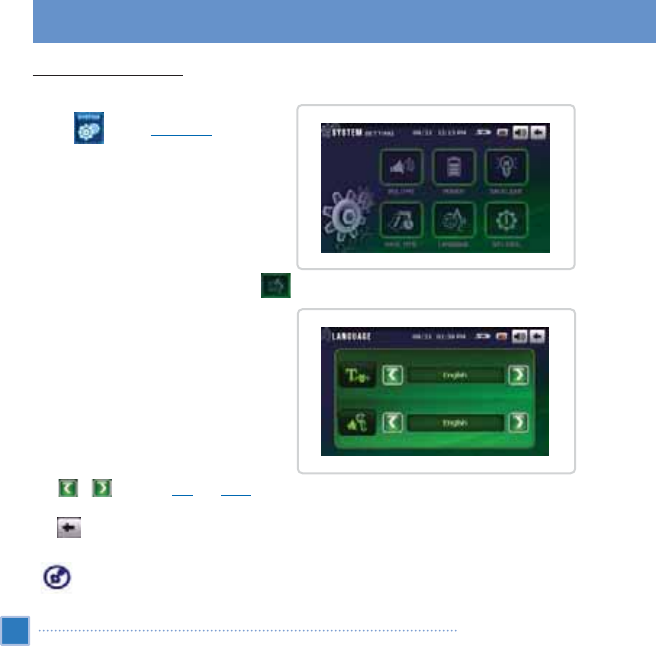
We recommend configuring the language and date/time settings first. The rest of the user preferences can be set up later.
1. Tap On the
Main Menu
panel.
2. To set the system language settings, tap (LANGUAGE).
Tap / next to the
Text
and
Voice
boxes until the language ice is displayed.
Tap to apply language setting.
Main menu language setting only applies to main menu display. Navigation mode language setting only
applies to navigation mode.
16
First things first
VXA-5000/4300 setup
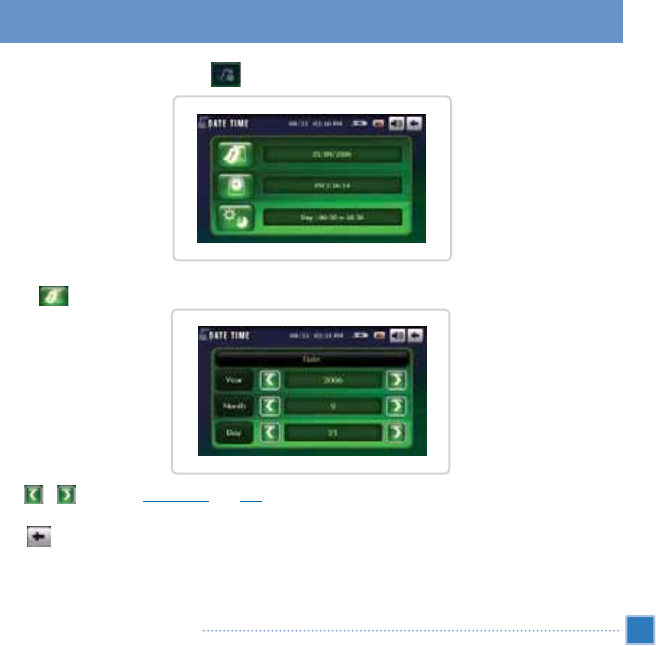
3. To set the system date and time, tap (DATE TIME).
4. Tap .
Tap / next to the
Year, Month
and
Day
boxes to set the date.
Tap to apply date setting.
17
First things first
VXA-5000/4300 setup
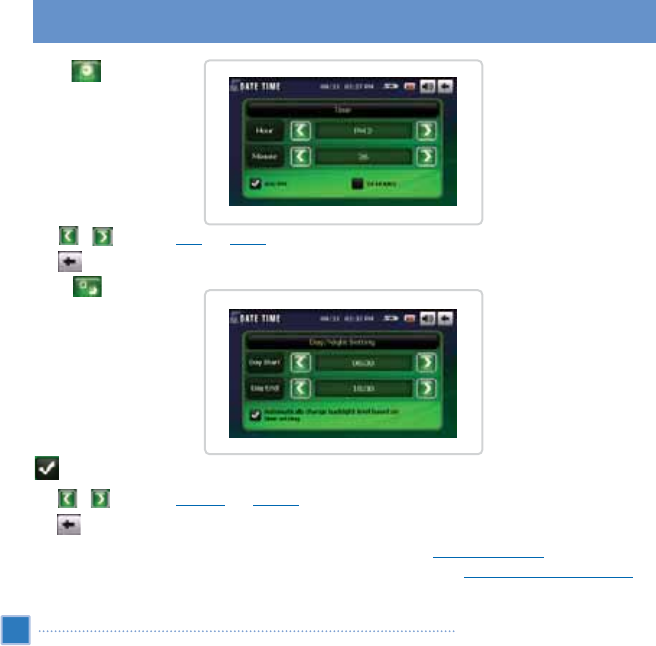
5. Tap .
Tap / next to the
Hour
and
Minute
boxes to set the time.
Tap to apply time setting.
6. Tap .
Check this box to enable automatic day/night backlight settings
Tap / next to the
Day Start
and
Day End
boxes to set the day/night time.
Tap to apply day/night settings.
For more information on the rest of the system configuration options, go to “
System configuration
”.
Congratulations! Your new VXA-5000/4300 is now ready for use. Proceed to “
VXA-5000/4300 fundamentals
”for
more information on the device’s user interface.
18
First things first
VXA-5000/4300 setup
This chapter describes basic hardware procedures for VXA-5000/4300. Information on the device’s command
interface is also discussed.
Hardware interface
Using the touch screen backlight
Under some lighting conditions, viewing the information on the device maybe difficult. If this is the case use the
backlight to illuminate the touch screen.
To activate the touch screen backlight:
•Press and hold the
POWER
button until the backlight turns on.
To turn off the touch screen backlight:
•Press and hold the
POWER
button until the backlight turns off.
Using the SD slot
VXA-5000/4300 has an SD slot compatible with a range of SD storage card that you can use to back up or transfer
files and data.
To insert a storage card:
•Hold the device securely, and then push the card into the slot until you hear an audible system sound; this will
signal that the card is properly seated within the slot. The card is secure when it is not protruding from the slot. If
the located on the top side of the menu panel appears highlighted , the system has successfully detected
the SD card memory.
19
VXA-5000/4300 fundamentals
Hardware interface

To remove a storage card:
1. Hold the device securely, and then push against the top of the card, as if you were pushing it further into the slot,
letting the card spring out. An audible system sound will signal that the card has been released.
2. Gently remove the card from the slot.
Recharging the VXA-5000/4300
VXA-5000/4300 uses a high-density rechargeable 2200 mAh Lithium Ion battery. The status icon located on the top
right corner of the Main Menu panel indicates the level of the device’s battery power.
•- Battery full charged
•- Battery charging
•- Battery level low
•- Battery level very low, recharging required
•- Battery power depleted, device will automatically turn off; recharging required
If the battery level becomes low in the course of normal use, recharge the device. If possible, please use the AC
adapter to recharge the VXA-5000/4300. However, this may be difficult when there’s no available AC power outlet.
If battery is drained while on the road, you can still recharge the device by using the car charger cable. Recharging
time from empty to full capacity is about six (6) hours in all cases.
If the battery level reaches very low status, the device will automatically turn off. At this stage, you have
about 12 hours to recharge your device or you risk losing all data in the device's internal memory. In the
case when all data is lost, the next power up will prompt you to restore the data.
20
VXA-5000/4300 fundamentals
Hardware interface
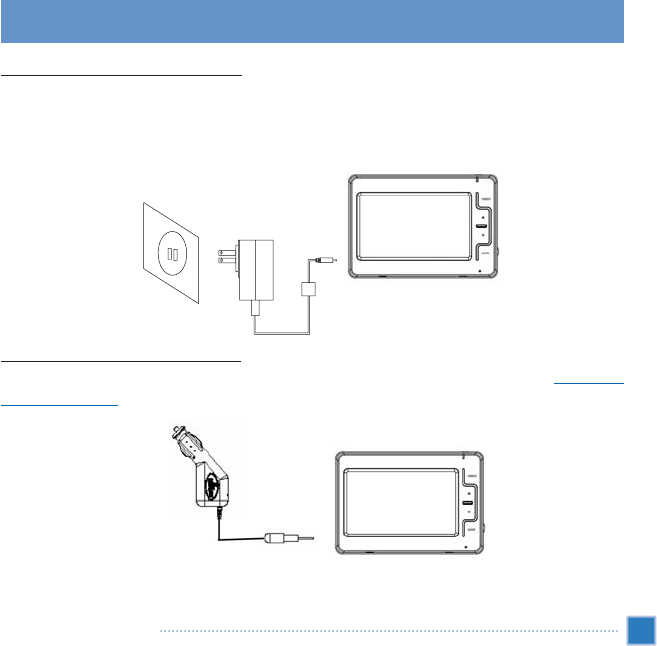
To recharge the device using the AC adapter:
1. Plug the AC adapter into any AC current outlet.
2. Connect the AC adapter cord to the power connector on the left panel of the device.
The power LED indicator lights up orange during charging. The backlight for hot keys also lights up.
3. Once charging is complete, as indicated by green light on power LED, disconnect the AC adapter cord from the device.
To recharge the device using the car charger:
Use the car charger to recharge the device while it is mounted in the vehicle. Perform step 7 of the “
To set up the
device on your vehicle
”section for instructions.
21
VXA-5000/4300 fundamentals
Hardware interface

Command interface
Using the hot keys
The hot keys on the VXA-5000/4300 allow users to:
•
HOME
: Launch the Main Menu panel
•Ƈ/Ɖ: Control the volume level of system sounds
•
NAVI
: Launch the Navigation panel
All four hot keys light up when pressed, for easier operation under low light conditions.
Using the VXA-5000/4300 touch screen
The VXA-5000/4300 touch sensitive screen allows convenience of entering information into the device by using
fingers instead of a stylus; no more wasted time searching for a lost stylus or fumbling with an awkwardly shaped
one! In this Guide, the tap and hold-and-drag actions are done by:
•
Tap
- Touch the screen once with your finger to open items and select options.
•
Hold and drag
- Tap a slider icon and drag it across the screen. In IMAGE VIEWER mode, hold and drag the
image to pan it in different directions.
•
Return
- Tap to apply any change in settings and/or revert to the previous screen.
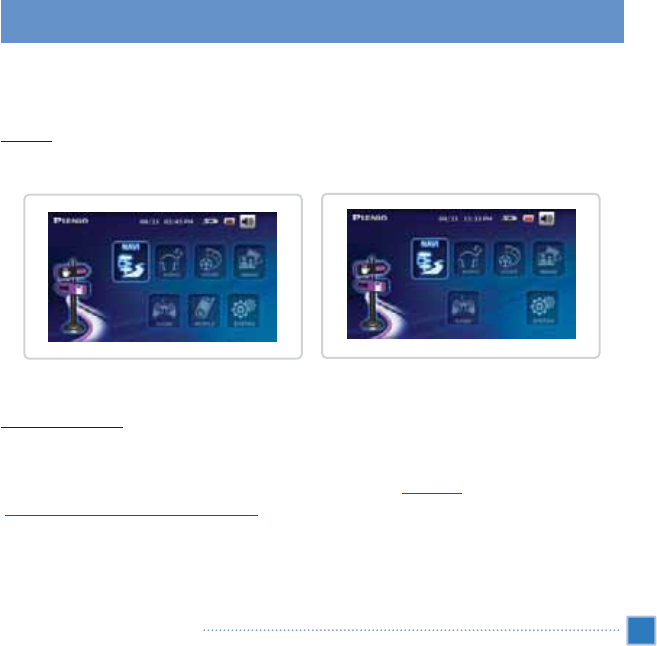
Using the Main menu panel
When the device turned on for the first time each day, you’ll see the Main Menu panel, also called the Home panel.
From any other screen, you can revert to it by pressing the Main Menu hot key
HOME
.
22
VXA-5000/4300 fundamentals
Command interface
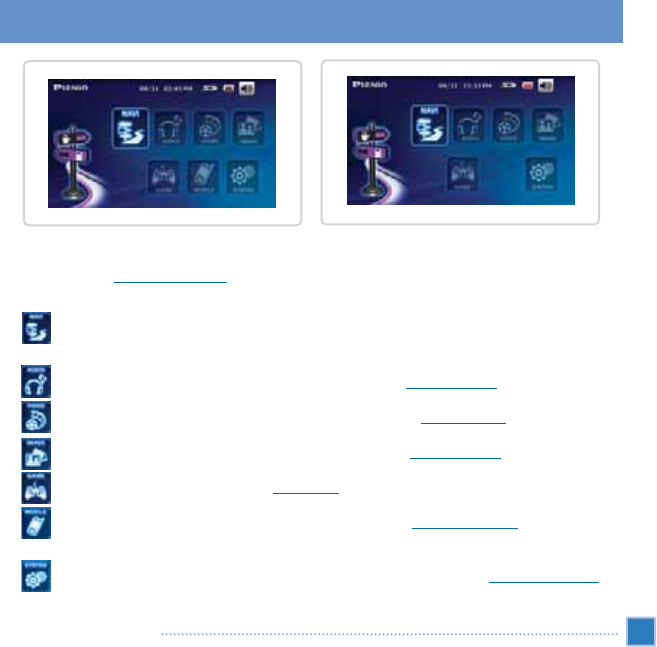
The panel’s title bar displays the panel name, the current time, the SD memory card detection icon, and the battery power
status icon. Go to the “
Recharging the device
”section for more information on the battery power status icon.
There are seven program icons on the Main Menu panel.
•- Tap to display the Navigation panel. Refer to the Gate 5 User’s Guide for more information on how to
use the device in navigation mode.
•- Tap to launch AUDIO PLAYER for music mode operation. Go to “
Multimedia mode
”for more information.
•- Tap to launch VIDEO PLAYER for moving picture mode operation. Go to “
Multimedia mode
”for more information.
•- Tap to launch IMAGE VIEWER for picture mode operation. Go to “
Multimedia mode
”for more information.
•- Tap to launch Cuty Cuty game. Go to “
Game mode
”for more information.
•- Tap to launch MOBILE for mobile phone mode operation. Go to “
Mobile Phone mode
”for more
information. (this is valid in VXA-5000 only)
•- Tap to open the System panel to configure the device’s user preferences. Go to “
System configuration
”for
more information.
23
VXA-5000/4300 fundamentals
Command interface
VXA-5000 VXA-4300

Navigation mode
Starting Navigation application
•The SD card must be inserted into the unit to launch the Navigation application. Please make sure that the SD
card is not write protected (the slide knob on the left side of the SD card must be in the up/unlock position). The
SD card is inserted into the device with the gold contacts facing you. Push the SD card all the way into the slot until
you feel a click. When properly inserted, the SD card should be flush with the opening of the slot.
•Switch on the unit, and tap in the Main Menu.
•When the navigation application is launched for the first time and if more than one language is loaded on your
SD card, you will be prompted to choose your language. (Multiple languages files are available on the provided
DVD or CD)
•Before the application loads, an important safety warning disclaimer will be displayed. Please read carefully. You
can choose to hide this screen for subsequent start ups by checking the “
Hide at startup
”box before proceeding.
When the device is powered on for the first time, the GPS receiver needs to find strong signals to download the
necessary data before a position solution can be calculated. Please have your car parked in a location with a clear
view of the sky for this initial data download. Depending on conditions, this may take up to 5 minutes before a GPS
position is captured. After this initial procedure, subsequent start ups should provide position in less than 1 minute.
However, if you have not used the unit for more than a few days, or if you are far away from where you last powered
down the unit, it may take up to 5 minutes again to receive the necessary data again.
Refer to the Gate 5 User’s Guide for more information on how to use the device in navigation mode.
24
VXA-5000/4300 fundamentals
Navigation mode
This chapter describes the entertainment programs bundled with your VXA-5000/4300.
If the battery level reaches very low status, the device will automatically turn off. In this case, you have about
12 hours to recharge your device after which you risk losing all data on the device's internal memory. In
case all data is lost, the next time you power on the device you will be prompted to restore the data.
Starting the Navigation application
•The SD card must be inserted into the unit to launch the Navigation application. Please makesure that the SD card
is not write protected (the slide knob on the left side of the SD card mustbe in the up position). The SD card is
inserted into the device with the gold contacts facing you. Push the SD card all the way into the slot untill you feel a
click. When properly inserted, the SD card should be flush with the opening of the slot.
•Switch on the unit, and tap on the NAVIGATION icon in the main menu.
•When the navigation application is launched for the first time, if more than one language is loaded on your SD
card, you will be prompted to choose your language. (Multiple languages files are available on the provided DVD)
•Before the application loads, an important safety warning disclaimer will be displayed. Please read carefully. You
can choose to hide this screen for subsequent start ups by checking the “Hide at startup”box before proceeding.
When the device is powered on for the first time, the GPS receiver needs to find strong signals to download the
necessary data before a position solution can be calculated. Please have your car parked in a location with a clear
view of the sky for this initial data download. Depending on conditions, this may take up to 5 minutes before a GPS
position is captured. After this initial procedure, subsequent start ups should provide position solution in less than 1
minute. However, if you have not used the unit for more than a few days, or if you are far away from where you last
powered down the unit, it may take up to 5 minutes again to receive the necessary data again.
25
VXA-5000/4300 fundamentals
Starting the Navigation application

Bold
Items you must select, such as menu options, command buttons or items in a list.
•Bullet
Step-by-step procedures. You can follow these instructions to complete a specific task.
Comment
Especially important or noteworthy information.
Monospace
Information that you must type, or information like folders and filenames.
CAPITALS
Names of keys on the keyboard. For example, SHIFT, CTRL or ALT.
Typographic Conventions
26
Typographic Conventions
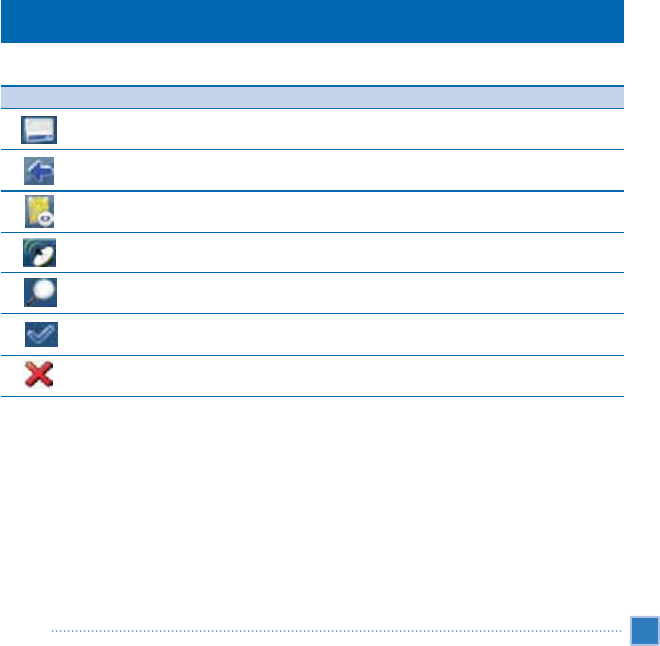
The following icons are used throughout the application:
27
Icons
Icons
Icon Name
Menu icon
Back icon
Navigation icon
GPS icon
Search icon
Confirmation icon
Cancel icon
Function
Open a menu containing various options.
Go back to the previous screen.
Start navigation.
Availability/strength of GPS signal.
Open a search screen.
Apply settings. Select/deselect all.
Cancel route calculation.

You have chosen a cutting-edge navigation system. Congratulations! Please enjoy using it. This navigation system
leads you straight to your destination, whether you are traveling by car or on foot. You can navigate and plan your
route with an easy-to-use and intuitive interface, just by using your finger. You can also use this application to plan
your trip to suit your personal preferences and interests and to save interesting destinations before you set off on your
journey. This manual leads you through the main features of the system.
Key Features
•Real pedestrian mode
•Trip planning
•Look-ahead search function
•Map Browsing
•Unique night mode
•Improved guidance engine
Key Features
28
Introduction

Please make sure that the battery in your device is fully charged.
•Switch on the unit and tap NAVI or NAVIGATION in the first screen.
Choosing a Language
If more than one language is available on your device, you are prompted to choose your language.
•Click the flag representing your country/language.
•On the following screen, choose the voice skins used for the voice commands during navigation (e.g., female or
male voice).
Setting the Time Zone
Your PND is able to automatically determine the time through the GPS signal. For this purpose, you need to set your
time zone.
•Choose your time zone from the list. It can be changed at a later time (see page 51).
•Press the Confirmation icon.
Safety Precautions
Next, a screen with safety precautions will be shown.
•Read the safety precautions.
•Select Hide at startup to hide these notes for future start-ups.
•Press the forward arrow.
29
Choosing a Language/Setting the Time Zone/Safety Precautions
Getting Started
GPS Connection
Your PND uses GPS technology for navigation. The device receives signals from a number of GPS satellites in order to
determine your current position.
•Place your PND in a location with an unobstructed ‘view’to the sky to set up your first satellite connection. In a car
this will usually be on the dashboard.
It may take up to 5 minutes to establish the first connection. Subsequent connections will be faster (30 seconds
to 1 minute), but if you have not used the unit for several days or are very far away from the last location
where you used it, it may take up to 5 minutes again to find a strong signal.
GPS Connection
30
Getting Started
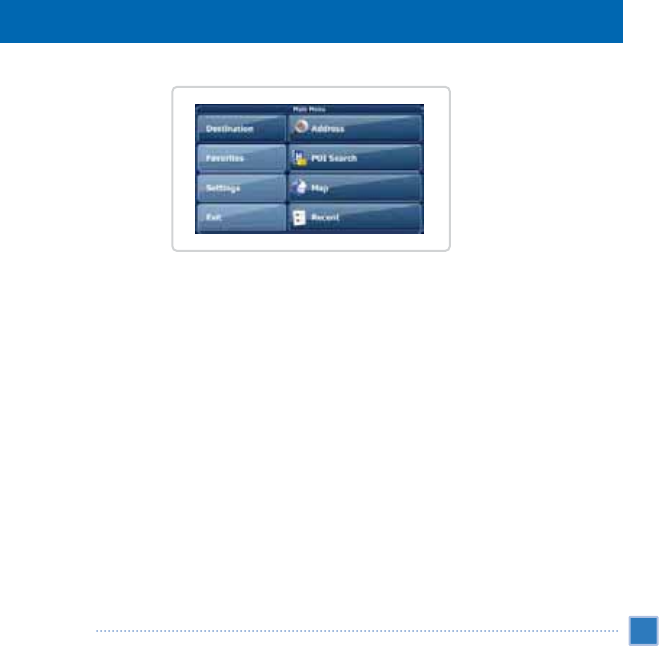
Main Menu
The main menu is your central point of access to all functions of your Personal Navigation Device. It allows you to set
your destination, manage your favorites and control all settings of your device.
On the left-hand panel there are three large buttons. Click one of the buttons to open a set of sub-options:
•Destination lets you choose your destination - either by searching for an address (see page 35), choosing an entry
from the POI directory or a city guide (see page 40), selecting a location from the map (see page 42) or a
recently visited location favorite (see page 44).
•Favorites allows you to manage your favorites (like bookmarks, recently visited locations, trips). You can rename,
sort or delete them (see page 42).
•Use Settings to configure your Personal Navigation Device to suit your needs. Define general settings (e.g., time,
language, system of measurement, see page 50), configure your map (e.g., 2D or 3D mode, day or night mode,
map complexity) or load a map of a different region (see page 51), set the route options (e.g., choose to avoid or
allow toll roads or ferries or select your mode of transportation; see page 50) or adjust the volume (see page 53).
31
Main Menu
Main Elements
Map
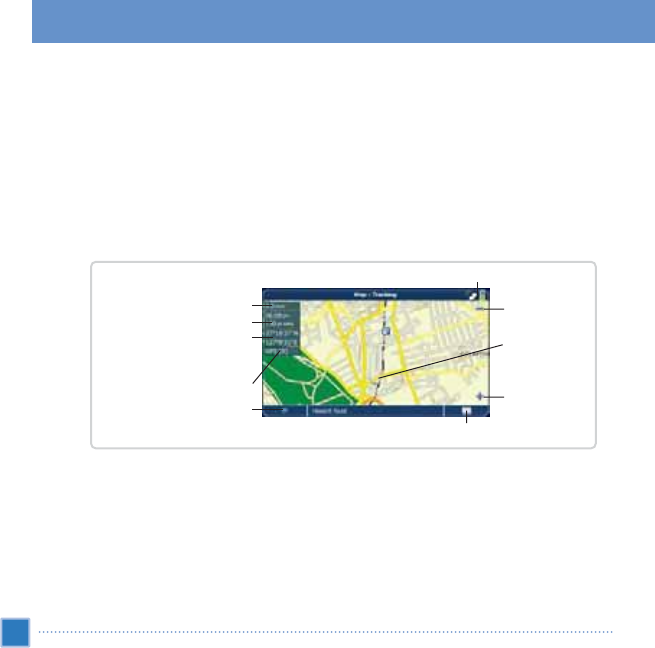
The map is the core component of your Personal Navigation Device. It is centered on your current location by default,
provided you have a GPS connection. You can browse the map, display information about the different locations
shown on it and, e.g., choose them for routing and navigating.
Tracking Mode and Browsing Mode
The map has two basic states: tracking and browsing.
In the tracking mode, the map follows your actual position (GPS position), displaying information about your geographic
position, your speed, etc. The GPS position is indicated through the crosshairs.
Map
32
Main Elements
Elevation above mean sea
level Geographic coordinates
Speed
Time
Back icon Zoom in
Menu icon
GPS position
Zoom out
GPS status Battery status
GPS info
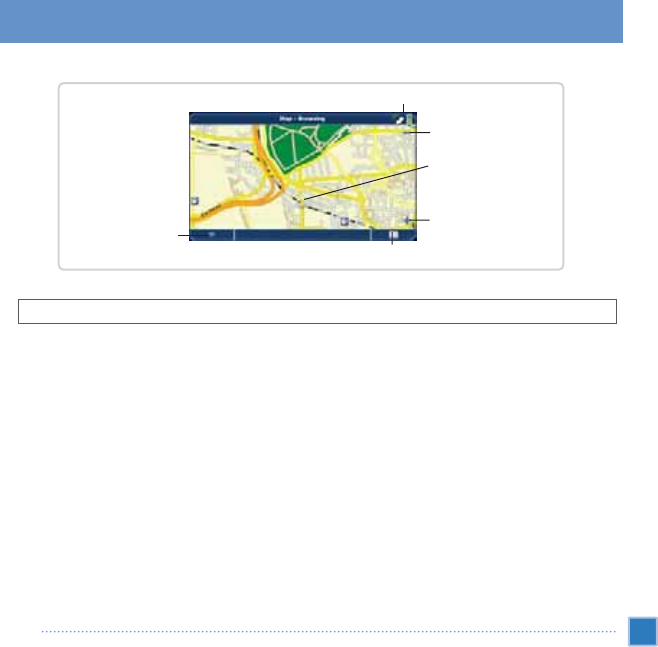
As soon as you browse the map, you enter the browsing mode:
•Use a pen or your finger to browse the map. The selected position will be identified by a cursor.
Clicking an icon on the map will open an overlay window with information about the selected item.
•To zoom in or out, press the + or - icons. As soon as you press one of the icons, the zoom slider is displayed to
enable smooth zooming.
•Use the Compass icon (in the bottom left-hand corner) to adjust the orientation.
•If you want to return to the tracking mode, press the Back icon.
33
Map
Main Elements
Back icon Zoom in
Menu icon
GPS position
Zoom out
GPS status Battery status
Navigation Screen
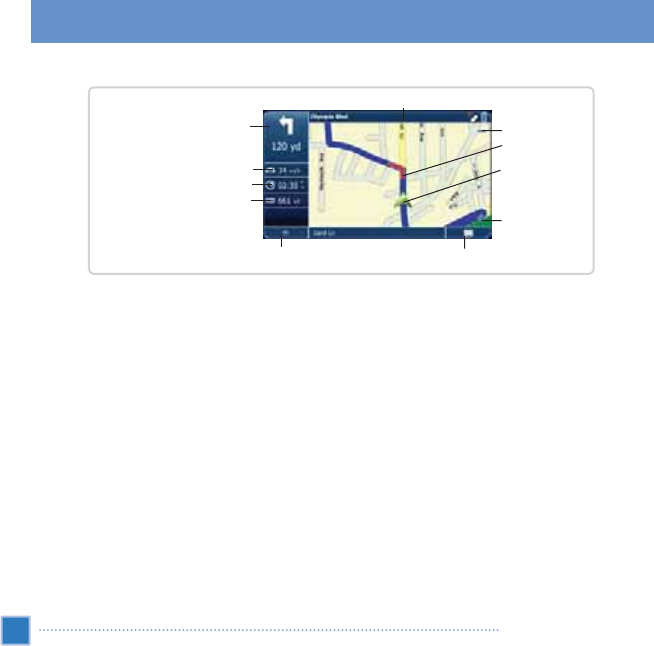
The navigation screen displays your route (in blue) and your surroundings. Crosshairs identify your current position.
The red arrow indicates the direction of your next turn. The upcoming maneuver is also visualized in the upper left
corner, together with the distance to it. When you approach a turn, there will be a voice command at the appropriate
time.
On the left side, additional information is displayed, such as current/estimated arrival time and the distance to your
destination.
In one-way streets, the direction of travel is indicated by a red arrow.
For more information about navigation see page 45.
Navigation Screen
34
Main Elements
Speed Current time
Estimated arrival time
Maneuver icon
Distance to next maneuver
Back icon
Zoom in
Menu icon
GPS position
Zoom out
Next turn/junction/exit no.
Distance to destination
Direction

This chapter describes the functions of your Personal Navigation Device in detail. On the following pages you will
learn how to
- Find and choose locations (see page 35)
- Navigate to your destination (see page 45)
- Use the route planner (see page 47)
- Configure the application (see page 50)
Choosing and Finding Locations
This section describes the different ways of finding and choosing locations. You can search for an address, browse
POI directories and city guides, choose locations on the map and choose one of your favorites (like home and work
address, your bookmarks and recently visited locations).
Searching for an Address
Use the address search function to find an address. Just enter information about the desired target, select a hit from
the results list and use the address found for different purposes, like showing it on a map, planning your route and
navigating.
•In the main menu, press Destination.
•Press Address.
35
Choosing and Finding Locations
Main Features
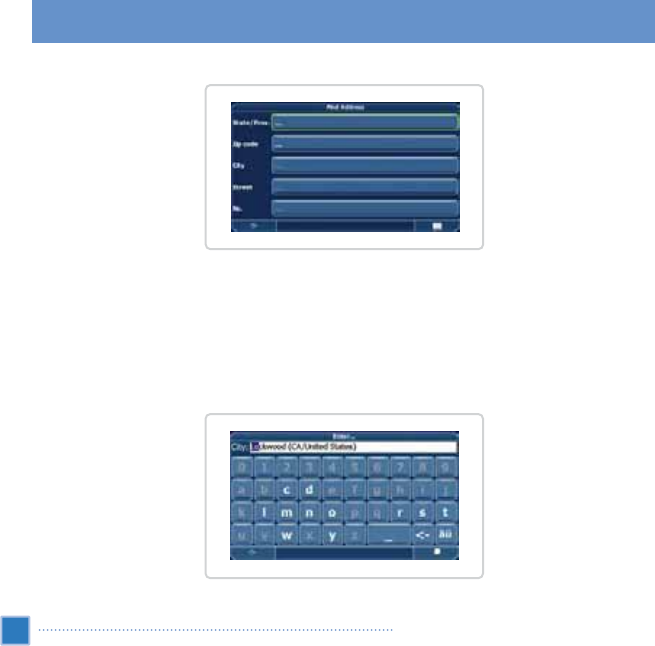
The Find Address window will be called up:
•Enter the appropriate data to find your address.
How to search
Your Personal Navigation Device offers a convenient interactive look-ahead search function to prevent misspelling.
Only keys that lead to a search result can be pressed - all others are grayed out!
•Enter the first character.
You will see that the some keys on the keypad turn gray. You can only choose black keys:
Choosing and Finding Locations
36
Main Features
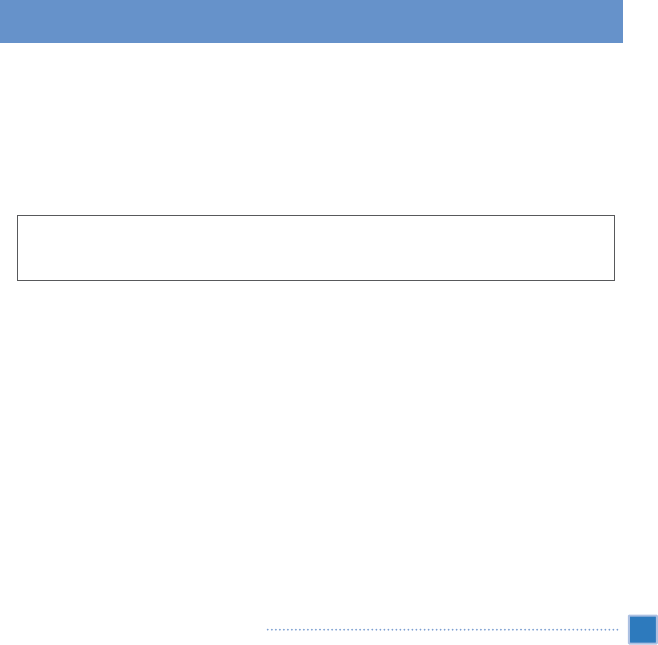
•Enter the second character.
Again, some keys will turn gray; others will turn black, depending on your choice.
•Keep on entering characters until you have narrowed down the search to only one result.
OR
•Press the Search icon (magnifying glass).
A result list will be displayed.
•Choose the appropriate entry from the list.
If at any point you want to go back and delete characters, press the backspace button <- on the screen. To
add a space, press the space bar _.
If you need to enter an apostrophe (‘) use the space key instead.
Set the country
•To select your state, press State/Prov..
•Choose your state from the list.
The State/Prov. field will be populated with the name of the chosen state.
Enter a zip code
Instead of a city you may enter a zip code.
•To enter a zip code, press Zip code.
•Enter the zip code of the town/city you are looking for.
•Press the Search icon (magnifying glass).
A hit list will be displayed.
•Choose the appropriate town/city from the list.
You will return to the Find Address screen, and the City and Zip code fields are populated with the chosen city/zip code.
37
Choosing and Finding Locations
Main Features

Search for a city
•To select a city, press City.
•Search for the city as described above.
A result list will be displayed.
•Choose the appropriate town/city from the list.
You will return to the Find Address screen, and the City field is populated with the name of the chosen town/city.
Search for a street
•To select a street, press Street.
•Search for the street as described above.
A result list will be displayed.
•Choose the appropriate street from the list.
You will return to the Find Address screen, which now contains the data previously entered.
You may also enter the number.
Main Features
Choosing and Finding Locations
38
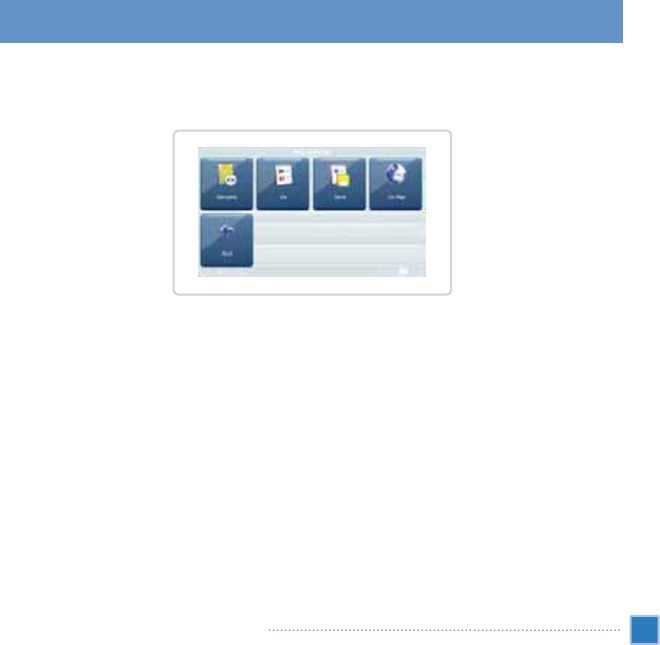
Navigate to the address found
Once you have narrowed down your search to a unique address, you can start navigation.
Press the Menu icon to access further options:
•To navigate to the location, press Navigate (see page 45).
•To use the location for planning a route, press Via (see page 47).
•To save the location as a bookmark, press Save (see page 42).
•To show the location on the map, press On Map.
Main Features
Choosing and Finding Locations 39
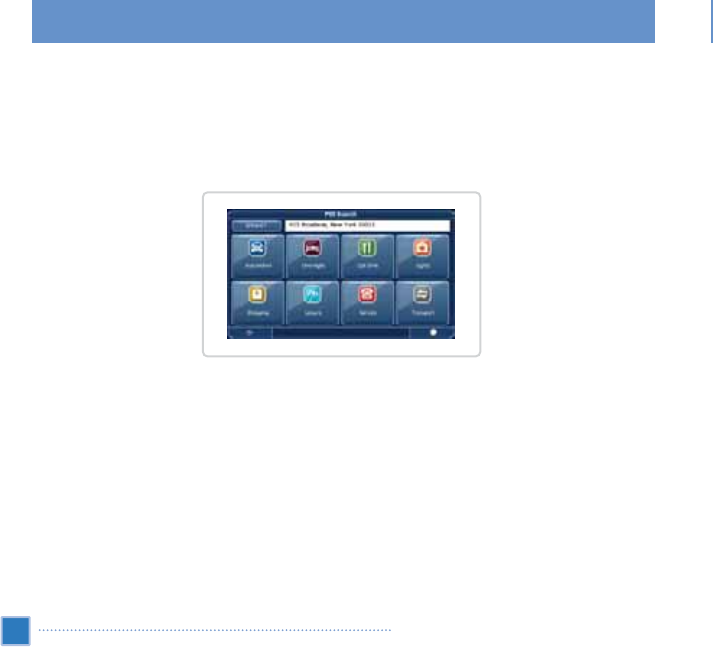
Searching for and Choosing POIs
The POI finder allows you to quickly find points of interest like gas stations and restaurants in a database of millions
of POIs. These places can be nearby or at a distant location.
•In the main menu, press Destination.
•Press POI Search.
The POI Search screen will be displayed:
Choosing a POI
•Select the desired POI category.
A menu with subcategories will be shown.
•Select a subcategory (if applicable).
•To return to the previous category, press the Back icon.
A list of POIs will be shown.
•Select a POI by clicking it.
A menu with a set of actions will be displayed:
Main Features
Choosing and Finding Locations
40
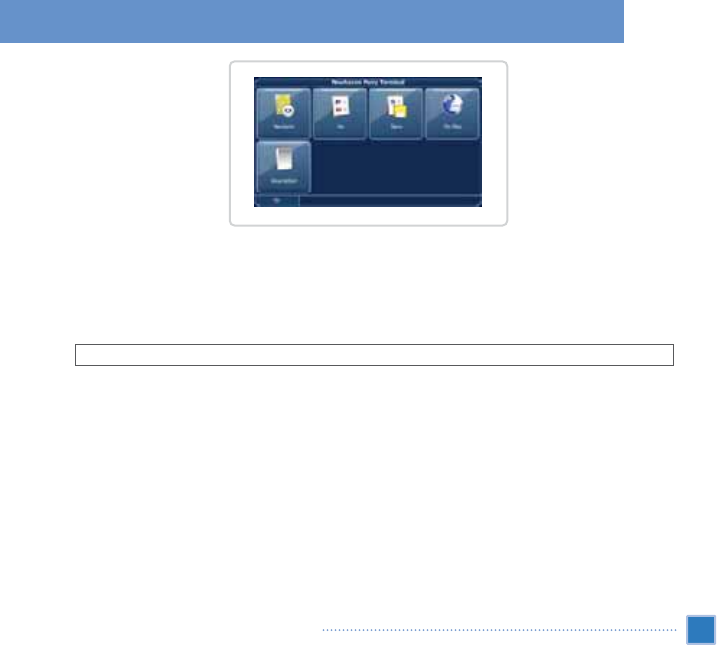
•To navigate to the location, press Navigate (see page 45).
•To use the location for planning a route, press Via (see page 47).
•To save the location as a bookmark, press Save (see page 42).
•To show the location on the map, press On Map.
•To show information about the location, press Description.
To set a starting point, press Where?. POIs near that point will be displayed.
Searching for a POI
•To enter a search keyword, press the Search icon.
•Enter the search keyword (at least three characters), and press the Confirmation icon.
A list of POIs will be shown.
•Select a POI by clicking it.
A menu with a set of actions will be displayed as described above.
Main Features
Choosing and Finding Locations 41
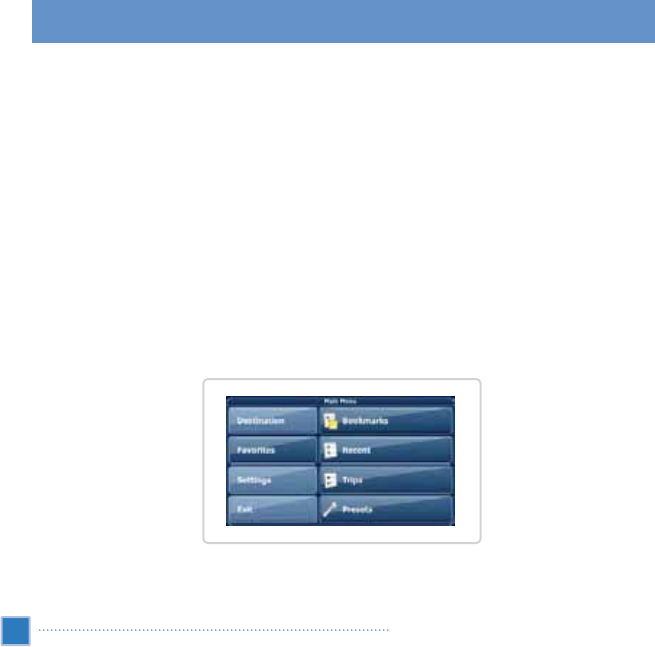
Choosing a Location on the Map
An easy way to choose a location is to select it on the map. Browse your surroundings and choose any street or
location to use it for navigation or routing.
•In the main menu, press Destination.
•In the main menu, press Map.
•Point the cursor at any place on the map. The name of the selected location/street will be shown in the info box.
•Press the Menu icon.
From the following menu you can choose to be guided to the address, use it for route planning, show it on the map,
etc. (see page 45).
Favorites
Use your frequently used or favorite destinations for guidance. You can choose among your bookmarks, recently
visited locations, previously saved trips (see page 47) and presets (e.g., your home or place of work).
•In the main menu, press Destination.
•In the main menu, press Favorites.
Main Features
Choosing and Finding Locations
42
Bookmarks
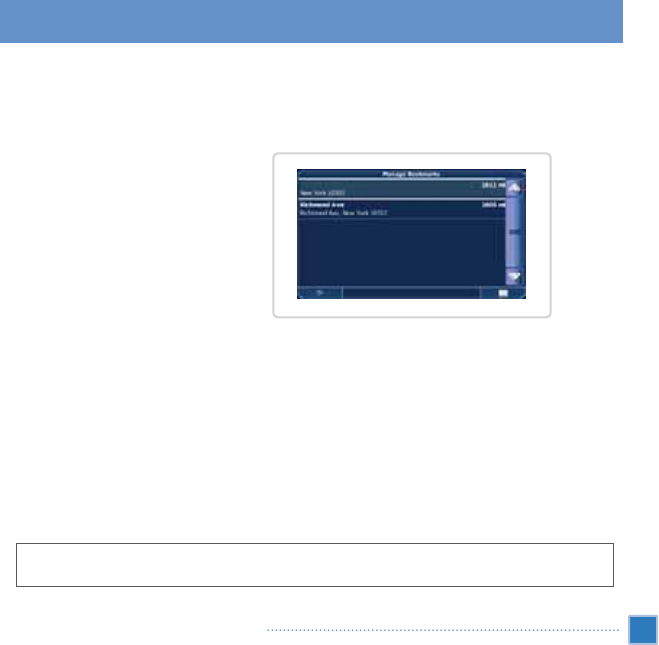
The bookmarks list contains the destinations you have saved as favorites (from the guides, by choosing them on a
map, etc.). This means that you do not need to perform repeated searches for those destinations.
•Press Bookmarks.
The bookmark list will be displayed on the screen:
Use the up and down arrows to scroll up and down in the list.
•Select an item by clicking it.
A menu with a set of actions will be displayed:
•To navigate to the location, press Navigate (see page 45).
•To use the location for planning a route, press Via (see page 47).
•To sort the list of location alphabetically, press Sort.
•To show the location on the map, press On Map.
•To delete the selected location, press Delete selected.
•To edit the location, press Rename.
•To delete all locations, press Delete all.
All user information such as settings, bookmarks and recently visited locations are stored on the memory
card and not on the device.
Main Features
Choosing and Finding Locations 43

Recent
Pressing Recent opens a list of recently visited or looked-up destinations.
•Press Recent.
The list of recent items will be displayed on the screen.
Use the up and down arrows to scroll up and down in the list.
•Select an item by clicking it.
A menu with a set of actions will be displayed as described above.
Trips
•To access your previously saved trips, i.e., routes, press Trips (see page 47).
Presets
You can save your home and street addresses as presets for quick access.
•Press Presets.
•Press My Home.
A menu with a set of actions will be displayed:
•To navigate to the location, press Navigate (see page 45).
•To edit the location, press Rename.
•To delete the location, press Delete selected.
•To show the location on the map, press On Map.
•To use the location for planning a route, press Via (see page 47).
•To delete all locations, press Delete all.
If no home address has been set, you are prompted to do so. You can choose it by searching for an address,
through your current GPS position or by choosing a recently visited location.
Proceed similarly with your work address.
Main Features
Choosing and Finding Locations
44
Navigating
The powerful navigation capabilities of your Personal Navigation Device guide you along the shortest or quickest
route from A to B - with voice commands and in 3D.
This section describes the navigation feature.
See page 42 for information about choosing elements on the map. See page 35 for information about finding
and choosing addresses, POIs and locations inside a guide.
•Choose a location through Destination, and press Navigate in the respective menu.
Your route is calculated, and the navigation screen is called up (see page 34).
Browsing the Map During Navigation
You can browse the map even while navigating. This way you can easily choose a new destination if you change
your mind. However, navigation will not be interrupted - you will be still guided through voice commands. Press the
Back icon to switch to on-screen navigation.
Main Features
Navigating 45
Menu options
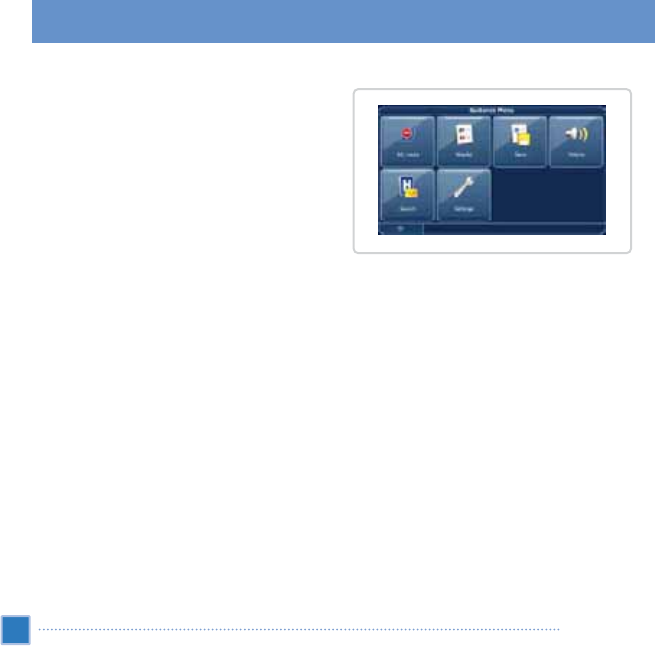
•To open a set of navigation options during navigation,
press the Menu icon:
Here you will find the following items:
Alt. route
With this option, you can choose to block the calculated route for a given distance (e.g., 0.5 km) and force an
alternative route. Simply tap the icon which shows the desired distance. Your route will be recalculated, and the
previous route will be discarded for the given distance.
List of waypoints
Opens a list of the waypoints on your itinerary.
Save
Save your actual position as a bookmark.
Volume
Alter the volume of the voice commands.
Search
You can redirect your route by choosing a point of interest (POI), e.g., a gas station.
Settings
Change the settings of your Personal Navigation Device as described on page 50.
Main Features
Navigating
46
Planning a Route
This section describes the route planning feature. This feature allows you to plan your route in advance, choosing
multiple stopovers along your journey.
See page 45 for information about choosing elements on the map. See page 35 for information about finding
and choosing addresses, POIs and locations inside a guide.
•Choose a location on the map or using Destination, and press Navigate in the respective menu.
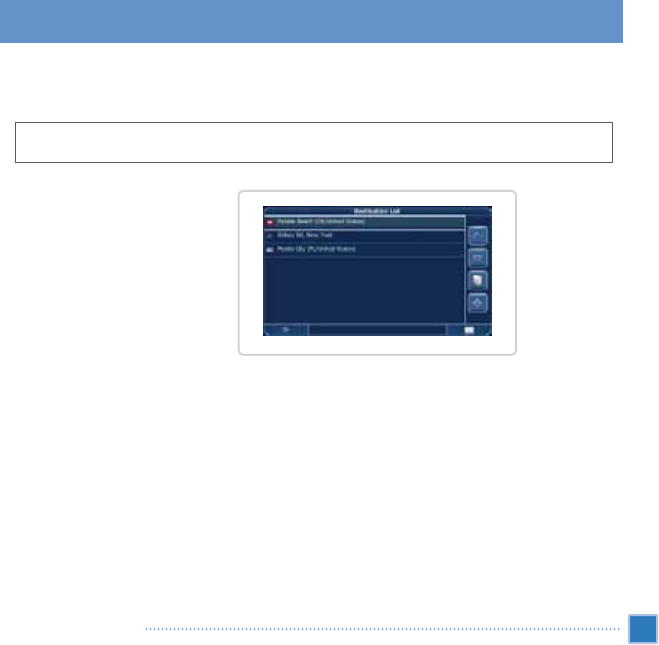
•The Destination List will be displayed:
The location will be added to the Destination List.
•To add another stopover, press the + icon.
Main Features
Planning a Route 47
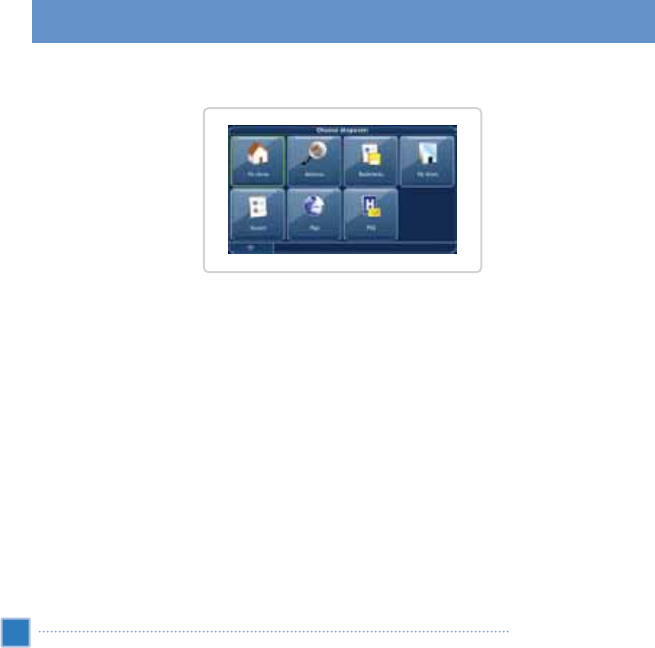
The Choose stopover: screen is called up. You may choose stopovers like your home or work addresses, a bookmark,
a point of interest, a recent location, or you can search for an address or pinpoint a destination on the map.
Once you have added stopovers (with the + icon) and returned to the Destination List, you have several options:
•Use the + icon to choose additional stopovers.
•To change the order of the stopovers, select a stopover and then use the up and down arrows to move it up/down
in the list.
•Use the Trash icon to delete a selected stopover.
Main Features
Planning a Route
48
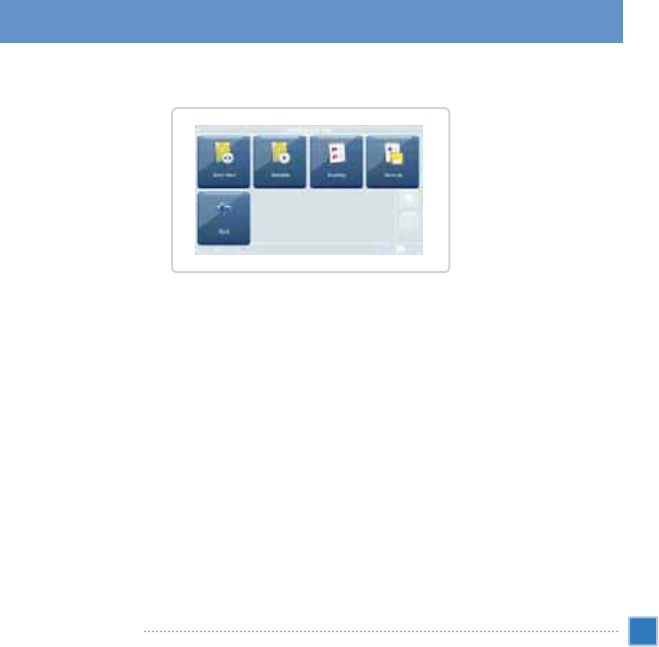
Once you have chosen your route, you have several options. You can access these options by pressing the Menu icon
(bottom right-hand corner of the screen).
•To simulate the planned route, press Simulate.
•To start guidance, press Start Navi. The display will switch to the navigation map.
•To calculate the route, press Routing. The Route Summary will be displayed. Tap one of the items in the Route
Summary to display the Waylist. Tap again to show the map view.
•To save the route as a favorite trip, press Save as (see page 44).
Main Features
Planning a Route 49
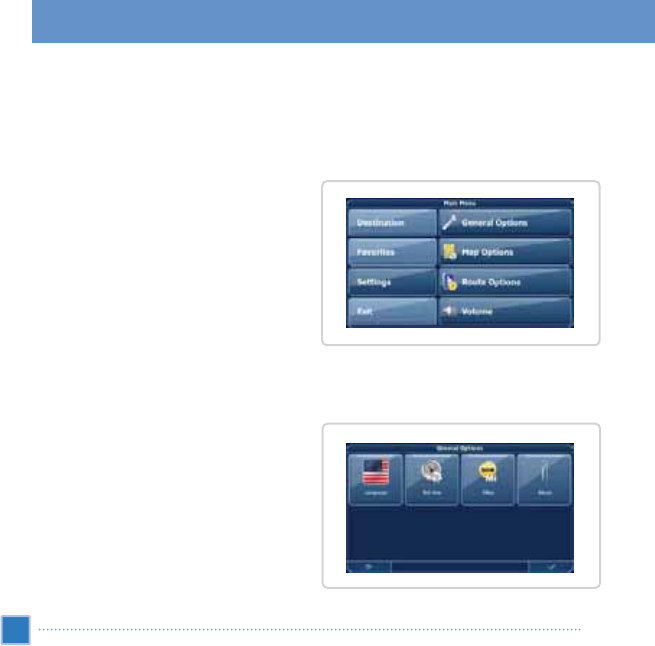
Settings
You can configure your Personal Navigation Device to suit your needs. When navigating you can, for example,
choose to avoid or allow toll roads or ferries or select your mode of transportation, like a fast or slow car, a scooter
or even your own feet. You can also edit several display settings, like 2D or 3D mode, day or night mode, map
complexity, etc.
•In the main menu, press Settings.
General Settings
•Choose General to change the general settings.
The window with the general settings will be shown:
Main Features
Settings
50
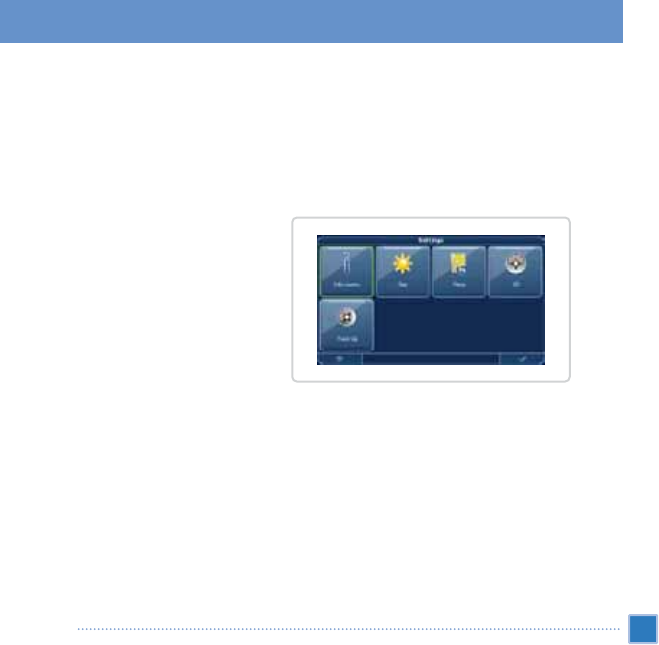
•To choose the language, press Language.
•To change the time zone, press Set time.
•To change the system of measurement, press Miles or Kilometers.
•To show information about the application, press About.
Map Settings
•Choose Map Options to change the map settings.
The window with the map settings will be shown:
•To toggle between night and day modes, press the corresponding icon. By selecting Automatic, the mode will be
chosen depending on the actual time.
•To select a map, press Maps.
If you have map data for different regions/cities on your memory card, tap the name of the current region (e.g.,
London). All available maps on the memory card will be listed. Choose the desired region by simply tapping its name.
•To toggle between 2D and 3D modes, press the corresponding icon.
•To optimize the map orientation during navigation, press Track Up. To keep the map oriented to the north, press
North Up.
Main Features
Settings 51
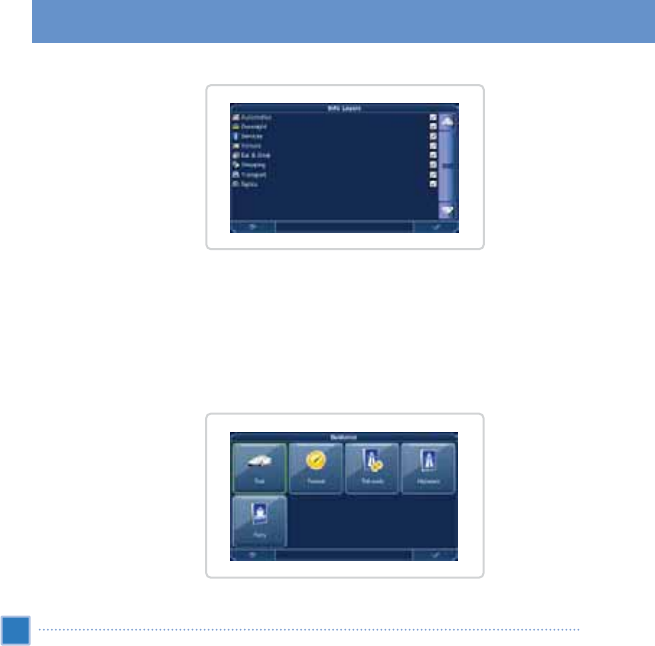
•To choose which kinds of elements are to be shown on the map, press Info Layers:
•Check the boxes of any category you want to have displayed on the map. Uncheck those that should be hidden.
•To apply your settings, press the Confirmation icon.
•To return to the previous screen, press the arrow.
Route Options
•Choose Route Options to change the route options.
The window with the route settings will be displayed:
Main Features
Settings
52

•To switch between the modes, just touch the icons. These will toggle so you can quickly see the activated settings.
You can choose among the following options: mode of transportation (fast car, slow car, motorbike, pedestrian, etc.),
fastest or shortest route, allow or avoid toll roads, highways and ferries. You can also choose the distance unit
(miles/kilometers).
Once you have chosen your settings, press the Confirmation icon to return to the main menu.
Mode of transportation -
Overview
Fast
- Assumes fast driving on highways. Choosing this option will slightly favor highways in the routing choice.
Slow
- Assumes slower driving on highways. Choosing this option will reduce the preference for highways in the
routing choice.
Bike
- Takes into account bike paths and ignores highways where bikes are prohibited.
Motorbike - Takes into account motorbike restrictions, where applicable.
Scooter
- Takes into account scooter restrictions, where applicable.
Van
- Takes into account van restrictions, where applicable.
Pedestrian
- Provides true pedestrian routing including full access to one-way streets and pedestrian zones, where
possible.
Volume
•To change the volume of voice commands, press Volume.
Main Features
Settings 53

Frequently asked questions
I can t find an address.
Please make sure you have correctly spelled your entry. If you do not know how an address is spelled correctly,
simply enter the parts of the address, you know for sure (e.g. “New York”, “Times”for Times Square in New York
City). Then browse in the result list and look for the address. Also make sure that the city in which you are looking for
an address is correct. Sometimes the official postal address differs from the address you are looking for. In that case,
search for an address nearby that you know of and browse on the map.
If you find the address on the map but you can not find it while searching for it, please let us know via customer
support located on page 84.
There is a failure in the map / POIs are missing.
If you detect an error in the map data (e.g. a street is missing completely), we would like to inform our map data
provider. Please let us know via customer support located on page 84.
I have problems to get a GPS fix.
If you have problems getting a satellite fix with the GPS (you can see how many satellites are being received on left
side of the destination “Map”screen. Please make sure, that you are outside and that the GPS antenna has a good
visibility to the open sky. Some models also do support an additional external active antenna.
Where can I get technical support and updates ?
Please, contact your retail store or the customer sevice center in page 84.
Extra Services
Frequently asked questions
54

Entertainment mode overview
In addition to its navigating function, the VXA-5000/4300 is also a mobile entertainment device that lets you enjoy
the digital music, moving picture, and image collection on the road. Music, moving picture, and image extend the
device’s function to the multimedia scene.
To enable access of multimedia files from the device, media files should be stored in the SD card, not in the device’s
internal memory. Do this either by:
•Using a compatible card reader to directly copy files to the SD card.
It is advisable to organize files into subfolders. This will served as playlists and albums when you access the
files from your device.
Audio Player
Enjoy your favorite music on the road. The program features:
•Support for MP3, WMA, WAV and OGG music files
•Auto-scanning of supported files in the device’s SD card
•Separate volume controls allow you to adjust the playback sound level while retaining the volume level set for
system sounds
•Hot key function for volume control
•Playlist support based on sub-directory contents
Each sub-directory containing compatible music files is treated as an individual playlist. For a more organized file
search, it is advisable to name sub-directories based on genre or listening preferences. For example, a sub-directory
containing music for traveling can be named as “
Journey favorites
”; or “
Top alternative
”for a sub-directory consisting
of your favorite alternative songs.
Multimedia mode
Entertainment mode overview/Audio Player 55
•Shuffle and repeat playback functions
Using Audio Player
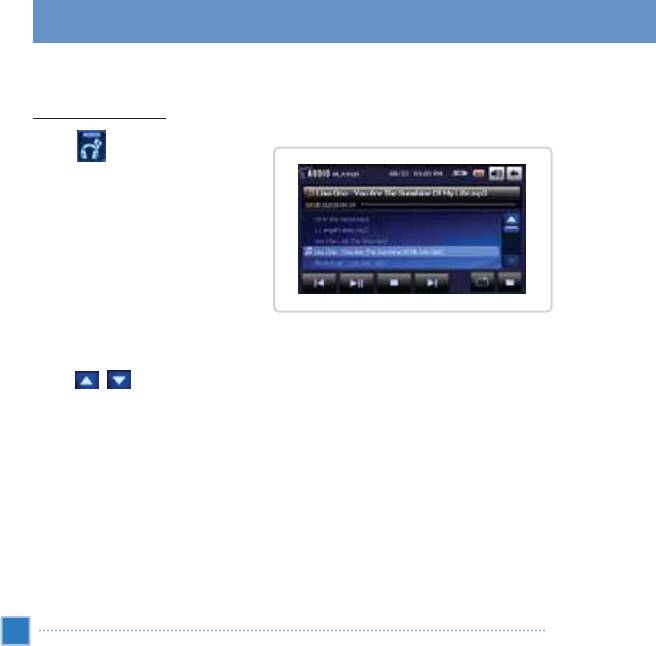
To open AUDIO PLAYER:
•Tap on the Main Menu panel.
The AUDIO player playback pad displays.
1. The program will automatically scan the device SD card for supported digital files.
2. Search for the file you want to play.
Tap / to scroll through all available files.
3. Tap a file to start playback of the selected file.
56
Multimedia mode
Audio Player
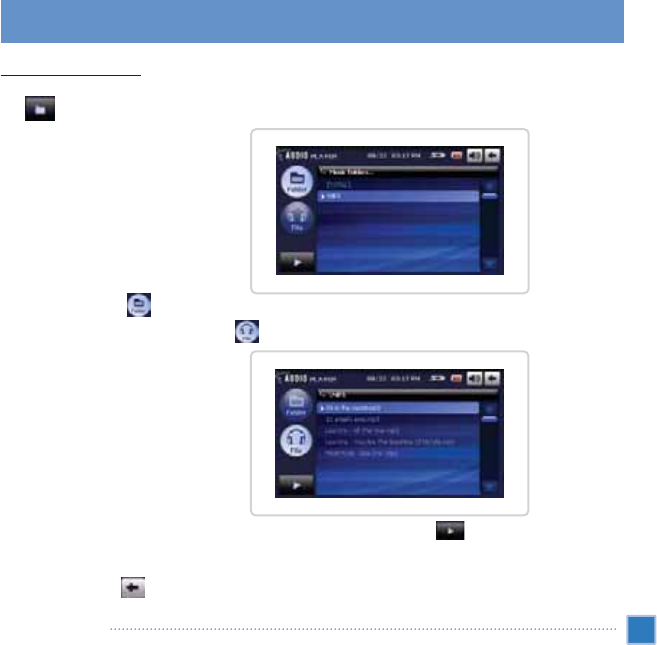
To open files for playback:
Tap .
The AUDIO player folder list pad displays.
Only sub-directories containing compatible
music files will be displayed.
By touching Folder tab , AUDIO player shows folders which playable music files are in. At the folder list view,
you can see the list of files by selecting File tab.
You can listen to selected music file, highlighted by cursor, using Playback button . You can select another file to
play by using scroll bar.
Touching Back button , you can return to basic screen of AUDIO player.
57
Multimedia mode
Audio Player
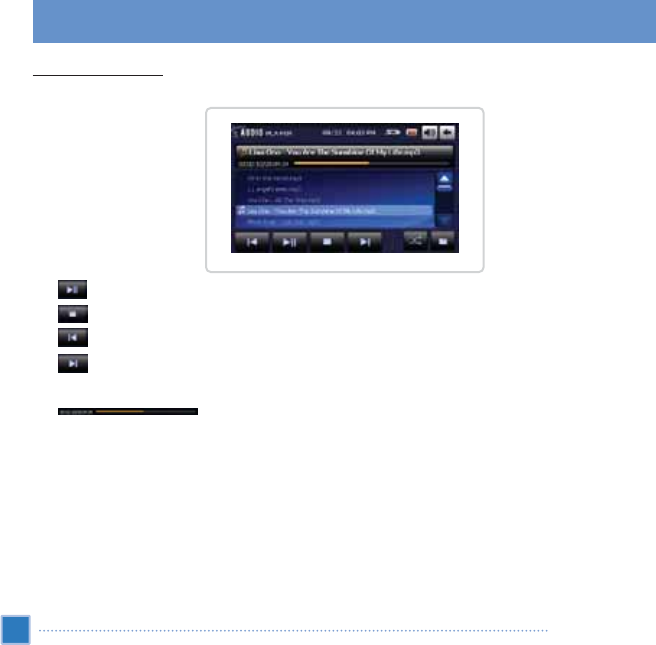
To control file playback:
The icons in the playback pad let you control the playback mode.
•- Tap to pause or resume playback
•- Tap to stop playback
•- Tap to skip backward to the previous track. If the current file is the first track in the list, the last track will be played.
•- Tap to skip forward to the next available track. If the current file is the last track in the list, the first track
will be played.
•- Tap the target position of the progress bar to adjust the progress of the current track.
58
Multimedia mode
Audio Player
To change the playback mode:
Tab the status and control icon located on the bottom right side of the panel.
•Normal mode
Tap icon to .
•Shuffle mode
Tap icon to .
Each directory containing supported music files is considered a playlist. You can choose to shuffle the playback
sequence to play files in random order.
•Repeat mode
Tap icon to .
The Repeat mode lets you play the current track in a loop. The same track will be played over and over again until
you disable the Repeat mode.
To control playback volume:
To adjust the playback volume, you can use the volume control hot keys Ƈ/Ɖ.
If SD memory card is removed while AUDIO player is in operation, system will get into unstable situation.
Please don’t remove SD Card memory during playback. If system is unstable due to removal of SD memory
card, press reset button.
59
Multimedia mode
Audio Player
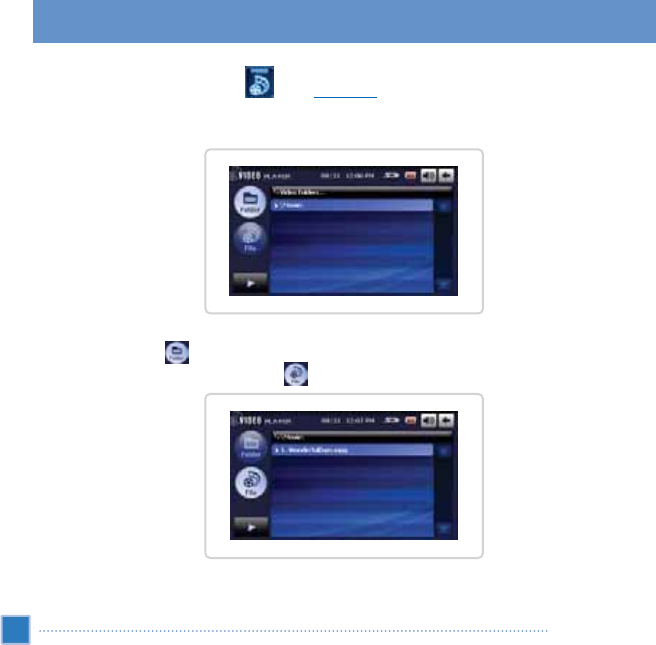
Video Player
You can play back movie by selecting in the
Main Menu
. Basic functions include Play, Pause and Stop. The
supported movie file formats are “
AVI, MPG, MPEG, WWV, MP4, ASF, Divx, and TS
”. You can save video files in the
SD Card memory. The VIDEO player manages the movie files by the unit of folder
VIDEO player scans all playable movie files stored in the SD Card memory and shows its result.
By touching Folder tab , VIDEO player shows folders which playable movie files are in. At the folder list view,
you can see the list of files by selecting File tab .
60
Multimedia mode
Video Player
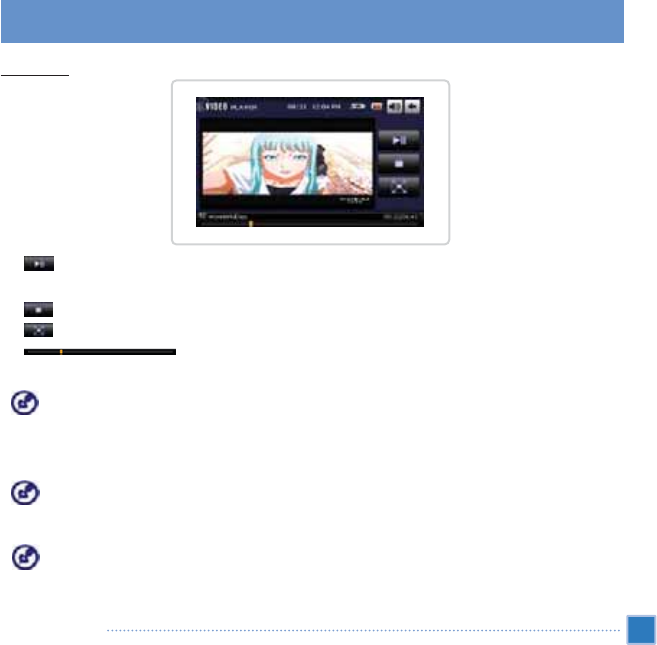
Basic screen:
•- Plays back the movie. While movie is playing, button keep the blue color. If you retouch this button,
movie will be paused.
•- Stops playback.
•- Plays back he movie as full screen.
•- Displays the progress status of play. This bar is used for seeking specific scene in the movie.
If SD memory card is removed while VIDEO player is in operation, system will get into unstable situation.
Please don’t remove SD Card memory during playback. If system is unstable due to removal SD memory
card, press reset button.
The device can not simultaneously run navigation function and multimedia function. If you don’t close the
navigator, system will close it when video player begins.
If you play the high resolution video file, system will be in unstable condition. For stable operation of the
system, recommended file resolution is less than 320 x 240.
61
Multimedia mode
Video Player
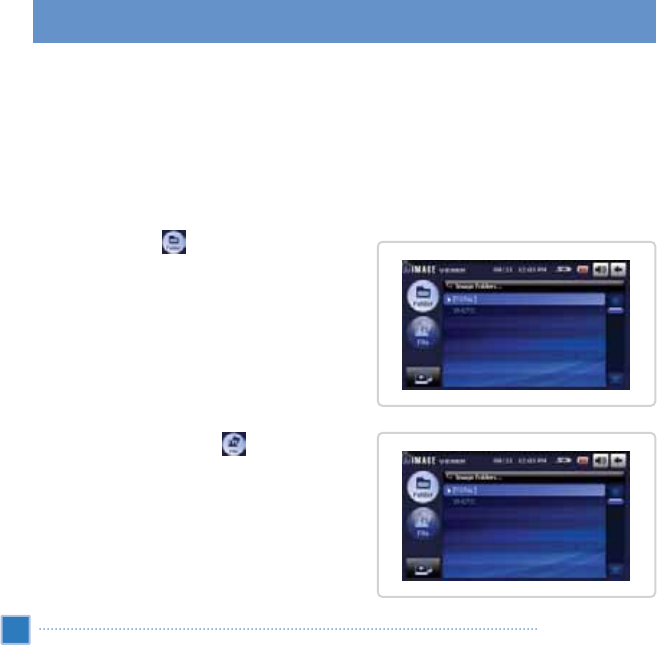
Image Viewer
These days every mobile device seems to be equipped with a digital camera, better for capturing that spontaneous
moment. With VXA-5000/4300 you can keep these images of your favorite moments as mobile as you are by using
IMAGE viewer. The program features:
•Support for GIF, JPEG and BITMAP files
•Auto-scanning of supported files in the device’s SD card.
•Viewing modes: Previous view, Next view, Zoom in, Zoom out, Rotate left, Rotate right, Full screen, and list of
image files
Touching the Folder tab , IMAGE viewer shows all
folders which have supported image files in SD Card memory.
When Folder tab is enabled, you can see image files of
selected folder by touching File tab .
62
Multimedia mode
Image Viewer
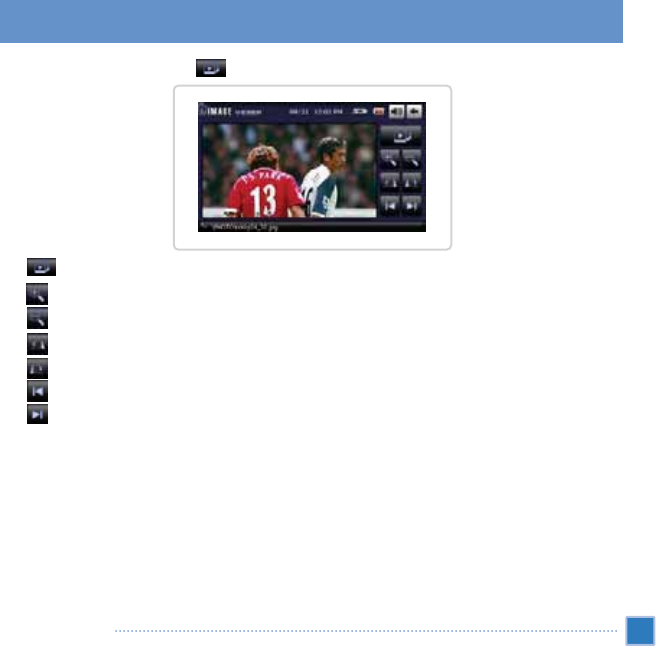
By touching the Image view button , you can see the highlighted image file by using cursor. You can select
another file using scroll bar.
•- Full screen : Can see full screen image.
•- Zoom in : Zoom in steps (150% Ɗ200% Ɗ250% Ɗ300%)
•- Zoom out : Be valid when zoomed in. Zoom out steps (300% Ɗ250% Ɗ200% Ɗ150%)
•- Rotate 90 degrees to left : Rotate 90˚to left by touching rotate button. (90˚Ɗ180˚Ɗ270˚Ɗ360˚Ɗ)
•- Rotate 90 degrees to right : Rotate 90˚to right by touching rotate button. (90˚Ɗ180˚Ɗ270˚Ɗ360˚Ɗ)
•- View previous image.
•- View next image.
•For stable operation of system, image size is limited by 2048 x 2048 or 1.8Mbyte file size. If you select image file
over the limitation, IMAGE viewer will show the warning message.
63
Multimedia mode
Image Viewer
Game mode
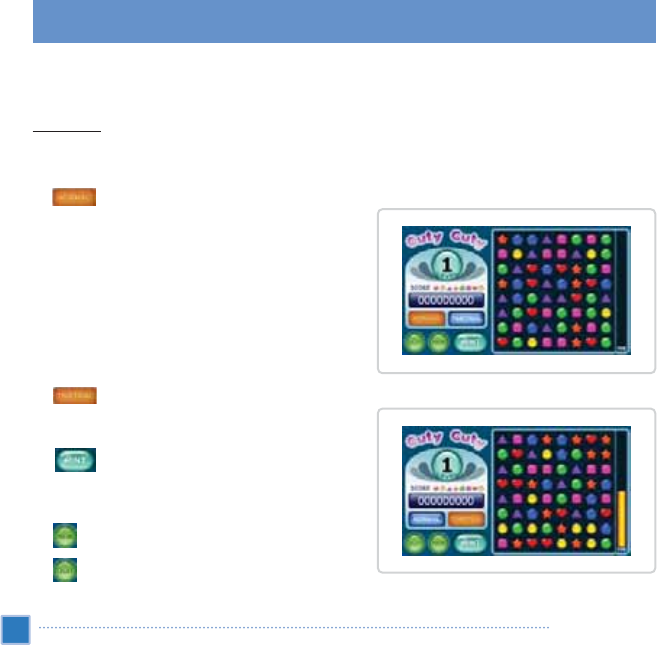
Select GAME from the main menu panel.
How to play:
If you place more than three of the same items in a row vertically or horizontally, these items will disappear.
To get higher score, remove as many items as possible in the shortest amount of time.
•: The game will be over if no further moves are possible. When you gain enough points to fill up the bar
on the right to the top, the next level will start.
•: The game will be over if the time bar on the right side runs down. If the bar on the right side is filled to
the top, the next level will start.
•: This button gives you a hint at the expense
of losing some score. This button will be disabled if your
score is not sufficient.
•: Stops the current game and starts a new one.
•: Exits the game.
64
Multimedia mode
Game mode
Mobile Phone mode
This is valid in VXA-5000 only.
This chapter contains information regarding the setup and use of the Bluetooth hands free feature with your Bluetooth
capable phone.
Mobile Phone Overview
•In order to interact successfully with the VXA-5000, your phone must be Bluetooth capable.
•Some Bluetooth capable phones do not support phonebook communication/interaction. For use with these
phones, the Phonebook, Caller ID, and Dialed menus on the VXA-5000 will not be supported. Please check your
mobile phone user manual for description of your phone’s Bluetooth capabilities.
•To interface with the VXA-5000, your Bluetooth capable mobile phone must go through a Pairing process, and a
Connecting process.
•Once a phone has been paired with the VXA-5000 unit, that phone will be registered with the unit, and
subsequent uses should only require a connecting process.
To open Mobile Phone
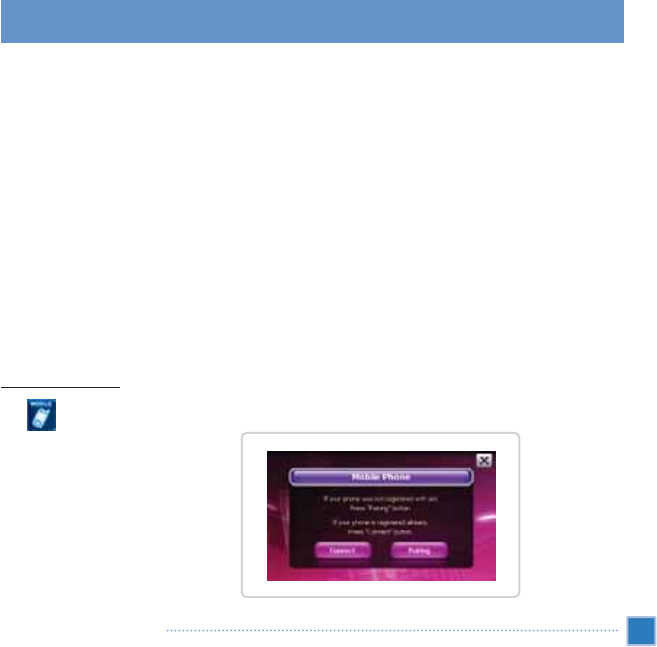
Tap on the Main Menu panel.
The Mobile Phone initializing pad displays.
65
Multimedia mode
Mobile Phone mode
Instructions for Pairing your phone with the VXA-5000:
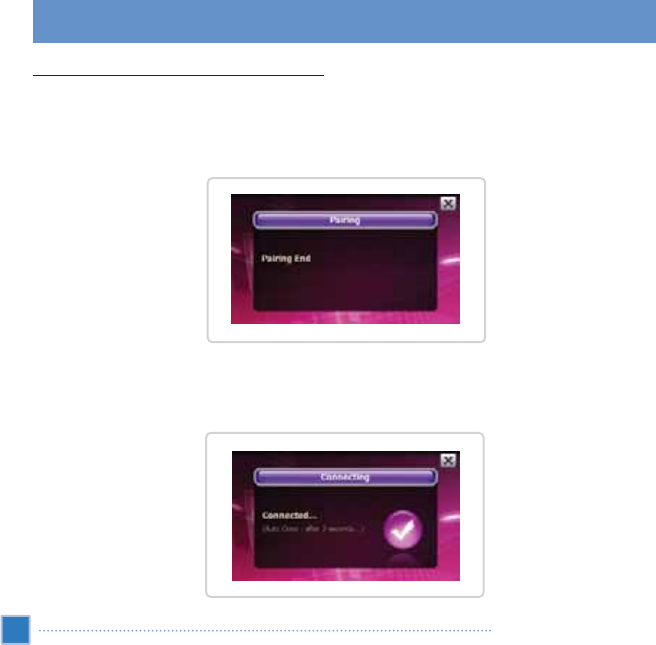
1. Press the Pairing button.
2. Turn on the Bluetooth feature on your mobile phone and set your phone to search for Bluetooth devices. When
‘
DVSK
’is found, register the device with your phone (PIN number is 0000) When Pairing is complete, you will see
the following screen on the VXA-5000 unit.
3. Press Connect. If your phone has already been paired with the unit and registered, you can press the connect
button from the main Mobile Phone initializing screen.
4. For some mobile phones, you may need to set your phone to connect to the ‘
DVSK
’device. Otherwise, a
connection will be made automatically. Once a connection has been established, you will see the following screen
on the VXA-5000 display.
66
Multimedia mode
Mobile Phone mode
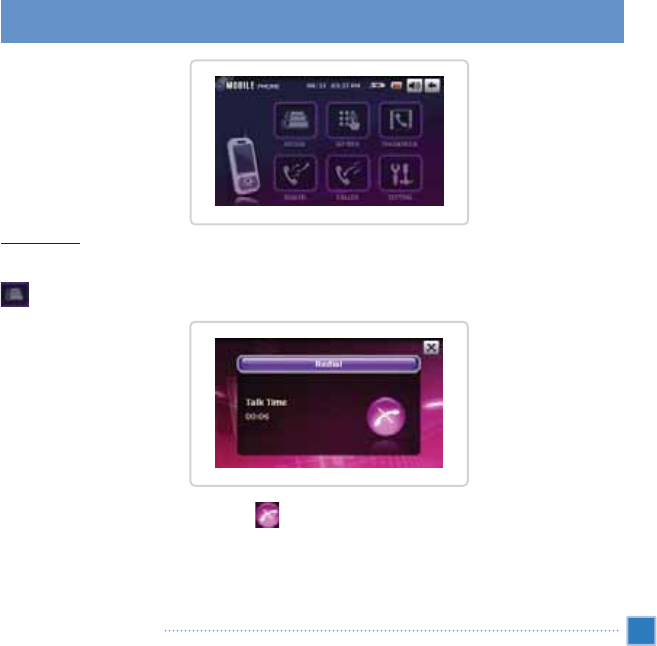
To Make Calls:
1. Call the most recent number in VXA-5000 memory
Press the ‘Redial’button, and the last dialed number from the unit or the last call number received by the unit
(whichever is latest) will be dialed.
When you are finished with your call, press the button to end your call.
67
Multimedia mode
Mobile Phone mode
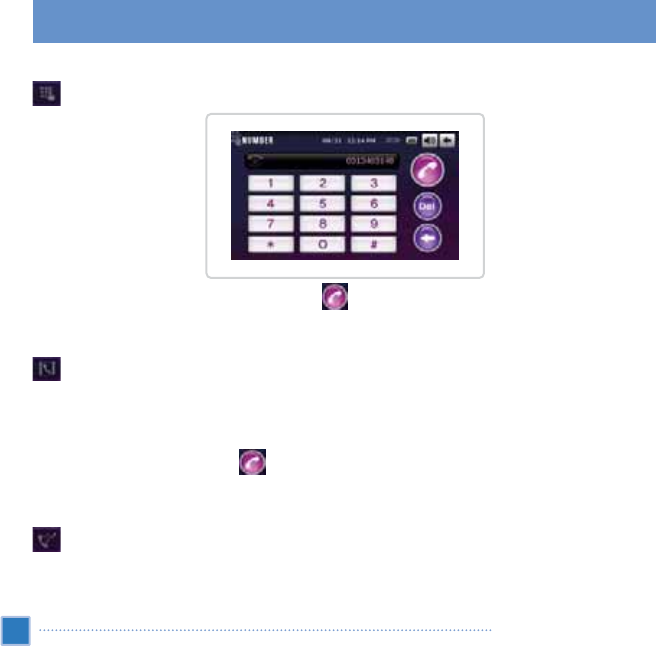
2. Input a number to dial
Press the ‘Number’button and you will be take to the number input window.
Input the number you would like to call, and press the button to dial.
3. Call a number located in the mobile phone phonebook.
To use this feature, your Bluetooth capable phone must support Phonebook data content download.
Press the ‘Phonebook’button, and a window will display the phonebook list that has been downloaded from
your mobile phone.
Select the desired listing and press the button to dial the number.
4. Call a number from the mobile phone recent dialed list
To use this feature, your Bluetooth capable phone must support Phonebook data content download.
Press the ‘Dialed’button, and a window will display the recent dialed list that has been downloaded from your mobile
phone.
68
Multimedia mode
Mobile Phone mode
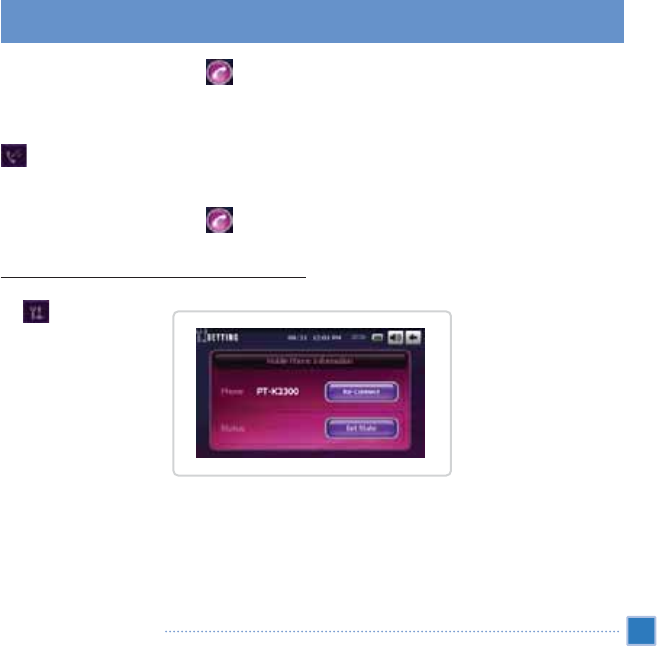
Select the desired listing and press the button to dial the number.
5. Call a number from the mobile phone caller ID list
To use this feature, your Bluetooth capable phone must support Phonebook data content download.
Press the ‘Caller’button, and a window will display the caller ID list that has been downloaded from your mobile
phone.
Select the desired listing and press the button to dial the number.
Checking on the status of connection to the mobile phone:
Tap .
1. Phone name
Please verify that your phone is correctly displayed in the Phone window.
2. Connection Status
The Status display will show the current connection status with your mobile phone.
69
Multimedia mode
Mobile Phone mode
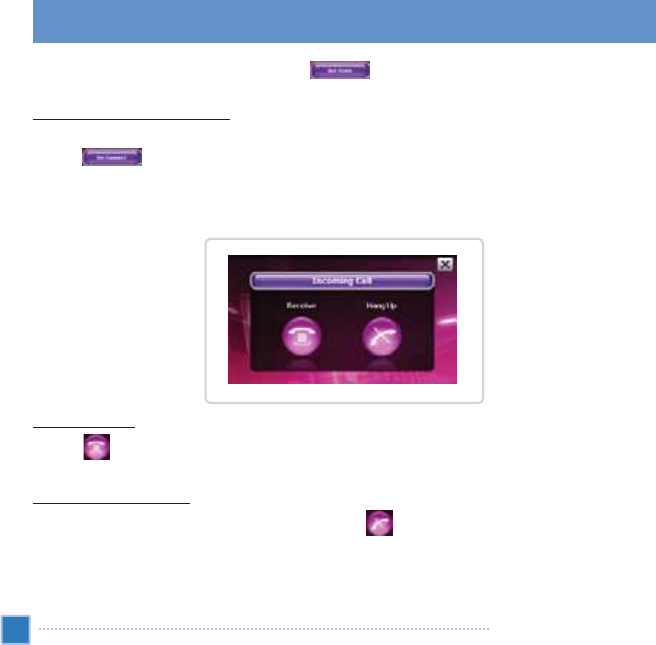
The status display can be refreshed by pressing the button.
The re-connect to your mobile phone:
Press the button to discontinue the current connection and to re-connect to the paired mobile phone.
Answering incoming calls
When you have an incoming call and your mobile phone is connected with the VXA-5000 unit, the following window
will pop-up.
To answer the call:
Press the button to answer the call using the hands-free feature of the VXA-5000 unit.
To hang up the incoming call:
If you do not wish to take the incoming call, you can press the button to immediately hang up the phone.
70
Multimedia mode
Mobile Phone mode
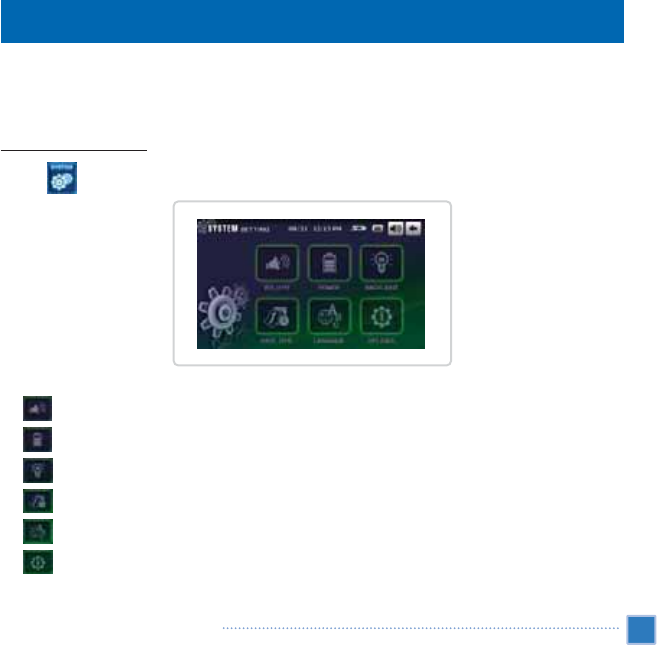
System settings overview
You can adjust the settings of the device to suit your preference. Adjusting certain settings, such as those for system
volume, power LED, and hot keys/ touch screen backlight may increase the standby time.
To access the System panel:
•Tap on the Main Menu panel.
There are six preferences icons on this panel :
•- Tap to set the volume level for system sounds, enable tapping sound and the FMT. (FMT is valid in VXA-5000 only)
•- Tap to view the battery power level and enable the hot keys backlight.
•- Tap to set the touch screen backlight level and enable its auto-off function.
•- Tap to change the system date, time, and time zone settings.
•- Tap to set the language option for the system menus and voice prompts.
•- Tap to displays your device’s model name and related technical specifications. Options for factory reset,
GPS reset, and screen recalibration are also shown.
71
System configuration
System settings overview
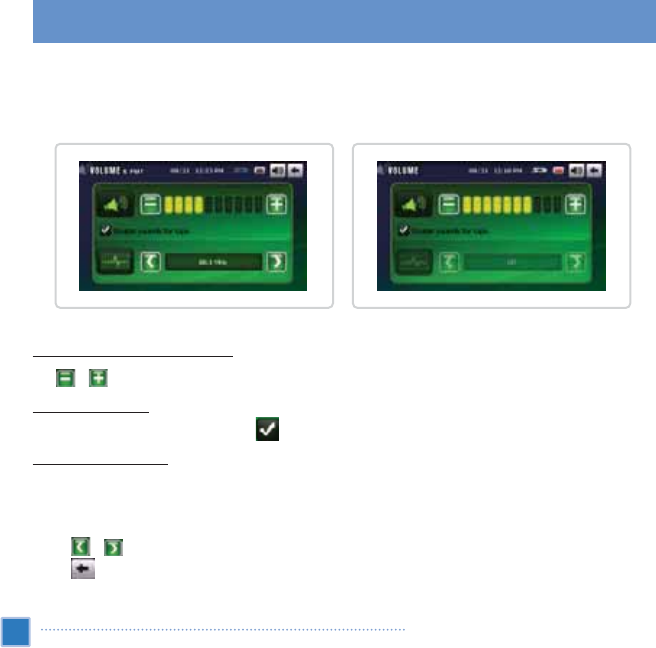
Customizing user preferences
Volume and FMT
FMT is valid in VXA-5000 only.
To set the system sounds volume level:
Tap / to adjust the volume level.
To enable tap sounds:
Tap the Enable sounds for taps check box .
To set the FMT frequency:
The FMT option allows user to select particular frequency for wireless transmission of system audio. By tuning car
stereo to selected frequency, system audio can be audible from car speakers. Frequency unused by radio station
should be used.
1. Tap / to adjust the FMT frequency
2. Tap to apply the changes made. When FMT is ON, the system speaker is disabled. In battery power mode,
FMT does not operate.
72
System configuration
Customizing user preferences
VXA-5000 VXA-4300
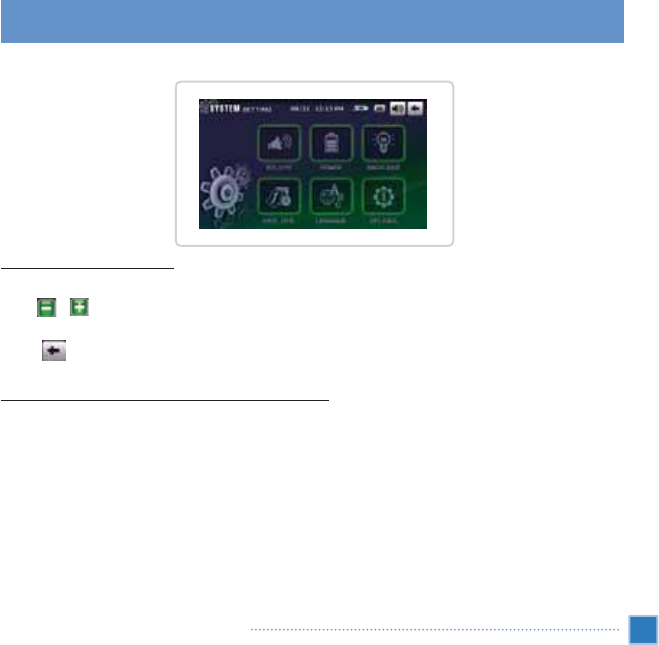
Power
To enable the hot keys backlight:
1. Tap the Hot keys backlight on when pressed check box.
2.Tap / to set the hot keys backlight’s auto-off function. Options include backlight off after 5, 10, 15, and
20 seconds.
3. Tap to apply the changes made.
To enable the hot keys backlight when running on AC power:
1. Tap the Hot keys backlight on when AC-in check box.
73
System configuration
Customizing user preferences
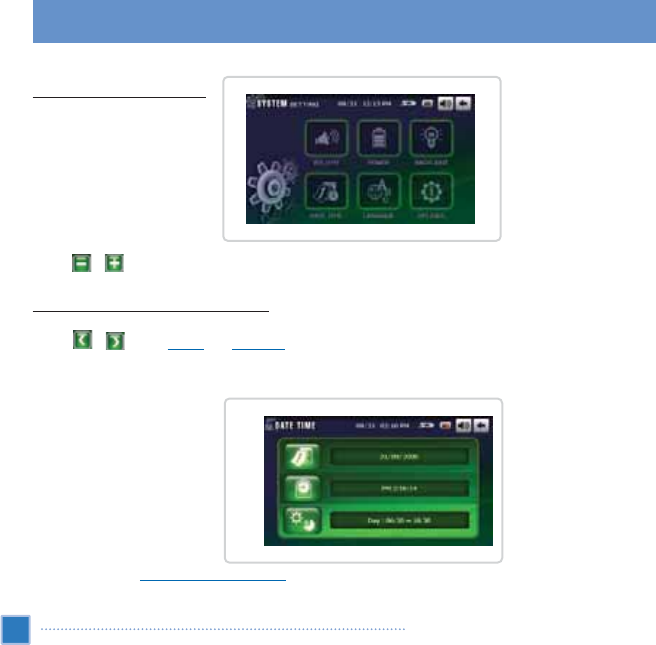
Tap Backlight
To set the screen backlight level:
1. Tap / to adjust the screen backlight level.
To set the screen backlight auto-off function:
1. Tap / next to
Battery
and
AC Power
boxes.
Options include Never, backlight off after 10 or 15 seconds, and backlight off after 1, 2, or 3 minutes.
Date Time
Go to step 3 of the “
To configure system settings
”section for instructions on how to set the system date and time.
74
System configuration
Customizing user preferences
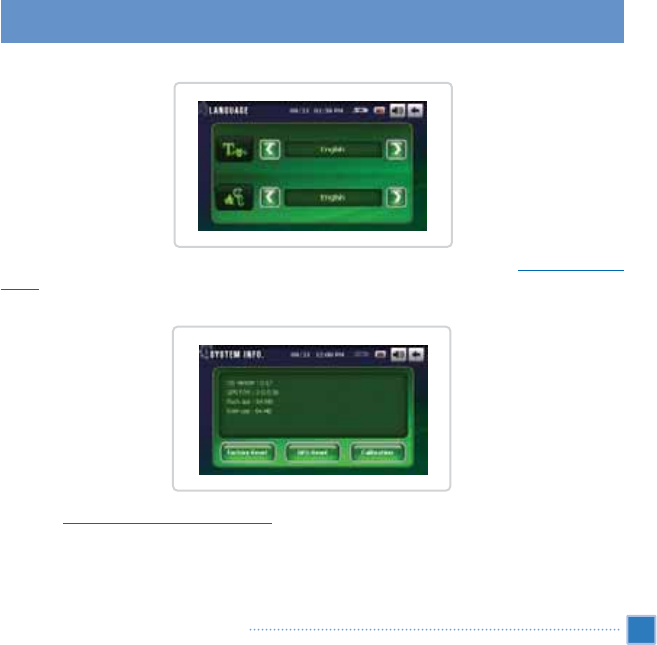
Language
The VXA-5000/4300’s user interface supports 11 pre-loaded languages. Go to step 2 of the “
To configure system
settings
”section for instructions on how to set the system language.
System Info
Go to the “
Troubleshooting your VXA-5000/4300
”section for instructions on how to use the three command buttons
on the System Info screen.
75
System configuration
Customizing user preferences

Using your VXA-5000/4300 safely
The precautions and instructions stated in this Guide shall be executed in the English language. In the event
of any discrepancy between the English language original hereof and any translation hereof into any other
language, the English language original shall govern.
Driving precautions
When using the device in a vehicle, the vehicle operator is solely responsible for operating the vehicle in a safe
manner. It is your responsibility to comply with all traffic laws. Failure to follow the directions below could result in
death or catastrophic bodily injury to you or to others.
•Do not attempt to enter information or configure the device while driving. If you need to do so, safely pull out of
the traffic and come to a stop at a safe location before using your device.
•Vehicle operators must maintain full surveillance of pertinent driving conditions at all times. Minimize the need to
view the device screen while driving and use voice prompts to guide you.
•Never place the device on the passenger seat or any place in the car where it can become a projectile during a
collision or stop.
•An air bag inflates with great force. DO NOT mount the device in the area over the air bag or in the air bag
deployment area.
•Although reasonable attempt has been made to ensure that the database in your VXA-5000/4300 is accurate, such
information may change from time to time. The VXA-5000/4300 database does not include any of the following:
Legal restrictions (such as vehicular type, weight, height, width, load and speed restrictions)
Road slope, bridge height, weight or other limits
Construction work zones or hazards; road closures, traffic conditions
Weather conditions
Emergency events
76
System configuration
Using your VXA-5000/4300 safely

It is your responsibility to disregard any unsafe, hazardous or illegal route suggestions. Your judgment and common
sense shall take precedence over any information that may be received through the use of your device.
Operating precautions
Device usage precautions
•Do not use your device anywhere it may be exposed to water or in conditions of high humidity.
•Do not expose the device to extreme temperatures, which can occur in a vehicle under direct sunlight. Such
exposure can shorten the life of the device, damage the plastic housing and/or battery, and increase the risk of explosion.
•Do not subject your device to sudden and severe temperature changes. This could result in moisture condensation
in the device that could cause damage to the device. In the event of moisture condensation, allow the device to
dry out completely.
•Do not leave the device unattended on an automobile dashboard. When your vehicle is parked and the device is
not in use, protect it from theft and extreme heat by storing it in an unobtrusive location and away from direct sunlight.
•The device is not a toy. Never allow children to play with the device.
•Never touch the liquid that might leak from a broken liquid crystal display. Contact with this liquid could cause a skin
rash. If the crystal display liquid should come into contact with the skin or clothing, wash it immediately with clean water.
•Never raise the sound volume level too high when using the device with earphones. An excessive sound volume
level could cause damage to your hearing.
Car mount precautions
•Some countries prohibit the mounting of any electronic device on the vehicle dashboard. Be sure to check the
local laws for applicable mounting before installing the car mount.
•Some newer vehicle models may have a heat reflective shield embedded in the windshield. This may in some
cases obstruct the GPS signal reception. If you encounter this problem in the vehicle, you need to purchase an
external GPS antenna.
77
System maintenance and user support
System maintenance and user support

•The heating and cooling cycle of a vehicle's interior can loosen the adhesion of the suction cup. Check the vacuum seal
of the car mount for adequate adhesion each time you use the unit, and reinstall if necessary.
•If the car mount has problem staying on, clean the plastic suction cup with alcohol, then reinstall. Moistening the
suction cup may help adhesion in some cases.
•To avoid extreme temperature from damaging the car mount, remove the unit if the temperature inside your
vehicle exceeds 70°C (160°F).
•The dip in humidity and temperature at night can loosen the adhesion of the suction cup. For this reason, as well
as for security, it is recommended that you remove both the car mount kit and the VXA-5000/4300 when leaving
your vehicle overnight.
Storage precautions
•Do not store the device anywhere it may be exposed to water or in conditions of high humidity.
•When the device is not in use for an extended period of time, bring it indoor and store it in a location with
temperature range of -20°to +70°C (-40°to 140°F) .
Cleaning the VXA-5000/4300
•Use a damp soft dry cloth to wipe the device’s casing (not the display screen). Never use organic solvents such as
benzene or paint thinner to clean the device. Use of these solvents can cause deformation or discoloration.
•Use a soft, clean, lint-free cloth to clean the display screen. Moistened LCD screen wipes could also be used as required.
Troubleshooting the VXA-5000/4300
Recalibrating the screen
If tapping an item doesn’t bring up the appropriate response, it means your device has lost its calibration. Recalibrate
the screen.
78
System maintenance and user support
Cleaning the VXA-5000/4300/Troubleshooting the VXA-5000/4300
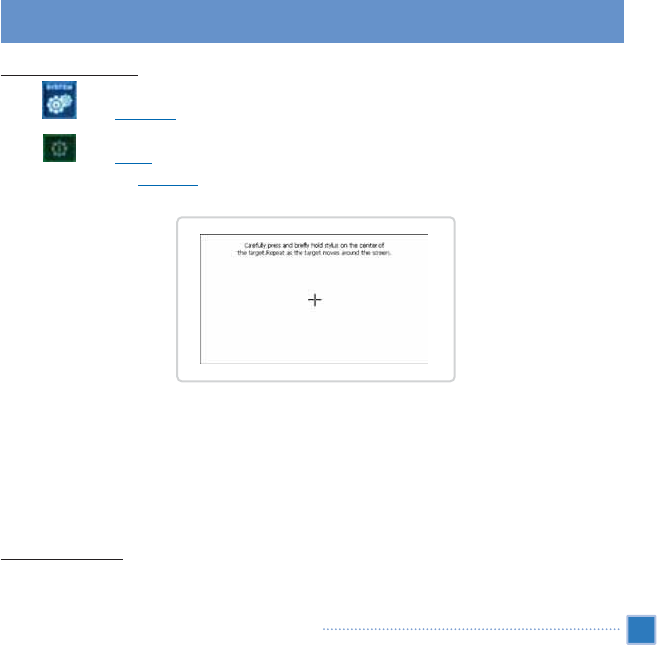
To recalibrate the screen:
1. Tap on the
Main Menu
panel.
2. Tap on the
System
panel.
3. Tap Calibration on the
System Info
screen.
4. Tap the center of the black cross as it moves around the screen.
5. Tap screen to apply the changes made.
Resetting the VXA-5000/4300
You may have to perform a reset if the device freezes (i.e., device no longer responds to the buttons on the screen). A
soft reset allows your device to get a fresh start, similar to rebooting a computer. This will restart your device and
adjust memory allocation. All records and entries are retained after a soft reset. GPS settings are also retained.
To perform a soft reset:
•Hold the device securely, and then press the
RESET
button on the bottom of the device.
79
System maintenance and user support
Troubleshooting the VXA-5000/4300
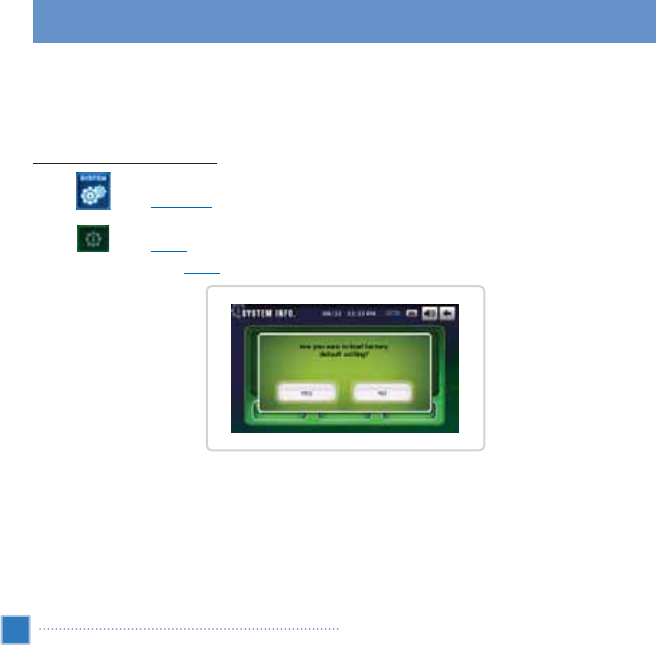
Loading the factory default settings
If you still encounter system errors even after soft resetting the device, load the factory default settings to correct the
error. These default settings have been selected to optimize your device’s performance.
To load the factory default settings:
1. Tap on the
Main Menu
panel.
2. Tap on the
System
panel.
3. Tap Factory Reset on the
System
Info screen.
4. Tap Yes on the dialog box.
5. After the factory reset, reconfigure your device’s user preferences.
80
System maintenance and user support
Troubleshooting the VXA-5000/4300
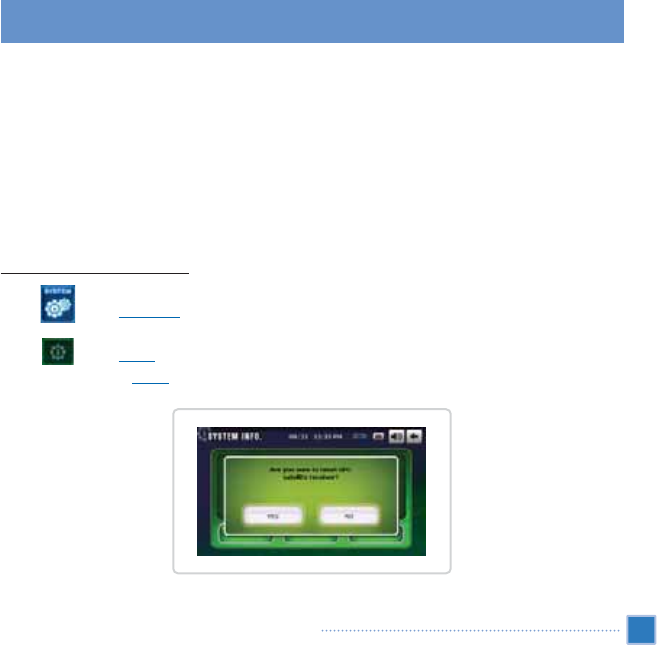
Resetting the GPS function
In the following circumstances, the TTFF (Time To Fix First) values of your VXA-5000/4300 may be longer than usual.
•After a long period of inactivity
•If the current GPS fix position is more than 500 km, or more than 12 hours apart, from the previous position
This is due to the nature of the GPS algorithm and rotational velocitybetween the satellites and planet Earth, and is
deemed normal. To correct this, perform a GPS reset. This will update the GPS database, which contains information
about the GPS satellites that the unit needs to function in navigation mode.
To load the factory default settings:
1. Tap on the
Main Menu
panel.
2. Tap on the
System
panel.
3. Tap GPS Reset on the
System
Info screen.
4. Tap Yes on the dialog box.
The GPS reset process will take about a minute to complete.
81
System maintenance and user support
Troubleshooting the VXA-5000/4300

FAQs
This section lists frequently-asked questions that may arise during the usage of your VXA-5000/4300, and gives easy
answers and solutions to these questions.
82
System maintenance and user support
FAQs
Aspect
Audio
Touch screen
Entertainment mode
Question
Why is there no sound coming
from the device?
Why is the touch screen not
responding to my finger taps?
Why can’t I view my picture files?
Why can’t I play my music files or
view my pictures while navigating?
Answer
•If the earphone is plugged into the device, the
speaker automatically shut off. Disconnect the earphone.
•Check that the device’s volume setting is not muted.
In the
System
panel, tap Volume.
The screen may have lost its calibration.
Recalibrate the screen. Go to the “
Recalibrating the
screen
“section for instructions.
You may be trying to view an image that is not
supported by IMAGE. Go to the “
IMAGE VIEWER
“
section for a list of supported image formats.
The device’s multimedia programs are not available in
navigation mode. This is for safety reason; not to distract
the driver’s attention from the road.

83
System maintenance and user support
FAQs
Aspect
Navigation mode
System information
and performance
Power
Question
Why is it that sometimes my device
takes longer than 5 minutes to get
a GPS fix?
How do I acquire a GPS fix within
standard time frame (about 1 GPS
minute in general)?
How do I check the OS version of
my device?
How do I restore the system back
to its default factory settings?
Does performing a factory reset
means a GPS reset as well?
What should I do if the system
stops functioning normally?
I couldn’t turn on the device.
Answer
If the previous GPS fix position was more than 500 km
or 12 hours apart from your current position and time,
it will take significantly longer than the standard TTFF
time to get a GPS fix. This is due to the nature of the
GPS algorithm and rotational velocity between the
satellites and planet Earth, and deemed normal and is
not the fault of your VXA-5000/4300 device.
Perform a GPS reset. Go to the “
Resetting the GPS
function
“section for instructions.
•Perform a soft reset on the device. Go to the
“
Resetting the VXA-5000/4300
“section for
instructions.The device’s OS version appears on the
bottom left corner of the screen.
•View the device’s OS version and other technical
specifications. In the System panel, tap Sys Info.
Users can perform this task by using the Factory Reset
button on the System Info screen. Go to the “
Loading
the factory default settings
“section for instructions.
No. The Factory Reset function mainly reset the OS
settings to their default factory values; it will not cause
the GPS settings to reset.
Perform a soft reset on the device. Go to the “
Resetting
the VXA-5000/4300
“section for instructions.
The battery power may be depleted. Recharge the device.
Go to the “
Recharging the device
”section for instructions.

Customer support
Technical assistance
If you encounter a problem with your VXA-5000/4300, review the following first:
•“
Troubleshooting your VXA-5000/4300
”section
•“
FAQs
”section
Product warranty
Refer to the VXA-5000/4300 Portable Navigator
Customer support and Product Inquiry
The product warranty period begins from the date of purchase. Please note your purchase date and
keep your sales receipt to ensure proper warranty service.
[Warranty service cannot be provided without a sales receipt clearly indicating the original purchase date from a
licensed Plenio retailer.]
Customer Service Center
You can make an inquiry about the product through our call center or via email.
Please check the customer service website for troubleshooting tips before calling or emailing.
Also, please check and install the latest downloadable software patches from our website, and check back
periodically for product news and announcements.
TEL : 408 970 3387
FAX : 408 970 3390
EMAIL : cs.dvs@dvs.co.kr
CUSTOMER SERVICE HOME PAGE : www.dvssales.com/support
84
System maintenance and user support
Customer support
This chapter lists the features and operating specifications of the VXA-5000/4300.
Hardware features
85
System specifications
Hardware features
Aspect
Processor
GPS chipset
Memory
Power
Display
Audio
Description
Samsung S3C2410 266 MHz application processor
SiRF Star III GPS
•64 MB SDRAM for system memory (for user applications and map storage)
•64 MB Flash ROM onboard flash memory (for operating system and embedded applications)
•High-density rechargeable 2200 mAh Lithium Ion battery
a. Up to 3 straight hours of operation (backlight in 10% and GPS locked
b. 4.5 hours charging time from empty to full capacity via car charger or AC adapter
•Recharging options
a. Indoors using the AC adapter
•Power status LED indicator
•4.3-inch screen for a wider viewing angle
•480 x 272 QVGA screen with 16.7M colors for a full-color display
•200-nit LCD provides higher brightness, high contrast, and low power consuming display
•TMR (Transmissive with Micro Reflective) technology allows the screen to display well-reproduced
images even under bright outdoors lighting.
•Hardware backlight control via the power button
•1W built-in speaker
•3.5 mm stereo earphone jack on the device

GPS specifications
86
System specifications
GPS specifications
Aspect
Connectivity
Hardware
Description
•SD slot
•Volume control hot keys command
•Main Menu hot key
•Navigation hot key
Item
Chipset
Receiver
Antenna
Navigation
Software
TTFF (Time To Fix First, typical)
Accuracy of position fix (horizontal position)
Velocity
Protocol
Description
SiRF Star III GPS
12 parallel channel
•Integrated patch antenna for optimum satellite pick up at every angle
•Optional connection for external antenna when the vehicle’s windshield
has a heat reflective shield Gate 5 features include:
•Favorite destination hot list
•Destination history
•Navigation mode support driving, hiking, and cycling activities
•Trip planner
•Reacquisition: 1 sec. First, typical)
•Hot start: 8 sec.
•Warm start: 35 sec.
•Cold start: 55 sec.
0.1 m/s
NMEA-0183 v3.0 supporting the following commands:
•GGA •GSV
•GGL •RMC
•GSA •VTG
Software specifications
Design and ergonomics
87
System specifications
Software specifications/Design and ergonomics
Item
Operating system
Navigation software
Entertainment applications
Mobile applications
Description
Microsoft Windows CE .NET 4.2
Gate 5
•MP3 - supports MP3, WMA, and WAV formats
•Photo - supports JPEG and BMP formats
•AUDIO - Supports for MP3, WMA, WAV and OGG music files
•VIDEO - Supports for AVI, MPG, MPEG, WWV, MP4, ASF, Divx, and TS files
•IMAGE - Supports for GIF, JPEG and BITMAP files
Uses Mobile phone with Bluetooth (VXA-5000 only)
Aspect
Compact and lightweight
User-friendly interface
Description
•Dimensions (L x W x H): 90 x 130 x 29 mm (3.5 x 5.1 x 1.1 in)
•Weight: 270 g (9.5 oz)
•VXA-5000/4300
a. Hot keys with dynamic backlight feature
b. Quick launch hot keys for Main Menu and Navigation panels
c. Hot keys for volume control
d. Touch sensitive screen
•Car mount
a. Versatile mounting options: windshield or dashboard
b. Firm grip suction cup provides a steady vibration-free support
c. Swiveling mechanism and axial rod allow for multi-angle adjustment for optimum
viewing position
88
System specifications
Design and ergonomics
Aspect
User-friendly interface
Power-saving options
Mobile design
Entertainment function
Bundled peripherals
Accessory options
Description
•Software
a. Multi-language user interface option
b. System configuration based on individual user preferences
•Auto-off function for touch screen backlight
•Auto-off function for hot keys backlight
•Suction-based car mount facilitates multi-vehicle usage
•Compact and lightweight body makes it easy for users to carry it anywhere
•On-the-road recharging via the car charger
•Simple and out-of-the-box operation: Mount, dock, and you’re on the go. No fussing
with screws and cables.
•Pre-loaded software for accessing digital music (
AUDIO
), moving picture (
VIDEO
)
and image files (
IMAGE
)
•Car mount
•Cradle
•Car charger
•AC adaptor
•Screen protector
•Protective carrying bag
Environmental specifications
Regulatory information
This device fully satisfies the requirements for CE marking when used in a residential, commercial or light industrial
environment.
89
System specifications
Environmental specifications/Regulatory information
Aspect
Temperature
Relative humidity (non-condensing)
Description
Operating
Storage
Operating
Non-operating
0°to 45°
-10°to +60°C
20% to 90% RH
20% to 90% RH

U.S.A.
U.S.FEDERAL COMMUNICATIONS COMMISSION RADIO FREQUENCY
INTERFERENCE STATEMENT INFORMATION TO THE USER
NOTE
: This equipment has been tested and found to comply with the limits for a Class B digital device pursuant to
Part 15 of the FCC Rules.
These limits are designed to provide reasonable protection against harmful Interference in a residential installation.
This equipment generates, uses, and can radiate radio frequency energy and, if Not installed and used in accordance
with the instructions, may cause harmful Interference to radio communications.
However, there is no guarantee that interference will not occur in a particular Installation.
If this equipment does cause harmful interference to radio or television reception, which can be determined by turning
the equipment off and on, the user is encouraged to try to correct the interference by one or more of the following
measures :
ҟReorient or relocate the receiving antenna.
ҟIncrease the separation between the equipment and receiver.
ҟConnect the equipment into an outlet of a circuit different from that to which the receiver is connected.
ҟConsult the dealer or an experienced radio/TV technician for assistance.
Change or modification not expressly approved by the party responsible for Compliance could void the userœs
authority to operate the equipment.
Connecting of peripherals requires the use of grounded shielded signal cables.
90
System specifications

COMPANY NAME
DVS KOREA
497-3, Sangha-dong, Giheung-gu, Yongin-si, Gyeonggi-do, Korea
DECLARATION OF CONFORMITY
WE
Declare under our sole responsibility that the product :
Kind of equipment : Navigation System
Type-Designation :
to which this declaration is in conformity with the following standard(s) or other normative document(s)
Safety : EN 60950 : 1992 + A1, A2, A3, A4, A11
EMC : EN 55022 : 1998, EN 55024 : 1998
EN 61000-3-2 : 1995+A1 : 1998+A2 : 1998
EN 61000-3-3 : 1995
following the provisions of the Low Voltage Directive 73/23/EEC, 93/68/EEC and the EMC Directive 89/336/EEC.
Accredited test laboratory :
TUV Rheinland
Am Grauen Stein
51105 Koln
KOREA / April. 27, 2006
--------------------------------- -------------------------------------------------------
(Place and date of issue) (Name and signature of authorized person)
91
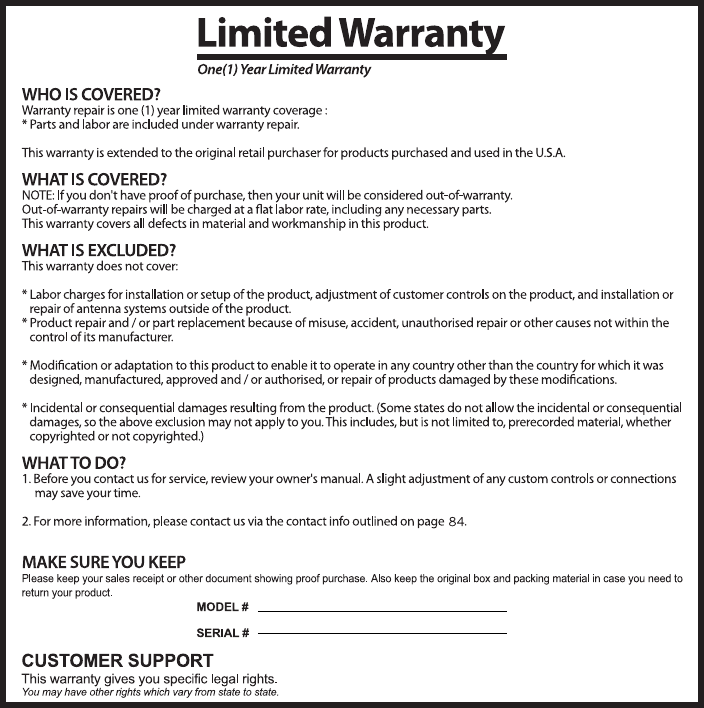

Please write your purchase date below, and save your sales receipt.
Both are needed for warranty repairs and customer service.