DVS Korea VXA3000 7" Navigation System User Manual VXA 3000 front pan 060503 Page 1
DVS Korea Co., Ltd. 7" Navigation System VXA 3000 front pan 060503 Page 1
Users Manual
ƕEnsure to read the ũSafety PrecautionsŪcarefully before using this product.
ƕProduct warranty is included in this UserŪs Manual.
ҶNavigation function
ҶAudio player function
ҶGame function
ҶAux function
UserŪs Manual VXA-3000
Please write the manufacturing date down here, which is needed for
registration at our web site. (You can find the manufacturing date at the rear
side of the product.)
Thank you for purchasing our product.
VXA-3000 Userœs Manual is designed to support convenient usage of the navigation system and
safe driving. Please read the manual carefully before using the product for safe usage.
The content of this manual can vary according to the navigation system version, and function or
performance of the navigation system and this manual are subject to change without the prior
notice for userœs convenience.
Make sure to read this manual for safe driving.
Please comply with the following instruction to prevent the property loss of the driver and user.
1
Warning Do not set or search the position while youœre driving. Make sure to park a
car at a safe place before operating this device.
Warning
Warning
Voice guide and map route can be different from the actual road condition.
Ensure to comply with the actual road signal system and traffic regulation for
safe driving.
Caution
This product contains the safe driving information for driverœs safe driving.
However, this information can be different from the actual traffic condition.
Drive safely according to the actual road condition.
VXA-3000
It is very dangerous to operate the navigation system or look at the screen
while youœre driving. Be careful of surrounding traffic condition or pedestrian
if you have to operate the system while youœre driving.
Basic Operation
About VXA-3000
1. Directions before using this product
2. Components
3. Description on product appearance
4. Installing product
Using VXA-3000
1. Basic functions of VXA-3000
2. Learning basic remote controller functions
3. Main menu
4. Quick Start
5. Detailed Description
6. Setup Assistantn
7. Frequently asked questions
8. Audio player
9. Video Player
10. Image Viewer
11. Game
12. Aux
13. Setup
2VXA-3000
3
3
3
6
7
9
11
11
12
14
14
19
43
45
46
49
52
54
55
58
Table of Contents
Upgrading VXA-3000
How to register the member
Downloading Navi or OS
What is V-Up Pro 3000
Specification
A/S and Product Enquiry
A/S and Product Enquiry
Customer Service Center
62
62
62
62
63
64
64
64
1. Directions before using this product
Read this ŔUserœs Manualŕwithout fail before using this product to use this product safely.
1-1. Usage directions
3
About VXA-3000
VXA-3000
Warning Refrain from operating the product. Please park a car at a safe place when operating
the product, because there is danger of a traffic accident.
Voice guide and map route can be different from the actual road condition. Ensure to
comply with the actual road signal system and traffic regulation for safe driving.
Warning If you modify the car to install this system, safe driving can be endangered.
Caution Do not use this product for a long time after stopping the engine. The car battery can be
discharged completely.
Caution
Do not use other cables than provided. Turn off the power when connecting the
external cable like A/V input, stereo output, and indoor TV antenna. If you connect
the cable while the power is on, the product can be damaged.
Caution Do not disassemble or apply shock to this product.
Warning
Caution Touch the touch panel with a round edge object or fingertip softly. If you press the touch
screen strongly with a sharp and hard object, it can damage the product.
Caution Turn off the power and use the clean and dry cloth when cleaning the screen. Keep
the screen away from water or chemical substance like detergent or solvent.
Basic Operation
Warning
PLENIO will not be liable for any damages arising out of any use of the software. The user
will bear the sole responsibility.
Warning
You have to take care, because applied windshield suction cup mount(suction cup) is able to
remove from the front windshield by vibration, sudden temperature changes, unexpected
sock and etc. If suction cup is removed suddenly by unexpected reason, navigator is able to
break and your car is damaged by navigator.
Caution
While Audio player, Video player or Navigation is operating, if you remove the
SD Card memory, system will be get into unstable situation. Please donŪt remove
SD Card memory during playback. If system is unstable because SD Card memory
is removed, turn off the system and rebooting.
1-2. Installation directions
4
About VXA-3000
VXA-3000
Warning Connect the wires properly by referring to ŔInstalling productŕsection. Otherwise,
malfunction or accident may occur.
Caution Use the connection cable for vehicle only that was provided at the time of product
purchase to ensure stable system operation.
Warning Do not install the product in a position where driving can be interfered or driverœs
field of vision can be blocked.
Caution This product must be used with 12V car power only. Do not use 24V power.
Caution
Some functions of this system are disabled for driverœs safety when the car is in motion.
Remove the test jack installed in the safety terminal and ensure to connect the hand brake
cable to the car hand brake. If this cable is not connected, only Ŕaudioŕof the TV and Aux
will be supported.
Caution Connect the Aux cable such as line out or A/V in after turning the power off. If the power
is on while connecting the cable, the product can be damaged.
Caution Do not install the product in a place with much water, humidity, vapor, dust, oil, or smoke.
Warning Install the product in a position that does not interfere driving or safety devices like an air bag
at the time of product installation and wiring.
Caution
If you donœt use the product for a long time after purchasing this product, car position
sensing time can be prolonged, since the GPS antenna backup battery can be discharged.
In this case, charge the batter for 2 ~3 hours while using the navigation system.
Caution
Do not put the object that interferes with GPS signal reception around the GPS receiver.
Radio interference may occur.
Caution
Do not install the electronic product that generates heavy electromagnetic waves like a radio
transmitter around the GPS antenna as much as possible.
Caution
GPS reception can be blocked if the car front side glass is specially coated.
1-3. Upgrade directions
1-4. Troubleshooting
1) Touching does not work
If you cannot set touching in the Setup menu due to wrong touch setting, use
the remote controller instead.
ȘPress the [Initial Screen] button on the remote controller to open the main menu
screen.
ȘPress the [F2] ơ[F3] ơ[F2] ơ[Full Screen] button sequentially to open the Touch
Setting screen
ȘPress the 5 cross marks using the test jack or touch adjustment rod, according to the
instructions displayed on the screen.
ȘPress the screen once to close the Touch Setting screen.
2) The LED turns on or flashes in red resulting in the VXA-3000 self-diagnostic
Addition to the VXA-3000 problem, when the temperature inside the car is too high
or low, the red LED flashes. In this case, follow the steps below.
ȘTurn the product power off and ventilate the car to get normal temperature.
ȘTurn the power on after a little while and observe the LED color.
ȘIf the red LED still flashes in normal temperature, ask for the service at A/S center.
5
About VXA-3000
ȘDepending on the SD Card memory product, the SD Card memory sensing time may vary
or sensing may fail.
VXA-3000
Park the car in a safe place for touch setting.
Basic Operation
Caution
6
About VXA-3000
2. Components
VXA-3000
Remote
controller
Test jack
VXA-3000 body
Stereo output cable Hand brake
connection cable
SD Card memory
reader
Car holder Userœs manual
Red : + : Bluek
-
SD Card memory
Aux cable
(AV In terminal) Cigar jack cable
NAVI
GAME AUX VIDEO
MAIN
IMAGE
OK
F4
F1 F2 F3
F5
FILE LIST PLAY TYPEFULL SCREEN
SCREEN OFF SETUP
3. Description on product appearance
3-1. Front/Right side
ڡTOUCH SCREEN : Handles user touch input.
ڢLED : Displays the product status.
(Blue: Normal operation, Red: Malfunction)
ڣREMOTE CONTROLLER BEAM RECEIVING UNIT : Receives the remote control signal.
ڤAUDIO OUT : Output the audio signal to the external device.
ڥAUDIO/VIDEO IN : Receives the A/V input from the external device like a DVD player.
ڦCOMM : Connects to the car DVD player (optional). Controls the DVD player using the touch
screen. (Compatible model: VXM-2000 family, VXD-2100)
ڧUSB : Connector for A/S.
ڨSAFETY : Connects to the car hand brake after removing the test jack, which is installed in
advance for safety.
7
About VXA-3000
ڤ
ڥ
ڦ
ڧ
ڨ
ڡڢڣ
VXA-3000
Basic Operation
Connect to USB memory
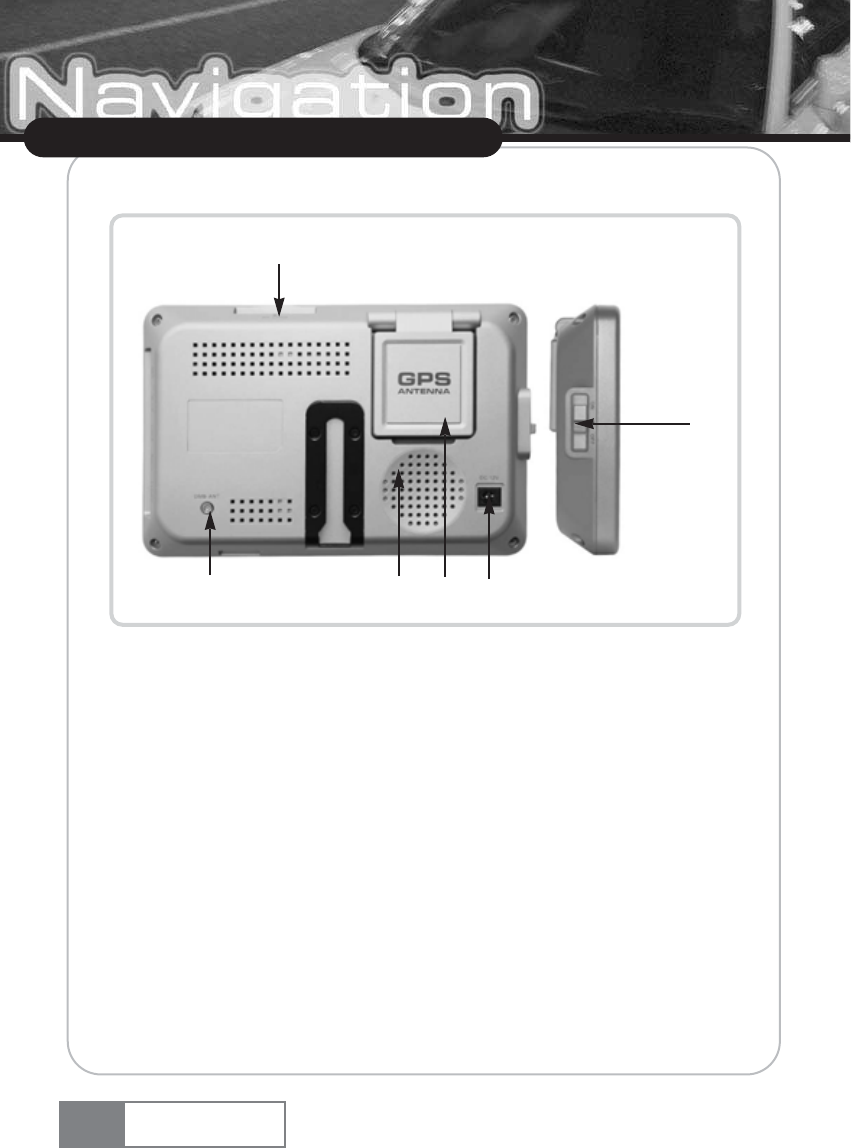
3-2. Rear/Left side
ڡDMB ANT
ڢSPEAKER : Outputs 1 watt audio.
ڣGPS ANT
ڤDC 12V : Connects to the provided cigar jack.
ڥPOWER SWITCH : Turns the power on/off.
ڽSD Card memory slot
8
About VXA-3000
ڥ
ڢ
VXA-3000
ڡڣڤ
ڦ
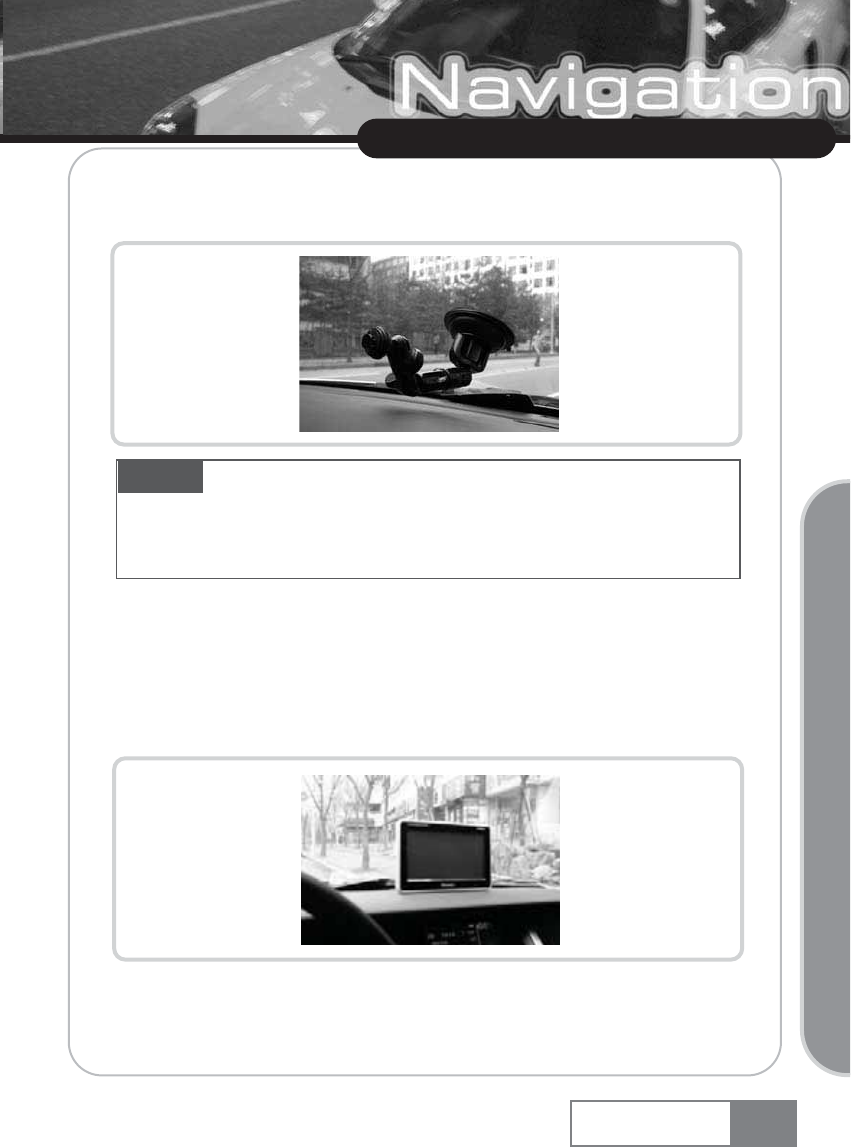
4. Installing product
1) Fix the holder on the car dashboard where the driver feels comfortable.
GPS sensitivity will increase if you use the GPS pedestal. Use the GPS pedestal in
any case.
2) Adjust the position to fit into the driverœs field of vision after fixing the product on the
pedestal.
9
About VXA-3000
Caution Remove the foreign object from the holder fixing place so that the holder can be attached
firmly. Then, fix it with screws to prevent falling down due to shock.
Do not install the holder at the position that hampers driverœs vision or driving. Be careful not to interfere
driving or the safety device like an air bag.
VXA-3000
Basic Operation
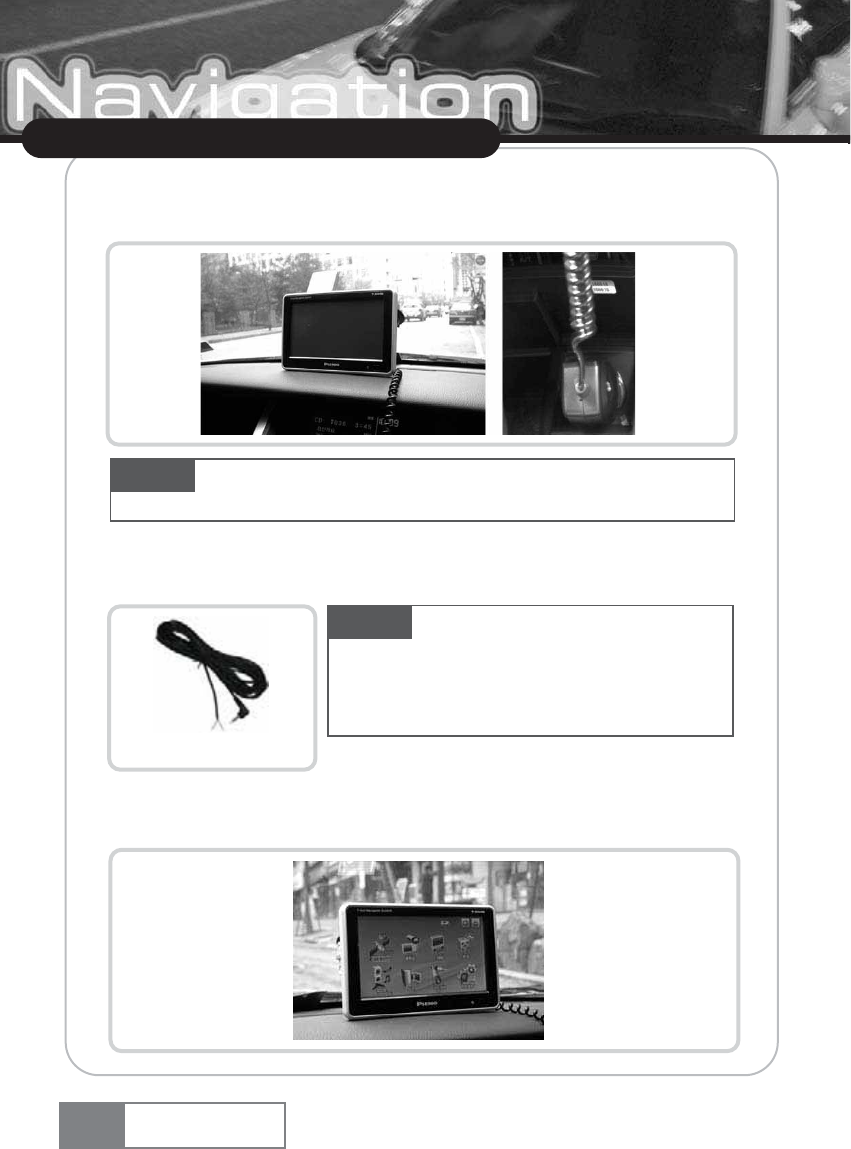
3) Connect the power cable to DC 12V terminal located at the left side of the product
and car cigar jack.
4) Remove the test jack from the Safety terminal and then, connect the cable to the hand brake.
5) Press the power switch ON that is located at the left side of the product.
10
About VXA-3000
Caution Use the car cigar jack that is included in the product package. If you use other cigar
jack, the product may not work properly.
Caution Make sure connect the cable to the car hand
brake to prevent operation while in motion. If the hand brake
connection cable is not connected, only Ŕaudioŕexternal input will
be supported.
VXA-3000
Red : + : Blue
-

1. Basic functions of VXA-3000
1) Navigation function : Helps car navigation using GPS (Global Positioning System) engine and
antenna, and electronic precision map.
2) Audio player function : Plays back MP3, WMA, WAV and OGG music files.
3) Video Player function : Plays back video files.
4) Image Viewer : GIF, JPEG and BITMAP image files.
5) Game function : Provides enjoyable games.
6) Aux function : Connects the DVD player manufactured by this company. When connected to
other manufacturerœs product, Aux function can be used.
7) Setup setting function : Various functions can be configured such as slide show, main theme,
touch setting, volume control, Dimmer control, OS upgrade, A/V input, and FM transmitter.
11
Using VXA-3000
VXA-3000
Basic Operation
Using VXA-3000
>@)
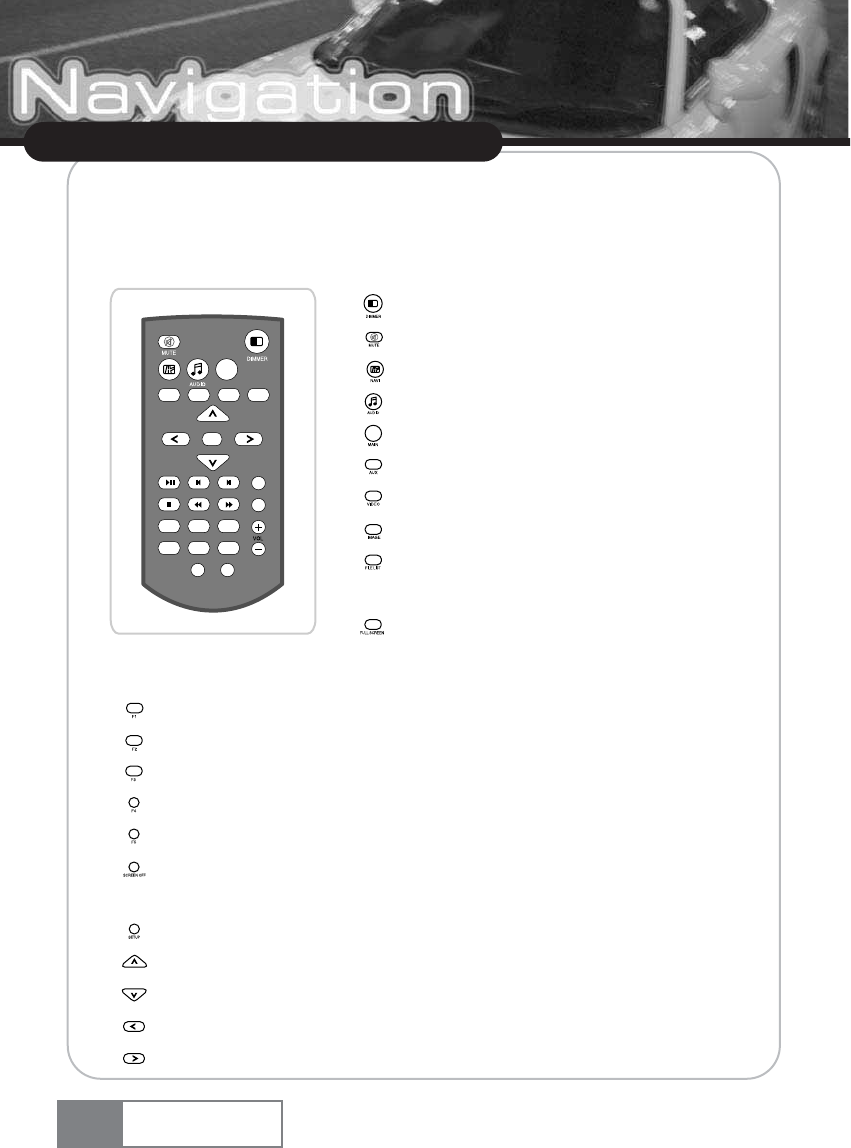
2. Learning basic remote controller functions
You can use frequently used function using the remote controller, as well as the touch screen for more
convenient usage of VXA-3000.
ȯ
: See additional function.
ȯ
: See additional function.
ȯ
: Reserved.
ȯ
: Reserved.
ȯ
: Reserved.
ȯ
: Turns on/off the LCD screen. Voice guide and audio play back will continue even the LCD screen
is turned off.
ȯ
: Directly switches to the Setup function.
ȯ
: Moves the cursor upward.
ȯ
: Moves the cursor downward.
ȯ
: Moves the cursor left.
ȯ
: Moves the cursor right.
ȯ: Controls screen brightness by 5 steps.
ȯ: Mutes the sound temporarily.
ȯ: Directly switches to the Navigation function.
ȯ: Directly switches to the audio player function.
ȯ: Directly switches to the initial screen.
ȯ: Directly switches to the Aux function.
ȯ: Directly switches to the Video player function.
ȯ: Directly switches to the image function.
ȯ: Display the file list of Video/Audio player and Image
viewer.
ȯ: Enlarge the Image or Video screen size to full LCD size, during
Video player and Image viewer function is operating.
NAVI
GAME AUX VIDEO
MAIN
IMAGE
OK
F4
F1 F2 F3
F5
FILE LIST PLAY TYPEFULL SCREEN
SCREEN OFF SETUP

Ș: Selects the cursor that was moved by the direction key.
Ș: Play back/Pause Audio or Video playback and show selected image in Image viewer mode.
Ș: Moves audio or DVD playback section backward in Audio player/Aux mode. In Image viewer
mode, shows previous image.
Ș: Moves audio or DVD playback section forward in Audio player/Aux mode. In Image viewer
mode, shows next image.
Ș: Stop Audio , Video or DVD playback.
Ș: Moves Audio or DVD playback section backward fast in the Audio player/Aux mode.
Ș: Moves Audio or DVD playback section forward fast in the Audio player/Aux mode.
Ș: Sets volume up or down.
Ș: Sets Repeat All/Repeat Start when playing back DVD, or Repeat All/Repeat Selected/Random
Selection when playing back MP3.
[Additional Remote controller function : Under button is redefined when File list
function is enabled in the Video player, Audio player or Image viewer mode.]
ƚBasic screen at the Image viewer
Ș: Zoom in function.
Ș: Rotate to left.
Ș: Zoom out function.
Ș: Rotate to right.
ƚDuring file list is enabled
Ș: Moves cursor up.
Ș: Close file list.
Ș: Moves cursor down.
Ș: Enable the folder tap when file tap is enabled.
Ș: Enable the file tap, when folder tap is enabled. And playbacks/shows selected file
when file tap is enabled.
Ș: Moves page of file list up.
Ș: Moves page of file list down.
13
Using VXA-3000
Caution Navigation and game functions are disabled when using the remote controller.
1) Navigation 2) game
VXA-3000
Basic Operation
ƚFull screen at the Image viewer
Ș: Moves center of image up.
Ș: Moves center of image left.
Ș: Moves center of image down.
Ș: Moves center of image right.
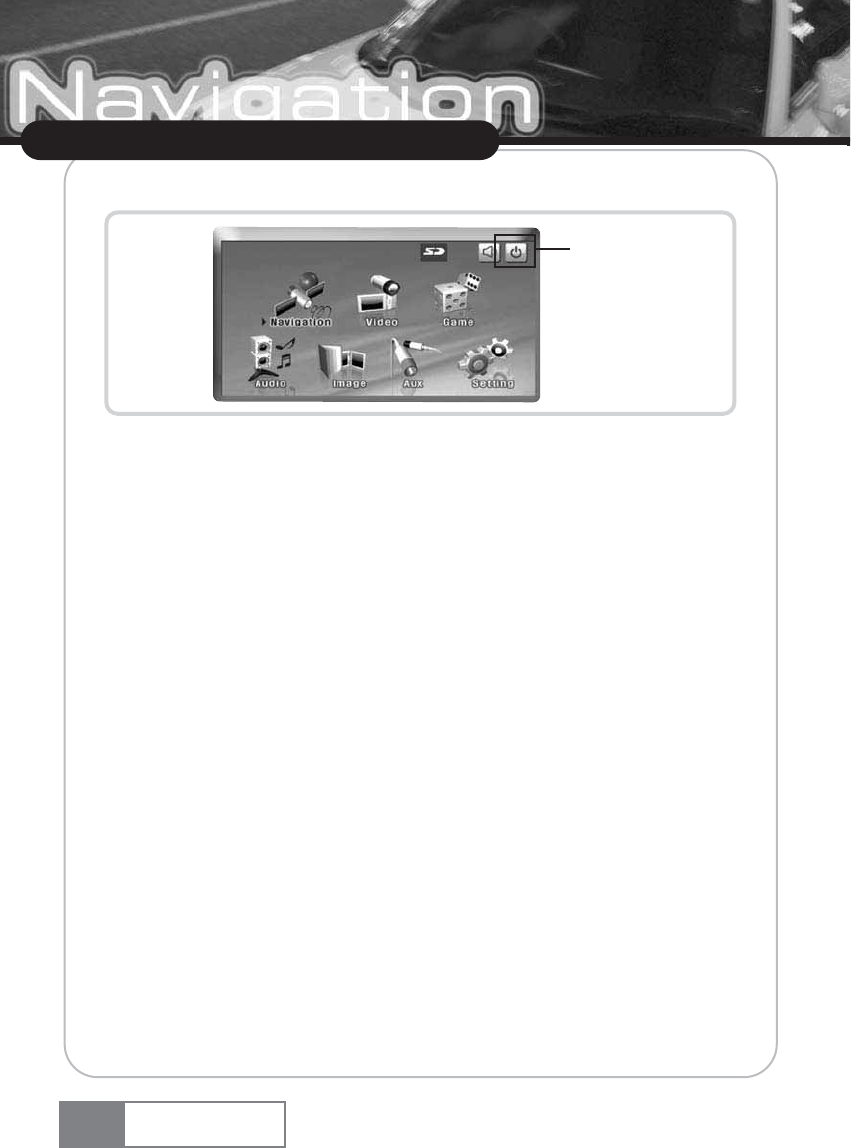
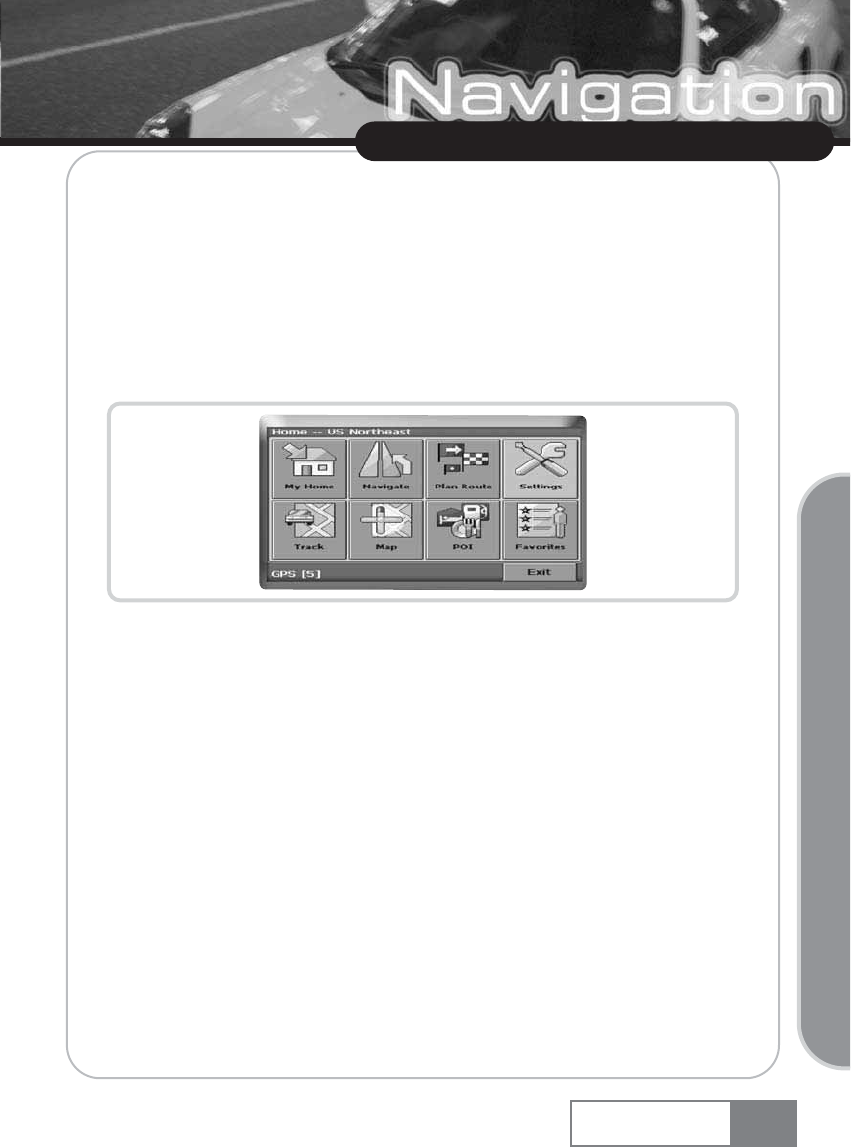
3. Main menu
The main menu is composed of Navigation, Audio Player, Video Player, Image Viewer, Game,
AUX, Setting, Screen On/Off button and etc.
4. Quick Start
This section will walk you through using your navigation unit for the first time, acquainting you with
the basic operation of the navigation system. The functions and buttons not mentioned will be
described in 5. DETAILED DESCRIPTION on page 19.
Switch the unit on and tap on NAVI or NAVIGATION in the start screen.
After the application loads, a screen with safety precautions will be shown. Please read them
carefully. Afterwards, you can choose to hide these notes for future startups.
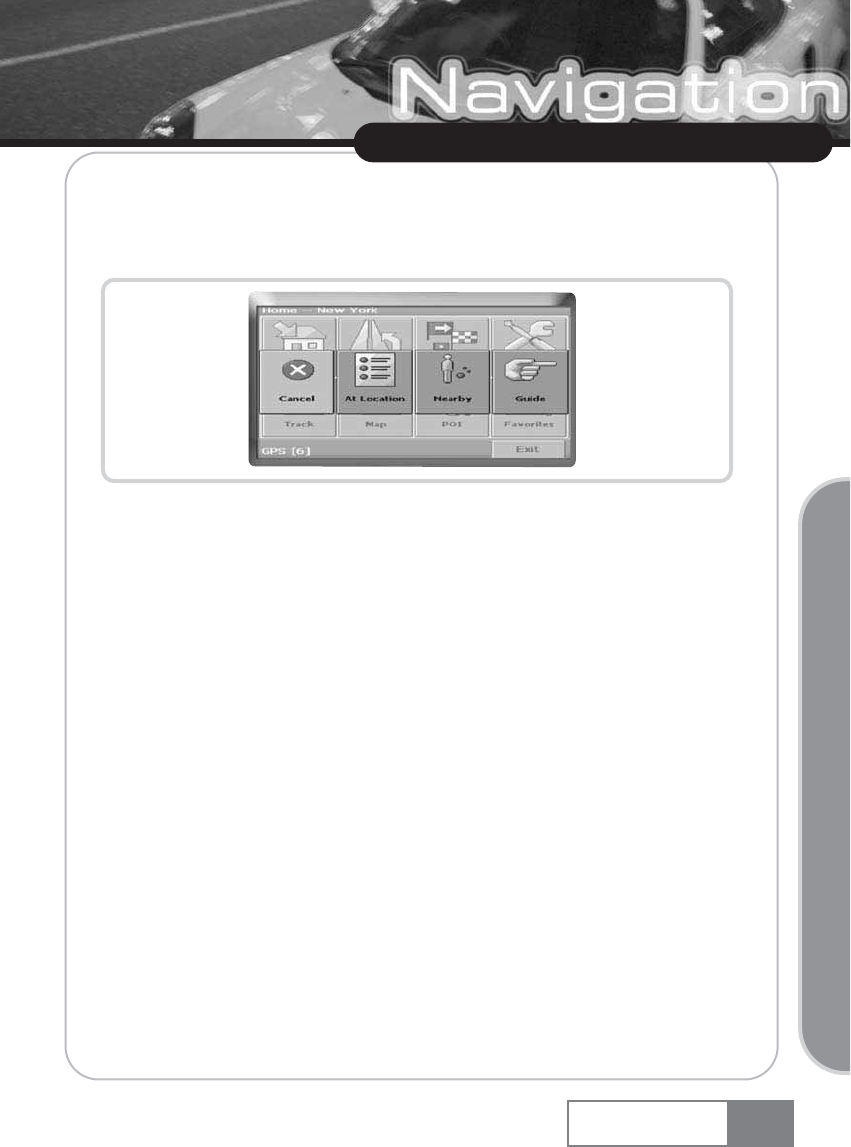
The main menu (Home) will appear:
14
Using VXA-3000
Screen on/off
VXA-3000
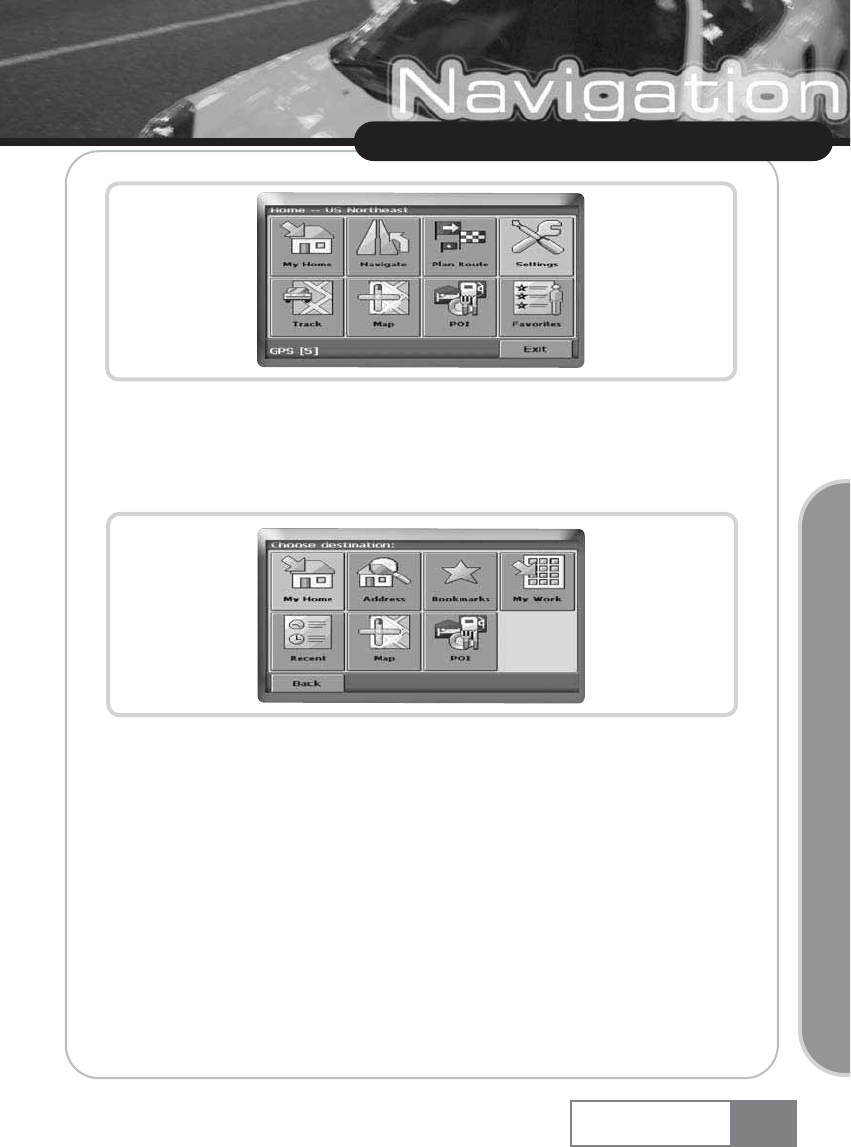
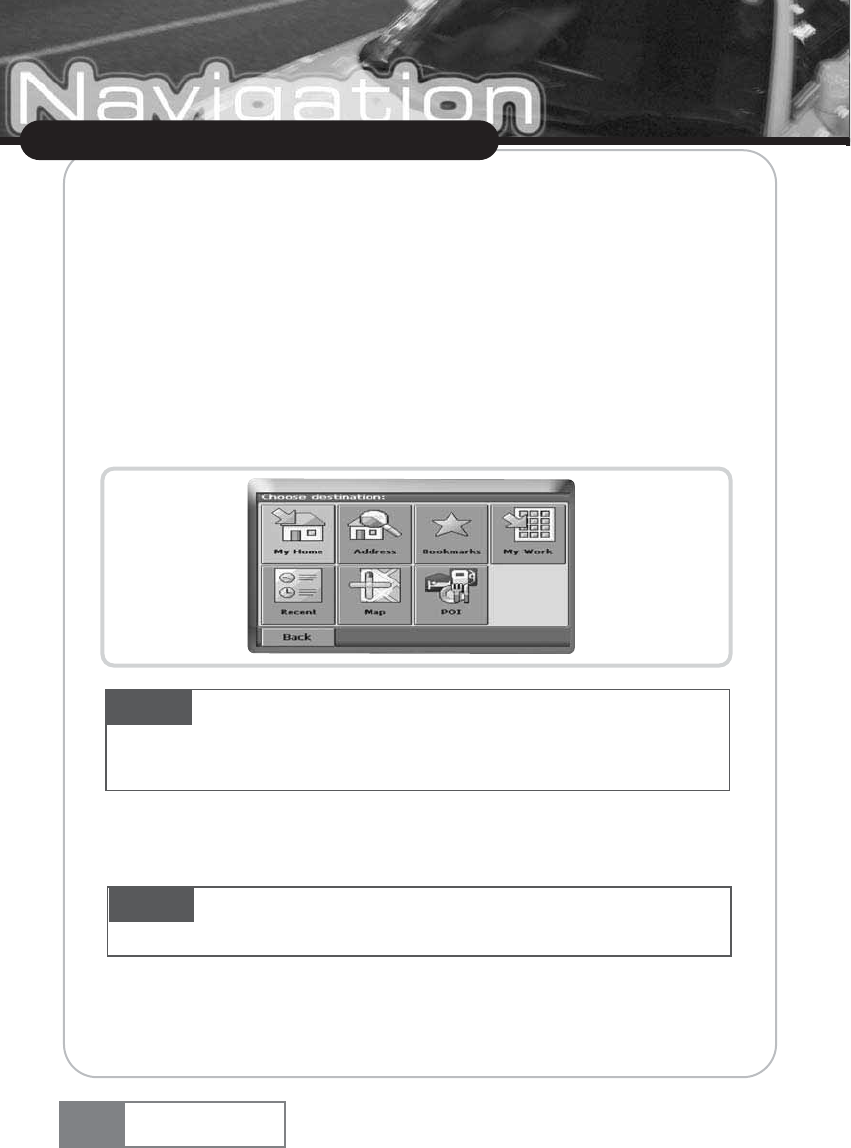
ҶSelect Navigate to set your destination.
A menu will open where you can choose a destination:
You have various ways to select your destination. The following page describes how to navigate to
a specific address.
15
Using VXA-3000
VXA-3000
Basic Operation
4-1. Navigate to An address
If you have the city and street address for your destination, simply enter it and the application will
guide you directly there.
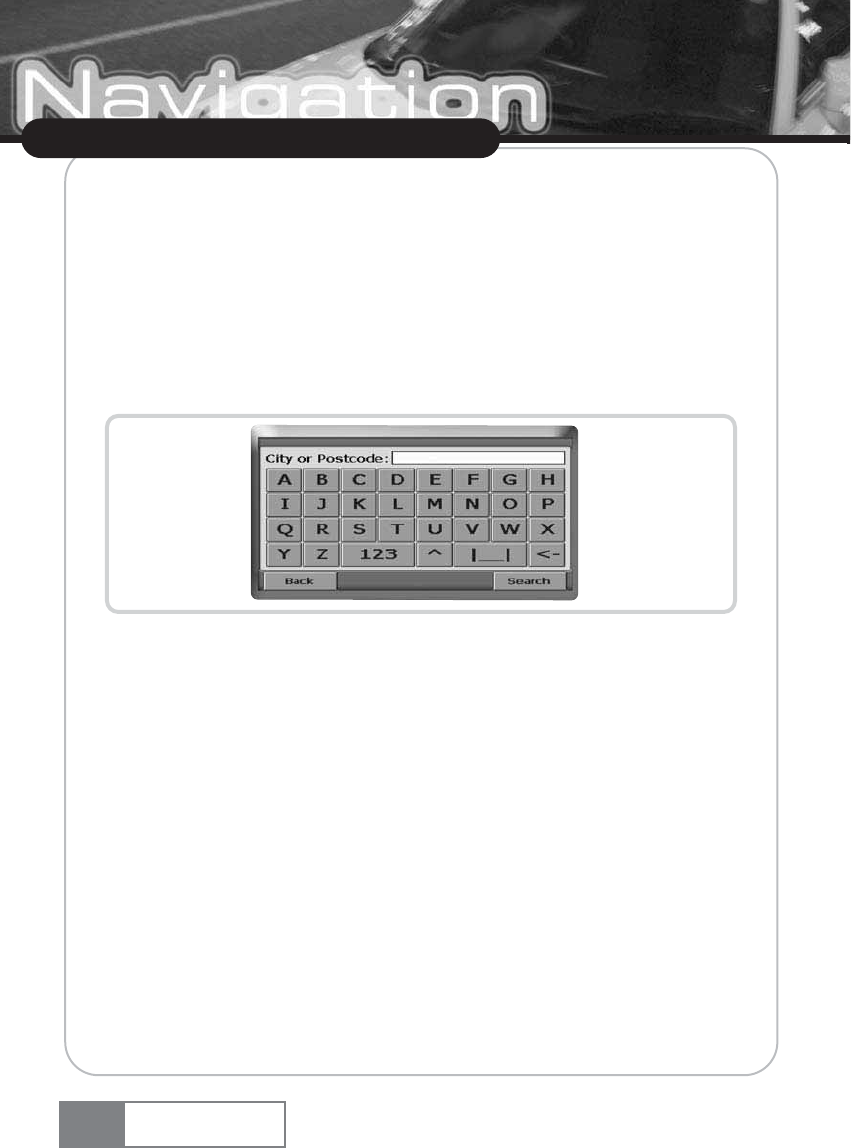
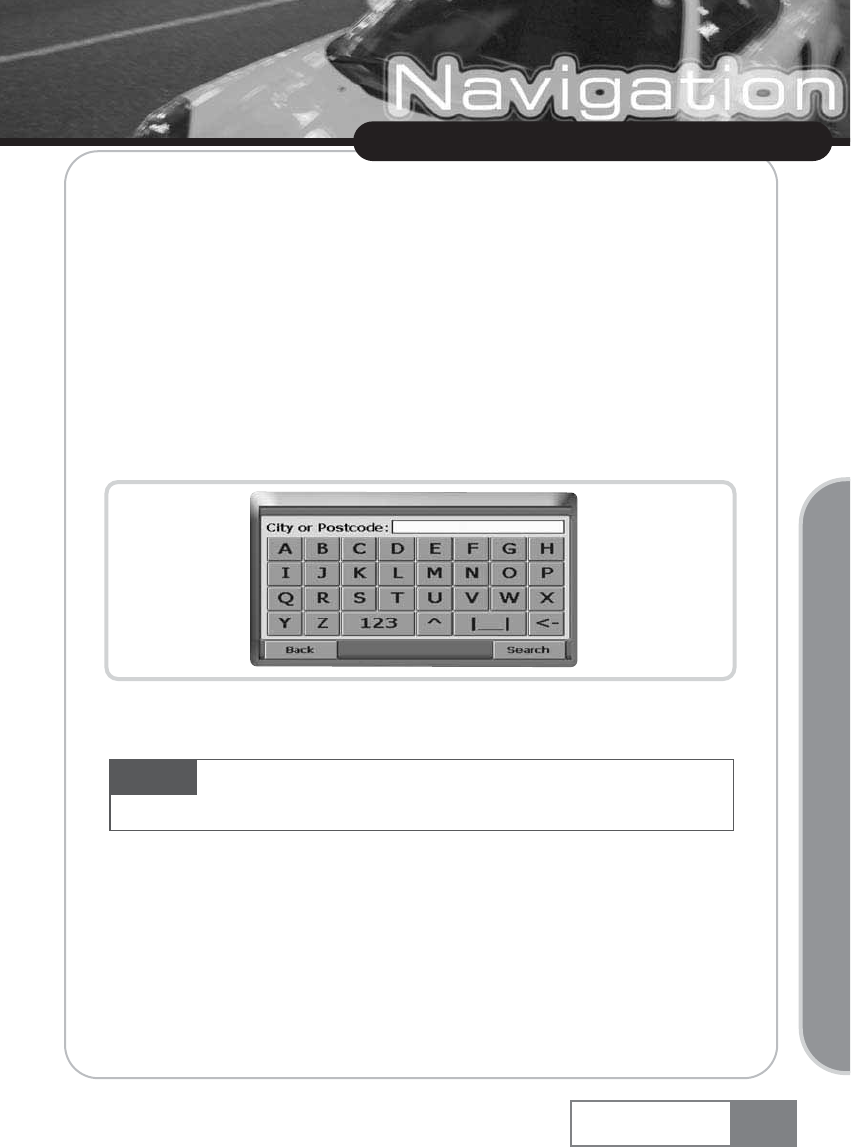
ҶTap the Address icon.
The address search screen with the keypad will now appear in the display:
ҶSwitch between letter and number mode by pressing 123 or ABC. Switch between upper case
and lower case by pressing ^.
ҶIf at any point you want to Backspace and delete characters, press the backspace button <- on
screen. To add a space, press the space bar |__|.
ҶTap on the City or P.C. field and enter your destination by tapping on the letters in the keypad
(at least three characters). Instead of the city you may also enter the postal code. Confirm the
City/postal code you have entered by pressing Search. On the following screen, choose the
appropriate city from the list by tapping on it. This will move you to the street search screen.
16
Using VXA-3000
VXA-3000
ҶOn the street search screen you may enter the street name (at least three characters) and then
press Next to go on.
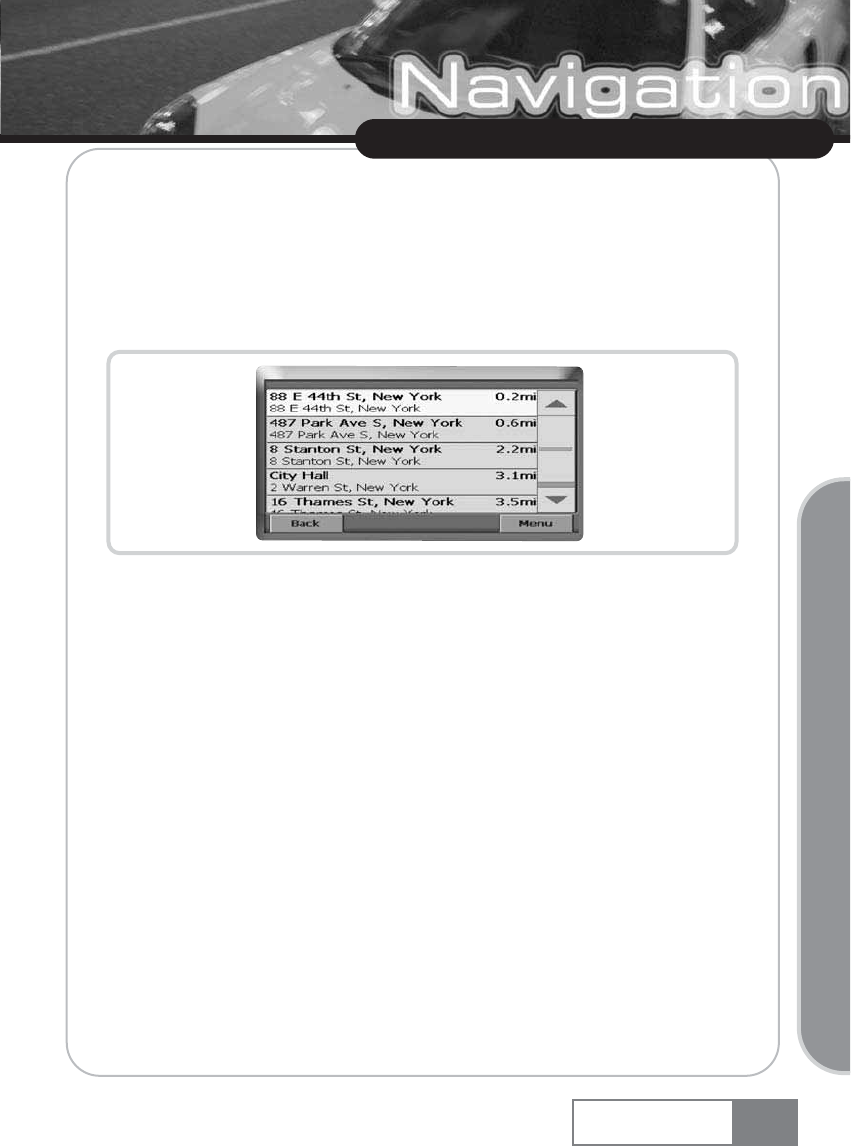
ҶNext, you may enter the number. Confirm and move to a list of matching address by pressing
the Search button.
After a few seconds you will be presented with a hit list of locations that match the address entered.
ҶSelect the required address from the hit list by tapping on it.
Once the system receives a GPS signal the guidance will commence automatically. The navigation
map will be shown, displaying all directions needed. Additionally, you will be guided by clear
voice commands.
You can set further options for navigation by tapping on the screen. A menu with rich guidance
options will be shown (see RICH GUIDANCE OPTIONS on page 21).
17
Using VXA-3000
VXA-3000
Basic Operation
NOTE If you have an imprecise address, such as ūTimes Square, New YorkŬ, you can enter that
as well, the only requirement is to enter some letters of the city name to begin your search.
You can also enter a unique 7-digit postal code. In that case, you do not need to enter a street name.
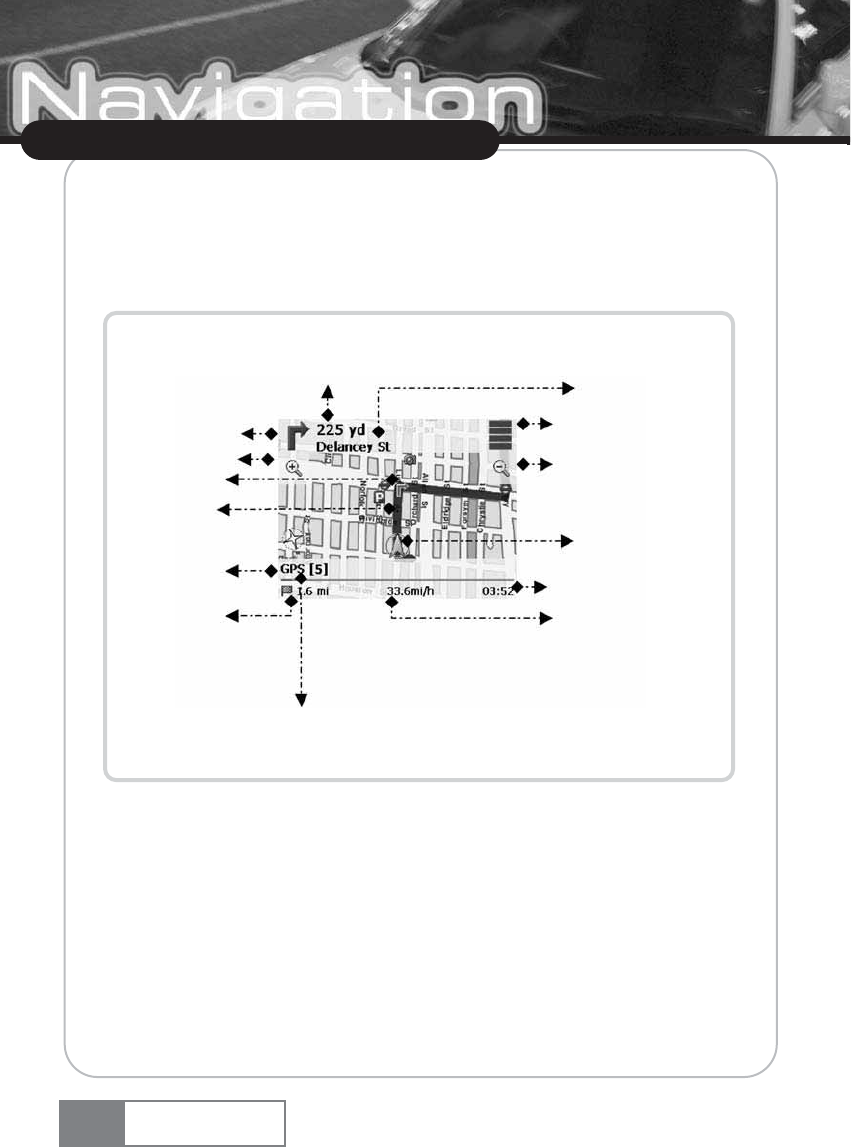
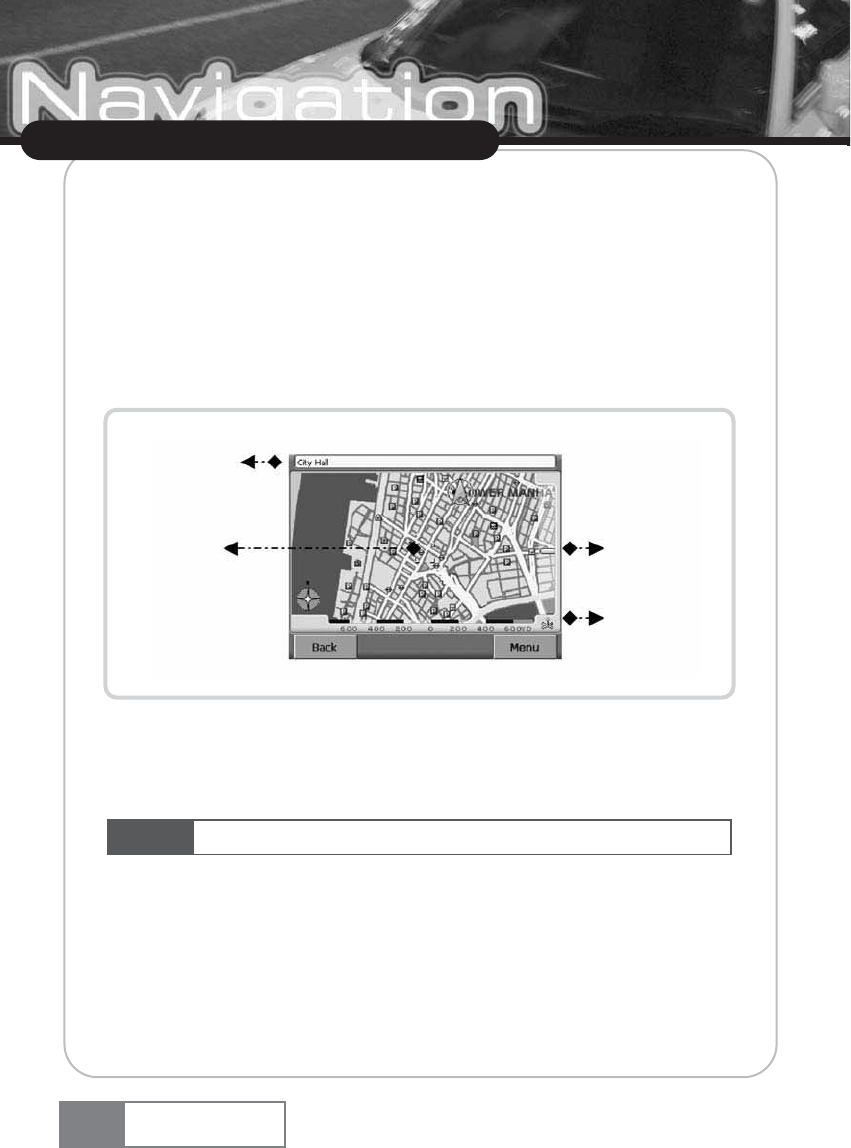
4-2. Navigation Screen
On the navigation map, the route will be shown in blue. The red arrow will indicate the direction of
your next manoeuvre. A silver arrow will identify your current position. When you come up to a
turn or other manoeuvre, you will hear a voice command at the appropriate time.
18
Using VXA-3000
VXA-3000
Target Street
Distance Bar
Zoom out
Current Posititon
Remaining Journey Time
Car Speed
Distance to next Manoeuvre
Manoeuvre Icon
Zoom in
Direction
Current Street
GPS info
Distance to
Destination
Optical Distance Bar
5. Detailed Description
5-1. Settings
ҶSwitch the unit on and tap on NAVI or NAVIGATION in the start screen.
After a short period of time the main menu (Home) will appear.
ҶChoose Settings
ҶChoose Language to select the language of your navigation system.
ҶIf you have map data for different regions/cities on your memory card, tap on the name of
the current region (e. g. London). All available maps on the memory card will be listed, and
you can choose by simply tapping on the desired region.
ҶSwitch between distance units (miles/kilometres) by tapping on the corresponding icon.
ҶChoose Guidance to change the guidance options.
19
Using VXA-3000
VXA-3000
Basic Operation
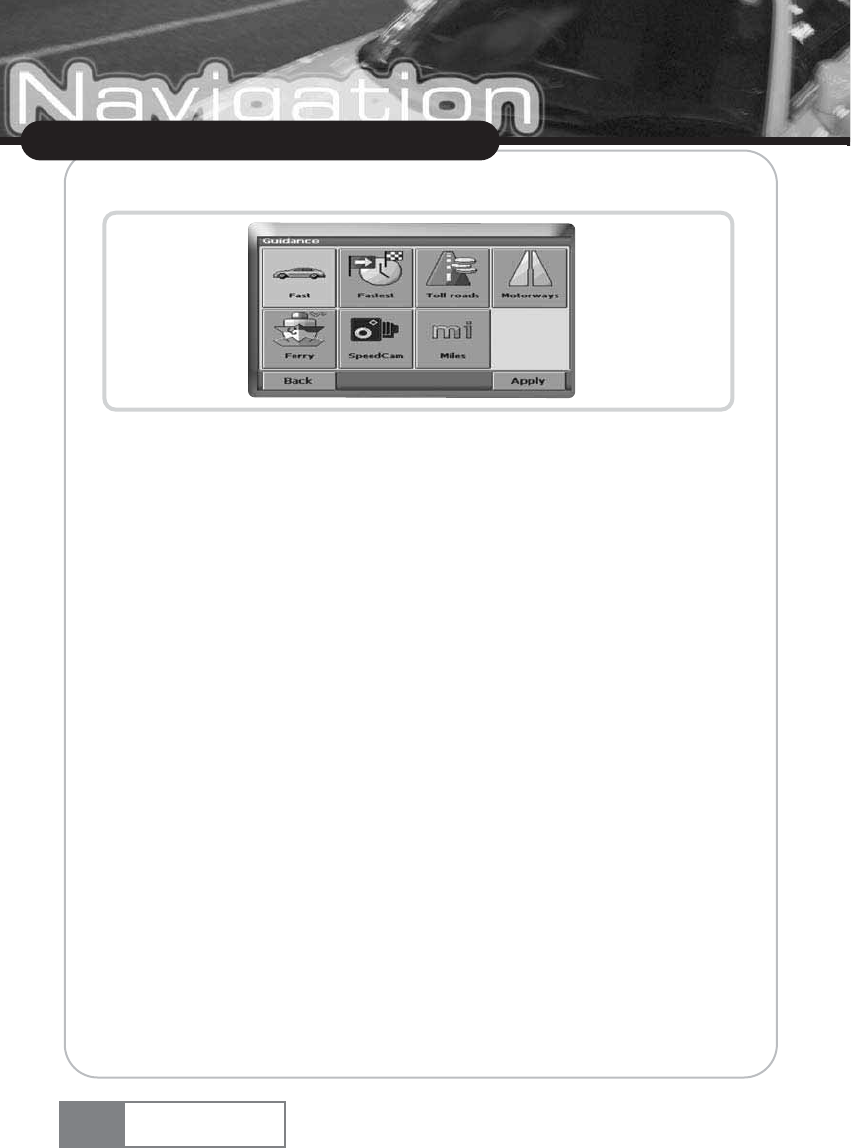
The window with the guidance options will be displayed:
You can choose among the following options: Mode of transportation (fast car, slow car,
pedestrian, etc.), fastest or shortest route, allow or avoid toll roads, motorways, and ferries.
ҶTo switch between the modes just touch the icons. These will toggle so you can quickly see the
activated settings.
ҶWith Back you go back to the main menu.
Set/change Home/Work position
You can define a home and work address (My Home and My Work) for faster access. By tapping
on the My Home icon in the main menu, you are instantly routed home. If no home address has
been set, you are prompted to do so. For more information about home and work address, see
Favorites on page 26.
20
Using VXA-3000
VXA-3000
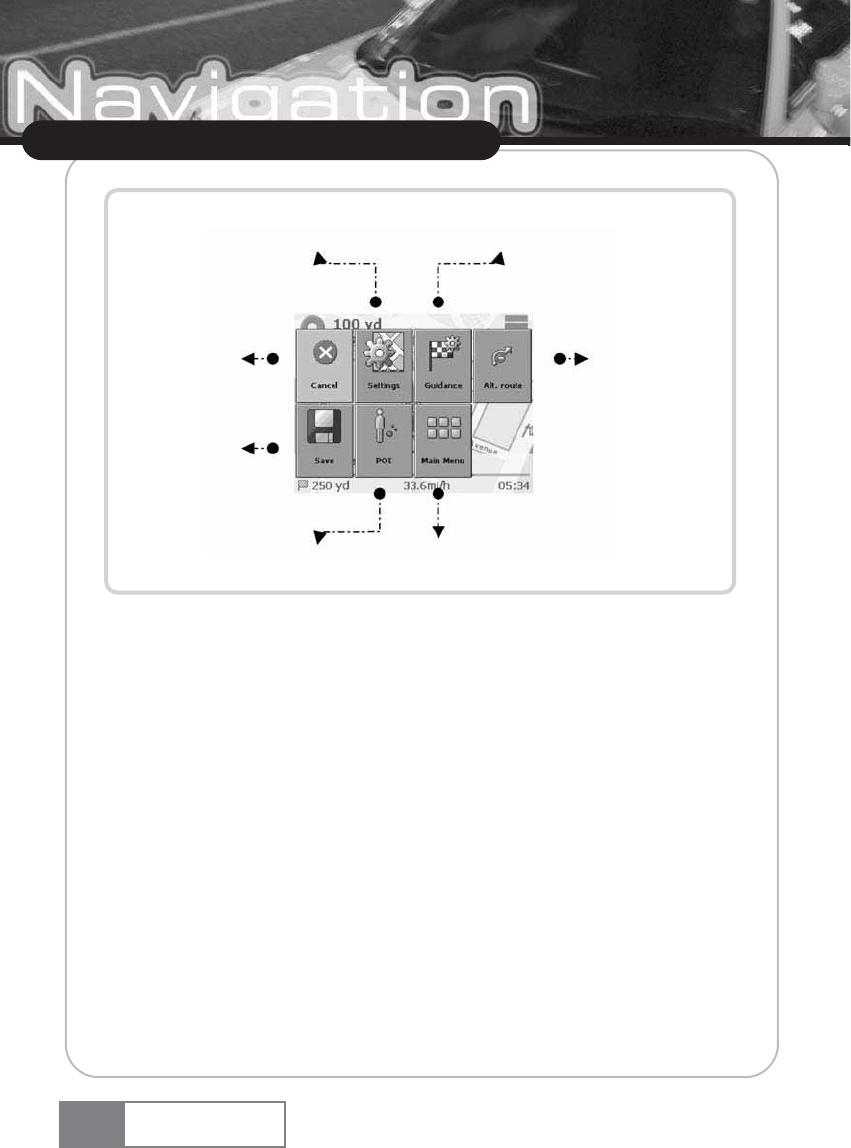
5-2. Rich Guidance Options
ҶTouch the screen during guidance to open the navigation options. Here you can change all
kind of settings, like adjusting volume, choosing night or day mode, saving your GPS position
as bookmark, record your route (optional feature), look for latest traffic information (optional
feature), choose an alternative route, change your destination to a Point of Interest (e. g. from
a Guide), etc.
Settings:
You may toggle between 2D and 3D modes, choose which kind of items to show on the map (Info
Layers, see page 37), switch between night and day mode and adjust the volume of voice
commands (or even mute them).
Guidance:
Here you can adjust the different guidance options, as seen in SETTINGS on page 19.
Alt. route:
With this option, you can choose to block the calculated route for a given distance (e. g. 0.5 kms)
and force an alternative route. Simply tap on the icon which shows the desired distance. Your
route will be recalculated, and the previous route will be discarded for the given distance.
Save:
You can save your actual position as a bookmark.
POI:
You can redirect your route by choosing a point of interest (POI), like a petrol station.
21
Using VXA-3000
VXA-3000
Basic Operation
NOTE IGuidance, including voice commands, will continue even as you are in the options screen.
22
Using VXA-3000
VXA-3000
Show Guidance Options
Change settings
Save Current
GPS Position as
Bookmark
Navigate to nearby POIs Exit guidance
Tap to Find
Alternate Route
Blocked Section/
Go back to
Navigation screen
Cancel
23
Using VXA-3000
VXA-3000
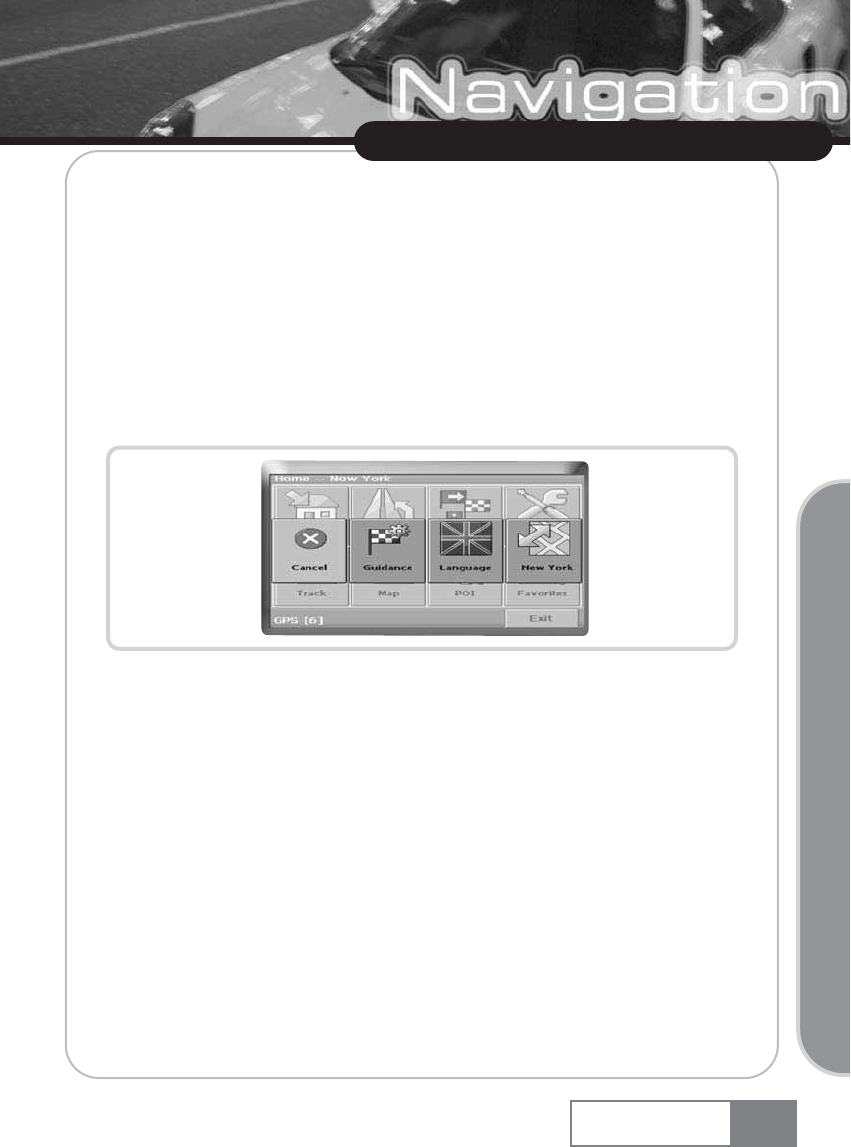
5-3. Main Menu Contents
The interface of the main menu is coherent throughout the whole navigation system. Via the main
menu you may access all functions.
ҶStart the navigation system by pressing NAVI or NAVIGATION in the start screen.
After a short period of time the main menu will appear:
My Home:
If you want to start your route guidance straight away to your home address, press My Home. If no
home address has been set, you are prompted to do so.
Navigate:
To choose another destination, select Navigate. You may then select your destination point by
tapping on your home or work position, by looking for an address, by selecting a personal
bookmark, recent destination, point of interest (e.g. through a Guide) or by consulting a map (see
HOW DO I CHOOSE MY DESTINATION? on page 28
Plan Route:
By selecting Plan Route you switch to the advanced route planning options. There you may plan
your route by choosing multiple stopovers (see HOW CAN I PLAN MY ROUTE? on page 34.
Basic Operation

Settings:
Via Settings you may determine following options:
Guidance:
Mode of transportation (fast car, slow car, pedestrian, etc.), fastest or shortest route, allow or avoid
toll roads, motorways, and ferries.
Language:
Here you may select other languages by tapping on them.
Other Maps:
If you have map data for different regions/cities on your memory card, tap on the name of the
current region (e. g. London). All available maps on the memory card will be listed and you can
choose one by simply tapping on the desired region..
Track:
Press Track to show your current GPS position.
Map:
You may also explore a town/city or its surroundings on a Map (General Map) and select places
or points of interest by tapping on the map. You may also use these for navigation and for
planning your route.
24
Using VXA-3000
VXA-3000
25
Using VXA-3000
VXA-3000
POI:
With the POI finder you can quickly find points of interest like petrol stations and restaurants that
are chosen from a database of millions of POI, either nearby or at a remote location. With the
Nearby option you will be presented a list of POIs near your current location. With At location you
can look for POIs at a remote location, therefore you need to enter a city or postal code through
the keypad.
Within the POI finder you will see the Guides, an optional and highly recommendable feature.
Branded travel/city guides will help you to find out what is nearby and will give you valuable
information about attractions, restaurants, hotels, etc. with detailed descriptions. You may then use
these for navigating or save the location as a bookmark. The (city) guides may be purchased
optionally.
Guides are an optional feature and may be purchased at:
ENTER URL HERE!
Basic Operation
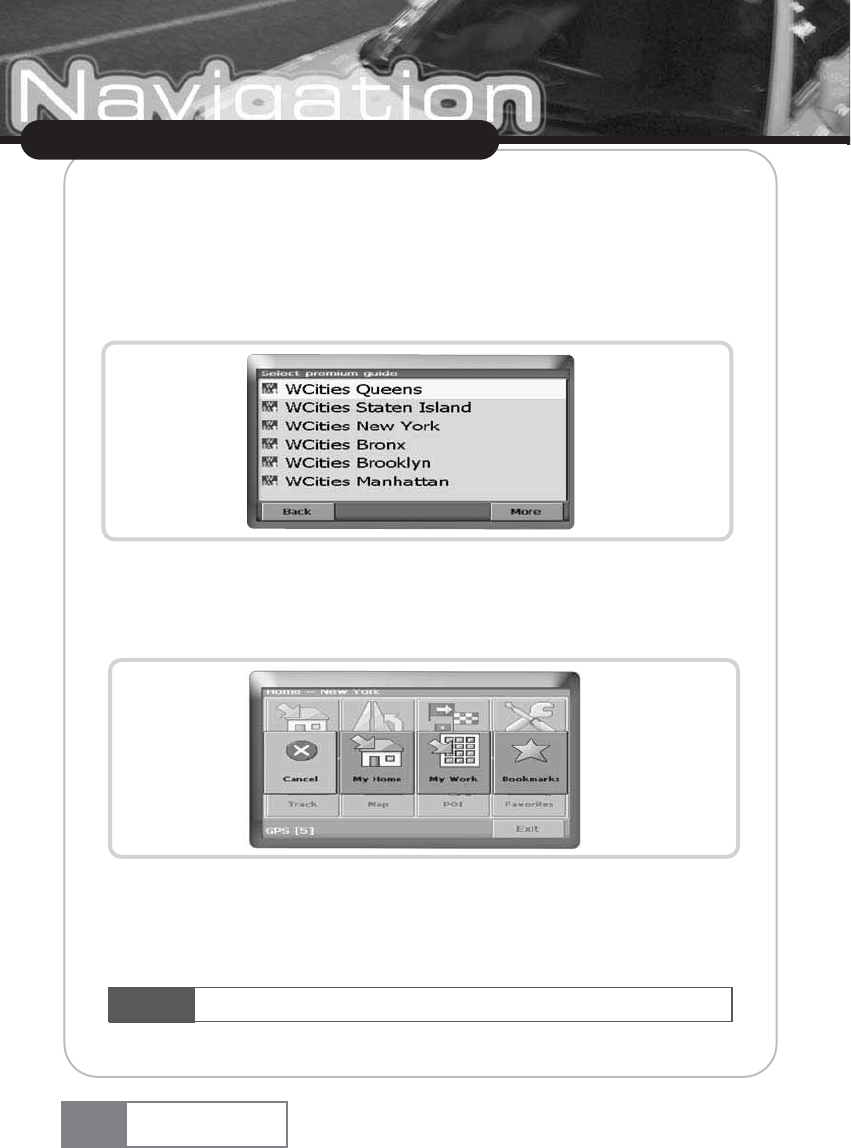
ҶIn the POI finder, press on Guide and the guide list for the current region you are in will be
opened.
You may choose a guide item as destination, save it as bookmark or pinpoint the location. (See
also HOW DO I USE GUIDES? on page 25.)
Favorites
Through Favorites you can access to, edit and delete your home and work positions, as well as
your bookmarks.
ҶVia Main Menu آFavorites آMy Home you can show your home position. The home
position will be shown on a map. Click on that map or on Menu to Change or Delete your
home address.
26
Using VXA-3000
VXA-3000
NOTE Access and edit your work address (My Home) accordingly.
ҶVia Main Menu آFavorites آBookmarks you can show your bookmarks. Click on a
bookmark to rename or delete it or to be routed directly to that location.
GPS:
At the bottom of the screen, your GPS status will be displayed all the time, showing the current
street you are on and the number of satellites the GPS system is currently tracking.
Exit:
With Exit you quit the navigation system.
27
Using VXA-3000
VXA-3000
Basic Operation
NOTE All information like Settings, Bookmarks and also the Recent items will be stored on the
memory card and not on the device.
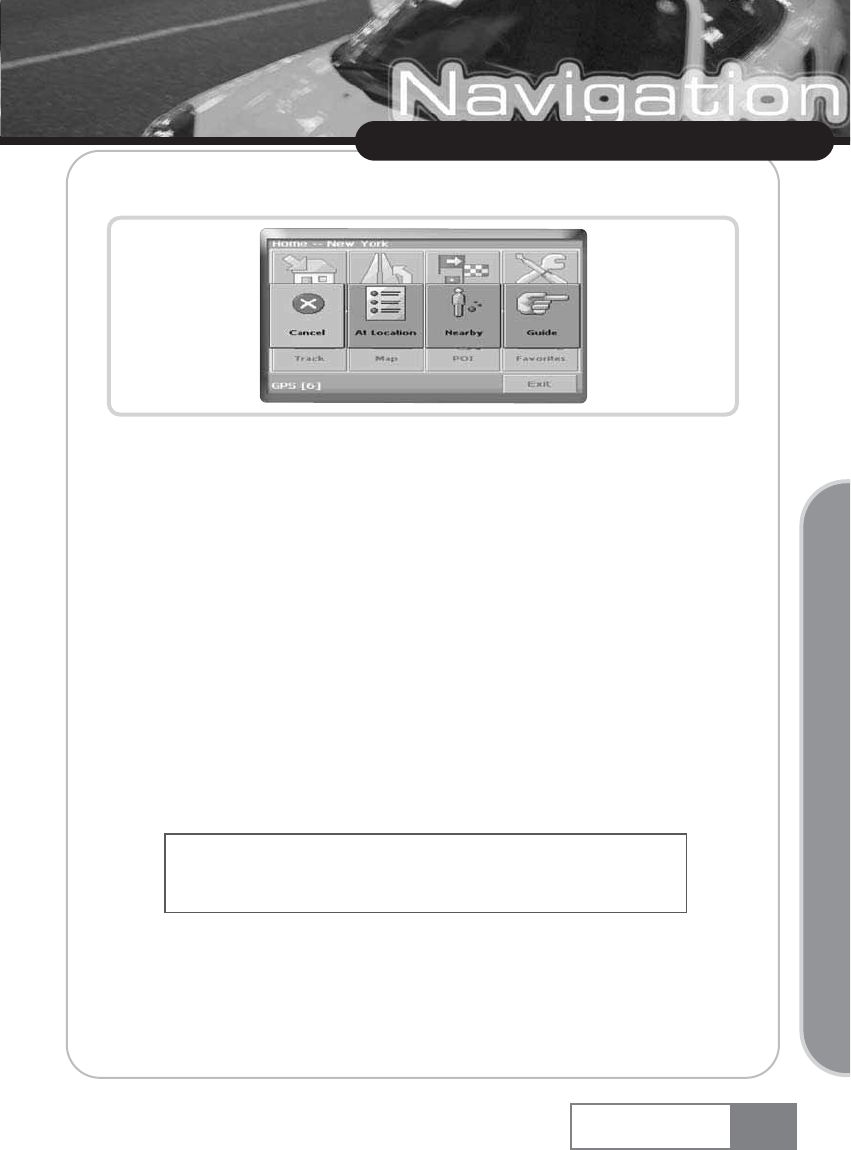
5-4. How do i choose my Destination?
You may choose your destination using your home address, the Address search, bookmarks, your
work address, recently searched destinations, the map or looking for points of interest (e.g. through
Guides).
ҶPress Navigate in the main menu.
The Choose destination menu opens:
ҶPress My Home to be guided home directly without any further input. The route guidance
system will start automatically.
ҶVia Back you may always step one level back throughout the whole application.
Alternatively you may use the other destination setting possibilities (see following pages):
28
Using VXA-3000
VXA-3000
NOTE Please remember that the ways of setting a destination described in this section originate
from the Choose destination menu. There are alternative ways of setting a destination, as described in
MAIN MENU CONTENTS on page 23.
NOTE If no home address has been set, you are prompted to do so. If you want to change an
existing home address, see Favorites on page 26.
Address search
Through the Address search you can perform a search by entering information about the desired
target (street and town/city). You may then select a hit from the hit list and start navigating. You
can also search for addresses if you want to plan a route with several stopovers. Alternatively, you
may wish to pinpoint a specific location.
ҶTo start this function, click on the Address icon.
The Address search with the keyboard will now appear in the display:
Ҷyou to the street search screen.
ҶOn this screen you may enter the street name (at least three characters) and then press Switch
between letter and number mode by pressing 123 or ABC. Switch between upper case and
lower case by pressing ^.
ҶIf at any point you want to Backspace and delete characters, press the backspace button <- on
screen. To add a space, press the space bar |__|.
29
Using VXA-3000
VXA-3000
Basic Operation
NOTE You can also enter a unique 7-digit postal code. In that case, you do not need to enter a
street name.

ҶTap on the City or P.C. field and enter your destination by tapping on the letters in the keypad
(at least three characters). Instead of the city you may also enter the postal code. Confirm the
city/postal code you have entered by pressing Search. On the following screen, choose the
appropriate city from the list by tapping on it. This will move move you to the street search
screen.
ҶNmsghrrbqddmxntl`xdmsdqsgdrsqddsm`ld'`skd`rssgqddbg`q`bsdqr(`mcsgdm
oqdrrMdwssnfnnm-
ҶNext, you may enter the number. Confirm and move to a list of matching address by pressing
the Search button.
ҶThe hit list will be displayed.
ҶSelect the desired address from the hit list.
Navigation will start automatically after selection. Clear visual and voice commands will guide you
along the route. (You can find a description of the navigation screen in NAVIGATION SCREEN on
page 18.)
30
Using VXA-3000
VXA-3000
NOTE You can also enter a unique 7-digit postal code. In that case, you do not need to enter a
street name.
Bookmarks
The bookmarks list contains the destinations you have saved as favorites (from the Guides, from
your Address search, etc.). There is no need to perform repeated searches for those destinations.
ҶPress the Bookmarks icon.
ҶUse the Up and Down arrows to scroll up and down in the list. Select an item by clicking on it.
Navigation will start immediately, assuming there is a GPS signal.
ҶIf you want to rename or delete a bookmark, please see Favorites on page 26.
31
Using VXA-3000
VXA-3000
Basic Operation

My Work
ҶBy pressing My Work you will be guided directly to your workplace (or another frequently
visited location of your choice).
Recent
ҶBy pressing Recent a list with the recently visited and searched destinations will be opened.
Map
Via Map you can move on the map of the surrounding area and select items for guidance. (See
also HOW DO I SELECT ADDRESSES ON THE MAP? on page 36.)
32
Using VXA-3000
VXA-3000
NOTE If no work address has been set, you are prompted to do so. If you want to change an
existing home address, see Favorites on page 26.
POI
You may also select a destination via the POI (points of interest) finder. Here you may choose POIs
that are either nearby or at a remote location. You may also browse a Guide.
33
Using VXA-3000
VXA-3000
Basic Operation

5-5. How can i plan my route?
Using the route planning functions you may plan your route with multiple stopovers along your
journey.
ҶTo start this function select Plan Route in the main menu.
The Destination List will be displayed:
ҶBy pressing the + icon you can add a stopover.
You will switch to the Choose stopover screen, which looks the same as the Choose destination
screen and is exactly the same to use. You may choose stopovers like your home or work
addresses, a bookmark, a point of interest, a recent location or by searching for an address or
pinpointing a destination on the map.
34
Using VXA-3000
VXA-3000
Once you have added stopovers (with the + Icon) and returned to the Destination List, you have
several options:
ҶWith the + icon you can add more stopovers.
ҶSelect a stopover and then use the Up and Down arrows to change the order of the stopovers.
ҶWith the Trashcan icon you can delete a selected stopover.
ҶVia Menu you may start following functions:
ҶWith Simulate you can simulate the route to come.
ҶBy pressing Start Navi the guidance will start automatically and the display will switch to the
navigation map.
ҶWith Routing the system will calculate your route and the Route Summary will be displayed.
Tap on one of the items in the Route Summary to display the Waylist. Tap again to show the
Map View.
.
35
Using VXA-3000
VXA-3000
Basic Operation
5-6. How do i select addresses on the map?
The Map (General Map) not only shows roads and squares, but also points of interest such as
restaurants, cultural attractions, parking garages, etc.
ҶTo start this function press the Map icon in the main menu.
The general map will now appear in the display:
Functions of buttons
ҶDiscover your surroundings by dragging the map with your finger (or with the pen).
ҶPoint at the symbol of a location to display its name.
ҶUse the Scroll Bar on the right to zoom in (down) or out (up) on the Map.
ҶUse the symbol in the bottom right-hand corner to toggle between 2D and 3D view.
36
Using VXA-3000
VXA-3000
Toggle between
2D and 3D Mode
Zoom In (down)
and Out (up)
POI Information
Selected POI
NOTE Alternatively you may also use the joystick on the device!
ҶWith the Compass icon (in the bottom left hand corner) you may adjust you orientation.
ҶBy pressing Menu, you can access to further options, like saving the actual location as a
bookmark, moving to the actual GPS position, navigating to the selected location, searching
an address, and accessing to a bookmark or point of interest.
Info Layers
You can define the complexity of the map by choosing the elements (locations) that will be shown
in it.
ҶVia the main menu آMap آMenu آSettings آInfo Layers you can select which locations
will be displayed on the Map:
Check the boxes of any category you want to have displayed on the map. Uncheck those that
should be hidden.
ҶBy pressing All you will select all POIs. If you do not want any POIs to be displayed on the
map select None.
ҶPress Back to return to the map.
37
Using VXA-3000
VXA-3000
Basic Operation
5-7. Optional Features
The following features are optionally available for your navigation system:
ҶCity Guides
ҶRoute Recording
ҶTraffic Information System (TMC)
ҶSpeed Camera Alert
HOW DO I USE GUIDES?
Guides are an optional feature and may be purchased at:
ENTER URL HERE
City Guides, available at ENTER URL HERE, contain lots of valuable information to enhance your
experience, such as descriptions, contact information, prices, opening times, etc.
ҶSelect POI in the Main Manu, then Guide.
38
Using VXA-3000
VXA-3000
The guide list will appear:
ҶSelect the guide you wish to use by clicking on it.
The Categories tab of the chosen guide will be displayed:
You can now browse the guide by categories or search the guide.
39
Using VXA-3000
VXA-3000
Basic Operation

Browse by categories:
ҶUnder Categories you may select from the different categories of the Guide (e.g. restaurants,
hotels, bars, museums etc.).
ҶUse the Up and Down arrows to scroll in the list.
Some Guides also offer subcategories.
ҶBy clicking on a category or subcategory the system will search for relevant items.
The hit list will display the search results, ordered by distance. You may select a found item directly
for guidance.
Search the guide:
Alternatively you may search in the guide for entries by using the search function.
ҶSelect a guide and press Search.
40
Using VXA-3000
VXA-3000

ҶEnter a search term (at least three characters) and confirm with Search.
The hit list will be displayed:
ҶSelect an entry by tapping on it.
ҶGet detailed information about the selected location via Detail.
ҶExplore the locationŪs surroundings via Map.
ҶYou may use this item for the guidance by pressing Navi.
ҶVia Save you may save the item as a bookmark.
41
Using VXA-3000
VXA-3000
Basic Operation
5-8. How do i use the speed camera alert?
If the Speed Camera function has been activated (via Main Menu آSettings آGuidance آ
Speed Cam Warnings On), Speed cameras can be displayed during navigation mode or tracking
mode.
In the event that Speed cameras are located on your journey a warning will be received. For each
camera you will receive two alerts. Each alert consists of an audible beep and a message
displayed on screen telling you the camera type and distance from it.
42
Using VXA-3000
VXA-3000
NOTE The speed camera warning will also work in Tracking Mode, i.e. if the speed camera
function is activated and user selects ũTrackŪon the start screen. The navigator can be used for speed
camera alerts in this mode without activating the navigation mode and setting a destination.
6. Setup Assistant
With the Setup Assistant you can choose and save your map and guide data on a memory card for
use with a supported handheld device. The Setup Assistant installs those data on the memory card,
together with the program files of your navigation software and the voice files for guidance.
ҶPlace the supplied CD or DVD in the CD/DVD slot of your computer.
ҶThe Setup Assistant will pop up automatically. Select the language of the installation program,
and press OK.
ҶYou will see the welcome page. Press Next.
ҶPlease read the End-User License Agreement and accept it by clicking I Agree. If you do not
accept the terms of the End-User License Agreement, click Cancel to exit the Setup Assistant.
ҶPlease choose the regions whose map and guide data you want to copy to your memory card.
Choose also the voice files used for guidance, and click Next to install the files.
43
Using VXA-3000
VXA-3000
Basic Operation
NOTE On the left, the space required for the data on your memory card will be shown. Please
make sure that there is enough space left on your memory card.
The following regions (states in brackets) are available:
Northeast: (ME, NH, VT, MA, RI, CT, NY, NJ, PA, WV, VA, DC, DE, MD)
Southeast: (NC, SC, TN, GA, AL, MS, FL, AR)
Upper Midwest: (MN, WI, IL, IN, OH, MI, KY)
Great Plains: (MT, WY, CO, ND, SD, NE, KS, IA, MO)
Southwest: (NM, TX, OK, AR, LA)
West: (CA, NV, OR, WA, ID, MT, UT, AR)
ҶYou are prompted to insert your memory card into your card reader.
ҶIf your system cannot determine the path to your memory card automatically, you are
prompted to enter it manually.
ҶThe selected data will be copied to your memory card. Please do not close the Setup Assistant
nor remove your memory card until the data transfer process is completed and you are
prompted to do so.
44
Using VXA-3000
VXA-3000
NOTE Please keep in mind that the Setup Assistant will override all map data contained on your
memory card. Your preferences, including personal bookmarks, as well as your premium content (e. g.
Guides) remain unaltered.

7. Frequently asked questions
I can«t find an address.
Please make sure you have correctly spelled your entry. If you do not know how an address is
spelled correctly, simply enter the parts of the address, you know for sure (e.g. ūLondŬ, ūLeicŬfor
Leicester Square in London). Then browse in the result list and look for the address. Also make sure
that the city in which you are looking for an address is correct. Sometimes the official postal
address differs from the address you are looking for. In that case, search for an address nearby that
you know of and browse on the map.
If you find the address on the map but you can not find it while searching for it, please let us know
via ENTER YOUR SUPPORT E-MAIL ADDRESS HERE.
There is a failure in the map / POIs are missing.
If you detect an error in the map data (e.g. a street is missing completely), we would like to inform
our map data provider. Please let us know at ENTER YOUR SUPPORT E-MAIL ADDRESS HERE.
I have problems to get a GPS fix.
If you have problems getting a satellite fix with the GPS (you can see how many satellites are being
received on the main menu at the bottom left) please make sure, that you are outside and the GPS
antenna has a good visibility to the open sky. Some models also do support an additional external
active antenna. Please also consult with the hardware manual of your device to get further
information of how to obtain a GPS fix.
Where can I get technical support?
Please contact the manufacturer or your retail store.
Where can I get software updates?
Please contact the manufacturer or your retail store for information about software updates.
Where can I get additional maps and guides?
Please visit the download shop of YOUR COMPANY NAME at ENTER URL HERE.
45
Using VXA-3000
VXA-3000
Basic Operation
8. Audio player
You can play back music by selecting Audio player in the main menu. Basic functions include Play,
Pause, Stop, Select Next, and Select Previous. Playback function includes Repeat, Repeat Selected,
and Random.
The supported music file formats are MP3, WMA, WAV, and OGG.
You can save music files in the SD Card memory. The Audio player manages the music file by the
unit of a folder.
To play back music using the SD Card memory.
(If the icon appears at the right upper side, the device detects the SD Card memory.)
1. If you save the music file in the root directory of the USB memory, it will be recognized
as the ũDefault album 1Ū.
2. If you create a ũMusicŪfolder in the USB memory and save the music file in it, it will be
recognized as the ũDefault album 2Ū.
3. If you create a folder inside the ũMusicŪfolder in the USB memory, this folder will be
recognized as an album.
46
Using VXA-3000
VXA-3000
Caution If you create a sub-folder under the user-defined folder of the Music folder, it will not be
recognized.
8-1. Basic screen
ڸIndicator of SD Card memory : If connected SD Card memory, this icon change to Blue color.
ڹFile list : Show folders and files that Audio player can playback.
ںVolume control : Increase or decrease volume.
ڻExit : Close Audio player and back to Main menu.
ڼPrevious file playback : Playback previous music file.
ڽPlay/Pause : Playback and Pause music.
ھStop : Stop the music playback.
ڿNext file playback : Playback next music file.
ۀPlayback mode : You can select playback mode, ūNormalŬ, ūRandomŬand ūOneŬ.
47
Using VXA-3000
VXA-3000
Basic Operation
ڥڦڧڨک
ڡڢڣ ڤ
Using VXA-3000
8-2. File list screen
By touching folder tap(ڸ), Audio player show folders which playable music files are in. At the
folder list view, you can see the list of files by selecting File tap(ڹ). You can listen to music file
highlighted by cursor using Playback button(ں). Touching Back button(ڻ), you can return to
basic screen of Audio player. You can select file to play by scroll bar(ڼ). Position sign on the
scroll bar represented by number means current cursor position/total file number.
8-3. Volume control
You can increase or decrease volume. By touching Mute button(ڸ), you can mute audio sound.
VXA-3000
48
ڡ
ڢ
ڣ
ڤ
ڥ
ڡ
Caution While Audio player is operating, if you remove the SD Card memory, system will be get into
unstable situation. Please donŪt remove SD Card memory during playback. If system is unstable because SD
Card memory is removed, turn off the system and rebooting.
Using VXA-3000
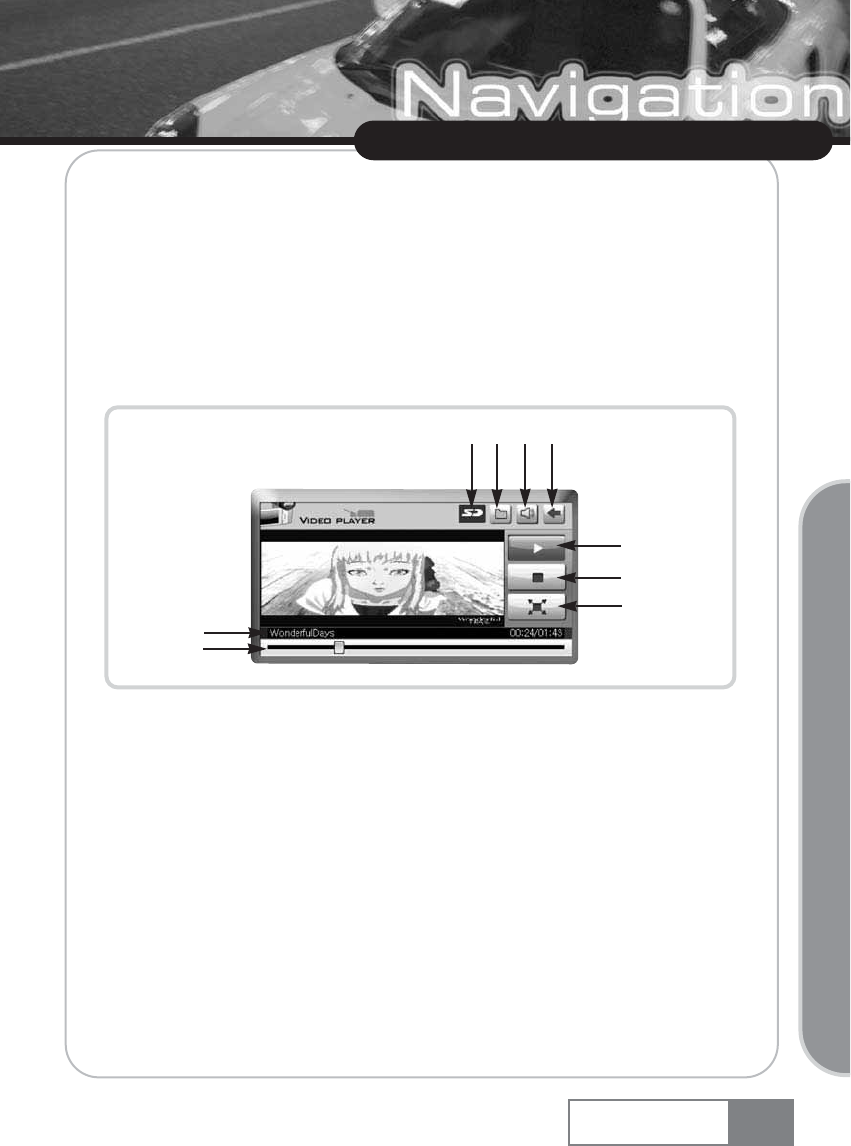
9. Video Player
You can play back movie by selecting Video Player in the main menu. Basic functions include Play,
Pause and Stop. The supported movie file formats are ūAVI, MPG, MPEG, WMV, MP4, ASF, TSŬ.
You can save video files in the SD Card memory. The Video player manages the movie file by the
unit of folder.
9-1. Basic Screen
ڸSD Card indication icon : If SD Card memory is inserted, icon is changed to Blue color.
ڹFile list : You can see playable movie files by selecting this button.
ںExit/Back : Close movie player and return to main menu.
ڻPlay/Pause : Plays back the movie. While movie is playing, button keep the Blue color and if
you retouch this button, movie will be paused.
ڼStop : Stops playback.
ڽFull Screen : Plays back the movie as full screen.
ھFile name/time : You can recognize the current file name and Elapsed time/Total time.
ڿProgress status bar : You can recognize the progress status of play. This bar is used for
seeking the specific scene of movie.
ۀVolume control : Increase or decrease sound volume.
VXA-3000 49
Basic Operation
ڥ
ڦ
ڧ
ڨ
ڡڢک ڣ
ڤ
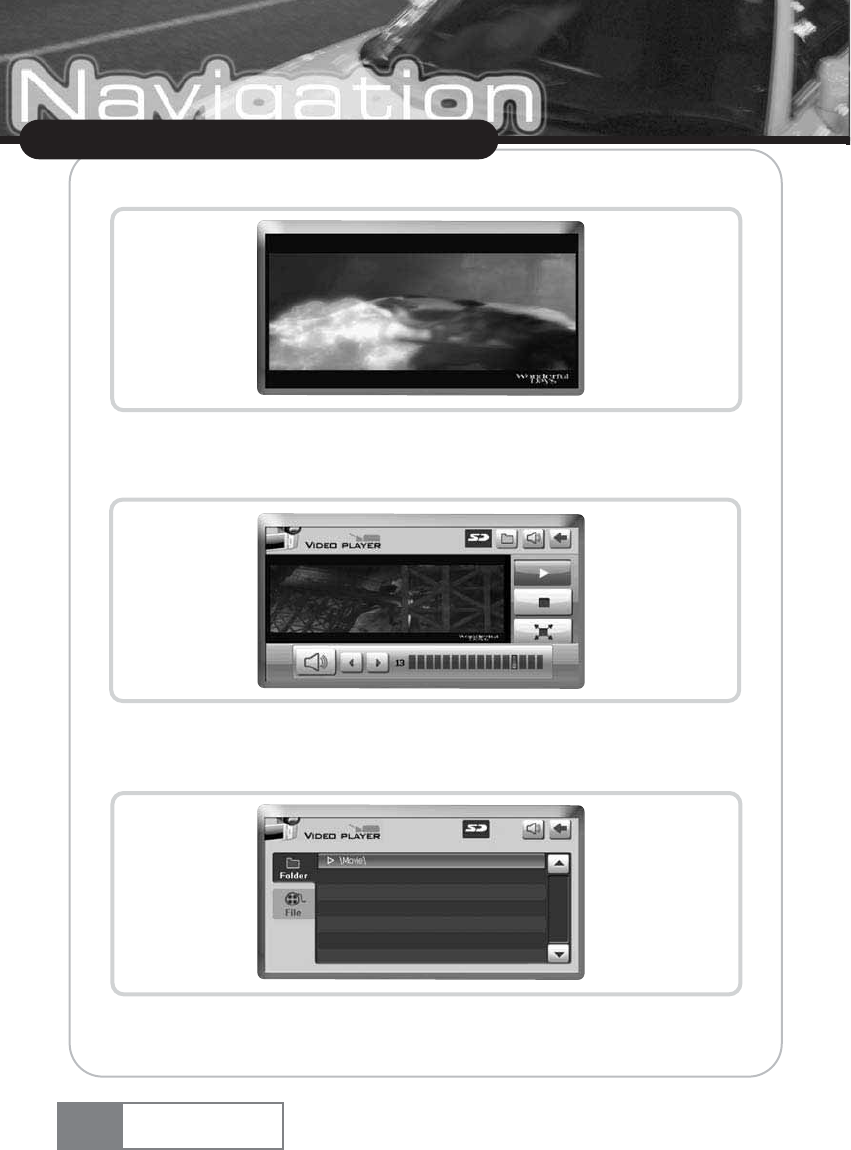
9-2. Full Screen
9-3. Volume Control Screen
9-3. Volume Control Screen
Movie player scan all playable movie files stored in the SD Card memory and show its result.
Using VXA-3000
VXA-3000
50

After select folder, if you touch File tap, you can see all playable movie files.
Using VXA-3000
Basic Operation
VXA-3000 51
Caution While movie player is operating, if you remove the SD Card memory, system will be
get into unstable situation. Please donŪt remove SD Card memory during playback. If system is
unstable because SD Card memory is removed, turn off the system and rebooting.
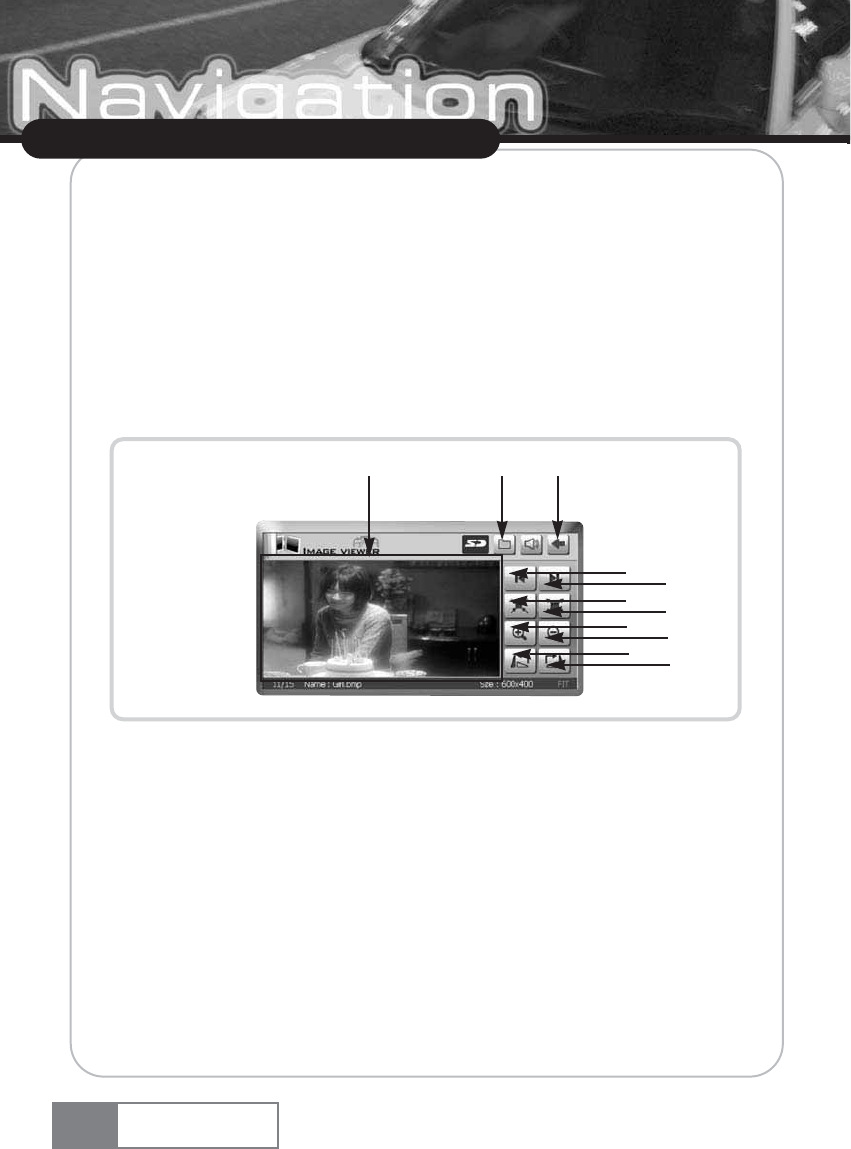
10. Image Viewer
You can see image by selecting Image Viewer in the main menu. Basic functions include Previous
view, Next view, Set image to original size, Fit image to viewer, Zoon in, Zoom out, Rotate left,
Rotate right, Full screen, List of image files. The supported image file formats are ūWAV, WMA,
MP3 and OGGŬ.
You can save image files in the SD Card memory. The Image viewer manages the image file.
10-1. Image Viewer main screen.
ڸView previous image.
ڹView next image.
ںSet image to original size.
ڻFit image to viewer : If you touch ڻbutton, you can fit image to viewer.
ڼZoom in : Zoom in steps (150% آ200% آ250% آ300%)
ڽZoom out : Zoom out steps (66% آ50% آ33% آ25%)
ھRotate 90 degrees to left : Rotate 90Şto left whenever touch rotate button. (90Şآ 180Şآ
270Şآ 360Ş)
ڿRotate 90 degrees to right : Rotate 90Şto right whenever touch rotate button. (90Şآ 180Ş
آ270Şآ 360Ş)
ۀFull screen : If you touch the ۀarea, you can see full screen image.
ہDisplay the list of image files.
ۂReturns to the main menu.
Using VXA-3000
VXA-3000
52
ڥڦ
ڧڨ
ڪګ
ڡڢ
ڣڤ
ک
10-2. Full Screen
You can see the full screen image by selecting Full screen button.
10-3. File list screen
You can see file list screen by touching the File list button. Touching the tap of folder(ڸ), image
viewer show all folders have supportable image files in SD Card memory. When Folder tap is
enabled, you can see image files of selected folder by touching File tap(ڹ). By touching the Image
view button(ں), you can see the highlighted image file by cursor. Selecting back button(ڻ), you
can back to basic screen of image viewer. You can select wanted file using scroll bar(ڼ). Position
sign on the scroll bar represented by number means current cursor position/total file number.
Using VXA-3000
Basic Operation
VXA-3000 53
ڡ
ڢ
ڣ
ڤ
ڥ
Caution For stable operation of system, image size is limited by 2048 X 2048. If you select
image file over the limitation, Image viewer will show the warning message.
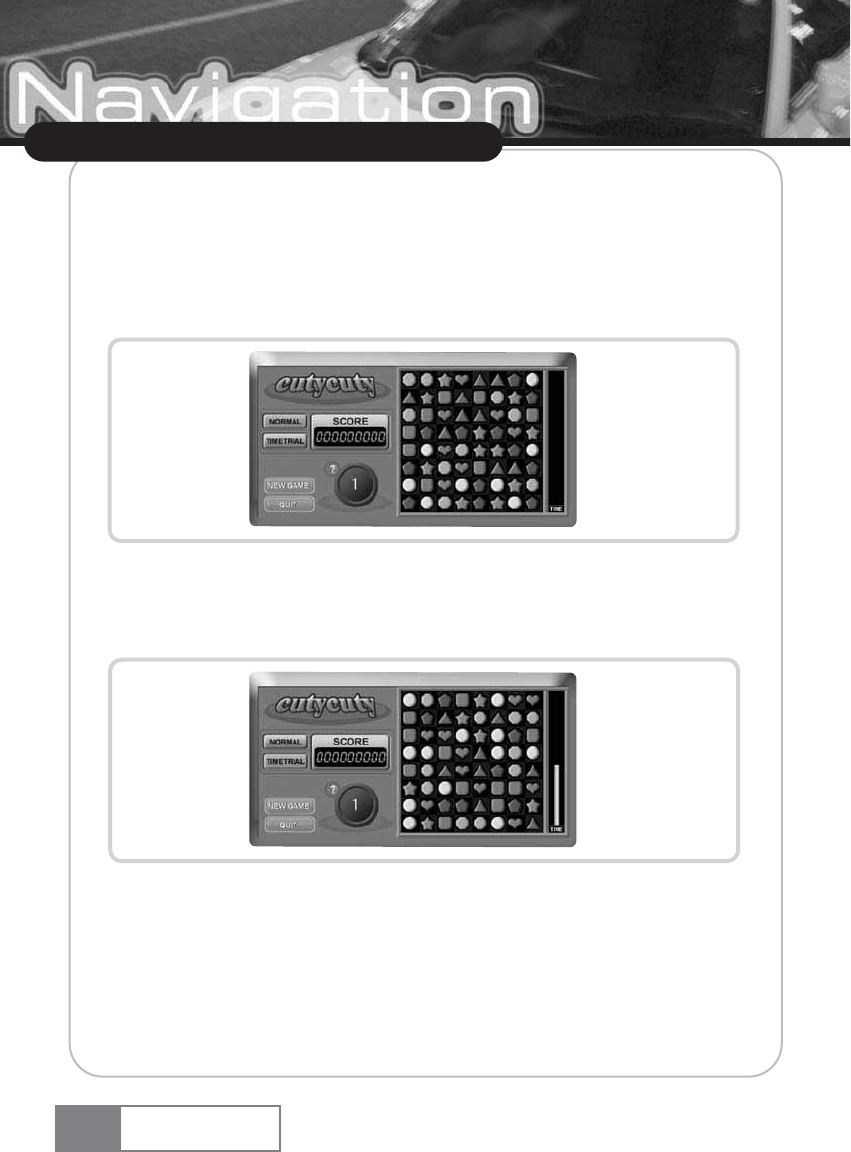
11. Game
Select the Game in the main menu.
How to play : If you put more than three same items vertically or horizontally, these items will
disappear.
To get higher score, remove as many items as possible at a time.
Normal mode : The game will be over if nothing can be moved any more. (If you cannot put more
than three same items in any direction.)
If the bar at the right side is filled, the next level will be started.
Ҷ
Time trial mode : The game will be over if the time bar at the right side is filled. If the bar at the
right side is filled, the next level will be started.
Ҷ
’?’ : This button gives you a hint by losing some scores. This button will be disabled
if the score is not sufficient.
Ҷ
New Game : Stops the current game and starts a new one.
Ҷ
Quit : Exits the game.
Using VXA-3000
VXA-3000
54
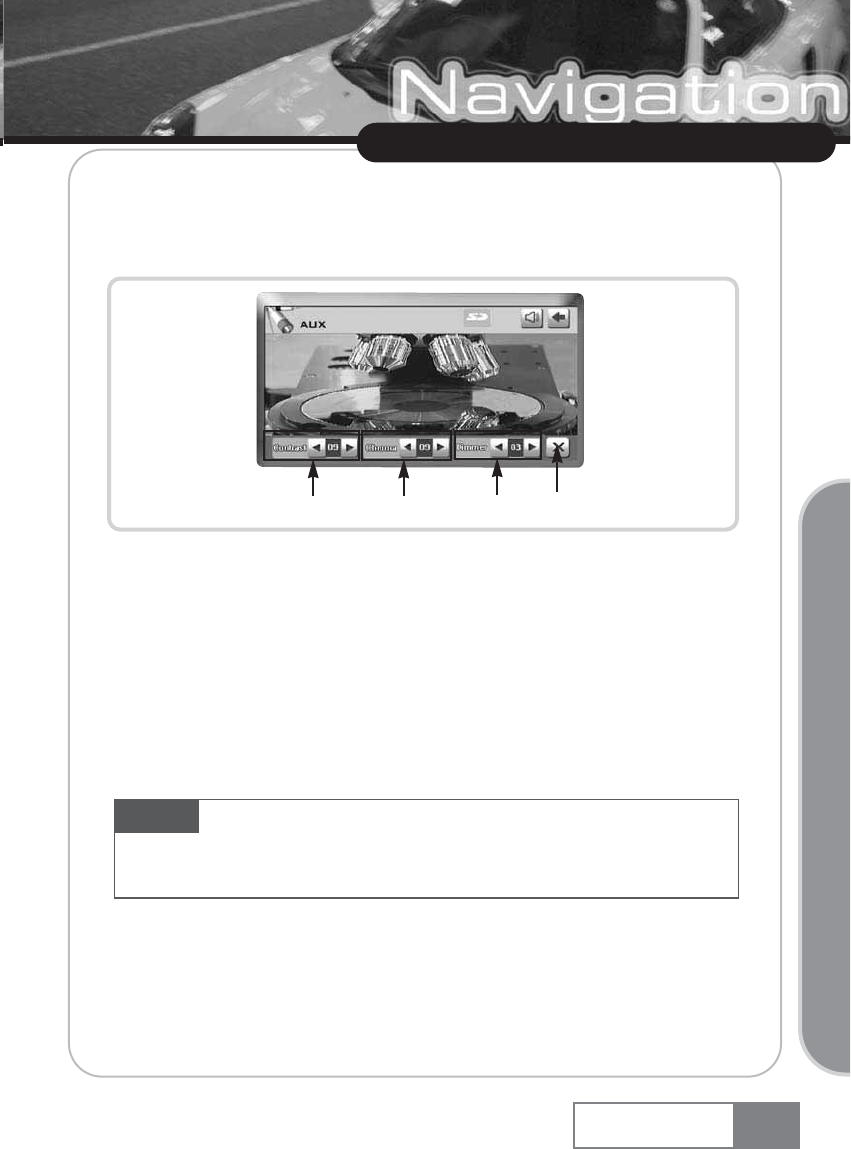
12. Aux
You can use the simple line-in function if you set A/V input as ũOthersŪnot VXM or VXD. Default
value is ũOthersŪ.
As shown by the above figure, only volume control and screen setting are supported in ũOthersŪ
mode. DVD player control is not supported.
ڸContrast : Controls contrast within the range of 0 ~ 16 stages.
ڹChroma : Controls chroma within the range of 0 ~ 16 stages.
ںDimmer : Controls brightness within the range of 1 ~ 5 stages.
ڻHide UI : Hides the UI from the screen.
Using VXA-3000
VXA-3000 55
Basic Operation
ڡڢڣڤ
Option The following functions are available when connected to the DVD player manufactured
by this company.
VXM-2000 and VXD-2100 are the model name.
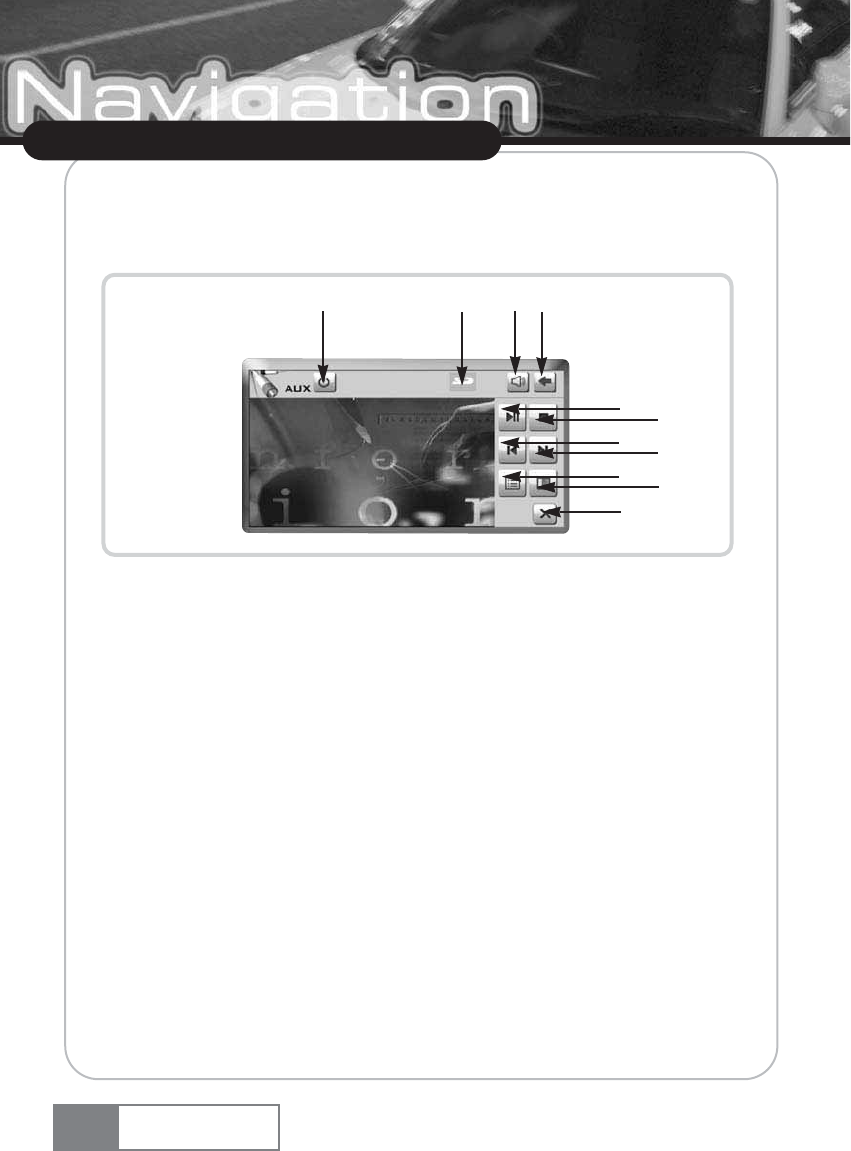
Using VXA-3000
If you select VXM or VXD as A/V input in setup menu, you can operation the DVD player
manufactured by this company. You can also use the remote controller to use the following
functions.
ڸPower : Power on or off the DVD player.
ڹSD : If the icon appears, the device detects the SD memory.
ںVolume : Controls sound volume of the DVD player.
ڻPlay/Pause : Starts or pauses the DVD player.
ڼStop : Stops the DVD player.
ڽPrev : Starts the DVD player and moves to previous screen.
ھNext : Starts the DVD player and moves to next screen.
ڿDVD Title: Switches to the DVD title menu and displays the direction key menu, which makes
cursor movement easier in the DVD title.
ۀSetting : Changes to screen setting.
ہHide UI : Hides the UI from the screen.
ۂReturns to the previous menu or the main menu.
56 VXA-3000
ڨک
ڪ
ڢڣ
ڤڥ
ڦڧ
ڡګ
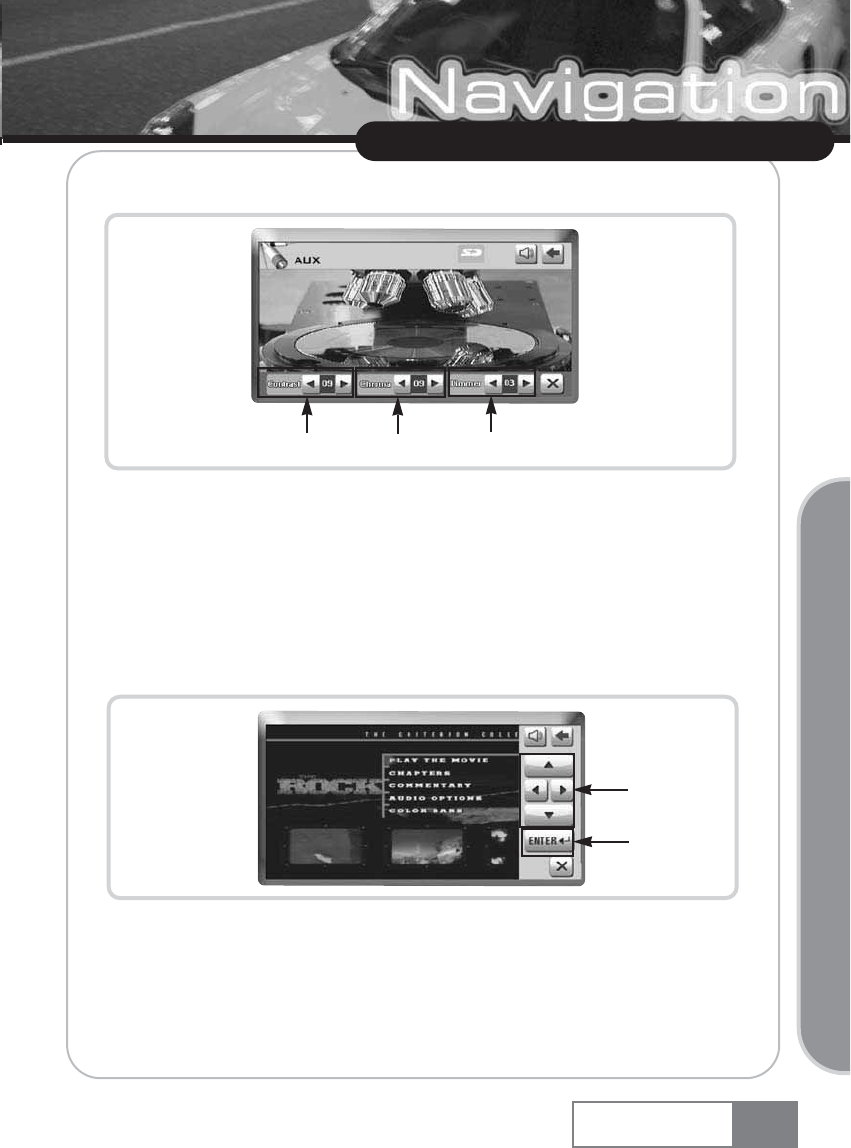
The following screen will appear if you press the setting icon.
ڸContrast: Controls contrast within the range of 0 ~ 16 stages.
ڹChroma : Controls chroma within the range of 0 ~ 16 stages.
ںDimmer: Controls brightness within the range of 1 ~ 5 stages.
The below figure shows the screen when you press the DVD title icon. You can move the DVD Title
cursor using the direction key.
ڸDirection key: Moves the DVD Title cursor.
ڹENTER: Selects the moved cursor.
57
Using VXA-3000
VXA-3000
Basic Operation
ڡڢڣ
ڡ
ڢ
13. Setup
You can change many settings if you select Setup in the main menu.
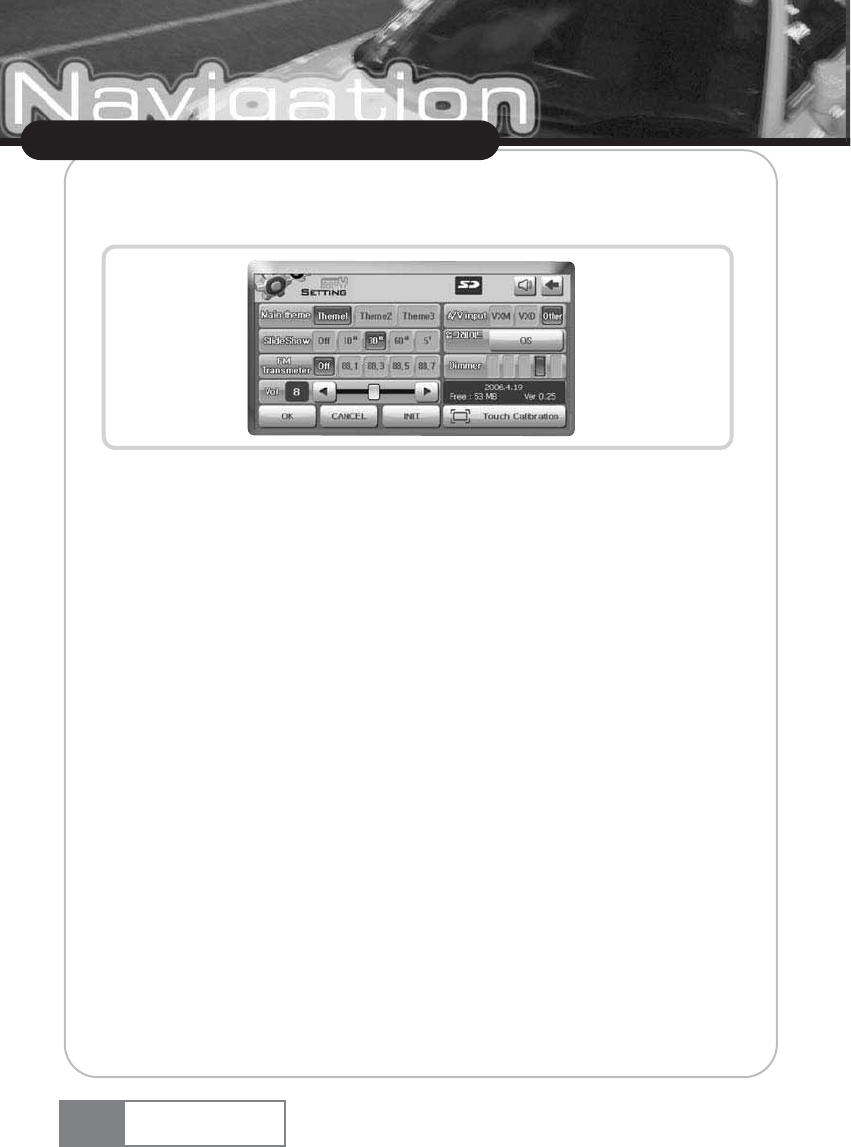
13-1. Main Theme
Change main theme of GUI (Graphic User Interface)
13-2. Slide show
If no input is made longer than one minute in the main menu, specified images will be displayed
sequentially. You can select one of Off, 10 seconds, 30 seconds, 60 seconds and 5 minutes, which
means the time interval of image changing when the slide show is started.
ƕTo use Slide show function, you have to resize image file to 480 X 234. V-up Pro 3000
supports image resizing function and save resized image in the SD Card memory automatically.
13-3. FM transmitter
You can select 88.1, 88.3, 88.5, 88.7 MHz or off. If you set the car radio frequency to the
selected frequency, you can listen to the sound using the car speaker.
13-4. Volume
You can select the sound volume from 0 to 16 level.
58
Using VXA-3000
VXA-3000
13-5. A/V Input
If you select the VXM or VXD, you can control the DVD player using this device, when the DVD
player manufactured by this company(VXM and VXD series) is connected. To connect other
manufacturerŪs product, set to ūOthersŬ. Default is ūOthersŬ.
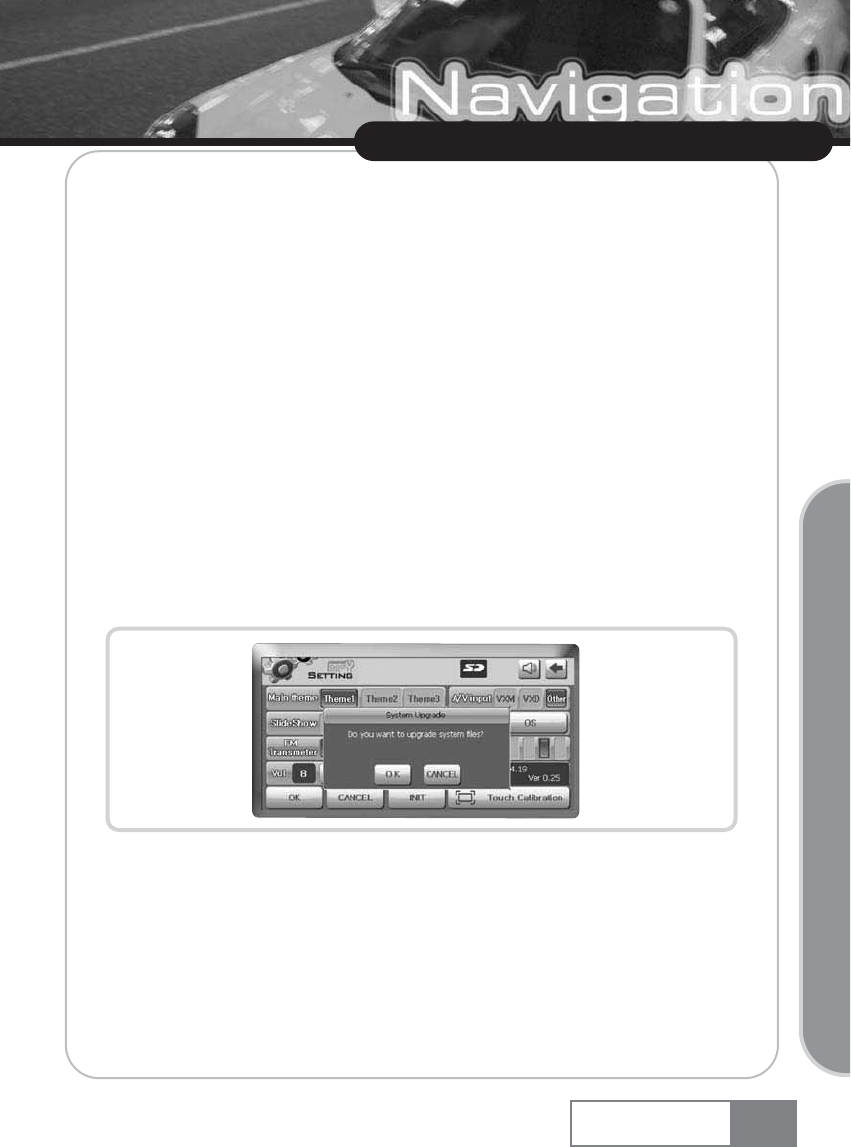
13-6. Upgrade
Upgrade using SD Card memory - You can upgrade the OS using SD Card memory. To
download OS from the web site(http://www.plenio.co.kr) down to SD Card memory using V-up
pro 3000, you have to register in the web site. See the web site to see how to use V-Up Pro 3000.
ƚOS Upgrade
1) Download the OS upgrade file to SD Card memory using V-Up Pro 3000.
2) Connect the SD Card memory to the device. When the SD Card memory icon appears, select
OS upgrade.
3) Press the [OK] button.
59
Using VXA-3000
VXA-3000
Basic Operation
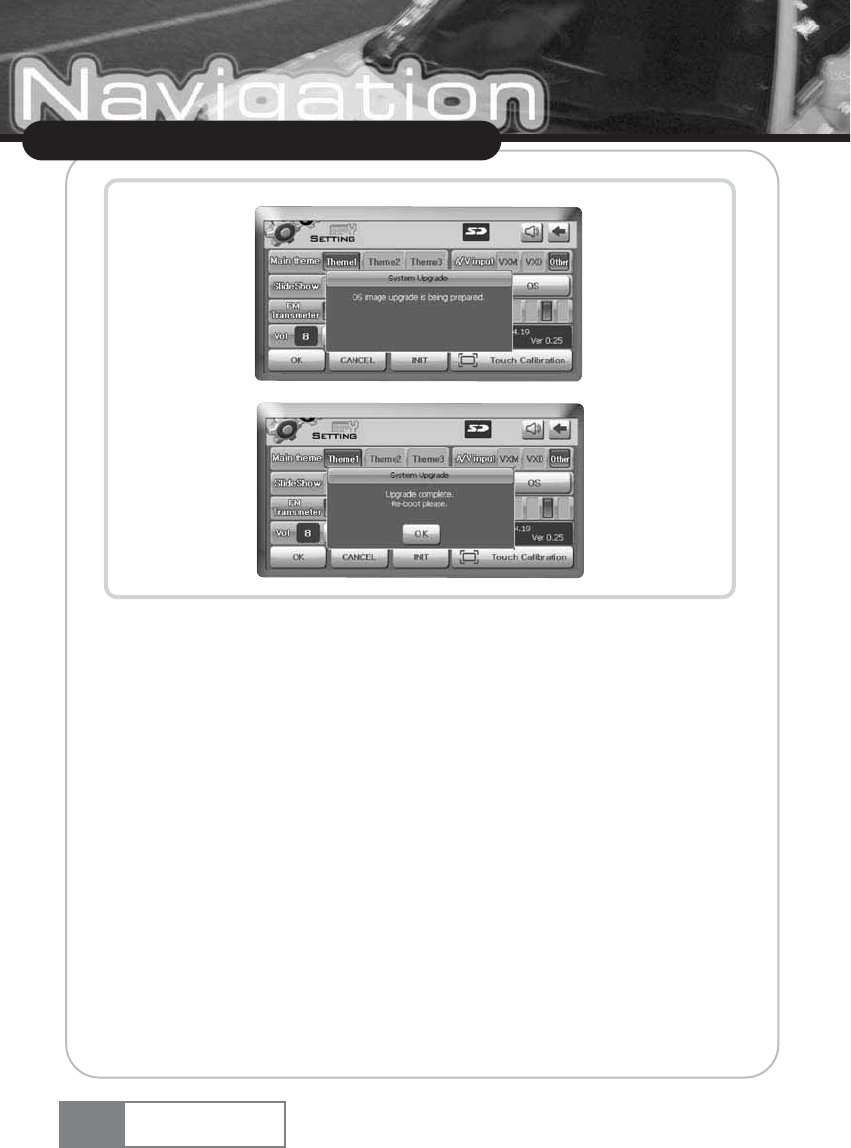
4) When upgrade is complete, turn the power off and on.
13-7. Dimmer
You can select 5 level of screen brightness.
60
Using VXA-3000
VXA-3000
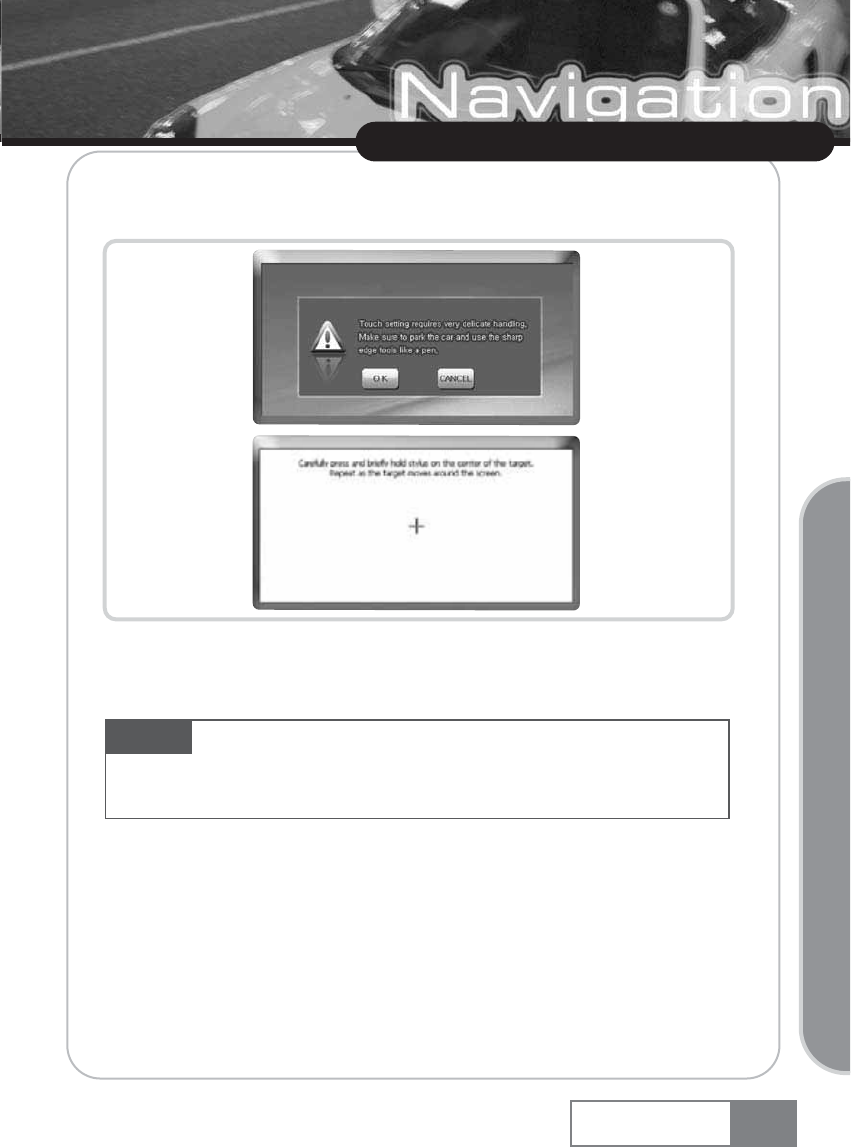
13-8. Touch Calibration
Selecting this menu to increase accuracy of the touch screen.
For touch setting, press the center of the cross symbol. Then, the cross symbol will appear at the
center, left upper side, left bottom side, right bottom side and right upper side one by one. To
complete touch setting, press the center of the cross symbol for 5 times in total.
13-9. OK
You can save all settings by pressing this button
13-10. Cancel
You can cancel all settings you made by pressing this button.
13-11. INIT
The factory default setting will be stored, if you press this button.
61
Using VXA-3000
VXA-3000
Basic Operation
Caution If you press the point that is far away from the cross symbol at the time of touch setting, the cross
symbol will appear indefinitely. Therefore, stop the car without fail for touch setting. Do not use the tool with too
sharp tip, since it can damage the touch panel. Instead, use the round edge object like a test jack for setting.
How to register the member
1. Connect to eh Plenio web site (http://www.plenio.co.kr).
2. Create your user ID and password by entering the customer information and product
number in the Subscribe menu.
3. If you input user ID and password correctly, you can download the latest information
related with upgrade.
Downloading Navi or OS
You can download V-up pro 3000 and various download files from the Customer Support section
of Plenio web site. The web site also provides the installation method and the latest download
information.
ȯYou need to subscriber for membership and receive product certification using the
product serial number that is printed on the rear side of the product, after purchasing
this product.
ȯYou may download map files, monitoring camera and others free of charge for one
year after product purchase. Afterwards, you can download these data free of
charge based on the criteria set by this company.
What is V-up Pro 3000
V-up Pro 3000 is the VXA-3000 management program and performs the following function.
ȯYou can download navigation data and OS using V-up Pro 3000.
ȯV-up Pro 3000 supports image resizing function and save resized image in the SD Card
memory automatically.
ȯSupport management function of music files.
ȯYou can download the latest version of V-up Pro 3000 from Plenio web site.
62
Upgrading VXA-2000
VXA-3000

Specification
63
Specification
VXA-3000
Specification
Item
OS
CPU
RAM
FLASH
DISPLAY
AUDIO
GPS Module
GPS sensitivity
Input power
Temperature
Size
Weight
MS WINDOWS CE.NET 4.2
ARM9 Core
64M Bytes
64M Bytes
7ŬTFT LCD (Touch Screen)
Internal Speaker(1W)
Lineout output
Connect to the car audio using FM Transmitter
SiRFstar III GPS engine, internal type
First start sensitivity : -135dBm
Restart sensitivity : -153Bm
Sensitivity in motion : -156dBm
12V, 1A
In storage : -35 ~ 75 Ƅ
In running : -10 ~ 60 Ƅ
190mm x 125mm x 33mm
600g
Details Remark

A/S and Product Enquiry
The product warranty period is calculated from the date of product purchase. Therefore, make sure
to write down the purchase data for proper after service.
[If the product purchase date cannot be known, the product warranty period will start 3 months
from the manufacturing date or import customs clearance date.]
Customer Service Center
Customer service and complaint reporting
You can make an enquiry or ask advice about the product through a phone call or in the web site.
64
A/S and Pro duct Enquiry
VXA-3000
U.S.A.
U.S.FEDERAL COMMUNICATIONS COMMISSION RADIO
FREQUENCY INTERFERENCE STATEMENT INFORMATION
TO THE USER
Customer service and complaint reporting
You can make an enquiry or ask advice about the product through a phone call or in the web site.
These limits are designed to provide reasonable protection against harmful Interference in a
residential installation.
This equipment generates, uses, and can radiate radio frequency energy and, if Not installed and
used un accordance with the instructions, may cause harmful Interference to radio communications.
However, there is no guarantee that interference will not occur in a particular Installation.
If this equipment does cause harmful interference to radio or television reception, which can be
determined by turning the equipment off and on, the user is encouraged to try to correct the
interference by one or more of the following measures :
ҶReorient or relocate the receiving antenna.
ҶIncrease the separation between the equipment and receiver.
ҶConnect the equipment into an outlet of a circuit different from that to which the receiver is
connected.
ҶConsult the dealer or an experienced radio/TV technician for assistance.
Change or modification not expressly approved by the party responsible for Compliance could void
the userŪs authority to operate the equipment.
Connecting of peripherals requires the use of grounded shielded signal cables.
65
VXA-3000
NOTE This equipment has been tested and found to comply with the limits for a Class B
digital device pursuant to Part 15 of the FCC Rules.
DECLARATION OF CONFORMITY
COMPANY NAME
DVS KOREA
7th & 8th Fl. KPS Bldg 196 Kumgok-dong, Boondang-ku Sungnam City, Kyungki-do, Korea
Declare under our sole responsibility that the product :
Kind of equipment : Navigation System
Type-Designation :
to which this declaration relates is in conformity with the following standard(s) or other normative
document(s)
Safety : EN 60950 : 1992 + A1, A2, A3, A4, A11
EMC : EN 55022 : 1998, EN 55024 : 1998
EN 61000-3-2 : 1995+A1 : 1998+A2 : 1998
EN 61000-3-3 : 1995
following the provisions of the Low Voltage Directive 73/23/EEC, 93/68/EEC and the EMC
Directive 89/336/EEC.
Accredited test laboratory :
TV Rheinland
Am Grauen Stein
51105 K_ln
KOREA / April. 27, 2006
--------------------------------- -------------------------------------------------------
(Place and date of issue) (Name and signature of authorized person)
66 VXA-3000
67
MEMO
VXA-3000
MEMO
68 VXA-3000
MEMO
VXA-3000 69