DVS Korea VXM2300 DVD Player with FM Transmitter User Manual Users manual 2
DVS Korea Co., Ltd. DVD Player with FM Transmitter Users manual 2
Contents
- 1. Users manual 1
- 2. Users manual 2
Users manual 2
21
Getting Started
Getting Started
C
onnecting to
C
ar
R
adio
S
ystem
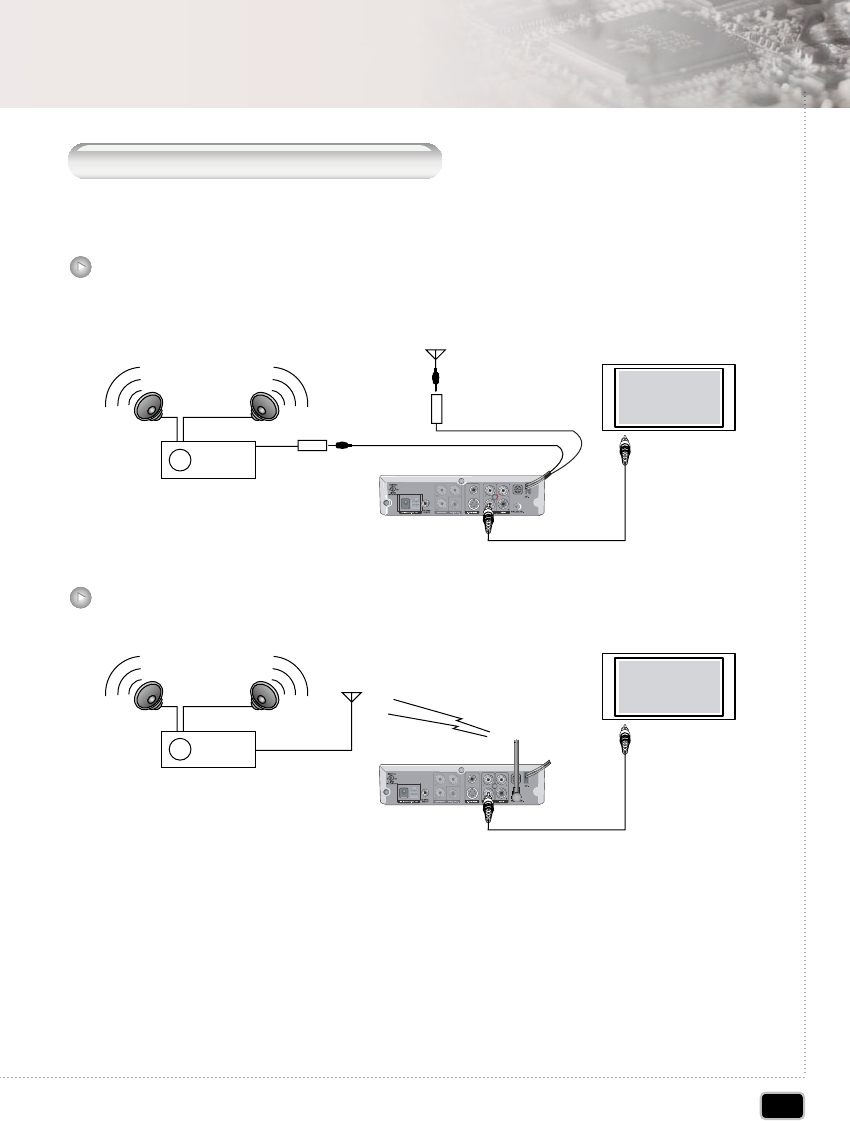
Connecting 2 wires to car antenna and car radio system each other.
For use internal FM transmitter any connecting will be required.
Wired FM transmitter model
TV
Video Signal
Audio Signal
Car Radio
Car Antenna
Just connect antenna to it's connector
Setting the FM transmitter frequency
SETUP => Audio Setup Page => FM Tx => Setting FM Frequency (Off, 88.1MHz ~ 88.9MHz)
CAUTION
- Some Frequency has any broadcasting signal.
- Audio signal has noise sometimes followed by moving position or electrical noise.
Sometimes wireless FM transmitter causes some noise according to setting position
of DVD player and environmental condition (high voltage wire or another radio frequency)
Wireless FM transmitter model
Audio Signal
TV
Video Signal
Car Radio
Car Antenna
22
Getting Started
Getting Started
C
onnecting to
C
omponent
V
ideo
I
nput
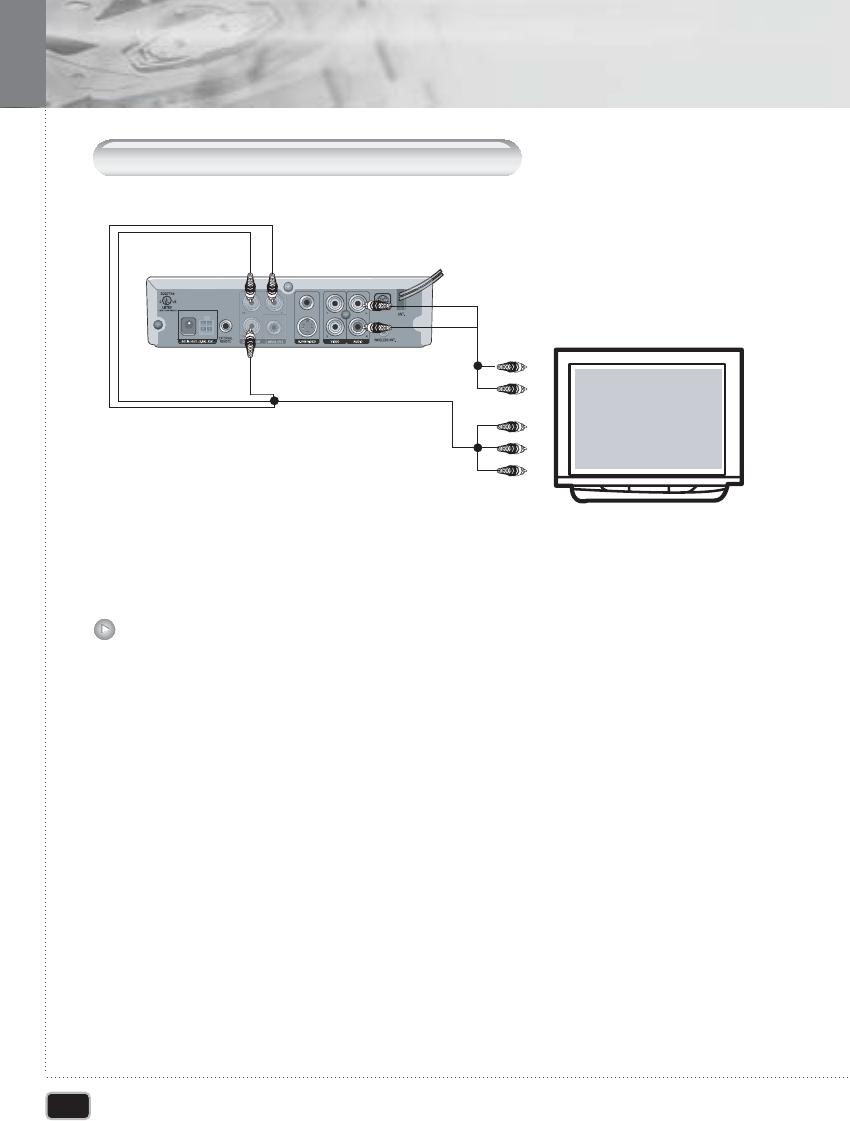
Some TV system has component video signal input terminal. DVD player can output
component video signal. At this mode progressive scan will possible.
Connect the component video (Y/Pb/Pr or RGB) cable to it's terminal and setting the
setup menu.
Connecting to Component Video Input
Setting the Component video output
SETUP => Video Setup Page => Component (select Off / YUV / RGB)
11
Setting the Progressive Scan (enable when YUV or RGB selected)
SETUP => Video Setup Page => TV Mode (select Interlace / P-SCAN)
22
Audio Output
Audio Input
Video Input
TV
Video Output
Component Cable
R (Red)
L(White)
L
Y
YPb
Pr
Pb
Pr
R

23
Basic Operation
Basic Operation
P
laying
DVD V
ideo
D
iscs
Ensure that your DVD player is connected correctly to the TV and audio system,
which are output components. Turn on the power of the TV and audio system.
Ensure that the local code of the DVD player is matched to that of the disc. If not
matched, your disc will not be played.
Before Playing Your DVD Disc
Press the POWER ( )button.
11
Insert the DVD disc. Ensure that the
labeled surface (not the surface where
data is recorded) is at the top when
placing it.
22
Your DVD disc will be automatically played depending on the current program mode.
1) The Disc menu is displayed on the screen. Select the desired menu using the
arrow ( )buttons or NUMBER buttons and press the ENTER button to play
your DVD disc.
33
To Play a DVD Disc
Some DVD discs contain menus. Sometimes these are displayed automatically when
you start playback; others only appear when you press MENU or Title remote control.
TITLE ( )button: Displays the top menu of a DVD disc
MENU ( )button: Displays a DVD disc menu-this varies with the disc and may be the
same as the top menu.
RETURN ( )button: Returns to the previously displayed menu screen.
Arrow( ) button: Move the cursor around the screen.
ENTER ( )button: Selects the current menu option.
Number button: Selects a numbered menu option
PLAY/PAUSE( ) : Starts playback or pause a disc that's playing
(press again to restart playback)
STOP( ): Stop playback
FR( ): Press for fast backward searching.
FF( ): Press for fast forward searching
PREV( ): Skip to the previous chapter.
NEXT( ): Skip to the next chapter.
24
Basic Operation
Basic Operation
- Don't move the DVD player during playback. During so may damage the disc and the
DVD player.
- When " " appears on the TV screen while a button is pressed, it means that this
function is not available on the disc you are playing.
- Depending on the DVD disc, some operations may be different or restricted. Refer to
the jacket or case of disc you are playing.
N
ote
Basic Playback Controls
Basic Disc Menu Controls
25
Basic Operation
Basic Operation
P
laying
MP3
discs
To Play a MP3 File
Insert the MP3 disc. Make sure that the disc's label is facing up.
11
MP3 menu screen is displayed
automatically depending on MP3 disc's
folder (directory) structure
22
Using the UP( ) or DOWN( ) button to find the desired folder
33
Press the ENTER( ) button to select.
The TV screen shows the file lists under
the folder.
44
Press the PROGRAM ( ) button
repeatedly. Each time you pressed,
PROGRAM mode will be changed
repeatedly. (Folder a Filelist)
55
26
Basic Operation
Basic Operation
- The file name is only displayed in English.
- This DVD player is compatible with the "MPEG-1 Audio Layer 3" standard. It is not
compatible with such other standards as "MPEG-2 Audio Layer 3", "MPEG-2.5 Audio
Layer 3", MP1, MP2, etc.
- Do not play CD-R/RW discs containing any files other than music CD files, MP3 and
JPEG files.
- Programmed playback is not possible with MP3 discs.
- When writing MP3 files on CD-R/RW discs, select "ISO9660 level 1" as the writing
software format.
N
ote
P
laying
K
odak picture
CD
and
JPEG
file play
When a Kodak Picture CD is inserted, an automated slide show is launched. When a JPEG
file loaded, the table of contents is displayed on TV screen. 16 slideshow transition modes
are provided. Use the PROGRAM button to switch the slideshow transition mode.
Diagonal Wipe Right Top -> Diagonal Wipe Left Bottom -> Diagonal Wipe Right Bottom ->
Extend from Center H -> Extend from Center V -> Compress to Center H -> Compress to
Center V -> Window H -> Window V -> Wipe from Edge to Center -> Move in from Top -> None)
Each time the ZOOM button is pressed during playback, zoom 125 -> 150 -> 200 ->
50 -> 75 -> zoom off is selected repeatedly
- UP( ) button : Moving up the zooming picture
- DOWN( ) button : Moving down the zooming picture
- LEFT( ) button : Moving left the zooming picture
- RIGHT( ) button : Moving right the zooming picture
22
Select the picture
Select the picture, you want to see, by pressing the UP( ) or DOWN( ) button.
The selected item shows as small size picture on the right side of File Menu Screen.
11
Image rotation
There are 4 modes to rotate a picture: Left, Right, Invert, Mirror
- UP( ) button : invert
- DOWN( ) button :mirror
- LEFT( ) button :Turn left
- RIGHT( ) button :Turn right
22
27
Basic Operation
Basic Operation
F
ast
F
orward
/B
ackward
Use this function to play the DISC contents in fast forward or fast reverse. During searching,
audio will be muted (except CD-DA).
Press the FR ( ) or FF ( ) button during disc play.
11
Press the PLAY/PAUSE ( ) button to resume normal playback.
22
S
kip
F
orward
/B
ackward
Use this function to move to the net or previous chapter for DVD, track for VCD and CD-DA.
Press the PREV ( ) button to go to the previous chapter or track.
11
Press the NEXT ( ) button to go to the next chapter or track.
22
- This function will not operate if there is only one chapter per a disc.
N
ote
ඔඔG x 2 ඔඔG x 4 ඔඔG x 8 ඔඔG x 16 ඔඔG x 32
ඖඖG x 2 ඖඖG x 4 ඖඖG x 8 ඖඖG x 16 ඖඖG x 32
28
Basic Operaion
Basic Operation
S
low
F
orward
/B
ackward
Use this function to play the DISC contents in slow forward or slow reverse. During
searching, audio will be muted.
Press the PLAY/PAUSE ( ) button during play mode.
11
Press the PLAY/PAUSE ( ) button to resume normal playback.
33
Press the ( ) or ( ) repeatedly.
22
F
rame
-
by
-F
rame
P
layback
Press the PLAY/PAUSE ( ) button during play mode.
11
Press the ( ) button repeatedly.
Each time you pressed, forward one frame is displayed at a time.
22
Press the ( ) button repeatedly.
Each time you pressed, backward one frame is displayed at a time.
33
Press the PLAY/PAUSE ( ) button to resume normal playback.
44
1/2 1/4 1/8 1/16
1/2 1/4 1/8 1/16
ඖඖඖඖ
ඖඖඖඖ
29
Advanced Operation
Advanced Operation
OSD (O
n
-
screen
D
isplay
)
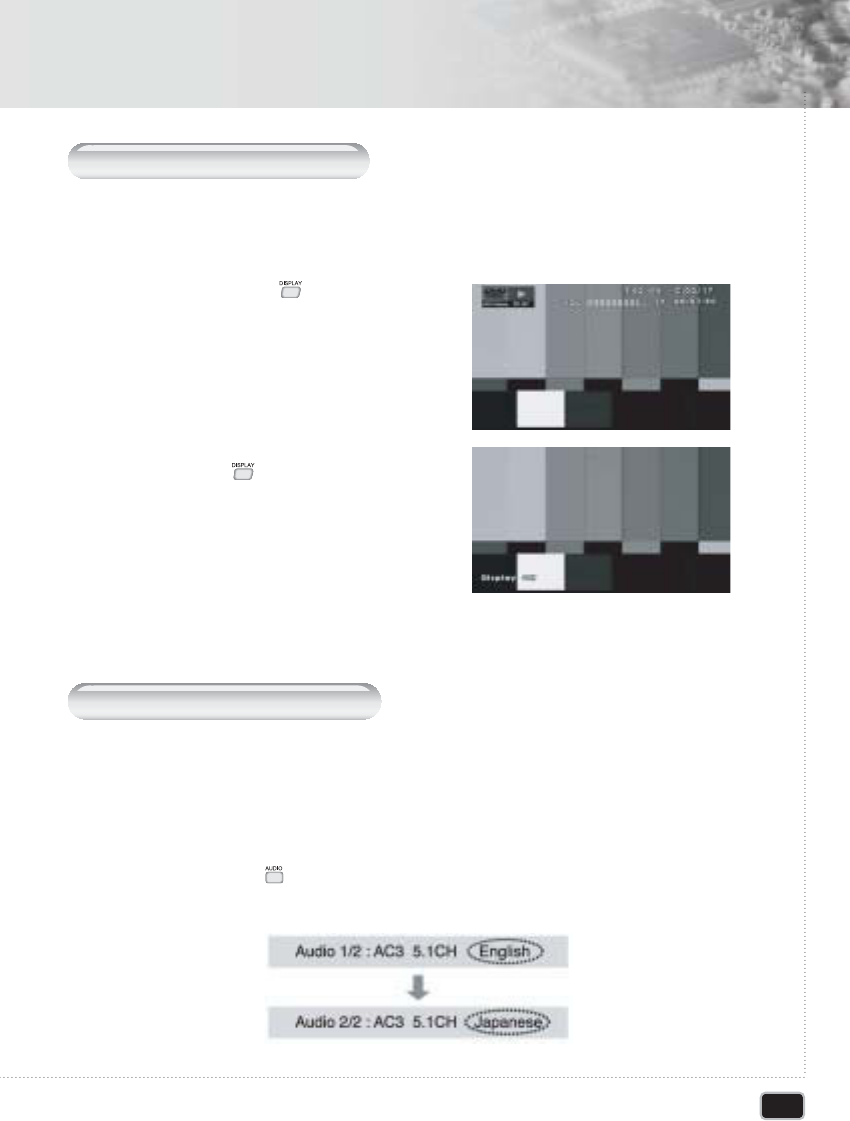
You can display the playback status on TV screen as following; Title, Chapter number,
Playing time, Disc.
Press the DISPLAY ( )button during
playback
- Disc, Chapter(DVD), Track(CD-DA),
Time information appears on screen.
11
To turn off the on-screen display, press
the DISPLAY ( )button
22
S
electing
A
udio
L
anguage
It is possible to change the audio soundtrack language to a different language from the one
selected at the initial settings. This operation works only with discs on which multiple audio
soundtrack languages are recorded. If the loaded disc supports multiple languages, you can
select the audio language.
Press the AUDIO button repeatedly during playback. Each time you pressed, the audio
language is changed
11
30
Advanced Operation
Advanced Operation
S
electing
S
ubtitles
It is possible to change the subtitle language to a different language from the one selected
at the initial settings. This operation works only with discs on which multiple subtitle
languages are recorded.
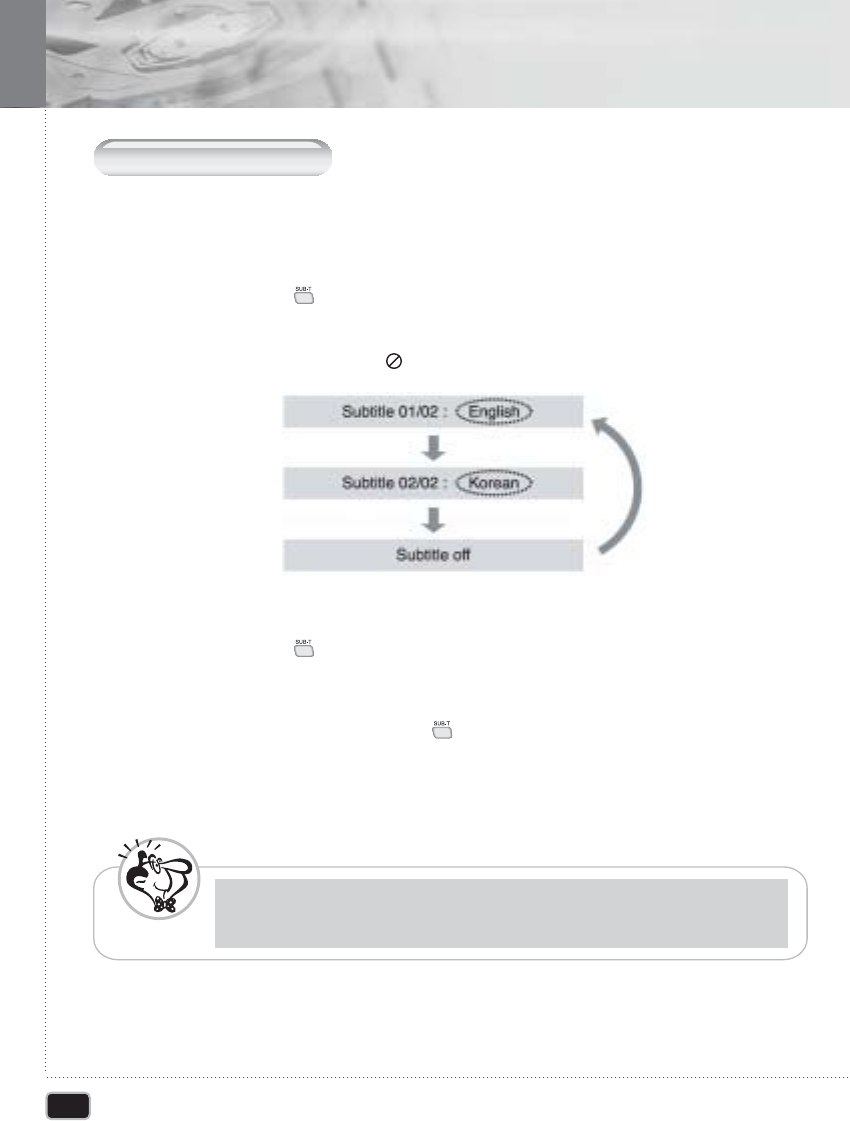
Press the SUB-T ( )button during disc play.
The subtitle info banner appears.
The default is Subtitle off.
If no subtitle are recorded, the ( ) icon will appear.
11
Press the SUB-T ( )button repeatedly until the desired subtitle language is
displayed.
22
To turn subtitle off, press the SUB-T ( )button until Subtitle off is displayed.
33
This function is a disc dependent. There are some DVD discs that prevent selecting
subtitle even if it supports multiple subtitles. In this case, the subtitle should be selected
via disc menu.
N
ote
31
Advanced Operation
Advanced Operation
R
epeating a
T
itle
, C
hapter
(DVD), T
rack
(CD-DA)
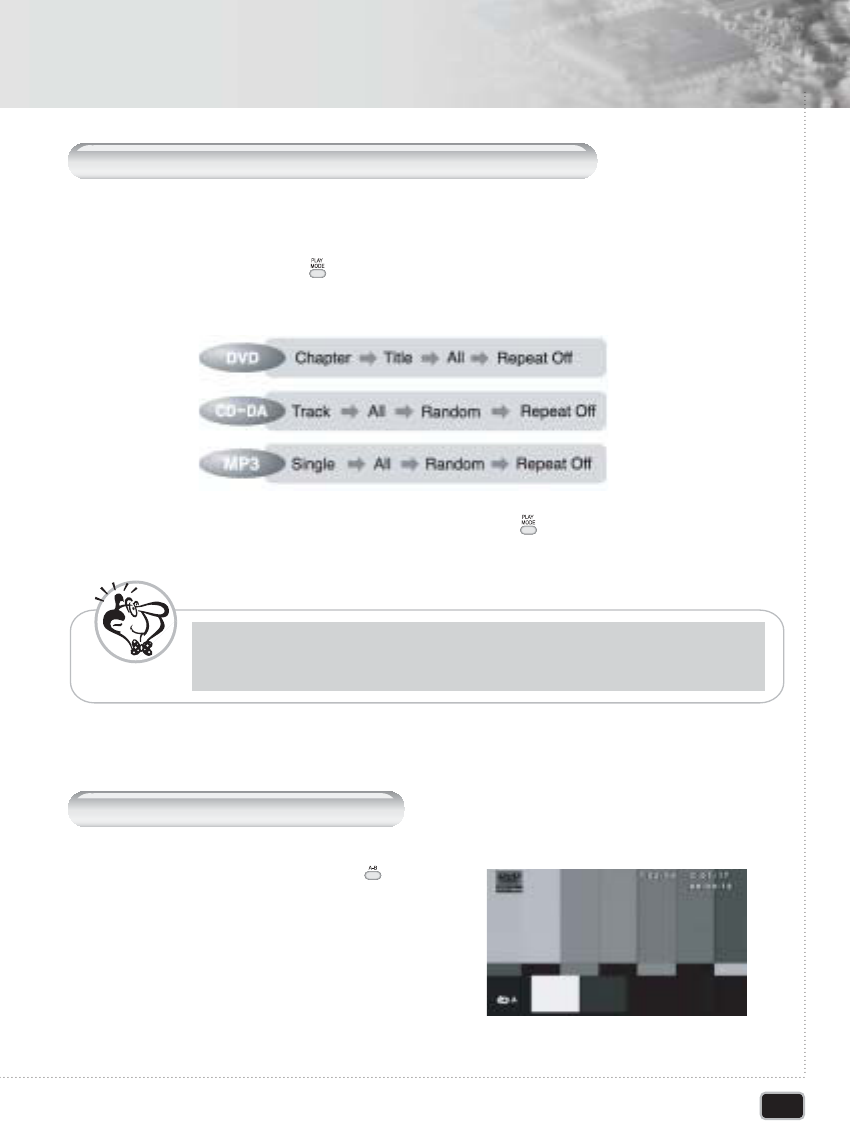
You can play the desired title, chapter, section repeatedly.
Press the PLAY MODE ( )button during disc play.
- Each press of the PLAY MODE button changes the repeat mode in the following
sequence.
11
To resume normal playback, press the PLAY MODE ( )button repeatedly until the repeat
mode indicator disappears on screen.
22
R
epeating a specific section
During playback, press the A-B ( )button
at the beginning of the desired section.
11
With some DVD discs, there may be times when repeat playback is not possible.
N
ote

32
Advanced Operation
Advanced Operation
P
rogram play
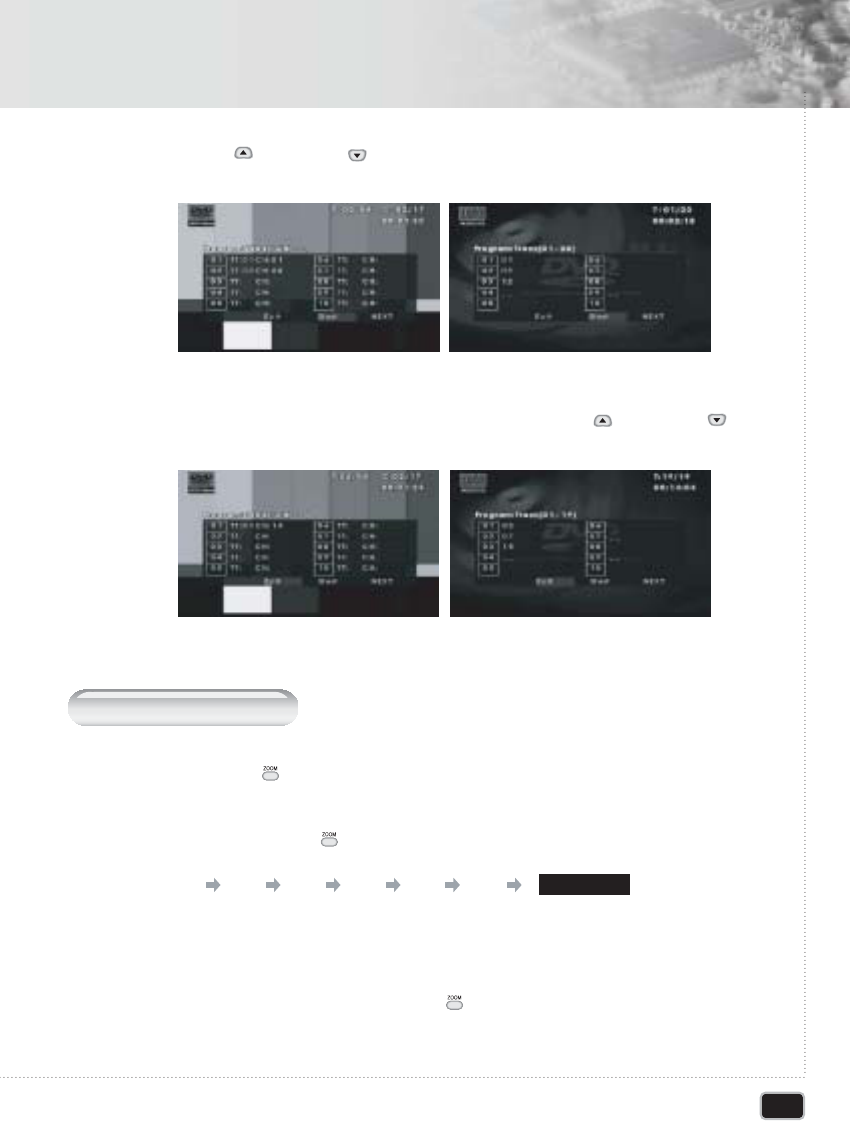
This function is used to play the Title, Chapter and Tracks on the disc in order you program.
Press the PROGRAM ( ) button on remote controller. Program menu is displayed
on screen.
11
Press the A-B ( ) button again at the end of
the section. "AB" will be displayed on the
screen then the A-B section is continually
repeated.
22
To resume normal playback, press the A-B ( ) button repeatedly until the repeat
mode indicator disappears on screen.
33
Select the Title, Chapter (DVD) and Track NO. (CD-DA) is displayed on the TV screen.
22
Select other NO. to program. Repeat step 2 until the programming is finished. You
can add desired tracks up to 20 programs.
33
DVD CD-DA
33
Advanced Operation
Advanced Operation
Using the UP ( ) or DOWN( ) button to select the "Start". And play now begins in
the programmed sequence.
44
Stop all the programmed title, chapter and tracks. Using the UP( ) or DOWN( )
button to select the "Exit".
55
Z
ooming a
P
icture
Press the ZOOM ( )button during playback.
DVD CD-DA
DVD CD-DA
11
Each press of the ZOOM ( )button changes the zoom mode in the following sequence.
22
If you press the direction button during the ZOOM mode, the ZOOM point will shift.
33
To resume normal playback, press ZOOM ( )button repeatedly until the repeat mode
indicator disappears on screen.
44
2 3 4 1/2 1/3 1/4 NORMAL
34
Advanced Operation
Advanced Operation
S
witching the
C
amera
A
ngle
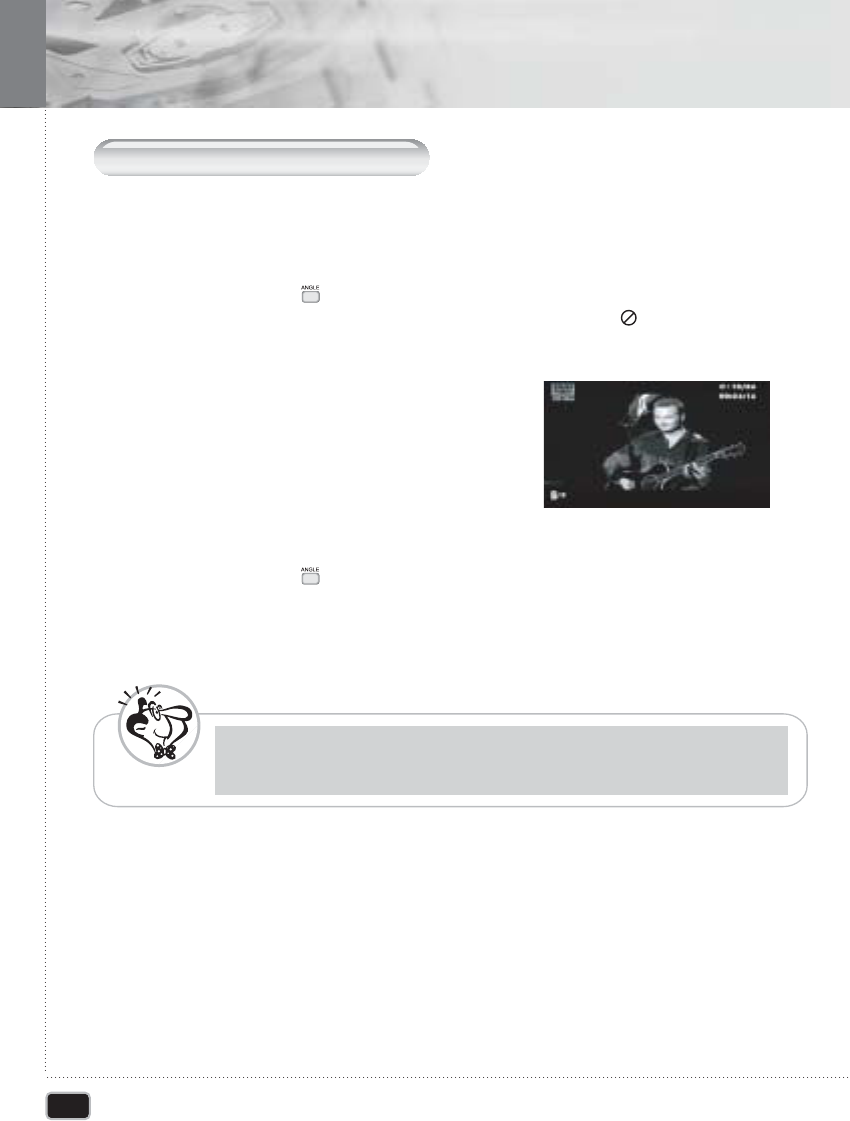
Some DVDs contain scenes that have been shot simultaneously from multiple angles.
Press the ANGLE ( )button on the remote control during disc play. The ANGLE
icon appears. If no additional camera angle are recorded, The ( ) icon will be displayed.
11
If multiple camera angles are recorded,
the ANGLE icon displays the current angle
number and the number of available.
22
Press the ANGLE ( )button again to go to the next camera angle.
33
This feature does not work if a DVD has not been recorded with multiple camera angle
N
ote
35
Advanced Operation
Advanced Operation
DIRECT S
earch
(GO TO)
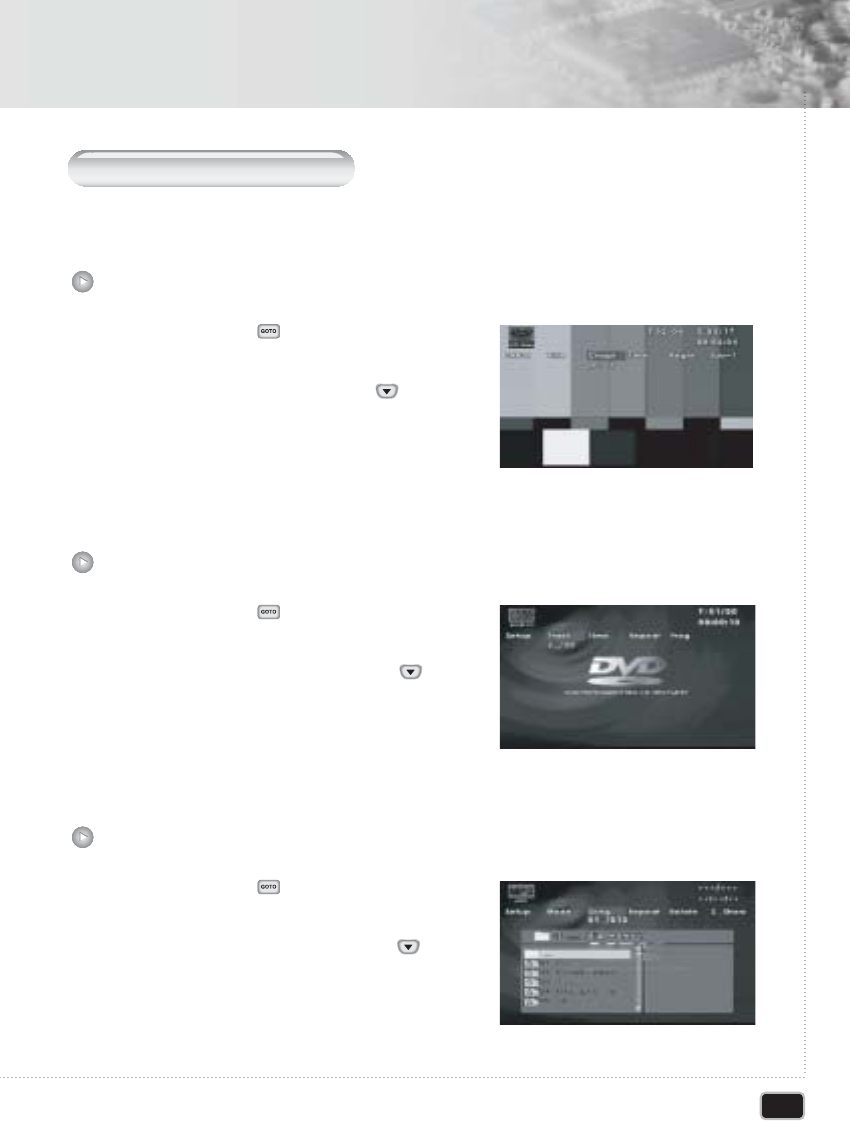
This function is used to go to the chapter, track or song of the disc you want.
Press the GOTO ( )button during playback.
11
Select "Chapt" and press DOWN ( ) button.
22
Enter the title number using numeric button.
33
DVD
Press the GOTO ( )button during playback.
11
Select "Track" and press the DOWN ( ) button.
22
Enter the Track number using numeric button.
33
CD-DA
Press the GOTO ( )button during playback.
11
Select "Song" and press the DOWN ( ) button.
22
Enter the Song number using numeric button.
33
MP3
36
Using the Setup Menu
Using the Setup Menu
B
asic
O
perations
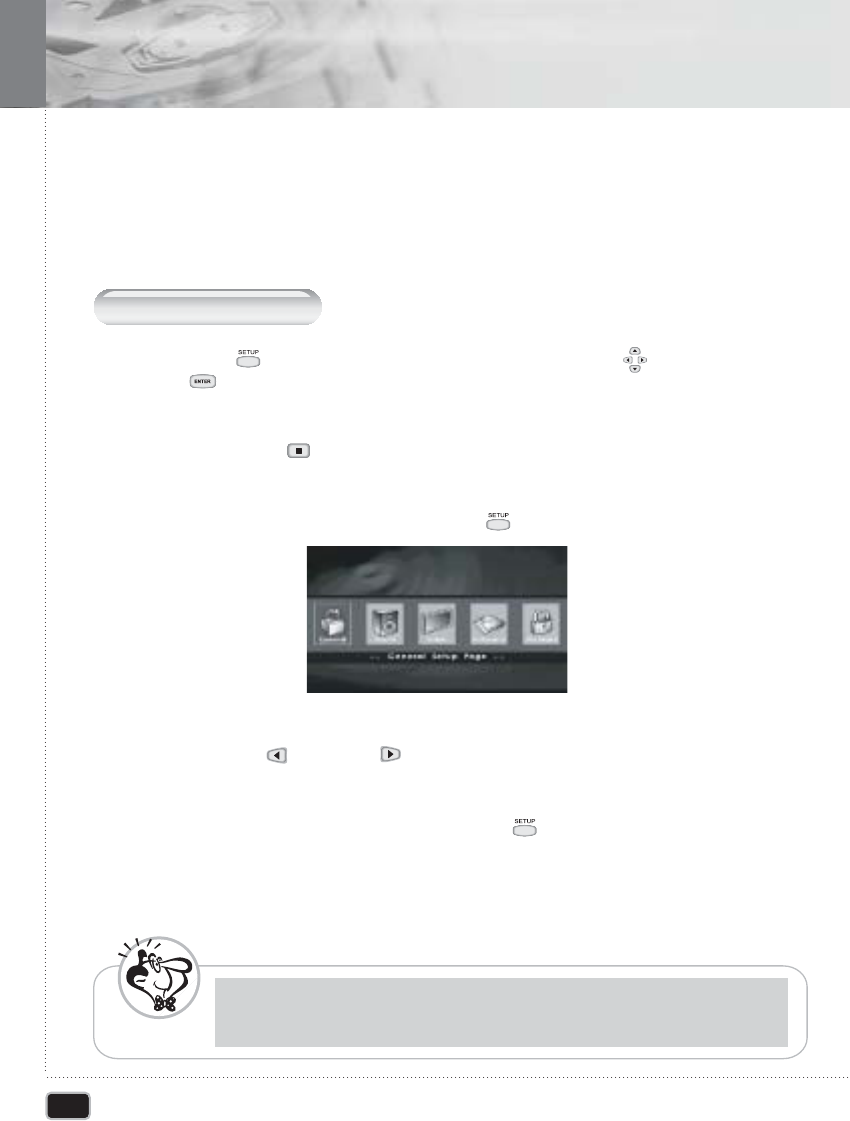
Once the initial settings have been completed, the player can always be operated under the
same conditions whenever the power is switched on. These settings are called SETUP data
that are easily modified and stored using the SETUP menu. The SETUP menu includes the
information for GENERAL, VIDEO, AUDIO and PREFERENCES system controls.
Press SETUP ( )button during stop mode. And use the ARROW ( )button and
ENTER ( ) button to navigate and select options. The current setting for any option is
marked with a colored box.
Press the STOP ( ) button, if the disc is being played.
11
To call the SETUP menu, press the SETUP ( ) button.
22
Use the LEFT( ) or RIGHT( ) button to find desired items.
33
To turn off the SETUP menu, press the SETUP ( )button again.
44
Depending on the disc, some setup menu selections may not work properly.
N
ote
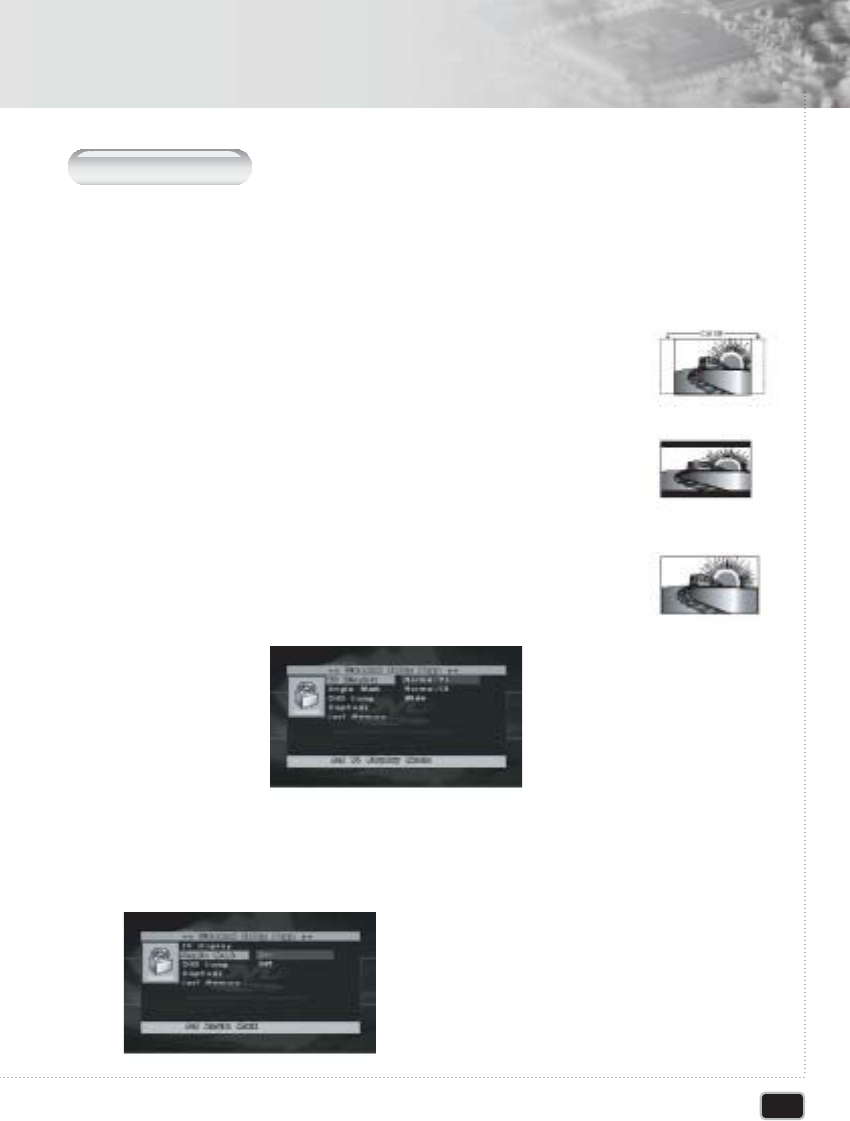
G
eneral
S
etup
TV DISPLAY
You can select a TV screen aspect ratio according to your TV.
If the TV on which the movie is played is of 'WIDE' type, choose "WIDE". If it is of
"4:3" type, choose NORMAL/PS(Pan & Scan) or NORMAL/LB(Letter Box).
NORMAL/PS : Choose this setting if you want the movie to fill the
entire screen of your TV. This might mean that the
left and right edges won't be seen.
NORMAL/LB : Choose this setting if you want to see movies in their
original aspect ratio. The movie might appear with
black bars at top and bottom of the screen.
WIDE : Choose this setting if your DVD player is connected
to a wide screen TV.
11
ANGLE MARK
You can set up so that the angle mark appears on scenes.
On: When selected, the screen will show angle
mark during disc play.
Off: When selected, no angle mark is shown on
the screen.
22
37
Using the Setup Menu
Using the Setup Menu
38
Using the Setup Menu
Using the Setup menu
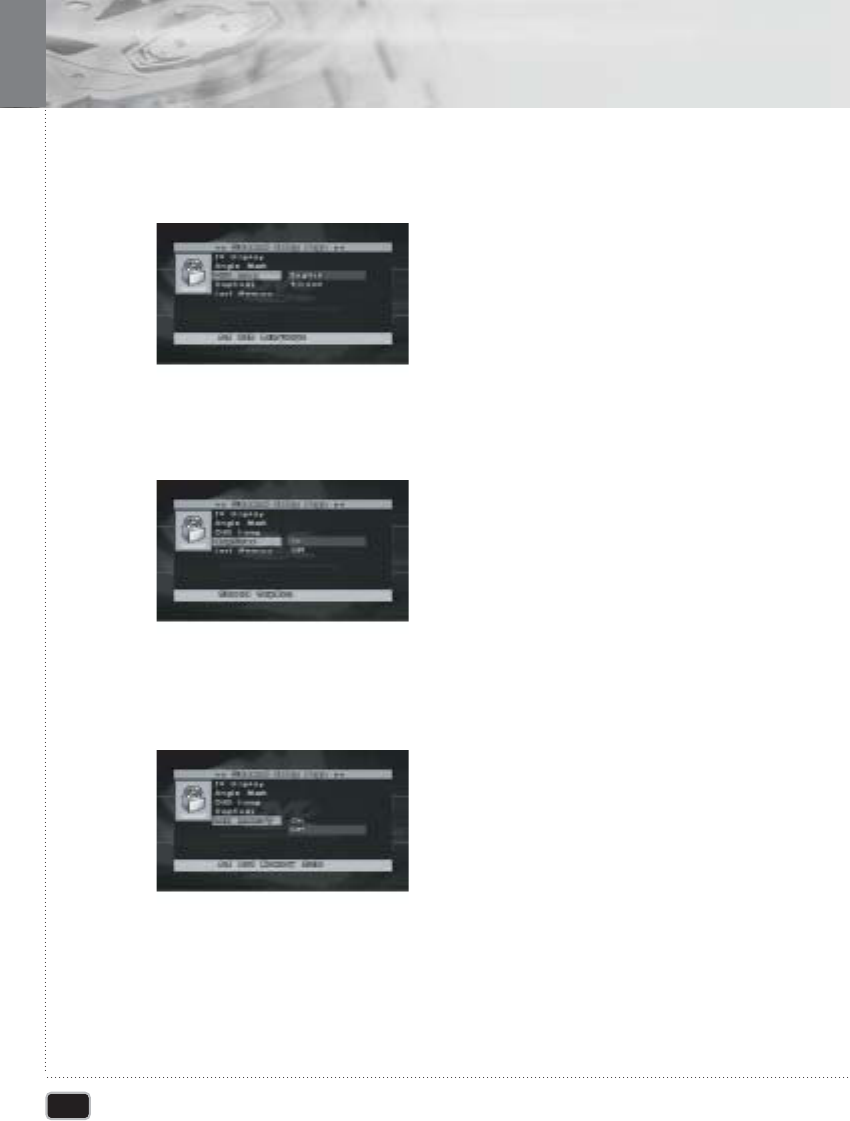
OSD language
Use this option to set the on-screen display language.
When selected, change to set the on-screen display language.
33
CAPTIONS
Adjusts caption selections.
On: Choose this setting to display captions.
Off: Choose this setting to close captions.
44
Last Memory
Adjusts Last Memory selections
55
39
Using the Setup Menu
Using the Setup Menu
A
udio
S
etup
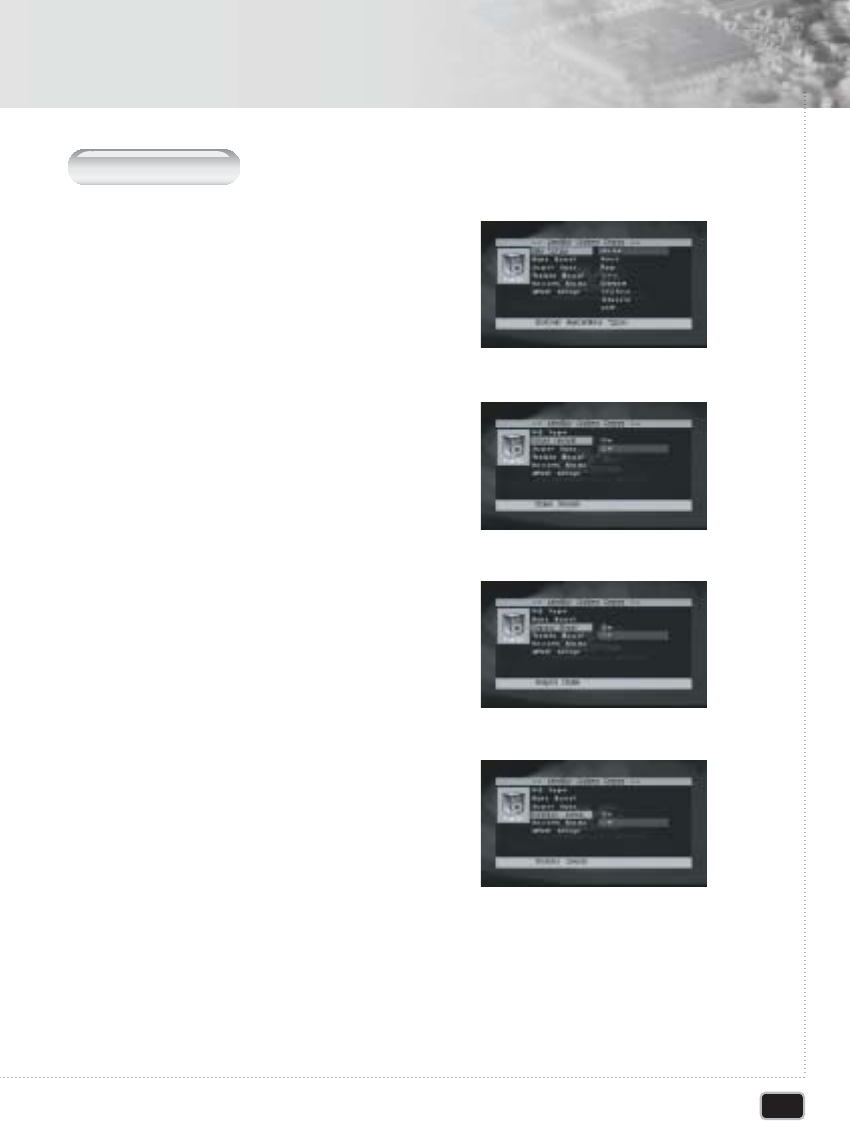
EQ Type
This unit can produce a 3D Surround effect,
using 3D Surround Sound technology.
Choose the desired preset equalizer mode.
(Rock, Pop, Live, Dance, Techno, Classic, Soft)
11
BASS BOOST
This is enhanced at all levels without
distorting other frequency.
22
SUPER BASS
This is enhanced at all levels without
distorting other frequency.
33
TREBLE BOOST
This is enhanced at all levels without
distorting other frequency.
44
40
Using the Setup Menu
Using the Setup Menu
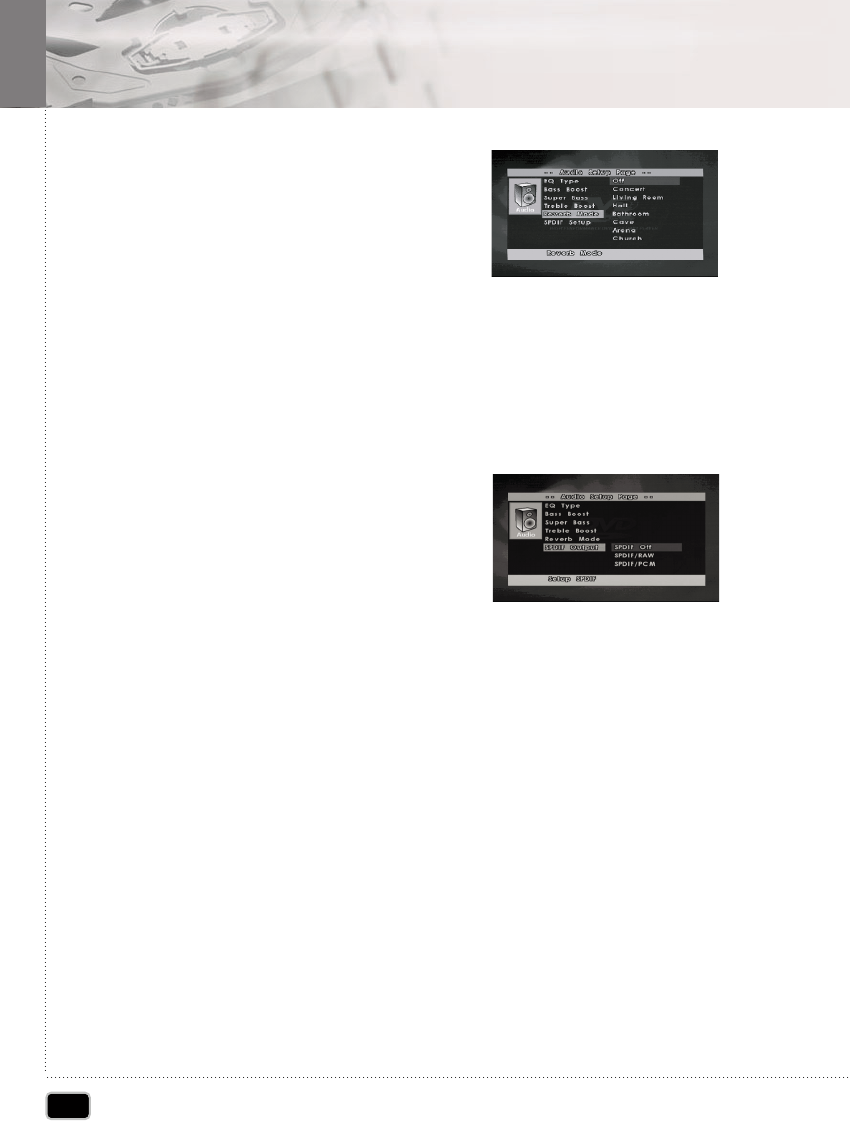
REVERB MODE
To enjoy various surround sound, features
when you can select and desired sound
effect. (Concert, Living Room, Hall, Bathroom,
Cave, Arena, Church)
55
SPDIF SETUP
To connect the unit's digital output to an external device equipped with a digital
input, this item must be set correctly.
1) SPDIF OFF
2) SPDIF / RAW : Output Dolby Digital
(or DTS) Bitstream directly.
If you connected this unit's
DIGITAL OUT jack to a Dolby
Digital decoder (or an amplifier
or other equipment with a Dolby
Digital decoder).
3) SPDIF / PCM : Output Decoded Dolby
Digital (or DTS) Bitstreem.
Select when connected to a 2ch
digital stereo amplifier. This unit
outputs sounds in the PCM 2ch
format when you play a DVD video
disc recorded on the Dolby Digital,
MPEG1, or MPEG2 recording
system.
66
41
Using the Setup Menu
Using the Setup Menu
V
ideo
S
etup
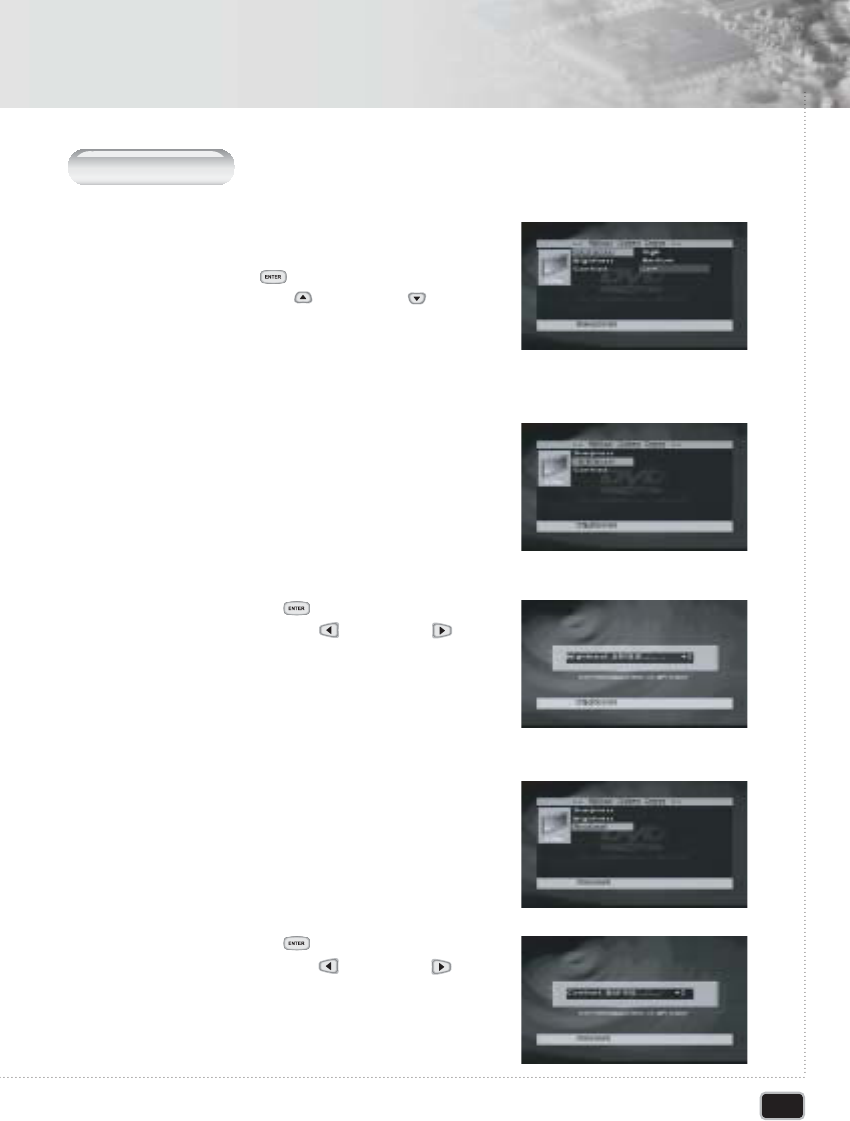
SHARPNESS
Adjusts the sharpness of the image.
Press the ENTER( ) button to select the adjust
mode, the use the UP( ) or DOWN( ) buttons
to select the image quality adjustment item.
11
BRIGHTNESS
1) Adjusts the picture's brightness.
2) Press the ENTER ( )button to select the adjust
mode, then use the LEFT( ) or RIGHT( )
buttons to select the image quality adjustment item.
22
CONTRAST
1) Adjusts the contrast of the picture.
2) Press the ENTER ( )button to select the adjust
mode, then use the LEFT( ) or RIGHT( )
buttons to select the image quality adjustment item.
33
42
Using the Setup Menu
Using the Setup Menu
P
reference
S
etup
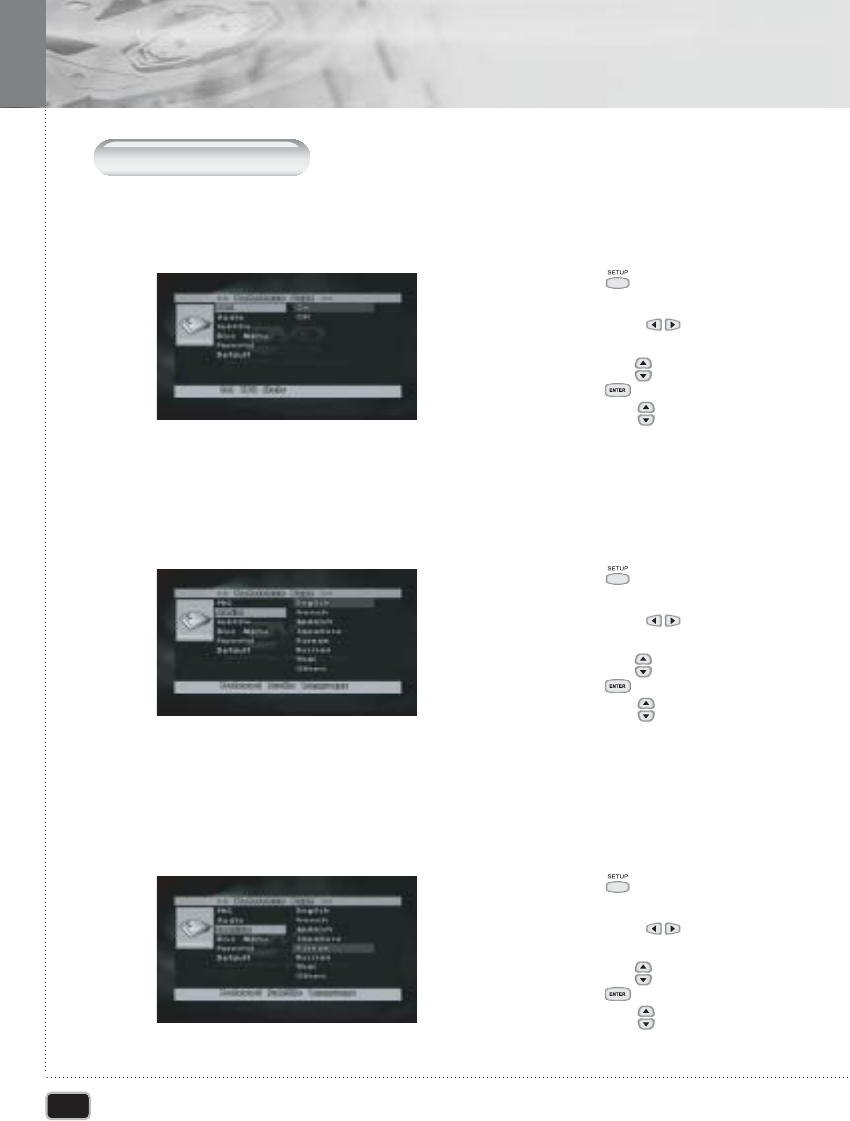
PBC
This feature is only available when a (Super) Video CD is loaded. It allows you to
disable or enable the PBC (Playback Control) menu of VCD discs.
1) Press the SETUP ( )button when during
stop mode.
2) Press the LEFT/RIGHT ( )button to move
to Preference.
3) Press the UP/DOWN ( )button to move PBC.
4) Press the ENTER ( )button.
5) Press the UP/DOWN ( )button to select
On/Off.
11
AUDIO
Use the audio language menu to select the subtitle language that you prefer. If the
disc you are playing has that language available, it will display subtitle in that l
anguage.
22
SUBTITLE
Use the subtitle language menu to select the subtitle language that you prefer.
If the disc you are playing has that language available, it will display subtitle in that
language.
33
1) Press the SETUP ( )button when during
stop mode.
2) Press the LEFT/RIGHT ( )button to move
to Preference.
3) Press the UP/DOWN ( )button to move Audio.
4) Press the ENTER ( )button.
5) Press the UP/DOWN ( )button to select
desired audio language.
1) Press the SETUP ( )button when during
stop mode.
2) Press the LEFT/RIGHT ( )button to move
to Preference.
3) Press the UP/DOWN ( )button to move Audio.
4) Press the ENTER ( )button.
5) Press the UP/DOWN ( )button to select
desired subtitle.
43
Using the Setup Menu
Using the Setup Menu
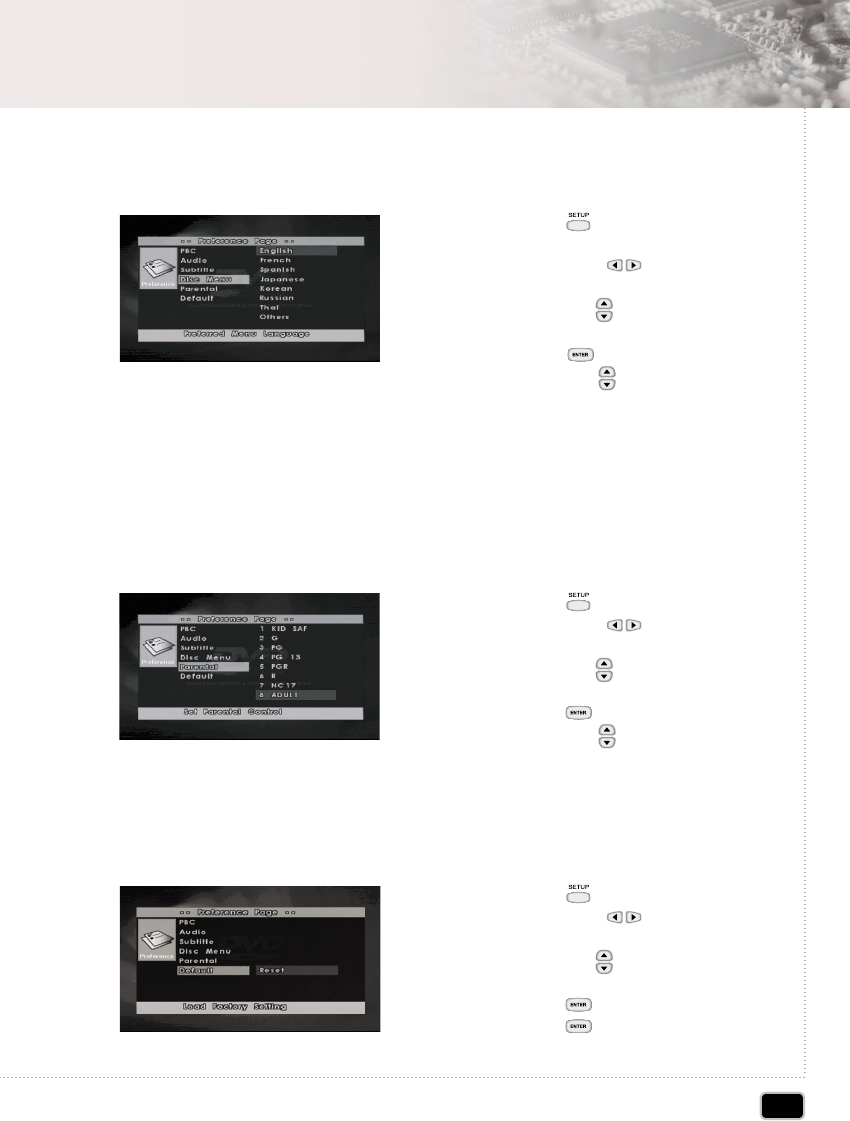
DISC MENU
Use the Disc Menu option to select the language you want a DVD's disc menu to be
displayed in (not the same as the player menu)
4
PARENTAL
The Parental feature is a rating limit system, like movie ratings.
It works with DVD's that have been assigned a rating. This option lets you determine
how your player will react to discs that contain movies that are rated (in the U.S.A.,
the Motion Pictures Association of America rates movies as G, PG, PG-13, etc.).
You decide which ratings require a password and which ones don't.
5
1) Press the SETUP ( ) button during
stop mode
2) Press the LEFT/RIGHT ( ) button to
move to Preference.
3) Press the UP/DOWN ( ) button to move
to Sub.
4) Press the ENTER ( ) button.
5) Press the UP/DOWN ( ) button to select
Disc Menu.
DEFAULT
If user selects reset from the setup menu, all the value of setup menu will be initialized by
factory setting value. (Exception: Parental level, Region code and Password values will
not be changed)
6
1) Press the SETUP ( ) button when stop mode
2) Press the LEFT/RIGHT ( ) button to
move to Preference.
3) Press the UP/DOWN ( ) button to move
to Parental.
4) Press the ENTER ( ) button.
5) Press the UP/DOWN ( ) button to select
desired parental level.
1) Press the SETUP ( ) button when stop mode.
2) Press the LEFT/RIGHT ( ) button to
move to Preference.
3) Press the UP/DOWN ( ) button to move
to Default.
4) Press the ENTER ( ) button.
5) Press the ENTER ( ) button to select reset.
44
Using the Setup Menu
Using the Setup Menu
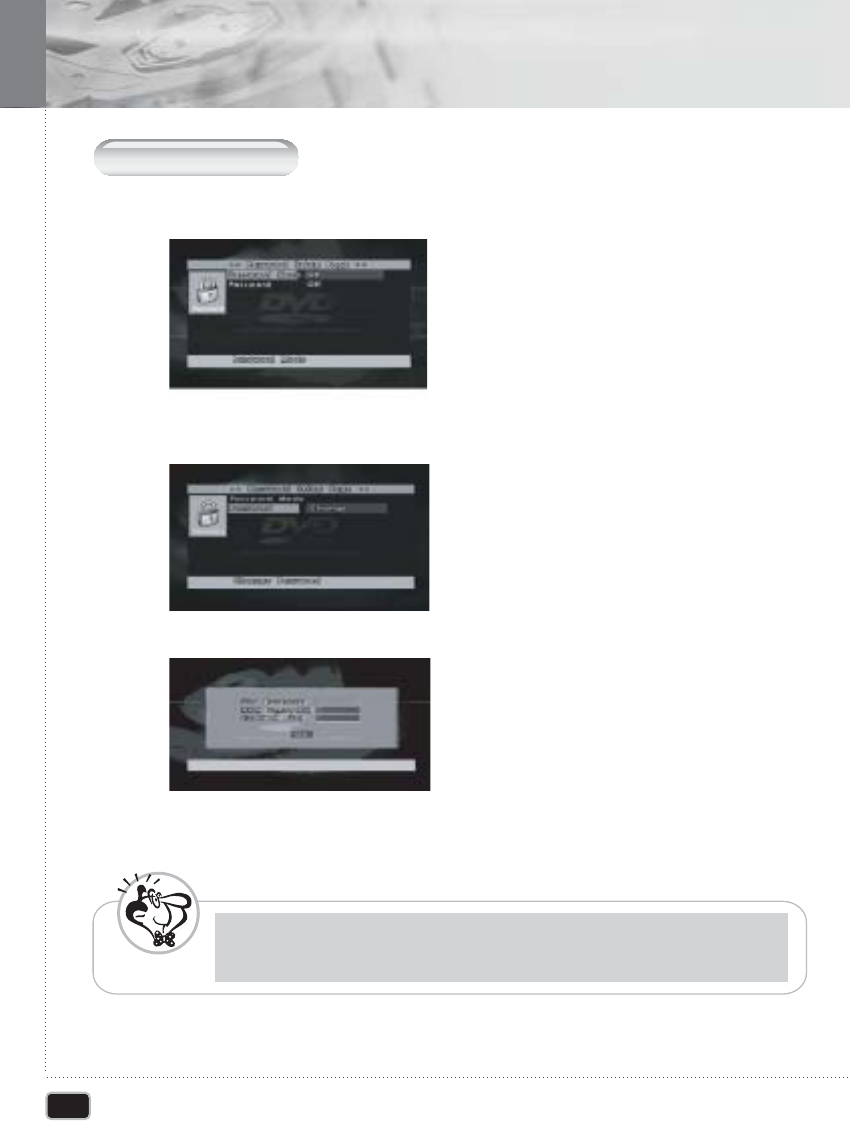
P
assword
S
etup
1. PASSWORD MODE
11
PASSWORD CHANGE
1) Select "Password Setup" sub item
2) Enter your old password and new password in 4 digits.
3) Re-enter new password for confirms then press ENTER button.
11
- Do not forget the password
- The setting cannot be changed without inputting the correct password.
N
ote
45
Additional Information
Additional Information
S
pecifications
General
Signal System
Video output
S-Video output
Audio output
Audio Characteristic
Digital Output
Accessories
* Optional
System
Power Supply
Power Consumption
Weight
External Dimensions (mm)
Operation Temperature
Operation Humidity
NTSC / PAL / MULTI
Output Level
Jacks
Y (luminance) - Output Level
C (color) - Output Level
Jacks
During Audio Output
Number of Channels
Jacks
Frequency Response
S/N Ratio
Dynamic Range
Total Harmonic Distortion
Coaxial Digital Output
Audio/Video Cable
Remote Control
1.5V(AAA SIZE)
IR Module *
Cigar Cable *
DC Cable *
Mounting Bracket for Car *
Screws *
Manual, Warranty Card
DVD-Video/DVD-R/-RW/+R/+RW/
Super VCD/VCD/CD/CD-R/RW/
MP3 files/Picture CD
DC 12V, 1.5A
1A, 12W
1,175g
178.0(W) x 212.2(D) x 42.0(H)
-5 ~ 50
10~80%
1.0Vp-p(75ohm)
RCA Jack
1.0Vp-p(75ohm)
0.286Vp-p(75ohm)
S-Video Jack
2Vrms(1kHz, 0dB)
2
RCA Jack
4Hz to 44kHz(DVD fs: 96kHz)
More than 85dB
More than 85dB
0.08%
RCA Jack
1
1
2
1
1
1
2
4
1
46
Additional Information
Additional Information
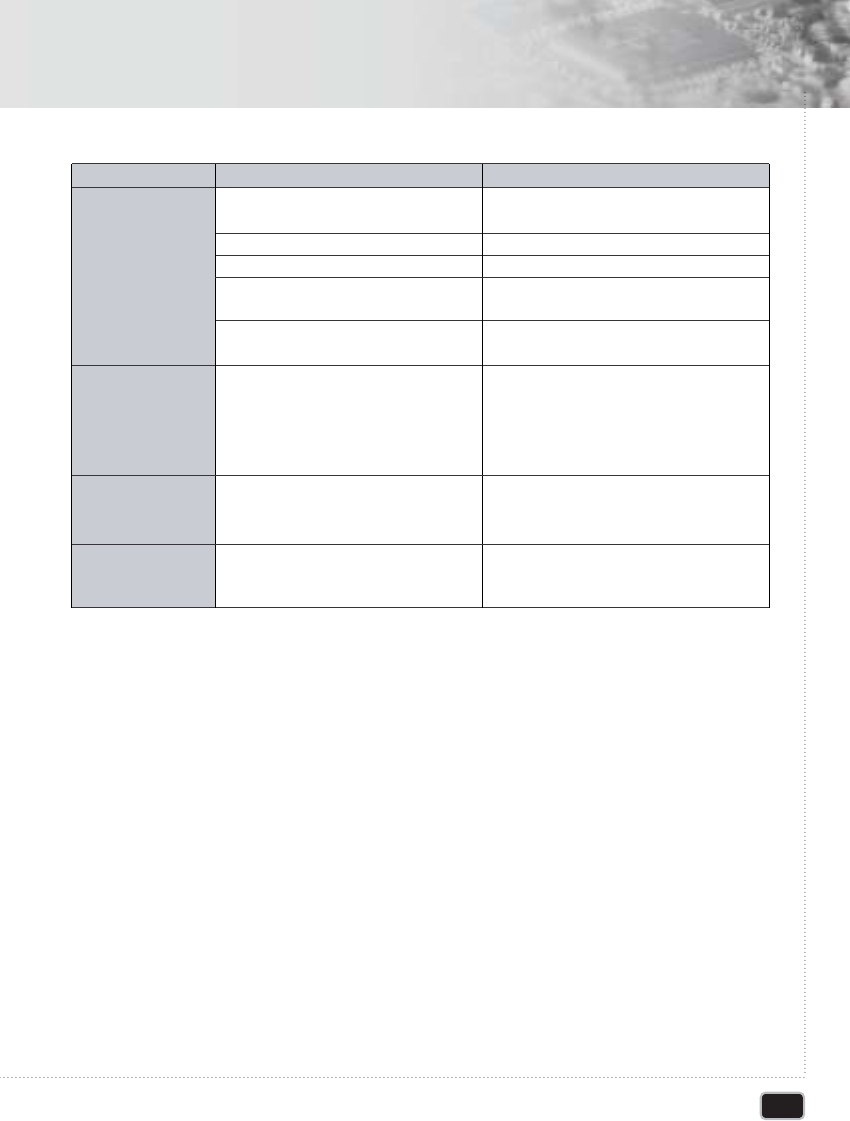
T
roubleshooting
Cause
The power cord is disconnected.
No disc in inserted.
The equipment connected with the audio
cable is not set to receive DVD signal
output
The audio cables are not connected
securely.
The power of the equipment connected
with the audio cable is turned off.
The digital audio output is set the wrong
position.
The TV is not set to receive DVD signal
output.
The video cable is not connected
securely.
The disc is dirty.
No disc is inserted.
An unplayable disc is inserted.
The disc is placed upside down.
The disc is not place within the guide.
A menu is on the TV screen.
The rating level is set.
Symptom
No power
The power is on,
but the DVD player
doesn't work
No sound
No picture
The playback picture
is poor.
Correction
Plug the power cord into the wall outlet
securely
Insert a disc. (Check that the DVD or audio
CD indicator in the DVD display is lit.)
Select the appropriate video input mode on
the TV so the picture from the DVD player
appears on the TV screen.
Connect the audio cable into the jacks
securely.
Turn on the equipment connected with the
audio cable.
Set the Digital Audio Output to the correct
position, and then turn on the DVD player
again by pressing the POWER button.
Select the appropriate video input mode on
the TV so the picture from the DVD player
appears on the TV screen.
Connect the video cable into the jacks
securely.
Switch TV to appropriate mode using the
TV mode using the TV MODE button on
the remote control.
Check if you pressed the AUDIO ONLY
button.
Clean the disc.
Insert a disc. (Check that the DVD, or audio
CD indicator in the DVD display is lit.)
Insert a playable disc.
(Check that the DVD,
or audio CD indicator in the DVD display is lit.)
Place the disc with the playback side down.
Insert the disc correctly inside the guide.
Press the SETUP button to turn off the
menu screen.
Cancel the rating function or change the
rating level.
47
Additional Information
Additional Information
Cause
The remote control is not pointed at the
remote sensor of the DVD player.
The remote control is too far from the
DVD player.
There is an obstacle in path of the remote
control and the DVD player.
The battery in the remote control is
exhausted.
Incorrect Audio menu settings.
If a track name not end in ".mp3" or
".MP3", this player will not recognize
it as an MP3 track.
Symptom
The remote control
doesn't work properly.
The analog audio OK,
but there appears to
be no digital audio
signal.
The disc containing
the MP3 tracks won't
play
Some MP3 tracks
appear to be missing
from a disc.
Correction
Point the remote control at the remote
sensor of the DVD player.
Operate the remote control within about
23ft(about 7m).
Remove the obstacle.
Replace the battery with new one.
Make sure that the Digital Out setting is
set to BITSTREAM or PCM. Check that
the BITSTREAM and PCM settings are
suitable for your amplifier check the amp's
instruction manual.
If the disc is a recordable CD, make sure
that the disc is finalized.Check that the tracks
are in the MPEG1 Audio Layer 3 format.
GDesigns, Accessories and specifications are subject to change without notice.

Limited Warranty
One(1) Year Limited Warranty
WHO IS COVERED?
A proof of purchase is required to received to warranty service. A sales receipt or other
document showing original date purchase is considered proof of purchase.
Warranty repair is one (1) year limited warranty coverage :
* Parts and labor are included under warranty repair.
WHAT IS NOT COVERED ?
NOTE : If you don't have proof of purchase, then your unit will be considered out-of-warranty.
Out-of-warranty repairs will be charge at a flat labor rate, including any necessary parts.
WHAT IS EXCLUDED ?
Your warranty does not cover :
* Labor charges for installation ro setup of the product, adjustment of customer controls on the
product, and installation or repair of antenna systems outside of the product.
* Product repair and / or part replacement because of misuse, accident, unauthorized repair or
other cause not within the control of its manufacturer.
* A product that requires modification or adaptation to enable it to operate in any country other
than the country for which it was designed, manufactured, approved and / or authorized, or
repair of products damaged by these modifications.
* Incidental or consequential damages resulting from the product. (Some states do not allow the
incidental or consequential damages, so the above exclusion may not apply to you. This
includes, but is not limited to, prerecorded material, whether copyrighted or not copyrighted.)
MAKE SURE YOU KEEP
Please keep your sales receipt or other document showing proof purchase. Also keep the
original box and packing material in case you need to return your product.
This warranty gives you specific legal right.
You may have other right which vary from state / province to state / provaice.
CUSTOMER SUPPORT
MODEL #
SERIAL #